Submitted by:
Shared posts
30 Jul 18:21
If Disney Princesses Were Actually Sloths by Jen...
Damiani.guilhermeuhaahahahhaha wat?


Albener Pessoa, Rtersieva and one other like this


30 Jul 17:55
Ignorance is bliss. [thegamercat]


Claudio Navarro Henriquez, Lori and one other like this
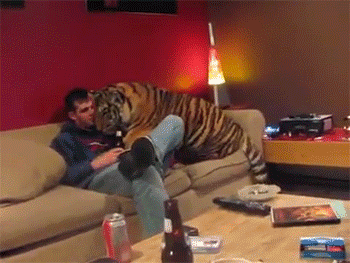
30 Jul 17:14
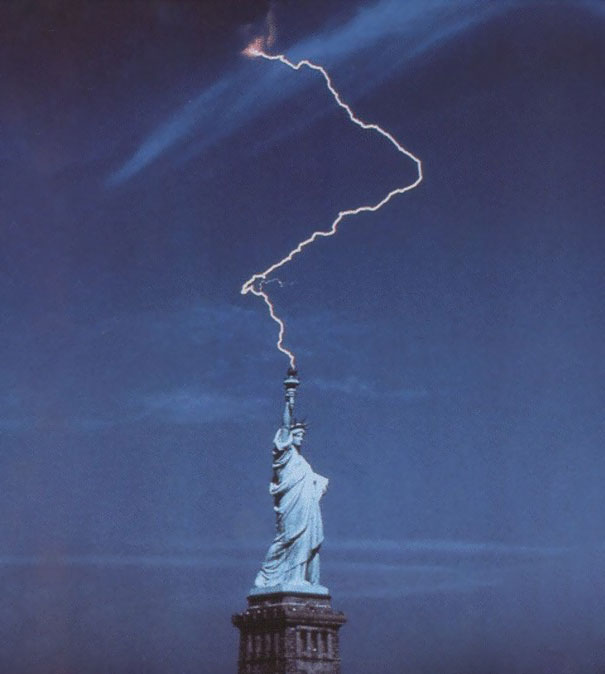
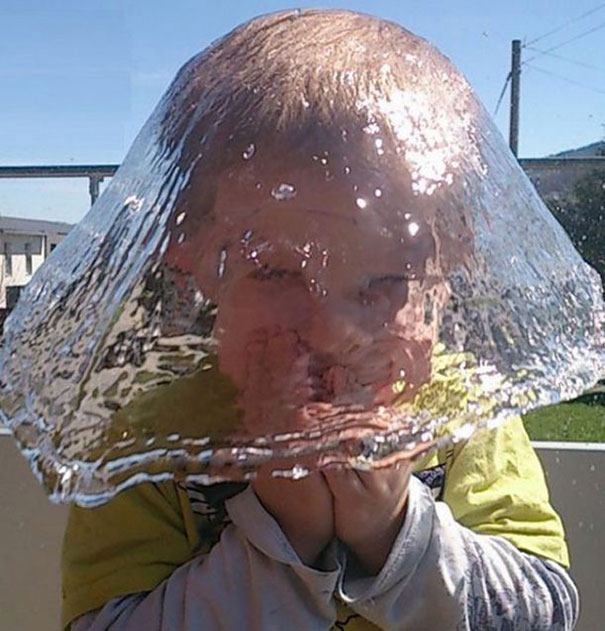
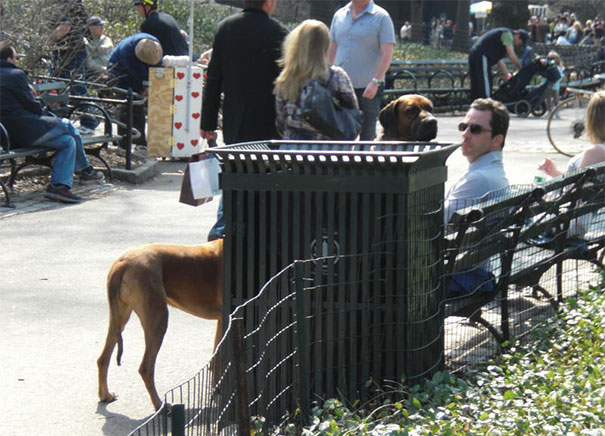
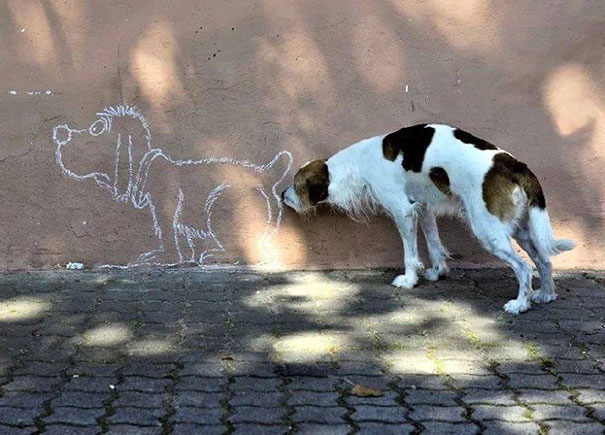
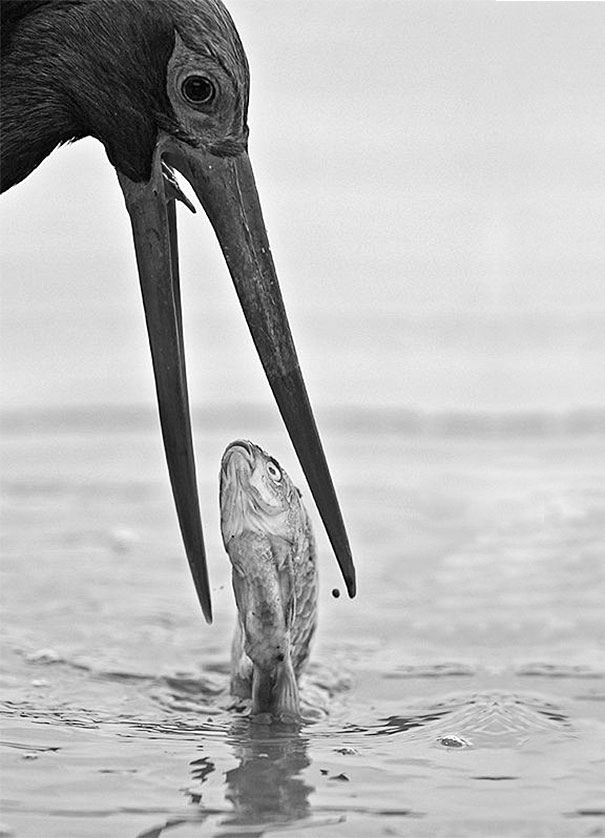
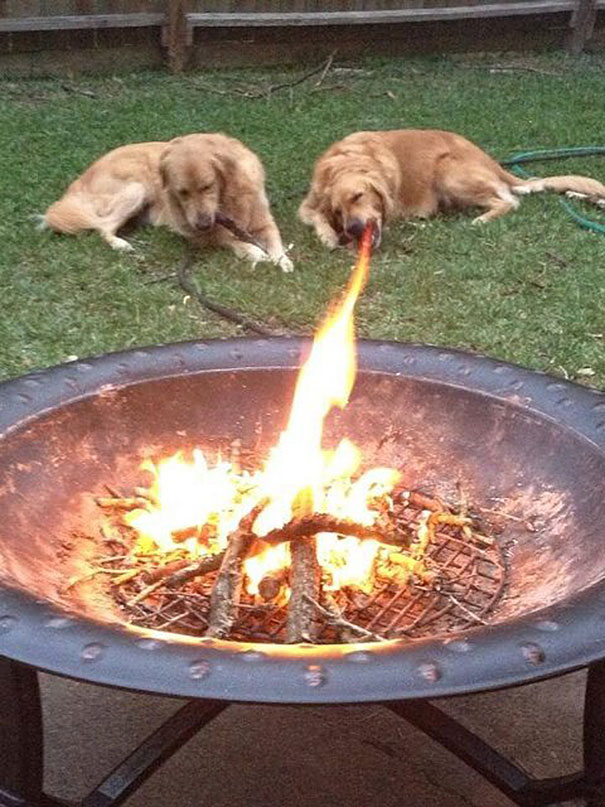
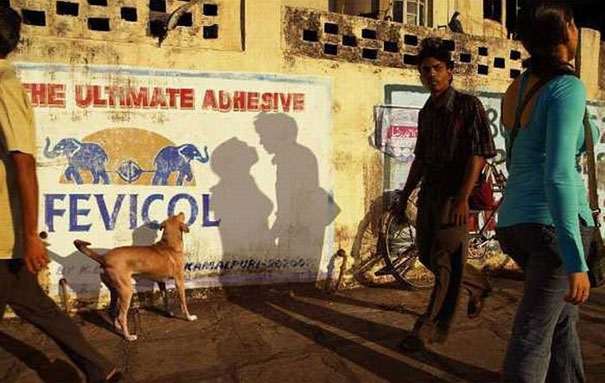
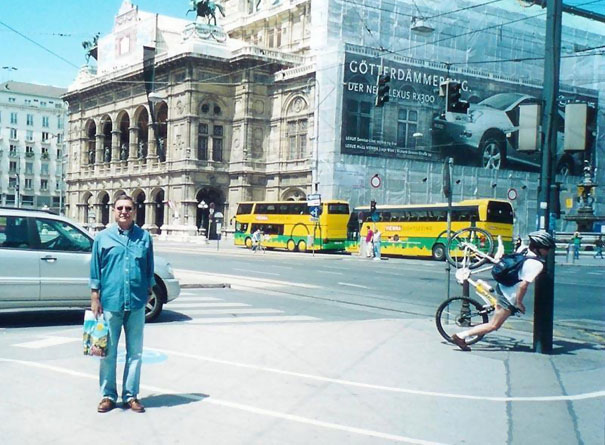
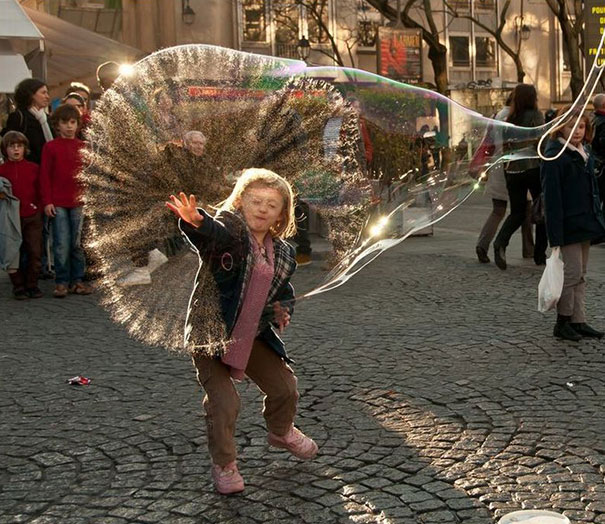
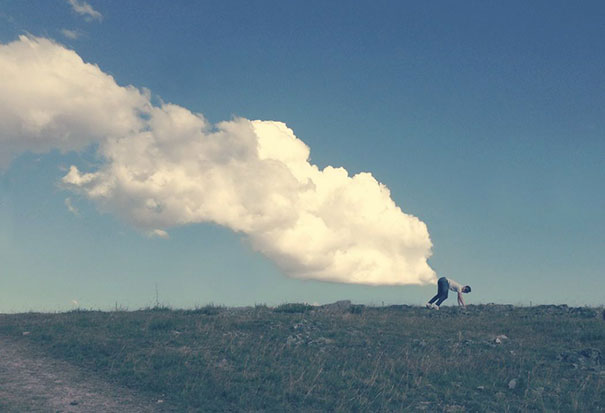
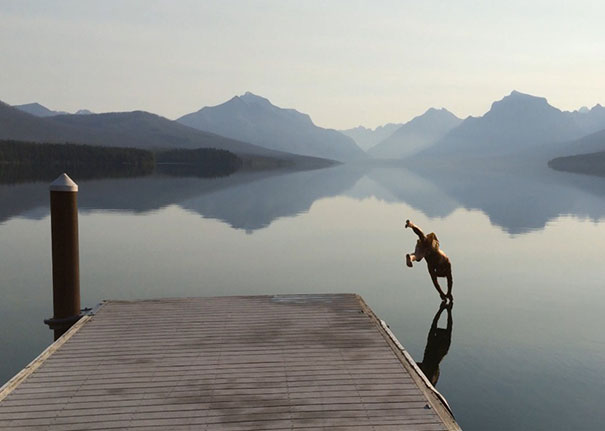
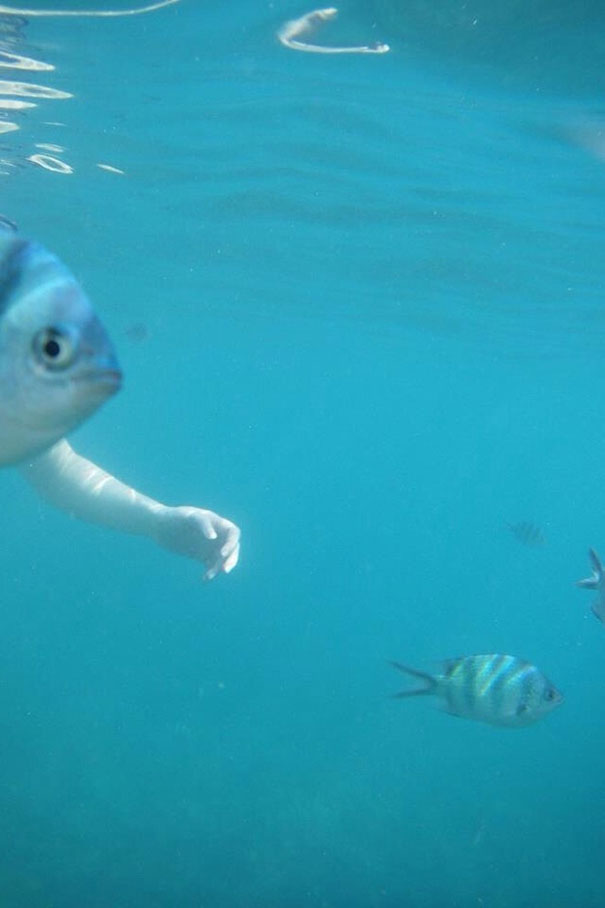
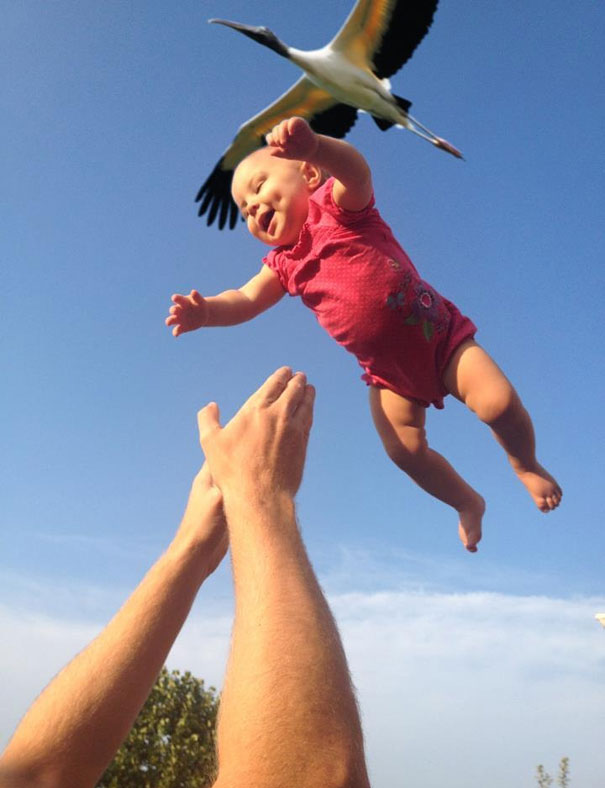
33 Pictures Taken At The Right Moment
by Julija
We Bored Pandas are huge fans of perfectly timed photos that capture perfect (and usually funny or unexpected) moments that come and go with a blink of the eye. The internet is abound with images shared by people who have captured images at just the right moment or from just the right perspective, so we wanted to share some more of them with you.
Anyone with a smart phone, point-and-click camera, DSLR or any other sort of camera can potentially capture such a moment – whether it’s staged or spontaneous. If you’ve ever captured such a photo, share it with us below!

Source: reddit (h/t: distractify)

Source: imgur

Source: reddit (h/t: distractify)
Source: reddit
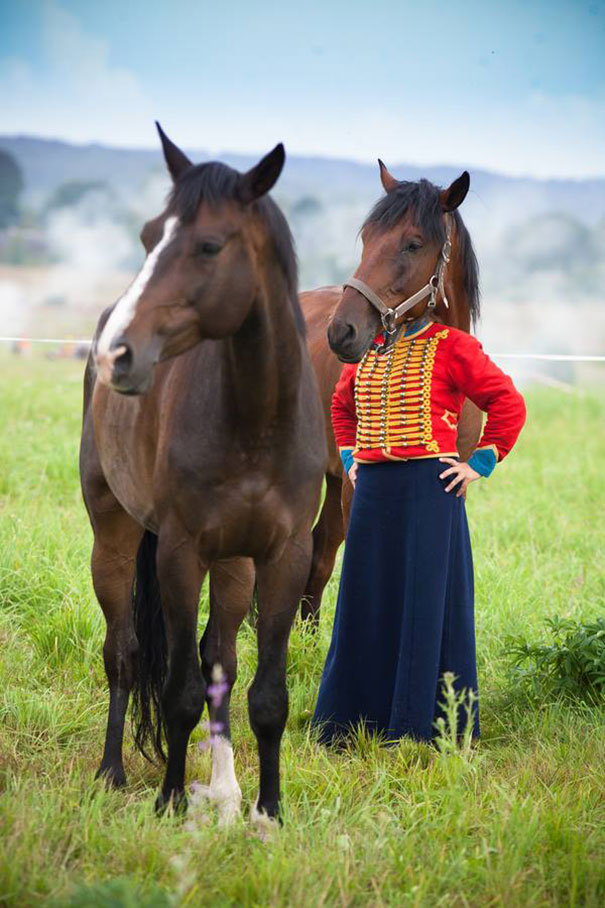
Image credits: Vladimir Levin
Source: reddit (h/t: distractify)

Source: buzzinspired.com
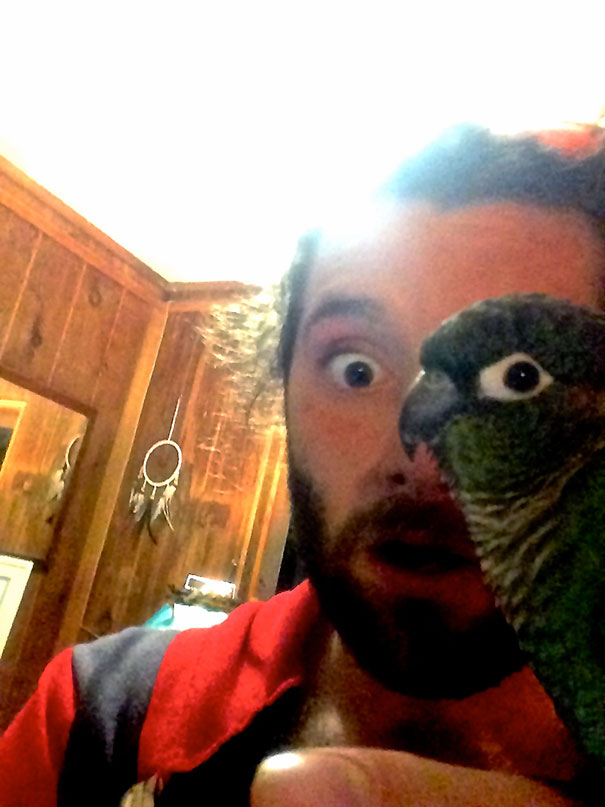
Image credits: Tom Baum
Source: imgur

Source: reddit
Source: imgur

Source: reddit

Source: reddit (h/t: distractify)
Source: imgur
Source: imgur
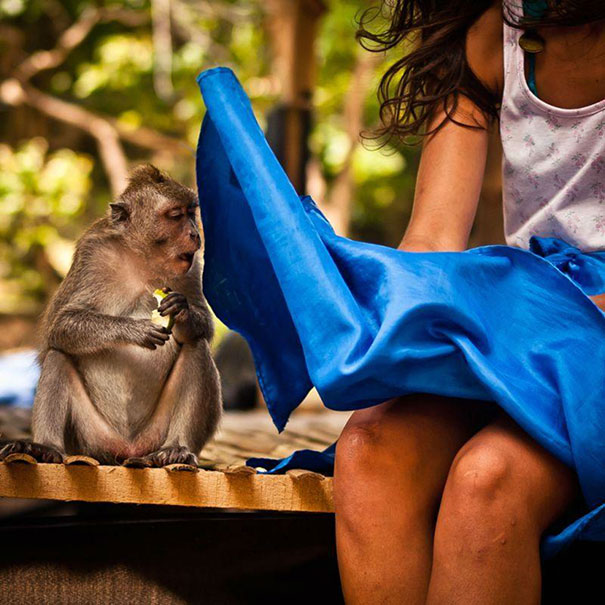
Image Credits: Adde Adesokan

Source: reddit

Source: reddit
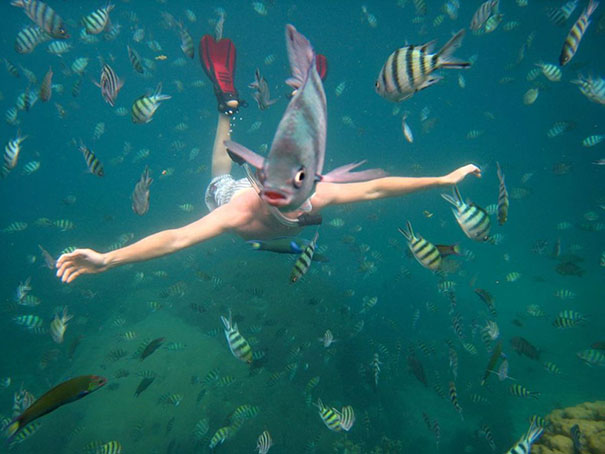
Image credits: Nick Kelly

Source: unknown

Image credits: Mrsnef1
Source: allarmo.livejournal.com
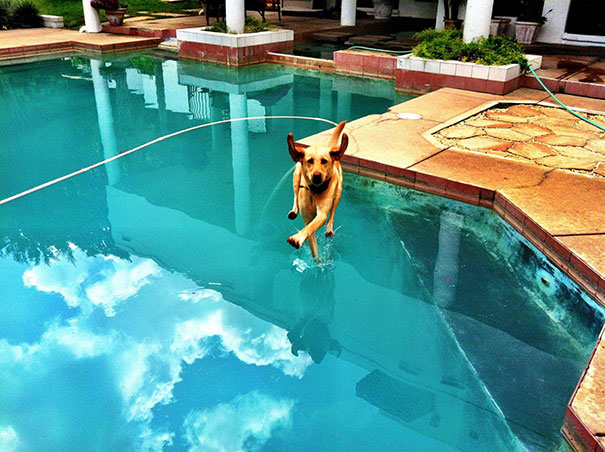
Image credits: troyANDabed
Source: reddit

Source: unknown
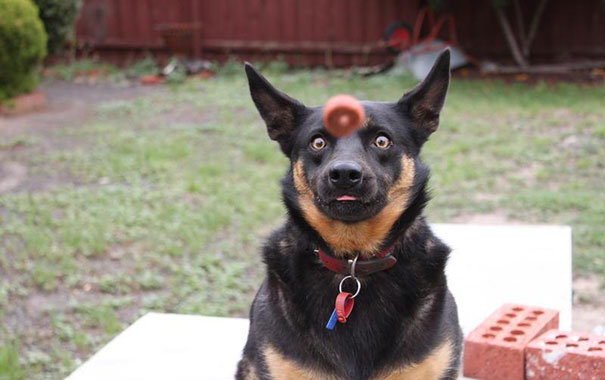
Image credits: Arainya
Source: reddit

Source: imgur
Source: reddit

Source: reddit

Source: reddit
Source: imgur

Source: imgur
Source: buzzland.com (h/t: buzzfeed)
Source: reddit
33 Pictures Taken At The Right Moment originally appeared on Bored Panda on July 29, 2014.
30 Jul 17:11
[video] New Kindle Helps Readers Show Off By Shouting Title Of Book Loudly And Repeatedly
Damiani.guilhermeHahahahahahah
Amazon says the Kindle Flare’s repetitive shouting will appeal to fans of print, who miss the ability to display a book’s cover to strangers.


30 Jul 17:08

A year ago I got to illustrate one of the endings in Ryan...
A year ago I got to illustrate one of the endings in Ryan North’s brilliant Hamlet choose-your-own-path book To Be or Not To Be. These are all things you may be able to find outside right now (if you can bear to put down this amazing book).
Artnemiz1, Roslyn Cook and 3 others like this
30 Jul 17:06


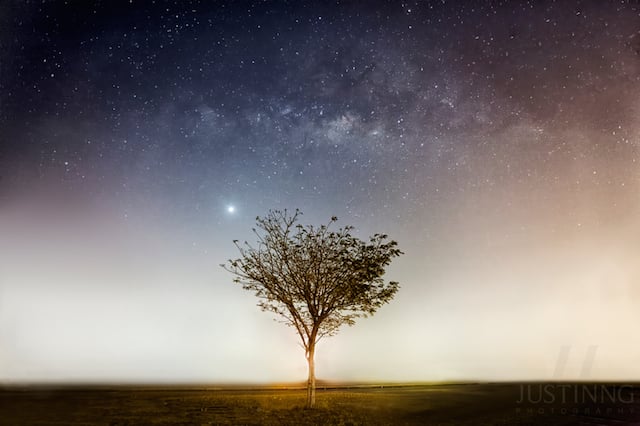
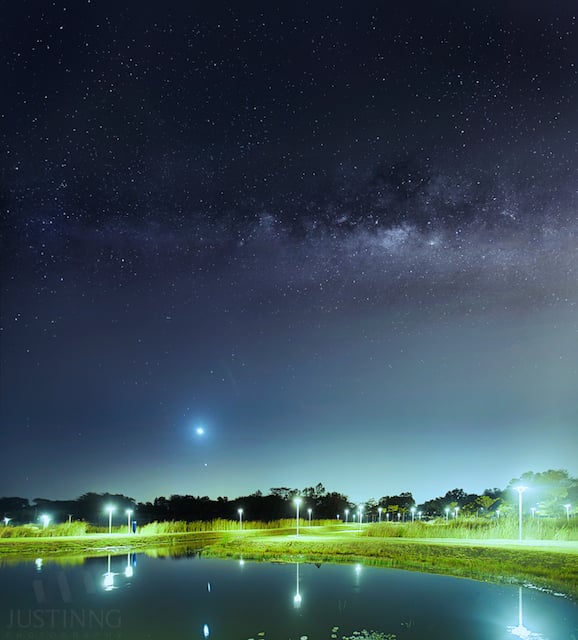
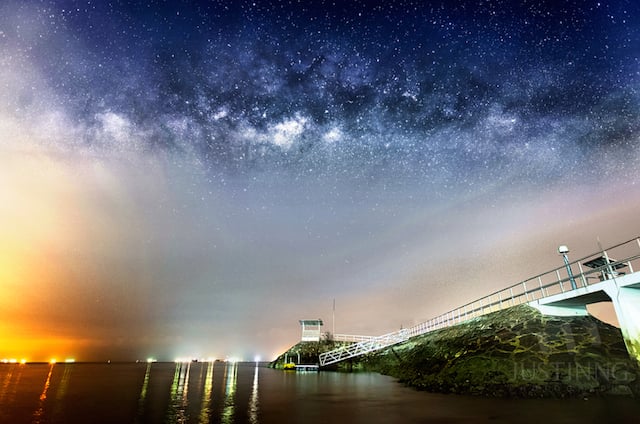
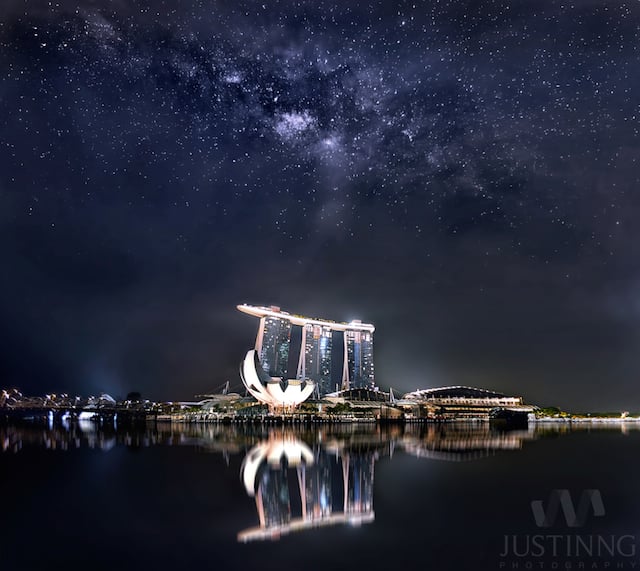
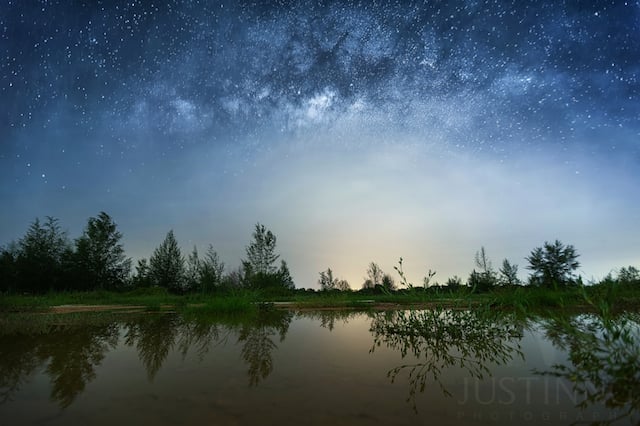
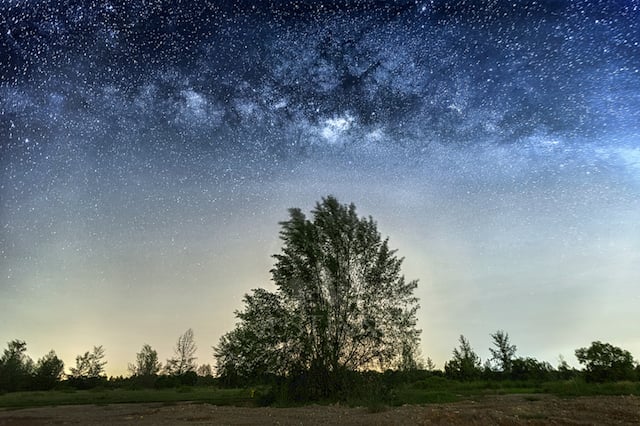
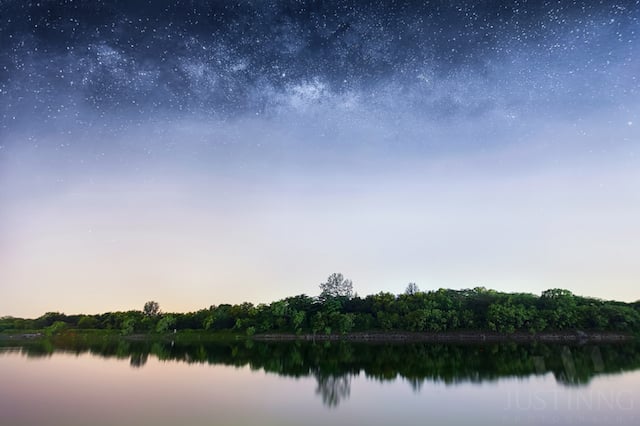
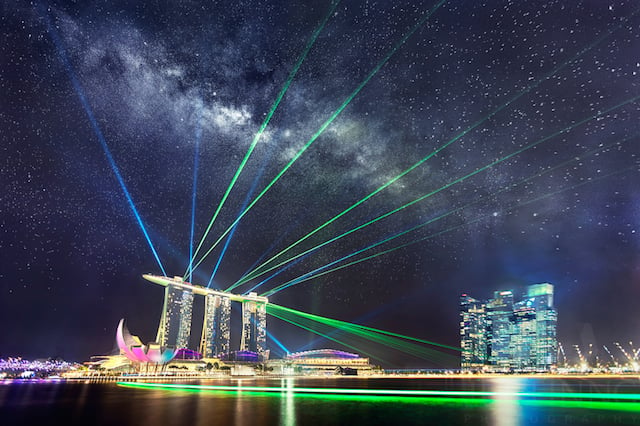
How I Photograph the Milky Way in the Light-Polluted Skies of Singapore
by Justin Ng
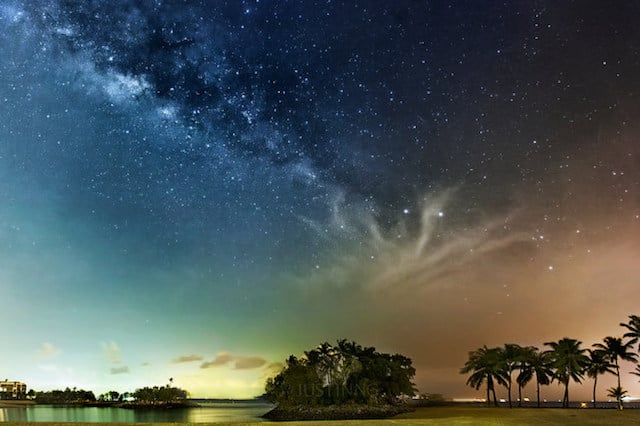
When it comes to photographing the elusive Milky Way in one of the most light-polluted major cities like Singapore, timing is critical. Most of the faint details will be washed out by the extreme light pollution and if we were to shoot the Milky Way under unfavorable atmospheric conditions, our attempt would be futile.
Unfortunately, most of the tutorials online only work in locations that are at least 2 stops darker than most of the dark locations in Singapore and so, we need to do more in post-processing to unveil the elusive Milky Way and more complex workflow is required if we’re shooting at much brighter locations.
In this tutorial, I am going to show you how I shoot the Milky Way that’s obscured by the heavy light pollution in Singapore using photography equipment that you may already have and a workflow that probably works in most versions of Photoshop without purchasing additional plugins.
Equipment I Am Using to Shoot the Milky Way in Singapore
- Unmodified full-frame DSLR camera (Canon 5D Mark II)
- Wide angle lens (Canon 16-35mm f/2.8)
- Tripod
- Intervalometer
- Memory cards and batteries
Step 1
If the atmospheric conditions are favorable, locate the Milky Way using mobile apps like Star Walk or SkySafari for example. I have developed a simple app for the same purpose too and it can be downloaded here.
Step 2
Switch to Bulb mode on your DSLR camera and set the aperture to 2.8, ISO to 6400 and focal length to 16mm. Remember to shoot in RAW format.
Step 3
I use a technique called Expose To The Right (ETTR), a concept that’s been around for more than a decade, to obtain the maximum amount of signals possible with a single exposure. You can produce an ETTR image by pushing its histogram to the far right by increasing the exposure during your shoot. I took mine at 16mm, F2.8, ISO6400 and I exposed my camera for 9 seconds.
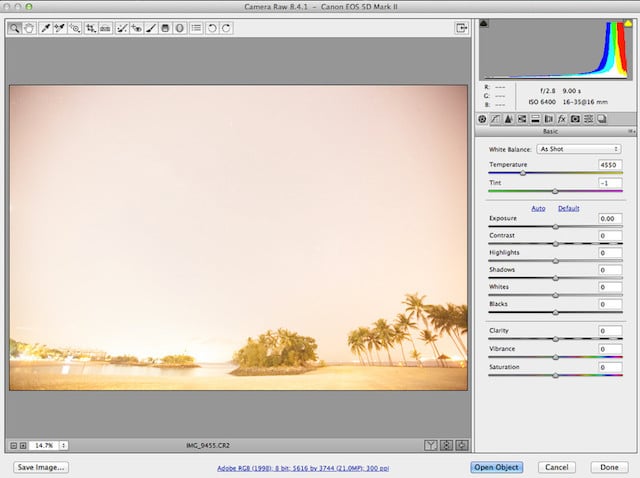
The ETTR technique, however, has its limitations and using just this technique alone won’t work for most parts of Singapore and so further processing is required to bring out the best of what’s recorded in the RAW file. A more complex workflow is required if I shoot from a brighter location.
Step 4
Normalize the image by playing around with the sliders until you’re able to see the elusive Milky Way!
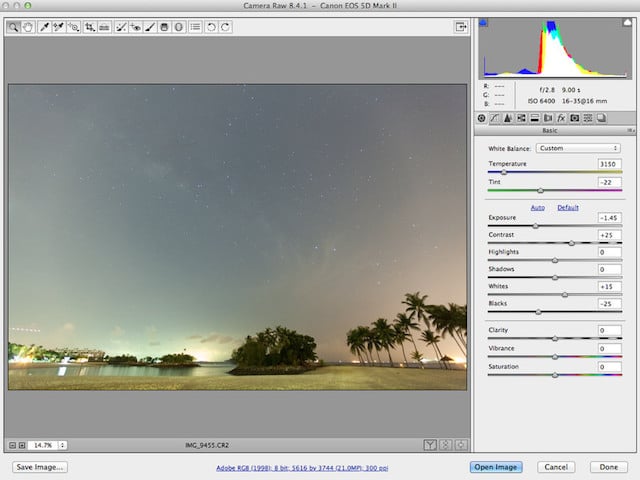
Step 5
At this juncture, if you’re shooting at a location that’s at least 2 stops darker than mine, which also means you are able to expose your camera for 30 to 40 seconds using the same settings (F2.8, ISO6400 @ 16mm), then you’ll probably be able to get away with a nice image by adjusting the sliders. But unfortunately, we need to do more to make the image pop when it’s taken in Singapore and the post-processing workflow will become more complex if the exposure time is reduced to 5 seconds or less at much brighter locations.
In Photoshop, click on Image -> Adjustments -> HDR Toning. Then play around with the Detail slider along with the rest to achieve to look you want and mask out the overexposed part of the image.
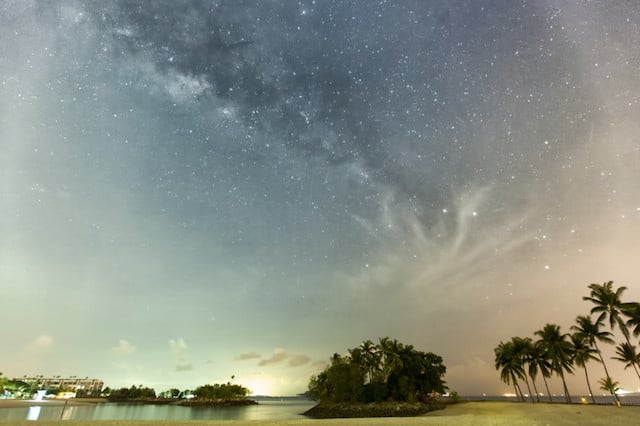
Step 6
From here onwards, you can tweak the image to your own liking!
So there you go! Thanks to Photoshop that we can now enhance the data that were recorded in the RAW file to unveil the beautiful Milky Way galaxy which we can’t see with our naked eyes in Singapore. But does Photoshop make the Sentosa image above any less real?
There are definitely many ways to achieve the same or better result and this is just one of the workflows that you can use without purchasing additional Photoshop plugins. As Singapore offers varying degrees of light pollution, different workflows will be required to unveil the elusive Milky Way taken at different locations.
For a full tutorial, please visit the post on my website here.
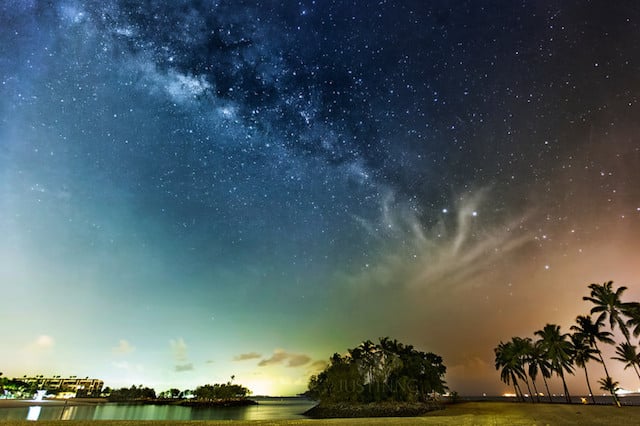
Here’s some of my images taken in Singapore. Note that not all images below were processed using the workflow presented in this tutorial:

About the author: Starting out as a self-taught photographer in September 2010, Justin Ng has garnered his photographic experience from a diverse range of subjects, events and locations eventually earning recognition and publication in world-famous media sources like the BBC, CNN, National Geographic, Yahoo!, Space.com, EarthSky, and UniverseToday, just to name a few.
Justin was published as Asia’s top 30 photographers by Signature Weddings, listed as top 6 landscape photographers in the world by Pixoto and recently, he has been named as Canon EOS World Photographer of the Year 2013. He is currently a writer/content contributor at Space.com and SLR Lounge.
To see more of his work, be sure to visit his website or follow him on Facebook, Twitter, Google+, 500px or Instagram. This article originally appeared here.
Luke.stirling, Thomas.friis.poulsen and 7 others like this


30 Jul 16:24
button, button
by kris
Damiani.guilhermeahhahaha ultimo quadrinho

this was an ’80s twilight zone episode based on a richard matheson short story
tune in tomorrow for more topical references
29 Jul 22:12
"Some good advice I found in a bathroom." -raym0ndv2

AM Sch, Albener Pessoa and 5 others like this
29 Jul 18:29
the GOOGLE CHEATS they do NOT want you to know!! Because they SINCERELY CARE about your WELL-BEING
Damiani.guilhermecreepy =|
| archive - contact - sexy exciting merchandise - search - about | |||
 |
|||
| ← previous | July 23rd, 2014 | next | |
|
July 23rd, 2014: THE DEEP WEB DOESN'T HAVE A BOTTOM HEY GUESS WHAT?? Today the final issue of The Midas Flesh comes out! You can read a preview here, and catch up with all you missed at midasflesh.com!
 – Ryan | |||
Tadeu, Randy Laue likes this
29 Jul 17:42

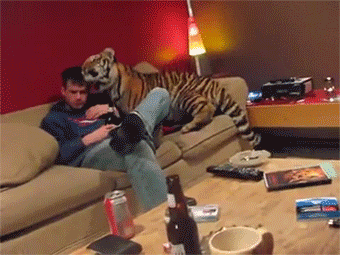
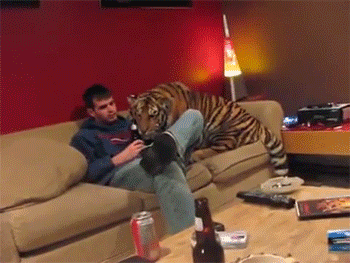
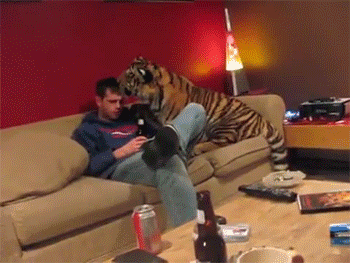
Photo
Damiani.guilhermeY so many things?
David Pelaez, firehose and 4 others like this
29 Jul 17:24


These Light Paintings Show How Wi-Fi Swirls and Shifts Around You
by Jamie Condliffe
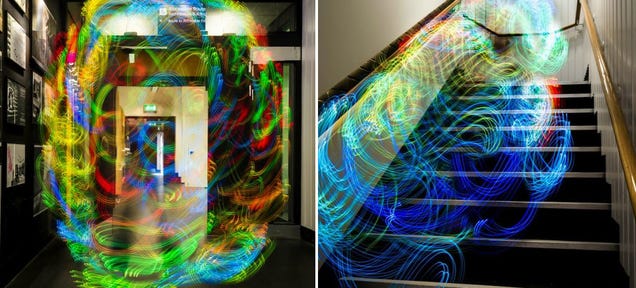
Ever wondered how the Wi-Fi signal varies around your house or workplace? Well, a new project by Luis Hernan combines signal strength sensing with light painting to show you just that.
29 Jul 17:10


15 Minutes Might Be the Ideal Meeting Length
by Patrick Allan

A meeting that drones on and on is hardly productive. Keeping a meeting to 15 minutes is ideal for the same reason that TED talks are maxed out at 18 minutes: attention span and memory.

29 Jul 17:03
onefitmodel: nutrifitblr: jacked-daniels: KITTY WHAT IT”S...
Damiani.guilhermeQuero ver a interaçao dele com laptops!


Roumen.ganeff, Mariela.kopcheva and 3 others like this


29 Jul 16:30

2014 Tumblr-4chan Raids | 510.png
Damiani.guilhermeWar... war never changes
Osiasjota, Adam Victor Brandizzi and 2 others like this
29 Jul 16:26
Photo
by manextreme
Damiani.guilherme?!?!?!?
bernot, Tertiarymatt and one other like this