Shared posts
03 Sep 16:29
תבשיל בקר בבצל וחמשת תבלינים
by הילה
קולקציית המדים השימושית שלי נכנסה לשבועיים וחצי של אפסון חושים. באמריקה, כמו באמריקה, מנהג שכיח הוא לשלוח את צעירי הבית למחנה-קיץ מרוחק לשבועיים-שלושה. "תראו שיהיה לכם כיף" אמרתי לטף הזועם שלא גילה שמחה רבה מהעניין. "קצת שקט מאמא זה דבר נפלא!" … להמשיך לקרוא ←
Yanniv Ovadia likes this
26 Oct 13:32


Two Methods for Shooting Star Trails Made Easy
by Rick Berk
As a landscape photographer, it can be easy to find stunning subject matter to photograph during the day. At night, things become more difficult as the sun goes down, but there is still plenty to photograph. With some patience, you can create stunning images featuring the stars as your backdrop, or even your subject.
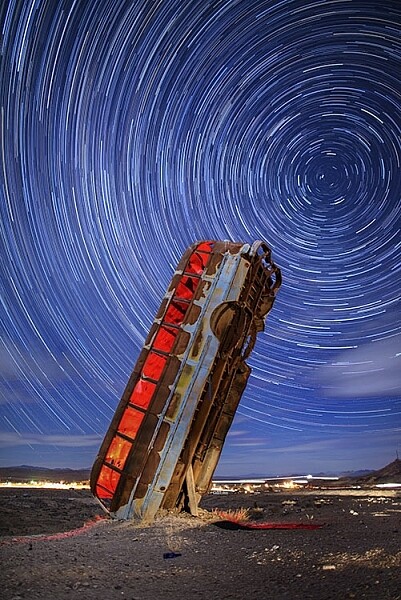
This image is a composite of 156 separate exposures, merged using StarStax software. Each exposure was ISO 400, f/2.8, 30 seconds. The red glow inside the bus was done by shining a red LED flashlight inside the bus from the other side, during one of the exposures.
Equipment list
Before you get started, you’re going to need a few things:
- A good sturdy tripod is absolutely essential, I’m using an Induro GTT204M2.
- A wired remote for your camera is also a necessity. Which model you use will depend on the camera you have.
- A fully charged battery is a must. The vertical grips that are available for some cameras, allowing you to use two batteries at once for longer life, can also be helpful.
- A flashlight can come in handy, both for finding your way to the location, and for light painting in the foreground.
- Finally, a large memory card, or two if your camera has dual slots, will be needed.
#1 – The One-Shot Method
There are two ways to photograph star trails. The first is the old-fashioned way, using a single exposure.
For this method, exposures can range anywhere from several minutes, to several hours. This method was the only way to photograph star trails in the days before digital cameras. When using the single exposure method, your camera needs to be in manual mode, with the shutter speed set to Bulb. Some cameras have a separate mode for Bulb. It is like manual mode, but the shutter stays open for as long as the release button is depressed. A time controller such as the Nikon MC-36A, or Canon TC-80N3 can make things easier by allowing you to lock the shutter button down, or program a set amount of time for the exposure.
ISO should be set to 400. You’ll want to set your aperture somewhere around f/4. The wider the aperture is open, the brighter the star trails will be. If you are photographing in a completely dark setting, with no moonlight, the stars will likely be the brightest object in your scene. Once you’ve set your aperture, you need to decide how long a star trail you want. The longer the exposure, the longer the trails. The image below was a 30 minute exposure.
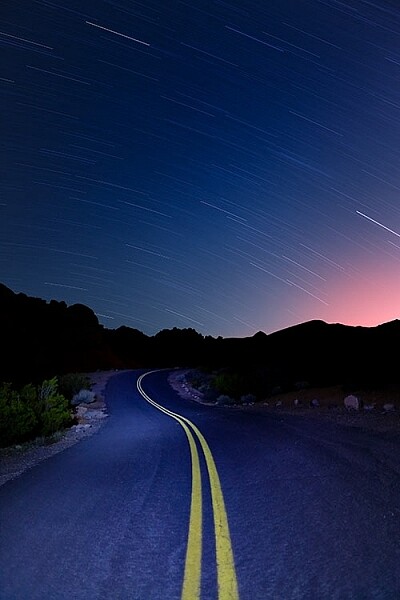
This image was created as a single exposure. Exposure time was 30 minutes, ISO 100, f/5.6. The star trails are dimmer due to the smaller aperture, the fact that the moon was still in the sky, and light pollution from the city in the distance, seen as the glow to the right. The street in the foreground was painted with an LED flashlight for several seconds during the exposure.
One thing you need to be concerned with when using a single long exposure is Long Exposure Noise Reduction. If you choose to photograph star trails using a single exposure, the heat generated on the imaging sensor adds noise to the image. Turning on Long Exposure Noise Reduction reduces that noise by using a method known as dark frame subtraction. I previously discussed dark frame subtraction in the article The Night Sky In Landscape Photography. Long Exposure Noise Reduction doubles the length of time needed to make an image. The camera first takes the exposure. In this case, let’s say the exposure is one minute.Long Exposure Noise Reduction then requires another minute to reduce the noise created by the long exposure. That means if you make a star trail exposure for 15 minutes, your camera will be unavailable to take another picture for 30 minutes. You’ll need to make sure you have enough battery to keep the camera powered while it carries out Long Exposure Noise Reduction.
This is a single exposure of 10 minutes, ISO 400, f/5.6.
In addition to Long Exposure Noise Reduction, another consideration is the length of the exposure itself. There is nothing worse than standing next to your camera while it makes a 30 or 45 minute exposure, and two-thirds of the way through the exposure, a car goes past, shining its headlights across the scene and ruining the exposure. It’s happened to the best of us.
#2 – Merging Multiple Exposures
This is where the second method for photographing star trails comes in. With the advancement of digital imaging, stacking multiple exposures has become possible, and has made creating star trail images easier than ever. By taking a series of drastically shorter exposures, then stacking them in software such as StarStaX, you can increase your flexibility as a photographer, because there are two benefits to this method. The first is that since the exposure are shorter, you can turn off Long Exposure Noise Reduction. The second benefit is that even if a car drives by to ruin the exposure, it’s only one small piece of the sequence, so you can just delete the one frame that was ruined.
StarStaX works by blending a series of images, allowing you to capture the motion of stars in the sky, similar to a single exposure. The one drawback to using software like StarStaX is if clouds are also moving across the sky, it has a tendency to create a stepped shape with them that doesn’t look natural. Better Star Trails Photographs with StarStax is an excellent tutorial for using StarStaX.
Camera settings
To use the stacking method for shooting star trails, set your camera to Manual mode and your camera’s drive to Continuous. Start with your aperture set to f/4. This setting can be adjusted, but the wider the aperture, the brighter the trails. However, be careful to ensure you have enough depth of field, and aren’t overexposing the stars. Shutter speed will be 30 seconds. ISO should be set to 400. Using the time controller or remote for your camera, release the shutter, and use the locking mechanism to keep the shutter button on the remote depressed. With the camera in continuous drive mode, as each exposure ends, another will begin until you stop it. This also minimizes the pause between each exposure, which can cause small breaks in the star trails when the exposures are merged. Alternatively you can use an intervalometer feature if you camera has that, or similar type of remote.
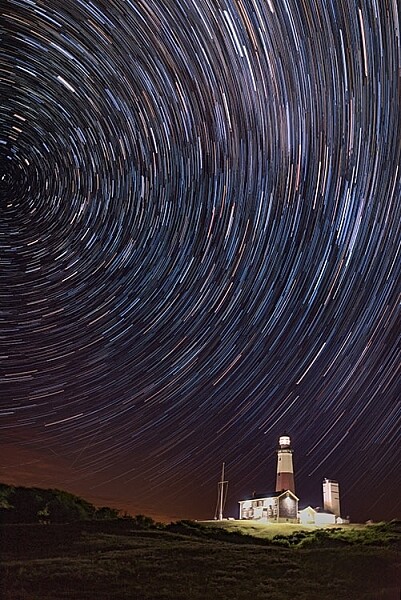
This image is a combination of 121 exposures merged in StarStaX. Each exposure was 15 seconds, ISO 400, f/1.4. To keep the lighthouse from being so bright that it would overpower the star trails, a 3-stop soft-edged graduated neutral density filter was used.
It can be easy to forget the rules of composition when photographing star trails, so don’t get so fixated on the stars that you forget to look at the foreground as well. Chances are your foreground will be shrouded in darkness. A flashlight can come in handy for painting the foreground object with light to make it stand out in the darkness. Colored gels can allow you to get creative with the light painting. When stacking images, you’ll only need to illuminate your foreground for a single frame, as StarStax will use the illuminated exposure for that foreground object.
By the same token, there may be a time where your foreground object is brightly illuminated, as with the lighthouse image above. So I carry a set of graduated neutral density filters, even when shooting at night. For the lighthouse image, I mounted a Vü filters 3-stop soft-edged ND grad on my lens, so that the dark side of the filter was over the bottom half of the frame. This allowed me to keep the lighthouse exposure dim enough to still allow the stars to register in the exposure as well.
This image was created by merging 116 separate exposures in StarStax software in comet mode. Each exposure was 30 seconds, ISO 400 at f/2.8. A red LED flashlight was shone inside the bus for the first exposure.
Once you’ve found your foreground, think about the direction you are facing. When facing north, star trails will form concentric circles. When facing away from the north, star trails will simply be slanted lines or arcs in the sky. Both can create interesting and awe-inspiring images.
Now that you know you don’t have to put your camera away when the sun goes down, you need to find some dark sky to get the best results with star trails. The International Dark Sky Association has a great tool on their website to help you find the best places for night sky photography.
Show some of your best star trail images below!
The post Two Methods for Shooting Star Trails Made Easy by Rick Berk appeared first on Digital Photography School.
Baker likes this
01 Dec 16:24


יותר מידי גירויים, מעט מידי זמן – 5 כלים שיעזרו לך להתפקס
by הילה חיימוביץ׳
מקור: Unsplash
סוף השבוע כבר כאן ולרוב הפעולה העיקרית שבא לנו לעשות בימים אלו היא בעיקר – כלום. כמובן שהבילוי האידיאלי הוא צפייה בסדרה האהובה בתוך הפוך, אבל סביר כי נרגיש סיפוק גדול יותר אם ננצל את הזמן להשלמת מטלות ומשימות שדחינו לאורך השבוע/חודש/שנה האחרונים. גם שכבר החלטתם שזהו, אתם עושים את זה ולא קמים מהכיסא עד שאתם לא משלימים את העבודה, מהר מאוד יצוצו גירויים שונים וטורדניים, בעיקר אם אתם עובדים באמצעות המחשב. על מנת לעזור לכם להתמקד במטלה אחת ולא לפזול לצדדים, בין אם בבית או בין אם במקום העבודה, ריכזנו עבורכם מספר כלים אשר יגרמו לכם לדבוק במטרה ובקיצור – להתפקס.
1. Noisli
Noisli הוא אתר פשוט וגאוני. בתור חובבת חורף לא קטנה המתגוררת בישראל, המתאפיינת ברוב ימות השנה במזג אוויר די קייצי, שמחתי לגלות את האתר אשר מאפשר להקשיב בין היתר לסאונדים מרגיעים ונעימים של גשם ורעמים. האתר עצמו מאוד מינימליסטי ומורכב ממגוון כפתורים ציוריים כדוגמת ענן, עלה וספל קפה, אשר ניתן לשלב בין כולם יחד או לבחור סאונד אחד ספציפי להאזין לו. אם אתם מחפשים מוזיקה סטטית ולא מסוגלים לתפקד ולהיות פרודוקטיביים בהאזנה למוזיקה ״רגילה״, האתר הזה מושלם עבורכם שכן מצד אחד הוא מאוד מרגיע אבל יחד עם זאת תורם לריכוז. כמו כן, ניתן להשתמש בכתבן הפשוט אשר נמצא באתר ומאפשר לכם לכתוב בלי הפרעות ובאווירה קצת אחרת.
מחיר: חינם
מקור: צילום מסך
2. Groove
אתר שנחשפתי אליו לגמרי במקרה המאפשר לכם להגדיר זמן לכל פעילות אשר בסיומו ישמע צלצול ותישאלו האם סיימתם את המשימה בזמן או לא. הרעיון העומד מאחורי Groove הוא שעל כל משימה שתשלימו בזמן תקבלו 5 דקות הפסקה ולאחר השלמת 4 סבבים של משימות, תוכלו ליהנות מהפסקה ארוכה יותר. אם אתם נהנים ואוהבים לקבל חיזוקים חיוביים אתם אמורים ליהנות מהשימוש באתר, אבל כמובן ששום דבר לא יקרה לכם אם לא תעמדו בזמנים, הכל עניין של משמעת עצמית. (מניסיון – כאשר עושים דברים בידיעה שסופרים לכם זמנים, אתם מיד הופכים לפרודוקטיביים יותר).
מחיר: חינם
מקור: צילום מסך
3. Cold Turkey
Cold turkey הינה אפליקציה שימושית נוספת אשר מאפשרת חסימת אתרים ומשחקים תוך כדי חלוקתם לקטגוריות שונות. למשל – אם אתם עובדים על מטלה ללימודים, אתם יכולים לחסום רשתות חברתיות שונות אך לא אתרי תוכן רלוונטים לעבודה למשל. ברגע שתנסו להיכנס לאחד מהאתרים אשר הוגדרו כחסומים בזמן מוגבל, תיתקלו בהודעה עם דמות חמודה שתבשר לכם כי העמוד לא זמין כרגע מאחר ונחסם על ידי האפליקציה. רעיון נחמד, עובד רק על Windows והגרסה החינמית די דלילה, לשיקולכם.
מחיר: חינם – 20$
מקור: צילום מסך
4. FORCEdraft
עורך טקסט חינמי אשר יחסום כל אפליקציה נוספת במחשב ולא יאפשר לכם לעזוב עד שלא תסיימו לכתוב את כמות המילים שהגדרתם או עד שעבר זמן מסוים. חסרונה של Forcedraft הוא שכרגע היא ניתנת להורדה רק ל- Windows, מה שמנע ממני להתנסות בה וחבל, שכן בתור אחת שכותבת לא מעט זה נשמע כמו כלי מצויין ואפקטיבי, למרות שלא מסובך ״לרמות״ בה (לפחות כאשר בוחרים בספירת המילים ולא בספירת הזמן).
מחיר: חינם
מקור: צילום מסך
5. Focusatwill
אם אתם נוהגים לעבוד כשלאוזניכם צמודות אוזניות עם מיטב הלהיטים, יתכן שאתם עושים משהו לא נכון ושאין בהכרח מדובר במוזיקה המתאימה והמועילה לכם. האתר Focusatwill מציע כעשרה ערוצי מוזיקה לבחור מהם תוך אפשרות להתאים את המוזיקה לרמת האנרגיה שלכם בהתאם לשעה ביממה. היתרון בפלטפורמה היא שמדובר באפליקציה אשר ניתן להשתמש בה לא רק במחשב אלא גם בטאבלט או בנייד. גם כאן ניתן להגדיר זמנים לכל משימה ולאורך כל העבודה עם האפליקציה וההאזנה למוזיקה תיהנו מטיפים שיעזרו לכם ללמוד איך לנצל את היום בצורה הטובה ביותר.
מחיר: 4.99$ לחודש או 44.99$ לשנה (30 יום התנסות חינם)
מקור: צילום מסך
בהצלחה!
Yanniv Ovadia likes this
05 Apr 06:16
 Zaanse Schans by Iván Maigua on 500px


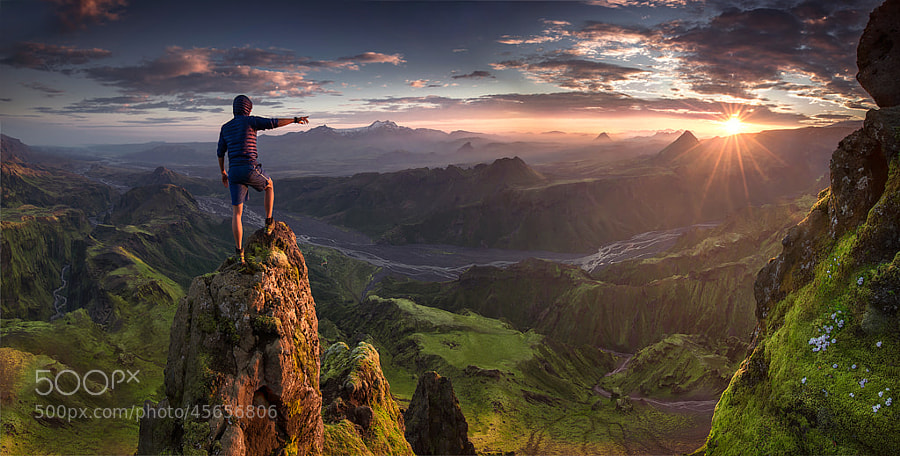
A Collection of Stunning Landscape Photographs
by Darlene Hildebrandt
This week’s collection of images to inspire you comes from 500px! Thanks to Evgeny Tchebotarev (founder of 500px) for letting us use these images, and for housing such a great website full of amazing images. To view any of them larger in all their glory, just click on the photo credit below the image.
Enjoy these amazing landscape photographs!


 Vernazza at sunset by Fabrizio Lunardi on 500px


 First Contact by Max Rive on 500px


 Zaanse Schans by Iván Maigua on 500px
I hope you notice something about many of these images. What is it that makes them great photographs? I can think of at least THREE qualities exhibited by some or most of the images above that make them a cut above the average landscape photo. Can you tell me what those three things are? What do you see that makes them stand out?
Share in the comments if you think you know what I’m thinking!
The post A Collection of Stunning Landscape Photographs by Darlene Hildebrandt appeared first on Digital Photography School.
Adam Victor Brandizzi, Andris Ulpke and one other like this
05 Apr 06:16


Weekly Photography Challenge Landscapes
by Darlene Hildebrandt
Yesterday I shared a collection of stunning landscape images and asked a question at the end of the list. If you missed it, you can see the collection and my question here.
By Eric Bryan
If you haven’t figured out the three things that I think make all, or most of those images a cut above – let me help you out:
- The light – having the right light in landscape photography is crucial to creating an image that is better than good, it’s great. Light is everything and what landscape photographers drool over when they find the “good light” or they wait hours and hours, or sometimes even days to get it.
- Simplicity – look at many of the images in the collection again. See how some have very few elements in the image? More is less. Keep things simple and draw the viewers attention.
- Going the extra mile – getting off the main road and beaten track is another key to great landscape photography. Anyone can stop at the “viewpoints” along the highway and get the same shot. But if you really want to take it up a notch it’s being willing to hike into the back country and camp overnight just to get a shot of the sunrise in a remote location. Or even getting up for sunrise in the first place (see not on light above again). Are you willing to stand in the creek and get wet if it’s going to add more drama to your image, or climb a mountain, or freeze your butt off in the cold? Those are the things that the best landscape photographers do that most of us don’t and therefore they get the images we all wish we had.
Now it’s your turn! The weekly photography challenge is of course, landscape photography.
Here’s a few more example which exhibit some of those qualities:
By Trey Ratcliff
Camped overnight on the great wall – go read the full story about this image on Trey’s blog (linked to from the image on Flickr)
By skoeber
By James Jordan
By Yasin Hassan – ????? ???
By Eleder Jimenez Hermoso
By Trey Ratcliff
Willing to risk life and limb on a rickety, questionable boat/raft on a river in China, in the pitch black darkness, to get this shot above. To read the story of the making of the image – click the image to go to Flickr.
Share your landscape masterpiece images!
Simply upload your shot into the comment field (look for the little camera icon in the Disqus comments section as pictured below) and they’ll get embedded for us all to see or if you’d prefer upload them to your favourite photo sharing site and leave the link to them.
And don’t forget to share the story of your image as well. Did you do #3 above and go the extra mile? Tell us about it!
The post Weekly Photography Challenge Landscapes by Darlene Hildebrandt appeared first on Digital Photography School.
Yanniv Ovadia likes this
29 Mar 07:50


This DreamWorks Animator Is Using His VFX Skills To Turn His Son Into a Superhero
by Noam Galai
James is not one of the ordinary kids in town. James is a superhero shooting lasers from his eyes and flying around. These super powers are all possible thanks to his dad, Daniel Hashimoto, who is a DreamWorks animator and a visual effects specialist based in LA. Daniel decided to use his visual effects skills and upgrade his own home-videos of his young son James, who is now also known as “The Action Kid“. [more]
![]()
Yanniv Ovadia likes this
25 Mar 08:08


Bruce Lee Appears Unexpectedly in France, This Bent Rail Ensued
OakOak is a street artist, but not in the traditional sense. His work, either on the streets of his native St Etienne, France, or made on his travels, is opportunistic and never "authorised". He is completely self-taught and works full-time in an office. Whilst his favourite artist is Amedeo Modigliani, he cites his main influences as football, comic books, video games and his home town. "I like this city, her atmosphere" OakOak says of Saint-Etienne and I wanted it to look nicer. It was an industrial city with many coal mines; now it's in regeneration and still quite poor. But it's easily traveled by foot with awkward aspects ideal for art. I saw shapes everywhere, and wanted to realize them." Click here to view the first image in this week's funny work pictures gallery. Continue reading for a viral video of someone who decided to use a quadcopter in a strange way.


22 Mar 05:28
Spring 2014
Spring was welcomed in the northern hemisphere this week after a long, cold winter for many. The temperatures and visual cues of spring are not omnipresent for all regions, but for some around the world, beauty abounds. --Leanne Burden Seidel (26 photos total)

David Pelaez, Yanniv Ovadia likes this
21 Mar 16:10


10 Photography Hacks that will Dramatically Improve Your Photos
by Mike Newton
Mike is the author of the eBook Hacking Photography: A Plain-English Guide to Taking Impressive Photos – Fast, on sale now for 60% off at SnapnDeals.
There is a widely accepted rule called The Pareto Principle also known as the 80:20 rule. In short, it states that 80% of the results come from 20% of the efforts. I find that in learning photography, this can even skew much higher. This means that potentially improving 5% of your photographic knowledge in the right places, could improve your photography by 95%!
10 photography hacks that will dramatically improve your photos
Hack 1 – Turn the flash off of automatic!
Camera manufacturers are often too eager to make the flash pop up even when it gets slightly dark. This is actually a retention tool for them. If the flash pops, the photo won’t look as good but people won’t be blurry because the flash freezes them in place. If enough new photographers see blurry photos (even though they are caused by improper photographer technique) they will assume something is wrong with the camera and take it back for a refund.
Instead, keep the flash closed and increase the ISO. In all the camera modes except manual mode, increasing your ISO will cause the camera to increase your shutter speed to have a better chance of freezing people in motion. Now shoot the photo. It will use the ambient (available) light, which typically has more color and character instead of a bright face and black background.

Hack 2 – Get in close to your subject…then get closer
Most people think that they have to step way back and get a lot of space around the subject to get the whole scene. Your subject is not a mime that is stuck in an invisible box, it’s okay to cut off their foreheads, legs, or lower half every now and then! Try getting a close-up of someone’s face from the eyebrows to the mouth. Here is a quick example:

The problem with zooming way out for every photo is that it doesn’t make it plainly obvious to the viewer what is the point or subject of the photo. I’m a huge fan of subtraction – the less there is in your photo the better. The best images are simple and very clear to the viewer what “story” you are telling with your images.
Hack 3: Eliminate the clutter
This is huge! The best images are ones that are simple and have breathing room for the subject. Try to find the simplest background possible. It’s no different than walking into a super cluttered house versus walking into a clean minimalistic space with very few items to distract you.
If you are taking a photo of a person, take the extra second to look around and find a minimal background that doesn’t distract the viewer.
Hack 4: Look for repeating patterns
Ever hear someone say that a photographer “just has the eye for it?” I disagree. This is a learned skill, not something that you are born with.
As you walk around, take notice of buildings, windows, patterns in brickwork, etc. I was walking by a building I walk by all the time and something suddenly ‘clicked’ and I realized there was a really cool pattern in the brickwork I had never noticed before. I ran home and grabbed my camera to shoot it before I forgot again.

Hack 5: Shoot from interesting perspectives
I would argue that 99% of photos most viewers ever see are shot from eye-level where the photographer was standing – the same viewpoint we see 99% of our lives from. It’s no surprise when you go to the top of a huge building and look down at a city that it’s visually stunning because we don’t see that perspective very often. You see this birds-eye-view used a lot in food photography.

The same goes for getting down on your stomach and shooting straight up to the sky. Anytime you are afforded a unique viewpoint it’s always interesting to the viewer.
Hack 6: Look for symmetry
Your viewer will do backflips if you can find an image that perfectly reflects the same thing top to bottom, or right to left! How many times have we seen something every day then see a photographer create an image that is an entirely different view of that item?
I took a photo trip to Italy and consciously tried to capture as much symmetry as I could. Here is a quick symmetrical shot:

Always keep an eye out for perfect symmetry!
Hack 7: Straighten your lines
Instead of just clicking away when you see something interesting, take the extra second to make sure horizontal lines are horizontal, and vertical lines are vertical. We all have the habit nowadays of just pointing our cameras in the general vicinity of what we are shooting. I propose you take a moment and line yourself up perfectly with that building or person.
Hack 8: Max out the aperture
What most people perceive as “artistic” photographs (AKA better than most) are ones that use a big aperture (small f-number) to blur the background or foreground, to call more attention to a subject. If you are using a kit lens your aperture will likely only go down to f/3.5, which isn’t a very big aperture.
The biggest impact item, and cheapest investment in gear that can make your photos go from okay to awesome is a lens with a huge aperture. I recommend purchasing a 50mm f/1.8 new on Amazon for $130-200 (Canon 50mm f/1.8 or Nikon version) or you can usually find them in perfect condition, used, for between $80-150.

Hack 9: Know where the light is coming from, and the quality
It’s funny how easy it is to take great photographs if you are just simply aware of these two things. Think about this: if you are shooting a photograph of someone outside and the sun is directly behind him or her, they will show up as a dark silhouette. If all you did was switch positions with this person so they are facing the sun, they will be nicely lit.
Being aware of the direction and quality of light can also ties into step 4 above. I walked outside of a building, looked down an outside walkway and noticed the shadows formed a really cool pattern because the sun was very bright and coming in from the left. This made an interesting arch pattern that almost looked like an MC Escher sketch.

Hack 10: Use the Rule of Thirds
The rule of thirds is the simplest and most under-utilized tip in the book. Are you ready for the quickest and easiest lesson yet? Here we go: go into your camera and turn on the “Grid” function which will show a grid in your viewfinder with horizontal and vertical lines when you look through it. 99% of new photographers put their subject smack in the middle of the frame when they compose the photo. The viewer also sees 99% of photos with the subject right in the middle of the frame because they look directly at a person, item, etc. This gets really boring really quickly, as we discussed earlier.
The tic-tac-toe rule
Imagine a tic-tac-toe board when you look through your viewfinder. Some cameras have a ‘grid’ function you can turn on to see this through the viewfinder. You always want to line up the point of interest where the lines meet each other. When you compose your photo, line up the point of interest at either 1/3 to the right or left of the frame, and/or the top or bottom 1/3. You want to give your subject room to breathe in the frame.
I caught this at a huge Halloween party Miller-Coors sponsored. You can see who got the attention at the intersection of the top and left 1/3 marks. Note the people on bottom all line up with the bottom horizontal 1/3 line.

Wrapping up
If you follow these 10 hacks, your photography will take a giant leap forward. I recommend experimenting with one of these hacks per day for 10 days. After you get used to thinking about each one, you will eventually internalize the lesson so it will just happen instinctually. That’s when photography really gets fun. I can’t wait to see what you come up with.
Please share any additional tips in the comments section below.
For more on these hacks grab Mike’s eBook Hacking Photography: A Plain-English Guide to Taking Impressive Photos – Fast, on sale now for 60% off at SnapnDeals.
The post 10 Photography Hacks that will Dramatically Improve Your Photos by Mike Newton appeared first on Digital Photography School.
Yanniv Ovadia, Xabier likes this
21 Mar 15:25


8 Reasons You Should Organize Your Photo Collection
by Matt Dutile
Editing and organizing our websites, print portfolios, business collateral and promotional material is something every professional photographer does at least once if not several times a year. It allows us to present the best possible vision of our work to our clients.
After a build-up of new work it was time for me to edit my portfolio as well. I’ve spent the last several weeks working on a vigorous edit in preparation for a large annual marketing and meeting push – and it occurred to me this would make a good post for dPS. While the purpose of my organizational edit is for business reasons, you don’t need to be a professional photographer to benefit from a good organization of your images. Every level of photographer will find something valuable in it.
Here are eight reasons why you should consider spending a bit of screen time and organize your photo collection.

1. Everything is easier to find
If you don’t have a good organizational system in place, there’s little that’s quite as droll as sifting through your images and key wording, tagging, starring, folder sorting, and/or color coding them. However you want to distinguish your files, it helps to find them in a pinch.
Without a good system how will you ever locate those photos of the Johnson family if they decide they actually want to buy some from you down the line? Or what about that shot you entered a year ago on a National Geographic forum… and now they want to publish it!
No matter what your system is, it’s important to develop one. Just know yours in and out, in case a cool or monetary opportunity arises in the future.
How could you find a file in this mess?
2. See how you’ve progressed
Sitting down and organizing your images from beginning to the present gives you a great overview of how you’ve progressed since first picking up a camera. You’ll notice not only the difference in content of what you’re photographing, but the quality of it as well. There’s nothing as head-shake inducing as looking at some of the first images that came out of your camera. Look back and see how far you’ve come, and how you continue to improve!
3. You’re forced to review the good with the bad
There are some valuable lessons to be learned in organizing your images, especially in recent ones. You’ll get a play-by-play look at the good images, along with the bad ones.
Sit down and really take some time to think about what it is that makes you admire certain images, but dislike others. What did you do right in those great ones? What did you do wrong in the poor ones? This critical review will help you develop your eye and create better images in the future.
4. It will teach you to avoid recurring mistakes
During any good review you’ll probably realize there are one, two or more mistakes you’re consistently making. You’ll find new ones every time you do this, and you’ll know what to avoid in the future.
During past reviews I found I used to slightly overexpose my images, or that I was lacking in night images with my travel shots. Taking the time to review allowed me to correct those mistakes and bolster the holes in my portfolio. I’m always finding something new to work on, and so will you. Learning from your mistakes is what makes you better.
5. Discover ideas you want to revisit
Perhaps a year or two or more ago you took a trip to the Grand Canyon or photographed a really fun concept, but realize now all the little things you missed or messed up on. Now that you’ve sat down to organize you remember that great idea you had – and with your new-found knowledge, it could be a great time to revisit the shoot and improve upon it.
There’s nothing wrong with revisiting a concept you’ve photographed before and working to improve it. Many professionals work on a project or series for years before they think it’s complete. Some scrub everything they’ve shot and re-start again on a concept they love, but want to tackle with a new execution. Consider it a challenge to re-invent something you’ve already done.
6. Find themes and begin developing a vision
If you had your own website, or already do have one, how would you organize it? Would there be a portrait section? Or weddings and babies? Perhaps landscapes and still life? Or travel and lifestyle? Most professionals organize their images by subject, project or theme. Doing so in your own work can tell you a lot about what kind of photographer you think you are or want to become. What do you value and enjoy shooting?
Look for themes across your work other than simply subject. What you may notice appearing is your specific style or vision. After a great period of time every photographer begins developing a sense of style, but you may be able to notice the threads of it early. It’s a clue to what you value in your images and your unique perspective.
7. It’s easier for potential clients
If you have the desire to take your hobby professionally one day, organizing now and understanding how you would define your photography will make it easier for potential clients to identify what they like about your work ,or why they should hire you. The business of photography is defining what you bring to the market that’s different, and at what value. It’s answering the question, “Why should I work with you?”.
8. It just looks nice
The last reason is one of simple vanity. Organization, if done right, just looks pretty. I often enjoy in my spare time putting together different color arrangements, collages and themes. Some of them make their way into my marketing material if the idea turns out particularly good, others may entirely change the way I categorize my business, and still others go in the trash as a fun but failed experiment. Organization doesn’t just have to be a boring task though, it can fuel creative insight and help you develop your images.
The post 8 Reasons You Should Organize Your Photo Collection by Matt Dutile appeared first on Digital Photography School.
Yanniv Ovadia, Xabier and -1 others like this
21 Mar 15:24
Holi celebrations 2014
Earlier this week Hindus greeted the turn of winter into spring with a massive display of color. They call their celebration the festival of Holi, and Hindus across India and throughout the world share prayer, camaraderie, special food, and a general sense of mischief as they douse each other in dyes and colored water. The festival has roots to many Hindu legends associated with the triumph of good over evil. --Lloyd Young (35 photos total)

Yanniv Ovadia, Sofía Henao and one other like this
07 Mar 06:26


Secrets Of The Best Levitation Shots Shared
by Dani Diamond
The first time I saw a levitation shot, I stared at it for 15 minutes in astonishment. I could not conceive how the image was captured; I was captivated by the story it conveyed, it was surreal, magical and awe-inspiring. Conceptualizing the image and executing it can prove to be rather difficult and meticulous. Thankfully, photographers who have mastered the techniques involved in levitating have decided to share their secrets with us. [more]

Martin Schwendtner, Yanniv Ovadia and -1 others like this
28 Feb 06:01
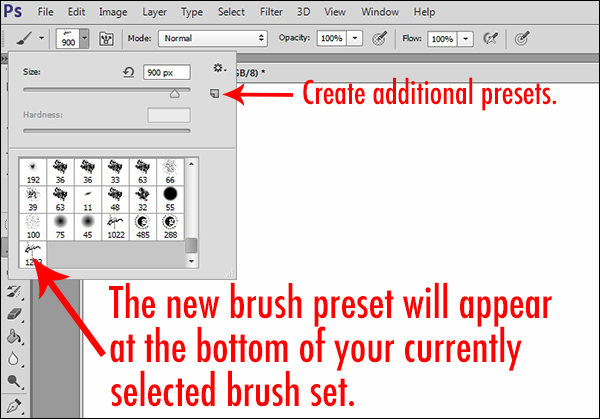


How to Make a Signature Brush in Photoshop
by Jeff Guyer

The decision of whether to watermark images posted online is a frequent topic of debate. Proponents say it’s an added measure of security–a notice to would-be image thieves that the photographer takes his or her copyright seriously and will defend it like a mama lion protecting her cubs. Others point out that watermarks are distracting, clients don’t like them, and unscrupulous people with decent editing software can make that watermark disappear in the blink of an eye, so what’s the point? Regardless of where you come down on this issue, sometimes you just find yourself wanting to make sure the world knows that you took the photo.
There are a lot of ways you can do this, but I find most of them to be rather cumbersome. You can create a watermark and save it in various file formats, but that means opening the file and dragging it onto your image each time you want to use it. Chances are that you’ll have to resize it and/or adjust the opacity for every image. I also tried it as a custom shape tool for a while, but that too was an inefficient way of accomplishing what should have been a pretty basic task. I eventually figured out how to create a signature brush in Photoshop, finally finding my perfect solution. I should point out, that I’m one of those people who has pretty much thrown in the towel when it comes to online watermarking. If someone really wants to steal my image, they are going to find a way to do it–with or without a watermark. I do, however, like adding my signature to some of my fine art images.
While I’ve outlined the steps for creating a brush of your signature, the same steps will work for making a brush of your logo.
Step 1 – Sign Your Name
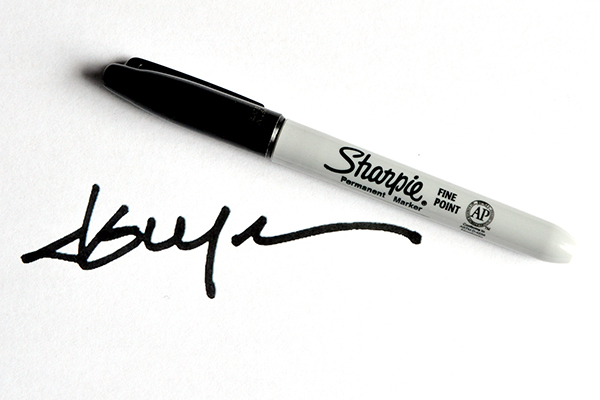
Use a plain white sheet of paper and a fine point Sharpie. The Photoshop part of the process will go much easier with the heavier lines of the marker, but you should also scribble out your signature a bit larger than you ordinarily would. Once your signature looks right, scan it at a high resolution and save the JPEG to your computer. You can try taking a photo if you don’t have a scanner, but fill the frame and make sure that your lens is as parallel to the paper as possible.
Thicker, bolder lines from a marker will make creating the brush easier, yet still give the signature a normal appearance when applied to an image.
Step 2 – Open, Zoom, and Select
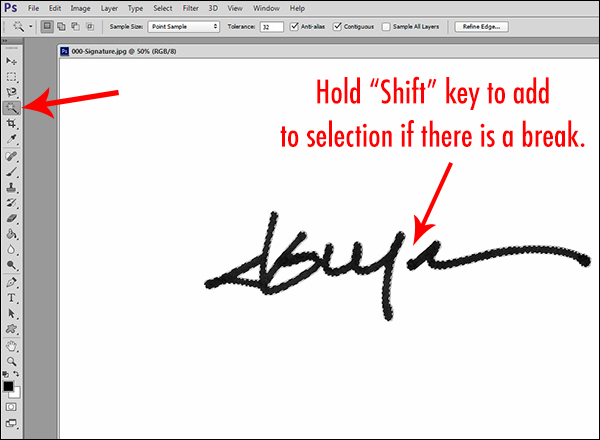
Once you open your signature in Photoshop, zoom in nice and tight. Using the magic wand tool (keyboard shortcut W), click on the signature to select it. You should immediately see the “marching ants” flashing across the outline of your signature. If the tool fails to select the entire signature, press and hold the Shift key while you click on parts of the signature that were missed the first time. Since my signature has a break in it, I had to add the second segment with an extra click of the selection tool. You can also right-click and select “Similar” from the context menu, but I find that the shift-click is quicker and more accurate.
The Magic Wand tool shares its spot in the tools palette with the Quick Selection Tool. Make sure you select the correct one.
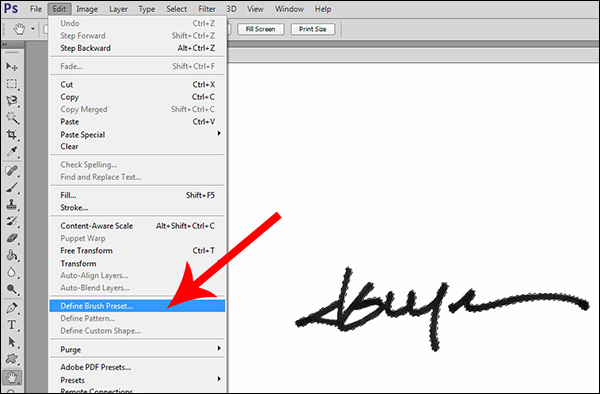
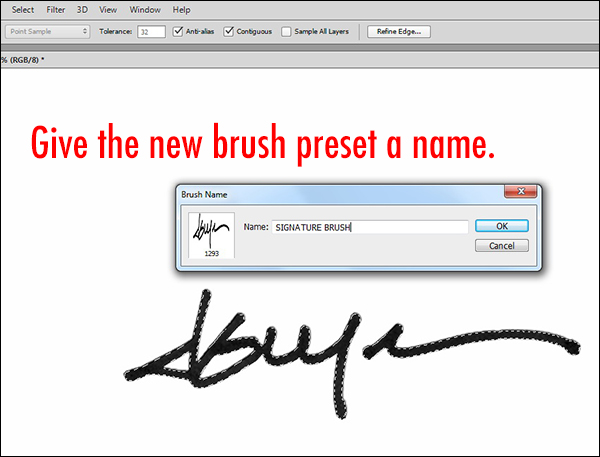
Step 3 – Save It and Name It
Once the complete signature is selected, click on the drop-down Edit menu at the top of the window. Clicking on Define Brush Preset will open a dialog box showing a thumbnail of your new brush. Give the brush a name and click “OK.” This will save the brush at its current dimensions in your current brushes set. You can check it by selecting the brush tool (keyboard shortcut B) and opening the preset picker (second drop-down menu from the left at the top of the window). Your new brush will appear at the bottom of the brush set.
The Define Brush Preset command appears in the drop-down Edit menu.
Finding your signature in the brushes palette will be pretty simple, but give it an easy-to-remember name, just in case.
Step 4 – Customize It
Due to the over-sized signature that we used to create the brush, our new brush is way too big for tastefully marking a photo. You can adjust the size within the brush panel, but there is a faster, easier way of doing it right from the keyboard. The right and left bracket keys — [ ] — can be used to adjust the size of the brush. The right key makes it bigger, and the left makes it smaller. You can either create a second preset at a more manageable size, or simply use the bracket keys to make quick size adjustments for each photo as necessary. The preset picker contains a small square icon on the right side. Clicking it will open a dialog box that will allow you to save the new preset at its new size. It’s also worth noting that–just like any other brush in Photoshop–you can change the color and opacity, as well as the hardness or softness of the edges.
You can further customize the brush by saving another preset with variations of size, color, and opacity.
I find that the best use of this brush is small and subtle, with enough contrast for it to be noticeable, but not too distracting. I usually select a color or shade from within the image to help the signature appear more organic and less out of place. You should also experiment with adjusting the opacity of the brush until you find a combination that suits you.
The post How to Make a Signature Brush in Photoshop by Jeff Guyer appeared first on Digital Photography School.
Thomas.friis.poulsen, Austin Stevenson and 3 others like this
28 Feb 06:00


How to Simplify and Improve Composition with Normal or Long Lenses
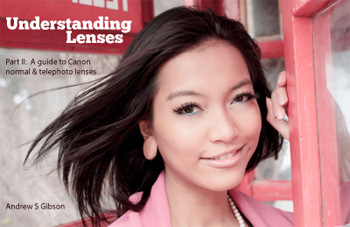
by Andrew S. Gibson

Andrew S. Gibson is the author of Understanding Lenses Part II: A Guide to Canon Normal & Telephoto Lenses, special deal on now 40% off at Snapndeals for a limited time only.
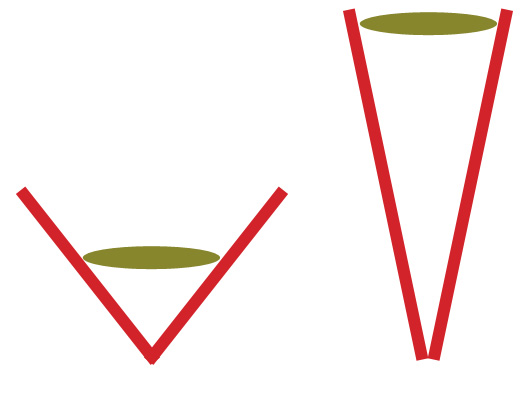
Wide-Angle Lenses
A potential issue with wide-angle lenses is that you try to include too much information in the frame. It takes real skill to create a strong composition with lenses that have a wide field-of-view. It is easier with normal and telephoto lenses, because you can utilise their narrow field-of-view to compose strong yet simple images with little in the background to distract the viewer.
Let’s take a look at how that works:
Angle of view from a wide-angle lens (left) and long lens (right)
This diagram shows the difference in field-of-view between a wide-angle lens (left) and a telephoto lens (right). You can think of a wide-angle lens as a lens of inclusion: it enables you to fit a lot of the scene in a photo. You can get close to the subject and still fit in a lot of the background.
The telephoto lens is a lens of exclusion. You don’t get so close to your subject and there is less in the background.
Here are a couple of examples:

I took this portrait using a wide-angle lens (24mm on a full-frame camera). I was able to get fairly close to the model and still include a lot of the background.

This portrait was taken using a short telephoto lens (85mm on a full-frame camera). I was able to get in close and exclude most of the background. The effect is emphasized by placing the model against a dark background.
This effect seems to kick in at around 50mm on a full-frame camera (the equivalents are 35mm on an APS-C camera, and 25mm with the micro-four thirds format). Here’s a photo taken with a 50mm lens on a full-frame camera to illustrate:

This means that you can use this technique to simplify composition even if the only lens you have is a kit lens. Just set it to the longest focal length and move in closer to your subject.
There are other ways to simplify composition – you can’t rely just on focal length:
- Pay attention to the background. Does it contain bright highlights or anything else that pulls attention away from the subject?
- Are the colours in your photo harmonious? If the colours don’t work well together this can also weaken the composition.
- Experiment with depth-of-field. Using a wide aperture helps simplify composition by throwing the background out of focus. This works best with prime lenses as they have wider apertures than most zooms.
- Move in as close as you can to the subject. One of my favourite techniques is to use a close-up lens (it’s called a lens but looks like a filter and screws to the front of your lenses the same way) to reduce the minimum focusing distance of my 85mm lens and get in really close. Another benefit is that depth-of-field becomes narrower in close up photography, helping create images with beautiful bokeh.
Here’s an example taken with an 85mm lens fitted with a Canon 500D close-up lens:

What are your thoughts? Do you use normal or telephoto lenses to simplify composition the same way? What are your favourite focal lengths? Let us know in the comments.
Understanding Lenses Part II: A Guide to Canon Normal & Telephoto Lenses
 My ebook Understanding Lenses Part II will teach you how to get the most out of Canon’s normal and telephoto lenses. It contains a buying guide, takes a deep look at aperture and bokeh, and shows you how to focus accurately with telephoto lenses. It’s now 40% off at Snapndeals for a limited time only.
The post How to Simplify and Improve Composition with Normal or Long Lenses by Andrew S. Gibson appeared first on Digital Photography School.
Yanniv Ovadia, Andris Ulpke likes this
25 Feb 05:05


Anatomy of a Concert Photography Shoot
by Matthias Hombauer
Slash from Guns N’ Roses
In my last article 6 tips for budding concert photographers I explained the basics (and camera settings) of how to start your career as a concert photographer. I would like to say a big thank you for your awesome feedback and your ongoing comments on that post. It really means a lot to me and shows how many talented and hard working concert photographers are out there.
This article is a follow up, and I will go into more details about the “anatomy of a concert photography shoot“. Especially when you are new to concert photography, it can be overwhelming to stand in the photo pit all alone with your camera. The venue lights go out, the band enters the stage and you have only three songs (average 10 minutes) to get your awesome shots. Honestly, in the beginning it was also scary for me, but trust me, after you have shot some concerts you’ll feel much more comfortable in front of the stage and you’ll learn to know your camera settings by heart.
One of the points that are often undervalued is the fact that a band consists of various individuals. It is tempting to only shoot the lead singer (the key person), but this would be just one out of the whole band. There’s also a guitarist, drummer, bass player and additional musicians that are worth taking a closer look. Hence, it is more difficult to photograph the other band members, but you definitely should try to catch everyone on stage.
Let´s break it up:
The Lead Singer (The celebrity of the band)
This guy is the one whose name is often linked to the bands name such as Iggy Pop, Morrissey, David Bowie, Neil Young or Leonard Cohen.
They are the celebrities and will be shown on every VIP party and on TV. So, to photograph this person is a must have. From a concert photographers perspective, this is the easiest member to photograph. They are always at the front of the stage and get the best lighting. I always focus on the lead singer first and once I’ve got some awesome shots, I will follow up on the other band members.
Iggy Pop
The Guitarist and the Bass Player
Next I focus on the guitarist and bass player. Both of them are standing on one side of the stage, either behind the singer or on the same level. I’ve shot concerts where the bass player was standing in total darkness, so I won´t have a chance (even with a full frame sensor DSLR, f/1.4 lens, and ISO 6400) to get a decent picture. These are the hard times of a concert photographer and you just have to accept it sometimes. However guitarists and bass players provide great shots when you catch them e.g. posing when playing a solo or jumping around.
(See photo below of Flea from the Red Hot Chili Peppers and Slash from Guns N’ Roses top of the article)

The Drummer
The drummer is the “heart“ of the band and the pulse generator. A rock band without a drummer doesn’t work, but photographers tend to ignore them in their pictures. The drummer is also the one who gets you awesome action shots if you catch them in the right moment. However, these guys are almost always in the back of the stage and therefore you need a telephoto lens like the 70-200mm to capture his presence. On bigger stages (like festivals) it can happen that the drummer is so far away, that it is not always possible to reach him with your basic lens kit. But try your best, and your efforts will be rewarded.
Chad Smith, Red Hot Chili Peppers
The Band
Also try to get a picture of the entire band. Your best bet is the use an ultra wide-angle lens such as a 14mm lens. This will allow you to get the whole stage in one picture. If you are allowed to shoot the complete show (you have to ask the band first), try to get other viewpoints such as from a balcony, from the back of the venue, or on stage.
Fink
The Audience
In addition, you can also take pictures of the audience. Just turn around in the photo pit and you are facing the screaming fans squeezed into the first row. This is a tricky one, because there is lack of lighting there and you need a ultra wide angle lens to capture some good action shots. Try to catch them when they are ecstatic about the band.

Some general notes for you as concert photographer:
- I always try to get the musicians with their instruments. So when I shoot the lead singer, I take care to include the microphone. When shooting the guitarist, get the guitar in the shot and the drummer needs to show his drumsticks, otherwise it looks strange when someone sits behind a huge drum kit, but you can’t actually see him playing.
- In general I try to frame my pictures in a way that I don´t chop off guitar necks, bass bodies or keyboards. For a close shot of the drummer you need to crop the drum kit. Thats fine, just try to get a clear framing.
- Shooting famous bands like Metallica, Iron Maiden, Red Hot Chili Peppers, they always provide good lighting on stage. It gets more difficult in smaller clubs where you are confronted with poor lighting conditions.
- Try to get some details shots too. Shoes, tattoos, fancy stage outfits such as lamps, visuals or flags. Some bands can be very creative.
Summary:
- Get to know your gear by heart first (camera settings, lenses)
- Even though the lead singer is the celebrity of the band, try to also get the other band members
- For the drummer, you often have to use a telephoto lens
- Show the context in your pictures e.g. The singer with a microphone, drummer with drumsticks, etc.
- Frame your pictures to avoid cropping off the instruments
- Get pictures of the band, audience and details on stage
- The more famous the band, the better lighting on the stage (rule of thumb)
The post Anatomy of a Concert Photography Shoot by Matthias Hombauer appeared first on Digital Photography School.
Luk.marczak, Yanniv Ovadia likes this
25 Feb 05:04


How to Handle Image Theft Peacefully
by James Brandon

First off, I am certainly not a lawyer and am not giving legal advice in this article, I’m simply telling my story and how I handle image theft. If you have questions about legal advice, please consult with an attorney.
Recently I received a phone call from a family member who believed a local news station was using one of my images as a green screen background. This was interesting considering I hadn’t had any conversations with any news stations recently about such a thing. I asked him to send me a photo of the segment and sure enough, it was mine.
I’ve dealt with my fair share of image theft over the last five years of being a professional photographer and I’ve certainly seen a lot more situations of other photographers getting their images stolen.
One thing that has never sat well with me is when I see some photographers attempt to completely destroy people for using their images without permission. Taking a situation like this to social media and damaging the reputation of the offender should be an absolute last resort, not a first knee-jerk reaction.
Quick Side Story
I had this same image stolen by a well known wedding photographer in the Dallas/Fort Worth area. I am friends with him on Facebook and was just scrolling through my feed when I saw this image being used as a photo booth background. I could not believe my eyes! What many photographers would have done is create a public post calling him out and saying what a despicable thing he had done. This would damage his local reputation and certainly go a long way toward making sure he never did it again.
Instead, I sent him an invoice for use of the image (it was in about 30 photo booth images in his wedding gallery), a cease and desist letter and a short email explaining why he was getting all this. Within 5 minutes he paid my invoice and sent very heartfelt apology letter and also thanked me for solving it privately instead of publicly. Turns out he hired someone to man the photo booth and told the person to only used free and clear images, but the person he hired was uneducated in finding the right images and found mine on Google and just assumed. Sure, he should have done a better job educating the hired help but it was a mistake. Not intentional.
Ok, Back on Topic – How I Handle Image Theft
Instead of calling the news station out publicly and demanding the image be taken down, I simply stepped back and analyzed the situation. I came to three conclusions…
- The image was indeed used without my permission.
- It had been shown on national television to hundreds of thousands (if not millions) of people.
- Whether they stopped using the image or not, I deserved compensation for the use that had already occurred.
Now it was time to make contact. I sent this short email…
Hello,
My name is James Brandon and your news program used one of my copyrighted photographs without permission this evening (I’m attaching a photo in the email). Also attached is a Cease & Desist letter to stop further use. Since the image has already been used and run on air, I’ll be sending an invoice for the unauthorized use of the photo as well. Please let me know immediately how you plan to respond to this matter, so I can act accordingly.
- James
I got an email back shortly that simply said, “James, I’m forwarding this to our corporate attorneys.”
I’m guessing the person writing the email didn’t think I had a case and figured his attorneys would confirm that. The next email I got from him was a lot more wordy and apologetic. It said…
Second reply from offending party
James,
I’m so sorry about the use of your photo. It was an unintentional error.
The editor thought he had found something in the public domain. Obviously, he was mistaken. He would never have used it if he’d realized it was copyrighted material.
OF COURSE we will immediately stop using the image. I’ve already deleted it from our system so it doesn’t get used again. In light of the error, could you please consider waiving the fee you would normally charge for such use?
- Mitch (name changed for purpose of article)
Decision time
This is where I had to make a decision. I didn’t send them an outrageously expensive invoice for thousands and thousands of dollars. Rather, I went to the Corbis website and used their pricing guide to figure out how much they would typically charge for similar use of a stock image. I then added a small percentage to that amount since it was unauthorized use. Should I just let them off the hook since he apologized? I think that I might have actually considered that option if that latest email had been the first thing he wrote me. I however got the impression that he was very unthreatened by my letter initially and only after talking to his corporate attorneys did he see the need to be nice to me and apologize. So I decided to (politely) press on.
Mitch,
I appreciate the apology. Since the image has already been used and run on air (and who knows how long), I really don’t see how it’s fair to ask me to waive the fee. I sent you a very reasonable invoice.
I will however agree that once the invoice is paid, I will send over a licensing agreement so that you can keep using the image in the future (provided that it is left in it’s original state and not Photoshopped like it was).
Thanks.
P.S. Do you know where the editor found the image? Was it on my website?
-James
Assuming that it actually was a mistake, I was more than willing to let them keep using the image if they were willing to pay my invoice. Some would say that’s too nice of me, but that’s just the decision I made. He wrote back quickly…
Hello, again, James. (<—-That didn’t sound very nice. I think he’s getting tired of me)
The editor thought he was on a site for which we have rights and somehow managed to get onto another site.
As to the invoice, I understand your need to charge for use of the image, accidental or otherwise. The fee is quite high, however, considering that it was on the air for only a few seconds.
Could you cut the fee in half? I could submit that invoice TODAY and we wouldn’t need the license to keep using the image.
Mitch
At this point I was getting frustrated. He spoke with his attorneys and they clearly told him that the news station was in the wrong. Now he’s trying to barter with me. I could have said screw it and gone to social media. I could have gone off on him and demanded my money and threatened a lawsuit. Instead I simply stood my ground and let him know my stance on the situation. I also let him know how I could have handled the situation…
Mitch,
When bartering, there has to be incentive on both sides to negotiate. If we were speaking before the image aired, there would be at least some incentive to get my image up on your news program. In this case, the image has already aired without my permission. I didn’t get a say in that.
This image has been stolen before, I guess there just aren’t that many photos of the Stockyards sign out there. The other people/companies that used the image paid my invoice without question (for the same price) and didn’t try to negotiate it. They understood they were in the wrong and didn’t want to risk having the matter becoming public. They were also nowhere near the size of your news program.
What most photographers do in a situation like this is immediately call out the business or person using their image on social media and their website. This gets the photographer’s followers up in arms and they will typically go bombard the Facebook page of the person or company in question. This looks very bad to the person/company’s followers and it usually gets the ball rolling pretty fast to get it resolved.
I’ve chosen to take a more peaceful approach, and attempt to settle this matter privately first. Please pay the invoice so we can put this matter behind us and move on.
-James
That was the last contact I had with Mitch. After that email, I got an email from somebody higher up asking for a W-9 and new invoice sent directly to him. I ended up talking to that person on the phone and explained the situation. He apologized for Mitch’s behaviour and for the unauthorized use of my image and said that I had every right to be compensated for it. He also thanked me for handling it privately and not defaming them publicly. He then paid my invoice over the phone and the matter was settled.
Conclusion
There are many ways to handle image theft, but most situations can be handled professionally without the need for burning bridges or destroying reputations. It can also nearly always be resolved without the use of attorney or going to court.
If someone steals an image blatantly and then refuses to take it down or ignores all attempts at making contact, then by all means sound off on social media and send your army. That’s not what happened here. The entire process of finding out about my image being used and getting the issue resolved and the invoice paid took about 6 days. It took some patience but in the end it was resolved peacefully.
What are your thoughts? Was I too easy on them? Too hard? What would you have done differently? Let me know!
For more articles on some legal ins and outs of photography and copyright try these:
- Intellectual Copyright – What is considered ‘stealing’?
- Using Image Watermarks In Lightroom
- Working with a Second Photographer – Legal Ins and Outs
The post How to Handle Image Theft Peacefully by James Brandon appeared first on Digital Photography School.
Luk.marczak, Yanniv Ovadia and -1 others like this
22 Feb 09:22


2014 Sochi Winter Olympics, Part II
After all the preparation and the opening ceremony, the 2014 Winter Olympics are well under way. More than 2,800 athletes from 88 countries are chasing medals in 98 events in 7 different sports, including newly added events like women's ski jumping and snowboard slopestyle. This is the second entry in this series, showing events from the past week. The games continue through February 23, and I'll continue posting periodic updates of some of the best photos from Sochi. Be sure to also see Olympic Photos Part I, earlier on In Focus. [42 photos total]
Emily Cook of the United States practices ahead of the Freestyle Skiing Ladies' Aerials Finals on day seven of the Sochi 2014 Winter Olympics at Rosa Khutor Extreme Park in Sochi, Russia, on February 14, 2014. (Cameron Spencer/Getty Images) 

    
|
Yanniv Ovadia likes this
22 Feb 09:20


Getting Started in Newborn Photography
by Maddy Rogers
Newborn photography has been around in the United States for fifteen or so years, but it’s only taken hold here in the UK in the last three to four. And take hold it certainly has!
All professional photography involves a multitude of skills and newborn photography is no different, with one very important exception. It is the only area of photography that involves the photographer being completely responsible for the safety and welfare of the subject – the baby. As a newborn photographer you will hold, comfort, soothe, pose, wrap, and often even feed and clean up after your subject, even with the parents present.

It is because of this difference that it is so specialized, and requires the right set of skills. Not having those skills is about more than the risk of poor images – someone’s safety is at stake.
So having decided it’s for you, you’ll have a huge number of questions. Here I aim to answer some of the biggest, and most important ones.

DO I REALLY NEED TRAINING?
The short answer is yes. It doesn’t matter how skilled you are at photography, because the skills required to be safe and of a good standard as a newborn photographer are really very different than anything you have done before. If you decide to become a wedding photographer with no training, the worst that may happen is you let down a couple on their big day. As bad as that could be, no one will get hurt.
Newborns are delicate and must be handled correctly. They can suffer circulation problems, are poor at regulating their temperature, and cannot tell you when they are feeling uncomfortable, which means they are relying on you to take care of them at all times. The correct training will teach you safe handling techniques, how to spot signs of baby not being happy for many reasons, as well as general safety and other important areas.

WHY DOES A SESSION TAKE SO LONG?
The average session is 3-4 hours, and you will soon realize why when you have done a couple of your own. The session is taken up by everything BUT taking photos. When I do a session my camera is in my hand for less than ten minutes the entire time. The session will involve settling, cuddling, reading baby, soothing for sleep, and gentle posing. They baby runs the show, of that there is little question, and as each baby is different, so is each session. Try to rush it and clock watch, and you’ll put yourself under huge pressure, and babies pick up on stress, which could cause you to have an unsettled baby on your hands. As a general rule, most newborn specialists will do just one session a day.

WHAT IS THE BEST AGE FOR A NEWBORN SESSION?
If you have children, you may well remember that newborns sleep a lot, at least through the day, and seem able to sleep through pretty much anything too. But that changes really quickly, and by week three babies are waking more easily, and spending more time awake each day. You cannot pose a baby that is awake, so a sleeping newborn is what you need, meaning you need to aim for under two weeks, and under ten days is even better.
Sleep isn’t the only issue that dictates though. Newborns are gorgeously squishy, floppy and bendy under ten days old, which, coupled with being sound asleep, makes them perfect for gently posing into those adorable positions parents love. Much after two weeks and they begin to gain muscle tone, which means they lose the flexibility that makes such posing possible.
So that covers not doing a session too late, but you need to know why doing it too early isn’t good either. Newborns don’t usually look their best after birth, and it can take time for their faces to settle. Also, feeding needs to be established because until a baby is feeding well, he won’t sleep well. My advice would be don’t do a session under 5 days of age.

HOW DO I MARKET NEWBORN PHOTOGRAPHY?
You are selling emotions. That is really the bottom line with newborns. The parents are melting with wonder and love at their new baby, and emotions are running their lives completely. If you can build a relationship with your clients that taps into their emotions, and leaves them feeling that you can truly relate to them and their baby, they will be more inclined to not only book you, but trust you.
Talk in a way that shows their baby means almost as much to you as he does them. Ask them lots of questions about their baby, and life since his arrival. New parents can talk all day about their baby, so showing he interests you will really endear you to them. Use emotive language on your site and Facebook page. Rather than saying “I like doing baby shoots” say “I simply adore capturing images of beautiful, squishy babies!”
Look after the parents when they are with you. Provide drinks and snacks, and comfortable seating. Mum will be sore and they are both likely to be exhausted.
Word of mouth is one of the best marketing tools in this genre. Mums talk, and will recommend you if they came away feeling that their baby was safe, respected and adored. The testimonials that will get you more bookings will not be the ones where mum says the pictures are good, but rather the ones where she gushes about how lovely the experience was while with you.

WHAT WILL I NEED AS A BEGINNER?
Keep it simple. Training will show you the basic equipment you’ll need, like beanbag and backdrop stand, as well as a small selection of throws, hats, headbands, and wraps. The most important area for your development as a newborn photographer will be developing safe handling of the baby in your early months. The confidence in posing takes time, and that is where your focus should be, not on having all the props and the biggest selection of hats. What will set you apart as a top newborn photographer will never be the amazing set up you design – it will be how good your posing is, and how comfortable your baby looks in the images.
So in summary, I would suggest you take your time setting up as a newborn photographer. Research good training, and consider that in this area especially, you get what you pay for.

For more on newborn photography and business see these articles:
- The Ultimate Guide to Going Pro as a Photographer
- How to Photograph Newborns
- Newborn Photography Tips for Beginners
- Different ways to Photograph your Baby
- The Sensitive Side of Newborn Photography
The post Getting Started in Newborn Photography by Maddy Rogers appeared first on Digital Photography School.
Yanniv Ovadia likes this
22 Feb 09:16


Landscape Photography and Hyperfocal Distance
by Andrew S. Gibson
I can remember when autofocus was relatively new and many photographers distrusted it. Now it’s the other way around – autofocus has become so good and so ubiquitous that manual focus lenses are a rarity. It’s easy to forget that sometimes it’s better to turn it off and use manual focus instead.
A good example of this is when you use a wide-angle lens to take a landscape photo. In this situation, you probably want to record the entire scene as sharply as possible. But how do you do this when the nearest part of the scene may be only centimetres (less than an inch) from your camera?
The answer is that you need to understand depth of field and be willing to take control and decide exactly where you want to focus the lens, rather than leave it up to the camera.
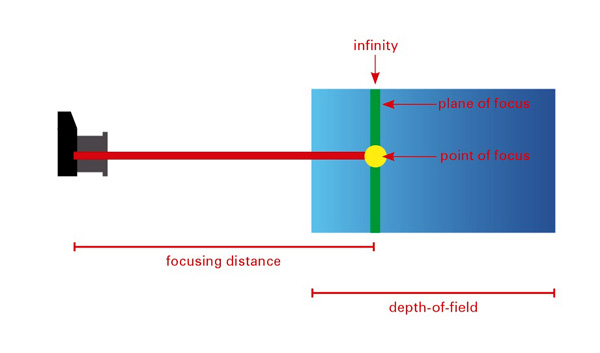
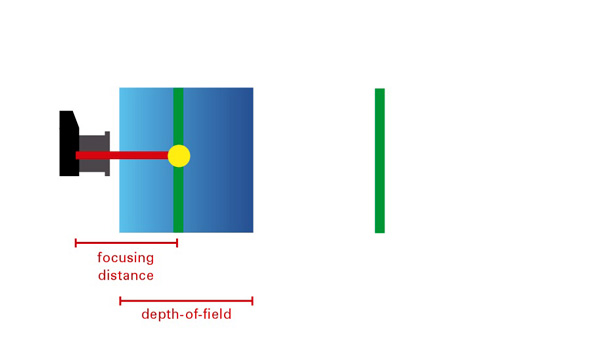
What is depth of field?
Depth of field is the area either side of the point of focus that appears to be sharp. The amount of depth of field depends partly on camera settings (the focal length of the lens and the aperture) and partly upon other factors such as the size of the photo and the eye of viewer. Sharpness is subjective – what might appear to be sharp to one person may not appear so to another. Keep this point in mind as we progress through the article.
This diagram shows the depth of field when you focus on infinity. You can see that most of the zone of sharpness (another term used to describe the areas that are in focus) extends beyond the point of focus and is effectively wasted.
Depth of field in action
The best way to understand how depth of field works is with a practical example. Imagine that you are using a 24mm lens (or a zoom lens set to 24mm) on an APS-C camera focused on a point exactly one metre (3.3′) from the camera. You want a nice sharp image so you have set the aperture to f/11 (the sharpest aperture settings on most lenses are f/8 and f/11). In this case everything between around 73cm (28.75″) and 157cm (5’1″) will be sharp.
This is what happens if you focus too closely to the camera. You will get the area around the point of focus sharp, but anything close to the horizon will not be sharp.
In reality, what is happening is that anything one metre (3.3′) from the camera (the point the lens is focused on) is sharp, and then everything either side gradually becomes less so until it reaches the point where it no longer appears to be in focus to the human eye.
Where did I get the above figures from? I used the depth of field calculator at DOF Master and selected EOS 7D as the camera. The camera is important as depth of field as affected by sensor size, as well as lens focal length and aperture.
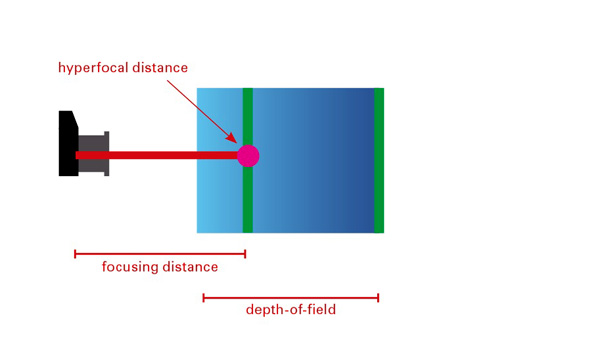
We have already seen that focusing on infinity effectively wastes depth hyof field. You’ll get a better result using the hyperfocal distance.
What is hyperfocal distance?
The depth of field calculator throws up another figure – the hyperfocal distance. This is the closest point at which you can focus the lens at this focal length and aperture settings, and still keep everything from the focusing point to infinity in focus.
In this example the hyperfocal distance is 2.7m (8’11″). Focus on this point and everything from 1.34 metres (4’5″) to infinity is in focus. That maximizes depth of field and helps you get the entire scene sharp.
This diagram shows what happens when you focus on the hyperfocal distance. Depth-of-field is maximised, helping you to create a sharp image.
Note that the near focus point (1.34 metres or 4’5″) is half the hyperfocal distance of 2.7 metres (8’11″). This ratio holds true no matter the hyperfocal distance of your lens, aperture and sensor size combination.
Hyperfocal distance in action
The easiest way to use the hyperfocal distance is to print out or photocopy some hyperfocal distance tables to take with you on a shoot (the DOF Master website has tables you can print out here).
Alternatively, there are several smartphone apps that will perform the calculations for you such as these (do a search for DOF or hyperfocal distance, there are plenty of others)
Once you have the information, you need a lens with a depth of field scale on the barrel to tell you the distance at which the lens is focused. Many lenses have these, but some don’t (including lots of kit and pancake lenses). Distance scales aren’t precise, so be prepared to work with approximate measurements.
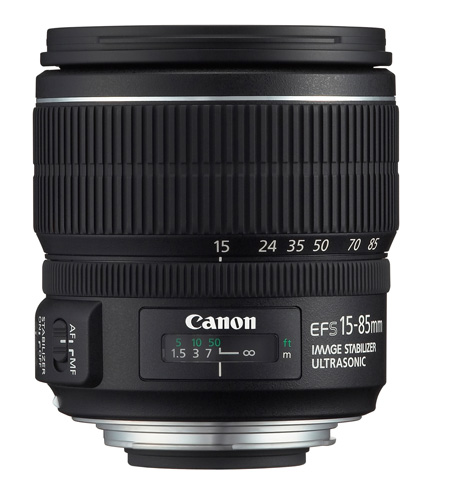 An example of a lens with a distance scale. |
 A lens without a distance scale. |
If your lens doesn’t have a distance scale, your only option is to guess the distance (or use a tape measure!). Luckily, it’s not hard to guess distances. In the above example, you would know that focussing on a point around 3 metres (approx. 10′) from the camera will maximize depth of field, so it’s not that hard to make a guess.
After you have taken a photo you can double check sharpness by playing it back on the camera’s LCD screen and enlarging it as much as you can. The usefulness of this depends on the clarity and size of your LCD screen, but you should be able to tell if the parts of the scene closest to you are unsharp. You will only really know for sure once you get home and look at the photo on your monitor, but checking the LCD screen reveals any major errors in your calculations.
Given all the variables and potential for mistakes, one way to apply hyperfocal distance is to use the calculations for one aperture setting (e.g. f/8) but set the camera to a smaller aperture (such as f/11). This gives you margin for error.
Notes on using hyperfocal distance
A couple of things to be aware of:
First, the depth of field calculations in this article are based on something called the circle of confusion. This is the maximum size at which an out of focus dot appears to be sharp to the human eye. Circles of confusion are necessary because they form the basis of depth of field calculations. Each camera and lens manufacturer makes its own judgement as to which size circle of confusion they will use for their calculations. That means the figures in depth of field calculations and hyperfocal distance tables vary according to the circle of confusion size the figures are based on.
If you didn’t understand that, don’t worry. This video explains it perfectly:
Second, you will often read that depth of field extends 1/3 in front and 2/3 behind the point being focused on. This isn’t true. Focus on something close to the camera and the split is closer to 50/50. Focus on something far away from the camera and the split may be 10/90. Advice that you should focus 1/3 of the way into the scene to maximize depth of field is well intended, but inaccurate.
More reading on this topic at Getting Landscapes Sharp: Hyperfocal Distances and Aperture Selection
Understanding Lenses ebooks
 My ebooks Understanding Lenses Part I and Understanding Lenses Part II will help Canon EOS owners decide what lenses to buy for their cameras. They are both filled with lots of tips to getting the most out of your Canon lenses. Click the links to learn more.
The post Landscape Photography and Hyperfocal Distance by Andrew S. Gibson appeared first on Digital Photography School.
Yanniv Ovadia, Xabier and one other like this
22 Feb 09:05


Do You Need to Upgrade to the Latest Camera?
by Katie McEnaney
Camera-envy is the bane of many photographers. Discussion forums are filled with conversations about the benefits of the latest and greatest camera gear, and our commercial-driven societies fill us with the deep-seated need for more, more, more! But do you really need to upgrade to the latest camera?
By Portrait / Wedding Photographer
What matters more: the camera or the photographer?
This is the question truly at the heart of most photography gear debates: what really matters? Is it the camera or the photographer?
You know what you want the answer to be. When you show someone a favourite picture, you are looking for compliments and congratulations for yourself, not your equipment. You likely don’t post an album on Facebook hoping to get a “Way to buy that new camera!” style of comment. If you compare yourself to a chef and use the analogy that no one would think to praise the frying pan for an excellent meal.
But yet. . .
You see the photographs of others and immediately start making excuses. “Oh, well, he has a 400mm zoom lens” or “Well, she has a full frame sensor,” and at the same time we overlook the years of training or the hours of planning that went into that shot or that set-up. You choose not to wake up early or to stay up late and then wonder why your sunrises or sunsets do not have the same pizzazz or punch as another’s. You choose to shoot quickly and move on, rather than staying around, observing, and find that ‘decisive moment.’

You are the variable that matters. If you want to take better pictures, there are unlimited steps you should be taking before you worry about upgrading to the latest and greatest. Think about the time and energy that you put in to your photography. Are you truly pushing your camera to its maximum potential?
Many of the latest and greatest benefits touted by newer model cameras are those that will rarely be used or exploited by the vast majority of camera owners. 61 compared to 9 possible focal points are not necessarily useful if you consistently use the center point to focus-and-recompose or if you rarely use auto-focus or servo-focusing modes for moving subjects.

A faster frame rate of 6 compared to 3 frames per second is useful, perhaps, if you are shooting a rapidly changing subject like a bird in flight or kids jumping into a pool, but you do not need six (or even three) identical photographs of a rock formation or a bouquet of flowers. Ask yourself how often you even shoot in such a burst mode.
You should also think about the strengths and limitations of the current lenses that you own. A fast prime lens can open up a wide-range of new shots and opportunities. If you do not already have at least a 50mm f/1.8 lens, then you have not even begun to explore the potential of your current camera body. Many photographers recommend putting your purchasing power into lenses, especially ones that you can hold on to and use down the line.
What I shoot
Full disclosure, I shoot with a Canon T1i (500D for the European naming system), a camera that went on the market in early 2009 and has since been upgraded four additional times. At nearly a year-old, the current Canon T5i is likely due for an upgrade in the near future: the Canon T5 was just announced February 12th. In many photography circles the T1i would be considered a nearly ‘ancient’ digital model. It is also in the entry-level line of Canon DSLRs, with multiple tiers of both cropped and full-frame sensor cameras above it. All photographs in this post (other than the shots of cameras and gear) and my other articles on dPS, were taken with this camera.
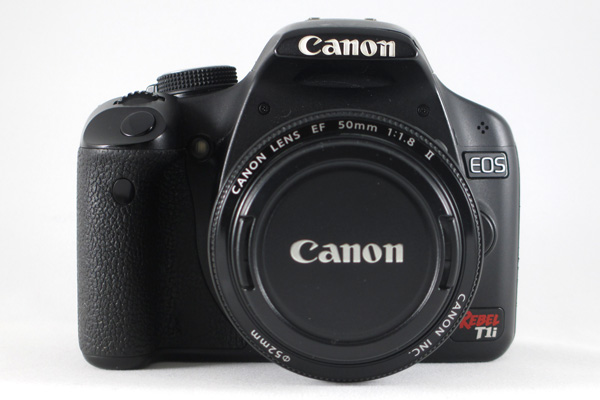
I will readily admit that there are trade-offs and limitations to my camera. I know that I cannot push the ISO very high without introducing significant noise into the final images. I know that my buffer will fill quickly and then stall if I take a series of RAW shots in rapid succession. I know that I cannot adjust my LCD screen or see myself while standing in front of the camera for a selfie. Has that ever negatively impacted a shot that I was trying to take? Not often.
I also know that I can carry a tripod and use it if shooting in low light. I know that I can switch into just JPEG if I am trying to take a hurried sequence of shots. I know that I can use cues from a test shot to figure out how to tweak a self-portrait and use a remote to set the focus when I am in position. I know that 15 MP can look great at web sizes as well as printed on canvas or aluminum and hung on my wall.
What frustrates you about your current camera? Think about whether it is something that you could change or whether it really an issue with your camera.
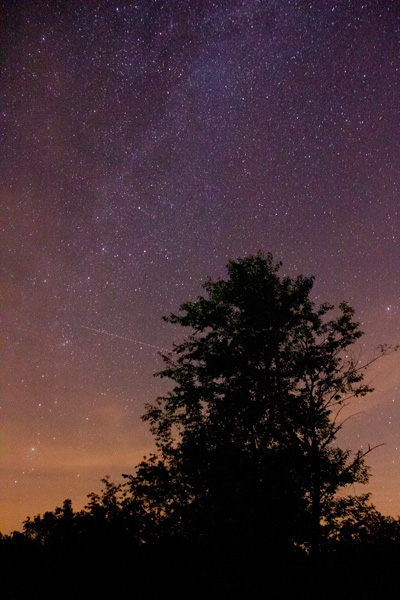
Agree or disagree: will you upgrade your camera?
Are you a frequent camera-upgrader or are you shooting with an “old” digital camera too? Share your constructive thoughts or an example photograph in the comments below.
Some other options to buying more stuff:
- Start Feeling GOOD About YOUR Photography
- A Year of Photographic Lessons – Journey of a Novice Photographer
- 5 Photography Rules Moms [and Dads] Can Ignore
The post Do You Need to Upgrade to the Latest Camera? by Katie McEnaney appeared first on Digital Photography School.
Yanniv Ovadia, Zoltán Kettinger and one other like this
17 Feb 19:09


Photographers: Why You Should Give Away What You Know
by John Schell
A few months ago, I was out at dinner with a couple of friends of mine. We had each just finished up our respective shoots and had settled into a booth where the conversation inevitably turned toward who we shot, where we shot, and whether or not we were happy with the in-camera results (we were). That night, we spent the better part of two hours eating, drinking and sharing our techniques with one another. [more]

Yanniv Ovadia likes this
15 Feb 09:43
How photographer John Flaig shot the Grand Canyon from the edge of space (VIDEO)
Amongst the burgeoning field of weather balloon photography, photographer John Flaig is probably one of the most well-established and respected names in the game. He's teamed up with National Geographic for a near-space shoot of the Grand Canyon, and in a video he walks through the process of shooting from the edge of space.
The images were destined for use for a National Geographic piece on the Grand Canyon, but the amount of work that goes into taking Flaig's images is an incredible story in and of itself. Watching the brief...
(read more)
(read more)
Yanniv Ovadia likes this
15 Feb 08:27


Nikon’s history in pictures: from the Nikon 1 rangefinder to the D70s DSLR
by [NR] admin
A reader sent me this history of Nikon poster that contains all cameras from the original Nikon 1 rangefinder to the D70s DSLR. Enjoy:

Posted by NikonRumors.com
This RSS feed is copyrighted and cannot be republished in any way without permission.
Follow [NR] on Facebook and Twitter.

Related posts:
17 Jan 10:27


The 2.5D Effect Explained Further
by Noam Galai
Few months back we featured a great video showing how Joe Fellows creates his stunning parallax videos. After posting the article, many of you had follow-up questions on his techniques and methods, so he decided to release a ‘part 2′ video explaining some of the cool tricks he uses to transform a 2D photo into a 2.5D video. [more]

Yanniv Ovadia and -1 others like this
17 Jan 07:46


Why You MUST Have a Polarizer
by Gavin Hardcastle

Ever wondered how professional photographers achieve such lush, vibrant colours and that magical “atmosphere” in their images? BAM – they use a polarizing filter or “polarizer”! I could never have achieved the shot above without a polarizer.
 Who would have thought that just one slice of wafer thin glass slapped on the front of your lens could transform your photographs from “meh” to “woah” with just a quick turn of the hand?
You MUST Have a Polarizer!
As a landscape photographer I won’t go anywhere without at least a couple of polarizers in my bag of goodies. My wife loves them too because she never has to ask me what I want for Christmas, the answer is always “a polarizer please”.
Can you spot the difference between the two shots below?


The effect is pretty dramatic in terms of how the polarizer removes all of the white glare from the wet rocks. It also allowed for a longer exposure so that I could capture more movement in the water.
So what does a polarizer do?
In a nutshell, your polarizer allows you to control the reflected light that you didn’t even realize is messing up your shot. It’s like putting a pair of shades on your camera (or monacle I guess). Here are just a few reasons you’ll love a polarizer:
- Allows you to see through shallow water by excluding light reflecting from the surface.
- Gives you deeply saturated colours by excluding reflected light, for example, wet rocks or leaves.
- Allows you to control which light reflections you want to keep. Lets say you’re shooting a shiny surface like a wet car, a polarizer will allow you to change the angles of the reflected light on the curves of the bodywork. See video below.
- Brings back definition to blown out clouds that may appear too bright without your polarizer.
- Allows you to use slower shutter speeds for milky water shots. You’ll never shoot another waterfall without one.
- Allows you to shoot through glass that would otherwise show obscuring reflections.
- It protects your lens from impact and the elements. It’s easier to replace a $100 filter than a $2000 lens.
Video of a polarizer in action to manipulate the reflections on paintwork.
Here’s another example of the way a polarizer allows us to see right through shallow water.

When NOT to use a polarizer
A polarizer reduces the amount of light that enters your lens. If you need to shoot fast, like in a dark canyon or a night time rock concert, ditch the polarizer. Low light situations won’t benefit from a polarizer because you’ll need all the light you can get for fast shooting.
If you want reflections, like in a lake scene, use a circular polarizer so that you can take a shot WITH the polarizer engaged and another shot WITHOUT the polarizer engaged. That way you can decide which you like best during editing and maybe blend the two for the ideal look.
Like to shoot rainbows? Ditch the polarizer or the rainbow will be invisible, it’s reflected light remember.
Which brand to choose
In all honesty I’ve used them all and I can’t recommend one brand over the other. Your challenge is to find one that fits the diameter of your lens. Try finding an 82mm at short notice and you’ll know my pain. Shop online for the best deals.
Invest in the most effective camera accessory money can buy, treat yourself to a polarizer then go create some awesome images.
What’s your recommendation for an absolute “MUST HAVE” in the camera bag?
Here are a few filters to check out:
-
B+W 77mm Kaesemann Circular Polarizer with Multi-Resistant Coating
-
Hoya PRO1 Digital CIRCULAR PL – Filter – circular polarizer – 67 mm
-
Hoya 58mm HRT Circular PL Polarizer Multi-Coated Glass Filter
-
Tiffen 72mm Circular Polarizer
Further reading on using filters:
- Polarizing and Neutral Density Filters: Essentials for Landscape Photography
- Getting It Right In Camera: Using Filters To Accurately Capture the Scene
- ND Filters: Everything You Need to Know
- Neutral Density Filters
- Introduction to Filters for DSLRs
The post Why You MUST Have a Polarizer by Gavin Hardcastle appeared first on Digital Photography School.
Yanniv Ovadia, Xabier likes this
17 Jan 07:42


Reverse Lens Macro: How to use it as a Great Learning Tool
by Sharath Prakash

Reverse Lens Macro: How to Use It as a Great Learning Tool
Yesterday one of my friends called me late and told me that he was going to buy a DSLR and asked me which one he should choose. As a friend, I knew that this was his first camera and he was in fact a complete stranger to the field of photography. I told him to buy a good compact camera in order to get used to the basic concepts of photography and to buy a DSLR only when he feels his equipment is limiting his creativity.
On the other hand are the people how have already bought an SLR, but get confused and overwhelmed by the level of control these cameras offer, and the sheer amount of effort they have to put in to make their photographs look beautiful. I write this article for those people who bought a DSLR, and are in distress seeing none of their photos looking as good as someone else’s.
Considering that you have bought a DLSR and are delving into some advanced levels of photography, let’s see how an interesting and fun technique known as reverse lens macro can teach you a great deal about your camera, light and in effect make the art of photography.

The basic trio of photography
Before understanding reverse lens macro let’s take a look the basic trio that every photographer needs to know to take a well exposed shot:
- Shutter speed

- Aperture
- ISO
Shutter speed is in essence the duration for which light falls on the camera’s sensor, shown in most cameras as 1/250th or 1/30, lower the denominator, the longer the duration.
Aperture is the opening in the lens which controls the amount of light entering your camera and the area in your image which is in sharp focus (aka depth-of-field) usually shown as f/5.6 or f/7.1. The lower the number, the more light getting to the sensor, and smaller the area in focus.
ISO determines just how sensitive your camera’s sensor is to the light falling on it. ISO usually ranges from 50 to above 100,000 in number. Large numbers represent high sensitivity.
Macro and reverse lens macro
Macro photography is a beautiful way to capture subjects as it gives you a very different and up-close perspective of photography. What macro photography does is to help us see the small world around us in a big picture. What your lens in its normal state does is to make the big world around you small, so just think what it will do when used reverse mounted? Yes, make the small world even BIGGER. But the fact is that dedicated macro lenses cost a fortune which puts it out of the reach of many of us. Reverse lens macro technique allows you to get really close without having to lighten your wallet on expensive lenses.
To take reverse lens macro shots, you have to reverse mount your kit lens (as depicted in the picture below).

HOW DOES REVERSE MACRO TEACHES YOU ABOUT THE ART OF PHOTOGRAPHY?
Everything is a double-headed sword. So is reverse macro, though it allows us to get really close to your subject it also means you have less light at your disposal, a very tight frame, and a very narrow area which is in sharp focus (depth-of-field). Less light means you will have to adjust shutter speed, aperture and ISO to get good exposure and nice depth of field.
But the best part lies ahead, when you reverse mount your lens, the camera loses all the electronic means to communicate with the lens, so you will have to move your camera back and forth to get your focus right and you have to use the small lever on the back (now front) of the lens for controlling the aperture. An interesting point to be noted is that the actual focal length (55mm gets you closest to the subject for 18-55mm lens) of a lens in normal operation is also reversed, meaning that you can get closest to your subject when the lens is at its widest (18mm for the same lens). Now when you look through the viewfinder you will see the magic unfolding right in front of your eyes!


Suddenly your viewfinder becomes a visual textbook through which you will see all the subtle changes that aperture, shutter speed and ISO makes on your image and how subtle changes to these can bring amazing clarity and depth to your images. At first this may seem a difficult task because of the extreme stillness needed to take them successfully and clearly, but “practice makes perfect”, doesn’t it?
The interesting part being that you can apply the information you learn, when you use your camera normally. Obviously this can also be learned with time and effort but rest assured many get bored or disheartened because their photos are not looking good before they understand how to use the camera. Reverse macro, as mentioned earlier, magnifies the world beyond what our eye can see. It is because of this magnification that the effect the changes you make to (shutter speed, aperture, ISO) have on our image becomes more apparent than in “normal” use. When doing reverse macro I recommend not using a tripod because that way you will also learn to keep your hands steady (a boon when shooting in dim light).

So because you get to see the magic of light unfold right in front of your eyes it registers quickly, and with practice becomes rather instinctive. This will startlingly improve the way you approach photography and ultimately your photos.
As Ansel Adams, a master of photography said “A Good photograph is knowing where to stand”. Understand where you stand now (as a photographer) and where you have to be standing to take photographs that exude beauty and share the emotion of the frame with the viewers.
Happy clicking!
The post Reverse Lens Macro: How to use it as a Great Learning Tool by Sharath Prakash appeared first on Digital Photography School.
tomshi, Yanniv Ovadia and one other like this
17 Jan 07:12


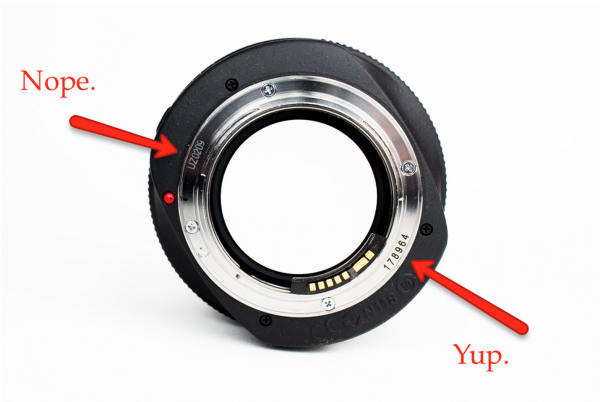


Lenstag: a World Without Camera Theft
by Jim Goldstein
Lenstag is a recently-launched, free online service for iOS, Android, and the web that records the serial numbers of your lenses, cameras, flashes, laptops and anything else in a secure, private registry before they are stolen.
If one or more of your items disappear, you can immediately flag the missing items as stolen which creates a public web page, quickly indexed by search engines. The serial number is then discoverable by a single Google search (example: ’75165 lenstag’) or by checking the Lenstag apps. Thanks to Lenstag’s growing relationships with the pawn shop industry and law enforcement, the exchange of money for that stolen item becomes much more difficult akin to trying to sell a stolen vehicle. The idea behind this service is that if everyone gets into the habit of checking serials numbers online before purchasing used equipment, it will become harder and harder over time to peddle hot items and thieves will get arrested when they try to pawn them. Think of it like a DMV for camera equipment. The more people who register their gear, the more effective the registry system becomes.
By locking down a particular serial number as belonging to you, the reselling and pawning of that stolen item becomes discouraged. Serial #s on Lenstag, marked as stolen, are indexed online.
There is currently no foolproof way to prevent potentially having all of your gear stolen, even if your equipment never leaves your home. Insurance can protect you financially, but you permanently lose your original items and any images or video stored on them. There is no guarantee Lenstag can get your original items back either, but with Lenstag there is a chance that only increases with time.
The more serial numbers that get checked prior to purchase on the used market, the safer everyone’s gear becomes.
With Lenstag, you have a centrally-located place to store all of your serial numbers. They can be easily transferred to another Lenstag user if you decide to sell your gear. Your serial logs are date marked. This is handy if you ever need, for whatever reason, to prove that you have owned a certain piece of gear for at least as long as it has been registered. You can make your gear lists public as well. This is handy for showing clients what you own or for resource planning with collaborators.
Transfer serials, share gear lists with others, or prove what you own via an clear-cut dashboard.
You should use Lenstag if?
- You don’t have any insurance. This service is free and is better than having absolutely no protection at all.
- You already have insurance but want just a little extra peace of mind.
- You collaborate with other photographers a lot or work with clients who need to know what equipment you are using.
- You, for whatever reason, need to prove you own something without having to carry around a bunch of receipts or registration cards.
- You buy a lot of used gear. You don’t have to be a Lenstag user to check a serial # but having the app on-hand for checking makes the process very easy. You can also use Lenstag’s text-to-check feature by texting the serial number in question to +1-415-749-9808. This works regardless of whether or not you’re registered on Lenstag.
Text to check a serial in question, regardless of whether or not you are registered on Lenstag.
Lenstag is used by all three of the major rental houses in the United States: BorrowLenses.com, LensRentals.com, and LensProToGo.com. It is currently being used in over 150 countries worldwide. Uploading an image of your item is quick and helps discourage theft one indexed serial at a time. Be sure your serial # is visible on your item when taking its picture for inclusion in your personal registry.
Not every number on your lens is a serial. Be sure you are reading the right thing.
Want to know how gear gets stolen the most? The results may surprise you. Lenstag took the stats of its reported serials to learn the most common ways gear got stolen in 2013, along with the most commonly stolen models.
Don’t leave it behind! You’re most likely to have items taken from your car.
How to use & find Lenstag
Lenstag can be download for iOS and Android. You can also use their service via their desktop site.
The post Lenstag: a World Without Camera Theft by Jim Goldstein appeared first on Digital Photography School.
Thomas.friis.poulsen, Xabier and 3 others like this
11 Jan 09:35


Ten technology predictions for 2014
by Robert X. Cringely
 Here is my first of two prediction columns for 2014. There’s just too much for it all to fit in one column. My neighbor and good friend Avram Miller wrote a predictions column this year that’s quite good and you might want to read it before this one. We discuss some of the same things though of course Avram and I occasionally agree to disagree.
This column is mainly about business predictions for 2014 while the follow-up column will be more about products and technologies.
#1 -- Microsoft gets worse before it gets better. Ford CEO Alan Mulally, who already owns a home in Seattle, announced just today that he is staying with Ford through 2014 and absolutely positively won’t be the next CEO of Microsoft. This firm statement is in contrast with his kinda-sorta firm denials before today. What this means to me is that Mulally was in hard discussions about the Microsoft job but walked away from the deal. Since there’s a clock ticking on Ballmer’s retirement someone will get the position but that someone will now probably be an insider, possibly Stephen Elop.
This is terrible news for everyone, even for the people who made it inevitable -- Steve Ballmer and Bill Gates. Mulally would have taken the job had Ballmer and Gates resigned from the Microsoft board. They wouldn’t and so he didn’t, the result being more palace intrigue and behind-the-scenes micromanaging not to good effect. Whoever gets the top job won’t have the power to do what’s needed and probably won’t have the job for long.
Microsoft’s future lies in the enterprise and the quicker it gets out of consumer products the better for the company, but a weak CEO won’t be able to move fast enough.
We’ll revisit this one next year when Mulally may again be on the short list.
#2 -- IBM throws in the towel. Any minute some bean counter at IBM is going to figure out that it is statistically impossible for the company to reach its stated earnings-per-share goal of $20 for 2015. Cutting costs, buying revenue, repurchasing shares and short-changing both customers and employees no longer adds-up to enough financial power to get the job done. This will lead to a management crisis at Big Blue. On top of that throw half a dozen customer lawsuits over bungled projects and it doesn’t look good for the regime of Ginni Rometty.
Can she pivot? That’s the question. Rometty has been trying to follow her predecessor Sam Palmisano’s playbook but it isn’t working. She needs a new strategy. This is actually a great opportunity for both Rometty and IBM, but the second half of this prediction is they’ll blow it. Rometty and IBM will survive 2014 but it won’t be pretty.
#3 -- BlackBerry to Microsoft. Assuming Elop gets the top job at Microsoft (not at all a shoo-in) he’ll approach the enterprise play from a mobile angle and that means buying BlackBerry. Microsoft will get enough patents from the deal to further enhance its revenue position in the Android market (you know Microsoft gets royalties from Android phones, right?). Redmond will get a great R&D facility in Waterloo and thousands of super-smart employees. I think this will happen, Elop or not. The only alternative purchasers are Intel and Qualcomm and I don’t see Microsoft doing that.
#4 -- Intel does ARM, kinda. The idea that Intel would go back to building ARM processors is supposed to be a big deal but I don’t see it happening without some external push. Remember Intel has been down this route before, eventually selling its StrongARM operation to Marvell. What’s key here is that Apple needs to dump Samsung so it’ll force Intel to fab its A-series processors by threatening to stop buying desktop and notebook CPUs. It’s not as big a deal as it sounds except that Samsung will be losing its largest customer.
#5 -- Samsung peaks. With Apple gone and Samsung phone margins eroding, what’s the company to do? 4K TVs aren’t it. Samsung needs to actually invent something and I don’t see that happening, at least not in 2014.
#6 -- Facebook transforms itself (or tries to) with a huge acquisition. I wrote long ago that we’d never see Facebook in the Dow 30 Industrials. The company is awash in users and profits but it's lost the pulse of the market if it ever had it. Trying to buy its way into the Millennial melting data market Facebook offered $3 billion for Snapchat, which turned it down then rejected a $4 billion offer from Google. Google actually calculates these things, Facebook does not, so where Google will now reverse-engineer Snapchat, Facebook will panic and go back with the BIG checkbook -- $10+ billion. If not Snapchat then some other overnight success. Facebook needs to borrow a cup of sugar somewhere.
#7 -- Cable TV is just fine, thank you. Avram thinks cable TV will go all-IP. This is inevitable and in fact I wrote about it the first time at least eight years ago. Cable companies already make all their profit from Internet service so why do anything else? But not this year. That’s one for 2016. For the moment cable advertising is in resurgence and these guys aren’t going to make any significant changes while they are still making money. Look for more cable industry consolidation but nothing revolutionary… yet.
#8 -- The Netflix effect continues, this time with pinkies raised. Hollywood is for sale. Nothing new there: Hollywood has always been for sale. Remember when it was Sony buying Columbia Pictures that was supposed to change entertainment forever? How did that work out? Now it’s Netflix blazing a new trail for content creation that threatens the old models except it doesn’t. Netflix knows from its viewer logs who likes what and can therefore make original programming that’s reliably popular. Amazon, in contrast, asks its users what they like and hasn’t been nearly as successful as Netflix at original content. Amazon will learn in time (it always does) but one of the things it’ll be learning is that people lie about what they like, though not about what they watch. Hollywood already knew that. Amazon doesn’t need to buy Netflix to learn this lesson, so I seriously doubt that Netflix is going to be in play. But Hollywood itself will very much be in play… in 2016.
#9 -- What cloud? The cloud disappears. My old friend Al Mandel once told me "The step after ubiquity is invisibility". This means that once everyone has something it becomes a given and gains commodity status along with dramatically lowered profit margins. In the 240 suggested predictions I saw over the last few days from readers almost nobody used the word cloud. It has effectively become invisible. Every IT startup from here on will rely strongly on the cloud but it won’t be a big deal. Commoditization will have cloud providers competing mainly on price. This means there are unlikely to be any significant new entrants to this space. The cloud opportunity, such as it was, has come and gone.
#10 -- Smart cards finally find their place in America. I covered smart cards in Electric Money, my PBS series from 2001, yet they still aren’t popular in the USA. Smart cards, if you don’t know it, are credit or debit cards with embedded RFID chips that impart greater security though at a cost. They’ve been popular in Europe for 15 years but American banks are too cheap to use them... or were. The Target data breach and others will finally change that in 2014 as the enterprise cost of insecurity becomes just too high even for banks Too Big to Fail.
Look for 10 or so more product predictions tomorrow.
10 Jan 23:16
מכשיר המהפכה: היום לפני 7 שנים הוצג האייפון לראשונה
by כתב אורח
היום, לפני 7 שנים בדיוק, הציג סטיב ג׳ובס לראשונה את מכשיר האייפון. למרות שהיום בראיה לאחור אנו מבינים לעומקה את המשמעות שהייתה לרגע הזה על חיינו,...


06 Jan 09:39
שוחררה פריצת ה-Jailbreak עבור מכשירי Apple TV מהדור השני
by אריק שיינר

לאחר שבסוף החודש שעבר קיבלו מכשיריה הניידים של אפל את פריצת ה-Jailbreak המיוחלת, היום נחשפה לאור הזרקורים גם הפריצה לדור השני של מכשיר ה-Apple TV. בזכות הפריצה, יוכלו מעתה המשתמשים לצפות בתכנים באיכות גבוהה ולהנות מאפשרויות אחרות שהיו חסומות בפניהם.
ה-Apple TV הוא מזרים מדיה (סטרימר) קטן מימדים המותאם לעבודה מול מכשיריה של החברה בלבד. לאחר ביצוע קישור פשוט, ניתן להזרים תכנים מכל iDevice אל מכשיר ה-Apple TV שמקושר לאותו חשבון Apple ID ומחובר לאותה רשת אלחוטית. כמו כן, לתושבי ארה"ב ניתנת האפשרות לרכוש מנוי חודשי להזמנת תכנים מחנות ה-iTunes, אותם ניתן להקרין על המסך הגדול.
עכשיו הגן כבר לא סגור
 מדיניות "הגן הסגור" של אפל איננה פוסחת על סטרימר ה-Apple TV. פריצת ה-Jailbreak החדשה תאפשר בין היתר לצפות בתכני וידאו באיכות מקסימלית של Full HD 1080p (אופציה שניתן לממש רק בדור השלישי של המכשיר). בנוסף, מאפשרת הפריצה החלפת גופני מערכת, צפיה בתכנים שהורדו מצד שלישי, הוספת כתוביות בעברית וניגון כל פורמט וידאו קיים. יש לציין כי מכשיר ה-Apple TV תומך באופן מלא בשפה העברית, כך גם חנות ה-iTunes הישראלית.
בחודשים שקדמו לפריצה שמרו חברי הקבוצה על שקט תעשייתי ולא התחייחסו כלל למועד שחרורה, כפי שתמיד נהגו לעשות. חשוב להדגיש כי הפרש הזמנים הקצר בין מועד שחרורן של שתי הפריצות הוא מקרי בהחלט – מדובר בשתי קבוצות שונות שאינן עובדות בתיאום האחת עם השנייה.
חברי קבוצת FireCore ששחררה את הפריצה ל-Apple TV, הבהירו כי הפריצה הבלתי קשורה מיועדת אך ורק למכשירי הדור השני המריצים את גרסה 5.3 של מערכת ההפעלה. כעת, עם שחרורה של פריצה זו, נותר באפילה רק הדור השלישי של הסטרימר, אותו עדיין מתקשות הקבוצות לפרוץ.
הורדת כלי הפריצה: עבור Mac | עבור Windows