.
Esse e os outros pôsteres incríveis na continuação desse post são obra de Tom Whalen.
São diversos cartazes com inspiração retrô para ícones da cultura pop, desde Mickey e Pato Donald até o Mario, passando por filmes inesquecíveis como Goonies, Os Caça-Fantasmas e, claro, Star Wars (a versão cowboy dele para o Bobba Fett é sensacional).


Confira a galeria completa.


O artigo Fã de Tolkien reduziu a trilogia Hobbit a um único filme de 4h faz parte do conteúdo do Byte Que Eu Gosto! - Nerd, Geek, Dicas, Cinema, Games e mais!.

Independente do quão fã de Tolkien você seja, ficou claro que Peter Jackson exagerou bastante em espremer o livro O Hobbit em 3 filmes longos, basicamente o mesmo que ele havia feito com Senhor dos Anéis. A diferença é que em Senhor dos Anéis os livros são gigantescos, lá ele teve que REDUZIR a história pra poder caber apenas em 3 filmes muito longos.
No caso de O Hobbit, é como se ele tivesse transformado o livro numa conversa telefônica entre duas amigas que não se falam há meses. Ou como outros já disseram, tinha pouca manteiga pra muito pão. Insatisfeito com o resultado, o blogueiro Tolken Editor decidiu fazer o que muita gente queria e editou os três filmes em apenas um, com quatro horas de duração, o que é muito mais justo.
Diversas cenas foram simplesmente limadas da história, por serem desnecessárias para a trama, outras foram reduzidas. Enormes porções inúteis do filme foram extirpadas. O lance é que Bilbo deveria ser o personagem principal e a história parece muito mais centrada em Thorin e sua busca por Erebor. A triângulo amoroso entre Tauriel, Kili e Legolas também foi pro escambau.
Grande parte das cenas de luta, muitas delas longas e desnecessárias também foram tiradas na edição, como a dos barris, a batalha entre os anões e Smaug e a batalha dos cinco exércitos, que por sinal é o que dá o nome do terceiro filme.
Depois disso tudo, o filme está disponível nesse torrent aqui ou nesse aqui. Minha sugestão para a edição seria chamar de O Hobbit – Uma Jornada Sensata. Baixei o filme editado e verei hoje a noite, posteriormente comento sobre o que achei. A história, como disse, está bem mais centrada em Bilbo, que afinal é o protagonista.
O artigo Fã de Tolkien reduziu a trilogia Hobbit a um único filme de 4h faz parte do conteúdo do Byte Que Eu Gosto! - Nerd, Geek, Dicas, Cinema, Games e mais!.
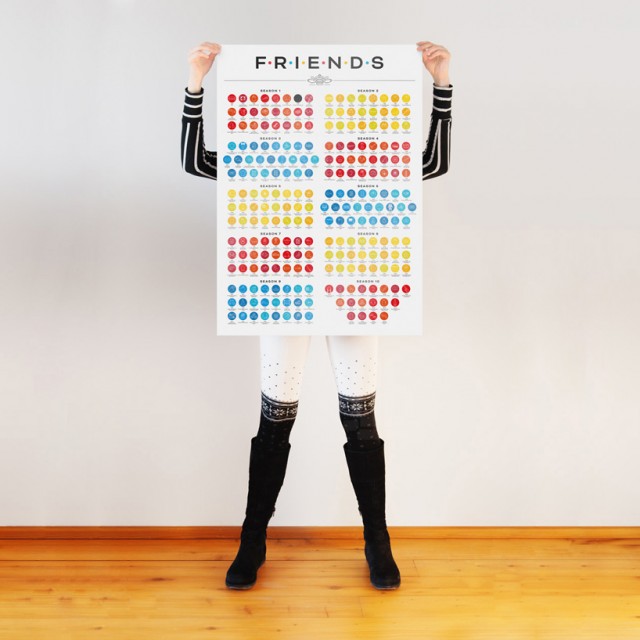
Pendant 10 ans, la série Friends a tenu en haleine des millions de fans et fait encore parler d’elle aujourd’hui. Le studio Re:design composé de Eurydyka Kata et Rafał Szczawiński a souhaité lui rendre hommage en créant une série de 236 icônes regroupées sur un poster unique. Chaque icône capture l’essence des moments les plus importants de chaque épisode.


Chunk has….a problem, for some reason- with this O CANADA water bottle. Chunk, Canadian water is just like everyone else’s water, dude! You don’t need to be scared of it!
[* * * * COMING UP NEXT……GOATS WITH COATS. And maybe a cow or three.* * * *]


Harnessing light can be the most challenging aspect of photography. So you got a window, eh? Well, now what do you do with it? How you direct light will dramatically change the mood of your photos. But guess what? You don't need any fancy equipment to do it! Let's talk about my three favorite styles of lighting for food photography and how you can recreate these looks in your own home.
DIFFUSING LIGHT
Please note that for each of these setups, you will need to use sheer, pure white curtain panels or privacy film on your windows to diffuse the light. If you're shooting on an overcast day, this may not be necessary.
DARK & MOODY LIGHTING
The photo above is an example of chiaroscuro in photography. Chiaroscuro, traditionally a painting technique famously employed by Renaissance artists such as Rembrandt, is the dramatic contrast of light and dark in an image. Whatever is lit in the image becomes the focal point, highlighted by the surrounding darkness. This lighting technique creates rich, moody vignettes.
The scene above is carefully arranged to direct light onto the side of my subject, while keeping the backdrop and background items in the shadows.
To create this look, you will need dark boards and possibly tape if you need to block off part of the light coming in from the window. For my backdrop, I used a black chalkboard, although the texture of it can't be seen because I didn't allow enough light back there to showcase it at all. My black flag* is a piece of black foam board, and for my floor drop, I used textural wood boards. If you want an even starker contrast to highlight your subject, you might try a black floor drop, such as a black chalkboard, dark stained wood, or a dark baking sheet.
*A black flag is just something dark to absorb/block light. Black flags are helpful in shading the camera and portions of a subject and are also excellent tools to create dramatic shadows.
Arrange your setup as shown in the diagram above, propping up your backdrop and black flag with heavy items found in your home, such as paint cans or buckets. The black flag you use can be any dark object, like a black piece of foam board, a board covered in black fabric, or an actual collapsible black flag meant for use in photography. It's important that whatever you use for this is not reflective because we want it to absorb light, not bounce it back to the subject.
The main objective in your setup should be to strictly control the light. Make sure the background is left in the shadows and that your subject is just barely within the flood of light from the window. Extra contrast can be created by holding a black flag (such as a sheet of dark card stock) to block light from hitting the foreground of the floor drop in front of the subject.
Look at that drama! I think these moody scenes are perfect for this time of year when cozy sweaters and hot cider are close to our hearts.
BRIGHT & ETHEREAL LIGHTING
Bright and airy styling is a bit of a trend in product and food photography. The use of white, lots of light, and sparse accessories lends a crisp and refreshing feel to an image. This style of photography is a staple for some food photographers, but works particularly well with summery recipes.
This backlit setup is wonderful for creating interest as generous highlights are created by the light that spills over top and around your backlit subject. It's also the easiest way to create a bright background without any shadows behind your subject.
To create this kind of light-washed image, you'll need a white floor drop and a couple of large pieces of white foam board. For my floor drop, I used white painted boards to give more interest to the image, rather than using a plain white surface like foam board or painted plywood. You can create texture with a white floor drop by adding other white elements, like layered table linens, crumpled white paper, lace, or anything else you can imagine. Just make sure your floor drop is predominantly white in order to get the most light in your image.
Arrange your setup as shown in the above diagram, with your subject in front of the window, tilted slightly to help the light come in at an angle, rather than directly behind the subject. Use white foam board or collapsible reflectors to bounce the light from the window back onto the front of the subject. Without the reflectors, your subject will become lost in the blow-out of light coming in from the window. Larger reflectors will give you the best diffused light in the front of your subject, but for close-up shots, holding up pieces of white card stock might be enough to properly light the front of your subject.
This bright setup will give you limited shadows and lots of light. Interest is created by the amount of highlights achieved by the backlighting from the window. So airy and refreshing, eh? It kind of makes me want to clean my whole house! Kind of.
EVEN LIGHTING
Still settling on a style for your indoor photography? Even lighting is a good place to start when trying to achieve consistent, quality images. It's about as middle-of-the-road as you can get, giving you flexibility with backdrops, colors, and styling accessories. I consider this style of lighting the vanilla of the photography world, but that's not a bad thing! Vanilla is my favorite flavor.
To create an evenly lit image, you'll want to assemble a makeshift light box next to your window. To do this, all you need is two large pieces of white foam board (or a white collapsible reflector). If you don't want a white background, then you'll just need one piece of foam board and then whatever background material you want.
To get a natural looking, evenly lit image, you'll want the white reflector to be positioned directly parallel to your window, as close to your subject as you can get, without the reflector intruding in your image. This will bounce the light from the window so that you get light on both sides of the subject, with the light from the window being a bit stronger than the light bounced from the reflector. This will give you soft shadows on the reflector side of the image.
To further even out the lighting, I like to use a white backdrop to reflect light to the back of the subject. This isn't necessary, though it's my personal preference. You can leave off the backdrop if you want to show your home in the image, or choose a medium-tone backdrop with some texture to it, such as a board tightly covered in fabric, or even wallpaper. The further the backdrop is from your object, the less shadows you'll have on it. You can also tilt the backdrop so that the top of it leans backwards a bit, helping reduce shadows by reflecting light upward as well as forward.
You can adapt this evenly lit style by removing the white reflector to give you more pronounced shadows, creating a bit of drama (see right image above). For even more drama, you can put up a black flag to create even more intense shadows. Don't worry— unless you actually block the light from hitting part of your subject, you won't get the high drama of the image I showed at the beginning of this post with the chiaroscuro style of lighting.
NOTE: Make sure you remember to diffuse the light coming in from your window with pure white sheers or privacy film. If you don't diffuse the light on a sunny day, it will be much stronger than the lighting shown in the images above, but hey— that might not be a bad thing! Why not experiment with the intense drama created by unfiltered light, like this incredibly photographed martini recipe?
Whatever your photography goals might be, one thing is true for us all: The more you practice, the better you'll be! If you want more photography tips or challenges check out ABM's new DSLR Basics e-course. -Mandi
Credits // Author and Photography: Mandi Johnson. Photos edited with Stella of the Signature Collection.