Making a knife is a satisfying project on a number of levels. You’re creating a fundamental tool — one of the first tools ever made — and every time you pick it up, you’ll think, “Wow, I made this with my own hands.” And because you’re making the knife, you’ll be able to adjust its shape to fit your specific needs. The trickiest part of making a knife is the blade. If you have a forge handy, and can get your hands on some good tool steel, that’s great. If you don’t, you can still make a knife using an old Appalachian trick: recycling. That’s what we’ll do in this project.
Old saw blades are almost always made from high quality steel. You can find them in abundance at swap meets, garage sales, rummage sales, etc. The biggest advantage of using an old saw is the lack of metallurgy you need to do. The blade is already the right hardness for holding an edge, so you don’t need to treat the steel to make it a good knife. However, blanks cut from the saw are sometimes a little too flexible, but you can work around (or with) it.
The steel in this handmade knife will not be super-hard. This is not ideal because your knife will lose its edge quickly if you try to hack through wood, slice cardboard, or use it as a screwdriver. But, the good thing about softer steel is that you can bring it back to a razor-sharp edge with a few strokes of a sharpening stone. I actually prefer softer steel as I like a keen edge, and I carry a small sharpening stone with me. If you can shave your arm hair, your knife is sharp enough.
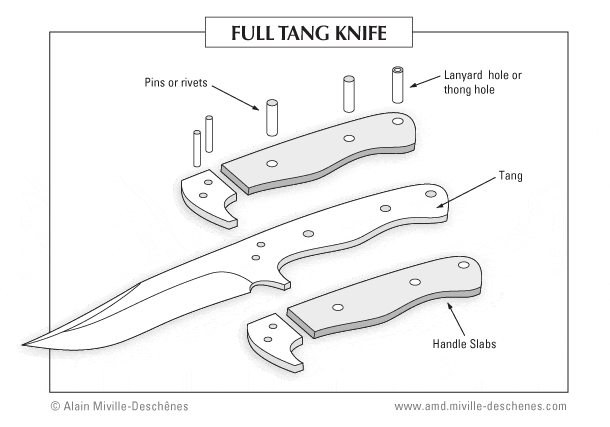
A knife can take many different forms and styles. In this project, we’re going to make what’s called a full-tang knife, meaning that the blade extends its full length into the handgrip of the knife. A partial tang extends only partially into the handle. A full-tang knife is, in my opinion, the easiest way to start making knives. It also produces a solid, sturdy knife that is less likely to break off at the handle.
Be nice to your knife and it will serve you well.
Materials List
- Old saw blade
- Thin cardboard manila file folder
- Pencil
- Scissors
- Chalk or soapstone
- Cold chisel
- Hammer to drive the chisel
- Sturdy piece of metal plate to use under your work
- Metal files (coarse and fine)
- Wire brush
- Coarse (00) steel wool
- Light oil (3-in-1 or gun oil)
- Acetone
- Cloth rags
- Vise
- C-clamps
- Hardwood (oak, maple, cherry, etc.) for handle scales
- Handsaw (Japanese pull saw preferred) if you’re cutting your own scales
- Two-part Epoxy (slow-cure)
- 3/16″ brass rod
- Power drill
- 3/16” sharp metal drill bit
- Ball-pein hammer
- Duct tape
- 4-in-hand or a patternmaker’s rasp
- Sandpaper (80 and 150-grit)
- Cabinet scraper (optional)
- Sharpening system of some sort
- Ear plugs or hearing protection earmuffs
How to Make the Knife
Step 1: Prepare your pattern.
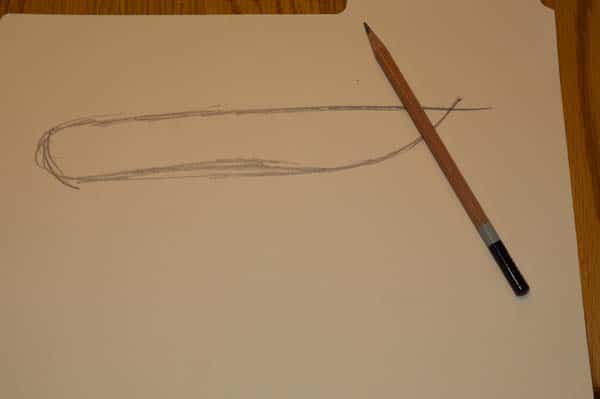
Your knife; your pattern! You can use an existing knife and trace it onto the cardboard, or you can design your own. In this case, I’m designing my own shape based on an old knife used by folks from the fur trade. Use a French curve to make sure your curves are consistent and more importantly, pretty. It’s a universal truth that a pretty shape in a tool or knife is a good shape. When you get to the point that you’re happy with your shape, cut it out with a pair of scissors. In my knife design, I didn’t include a bolster or fingerguard like in the illustration above.
Step 2: Transfer the design to your metal stock.
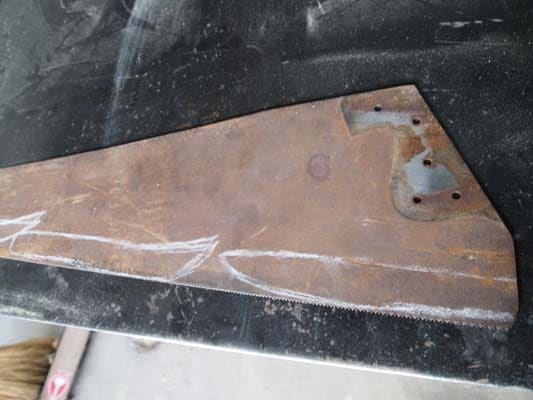
Using a piece of chalk or soapstone, trace your pattern onto the old saw blade. It doesn’t have to be perfect, as you will be using your eyes as you go, and you will be filing away any imperfections.
Step 3: Score the outline of your blade.
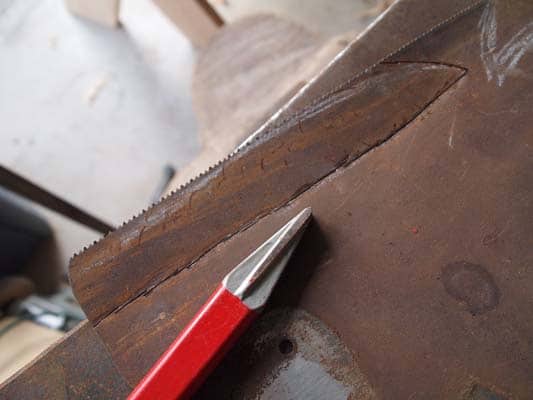
Before you start this step, put on your hearing protection and place a large piece of metal plate under your metal stock. If you have an anvil, don’t work directly on it, as you would be driving hardened steel onto hardened steel. Something’s gotta give, and you really don’t want that something to break off the chisel and imbed itself in your body somewhere.
Line up your chisel with your chalk line, take a deep breath and give it a good whack. It may not cut all the way through the blade, but the score it makes will suffice for now. Overlap the chisel marks as you work around the outline so there is one solid line, not a series of dashes. Take your time.
Step 4: Bust out the blade.
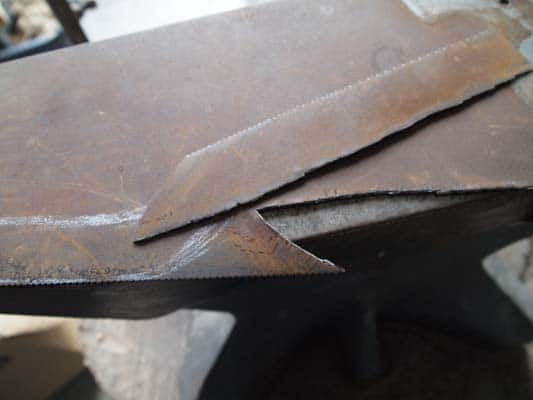
Creating a sheer is what breaks the metal. I do this by placing the metal over the edge of an anvil and striking it with a hammer as close the scored line and the anvil as I can. If you don’t have an anvil, put your saw blade in a vise and tap the blade as close to the cut line as you can. If you did the chisel work well your knife blade should pop right out of the metal.
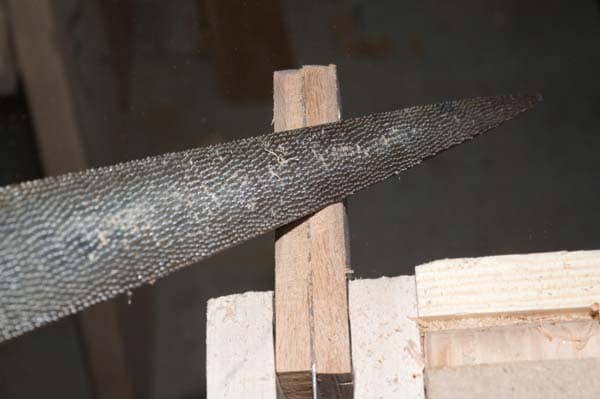
Step 5: File the blade to shape.
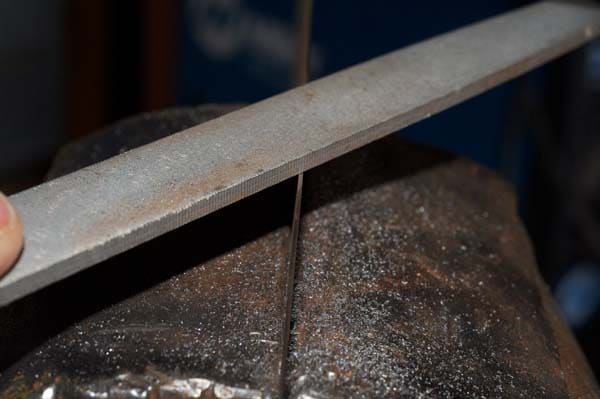
The chisel doesn’t leave the best edge, so you’ll need to dress up the piece with a file. For this step, it’s important to remember that sheet metal is resonant (that’s why people play hand saws with a violin bow). The sound of filing a piece of sheet metal is one of true torture. Minimize this by clamping the blade as close the vise as you can and be sure to wear your hearing protection.
Note: Do not attempt to put an edge on your knife yet. The edge should be perpendicular to the sides of the blade. Look for a consistent stripe the width of the blade. That tells you you’re ready for the next step.
Step 6: Start the handle.
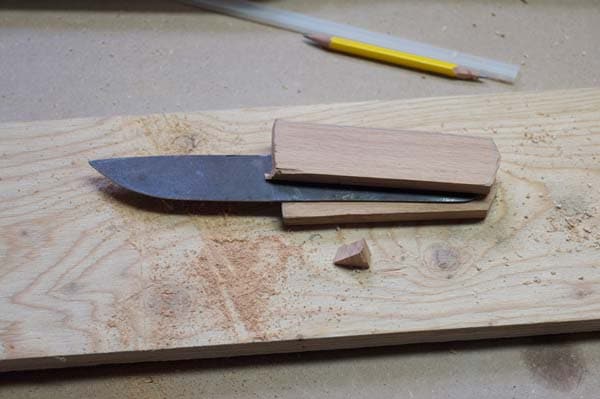
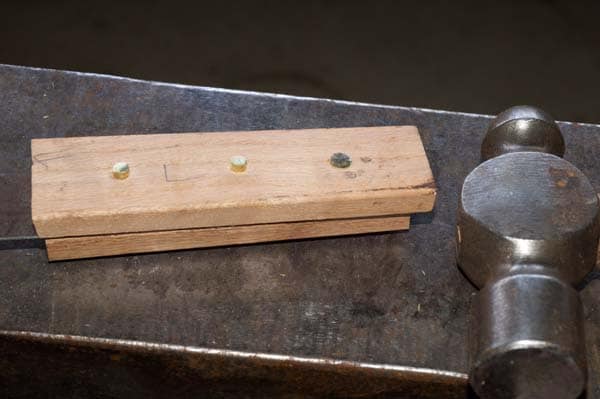
We’re making a full-tang knife, which means the blade edge will be visible all the way around the handle. We’ll do this by adding a scale of wood to each side of the handle. (A scale is a flat piece of wood, bone, or some other material that will create the handle.) You can purchase pre-made scales or make your own. In this instance I’m making my own scales out of a few slats of oak trim I had laying around. Trace the outline of your blade on to your wood stock two times to create the shape of two scales. Then cut them out.
Step 7: Clean and polish your blank.
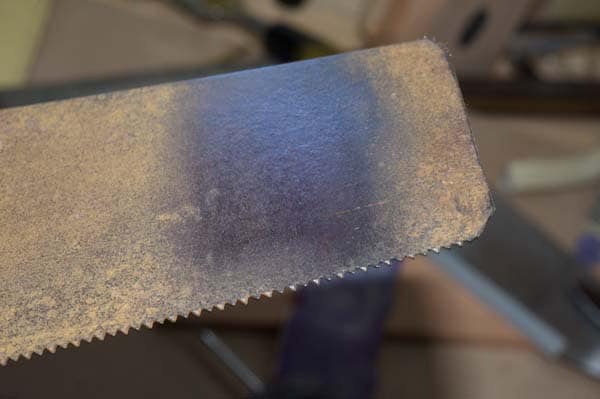
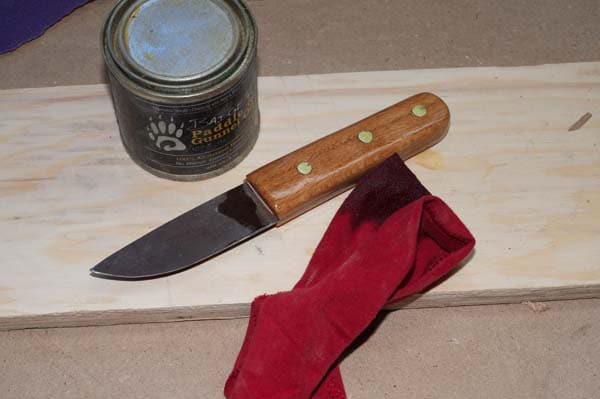
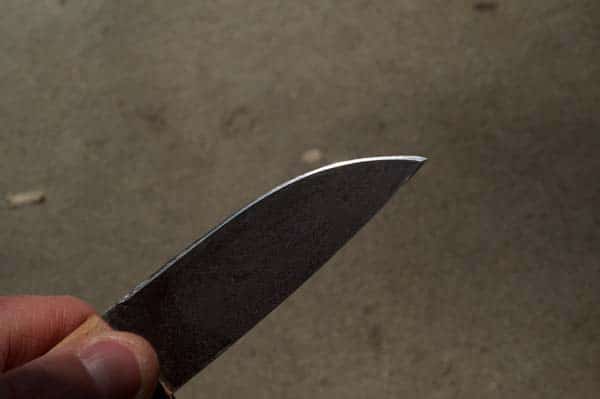
Clean your blank with steel wool and a little light oil (gun oil or 3-in-1 works great). After it’s clean (but not necessarily completely shiny), clean off the blank with some acetone to remove all traces of oil. Mixing oil and epoxy doesn’t work. You can get an idea of what the metal looks like from this image. Remember, no oils left or your scales won’t bond to the blank. You can do as much or as little as you want with this step. If you want your knife to have a more rustic look, use a little oil and steel wool (00, or double-aught, which means double zero). Steel wool comes in 00, 000, and 0000. The quadruple aught is used for fine polishing such as removing rust from a gun barrel. The 00 is fine for a knife, unless you’re really meticulous. I prefer to leave a little color in this type of rustic knife.
Step 8: Set up for your rivets.
Rivets are attractive and will strengthen your knife. Do it right and you wouldn’t need epoxy, but I like belts and suspenders.
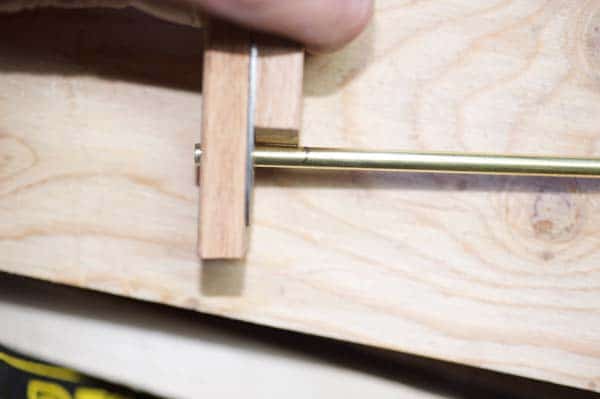
You will end up with three rivets through your knife blade. Start by drilling a hole through the tang, and line up one of your scales with the handle and drill through the scale. Make sure you are backing your scale with a piece of scrap plywood so it doesn’t split out when you drill through. Insert the rod through the tang and through the scale, plus 1/8″ as shown above. That’s where you want to end up eventually.
Put your second scale against the blade, add about 1/8″, and mark it with a pencil. You’ll use this later.
Do this two more times, and you should have one scale with holes, a blade with holes, and one scale without holes. Pull the rod from the holes if it’s still there, and use the blade as a template to mark the holes on the scale without holes. Make sure you’re drilling into the backside of the scale with the scale oriented properly (point end toward the point).
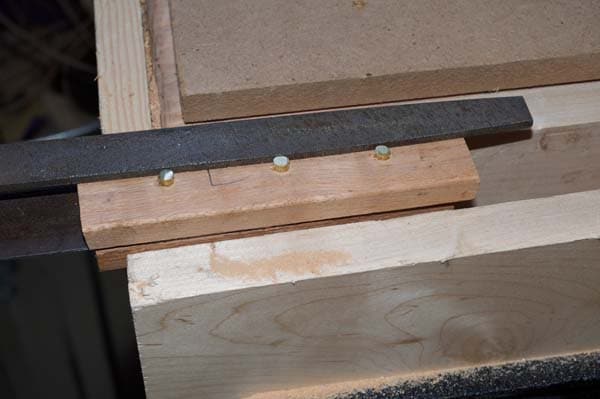
Now reinsert the rod into the first hole on the outside of the first scale, through the handle, and through the backside of the scale you just drilled. It should be tight with your 1/4″ marking still 1/4″ from the surface of the scale. If it’s right, great; cut it off with a hacksaw and insert the rod in the next hole. If make take a bit of fussing to get it right, and if you need to drill a little to make things line up, go for it. Just try to keep the wood holes round. Once that one is in, go to the next hole closest to the blade, and repeat the process. Now separate the scales from the blade, leaving the rods in. A screwdriver or a knife can help.
Step 9: Attach your scales to your knife.
Mix a little two-part epoxy, about the size of a half-dollar, and spread it on one side of the knife blank. (Do not use five-minute epoxy. It’s weak and doesn’t give you time to work.) Place a scale on the epoxy. Repeat this process on the other side of the blade.
Now slide your scales back on the knife blade and tap into place. You might have to use an open vise to allow you to tap the scales into place, but they should go on fairly easily.
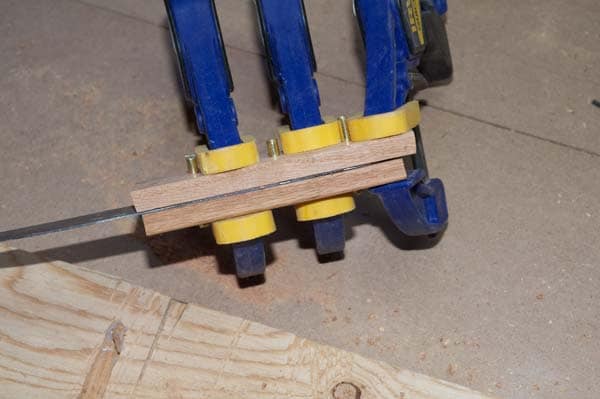
After both scales are attached and you’re confident the scales are in the right place, put a clamp or two on the scales and tighten until you see a little epoxy bead form along the edge between the scale and the knife blank. This is called squeeze-out and is a sign that you have a good bond. Once it oozes, stop clamping. You want a little epoxy in the space.
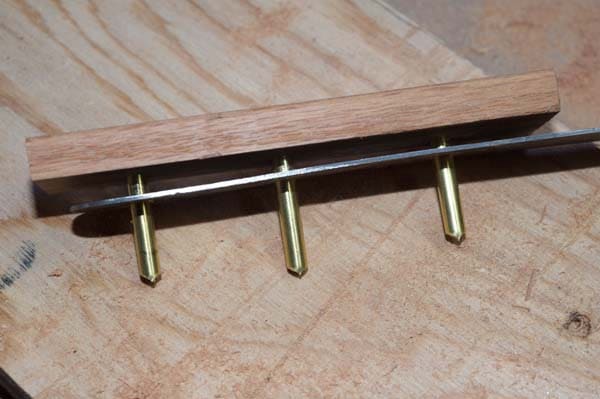
Note that there’s a LOT more rod sticking out than 1/8″. That’s because I didn’t know how much I would need for a rivet, so there’s more like 1/4″ or more on each side.
I dealt with the excess rod by filing it off. It’s soft so it didn’t take much. Of course, you were smarter than me and benefited from my experience. You won’t have to do this.
Step 10: Pein your rivets.
The worst part about building things by yourself is that sometimes you can’t take pictures of a particular step. So I will be as descriptive as possible. Place your knife on a hard surface such as a metal plate or an anvil if you’re lucky enough to have one or know someone that does. Using the round side of a ball pein hammer (it’s called a pein for a reason), tap your brass rod, moving the hits in a slight circular motion, not hitting the rod straight in the middle. This allows the metal to mushroom a little bit. Pein your rivet for a few minutes, turn your knife over and repeat. If the rods don’t appear to be equal on each side, tap the rod so it sticks out a little more on the other side.
Continue to tap, turning the knife often as the rods (now rivets) approach the handle. As the rivet touches the scales, tap a little harder and recess (slightly) the rivets. Keep going and do the other two.
Step 11: Shape and sand the handle.
Clamp the handle in a vise and begin shaping your handle. There’s no set way to do this, but I find a 4-in-hand or patternmaker’s rasp works great. Take it easy, running the file mostly up and down at a 45 degree angle to the blade. Work slowly. If you get to close to the blade with your rasp you can dull the rasp.
As you continue to shape with your rasp, check the handle frequently to make sure it is symmetrical and fits your hand nicely. Go slow; it’s easier to take off than put back.
When your handle is the shape you want, sand it with a heavier grit sandpaper (80 or so), then gradually use finer and finer grits until the handle is a smooth as you want it to be. Go ahead and sand your rivet heads to flatten them a little too. The metal is soft and the sandpaper will cut the metal just fine.
When sanding wood, you can tell you’re ready for the next finer grit when you can see no sanding marks from the previous grit. In other words, when you go to a 120 or 150-grit from an 80-grit, you should see no sanding marks that are from the 80-grit. If you move to finer grit too quickly, you’ll have more work to do when you step down for the next sanding.
Step 12: Finish your handle.
I like oiled finishes, so I used a hempseed oil to finish the handle. You can use whatever suits your fancy. The more coats of oil, the richer the look and you’ll be providing a lot of protection to your wood.
Step 13: Sharpen your blade.
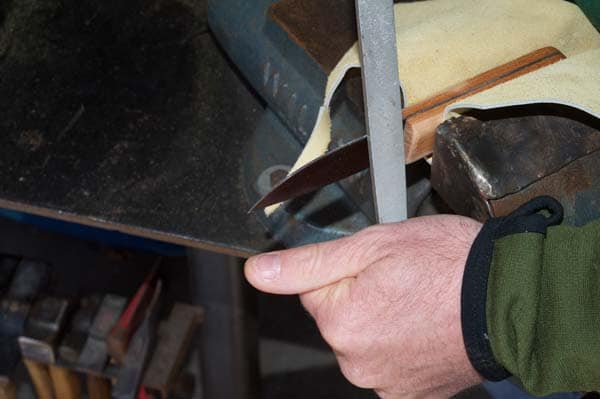
Wrap cardboard or leather around your finely sanded handle and secure with duct tape. Clamp the knife handle in your vise with the edge to be sharpened facing up. Put on your safety glasses and hearing protection. Using a file, start filing up and down the blade edges, holding the file at an approximately 20–22 degree angle to the blade. Visualize this distance by cutting a 45-degree angle in half. Do not drag the file, as it only cuts on the pushing stroke. Don’t file in one spot too much or you’ll create a low spot, which means a do-over if you want a good, true edge.
Do a few strokes on one side, then on the other. You’ll see your nice flat edge disappear as you remove metal. Watching this edge is a good indicator of how even your filing is. Most people (myself included) tend to screw up the tip by either not filing it enough, or letting the angle drift toward 25…28…30… Be careful and go slow. Stop when you have a filed edge that looks clean and straight.
If you do mess this up, file the blade flat like you did in Step 5 and start over. Depending on the size of the blade, the tip may vibrate. Clamping a small C-clamp with a piece of scrap wood on the back of the blade can lessen vibrations (and keep your dogs, cats, and other creatures within earshot from howling at the sound).
Step 14: Hone the blade. You can use any sort of sharpening method: Diamond stones, Arkansas stones, Japanese wet stones, ceramic sticks; it doesn’t matter. You’re just refining the edge. When you’re done, cut something (preferably not yourself) to test the blade.
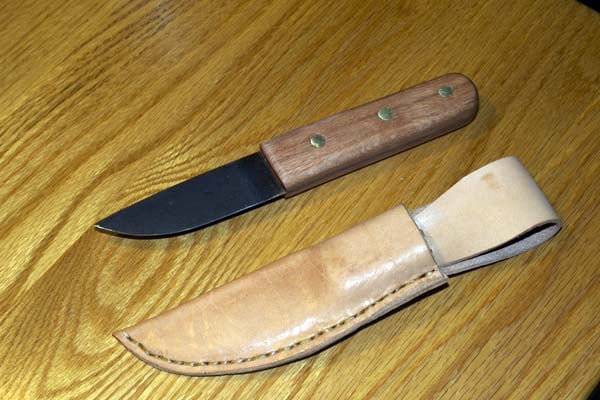
You’ll want to make a sheath like this for the knife, of course. That’s for another day.


 A Visual Compendium of Sneakers: A meticulously illustrated collection of the 134 greatest sneakers in human history, starting with the Chuck Taylor way back in 1917, progressing through the styling low-tops of the 60s and 70s, delving deep into the great sneaker explosion of the 1980s, and carrying through the instant classics of the modern day. Includes everything from ageless Adidas designs, the many, many permutations of Air Jordans, groundbreaking skate shoes like Vans and Etnies, monsters from the golden age of Reebok (such as the Shaq Attack and Alien Stomper), and the high-fashion collabs of today like Jeremy Scott x Adidas and the Air Yeezy.
 A Visual Compendium of Cameras: A meticulously illustrated catalog of 100 landmark cameras, culled from over a century of photographic history, depicting both professional and consumer models and tracing photography’s history from the first models to today’s digital wonders.
 A Visual Compendium of Guitars: A catalog of 64 famed guitars culled from over 75 years of rock ‘n’ roll history. Rendered in exquisite detail is everything from Leadbelly’s famed 12-string to Woody Guthrie’s Fascist-killing machine to multi-necked monsters to an axe shaped like an axe. Containing representations of the famed instruments that have brought countless headbanging riffs and wailing solos into the world, this print is guaranteed to up the rocking of any wall to 11.
 The Evolution of Video Game Controllers: The complete family tree of video game control schemes–including handhelds, joysticks, paddles, gamepads, and one notable glove–this chart shows how gaming input has evolved from simple knobs to directional pads to touch screens. Including every console ever, this sprawling print features 191 species and 12 genera over seven decades of gaming.
 The Cartography of Kitchenware: Over 200 tools, machines, and manipulators–from mandolines to microwaves and ramekins to ravioli pins–used in the construction of delicious foodstuffs.
 THE GREAT GATSBY CHART: A chapter-by-chapter breakdown of the comings and goings of characters in the The Great Gatsby, this chart traces plot action and movement by trains, cars, and feet for Daisy, Nick, Tom, Gatsby, and every other character in the novel. A map at the top of the chart also shows the real-life Roaring 20′s New York locations (or the best guesses thereof) of scenes in the book. From the first introduction to the world of West and East Egg to the novel’s tragic climax, this print lays out the whole scope of F. Scott Fitzgerald’s masterpiece.
 OMNIBUS OF SUPERPOWERS: In its 3rd iteration, this is the universe’s most extensive charting of superpowers. The sprawling taxonomy of over 200 superpowers and 600 superheroes and villains spreads over six square feet. Powers from the mighty (Super Strength and Immortality) to the meek (Open Any Window) to the weird (Infinite Mouth Storage) are charted, along with the characters that wield these awesome abilities, spanning the past 75 years of comic book history from the giant publishers like Marvel and DC to indies like IDW, Image, and Dark Horse. And all of it is rendered in a design that pays tribute to the great cosmic covers of the Bronze Age of Comics.
  The Insanely Great History of Apple: The world’s most comprehensive mapping of Apple products. This print shows every computer, handheld, peripheral device, software, and operating system released by Apple in the last thirty years, from the original Mac through the MacBook Air. Over 500 products are sorted according to type, including the connections between various form factors which have arisen as Apple has invented–and reinvented–insanely great products.