KWBaker
Shared posts
HPVoice: 7 Ways Tech Will Change The Future Of Music

Would You Trade Places With Your Dog?

Time for your weekly edition of the Deadspin Funbag. Got something on your mind? Email the Funbag. Today, we’re talking nakedness, hot dogs, Pat Tillman, Queens of the Stone Age, and more.
Report: Red Sox Used Smartwatch To Steal Signs Against Yankees

The Red Sox-Yankees rivalry hasn’t been particularly contentious for a while, with the last waypoint being that time Boston called out Michael Pineda for the obvious pine tar on his hand. Maybe a good sign-stealing feud will bring it back.
Rooster Attacks, Kills And Eats Cobra

Chickens are constantly getting eaten by foxes, wolves, coyotes, cougars and other predators, but you don't hear about roosters getting eaten quite as often- because they can be scary tough.
Most predators are lazy and try to avoid harm when out hunting for their meals, and roosters will put up a fight with flailing claws and flashing beak capable of causing some serious damage, so predators tend to steer clear of roosters.
But what is a predator like the cobra to do when a rooster decides to beat them to the punch and gobble them up first?

-Via Dangerous Minds
Backed By Twitter & Skype Co-Founders, Flying Cars Take Another Step Closer To Reality

Medical Dangers of Sneezing
 The following is an article from The Annals of Improbable Research, now in all-pdf form. Get a subscription now for only $25 a year!
Explorations of medical mysteries
compiled by Marina Tsipis, Improbable Research staff
The Danger of Suppressed Sneezing
“Suppressed Sneezing as a Cause of Hearing Loss and Vertigo,” Harold F. Schuknecht and Robert L. Witt, American Journal of Otolaryngology, vol. 6, no. 6, November- December 1985, pp. 468-470. The authors, at the Massachusetts Eye and Ear Infirmary in Boston, report:
Two cases of inner ear injury caused by suppressed sneezing are described....
CASE 1: This 23-year-old man, while suppressing a sneeze by clamping his nostrils, heard a “pop” in his right ear followed by severe vertigo, nausea, and vomiting that lasted for 15 to 20 minutes.... During the subsequent two years, he noticed intermittent unsteadiness precipitated by rapid head movements and physical exertion....
CASE 2. At the age of 58, this woman had a sneezing spell, which she attempted to suppress by clamping her nostrils, and immediately experienced vertigo and right-sided hearing loss.... Common sense dictates that the nostrils should be covered but not clamped during sneezing.
A Sneeze Unto Silence
“Sudden Conductive Hearing Loss Following Sneezing,” Khalil Azem and David D. Caldarelli, Archives of Otolaryngology, vol. 97, no. 5, 1973, pp. 413-414.
This is a case report of sudden conductive hearing loss following sneezing. Surgical exploration of the middle ear revealed a fragmented stapedial foot plate. Stapedectomy was performed with a satisfactory result.

Fracture From a Sneezing Attack (1950)
“Fracture of Thyroid Cartilage During a Sneezing Attack,” P.T. Quinlan, British Medical Journal, vol. 1, no. 4661, May 6, 1950, p. 1052. The author, at Salford Royal Hospital in Salford, England, reports:
I have been unable to find a report of any other case of fracture of the thyroid cartilage during a sneezing attack. How the fracture occurred has given rise to considerable surmise without any definite solution. The patient is sure that there was no direct trauma to the neck. He did shake his head violently backwards and forwards when sneezing. He was not wearing a collar, and his shirt was open at the neck without any front stud.
Fracture From a Sneezing Episode (2007)
“Fracture of Thyroid Cartilage After a Sneezing Episode,” Ainhoa Beato Martínez, Ángel Moreno Juara, and Julio J. López Moya, Acta Otorrinolaringológica Española, vol. 58, no. 2, February 2007, pp. 73-74. The authors, at Clínica Moncloa, Madrid, Spain, explain:
We present a case report of a thyroid fracture after a sneezing episode, with odynophagia, dysphonia, and neck pain. The examination showed oedema at the right vocal cord and haematoma at the right false vocal cord. An anterior thyroid fracture without displacement, and a subcutaneous emphysema could be seen on the CT. Thyroid fracture because of this aetiology is most exceptional.

Detail from the study “Fracture of Thyroid Cartilage After a Sneezing Episode.”
_____________________
 This article is republished with permission from the January-February 2017 issueof the Annals of Improbable Research. You can download or purchase back issues of the magazine, or subscribe to receive future issues. Or get a subscription for someone as a gift!
Visit their website for more research that makes people LAUGH and then THINK.
Watch: Partridge Country
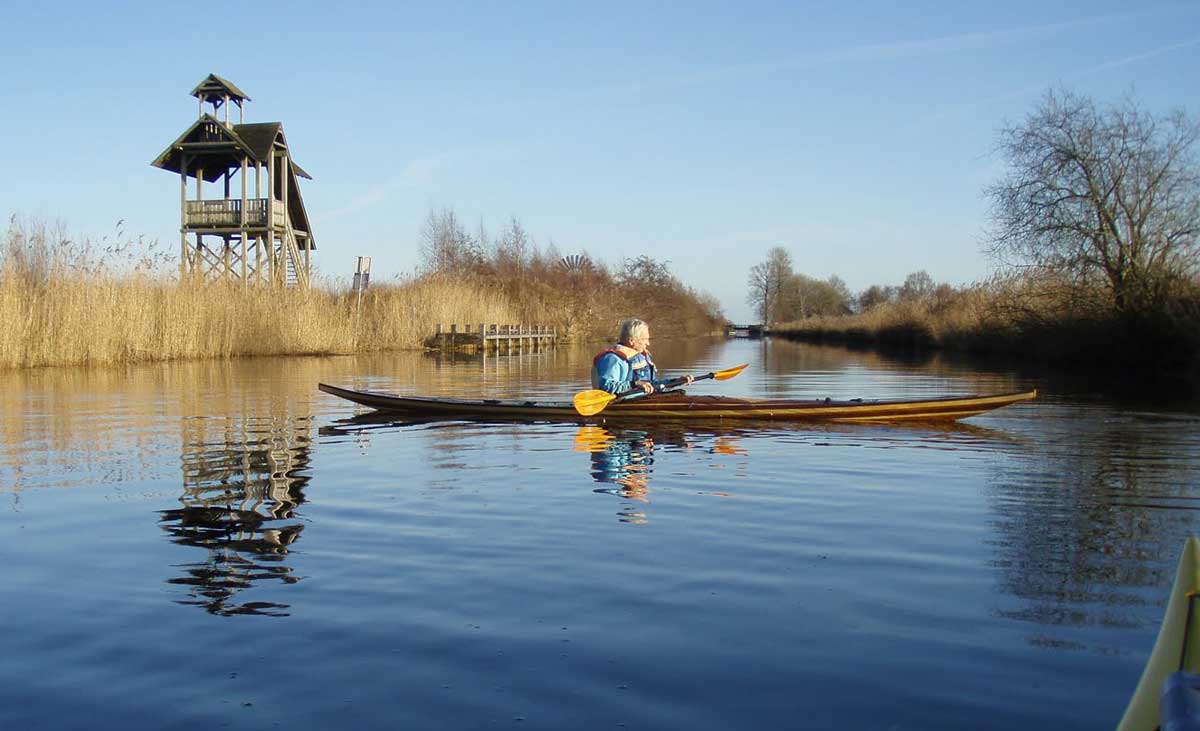
Black Pearl – Ton Affourtit

From Netherlands, a beautifully decorated Black Pearl:
"Björn Thomasson,
It's already almost a year ago that I finished the building of your Black Pearl. Ready a nice boat and it is fast.
Enclosed some pictures and my website with all the pictures of the building process.http://home.hccnet.nl/a.g.affourtit/nw/hoofdsite.htm
Regards Ton Affourtit
PS Perhaps I'm going to build your Frej. I'm looking for a boat for expeditions with our tent and equipment. Lots of room and fast and nice. ????"

Deus Ex Machina Triumph C-Seven Motorcycle

Visit Uncrate for the full post.
The Architecture of Hong Kong As You’ve Never Seen It Before

Over the last few years, the dense, vertical architecture of Hong Kong has enchanted many photographers. Michael Wolf and Greer Muldowney studied the region’s urban density. Romain Jacquet-Lagreze photographed the buildings during “blue hour,” when silver moonlight mixes with the fluorescent light pouring out from countless windows. Peter Steinhauer documented the construction process.
Most of these photographers do not fly drones, and most of them have not lived in Hong Kong for their entire lives. These are two things that set photographer Andy Yeung apart. He’s been shooting this place and its architecture from the sky for the last few years, and he’s learned everything from the right time to launch to the proper spots to fly. In fact, in order to avoid electromagnetic interference, he’s been known to take off from a mountain peak.
Walled City, Yeung’s latest body of aerial work, draws its title and inspiration from the Kowloon Walled City. Before it was demolished in the early 1990s, the Kowloon Walled City housed an estimated 33,000 people in only 6.4 acres of land, making it about 119 times as dense as modern-day NYC. Relatively isolated from the rest of the world, the walled city was for the most part ungoverned, and crime-rates were high, though residents managed to set up and maintain small businesses, shops, and factories.
Although the Kowloon Walled City no longer exists, Yeung recognizes symbolic echoes of the place throughout his homeland. According to some reports, sunlight was blocked out by the walled city’s buildings. When photographer Greg Girard made pictures there, he told Business Insider, “It was nighttime all the time in there.” Of course, people in Hong Kong today have access to the sun, but it’s still crowded near to the point of bursting. In many modern high-rise buildings, Yeung says, “the only view out the window is the neighbor’s window.”
Still, Yeung hasn’t lost hope for Hong Kong. Living in such dense conditions poses serious problems, of course, but the photographer also finds beauty in the chaos. “I have noticed that even though Hong Kong is filled with buildings and living space is very cramped, people manage to find a way to live in harmony with each other and make the best use of the land,” he tells me.


All images © Andy Yeung
The post The Architecture of Hong Kong As You’ve Never Seen It Before appeared first on Feature Shoot.
Does The Universe Have Physical Boundaries?

How It Was Shot: A Climber and a Total Solar Eclipse
On August 21st, 2017, a large swath of the United States was treated to a sighting of a solar eclipse. Naturally, this inspired photographers around the country to grab their cameras and immortalize the event in a photo. Two of the most viral images were captured by photographers Ted Hesser and Andrew Studer.
The 4-minute video above is the story of how Hesser and Studer managed to capture their viral photos of a climber silhouetted against the total solar eclipse.
The two photographers teamed up with climber Tommy Smith to create mesmerizing photos of Smith during totality, and the extreme effort and planning it required totally paid off. It took Hesser 4 days just to find the perfect location. Here’s a look at Studer setting up his camera prior to totality:
During the eclipse, Smith positioned himself on the Monkey Face of Smith Rock in Oregon and posed to allow the photographers below to line-up and capture the image. The spot is significant to the team because this is considered to be the “birthplace of sport climbing.”
To achieve the image they had to measure and estimate where exactly the sun would be positioned in the sky relative to the camera during totality, a challenge that would make or break the shoot. But it worked, and the team shot something that hasn’t been done before.
“Total goosebumps, I’ve never seen anything like that before,” summed up Hesser.
Here’s the photo captured by Hesser:

Here’s the viral photo captured by Studer:

The photo is likely to invite knee-jerk cries of “Photoshop” due to its perfection in execution, but the duo shot a number of frames that show the scene at various moments throughout the eclipse:


(via Columbia Sportswear via Fstoppers)
Image credits: Photographs by Theodore Hesser and Andrew Struder, and used with permission
How Higgins won the War
Small, Fast and Furious: The freedom of the world depended on this one thing. Higgins.
Much of history, including that about World War II, outlines events in general terms—the big names and a summary of what happened. As always, however, the truth largely lies in the details. Digging beneath the surface, there was one particular innovation that changed the tide of the war for the Allies.
Simply put, small boats made the difference: fast, lightweight vessels that were able to withstand the strongest of waves— Higgins landing craft.
In order to destroy Hitler’s army, Dwight D. Eisenhower, the Supreme Commander of the Allied forces, was in charge of planning the inevitable—an invasion by air and sea. All the strategies he came up with led to only one conclusion: to invade from the shores of France. Nearly all the shoreline was rocky, shallow and very open to the sea. Also, most of the miles of beach had high banks and cliffs which would
Nearly all the shoreline was rocky, shallow and very open to the sea. Also, most of the miles of beach had high banks and cliffs which would be perfect spots for the enemy to set up their cannons and machine gun nests.
The Navy’s ships would be able to get the hundreds of thousands of soldiers to within several miles of the beach without their ships running aground. After that, the risks for the troops were enormous. There was always the possibility of rough seas and foul weather, which could also determine the drop point from the ships. The initial plan might call for a quick one-mile run from ship to shore, but that could easily turn into six or seven miles depending on the seas and the winds. And the concerns that kept Eisenhower up at night were just how fast and how safely he could transport 36 men per boat times thousands and avoid having them blown to bits.


June 6, 1944, was, of course, the most important invasion—D-Day. Eisenhower had actually wanted that invasion to occur a year, possibly two years, earlier, but he did not have enough landing craft. Almost from the moment that he was named Supreme Commander, Eisenhower requested that the government produce large numbers of landing craft. He was disappointed in the production amounts, and he was not convinced of their quality.
Harry Truman, then-U.S. Senator from Missouri, was chairman of a special Senate committee dealing with national defense, and he shared Eisenhower’s concerns. The Navy knew a lot about building big ships, but was struggling to design an effective small landing craft that met Eisenhower’s requirements. The Marines also failed at creating a landing craft in line with what Eisenhower needed and suggested the Higgins Company from New Orleans.
Andrew Jackson Higgins is a name not familiar to most Americans. The New Orleans boatbuilder began his career in the 1920s by building shallow-draft small vessels used for oil drillers. Higgins’ small boats had propellers that were recessed into a semi-tunnel in the hull, and this one adjustment allowed the vessel to perform in very shallow waters full of obstacles.
Additionally, Higgins boats were fast.
Truman’s committee insisted that the Navy allow head-to-head competition. When tested against the Higgins landing craft, it easily surpassed the Navy-built craft. With Senator Truman’s support, the government contracted with Higgins to build the landing craft and other amphibious boats that were needed in the war. Pre-war, Higgins’ New Orleans boatyard employed fewer than 100 employees, but by 1944, his company had more than 25,000 workers building more than 20,000 boats for the military.
In addition to the thousands of landing craft built, Higgins’ boatyard also produced the fast-moving PT boats, supply vessels and other watercraft made for specific needs. By the end of the war, Higgins’ boats had been used successfully in many of the major landing invasions, including Normandy, Okinawa, Guadalcanal, and Iwo Jima.
It could be said that his landing craft delivered many of our troops to their deaths. His skillfully designed boats, however, allowed the invasion to happen, and with speed and the utmost precision in delivering the troops to the shores.
Adolph Hitler had not counted on the Allies coming up with such an effective landing craft, and he referred to Higgins as “the new Noah.” Eisenhower summed up the value of Higgins’ contribution by saying, “Andrew Higgins…is the man who won the war for us.… If Higgins had not designed and built those LCVPs [landing craft, vehicle, personnel], we never could have landed over an open beach. The whole strategy of the war would have been different.”
For more information, check out William Lee Miller’s Two Americans: Truman, Eisenhower, and a Dangerous World.
By Alan Cornwell Southern Boating, July 2017; Photos: Higgins Boat Patent Illustration, US National Archives.
The post How Higgins won the War appeared first on Southern Boating & Yachting.
How to Read a Bourbon Label

Editor’s note: This is a guest article from Drew Crawley.
With its resurgent popularity and increased availability, bourbon has become a go-to drink for the refined gentleman. For many, it has knocked Scotch out of the top liquor spot due to its affordability and unique flavor-set. If you’re a bourbon fan yourself, or are thinking of venturing into the flavorful and historical world of this beverage, but have found yourself spending too much money on a bottle that you didn’t truly enjoy, this article is for you.
Many of us have wandered the aisle of a liquor store aimlessly waiting for a bottle to catch our eye. If you’re like me, the first one (or three) you notice may be significantly beyond your price range. So you eventually settle for a standard big-name whiskey without really knowing what you’re getting into. Oftentimes, the product that you go home with is underwhelming and/or not quite what you expected. In some ways, it’s like buying Budweiser when you really want a craft brew, but don’t know where to start. It can be an intimidating world.
This was a common occurrence in my life until about a year ago, when I determined to learn more about the drink I’d been spending so much money and time on. I began to ask questions of friends in the industry and read documents pertaining to the qualifications and taxonomy which guide this category of whiskey. I am not in the distilled spirits industry myself; however, living in Louisville, Kentucky, I’ve had the privilege of interacting with some legends of bourbon culture. When asked to pass on some wisdom to a bourbon newbie, they’ve all said essentially the same thing: “The informed consumer is the happy consumer.”
Today I’ll pass on the knowledge they’ve imparted to me, so that you too can make an informed choice when selecting a bourbon. Below I’ll walk you through the meanings of some of the common bourbon terminology you’ll find on the bottles you pick up and examine at the store, to ensure you bring home the right one.
Whiskey
First, let’s briefly define whiskey. Simply put, it is a distilled spirit made from fermented grain. Rum is distilled from fermented sugar cane, sorghum, molasses, or other sweet substances. Brandy is distilled from wine, which is made from fermented fruit. Any distillate made with anything other than grain cannot be considered whiskey. These boundaries are wide, allowing for distilled rice or quinoa to be considered whiskey, but not so wide as to be insignificant.
Bourbon is a type of whiskey, as is rye, Scotch, single malt, etc. Those all fall under the vast banner of whiskey.
Kentucky
There is a myth, common in the whiskey world, that to be called “bourbon” the beverage in question must be made in Kentucky. This sentiment, while popular, is not true. Although there are plenty of other places bourbon is made, seeing the word “Kentucky” on a bottle’s label is significant for at least two reasons.
First, Kentucky is home to many rivers, the most important of which is the Kentucky River, which runs the length of the state. The riverbeds of the Kentucky and its tributaries contain natural limestone, which naturally filters out impurities — like iron — which can cause discoloration, off flavors, and hangovers. It is possible to remove these impurities through chemical processes in a lab, but the natural filtering of the limestone interacts in such a way as to remove the greatest amount of impurities. While Kentucky isn’t the only place in the country with naturally-occurring, limestone-laden water, it does have the easiest access to the highest amounts, making it prime whiskey production territory. Because of its superb purity, limestone-filtered water is, in my humble opinion, the most important ingredient in your favorite distilled beverage.
The second reason the word “Kentucky” matters on your whiskey label is because of the bluegrass state’s drastic changes in weather. All four seasons are experienced distinctly each year, making Kentucky an excellent environment for aging whiskey. As the weather heats up, the wooden staves that make up a bourbon barrel expand, soaking up whiskey and passing the liquid through a layer of caramelized wood sugars, adding a large portion of the flavor and 100% of the color to the drink. When the weather turns cold, the staves contract, forcing the liquid back out. This repeated filtration in and out of the wood ages the whiskey more thoroughly and consistently than if the climate were more consistently warm or cold. When hosting tastings for friends, I will often ask, “Would you rather drink Florida bourbon, where the weather is consistently swamp-like, North Dakota bourbon, where the weather is consistently cold, or Kentucky bourbon, where the fluctuations in temperature help it age and develop those signature robust flavors?” With proper understanding, the answer is always: “Kentucky!”
Of course, other parts of the country have seasonal variety, but in combination with the natural limestone water, the best of the best bourbons come from the state with the deepest heritage: Kentucky.
Age Statements

For one reason or another, age statements on bottle labels seem to be going the way of the dodo. Some distilleries, such as Heaven Hill and Jim Beam, have begun to take age statements off of some of their bottles in favor of wording such as: “Artfully aged to meet our unique flavor profile.” However, age matters when it comes to whiskey, both legally and for depth of flavor. Unlike wine, the age on a bottle of whiskey refers to the time spent aging in a barrel rather than the bottle. The age statement put on a specific label and used in its marketing material must match the youngest drop of whiskey in the bottle. So, hypothetically, you could have a bottle of bourbon containing 6-year, 8-year, and 10-year-old whiskey, and legally it must be labeled as 6 years old.
How does this happen? Isn’t bourbon just aged in a barrel, and bottled straight from there? Not quite. Unless it has the term “Single Barrel” on the label, you know that it’s actually a blend. The distiller has taken a 6-year barrel, an 8-year barrel, and a 10-year barrel (using the example above), mixed it all together in a big tank, and then bottled it from there — labeled, of course, as 6-year bourbon.
There is another myth out there that whiskey must be aged two years to legally be considered bourbon. This is simply not true! Whiskey that was put in a virgin oak barrel straight off the still and bottled afterward has equal claim to the title of bourbon in the eyes of the law. However, anything aged less than 4 years must display an age statement. So the distillers mentioned above that have taken age statements off bottles are providing bourbon at least 4 years old, but probably not much more than that — if it was 8- or 10-year bourbon it would be labeled as such because of the prestige of a long-aged whiskey.
Straight

The term “straight” is a legal reference to the liquor’s age. Straight whiskey is aged for a minimum of 2 years. It is rare that a whiskey develops any depth of flavor prior to that 2-year mark. Whiskey less than 2 years old will often taste “green” or overly floral, and will be lightly colored, sometimes even clear. While everyone has a unique palate and some may prefer this flavor profile, straight whiskey is the widely-accepted baseline in the industry.
Bourbon
In the early 1960s, Senator Thruston Morton from Louisville and Representative John C. Watts of Nicholasville introduced a proposal before a joint session of Congress which would solidify bourbon’s place in U.S. history. On May 4th, 1964, the United States Congress passed a concurrent resolution, ratifying the senator’s proposal designating bourbon as the native spirit of the United States. This resolution codified the industry standards for production and made the claim that anything labeled and sold as bourbon had to be made exclusively within the boundaries of the United States. This particular piece of legislation, along with differences in the grain mash recipes, differentiates bourbon from Scotch, Irish, Japanese, and other types of whiskeys.
A whiskey must meet the following qualifications to be considered bourbon:
- It must be distilled from a grain mash consisting of at least 51% corn.
- It must be distilled at a maximum of 160 proof, and barreled at a maximum of 125 proof.
- It must be aged in a new, charred oak container. This could legally be oak from any part of the world — red oak or white, a box or a barrel. The important thing is oak wood specifically. Additionally, the oak must be virgin, meaning that the container cannot have been used for any other purpose prior to the whiskey entering. Unlike other distilled grain spirits, the cooperage used to age bourbon may only be used once. The industry standard is an American white oak barrel, usually 53 gallons.
- Additional flavoring or coloring may not be added to the distilled spirit. Only water, to cut the proof, or bourbon from other barrels may be added to the whiskey.
- It must be made in the United States. If all other qualifications are met, and the whiskey is produced in Canada, it must be labeled as “bourbon-style whiskey,” as it does not meet the legal standards required to be called bourbon.
Bottled-in-Bond

This category is not found on the majority of bourbon labels, and they’re usually located near the bottom of the shelf in the liquor store. You’d think that would make them a lower-quality product (because they’re also lower priced), but it’s a secret in the bourbon-drinking community that just the opposite is true. In my opinion, bonded bourbons are the best bang for your buck and the most flavorful/unique bourbons in production.
The high standards that guide this federally defined category came about, like most things, out of necessity.
Until the early 20th century, bourbon was sold to taverns and bars by the barrel. To increase the longevity of the whiskey supply and the profits of the barkeeper, as the barrel would begin to empty, foreign substances would be added back into the barrel. According to the stories I’ve heard most consistently, these substances included: iodine, acid (to retain the bite), tobacco spit (to maintain color), and river water (to retain liquid volume). People would often fall ill, even to the point of death, from consuming these tainted bourbons. In 1897, Kentucky legend Colonel Edmund Haynes Taylor passed a piece of legislation known as the Bottled-in-Bond Act. This consumer protection bill increased the quality of the whiskey for the drinker and benefited both the distillers and the federal government by providing mutually beneficial regulations and protections. Funny enough, this beat the Pure Food and Drug act by 9 years; apparently Congress was more worried about tainted booze than tainted food!
To be considered bottled-in-bond, a bourbon must meet the following qualifications:
- It must be: “the product of one distiller, at one distillery, in one distilling season.” This helps ensure quality control by making each batch of whiskey identifiable by its producer. This is important because many modern distilleries actually produce and bottle their product at a third-party production facility, and that’s often kept a secret for marketing and branding purposes. Iowa favorite Templeton Rye got in trouble for this a few years back.
- “It must be aged in a federally bonded warehouse.” This is where the tax agent and this mutually beneficial arrangement come in. With federal involvement, a distiller can market their increased quality standards and the government is able to profit from taxes on the whiskey, both as it ages in the warehouses and as it is sold.
- It must be aged in the bonded warehouses for a minimum of 4 years. This ensures a consistent and thorough aging process.
- It must be bottled at exactly 100 proof (50% alcohol by volume). This is a higher ABV than you’ll find in a lot of whiskeys, making it hard to drink neat (with no ice). But, it makes the value higher for the consumer and creates a universal standard that can be tested.
Bottled-in-bond bourbons are the most restricted class of bourbons in the world. The high standards and consistent production makes them a wonderful value for even the most pretentious of bourbon snobs. If you’re not sure what to purchase in the liquor store and are looking to venture outside of the “well” whiskeys that most people know, I recommend trying some bottled-in-bond products (here’s a list of those that are available today).
Why is it that bottle-in-bond products are often cheaper than the top-shelf bottles? They just aren’t as rare or hip as some of your more expensive options. A distillery, especially a new and upcoming one, isn’t going to invest in meeting the bottled-in-bond qualifications for small batches. It’s just not feasible. For the warehousing and taxation involved, the bourbon needs to be made at a fairly high volume to be worth it. A lot of the money being made in bourbon today is about marketing and being “cool,” but much of the bottled-in-bond makers have been doing it for a very long time. It’s sort of a throwback label; today’s new products aren’t dangerous to consumers, but 100 years ago that was a different case, and some of those distillers are still around, making bottled-in-bond bourbons and selling them to you on the cheap.
Understanding the meaning behind words and phrases on a bourbon label helps the consumer make more informed choices when looking to purchase a valuable product. Being able to identify what you’re taking home will provide for a better drinking experience and waste less of your time and resources. Additionally, knowing the history and reasoning behind each word or phrase on the label increases the pleasure of both the buying experience and the actual imbibing of your favorite brown water. Keep learning, keep experimenting, and keep on drinking Kentucky’s native spirit — and the gentleman’s favorite.
_______________
Drew Crawley lives and works in Louisville, KY with his wife, Kaylee. In his spare time, he enjoys reading about bourbon and theology, running, and playing music. Follow him on Twitter @drewcrawley63.
The post How to Read a Bourbon Label appeared first on The Art of Manliness.
It's Time to Admit That the "Family Day Out" Is Really Not That Fun

Lie in Your Out-of-Office Reply to Avoid Spending Time on Your Phone During Vacation

Vacations are for unplugging, but unplugging can be hard when you carry your work around on your device in your pocket. To keep work-related emails and messages at bay, adjust your “out of office” reply.
3-Ingredient Happy Hour: The Meyer Lemon Mule

Happy weekend, and welcome back to 3-Ingredient Happy Hour, the weekly drink column featuring super simple yet delicious libations. Today we’re going to be putting a bright and sunny spin on a fizzy classic: the Moscow Mule.
Fall Trout Fishing: How to Change with the Season

The crowds are gone, but the fish aren't

Lime Salsa

Three Charles Bukowski Books Illustrated by Robert Crumb: Underground Comic Art Meets Outsider Literature

Think of the artists you know who, especially in the 1960s and 70s, portrayed an often sordid reality in detail, just as they saw it, garnering acclaim from enthusiasts, who perceived a high artistry in their seemingly rough-hewn work, and cries from countless detractors who objected to what they saw as the artists' lazy crudity. In the realm of poetry and prose, Charles Bukowski should come to mind sooner or later; in that of comic art, who fits the bill better than Robert Crumb? It makes only good sense that the work of both men should intersect, and they did in the 1980s when Crumb illustrated two short books by Bukowski, Bring Me Your Love and There’s No Business.

"Crumb’s signature underground comix aesthetic and Bukowski’s commentary on contemporary culture and the human condition by way of his familiar tropes — sex, alcohol, the drudgery of work — coalesce into the kind of fit that makes you wonder why it hadn’t happened sooner," writes Brain Pickings' Maria Popova.
"In 1998, a final posthumous collaboration was released under the title The Captain Is Out to Lunch and the Sailors Have Taken Over the Ship — an illustrated selection from Buk’s previously unpublished diaries, capturing a year in his life shortly before his death in 1994." As one student of the graphic novel summarizes Bring Me Your Love, "the main character is a man whose personality resembles the main character of most Bukowski stories. He goes through life rather aimlessly, killing time by drinking and having sex. His wife is in a mental hospital."

"Crumb’s illustrations give the already gritty storylines a visual context — such as a man who looks much like Buk wrestling on the floor with his 'wife' after a dispute involving answering the phone or various barroom skirmishes depicting a Bukowski-looking character running amok," says Dangerous Minds. "He was a very difficult guy to hang out with in person, but on paper he was great," Crumb once said of Bukowski, and his illustrations also reveal that he understands Bukowski's own awareness of the difference between his page self and his real one. "Old writer puts on sweater, sits down, leers into computer screen, and writes about life," Bukowski writes, in their third and final collaboration, above a Crumb illustration of just such a scene. "How holy can we get?"

See more Crumb illustrations of Bukowski at Brain Pickings.
Related Content:
Four Charles Bukowski Poems Animated
Watch “Beer,” a Mind-Warping Animation of Charles Bukowski’s 1971 Poem Honoring His Favorite Drink
Robert Crumb Illustrates Philip K. Dick’s Infamous, Hallucinatory Meeting with God (1974)
Cartoonist R. Crumb Assesses 21 Cultural Figures, from Dylan & Hitchcock, to Kafka & The Beatles
Based in Seoul, Colin Marshall writes and broadcasts on cities and culture. He’s at work on the book The Stateless City: a Walk through 21st-Century Los Angeles, the video series The City in Cinema, the crowdfunded journalism project Where Is the City of the Future?, and the Los Angeles Review of Books’ Korea Blog. Follow him on Twitter at @colinmarshall or on Facebook.
Three Charles Bukowski Books Illustrated by Robert Crumb: Underground Comic Art Meets Outsider Literature is a post from: Open Culture. Follow us on Facebook, Twitter, and Google Plus, or get our Daily Email. And don't miss our big collections of Free Online Courses, Free Online Movies, Free eBooks, Free Audio Books, Free Foreign Language Lessons, and MOOCs.
How to Understand ISO on Your Digital Camera
In this article we’ll look at how to use and understand ISO on your digital camera better.
Do you use auto modes?
Are you the type of photographer who shoots in Manual mode? Or do you go to the other extreme and use one of your camera’s fully automatic exposure modes, such as Program? If you tend to go the fully automatic route then it’s quite possible you’ve never paid much attention to your camera’s exposure settings – ISO, aperture and shutter speed.
Aperture, you probably already know, controls the depth of field. Shutter speed affects the way moving subjects are recorded by the camera. But what about ISO? ISO is a remarkable setting in that it enables you to take photos in any scene from bright sunlight to candle light. It’s thanks to ISO that your digital camera is so versatile.

So let’s take a closer look at ISO and what the choice of ISO setting means for your photos.
What is ISO?
In simple terms, ISO is a measure of the sensitivity of the camera’s sensor to light. The lowest ISO setting of most digital cameras is 50, 100 or 200. At this setting, the camera’s sensor is least sensitive to light. At higher settings, like 3200 or 6400, the sensor is more sensitive to light.
Note: yes it’s more complex than that – this is the simple explanation for those who are new to this setting so they can understand it better.
Where does ISO come from?
The letters ISO stand for International Standards Organization (more correctly known as the International Organization for Standards). The International Organization for Standards lays out the criteria that camera manufacturers use to calibrate the ISO settings on their cameras.
The idea is that different camera and lens combinations all produce the same results at the same aperture, shutter speed, and ISO settings.
In other words, a photo taken at ISO 400, f/5.6 and 1/500th of a second, such as the one below shot with my Fujifilm X-T1, should look the same as one taken at the same settings on your camera, whatever it is.

Having a universal standard is important when photographers use light meters. For example, if a studio photographer sets up the lights and uses a flash meter to work out that the required exposure is, say, f/11 at ISO 100, then it’s important to know that these settings work for any camera.
In practice, there are often variations in the accuracy of ISO settings between different camera models. But for the most part, these are minor and nothing to worry about.
How to use ISO
ISO is part of the exposure triangle. It works with shutter speed and aperture to (hopefully!) give you a good exposure for the ambient light level of your scene. One of the benefits of digital cameras is that ISO is a variable that you can change from shot to shot if necessary.
The advantage is that you can use your digital camera in just about any lighting situation. When light levels are low, you have the option of raising the ISO, in addition to using a larger aperture or a longer shutter speed, to help you obtain a good exposure.
But you need to be aware that raising the ISO has a side effect – it increases the amount of noise in your photos, especially in the darkest tones. This is not the problem that it was 10 years ago as modern sensors are very capable (amazingly so) at high ISO settings. But you do need to be aware of it.
I used a low ISO of 50 for this landscape photo to help obtain a slow shutter speed (to blur the water) and for optimum image quality.

I used a high ISO of 6400 for this photo (below) as it was taken indoors with a hand-held camera in low light conditions.

Avoiding Auto ISO
If you use Program, Aperture Priority, Shutter Priority, or Manual exposure modes on your camera you can set the ISO yourself rather than let the camera decide what it should be. I encourage you to do this as it makes you think about the relationship between ISO and image quality.
This is more relevant in low light. For example, let’s say you find yourself in a situation where you are hand-holding the camera (therefore can’t use a slower shutter speed) and need to either raise the ISO or open the aperture to obtain the correct exposure.
If you open the aperture, you’ll have less depth of field. If you raise the ISO, you’ll have more noise. You have to make a choice. What’s more important, noise or depth of field? You have control, not the camera.
For example, I made this photo indoors with a hand-held camera. I needed a shutter speed of 1/60th of a second to avoid camera shake, so I couldn’t change that. I decided to shoot at ISO 3200 and f/8 to give good depth of field. Alternatively, I could have used settings of ISO 200 and f/2 to make a photo with much less depth of field. The choice is yours!

Full-frame versus crop sensor cameras
Generally speaking, digital cameras with full-frame sensors create images with less noise at any given ISO setting than crop sensor cameras (that is, the sensors in APS-C and Micro Four-thirds cameras).
But, as ISO performance has increased, the gap between full-frame and crop sensor has narrowed. Image quality (noise) is not the only reason why you might buy a full-frame camera instead of a crop sensor one, but it’s no longer the major consideration it once was.
For example, the photos taken at high ISO with my newer Fujifilm X-T1 camera (APS-C sensor) easily match the quality from my older EOS 5D Mark II full-frame camera. The high ISO performance of modern crop sensor cameras is more than good enough for most photographers.
ISO for landscapes, architectural and studio photography
The best quality images (i.e. those with the least noise) are always made at the lowest possible ISO setting. You can use ISO 100 quite comfortably on a hand-held camera in bright sunlight, but it’s more difficult in low light conditions, for example at dusk or indoors.
For those situations, you can use low ISO if you have a tripod to support your camera. The tripod allows you to use long shutter speeds without having to worry about camera shake. For that reason, low ISOs are ideal for landscape and architectural photography, where it’s normal for photographers to use tripods.
Low ISOs are also good for studio photography, as most studio lights are powerful enough to give good illumination at ISO 100.
I used ISO 50 for this photo and used a tripod to prevent camera shake.

Don’t be afraid of high ISO
Having said that, there is no reason to be afraid of the high ISO on your camera. The key is to test your camera at each major high ISO setting (1600, 3200, 6400, 12800, etc.) to see how much noise you get in your images and what your personal tolerance is for noise with your camera. You might, for example, find that you are happy with images taken at ISO 6400, but not at 12,800. Once you’ve established that then you can work within those limitations.
Subjects such as natural light portraits, or photos taken indoors, often require high ISO settings, especially if they are done when the ambient light levels are low, such as dusk. The high ISO settings of modern cameras are a great benefit in low light conditions because they let you experiment with taking photos hand-held that years ago you could only have attempted with a tripod (and slow shutter speeds) or by using a flash to light the scene.

I used ISO 6400 for this photo made in a temple in China. I had no tripod and the light was so low that I couldn’t use a lower ISO.
Another type of photography that high ISOs enable is astrophotography. High ISO settings are required to get a good exposure of the night sky that captures the stars without the trailing effect created by using shutter speeds longer than 20 seconds.

This photo was made at ISO 6400 and a shutter speed of 20 seconds.
Conclusion
Recent advances in camera technology mean that many photographers can get great results from their cameras at ISO settings up to 6400 and beyond. It’s a revolution that has changed the way some photographers work by opening up the possibility of working creatively in low light conditions. But it’s also important to understand that sometimes it’s best to use low ISO settings for the best image quality.
Questions? Let me know in the comments!
Want to learn how to get perfect exposure on your digital camera? Then check out my new e-book, Mastering Exposure and say goodbye to all your exposure problems!
The post How to Understand ISO on Your Digital Camera by Andrew S. Gibson appeared first on Digital Photography School.
7,000 Free Photography Tutorials – Here’s our Best 20!
This week on dPS we published our 7,000th post here on the Digital Photography School blog.

I started this site back in April 2006 because my friends – who had all just bought new DSLRs – kept asking me the same questions about how to use their new gear to its potential.
Instead of answering them one by one I decided to write down my answers on a blog – not really knowing that 11 years later I’d have created a resource that:
- is read by millions of people every month!
- employs a team of writers, editors, developers, producers, customer service reps, marketers from around the world
- has millions of social media followers on Facebook, Twitter, Pinterest
- has published over 20 eBooks, 6 courses and 3 Lightroom Presets Packs
- has close to 1,000,000 newsletter subscribers.
The mind boggles a little at the crazy journey we’ve had here at dPS and we’re excited about the future.
To celebrate the milestone today I thought it’d be fun to dig into our analytics and take a look at which posts got the most traffic. As I looked over the list I realised many are deep in our archives and may not have been seen by our newer readers and so I thought it’d be useful to some of you to list them here.
Our 15 Most Popular Posts
Each of these most popular 15 posts has been read by millions of people since they were published. Some were published quite a few years ago but most have been updated and are still 100% relevant today.
- 10 Ways to Take Stunning Portraits
- Understanding ISO in Digital Photography
- Long Exposure Photography – 15 Stunning Examples
- The Rule of Thirds
- Wedding Photography – 21 Tips for Amateur Wedding Photographers
- An Introduction to Aperture in Photography
- Popular Digital Cameras and Gear (regularly updated)
- An Introduction to Shutter Speed
- DIY: How to Make an Inexpensive Light Tent
- Posing Guide: 21 Sample Poses to Get You Started Photographing Women (plus 7 more posing guides for photographing kids, men, couples etc)
- 7 Photography Projects to Jumpstart your Creativity
- How to Photograph Fireworks
- 11 Surefire Landscape Photography Tips
- 21 Settings, Techniques and Rules all New Camera Owners Should Know
- The Ultimate Guide to Learning How to Use Your First DSLR
5 More Ultimate Guides
Over the last year we’ve been rolling out a new type of blog post – our ‘Ultimate Guides’. These are longer, deeper and more comprehensive tutorials that we offer both as a blog post but also as a free downloadable guide.
While these are not in our most popular of all time (because they’re new) we’re very proud of these guides and are excited to have plans for numerous more in the coming months.
Here are our first 5 Ultimate Photography Guides:
- The Ultimate Guide to Photography for Beginners
- The Ultimate Guide to Landscape Photography
- The Ultimate Guide to Street Photography
- The Ultimate Guide for Getting Started in Lightroom
- The Ultimate Guide to Photography Terms
Thanks!
7,000 free blog based tutorials would not have been possible without an amazing team – particularly our editorial team led by Darlene and with over 100 writers over the 11 years. So thank you to our team.
Also a massive thank you to our readers, followers and customers. Your support helps us keep this site running and inspires us to keep creating the best tutorials we can.
If you’re new to dPS, there’s so much more to see than what I’ve listed above. Dig around in our archives and you’ll find some amazing free content. We also regularly share posts from our archives on our Facebook Page so follow us there to see more of our older posts.
Lastly, make sure you’re subscribed to our newsletter to get notified weekly of the 14 new articles we publish each week.
The post 7,000 Free Photography Tutorials – Here’s our Best 20! by Darren Rowse appeared first on Digital Photography School.
Cleaning your car interior | Autoblog Details | Complete Detail ep 3
Filed under: Videos,Autoblog Details,Original Video
 Find out how to become an interior detailing machine on this episode of Autoblog Details.
Continue reading Cleaning your car interior | Autoblog Details | Complete Detail ep 3
Cleaning your car interior | Autoblog Details | Complete Detail ep 3 originally appeared on Autoblog on Wed, 23 Aug 2017 15:30:00 EDT. Please see our terms for use of feeds.
Permalink | Email this | CommentsCapital OneVoice: 5 Gadgets To Make Your Late Summer Road Trip Safer And Smoother

2017 Monterey Car Week | Visual feast of ravishing cars
Filed under: Motorsports,Classics,Concept Cars,Luxury,Racing,Supercars
 Running down all the exotics and classics on display
Continue reading 2017 Monterey Car Week | Visual feast of ravishing cars
2017 Monterey Car Week | Visual feast of ravishing cars originally appeared on Autoblog on Wed, 23 Aug 2017 15:00:00 EDT. Please see our terms for use of feeds.
Permalink | Email this | CommentsThese Aerial Photos Will Make You See Famous Landscapes in a New Way

Yellowstone National Park
Three years ago, a GoPro photograph of the tallest building in the world, the Burj Khalifa in Dubai, went viral and changed the course of Henry Do‘s life. Since then, the Las Vegas-based photographer has taken to the skies all over the world. Do bought his first drone back in 2015. He got his second drone a week later.
It was a picture of a metropolis that first catapulted Do onto the aerial photography scene, and he’s continued photographing skyscrapers. But in between the busy, fast-paced city shots, he finds respite in wild, ancient places. “Our attention span these days is usually five seconds or less,” Do tells us. His (wildly popular) Instagram account asks us to pause for a moment.
Last fall, he told Full Drone that his favorite photograph was one he’d taken on the coast of Oahu, Hawaii. He loved not only the image itself but also its story: the area hadn’t been green until soon before the photo was taken, when rainfall had brought the verdant landscape back to life.
And Do has gone to great lengths to reconnect with the Earth and our history. He’s driven through the whole night just to see places at the perfect moment. He’s waited for the sunrise and watched heavy fog envelop the land. He longs for locations off the beaten path, where few people have roamed, and if he’s in a familiar place, he wants to find a different and surprising way of capturing it. When a drone isn’t an option, a helicopter does just fine.
You can find prints of Henry Do’s work over on Society6.
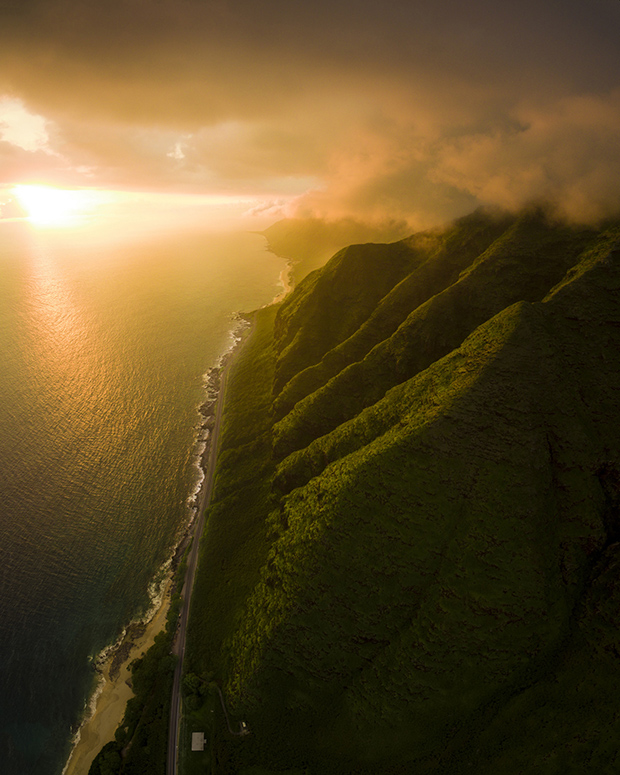
Oahu, Hawaii

Shiprock, New Mexico
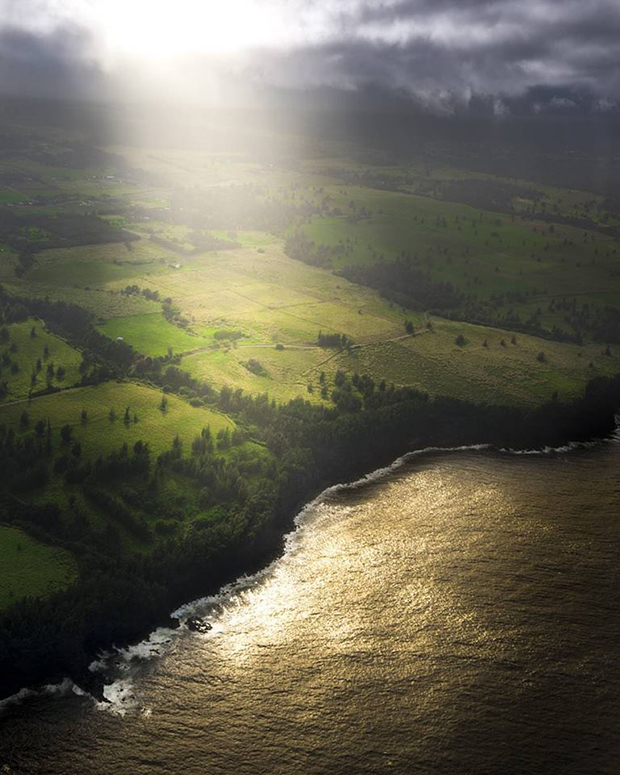
Hawaii
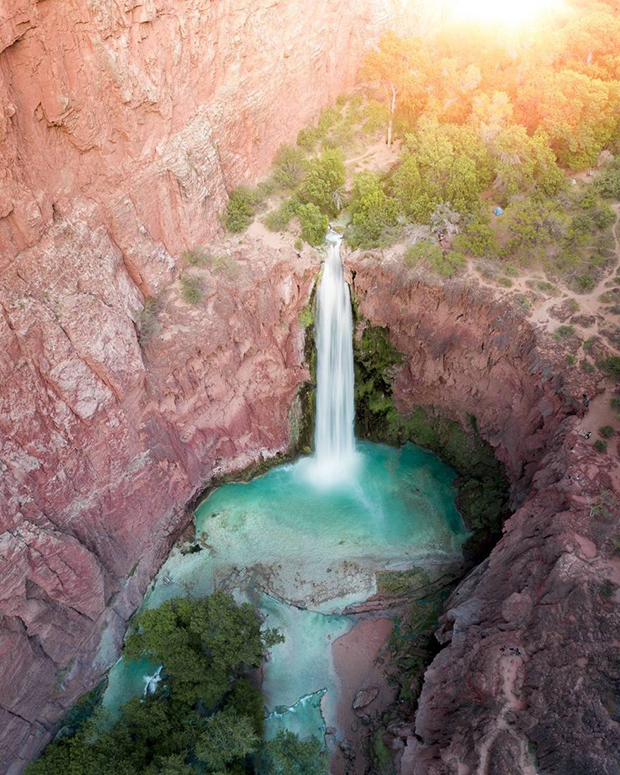
Mooney Falls, Arizona

Monument Valley

Pololu Valley

Kalapana Lava Flow

Hawaii
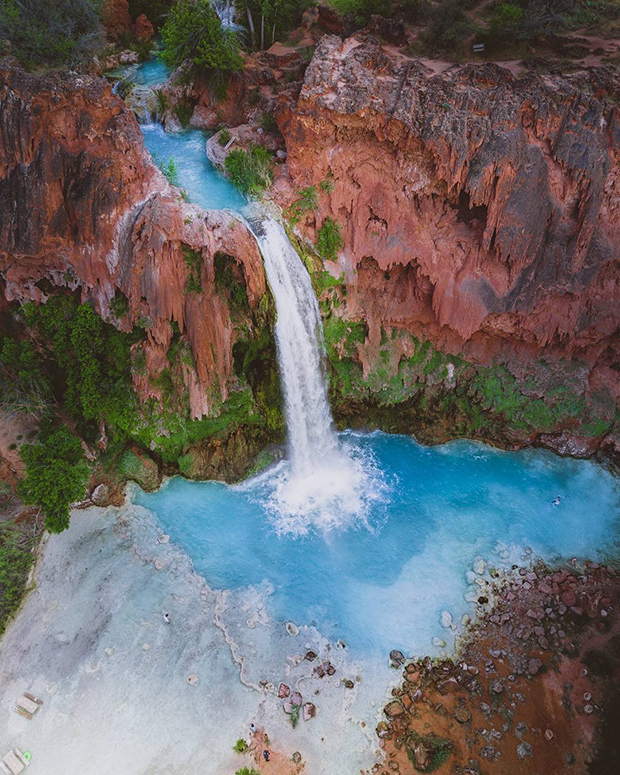
Havasupai Falls
All images © Henry Do
The post These Aerial Photos Will Make You See Famous Landscapes in a New Way appeared first on Feature Shoot.
How to Win at Texas Hold ‘Em: A Free MIT Course
In 2015, we featured a short MIT course called Poker Theory and Analytics, which introduced students to poker strategy, psychology, and decision-making in eleven lectures. Now comes a new course, this one more squarely focused on Texas Hold 'Em. Taught by MIT grad student Will Ma, the course "covers the poker concepts, math concepts, and general concepts needed to play the game of Texas Hold'em on a professional level." Here's a quick overview of the topics the course delves into in the 7 lectures above (or find them here on YouTube).
- Poker Concepts: preflop ranges, 3-betting, continuation betting, check-raising, floating, bet sizing, implied odds, polarization, ICM theory, data mining in poker
- Math Concepts: probability and expectation, variance and the Law of Large Numbers, Nash Equilibrium
- General Concepts: decisions vs. results, exploitative play vs. balanced play, risk management
You can find the syllabus, lecture slides and assignments on this MIT website. How to Win at Texas Hold 'Em will be added to our collection, 1,250 Free Online Courses from Top Universities.
Follow Open Culture on Facebook and Twitter and share intelligent media with your friends. Or better yet, sign up for our daily email and get a daily dose of Open Culture in your inbox.
If you'd like to support Open Culture and our mission, please consider making a donation to our site. It's hard to rely 100% on ads, and your contributions will help us provide the best free cultural and educational materials.
Related Content:
MIT’s Introduction to Poker Theory: A Free Online Course
150 Free Online Business Courses
Learn Python with a Free Online Course from MIT
How to Win at Texas Hold ‘Em: A Free MIT Course is a post from: Open Culture. Follow us on Facebook, Twitter, and Google Plus, or get our Daily Email. And don't miss our big collections of Free Online Courses, Free Online Movies, Free eBooks, Free Audio Books, Free Foreign Language Lessons, and MOOCs.
The Scientifically Proven Way to Cut in Line

British friends stop reading now.
.
.
.
Everyone else, here’s how to cut in line, according to science.
For Centuries, Readers Annotated Books With Tiny Drawings of Hands
In the list of rarely-used punctuation marks—amid the interrobang (‽), hedera (❧), lozenge (◊), and asterism (⁂)—the manicule is a pointedly unique symbol. Quite literally: it takes the form of a hand with an outstretched index figure, gesturing towards a particularly pertinent piece of text.
Although manicules are still visible today in old signage and retro décor, their heyday was in medieval and Renaissance Europe.
Despite its centuries-long popularity, the first-ever use of a manicule is surprisingly difficult to pinpoint. They were reportedly used in the Domesday Book of 1066, a record of land ownership in England and Wales, but widespread use began around the 12th century. The name comes from the latin word manicula—little hand—but the punctuation mark has had other synonyms, including bishop’s fist, pointing hand, digit, and fist.
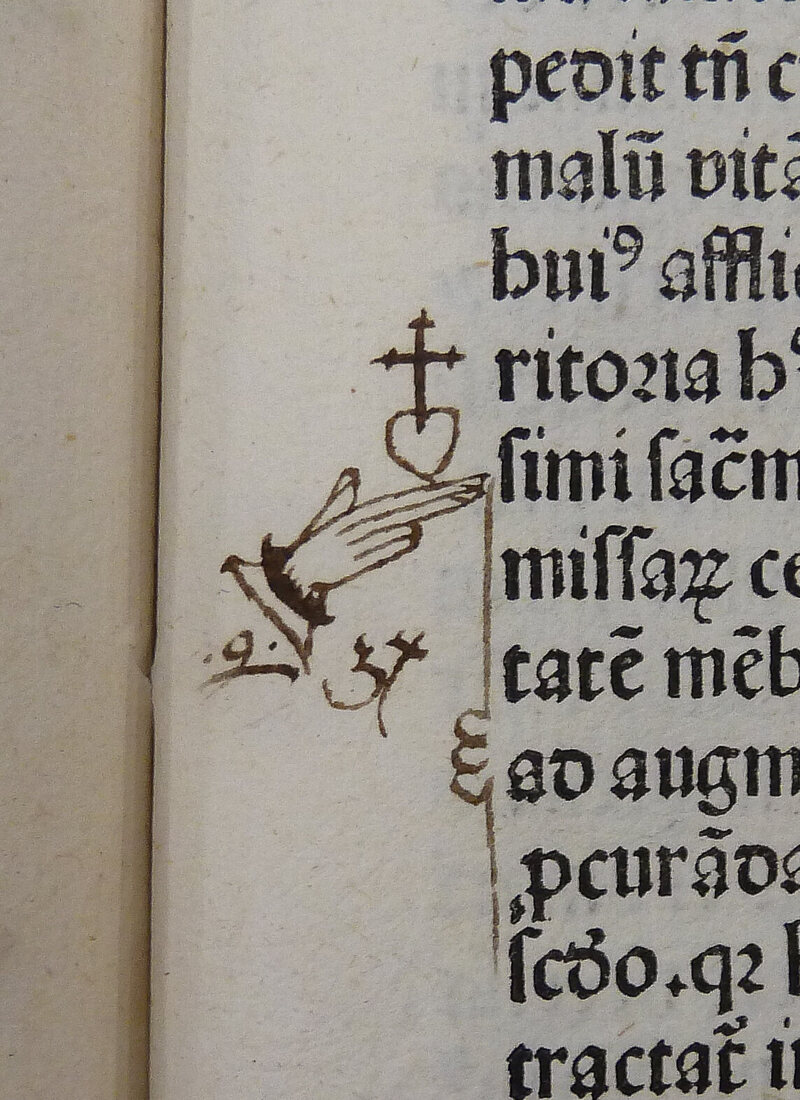
As far as punctuation marks go, the manicule’s function was fairly self-explanatory. Usually drawn in the margin of a page (and sometimes between columns of text or sentences), it was a way for the reader to note a particularly significant paragraph of text. They were essentially the medieval version of a highlighter. Although mainly used by readers, occasionally a scribe or a printer would draw a manicule to indicate a new section in a book.
The use and dynamic of manicules changed once books began to be printed. This new technology allowed writers and publishers to highlight what they believed to be significant. As Keith Houston notes in his book Shady Characters: The Secret Life of Punctuation, Symbols and Other Typographical Marks, “the margin, once the reader’s workspace and sketchbook, was gradually colonized by writers seeking to provide their own explanatory notes or commentaries.”

Despite its simplicity, the style of the manicule could vary. Some had elaborate sleeves, some were strangely proportioned with extra-long fingers, as the one leading this article, and some were otherwise anatomically incorrect. The Italian Renaissance scholar Petrarch drew manicules that consisted of five fingers and no thumb, which is surprising, seeing as he would have been looking at the very thing he was drawing. (A five-fingered hand, it's worth noting, would not have been the strangest thing to adorn the margins of a Medieval manuscript).
In the 19th century, manicules had moved beyond books and into signage, advertisements, and posters as a way of directing the eye. They pointed the way to trains and pubs. In the "Wanted" poster for John Wilkes Booth following his assassination of President Lincoln, a manicule gestured towards the reward announcement. Manicules were even used on gravestones (pointing up toward heaven, of course).

While the popularity of manicules faded before the arrival of the 20th century, they aren't completely extinct. A mutated version existed in early versions of the cursor, in the form of an upwards-pointing clenched fist. There are manicule emojis that point left, right, up and down. If you look hard enough, you can even find one in the Wingdings font. ☞ Scroll on for more manicules.


How to Make a Grilled Cocktail

With summer winding down and fall fast approaching, there are only a handful of barbecues left in the season — so it's especially crucial that you make the most of them. Sure, you could toss a few High Lifes in a cooler and call it a day, but why not impress your buds with an Old-Fashioned cocktail that's grilled inside of a pineapple? That's right, a pineapple. The champagne of beers never even stood a chance. Don't fall back into your same old routine, mix it up and give this strange recipe the old college try.
The Grilled Pineapple Old-Fashioned
Ingredients (3-4 Cocktails Per Pineapple)
· 2 oz. whiskey
· 2-3 dashes Angostura bitters
· 1 brown sugar cube (1 tsp)

Preparation
1. Core a fresh whole pineapple and char inside with whiskey (Eric Tecosky, the inventor of the recipe, uses Jack Daniel’s Single Barrel Tennessee Whiskey Barrel Proof to char)
2. Grill pineapple slices
3. Add one slice back into pineapple and add cocktail ingredients

4. Grill whole pineapple over medium flame for 5-7 min.
5. While grilling, char outside of pineapple for 15-20 seconds
6. Remove from grill and let rest for 5 min.

7. Fine strain contents into service bottle
8. Pour 2 oz. of liquid into mixing glass over ice
9. Stir until cold and strain over fresh ice, garnish with a grilled pineapple slice, enjoy.
This recipe originally appeared on Men's Journal.
Special thanks to our friends over there for keeping us well hydrated.