
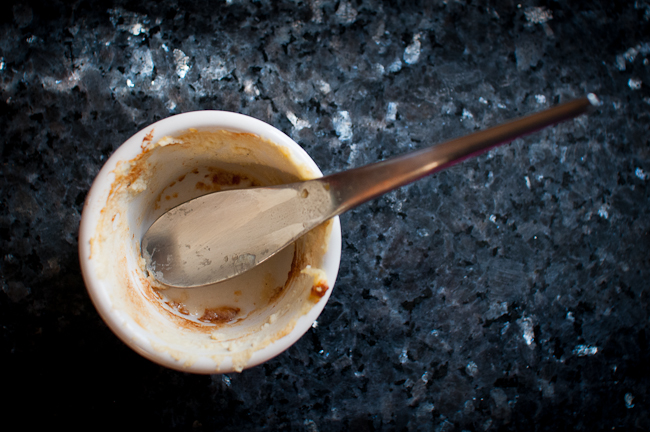
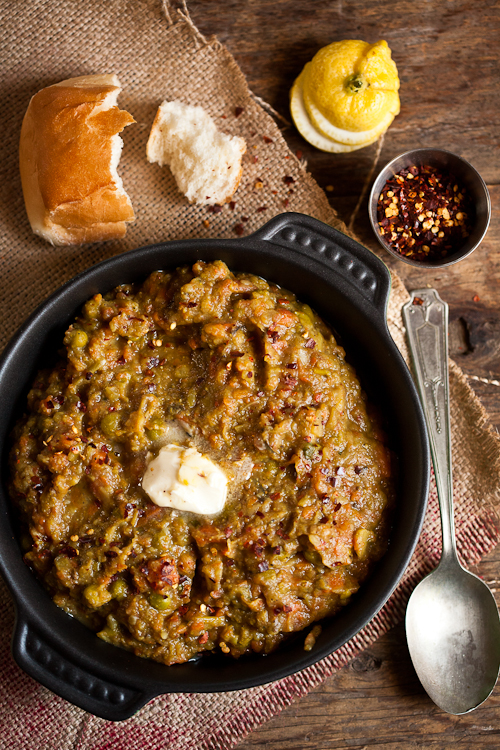
Loosely inspired by Mexico's Cholula brand of hot sauces, this spicy homemade condiment is packed with the smoky flavors of chipotle and the bold funk of cumin and garlic. Read More

Today’s “Day in the Life” subject might look familiar to you. In addition to being the founder of creative agency Field Guide Los Angeles, Andrea Hawken has modeled for Storq (among other brands). And on top of it all, the Philippines-born, SoCal dweller is also a mother to three kiddos—Gabriel, 9, Raphael, 3, and Anya, 4 months. Below, Andrea shares what her current day in the life looks like—toddler meltdowns, pantless Zoom calls, and everything in between!
For more Day in the Life profiles, check out our features on Idaho-based Laura Tully, and Bay Area mamas Dr. Kat De Jong and Juvilynn Arbuthnot.
The post Day In The Life: Andrea Hawken, Creative Director & Mother Of 3 appeared first on MOTHER.

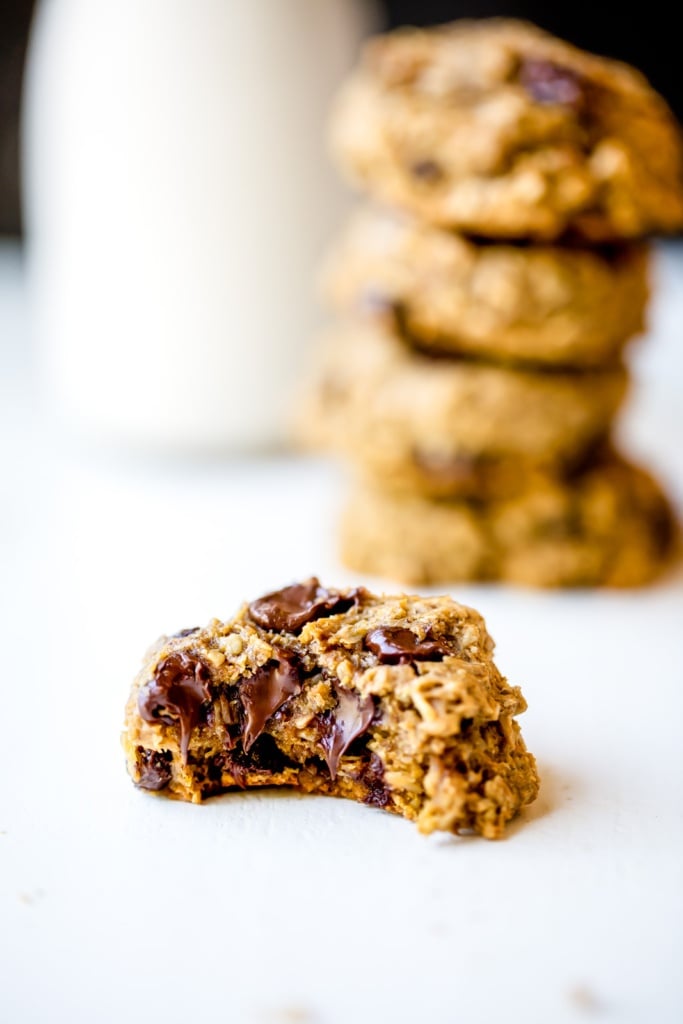
Whole grain pumpkin oatmeal chocolate chip cookies in partnership with Coach’s Oats. These cookies are packed with cozy pumpkin flavor + plenty of chocolate chips. Made with coconut oil instead of butter! It’s HERE! Welcome to Pumpkin Week 2017! Dear LAWD I love pumpkin. Once I hit 70 years old my goal is to eat [...]
The post Pumpkin Oatmeal Chocolate Chip Cookies appeared first on Ambitious Kitchen.


A reader writes:
You’ve written before about how NOT to behave in an informational interview (i.e. use it to try to get a job), but I wonder what you recommend to get the most out of them when you’re approaching the meeting with the proper mindset.
I’m about six months away from getting a masters degree, and another student in my program recently arranged for me to have lunch with her and a family friend. She organized the lunch because the family friend works in an industry related to the particular niche of our field I’d like to work in. This was an incredibly kind thing of her to do, but it was rather short notice, and I scrambled to come up with questions.
I asked a few specific things about the direction the industry is going in, and a few questions about a new side project her company has that’s of particular interest to me, but I fear that beyond that she was left to lead the conversation more than I would have liked. She did so wonderfully, giving us a tour of the building, asking me about myself, showing me the software she uses, etc. I wonder though, how I might have made more of this networking opportunity. Obviously some questions are specific to industry and situation, but do you have any across-the-board recommendations (beyond being prepared) for making the most of informational interviews, particularly ones you didn’t seek out?
Like with asking questions in interviews, my advice on this is to spend some time really thinking about what you genuinely want to know from this person who has experience in your field. That’s probably going to lead you to questions I’d never think of, like or “how do you handle the frustration of X?” or “how have the new regulations on Y played out in your work?”
In other words, don’t just focus on being impressive (which is the pitfall a lot of people fall into), but think seriously about what you’re really wondering about. I can promise you that this person doesn’t want to spend their time answering questions that you’re asking because you saw a list that suggested asking them; they want to answer the stuff you’re really dying to know. (I’m not saying that’s where you’re coming from — I just see it so much that I need to raise it.)
Now that that disclaimer is out there, here are some questions that I think are great to ask in informational interviews:
What other suggestions do people have?
actually useful questions to ask in informational interviews was originally published by Alison Green on Ask a Manager.
New Year's resolutions! Do you make them? I do. I know, I know, yawn, but I can't help it. I do feel like there is something about turning the page from one year to the next that gives you the glorious sensation of having a clean slate in front of you to fill with all your wonderful scribblings. Like every year, I put down "exercise more" and "eat less sugar", but now I've started adding "be more patient", because oooh that little child of mine, and "get more organized" and "email less" and other exhortations that sort of kill me with their mundanity but are increasingly integral to my peace of mind. Once we get all those self-improvement things out the way, though, we get to the really fun stuff - like "make your own vanilla extract" and behold, it is only January 15th and I have already knocked this one off the list! ROAR!
Though to be fair and honest, there could be nothing less challenging about making your own vanilla extract. In fact, it is so easy, so ridiculously nothing that I'm almost sort of appalled that we've all been keeping Nielsen-Massey and McCormick in business all these years. (And that us expats have been wasting precious suitcase space on meticulously wrapped bottles of extract.) No more!
Okay, so here's what you do: First, get yourself some vanilla beans. Nowadays you can get amazing deals on vanilla on this here internet. For example:
Shipping to the US:
Shipping to Europe:
Next, get yourself a bottle of alcohol. Vodka's a pretty great choice, since it's available everywhere and doesn't have much of its own flavor. I suggest getting a 500 ml bottle. (You can certainly use bourbon or rum, but for a neutral vanilla extract, vodka is good. If you happen to live in Italy or another country where pure alcohol is cheap and plentiful, you can buy that instead. Then use only 250 ml of alcohol and 250 ml of water.)
Now for the hard work. Select eight plump vanilla beans. Open the bottle of alcohol. Split the beans lengthwise and carefully scrape out all the seeds. Put the seeds in the bottle of alcohol and then the split beans. Close the bottle. Shake. Store. DONE. See what I mean? Stupid easy.
The recipe is easily doubled or halved or quadrupled or whatever. You can make many little bottles as gifts or one big bottle that you share with no one. It's up to you! Now, the longer you let the extract sit, the more flavorful it gets - but it's pretty much ready to use after a week or so of sitting. The best thing about this stuff is that every time you use some of your glorious homemade vanilla extract, you can top up the bottle with a bit more alcohol. Vanilla beans are so intense that they can handle being used a few times over.
And with that, I'm off to work on my other resolutions. Like meal planning! On that list thanks to you helpful folks.
Happy 2014! May this year bring you a lot of cauliflower, wheat berries, and chocolate!

Cooking is an art form. And as with any art, it takes time to master.
First, you learn the skill by copying someone else’s perfection. Recipe after recipe. You learn to broil, cream, and season. You practice until, finally, you close all cookbooks, reach into the pantry/fridge/veggie basket and create your own masterpiece. And then YOU KNOW; you’ve mastered the art of cooking! You are an artist.
After years of practice and experimentation, humbly yet with confidence, I can call myself a culinary artist!
And now that I can so easily express myself through cooking, I feel a need for a different form of self-expression. So, secretly, behind my kitchen’s back, I’ve taken up sketching…. I feel bad, as if I am cheating on my pots and pans with the new and shiny pencils and erasers… yet I continue listening to the voice inside me, and I keep on drawing.
My sketching is at its very early stages of evolution. I mainly draw inspiration from photographs. I sketch in black and white, following one very distinct style. I pick one simple subject: a meaningful facial expression, a gnarly smile, a telling silhouette… I turn my paper upside down; stroke by stroke, until finally a picture emerges. The act of sketching itself is therapeutic and meditating; while seeing the final result is completely intoxicating… Just like with cooking….
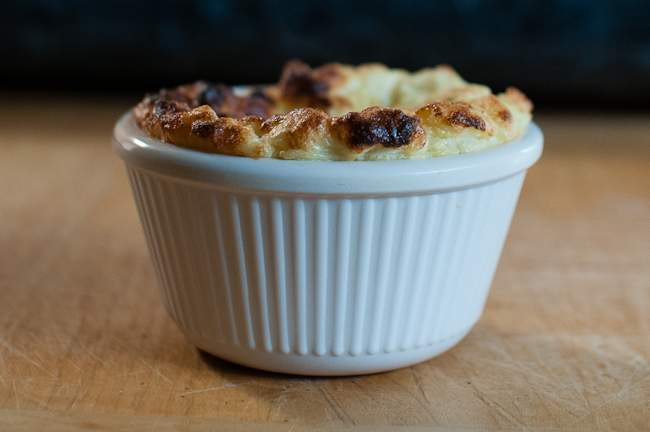
This new recipe was inspired by a master of simplicity, the one and only Malevich. I saw a picture of the dish in The Art Of Eating Well and it reminded me of White on White. Light, graceful, and delicate. Healthy, comforty, and clean. This souffle will tickle your senses and inspire you to start cooking again… and perhaps even drawing.
Adapted from The Art of Eating Well: An Italian Cookbook and The Iron You
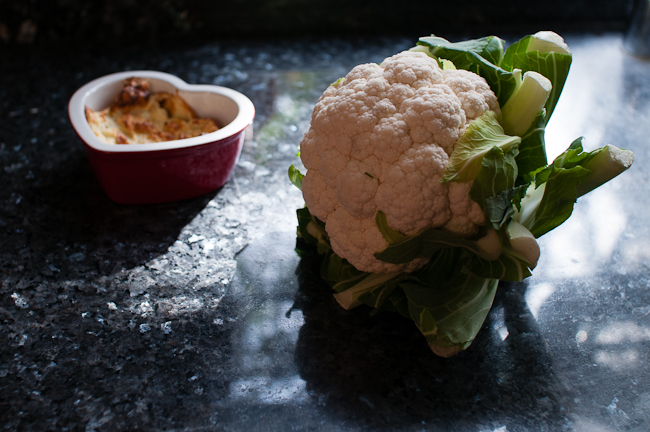
Once upon a time I was blown away by a food and wine pairing. A simple, creamy cauliflower dish with a bottle of vintage Chateauneuf du Pape Vieilles Vignes. To share :( This is probably the only French wine I will ever reference on Cucee (only because I am a supporter of local and talented wine makers).

It's always more fun to DIY. Every week, we'll spare you a trip to the grocery store and show you how to make small batches of great foods at home.
Today: Mandy from Lady and Pups replicates a Taiwanese street snack at home: crispy scallion pancakes, with plenty of layers.
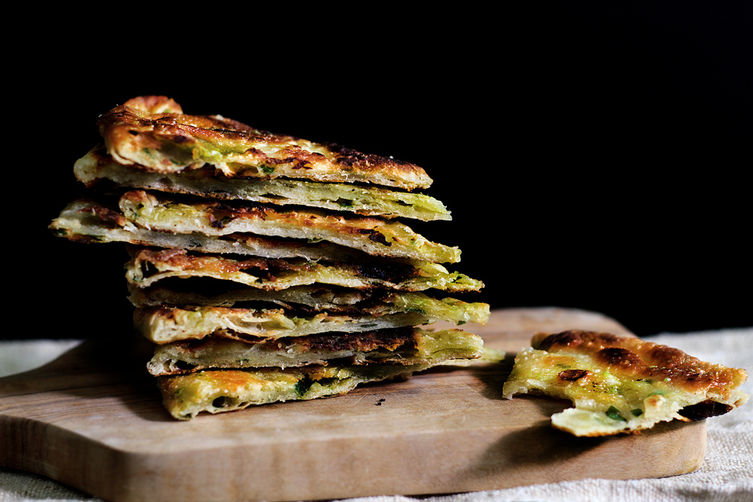
I can't tell you how many times I've tried and failed to make scallion pancakes over the past few years. They're one of my favorite street snacks in Taiwan: a thinly rolled out soft dough with layers of finely diced scallions, pan-fried to golden brown yumminess. It was a challenge to make a home-friendly version that tasted just as good -- not to mention the fact that the idea of replicating all of those layers was extremely daunting.
Did I mention the street-version is almost always fried in lard?

Luckily (or perhaps dangerously) for you, I think I did it. After years of harassing street vendors and a number of my mother's friends who allegedly make them, a love child was born. This scallion flatbread has a dough that's made with both all-purpose and bread flours, plus both hot water and cold water (a Chinese technique that creates both softness and body). Scallion oil with a pinch of baking soda puffs up the layers during cooking and boosts the overall flavor.
These can even make a hearty meal if you toss a golden brown flatbread on top of an egg that's still frying in the pan, and let them "stick" together, then brush some chili sauce over the top.

Multi-Layered Scallion Pancakes
Makes 4 large flatbreads
For the dough:
1 cup (130 grams) all-purpose flour
1 cup (140 grams) bread flour
2 teaspoons of sugar
1/4 teaspoon salt
1/2 cup (120 grams) hot water (150° F)
1/4 cup of cold/room temperature water
1/4 cup (50 grams) vegetable oil
For the scallion oil and fillings:
2 cups (105 grams) diced scallions, divided
1/2 cup (100 grams) vegetable oil
1 teaspoon salt
1 teaspoon ground white pepper, divided into 1/2 teaspoon each
1/4 teaspoon ground black pepper
1/8 teaspoon baking soda
Coarse sea salt, to taste
See the full recipe (and save and print it) here.
Photos by Mandy from Lady and Pups

[Photograph: Bobby Fisher]
Roy Choi's recipe for brussels sprouts and kimchi in his new cookbook/memoir, L.A. Son, is a prime example of his effortless expertise in Korean fusion. He throws sprouts, butter, kimchi, lemon, and shiso all together in a hot pan for a dish that looks like a miss-mashed stir-fry but tastes like a dish that's been made by countless cooks for generations. The heat of the kimchi is tempered ever-so-slightly by the butter and the sweetness of the caramelized brussels. Shiso and lemon are a fine finish to the dish, adding bright herbaceousness to the vegetables.
Why I picked this recipe: Brussels sprouts are a staple vegetable for me this time of year, and cooking them with kimchi offered a nice break from more typical preparations.
What worked: I loved the fact that this flavor-packed side dish was so easy and fast to prepare.
What didn't: No problems here.
Suggested tweaks: To make this dish a full meal, consider adding fried tofu or a poached egg on top, and serve with rice.
Reprinted with permission from L.A. Son: My Life, My City, My Food by Roy Choi with Tien Nguyen and Natasha Phan. Copyright 2013. Published by Anthony Bourdain/Ecco, an imprint of Harper Collins. All rights reserved. Available wherever books are sold.
serves Serves 1 to 2, active time 25 minutes, total time 25 minutes
Heat a pan over medium heat until it’s smoking. Add the oil and the brussels sprouts.
Move the pan around, caramelizing the sprouts, 5 to 7 minutes. Add the kimchi and toss.
Get some good color on everything, about 7 to 10 minutes, then add the butter. Swirl and season everything with salt, pepper, a squeeze of the lemon, and a sprinkle of the shiso leaves. Enjoy immediately.
Trey and I decided to update our dining room with a new table. I loved my wood pallet table. We've been through a lot with that table. You've probably noticed it in countless food posts here on ABM. But I just felt like I was ready for a change.
A few considerations/challenges we faced: Our dining room is more of a dining area/breakfast nook. It's quite small. We have people over quite a bit for drinks or dinner. So the more seating we can fit (comfortably) in the space the better. We really wanted to upgrade our table to seat six, instead of four. I wish we had space for a table that seats eight, like Elsie's dining room table. Maybe in our next house. Dare to dream. I also wanted a table I could move easily. I know, weird. But, depending what time of day I'm photographing the recipes you see here on the blog, I often need to move my dining room table closer to the window. And hairpin legs sometimes aren't best for scooching.Trey came up with the idea of creating a hexagon-shaped table. This proved to be a GREAT solution for maximizing the amount of seating our little dining area can accomodate. We also decided to use plumbing pipes fitted with casters (wheels) for the legs of the table. I have been loving the look of pipe leg tables lately.
Now, to outright buy a pipe leg table is quite expensive (we've seen them for upwards of $1500). Plumbing pipes are more expensive than you might guess (or at least more than we would guess). To build our table from scratch, with all the supplies, cost right around $250 to make—most of which was spent on the plumping pipes. So, this table was still a bit of an investment. But, we certainly saved a pretty penny by making our own rather than purchasing one (not to mention, we couldn't find a table for sale that really matched our exact needs). If plumbing pipes just don't fit your budget you could easily reduce your costs with hairpin legs or even painted PVC pipe.Supplies needed:
four 10x1-inch black iron nipple fittings (yes, they're actually called that, we learned)
eight 8x1-black iron nipple fittings
one 16x1-inch black iron nipple fittings
four 1-inch floor flanges
four wheels to fit 1 inch pipe (we got 3-in, size 6 casters with brakes from here)
six 1-inch black iron tee fittings
four 8-foot 1x12 wood planks (can be a bit longer, we'll be cutting this down)
six 4-foot 1x2 wood pieces (can be a bit longer, we'll be cutting this down too)
one 4-foot 1x8 hard wood piece (can be up to 3 inches wider or longer)
protractor
pencil
16 (at least) 0.75-inch screws
50 (or so) 1.25-inch screws
sand paper
wood stain (if using) and polyurethane (we used semi-gloss)
You will also need a couple clean rags or brushes, a power saw and drill. With the exception of the fitted casters (you could replace with 4 more flanges if you don't want the mobility), we were able to find all necessary supplies at our local hardware stores.First, secure your four 8-foot planks together using your 4-foot hardwood piece using the 1.25-inch screws.
Next, you're drawing your hexagon. Don't let yourself get too overwhelmed by this part, but there's a little math involved here. Trey found this regular hexagon (all angles and sides of a regular hexagon are equal) calculator to make it a little easier for him. To figure out your side, you just need to measure the width of the 4 1x12 boards next to each other and divide that by 2. That number will be your inradius. As you may or may not know 1x12 doesn't necessarily mean your wood is 1 inch by 12 inches. That's actually the measurements before the wood is dried, so 1x12 is more like 0.8x11.25. Never figured out why it's labeled like it is, but I'll leave that to the experts. Anyway, luckily your box stores like Home Depot and Lowe's are pretty consistent with their wood sizings, so you could probably get away with using our measurements:
• Inradius: 22.5 inches
• Sides: 26 inches
• Corner angles: 120° (true of all regular hexagons)
Really, all you need to know is the length of the sides of your hexagon (all are 26 inches) and the angle of your corners. Then the rest sorts itself out. So center, measure, and mark 26 inches on either side of your 4 wood planks attached together. These should be exactly across from each other. Now break out your protractor (super cheap and can be found at any hardware store), set it to 120°, and place it at the end of all of your 26-inch side marking. Draw yourself a starting reference line, and use a longer straight edge to continue it, completing the side. You actually only need to do this 4 times, as the remaining 2 corners create themselves. And just like that, your hexagon is drawn.Follow your drawing to cut the edges of the table.
Put together your pipes to make sure they suit your table well. Maybe you want to swap out one of your pipe pieces for something longer or shorter (we had a little trial-and-error check with ours). This can be done by one person, but it's much easier with two—especially if that second person is willing to run back to the hardware store to get a different length of pipe. Just FYI.
For the lip, we didn't bother being nearly as exact on our anges, since they were pretty much never going to be seen. Cut 6 26-in pieces from your 1x2s. Then, cut overcompensated inward angles (like you're making the bottom level of a pyramid). We just eyeballed the angles but made sure the ends stayed exactly 26 inches. So once you were looking at the finished table, the corners were seamless. Then, using your 1.25-inch screws, secure the lip in place. This sturdies the table and makes it look quite a bit cleaner/more professional.
TIP: Your wood will never be perfect and is bound to have some warping here and there. After you've secured you lip, take a look and see if some of your main planks are sticking up a little. If so, just use the scrap from your 1x2s to secure the four main planks together even more. Just be sure you don't put anything in the way of your table's legs.Next sand the entire table, so it's super smooth. If you are staining, add your color choice. We used wheat stain. Allow to fully dry. Seal with polyurethane. We used two coats for extra protection.
Once that's dry you're ready to screw the legs and wheels onto the table top (this is where you use your 0.75-inch screws). You can also do this before you sand/stain. But we were still waiting on our wheels to come in the mail at this point. There are several methods for adding the wheels to the table, but these were super easy. Just pop them on, tighten the bolt underneath just a little, and you're good to go!I love our new table! We added two more ghost chairs (gifted to us by Elsie) to our existing four we already had. I think ghost chairs are the perfect fit with our dining space. It keeps the area from looking overly cluttered, since we're trying to fit 6 people and chairs into a relatively small space. We also moved our vintage cow hide rug from the living room to the dining room. Our dining area is one of the most high traffic spots in our home, and I love how our cow hide rug has held up against all the dog hair (we have three dogs, too much?) and foot traffic so far. Even with it being vintage (no clue how old it actually is), they are actually surprisingly durable and easy to clean.
I can't wait for our next dinner party. Now we can invite an extra couple! Thanks for letting us share our new dining room table with you all. xo. Emma + Trey
P.S. Our ghost chairs are all from Amazon, the peg board is a DIY, cow hide rug is vintage from Red Velvet and the "pot luck" letters are vintage from Funtiques.
Credits // Authors: Emma Chapman and Trey George, Photography by: Emma Chapman
")


[Photographs: J. Kenji Lopez-Alt]
About the author: J. Kenji Lopez-Alt is the Chief Creative Officer of Serious Eats where he likes to explore the science of home cooking in his weekly column The Food Lab. You can follow him at @thefoodlab on Twitter, or at The Food Lab on Facebook.
Every recipe we publish is tested, tasted, and Serious Eats-approved by our staff. Never miss a recipe again by following @SeriousRecipes on Twitter!
Special equipment: .3-ounce half sphere silicone mold, 1.5 ounce half sphere silicone mold, chinois or fine mesh strainer, food processor or box grater, and a wok or Dutch oven for deep frying
serves Makes about 12 stuffing fritters, active time 2 hours, total time 3 hours
Combine cranberries, sugar, and water in a small saucepan and bring to a simmer over medium-high heat. Cook, stirring occasionally and breaking up cranberries with a wooden spoon or spatula until cranberries have all popped, about 10 minutes. Strain mixture through a fine mesh strainer. Fill 24 cavities in a .3-ounce half sphere silicone mold with cranberry mixture. Refrigerate until set, then remove half of the hemispheres and place them on top of the other half to create full spheres. Press gently on each one to stick two halves together. Cover with plastic and transfer to freezer until frozen.
Combine stuffing with 1 egg and fold with hands until combined. Fill 12 wells in a 1.5 ounce half sphere silicone mold with stuffing mixture, then press a frozen cranberry sphere into the center of each one. Top with more stuffing mixture, sculpting it to create as perfect a sphere as possible and ensuring that the cranberry sphere does not show. Transfer to freezer until completely frozen, about 1 hour.
Peel potato and grate using the grating attachment of a food processor or the large holes of a box grater. Transfer to a large bowl. Grate onion and add to potatoes. Add remaining two eggs, flour, 3 tablespoons chives, 2 teaspoons salt, and a generous grind of black pepper. Mix with hands, adding more flour as necessary until mixture holds together.
Heat oil to 400°F in a large wok or Dutch oven. Adjust flame to maintain temperature. Preheat oven to 300°F. Working one at a time, remove a stuffing ball from the silicone mold and transfer to potato mixture. Use your hands to carefully mold a thin layer of potato mixture around the ball, then gently lower into hot oil. Repeat until you have four balls in the oil. Oil temperature will drop to about 300°F. Increase heat and adjust the flame to maintain a temperature of 325°F for the duration of the cooking time.
Fry balls, agitating oil and turning occasionally until deep golden brown and hot throughout (use a cake tester or thermometer to test internal temperature), about 8 minutes. Transfer to a paper towel-lined bowl using a slotted spatula, season with salt, and transfer to a wire rack set in a rimmed baking sheet. Hold in oven while you fry the remaining balls in 2 more batches, reheating oil to 400°F before adding each new batch.
When all balls are fried, season with salt in a large bowl, toss with remaining chives, and serve with hot gravy.
In Food History 101, we're hitting the books -- to explore the who, what, when, where, and why of what we eat today.
Today: Turns out Passover isn't the only Jewish holiday with a seder plate.

Most people associate a seder plate with the Passover holiday -- and they associate apples dipped in honey with Rosh Hashanah. But well before apples entered the scene, there was a seder plate on the Rosh Hashanah table. Rosh Hashanah is one of the few Jewish holidays that focuses not on an event -- like Passover's celebration of the exodus from Egypt -- but rather on self-reflection and prayers. Each item on the seder plate represents a prayer for the year to come.
According to Jewish food historian Gil Marks who (literally) wrote the book on Jewish Food, the original five simanim, or symbolic foods on the seder plate -- gourds, fenugreek or black-eyed peas, leeks, chard or beet greens, and dates -- were first documented the Talmud (the book of Jewish rabbinic law) in 400-500 CE. The impetus for using each of these five fruits and vegetables was to make puns -- that’s right, puns in Hebrew or Aramaic! For example, the Hebrew word for gourd is related to the word for "called out," suggesting a blessing that one's merits be called out and recognized. These word plays are continually updated; some eat dates while praying for romantic connections in the coming year. The exact make-up of the Rosh Hashanah seder plate varies by community, geographic location, and ancestry. And families who don’t start their meal with a seder plate nonetheless incorporate some of the symbolic foods into the dishes they serve.


Now let’s get back to those apples, which were first associated with Rosh Hashanah in France circa 1100 CE. Soon, German and other Eastern European Ashkenazi Jews began the tradition of dipping apple slices into honey for a sweet year. However, among Sephardim (Jews who trace their family roots back to pre-Inquisition Spain and Portugal, the Babylonian Era, or Northern Africa), the quince is the quintessential Rosh Hashanah fruit. You may only know of quince as the main component in the membrillo on your cheese plate, but around Rosh Hashanah, this fruit is incorporated into syrups, preserves, stews, and cakes.

Over the years, other symbolic foods have entered the Rosh Hashanah lexicon: sweet carrots, pomegranates, and sesame seeds to increase one's merits, challahs studded with raisins and braided into circles to represent the continuity of life, and the head of a fish or lamb with the hope to be a head (rosh in Hebrew means head) -- a leader instead of a follower. If you're squeamish and don't want an entire lamb head on your table, serve lamb as a main course.

To coin an original Rosh Hashanah-style salutation: This year, may your seder plate prayers be answered, may your merits increase like the seeds of a pomegranate, and may you eat well. Very very well.
Photos by James Ransom, Emiko Davies, and Cookie and Kate


