Shared posts

25 Feb 14:31

How to upload file via Swagger in ASP.NET Core Web API

by Talking Dotnet

Swagger is a simple, clean and powerful representation of your RESTful API. Once integrated with WEB API, it provides a UI which helps in testing the API with ease. In my earlier post, I explained about how to integrate swagger with the ASP.NET Core Web API. And it works great with all HTTP verbs and input parameters. But uploading a file via Swagger is not straightforward. In this post, let’s find out how to upload file via Swagger in ASP.NET Core Web API.

Upload file via Swagger in ASP.NET Core Web API

Before you read further, please read my post and know how to add swagger to your ASP.NET Core project. Now let’s add a method to your controller, which take IFromFile as input parameter. IFromFile represents a file sent with the HttpRequest and it is available in the Microsoft.AspNet.Http namespace. For the demo, this method is added to default controller (ValuesController) available with default ASP.NET Core Web API template.

[HttpPost]
[Route("upload")]
public void PostFile(IFormFile uploadedFile)
{
   //TODO: Save file
}

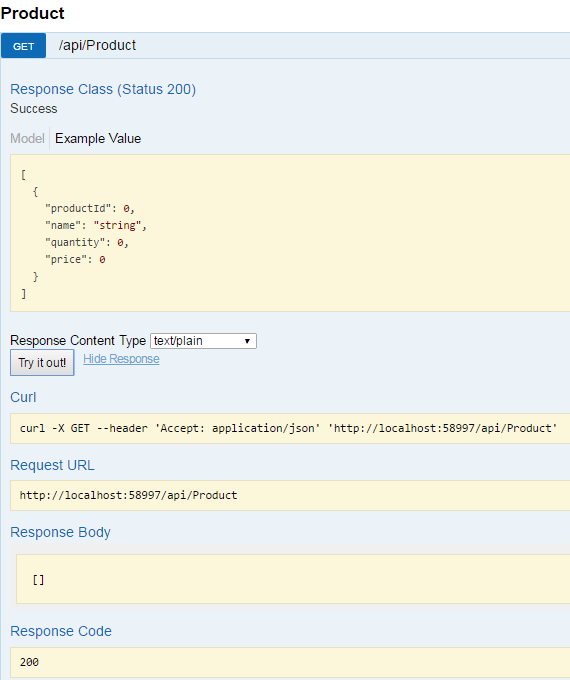
And now when you run the application and navigate to upload method, you will see the following.

How to upload file via Swagger in ASP.NET Core

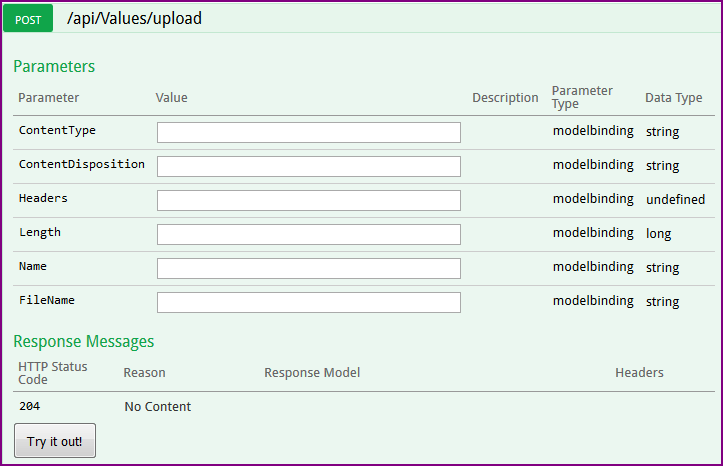
Instead of file upload control, you see multiple input boxes. Well, these are properties of IFromFile which represents the uploaded file. But, you can’t upload file with these input boxes. Rather, a file upload control will make your life simple. Let’s find out how to get file upload control, instead of these input boxes.

Swashbuckle has IOperationFilter which allows to post-modify operation descriptions once they’ve been generated by wiring up one or more Operation filters. Implementing this filter will provide the option to modify or replace the operation parameters. To implement IOperationFilter, let’s add a class FileUploadOperation which implement this filter. IOperationFilter has only one method called Apply to implement.

public class FileUploadOperation : IOperationFilter
{
    public void Apply(Operation operation, OperationFilterContext context)
    {
        if (operation.OperationId.ToLower() == "apivaluesuploadpost")
        {
            operation.Parameters.Clear();
            operation.Parameters.Add(new NonBodyParameter
            {
                Name = "uploadedFile",
                In = "formData",
                Description = "Upload File",
                Required = true,
                Type = "file"
            });
            operation.Consumes.Add("multipart/form-data");
        }
    }
}

This filter will replace the multiple input boxes with file upload control. The above code does following things.

  • It first checks for operation with OperationId as “apivaluesuploadpost“. The operationId name is a combination of couple of parameters. It is made up of “api” + [Controller name] + [Method Name] + [HTTP Verb].
    Or in other words, it is the URL of your controller method, but without “/” + [HTTP Verb].
  • It clears all the parameters. So all the properties of IFromFile interface are cleared.
  • And then adds custom parameters to the operation. Please note, the Name parameter value must be equal to parameter name to the method. So in this case, it is “uploadedFile” PostFile(IFormFile uploadedFile). In property must be set to “formData” and Type must be “file”.
  • Finally, consume type multipart/form-data which is required for file transfer from client to server.

And final step is to register this operation filter in Startup.cs.

services.AddSwaggerGen();
services.ConfigureSwaggerGen(options =>
{
    options.SingleApiVersion(new Info
    {
        Version = "v1",
        Title = "My API",
        Description = "My First Core Web API",
        TermsOfService = "None",
        Contact = new Contact() { Name = "Talking Dotnet", Email = "contact@talkingdotnet.com", Url = "www.talkingdotnet.com" }
    });
    options.IncludeXmlComments(GetXmlCommentsPath());
    options.DescribeAllEnumsAsStrings();
    options.OperationFilter<FileUploadOperation>(); //Register File Upload Operation Filter
});

Now when you run the application and navigate to Upload method. And you should see following.

How to upload file via Swagger in ASP.NET Core Web API

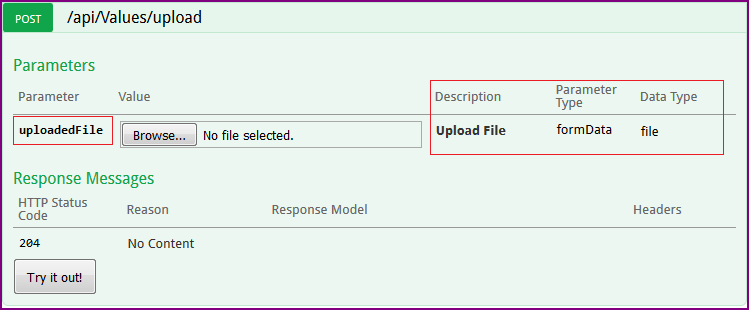
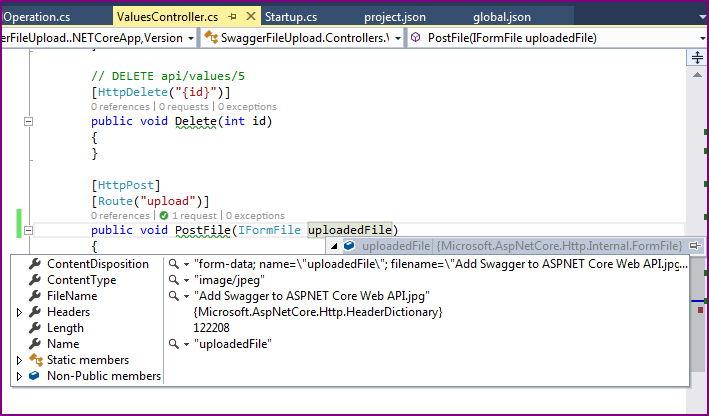
There is a file upload control and all the parameters that we configured are also present on UI (as highlighted in the image). When you select a file to upload and navigate to VS in debugging mode, you can see IFormFile object holds the uploaded file.

How to upload file via Swagger in ASP.NET Core Web API-2

That’s it.

To sum up things, to support file uploading via Swagger UI, IOperationFilter provided by SwashBuckle needs to be implemented to modify post operation description for the web API method which supports file uploading.

Thank you for reading. Keep visiting this blog and share this in your network. Please put your thoughts and feedback in the comments section.

The post How to upload file via Swagger in ASP.NET Core Web API appeared first on Talking Dotnet.

25 Feb 13:54

Basics of Web Application Security: Authorize Actions

Authentication means you know who your user is, protecting their session ensures that information stays correct. Now Cade and Daniel move on to authorization: checking that users only do what they are allowed to do. Authorization should always be checked on the server and should deny by default. Actual authorization schemes are domain-specific, but some common patterns help get you started.

more…

19 Feb 12:49

What’s brewing in Visual Studio Team Services: January 2017 Digest

by Buck Hodges

This post series provides the latest updates and news for Visual Studio Team Services and is a great way for Azure users to keep up-to-date with new features being released every three weeks. Visual Studio Team Services offers the best DevOps tooling to create an efficient continuous integration and release pipeline to Azure. With the rapidly expanding list of features in Team Services, teams can start to leverage it more efficiently for all areas of their Azure workflow, for apps written in any language and deployed to any OS.

Release Management is generally available

Release Management is now generally available. Release Management enables you to create a continuous deployment pipeline for your applications with fully automated deployments, seamless integration with Azure, and end to end traceability.

release-summary

Azure App Services Continuous Delivery

Additionally, Release Management is now available in the Azure Portal. You can start using this feature today by navigating to your app’s menu blade in the Azure portal and clicking on APP DEPLOYMENT > Continuous Delivery (Preview).

azure-cd-entry-point

Package Management is generally available

Package Management is available as an extension to Team Services and Team Foundation Server 2017 for hosting your packages and making them available to your team, your builds, and your releases. In addition to support for NuGet packages, Package Management now support npm packages. If you’re a developer working with node.js, JavaScript, or any of its variants, you can now use Team Services to host private npm packages right alongside your NuGet packages.

npm in Package Management

Work Item Search is now in public preview

While Code Search is the most popular extension for Team Services and has been available for a while now, Work Item Search is now available in public preview. You can install the free Work Item Search extension from the Team Services Marketplace. With Work Item Search you can quickly and easily find relevant work items by searching across all work item fields over all projects in an account. You can perform full text searches across all fields to efficiently locate relevant work items. Use in-line search filters, on any work item field, to quickly narrow down to a list of work items.

workitem-search

Import TFS servers directly into Team Services

We are very excited to announce the preview of the TFS Database Import Service for Visual Studio Team Services. In the past, we have had various options that offered a low-fidelity method for migrating your data.  The difference today is that the TFS Database Import Service is a high-fidelity migration that brings over your source code history, work items, builds, etc. and keeps the same ID numbers, traceability, settings, permissions personalizations, and much more.  Our goal for your final production import is that your team will be working in TFS on a Friday and then be continuing their work in Visual Studio Team Services when they come back to work on Monday.

TFS to VSTS Migration Diagram

Public preview of Linux in the hosted build pool

That’s right – we have added Linux containers to our host build pool. These are running on Ubuntu Linux inside the vsts-agent-docker container. This container includes all the standard Java, Node, Docker, and .NET Core tooling. You can create or spawn other Docker containers as part of your build or release process using either a script or the Docker extension in the Visual Studio Marketplace. To use Linux, just choose Hosted Linux Preview for the default agent queue in the General section of your build definition.

image

Improvements to the pull request experience

We continue to enhance the pull request experience, and we’ve now added the ability to see the changes in a PR since you last looked at it, add attachments in comments, and to see and resolve merge conflicts.

The pull request overview highlights the updates since your last visit.

JBoss and WildFly extension

The JBoss and WildFly extension provides a task to deploy your Java applications to an instance of JBoss Enterprise Application Platform (EAP) 7 or WildFly Application Server 8 and above over the HTTP management interface.  It also includes a utility to run CLI commands as part of your build/release process.  Check out this video for a demo. This extension is open sourced on GitHub so reach out to us with any suggestions or issues.  We welcome contributions.

screenshot

There are many more updates, so I recommend taking a look at the full list of new features in the release notes for November 23rd and January 5th.

Happy coding!

18 Feb 10:10

SQL Database Query Editor available in Azure Portal

by Ninar Nuemah

We are excited to announce the availability of an in-browser query tool that provides you an efficient way to execute queries on your Azure SQL Databases and SQL Data Warehouses without leaving the Azure Portal. This SQL Database Query Editor is now in public preview in the Azure Portal.

With this editor, you can access and query your database without needing to connect from a client tool or configure firewall rules.

The various features in this new editor create a seamless experience for querying your database.

Query Editor capabilities

Connect to your database

Before executing queries against your database, you must login with either your SQL server or Azure Active Directory (AAD) credentials. If you are the AAD admin for this SQL server, you will be automatically logged in when you first open the Query Editor using AAD single sign-on.

Learn more about how to configure your AAD server admin. If you are not currently taking advantage of Azure Active Directory, you can learn more.

Write and execute T-SQL scripts

If you are already familiar with writing queries in SSMS, you will feel right at home in the in-browser Query Editor.

Many common queries can be run in this editor, such as create new table, display table data, edit table data, create a stored procedure, or drop table. You have the flexibility to execute partial queries or batch queries in this editor. And by utilizing syntax highlighting and error indicating, this editor makes writing scripts a breeze.

Additionally, you can easily load an existing query file into the Query Editor or save your current script in this editor to your local machine. This ability provides you the convenience to save and port the queries between editors.

Manage query results

Another similarity between this Query Editor and SSMS is the ability to resize the Results pane to get the desired ratio between the Editor and Results sections. You can also filter results by keyword rather than having to scroll through all the output.

How to find Query Editor

SQL Database

You can find this experience by navigating to your SQL database and clicking the Tools command and then clicking Query Editor (preview), as shown in the screenshots below. While this feature is in public preview, you will need to accept the preview terms before using the editor.

SQL Database Find Query Editor

SQL Database Query Editor

SQL Data Warehouse

You can find this experience by navigating to your SQL data warehouse and clicking on Query Editor (preview), shown in the screenshot below. While this feature is in public preview, you will need to accept the preview terms before using the editor.

SQL Data Warehouse Find Query Editor

Run sample query

You can quickly test out the editor by running a simple query, such as in the screenshot below.

Sample query

Send us feedback!

Please reach out to us with feedback at sqlqueryfeedback@microsoft.com.

18 Feb 10:07

Event Hubs .NET Standard client is now generally available

by John Taubensee

After several months of testing, both internally and by our users (thank you), we are releasing our newest Event Hubs clients to general availability. This means that these new libraries are production ready and fully supported by Microsoft.

What new libraries are available?

Consistent with our past design decisions, we are releasing two new NuGet packages:

  1. Microsoft.Azure.EventHubs – This library comprises the Event Hubs specific functionality that is currently found in the WindowsAzure.ServiceBus library. In here you will be able to do things like send and receive events from an Event Hub.
  2. Microsoft.Azure.EventHubs.Processor – Replaces functionality of the Microsoft.Azure.ServiceBus.EventProcessorHost library. This is the easiest way to receive events from an Event Hub, and keeps you from having to remember things such as offsets and partition information between receivers.

What does this mean for you?

Releasing these new libraries provides three major benefits:

  1. Runtime portability – Using .NET Standard, we now have the ability to write a single code base that is portable across different .NET runtimes, including .NET Core, .NET framework, and the Universal Windows Platform. You can take this library and run it on Windows Server with .NET Framework 4.6, or on a Mac/Linux machine using .NET Core.
  2. Open source – Yes! We are very excited that these new libraries are open source and available on GitHub. We love the interactions that we have with our customers, whether it be an issue or pull request.
  3. Event Hubs now has its own library – while Event Hubs and Service Bus have been seemingly joined in the past, the use cases between these two products are often times different. Previously, you needed to download a Service Bus library in order to use Event Hubs. These new libraries are specific to Event Hubs, so we hope that they will make things more clear for our new users.

What's next?

For those of you currently using the WindowsAzure.ServiceBus library, we will continue to support Event Hubs workloads on this library for the foreseeable future. With that said, we currently have a .NET Standard Service Bus library in preview!

For more information on getting started with these new libraries , check out our updated getting started documentation.

So take the new libraries for a spin, and let us know what you think!

13 Feb 16:25

What .NET Developers ought to know to start in 2017

by Scott Hanselman

.NET ComponentsMany many years ago I wrote a blog post about what .NET Developers ought to know. Unfortunately what was just a list of questions was abused by recruiters and others who used it as a harsh litmus test.

There's a lot going on in the .NET space so I thought it would be nice to update with a gentler list that could be used as a study guide and glossary. Jon Galloway and I sat down and put together this list of terms and resources.

Your first reaction might be "wow that's a lot of stuff, .NET sucks!" Most platforms have similar glossaries or barriers to entry. There's TLAs (three letter acronyms) in every language and computer ecosystems. Don't get overwhelmed, start with Need To Know and move slowly forward. Also, remember YOU decide when you want to draw the line. You don't need to know everything. Just know that every layer and label has something underneath it and the whatever program you're dealing with may be in a level you have yet to dig into.

Draw a line under the stuff you need to know. Know that, and know you can look the other stuff up.  Some of us want the details – the internals. Others don't. You may learn from the Metal Up or from the Glass Back. Know your style, and revel in it.

First, you can start learning .NET and C# online at https://dot.net. You can learn F# online here http://www.tryfsharp.org. Both sites let you write code without downloading anything. You just work in your browser.

When you're ready, get .NET Core and Visual Studio Code at https://dot.net and start reading! 

Need To Know

  • What's .NET? .NET has some number of key components. We'll start with runtimes and languages.
  • Here are the three main runtimes:
    • .NET Framework - The .NET framework helps you create mobile, desktop, and web applications that run on Windows PCs, devices and servers.
    • .NET Core - .NET Core gives you a fast and modular platform for creating server applications that run on Windows, Linux and Mac.
    • Mono for Xamarin - Xamarin brings .NET to iOS and Android, reusing skills and code while getting access to the native APIs and performance. Mono is an open source .NET that was created before Xamarin and Microsoft joined together. Mono will support the .NET Standard as another great .NET runtime that is open source and flexible. You'll also find Mono in the Unity game development environment.
  • Here are the main languages:
    • C# is simple, powerful, type-safe, and object-oriented while retaining the expressiveness and elegance of C-style languages. Anyone familiar with C and similar languages will find few problems in adapting to C#. Check out the C# Guide to learn more about C# or try it in your browser at https://dot.net
    • F# is a cross-platform, functional-first programming language that also supports traditional object-oriented and imperative programming. Check out the F# Guide to learn more about F# or try it in your browser at http://www.tryfsharp.org 
    • Visual Basic is an easy language to learn that you can use to build a variety of applications that run on .NET. I started with VB many years ago.
  • Where do I start?
  • After runtimes and languages, there's platforms and frameworks.
    • Frameworks define the APIs you can use. There's the .NET 4.6 Framework, the .NET Standard, etc. Sometimes you'll refer to them by name, or in code and configuration files as a TFM (see below)
    • Platform (in the context of .NET) - Windows, Linux, Mac, Android, iOS, etc. This also includes Bitness, so x86 Windows is not x64 Windows. Each Linux distro is its own platform today as well.
  • TFMs (Target Framework Moniker) - A moniker (string) that lets you refer to target framework + version combinations. For example, net462 (.NET 4.6.2), net35 (.NET 3.5), uap (Universal Windows Platform). For more information, see this blog post. Choosing a TFM decides which APIs are available to you, and which frameworks your code can run on.
  • NuGet - NuGet is the package manager for the Microsoft development platform including .NET. The NuGet client tools provide the ability to produce and consume packages. The NuGet Gallery is the central package repository used by all package authors and consumers.
  • What's an Assembly? - An assembly is typically a DLL or EXE containing compiled code. Assemblies are the building blocks of .NET Full Framework applications; they form the fundamental unit of deployment, version control, reuse, activation scoping, and security permissions. In .NET Core, the building blocks are NuGet packages that contain assemblies PLUS additional metadata
  • .NET Standard or "netstandard" - The .NET Standard simplifies references between binary-compatible frameworks, allowing a single target framework to reference a combination of others. The .NET Standard Library is a formal specification of .NET APIs that are intended to be available on all .NET runtimes.
  • .NET Framework vs. .NET Core: The .NET Framework is for Windows apps and Windows systems, while the .NET Core is a smaller cross platform framework for server apps, console apps, web applications, and as a core runtime to build other systems from.

Should Know

    • CLR – The Common Language Runtime (CLR), the virtual machine component of Microsoft's .NET framework, manages the execution of .NET programs. A process known as just-in-time compilation converts compiled code into machine instructions which the computer's CPU then executes.
    • CoreCLR - .NET runtime, used by .NET Core.
    • Mono - .NET runtime, used by Xamarin and others.
    • CoreFX - .NET class libraries, used by .NET Core and to a degree by Mono via source sharing.
    • Roslyn - C# and Visual Basic compilers, used by most .NET platforms and tools. Exposes APIs for reading, writing and analyzing source code.
    • GC - .NET uses garbage collection to provide automatic memory management for programs. The GC operates on a lazy approach to memory management, preferring application throughput to the immediate collection of memory. To learn more about the .NET GC, check out Fundamentals of garbage collection (GC).
    • "Managed Code" - Managed code is just that: code whose execution is managed by a runtime like the CLR.
    • IL – Intermediate Language is the product of compilation of code written in high-level .NET languages. C# is Apples, IL is Apple Sauce, and the JIT and CLR makes Apple Juice. ;)
    • JIT – Just in Time Compiler. Takes IL and compiles it in preparation for running as native code.
    • Where is  .NET on disk? .NET Framework is at C:\Windows\Microsoft.NET and .NET Core is at C:\Program Files\dotnet. On Mac it usually ends up in /usr/local/share. Also .NET Core can also be bundled with an application and live under that application's directory as a self-contained application.
    • Shared Framework vs. Self Contained Apps - .NET Core can use a shared framework (shared by multiple apps on the same machine) or your app can be self-contained with its own copy. Sometimes you'll hear "xcopy-deployable / bin-deployable" which implies that the application is totally self-contained.
    • async and await– The async and await keywords generate IL that will free up a thread for long running (awaited) function calls (e.g. database queries or web service calls). This frees up system resources, so you aren't hogging memory, threads, etc. while you're waiting.
    • Portable Class Libraries -  These are "lowest common denominator" libraries that allow code sharing across platforms. Although PCLs are supported, package authors should support netstandard instead. The .NET Platform Standard is an evolution of PCLs and represents binary portability across platforms.
    • .NET Core is composed of the following parts:
      • A .NET runtime, which provides a type system, assembly loading, a garbage collector, native interop and other basic services.
      • A set of framework libraries, which provide primitive data types, app composition types and fundamental utilities.
      • A set of SDK tools and language compilers that enable the base developer experience, available in the .NET Core SDK.
      • The 'dotnet' app host, which is used to launch .NET Core apps. It selects the runtime and hosts the runtime, provides an assembly loading policy and launches the app. The same host is also used to launch SDK tools in much the same way.

    Nice To Know

      • GAC – The Global Assembly Cache is where the .NET full Framework on Windows stores shared libraries. You can list it out with "gacutil /l"  
      • Assembly Loading and Binding - In complex apps you can get into interesting scenarios around how Assemblies are loaded from disk
      • Profiling (memory usage, GC, etc.) - There's a lot of great tools you can use to measure – or profile – your C# and .NET Code. A lot of these tools are built into Visual Studio.
      • LINQ - Language Integrated Query is a higher order way to query objects and databases in a declarative way
      • Common Type System and Common Language Specification define how objects are used and passed around in a way that makes them work everywhere .NET works, interoperable. The CLS is a subset that the CTS builds on.
      • .NET Native - One day you'll be able to compile to native code rather than compiling to Intermediate Language.
      • .NET Roadmap - Here's what Microsoft is planning for .NET for 2017
      • "Modern" C# 7 – C# itself has new features every year or so. The latest version is C# 7 and has lots of cool features worth looking at.
      • Reactive Extensions - "The Reactive Extensions (Rx) is a library for composing asynchronous and event-based programs using observable sequences and LINQ-style query operators." You can create sophisticated event-based programs that work cleanly and asynchronously by applying LINQ-style operators to data streams.

      NOTE: Some text was taken from Wikipedia's respective articles on each topic, edited for brevity. Creative Commons Attribution-ShareAlike 3.0. Some text was taken directly from the excellent .NET docs. This post is a link blog and aggregate. Some of it is original thought, but much is not.


      Sponsor: Big thanks to Raygun! Join 40,000+ developers who monitor their apps with Raygun. Understand the root cause of errors, crashes and performance issues in your software applications. Installs in minutes, try it today!


      © 2016 Scott Hanselman. All rights reserved.
           
      13 Feb 16:23

      Monday Vision, Daily Outcomes, Friday Reflection for Remote Team Management

      by Scott Hanselman

      Monday Vision, Friday ReflectionMy friend J.D. Meier has an amazing blog called Sources of Insight and he's written a fantastic book called Getting Results the Agile Way. You can buy his book on Amazon (it's free on Kindle Unlimited!). I put J.D. up there with David Allen and Stephen Covey except J.D. is undiscovered. For real. If you've seen my own live talk on Personal Productivity and Information Overload you know I reference J.D.'s work a lot.

      I've been a people manager as well as an IC (individual contributor) for a while now, and while I don't yet have the confidence to tell you I'm a good manager, I can tell you that I'm trying and that I'm introspective about my efforts.

      My small team applies J.D.'s technique of "Monday Vision, Daily Outcomes, Friday Reflection" to our own work. As he says, this is the heart of his results system.

      The way it works is, on Mondays, you figure out the 3 outcomes you want for the week.  Each day you identify 3 outcomes you want to accomplish.  On Friday, you reflect on 3 things going well and 3 things to improve.  It’s that simple. - J.D. Meier

      We are a remote team and we are in three different time zones so the "morning standup" doesn't really work so well for us. We want a "scrum" style standup, but we're a team that lives in Email/Slack/Microsoft Teams/Skype.

      Here's how Monday Vision works for us as a team. We are transparent about what we're working on and we are honest about what works and when we stumble.

      • On Monday morning each of us emails the team with:
        • What we hope to accomplish this week. Usually 3-5 things.
        • This isn't a complete list of everything on our minds. It's just enough to give context and a vector/direction.

      It's important that we are clear on what our goals are. What would it take for this week to be amazing? What kinds of things are standing in our way? As a manager I think my job is primarily as traffic cop and support. My job is to get stuff out of my team's way. That might be paperwork, other teams, technical stuff, whatever is keeping them out of their flow.

      These emails might be as simple as this (~real) example from a team member.

      Last Week:

      • DevIntersection Conference
        • Workshop and 2 sessions
      • Got approval from Hunter for new JavaScript functionality

      This Week:

      • Trip Report, Expenses, and general administrivia from the event last week
      • Final planning for MVP Summit
      • Spring Planning for ASP.NET Web Forms, IIS Express, EF4, WCF, and more 
      • Modern ASP.NET Web Forms research paper
      • Thursday evening – presenting over Skype to the London.NET user-group “Introduction to Microservices in ASP.NET Core”

      Again, the lengths and amount of detail vary. Here's the challenge part though - and my team hasn't nailed this yet and that's mostly my fault - Friday Reflection. I have an appointment on my calendar for Friday at 4:30pm to Reflect. This is literally blocked out time to look back and ask these questions....

      • On Friday evening on the way out, email the team with:
        • What worked this week? Why didn't Project Foo get done? Was the problem technical? Logistical? Organizational?
        • Did you feel amazing about this week? Why? Why not? How can we make next week feel better?

      What do you do to kick off and close down your week?

      Related J.D. Meier productivity reading


      Sponsor: Big thanks to Raygun! Join 40,000+ developers who monitor their apps with Raygun. Understand the root cause of errors, crashes and performance issues in your software applications. Installs in minutes, try it today!


      © 2016 Scott Hanselman. All rights reserved.
           
      07 Feb 19:36

      Microsoft hosts the Windows source in a monstrous 300GB Git repository

      by Peter Bright

      Enlarge (credit: Git)

      Git, the open source distributed version control system created by Linus Torvalds to handle Linux's decentralized development model, is being used for a rather surprising project: Windows.

      Traditionally, Microsoft's software has used a version control system called Source Depot. This is proprietary and internal to Microsoft; it's believed to be a customized version of the commercial Perforce version control system, tailored for Microsoft's larger-than-average size. Over the years, Redmond has also developed its own version control products. Long ago, the company had a thing called SourceSafe, which was reputationally the moral equivalent to tossing all your precious source code in a trash can and then setting it on fire thanks to the system's propensity to corrupt its database. In the modern era, the Team Foundation Server (TFS) application lifecycle management (ALM) system offered Team Foundation Version Control (TFVC), a much more robust, scalable version control system built around a centralized model.

      Much of the company uses TFS not just for version control but also for bug tracking, testing, automated building, and project management. But large legacy products, in particular Windows and Office, stuck with Source Depot rather than adopting TFVC. The basic usage model and theory of operation between Source Depot and TFVC are pretty similar, as both use a centralized client-server model.

      Read 15 remaining paragraphs | Comments

      05 Feb 11:58

      I'm Loyal to Nothing Except the Dream

      by Jeff Atwood

      There is much I take for granted in my life, and the normal functioning of American government is one of those things. In my 46 years, I've lived under nine different presidents. The first I remember is Carter. I've voted in every presidential election since 1992, but I do not consider myself a Democrat, or a Republican. I vote based on leadership – above all, leadership – and issues.

      In my 14 years of blogging, I've never written a political blog post. I haven't needed to.

      Until now.

      It is quite clear something has become deeply unglued in the state of American politics.

      As of 2017, the United States, through a sequence of highly improbable events, managed to elect an extremely controversial president.

      A president with historically low approval ratings, elected on a platform many considered too extreme to even be taken literally:

      Asked about Trump’s statements proposing the construction of a wall on the US-Mexico border and a ban on all Muslims entering the country, Thiel suggested that Trump supporters do not actually endorse those policies.

      “I don’t support a religious test. I certainly don’t support the specific language that Trump has used in every instance,” he said. “But I think one thing that should be distinguished here is that the media is always taking Trump literally. It never takes him seriously, but it always takes him literally.”

      The billionaire went on to define how he believes the average Trump supporter interprets the candidate’s statements. “I think a lot of voters who vote for Trump take Trump seriously but not literally, so when they hear things like the Muslim comment or the wall comment their question is not, ‘Are you going to build a wall like the Great Wall of China?’ or, you know, ‘How exactly are you going to enforce these tests?’ What they hear is we’re going to have a saner, more sensible immigration policy.”

      A little over a week into the new presidency, it is obvious that Trump meant every word of what he said. He will build a US-Mexico wall. And he signed an executive order that literally, not figuratively, banned Muslims from entering the US — even if they held valid green cards.

      As I said, I vote on policies, and as an American, I reject these two policies. Our Mexican neighbors are not an evil to be kept out with a wall, but an ally to be cherished. One of my favorite people is a Mexican immigrant. Mexican culture is ingrained deeply into America and we are all better for it. The history of America is the history of immigrants seeking religious freedom from persecution, finding a new life in the land of opportunity. Imagine the bravery it takes to leave everything behind, your relatives, your home, your whole life as you know it, to take your entire family on a five thousand mile journey to another country on nothing more than the promise of a dream. I've never done that, though my great-great grandparents did. Muslim immigrants are more American than I will ever be, and I am incredibly proud to have them here, as fellow Americans.

      Help Keep Your School All American!

      Trump is the first president in 40 years to refuse to release his tax returns in office. He has also refused to divest himself from his dizzying array of businesses across the globe, which present financial conflicts of interest. All of this, plus the hasty way he is ramrodding his campaign plans through on executive orders, with little or no forethought to how it would work – or if it would work at all – speaks to how negligent and dangerous Trump is as the leader of the free world. I want to reiterate that I don't care about party; I'd be absolutely over the moon with President Romney or President McCain, or any other rational form of leadership at this point.

      It is unclear to me how we got where we are today. But echoes of this appeal to nationalism in Poland, and in Venezula, offer clues. We brought fact checkers to a culture war … and we lost. During the election campaign, I was strongly reminded of Frank Miller's 1986 Nuke story arc, which I read in Daredevil as a teenager — the seductive appeal of unbridled nationalism bleeding across the page in stark primary colors.

      Daredevil issue 233, page excerpt

      Nuke is a self-destructive form of America First nationalism that, for whatever reasons, won the presidency through dark subvocalized whispers, and is now playing out in horrifying policy form. But we are not now a different country; we remain the very same country that elected Reagan and Obama. We lead the free world. And we do it by taking the higher moral ground, choosing to do what is right before doing what is expedient.

      I exercised my rights as a American citizen and I voted, yes. But I mostly ignored government beyond voting. I assumed that the wheels of American government would turn, and reasonable decisions would be made by reasonable people. Some I would agree with, others I would not agree with, but I could generally trust that the arc of American history inexorably bends toward justice, towards freedom, toward equality. Towards the things that make up the underlying American dream that this country is based on.

      This is no longer the case.

      I truly believe we are at an unprecedented time in American history, in uncharted territory. I have benefited from democracy passively, without trying at all, for 46 years. I now understand that the next four years is perhaps the most important time to be an activist in the United States since the civil rights movement. I am ready to do the work.

      • I have never once in my life called my representatives in congress. That will change. I will be calling and writing my representatives regularly, using tools like 5 Calls to do so.

      • I will strongly support, advocate for, and advertise any technical tools on web or smartphone that help Americans have their voices heard by their representatives, even if it takes faxing to do so. Build these tools. Make them amazing.

      • I am subscribing to support essential investigative journalism such as the New York Times, Los Angeles Times, and Washington Post.

      • I have set up large monthly donations to the ACLU which is doing critical work in fighting governmental abuse under the current regime.

      • I have set up monthly donations to independent journalism such as ProPublica and NPR.

      • I have set up monthly donations to agencies that fight for vulnerable groups, such as Planned Parenthood, Center for Reproductive Rights, Refugee Rights, NAACP, MALDEF, the Trevor Project, and so on.

      • I wish to see the formation of a third political party in the United States, led by those who are willing to speak truth to power like Evan McMullin. It is shameful how many elected representatives will not speak out. Those who do: trust me, we're watching and taking notes. And we will be bringing all our friends and audiences to bear to help you win.

      • I will be watching closely to see which representatives rubber-stamp harmful policies and appointees, and I will vote against them across the ticket, on every single ticket I can vote on.

      • I will actively support all efforts to make the National Popular Vote Interstate Compact happen, to reform the electoral college.

      • To the extent that my schedule allows, I will participate in protests to combat policies that I believe are harmful to Americans.

      • I am not quite at a place in my life where I'd consider running for office, but I will be, eventually. To the extent that any Stack Overflow user can be elected a moderator, I could be elected into office, locally, in the house, even the senate. Has anyone asked Joel Spolsky if he'd be willing to run for office? Because I'd be hard pressed to come up with someone I trust more than my old business partner Joel to do the right thing. I would vote for him so hard I'd break the damn voting machine.

      I want to pay back this great country for everything it has done for me in my life, and carry the dream forward, not just selfishly for myself and my children, but for everyone's children, and our children's children. I do not mean the hollow promises of American nationalism

      We would do well to renounce nationalism and all its symbols: its flags, its pledges of allegiance, its anthems, its insistence in song that God must single out America to be blessed.

      Is not nationalism—that devotion to a flag, an anthem, a boundary so fierce it engenders mass murder—one of the great evils of our time, along with racism, along with religious hatred?

      These ways of thinking—cultivated, nurtured, indoctrinated from childhood on— have been useful to those in power, and deadly for those out of power.

      … but the enduring values of freedom, justice, and equality that this nation was founded on. I pledge my allegiance to the American dream, and the American people – not to the nation, never to the nation.

      Daredevil issue 233, page excerpt

      I apologize that it's taken me 46 years to wake up and realize that some things, like the American dream, aren't guaranteed. There will come a time where you have to stand up and fight for them, for democracy to work. I will.

      Will you?

      [advertisement] At Stack Overflow, we help developers learn, share, and grow. Whether you’re looking for your next dream job or looking to build out your team, we've got your back.
      03 Feb 19:21

      The future of Microsoft’s languages: C# to be powerful, Visual Basic friendly

      by Peter Bright

      Enlarge

      Since their introduction in 2002, Microsoft's pair of .NET programming languages, C# and Visual Basic.NET, have been close siblings. Although they look very different—one uses C-style braces, brackets, and lots of symbols, whereas the other looks a great deal more like English—their features have, for the most part, been very similar. This strategy was formalized in 2010, with Microsoft planning coevolution, to keep them if not identical then at least very similar in capability.

      But the two languages have rather different audiences, and Microsoft has decided to change its development approach. The company has made two key findings. First, drawing on the annual Stack Overflow developer survey, it's clear that C# is popular among developers, whereas Visual Basic is not. This may not be indicative of a particular dislike for Visual Basic per se—there's likely to be a good proportion within that group who'd simply like to consolidate on a single language at their workplace—but is clearly a concern for the language's development.

      Second, however, Microsoft has seen that Visual Basic has twice the share of new developers in Visual Studio as it does of all developers. This could indicate that Visual Basic is seen or promoted as an ideal beginners' language; it might also mean that programmers graduating from Visual Basic for Applications (VBA) macros in programs such as Word, Access, and Excel are picking the option that is superficially most comfortable for them. Visual Basic developers are generally creating business applications using WinForms, or occasionally ASP.NET Web Forms; the use of WinForms in particular again suggests that developers are seeking something similar to Office macros.

      Read 7 remaining paragraphs | Comments

      03 Feb 19:10

      Announcing TypeScript 2.2 RC

      by Daniel Rosenwasser

      TypeScript 2.2 is just around the corner, and today we’re announcing its release candidate!

      If you’re first hearing about it, TypeScript is a language that just takes JavaScript and adds optional static types. Being built on JavaScript means that you don’t have to learn much more beyond what you know from JavaScript, and all your existing code continues to work with TypeScript. Meanwhile, the optional types that TypeScript adds can help you catch pesky bugs and work more efficiently by enabling great tooling support.

      To try out the RC today, you can use NuGet, or using npm just run

      npm install -g typescript@rc

      You can also get the TypeScript release candidate for Visual Studio 2015 (if you have Update 3). Other built-in editor support will be coming with our proper 2.2 release, but you can look at guides on how to enable newer versions of TypeScript in Visual Studio Code and Sublime Text 3.

      To clue you in on what’s new, here’s a few noteworthy features to get an idea about what to keep an eye out for in this release candidate.

      The object type

      There are times where an API allows you to pass in any sort of value except for a primitive. For example, consider Object.create, which throws an exception unless you pass in an object or null for its first argument.

      // All of these throw errors at runtime!
      Object.create(undefined);
      Object.create(1000);
      Object.create("hello world");

      If we try to come up with the type of the first parameter, a naive approach might be Object | null. Unfortunately, this doesn’t quite work. Because of the way that structural types work in TypeScript, number, string, and boolean are all assignable to Object.

      To address this, we’ve created the new object type (and notice all of those lowercase letters!).
      A more obvious name might be the “non-primitive” type.

      The object type is “empty” – it has no properties just like the {} type.
      That means that almost everything is assignable to object except for primitives.
      In other words, number, boolean, string, symbol, null, and undefined won’t be compatible.

      But that means that we can now correctly type Object.create‘s first parameter as object | null!

      We anticipate that the object primitive type will help catch a large class of bugs, and more accurately model real world code.

      We owe a big thanks to Herrington Darkholme for lending a hand and implementing this feature!

      Improved support for mixins and composable classes

      The mixin pattern is fairly common in the JavaScript ecosystem, and in TypeScript 2.2 we’ve made some adjustments in the language to supporting it even better.

      To get this done, we removed some restrictions on classes in TypeScript 2.2, like being able to extend from a value that constructs an intersection type. It also adjusts some functionality in the way that signatures on intersection types get combined. The result is that you can write a function that

      1. takes a constructor
      2. declares a class that extends that constructor
      3. adds members to that new class
      4. and returns the class itself.

      For example, we can write the Timestamped function which takes a class, and extends it by adding a timestamp member.

      /** Any type that can construct *something*. */
      export type Constructable = new (...args: any[]) => {};
      
      export function Timestamped<BC extends Constructable>(Base: BC) {
          return class extends Base {
              timestamp = new Date();
          };
      }

      Now we can take any class and pass it through Timestamped to quickly compose a new type.

      class Point {
          x: number;
          y: number;
          constructor(x: number, y: number) {
              this.x = x;
              this.y = y;
          }
      }
      
      const TimestampedPoint = Timestamped(Point);
      
      const p = new TimestampedPoint(10, 10);
      p.x + p.y;
      p.timestamp.getMilliseconds();

      Similarly, we could write a Tagged function which adds a tag member. These functions actually make it very easy to compose extensions. Making a special 3D point that’s tagged and timestamped is pretty clean.

      class SpecialPoint extends Tagged(Timestamped(Point)) {
          z: number;
          constructor(x: number, y: number, z: number) {
              super(x, y);
              this.z = z;
          }
      }

      A new JSX emit mode: react-native

      In TypeScript 2.1 and earlier, the --jsx flag could take on two values:

      • preserve which leaves JSX syntax alone and generates .jsx files.
      • react which transforms JSX into calls to React.createElement and generates .js files.

      TypeScript 2.2 has a new JSX emit mode called react-native which sits somewhere in the middle. Under this scheme, JSX syntax is left alone, but generates .js files.

      This new mode accomodates React Native’s loader which expects all input files to be .js files. It also satisfies cases where you want to just leave your JSX syntax alone but get .js files out from TypeScript.

      What’s next for 2.2?

      While we can’t list everything that we’ve worked on here on this post, you can see what else we have in store here on the TypeScript Roadmap.

      We’re counting on your feedback to make TypeScript 2.2 a solid release!
      Please feel free to leave us feedback here, or file an issue on GitHub if you run into anything you may think is a bug.

      06 Jan 11:49

      Teaching coding from the Metal Up or from the Glass Back?

      by Scott Hanselman
      * Stock photo by WOCInTech Chat used under CC

      Maria on my team and I have been pairing (working in code and stuff together) occasionally in order to improve our coding and tech skills. We all have gaps and it's a good idea to go over the "digital fundamentals" every once in a while to make sure you've got things straight. (Follow up post on this topic tomorrow.)

      As we were whiteboarding and learning and alternating teaching each other (the best way to make sure you know a topic is to teach it to another person) I was getting the impression that, well, we weren't feeling each other's style.

      Now, before we get started, yes, this is a "there's two kinds of people in this world" post. But this isn't age, background, or gender related from what I can tell. I just think folks are wired a certain way.  Yes, this a post about generalities.

      Here's the idea. Just like there are kinesthetic learners and auditory learners and people who learn by repetition, in the computer world I think that some folks learn from the metal up and some folks learn from the glass back.

      Learning from Metal Up

      Computer Science instruction starts from the metal, most often. The computer's silicon is the metal. You start there and move up. You learn about CPUs, registers, you may learn Assembly or C, then move your way up over the years to a higher level language like Python or Java. Only then will you think about Web APIs and JSON.

      You don't learn anything about user interaction or user empathy. You don't learn about shipping updates or test driven development. You learn about algorithms and Turing. You build compilers and abstract syntax trees and frankly, you don't build anything useful from a human perspective. I wrote a file system driver in Minix. I created new languages and built parsers and lexers.

      • When you type cnn.com and press enter, you can pretty much tell what happens from the address bar all the way down to electrons. AND YOU LOVE IT.
      • You feel like you own the whole stack and you understand computers like your mechanic friends understand internal combustion engines.
      • You'll open the hood of a car and look around before you drive it.
      • You'll open up a decompiler and start poking around to learn.
      • When you learn something new, you want to open it up and see what makes it tick. You want to see how it relates to what you already know.
      • If you need to understand the implementation details then an abstraction is leaking.
        • You know you will be successful because you can have a FEEL for the whole system from the computer science perspective.

        Are you this person? Were you wired this way or did you learn it? If you teach this way AND it lines up with how your students learn, everyone will be successful.

          Learning from the Glass Back

          Learning to code instruction starts from the monitor, most often. Or even the user's eyeballs. What will they experience? Let's start with a web page and move deeper towards the backend from there.

          You draw user interfaces and talk about user stories and what it looks like on the screen. You know the CPU is there and how it works but CPU internals don't light you up. If you wanted to learn more you know it's out there on YouTube or Wikipedia. But right now you want to build an application for PEOPLE an the nuts and bolts are less important. 

          • When this person types cnn.com and presses enter they know what to expect and the intermediate steps are an implementation detail.
          • You feel like you own the whole experience and you understand people and what they want from the computer.
          • You want to drive a car around a while and get a feel for it before you pop the hood.
          • You'll open F12 tools and start poking around to learn.
          • When you learn something new, you want to see examples of how it's used in the real world so you can build upon them.
          • If you need to understand the implementation details then someone in another department didn't do their job.
          • You know you will be successful because you can have a FEEL for the whole system from the user's perspective.

          Are you this person? Were you wired this way or did you learn it? If you teach this way AND it lines up with how your students learn, everyone will be successful.

            Conclusion

            Everyone is different and everyone learns differently. When teaching folks to code you need to be aware of not only their goals, but also their learning style. Be ware of their classical learning style AND the way they think about computers and technology.

            My personal internal bias sometimes has me asking "HOW DO YOU NOT WANT TO KNOW ABOUT THE TOASTER INTERNALS?!?!" But that not only doesn't ship the product, it minimizes the way that others learn and what their educational goals are.

            I want to take apart the toaster. That's OK. But someone else is more interested in getting the toast to make a BLT. And that's OK.

            * Stock photo by WOCInTech Chat used under CC


            Sponsor: Big thanks to Telerik! They recently published a comprehensive whitepaper on The State of C#, discussing the history of C#, what’s new in C# 7 and whether C# is the top tech to know. Check it out!


            © 2016 Scott Hanselman. All rights reserved.
                 
            06 Jan 08:01

            “Neon” screenshots leak, showing off a refreshed Windows 10 look and feel

            by Peter Bright

            Enlarge / Neon introduces the use of transparency, such as on the left panel of Groove Music. (credit: MSPoweruser)

            After reports last year that Microsoft was going to revise and update the design language used for Windows applications, some screenshots have leaked to MSPoweruser giving an indication of how the appearance is going to change.

            Windows 10 presently uses a design language known as MDL2 (Microsoft Design Language 2), which is an evolved version of the Metro design first introduced with Windows Phone 7. Both Metro and MDL2 put an emphasis on clean lines, simple geometric shapes, attractive typography, photographic imagery, and minimal use of ornamentation. Both heavily borrow from responsive Web design concepts. Google's Material design language builds on similar themes, adding transitions and animations to better show how pieces of information are related.

            The new Microsoft look is named Neon. It continues the evolution of Metro—it retains the emphasis on clean text and a generally flat appearance but adds certain elements of translucency (which the company is calling "acrylic") and greater use of animation and movement. Additional new elements are "Conscious UI," wherein an acrylic element might change depending on what's behind the current app, and "Connected Animations." The current preview of the Groove Music app, available to users of Windows Insider builds, already includes Connected Animations. Headers and pictures shrink as you scroll down the list of songs. As with Metro before it, much of this is already familiar and commonplace in Web design.

            Read 4 remaining paragraphs | Comments

            05 Jan 17:31

            Code Style Configuration in the VS2017 RC Update

            by Kasey Uhlenhuth

            Fighting like Cats and Dogs

            Visual Studio 2017 RC introduced code style enforcement and EditorConfig support. We are excited to announce that the update includes more code style rules and allows developers to configure code style via EditorConfig.

            What is EditorConfig?

            EditorConfig is an open source file format that helps developers configure and enforce formatting and code style conventions to achieve consistent, more readable codebases. EditorConfig files are easily checked into source control and are applied at repository and project levels. EditorConfig conventions override their equivalents in your personal settings, such that the conventions of the codebase take precedence over the individual developer.

            The simplicity and universality of EditorConfig make it an attractive choice for team-based code style settings in Visual Studio (and beyond!). We’re excited to work with the EditorConfig community to add support in Visual Studio and extend their format to include .NET code style settings.

            EditorConfig with .NET Code Style

            In VS2017 RC, developers could globally configure their personal preferences for code style in Visual Studio via Tools>Options. In the update, you can now configure your coding conventions in an EditorConfig file and have any rule violations get caught live in the editor as you type. This means that now, no matter what side you’re on in The Code Style Debate, you can choose what conventions you feel are best for any portion of your codebase—whether it be a whole solution or just a legacy section that you don’t want to change the conventions for—and enforce your conventions live in the editor. To demonstrate the ins-and-outs of this feature, let’s walk through how we updated the Roslyn repo to use EditorConfig.

            Getting Started

            The Roslyn repo by-and-large uses the style outlined in the .NET Foundation Coding Guidelines. Configuring these rules inside an EditorConfig file will allow developers to catch their coding convention violations as they type rather than in the code review process.

            To define code style and formatting settings for an entire repo, simply add an .editorconfig file in your top-level directory. To establish these rules as the “root” settings, add the following to your .editorconfig (you can do this in your editor/IDE of choice):

            EditorConfig settings are applied from the top-down with overrides, meaning you describe a broad policy at the top and override it further down in your directory-tree as needed. In the Roslyn repo, the files in the Compilers directory do not use var, so we can just create another EditorConfig file that contains different settings for the var preferences and these rules will only be enforced on the files in the directory. Note that when we create this EditorConfig file in the Compiler directory, we do not want to add root = true (this allows us to inherit the rules from a parent directory, or in this case, the top-level Roslyn directory).

            EditorConfig File Hierarchy

            Figure 1. Rules defined in the top-most EditorConfig file will apply to all projects in the “src” directory except for the rules that are overridden by the EditorConfig file in “src/Compilers”.

            Code Formatting Rules

            Now that we have our EditorConfig files in our directories, we can start to define some rules. There are seven formatting rules that are commonly supported via EditorConfig in editors and IDEs: indent_style, indent_size, tab_width, end_of_line, charset, trim_trailing_whitespace, and insert_final_newline. As of VS2017 RC, only the first five formatting rules are supported. To add a formatting rule, specify the type(s) of files you want the rule to apply to and then define your rules, for example:

            Code Style Rules

            After reaching out to the EditorConfig community, we’ve extended the file format to support .NET code style. We have also expanded the set of coding conventions that can be configured and enforced to include rules such as preferring collection initializers , expression-bodied members, C#7 pattern matching over cast and null checks, and many more!

            Let’s walk through an example of how coding conventions can be defined:

            The left side is the name of the rule, in this case “csharp_style_var_for_built_in_types”. The right side indicates the rule settings: preference and enforcement level, respectively.

            • A preference setting can be either true (meaning, “prefer this rule”) or false (meaning, “do not prefer this rule”).
            • The enforcement level is the same for all Roslyn-based code analysis and can be, from least severe to most severe: none, suggestion, warning, or error.

            Ultimately, your build will break if you violate a rule that is enforced at the error severity level (however, this is not yet supported in the RC). To see all code style rules available in the VS2017 RC update and the final Roslyn code style rules, see the Roslyn .editorconfig or check out our documentation.

            If you need a refresher on the different severity levels and what they do, see below:

            Table of code analysis severity levels

            Pro-tip: The gray dots that indicate a suggestion are rather drab. To spice up your life, try changing them to a pleasant pink. To do so, go to Tools>Options>Environment>Fonts and Colors>Suggestion ellipses (…) and give the setting the following custom color (R:255, G:136, B:196):

            R:255, G:136, B:196

            Experience in Visual Studio

            When you add an EditorConfig file to an existing repo or project, the files are not automatically cleaned up to conform to your conventions. You must also close and reopen­ any open files you have when you add or edit the EditorConfig file to have the new settings apply. To make an entire document adhere to code formatting rules defined in your settings, you can use Format Document (Ctrl+K,D). This one-click cleanup does not exist yet for code style, but you can use the Quick Actions menu (Ctrl+.) to apply a code style fix to all occurrences in your document/project/solution.

            Fix all violations of a code style rule

            Figure 2. Rules set in EditorConfig files apply to generated code and code fixes can be applied to all occurrences in the document, project, or solution.

            Pro Tip: To verify that your document is using spaces vs tabs, enable Edit>Advanced>View White Space.

            How do you know if an EditorConfig file is applied to your document? You should be able to look at the bottom status bar of Visual Studio and see this message:

            Visual Studio status bar

            Note that this means EditorConfig files override any code style settings you have configured in Tools>Options.

            Conclusion

            Visual Studio 2017 RC is just a stepping stone in the coding convention configuration and enforcement experience. To read more about EditorConfig support in Visual Studio 2017, check out our documentation. Download the VS2017 RC with the update to test out .NET code style in EditorConfig and let us know what you think!

            Over ‘n’ out,

            Kasey Uhlenhuth, Program Manager, .NET Managed Languages

            Known Issues

            • Code style configuration and enforcement only works inside the Visual Studio 2017 RC update at this time. Once we make all the code style rules into a separate NuGet package, you will be able to enforce these rules in your CI systems as well as have rules that are enforced as errors break your build if violated.
            • You must close and reopen any open files to have EditorConfig settings apply once it is added or edited.
            • Only indent_style, indent_size, tab_width, end_of_line, and charset are supported code formatting rules in Visual Studio 2017 RC.
            • IntelliSense and syntax highlighting are “in-progress” for EditorConfig files in Visual Studio right now. In the meantime, you can use MadsK’s VS extension for this support.
            • Visual Basic-specific rules are not currently supported in EditorConfig beyond the ones that are covered by the dotnet_style_* group.
            • Custom naming convention support is not yet supported with EditorConfig, but you can still use the rules available in Tools>Options>Text Editor>C#>Code Style>Naming. View our progress on this feature on the Roslyn repo.
            • There is no way to make a document adhere to all code style rules with a one-click cleanup (yet!).
            05 Jan 17:25

            Git Alias to browse

            by Phil Haack

            Happy New Year! I hope you make the most of this year. To help you out, I have a tiny little Git alias that might save you a few seconds here and there.

            When I’m working with Git on the command line, I often want to navigate to the repository on GitHub. So I open my browser and type in the URL like a Neanderthal. Yes, a little known fact about Neanderthals is that they were such hipsters they were using browsers before computers were even invented. Look it up.

            But I digress. Typing in all those characters is a lot of work and I’m lazy and I like to automate all the things. So I wrote the following Git alias.

            [alias]
              open = "!f() { REPO_URL=$(git config remote.origin.url); explorer ${REPO_URL%%.git}; }; f"
              browse = !git open
            

            So when I’m in a repository directory on the command line, I can just type git open and it’ll launch my default browser to the URL specified by the remote origin. In my case, this is typically a GitHub repository, but this’ll work for other hosts.

            The second line in that snippet is an alias for the alias. I wrote that because I just know I’m going to forget one day and type git browse instead of git open. So future me, you’re welcome.

            This alias makes a couple of assumptions.

            1. You’re running Windows
            2. You use https for your remote origin.

            In the first case, if you’re running a Mac, you probably want to use open instead of explorer. For Linux, I have no idea, but I assume the same will work.

            In the second case, if you’re not using https, I can’t help you. You might try this approach instead.

            Update 2017-05-09 I updated the alias to truncate .git at the end.

            05 Jan 17:18

            Response Caching in ASP.Net Core 1.1

            by Talking Dotnet

            With the ASP.NET Core 1.1 release, many new features were introduced. One of them was enabling gZip compression and today we will take a look at another new feature which is Response Caching Middleware. This middleware allows to implement response caching. Response caching adds cache-related headers to responses. These headers specify how you want client, proxy and middleware to cache responses. It can drastically improve performance of your web application. In this post, let’s see how to implement response caching in ASP.Net Core application.

            Response Caching in ASP.Net Core 1.1

            To use this middleware, make sure you have ASP.NET 1.1 installed. You can download and install the .NET Core 1.1 SDK from here.

            Let’s create an ASP.NET Core application. Open Project.json and include following nuget package.

            "Microsoft.AspNetCore.ResponseCaching": "1.1.0"
            

            Once the package is restored, now we need to configure it. So open Startup.cs, add highlight line of code in ConfigureServices method.

            public void ConfigureServices(IServiceCollection services)
            {
                // Add framework services.
                services.AddApplicationInsightsTelemetry(Configuration);
                services.AddResponseCaching();
                services.AddMvc();
            }
            

            And now let’s add this middleware to HTTP pipeline, so add highlighted line in the Configure method of Startup.cs.

            public void Configure(IApplicationBuilder app, IHostingEnvironment env, ILoggerFactory loggerFactory)
            {
                loggerFactory.AddConsole(Configuration.GetSection("Logging"));
                loggerFactory.AddDebug();
                app.UseResponseCaching();
                app.UseApplicationInsightsRequestTelemetry();
                if (env.IsDevelopment())
                {
                    app.UseDeveloperExceptionPage();
                    app.UseBrowserLink();
                }
                else
                {
                    app.UseExceptionHandler("/Home/Error");
                }
                app.UseApplicationInsightsExceptionTelemetry();
                app.UseStaticFiles();
                app.UseMvc(routes =>
                {
                    routes.MapRoute(
                        name: "default",
                        template: "{controller=Home}/{action=Index}/{id?}");
                });
            }
            

            We are done with all configurations. To use it, you need to include ResponseCache attribute on controller’s action method. So open HomeController.cs and add ResponseCache attribute to Contact method and set the duration to 20 seconds. For the demo, I modified the contact method and add Date time to see response caching in action.

            [ResponseCache(Duration = 20)]
            public IActionResult Contact()
            {
                ViewData["Message"] = "Your contact page." + DateTime.Now.ToString();
            
                return View();
            }
            

            This attribute will set the Cache-Control header and set max-age to 20 seconds. The Cache-Control HTTP/1.1 general-header field is used to specify directives for caching mechanisms in both requests and responses. Use this header to define your caching policies with the variety of directives it provides. In our case, following header will be set.

            Cache-Control:public,max-age=20
            

            Here the cache location is public and expiration is set to 20 seconds. Read this article to know more about HTTP Caching.

            Now let’s run the application to see it in action. When you visit contact page, you should see the current date and time of your system. As the cache duration is set to 20 seconds, the response will be cached for 20 seconds. You can verify it via visiting other pages of the application and then coming back to Contact page.

            Response Caching in ASP.Net Core

            During a browser session, browsing multiple pages within the website or using back and forward button to visit the pages, content will be served from the local browser cache (if not expired). But when page is refreshed via F5 , the request will be go to the server and page content will get refreshed. You can verify it via refreshing contact page using F5. So when you hit F5, response caching expiration value has no role to play to serve the content. You should see 200 response for contact request.

            Static contents (like image, css, js) when refreshed, will result in 304 Not Modified if nothing has changed for the requested content. This is due to the ETag and Last-Modified value append in the response header. See below image (Screenshot taken in Firefox)

            Response Caching in ASP.NET Core ETag

            Firefox gives 304 where chrome gives 200 response for static files. Strange behavior from Chrome.

            When a resource is requested from the site, the browser sends ETag and Last-Modified value in the request header as If-None-Match and If-Modified-Since. The server compares these header’s value against the value present on the server. If values are same, then server doesn’t send the content again. Instead, the server will send a 304 - Not Modified response, and this tells the browser to use previously cached content.

            Other options with ResponseCache attribute

            Along with duration, following options can also be configured with ResponseCache attribute.

            • Location: Gets or sets the location where the data from a particular URL must be cached. You can assign Any, Client or None as cache location.
              // Determines the value for the "Cache-control" header in the response.
              public enum ResponseCacheLocation
              {
                  // Cached in both proxies and client. Sets "Cache-control" header to "public".
                  Any = 0,
                  // Cached only in the client. Sets "Cache-control" header to "private".
                  Client = 1,
                  // "Cache-control" and "Pragma" headers are set to "no-cache".
                  None = 2
              }
              
            • NoStore: Gets or sets the value which determines whether the data should be stored or not. When set to true, it sets “Cache-control” header to “no-store”. Ignores the “Location” parameter for values other than “None”. Ignores the “duration” parameter.
            • VaryByHeader: Gets or sets the value for the Vary response header.

            Read this article to find out how to use these options. That’s it.

            Thank you for reading. Keep visiting this blog and share this in your network. Please put your thoughts and feedback in the comments section.

            The post Response Caching in ASP.Net Core 1.1 appeared first on Talking Dotnet.

            03 Jan 18:47

            How to enable gzip compression in ASP.NET Core

            by Talking Dotnet

            ASP.NET Core 1.1 has an inbuilt middleware for Response compression, which by default uses gzip compression. All modern browsers support response compression, and you should take advantage of it. Instead of sending response from the server as it is, it’s better to compress it and then send it, as this will reduce the response size and provides better speed. So in this post, let’s see how to enable gzip compression in ASP.NET Core.

            Enable gzip compression in ASP.NET Core

            To use this middleware, make sure you have ASP.NET 1.1 installed. Download and install the .NET Core 1.1 SDK. Let’s create an ASP.NET Core web API application. Open Project.json and include following nuget package.

            "Microsoft.AspNetCore.ResponseCompression": "1.0.0"
            

            Once the package is restored, now we need to configure it. So open Startup.cs, add highlight line of code in ConfigureServices method.

            public void ConfigureServices(IServiceCollection services)
            {
                // Add framework services.
                services.AddApplicationInsightsTelemetry(Configuration);
                services.AddResponseCompression();
                services.AddMvc();
            }
            

            By Default, ASP.NET Core uses gzip compression. And now let’s add this middleware to HTTP pipeline, so add highlighted line in the Configure method of Startup.cs. Remember to add the Compression middleware before other middlewares which serves the files.

            public void Configure(IApplicationBuilder app, IHostingEnvironment env, ILoggerFactory loggerFactory)
            {
                loggerFactory.AddConsole(Configuration.GetSection("Logging"));
                loggerFactory.AddDebug();
                app.UseApplicationInsightsRequestTelemetry();
                app.UseApplicationInsightsExceptionTelemetry();
                app.UseResponseCompression();
                app.UseMvc();
            }
            

            That’s it for setting it up. Now, let’s modify the default Get method of the Values Controller to return some large data.

            [HttpGet]
            public IEnumerable<string> Get()
            {
                List<string> lstString = new List<string>();
                for (int i=1; i<= 100; i++)
                {
                    lstString.Add("Value " + i.ToString());
                }
                return lstString;
            }
            

            Below two images show the difference in the response size. The first image is without compression, where the response size is 1.4 KB

            Enable gzip compression in ASP.NET Core

            And here is the output, after enabling the compression. The response size is reduced to 524 bytes. And you can also see the content-type is set to gzip in the response.

            http://www.talkingdotnet.com/wp-content/uploads/2016/12/Enable-gZip-compression-in-ASP.NET-Core-1.png

            You can also set the compression level to,

            • Optimal: The compression operation should be optimally compressed, even if the operation takes a longer time to complete.
            • Fastest: The compression operation should complete as quickly as possible, even if the resulting file is not optimally compressed.
            • NoCompression: No compression should be performed on the file.
            services.Configure<GzipCompressionProviderOptions>(options =>
                      options.Level = System.IO.Compression.CompressionLevel.Optimal);
            services.AddResponseCompression(options =>
            {
                options.Providers.Add<GzipCompressionProvider>();
            });
            

            There are a couple of options available which can also be configured like enabling compression for HTTPS connection, compression to support different MIME types and using other compression providers. By default, compression is disabled for HTTPS requests. This can be enabled by setting the EnableForHttps flag to true.

            services.AddResponseCompression(options =>
            {
                options.EnableForHttps = true;
                options.Providers.Add<GzipCompressionProvider>();
            });
            

            You can also include other mime types (other than default) to include for compression. At the time of writing this post, default supported Mime Types are,

            public static readonly IEnumerable<string> MimeTypes = new[]
            {
                // General
                "text/plain",
                // Static files
                "text/css",
                "application/javascript",
                // MVC
                "text/html",
                "application/xml",
                "text/xml",
                "application/json",
                "text/json",
            };
            

            You can also include other mime type by concating other mime type in ResponseCompressionDefaults.MimeTypes. Like,

            services.AddResponseCompression(options =>
            {
               options.EnableForHttps = true;
               options.MimeTypes = ResponseCompressionDefaults.MimeTypes.Concat(new[]
                                        {
                                           "image/svg+xml",
                                           "application/atom+xml"
                                        });;
               options.Providers.Add<GzipCompressionProvider>();
            });
            

            That’s it.

            Thank you for reading. Keep visiting this blog and share this in your network. Please put your thoughts and feedback in the comments section.

            The post How to enable gzip compression in ASP.NET Core appeared first on Talking Dotnet.

            02 Jan 13:00

            Carrie Fisher, 1956-2016

            by Sam Machkovech

            Enlarge (credit: Getty Images / Jeff Spicer)

            Carrie Fisher, the actress who brought Princess Leia to life and reprised the role in last year's The Force Awakens, has died at the age of 60.

            The sad news follows word that Fisher suffered cardiac arrest while flying to Los Angeles on Friday. After landing and being rushed to a hospital, her brother issued a statement indicating that Fisher was "stable."

            Fisher's Hollywood career skyrocketed after her first young portrayal of Leia. She was 19 during the filming, though her Hollywood acting debut actually came in 1975's Shampoo—and her Hollywood indoctrination began even before that, thanks to a tumultuous LA childhood that she wrote and spoke about at length in the form of memoirs and one-woman shows.

            Read 2 remaining paragraphs | Comments

            24 Dec 10:21

            This low-cost device may be the world’s best hope against account takeovers

            by Dan Goodin

            Enlarge

            The past five years have witnessed a seemingly unending series of high-profile account take-overs. A growing consensus has emerged among security practitioners: even long, randomly generated passwords aren't sufficient for locking down e-mail and other types of online assets. According to the consensus, these assets need to be augmented with a second factor of authentication.

            Now, a two-year study of more than 50,000 Google employees concludes that cryptographically based Security Keys beat out smartphones and most other forms of two-factor verification.

            The Security Keys are based on Universal Second Factor, an open standard that's easy for end users to use and straightforward for engineers to stitch into hardware and websites. When plugged into a standard USB port, the keys provide a "cryptographic assertion" that's just about impossible for attackers to guess or phish. Accounts can require that cryptographic key in addition to a normal user password when users log in. Google, Dropbox, GitHub, and other sites have already implemented the standard into their platforms.

            Read 8 remaining paragraphs | Comments

            23 Dec 13:13

            Announcing Microsoft ASP.NET WebHooks V1 RTM

            by Henrik F Nielsen

            We are very happy to announce ASP.NET WebHooks V1 RTM making it easy to both send and receive WebHooks with ASP.NET.

            WebHooks provide a simple pub/sub model for wiring together Web APIs and services with your code. A WebHook can be used to get notified when a file has changed in Dropbox, a code change has been committed to GitHub, a payment has been initiated in PayPal, a card has been created in Trello, and much more — the possibilities are endless! When subscribing, you provide a callback URI where you want to be notified. When an event occurs, an HTTP POST request is sent to your callback URI with information about what happened so that your Web app can act accordingly. WebHooks happen without polling and with no need to hold open a network connection while waiting for notifications.

            Because of their simplicity, WebHooks are already exposed by most popular services and Web APIs. To help managing WebHooks, Microsoft ASP.NET WebHooks makes it easier to both send and receive WebHooks as part of your ASP.NET application:

            The two parts can be used together or apart depending on your scenario. If you only need to receive WebHooks from other services, then you can use just the receiver part; if you only want to expose WebHooks for others to consume, then you can do just that.

            In addition to hosting your own WebHook server, ASP.NET WebHooks are part of Azure Functions where you can process WebHooks without hosting or managing your own server! You can even go further and host an Azure Bot Service using Microsoft Bot Framework for writing cool bots talking to your customers!

            The WebHook code targets ASP.NET Web API 2 and ASP.NET MVC 5, is available as Open Source on GitHub, and as Nuget packages.

            A port to the ASP.NET Core is being planned so please stay tuned!

            Receiving WebHooks

            Dealing with WebHooks depends on who the sender is. Sometimes there are additional steps registering a WebHook verifying that the subscriber is really listening. Often the security model varies quite a bit. Some WebHooks provide a push-to-pull model where the HTTP POST request only contains a reference to the event information which is then to be retrieved independently.

            The purpose of Microsoft ASP.NET WebHooks is to make it both simpler and more consistent to wire up your API without spending a lot of time figuring out how to handle any WebHook variant:

            WebHookReceivers

            A WebHook handler is where you process the incoming WebHook. Here is a sample handler illustrating the basic model. No registration is necessary – it will automatically get picked up and called:

            public class MyHandler : WebHookHandler
            {
            // The ExecuteAsync method is where to process the WebHook data regardless of receiver
            public override Task ExecuteAsync(string receiver, WebHookHandlerContext context)
            {
            // Get the event type
            string action = context.Actions.First();

            // Extract the WebHook data as JSON or any other type as you wish
            JObject data = context.GetDataOrDefault<JObject>();

            return Task.FromResult(true);
            }
            }

            Finally, we want to ensure that we only receive HTTP requests from the intended party. Most WebHook providers use a shared secret which is created as part of subscribing for events. The receiver uses this shared secret to validate that the request comes from the intended party. It can be provided by setting an application setting in the Web.config file, or better yet, configured through the Azure portal or even retrieved from Azure Key Vault.

            For more information about receiving WebHooks and lots of samples, please see these resources:

            Sending WebHooks

            Sending WebHooks is slightly more involved in that there are more things to keep track of. To support other APIs registering for WebHooks from your ASP.NET application, we need to provide support for:

            • Exposing which events subscribers can subscribe to, for example Item Created and Item Deleted;
            • Managing subscribers and their registered WebHooks which includes persisting them so that they don’t disappear;
            • Handling per-user events in the system and determine which WebHooks should get fired so that WebHooks go to the correct receivers. For example, if user A caused an Item Created event to fire then determine which WebHooks registered by user A should be sent. We don’t want events for user A to be sent to user B
            • Sending WebHooks to receivers with matching WebHook registrations.

            As described in the blog Sending WebHooks with ASP.NET WebHooks Preview, the basic model for sending WebHooks works as illustrated in this diagram:

            WebHooksSender

            Here we have a regular Web site (for example deployed in Azure) with support for registering WebHooks. WebHooks are typically triggered as a result of incoming HTTP requests through an MVC controller or a WebAPI controller. The orange blocks are the core abstractions provided by ASP.NET WebHooks:

            1. IWebHookStore: An abstraction for storing WebHook registrations persistently. Out of the box we provide support for Azure Table Storage and SQL but the list is open-ended.
            2. IWebHookManager: An abstraction for determining which WebHooks should be sent as a result of an event notification being generated. The manager can match event notifications with registered WebHooks as well as applying filters.
            3. IWebHookSender: An abstraction for sending WebHooks determining the retry policy and error handling as well as the actual shape of the WebHook HTTP requests. Out of the box we provide support for immediate transmission of WebHooks as well as a queuing model which can be used for scaling up and out, see the blog New Year Updates to ASP.NET WebHooks Preview for details.

            The registration process can happen through any number of mechanisms as well. Out of the box we support registering WebHooks through a REST API but you can also build registration support as an MVC controller or anything else you like.

            It’s also possible to generate WebHooks from inside a WebJob. This enables you to send WebHooks not just as a result of incoming HTTP requests but also as a result of messages being sent on a queue, a blob being created, or anything else that can trigger a WebJob:

            WebHooksWebJobsSender

            The following resources provide details about building support for sending WebHooks as well as samples:

            Thanks to all the feedback and comments throughout the development process, it is very much appreciated!

            Have fun!

            Henrik

            23 Dec 13:06

            Writing Declaration Files for @types

            by Daniel Rosenwasser

            A while back we talked about how TypeScript 2.0 made it easier to grab declaration files for your favorite library. Declaration files, if you’re not familiar, are just files that describe the shape of an existing JavaScript codebase to TypeScript. By using declaration files (also called .d.ts files), you can avoid misusing libraries and get things like completions in your editor.

            As a recap of that previous blog post, if you’re using an npm package named foo-bar and it doesn’t ship any .d.ts files, you can just run

            npm install -S @types/foo-bar

            and things will just work from there.

            But you might have asked yourself things like “where do these ‘at-types’ packages come from?” or “how do I update the .d.ts files I get from it?”. We’re going to try to answer those very questions.

            DefinitelyTyped

            The simple answer to where our @types packages come from is DefinitelyTyped. DefinitelyTyped is just a simple repository on GitHub that hosts TypeScript declaration files for all your favorite packages. The project is community-driven, but supported by the TypeScript team as well. That means that anyone can help out or contribute new declarations at any time.

            Authoring New Declarations

            Let’s say that we want to create declaration files for our favorite library. First, we’ll need to fork DefinitelyTyped, clone your fork, and create a new branch.

            git clone https://github.com/YOUR_USERNAME_HERE/DefinitelyTyped
            cd DefinitelyTyped
            git checkout -b my-favorite-library

            Next, we can run an npm install and create a new package using the new-package npm script.

            npm install
            npm run new-package my-favorite-library

            For whatever library you use, my-favorite-library should be replaced with the verbatim name that it was published with on npm.
            If for some reason the package doesn’t exist in npm, mention this in the pull request you send later on.

            The new-package script should create a new folder named my-favorite-library with the following files:

            • index.d.ts
            • my-favorite-library-tests.ts
            • tsconfig.json
            • tslint.json

            Finally we can get started writing our declaration files. First fix up the comments for index.d.ts by adding the library’s MAJOR.MINOR version, the project URL, and your username. Then, start describing your library. Here’s what my-favorite-library/index.d.ts might look like:

            // Type definitions for my-favorite-library x.x
            // Project: https://github.com/my-favorite-library-author/my-favorite-library
            // Definitions by: Your Name Here <https://github.com/YOUR_GITHUB_NAME_HERE>
            // Definitions: https://github.com/DefinitelyTyped/DefinitelyTyped
            
            export function getPerpetualEnergy(): any[];
            
            export function endWorldHunger(n: boolean): void;

            Notice we wrote this as a module – a file that contains explicit imports and exports. We’re intending to import this library through a module loader of some sort, using Node’s require() function, AMD’s define function, etc.

            Now, this library might have been written using the UMD pattern, meaning that it could either be imported or used as a global. This is rare in libraries for Node, but common in front-end code where you might use your library by including a <script> tag. So in this example, if my-favorite-library is accessible as the global MyFavoriteLibrary, we can tell TypeScript that with this one-liner:

            export as namespace MyFavoriteLibrary;

            So the body of our declaration file should end up looking like this:

            // Our exports:
            export function getPerpetualEnergy(): any[];
            
            export function endWorldHunger(n: boolean): void;
            
            // Make this available as a global for non-module code.
            export as namespace MyFavoriteLibrary;

            Finally, we can add tests for this package in my-favorite-library/my-favorite-library-tests.ts:

            import * as lib from "my-favorite-library";
            
            const energy = lib.getPerpetualEnergy()[14];
            
            lib.endWorldHunger(true);

            And that’s it. We can then commit, push our changes to GitHub…

            git add ./my-favorite-library
            git commit -m "Added declarations for 'my-favorite-library'."
            git push -u origin my-favorite-library

            …and send a pull request to the master branch on DefinitelyTyped.

            Once our change is pulled in by a maintainer, it should be automatically published to npm and available. The published version number will depend on the major/minor version numbers you specified in the header comments of index.d.ts.

            Sending Fixes

            Sometimes we might find ourselves wanting to update a declaration file as well. For instance, let’s say we want to fix up getPerpetualEnergy to return an array of booleans.

            In that case, the process is pretty similar. We can simply fork & clone DefinitelyTyped as described above, check out the master branch, and create a branch from there.

            git clone https://github.com/YOUR_USERNAME_HERE/DefinitelyTyped
            git checkout -b fix-fav-library-return-type

            Then we can fix up our library’s declaration.

            - export function getPerpetualEnergy(): any[];
            + export function getPerpetualEnergy(): boolean[];

            And fix up my-favorite-library‘s test file to make sure our change can be verified:

            import * as lib from "my-favorite-library";
            
            // Notice we added a type annotation to 'energy' so TypeScript could check it for us.
            const energy: boolean = lib.getPerpetualEnergy()[14];
            
            lib.endWorldHunger(true);

            Dependency Management

            Many packages in the @types repo will end up depending on other type declaration packages. For instance, the declarations for react-dom will import react. By default, writing a declaration file that imports any library in DefinitelyTyped will automatically create a dependency for the latest version of that library.

            If you want to snap to some version, you can make an explicit package.json for the package you’re working in, and fill in the list of dependencies explicitly. For instance, the declarations for leaflet-draw depend on the the @types/leaflet package. Similarly, the Twix declarations package has a dependency on moment itself (since Moment 2.14.0 now ships with declaration files).

            As a note, only the dependencies field package.json is necessary, as the DefinitelyTyped infrastructure will provide the rest.

            Quicker Scaffolding with dts-gen

            We realize that for some packages writing out every function in the API an be a pain. Thats why we wrote dts-gen, a neat tool that can quickly scaffold out declaration files fairly quickly. For APIs that are fairly straightforward, dts-gen can get the job done.

            For instance, if we wanted to create declaration files for the array-uniq package, we could use dts-gen intsead of DefinitelyTyped’s new-package script. We can try this our by installing dts-gen:

            npm install -g dts-gen

            and then creating the package in our DefinitelyTyped clone:

            cd ./DefinitelyTyped
            npm install array-uniq
            
            dts-gen -d -m array-uniq

            The -d flag will create a folder structure like DefinitelyTyped’s new-package script. You can peek in and see that dts-gen figured out the basic structure on its own:

            export = array_uniq;
            declare function array_uniq(arr: any): any;

            You can even try this out with something like TypeScript itself!

            Keep in mind dts-gen doesn’t figure out everything – for example, it typically substitutes parameter and return values as any, and can’t figure out which parameters are optional. It’s up to you to make a quality declaration file, but we’re hoping dts-gen can help bootstrap that process a little better.

            dts-gen is still in early experimental stages, but is on GitHub and we’re looking feedback and contributions!

            A Note About Typings, tsd, and DefinitelyTyped Branches

            If you’re not using tools like tsd or Typings, you can probably skip this section. If you’ve sent pull requests to DefinitelyTyped recently, you might have heard about a branch on DefinitelyTyped called types-2.0. The types-2.0 branch existed so that infrastructure for @types packages wouldn’t interfere with other tools.

            However, this was a source of confusion for new contributors and so we’ve merged types-2.0 with master. The short story is that all new packages should be sent to the master branch, which now must be structured for for TypeScript 2.0+ libraries.

            Tools like tsd and Typings will continue to install existing packages that are locked on specific revisions.

            Next Steps

            Our team wants to make it easier for our community to use TypeScript and help out on DefinitelyTyped. Currently we have our guide on Publishing, but going forward we’d like to cover more of this information on our website proper.

            We’d also like to hear about resources you’d like to see improved, and information that isn’t obvious to you, so feel free to leave your feedback below.

            Hope to see you on DefinitelyTyped. Happy hacking!

            23 Dec 08:10

            Exercise your greatest power as a developer

            by Nicole Herskowitz

            To paraphrase Daniel Webster (American Statesman, 1782-1852), “If all my developer skills were taken from me with one exception, I would choose to keep the power of learning like a developer, for by it I would soon regain all the rest.”

            To be a good developer is to be a perpetual learner; it is essential for survival. The problems you solve are always changing, but the programming languages, platforms, hardware, tools and technologies you use to solve them are all moving targets. Even the foundation of the agile development processes most developers follow has the notion that you must continue to learn to be more effective. After all, if you’re not learning something new, you’re either falling behind or getting left behind.

            Once again, it’s that time of year when many office buildings get a bit quieter, parking and traffic get a little easier, and many production systems go into “hands-off” lockdown for fear of a breaking change ruining the holidays. This slow period provides an opportunity to step back from the stuff you work on every day and learn something new that perhaps you haven’t had a chance to try yet.

            Fortunately, there are a lot of great resources available for you to learn new skills in Azure. Below are ten areas to explore that go beyond the familiar cloud workhorses (such as virtual machines and storage) and focus on capabilities related to IoT, containers, microservices, serverless computing, bots, artificial intelligence, and more. Each has a list of resources to give you a quick intro, and additional content to help you dive deeper.

            If you’re new to Microsoft Azure, you may want to start with the Get Started Guide for Azure Developers.

            1. Internet of Things (IoT)

            Anything can be a connected device these days. Azure IoT Suite and the Azure IoT services make it easy for you to connect devices to the cloud, not only to collect the telemetry data they generate but also to do things  in your apps based on that data. You can also get Azure IoT-certified starter kits for some DIY time building your own devices.

            Quick:

            More time:

            2. Functions

            Looking for a way to build microservices or get tasks done easily in your apps, such as processing data, integrating systems, or providing simple APIs? Azure Functions offers serverless compute for composing event driven solutions. You only need to write the code that solves a specific need and then not worry about building out an entire application or the infrastructure required to run it.

            Quick:

            More time:

            3. Cognitive Services

            Artificial intelligence is no longer science fiction and can be used in your applications today. Cognitive Services is a growing collection of machine learning APIs, SDKs, and services you can use to make your applications more intelligent, engaging, and discoverable. Add smart features to your applications and bots, such as emotion and video detection; facial, speech, and vision recognition; and speech and language understanding.

            Quick:

            More time:

            4. Bot Service

            Looking to improve customer engagement in a new or existing application? Azure Bot Service enables rapid, intelligent bot development, bringing together the power of the Microsoft Bot Framework and Azure Functions. Build, connect, deploy and manage bots that interact naturally wherever your users are talking. Allow your bots to scale based on demand, and you pay only for the resources you consume.

            Quick:

            More time:

            5. Container Service

            If you have been building container based applications and now need to get them into production, check out Azure Container Service. This open sourced service supports popular container orchestration engines such as Kubernetes, Docker Swarm, and DC/OS. Azure Container Service removes a lot of complexity to help you manage clusters of virtual machines to run your containerized applications.

            Quick:

            More time:

            6. Logic Apps

            Azure Logic Apps help you automate workflows and integrate applications and services. Nearly a hundred out of the box connectors for all your favorite services  make it easy to set up workflows and accomplish tasks between connected services. Using a visual designer in the Azure portal or Visual Studio, you can compose the logic (and it works great with Azure Functions) that act based on events.

            Quick:

            More time:

            7. API Apps

            Azure API Apps make it easy for you to build and consume cloud-hosted REST APIs. Azure provides a marketplace of APIs where you can publish your API, or find existing APIs to use in your applications. You can also generate cross-platform client SDKs for the hosted API using Swagger.

            Quick:

            More time:

            8. DocumentDB

            Sometimes a traditional relational database is not the best choice for your data. DocumentDB is a fully managed and scalable NoSQL database service that features SQL queries over object data. You can also access DocumentDB by using existing MongoDB drivers, which enables you to use DocumentDB with apps written for use with MongoDB.

            Quick:

            More time:

            9. Mobile Center

            If you’re already working on a mobile app, you should learn more about mobile DevOps with Visual Studio Mobile Center, which brings together our mobile developer services, including HockeyApp and Xamarin Test Cloud. Currently in Preview, Visual Studio Mobile Center provides cloud-powered lifecycle services for mobile apps, including continuous integration, test automation, distribution, crash reporting, and application analytics. The Mobile Center SDK currently supports Android, iOS, Xamarin, and React Native apps with a roadmap to support more over the coming months.

            Quick:

            More time:

            10. Application Insights

            Rich application metrics help you deliver and continuously improve applications for your customers. Application Insights is an extensible application performance management service that’ll help you detect, triage, and diagnose issues in web apps and services. You can integrate it into your DevOps pipeline and use it to monitor the usage and experience of your apps.

            Quick:

            More time:

            I hope you found an area that caught your interest and you learn something new from the content provided.

            Happy holidays!

            23 Dec 08:08

            General Availability: Larger Block Blobs in Azure Storage

            by Michael Hauss

            Azure Blob Storage is a massively scalable object storage solution capable of storing and serving tens to hundreds of petabytes of data per customer across a diverse set of data types including media, documents, log files, scientific data and much more. Many of our customers use Blobs to store very large data sets, and have requested support for larger files. The introduction of larger Block Blobs increases the maximum file size from 195 GB to 4.77 TB. The increased blob size better supports a diverse range of scenarios, from media companies storing and processing 4K and 8K videos to cancer researchers sequencing DNA.  

            Azure Block Blobs have always been mutable, allowing a customer to insert, upload or delete blocks of data without needing to upload the entire blob. With the new larger block blob size, mutability offers even more significant performance and cost savings, especially for workloads where portions of a large object are frequently modified. For a deeper dive into the Block Blobs service including object mutability, please view this video from our last Build Conference. The REST API documentation for Put Block and Put Block List also covers object mutability. 

            We have increased the maximum allowable block size from 4 MB to 100 MB, while maintaining support for up to 50,000 blocks committed to a single Blob. Range GETs continue to be supported on larger Block Blobs allowing high speed parallel downloads of the entire Blob, or just portions of the Blob. You can immediately begin taking advantage of this improvement in any existing Blob Storage or General Purpose Storage Account across all Azure regions. 

            Larger Block Blobs are supported by the most recent releases of the .Net Client Library (version 8.0.0) and the AzCopy Command-Line Utility (version 5.2.0), with support for Java and Node.js rolling out over the next few weeks. You can also directly use the REST API as always. Larger Block Blobs are supported by REST API version 2016-05-31 and later. There is nothing new to learn about the APIs, so you can start uploading larger Block Blobs right away.    

            This size increase only applies to Block Blobs, and the maximum size of Append Blobs (195 GB) and Page Blobs (1 TB) remains unchanged. There are no billing changes. To get started using Azure Storage Blobs, please see our getting started documentation, or reference one of our code samples.

            23 Dec 07:38

            Facebook already has a Muslim registry—and it should be deleted

            by Peter Bright

            Enlarge / A Hollerith machine used in the 1890 US Census. Hollerith's company later merged with three others to create the company that later became known as IBM, and similar machines were instrumental in organizing the Holocaust. (credit: Marcin Wichary)

            Since Donald Trump's election, many in the tech industry have been concerned about the way their skills—and the data collected by their employers—might be used. On a number of occasions, Trump has expressed the desire to perform mass deportations and end any and all Muslim immigration. He has also said that it would be "good management" to create a database of Muslims, and that there should be "a lot of systems" to track Muslims within the US.

            In the final days of his presidency, Barack Obama has scrapped the George W. Bush-era regulations that created a registry of male Muslim foreigners entering the US—the registry itself was suspended in 2011—but given Trump's views, demands to create a domestic registry are still a possibility.

            As a result, some 2,600 tech workers (and counting) have pledged both not to participate in any such programs and to encourage their employers to minimize any sensitive data they collect. The goal is to reduce the chance that such data might be used in harmful ways.

            Read 9 remaining paragraphs | Comments

            23 Dec 06:26

            Le GPS européen Galileo prend son envol

            by Geoffray

            La commission européenne a validé à Bruxelles les premiers services de géolocalisation gratuits et accessibles au grand public. Galileo entre en service à la mi-décembre 2016.

            Comme prévu, l’équivalent européen du GPS entre en service cette semaine.

            La Commission européenne a lancé, ce jeudi, les premiers services de géolocalisation gratuits et accessibles au grand-public. Le système Galileo s’appuie sur un réseau de 18 satellites placés en orbite, à environ 22.000 kilomètres autour de la Terre.

            Au départ, peu d’appareils pourront cependant en profiter : , seuls les smartphones équipés de la puce de réception adaptée pourront exploiter les signaux émis par le système de navigation par satellites Galileo. Par exemple, l’aquatis X5 (inconnu) du fabricant espagnol BQ sera le premier smartphone à pouvoir en profiter.

            Pour combler son retard vis à vis de la technologie américaine, Galileo promet une précision supérieure au GPS :

            « Galileo permettra de voir sur quel rail est un train, là où le GPS permettrait de le localiser sur une carte de France »

            Un GPS européen ?

            Le 17 Novembre dernier, le lancement réussi de 4 satellites Galileo à par une fusée Ariane 5 EPS, depuis le centre spatial guyanais à Kourou, a marqué le début de Galileo.

            Un mois plus tard, le service est opérationnel.

            Les opérations de mise à poste ont été réalisées par le CNES de Toulouse, en partenariat avec l’ESOC, le centre européen d’opérations spatiales, à Darmstadt.

            Depuis le premier lancement en 2012, 14 satellites ont déjà été mis en orbite, dont 3 sont inutilisables (l’un est hors service suite à une panne d’antenne et 2 autres ont été placés sur une mauvaise orbite).

            Le programme Galileo a été initié en 1999 par la Commission Européenne pour doter l’Europe de son propre système de positionnement et de datation.

            L’objectif vise à garantir l’indépendance européenne face aux autres systèmes existants, tels que l’américain GPS, le GLONASS russe et le chinois Beidou.

            Bruxelles a notamment alloué 7 milliards d’euros à la mise en place et l’exploitation des systèmes européens de navigation par satellite pour la période 2014-2020.

            Parallèlement, une vingtaine de 20 stations au sol ont déjà été réparties autour du globe et l’ infrastructure devrait encore se renforcer d’ici à 2020.

            Plus de précision à la clé ?

            Galileo est le système de géo-positionnement le plus précis de la planète affirme l’Europe.

            Avec une précision de l’ordre d’1m , la technologie bat le GPS dont la précision d’environ 10m était déjà plus performante que celle du GLONASS russe. Aussi, le signal Galileo présente la particularité d’offrir une datation à quelques milliardièmes de seconde près.

            « Le signal Galileo sera bien meilleur que celui du GPS notamment pour les lieux encaissés comme les canyons urbains. Nous partons en retard, mais nous courrons plus vite et nous avons d’emblée une longueur d’avance sur nos concurrents », – Jean-Yves le Gall, Président CNES

            La France contribue au programme Galileo à hauteur de 17 %, juste derrière l’Allemagne (21%).

            Le système Galileo est piloté par la Commission Européenne qui décide et supervise son déploiement, l’ESA qui assure la phase de construction, et la GSA (agence de navigation par satellite européenne) basée à Prague, chargée d’exploiter le système en phase opérationnelle.

            De nouveaux services

            Galileo proposera bientôt différent types de services dont le premier –le service de positionnement et de datation– sera ouvert et accessible gratuitement. Au delà, on pourra aussi bénéficier d’une authentification du signal utilisé.

            Le second service sera plus commercial. Moyennant une redevance, un positionnement centimétrique pourra être dispensé, associé à une authentification plus robuste encore.

            Le second sera commercial : moyennant une redevance, le PRS (service public réglementé), permettra un positionnement précis de quelques centimètres et le chiffrage des informations, avec une authentification encore plus robuste. Il disposera aussi de signaux très robustes aux perturbations électro-magnétiques.

            Enfin, les services recherche et sauvetage de navires et aeronefs en détresse disposeront de leur propre itération de Galileo, avec des performances bien plus rapides et précises que celle du système utilisé à l’heure actuelle (Cospas-Sarsat).

            Plus généralement, de nombreuses société privées annonceront progressivement l’utilisation du système Galileo, notamment dans des cas d’usage liés à la navigation aérienne, routière, maritime (l’organisation maritime internationale a reconnu Galileo comme étant un moyen de navigation maritime), ferroviaire (un accord a été passé avec la SNCF) ou dans les services économiques et financiers.

            Le secteur automobile devrait lui aussi se pencher sur Galileo afin de bénéficier de ses performances dans le cadre du développement du marché des voitures autonomes.

            Via

            19 Dec 13:05

            What is Batching of Statement in Entity Framework Core?

            by Talking Dotnet

            There are many new features introduced in Entity Framework Core (EF Core). And one of the most awaited feature is, batching of statement. So what exactly batching of statement is? Batching of statement means that it doesn’t send individual command for every insert/update/delete statement. It will batch multiple statements in a single round trip to the database. So In this post, let’s see how it works and then compare the results with EF6.

            Batching of Statement in Entity Framework Core

            So EF Core will prepare a batch of multiple statements and then executes them in a single round trip. So this provides better performance and speed. Let’s see how it works. We shall take the help of SQL Server Profiler to find out the actual query generated and executed.

            Insert Operation

            First, let’s see how it behaves in case of insert statements. The following code adds 3 records in the category table.

            using (var c= new SampleDBContext())
            {
                c.Categories.Add(new Category() { CategoryID = 1, CategoryName = "Clothing" });
                c.Categories.Add(new Category() { CategoryID = 2, CategoryName = "Footwear" });
                c.Categories.Add(new Category() { CategoryID = 3, CategoryName = "Accessories" });
                c.SaveChanges();
            }
            

            And when SaveChanges() is executed, following query is generated (taken from SQL Profiler).

            exec sp_executesql N'SET NOCOUNT ON;
            INSERT INTO [Categories] ([CategoryID], [CategoryName])
            VALUES (@p0, @p1),
            (@p2, @p3),
            (@p4, @p5);
            ',N'@p0 int,@p1 nvarchar(4000),@p2 int,@p3 nvarchar(4000),@p4 int,@p5 nvarchar
            
            (4000)',@p0=1,@p1=N'Clothing',@p2=2,@p3=N'Footwear',@p4=3,@p5=N'Accessories'
            

            As you can see, there are no 3 individual insert statements. They are grouped into one statement and makes uses of table valued parameters for the values. And here is the screenshot of SQL Server Profiler.

            Entity Framework Core Insert Statement Batching Query

            If we execute the same code against EF 6, there would see 3 individual insert statements in the SQL Server Profiler.

            Entity Framework 6 Insert Statement Queries

            That’s a pretty big difference in terms of performance and speed. And it will also be cost efficient if these queries are run against a cloud deployed database. Now, let’s see what happens in case of update statements.

            Update Operation

            Following code will get a list of all category records and then iterates through them and append “-Test” text for each category name and finally saves it. At this point of time, there are only 3 records exists in the database.

            using (var c= new SampleDBContext())
            {
                List<Category> lst = dataContext.Categories.ToList();
                foreach (var item in lst)
                {
                    item.CategoryName = item.CategoryName + "-Test";
                }
                c.SaveChanges();
            }
            

            And when executed against EF Core, following query is generated (taken from SQL Profiler).

            exec sp_executesql N'SET NOCOUNT ON;
            UPDATE [Categories] SET [CategoryName] = @p0
            WHERE [CategoryID] = @p1;
            SELECT @@ROWCOUNT;
            UPDATE [Categories] SET [CategoryName] = @p2
            WHERE [CategoryID] = @p3;
            SELECT @@ROWCOUNT;
            UPDATE [Categories] SET [CategoryName] = @p4
            WHERE [CategoryID] = @p5;
            SELECT @@ROWCOUNT;
            ',N'@p1 int,@p0 nvarchar(4000),@p3 int,@p2 nvarchar(4000),@p5 int,@p4 nvarchar(4000)',@p1=1,@p0=N'Clothing-Test',@p3=2,@p2=N'Footwear-Test',@p5=3,@p4=N'Accessories-Test'
            

            As you can see, there are 3 update statements, but all are combined into a single SQL statement. And the same code executed against EF 6, there would see 3 individual update statements in the SQL Server Profiler.

            Entity Framework 6 mulitple update queries

            With EF 6, there would be 1+N round-trips to the database. One to load the data and then one for each row. But with EF core, save operations are batched so that there would be only two round-trips to the database.

            Insert, Update, Delete (all 3) Operations

            Now let’s try to mix all 3 operations together and see how EF Core and EF 6 behaves. Following code will updates existing record, insert 2 new records and then finally delete one record.

            using (var c= new SampleDBContext())
            {
                Category cat = dataContext.Categories.Where(c => c.CategoryID == 3).First();
                cat.CategoryName = "Accessory";
                c.Categories.Add(new Category() { CategoryID = 4, CategoryName = "Fragnance" });
                c.Categories.Add(new Category() { CategoryID = 5, CategoryName = "Sports" });
                Category catToDelete = dataContext.Categories.Where(c => c.CategoryID == 2).First();
                c.Entry(catToDelete).State = EntityState.Deleted;
                c.SaveChanges();
            }
            

            And when SaveChanges() is executed, following query is generated (taken from SQL Profiler).

            exec sp_executesql N'SET NOCOUNT ON;
            DELETE FROM [Categories]
            WHERE [CategoryID] = @p0;
            SELECT @@ROWCOUNT;
            UPDATE [Categories] SET [CategoryName] = @p1
            WHERE [CategoryID] = @p2;
            SELECT @@ROWCOUNT;
            INSERT INTO [Categories] ([CategoryID], [CategoryName])
            VALUES (@p3, @p4),
            (@p5, @p6);
            ',N'@p0 int,@p2 int,@p1 nvarchar(4000),@p3 int,@p4 nvarchar(4000),@p5 int,@p6 nvarchar
            
            (4000)',@p0=2,@p2=3,@p1=N'Accessory',@p3=4,@p4=N'Fragnance',@p5=5,@p6=N'Sports'
            

            As you can see, there are individual DELETE, UPDATE and INSERT statements, but grouped into a single SQL statement. And here is the screenshot of SQL Server Profiler.

            Entity Framework Core Insert, Update, Delete Batching Query

            And what would happen in case of EF 6? Well, you guessed it right. Individual statements will be executed on the database as you can see in SQL Profiler.

            Entity Framework 6 Insert, Update, Delete Query

            So batching with EF Core works quite well and it can certainly boost the speed and performance of your application to a great extent. Wait, what happens in case of large query like a table with 500 columns and 100 rows you want to insert? Is it going to fail?

            Well, the batching limit depends on your database provider. As an example, the maximum number of parameters supported by the SQL Server query is 2100. So EF Core works smartly here and will split the query in multiple batches when the batching limit exceeds based on the database provider. But batching everything in one query is sometimes not a good idea. Is there a way to disable batching?

            How to disable batching

            Yes, you can disable the batching. To disable the batching, you need to configure MaxBatchSize option. You can configure this within OnConfiguring method.

            protected override void OnConfiguring(DbContextOptionsBuilder optionbuilder)
            {
                string sConnString = @"Server=localhost;Database=EFSampleDB;Trusted_Connection=true;";
                optionbuilder.UseSqlServer(sConnString , b => b.MaxBatchSize(1));
            }
            

            Here, 1 is set as max batch size, which means batching would now have only one query. In other words, it behaves like EF 6. To insert 3 records, there would be 3 individual insert statements. Using this option, you can define the maximum batch size.

            Summary

            Batching was much awaited feature and community asked it a number of times and now EF Core supporting batching out of the box is really great. It can boost performance and speed of your application. At this point of time, EF Core is itself not as powerful compare to EF6, but it will become more and more mature with the time.

            Thank you for reading. Keep visiting this blog and share this in your network. Please put your thoughts and feedback in the comments section.

            The post What is Batching of Statement in Entity Framework Core? appeared first on Talking Dotnet.

            19 Dec 13:03

            Use NPoco ORM With ASP.NET Core

            by Talking Dotnet

            NPoco is a simple C# micro-ORM that maps the results of a query onto a POCO object. NPoco is a fork of PetaPoco with a handful of extra features. And NPoco ORM can be used with .NET Core. So in this post, let’s find out how to use NPoco ORM with ASP.NET Core for CRUD operations.

            Use NPoco ORM With ASP.NET Core

            In this post, we will be using SQL Server as a database with NPoco ORM. So let’s first create the database. Open SQL Server Management Studio and create a new database called “NPocoDemo” or you can name it anything of your choice. And create a table named “Products”.

            CREATE TABLE [dbo].[Products](
            	[ProductID] [int] IDENTITY(1,1) NOT NULL,
            	[Name] [nvarchar](max) NULL,
            	[Quantity] [int] NULL,
            	[Price] [float] NULL,
             CONSTRAINT [PK_Products] PRIMARY KEY CLUSTERED 
            (
            	[ProductID] ASC
            )WITH (PAD_INDEX = OFF, STATISTICS_NORECOMPUTE = OFF, IGNORE_DUP_KEY = OFF, ALLOW_ROW_LOCKS = ON, ALLOW_PAGE_LOCKS = ON) ON [PRIMARY]
            ) ON [PRIMARY] TEXTIMAGE_ON [PRIMARY]
            
            GO
            

            Okay. Let’s create an ASP.NET Core Web API project. The default Web API template comes with a controller named “Value”. We don’t need this for demo, so I deleted it. To use NPoco ORM, we need to install following nuget package.

            • “NPoco”: “3.4.7”

            To test our WEB API, also add Swagger. If you don’t know about using Swagger then read how to add swagger to the ASP.NET Core WEB API

            So your project.json should look like this, (BTW if you are not knowing then, it’s time to say Bye-Bye Project.json and .xproj and welcome back .csproj

            "dependencies": {
              "Microsoft.NETCore.App": {
                "version": "1.0.0",
                "type": "platform"
              },
              "Microsoft.ApplicationInsights.AspNetCore": "1.0.0",
              "Microsoft.AspNetCore.Mvc": "1.0.0",
              "Microsoft.AspNetCore.Server.IISIntegration": "1.0.0",
              "Microsoft.AspNetCore.Server.Kestrel": "1.0.0",
              "Microsoft.Extensions.Configuration.EnvironmentVariables": "1.0.0",
              "Microsoft.Extensions.Configuration.FileExtensions": "1.0.0",
              "Microsoft.Extensions.Configuration.Json": "1.0.0",
              "Microsoft.Extensions.Logging": "1.0.0",
              "Microsoft.Extensions.Logging.Console": "1.0.0",
              "Microsoft.Extensions.Logging.Debug": "1.0.0",
              "Microsoft.Extensions.Options.ConfigurationExtensions": "1.0.0",
              "Swashbuckle": "6.0.0-beta902",
              "NPoco": "3.4.7"
            },
            

            Now, we need to add Product entity model. So create a folder named “Model” and create a new class “Product.cs” as follows,

            [TableName("Products")]
            [PrimaryKey("ProductId")]
            public class Product
            {
                public int ProductId { get; set; }
                public string Name { get; set; }
                public int Quantity { get; set; }
                public double Price { get; set; }
            }
            

            NPoco works by mapping the column names to the property names on the entity object. This is a case-insensitive match. By default, no mapping is required. It will be assumed that the table name will be the class name and the primary key will be ‘Id’ if it’s not specified. But when your table name is different from entity name, then you need to use TableName attribute which indicates the table for which the Poco class will be mapped to. Similarly, if primary key column name is other than ‘Id’ then use PrimaryKey attribute to let NPoco know that this is the primary key column for this entity (As decorated in above code).

            You can find more details on list of all supported attributes here.

            Setting up NPoco is very easy process and similarly using it is also very simple and straightforward. You need to follow 3 simple steps to use it.

            • Create an IDatabase object with a connection string, Database Type and DBProvider factory.
            • IDatabase provides methods for insert, update, delete and GetById. You can also execute Raw SQL queries.
            • Pass the entity object or query to NPoco IDatabase and it’s done.

            So let’s create ProductRepository for all database calls. Create a folder named “Repository” and create a new class “ProductRepository.cs” as follows,

            public class ProductRepository
            {
                private string connectionString;
                public ProductRepository()
                {
                    connectionString = @"Server=localhost;Database=NPocoDemo;Trusted_Connection=true;";
                }
            
                public IDatabase Connection
                {
                    get
                    {
                        return new Database(connectionString, DatabaseType.SqlServer2008, SqlClientFactory.Instance);
                    }
                }
            
                public void Add(Product prod)
                {
            
                    using (IDatabase db = Connection)
                    {
                        db.Insert<Product>(prod);
                    }
                }
            
                public IEnumerable<Product> GetAll()
                {
                    using (IDatabase db = Connection)
                    {
                        return db.Fetch<Product>("SELECT * FROM Products");
                    }
                }
            
                public Product GetByID(int id)
                {
                    using (IDatabase db = Connection)
                    {
                        return db.SingleById<Product>(id);
                    }
                }
            
                public void Delete(int id)
                {
                    using (IDatabase db = Connection)
                    {
                        db.Delete<Product>(id);
                    }
                }
            
                public void Update(Product prod)
                {
                    using (IDatabase db = Connection)
                    {
                        db.Update(prod);
                    }
                }
            }
            

            To create NPoco Database class object, you need to either pass a connection string or DBConnection class object. Here, the connection string is passed to create the object.

            return new Database(connectionString, DatabaseType.SqlServer2008, SqlClientFactory.Instance);
            

            You can also create SqlConnection class object which is inherited from DBConnection class and pass the same. Like,

            SqlConnection con = new SqlConnection(connectionString);
            return new Database(con);
            

            The only thing is to keep in mind when initializing using DBConnection object, that you will need to open the connection before any DB operation. And while initializing using the connection string, Database class will take care of opening the connection. Please take a look at Database.cs class code in Github and look for _connectionPassedIn property use.

            There are CRUD methods defined that uses entity object for all DB operations. As mentioned earlier, in every method

            • Create IDatabase object.
            • Pass the object/Query and call the method.

            As you can see, there is also a method SingleById to get single record from a table and Fetch method to get all records using a RAW SQL query.

            Now, lets create a new controller “ProductController.cs” as follows,

            [Route("api/[controller]")]
            public class ProductController : Controller
            {
                private readonly ProductRepository productRepository;
                public ProductController()
                {
                    productRepository = new ProductRepository();
                }
                // GET: api/values
                [HttpGet]
                public IEnumerable<Product> Get()
                {
                    return productRepository.GetAll();
                }
            
                // GET api/values/5
                [HttpGet("{id}")]
                public Product Get(int id)
                {
                    return productRepository.GetByID(id);
                }
            
                // POST api/values
                [HttpPost]
                public void Post([FromBody]Product prod)
                {
                    if (ModelState.IsValid)
                        productRepository.Add(prod);
                }
            
                // PUT api/values/5
                [HttpPut("{id}")]
                public void Put(int id, [FromBody]Product prod)
                {
                    prod.ProductId = id;
                    if (ModelState.IsValid)
                        productRepository.Update(prod);
                }
            
                // DELETE api/values/5
                [HttpDelete("{id}")]
                public void Delete(int id)
                {
                    productRepository.Delete(id);
                }
            }
            

            This controller has methods for GET, POST, PUT and DELETE. That’s all to code. Now, let’s just run the application and execute the GET API. Since the table is empty, so you should see following.

            NPoco with ASP.NET Core GET Data

            Now, let’s add a product via Post API.

            Use NPoco ORM With ASP.NET Core

            And now call the GET Product API again and you should see that product you just added is returned.

            NPoco with ASP.NET Core Get All Records

            Here is the video showing all Product API operations.

            That’s it. It’s really very easy to setup and use NPoco. Along with executing SQL queries, you can also use inbuit methods for CRUD operations. And the good thing is that it maps the results to Poco objects. It also supports transaction supports, mapping of nested objects, change tracking, Fluent based mapping and many other features. It’s tiny but really powerful.

            If you are interested in Entity Framework Core, then read my series of posts about EF Core and loves Dapper.NET then read Use Dapper.NET With ASP.NET Core.

            Thank you for reading. Keep visiting this blog and share this in your network. Please put your thoughts and feedback in the comments section.

            The post Use NPoco ORM With ASP.NET Core appeared first on Talking Dotnet.

            18 Dec 20:52

            Introducing Change Feed support in Azure DocumentDB

            by Aravind Ramachandran

             We’re excited to announce the availability of Change Feed support in Azure DocumentDB! With Change Feed support, DocumentDB provides a sorted list of documents within a DocumentDB collection in the order in which they were modified. This feed can be used to listen for modifications to data within the collection and perform actions such as:

            • Trigger a call to an API when a document is inserted or modified
            • Perform real-time (stream) processing on updates
            • Synchronize data with a cache, search engine, or data warehouse

            DocumentDB's Change Feed is enabled by default for all accounts, and does not incur any additional costs on your account. You can use your provisioned throughput in your write region or any read region to read from the change feed, just like any other operation from DocumentDB.

            In this blog, we look at the new Change Feed support, and how you can build responsive, scalable and robust applications using Azure DocumentDB.

            Change Feed support in Azure DocumentDB

            Azure DocumentDB is a fast and flexible NoSQL database service that is used for storing high-volume transactional and operational data with predictable single-digit millisecond latency for reads and writes. This makes it well-suited for IoT, gaming, retail, and operational logging applications. These applications often need to track changes made to DocumentDB data and perform various actions like update materialized views, perform real-time analytics, or trigger notifications based on these changes. Change Feed support allows you to build efficient and scalable solutions for these patterns.

            Many modern application architectures, especially in IoT and retail, process streaming data in real-time to produce analytic computations. These application architectures (“lambda pipelines”) have traditionally relied on a write-optimized storage solution for rapid ingestion, and a separate read-optimized database for real-time query. With support for Change Feed, DocumentDB can be utilized as a single system for both ingestion and query, allowing you to build simpler and more cost effective lambda pipelines. For more details, read the paper on DocumentDB TCO.


            clip_image002

            Stream processing: Stream-based processing offers a “speedy” alternative to querying entire datasets to identify what has changed. For example, a game built on DocumentDB can use Change Feed to implement real-time leaderboards based on scores from completed games. You can use DocumentDB to receive and store event data from devices, sensors, infrastructure, and applications, and process these events in real-time with Azure Stream Analytics, Apache Storm, or Apache Spark using Change Feed support.

            Triggers/event computing: You can now perform additional actions like calling an API when a document is inserted or modified. For example, within web and mobile apps, you can track events such as changes to your customer's profile, preferences, or location to trigger certain actions like sending push notifications to their devices using Azure Functions or App Services.

            Data Synchronization: If you need to keep data stored in DocumentDB in sync with a cache, search index, or a data lake, then Change Feed provides a robust API for building your data pipeline. Change feed allows you to replicate updates as they happen on the database, recover and resume syncing when workers fail, and distribute processing across multiple workers for scalability.


            Working with the Change Feed API

            Change Feed is available as part of REST API 2016-07-11 and SDK versions 1.11.0 and above. See Change Feed API for how to get started with code.


             clip_image004

            The change feed has the following properties:

            • Changes are persistent in DocumentDB and can be processed asynchronously.
            • Changes to documents within a collection are available immediately in the change feed.
            • Each change to a document appears only once in the change feed. Only the most recent change for a given document is included in the change log. Intermediate changes may not be available.
            • The change feed is sorted by order of modification within each partition key value. There is no guaranteed order across partition-key values.
            • Changes can be synchronized from any point-in-time, that is, there is no fixed data retention period for which changes are available.
            • Changes are available in chunks of partition key ranges. This capability allows changes from large collections to be processed in parallel by multiple consumers/servers.
            • Applications can request for multiple Change Feeds simultaneously on the same collection.

            Next Steps

            In this blog post, we looked the new Change Feed support in Azure DocumentDB.

            18 Dec 20:48

            Azure IoT Hub message routing dramatically simplifies IoT solution development

            by Nicole Berdy

            IoT solutions can be complex, and we’re always working on ways to simplify them.

            As we work with customers on real-world, enterprise-grade IoT solutions built on Azure IoT, one pattern we’ve noticed is how businesses route inbound messages to different data processing systems.

            Imagine millions of devices sending billions of messages to Azure IoT Hub. Some of those messages need to be processed immediately, like an alarm indicating a serious problem. Some messages are analyzed for anomalies. Some messages are sent to long term storage. In these cases, customers have to build routing logic to decide where to send each message:

            routes1

            While the routing logic is straightforward conceptually, it’s actually really complex when you consider all of the details you have to handle when you build a dispatching system: handling transient faults, dealing with lost messages, high reliability, and scaling out the routing logic.

            To make all this easier, we’ve made a great new feature to IoT Hub generally available: message routing. This allows customers to setup automatic routing to different systems via Azure messaging services and routing logic in IoT Hub itself, and we take care of all of the difficult implementation architecture for you:

            routes 2

            You can configure your IoT hub to route messages to your backend processing services via Service Bus queues, topics, and Event Hubs as custom endpoints for routing rules. Queuing and streaming services like Service Bus queues and Event Hubs are used in many if not all messaging applications. You can easily set up message routing in the Azure portal. Both endpoints and routes can be accessed from the left-hand info pane in your IoT Hub:

            routes 3

            You can add routing endpoints from the Endpoints blade:

            routes 4

            You can configure routes on your IoT Hub by specifying the data stream (device telemetry), the condition to match, and the endpoint to which matching messages are written.

            routes 5

            Message routing conditions use the same query language as device twin queries and device jobs. IoT Hub evaluates the condition on the properties of the messages being sent to IoT Hub and uses the result to determine where to route messages. If messages don’t match any of your routes, the messages are written to the built-in messages/events endpoint just like they are today.

            routes 6

            We have also enhanced our metrics and operations monitoring logs to make it easy for youto tell when an endpoint is misbehaving or whether a route was incorrectly configured. You can learn about the full set of metrics that IoT Hub provides in our documentation including how each metric is used.

            Azure IoT is committed to offering our customers high availability message ingestion that is secure and easy to use. Message routing takes telemetry processing to the next step by offering customers a code-free way to dispatch messages based on message properties. Learn more about today's enhancements to Azure IoT Hub messaging by reading the developer guide. We firmly believe in customer feedback, so please continue to submit your suggestions through the Azure IoT User Voice forum or join the Azure IoT Advisors Yammer group.

            13 Dec 19:29

            Query Store ON is the new default for Azure SQL Database

            by Borko Novakovic

            We are happy to announce that Query Store is turned ON in all Azure SQL databases (including Elastic Pools) which will bring benefits both to the end users and the entire Azure SQL Database platform.

            Why is this important?

            Query Store acts as a “flight data recorder” for the database, continuously collecting critical information about the queries. It dramatically reduces resolution time in case of performance incidents, as pre-collected, relevant data is available when you need it, without delays.

            You can use Query Store in scenarios when tracking performance and ensuring database performance predictability is critical. The following are some examples where Query Store is going to significantly improve your productivity:

            • Identifying and fixing application performance regressions (more details in this blog article)
            • Tuning the most expensive queries considering different consumption metrics (elapsed time, CPU time, used memory, read and write operations, log I/O, etc.)
            • Keeping performance stability with compatibility level 130 in Azure SQL Database (more details in this blog article)
            • Assessing impact of any application or configuration change (A/B testing)
            • Identifying and improving ad-hoc workloads (more details here)

            Query Store also provides the foundation for performance monitoring and tuning features, such as the SQL Database Advisor. Query Store powers SQL Database Performance Insights which allows you to monitor and troubleshoot database performance directly from the Azure portal. With Query Store turned ON we ensure that relevant information about your most critical queries is available first time you open the queries chart on SQL Database Performance Insights:

            Query Perfrormance Insights

            We strongly recommend keeping Query Store ON. Thanks to an optimal default configuration and automatic retention policy, Query Store operates continuously using an insignificant part of the database space with a negligible performance overhead, typically in the range of 1-2%.

            The default configuration is automatically applied by Azure SQL Database. If you want to switch to a customized Query Store configuration, use ALTER DATABASE with Query Store options. Also check out Best Practices with the Query Store to learn how to choose optimal parameter values.

            Next steps

            For more detailed information, check out the online documentation: