Shared posts

19 Dec 14:14

Announcing TypeScript 2.1

by Daniel Rosenwasser

We spread ourselves thin, but this is the moment you’ve been awaiting – TypeScript 2.1 is here!

For those who are unfamiliar, TypeScript is a language that brings you all the new features of JavaScript, along with optional static types. This gives you an editing experience that can’t be beat, along with stronger checks against typos and bugs in your code.

This release comes with features that we think will drastically reduce the friction of starting new projects, make the type-checker much more powerful, and give you the tools to write much more expressive code.

To start using TypeScript you can use NuGet, or install it through npm:

npm install -g typescript

You can also grab the TypeScript 2.1 installer for Visual Studio 2015 after getting Update 3.

Visual Studio Code will usually just prompt you if your TypeScript install is more up-to-date, but you can also follow instructions to use TypeScript 2.1 now with Visual Studio Code or our Sublime Text Plugin.

We’ve written previously about some great new things 2.1 has in store, including downlevel async/await and significantly improved inference, in our announcement for TypeScript 2.1 RC, but here’s a bit more about what’s new in 2.1.

Async Functions

It bears repeating: downlevel async functions have arrived! That means that you can use async/await and target ES3/ES5 without using any other tools.

Bringing downlevel async/await to TypeScript involved rewriting our emit pipeline to use tree transforms. Keeping parity meant not just that existing emit didn’t change, but that TypeScript’s emit speed was on par as well. We’re pleased to say that after several months of testing, neither have been impacted, and that TypeScript users should continue to enjoy a stable speedy experience.

Object Rest & Spread

We’ve been excited to deliver object rest & spread since its original proposal, and today it’s here in TypeScript 2.1. Object rest & spread is a new proposal for ES2017 that makes it much easier to partially copy, merge, and pick apart objects. The feature is already used quite a bit when using libraries like Redux.

With object spreads, making a shallow copy of an object has never been easier:

let copy = { ...original };

Similarly, we can merge several different objects so that in the following example, merged will have properties from foo, bar, and baz.

let merged = { ...foo, ...bar, ...baz };

We can even add new properties in the process:

let nowYoureHavingTooMuchFun = {
    hello: 100,
    ...foo,
    world: 200,
    ...bar,
}

Keep in mind that when using object spread operators, any properties in later spreads “win out” over previously created properties. So in our last example, if bar had a property named world, then bar.world would have been used instead of the one we explicitly wrote out.

Object rests are the dual of object spreads, in that they can extract any extra properties that don’t get picked up when destructuring an element:

let { a, b, c, ...defghijklmnopqrstuvwxyz } = alphabet;

keyof and Lookup Types

Many libraries take advantage of the fact that objects are (for the most part) just a map of strings to values. Given what TypeScript knows about each value’s properties, there’s a set of known strings (or keys) that you can use for lookups.

That’s where the keyof operator comes in.

interface Person {
    name: string;
    age: number;
    location: string;
}

let propName: keyof Person;

The above is equivalent to having written out

let propName: "name" | "age" | "location";

This keyof operator is actually called an index type query. It’s like a query for keys on object types, the same way that typeof can be used as a query for types on values.

The dual of this is indexed access types, also called lookup types. Syntactically, they look exactly like an element access, but are written as types:

interface Person {
    name: string;
    age: number;
    location: string;
}

let a: Person["age"];

This is the same as saying that n gets the type of the age property in Person. In other words:

let a: number;

When indexing with a union of literal types, the operator will look up each property and union the respective types together.

// Equivalent to the type 'string | number'
let nameOrAge: Person["name" | "age"];

This pattern can be used with other parts of the type system to get type-safe lookups, serving users of libraries like Ember.

function get<T, K extends keyof T>(obj: T, propertyName: K): T[K] {
    return obj[propertyName];
}

let x = { foo: 10, bar: "hello!" };

let foo = get(x, "foo"); // has type 'number'
let bar = get(x, "bar"); // has type 'string'

let oops = get(x, "wargarbl"); // error!

Mapped Types

Mapped types are definitely the most interesting feature in TypeScript 2.1.

Let’s say we have a Person type:

interface Person {
    name: string;
    age: number;
    location: string;
}

Much of the time, we want to take an existing type and make each of its properties entirely optional. With Person, we might write the following:

interface PartialPerson {
    name?: string;
    age?: number;
    location?: string;
}

Notice we had to define a completely new type.

Similarly, we might want to perform a shallow freeze of an object:

interface FrozenPerson {
    readonly name: string;
    readonly age: number;
    readonly location: string;
}

Or we might want to create a related type where all the properties are booleans.

interface BooleanifiedPerson {
    name: boolean;
    age: boolean;
    location: boolean;
}

Notice all this repetition – ideally, much of the same information in each variant of Person could have been shared.

Let’s take a look at how we could write BooleanifiedPerson with a mapped type.

type BooleanifiedPerson = {
    [P in "name" | "age" | "location"]: boolean
};

Mapped types are produced by taking a union of literal types, and computing a set of properties for a new object type. They’re like list comprehensions in Python, but instead of producing new elements in a list, they produce new properties in a type.

In the above example, TypeScript uses each literal type in "name" | "age" | "location", and produces a property of that name (i.e. properties named name, age, and location). P gets bound to each of those literal types (even though it’s not used in this example), and gives the property the type boolean.

Right now, this new form doesn’t look ideal, but we can use the keyof operator to cut down on the typing:

type BooleanifiedPerson = {
    [P in keyof Person]: boolean
};

And then we can generalize it:

type Booleanify<T> = {
    [P in keyof T]: boolean
};

type BooleanifiedPerson = Booleanify<Person>;

With mapped types, we no longer have to create new partial or readonly variants of existing types either.

// Keep types the same, but make every property optional.
type Partial<T> = {
    [P in keyof T]?: T[P];
};

// Keep types the same, but make each property to be read-only.
type Readonly<T> = {
    readonly [P in keyof T]: T[P];
};

Notice how we leveraged TypeScript 2.1’s new indexed access types here by writing out T[P].

So instead of defining a completely new type like PartialPerson, we can just write Partial<Person>. Likewise, instead of repeating ourselves with FrozenPerson, we can just write Readonly<Person>!

Partial, Readonly, Record, and Pick

Originally, we planned to ship a type operator in TypeScript 2.1 named partial which could create an all-optional version of an existing type.
This was useful for performing partial updates to values, like when using React‘s setState method to update component state. Now that TypeScript has mapped types, no special support has to be built into the language for partial.

However, because the Partial and Readonly types we used above are so useful, they’ll be included in TypeScript 2.1. We’re also including two other utility types as well: Record and Pick. You can actually see how these types are implemented within lib.d.ts itself.

Easier Imports

TypeScript has traditionally been a bit finnicky about exactly how you can import something. This was to avoid typos and prevent users from using packages incorrectly.

However, a lot of the time, you might just want to write a quick script and get TypeScript’s editing experience. Unfortunately, it’s pretty common that as soon as you import something you’ll get an error.

The code `import * as lodash from "lodash";` with an error that `lodash` cannot be found.

“But I already have that package installed!” you might say.

The problem is that TypeScript didn’t trust the import since it couldn’t find any declaration files for lodash. The fix is pretty simple:

npm install --save @types/lodash

But this was a consistent point of friction for developers. And while you can still compile & run your code in spite of those errors, those red squiggles can be distracting while you edit.

So we focused on on that one core expectation:

But I already have that package installed!

and from that statement, the solution became obvious. We decided that TypeScript needs to be more trusting, and in TypeScript 2.1, so long as you have a package installed, you can use it.

Do be careful though – TypeScript will assume the package has the type any, meaning you can do anything with it. If that’s not desirable, you can opt in to the old behavior with --noImplicitAny, which we actually recommend for all new TypeScript projects.

Enjoy!

We believe TypeScript 2.1 is a full-featured release that will make using TypeScript even easier for our existing users, and will open the doors to empower new users. 2.1 has plenty more including sharing tsconfig.json options, better support for custom elements, and support for importing helper functions, all which you can read about on our wiki.

As always, we’d love to hear your feedback, so give 2.1 a try and let us know how you like it! Happy hacking!

19 Dec 13:09

Exploring Wyam - a .NET Static Site Content Generator

by Scott Hanselman

It's a bit of a renaissance out there when it comes to Static Site Generators. There's Jekyll and GitBook, Hugo and Hexo. Middleman and Pelican, Brunch and Octopress. There's dozens, if not hundreds of static site content generators, and "long tail is long."

Wyam is a great .NET based open source static site generator

Static Generators a nice for sites that DO get updated with dynamic content, but just not updated every few minutes. That means a Static Site Generator can be great for documentation, blogs, your brochure-ware home page, product catalogs, resumes, and lots more. Why install WordPress when you don't need to hit a database or generate HTML on every page view? Why not generate your site only when it changes?

I recently heard about a .NET Core-based open source generator called Wyam and wanted to check it out.

Wyam is a simple to use, highly modular, and extremely configurable static content generator that can be used to generate web sites, produce documentation, create ebooks, and much more.

Wyam is a module system with a pipeline that you can configure and chain processes together however you like. You can generate HTML from Markdown, from Razor, even XSLT2 - anything you like, really. Wyam also integrates nicely into your continuous build systems like Cake and others, so you can also get the Nuget Tools package for Wyam.

There's a few ways to get Wyam but I downloaded the setup.exe from GitHub Releases. You can also just get a ZIP and download it to any folder. When I ran the setup.exe it flashed (I didn't see a dialog, but it's beta so I'll chalk it up to that) and it installed to C:\Users\scott\AppData\Local\Wyam with what looked like the Squirrel installer from GitHub and Paul Betts.

Wyam has a number of nice features that .NET Folks will find useful.

Let's see what I can do with http://wyam.io in just a few minutes!

Scaffolding a Blog

Wyam has a similar command line syntax as dotnet.exe and it uses "recipes" so I can say --recipe Blog and I'll get:

C:\Users\scott\Desktop\wyamtest>wyam new --recipe Blog

Wyam version 0.14.1-beta

,@@@@@ /@\ @@@@@
@@@@@@ @@@@@| $@@@@@h
$@@@@@ ,@@@@@@@ g@@@@@P
]@@@@@M g@@@@@@@ g@@@@@P
$@@@@@ @@@@@@@@@ g@@@@@P
j@@@@@ g@@@@@@@@@p ,@@@@@@@
$@@@@@g@@@@@@@@B@@@@@@@@@@@P
`$@@@@@@@@@@@` ]@@@@@@@@@`
$@@@@@@@P` ?$@@@@@P
`^`` *P*`
**NEW**
Scaffold directory C:/Users/scott/Desktop/wyamtest/input does not exist and will be created
Installing NuGet packages
NuGet packages installed in 101813 ms
Recursively loading assemblies
Assemblies loaded in 2349 ms
Cataloging classes
Classes cataloged in 277 ms

One could imagine recipes for product catalogs, little league sites, etc. You can make your own custom recipes as well.

I'll make a config.wyam file with this inside:

Settings.Host = "test.hanselman.com";

GlobalMetadata["Title"] = "Scott Hanselman";
GlobalMetadata["Description"] = "The personal wyam-made blog of Scott Hanselman";
GlobalMetadata["Intro"] = "Hi, welcome to my blog!";

Then I'll run wyam with:

C:\Users\scott\Desktop\wyamtest>wyam -r Blog

Wyam version 0.14.1-beta
**BUILD**
Loading configuration from file:///C:/Users/scott/Desktop/wyamtest/config.wyam
Installing NuGet packages
NuGet packages installed in 30059 ms
Recursively loading assemblies
Assemblies loaded in 368 ms
Cataloging classes
Classes cataloged in 406 ms
Evaluating configuration script
Evaluated configuration script in 2594 ms
Root path:
file:///C:/Users/scott/Desktop/wyamtest
Input path(s):
file:///C:/Users/scott/.nuget/packages/Wyam.Blog.CleanBlog.0.14.1-beta/content
theme
input
Output path:
output
Cleaning output path output
Cleaned output directory
Executing 7 pipelines
Executing pipeline "Pages" (1/7) with 8 child module(s)
Executed pipeline "Pages" (1/7) in 221 ms resulting in 13 output document(s)
Executing pipeline "RawPosts" (2/7) with 7 child module(s)
Executed pipeline "RawPosts" (2/7) in 18 ms resulting in 1 output document(s)
Executing pipeline "Tags" (3/7) with 10 child module(s)
Executed pipeline "Tags" (3/7) in 1578 ms resulting in 1 output document(s)
Executing pipeline "Posts" (4/7) with 6 child module(s)
Executed pipeline "Posts" (4/7) in 620 ms resulting in 1 output document(s)
Executing pipeline "Feed" (5/7) with 3 child module(s)
Executed pipeline "Feed" (5/7) in 134 ms resulting in 2 output document(s)
Executing pipeline "RenderPages" (6/7) with 3 child module(s)
Executed pipeline "RenderPages" (6/7) in 333 ms resulting in 4 output document(s)
Executing pipeline "Resources" (7/7) with 1 child module(s)
Executed pipeline "Resources" (7/7) in 19 ms resulting in 14 output document(s)
Executed 7/7 pipelines in 2936 ms

I can also run it with -t for different themes, like "wyam -r Blog -t Phantom":

Wyam supports themes

As with most Static Site Generators I can start with a markdown file like "first-post.md" and included name value pairs of metadata at the top:

Title: First Post

Published: 2016-01-01
Tags: Introduction
---
This is my first post!

If I'm working on my site a lot, I could run Wyam with the -w (WATCH) switch and then edit my posts in Visual Studio Code and Wyam will WATCH the input folder and automatically run over and over, regenerating the site each time I change the inputs! A nice little touch, indeed.

There's a lot of cool examples at https://github.com/Wyamio/Wyam/tree/develop/examples that show you how to generate RSS, do pagination, use Razor but still generate statically, as well as mixing Razor for layouts and Markdown for posts.

The AdventureTime sample is fairly sophisticated (be sure to read the comments in the config.wyam for gotcha) example that includes a custom Pipeline, use of Yaml for front matter, and mixes markdown and Razor.

There's also a ton of modules you can use to extend the build however you like. For example, you could have source images be large and then auto-generate thumbnails like this:

Pipelines.Add("Images",

ReadFiles("*").Where(x => x.Contains("images\\") && new[] { ".jpg", ".jpeg", ".gif", ".png"}.Contains(Path.GetExtension(x))),
Image()
.SetJpegQuality(100).Resize(400,209).SetSuffix("-thumb"),
WriteFiles("*")
);

There's a TON of options. You could even use Excel as the source data for your site, generate CSVs from the Excel OOXML and then generate your site from those CSVs. Sounds crazy, but if you run a small business or non-profit you could quickly make a nice workflow for someone to take control of their own site!

GOTCHA: When generating a site locally your initial reaction may be to open the /output folder and open the index.html in your local browser. You MAY be disappointed with you use a static site generator. Often they generate absolute paths for CSS and Javascript so you'll see a lousy version of your website locally. Either change your templates to generate relative paths OR use a staging site and look at your sites live online. Even better, use the Wyam "preview web server" and run Wyam with a "-p" argument and then visit http://localhost:5080 to see your actual site as it will show up online.

Wyam looks like a really interesting start to a great open source project. It's got a lot of code, good docs, and it's easy to get started. It also has a bunch of advanced features that would enable me to easily embed static site generation in a dynamic app. From the comments, it seems that Dave Glick is doing most of the work himself. I'm sure he'd appreciate you reaching out and helping with some issues.

As always, don't just send a PR without talking and working with the maintainers of your favorite open source projects. Also, ask if they have issues that are friendly to http://www.firsttimersonly.com.


Sponsor: Big thanks to Redgate! Help your team write better, shareable SQL faster. Discover how your whole team can write better, shareable SQL faster with a free trial of SQL Prompt. Write, refactor and share SQL effortlessly, try it now!


© 2016 Scott Hanselman. All rights reserved.
     
13 Dec 06:40

New price-performance choices for Azure SQL Database elastic pools

by Morgan Oslake

Azure SQL Database elastic pools provide a simple cost effective solution for managing the performance of multiple databases with unpredictable usage patterns. New price-performance choices for elastic pools provide even more cost effectiveness and greater scale than before.

More cost effectiveness
Now available are smaller elastic pool sizes and pools with higher database limits. These new choices lower the starting price for pools, lower the effective cost per database, and reduce price jumps between pool sizes.

Greater scale
Also, now available are larger sizes for Basic, Standard, and Premium pools, and higher eDTU limits per database for Premium pools. These new choices provide more storage and eDTU headroom for greater scale and the most demanding workloads.

Highlights


More pool eDTU sizes
  • New sizes range from 50 eDTUs for Basic and Standard pools up to 4000 eDTUs for Premium pools with additional sizing choices in between.
More storage for Standard pools
  • Up to 2.9 TB for 3000 eDTU Standard pools.
Higher database limits per pool
  • Up to 500 databases for Basic and Standard pools of at least 200 eDTUs.
  • Up to 100 databases for Premium pools of at least 250 eDTUs.
Higher eDTU limits per database for Premium pools
  • Max eDTUs per database increase to 1750 eDTUs (P11 level) and 4000 eDTUs (P15 level) for the largest Premium pools.

Learn more

To learn more about SQL Database elastic pools and these new choices, please visit the SQL Database elastic pool webpage.  And for pricing information, please visit the SQL Database pricing webpage.

05 Dec 19:52

Bye-Bye Project.json and .xproj and welcome back .csproj

by Talking Dotnet

In my previous post, I posted about Some cool Project.json features with ASP.NET Core and also mentioned about announcement made by Microsoft in May 2016 that Project.json will be going away so as .xproj and .csproj will make a comeback for .NET Core. This change was supposed to come out after tooling preview 2 release and in one of recent nightly build release of .NET core, this change is introduced. So bye-bye Project.json and .xproj and welcome back .csproj.

Bye-Bye Project.json and .xproj and welcome back .csproj

I personally liked Project.json idea to manage dependencies, framework and managing pre, post build and publish events as JSON is far easy to handle than XML. Sadly, it is going to become history now. To see this change in action, you have to download .NET Core nightly build from here. At the time of writing this post, this change was available in the nightly build only. So download the .NET Core installer based on your platform and install it. If you are new to .NET Core, then read How to Install ASP.NET Core And Create Your First Application

Once the installation is over, go to command prompt and run following command to ensure the latest version of tooling is installed or not.

dotnet --version

And you should see following.

Dotnet tooling preview 4

The dotnet tooling version number may be different on your system, as this is a nightly build and likely to be replaced with new build. So in my system, the tooling version is “1.0.0-preview4-004175”. Please keep in mind, this is a nightly build and there would be issues. Let’s create an .NET Core application.

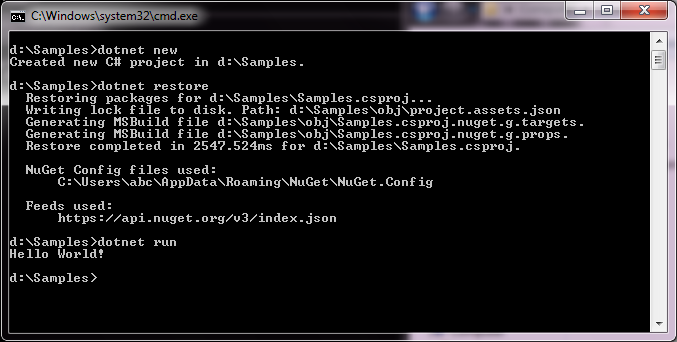
dotnet new
dotnet restore
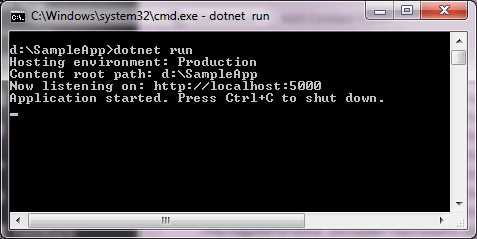
dotnet run

dotnet-core-tooling-preview-4-application

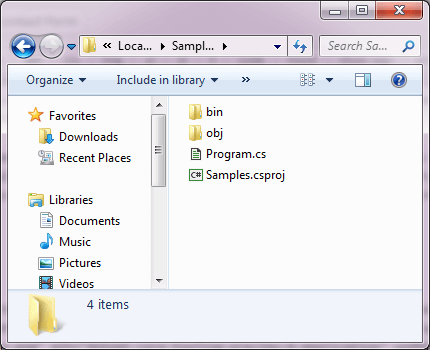
So the application is running successfully. And following is the screenshot of the folder.

dotnet-core-tooling-preview-4-folder-strcture

As you can see, there is no project.json and .xproj. And this app is successfully getting opened in VS 2015 and VS Code. If you don’t know about VS Code, then read What is Visual Studio Code and how is it different from Visual studio 2015?.

Following is the content of .csproj.

<Project ToolsVersion="15.0" xmlns="http://schemas.microsoft.com/developer/msbuild/2003">
  <Import Project="$(MSBuildExtensionsPath)\$(MSBuildToolsVersion)\Microsoft.Common.props" />
  
  <PropertyGroup>
    <OutputType>Exe</OutputType>
    <TargetFramework>netcoreapp1.0</TargetFramework>
  </PropertyGroup>

  <ItemGroup>
    <Compile Include="**\*.cs" />
    <EmbeddedResource Include="**\*.resx" />
  </ItemGroup>

  <ItemGroup>
    <PackageReference Include="Microsoft.NETCore.App">
      <Version>1.0.1</Version>
    </PackageReference>
    <PackageReference Include="Microsoft.NET.Sdk">
      <Version>1.0.0-alpha-20161104-2</Version>
      <PrivateAssets>All</PrivateAssets>
    </PackageReference>
  </ItemGroup>
  
  <Import Project="$(MSBuildToolsPath)\Microsoft.CSharp.targets" />
</Project>

And now let’s create an ASP.NET Core web application.

dotnet new -t web

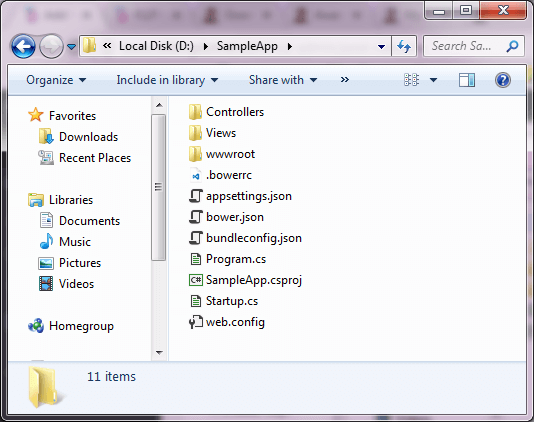
After executing above command, visit the folder where this ASP.NET Core Web application is created. And you will find there is no Project.json and .xproj.

dotnet-core-tooling-preview-4-aspnet-core-folder-strcture

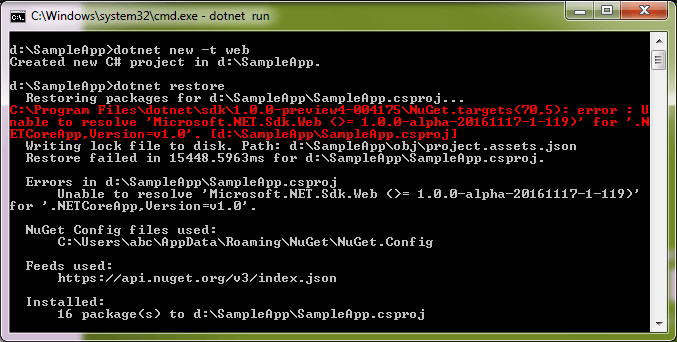
Now, restore the packages via dotnet restore. But there is an error “Unable to resolve ‘Microsoft.NET.Sdk.Web (>= 1.0.0-alpha-20161117-1-119)’ for ‘.NETCoreApp,Version=v1.0′”> while restoring the packages.

dotnet-core-tooling-preview-4-aspnet-core-restore-errorThe error is related with Microsoft.NET.Sdk.Web package which is not getting restored successfully. To fix this error, open the .csproj file. As you can see, .csproj now contains a list of all the dependencies and framework version like project.json. To fix the error, look for Microsoft.NET.Sdk.Web. And update package version to 1.0.0-* from 1.0.0-alpha-20161117-1-119 and save it.

<Project ToolsVersion="15.0">
  <Import Project="$(MSBuildExtensionsPath)\$(MSBuildToolsVersion)\Microsoft.Common.props" />

  <PropertyGroup>
    <OutputType>Exe</OutputType>
    <TargetFramework>netcoreapp1.0</TargetFramework>
    <PreserveCompilationContext>true</PreserveCompilationContext>
  </PropertyGroup>

  <PropertyGroup>
    <PackageTargetFallback>$(PackageTargetFallback);portable-net45+win8+wp8+wpa81;</PackageTargetFallback>
  </PropertyGroup>

  <ItemGroup>
    <Compile Include="**\*.cs" />
    <EmbeddedResource Include="**\*.resx" />
  </ItemGroup>

  <ItemGroup>
    <PackageReference Include="Microsoft.NETCore.App" Version="1.0.1" />
    <PackageReference Include="Microsoft.NET.Sdk.Web" Version="1.0.0-alpha-20161117-1-119">
      <PrivateAssets>All</PrivateAssets>
    </PackageReference>
    <PackageReference Include="Microsoft.AspNetCore.Diagnostics" Version="1.0.0" />
    <PackageReference Include="Microsoft.AspNetCore.Mvc" Version="1.0.1" />
    <PackageReference Include="Microsoft.AspNetCore.Razor.Tools" Version="1.0.0-preview2-final" />
    <PackageReference Include="Microsoft.AspNetCore.Routing" Version="1.0.1" />
    <PackageReference Include="Microsoft.AspNetCore.Server.IISIntegration" Version="1.0.0" />
    <PackageReference Include="Microsoft.AspNetCore.Server.Kestrel" Version="1.0.1" />
    <PackageReference Include="Microsoft.AspNetCore.StaticFiles" Version="1.0.0" />
    <PackageReference Include="Microsoft.Extensions.Configuration.EnvironmentVariables" Version="1.0.0" />
    <PackageReference Include="Microsoft.Extensions.Configuration.Json" Version="1.0.0" />
    <PackageReference Include="Microsoft.Extensions.Logging" Version="1.0.0" />
    <PackageReference Include="Microsoft.Extensions.Logging.Console" Version="1.0.0" />
    <PackageReference Include="Microsoft.Extensions.Logging.Debug" Version="1.0.0" />
    <PackageReference Include="Microsoft.Extensions.Options.ConfigurationExtensions" Version="1.0.0" />
    <PackageReference Include="Microsoft.VisualStudio.Web.BrowserLink.Loader" Version="14.0.0" />
  </ItemGroup>

  <Import Project="$(MSBuildToolsPath)\Microsoft.CSharp.targets" />
</Project>

After saving it, run dotnet restore again and packages should be restored successfully. Executing dotnet run should start the application also.

dotnet-core-tooling-preview-4-aspnet-core-running

Visit the localhost URL in browser and you will see it’s running successfully. Great!!!!

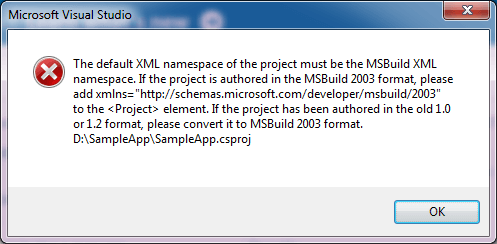
Let’s open this application in VS 2015 and guess what one more error. :(

dotnet-core-tooling-preview-4-aspnet-core-vs2015-error

As per the error message, it is looking for XML namespace in .csproj file. So let’s add that to .csproj and save it.

<Project ToolsVersion="15.0" xmlns="http://schemas.microsoft.com/developer/msbuild/2003">

Let’s open it again. And there comes one more error “The attribute “Version” in element is unrecognized.”. I couldn’t find a fix and honestly, I didn’t put much effort to fix it as it’s a nightly build and contains some bugs.

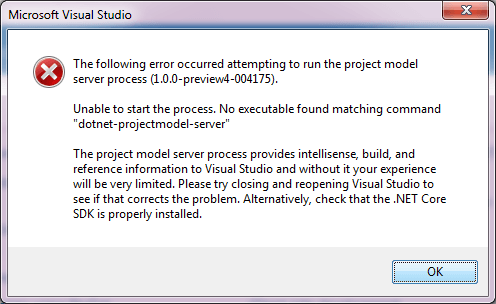
Now, let’s try to create a new application from VS 2015 itself. And following error is coming as soon as you hit ok after selecting web application option from the selection dialog box.

dotnet-core-tooling-preview-4-new-aspnet-core-app-vs2015-error
So it seems that there are some issues with the nightly build. And let’s not worry about them as these will be addressed when the final release will be made.

What about old projects?

When this change was announced, it was also mentioned that this migration will be done automatically via VS when old projects (with .xproj) will be opened. But for now, it is not happening (since it’s a nightly build). But is there any way to migrate it now?

Well, the answer is Yes. I posted about Entity Framework Core InMemory provider with ASP.NET Core and let’s migrate it to new .csproj. dotnet tooling support migrate command which migrates a Preview 2 .NET Core project to Preview 3 .NET Core project. You can get more information about dotnet migrate from here.

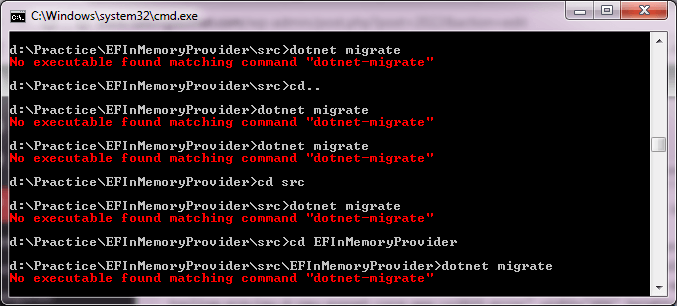
So let’s do the migration now. Open command prompt and get to the location where the old project resides and execute dotnet migrate command. And got an error saying “no executable found matching command dotnet-migrate”. I tried executing at parent folder also but got the same error.

no executable found matching command dotnet-migrate

To fix above error, I followed these steps.

  • Open global.json in notepad, and update the SDK version to 1.0.0-preview4-004175 (this is the version that’s installed on my syetem).
  • Go back to command prompt, and execute dotnet migrate command again. And this time, it works.
    Fix for no executable found matching command dotnet-migrate
  • Execute dotnet restore to restore packages. And once that is done, you will find project.json and .xproj files are now gone and .csproj file is present. All the dependencies are now part of .csproj.
  • Running dotnet run should run the application.

Summary

Though Project.json was a welcome change the experience is better than traditional .csproj. Since the announcement of ASP.NET Core (aka ASP.NET 5), things have changed as the framework is becoming more and more mature and probably based on the community feedback. So bye-bye Project.json and .xproj, let’s celebrate the rebirth of .csproj.

Thank you for reading. Keep visiting this blog and share this in your network. Please put your thoughts and feedback in the comments section.

The post Bye-Bye Project.json and .xproj and welcome back .csproj appeared first on Talking Dotnet.

05 Dec 19:43

Officiel: Le Paul Ricard accueillera la F1 en 2018

by Pascal MICHEL
circuit-paul-ricard

Après une longue absence de dix ans, la F1 effectuera son retour en France à l’été 2018 sur le circuit Paul Ricard. L’annonce a été faite cet après-midi par Christian Estrosi, président de la région PACA, lors d’une conférence de presse organisée dans les salons de l’Automobile Club de France à Paris. Le contrat porte […]

Cet article Officiel: Le Paul Ricard accueillera la F1 en 2018 est apparu en premier sur le blog auto.

04 Dec 07:29

NoSQL .NET Core development using an local Azure DocumentDB Emulator

by Scott Hanselman

I was hanging out with Miguel de Icaza in New York a few weeks ago and he was sharing with me his ongoing love affair with a NoSQL Database called Azure DocumentDB. I've looked at it a few times over the last year or so and though it was cool but I didn't feel like using it for a few reasons:

  • Can't develop locally - I'm often in low-bandwidth or airplane situations
  • No MongoDB support - I have existing apps written in Node that use Mongo
  • No .NET Core support - I'm doing mostly cross-platform .NET Core apps

Miguel told me to take a closer look. Looks like things have changed! DocumentDB now has:

  • Free local DocumentDB Emulator - I asked and this is the SAME code that runs in Azure with just changes like using the local file system for persistence, etc. It's an "emulator" but it's really the essential same core engine code. There is no cost and no sign in for the local DocumentDB emulator.
  • MongoDB protocol support - This is amazing. I literally took an existing Node app, downloaded MongoChef and copied my collection over into Azure using a standard MongoDB connection string, then pointed my app at DocumentDB and it just worked. It's using DocumentDB for storage though, which gives me
    • Better Latency
    • Turnkey global geo-replication (like literally a few clicks)
    • A performance SLA with <10ms read and <15ms write (Service Level Agreement)
    • Metrics and Resource Management like every Azure Service
  • DocumentDB .NET Core Preview SDK that has feature parity with the .NET Framework SDK.

There's also Node, .NET, Python, Java, and C++ SDKs for DocumentDB so it's nice for gaming on Unity, Web Apps, or any .NET App...including Xamarin mobile apps on iOS and Android which is why Miguel is so hype on it.

Azure DocumentDB Local Quick Start

I wanted to see how quickly I could get started. I spoke with the PM for the project on Azure Friday and downloaded and installed the local emulator. The lead on the project said it's Windows for now but they are looking for cross-platform solutions. After it was installed it popped up my web browser with a local web page - I wish more development tools would have such clean Quick Starts. There's also a nice quick start on using DocumentDB with ASP.NET MVC.

NOTE: This is a 0.1.0 release. Definitely Alpha level. For example, the sample included looks like it had the package name changed at some point so it didn't line up. I had to change "Microsoft.Azure.Documents.Client": "0.1.0" to "Microsoft.Azure.DocumentDB.Core": "0.1.0-preview" so a little attention to detail issue there. I believe the intent is for stuff to Just Work. ;)

Nice DocumentDB Quick Start

The sample app is a pretty standard "ToDo" app:

ASP.NET MVC ToDo App using Azure Document DB local emulator

The local Emulator also includes a web-based local Data Explorer:

image

A Todo Item is really just a POCO (Plain Old CLR Object) like this:

namespace todo.Models
{
    using Newtonsoft.Json;
    public class Item
    {
        [JsonProperty(PropertyName = "id")]
        public string Id { get; set; }
        [JsonProperty(PropertyName = "name")]
        public string Name { get; set; }
        [JsonProperty(PropertyName = "description")]
        public string Description { get; set; }
        [JsonProperty(PropertyName = "isComplete")]
        public bool Completed { get; set; }
    }
}

The MVC Controller in the sample uses an underlying repository pattern so the code is super simple at that layer - as an example:

[ActionName("Index")]

public async Task<IActionResult> Index()
{
var items = await DocumentDBRepository<Item>.GetItemsAsync(d => !d.Completed);
return View(items);
}

[HttpPost]
[ActionName("Create")]
[ValidateAntiForgeryToken]
public async Task<ActionResult> CreateAsync([Bind("Id,Name,Description,Completed")] Item item)
{
if (ModelState.IsValid)
{
await DocumentDBRepository<Item>.CreateItemAsync(item);
return RedirectToAction("Index");
}

return View(item);
}

The Repository itself that's abstracting away the complexities is itself not that complex. It's like 120 lines of code, and really more like 60 when you remove whitespace and curly braces. And half of that is just initialization and setup. It's also DocumentDBRepository<T> so it's a generic you can change to meet your tastes and use it however you'd like.

The only thing that stands out to me in this sample is the loop in GetItemsAsync that's hiding potential paging/chunking. It's nice you can pass in a predicate but I'll want to go and put in some paging logic for large collections.

public static async Task<T> GetItemAsync(string id)
{
    try
    {
        Document document = await client.ReadDocumentAsync(UriFactory.CreateDocumentUri(DatabaseId, CollectionId, id));
        return (T)(dynamic)document;
    }
    catch (DocumentClientException e)
    {
        if (e.StatusCode == System.Net.HttpStatusCode.NotFound){
            return null;
        }
        else {
            throw;
        }
    }
}
public static async Task<IEnumerable<T>> GetItemsAsync(Expression<Func<T, bool>> predicate)
{
    IDocumentQuery<T> query = client.CreateDocumentQuery<T>(
        UriFactory.CreateDocumentCollectionUri(DatabaseId, CollectionId),
        new FeedOptions { MaxItemCount = -1 })
        .Where(predicate)
        .AsDocumentQuery();
    List<T> results = new List<T>();
    while (query.HasMoreResults){
        results.AddRange(await query.ExecuteNextAsync<T>());
    }
    return results;
}
public static async Task<Document> CreateItemAsync(T item)
{
    return await client.CreateDocumentAsync(UriFactory.CreateDocumentCollectionUri(DatabaseId, CollectionId), item);
}
public static async Task<Document> UpdateItemAsync(string id, T item)
{
    return await client.ReplaceDocumentAsync(UriFactory.CreateDocumentUri(DatabaseId, CollectionId, id), item);
}
public static async Task DeleteItemAsync(string id)
{
    await client.DeleteDocumentAsync(UriFactory.CreateDocumentUri(DatabaseId, CollectionId, id));
}

I'm going to keep playing with this but so far I'm pretty happy I can get this far while on an airplane. It's really easy (given I'm preferring NoSQL over SQL lately) to just through objects at it and store them.

In another post I'm going to look at RavenDB, another great NoSQL Document Database that works on .NET Core that s also Open Source.


Sponsor: Big thanks to Octopus Deploy! Do you deploy the same application multiple times for each of your end customers? The team at Octopus have taken the pain out of multi-tenant deployments. Check out their latest 3.4 release


© 2016 Scott Hanselman. All rights reserved.
     
03 Dec 13:28

Visual Studio Tools for Azure Functions

by Andrew B Hall - MSFT

Update 12-6-16 @5:00 PM: Updated version of the tools are available that fix the ability to open .NET Core projects with Azure Functions tools installed. Install the updated version over your old version to fix the issue, there is no need to uninstall the previous copy. 

Today we are pleased to announce a preview of tools for building Azure Functions for Visual Studio 2015. Azure Functions provide event-based serverless computing that make it easy to develop and scale your application, paying only for the resources your code consumes during execution. This preview offers the ability to create a function project in Visual Studio, add functions using any supported language, run them locally, and publish them to Azure. Additionally, C# functions support both local and remote debugging.

In this post, I’ll walk you through using the tools by creating a C# function, covering some important concepts along the way. Then, once we’ve seen the tools in action I’ll cover some known limitations we currently have.

Also, please take a minute and let us know who you are so we can follow up and see how the tools are working.

Getting Started

Before we dive in, there are a few things to note:

For our sample function, we’ll create a C# function that is triggered when a message is published into a storage Queue, reverses it, and stores both the original and reversed strings in Table storage.

  • To create a function, go to:
  • File -> New Project
  • Then select the “Cloud” node under the “Visual C#” section and choose the “Azure Functions (Preview) project type
    image
  • This will give us an empty function project. There are a few things to note about the structure of the project:
  • For the purposes of this blog post, we’ll add an entry that speeds up the queue polling interval from the default of once a minute to once a second by setting the “maxPollingInterval” in the host.json (value is in ms)
    image
  • Next, we’ll add a function to the project, by right clicking on the project in Solution Explorer, choose “Add” and then “New Azure Function”
    image
  • This will bring up the New Azure Function dialog which enables us to create a function using any language supported by Azure Functions
    image
  • For the purposes of this post we’ll create a “QueueTrigger – C#” function, fill in the “Queue name” field, “Storage account connection” (this is the name of the key for the setting we’ll store in “appsettings.json”), and the “Name” of our function.  Note: All function types except HTTP triggers require a storage connection or you will receive an error at run time
    image
  • This will create a new folder in the project with the name of our function with the following key files:
  • The last thing we need to do in order to hook up function to our storage Queue is provide the connecting string in the appsettings.json file (in this case by setting the value of “AzureWebJobsStorage”)
    image
  • Next we’ll edit the “function.json” file to add two bindings, one that gives us the ability to read from the table we’ll be pushing to, and another that gives us the ability to write entries to the table
    image
  • Finally, we’ll write our function logic in the run.csx file
    image
  • Running the function locally works like any other project in Visual Studio, Ctrl + F5 starts it without debugging, and F5 (or the Start/Play button on the toolbar) launches it with debugging. Note: Debugging currently only works for C# functions. Let’s hit F5 to debug the function.
  • The first time we run the function, we’ll be prompted to install the Azure Functions CLI (command line) tools. Click “Yes” and wait for them to install, our function app is now running locally. We’ll see a command prompt with some messages from the Azure Functions CLI pop up, if there were any compilation problems, this is where the messages would appear since functions are dynamically compiled by the CLI tools at runtime.
    image
  • We now need to manually trigger our function by pushing a message into the queue with Azure Storage Explorer. This will cause the function to execute and hit our breakpoint in Visual Studio.
    image

Publishing to Azure

  • Now that we’ve tested the function locally, we’re ready to publish our function to Azure. To do this right click on the project and choose “Publish…”, then choose “Microsoft Azure App Service” as the publish target
    image
  • Next, you can either pick an existing app, or create a new one. We’ll create a new one by clicking the “New…” button on the right side of the dialog
  • This will pop up the provisioning dialog that lets us choose or setup the Azure environment (we can customize the names or choose existing assets). These are:
    • Function App Name: the name of the function app, this must be unique
    • Subscription: the Azure subscription to use
    • Resource Group: what resource group the to add the Function App to
    • App Service Plan: What app service plan you want to run the function on. For complete information read about hosting plans, but it’s important to note that if you choose an existing App Service plan you will need to set the plan to “always on” or your functions won’t always trigger (Visual Studio automatically sets this if you create the plan from Visual Studio)
  • Now we’re ready to provision (create) all of the assets in Azure. Note: that the “Validate Connection” button does not work in this preview for Azure Functions 
    image
  • Once provisioning is complete, click “Publish” to publish the Function to Azure. We now have a publish profile which means all future publishes will skip the provisioning steps
    image
    Note: If you publish to a Consumption plan, there is currently a bug where new triggers that you define (other than HTTP) will not be registered in Azure, which can cause your functions not to trigger correctly. To work around this, open your Function App in the Azure portal and click the “Refresh” button on the lower left to fix the trigger registration. This bug with publish will be fixed on the Azure side soon.
  • To verify our function is working correctly in Azure, we’ll click the “Logs” button on the function’s page, and then push a message into the Queue using Storage Explorer again. We should see a message that the function successfully processed the message
    image
  • The last thing to note, is that it is possible to remote debug a C# function running in Azure from Visual Studio. To do this:
    • Open Cloud Explorer
    • Browse to the Function App
    • Right click and choose “Attach Debugger”
      image

Known Limitations

As previously mentioned, this is the first preview of these tools, and we have several known limitations with them. They are as follow:

  • IntelliSense: IntelliSense support is limited, and available only for C#, and JavaScript by default. F#, Python, and PowerShell support is available if you have installed those optional components. It is also important to note that C# and F# IntelliSense is limited at this point to classes and methods defined in the same .csx/.fsx file and a few system namespaces.
  • Cannot add new files using “Add New Item”: Adding new files to your function (e.g. .csx or .json files) is not available through “Add New Item”. The workaround is to add them using file explorer, the Add New File extension, or another tool such as Visual Studio Code.
  • Function bindings generate incorrectly when creating a C# Image Resize function: The settings for the binding “Azure Storage Blob out (imageSmall)” are overridden by the settings for the binding “Azure Storage Blob out (imageMedium)” in the generated function.json. The workaround is to go to the generated function.json and manually edit the “imageSmall” binding.
  • Local deployment and web deploy packages are not supported: Currently, only Web Deploy to App Service is supported. If you try to use Local Deploy or a Web Deploy Package, you’ll see the error “GatherAllFilesToPublish does not exist in the project”.
  • The Publish Preview shows all files in the project’s folder even if they are not part of the project: Publish preview does not function correctly, and will cause all files in the project folder to be picked up and and published.  Avoid using the Preview view.
  • The publish option “Remove additional files at destination” does not work correctly:  The workaround is to remove these files manually by going to the Azure Functions Portal, Function App Settings -> App Service Editor

Conclusion

Please download and try out this preview of Visual Studio Tools for Azure Functions and let us know who you are so we can follow up and see how they are working. Additionally, please report any issues you encounter on our GitHub repo (include “Visual Studio” in the issue title) and provide any comments or questions you have below, or via Twitter.

03 Dec 13:12

MVP Hackathon 2016: Cool Projects from Microsoft MVPs

by Jeffrey T. Fritz

Last week was the annual MVP Summit on Microsoft’s Redmond campus.  We laughed, we cried, we shared stories around the campfire, and we even made s’mores.  Ok, I’m stretching it a bit about the last part, but we had a good time introducing the MVPs to some of the cool technologies you saw at Connect() yesterday, and some that are still in the works for 2017.  As part of the MVP Summit event, we hosted a hackathon to explore some of the new features and allow attendees to write code along with Microsoft engineers and publish that content as an open source project.

We shared the details of some of these projects with the supervising program managers covering Visual Studio, ASP.NET, and the .NET framework.  Those folks were impressed with the work that was accomplished, and now we want to share these accomplishments with you.  This is what a quick day’s worth of work can accomplish when working with your friends.

MVP Hackers at the end of the Hackathon

MVP Hackers at the end of the Hackathon

  • Shaun Luttin wrote a console application in F# that plays a card trick.  Source code at:  https://github.com/shaunluttin/magical-mathematics
  • Rainer Stropek created a docker image to fully automate the deployment and running of a Minecraft server with bindings to allow interactions with the server using .NET Core.  Rainer summarized his experience and the docker image on his blog
  • Tanaka Takayoshi wrote an extension command called “add” for the dotnet command-line interface.  The Add command helps format new classes properly with namespace and initial class declaration code when you are working outside of Visual Studio. Tanaka’s project is on GitHub.
  • Tomáš Herceg wrote an extension for Visual Studio 2017 that supports development with the DotVVM framework for ASP.NET.  DotVVM is a front-end framework that dramatically simplifies the amount of code you need to write in order to create useful web UI experiences.  His project can be found on GitHub at: https://github.com/riganti/dotvvm   See the animated gif below for a sample of how DotVVM can be coded in Visual Studio 2017:

    DotVVM Intellisense in action

    DotVVM Intellisense in action

  • The ASP.NET Monsters wrote Pugzor, a drop-in replacement for the Razor view engine using the “Pug” JavaScript library as the parser and renderer. It can be added side-by-side with Razor in your project and enabled with one line of code. If you have Pug templates (previously called Jade) these now work as-are inside ASP.NET Core MVC. The ASP.NET Monsters are: Simon Timms, David Paquette and James Chambers

    Pugzor

    Pugzor

  • Alex Sorkoletov wrote an addin for Xamarin Studio that helps to clean up unused using statements and sort them alphabetically on every save.  The project can be found at: https://github.com/alexsorokoletov/XamarinStudio.SortRemoveUsings
  • Remo Jansen put together an extension for Visual Studio Code to display class diagrams for TypeScript.  The extension is in alpha, but looks very promising on his GitHub project page.

    Visual Studio Code - TypeScript UML Generator

    Visual Studio Code – TypeScript UML Generator

  • Giancarlo Lelli put together an extension to help deploy front-end customizations for Dynamics 365 directly from Visual Studio.  It uses the TFS Client API to detect any changes in you workspace and check in everything on your behalf. It is able to handle conflicts that prevents you to overwrite the work of other colleagues. The extension keeps the same folder structure you have in your solution explorer inside the CRM. It also supports adding the auto add of new web resources to a specific CRM solution. This extension uses the VS output window to provide feedback during the whole publish process.  The project can be found on its GitHub page.

    Publish to Dynamics

    Publish to Dynamics

  • Simone Chiaretta wrote an extension for the dotnet command-line tool to manage the properties in .NET Core projects based on MSBuild. It allows setting and removing the version number, the supported runtimes and the target framework (and more properties are being added soon). And it also lists all the properties in the project file.  You can extend your .NET CLI with his NuGet package or grab the source code from GitHub.  He’s written a blog post with more details as well.

    The dotnet prop command

    The dotnet prop command

  • Nico Vermeir wrote an amazing little extension that enables the Surface Dial to help run the Visual Studio debugger.  He wrote a blog post about it and published his source code on GitHub.
  • David Gardiner wrote a Roslyn Analyzer that provides tips and best practice recommendations when authoring extensions for Visual Studio.  Source code is on GitHub.

    VSIX Analyzers

    VSIX Analyzers

  • Cecilia Wirén wrote an extension for Visual Studio that allows you to add a folder on disk as a solution folder, preserving all files in the folder.  Cecilia’s code can be found on GitHub

    Add as Solution Folder

    Add Folder as Solution Folder

  • Terje Sandstrom updated the NUnit 3 adapter to support Visual Studio 2017.

    NUnit Results in Visual Studio 2017

    NUnit Results in Visual Studio 2017


  • Ben Adams made the Kestrel web server for ASP.NET Core 8% faster while sitting in with some of the ASP.NET Core folks.

Summary

We had an amazing time working together, pushing each other to develop and build more cool things that could be used with Visual Studio 2015, 2017, Code, and Xamarin Studio.  Stepping away from the event, and reading about these cool projects inspires me to write more code, and I hope it does the same for you.  Would you be interested in participating in a hackathon with MVPs or Microsoft staff?  Let us know in the comments below


03 Dec 13:06

Client-side debugging of ASP.NET projects in Google Chrome

by Mads Kristensen

Updated 2017/1/3 – Setting to control script debugging added. See below.

Visual Studio 2017 RC now supports client-side debugging of both JavaScript and TypeScript in Google Chrome.

For years, it has been possible to debug both the backend .NET code and the client-side JavaScript code running in Internet Explorer at the same time. Unfortunately, the capability was limited solely to Internet Explorer.

In Visual Studio 2017 RC that changes. You can now debug both JavaScript and TypeScript directly in Visual Studio when using Google Chrome as your browser of choice. All you should do is to select Chrome as your browser in Visual Studio and hit F5 to debug.

If you’re interested in giving us feedback on future features and ideas before we ship them, join our community.

browser-selector

The first thing you’ll notice when launching Chrome by hitting F5 in Visual Studio is a page that says, “Please wait while we attach…”.

debugger-attach

What happens is that Visual Studio is attaching to Chrome using the remote debugging protocol and then redirects to the ASP.NET project URL (something like http://localhost:12345) after it attaches. After the attach is complete, the “Please wait while we attach…” message remains visible while the ASP.NET site starts up where normally you’d see a blank browser during this time.

Once the debugger is attached, script debugging is now enabled for all JavaScript files in the project as well as all TypeScript files if there is source map information available. Here’s a screen shot of a breakpoint being hit in a TypeScript file.

breakpoint-hit

For TypeScript debugging you need to instruct the compiler to produce a .map file. You can do that by placing a tsconfig.json file in the root of your project and specify the a few properties, like so:

{
  "compileOnSave": true,
  "compilerOptions": {
    "sourceMap": true
  }
}

If you prefer to use Chrome’s or IE’s own dev tools to do client-side debugging, the recent update to Visual Studio 2017 RC introduced a setting to disable the IE and Chrome script debugger (this will also prevent Chrome/IE from closing after a debugging session ends).

Go to Tools -> Options -> Debugging -> General and turn off the setting Enable JavaScript Debugging for ASP.NET (Chrome and IE).

debugger settings

We hope you’ll enjoy this feature and we would love to hear your feedback in the comments section below, or via Twitter.

Download Visual Studio 2017 RC

03 Dec 13:02

Some cool Project.json features with ASP.NET Core

by Talking Dotnet

As of today, Project.json is the way to define your dependencies, managing runtime frameworks, compilation settings, adding scripts to execute at different events (Prebuild, Postbuild etc.) for ASP.NET Core projects. Though, it will be no longer available in future releases of ASP.NET Core. But since it is available till now, and I used couple of features which I found useful. So sharing those cool Project.json features with ASP.NET Core that you may also find helpful.

Cool Project.json features with ASP.NET Core

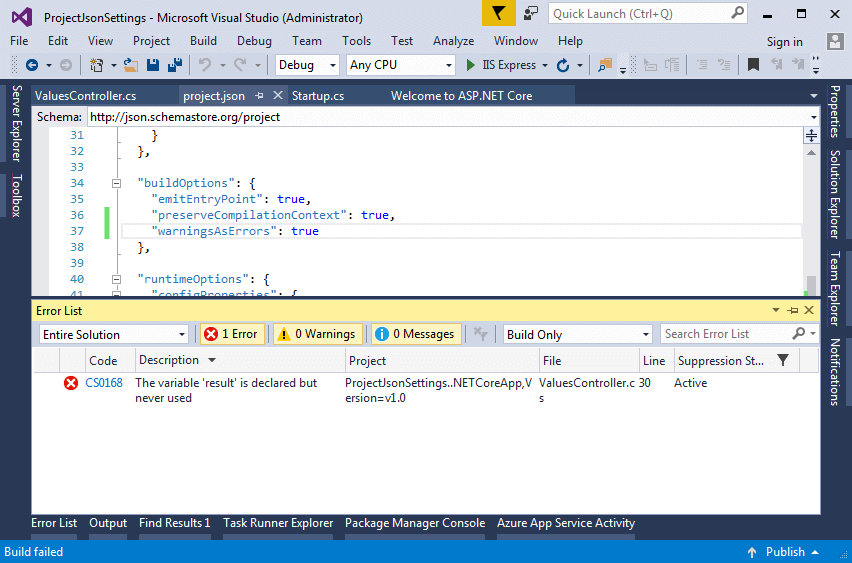
  • warningsAsErrors
  • Most of the time, we concentrate only on fixing build error, and ignore build warnings. It’s not a good practice as to ignore them.

    Varible Declared but not used Warning

    The best way to fix those warnings is to convert them into error, so you had to fix them to proceed. So in project.json, there is an option warningsAsErrors under buildOptions. Set value to “true” for this option.

    "buildOptions": {
      "warningsAsErrors": true
    },
    

    And now when you build the application, warning is now an error.
    WarningAsErrors

  • nowarn
  • As warningsAsErrors when set to “true”, will convert warnings into errors, but sometimes it is not required. When you are sure about any particular warning that will not create any problem in the future like, the warning The variable ‘var’ is assigned but its value is never used. So you want to ignore some of the warnings, while continue to convert all other warnings as errors.

    Open Project.json and add nowarn option under buildOptions. You can define a comma separated list of error codes.

     "buildOptions": {
       "warningsAsErrors": true,
       "nowarn": ["CS0168"]
      },
    

  • xmlDoc
  • It’s a best practice to put comments in your code but lots of developers don’t follow this. Though you can’t force developers to put comments in code, but you can definitely force for putting xml documentation comments (using a triple slash). If there are no XML comments present, Visual studio will display green squiggly lines in the code and also display warning Missing XML comment build warning.

    To force XML comments then, open Project.json and add xmlDoc option under buildOptions. Set the value to true to make XML comments compulsory.

    "buildOptions": {
      "warningsAsErrors": true,
      "xmlDoc": true
    },
    

    XMLDoc Error

  • outputName
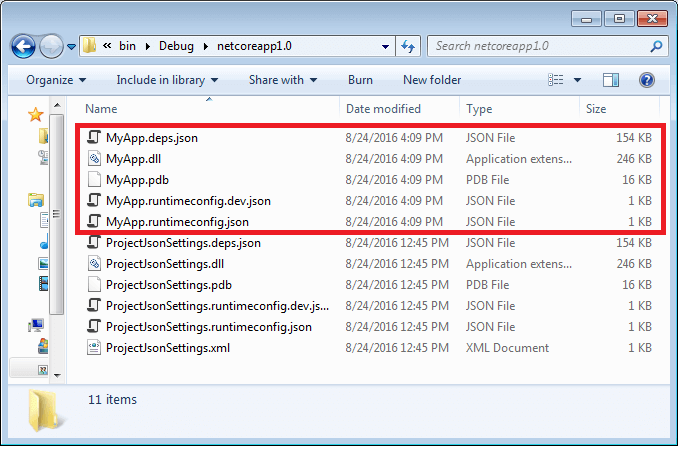
  • By default, .NET core output file (.dll, .pdb,.json) name is based on the project name. If you wish to change it to any other name of your choice, then use outputName option in Project.json to control the name of output file.

     "buildOptions": {
        "warningsAsErrors": true,
        "xmlDoc": false,
        "outputName": "MyApp"
      },
    

    Project json outputName

  • entryPoint
  • As an ASP.NET Core application is a true console application, therefore it has Main() method as entry point of application. If you wish to change the entry point of the application, then open Project.json and add entryPoint option in the beginning. Here you need to define name of the method which you want to make as starting point.

    {
       "entryPoint": "ProjectJsonSettings.Program.MyMainMethod",
    }
    

    However, this option is not working. When application is built after this change, an error comes “Program does not contain a static ‘Main’ method suitable for an entry point”. So the changes made to project.json are not reflected. Let me know in comments section, if you are able to make it work.

    Hope you find them useful. You can find list of all options in Project.json here.

    Thank you for reading. Keep visiting this blog and share this in your network. Please put your thoughts and feedback in the comments section.

    The post Some cool Project.json features with ASP.NET Core appeared first on Talking Dotnet.

    03 Dec 09:37

    USB Killer, yours for $50, lets you easily fry almost every device

    by Sebastian Anthony

    Last year we wrote about the "USB Killer"—a DIY USB stick that fried almost everything (laptops, smartphones, consoles, cars) that it was plugged into. Now the USB Killer has been mass produced—you can buy it online for about £50/$50. Now everyone can destroy just about every computer that has a USB port. Hooray.

    The commercialised USB Killer looks like a fairly humdrum memory stick. You can even purchase a "Test Shield" for £15/$15, which lets you try out the kill stick—watch the spark of electricity arc between the two wires!—without actually frying the target device, though I'm not sure why you would want to spend £65 to do that. The website proudly states that the USB Killer is CE approved, meaning it has passed a number of EU electrical safety directives.

    Read 9 remaining paragraphs | Comments

    02 Dec 19:20

    F1 : Nico Rosberg prend sa retraite !

    by Thomas Roux
    nico_rosberg_retraite

    Moins d’une semaine après avoir remporté le titre de champion du monde de Formule 1, le pilote allemand surprend tout le monde en annonçant sa retraite avec effet immédiat ! C’est via sa page Facebook que Rosberg vient de livrer sa décision. Au-delà de celle-ci, et de l’onde de choc qu’elle va produire dans le petit monde […]

    Cet article F1 : Nico Rosberg prend sa retraite ! est apparu en premier sur le blog auto.

    02 Dec 13:03

    Bliki: FunctionLength

    During my career, I've heard many arguments about how long a function should be. This is a proxy for the more important question - when should we enclose code in its own function? Some of these guidelines were based on length, such as functions should be no larger than fit on a screen [1]. Some were based on reuse - any code used more than once should be put in its own function, but code only used once should be left inline. The argument that makes most sense to me, however, is the separation between intention and implementation. If you have to spend effort into looking at a fragment of code to figure out what it's doing, then you should extract it into a function and name the function after that “what”. That way when you read it again, the purpose of the function leaps right out at you, and most of the time you won't need to care about how the function fulfills its purpose - which is the body of the function.

    Once I accepted this principle, I developed a habit of writing very small functions - typically only a few lines long [2]. Any function more than half-a-dozen lines of code starts to smell to me, and it's not unusual for me to have functions that are a single line of code [3]. The fact that size isn't important was brought home to me by an example that Kent Beck showed me from the original Smalltalk system. Smalltalk in those days ran on black-and-white systems. If you wanted to highlight some text or graphics, you would reverse the video. Smalltalk's graphics class had a method for this called 'highlight', whose implementation was just a call to the method 'reverse' [4]. The name of the method was longer than its implementation - but that didn't matter because there was a big distance between the intention of the code and its implementation.

    Some people are concerned about short functions because they are worried about the performance cost of a function call. When I was young, that was occasionally a factor, but that's very rare now. Optimizing compilers often work better with shorter functions which can be cached more easily. As ever, the general guidelines on performance optimization are what counts. Sometimes inlining the function later is what you'll need to do, but often smaller functions suggest other ways to speed things up. I remember people objecting to having an isEmpty method for a list when the common idiom is to use aList.length == 0. But here using the intention-revealing name on a function may also support better performance if it's faster to figure out if a collection is empty than to determine its length.

    Small functions like this only work if the names are good, so you need to pay good attention to naming. This takes practice, but once you get good at it, this approach can make code remarkably self-documenting. Larger scale functions can read like a story, and the reader can choose which functions to dive into for more detail as she needs it.

    Acknowledgements

    Brandon Byars, Karthik Krishnan, Kevin Yeung, Luciano Ramalho, Pat Kua, Rebecca Parsons, Serge Gebhardt, Srikanth Venugopalan, and Steven Lowe discussed drafts of this post on our internal mailing list.

    Christian Pekeler reminded me that nested functions don't fit my sizing observations.

    Notes

    1: Or in my first programming job: two pages of line printer paper - around 130 lines of Fortran IV

    2: Many languages allow you to use functions to contain other functions. This is often used as a scope reduction mechanism, such as using the Function as Object pattern to implement a class. Such functions are naturally much larger.

    3: Length of my functions

    Recently I got curious about function length in the toolchain that builds this website. It's mostly Ruby and runs to about 15 KLOC. Here's a cumulative frequency plot for the method body lengths

    As you see there's lots of small methods there - half of the methods in my codebase are two lines or less. (lines here are non-comment, non-blank, and excluding the def and end lines.)

    Here's the data in a crude tabular form (I'm feeling too lazy to turn it into proper HTML tables).

                  lines.freq lines.cumfreq lines.cumrelfreq
    [1,2)          875           875        0.4498715
    [2,3)          264          1139        0.5856041
    [3,4)          195          1334        0.6858612
    [4,5)          120          1454        0.7475578
    [5,6)          116          1570        0.8071979
    [6,7)           69          1639        0.8426735
    [7,8)           75          1714        0.8812339
    [8,9)           46          1760        0.9048843
    [9,10)          50          1810        0.9305913
    [10,15)         98          1908        0.9809769
    [15,20)         24          1932        0.9933162
    [20,50)         12          1944        0.9994859
          

    4: The example is in Kent's excellent Smalltalk Best Practice Patterns in Intention Revealing Message

    Translations: Chinese
    Share:
    if you found this article useful, please share it. I appreciate the feedback and encouragement
    02 Dec 12:58

    Bliki: HiddenPrecision

    Sometimes when I work with some data, that data is more precise than I expect. One might think that would be a good thing, after all precision is good, so more is better. But hidden precision can lead to some subtle bugs.

    const validityStart = new Date("2016-10-01");   // JavaScript
    const validityEnd = new Date("2016-11-08");
    const isWithinValidity = aDate => (aDate >= validityStart && aDate <= validityEnd);
    const applicationTime = new Date("2016-11-08 08:00");
    
    assert.notOk(isWithinValidity(applicationTime));  // NOT what I want

    What happened in the above code is that I intended to create an inclusive date range by specifying the start and end dates. However I didn't actually specify dates, but instants in time, so I'm not marking the end date as November 8th, I'm marking the end as the time 00:00 on November 8th. As a consequence any time (other than midnight) within November 8th falls outside the date range that's intended to include it.

    Hidden precision is a common problem with dates, because it's sadly common to have a date creation function that actually provides an instant like this. It's an example of poor naming, and indeed general poor modeling of dates and times.

    Dates are a good example of the problems of hidden precision, but another culprit is floating point numbers.

    const tenCharges = [
      0.10, 0.10, 0.10, 0.10, 0.10,
      0.10, 0.10, 0.10, 0.10, 0.10,
    ];
    const discountThreshold = 1.00;
    const totalCharge = tenCharges.reduce((acc, each) => acc += each);
    assert.ok(totalCharge < discountThreshold);   // NOT what I want

    When I just ran it, a log statement showed totalCharge was 0.9999999999999999. This is because floating point doesn't exactly represent many values, leading to a little invisible precision that can show up at awkward times.

    One conclusion from this is that you should be extremely wary of representing money with a floating point number. (If you have a fractional currency part like cents, then usually it's best to use integers on the fractional value, representing €5.00 with 500, preferably within a money type) The more general conclusion is that floating point is tricksy when it comes to comparisons (which is why test framework asserts always have a precision for comparisons).

    Acknowledgements

    Arun Murali, James Birnie, Ken McCormack, and Matteo Vaccari discussed a draft of this post on our internal mailing list.
    Translations: Chinese
    Share:
    if you found this article useful, please share it. I appreciate the feedback and encouragement
    29 Nov 19:27

    South Korean Protesters Call for Their President to Step Down (22 photos)

    For the past five weekends, hundreds of thousands of protesters have been occupying large parts of downtown Seoul, South Korea, in some of the largest demonstrations seen in decades, demanding the ouster of President Park Geun-hye. This weekend’s crowd was estimated to be as large as 1.3 million protesters. Prosecutors have accused the president of helping a close family friend manipulate government affairs and extort large sums of money from businesses. Park now has the worst-ever polling figures for the country's presidency, and opposition groups are working to have her impeached.

    South Korean protesters scuffle with riot police as they try to march toward the presidential Blue House after a candle-lit rally in central Seoul on October 29, 2016, denouncing President Park Geun-Hye over a high-profile corruption and influence-peddling scandal involving her close friend. (Jung Yeon-Je / AFP / Getty)
    29 Nov 14:51

    Microsoft Azure Storage Explorer: November update and summer recap

    by Cristy Gonzalez

    One year ago we released the very first version of Microsoft Azure Storage Explorer. At the beginning we only supported blobs on Mac OS and Windows. Since then, we've added the ability to interact with queues, tables and file shares. We started shipping for Linux and we've kept adding features to support the capabilities of Storage Accounts.

    In this post, we first want to thank our users for your amazing support! We appreciate all the feedback we get: your praise encourages us, your frustrations give us problems to solve, and your suggestions help steer us in the right direction. The developers behind Storage Explorer and I have been using this feedback to implement features based on what you liked, what needed improvement, and what you felt was missing in the product.

    Today, we'll elaborate on these features, including what's new in the November update (0.8.6) and what we've shipped since our last post.

    November release downloads: [Windows] [Mac OS] [Linux]

    New in November:

    • Quick access to resources
    • Tabs
    • Improved upload/download speeds and performance
    • High contrast theme support
    • Return of scoped search
    • "Create new folder" for blobs
    • Edit blob and file properties
    • Fix for screen freeze bug

    Major features from July-October:

    • Grouping by subscriptions and local resources
    • Ability to sign-off from accounts
    • Rename for blobs and files
    • Rename for blob containers, queues, tables, and file shares
    • Deep search
    • Improved table query experience
    • Ability to save table queries
    • CORS Settings
    • Managing blob leases
    • Direct links for sharing
    • Configuring of proxy settings
    • UX improvements

    November features

    For this release we focused on the features that most help with productivity when working across multiple Storage Accounts and services. With this in mind we implemented quick access to resources, the ability to open multiple services in tabs, and vastly improved the upload and download speeds of blobs.

    Quick Access

    The top of the tree view now contains a "Quick Access" section, which displays resources you want to access frequently. You can add any Storage Accounts, blob containers, queues, tables, or file shares to the Quick Access list. To add resources to this list, right-click on the resource you want to access and select "Add to Quick Access".

    Quick Access - Microsoft Azure Storage Explorer

    Tabs

    This has long been requested in feedback, so we're pleased to share you can now have multiple tabs! You can open any blob container, queue, table, or file share in a tab by double-clicking it. Single-clicking on a resource will open it in a temporary tab, the contents of which change depending on which service you have single-clicked on the left-hand tree view. You can make the temporary tab permanent by clicking on the tab name. This emulates patterns set by Visual Studio Code.

    Tabs - Microsoft Azure Storage Explorer

    Upload/download performance improvements

    On the performance front, we've made major improvements to the upload and download speeds of blobs. The new speeds are approximately 10x faster than our previous releases. This improvement primarily impacts large files such as VHDs, but also benefits the upload and download of multiple files.

    Folders and property editing

    Before this release, you could only see the properties of a specific file or blob. With this release you'll have the ability to modify the value of editable properties, such as cache control or content type. You can right-click on the blob or file to see and edit their properties.

    Editable Properties - Microsoft Azure Storage Explorer

    We've also added support for creating empty "virtual" folders in blob containers. Now you can create folders before uploading any blobs to it, rather than only being able to create them in the "Upload blob" dialog.

    Usability and reliability

    Last but not least, we worked on features and bug fixes to improve overall usability and reliability. First, we've brought back the ability to search within a Storage Account or service. We know a lot of you missed this feature, so now you have two ways of searching your resources:

    • Global search: Use the search box to search for any Storage Accounts or services
    • Scoped search: Use the magnifying glass to search within that node of the tree view

    Scoped search - Microsoft Azure Storage Explorer

    We also improved usability by adding support for themes in Storage Explorer. There are four themes available: light (default), dark, and two high-contrast themes. You can change the theme by going to the Edit menu and selecting "Themes."

    Themes - Microsoft Azure Storage Explorer

    Lastly, we fixed a screen freeze issue that had been impacting Storage Explorer when starting the app or using the Windows + arrow keys to move it around the screen. Based on our testing we believe this issue is fully fixed, but if you run into it please do let us know.

    Summer features

    After completing support for the full set of Storage services, we pivoted on improving the experience for connecting to your Storage Accounts and managing their content. This allowed us to open up our backlog to work on the major features we shipped in November.

    Account management

    One of the main areas we wanted to improve was the display of Storage Accounts in the left-hand tree view. The tree now shows Storage Accounts grouped by subscription, as well as a separate section for non-subscription resources. This "(Local and Attached)" section lists the local development storage (on Windows) and any Storage Accounts you've attached via either account name and key or SAS URI. It also contains a "SAS-Attached Services" node, which displays all services (such as blob containers) that you've added with SAS .

    Proxy - Microsoft Azure Storage Explorer

    If you're behind a firewall, you've likely had issues with signing into Storage Explorer. To help mitigate this, we've added the ability to specify proxy settings. To modify Storage Explorer proxy settings, you can select the "Configure proxy settings…" icon in the left-side toolbar.

    Lastly, we've also modified the experience when you first sign-in so that all the subscriptions you have under the Azure account are displayed. You can modify this behavior in the account settings pane either by filtering subscriptions under an account, or by selecting the "Remove" button to completely sign-off from an account.

    Copying and renaming

    In the summer months we also added the ability to copy and rename blob containers, queues, tables, and file shares. You can also copy and rename blobs, blob folders, files, and file directories.

    To copy and rename, we first create a copy of all the resources selected and move them if necessary. In the case of a rename, we delete the original files once the copy operation is completed successfully.

    It's possible to copy within an account as well as from one storage account to another, regardless of how you're connected to it. The copy is done on the server-side, so it's a fast operation that does not require disk space on your machine.

    CORS, leases, and sharing

    We've also improved the way to manage the access and rules of your storage resources. At the storage account level, you can now add, edit, and delete CORS rules for each of the services. You can do this by right-clicking on the node for either blob containers, queues, tables, or file shares, and selecting the "Configure CORS Settings…" option.

    You can also control the actions you can take on blobs by creating and breaking leases for blobs and blob containers. Blobs with leases will be marked by a "lock" icon beside the blob, while blob containers with leases will have the word "(Locked)" displayed next to the blob container name. To manage leases, you can right-click on the resource for which you want to break or acquire a lease.

    Blob leases - Microsoft Azure Storage Explorer

    We also added the ability to share direct links to the resources in your subscription. This allows another person (who also has access to your subscription) to click on a link that will open up Storage Explorer and navigate to the specific resource you shared. To share a direct link, right-click on the Storage Account or blob container, queue, table, or file share you want the other person to access and select "Get Direct Link…."

    Writing and saving queries

    Lastly, we made significant improvements to the table querying functionality. The new query builder interface allows you to easily query your tables without having to know ODATA. With this query builder you can create AND/OR statements and group them together to search for any field in your table. You still can switch to the ODATA mode by selecting the "Text Editor" button at the top of the query toolbar.

    Additionally, you have the ability to save and load any queries you have created, regardless of whether you use the builder or the editor to construct your queries.

    Table query - Microsoft Azure Storage Explorer

    Summary

    Although we've done a lot of big features, we know there's still gaps. Blob snapshots, stats and counts about the contents of your services, and support for Azure Stack are among the features for which we've heard a lot of requests. If you notice anything missing form that list or have any other comments, issues, or suggestions, you can send us feedback directly from Storage Explorer.

    Feedback - Microsoft Azure Storage Explorer

    Thanks for making our first year a fantastic one!

    - The Storage Explorer Team

    24 Nov 20:21

    The 2016 Christmas List of Best STEM Toys for your little nerds and nerdettes

    by Scott Hanselman

    Last year my 9 year old asked, "are we nerds yet?" Being a nerd doesn't have the negative stigma it once did. A nerd is a fan, and everyone should be enthusiastic about something. You might be a gardening nerd or a woodworking nerd. In this house, we are Maker Nerds. We've been doing some 3D Printing lately, and are trying to expand into all kinds of makings.

    NOTE: We're gearing up for another year of March Is For Makers coming soon in March of 2017. Now is a great time for you to catch up on the last two year's amazing content with made in conjunction with http://codenewbie.org!

    Here's a Christmas List of things that I've either personally purchased, tried for a time, or borrowed from a friend. These are great toys and products for kids of all genders and people of all ages.

    Sphero Star Wars BB-8 App Controlled Robot

    Sphero was a toy the kids got for Christmas last year that they are still playing with. Of course, there's the Original Sphero that's just a white ball with zero personality. I remember when it  came out and I was like, "meh, ok." But then Star Wars happened and I tell ya, you add a little head on the thing and give it some personality and it's a whole new toy.

    Sphero Star Wars BB-8 App Controlled Robot

    The Sphero team continues to update the firmware and software inside BB-8 even now and recently added a new "Sphero Force Band" so you can control Sphero with gestures.

    However, the best part is that Sphero supports a new system called "The SPRK Lightning Lab" (available for Android, iOS, or other devices) that lets kids program BB-8 directly! It's basically Scratch for BB-8. You can even use a C-style language called OVAL when you outgrow their Scratchy system.

    Meccano Micronoids

    81r9vmEHZvL._SL1500_

    I grew up in a world of Lincoln Logs and Erector Sets. We were always building something with metal and screws. Well, sets like this still exist with actual screws and metal...they just include more plastic than before. Any of these Meccano sets are super fun for little builders. They are in some ways cooler than LEGO for my kids because of the shear size of them. The Meccano Meccanoid 2.0 is HUGE at almost two feet tall. It's got 6 motors and there's three ways to program it. There's a large variety of Meccano robot and building kids from $20 on up, so they fit most budgets.

    Arduino UNO Project Super Starter Kit from Elegoo

    91XepSwZP5L._SL1457_

    Arduino Kits are a little touch and go. They usually say things like "1000 pieces!"...but they count all the resistors and screws as a single part. Ignore that and try to look at the underlying pieces and the possibilities. Things move quickly and you'll sometimes need to debug Arudino Programs or search for updates but the fundamentals are great for kids 8-13.

    I particularly like this Elegoo Arduino UNO Starter Kit as it includes everything you'll need and more to start playing immediately. If you can swing a little more money you can add on touchscreens, speakers, and even a little robot car kit, although the difficulty ratchets up.

    Snap Circuits

    Snap Circuits

    I recommended these before on twitter, and truly, I can't sing about them enough. I love Snap Circuits and have blogged about them before on my blog. We quickly outgrew the 30 parts in the Snap Circuits Jr. Even though it has 100 projects, I recommend you get the Snap Circuits SC-300 that has 60 parts and 300 projects, or do what we did and just get the Snap Circuits Extreme SC-750 that has 80+ parts and 750 projects. I like this one because it includes a computer interface (via your microphone jack, so any old computer will work!) as well as a Solar Panel.

    In 2016 Snap Circuits added a new "3D" kit that lets you build not just on a flat surface but expands building up walls! If you already have a SnapCircuits kit, remember that they all work together so you can pick this one up as well and combine them!

    91NYoJujYYL._SL1500_

    Secret Messages Kit

    It's a fact - little kids LOVE secret messages. My kids are always doing secret notes with lemon juice as invisible ink. This kit brings a ton of "hidden writing systems" together in one inexpensive package. Ciphers, Braille, Code Breaking, and more are all combined into a narrative of secret spy missions.

    817VYGOwvkL._SL1200_

    What educational toys do YOU recommend this holiday season?

    FYI: These Amazon links are referral links. When you use them I get a tiny percentage. It adds up to taco money for me and the kids! I appreciate you - and you appreciate me-  when you use these links to buy stuff.


    Sponsor: Help your team write better, shareable SQL faster! Discover how your whole team can write better, shareable SQL faster with a free trial of SQL Prompt. Write, refactor and share SQL effortlessly, try it now.


    © 2016 Scott Hanselman. All rights reserved.
         
    23 Nov 16:08

    Announcing auto-shutdown for VMs using Azure Resource Manager

    by Xiaoying Guo

    We are excited to announce you can set any ARM-based Virtual Machines to auto-shutdown with a few simple clicks!
     
    This was a feature originally available only to VMs in Azure DevTest Labs: your self-service sandbox environment in Azure to quickly create Dev/Test environments while minimizing waste and controlling costs. In case you haven't heard it before, the goal for this service is to solve the problems that IT and development teams have been facing: delays in getting a working environment, time-consuming environment configuration, production fidelity issues, and high maintenance cost. It has been helping our customers to quickly get “ready to test” with a worry-free self-service environment.
     
    The reusable templates in the DevTest Labs can be used everywhere once created. The public APIs, PowerShell cmdlets and VSTS extensions make it super easy to integrate you Dev/Test environments from labs to your release pipeline. In addition to the Dev/Test scenario, Azure DevTest Labs can also be used in other scenarios like training and hackathon. For more information about its value propositions, please check out our GA announcement blog post. If you are interested in how DevTest Labs can help for training, check out this article to use Azure DevTest Labs for training.
     
    In the past months, we’ve been very happy to see that auto-shutdown is the #1 policy used by DevTest Labs customers. On the other hand, we also learned from quite a few customers that they have their centrally managed Dev/Test workloads already running in Azure and simply want to set auto-shutdown for those VMs. Since those workloads have already been provisioned and managed centrally, self-service is not really needed. It’s a little bit overkill for them to create a DevTest lab in this case just for the auto-shutdown settings. That’s why we make this popular feature, VM auto-shutdown, available to all the ARM-based Azure VMs.
     
    With this feature, setting auto-shutdown can’t be easier:

    • Go to your VM blade in Azure portal.
    • Click Auto-shutdown in the resource menu on the left-side.
    • You will see an auto-shutdown settings page expanded, where you can specify the auto-shutdown time and time zone. You can also configure to send notification to your webhook URL 15 minutes before auto-shutdown. This post illustrates how you can set up an Azure logic app to send auto-shutdown notification.

      Set auto-shutdown for any ARM-based Azure VMs

    To learn more about this feature or see what's more Azure DevTest Labs can do for you, please check out our announcement on the Azure DevTest Labs team blog.

    To get latest information on the service releases or our thoughts on the DevTest Labs, please subscribe to the team blog’s RSS feed and our Service Updates.

    There are still a lot of things in our roadmap that we can’t wait to build and ship to our customers. Your opinions are valuable for us to deliver the right solutions for your problems. We welcome ideas and suggestions on what DevTest Labs should support, so please do not hesitate to create an idea at the DevTest Labs feedback forum, or vote on others’ ideas.

    If you run into any problems when using the DevTest Labs or have any questions, we are ready at the MSDN forum to help you.

    23 Nov 16:05

    In-Memory OLTP in Azure SQL Database

    by Jos de Bruijn

    We recently announced general availability for In-Memory OLTP in Azure SQL Database, for all Premium databases. In-Memory OLTP is not available in databases in the Standard or Basic pricing tiers today.

    In-Memory OLTP can provide great performance benefits for transaction processing, data ingestion, and transient data scenarios. It can also help to save cost: you can improve the number of transactions per second, while increasing headroom for future growth, without increasing the pricing tier of the database.

    For a sample order processing workload Azure SQL Database is able to achieve 75,000 transactions per second (TPS) in a single database, which is an 11X performance improvement from using In-Memory OLTP, compared with traditional tables and stored procedures. Mileage may vary for different workloads. The following table shows the results for running this workload on the highest available pricing tier, and also shows similar benefits from In-Memory OLTP even in lower pricing tiers.*


    Pricing tier TPS for In-Memory OLTP TPS for traditional tables Performance gain
    P15 75,000 6,800 11X
    P2 8,900 1,000 9X


    Table 1: Performance comparison for a sample order processing workload

    * For the run on P15 we used a scale factor of 100, with 400 clients; for the P2 run we used scale factor 5, with 200 clients. Scale factor is a measure of database size, where 100 translates to a 15GB database size, when using memory-optimized tables. For details about the workload visit the SQL Server samples GitHub repository.

    In this blog post, we are taking a closer look at how the technology works, where the performance benefits come from, and how to best leverage the technology to realize performance improvements in your applications.

    Keep in mind that In-Memory OLTP is for transaction processing, data ingestion, data load and transformation, and transient data scenarios. To improve performance of analytics queries, use Columnstore indexes instead. You will find more details about those in the documentation as well as on this blog, in the coming weeks.

    How does In-Memory OLTP work?

    In-Memory OLTP can provide great performance gains, for the right workloads. One of our customers, Quorum Business Solutions, managed to double a database’s workload while lowering DTU by 70%. In Azure SQL Database, DTU is a measure of the amount of resources that can be utilized by a given database. By reducing resource utilization, Quorum Business Solutions was able to support a larger workload while also increasing the headroom available for future growth, all without increasing the pricing tier of the database.

    Now, where does this performance gain and resource efficiency come from? In essence, In-Memory OLTP improves performance of transaction processing by making data access and transaction execution more efficient, and by removing lock and latch contention between concurrently executing transactions: it is not fast because it is in-memory; it is fast because it is optimized around the data being in-memory. Data storage, access, and processing algorithms were redesigned from the ground up to take advantage of the latest enhancements in in-memory and high concurrency computing.

    Now, just because data lives in-memory does not mean you lose it when there is a failure. By default, all transactions are fully durable, meaning that you have the same durability guarantees you get for any other table in Azure SQL Database: as part of transaction commit, all changes are written to the transaction log on disk. If there is a failure at any time after the transaction commits, your data is there when the database comes back online. In Azure SQL Database, we manage high availability for you, so you don’t need to worry about it: if an internal failure occurs in our data centers, and the database fails over to a different internal node, the data of every transaction you committed is there. In addition, In-Memory OLTP works with all high availability and disaster recovery capabilities of Azure SQL Database, like point-in-time restore, geo-restore, active geo-replication, etc.

    To leverage In-Memory OLTP in your database, you use one or more of the following types of objects:

    • Memory-optimized tables are used for storing user data. You declare a table to be memory-optimized at create time.
    • Non-durable tables are used for transient data, either for caching or for intermediate result set (replacing traditional temp tables). A non-durable table is a memory-optimized table that is declared with DURABILITY=SCHEMA_ONLY, meaning that changes to these tables do not incur any IO. This avoids consuming log IO resources for cases where durability is not a concern.
    • Memory-optimized table types are used for table-valued parameters (TVPs), as well as intermediate result sets in stored procedures. These can be used instead of traditional table types. Table variables and TVPs that are declared using a memory-optimized table type inherit the benefits of non-durable memory-optimized tables: efficient data access, and no IO.
    • Natively compiled T-SQL modules are used to further reduce the time taken for an individual transaction by reducing CPU cycles required to process the operations. You declare a Transact-SQL module to be natively compiled at create time. At this time, the following T-SQL modules can be natively compiled: stored procedures, triggers and scalar user-defined functions.

    In-Memory OLTP is built into Azure SQL Database, and you can use all these objects in any Premium database. And because these objects behave very similar to their traditional counterparts, you can often gain performance benefits while making only minimal changes to the database and the application. You will find a Transact-SQL script showing an example for each of these types of objects towards the end of this post.

    Each database has a cap on the size of memory-optimized tables, which is associated with the number of DTUs of the database or elastic pool. At the time of writing you get one gigabyte of storage for every 125 DTUs or eDTUs. For details about monitoring In-Memory OLTP storage utilization and altering see: Monitor In-Memory Storage.

    When and where do you use In-Memory OLTP?

    In-Memory OLTP may be new to Azure SQL Database, but it has been in SQL Server since 2014. Since Azure SQL Database and SQL Server share the same code base, the In-Memory OLTP in Azure SQL DB is the same as the In-Memory OLTP in SQL Server. Because the technology has been out for a while, we have learned a lot about usage scenarios and application patterns that really see the benefits of In-Memory OLTP.

    Resource utilization in the database

    If your goal is to achieve improved performance for the users of you application, whether it is in terms of number of requests you can support every second (i.e., workload throughput) or the time it takes to handle a single request (i.e., transaction latency), you need to understand where is the performance bottleneck. In-Memory OLTP is in the database, and thus it improves the performance of operations that happen in the database. If most of the time is spent in your application code or in network communication between your application and the database, any optimization in the database will have a limited impact on the overall performance.

    Azure SQL Database provides resource monitoring capabilities, exposed both through the Azure portal and system views such as sys.dm_db_resource_stats. If any of the resources is getting close to the cap for the pricing tier your database is in, this is an indication of the database being a bottleneck. The main types of resources In-Memory OLTP really helps optimize are CPU and Log IO utilization.

    Let’s look at a sample IoT workload* that includes a total of 1 million sensors, where every sensor emits a new reading every 100 seconds. This translates to 10,000 sensor readings needing to be ingested into the database every second. In the tests executed below we are using a database with the P2 pricing tier. The first test uses traditional tables and stored procedures. The following graph, which is a screenshot from the Azure portal, shows resource utilization for these two key metrics.

    image
    Figure 1: 10K sensor readings per second in a P2 database without In-Memory OLTP

    We see very high CPU and fairly high log IO utilization. Note that the percentages here are relative to the resource caps associated with the DTU count for the pricing tier of the database.

    These numbers suggest there is a performance bottleneck in the database. You could allocate more resources to the database by increasing the pricing tier, but you could also leverage In-Memory OLTP. You can reduce resource utilization as follows:

    • CPU:
      • Replace tables and table variables with memory-optimized tables and table variables, to benefit from the more efficient data access.
      • Replace key performance-sensitive stored procedures used for transaction processing with natively compiled stored procedures, to benefit from the more efficient transaction execution.
    • Log IO:
      • Memory-optimized tables typically incur less log IO than traditional tables, because index operations are not logged.
      • Non-durable tables and memory-optimized table variables and TVPs completely remove log IO for transient data scenarios. Note that traditional temp table and table variables have some associated log IO.

    Resource utilization with In-Memory OLTP

    Let’s look at the same workload as above, 10,000 sensor readings ingested per second in a P2 database, but using In-Memory OLTP.

    After implementing a memory-optimized table, memory-optimized table type, and a natively compiled stored procedure we see the following resource utilization profile.

    image
    Figure 2: 10K sensor readings per second in P2 database with In-Memory OLTP

    As you can see, these optimizations resulted in a more than 2X reduction in log IO and 8X reduction in CPU utilization, for this workload. Implementing In-Memory OLTP in this workload has provided a number of benefits, including:

    • Increased headroom for future growth. In this example workload, the P2 database could accommodate 1 million sensors with each sensor emitting a new reading every 100 seconds. With In-Memory OLTP the same P2 database can now accommodate more than double the number of sensors, or increase the frequency with which sensor readings are emitted.
    • A lot of resources are freed up for running queries to analyze the sensor readings, or do other work in the database. And because memory-optimized tables are lock- and latch-free, there is no contention between the write operations and the queries.
    • In this example you could even downgrade the database to a P1 and sustain the same workload, with some additional headroom as well. This would mean cutting the cost for operating the database in half.

    Do keep in mind that the data in memory-optimized tables does need to fit in the In-Memory OLTP storage cap associated with the pricing tier of your database. Let’s see what the In-Memory OLTP storage utilization looks like for this workload:

    image
    Figure 3: In-Memory OLTP storage utilization

    We see that In-Memory OLTP storage utilization (the green line) is around 7% on average. Since this is a pure data ingestion workload, continuously adding sensor readings to the database, you may wonder, “how come the In-Memory OLTP storage utilization is not increasing over time?”

    Well, we are using a memory-optimized temporal table. This means the table maintaining it’s own history, and the history lives on-disk. Azure SQL Database takes care of the movement between memory and disk under the hood. For data ingestion workloads that are temporal in nature, this is a great solution to manage the in-memory storage footprint.

    * to replicate this experiment, change the app.config in the sample app as follows: commandDelay=1 and enableShock=0; in addition, to recreate the “before” picture, change table and table type to disk-based (i.e., MEMORY_OPTIMIZED=OFF) and remove NATIVE_COMPILATION and ATOMIC from the stored procedure

    Usage scenarios for In-Memory OLTP

    As noted at the top of this post, In-Memory OLTP is not a magic go-fast button, and is not suitable for all workloads. For example, memory-optimized tables will not really bring down your CPU utilization if most of the queries are performing aggregation over large ranges of data – Columnstore helps for that scenario.

    Here is a list of scenarios and application patterns where we have seen customers be successful with In-Memory OLTP. Note that these apply equally to SQL Server and Azure SQL Database, since the underlying technology is the same.

    High-throughput and low-latency transaction processing

    This is really the core scenario for which we built In-Memory OLTP: support large volumes of transactions, with consistent low latency for individual transactions.

    Common workload scenarios are: trading of financial instruments, sports betting, mobile gaming, and ad delivery. Another common pattern we’ve seen is a “catalog” that is frequently read and/or updated. One example is where you have large files, each distributed over a number of nodes in a cluster, and you catalog the location of each shard of each file in a memory-optimized table.

    Implementation considerations

    Use memory-optimized tables for your core transaction tables, i.e., the tables with the most performance-critical transactions. Use natively compiled stored procedures to optimize execution of the logic associated with the business transaction. The more of the logic you can push down into stored procedures in the database, the more benefit you will see from In-Memory OLTP.

    To get started in an existing application, use the transaction performance analysis report to identify the objects you want to migrate, and use the memory-optimization and native compilation advisors to help with migration.

    Data ingestion, including IoT (Internet-of-Things)

    In-Memory OLTP is really good at ingesting large volumes of data from many different sources at the same time. And it is often beneficial to ingest data into a SQL database compared with other destinations, because SQL makes running queries against the data really fast, and allows you to get real-time insights.

    Common application patterns are: Ingesting sensor readings and events, to allow notification, as well as historical analysis. Managing batch updates, even from multiple sources, while minimizing the impact on the concurrent read workload.

    Implementation considerations

    Use a memory-optimized table for the data ingestion. If the ingestion consists mostly of inserts (rather than updates) and In-Memory OLTP storage footprint of the data is a concern, either

    The following sample is a smart grid application that uses a temporal memory-optimized table, a memory-optimized table type, and a natively compiled stored procedure, to speed up data ingestion, while managing the In-Memory OLTP storage footprint of the sensor data: release and source code.

    Caching and session state

    The In-Memory OLTP technology makes SQL really attractive for maintaining session state (e.g., for an ASP.NET application) and for caching.

    ASP.NET session state is a very successful use case for In-Memory OLTP. With SQL Server, one customer was about to achieve 1.2 Million requests per second. In the meantime they have started using In-Memory OLTP for the caching needs of all mid-tier applications in the enterprise. Details: https://blogs.msdn.microsoft.com/sqlcat/2016/10/26/how-bwin-is-using-sql-server-2016-in-memory-oltp-to-achieve-unprecedented-performance-and-scale/

    Implementation considerations

    You can use non-durable memory-optimized tables as a simple key-value store by storing a BLOB in a varbinary(max) columns. Alternatively, you can implement a semi-structured cache with JSON support in Azure SQL Database. Finally, you can create a full relational cache through non-durable tables with a full relational schema, including various data types and constraints.

    Get started with memory-optimizing ASP.NET session state by leveraging the scripts published on GitHub to replace the objects created by the built-in session state provider.

    Tempdb object replacement

    Leverage non-durable tables and memory-optimized table types to replace your traditional tempdb-based #temp tables, table variables, and table-valued parameters.

    Memory-optimized table variables and non-durable tables typically reduce CPU and completely remove log IO, when compared with traditional table variables and #temp table.

    Case study illustrating benefits of memory-optimized table-valued parameters in Azure SQL Database: https://blogs.msdn.microsoft.com/sqlserverstorageengine/2016/04/07/a-technical-case-study-high-speed-iot-data-ingestion-using-in-memory-oltp-in-azure/

    Implementation considerations

    To get started see: Improving temp table and table variable performance using memory optimization.

    ETL (Extract Transform Load)

    ETL workflows often include load of data into a staging table, transformations of the data, and load into the final tables.

    Implementation considerations

    Use non-durable memory-optimized tables for the data staging. They completely remove all IO, and make data access more efficient.

    If you perform transformations on the staging table as part of the workflow, you can use natively compiled stored procedures to speed up these transformations. If you can do these transformations in parallel you get additional scaling benefits from the memory-optimization.

    Getting started

    The following script illustrates how you create In-Memory OLTP objects in your database.

    -- memory-optimized table
    CREATE TABLE dbo.table1
    ( c1 INT IDENTITY PRIMARY KEY NONCLUSTERED,
      c2 NVARCHAR(MAX))
    WITH (MEMORY_OPTIMIZED=ON)
    GO
    -- non-durable table
    CREATE TABLE dbo.temp_table1
    ( c1 INT IDENTITY PRIMARY KEY NONCLUSTERED,
      c2 NVARCHAR(MAX))
    WITH (MEMORY_OPTIMIZED=ON,
          DURABILITY=SCHEMA_ONLY)
    GO
    -- memory-optimized table type
    CREATE TYPE dbo.tt_table1 AS TABLE
    ( c1 INT IDENTITY,
      c2 NVARCHAR(MAX),
      is_transient BIT NOT NULL DEFAULT (0),
      INDEX ix_c1 HASH (c1) WITH (BUCKET_COUNT=1024))
    WITH (MEMORY_OPTIMIZED=ON)
    GO
    -- natively compiled stored procedure
    CREATE PROCEDURE dbo.usp_ingest_table1
      @table1 dbo.tt_table1 READONLY
    WITH NATIVE_COMPILATION, SCHEMABINDING
    AS
    BEGIN ATOMIC
        WITH (TRANSACTION ISOLATION LEVEL=SNAPSHOT,
              LANGUAGE=N'us_english')

      DECLARE @i INT = 1

      WHILE @i > 0
      BEGIN
        INSERT dbo.table1
        SELECT c2
        FROM @table1
        WHERE c1 = @i AND is_transient=0

        IF @@ROWCOUNT > 0
          SET @i += 1
        ELSE
        BEGIN
          INSERT dbo.temp_table1
          SELECT c2
          FROM @table1
          WHERE c1 = @i AND is_transient=1

          IF @@ROWCOUNT > 0
            SET @i += 1
          ELSE
            SET @i = 0
        END
      END

    END
    GO
    -- sample execution of the proc
    DECLARE @table1 dbo.tt_table1
    INSERT @table1 (c2, is_transient) VALUES (N'sample durable', 0)
    INSERT @table1 (c2, is_transient) VALUES (N'sample non-durable', 1)
    EXECUTE dbo.usp_ingest_table1 @table1=@table1
    SELECT c1, c2 from dbo.table1
    SELECT c1, c2 from dbo.temp_table1
    GO

    A more comprehensive sample leveraging In-Memory OLTP and demonstrating performance benefits can be found at: Install the In-Memory OLTP sample.

    The smart grid sample database and workload used for the above illustration of the resource utilization benefits of In-Memory OLTP can be found here: release and source code.


    Try In-Memory OLTP in your Azure SQL Database today!

    Resources to get started:

    23 Nov 06:53

    Let's Encrypt Everything

    by Jeff Atwood

    I'll admit I was late to the HTTPS party.

    But post Snowden, and particularly after the result of the last election here in the US, it's clear that everything on the web should be encrypted by default.

    Why?

    1. You have an unalienable right to privacy, both in the real world and online. And without HTTPS you have zero online privacy – from anyone else on your WiFi, from your network provider, from website operators, from large companies, from the government.

    2. The performance penalty of HTTPS is gone, in fact, HTTPS arguably performs better than HTTP on modern devices.

    3. Using HTTPS means nobody can tamper with the content in your web browser. This was a bit of an abstract concern five years ago, but these days, there are more and more instances of upstream providers actively mucking with the data that passes through their pipes. For example, if Comcast detects you have a copyright strike, they'll insert banners into your web contentall your web content! And that's what the good guy scenario looks like – or at least a corporation trying to follow the rules. Imagine what it looks like when someone, or some large company, decides the rules don't apply to them?

    So, how do you as an end user "use" encryption on the web? Mostly, you lobby for the websites you use regularly to adopt it. And it's working. In the last year, the use of HTTPS by default on websites has doubled.

    Browsers can help, too. By January 2017, Google Chrome will show this alert in the UI when a login or credit card form is displayed on an unencrypted connection:

    Additionally, Google is throwing their considerable weight behind this effort by ranking non-encrypted websites lower in search results.

    But there's another essential part required for encryption to work on any websites – the HTTPS certificate. Historically these certificates have been issued by certificate authorities, and they were at least $30 per year per website, sometimes hundreds of dollars per year. Without that required cash each year, without the SSL certificate that you must re-purchase every year in perpetuity – you can't encrypt anything.

    That is, until Let's Encrypt arrived on the scene.

    Let's Encrypt is a 501.3(c)(3) non-profit organization supported by the Linux Foundation. They've been in beta for about a year now, and to my knowledge they are the only reliable, official free source of SSL certificates that has ever existed.

    However, because Let's Encrypt is a non-profit organization, not owned by any company that must make a profit from each SSL certificate they issue, they need our support:

    As a company, we've donated a Discourse hosted support community, and a cash amount that represents how much we would have paid in a year to one of the existing for-profit certificate authorities to set up HTTPS for all the Discourse websites we host.

    I urge you to do the same:

    • Estimate how much you would have paid for any free SSL certificates you obtained from Let's Encrypt, and please donate that amount to Let's Encrypt.

    • If you work for a large company, urge them to sponsor Let's Encrypt as a fundamental cornerstone of a safe web.

    If you believe in an unalienable right to privacy on the Internet for every citizen in every nation, please support Let's Encrypt.

    [advertisement] Find a better job the Stack Overflow way - what you need when you need it, no spam, and no scams.
    21 Nov 20:27

    Introducing the Azure IoT Hub IP Filter

    by Sam George

    As more businesses turn to the Internet of Things (IoT), security and privacy are often top of mind. Our goal at Microsoft is to keep our customers' IoT solutions secure. As part of our ongoing security efforts, we recently launched the Security Program for Azure IoT, which provides customers with a choice of security auditors who can assess their IoT solutions from device to cloud. Microsoft also offers comprehensive guidance on IoT security and state of the art security built into Azure IoT Suite and Azure IoT Hub. Today, we’re excited to announce another important security feature: IP filtering.

    IP filtering enables customers to instruct IoT Hub to only accept connections from certain IP addresses, to reject certain IP addresses or a combination of both. We’ve made it easy for administrators to configure these IP filtering rules for their IoT Hub. These rules apply any time a device or a back-end application is connecting on any supported protocols (currently AMQP, MQTT, AMQP/WS, MQTT/WS, HTTP/1). Any application from an IPv4 address that matches a rejecting IP rule receives an unauthorized 401 status code without specific mention of the IP rule in the message.

    The IP filter allows maximum 10 rules each rejecting or accepting an individual IPv4 address or a subnet using the CIDR-notation format. The following two examples demonstrate how to blacklist an IP address and whitelist a certain subnet.

    Tutorial: How to Blacklist an IP address

    By default, Azure IoT Hub is configured to accept all IP addresses to be compatible with the existing customer configurations prior to providing this feature.
     
    For the purposes of this tutorial, let’s assume the IoT Hub administrator notices suspicious activity from address 184.13.152.8 and wants to reject traffic from that IP address. To block the address 184.13.152.8, the IoT Hub administrator simply needs to add a rule that rejects this IP (as illustrated below):

    Azure IoT Hub administrator rejects IP Image

    In this example, any time a device or a back-end application with the rejected IP address connects to this IoT Hub, it will receive 401 Unauthorized error. The IoT Hub administrator will see this being logged, but the malicious attacker will not receive any further error messages.

    Tutorial: How to Whitelist a Subnet

    For our next tutorial, let’s assume that the administrator wants to configure the Azure IoT Hub to accept only the IPv4 range from 192.168.100.0 to 192.168.103.255 and reject everything else. This can be simply achieved by adding only two rules using the CIDR notation:

    1. Accept the CIDR notation mask 192.168.100.0/22
    2. Reject all IP addresses

    The CIDR (Classless Inter Domain Routing) format makes it easy for the IoT Hub network administrator to accept or reject a range of addresses in one rule, so 192.168.100.0/22 will translate into a range from 192.168.100.0 to 192.168.103.255.  For those who are not network administrators, there is plenty of documentation online that explains the complexity of the CIDR format or provide calculators. One of our favorites is here. By adding a last rule that rejects 0.0.0.0/0, the administrator changes the default to be blacklist.

    The illustration below shows an IoT Hub that whitelists only the 192.168.100.0 to 192.168.103.255 range. Note that the order is important and the first rule that matches the IP decides the action.

    Azure IoT Hub whitelist
     

    Finally, while IoT Hub already supports private connections using Azure Express Route, IP filtering enables an additional level of security by enabling administrators to only accept private Express Route connections.  To enable this, you would use IP filtering to accept connections from Express Route and then reject all others.

    20 Nov 07:57

    Announcing the Fastest ASP.NET Yet, ASP.NET Core 1.1 RTM

    by Jeffrey T. Fritz

    We are happy to announce that ASP.NET Core 1.1 is now available as a stable release on nuget.org! This release includes a bunch of great new features along with many bug fixes and general enhancements. We invite you to try out the new features and to provide feedback.

    To update an existing project to ASP.NET Core 1.1 you will need to do the following:

    1. Download and install the .NET Core 1.1 SDK
    2. If your application is referencing the .NET Core framework, your should update the references in your project.json file for netcoreapp1.0 or Microsoft.NetCore.App version 1.0 to version 1.1. In the default project.json file for an ASP.NET Core project running on the .NET Core framework, these two updates are located as follows:

      Two places to update project.json to .NET Core 1.1

      Two places to update project.json to .NET Core 1.1

    3. Update your ASP.NET Core packages dependencies to use the new 1.1.0 versions. You can do this by navigating to the NuGet package manager window and inspecting the “Updates” tab for the list of packages that you can update.

      Package list in NuGet package manager UI in Visual Studio

      Updating Packages using the NuGet package manager UI with the last pre-release build of ASP.NET Core 1.1

    Side by side install

    NOTE: By installing the new SDK, you will update the default behavior of the dotnet command. It will use msbuild and process csproj projects instead of project.json. Similarly, dotnet new will create a csproj profile file.

    In order to continue using the earlier project.json-based tools on a per-project basis, create a global.json file in your project directory and add the “sdk” property to it. The following example shows a global.json that contrains dotnet to using the project.json-based tools:

    
    {
        "sdk": {
            "version": "1.0.0-preview2-003131"
        }
    }
    

    Performance

    We are very pleased to announce the participation of ASP.NET Core with the Kestrel webserver in the round 13 TechEmpower benchmarks.  The TechEmpower standard benchmarks are known for their thorough testing of the many web frameworks that are available.  In the latest results from TechEmpower, ASP.NET Core 1.1 with Kestrel was ranked as the fastest mainstream fullstack web framework in the plaintext test.

    TechEmpower also reports that the performance of ASP.NET Core running on Linux is approximately 760 times faster than it was one year ago.  Since TechEmpower started measuring benchmarks in March 2013, they have never seen such a performance improvement as they have observed in ASP.NET Core over the last year.

    You can read more about the TechEmpower benchmarks and their latest results on the TechEmpower website.

    New Web Development Features in Visual Studio 2017

    including:

    • The new JavaScript editor
    • Embedded ESLint capabilities that help check for common mistakes in your script
    • JavaScript debugging support for browser
    • Updated BrowserLink features for two-way communication between your browsers and Visual Studio while debugging

    Support for ASP.NET Core in Visual Studio for Mac

    Visual Studio for MacWe’re pleased to announce the first preview of ASP.NET Core tooling in Visual Studio for Mac.  For those familiar with Visual Studio, you’ll find many of the same capabilities you’d expect from a Visual Studio development environment.  IntelliSense and refactoring capabilities are built on top of Roslyn, and it shares much of Visual Studio’s .NET Core debugger.

    This first preview focuses on developing Web API applications.  You’ll have a great experience creating a new project, and working with C# files, and TextMate bundle support for web file types (e.g HTML, JavaScript, JSON, .cshtml). In a future update, we’ll be adding the same first class support for these file types we have in Visual Studio which will bring IntelliSense for all of those as well.

    What’s new in the ASP.NET 1.1?

    This release was designed around the following feature themes in order to help developers:

    • Improved and cross-platform compatible site hosting capabilities when using a host other than Windows Internet Information Server (IIS).
    • Support for developing with native Windows capabilities
    • Compatibility, portability and performance of middleware and other MVC features throughout the UI framework
    • Improved deployment and management experience of ASP.NET Core applications on Microsoft Azure. We think these improvements help make ASP.NET Core the best choice for developing an application for the cloud.

    For additional details on the changes included in this release please check out the release notes.

    URL Rewriting Middleware

    We are bringing URL rewriting functionality to ASP.NET Core through a middleware component that can be configured using IIS standard XML formatted rules, Apache Mod_Rewrite syntax, or some simple C# methods coded into your application.  When you want to run your ASP.NET Core application outside of IIS, we want to enable those same rich URL rewriting capabilities regardless of the web host you are using.  If you are using containers, Apache, or nginx you will be able to have ASP.NET Core manage this capability for you with a uniform syntax that you are familiar with.

    URL Rewriting allows mapping a public URL space, designed for consumption of your clients, to whatever representation the downstream components of your middleware pipeline require as well as redirecting clients to different URLs based on a pattern.

    For example, you could ensure a canonical hostname by rewriting any requests to http://example.com to instead be http://www.example.com for everything after the re-write rules have run. Another example is to redirect all requests to http://example.com to https://example.com. You can even configure URL rewrite such that both rules are applied and all requests to example.com are always redirected to SSL and rewritten to www.

    We can get started with this middleware by adding a reference to our web application for the Microsoft.AspNetCore.Rewrite package.  This allows us to add a call to configure RewriteOptions in our Startup.Configure method for our rewriter:

    As you can see, we can both force a rewrite and redirect with different rules.

    • Url Redirect sends an HTTP 301 Moved Permanently status code to the client with the new address
    • Url Rewrite gives a different URL to the next steps in the HTTP pipeline, tricking it into thinking a different address was requested.

    Response Caching Middleware

    Response Caching similar to the OutputCache capabilities of previous ASP.NET releases can now be activated in your application by adding the Microsoft.AspNetCore.ResponseCaching and the Microsoft.Extensions.Caching.Memory packages to your application.  You can add this middleware to your application in the Startup.ConfigureServices method and configure the response caching from the Startup.Configure method.  For a sample implementation, check out the demo in the ResponseCaching repository.

    You can now add GZipCompression to the ASP.NET HTTP Pipeline if you would like ASP.NET to do your compression instead of a front-end web server.  IIS would have normally handled this for you, but in environments where your host does not provide compression capabilities, ASP.NET Core can do this for you.  We think this is a great practice that everyone should use in their server-side applications to deliver smaller data that transmits faster over the network.

    This middleware is available in the Microsoft.AspNetCore.ResponseCompression package.  You can add simple GZipCompression using the fastest compression level with the following syntax in your Startup.cs class:

    There are other options available for configuring compression, including the ability to specify custom compression providers.

    WebListener Server for Windows

    WebListener is a server that runs directly on top of the Windows Http Server API. WebListener gives you the option to take advantage of Windows specific features, like support for Windows authentication, port sharing, HTTPS with SNI, HTTP/2 over TLS (Windows 10), direct file transmission, and response caching WebSockets (Windows 8).  This may be advantageous for you if you want to bundle an ASP.NET Core microservice in a Windows container that takes advantage of these Windows features.

    On Windows you can use this server instead of Kestrel by referencing the Microsoft.AspNetCore.Server.WebListener package instead of the Kestrel package and configuring your WebHostBuilder to use Weblistener instead of Kestrel:

    You can find other samples demonstrating the use of WebListener in its GitHub repository.

    Unlike the other packages that are part of this release, WebListener is being shipped as both 1.0.0 and 1.1.0. The 1.0.0 version of the package can be used in production LTS (1.0.1) ASP.NET Core applications. The 1.1.0 version of the package is the next version of WebListener as part of the 1.1.0 release.

    View Components as Tag Helpers

    ViewComponents are an ASP.NET Core display concept that provides for a razor view that is triggered from a server-side class that inherits from the ViewComponent base class.  You can now invoke from your views using Tag Helper syntax and get all the benefits of IntelliSense and Tag Helper tooling in Visual Studio. Previously, to invoke a View Component from a view you would use the Component.InvokeAsync method and pass in any View Component arguments using an anonymous object:

     @await Component.InvokeAsync("Copyright", new { website = "example.com", year = 2016 })

    Instead, you can now invoke a View Component like you would any Tag Helper while getting Intellisense for the View Component parameters:

    TagHelper in Visual Studio

    This gives us the same rich intellisense and editor support in the razor template editor that we have for TagHelpers.  With the Component.Invoke syntax, there is no obvious way to add CSS classes or get tooltips to assist in configuring the component like we have with the TagHelper feature.  Finally, this keeps us in “HTML Editing” mode and allows a developer to avoid shifting into C# in order to reference a ViewComponent they want to add to a page.

    To enable invoking your View Components as Tag Helpers simply add your View Components as Tag Helpers using the @addTagHelpers directive:

    @addTagHelper "*, WebApplication1"
    

    Middleware as MVC filters

    Middleware typically sits in the global request handling pipeline. But what if you want to apply middleware to only a specific controller or action? You can now apply middleware as an MVC resource filter using the new MiddlewareFilterAttribute.  For example, you could apply response compression or caching to a specific action, or you might use a route value based request culture provider to establish the current culture for the request using the localization middleware.

    To use middleware as a filter you first create a type with a Configure method that specifies the middleware pipeline that you want to use:

    You then apply that middleware pipeline to a controller, an action or globally using the MiddlewareFilterAttribute:

    Cookie-based TempData provider

    To use the cookie-based TempData provider you register the CookieTempDataProvider service in your ConfigureServices method after adding the MVC services as follows:

    services.AddMvc();
    services.AddSingleton<ITempDataProvider, CookieTempDataProvider>();
    

    View compilation

    The Razor syntax for views provides a flexible development experience where compilation of the views happens automatically at runtime when the view is executed. However, there are some scenarios where you do not want the Razor syntax compiled at runtime. You can now compile the Razor views that your application references and deploy them with your application.  To enable view compilation as part of publishing your application,

    1. Add a reference to “Microsoft.AspNetCore.Mvc.Razor.ViewCompilation.Design” under the “dependencies” section.
    2. Add a reference to “Microsoft.AspNetCore.Mvc.Razor.ViewCompilation.Tools” under the tools section
    3. Add a postpublish script to invoke view compiler:
    "scripts": {
    
       "postpublish": "dotnet razor-precompile --configuration %publish:Configuration% --framework %publish:TargetFramework% --output-path %publish:OutputPath% %publish:ProjectPath%"
    
    }

    Azure App Service logging provider

    The Microsoft.AspNetCore.AzureAppServicesIntegration package allows your application to take advantage of App Service specific logging and diagnostics. Any log messages that are written using the ILogger/ILoggerFactory abstractions will go to the locations configured in the Diagnostics Logs section of your App Service configuration in the portal (see screenshot).  We highly recommend using this logging provider when deploying an application to Azure App Service.  Prior to this feature, it was very difficult to capture log files without a third party provider or hosted service.

    Usage:

    Add a reference to the Microsoft.AspNetCore.AzureAppServicesIntegration package and add the one line of code to UseAzureAppServices when configuring the WebHostBuilder in your Program.cs.

      
      var host = new WebHostBuilder()
        .UseKestrel()    
        .UseAzureAppServices()    
        .UseStartup<Startup>()    
        .Build();
    

    NOTE: UseIISIntegration is not in the above example because UseAzureAppServices includes it for you, it shouldn’t hurt your application if you have both calls, but explicitly calling UseIISIntegration is not required.
    Once you have added the UseAzureAppServices method then your application will honor the settings in the Diagnostics Logs section of the Azure App Service settings as shown below. If you change these settings, switching from file system to blob storage logs for example, your application will automatically switch to logging to the new location without you redeploying.

    Azure Portal Configuration Options for Diagnostic Logging

    Azure Key Vault configuration provider

    Azure Key Vault is a service that can be used to store secret cryptographic keys and other secrets in a security hardened container on Azure.  You can set up your own Key Vault by following the Getting Started docs. The Microsoft.Extensions.Configuration.AzureKeyVault package then provides a configuration provider for your Azure Key Vault. This package allows you to retrieve configuration from Key Vault secrets on application start and hold it in memory, using the normal ASP.NET Core configuration abstractions to access the configuration data.

    Basic usage of the provider is done like this:

    For an example on how to add the Key Vault configuration provider see the sample here: https://github.com/aspnet/Configuration/tree/dev/samples/KeyVaultSample

    Redis and Azure Storage Data Protection Key Repositories

    The Microsoft.AspNetCore.DataProtection.AzureStorage and Microsoft.AspNetCore.DataProtection.Redis packages allow storing your Data Protection keys in Azure Storage or Redis respectively. This allows keys to be shared across several instances of a web application so that you can  share an authentication cookie, or CSRF protection across many load balanced servers running your ASP.NET Core application. As data protection is used behind the scenes for a few things in MVC it’s extremely probable once you start scaling out you will need to share the keyring. Your options for sharing keys before these two packages would be to use a network share with a file based key repository.

    Examples:

    Azure:

    services.AddDataProtection()  
      .PersistKeysToAzureBlogStorage(new Uri(“<blob URI including SAS token>”));
    

    Redis:

    // Connect
    var redis = ConnectionMultiplexer.Connect("localhost:6379"); 
    // Configure
    services.AddDataProtection()  
      .PersistKeysToRedis(redis, "DataProtection-Keys");
    

    NOTE: When using a non-persistent Redis instance then anything that is encrypted using Data Protection will not be able to be decrypted once the instance resets. For the default authentication flows this would usually just mean that users are redirected to login again. However, for anything manually encrypted with Data Protections Protect method you will not be able to decrypt the data at all. For this reason, you should not use a Redis instance that isn’t persistent when manually using the Protect method of Data Protection. Data Protection is optimized for ephemeral data.

    In our initial release of dependency injection capabilities with ASP.NET Core, we heard feedback that there was some friction in enabling 3rd party providers.   With this release, we are acting on that feedback and introducing a new IServiceProviderFactory interface to enable those 3rd party containers to be configured easily in ASP.NET Core applications.  This interface allows you to move the construction of the container to the WebHostBuilder and allow for further customization of the mappings of your container in a new ConfigureContainer method in the Startup class.

    Developers of containers can find a sample demonstrating how to connect their favorite provider, including samples using Autofac and StructureMap on GitHub.

    This additional configuration should allow developers to use their favorite containers by adding a line to the Main method of their application that reads as simple as “UseStructureMap()”

    Summary

    The ASP.NET Core 1.1 release improves significantly on the previous release of ASP.NET Core.  With improved tooling in the Visual Studio 2017 RC and new tooling in Visual Studio for Mac, we think you’ll find web development to be a delightful experience.  This is a fully supported release and we encourage you to use the new features to better support your applications.  You will find a list of known issues with workarounds on GitHub, should you run into trouble. We will continue to improve the fastest mainstream full-stack framework available on the web, and want you to join us.  Download Visual Studio 2017 RC and Visual Studio for Mac from https://visualstudio.com and get the latest .NET Core SDK from https://dot.net

    19 Nov 09:56

    How to use Shadow Properties with Entity Framework Core

    by Talking Dotnet

    As mentioned in my earlier post Quick summary of what’s new in Entity Framework Core 1.0, “Shadow Properties” is one of the new feature of Entity Framework Core. Shadow Properties are fields which are not part of your entity class so they don’t exist in your class but they do exist in entity model. In this post, let’s find out how to use shadow properties in Entity Framework Core.

    Use Shadow Properties with Entity Framework Core

    The value and state of Shadow properties are maintained in the Change Tracker API. Shadow Properties are a useful in following conditions,

    • When you can’t make changes to existing entity class (third party) and you want to add some fields to your model.
    • When you want certain properties to be part of your context, but don’t wish to expose them.

    So these properties are available for all database operations, but not available in the application as they are not exposed via entity class. Let’s see how to create and use them.

    Creating Shadow Properties

    For demonstration, let’s consider following entity class named Category. As per the domain class, there should be only 2 fields present in database Category table which are CategoryID and CategoryName.

    public class Category
    {
        public int CategoryID { get; set; }
        public string CategoryName { get; set; }
    }
    

    And we wish to add a new field to database table named CreatedDate but as a shadow property. At the time of writing this post, you can only create Shadow Properties via Fluent API. So to create CreatedDate shadow property, override OnModelCreating and add the following code. Use Property() method to define the data type and name of the property.

    protected override void OnModelCreating(ModelBuilder modelbuilder)
    {
        modelbuilder.Entity<Category>().Property<DateTime>("CreatedDate");
    }
    

    As mentioned earlier, Change Tracker API is responsible for maintaining the shadow properties. So you can Get and Set value via Change Tracker API. Following code adds a category record in the database. See highlight line to set shadow property value.

    Category c = new Category() { CategoryName = "Accessories" };
    dataContext.Entry(c).Property("CreatedDate").CurrentValue = DateTime.Now;
    dataContext.Categories.Add(c);
    dataContext.SaveChanges();
    

    If you don’t specify any value for shadow properties, then DateTime.MinValue will be taken as default value. You can also set the value in SaveChanges() method. Following code, first finds all the entities with added state and then set the created date for every record.

    public override int SaveChanges()
    {
        var modifiedEntries = ChangeTracker
                            .Entries().Where(x => x.State == EntityState.Added);
    
        foreach (var item in modifiedEntries)
        {
            item.Property("CreatedDate").CurrentValue = DateTime.Now;
        }
        return base.SaveChanges();
    }
    

    How to refer them in LINQ query?

    Shadow properties can be referenced in LINQ queries via the EF.Property static method. Following code, retrieves the category list order by created date and then display them.

    var cList = dataContext.Categories
            .OrderBy(b => EF.Property<DateTime>(b, "CreatedDate")).ToList();
    foreach (var cat in cList)
    {
       Console.Write("Category Name: " + cat.CategoryName);
       Console.WriteLine(" Created: " + dataContext.Entry(cat).Property("CreatedDate").CurrentValue);
    }
    

    To display or get the value, we need to use Change Tracker API only.

    Shadow Property name matches with existing property name?

    What happens when defined shadow property name matches one of the existing model property name? Is your code going to throw an exception? Well, no. The code will configure the existing property instead of creating a new shadow property. You can also configure column name to be different from Shadow Property. Like,

    modelbuilder.Entity<Category>().Property<DateTime>("CreatedDate")
                       .HasColumnName("Created_Date");
    

    Summary

    That’s it. Shadow properties may come handy while working with any existing entity and you don’t have access to modify it.

    Thank you for reading. Keep visiting this blog and share this in your network. Please put your thoughts and feedback in the comments section.

    The post How to use Shadow Properties with Entity Framework Core appeared first on Talking Dotnet.

    18 Nov 10:58

    Free local development using the DocumentDB Emulator plus .NET Core support

    by Aravind Ramachandran

    Azure DocumentDB is a fully managed, globally distributed NoSQL database service backed by an enterprise grade SLA that guarantees 99.99% availability. DocumentDB is a cloud born database perfect for the massive scale and low latency needs of modern applications, with guarantees of <10ms read latency and <15ms write latency at the 99th percentile. A single DocumentDB collection can elastically scale throughput to 10s-100s of millions of request/sec and storage can be replicated across multiple regions for limitless scale, with the click of a button. Along with the flexible data model and rich query capabilities, DocumentDB provides both tenant-controlled and automatic regional failover, transparent multi-homing APIs and four well-defined consistency models for developers to choose from.

    Due to its flexible schema, rich query capabilities, and availability multiple SDK platforms, DocumentDB makes it easy to develop, evolve and scale modern applications. At the Connect() conference this week, we announced the availability of new developer tools to make it even easier to build applications on DocumentDB.

    • We're excited to introduce a public preview of the DocumentDB Emulator, which provides a local development experience for the Azure DocumentDB service. Using the DocumentDB Emulator, you can develop and test your application locally without an internet connection, without creating an Azure subscription, and without incurring any costs. This has long been the most requested feature on the user voice site, so we are thrilled to roll this out everyone that's voted for it.
    • We are also pleased to announce the availability of the DocumentDB .NET Core SDK, which lets you build fast, cross-platform .NET web applications and services.

    Azure DocumentDB Emulator

    About the DocumentDB Emulator

    The DocumentDB Emulator provides a high-fidelity emulation of the DocumentDB service. It supports identical functionality as Azure DocumentDB, including support for creating and querying JSON documents, provisioning and scaling collections, and executing stored procedures and triggers. You can develop and test applications using the DocumentDB Emulator, and deploy them to Azure at global scale by just making a single configuration change.

    You can use any supported DocumentDB SDK or the DocumentDB REST API to interact with the emulator, as well as existing tools such as the DocumentDB data migration tool and DocumentDB studio.  You can even migrate data between the DocumentDB emulator and the Azure DocumentDB service.

    While we created a high-fidelity local emulation of the actual DocumentDB service, the implementation of the DocumentDB emulator is different than that of the service. For example, the DocumentDB Emulator uses standard OS components such as the local file system for persistence, and HTTPS protocol stack for connectivity. This means that some functionality that relies on Azure infrastructure like global replication, single-digit millisecond latency for reads/writes, and tunable consistency levels are not available via the DocumentDB Emulator.

    Get started now by downloading the DocumentDB Emulator to your Windows desktop.

    About the DocumentDB .NET Core SDK

    You can build fast, cross-platform web-apps and services that run on Windows, Mac, and Linux using the new DocumentDB .NET Core SDK. You can download the latest version of the .NET Core SDK via Nuget. You can find release notes and additional information in our DocumentDB .NET Core SDK documentation page.

    Next Steps

    In this blog post, we looked at some of the new developer tooling introduced in DocumentDB, including the DocumentDB Emulator and DocumentDB .NET Core SDK.

    18 Nov 08:02

    Announcing .NET Core Tools MSBuild “alpha”

    by Rich Lander [MSFT]

    We are excited to announce the first “alpha” release of the new MSBuild-based .NET Core Tools. You can try out the new .NET Core Tools in Visual Studio 2017 RC, Visual Studio for Mac, Visual Studio Code and at the commandline. The new Tools release can be used with both the .NET Core 1.0 and .NET Core 1.1 runtimes.

    When we started building .NET Core and ASP.NET Core it was important to have a project system that worked across Windows, Mac and Linux and worked in editors other than Visual Studio. The new project.json project format was created to facilitate this. Feedback from customers was they loved the new project.json model, but they wanted their projects to be able to work with existing .NET code they already had. In order to do this we are making .NET Core become .csproj/MSBuild based so it can interop with existing .NET projects and we are taking the best features of project.json and moving them into .csproj/MSBuild.

    There are now four experiences that you can take advantage of for .NET Core development, across Windows, macOS and Linux.

    Yes! There is a new member of the Visual Studio family, dedicated to the Mac. Visual Studio for Mac supports Xamarin and .NET Core projects. Visual Studio for Mac is currently in preview. You can read more about how you can use .NET Core in Visual Studio for Mac.

    You can download the new MSBuild-based .NET Core Tools preview and learn more about the new experiences in .NET Core Documentation.

    Overview

    If you’ve been following along, you’ll know that the new Preview 3 release includes support for the MSBuild build system and the csproj project format. We adopted MSBuild for .NET Core for the following reasons:

    • One .NET tools ecosystem — MSBuild is a key component of the .NET tools ecosystem. Tools, scripts and VS extensions that target MSBuild should now extend to working with .NET Core.
    • Project to project references – MSBuild enables project to project references between .NET projects. All other .NET projects use MSBuild, so switching to MSBuild enables you to reference Portable Class Libraries (PCL) from .NET Core projects and .NET Standard libraries from .NET Framework projects, for example.
    • Proven scalability – MSBuild has been proven to be capable of building large projects. As .NET Core adoption increases, it is important to have a build system we can all count on. Updates to MSBuild will improve the experience for all project types, not just .NET Core.

    The transition from project.json to csproj is an important one, and one where we have received a lot of feedback. Let’s start with what’s not changing:

    • One project file – Your project file contains dependency and target framework information, all in one file. No source files are listed by default.
    • Targets and dependencies — .NET Core target frameworks and metapackage dependencies remain the same and are declared in a similar way in the new csproj format.
    • .NET Core CLI Tools – The dotnet tool continues to expose the same commands, such as dotnet build and dotnet run.
    • .NET Core Templates – You can continue to rely on dotnet new for templates (for example, dotnet new -t library).
    • Supports multiple .NET Core version — The new tools can be used to target .NET Core 1.0 and 1.1. The tools themselves run on .NET Core 1.0 by default.

    There are many of you that have already adopted .NET Core with the existing project.json project format and build system. Us, too! We built a migration tool that migrates project.json project files to csproj. We’ve been using those on our own projects with good success. The migration tool is integrated into Visual Studio and Visual Studio for Mac. It is also available at the command line, with dotnet migrate. We will continue to improve the migration tool based on feedback to ensure that it’s ready to run at scale by the final release.

    Now that we’ve moved .NET Core to use MSBuild and the csproj project format, there is an opportunity to share improvements that we’re making with other projects types. In particular, we intend to standardize on package reference within the csproj format for other .NET project types.

    Let’s look at the .NET Core support for each of the four supported experiences.

    Visual Studio 2017 RC

    Visual Studio 2017 RC includes support for the new .NET Core Tools, as a Preview workload. You will notice the following set of improvements over the experience in Visual Studio 2015.

    • Project to project references now work.
    • Project and NuGet references are declared similarly, both in csproj.
    • csproj project files can be manually edited while the project is open.

    Installation

    You can install the Visual Studio 2017 from the Visual Studio site.

    You can install the .NET Core Tools in Visual Studio 2017 RC by selecting the “.NET Core and Docker Tools (Preview)” workload, under the “Web and Cloud” workload as you can see below. The overall installation process for Visual Studio has changed! You can read more about that in the Visual Studio 2017 RC blog post.

    .NET Core workload

    Creating new Projects

    The .NET Core project templates are available under the “.NET Core” project node in Visual Studio. You will see a familar set of projects.

    .NET Core templates

    Project to project references

    You can now reference .NET Standard projects from .NET Framework, Xamarin or UWP projects. You can see two app projects relying on a .NET Standard Library in the image below.

    project to project references

    Managing NuGet package references

    You can manage NuGet package references in the familiar way, with the NuGet package manager. You can see in the image below that the Newtonsoft.Json package has been added to the project.

    The package reference is added to the csproj project file. There is no need to look at the project file, but if you want to you can add or delete package references from that file, too. Visual Studio will respond in Solution Explorer appropriately.

    Editing CSProj files

    You can now edit CSProj files, while the project is open and with intellisense. It’s not an experience we expect most of you to do every day, but it is still a major improvement. It also does a good job of showing the similarily between NuGet and projects references.

    Editing csproj files

    Dynamic Project system

    The new csproj format adds all source files by default. You do not need to list each .cs file. You can see this in action by adding a .cs file to your project directory from outside Visual Studio. You should see the .cs file added to Solution Explorer within 1s.

    A more minimal project file has a lot of benefits, including readability. It also helps with source control by reducing a whole category of changes and the potential merge conflicts that have historically come with it.

    Opening and upgrading project.json Projects

    You will be prompted to upgrade project.json-based xproj projects to csproj when you open them in Visual Studio 2017. You can see that experience below. The migration is one-way. There is no supported way to go back to project.json other than via source control or backups.

    .NET Core migration

    Visual Studio for Mac

    Visual Studio for Mac is a new member of the Visual Studio family, focussed on cross-platform mobile and cloud development on the mac. It includes support for .NET Core and Xamarin projects. In fact, Visual Studio for Mac is an evolution of Xamarin Studio.

    Visual Studio for Mac is intended to provide a very similar .NET Core development experience as what was described above for Visual Studio 2017 RC. We’ll continue to improve both experiences together as we get closer to shipping .NET Core Tools, Visual Studio for Mac and Visual Studio 2017 next year.

    Installation

    You can install the Visual Studio for Mac from the Visual Studio site. Support for .NET Core and ASP.NET Core projects is included.

    Creating new Projects

    The .NET Core project templates are available under the “.NET Core” project node in Visual Studio. You will see a familar set of projects.

    .NET Core templates

    You can see a new ASP.NET Core project, below.

    ASP.NET Core New Project

    Other experiences

    Visual Studio for Mac does not yet support xproj migration. That experience will be added before release.

    Visual Studio for Mac has existing support for editing csproj files while the project is loaded. You can open the csproj file by right-clicking on the project file, selecting Tools and then Edit File.

    Visual Studio Code

    The Visual Studio Code C# extension has also been updated to support the new .NET Core Tools release. At present, the extension has been updated to support building and debugging your projects. The extension commands (in the command palette) have not yet been updated.

    Installation

    You can install VS Code from the visualstudio.com. You can add .NET Core support by installing the C# extension. You can install it via the Extensions tab or wait to be prompted when you open a C# file.

    Debugging a .NET Core Project

    You can build and debug csproj .NET Core projects.

    VS Code Debugging

    When you attempt to debug the application, VS Code will create a launch.json and task.json for you. The launch.json must be updated per your application settings. I created a launch.json gist for you to consult as an example.

    .NET Core CLI Tools

    The .NET Core CLI Tools have also been updated. They are now built on top of MSBuild (just like Visual Studio) and expect csproj project files. All of the logic that once processed project.json files has been removed. The CLI tools are now much simpler (from an implementation perspective), relying heavily on MSBuild, but no less useful or needed.

    When we started the project to update the CLI tools, we had to consider the ongoing purpose of the CLI tools, particularly since MSBuild is itself a commandline tool with its own command line syntax, ecosystem and history. We came to the conclusion that it was important to provide a set of simple and intutive tools that made adopting .NET Core (and other .NET platforms) easy and provided a uniform interface for both MSBuild and non-MSBuild tools. This vision will become more valuable as we focus more on .NET Core tools extensibility in future releases.

    Installing

    You can install the new .NET Core Tools by installing the Preview 3 .NET Core SDK. The SDK comes with .NET Core 1.0. You can also use it with .NET Core 1.1, which you can install separately.

    You are recommended to install the zips not the MSI/PKGs if you are doing project.json-based development outside of VS.

    Side by side install

    By installing the new SDK, you will update the default behavior of the dotnet command. It will use msbuild and process csproj projects instead of project.json. Similarly, dotnet new will create a csproj profile file.

    In order to continue using the earlier project.json-based tools on a per-project basis, create a global.json file in your project directory and add the “sdk” property to it. The following example shows a global.json that contrains dotnet to using the project.json-based tools:

    Templates

    You can use the dotnet new command for creating a new project. It continues to support multiple project types with the -t argument (for example, dotnet new -t lib). The complete list of supported templates follows:

    • console
    • web
    • lib
    • xunittest

    We intend to extend the set of templates in the future and make it easier for the community to extend the set of templates. In fact, we’d like to enable acqisition of full samples via dotnet new.

    Upgrading project.json projects

    You can use the dotnet migrate command to migrate a project.json project to the csproj format. This command will also migrate any project-to-project references you have in your
    project.json file automatically. You can check the dotnet migrate command documentation for more information.

    You can see an example below of what a default project look file looks like after migration from project.json to csproj. We are continuing to look for opportunities to simplify and reduce the size of the csproj format.

    Existing .NET csproj files, for other project types, include GUIDs and file references. Those are (intentionally) missing from .NET Core csproj project files.

    Adding project references

    Adding a project reference in csproj is done using a <ProjectReference> element within an <ItemGroup> element. You can see an example below.

    <ItemGroup>
      <ProjectReference Include="..\ClassLibrary1\ClassLibrary1.csproj" />
    </ItemGroup>

    After this operation, you still need to call dotnet restore to generate “the assets file” (the replacement for the project.lock.json file).

    Adding NuGet references

    We made another improvement to the overall csproj experience by integrating NuGet package information into the csproj file. This is done through a new <PackageReference> element. You can see an example of the below.

    <PackageReference Include="Newtonsoft.Json">
      <Version>9.0.1</Version>
    </PackageReference>

    Upgrading your project to use .NET Core 1.1

    The dotnet new command produces projects that depends on .NET Core 1.0. You can update your project file to depend on .NET Core 1.1 instead, as you can see in the example below.

    The project file has been updated in two places:

    • The target framework has been updated from netcoreapp1.0 to netcoreapp1.1
    • The Microsoft.NETCore.App version has been updated from ‘1.0.1’ to ‘1.1.0’

    .NET Core Tooling for Production Apps

    We shipped .NET Core 1.0 and the project.json-based .NET Core tools back in June. Many of you are using that release every day on your desktop to build your app and in production on your server/cloud. We shipped .NET Core 1.1 today, and you can start using it the same way.

    Today’s .NET Core Tools release is considered alpha and is not recommended for use in production. You are recommended to use the existing project.json-based .NET Core tools (this is the preview 2 version) for production use, including with Visual Studio 2015.

    When we ship the new msbuild-based .NET Core Tools, you will be able to open your projects in Visual Studio 2017 and Visual Studio for Mac and go through a quick migration.

    For now, we recommend that you you try out today’s Tools alpha release and the .NET Core Tools Preview workload in Visual Studio 2017 RC with sample projects or projects that are under source control.

    Closing

    Please try the new .NET Core Tools release and give us feedback. You can try out the new csproj/MSBuild support in Visual Studio 2017 RC, Visual Studio for Mac, Visual Studio Code and at the command line. You’ve got great options for .NET Core development on Windows, macOS and Linux.

    To recap, the biggest changes are:

    • .NET Core csproj support is now available as an alpha release.
    • .NET Core is integrated into Visual Studio 2017 RC and Visual Studio for Mac. It can be added to Visual Studio Code by the C# extension.
    • .NET Core tools are now based on the same technology as other .NET projects.

    Thanks to everyone who has given us feedback about both project.json and csproj. Please keep it coming and please do try the new release.

    17 Nov 21:38

    Public Preview: Azure Data Lake Tools for Visual Studio Code (VSCode)

    by Jenny Jiang

    We are pleased to announce the Public Preview of the Azure Data Lake (ADL) Tools for VSCode. The tools provide users with the best in class light weight, keyboard focused authoring experience for U-SQL as an alternative solution to the Data Lake Tools for Visual Studio.

    By extending VSCode, leveraging the Azure Data Lake Java SDK for U-SQL job submission, and integrating with the Azure portal for job monitoring, the tools provide a cross-platform IDE. Users can run it smoothly in Window, Linux and Mac.

    The ADL Tools for VSCode fully embrace the U-SQL language. User can enjoy the power of IntelliSense, Syntax Highlighting, and the Error Marker. It covers the core user scenarios of U-SQL scripting and U-SQL extensibility through custom code. The ADL Tools seamlessly integrate with ADL, which allows user to compile and submit jobs to ADLA.

    What features are supported in ADL Tools for VSCode?

    U-SQL Language Authoring

    The ADL Tools for VSCode allows users to fully utilize the power of U-SQL: a language you’ll be comfortable with from Day One. It empowers users to enjoy the advantages of U-SQL: process any type of data, integrate with your custom code, as well as efficiently scale to any size of data.

    U-SQL Scripting

    U-SQL combines the declarative advantage of T-SQL and extensibility of C#. Users can create a VSCode U-SQL job in a file format with usql file extension, and leverage the full feature set of U-SQL language and its built-in C# expressions for U-SQL job authoring and submission.

    U-SQL Job

    U-SQL Language Extensibility

    ADL Tools for VSCode enables user to fully leverage U-SQL extensibility (e.g. UDOs, UDFs, UDAGG) through custom code. User can do so either through registering assembly or using Code Behind feature.

    Manage Assembly

    The Register Assembly command allows users to register custom code assemblies into the ADLA Metadata Service so that users can refer to the UDF, UDO and UDAGG in their U-SQL scripts. This functionality allows users to package the custom code and share the functionality with others.

    Register Assembly

    Code Behind

    The easiest way to make use of custom code is to use the code-behind capabilities. Users can fill in the custom code for the script (e.g., Script.usql) into its code-behind file (e.g., Script.usql.cs). The advantage of code-behind is that the tooling takes care of the following steps for you when you submit your script:

    1. It creates a .CS C# codebehind file and links it with the original U-SQL file.
    2. It compiles the codebehind into an assembly under the codebehind folder.
    3. It registers and unregisters the codebehind assembly as part of the script through an automatic prologue and epilogue.

    Azure Data Lake Integration

    The ADL Tools for VSCode integrate seamlessly with Azure Data Lake Analytics (ADLA). Azure Data Lake includes all the capabilities required to make it easy for developers, data scientists, and analysts to store data of any size, shape and speed, and do all types of processing and analytics across platforms and languages. U-SQL on ADLA offers Job as a Service with the Microsoft invented U-SQL language. Customers do not have to manage deployment of clusters but can simply submit their jobs to ADLA, an analytics platform managed by Microsoft.

    ADLA – Metadata Navigation

    Upon signing into Azure, users can view his / her ADLA Metadata entities through a list of customized VSCode command items. The workflow and steps to navigate through ADLA Metadata based on its hierarchy are managed through a set of command items.

    ADLA

    ADLA - Job Submission

    The ADL Tools for VSCode allow users to submit the U-SQL job into ADLA either through the Submit Job command in the command palette or the right click menu in U-SQL file.

    Users can either output the job to ADLS or Azure Blob storage based on their needs. The U-SQL compilation and execution is performed remotely in ADLA.

    ADLS

    Customized Menu Additions U-SQL

    How do I get started?

    You need to first install Visual Studio Code and download the prerequisite files including JRE 1.8.x, Mono 4.2.x (for Linux and Mac), and .Net Core (for Linux and Mac). Then get the latest ADL Tools by going to the VSCode Extension repository or VSCode Marketplace and searching Azure Data Lake Tool for VSCode. Please visit the following link for more information.

    Azure Data Lake Tool Preview

    For more information, check out the following links:

    Learn more about today’s announcements on the Azure Data Lake Blog.

    Discover more Azure service updates.

    If you have questions, feedback, comments, or bug reports, please use the comments below or send a note to hdivstool@microsoft.com.

    17 Nov 21:36

    Total Cost of (Non) Ownership of a NoSQL database service in 2016

    by Kirill Gavrylyuk

    Earlier today we published a paper Total Cost of (Non) Ownership (TCO) of a NoSQL Database Cloud Service. TCO is an important consideration when choosing your NoSQL database, and customers often overlook many factors impacting the TCO. In the paper we compare TCO of running NoSQL databases in the following scenarios:

    • OSS NoSQL database like Cassandra or MongoDB hosted on-premises
    • OSS NoSQL database hosted on Azure Virtual Machines
    • Using a managed NoSQL database as a service such as Azure DocumentDB.

    To minimize our bias, we leveraged scenarios from other publications whenever possible.

    In part 1 of our TCO paper, we explore an end-to-end gaming scenario from a similar paper NoSQL TCO analysis published by Amazon. We kept scenario parameters and assumptions unchanged and used the same methodology for computing the TCO for OSS NoSQL databases on-premise and on virtual machines. Of course in our paper we used Azure Virtual Machines. The scenario explores an online game that is based on a movie, and involves three different levels of game popularity: the time before the movie is released (low usage), the first month after the movie releases (high usage), and subsequent usage (medium usage), with different volume of transactions and data stored during each stage, as listed in the chart below.

    The results of our analysis are fairly consistent with AWS paper. Once all the relevant TCO considerations taken into account, the managed cloud services like DocumentDB and DynamoDB can be five to ten times more cost effective than their OSS counter-parts running on-premises or virtual machines.

    part1_chart

     The following factors make managed NoSQL cloud services like DocumentDB more cost effective than their OSS counter-parts running on-premises or virtual machines:

    • No NoSQL administration dev/ops required. Because DocumentDB is a managed cloud service, you do not need to employ a dev/ops team to handle deployments, maintenance, scale, patching and other day-to-day tasks required with an OSS NoSQL cluster hosted on-premises or on cloud infrastructure.
    • Superior elasticity. DocumentDB throughput can be scaled up and down within seconds, allowing you to reduce the cost of ownership during non-peak times. OSS NoSQL clusters deployed on cloud infrastructure offer limited elasticity, and on-premises deployments are not elastic.
    • Economy of scale. Managed services like DocumentDB are operating really large number of nodes, and are able to pass on savings to the customer.
    • Cloud optimized. Managed services like DocumentDB take full advantage of the cloud. OSS NoSQL databases at the moment are not optimized for specific cloud providers. For example, OSS NoSQL software is unaware of the differences between a node going down vs a routine image upgrade, or the fact that premium disk is already three-way replicated.

    The TCO for Azure DocumentDB and AWS DynamoDB in this moderate scenario were comparable, with Azure DocumentDB slightly (~10%) cheaper due to lower costs for write requests.

    Quantitative comparison

    One challenge with the approach taken in Amazon’s whitepaper is the number of assumptions (often not explicitly articulated) made about the cost of running OSS NoSQL database. To start with, the paper does not mention which OSS NoSQL database is being used for comparison. It is difficult to imagine that the TCO of running two very different NoSQL database engines such as Cassandra or MongoDB for the same scenario would be exactly the same. However, we think Amazon’s methodology maintains its important qualitative merit, this concern non-withstanding.

    In the second section of our whitepaper we attempt to address this concern, and provide more precise quantitative comparison for more specific scenarios. We examine three scenarios:

    • Ingesting one million records/second
    • A balanced 50/50 read/write workload
    • Ingesting one million records/second in regular bursts

    We compare the TCO for these micro-scenarios when using the following NoSQL databases: Azure DocumentDB, Amazon DynamoDB, and OSS Cassandra on Azure D14v2 Linux Virtual Machines, a popular NoSQL choice for high data volume scenarios. In order to run tests with Cassandra, we utilize the open source Cassandra-stress command included in the open source PerfKit Benchmarker.

    tco_part2

    Hourly TCO results depicted in the chart above are consistent with the observations in Part 1, with few additional quantitative findings:

    • DocumentDB TCO is comparable to that of OSS Cassandra running on Azure D14v2 VMs for scenarios involving high sustained pre-dominantly write workloads with low storage needs (i.e. local SSD on the Cassandra nodes is sufficient). For example, 1M writes with a time to live (TTL) less than three hours, or most writes are updates. Cassandra is famous for its good performance for such scenarios and in the early stages of product development is often seen very attractive for this reason. However, the non-trivial dev/ops cost component brings the total cost of ownership of Cassandra deployment higher.
    • If more storage is needed, or the workload involves a balanced read / write mix, or the workload is bursty, DocumentDB TCO can be up to 4 time lower than OSS Cassandra running on Azure VMs. Cassandra's TCO is higher in these scenarios due to non-trivial dev/ops cost for administration of Cassandra clusters and Cassandra's lack of awareness of the underlying cloud platform. DocumentDB TCO is lower thanks to superior elasticity and lower cost for reads and queries thanks to low overhead auto-indexing.
    • DocumentDB is up to two to three times cheaper than DynamoDB for high volume workloads we examined. Thanks to predictable performance guaranteed by both offerings, these numbers can be verified by simply comparing the public retail price pages. DocumentDB offers write optimized low overhead indexing by default making queries more efficient without worrying about secondary indexes. DocumentDB writes are significantly less expensive for high throughput workloads.

    In conclusion, we’d like to add that TCO is only one (albeit an important one) consideration when choosing NoSQL database. Each of these products compared shines in its own way. Product capabilities, ease of development, support, community and other factors need to be taken into account when making a decision. The paper includes briend overview of DocumentDB functionality.

    On the community front, we applaud MongoDB and Cassandra projects for creating significant community around their offerings. In order to make Azure a better place for these communities we recently offered protocol level support for MongoDB API as part of DocumentDB offering, and are encouraged with the feedback received to date from MongoDB developers. DocumentDB customers can now take advantage of the MongoDB API community expertise, as well as not worry about locking in into proprietary APIs, a common concern with PaaS services.

    As always, let us know how we are doing and what improvements you'd like to see going forward for DocumentDB through UserVoice, StackOverflow #azure-documentdb, or Twitter @DocumentDB.

    17 Nov 14:14

    WinAppDriver - Test any app with Appium's Selenium-like tests on Windows

    by Scott Hanselman
    WinAppDriver - Appium testing Windows Apps

    I've found blog posts on my site where I'm using the Selenium Web Testing Framework as far back as 2007! Today there's Selenium Drivers for every web browser including Microsoft Edge. You can write Selenium tests in nearly any language these days including Ruby, Python, Java, and C#.

    I'm a big Selenium fan. I like using it with systems like BrowserStack to automate across many different browser on many operating systems.

    "Appium" is a great Selenium-like testing framework that implements the "WebDriver" protocol - formerly JsonWireProtocol.

    WebDriver is a remote control interface that enables introspection and control of user agents. It provides a platform- and language-neutral wire protocol as a way for out-of-process programs to remotely instruct the behavior of web browsers.

    From the Appium website, "Appium is 'cross-platform': it allows you to write tests against multiple platforms (iOS, Android, Windows), using the same API. This enables code reuse between iOS, Android, and Windows testsuites"

    Appium is a webserver that exposes a REST API. The WinAppDriver enables Appium by using new APIs that were added in Windows 10 Anniversary Edition that allow you to test any Windows app. That means ANY Windows App. Win32, VB6, WPF, UWP, anything. Not only can you put any app in the Windows Store, you can do full and complete UI testing of those apps with a tool that is already familiar to Web Developers like myself.

    Your preferred language, your preferred test runner, the Appium Server, and your app

    You can write tests in C# and run them from Visual Studio's Test Runner. You can press any button and basically totally control your apps.

    // Launch the calculator app
    
    DesiredCapabilities appCapabilities = new DesiredCapabilities();
    appCapabilities.SetCapability("app", "Microsoft.WindowsCalculator_8wekyb3d8bbwe!App");
    CalculatorSession = new RemoteWebDriver(new Uri(WindowsApplicationDriverUrl), appCapabilities);
    Assert.IsNotNull(CalculatorSession);
    CalculatorSession.Manage().Timeouts().ImplicitlyWait(TimeSpan.FromSeconds(2));
    // Make sure we're in standard mode
    CalculatorSession.FindElementByXPath("//Button[starts-with(@Name, \"Menu\")]").Click();
    OriginalCalculatorMode = CalculatorSession.FindElementByXPath("//List[@AutomationId=\"FlyoutNav\"]//ListItem[@IsSelected=\"True\"]").Text;
    CalculatorSession.FindElementByXPath("//ListItem[@Name=\"Standard Calculator\"]").Click();

    It's surprisingly easy once you get started.

    public void Addition()
    
    {
    CalculatorSession.FindElementByName("One").Click();
    CalculatorSession.FindElementByName("Plus").Click();
    CalculatorSession.FindElementByName("Seven").Click();
    CalculatorSession.FindElementByName("Equals").Click();
    Assert.AreEqual("Display is 8 ", CalculatorResult.Text);
    }

    You can automate any part of Windows, even the Start Menu or Cortana.

    var searchBox = CortanaSession.FindElementByAccessibilityId("SearchTextBox");
    
    Assert.IsNotNull(searchBox);
    searchBox.SendKeys("What is eight times eleven");

    var bingPane = CortanaSession.FindElementByName("Bing");
    Assert.IsNotNull(bingPane);

    var bingResult = bingPane.FindElementByName("88");
    Assert.IsNotNull(bingResult);

    If you use "AccessibiltyIds" and refer to native controls in a non-locale specific way you can even reuse test code across platforms. For example, you could write sign in code for Windows, iOS, your web app, and even a VB6 Win32 app. ;)

    Testing a VB6 app with WinAppDriver

    Appium and WebAppDriver a nice alternative to "CodedUI Tests." CodedUI tests are great but just for Windows apps. If you're a web developer or you are writing cross platform or mobile apps you should check it out.


    Sponsor: Help your team write better, shareable SQL faster! Discover how your whole team can write better, shareable SQL faster with a free trial of SQL Prompt. Write, refactor and share SQL effortlessly, try it now.


    © 2016 Scott Hanselman. All rights reserved.
         
    15 Nov 18:04

    The Santa Cloud

    by Joe Davies

    We all know Santa Claus gets help, but perhaps you didn’t realize how much and from where…

    ‘Twas almost October and up at the pole

    The diligent elves were not reaching their goal

    The IT department was working nonstop

    A request for help flew to the guy at the top

    The Santa Cloud poster shows how Santa and his elves use Microsoft Azure and other Microsoft cloud offerings for his annual gift deliveries on the evening of December 24.

    Such an undertaking requires massive amounts of compute and storage resources and the software to:

    • Collect and analyze current and historical data and requests for presents from multiple sources (Azure Data Lake, SQL Data Warehouse, and Stream Analytics)

    • Work with vendors and partners during various parts of the manufacturing process

    • Perform the final determination of just who is naughty and who is nice (SQL Data Warehouse and Machine Learning)

    These resources must scale to handle the data processing demands for all the world’s children up to the delivery date.

    See how Microsoft Azure can tackle some of the biggest and, for the world’s children, most important processing tasks.

    Poster-sized PDF (34x22)

    Enjoy.

    15 Nov 18:01

    Announcing general availability of Azure Functions

    by Yochay Kiriaty

    Today organizations are turning to the cloud not only to accelerate – but to transform – their business. Platform as a Service (PaaS) enables businesses to innovate at a scale that fuels their business transformation – with a focus on application innovation rather than infrastructure management and maintenance. Microsoft Azure has led the way with PaaS in alignment with our decades long commitment to enable developers with world class tools and services. Part of the Azure PaaS portfolio, Azure Functions, offers a serverless compute experience for rapid application development and operational agility. Released in preview in March 2016, we’re excited to announce the general availability of Azure Functions today.

    Functions supports the development of event driven solutions on a serverless architecture, enabling on demand scaling and you pay only for the resources you consume. Today, Functions support for both C# and JavaScript is generally available and F#, PowerShell, PHP, Python and Bash are in preview. Functions uniquely offers integrated tooling support, out of the box Azure and third-party service bindings and continuous deployment to improve developer productivity.

    Building with the community

    Azure Functions is built in the open with the community on GitHub. The Functions team has actively engaged in customer discussions as feedback has been shared. In the preview period, over 900 GitHub issues were raised and addressed helping us deliver a high quality, production-ready service. We want to continue this dialogue with our customers and we maintain a backlog of features in UserVoice where you can provide suggestions.

    Integrated tooling support

    We now have support for creating, running, and debugging Functions locally on Windows, with the beta Azure Functions CLI. For JavaScript Functions on NodeJS, the CLI integrates with Visual Studio Code and sets up debug targets automatically. While the CLI currently only works on Windows, we’re working on support on Mac and Linux.

    Our top UserVoice suggestion is for Visual Studio 2015 tooling support, which will be available as a preview shortly. (We’ll update this post with a download link when it’s ready). This preview tooling will enable developers to create and develop new Function Apps, debug them locally or remotely, and publish them to Azure.

    Bind to services

    Unlike other comparable services in the market, Azure Functions enables developers to configure bindings to services with just a few clicks. Bindings can be set for services to trigger a function and the object is passed into the function at runtime. There is support for Azure services such as Blob Storage, Event Hub, Service Bus, Storage Tables and external services like OneDrive and DropBox. For example, a binding configured to Azure Storage could trigger a function when a new file is uploaded. This results in less code for developers to maintain as the binding implementations are managed by the service. Developers who use their own tool chain can also edit the functions.json file directly to configure bindings.

    The SendGrid, Twillio, Box, DropBox and Google Drive preview bindings were built in-house based on a binding extensibility framework that we will launch in preview early next year. This framework will allow developers to create their own service bindings and allow ISVs to contribute to the extension ecosystem.

    Pay only for what you use

    With Azure Functions, there is no need to reserve resources and you will only be charged for the time your function runs and memory consumed. Azure Functions pricing includes a permanent free grant of 400,000 Gigabyte Seconds (GB-s) execution time and one million total executions each month.  For usage exceeding the monthly free grant, customers are billed based on GB-s and executions consumed. Azure Functions charges execution per msec, with a 100 msec minimum. For existing Azure App Service Basic/Standard/Premium customers, Functions consumption is incorporated into the cost of the plan. Azure Functions is currently available in 12 Azure Regions with more on the way and the full price billing will start January 1, 2017. For more information check out the pricing page.

    Increased operational efficiency

    Azure Functions can scale up and down on demand so you don’t need to build infrastructure for the largest scale scenario and pay for resources you don’t use. You can also set a maximum daily spending cap to prevent runaway functions. There is also no more worrying about patching and maintaining frameworks, the operating system or infrastructure. Functions takes care of the underlying infrastructure for you.

    Our customers

    The true power of Azure Functions is realized through the application innovations of our early adopter customers like Accuweather and Plexure. Both customers are using Azure Functions in their production applications.

    • Accuweather: “Azure Functions has allowed us to move CRON workloads to the Cloud in an easy and efficient way. They provide powerful functionality without complicated setup, and allow us to quickly and easily implement event driven processes and workflows that are critical to our business.” Chris Patti, CTO at Accuweather.
    • Plexure: “As a software vendor it can be hard to completely solve a client problem where the software only meets ninety percent of their needs. Functions lets the team rapidly release small auto scaling units of logic that fill these gaps and unlocking significant value in our product to our customers. By building this into our software architecture it allows the teams to rapidly evolve the software to fill gaps unique to a customer but still keeping product standardization.” David Inggs, CTO at Plexure

    What next?

    So, what are you waiting for? Try Azure Functions for FREE for one hour without the need for a credit card today. Please visit UserVoice to give us your thoughts on Azure Functions.