There are recipes on my Cook This list that I’ve been plotting for years but take forever to jump from that place where they’re a rough idea of how I think something might taste good and how I’ll make that happen. There are items on the list which are just the names of dishes I haven’t tried yet and want to learn more about. And there are recipes that make me kick myself every time I see them because how have we not made a good hearty tortilla soup here yet? And where is that Russian napoleon I’ve been promising you? But this here is none of the above. Exactly one month ago, someone emailed me (hi Angela!) and asked if I had ever made a German Sunken Apple Cake [which sounds even cooler in its native language: Versunkener Apfelkuchen] and I had barely finished reading the email before I had a new tab open because I had to immediately know what it was.
What it was is adorable. Seriously, it’s relentlessly cute. Small apples are peeled, halved, cored and then scored and arranged rump-up on a buttery cake base and in the oven, the cake begins to creep up around them and the apples fan out like accordions and the whole thing is so golden, dimpled and lovely that I abandoned all hopes, plans to do anything else until I could make this happen. (Perhaps predictably, this still took three weeks.)
This post is for all of you. But it's also for me.
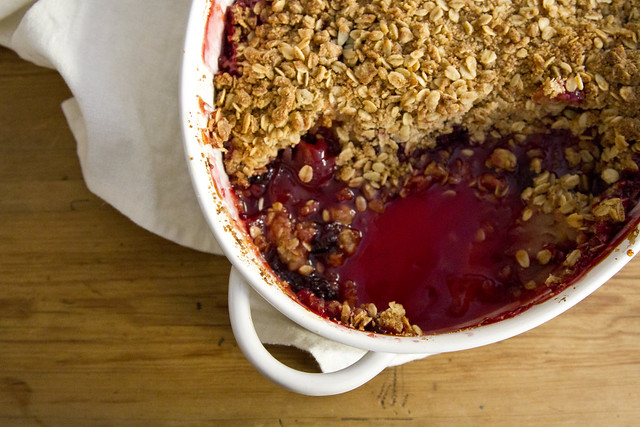
Every year at around this time, I endeavor to make a perfect apple crumble that lives up to my expectations of fallish flavors and relative ease so far as desserts go. In fact, before the season's up I usually make several, the first of which is not quite right and a few more that are only marginally better. I typically make them from memory, relying on appoximations of proper butter to flour ratios and wholly skipping certain ingredients because I've forgotten about them over the past year. None of that is very encouraging, so I told myself that this fall I would finally settle on an actual recipe that warrants the remaking.
Here it is, recorded on these tea leaves for my future reference and yours. I riffed on a recipe from Cory Schreiber and Julie Richardson's Rustic Fruit Desserts in part because Cory happens to be married to the sister of my dear brother-in-law and what a treat that is, and in part because a book with such a title suggests that those two know a thing or two about making apple crumble.
The original recipe calls for apples and cranberries, but because we're in that delicious in-between time where the nights are cool but the days are still warm, I added blackberries to my crumble as a kind of farewell to summer. I've made a few adjustments to account for the swap in fruit, and a few to account for my general laziness.
For the topping: 2 cups rolled oats 1 1/2 cups flour 1 1/3 cups brown sugar 1/2 teaspoon sea salt 1 1/2 sticks unsalted butter, melted
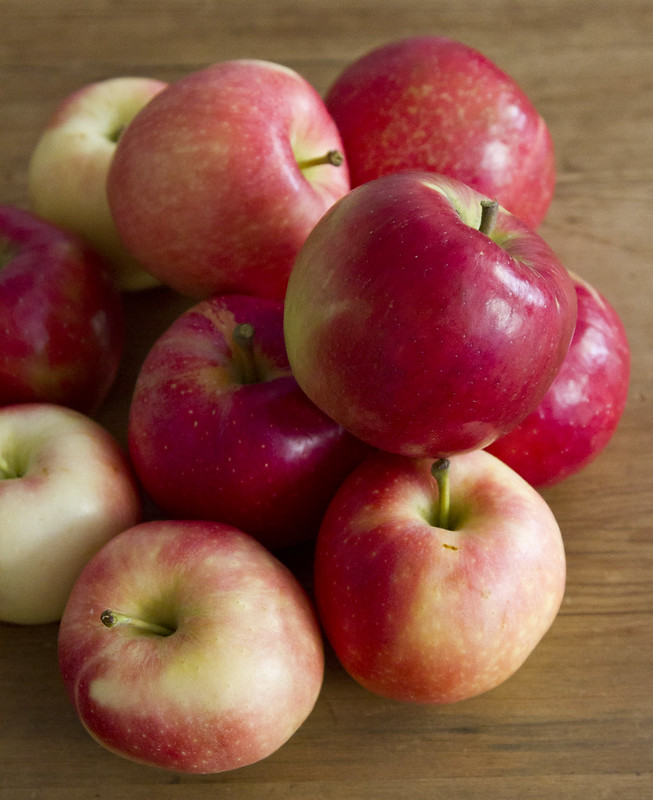
For the filling: 8 large apples (I used 1/2 honey crisp, 1/2 gala, and 8 instead of 10 so they would fit into my baking dish) A dash or two of lemon juice 6 oz (or therabouts) blackberries (I used frozen blackberries. But fresh would be delightful if you're anywhere where you can still find them.) 1 cup granulated sugar (The original recipe calls for an extra 1/3 cup of sugar, but because blackberries are sweeter than cranberries, I left that bit out.) 2 tablespoons cornstarch A healthy sprinkling of ground cinnamon (The original recipe calls for 2 teaspoons if you prefer to follow instructions.)
1. To make the topping, combine oats, flour, brown sugar, sea salt, and melted butter in a large bowl. I used salted butter because it's what we had. This is probably not what a proper baker would do, but I am not a proper baker. The melting of the butter is absolute key. It will make this dessert and every variation you make ever after.
2. After the topping is mixed, pop it into the freezer to firm up while you prepare your filling.
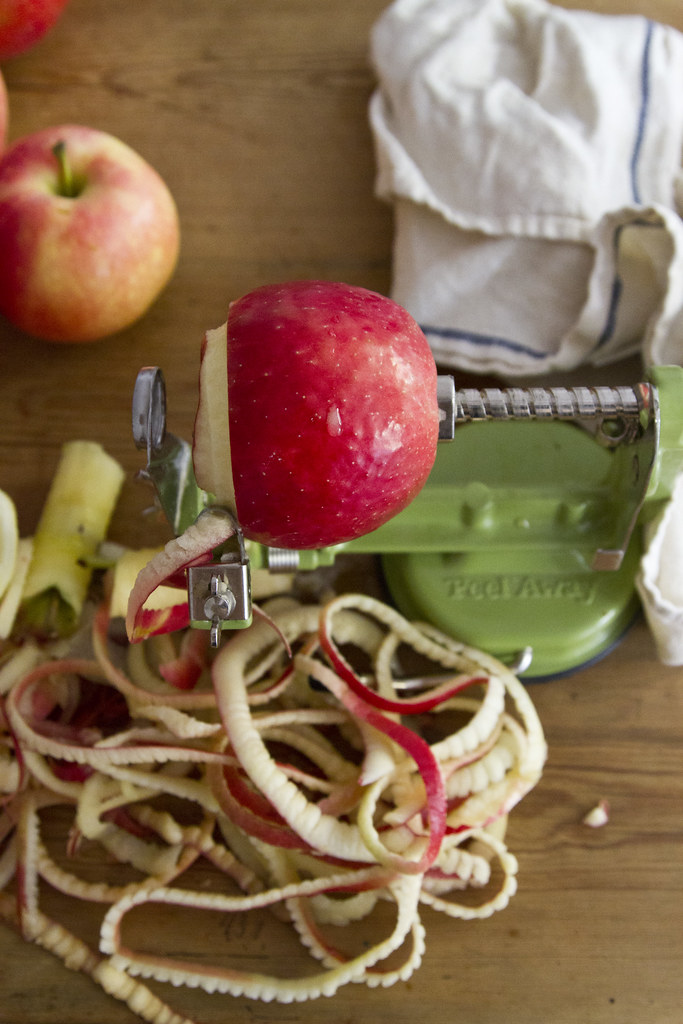
3. Peel, core, and slice your apples into evenly thick chunks or slices. (I pulled out my apple peeler/corer to prepare mine. A good thing to remember if you're using such a device: the peeler takes a bit of adjusting to get the peel to be the right thickness. One can end up with nothing but a peel if one is not careful. More about storing superfluous kitchen items here.) I sprinkled a bit of lemon juice on my apples so they didn't brown too much while I hopped around taking pictures chopped.
4. Combine apples, blackberries, sugar, cornstarch, and cinnamon in a large bowl, and dump into a buttered baking dish.
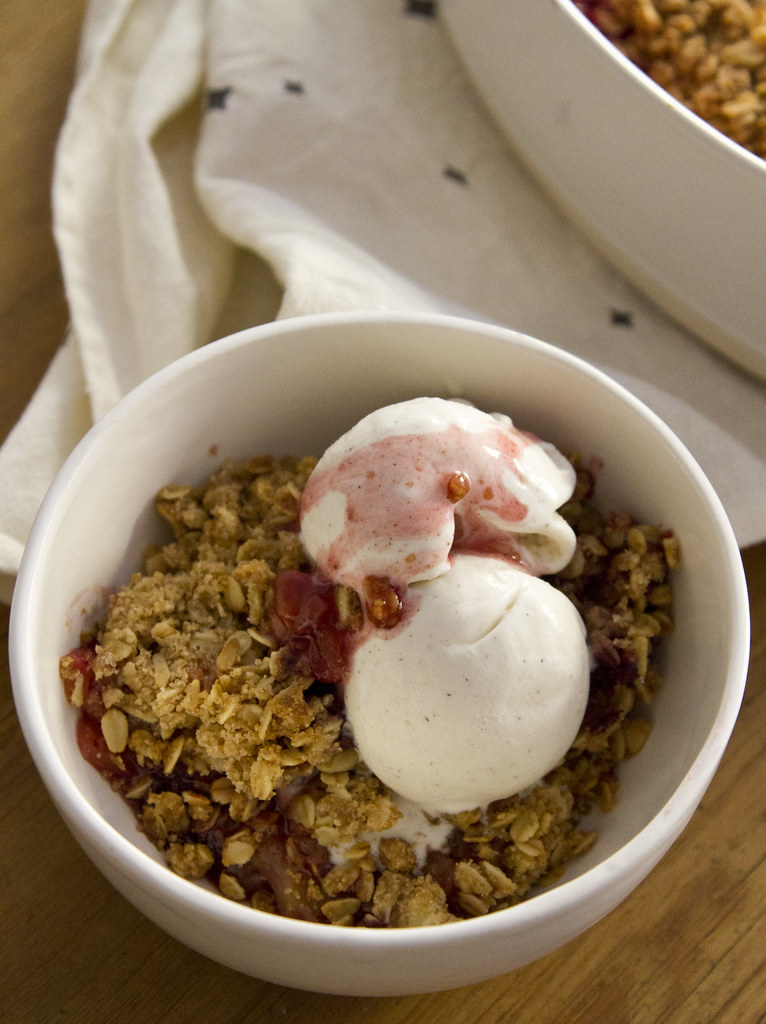
5. Press the chilled topping evenly over the top of the fruit and slide the dish into a preheated 375° oven for 60 to 70 minutes. You'll want your crumble to be nice and golden on top and the fruit inside to be soft. If your topping begins to brown too much before the hour mark, cover the top with a bit of foil to prevent burning.
To serve, add a healthy scoop of vanilla ice cream and spoon a bit of the soupy stuff on top.
My husband and I celebrated our wedding anniversary yesterday, and I’d say as marriages go, ours is pretty darn good. We have four kids, work pretty hard, and spend most of our time together, which is just fine with us since we really like each other and all that.
Now, I will confess that there has been one steady source of marital conflict through the years, and that is the fact that I gosh darn love a good meatless burger. I can’t really explain it. It must be a throwback to my vegetarian days. I don’t know…I just love them. And I’ll never, ever forget the time, very early in our marriage, that Marlboro Man and I went out to eat and I ordered—gasp—a veggie burger from the menu. The look on his face—I’ll never, ever forget it. From where he stood, he didn’t even know burgers without meat existed. In his experience, a burger was meat, much like air was oxygen or rain was water. It sent shockwaves through his being, and it shook our foundation to the core.
Over the years, I’ve tried to help my beloved cattle rancher husband understand my position: That my love of meatless burgers has no hidden meaning. It doesn’t mean I don’t also love big, beefy burgers. It doesn’t mean I’m going to start making the family drink shots of wheat grass juice every morning. I just like the taste of weird, mushy concoctions meant to resemble hamburger patties. Call me wacky!
I love you, Marlboro Man.
But I also love meatless burgers.
And I know in my heart that those two things can coexist.
On the show I used this homemade black bean recipe, but it’s much easier just to crack open a couple of cans of seasoned black beans. Honestly, either one works great! So if you have a last-minute hankering for black bean burgers, you don’t have to wait four hundred years while you cook a batch from scratch.
Now, I drain the black beans…but I don’t rinse them. I want to have a little bit of that natural bean liquid to work with.
“I want to have a little bit of that natural bean liquid to work with.”
When I was sixteen and wearing Guess jeans and Cyndi Lauper neon fingerless gloves, I never would have believed that I would ever utter—let alone type—the aforementioned sentence.
Life is a journey.
Pour the beans into a bowl…
Then use a fork…
To mash ‘em up.
Basically, you want to mash them up until they’re pretty mushy, but still have some whole bean pieces throughout.
So sorta mushy.
But not totally mushy.
But kinda mushy.
But not completely mushy.
Thank you for listening.
To bring in a little substance and texture, measure 1 cup of seasoned breadcrumbs…
And pour them in with the beans.
Now, for extra delicousness, peel an onion…
And grate it up.
I love grating onion whenever I want the flavor of onion, but don’t want big chunks of onion getting in the way of my happiness.
Solutions. I’m all about solutions, people.
Throw in the grated onion…
Then, to bind it all together, crack in an egg! It’s the right thing to do.
Now, I like to spice things up a bit because I’m a middle child and have issues with my third grade teacher. Not really. I just like spicy food. So I add a little chili powder!
Then, for kicks, some salt…
And pepper.
And that right there is a bowl full of deliciousness, baby.
You’re just gonna have to trust me here.
Now, smush it all together until it’s all mixed together…
Then, because I was feeling sassy, I added in a little hot sauce.
Now hear this: A little spice, when it comes to black bean burgers, is really, realllllllly nice.
Now I just want to let the mixture sit for about 5 minutes so it can figure out the meaning of life. While that happens, I’ll get the skillet ready!
Drizzle in a little olive oil…
And a little buttah for flavah.
Now, grab a hunk of the bean mixture…
Form it into a nice, neat patty…
And throw it into the skillet. Now, a note about the size of the patty: Black bean burgers are different from regular beef burgers in that they don’t shrink at all when they cook. So whatever size you make ‘em when they go into the skillet will be the size they are when they come out. So if you’re in the habit of making burger patties a little larger than the bun to allow for shrinkage, beware!
Now, I cook the burger on pretty low heat, because I want the middle to get heated through without burning the outside surface.
“Outside surface” is totally redundant, by the way.
So after about 4 to 5 minutes, flip the burger over to the other side and let it cook another 4 to 5 minutes.
Then, to really drive home the lusciousness, I added a couple of slices of Swiss cheese.
After a couple of minutes, I inverted a second skillet on top of the first skillet in order to hasten the cheese melting process.
“Inverted a second skillet on top” – Otherwise known as “a lid.”
Now, during the whole cooking process, I got other burger stuff ready: I grilled a bun with a little butter on a griddle…
Until it was a nice, lovely golden brown.
You can dress the burger however you’d like! I used mayo, not to be confused with Miracle Whip, which we all know is what they serve in Hades…
And some hot sauce. I seriously think I have a problem. Either my body or my psyche needs hot sauce in the worst way. (Pssst. You can use ketchup if you’re more emotionally sound than I!)
Spread it around until it’s all swirly and magnificent.
And are you ready to see the burger now?
Are you sure?
Are you sure you’re sure?
Tada! Man, you’d never know there’s not an ounce of meat in this sucker. And the Swiss cheese is the perfect…well, icing on the cake.
Put it on the bottom bun…
Then I spooned on a little more mayo/hot sauce mixture, followed by some lettuce, and a big slice of tomato.
And the top half of the bun, of course!
Then I realized I forgot the onion—which made everything utterly perfect.
So delicious, and half of this baby was totally satisfying. You can also cut out a lot of the bread (remember that the bean mixture also has breadcrumbs in it) by forgoing the bun and just eating the cheesy patty by itself.
Here’s the handy dandy printable!
x
Print Options
Page size
Letter
3x5
4x6
Text Size
Small
Medium
Large
Content
Include description
Include prep time, etc.
Show image
Print
Drain, but do not rinse, the black beans. Place them in a bowl and use a fork to mash them. Keep mashing until they're mostly broken up, but still have some whole beans visible. Add the breadcrumbs, onion, egg, chili powder, salt, pepper, and hot sauce. Stir until everything is combined, then let the mixture sit for 5 minutes.
Heat a tablespoon or two of olive oil with an equal amount of butter in a skillet over medium-low heat. Form the bean mixture into patties slightly larger than the buns you're using (the patties will not shrink when they cook.) Place the patties in the skillet and cook them about 5 minutes on the first side. Flip them to the other side, place 2 slices of cheese onto each patty, and continue cooking them for another 5 minutes, or until the burgers are heated through. (Place a lid on the skillet to help the cheese melt if needed.)
Grill the buns on a griddle with a little butter until golden. Spread the buns with mayonnaise and hot sauce, then place the patties on the buns. Top with lettuce and tomato, then pop on the lids!
Yum.
Posted by Ree | The Pioneer Woman on September 22 2014
I don't know about you, but every autumn season I get the itch to start something new! I don't know what it is, but every year I feel in the mood to get crafty or start some kind of project that I can do at home. In case any of you feel the same, we thought it would be fun to do something together. So, we've worked with Holly Neufeld to create a series of posts designed to teach you to crochet! I have been looking forward to this series for a few months now as I am in NEED of brushing up on some long-forgotten skills. So without further a do, take it away, Holly:
Crocheting is one of my most beloved hobbies. I think one of the biggest reasons I love it so much is the simplicity of it. You only need a hook and yarn to create something. And it’s so easy to bring your projects with you wherever you go.
I was very fortunate to have my husband’s mom teach me how to crochet. She took a bit of time one summer afternoon six years ago to show me the basics, and I’ve been “hooked” ever since. I started off making scarves and dish cloths, but it didn’t take very long before I was trying amigurumi animals and making hats and cowls. I enjoyed crocheting so much that I was looking for excuses to buy yarn and make things. I ended up opening an Etsy shop in 2007 to sell the things I created.
My wish for you, is that this series will be a simple way for you to grasp the hobby and be well on your way to creating crocheted gifts and lovely things for you, your friends, family, and your home. I hope it ignites a passion for yarn crafts like it has for me.
To begin, you will need yarn, a hook, and scissors. Other things that will come in handy are a measuring tape and a tapestry/darning needle.
If there is a specific project you have in mind, your pattern will suggest a yarn weight that is best suited. There are many different weights of yarn, such as:
0: Lace (or fingering)
1: Superfine (or sock)
2: Fine (or sport)
3: Light (or DK, light worsted)
4: Medium (or worsted, afghan, aran)
5: Bulky (or chunky)
6: Super Bulky
Your yarn label will have a little symbol with a number on it.
The size of hook that you need is determined by the yarn you are using. Your yarn label will also have the suggested hook size printed on it. Either in metric range or letter size.
0: Lace, 1.6 - 1.4mm (steel hook)
1: Superfine, 2.25 - 3.5mm
2: Fine, 3.5 - 4.5mm
3: Light, 4.5 - 5.5mm
4: Medium, 5.5 - 6.5mm
5: Bulky, 6.5 - 9mm
6: Super Bulky, 9mm +
Your pattern will have a gauge that explains how many stitches (st) should be in a certain length, for example, 4 inches. Use your measuring tape to crochet 4 inches of single crochet (sc) stitches to make sure the gauge is correct.
To start, choose a medium or bulky weight yarn and the appropriate hook. With the hook in your right hand, hold it with the hooked end pointing upwards between your thumb and middle finger. Your index finger will be a guide for the yarn, and the handle end of the hook will rest on the outer edge of your hand, with your ring and pinky fingers lightly keeping it in place.
Flip if you are left handed.
Now let's talk about reading a pattern. Crochet patterns are written using abbreviations, which makes them easier to read. Yarn industry designers and publishers use the same abbreviations in most patterns. Sometimes a pattern will have a unique abbreviation and usually explains what it means at the beginning of the pattern. These are a few of the most commonly used abbreviations:
ch, chs - chain, chains
dc - double crochet
dc2tog - double crochet two stitches together
dec - decrease
hdc - half double crochet
inc - increase
rep - repeat
rnd, rnds - round, rounds
sc - single crochet
sc2tog - single crochet two stitches together
sl st - slip stitch
st, sts - stitch, stitches
tog - together
tr - treble crochet
yo - yarn over
beg - beginning
ch sp - chain space
A chain space is, for example, when you ch1 and then skip a stitch before making another ch1 in the next stitch. This creates a little opening which is called the "chain space". So when the pattern reads: 4dc in ch sp, you'll stitch those 4 double crochet stitches in the little opening that was created the previous row. A Granny Square pattern is a pattern that you will work in chain spaces.
Brackets [ ] and parentheses ( ), indicate that you work the instructions within them as many times as directed, often in the same stitch. For example, when the pattern reads (sc, 2dc), it means to do those stitches in the same stitch.
* or * * indicates to repeat the instructions after or between asterisks as many times as directed. For example, the pattern might read: "Row 2: Dc in next 5 sts; *ch 1, skip next st, dc in next st; rep from * to end of row."
Understanding abbreviations, how to read patterns, needle sizes, and different yarn weights will be less overwhelming. This series will teach you basic stitches, and equip you with everything you need to know to start crocheting. So look forward to some fun patterns and how-to videos! -Holly
Credits // Author: Holly Neufeld, Photography: Sarah Rhodes. Photos edited with A Beautiful Mess actions.
Sometimes you feel like making macaroni and cheese that involves whipping up a roux, then making a white sauce, then adding cheese to make it a cheese sauce.
And sometimes you don’t.
This ultra-simple, kid-friendly recipe for pasta shells and cheese is absolutely scrumptious and so darn easy to make.
The secret’s in the (artisan cheese) sauce.
Just you wait, ‘enry ‘iggins. Just you wait…
First, boil up some pasta! These are just good ol’ medium pasta shells, but you can use the small shells if you want.
Next, make the gourmet cheese sauce: Add 2 cups of milk (I used 2%) to a saucepan…
And add a pat or two of buttah! And that’s basically the basic basis for the cheese sauce, basically. Note that there’s no flour, there’s no roux, and there’s no white sauce. And that’s what’s so beautifully simple about this recipe!
Heat this mixture over medium-low heat until the milk is heated and the butter is melted.
And now, for the artisan cheese blend, which you can only get from specialty gourmet mail order catalogs: Start with a hunka hunka burnin’ Velveeta. And actually, it would be best if it wasn’t burnin’. Just straight out of the tight foil wrapper is best.
And by the way…have you ever, just for fun, suspended a hunk of Velveeta from a height of a few inches, then released the Velveeta to see if it would bounce?
Try it sometime. It might make you giggle.
After you play a few rounds of bouncy ball, go ahead and cut it into cubes.
Then, to redeem what you’ve just done, grate up a nice amount of sharp cheddar. (On the show I used cheddar-jack, which is delicious, but I love the sharpy sharpiness of the sharper sharp cheddar.)
(I’m in a little bit of a mood today. Can you tell?)
Now, making sure the milk/butter combo is nice and heated, drop in the Velveeta.
Stir it around until the pieces soften…
And eventually melt into a golden, wonderful sauce.
Okay: Redemption time again! Drop in the grated cheddar.
This is what you call the best of both worlds. The creaminess of the Velveeta + the natural sharpness of the cheddar = TruLuv4Evr.
Stir it around until the cheddar begins to melt, then add in some seasoned salt. I use Lowry’s, but you can use whatever salt blend you like to reach for during your life’s journey. (Even lemon pepper would be lovely!) Just don’t leave this out; it makes a really nice difference.
Another essential: black pepper! Really go for it, too. A lot goes a little way. Or something like that. Ha.
Stir it around until the cheese is largely melted…
Then give it a taste…
And add more of whatever you think the sauce needs. Be sure you add enough seasoned salt for the whole thing to be really, really flavorful!
(Pssst. You could also press in a clove of garlic and let it heat up with the butter and the milk. That would be crazy good!)
Cook the pasta until it’s al dente (this isn’t quite there, so I kept cooking it for a little while.)
Then drain it…
And pour it right into the sauce!
Oh, the excitement.
Oh, the promise.
Oh, the impatience.
Oh, the AGONY.
Now just stir it around…
Until the shells are all coated in the sauce.
Now, look at this pan of wonder. It’s somewhat saucy/soupy, and that’s just the way you want it! It will actually thicken a bit as it sits (not that it will sit very long) so if it’s a little soupy/saucy to begin with, there’s a little room to work with.
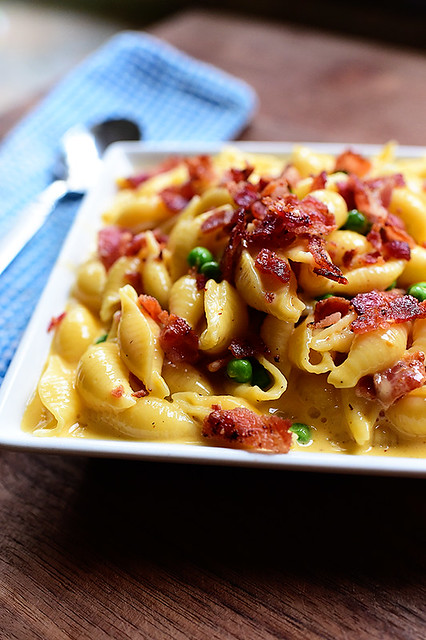
So there it is—the basic, ridonkulously easy, crazily delicious Shells & Cheese. Serve it up like this in all its glory…
Or you can have a little more fun with it.
Earlier, when I put the pasta water on to boil, I fried up some bacon.
Then I threw it on the cutting board…
And chopped it up. But before I added it to the pan…
I grabbed a bag of frozen peas and poured them right in, ice crystals and all. No need to thaw them first!
Then in goes the bacon.
And I just stirred it around.
Good grief. How lovely does this look?
And maybe “lovely” isn’t the most fitting adjective. Lovely is what you call a salad or a berry dessert or a fizzy drink. I’ll try again.
How gooooooooood does this look?
There. That’s better.
And here are some other things you could stir in: Caramelized onions, finely diced jalapenos, pimientos, halved grape tomatoes…the list goes on!
Dish it up…and when you do, make sure you get plenty of extra sauce in there.
A little extra bacon sprinkled over the top makes the world go ’round.
Whoa. Whoa whoa whoa. Like, seriously. Whoa. It’s almost exactly like Pasta Carbonara!
Except…not.
I’m in love.
Now, just a note: The peas really assert themselves once you mix them in, so start a little light, give it a taste, and you can always add more. I happen to love the flavor of peas, but if you’re on the fence, tread lightly at first.
This is my serving. Just kidding! Hahaha.
(At least I think I’m kidding.)
Enjoy this, my friends! Here’s the handy dandy printable!
x
Print Options
Page size
Letter
3x5
4x6
Text Size
Small
Medium
Large
Content
Include description
Include prep time, etc.
Show image
Print
8 ounces, weight Velveeta, Cut Into Cubes (I Actually Used About 10-12 Ounces!)
2 cups Grated Sharp Cheddar Cheese (more To Taste!)
1/4 teaspoon Seasoned Salt, More To Taste
1/2 teaspoon Black Pepper
1/2 cup Frozen Peas (more To Taste)
8 slices Thin Bacon, Fried Crisp And Chopped
Preparation Instructions
Cook pasta according to package instructions for al dente (do not overcook). Drain and set aside.
In a large pot heat the milk and butter over medium-low heat. Turn off the heat, then add Velveeta and stir until completely smooth and melted. Stir in the grated cheddar, then add seasoned salt and pepper. Stir until combined, then taste it and add more seasonings if needed.
Add cooked pasta and stir until coated. It will be soupy and saucy, but will thicken slowly.
If desired, stir in frozen peas (they will thaw) and bacon. Serve immediately.
Posted by Ree | The Pioneer Woman on September 15 2014
Save money, save the Earth and entertain your kids simultaneously — sounds like winners all around to me! If there's one thing I hear frequently from my four-year-old it's that she doesn't have anything to do, despite our toy cupboard, bookshelves, and craft basket all seem to be brimming with possibilities. But if I give her some recycling, scissors, and tape, she can entertain herself for an eternity.
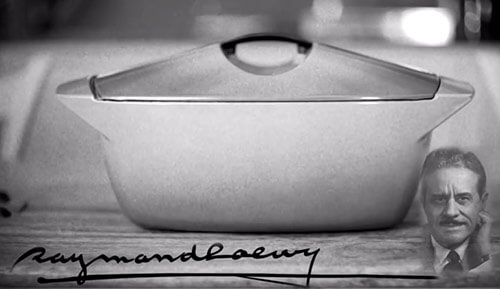
Le Creuset is offering two vibrant colors of the sleek, oven to table design — a bright reddish orange called flame and turquoise. The reissued Coquelle retails for $375, which is spendy for sure, but golly — a fresh chance to own a simply gorgeous and well designed piece of kitchen history. Pam says she has a couple of pieces of Le Creuset — gifts from her Mom, who is a fan of the brand — and both Kueber women like them a lot, especially for slow cooking navy bean soup and beef stews and other winter comfort foods yummy in the tummy. (They are also both #1 fans of cooking with vintage Club Aluminum.)
Loewy was the most influential industrial designer of the post-war era — designing products ranging from home goods like furniture and kitchenwares, packaging and logo design, industrial designs for trains, cars and other transportation. See his career highlights — and lookie that client list! — here.
Of particular interest here in Retro Renovationland, in 1954 Loewy redesigned colorways for the groundbreaking Formica Skylark boomerang pattern, originally conceived by Brooks Stevens four years earlier. Loewy also worked with architect Stanley Klein and Andrew Geller through his firm Raymond Loewy Associates to help design the American Brand steel kitchen– a longtime favorite on the blog for its easily recognizable curves.
From the Le Creuset website:
In 1958, acclaimed industrial designer Raymond Loewy created a new and unique shape to add to the world-renowned range of Le Creuset cast iron cookware. Internationally famous for his designs for some of the most well-known consumer brands, Loewy created a striking, evocative design called the Le Creuset Coquelle. To celebrate this iconic design, Le Creuset is introducing the Coquelle to a new generation with a limited release.
In addition to being a symbol of mid-century design, the Coquelle delivers the same outstanding cooking performance as every other piece of Le Creuset cast iron, ensuring that everything you stew, braise, simmer or bake will taste delicious.
Features
Colorful, long-lasting exterior enamel resists chipping and cracking; interior enamel is engineered to resist staining and dulling
Sand-colored interior enamel makes it easy to monitor food as it cooks, preventing burning and sticking
Wide handles provide even weight distribution and a secure grip
Phenolic handle is heat-resistant to 500°F
The lightest weight per quart of any premium cast iron cookware available
A blog reader recently emailed me hoping to see a gluten-free version of an oldie but goodie blog recipe – the popular Healthy Strawberry Oat Bars from way back in 2010. There’s something about this time of the year that makes me crave jam-filled oat crumble squares (or really, any kind of baked good, who am I fooling!), so she didn’t need to twist my arm. Not only is this version gluten-free, but it uses coconut oil instead of vegan butter (reduced by about half!), and showcases a new and improved crispy topping. The topping gets crunchy and golden, almost like a granola. Wowzers. My Raspberry Chia Seed Jam recipe was used for a reduced sugar option, but you can use any store-bought or homemade jam you see fit. The beauty of the oat square is that you can change up the flavour significantly just by swapping out different flavours of jam. I think a peach version would be nice too. I made a cinnamon peach chia seed jam a few weeks ago and it was delicious!
Joanna, this one is for you, and anyone who appreciates a classic jam + oat combo! These are healthy enough to start your day with, and delicious enough for an end of the night treat.
Raspberry Chia Seed Jam Oat Crumble Squares
Vegan, gluten-free, soy-free
Reminiscent of a Nutri-Grain bar, this version is vegan, gluten-free, and made with a homemade raspberry chia seed jam. These squares require a good period of cooling before they are ready to slice - otherwise they are very delicate and may crumble a bit. However, once cooled (and I even recommend storing in the fridge), they firm up nicely. Feel free to use your favourite store-bought jam (use 1 cup) in place of the chia seed jam if you are tight on time. Oat squares adapted from my Healthy Strawberry Oat Bars. Chia seed jam from here.
2 tablespoons brown rice syrup (used for its binding powers)
1 teaspoon pure vanilla extract
2 1/2 cups rolled oats (use certified gluten-free if necessary)
1/2 cup rolled oats, ground into a flour
1 cup almond flour
1/2 teaspoon baking soda
scant 1/2 teaspoon fine grain sea salt or pink Himalayan sea salt
Directions:
Preheat oven to 350F and line an 8-inch square pan with parchment paper.
For the jam: In a medium pot, stir together the raspberries, syrup, and chia seeds until combined. Bring to a low boil and reduce heat to medium. Simmer, uncovered, for about 10-15 minutes, stirring frequently, until the raspberries break down and the mixture thickens slightly. Remove from heat and stir in the vanilla. Transfer the mixture to a bowl and into the freezer for about 15-20 minutes, until cool.
For the oat squares: In a small mug, mix together the chia seeds and water. Set aside for about 5 minutes until thickened.
In a large bowl, stir together the melted oil, maple syrup, brown rice syrup, and vanilla. When the chia egg has thickened, stir that in too.
One by one, stir in the rolled oats, almond flour, oat flour, baking soda, and salt until the mixture comes together. It will be quite sticky, but this is normal.
Spoon 2/3 of the oat mixture into the prepared pan. Place a piece of parchment paper on top of the dough and press it down to spread it out evenly. Use a pastry roller to roll it out smooth into the corners. I repeat: the dough will be very sticky!
When the chia jam has thickened and cooled, pour all of it on top of the oat mixture and spread it out evenly.
Take the remaining 1/3 of the oat dough and crumble it evenly on top of the chia jam.
Bake for 25-30 minutes, uncovered, until the topping is lightly golden. I baked for 30 minutes, but this was a bit long in my oven as the topping browned a bit too much. I recommend checking it after 20 minutes and if it's starting to brown, cover the top with tin foil for the remaining 5-10 minutes of baking.
Place pan directly on a cooling rack for 20-30 minutes and then carefully lift out the square and place directly onto the cooling rack until completely cooled. Slice into squares.
Store leftovers in the fridge or freezer.
Tip: To make oat flour, add the 1/2 cup of rolled oats into a high-speed blender and blend on high until a flour forms. You can substitute this with 1/2 cup + 1 tablespoon of oat flour if desired.
September is here and we all know what that means: time for internet ladies to lose it over pumpkin spice everything!
I'm kidding.
Ok, half kidding.
But you totally know it's true. I'm a total internet lady myself, so you can bet I hopped in line for my pumpkin spice latte first chance I got this week. :)
So if you're feeling pumpkin crazy, I have a suggestion. Make this bread. I don't get anything if you do. I'm just saying, it's tasty and could easily find it's way on to a breakfast plate or beside your afternoon coffee. I mean, pumpkin AND chocolate? Yum!
Chocolate Pumpkin Bread, makes one loaf.
1/2 cup sugar 1/2 cup brown sugar 1/2 cup softened butter 2 eggs 1 teaspoon vanilla extract 1 1/2 cups flour 3 teaspoons cocoa 1/2 teaspoon baking soda 1/4 teaspoon salt 1/2 cup pumpkin puree 2 tablespoons greek yogurt
We're going to be mixing things, and then dividing them so we can get that pretty marbled look. Don't fret, it'll all work out in the end.
In a bowl, combine the sugars and softened butter. Mix well. Stir in each egg and then the vanilla extract until just combined. Set aside.
In another bowl, whisk together the flour, baking soda, and salt. Remove half of the mixture to another bowl (yes, a third bowl), and to this add the cocoa. Now divide the butter mixture in half between these two bowls. Add 1/4 cup pumpkin puree and a tablespoon of greek yogurt to each. Stir until just combined.
Add the batter to a buttered loaf pan in large spoonfuls, dispersing the two colors throughout. Then use a knife to swirl the batter around.
Bake at 325°F for 50-55 minutes, or until a toothpick inserted in the center comes out clean. Allow to cool for 5-10 minutes before removing it from the pan.
Serve warm with a tall glass of milk and a side of autumn vibes.
No? That got a little goofy at the end? Yeah, ok. I can see that now.
This whole newborn stage is a lot more fun than I expected! Team Quirk is feeling pretty great on day six! Remembering back to last Saturday and being in labor and honestly, how much I enjoyed it. Now in awe that this little baby was IN my belly just a week ago. This is good stuff people. Highly recommend having a baby.#babyfelix
I realize I posted my Browned Butter M&M Cookie recipe just last week, and I realize this recipe is pretty much identical, but I definitely wanted to post it separately because this chocolate chunk version will absolutely knock your socks off.
Just make ‘em.
Just once.
Your life will be forever altered.
Melt a stick of butter in a medium skillet over medium heat.
Keep a close watch on it, and swirl the pan around regularly! It will bubble up and sizzle…
Then, a minute or two later, the foam will appear.
And when the foam appears, it isn’t long before the butter is nice and brown. Take the pan off the heat when it gets to this light golden stage.
Because it’ll keep browning even after you take it off the stove.
When it’s nice and deep brown—but definitely not burned/black!—pour it into a dish…
And let it cool completely. This is difficult to do when you have a hankering for warm chocolate chip cookies…but it’s a necessity! If you pour warm butter into the dough, your life will spiral into a series of unfortunate events and you’ll live to regret it.
Once the browned butter has totally cooled, start making the cookie dough! It starts with a stick of softened butter. This, as you can see, is room temperature soft.
Add brown sugar and regular sugar…
Then mix it until it’s all combined, scraping the sides at least once to make sure it’s totally mixed together.
Once the butter and sugars are all mixed together, it’s time to add the browned butter with the mixer on low. And I can not emphasize enough how important it is to add the butter very, very slowly and gradually. If you add it too fast, the mixture will be wet and soupy. So just take your time…
Stopping halfway through to scrape the bowl and make sure it mixes in nice and slow. (And be sure to get ALL the dark brown, beautiful solids in there. That’s where the flavor is!)
Add in 2 eggs, one at a time…
Again (broken record here), scraping and mixing along the way.
Next, a good amount of vanilla.
Yum!
For the dry ingredients, combine flour…
Baking soda…
Salt…
And instant coffee granules! Now, I know the coffee-averse among you are balking at this ingredient…but please pretty please believe me when I tell you that the cookies do not taste like coffee. The coffee simply adds a depth and richness of flavor, and to prove it: Marlboro Man has never had a cup of coffee in his life because he thinks it will taste bad. And he’ll polish off these cookies like there’s no tomorrow.
As long as I never tell him there’s coffee in them.
I just turn the mixer on low, and add scoops of the dry ingredients so they mix in gradually.
And yes…I’m a-gonna say it: Scrape halfway through!
For the chocolate, I used a couple of these babies.
Soooooo much better than chocolate chips.
You’ve gotta trust me on this.
Just unwrap ‘em…
Slice ‘em into sticks…
Then chop ‘em into chunks!
Throw them into the dough…
Then stir them in until they’re evenly distributed.
Use a scoop or a spoon…
To get the dough onto the cookie sheets. I used a baking mat, but you can use parchment…or nothing, if you’re feeling rebellious!
Totally optional here: I gathered up the extra bits of chocolate from the cutting board and sprinkled/pressed a few into each cookie.
Before I baked the cookies, I popped the pans into the fridge for about 15 minutes, just to firm them up a bit before they went into the oven
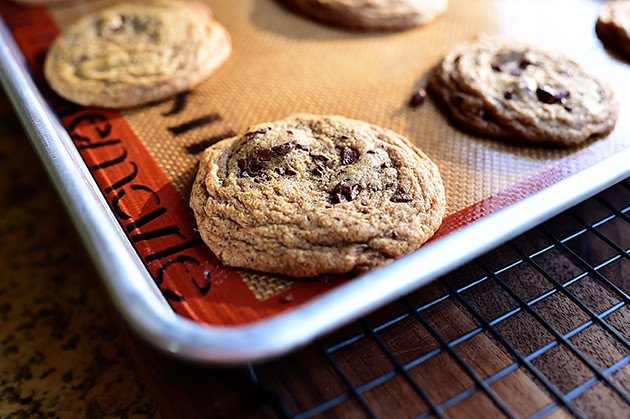
Then I baked ‘em until they were beautiful and golden!
Emphasis on beautiful. And golden.
Transfer them onto a cooling rack and let them cool for .3554 seconds.
Then dig right in!
Ahh…look at that luscious chocolate. To die for!
Here’s the handy dandy printable. Just like the M&M cookies from last week…but I like these even better. They’re a keeper!
8 ounces, weight Good Semi-sweet Chocolate, Chopped Into Chunks
1/2 cup Finely Chopped Pecans (optional)
Preparation Instructions
***Note: The amount of instant coffee should have been 2 heaping teaspoons, not 2 heaping tablespoons. I apologize for this error in the recipe entry!
Add one stick of butter to a medium skillet over medium heat. Allow it to melt and bubble up for 3 to 4 minutes, swirling the pan to keep the butter moving around. When the butter is a medium golden brown, remove the pan from the heat (it will continue browning in the pan over the next 30 seconds or so!) Pour butter (and any solids in the bottom of the pan) into a heatproof bowl and allow it to cool completely, about 30 minutes. Meanwhile, allow the other stick of butter to soften.
Preheat the oven to 375 degrees*.
Cream the softened butter together with the brown sugar and regular sugar until it’s nice and combined. Add the eggs and vanilla, and beat until smooth, scraping the bowl if necessary to make sure everything is incorporated.
With the mixer on medium-low, very slowly drizzle in the cooled melted butter, making sure to add all the darker brown solids. Scrape the bowl the mix again for 20-30 seconds, until everything is combined.
In a separate bowl, combine the flour, coffee granules, baking soda and salt. Stir together, then add it in 1/3 increments, mixing on low, until it’s totally incorporated. Scrape the bowl and beat for a few more seconds. Stir in the chocolate chunks and nuts, if using.
In batches, scoop by heaping teaspoon onto a baking sheet lined with a baking mat, Press extra chocolate chunks into the tops of each cookie, if desired. Refrigerate scoped cookies for 15 minutes, then bake for 9 to 10 minutes, or until golden brown. Remove from oven, then transfer cookies to a cooling rack. Repeat with the rest of the dough. Serve cookies with a big glass of cold milk!
Posted by Ree | The Pioneer Woman on September 4 2014
I have a lot of feelings about lunch boxes, none of them especially genial. But as this teeny tiny person that I only just recently brought home from the hospital, barely able to utter a “beh” and now able to fill a 2-hour car ride back from a beach house with all the words every uttered (hm, wonder where he gets it) begins kindergarten this week, and will do so with a lunchbox in hand, I’ve realized that the only way to move forward with my grouchy feelings about lunch boxes is to air them here, in this town’s square, and then move on.
And so here goes: I, Deb Perelman, resent lunch boxes. I resent that my friend Valerie can send her children to a French summer camp where they are served hot lunches (just the basics, like blanquette de veau, omelette aux champginons and, oh, a galette du rois) on real plates daily and the best my child can hope for is stuff like this. I resent that we don’t prioritize filling our children’s bellies with nutritional, balanced meals that will fuel them their growing bodies and brains through long school days, and that only parents with the means to (time or financially) can provide wholesome alternatives. I resent that I’m looking down the barrel of a decade or more of this, every single school day. And I resent that, on top of all this, if our summer months of packing lunch boxes for camp were any indication, at least half of the food will come back uneaten because a whole lot of places that ostensibly have children’s best interests in mind feed them cookies or crackers with ingredient lists as long as this blog post and juice in the middle of the morning as a snack, sometimes just an hour before lunchtime.
I just got home from a soccer tournament all weekend and was making plans for what I’m cooking all week when I remembered a recipe I photographed a few months ago that I plum forgot to share! And the recipe doesn’t even have plums in it!
Yes, I’m a little loopy today.
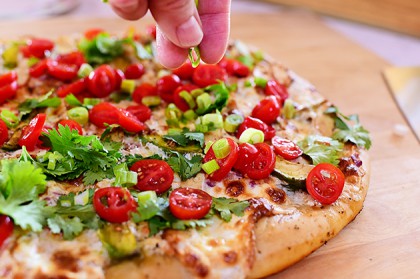
This is a really delicious pizza, with warm avocado, bubbly cheese, and other delicious toppings that go on the pizza after it comes out of the oven. You can use a homemade pizza crust (I’m including my recipe below) or you can use a storebought, ready made crust if time is of the essence.
Here’s how I made it!
I started by slicing 2 chicken breasts in half across the middle so I wound up with 4 very thin chicken breast-shaped pieces. You don’t have to do this—you can just throw the whole breasts on there. But I like to slice them into thinner pieces like this because a) they take less time to cook through, and b) you wind up with much thinner pieces once you slice them up.
I just seasoned them with salt and pepper, then grilled them until they were all done!
Then I just let ‘em cool and sliced ‘em up.
My favorite pizza dough on the planet! Below, I’m pasting in the directions for making the dough—I’ve used these same photos in lots of the pizza recipes on my website because, well, they explain it all.
Note: For a time-saver, you can also just use a pre-made pizza crust, storebought flatbread—any pizza crust you want! Just adjust the baking time and temp accordingly.
Here’s what you need for the pizza crust. Totally simple!
Sprinkle yeast over warm water and let it stand for a few minutes.
Next, add the salt to the flour.
And stir it around in the mixer for a few seconds.
Next, with the mixer on low, drizzle in the olive oil.
Stir it together till the olive oil is worked into the flour.
Next, pour in the warm water/yeast mixture.
Mix it together until the dough all comes together in a sticky mass.
Then just cover the bowl with plastic wrap and set it aside for 1 to 2 hours. Or, to really step up the flavor and texture, just park it in the fridge for a few days, sealed in a plastic bag.
Use a rolling pin and/or your hands to get it into a large rough rectangle shape and put it onto a pan.
Drizzle on some olive oil and smear it around with your fingers…
Then sprinkle on lots of salt and pepper.
And now for all the other ingredients! I sliced up a couple of balls of the good, fresh, bright white mozzarella…but you can also use the supermarket mozzarella if you prefer.
(And if you’re feeling really sassy, grate it instead of slice it. C’mon. Take a walk on the wild side.)
And avocado: Slice up 2 or 3. And here’s where I went horribly wrong in my life: I should have squeezed lime or lemon juice all over the slices and tossed them around, both to give the avocados a little bit of an acidy bite and to keep them from browning. But this was back when limes were approximately $1,800.00 apiece and hard to find and I didn’t keep them around in abundance.
So if you make this…give the avocados a nice coating of lime juice.
Also! It’s best if the avocados aren’t quite this ripe/soft since they’ll soften a bit in the oven.
I also finely minced up some red onion…
Sliced some green onion…
And sliced some grape tomatoes!
(Also: Cilantro. Not shown because I’m an airhead.)
Now it’s time to assemble everything: Lay the mozzarella all over the surface of the dough…
Then arrange chicken and avocado slices all over the cheese.
Lookin’ good so far!
Next, sprinkle on the red onion. I minced it really fine because I want the onion to have a chance to soften in the oven, and it wouldn’t do that if the chunks were big.
Raw, crunchy onion pieces are against my religion.
Now, I decided to bake it at this stage, then move on with the other toppings after it came out of the oven. So get it into a really, really hot oven until the crust is golden and the cheese is bubbly. (And pssst. Another squeeze of lime juice would be a really good idea.)
And here ’tis!
The crust is perfect.
As soon as it comes out of the oven, sprinkle on the cilantro, tomatoes…
And green onions.
Then slice it up and serve it right then and there!
Keep in mind that the avocado will tend to brown quickly once it comes out of the oven. (Of course, the lime juice will help, but definitely plan on serving it right away.)
Very simple, very delicious.
Here are the handy dandy printables—both for the pizza and the crust! (Note: the crust recipe below makes two pizza crusts. Store the other one in the fridge for several days until you need it, or make two pizzas at once!)
2 whole Boneless, Skinless Chicken Breasts, Cut In Half Half Horizontally To Make Thin Breasts
Olive Oil, For The Chicken And For Drizzling On The Crust
Salt And Pepper, to taste
3 whole Avocados, Ripe But Not Overly Soft, Peeled, Pitted And Sliced
Lime Juice, For Squeezing Over Avocados
1 whole (Medium To Large Size) Pizza Crust, Unbaked
8 ounces, weight Mozzarella Cheese, Sliced Thin Or Grated
1/2 whole Red Onions, Minced Finely
1 cup Cilantro Leaves
1/2 cup Red Grape Or Cherry Tomatoes, Sliced Thin
3 whole Green Onions, Sliced
Preparation Instructions
Sprinkle chicken breasts with salt and pepper. Heat olive oil on a grill pan or in a skillet, and cook the chicken on both sides until done in the middle, about 3-5 minutes per side depending on thickness. Remove from the pan, allow to cool slightly, then slice into thin pieces. Set aside.
Toss the avocado slices in lime juice. Set aside.
Preheat the oven to 500 F. Roll out pizza dough until very thin and place on a large baking sheet. Drizzle with olive oil and smear all over the surface of the dough with your fingers. Sprinkle with salt and pepper. Lay on the mozzarella, chicken, and avocado slices. Sprinkle on minced red onions. Sprinkle with a little more salt and pepper, then place the pan in the oven.
Bake the pizza for 12-15 minutes, or until crust is golden and cheese is melted and bubbly.
Remove from the oven and immediately add cilantro, tomatoes, and green onions on top. Squeeze on a little more lime juice, slice, and serve immediately.
(Note: Use store bought pizza crust to save time! Just adjust cooking temperature and time accordingly, based on package instructions.)
Posted by Ree | The Pioneer Woman on September 2 2014
Sprinkle yeast over 1 1/2 cups warm (not lukewarm) water. Let stand for a few minutes.
In a mixer, combine flour and salt. With the mixer running on low speed (with paddle attachment), drizzle in olive oil until combined with flour. Next, pour in yeast/water mixture and mix until just combined, and the dough comes together in a sticky mass.
Coat a separate mixing bowl with a light drizzle of olive oil, and form the dough into a ball. Toss to coat dough in olive oil, then cover the bowl tightly with plastic wrap and set it aside for 1 to 2 hours, or store in the fridge until you need it.
Note: it’s best to make the dough at least 24 hours in advance, and 3 or 4 days is even better.
When you are ready to make the pizza, grab HALF the pizza dough (recipe makes 2 crusts) and squeeze the dough toward the bottom to form a nice, tight, pulled ball. You can roll out the pizza with a rolling pin if you’d like, but sometimes it’s just as easy to throw it around and pull and stretch till it feels right. And when the crust is nice and thin, lay it on an oiled baking sheet or pizza pan. Drizzle a little olive oil on the dough and spread it with your fingers. Very lightly sprinkle some salt on the crust.
Preheat oven to 375 degrees. Top your crust with your toppings of choice. Then bake for 15 to 17 minutes, or until crust is golden brown and toppings are bubbly.
Posted by Ree | The Pioneer Woman on September 2 2014
When I was eighteen I went to India for the first time, and I've been dying to go back ever since. It was so beautiful and colorful! It was in India that I had my first chai tea. When I got home I started making chai at home, and then all through my twenties it was my go-to coffee shop drink (did you know I used to think I didn't like coffee? How things have changed!). Anyway, to this day I can't drink a chai without mentally booking a trip to India (I need to book a trip for real). It's a very cool, transportive flavor.
Today I'm here teaming up with Almond Breeze to share a recipe for a frozen chai. It's nice and spicy with a hint of almond—a perfect treat!
Frozen Spiced Chai, serves one.
1 cup Vanilla Almond Breeze Almondmilk 2 chai tea bags frozen yogurt ground nutmeg ground cinnamon ground ginger cinnamon sticks (optional, for garnish) pure vanilla extract whipped cream honey
Prep: The day before, freeze some Almond Breeze into ice cubes. I don't know about you, but I think I almost always prefer almond milk to regular milk—especially in drinks. It just feels less heavy, and of course I love the added almond flavor.
An hour (or more) before making your shake, heat 1 cup Almond Breeze and let it cool in the fridge with 2 chai tea bags to infuse.
In a blender, combine 1 cup infused Almond Breeze; 4 scoops frozen yogurt; 6 Almond Breeze ice cubes; 1 pinch each ground nutmeg, cinnamon, and ginger; 1/4 teaspoon pure vanilla extract; and 1 tablespoon honey. Blend to perfection!
Top with whipped cream and cinnamon. Garnish with a cinnamon stick.
I like the looks of this recipe better than the other one i used
Here’s one of the best loved recipes on the site—tomato pie! Perfect at the peak of summer tomato season.
One of the great things about going on vacation is I get to hang out with my friends, and sometimes meet their friends, who sometimes have OMG-this-is-so-GOOD dishes that they bring over. This tomato pie recipe is a result of one of these encounters.
I love veggie bowls and yet I don’t make them as much as I’d like. I think I just forget about them so this post is a reminder to myself to make up a veggie bowl on a weekly basis. They’re healthy and colourful and taste amazing. The best part is that the ingredients are super flexible. Add kale, broccoli, zucchini or whatever vegetable available. Add beans or salsa or roast up some chickpeas. But it’s the sauce that you choose that really makes the magic happen.
This time, I wanted to try a new sauce instead of myusualstandbys. I had this recipe bookmarked on pinterest for ages, unfortunately it’s an almond-based sauce and I was out of almonds. I did have an abundance of walnuts though, so found a different but similar recipe that also threw in some chickpeas. Since the recipe wasn’t so reliant on just a nut, I figured I could mix things up and that’s exactly what I did. I changed up the seasoning too and I’m thrilled to report that the results were delicious.
Usually when I make up a veggie bowl, I use roasted vegetables so that I can pump up the flavour with spices and all that sexy caramelization that comes from roasting. But it’s hot outside and I didn’t want it to be hot in the kitchen too. Plus, let’s face it, roasting can make a big ol’ mess. So I decided to steam some beets, sweet potato and asparagus and mix it up with some raw vegetables, along with some leftover brown rice. And because I couldn’t leave my love affair of roasting alone, I did lightly roast the leftover can of chickpeas that I didn’t use in the yumm sauce. It was worth it.
This is a healthy vegan meal that tastes amazing. I don’t often steam vegetables (why is that?), but I really loved it here. To properly steam vegetables, add the heartier vegetables like beets first and let steam for a bit and then add vegetables that take quicker to cook. For instance, I steamed the beets for 10-15 minutes, then the sweet potatoes and then at the very end, the asparagus for just a minute or two. You still want lightly crisp vegetables here. It’s a good healthy option and because the yumm sauce is so bold and in your face that you don’t need highly seasoned vegetables. Make sure you throw in some raw vegetables too for extra crunch.
holy hippy yummm bowl I used vegetables that I had on hand but you can add whatever vegetables or grains that you love most. Use my suggestions or create your own version.
cooked brown rice or a grain of your choice (millet, quinoa, farro would be good options) roasted chickpeas (tossed with oil, salt & pepper & roasted in a 400F oven for at least 20 minutes)
steamed vegetables: diced beets, asparagus, sweet potato, carrots
raw vegetables: grated or julienned carrots and beets, chopped scallions, chopped orange/red sweet peppers, sliced cabbage, diced cucumbers
toasted chopped walnuts or almonds for crunch
yumm sauce
1/2 c canola oil
1/2 c walnuts or almonds*
3/4 c chickpeas
4 garlic cloves
1/2 c water
1/2 c lemon juice
1/3 c nutritional yeast
1/2 t kosher salt
1/2 t reduced sodium soy sauce or Braggs (use Braggs if you want this gluten-free)
1/2 t chili powder
1/4 t ground cumin
1/2 t dried oregano
Dump all ingredients into a high powered blender and blend until smooth. Taste & adjust seasoning.
*soak almonds overnight if you don’t have a high-powered blender.
For each bowl, layer with rice or grain of your choice, roasted chickpeas, steamed vegetables, raw vegetables, nuts, and then drizzle with yumm sauce. If you’re like me, you’ll want to add more sauce as you dig deeper in your bowl. It’s that good.
Yogurt and granola is probably what I eat for breakfast about 60% of the time. That makes it the majority, I guess. It's not just any old yogurt and granola either. Oh, no. It's gotta be Greek yogurt, preferably with fresh fruit or jam and a little honey. I like all sorts of granola, and I LOVE making it at home because you can easily make a big batch to last you a couple weeks.
This granola is inspired by one of my favorite quick breads: banana bread. It has small pieces of crunchy dried bananas and plenty of spices to give it flavor. If you've never made homemade granola before, I highly recommend you give it a try. It really could not be easier, and having a big container of homemade granola sitting on your kitchen counter is total street cred in the cooking world, if you ask me. :)
Banana Bread Granola, makes about six cups.
4 cups old fashioned oats 1 cup chopped nuts (I used 1/2 cup walnuts and 1/2 cup pecans) 1/3 cup olive oil 3 tablespoons melted butter 1 teaspoon salt 1/2 teaspoon cinnamon a big pinch of nutmeg and ginger 1/2 teaspoon vanilla extract 1 cup chopped banana chips
You'll note there's not a bunch of sugar in the ingredient list. I think it's easier to add honey or maple syrup to your morning breakfast rather than add it to the granola itself. Or if you prefer to buy yogurts that are already sweetened, then this granola won't overwhelm you with sugar.
In a large bowl, combine the oats, nuts, salt, and spices. Pour the oil, melted butter, and vanilla extract over the mixture and give it a good stir so everything gets coated.
Spread the mixture out onto a baking sheet lined with a baking mat (Silpat) or parchment paper. Bake for 20-30 minutes at 350°F. Every 10 minutes or so, remove the sheet from the oven and give the granola a stir. This will ensure that no pieces get too burnt while other pieces don't cook at all.
After the granola is done baking, remove from the oven and toss in the chopped banana chips.
Store in an airtight container for at least a few weeks (probably longer). Enjoy! xo. Emma
I am not of the mind-set that food has to be complicated in order to be good. Quite the opposite, actually. More often than not, I'll find that some of my very favorite meals turn out to be something so simple and easy to put together.
Also, you don't need fancy cooking skills to make something restaurant quality. I mean, how many trendy coffee shops charge $4+ for fancy toast? But then you get the toast and it's AMAZING. And you contemplate spending another $4+ to get more.
This post is about toast. Because everyone should know, if they don't already, that they can make the best toast ever! This one is very much inspired by my mom. My dad has a massive garden; he's a real pro gardener. And every summer his garden produces about one million tomatoes.
Okay, not a million. But a lot.
And you can find my mom putting together a tomato sandwich for lunch for quite some time after that. It's simple, but so amazing, because the tomatoes have so much flavor. Currently we have quite a few amazing tomatoes around the ABM office from our CSA box. Perfect opportunity to throw together an easy but impressive savory breakfast.
You don't need skills to make fancy cream cheese. Just chop up 5-6 leaves of fresh basil and mince 1 or 2 cloves of garlic.
Stir those ingredients in with 8 ounces of softened cream cheese and you're in business. You can store any unused cream cheese in an airtight container, in the refrigerator for up to a week. This is great on bagels or to spread on sandwiches too. The flavors become more pronounced over time, so go easy on the garlic unless you know you love it. :)
What kind of toast person are you? Do you own a toaster or toaster oven? Or are you an under-the-oven-broiler kind of toaster? Whatever your method, toast a few thick slices of your favorite bread (I used sourdough) and spread on the cream cheese.
Top with thick slices of tomatoes and a little salt and pepper. I ate a version of this for lunch the other day as well. It's good any time of day really. So if tomatoes are in season where you live, buy some and make some tomato toast this week. xo. Emma
Credits // Author: Emma Chapman, Photography: Sarah Rhodes. Photos edited with The Folk Collection.
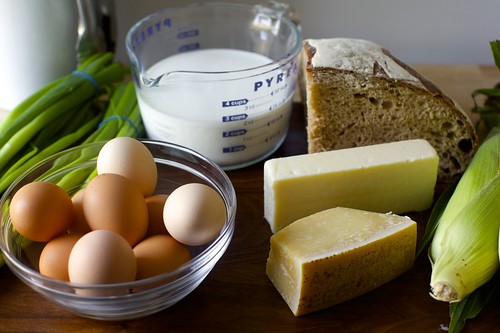
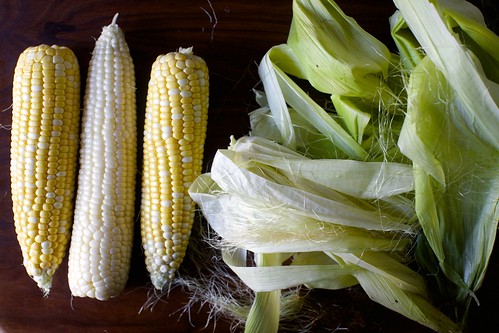
It’s chile season! My poblanos are taking over the garden right now so I thought I would cook up a few into a hearty corn chowder. The soup consists of onions, celery, garlic, yukon gold potatoes, corn, green poblano chiles, and chicken stock. Near the end, you swirl in cream (chiles love cream) to balance out the heat of the chiles, and add a splash of lime juice for brightness.
All I can say is thank goodness I banked a few recipe posts earlier this summer because my inspiration has been pretty dismal during this kitchen reno. Combine that with the dreaded 3rd tri “preggo brain”, and my recipe mojo just isn’t flowing like it normally does. Then there was that disaster of a crock pot recipe I made on the weekend for Eric’s birthday. The pot is still soaking in the laundry tub because when you mess up a slow cooker recipe, you pay the price. I might have to chisel it out. Thankfully, I’ve been sitting on this recipe gem since June. I don’t know how I waited that long to share it because it’s a great one! When I first made these crispy quinoa cakes they disappeared at a record pace. I think I recall eating 5 of them straight from the pan. [Then I made you wait for the recipe for 2 1/2 months! Pure evil.] The next two batches were also quickly enjoyed and made easy meals for us without much fuss. We served them as part of a weekend brunch with home fries and avocado toast, for lunch on top of a salad, and for dinner tossed into a wrap or served with roasted veggies. Oh, and I also love them for a snack, straight from the fridge (yes, cold!) slathered in hummus. So unbelievably satisfying.
For those of you who can’t tolerate beans you will be happy to know these veggie cakes don’t have a bean in sight. In fact, I think this might be the only bean-free veggie patty on my entire blog! The quinoa provides a complete protein source and gives them a wonderful chewy texture at the same time. The oven bakes them up golden and crispy – no frying required. I also made the recipe gluten-free, soy-free, and nut-free so almost anyone can enjoy these delightful crispy cakes. Whether it’s breakfast, lunch, snack time, or dinner, they make a great addition to any meal. Just don’t be surprised if your favourite way to enjoy them is straight from the baking sheet…
Crispy quinoa cakes packed with vegetables like kale, sweet potato, sun-dried tomatoes, and more! Enjoy these as part of breakfast, lunch, or dinner. They are great with roasted home fries and avocado toast, on top of a salad, in a wrap, or enjoyed all of their own. It's important to make sure the vegetables are finely chopped for this recipe. If the pieces are too large, the patties won't stick together as well. Recipe inspired by Vegetarian Times .
Yield 1 dozen cakes
Prep Time 25 Minutes
Cook time 25 Minutes
Total Time 50 Minutes
Ingredients:
1 1/2 cups cooked quinoa
2 tablespoons ground flax + 6 tablespoons water
1 cup destemmed and finely chopped kale
1/2 cup rolled oats, ground into a flour (use certified gluten-free if necessary)
1/2 cup finely grated sweet potato
1/4 cup finely chopped oil-packed sun-dried tomatoes
1/4 cup sunflower seeds
1/4 cup fresh basil leaves, finely chopped
2 tablespoons finely diced onion
1 clove garlic, minced
1 tablespoon runny tahini paste
1 1/2 teaspoons dried oregano
1 1/2 teaspoons red or white wine vinegar
1/2 teaspoon fine grain sea salt, or to taste
3 tablespoons gluten-free all-purpose flour (I used King Arthur) or regular all-purpose flour
red pepper flakes, to taste
Directions:
Preheat oven to 400°F. Line a large baking sheet with parchment paper.
Mix the ground flax and water in a small bowl and set aside for 5 minutes or so to thicken.
Combine all ingredients together in a large bowl, including the flax mixture and the 1.5 cups cooked quinoa. Stir well until the mixture comes together. Don't forget the flour because it helps bind the patties.
Shape mixture into 1/4-cup patties with wet hands. Pack tightly so they hold together better. Place on baking sheet.
Bake for 15 minutes, then carefully flip cakes, and bake for another 8-10 minutes until golden and firm.
Cool for 5 minutes on the sheet and then enjoy!
Store leftovers in a container in the fridge for up to 5-6 days. To reheat, preheat a skillet over medium heat, add a bit of oil, and cook patties for about 3 minutes per side, or until heated through.
Tips: 1) To cook quinoa, rinse 1 cup uncooked quinoa in a fine mesh strainer. Place quinoa in a medium pot and cover with 1 1/2 cups water. Bring to a low boil, reduce heat to medium-low, and then cover with a tight fitting lid. Simmer covered for 14-17 minutes until most of the water is absorbed and the quinoa is light and fluffy. Remove from heat, fluff with a fork, and then place lid back on to steam for another 4-5 minutes. Note that this makes almost 3 cups of cooked quinoa and you only need 1 1/2 cups for this recipe, so you will have leftover quinoa (which is never a bad thing if you ask me!).
2) To make oat flour, add the oats into a high speed blender and blend on the highest speed until a fine flour forms. You can also use store-bought oat flour if desired.


")
")
")


 Print This Recipe

")
")
")