
Not all resolutions need be serious. In fact, we are 100% behind fun (& funny) goals. And what's funnier than butts? Charles Vestal resolved to draw one rear a day for all of 2016, and we're on the edge of our seats.
Shh.listen
Shared posts
12 Jan 15:39

A Resolution to Draw a Butt a Day is Something We Can Get Behind — Design News
by Tara Bellucci
11 Jan 21:18
10 Ways to Help Your Kitchen Recover From the Busy Holiday Season — The Kitchn
by Apartment Therapy
Shh.listenThe dishwasher deep clean!

11 Jan 21:14

Danish Brand Hay Pops In at Nordstrom — Design News
by Tara Bellucci


Say hey to Hay: The Danish home brand with a cult following is popping up at select Nordstrom stores and online.
11 Jan 20:25

My Home Intentions for 2016 (That Might Work For You, Too)
by Eleanor Büsing

Mid-January is about the time I usually get around to making resolutions, goals, intentions, or what-have-you for the year ahead. Right after New Year's I'm often too tired, jet lagged, hungover, or busy to deal with self improvement, but by this time I've managed to take stock of the past year and lay some blueprints for the next one. Read on for my home-specific plans for the next 12 months.
Arcelia likes this
11 Jan 20:11
swiss chard pancakes
by deb

... Read the rest of swiss chard pancakes on smittenkitchen.com
© smitten kitchen 2006-2012. | permalink to swiss chard pancakes | 125 comments to date | see more: Freezer Friendly, French, Pancakes, Photo, Swiss Chard, Vegetarian, Weeknight Favorite
arzakcoper, Cat B and 3 others like this
07 Jan 19:02


Garlic Chicken with White Wine Sauce
by Elise
Shh.listenmmMMMmmMMmmMmMmm
Do like garlic? Do you like chicken? Then you’ll love garlic chicken, a classic recipe of chicken parts that have been browned in olive oil, then cooked with white wine and garlic. It’s also known as “40 Clove Chicken” because that’s how many garlic cloves you’ll use to make the dish.
So, crazy right?
Continue reading "Garlic Chicken with White Wine Sauce" »
06 Jan 16:37
decluttering resolutions for a new year.
by erin
Shh.listenYes yes yes yes!
 In a tiny apartment or otherwise, let’s all agree that the excess of the holiday season followed by the promise of a new year creates perhaps the perfect incentive for paring down, reevaluating our homes, and kicking bad habits to the curb. Clear out the pine needles, sure, but then I say, take a look at the other things that have also fluttered into your space in the last year and decide whether they’re deserving of the space they’re taking up.
Decluttering, a term that I’m fairly certain my grandmother would ask for a definition of, is all the rage; thank goodness and no surprise. Faced with a near endless opportunity to fill our homes with ever more, there’s been a shift in the zeitgeist and people are beginning to yearn for less.
For me, true decluttering doesn’t mean finding new spaces to store old things; it means giving all of your spaces—visible and hidden—a bit of breathing room free from anything at all.
I have a chapter devoted to the subject in Simple Matters, but since we’ve got a few days yet ’til that makes its debut, here are four quick resolutions for embracing right away:
1. Use up what you have.
Doesn’t matter if it’s peanut butter in the jar, shampoo in a bottle, milk in a jug, notecards in a desk drawer, or pens in your pocketbook, use up what you have before buying anything new. One of the biggest sources of clutter that I notice in people’s homes comes from an impulse to stockpile. It stems from an urge to buy something—anything—new, or forgetfulness about what we already have, or reluctance to rustle up what we’ve stashed into hiding, but whether it’s undrunk tea or unworn sweaters, or duplicate moisturizers, I’ve got a hunch that making a commitment to use what we already have before adding anything new to the mix could be the biggest game changer in the quest for a clutter-free home. I’m embracing this with particular gusto this year. Hunk of beeswax waiting to be made into candles? Melted and poured. Notecards not yet sent? Written and mailed. Sea salt hair mist in the cabinet? Used with enthusiasm every morning.
Where to start? Your bathroom. Finish the last drop of your shampoo, use your soap until the last sliver slips down the drain, resist the urge to buy the new face mask until you’ve used the one you already heave. If there’s something lurking in the cabinet that’s so heinous that you can’t use it up. Let it go. As I write in my book, it’s gone already. Once everything is finished, start fresh. Buy things one at a time. If you’re like me, it will mean reveling in the newness when you need to restock and enjoying a clutter-free bathroom (fridge, cabinet, stationery drawer, etc.) the rest of the time.

2. Clear your surfaces.
It’s the clutter, perhaps, that comes to mind when you think of the term: The trinkets and baubles and tchotchkes that can make a space feel cramped and crowded when allowed to run roughshod over otherwise smooth dresser tops and counters and kitchen tables.
Where to start? Your bedroom. Take every solitary thing off your dresser (or desk or night table). When you’ve got the pile in front of you, decide what you want to put back in those places. Chances are it won’t be the pile of mail or the spare car keys or the coffee cup you came home with on your morning walk with the dog. Only put back what you really want to look at all the time. Then decide whether what’s left is worth making a space for elsewhere, or whether it’s time to send it on out, never to return.

3. Throw away your trash.
Or recycle it. Or donate it. The point is that many of us keep things in our homes that we were never meant to hang onto in the first place: junk mail and packaging and freebies that are better left behind. I’ll have more to say on the subject later in the week, but these things create visual clutter and take up precious real estate.
Where to start? With five minutes. Take five minutes to scan a room. Gather anything visible that you see that looks like trash: cereal boxes left out on the counter, catalogs that came in yesterday’s mail, advertising stickers still stuck on your stereo, receipts and warranties and brochures left lingering. Make three piles: one for things that can be immediately recycled, one for things that could be decanted or unpacked or otherwise made to feel more like a part of your home and less like a part of the corner store, and one for things that need to be dealt with. Then deal. Not tomorrow, today. We’ve taken to hanging a large clip on the wall next to our door. We use it as a place to leave each other notes, hang up out-going mail, or pin up things that need to be dealt with before they spiral out of control. The relatively small size keeps us from creating an ever-growing pile, and the visual reminder near the door means we’re more likely to take care of what we put there.

4. Pick and choose.
I understand that not everyone is in the mood or mindset for a wholesale rejection of material goods. No need to strip the place bare, I suppose. But if you’re finding yourself overwhelmed in your space—or not enjoying what you have—try, at least, to pack some things away for awhile. If there’s one thing I’ve learned from living in even very tiny spaces, it’s that there’s almost always a place to stash something. So if the pile of books on your nightstand is making you feel crazy, but you find that you’re unable to part with any for good, pile up the ones you’re not reading and tuck them into a place for safe-keeping.
Where to start? Seasonally. I have a collection of small books—poetry and essays mostly—that I realized I was keeping tucked into the crate I use for my nightstand, but never really reading. This fall, I decided I’d leave just one book out at a time—I replaced David Sedaris’s Holidays on Ice with Oliver Sack’s Gratitude for January and that will be swapped out for Pablo Neruda’s Love Poems in February, and so on and so forth. This doesn’t just work for books. I have a small collection of antique glass bottles that I love, but I’d feel claustrophobic if I left them displayed all the time. Instead, I bring them in and out of rotation depending on the particular twig or flower stem I’m in the spirit to display.
What about you guys? On a decluttering kick or very much pleased with your clutter thankyouverymuch?
04 Jan 23:07
Smoky Cauliflower Steaks With Orange and Herb Quinoa
by A Beautiful Mess
Have you guys had cauliflower steaks yet? There's a great restaurant near our new house that sometimes has this cauliflower steak and bean dish on the menu, and it's awesome! I have no idea what their recipe is. And this isn't exactly modeled after theirs, mainly because it's been a while now since I had it. BUT, it is cauliflower steaks. And it is delicious. Actually I can't decide which I like better in this dish: the cauliflower or the quinoa.
We're gonna roast our cauliflower in a smoky, slightly sweet sauce. It's kind of like a quick homemade BBQ sauce. Kind of. And then the quinoa gets sautéed with butter, olive oil, orange zest, garlic and parsley. I don't know what it is but something about the orange and kind-of-sort-of BBQ sauce just works for me! But you could also serve this quinoa alongside all sorts of other main dishes and it would be plenty fun.
Now I must admit that this particular meal takes a bit of prep and uses 2-3 pots/pan along the way. It's not a one-pot dinner, but I think you'll find that it's totally worth the extra 2 minutes of clean up. :)
Smoky Cauliflower Steaks With Orange and Herb Quinoa, serves two.
1 head of cauliflower
1 tablespoon ketchup
1 tablespoon soy sauce
1 tablespoon molasses
1 teaspoon liquid smoke
1 teaspoon apple cider vinegar
1/8 teaspoon cayenne
2 cups cooked quinoa
2 tablespoons butter
1 tablespoon olive oil
zest from one orange (about 1 tablespoon)
2 cloves garlic
1 tablespoon chopped fresh parsley
salt and pepper
For the cauliflower steaks, first cut the head so that you have 2-3 "steaks" from the center. You will have extra cauliflower florets from both sides, which you can either cook alongside the steaks now or save for another meal. I usually save them for another meal and just cook the two steaks if my cauliflower head was fairly large to begin with, but this is up to you. Not all cauliflower heads are going to be the same size, so just think about how much you want to serve per serving here.
Blanch the cauliflower in boiling, salted water for 8-10 minutes until softened. Drain and pat dry. In a small glass bowl stir together the ketchup, soy, molasses, liquid smoke, vinegar and cayenne. Place the cauliflower on a baking sheet lined with parchment paper or a baking mat. Brush 2/3 of this mixture over the cauliflower and bake at 375°F for 15-18 minutes. The cauliflower will release moisture (from the vegetable but also from the blanching process). So at this stage carefully dab some of that up with a paper towel, then brush with the rest of the sauce and bake for another 5-6 minutes.
While all of that is going on, make your quinoa. Lately I've been cooking my quinoa in a rice cooker as it just makes everything super easy. But if you don't have a rice cooker, just follow the directions on your quinoa package.
Once cooked, sauté in a pan over medium/high heat with the butter, olive oil and chopped garlic. Cook for 1-2 minutes, then add the orange zest. Cook for another 1-2 minutes. Then stir in the parsley. Taste and add salt and pepper as needed.
Once it's all ready, plate it up and enjoy! In this photo I really have more like two servings on one plate as I was eating this for lunch one day and didn't bother saving Trey any. Ha! But I wasn't able to finish it all, not even close. So I'd stick to the two servings here.
Am I over explaining my photos? Yes, yes I am. OK. I'll stop now. Enjoy! xo. Emma
Credits // Author and Photography: Emma Chapman. Photos edited with A Beautiful Mess actions.

28 Dec 15:25
Slow Cooker Split Pea and Lentil Soup
by A Beautiful Mess
Soup doesn't get praised enough. When it's cold outside, there are few things more comforting than a big bowl of hot soup. I really love the soup I'm sharing with you all today because it's a thick and creamy kind (although there's no actual cream in it).
This split pea and lentil soup is hearty! You don't have to serve it alongside anything if you don't want to. I ate this for lunch two days in a row (it's good! but also this recipe makes a lot) with just a few pieces of whole grain toast that I tore up, so I guess they were kind of makeshift croutons. :) I also think a small bowl of this along with a salad or a grilled cheese would be amazing too.
Slow Cooker Split Pea and Lentil soup, makes 6-8 servings.
1/2 yellow onion chopped (around 1/3 to 1/2 cup)
4 cloves garlic
1 tablespoon olive oil
1 cup chopped carrots
2 small to medium russet potatoes, peeled and chopped
8 oz. split peas
8 oz. lentils
1 bay leaf
1/2 teaspoon oregano
1/4 teaspoon cayenne
7-8 cups vegetable stock
salt and pepper
Sauté the onions and garlic in the olive oil until they begin to turn brown and caramelize. Remove from heat. In a large slow cooker (where I'm from we call 'em crock pots—but that kind of sounds less appetizing, right?), combine the cooked onions and garlic, chopped carrot, chopped potatoes, split peas, lentils, bay leaf, oregano, cayenne and 7 cups of vegetable stock.
Yep, you pretty much just dump it all in there and then set it to high for six hours. If you want to give it a creamier texture, you can blend it with an immersion blender or in batches in a good blender. Remove the bay leaf before you do this. Taste and add salt and pepper or even a bit more cayenne if you want more heat.
I think this tastes even better the next day warmed up! It will get quite thick, so you can thin it out with more stock or water as you reheat it.
I didn't end up freezing any of this batch, but I have a feeling it would freeze well if you don't need this many servings and don't want it two days in a row. Up to you here! Personally, sometimes I like having the same thing to eat the next day. It sort of feels like someone laid out my clothes for me. :) If that even makes sense. Ha! Anyway, enjoy and make some soup soon, guys. It's getting cold! xo. Emma
Credits // Author and Photography: Emma Chapman. Photos edited with A Beautiful Mess actions.
22 Dec 14:34
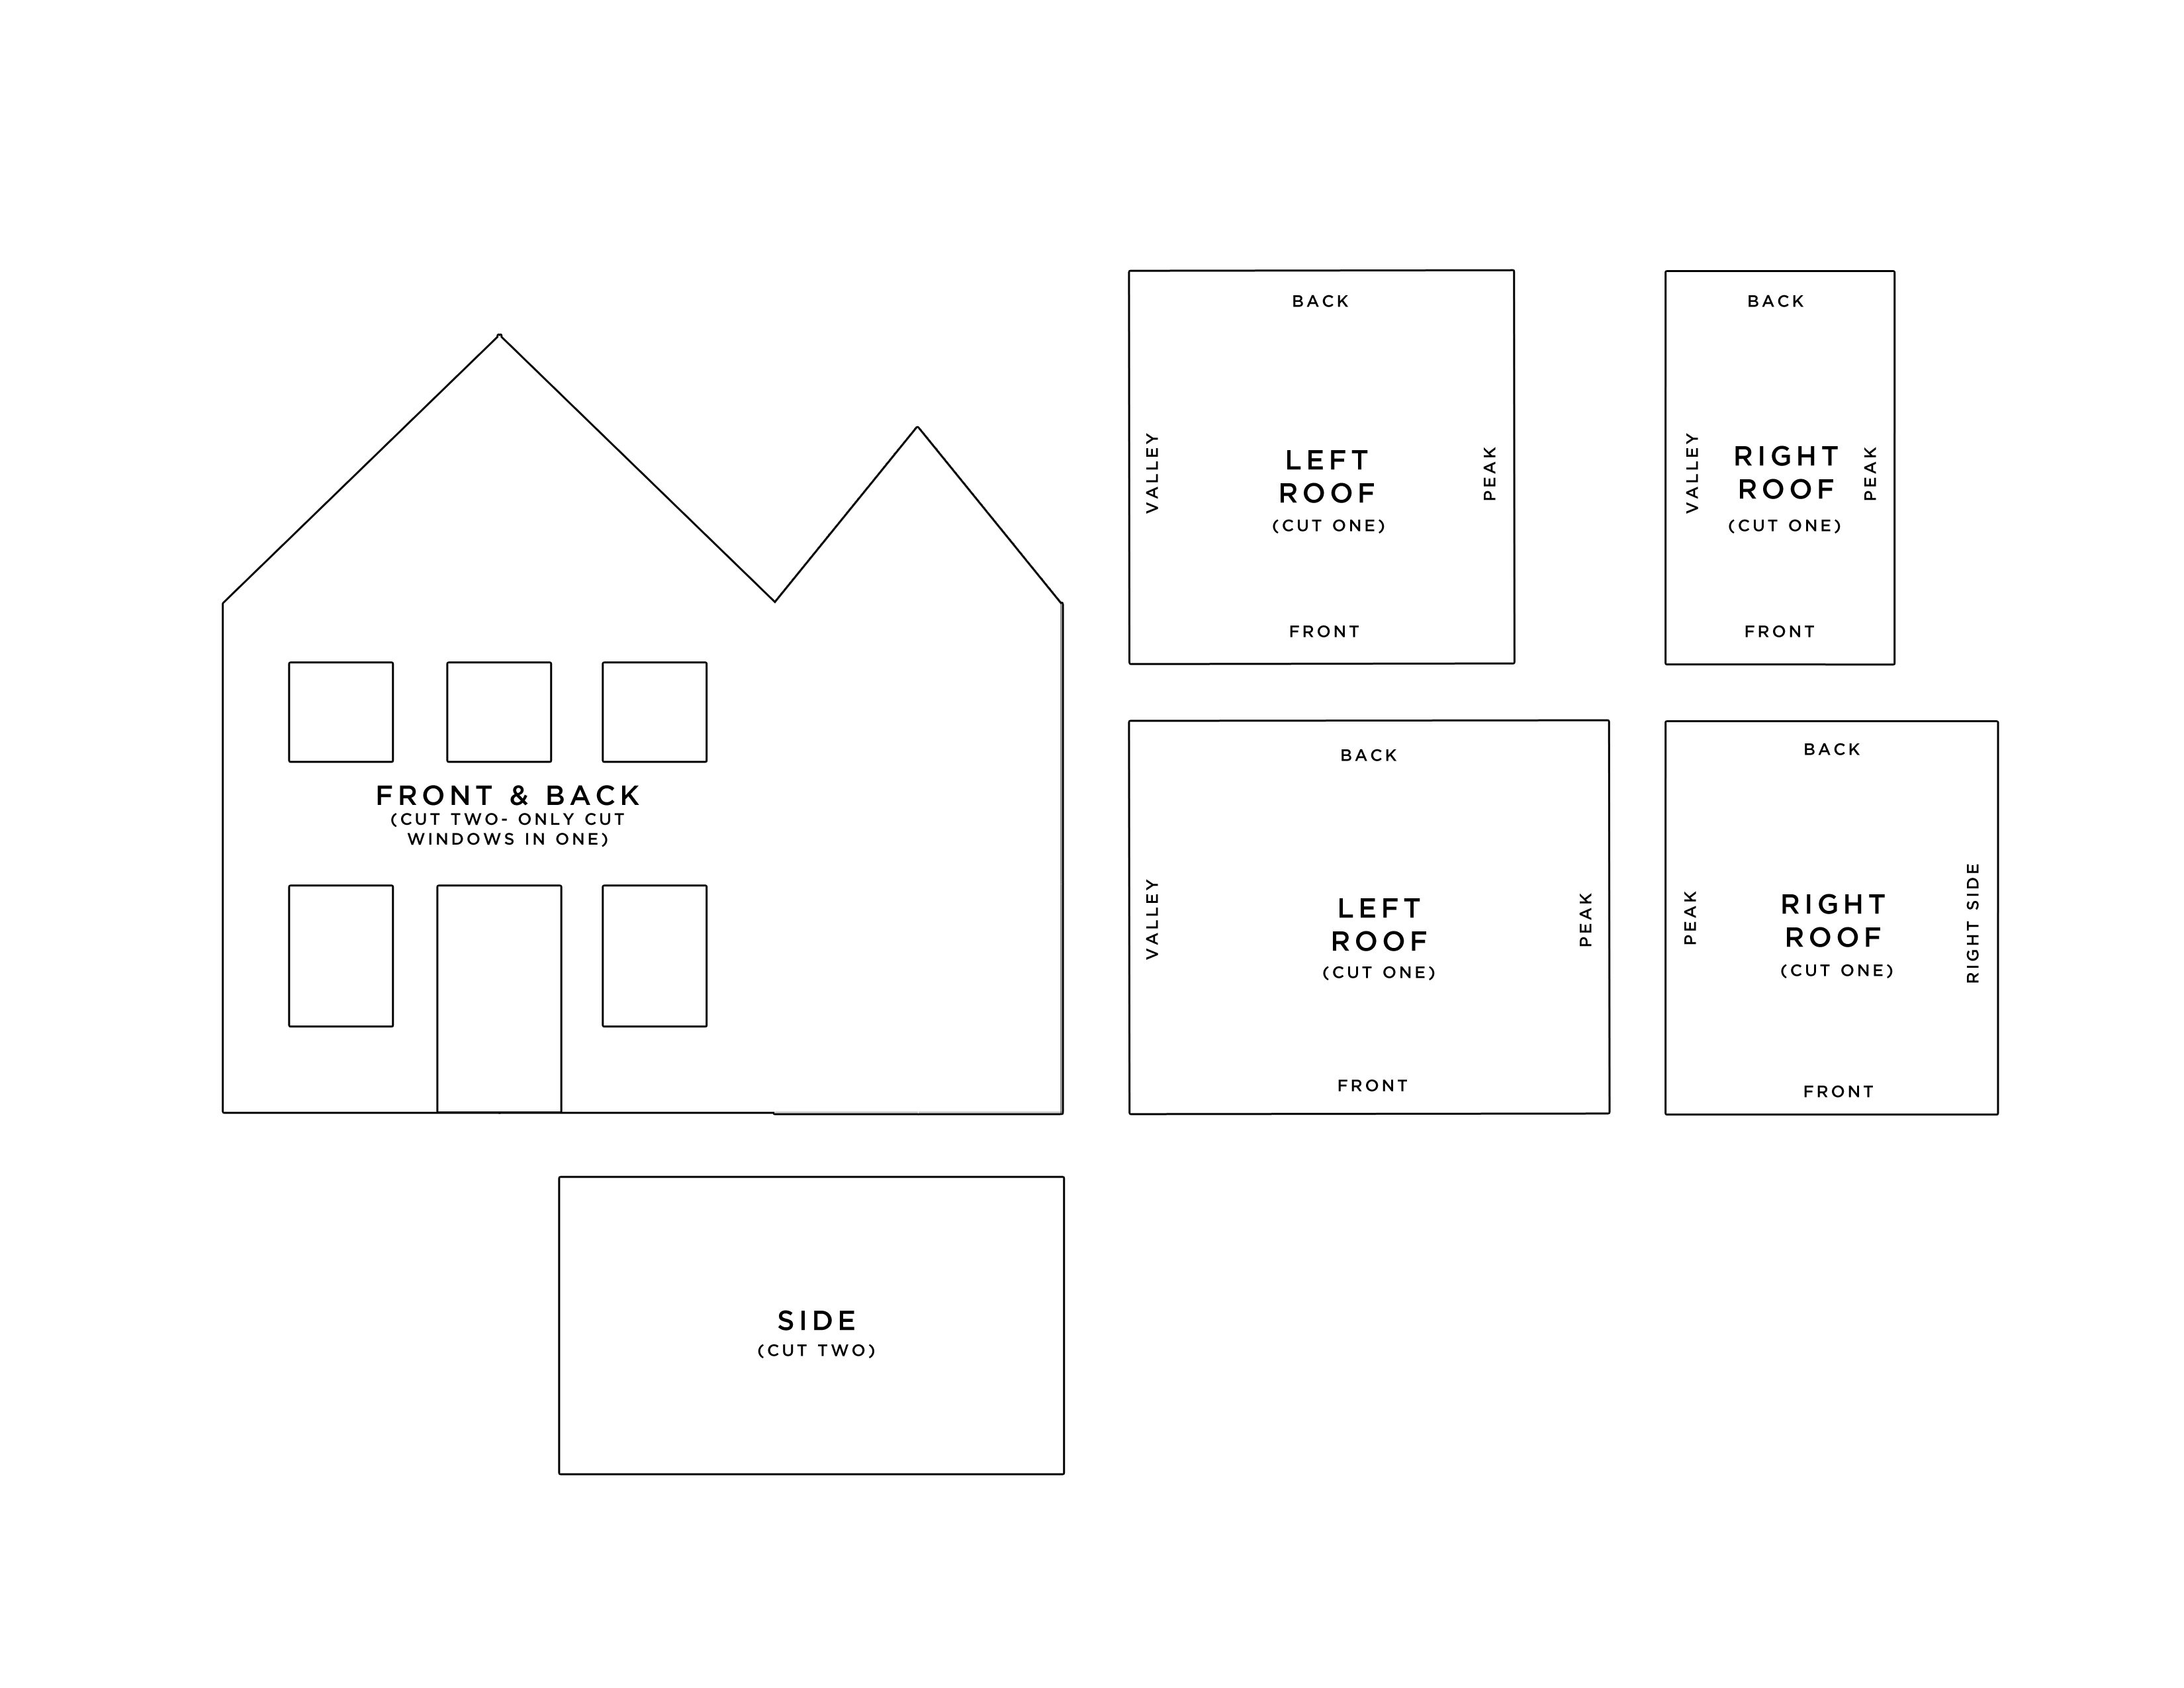
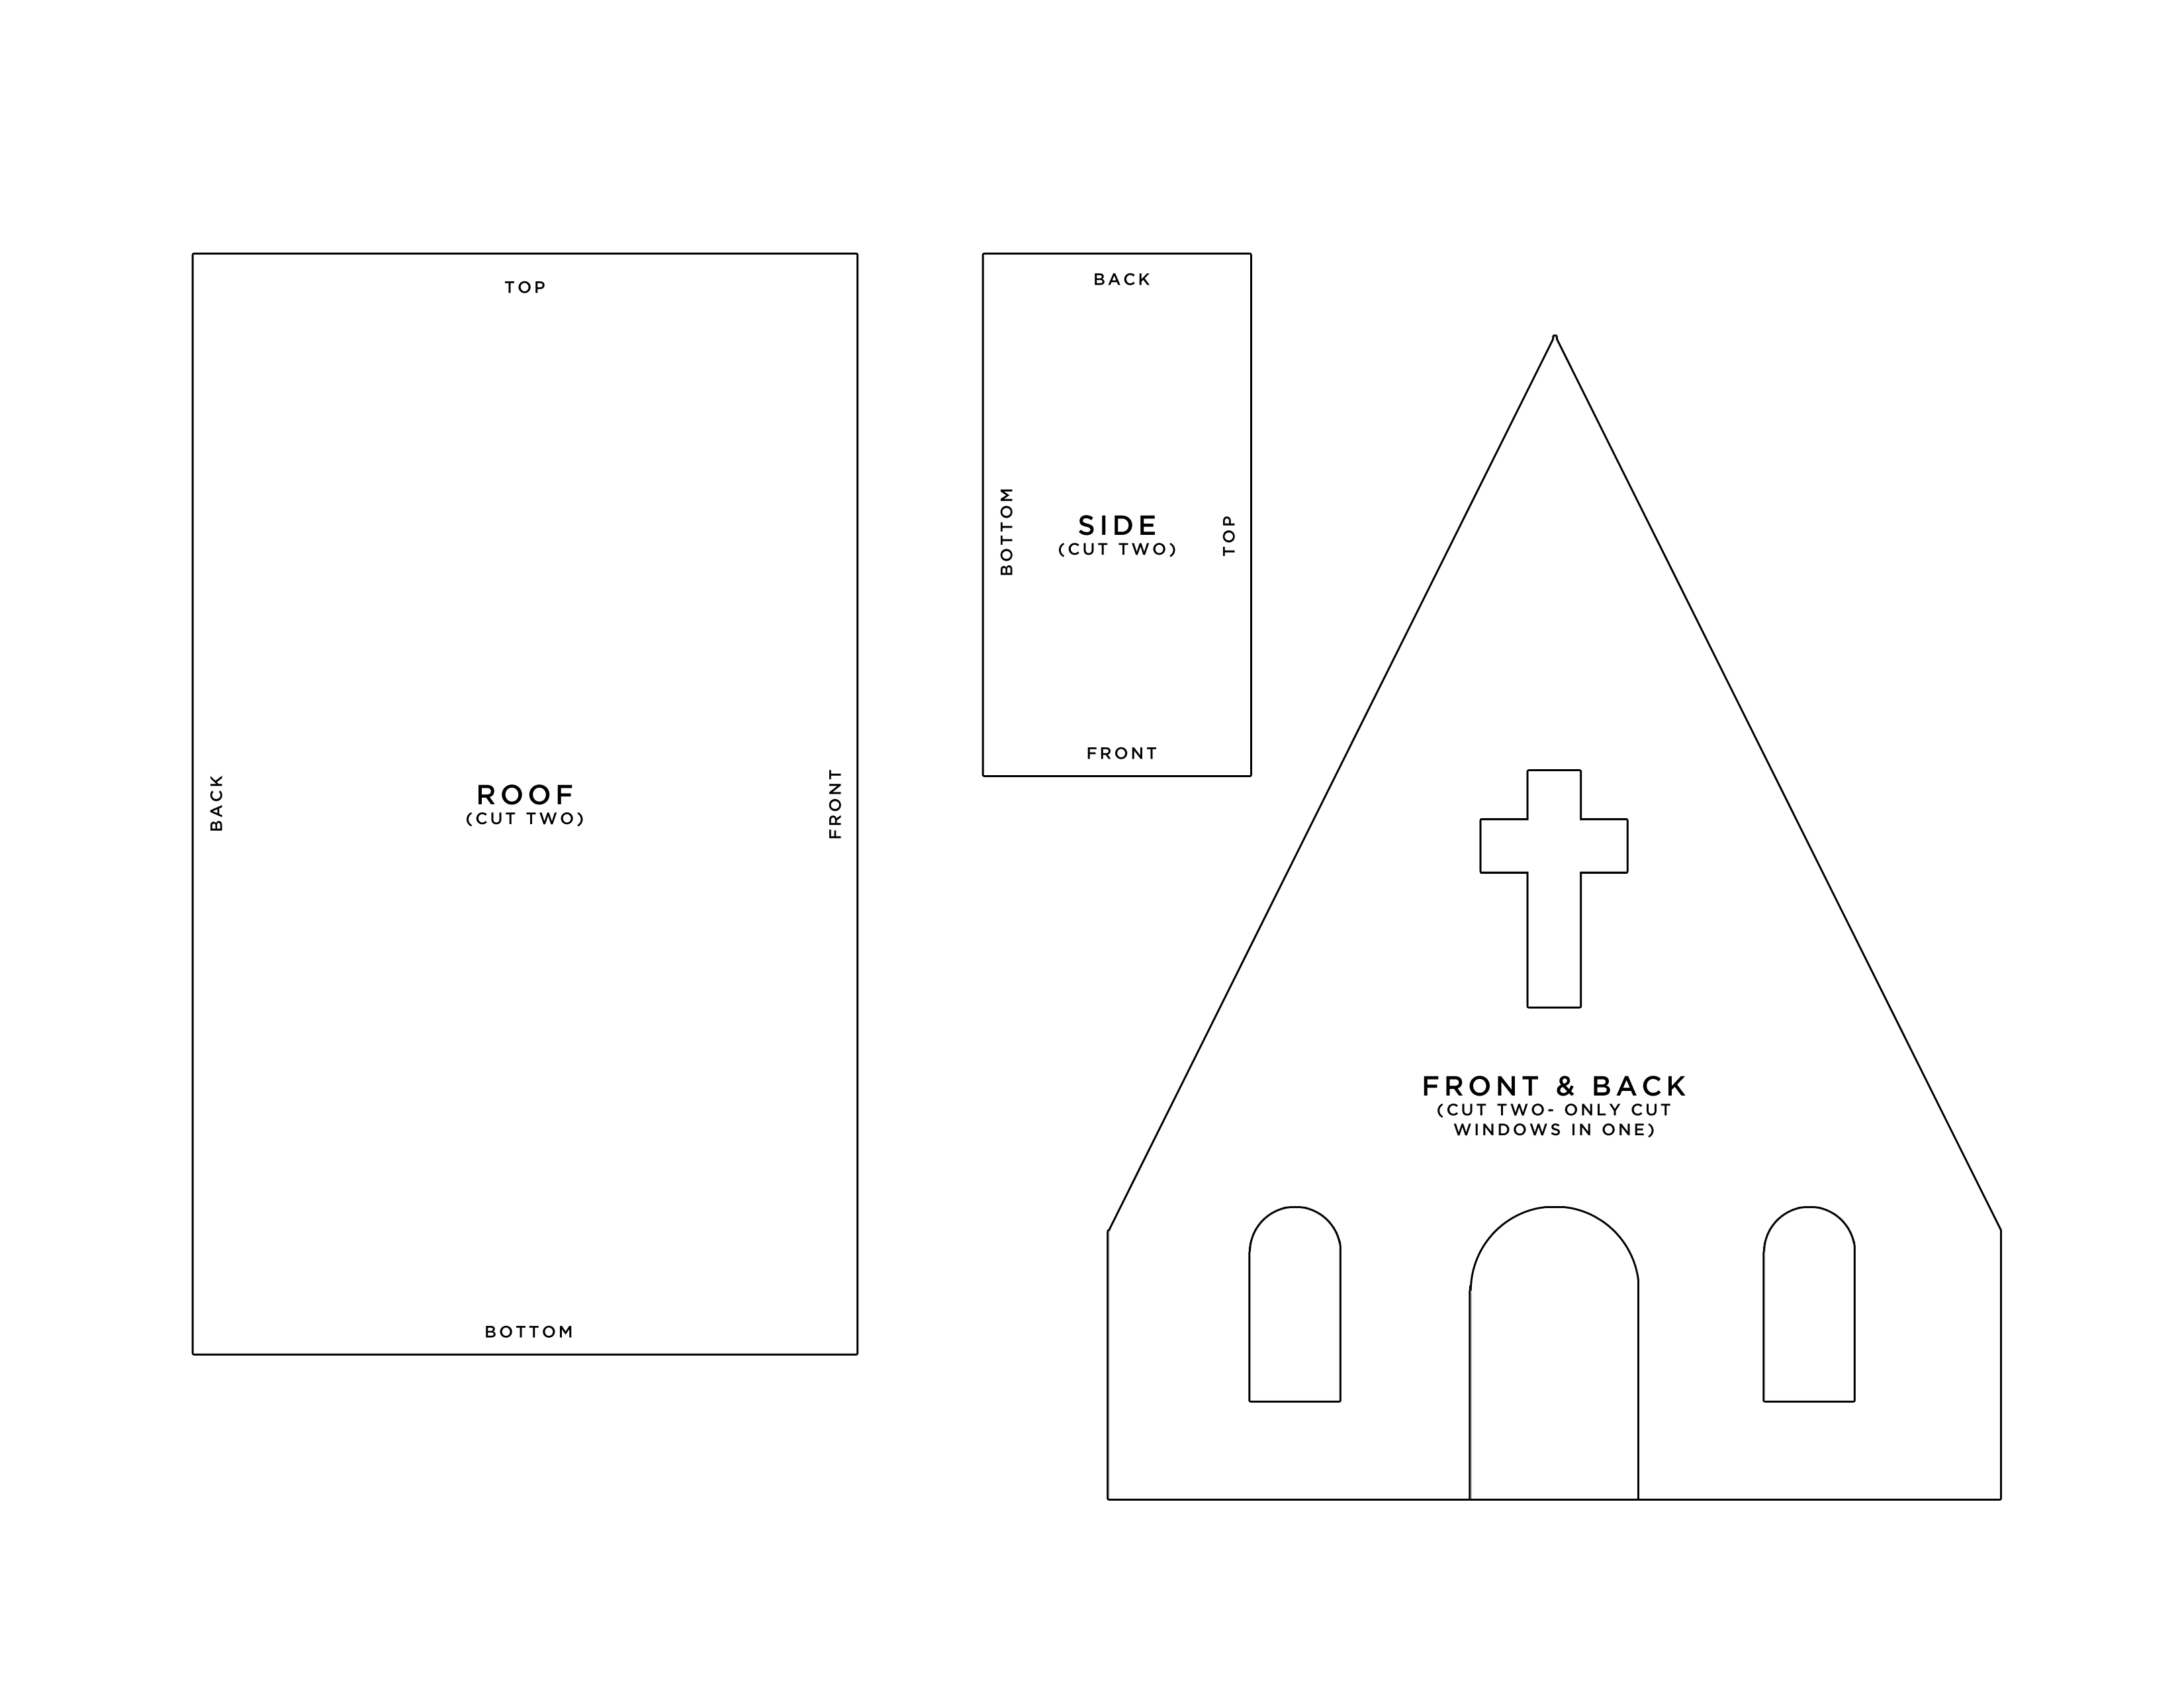
Salt Dough Cookie Village
by A Beautiful Mess
Who can resist the charm of gingerbread houses for the holiday? The problem is, sometimes I can't resist the candy decorations either. I thought I'd skip the temptation all together by making a village of salty houses—no temptation there! These buildings pack the charm of vintage putz villages with the oven-baked look of gingerbread. And you can use them year after year! (I'm always so devastated at the thought of throwing away a beautiful gingerbread house.)
These salt dough homes can be dyed any color you choose, or left a natural flour color. Of course, I chose pink, but wouldn't an aqua blue village be beautiful, too?
Materials:
-2 cups flour
-1/2 cup salt
-3/4 cup water
-acrylic paint in colors of your choice
-parchment paper
-caulk
-quick grab tacky glue
-glitter (optional)
Tools:
-rolling pin
-parchment paper
-cookie sheets
-oven
Use these templates, or get extra creative and design your own little cookie homes. Click the links below and print the images without resizing them. Then trim and use!
-Large House
-Small House
-Church
Step One: Make your salt dough. Mix 2 cups of flour with 1/2 cup of salt. Then stir in 3/4 cup of warm water. The dough will require kneading to come together like a dense cookie dough. If you'd like to color your houses, then mix in acrylic paint as you make your dough. You can knead in extra paint later to make portions of your dough more brightly colored than the rest.
Step Two: Roll out the dough into 1/8 inch thickness and place on parchment paper. Then use the templates as guides to cut out each piece needed to make the buildings. I used an X-Acto blade with a cutting mat under the parchment paper, but you can use whatever kind of knife or metal scraper you have to cut out the shapes.
Step Three: Bake the cookies at 200ºF for 2-3 hours until hardened. I made the mistake of baking my cookies at 300º to begin with, and they puffed up like crackers. Don't do that! Keep the heat low to avoid any puffing. Be sure to keep parchment paper under the cookies while baking, or they will stick to your cookie sheets. (Another lesson learned! This was my first time using salt dough. So many lessons learned!)
Step Four: Use quick grab tacky glue to assemble the building parts. Use tape if necessary to hold the pieces together as the glue dries.
Step Five: Fill any gaps and decorate the roofs of the buildings with caulk. That's right—caulk! It acts like icing without any of the edibility. You need to work quickly when using caulk, though, because it gets goopy quickly. I sprinkled mine with glitter just after applying the caulk.
I placed battery-powered tea lights inside of my little homes to create an enchanting glow on my dining room cabinet. I'll have to carefully pack them away after Christmas, and then make a couple of new ones to add to the village next year! -Mandi
Credits // Author and Photography: Mandi Johnson. Photos edited with A Beautiful Mess actions.
Shh.listen likes this
22 Dec 14:29
free gifts, fifty ways.
by erin
 The best things in life are free. So instead of getting caught up in finding the perfect something to give during the holidays, I think it’s kind of nice—if slightly offbeat—to think of the resources that we have right under our noses: the kindnesses and favors and generosities-of-spirit that, in all honesty, might mean about a million times more than a new pair of socks or earrings (nice though socks and earrings might be).
Giving a free gift doesn’t have to be an exercise in Scroogey asceticism. Carefully planned, thoughtfully described, and tenderly given—maybe even with a bow on top—a free gift might be an offer of help, a gesture of kindness, a promise for accompaniment somewhere special (or hard).
My top fifty ideas for friends and family, below. Specifics, unimportant. Mix and match, etc.
Give a foot rub to your son.
Accompany a sister on a long walk.
Read aloud a favorite book to your wife.
Make a playlist for your husband.
Give a hand massage to your sister.
Write a love note to your brother.
Share a secret recipe with your mother-in-law.
Volunteer to pet sit for your neighbor.
Reorganize the coat closet for your wife.
Label the linen closet shelves for your family.
Donate a stack of books for your grandpa.
Reindex your mom’s digital photo collection, according to her preferences.
Turn down the covers for your wife.
De-pill every sweater in your daughter’s drawer.
Plan a garden with your spouse.
Get your kid’s passport paperwork in order.
Scrub out your husband’s garden pots.
Configure your dad’s new hard drive.
Clean your mom’s oven.
Shovel the neighbors’ walk.
Teach your babysitter how to knit.
Babysit your friends’ kids.
Teach a friend to play the piano.
Offer a head massage to your husband.
Prune your mom’s apple tree.
Hang a shelf for your grandson.
Scrub the bathtub, without being asked.
Loan a friend your car.
Teach a niece to skip rocks.
Do your aunt’s grocery shopping.
Plan a week of meals for your sister.
Lend your power drill to your daughter.
Update the address book.
Draft a running plan for a newbie runner.
Give your son a sewing lesson.
Teach your brother how to pickle.
Share your sourdough secrets with your uncle.
Take a friend to your favorite foraging spot.
Record family stories.
Vacuum out your father-in-law’s car.
Help your daughter master the harmonica.
Pass along a cutting from your houseplant.
Tutor your co-worker in a foreign language.
Teach your friend how to make a button hole.
Show your grandson how to darn socks.
Sing an aria for your grandma.
Tune your brother’s guitar.
Pass down a cookie recipe to your nephew.
Teach a cousin a card trick.
Show your granddaughter how to chop wood.
Need more ideas?
Holiday Gifts, Two Ways
Holiday Gifts for Kids, Two Ways
Simple Gifts, Two Ways
Any to add? To the comments!
21 Dec 14:46
DIY New Year’s Eve Headband
by Sarah

Is it just me, or can you believe that it’s almost 2016?! Between all our travel and big move this year has really flown by. If you’re hosting or attending a New Year’s party here’s just the accessory you need. Or if you’re just hanging out at home with some close friends, that’s no excuse to not wear sequins, right? So skip the party store and DIY some sparkly New Year’s Eve headbands for you and your friends. Because sparkly things are really the best part of New Years celebrations, right?

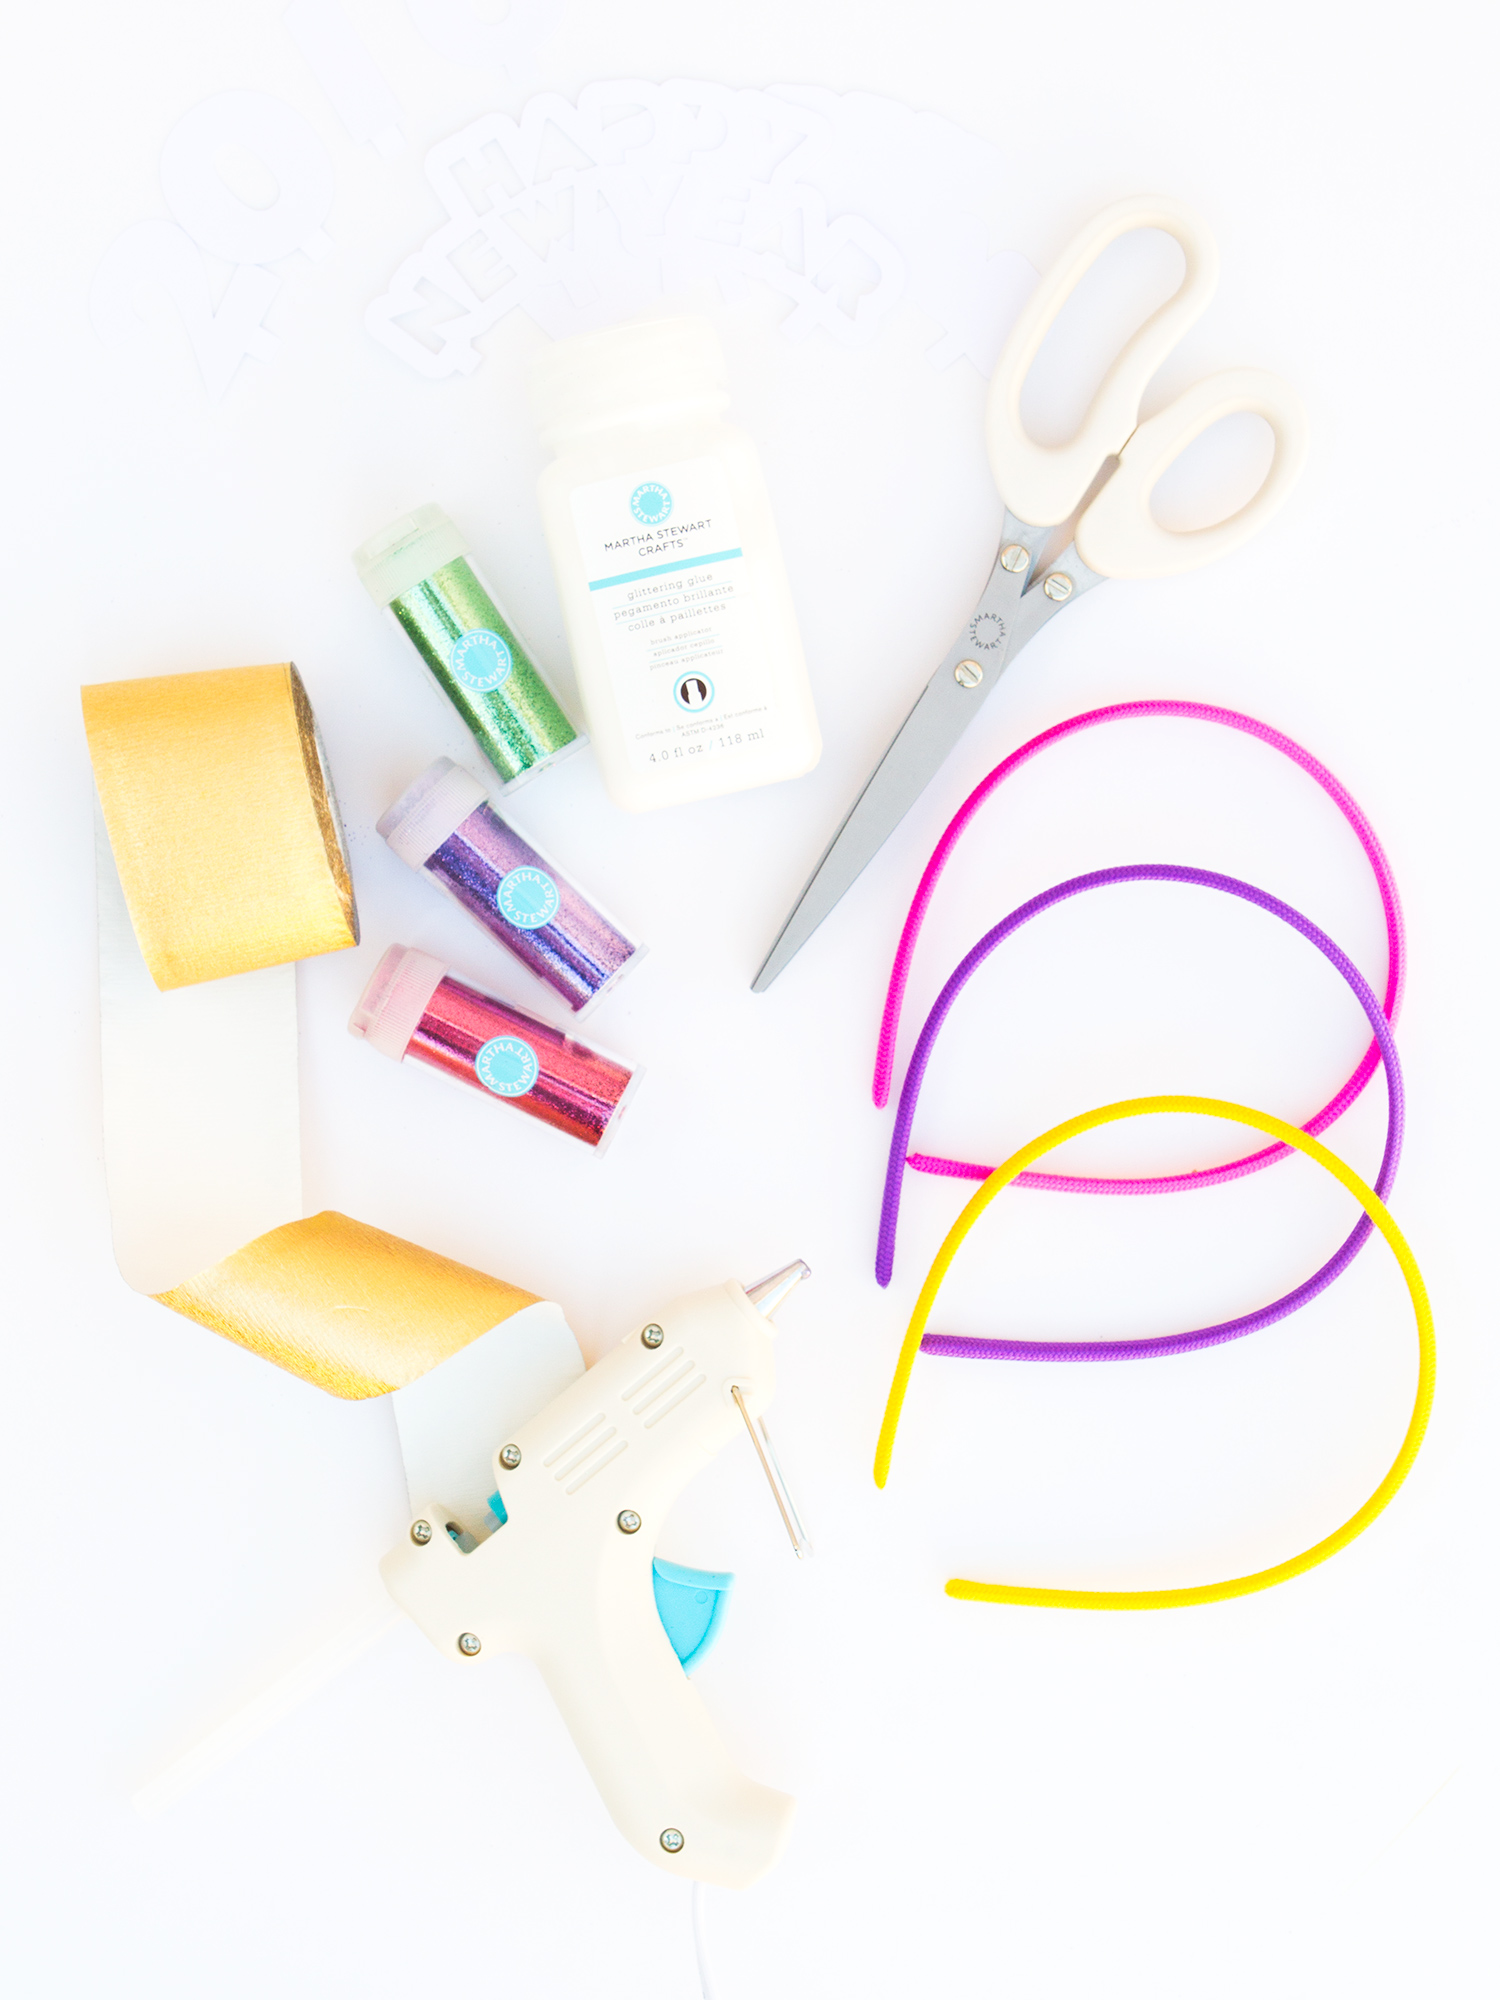
DIY New Year’s Eve Headband
Supplies: 2016 template / headbands / gold streamers / fringe scissors / glue gun / cardstock / glitter / glittering glue
Time: 20 minutes
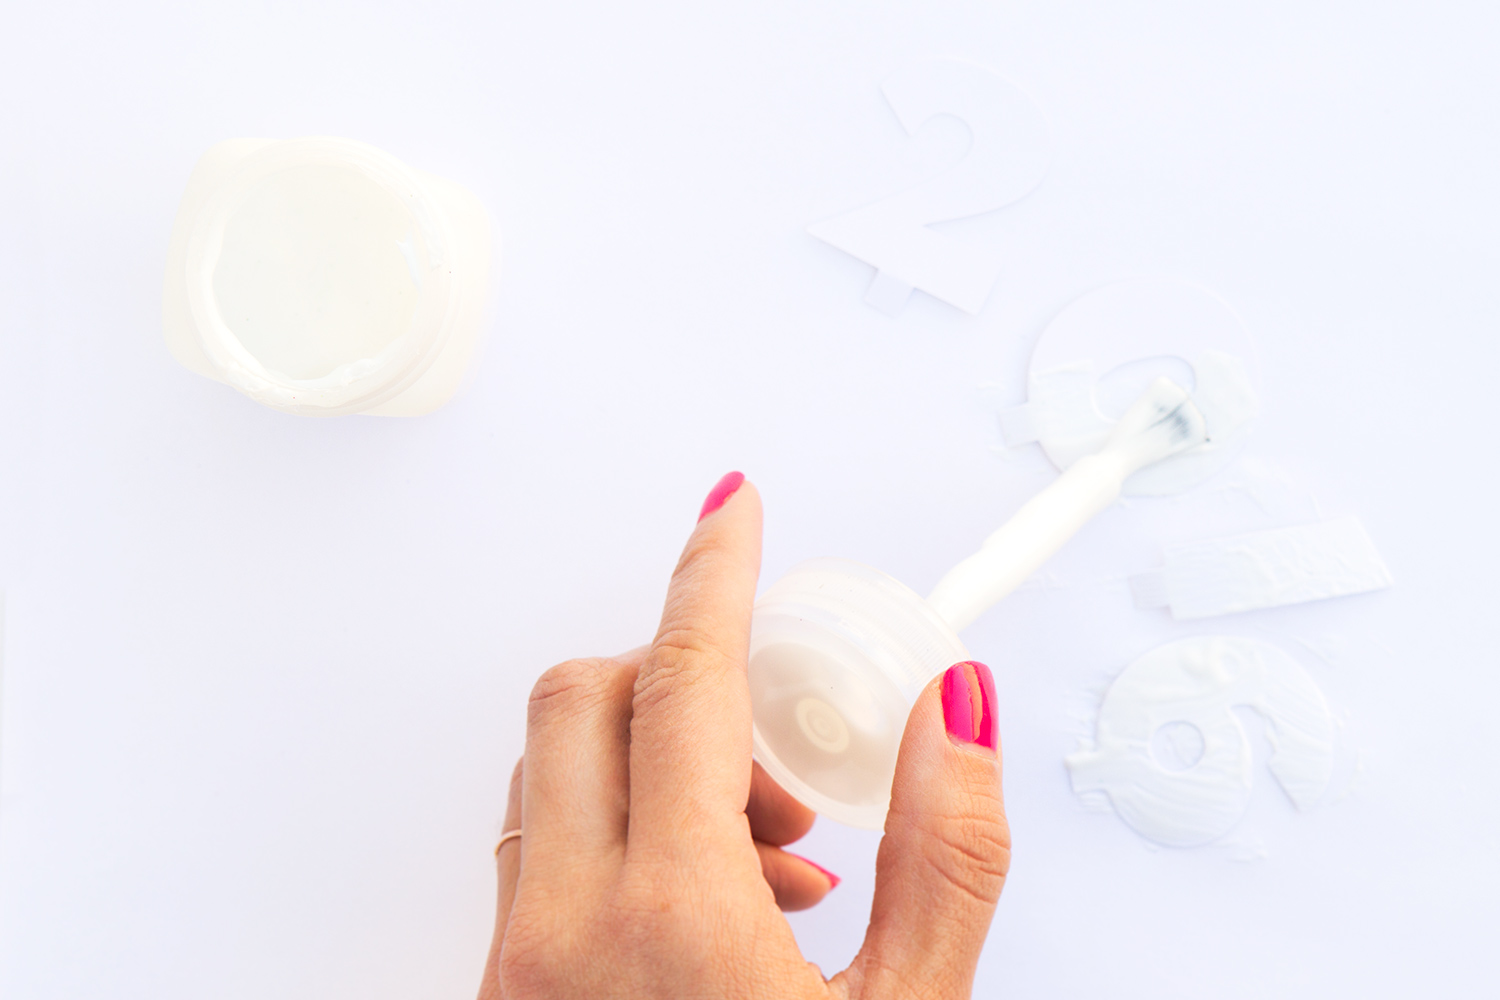


- Download the 2016 template. Print it out on cardstock and cut out with scissors, or if you have a Silhouette Cameo you can easily cut it out with that.
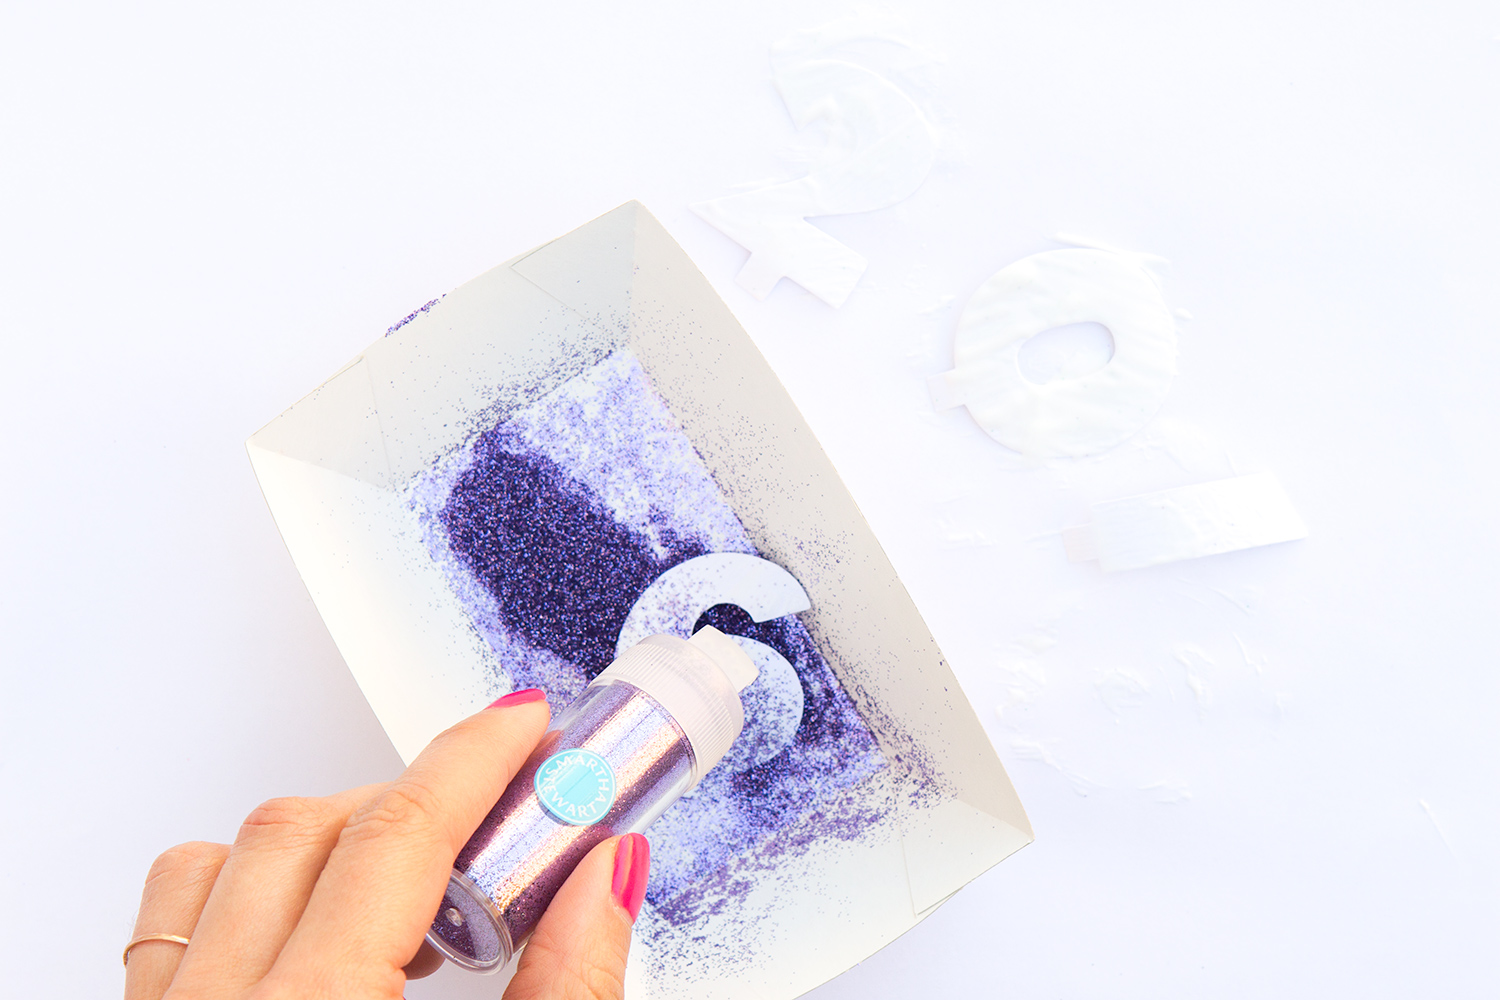
- Cover the entire front side of each number or background shape in glittering glue.
- Sprinkle each number or background piece with glitter. Shake of the excess and allow it to dry.
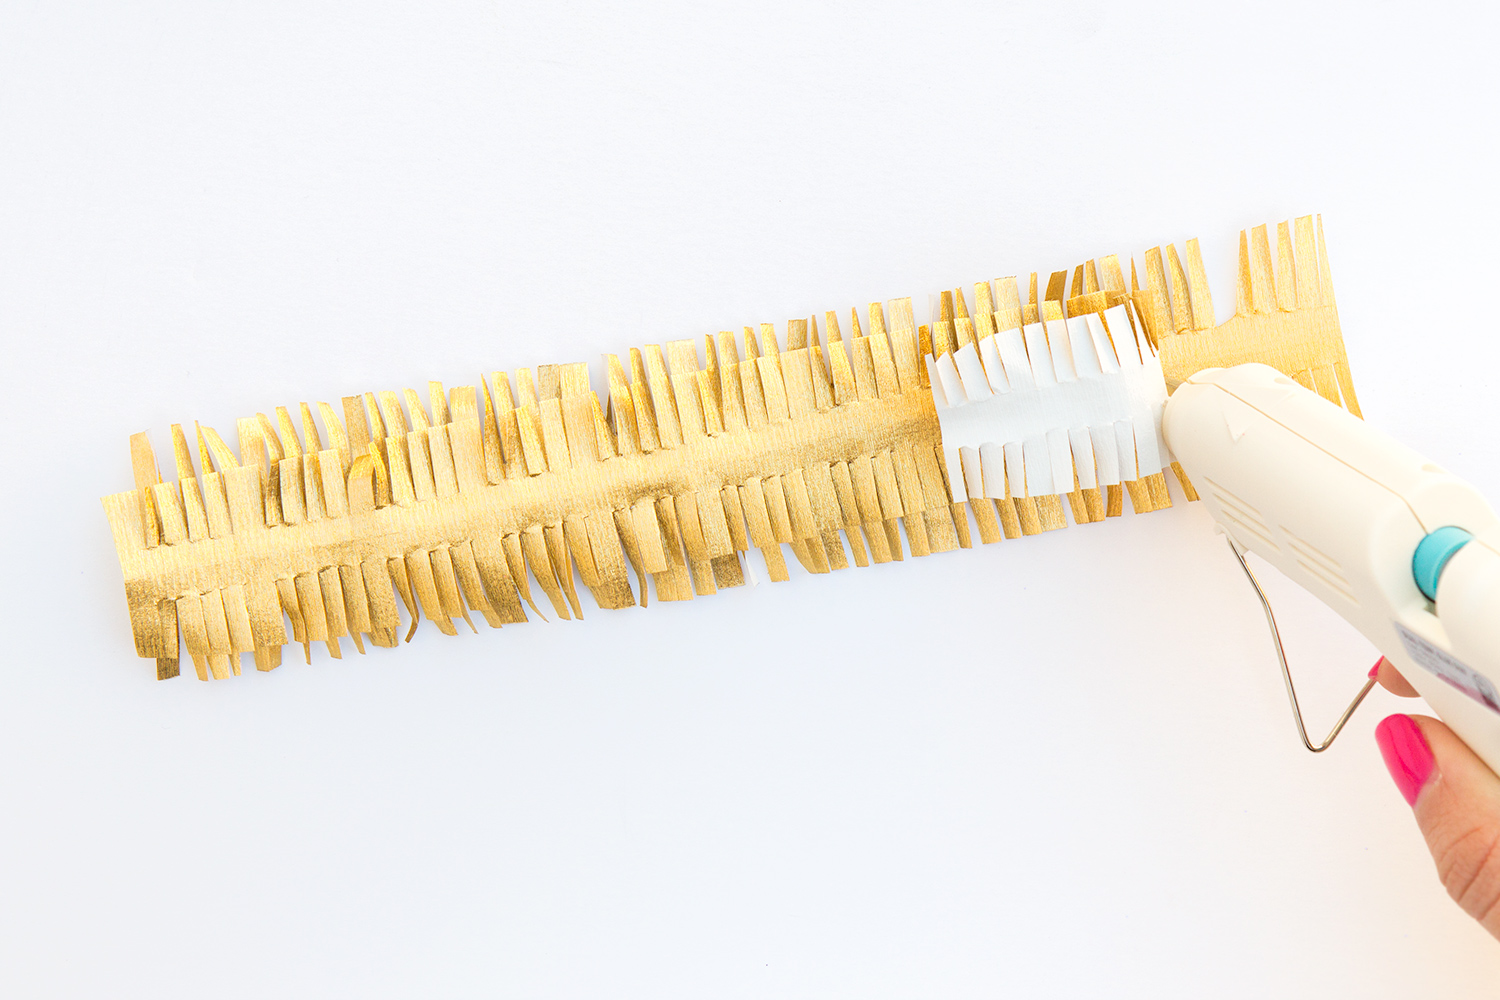
- Meanwhile, cut 2 gold streamers, each 8″ long. Fold them in half length wise and carefully trim the long sides with the fringe scissors. Fold the second gold streamer in half length and use regular scissors to cut off about .25″ of the width. Continue to fringe the long sides using the fringe scissors. Carefully open up each fringed piece.
- Use a glue gun to glue the narrower fringe streamer on top of the wider one. Apply hot glue along the top of a headband and place the gold fringe paper on top. It’s easiest to do this in 2 steps because the hot glue dries rather quickly.
- If you’re creating a Happy New Year headband, glue the white outlined piece on top of the glittered background piece.
- Fold the small tabs on the bottom of each number or happy new year piece towards the back. Apple a small dot of hot glue on the bottom side of each tab and quickly place it on the headband. Hold it in place for a few seconds, or until the glue begins to harden. Repeat this with the other tabs and then you’re headband is ready to be worn!


See what I’ve created throughout the year for #12monthsofmartha!

The post DIY New Year’s Eve Headband appeared first on Sarah Hearts.
15 Dec 16:33
Gingerbread People Jello Shots!
by A Beautiful Mess
Holiday parties can be a lot of fun, but they can become a bit of a blur if you go to a lot of them. To avoid that from happening at your party, why not make something that your guests won't forget? Like, gingerbread people jello shots! Inviting these little guys will add the perfect dose of holiday fun to get your party started right!
Gingerbread People Jello Shots
1 1/4 cups cream
1 1/2 cups vodka
2-3 tablespoons gingerbread syrup
2-3 tablespoons of creme de cacao or Kahlua
dash of pumpkin pie spice
3 packets of unflavored gelatin
Heat the vodka in a pan over medium heat and stir in the gelatin packets, whisking together until dissolved. Pour into a bowl and stir in your cream, gingerbread syrup, pumpkin pie spice, and dark colored liquor (I used this mostly to darken the color of the liquid, but you may not need it if your gingerbread syrup is dark in color).
Pour the mixture into a greased pan and let it set in the fridge for a few hours or overnight. Once it has set, use your gingerbread cookie cutter to cut out as many as you can fit in your pan, and then use a spatula to pull out the extra jello from in between the gingerbread shapes. Once the shapes are free, you can scoop those out as well.
Since jello shots don't do well when they sit out for a long time, I would keep them in the fridge until you are ready to serve them. Put them out with some icing and sprinkles nearby so guests can decorate them before eating the treats. So fun!
I could fit about 8 men per pan with my size cookie cutter, so I would get a smaller size cutter if you want to make a lot. I just love how gingerbread people look with their goofy smiles and button eyes—they just make me happy. If you are looking for a treat to set your holiday party apart, then look no further! I think you've found the one...xo. Laura
Credits // Author and Photography: Laura Gummerman. Photos edited with A Beautiful Mess actions.
15 Dec 14:39
Gift Ideas for Creatives
by Sarah
Shh.listenWatch! Clock!
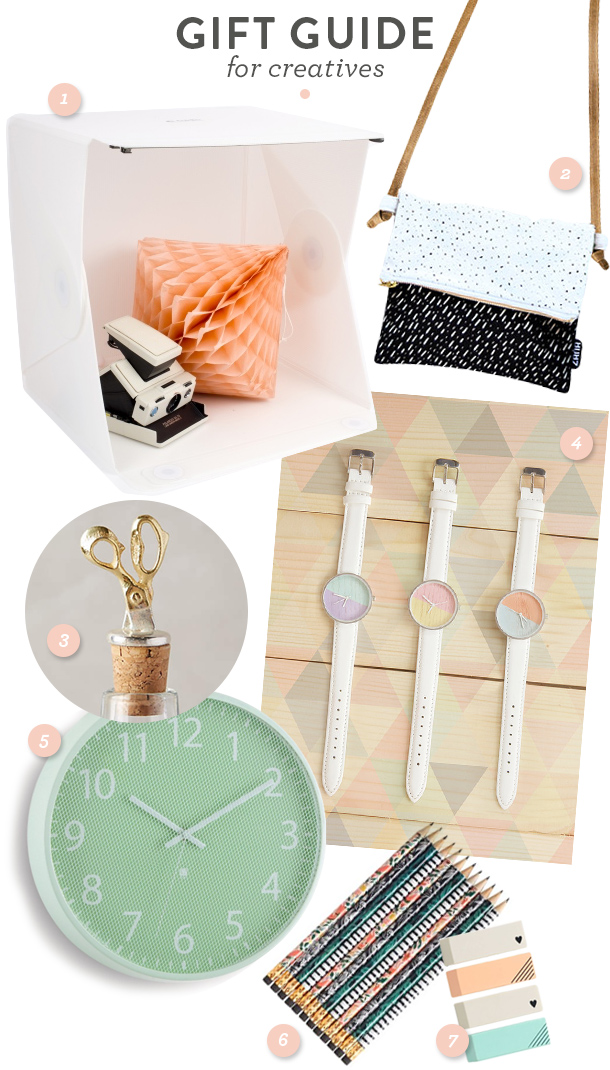
Today’s gift guide is for all your friends who rather DIY than buy, though I’m sure they would appreciate any of these stylish, design-minded gifts. On my personal holiday wishlist? The practical hands-free crossbody bag! Even color-lovers like myself will adore this practical and pretty bag.
- Foldio portable lightbox – perfect for bloggers and Etsy shop owners
- Black and white fold over crossbody bag
- Gold scissor bottle stopper – gift with a matching pair of gold scissors
- Pastel wood watch
- Mint green wall clock
- Rifle Paper Co. pencil set
- Heart printed eraser set
Check off everyone else on your list! Shop my gift guides for great holiday gift ideas.
The post Gift Ideas for Creatives appeared first on Sarah Hearts.
09 Dec 13:57
Sausage Breakfast Casserole
by Elise
Shh.listenLet's make a small one for our christmas morning!
EASY sausage breakfast casserole! Made with eggs, sharp cheddar cheese, cubed day old bread, and Italian pork sausage. Perfect brunch casserole! 
Continue reading "Sausage Breakfast Casserole" »
08 Dec 18:48
Any kind of egg mixed with a bit of pesto is a winner. I like to top the toast with a drizzle of pesto, an egg cooked however you like it (my favorite way is poached or soft boiled), and another dollop of pesto. Good stuff! The flavor is out of control and if you’re a runny egg yolk kind of person, you’ll adore this. It’s a breakfast that frequents my kitchen every week!
For some heat, trying using crumbled goat cheese for a creamy tang (a flavored variety like honey or fig would be good too!) and topping it with a few drizzles of hot chili oil. Just enough spice to give it a kick, but the goat cheese keeps it from being overwhelmingly hot.
For major flavor and staying power, trying topping the avo with chopped chickpeas, roasted red peppers (bonus points if they are packed in garlic olive oil) and a sprinkling of toasted sesame seeds. This is a little briny from the peppers (my fave!) and has texture from the chickpeas. Winner winner! (Avocado toast dinner?)


Elevating Avocado Toast by Jessica
by Jessica

If you give me one avocado and five minutes in the kitchen, I’m going to come out swinging with some crazy version of avocado toast. Because it’s 2015. Who can keep things simple?

All millennial boredom aside, nearly everyday I make a slice of avocado toast, whether it be for breakfast, lunch or an afternoon snack with a latte. And it doesn’t always have to be fancy, nor do I want it too. It’s like craving a classic breakfast of bacon and eggs or wanting to keep spaghetti and meatballs super traditional: sometimes I just want thick, toasty bread top with mashed buttery avocado and that’s it.
But first, let’s get this out of the way. How do you take your toast? I like my toast to be, well, toasted. Like, really toasted. My husband, on the other hand, prefers what I like to call “warm bread,” with no golden toasty goodness to it. The toaster setting is a constant battle in our home and let’s just say thank goodness we have a four-slice toaster with two settings, allowing us each to have our own toaster “side.”
So my first key to the perfect avocado toast is just that: super toasty toast!

From there, I go with a ripe avocado, a hint of lemon for freshness and salt and pepper. I’ve recently been topping my toast with a truffled sesame sea salt blend I have from etsy and that’s the perfect way to spice up my favorite snack when I’m in a rush.

I used to use a bit of lime juice, and occasionally I still do, but I generally try to avoid feeling like I’m eating guacamole on toast, which can sometimes happen with lime juice. I adore guac, but in my brain, avocado toast and guacamole are two very different things and I have no desire to mesh the two. You feel me?

When I have a little more time, I like to change things up and, to be all fancy, elevate my favorite toast. Here are three of my favorites!

Pesto and Egg
Any kind of egg mixed with a bit of pesto is a winner. I like to top the toast with a drizzle of pesto, an egg cooked however you like it (my favorite way is poached or soft boiled), and another dollop of pesto. Good stuff! The flavor is out of control and if you’re a runny egg yolk kind of person, you’ll adore this. It’s a breakfast that frequents my kitchen every week!

Goat Cheese and Chili Oil
For some heat, trying using crumbled goat cheese for a creamy tang (a flavored variety like honey or fig would be good too!) and topping it with a few drizzles of hot chili oil. Just enough spice to give it a kick, but the goat cheese keeps it from being overwhelmingly hot.

Chickpeas, Sesame and Roasted Red Peppers
For major flavor and staying power, trying topping the avo with chopped chickpeas, roasted red peppers (bonus points if they are packed in garlic olive oil) and a sprinkling of toasted sesame seeds. This is a little briny from the peppers (my fave!) and has texture from the chickpeas. Winner winner! (Avocado toast dinner?)

Don’t forget you can also change up the bread! While my favorite is a version of sourdough, I also love using ciabatta baguettes or even leftover toasted cornbread. Another great idea? Pretzel bread!
Tell me, what’s YOUR favorite way to eat avocado toast?
07 Dec 21:11


The Best Board Games You've Probably Never Played Before
by Taryn Williford
Have you heard of Eurogames before? It's a subgenre of board games classified by two major features: their attention to design and theme, and focus on serious strategy. Competetive folks, take note: Put away the Scrabble set and try on one of these board games for size.
07 Dec 18:36


Slow Cooker Moroccan Chicken
by Elise
♫ Would you know we’re riding on the Marrakesh express ♪
Moroccan chicken, my favorite! Chicken thighs, rubbed in more spices than you would ever think you could use at once, cooked until tender with olives and lemons.
This is a slow cooker riff off our popular tagine recipe. Boneless skinless chicken thighs are sprinkled with paprika, ginger, cumin, coriander, and more, placed on a bed of chopped onions, and slow cooked with green olives, lemon slices, and raisins until fork tender.
Continue reading "Slow Cooker Moroccan Chicken" »
01 Dec 20:19
potato kugel
by deb

... Read the rest of potato kugel on smittenkitchen.com
© smitten kitchen 2006-2012. | permalink to potato kugel | 136 comments to date | see more: Breakfast, Gluten-Free, Hanukah, Jewish, Onions, Passover, Photo, Potatoes, Put An Egg On It, Side Dish, Vegetarian
Arnojahn, Martin Schwendtner and 3 others like this
24 Nov 21:19
Brass Globe Sconce DIY
by A Beautiful Mess
OK, you guys are going to love this one! I've been wanting to do a light fixture DIY for a while now, but it looked a little too intimidating to jump into, so I kept putting it off. Thankfully our new house forced me into it as we were looking at buying some wall mounted lights for our den and I balked at the price tag of some of the globe sconces I loved. So, what's a girl to do? Make her own, of course! This is probably the most time I've ever spent on a project as far as the preparation stage goes (i.e. figuring out what parts I needed), but thankfully, it's one of my favorites that I've ever done and it is way easier for you to do now that I've already made two and figured out my mistakes—you're welcome! This light will plug right into your wall so you don't have to worry about hardwiring a permanent fixture either. You can move it wherever you like!
Our den is a bit of an odd shape and there aren't really any good spots for floor lamps. So we've been installing new lighting in the ceiling or walls that we can dim as needed to create a softer glow. I mean, we all know there's nothing worse than a harsh overhead light to kill the cozy mood, am I right? Dimmers are my jam.
With dimming being such a key element to the lighting I needed for this room, it was the perfect project to team up with Philips and use the Philips LEDs with dimmable warm glow effect. We wanted a warmer glow, and we really wanted it to last so I don't have constantly take the globe on and off and on and off. So these bulbs were perfect! Perfect warm light, and they last over 22 years! Love them.
Supplies for one light (listed with the part number in parentheses so you can find each component at this store):
A. neckless frosted globe (GLGB08NLSO)
B. brass canopy (CAS05)
C. dimmer (DI6250I)
D. brass socket cup (CU578)
E. porcelain socket (SO10045C)
F. brass neckless holder set (HONL04BR)
G. 90 degree brass arm (AR90B)
H. silver socket top (comes with part E)
I. snap in lamp plug (PL123PW)
J. slip star lock washer (WASTAR1/8)
K. 2 acorn caps (FI855-8/32)
L. 2 threaded studs (SCS600)
M. threaded hollow steel nipple (NI1-0X1/8)
N. hex nut (NU233WZ)
O. threaded straight coupling brass (NE438)
P. slip ring with side screw (SRS0-3/8)
Q. washer (WABP1)
R. crossbar and wood or drywall screws for mounting to the wall (not pictured) (CBSV2-3/4)
S. nylon braid lamp wire (not pictured) (WI18SPT1POULW)
Tools:
-drill with metal drill bit
-allen wrench
-wrench
-wire strippers
-screwdriver
If you aren't happy with the finish of your brass pieces, polish all the brass before you start. (Wear gloves when you assemble the light or you'll have a few finger smudges to buff out when you're finished.) Take your nylon braid wire and thread it through your brass arm. One side of the arm is a little shorter than the other, and the end of that side is what your socket and globe will attach to.
On that shorter side, slide the slip ring onto the arm (you don't need to tighten it yet), then the gold and silver dome of the neckless holder kit, the brass socket cup, and the silver top of the porcelain socket. Screw in the silver socket top to the end of the brass arm so they are attached and tighten the silver screw on the side.
Pull back the nylon braid about 1 1/2" from the end of the wire that is through the silver top of the porcelain socket. To keep the braided nylon you cut from fraying, you can hold a lighter under the nylon for a second until it melts the nylon together. Pull the wires underneath apart to separate the wires (you can make a small cut between them to get the separation started), and use a wire stripper to expose about 1" of both the silver and copper wires (you want to leave some plastic covering on the wires near where they meet up).
You'll see on the top of the porcelain socket that there are two screws. One is silver and one is gold. Wrap the silver wire clockwise around the base of the silver screw and tighten in place. Repeat with the copper wire and gold screw.
To attach the wired porcelain socket to the silver socket top, match up the two screws that are inside of the porcelain socket with the two holes in the silver socket top, and screw the two together through the inside of the porcelain socket.
Make sure when you are wiring light fixtures yourself to follow some common sense guidelines and only use bulbs that have a wattage your socket can handle (the ones I chose can do up to a 660 watt bulb).
Push the silver and brass domes of the neckless holder back in place and use an allen wrench to tighten the screw on the slip ring. This will keep all those pieces from sliding around while you work on the other side.
At the other end of the brass arm (the side that will attach to the wall), thread the nylon wire through the threaded straight coupling, and screw the coupling halfway onto the brass arm. Thread the wire through the threaded hollow steel nipple and screw that into the other half of the coupling.
Put the brass canopy onto the steep nipple, then thread through the large washer, the lock washer, then hex nut. Tighten the hex nut in place.
I couldn't find a brass canopy that also had a wire way at the bottom (a hole for the wire to hang down through since we aren't hardwiring it into the wall). So I just used a metal drill bit to make a hole big enough for the wire to come down through.
Once your wire is threaded down through your makeshift wire way, splice in the dimmer so you can adjust your brightness as needed. Choose where you want your dimmer to go in your cord and peel away about 2" of nylon from the wire. Separate the wires in the area you exposed and cut only the copper wire in the middle of that 2" section (look at the bottom of the wire to see which is on the left and right in case you lost track of which color is where). Use wire cutters to strip each 1" of the copper wire.
Open the dimmer switch, and wrap each end clockwise around the top and bottom screws. Tighten the screws to secure and replace the top on the dimmer.
Cut the end of the wire to the final length you want for your fixture and pull back the nylon about 2". Pull out the middle section of the snap in lamp plug and you'll see that each side of the plug has either a gold or silver prong that will clamp down into the wire once you insert it. Thread your wire through the back of the lamp plug housing and into the back of the lamp plug middle making sure the copper is on the gold prong side and the silver is on the silver side. Push it through until it won't go any further. Then push the prongs into the wire and snap the middle back into the lamp plug housing.
Once you're all wired up, it's time to attach the light to the wall!
Mount the flat part of the crossbar to the wall at desired location, and thread in your 2 stud screws all the way until they hit the wall.
Place your brass canopy over the two screws and secure in place with your acorn cap nuts.
Loosen the slip ring above the brass neckless holder so you can push back the slip ring and brass dome and screw in your lightbulb. Gently angle the silver portion of the neckless holder so that it slides into the inside of your glass globe and center the silver plate in the globe opening.
Pull down the brass dome and slip ring and tighten back in place.* That's all! You're done! Now plug in your light and watch it glow!
*Note: If you need to replace a lightbulb that has burned out, you'll loosen the slip ring and slide the gold dome up again so you can remove the globe and change the bulb. It's not that hard to do, but using a long lasting bulb (like an LED) will ensure you don't have to change it for years!
The first night we plugged these in we were giddy with excitement. They look so good and I love how we can dim them to whatever brightness we want according to our mood. And the other best part is that I made both of these lights for less than one of the ones I wanted online (each one was less than $100!). BOO-YA! These would be great as bathroom lights as well or on either side of a bed. If you've been looking for a beautiful brass sconce and feel that urge to tackle a new skill, then this is totally the project for you. I can't wait to make more lights, so I guess my future is looking bright! xo. Laura
Credits//Author: Laura Gummerman, Photography: Laura Gummerman and Todd Gummerman. Photos edited with A Beautiful Mess Actions.
20 Nov 14:36
Brussels Sprout + Purple Potato Hash (aka the best brunch ever!)
by A Beautiful Mess
Shh.listenDream Brunch!
You guys! Today is a monumental occasion. Because after, oh I don't know, five or maybe six years of asking Jeremy to help me write a recipe post, HE FINALLY CAVED!
We cook together a lot. If there's one thing that months without running water or a stove will teach you, it's that eating out is kind of overrated and cooking at home is a miracle! We've been experimenting with lots of vegetable-based meals lately, and since this one turned out so delish, he agreed to help me make it into a recipe for you!
Brussels sprouts. Historically, they've gotten a bad rap. But in recent years, they're the cool girls at all the hipster restaurants. I'm so happy for them, their time has come!
Purple potatoes. The prettiest potatoes by a lot. I don't know how or why I never bought them until this past week!
Anyway! Enough chit chat. I never know the right amount of dad jokes to put into a blog post. Sometimes it's way too much, sometimes it's not enough. Sometimes you're like, "Share WAY more," and sometimes you're like, "Please shut up." Here's the recipe...
Brussels Sprout + Purple Potato Hash
*serves 1 VERY hungry person or 2 people who are also eating avocado toast.
3 cups Brussels sprouts
3 cloves garlic
1/4 onion
1 purple potato
coconut oil
1/4 teaspoon black pepper
1/2 teaspoon salt
paprika
fresh rosemary
avocado slices
First, thinly slice the purple potato. Pan fry it with coconut oil (or your oil of choice, butter works too). We like to do this step separately because we like our potatoes very crispy. Plus, they take longer to cook. So let them cook while you're prepping the rest. Then set them aside when they're done.
Next, fill your food processor with Brussels, garlic and onion and chop your veggies. Process it till it looks about like this-
Now it's ready to cook! Throw it in a pan on the stovetop with a little coconut oil and the salt and pepper. As you're cooking it, give it a taste and see if you want any garlic powder or more pepper or salt. I feel like we over-garlic all of our food, so I made the recipe "safe".
When the slaw is almost done cooking, throw the potatoes back in so they can heat up.
Almost done! Just fry a couple eggs and garnish them with a little paprika, some fresh cut rosemary and some avocado slices.
Now, dig in! You've earned it.
xoxo. Elsie + Jeremy
Credits// Author and Photography: Jeremy and Elsie Larson. Photos edited with A Beautiful Mess Actions.
20 Nov 13:47
Chipotle & Pumpkin Veggie Enchiladas
by A Beautiful Mess
I'm excited to start an official new tag with you guys today! You've probably noticed many of the different tags we use here on ABM. They are located at the top of each post, just after the title. Our tags can alert you to all sorts of things like if a recipe is a main course (meal idea) or side dish (small bites), or even if something is sponsored. If you click on a tag, you'll get transported to an archive page showing you all our past posts that have that tag. It's a pretty handy tool if you're looking for more ideas in a certain category of if you can't find an old post, but you know a few tags it might belong to.
And today we're starting a new tag called "freezer meals". Lately I've found myself often cooking twice the amount of food I plan to eat and freezing the second meal so that I have something I can quickly throw in the oven on days I just don't feel like cooking or if I've cooked all day for ABM and I don't want to do any more dishes. :) So far this is has been a weeknight dinner game changer for us. This isn't something I do a lot because I don't have a huge freezer, so I really only need a few easy meals saved at a time. But I thought that I could start sharing some of my favorites here on ABM in case you could benefit from a similar practice.
This one is SO flavorful and is super filling while also remaining pretty darn healthy. We're gonna make our own enchilada sauce with just a few simple but surprising ingredients. And then we're gonna smother some corn tortillas filled with loads of good things in that sauce. The story ends with us stuffing our faces AND storing away the same meal to be enjoyed in a few weeks or a few months.
I'm pretty excited. I hope you are too. OK, let's enchilada!
Chipotle & Pumpkin Veggie Enchiladas, makes TWO two serving dinners (that's four servings total).
1 bell pepper
1/3 onion
2 cloves of garlic
1 tablespoon olive oil
salt and pepper to season
one 15 oz. can prepared black beans, drained
10-12 corn tortillas
For the sauce:
3 tablespoons olive oil
1 tablespoon flour (I used whole wheat pastry flour, but any flour is fine.)
1 chipotle pepper in adobo sauce
1/4 cup tomato paste
1/4 cup pumpkin puree
1 1/2 cups vegetable stock
1/2 teaspoon salt
1 tablespoon chopped cilantro
1/2 cup shredded cheese (optional)
First dice the peppers and onions and mince the garlic. Sauté those three ingredients in 1 tablespoon olive oil over medium / high heat for 4-6 minutes until the peppers soften and just begin to brown. Season with salt and pepper and remove from heat.
Drain the can of black beans and toss into a large bowl. I like to use a pastry blender to mash some of the beans just to give my filling a different texture, but this is optional. Add the cooked peppers and onions to the bowl and reserve until you are ready to stuff the tortillas.
Now it's sauce time! In a good blender, combine the tomato paste, pumpkin puree, chipotle pepper, and 1/2 cup of the vegetable stock. Puree until smooth. In a medium sized pot, heat the 3 tablespoons olive oil over medium heat and whisk in the flour. This will make a very thin roux of sorts. Add the pureed pumpkin mix and the remaining 1 cup vegetable stock and whisk well.
To assemble your enchiladas, simply add about 1/3 cup of the sauce to a small baking pan or cast iron pan. For my freezer version, I used a small aluminum baking pan that came with a paper lid—convenient for my purposes. :) Roll the filling up in the tortillas and place them side by side in the pans. Then top with the remaining sauce. Whether you do decide to add cheese to these or not, don't add any to the freezer version because I find that cheese doesn't tend to freeze well. So you can always add it later before baking if you want it.
Bake at 350°F for 20-25 minutes. Then top with a little fresh cilantro before serving.
I love to top this with half a sliced avocado if possible and I suggest you do it. :) Enjoy! xo. Emma
Credits // Author and Photography: Emma Chapman. Photos edited with A Beautiful Mess actions.
20 Nov 13:42
Homemade Hot Cereal Mix
by A Beautiful Mess
A couple weeks ago I came down with a cold. And for me this wasn't a sniffle-for-a-few-days but ultimately you're fine kind of cold. No. This was the kind of cold that rendered me useless for about three days, and I'm a to-do list kind of gal for crying out loud! I ended up having to stay home from a family wedding that Trey and I already had plane tickets and a hotel booked for. I was afraid to let my SIL and her newborn stay over when she was in town for fear her son might catch whatever was knocking me off my feet. Which meant I missed my chance to hold a baby—and guys, I have baby fever, so this put me at an all time low.
I was humbled. I like to think of myself as a fairly healthy and productive gal. The kind that goes to family weddings and holds every baby in sight!
OK, I think I might be oversharing a little. One morning, while I was still feeling pretty sick but was on the mend, I made myself a big bowl of hot cereal. I added all sorts of nuts, fruit and a little maple syrup. I ate it while sipping some lemon tea with honey and it was a comforting moment, to say the least! There's just something about a warm, healthy breakfast. And here's my confession: I ate the same thing for lunch that day too. Of course I'm not saying this hot cereal healed me. It did not. But man did it make me feel better, I guess in the way a warm, nourishing hug might. And good news—hot cereal is great all the time, not just when you're sick.
I'm stoked to share my current favorite homemade hot cereal mix with you all. We are partnering with Vitamix on this recipe and I could not be more excited! I found out Vitamix was interested in working with ABM right around the time I was shopping for a new blender, as luck would have it. This was going to be my third blender in under two years. So needless to say, I was excited to try something that promised to be more durable since I love to cook and want something that is going to last. I'll keep you all updated as time goes on, but so far I've been SUPER impressed with my 780 blender. I've already made lots of (green) smoothies, a few soups, and this hot cereal mix a few times and it's pretty amazing how well it works compared to past blenders I've used.
Anyway, hot cereal. Let's do this.
Homemade Hot Cereal Mix, makes 15-18 servings. Feel free to cut in half if you want to make less.
2 cups old fashioned rolled oats
1 cup brown rice
1 cup quinoa
1/2 cup flaxseeds
1/2 cup wheat germ*
1/2 cup unsweetened coconut flakes
1/4 cup sliced almonds (or other nuts you prefer)
*If you want to keep your hot cereal mix gluten free, then omit the wheat germ.
Place all the ingredients in a quality blender and pulse until well blended. The mixture should be a very coarse powder, not quite as fine as flour but very small pieces throughout. If you want even more control over the texture of your mix, you can pulse each ingredient separately and then combine. That's it! Easy, right? Just store in an air tight container and use whenever you like.
To make hot cereal, cook with a 3:1 ratio of water. I usually cook 1/3 cup hot cereal mix with 1 cup of water for a serving because I like to add lots of nuts, fresh fruit, sometimes nut butter, sweetener and sometimes almond milk. If you don't plan to add much to your mix, then I'd recommend cooking 1/2 cup mix with 1 1/2 cups water for a serving, but this is really up to you.
Bring water with a sprinkle of salt to a boil. Whisk in your hot cereal mix. Cover, reduce the heat, and cook for 8-9 minutes. Remove the lid, stir, and continue to cook for another minute.
I do recommend refrigerating your unused mix and here's why: my jar of wheat germ recommends you refrigerate it after opening. So although most of these ingredients are pretty shelf stable without refrigeration, just to be safe I'd still go ahead and refrigerate. But, I'm not a food scientist. This is just my thinking based on the labels I read.
Guys, you can totally change up this mix however you like! Honestly the possibilities are endless—there so many other ingredients you could add or change up depending on what you have on hand and what you prefer. I totally recommend you make some hot cereal for yourself this week. xo. Emma
Credits // Author and Photography: Emma Chapman. Photos edited with A Beautiful Mess actions.
13 Nov 14:25
Try This: Update Simple Frames With Gold Hardware
by A Beautiful Mess
Shh.listenIkea frames + this!
I am so freaking excited to share today's project with you! Not only is it the first wall art I've put up in my new home, but I think it's my favorite wall art project EVER.
Start by watching my video–
We teamed up with our longest supporters and friends over at Canon USA for this post. Specifically, we used the Canon PIXMA iP8720 Crafting Printer on their Pro Luster Paper for this one because it handles B&W so well. Plus, it can print up to 13x19, which was necessary for the size of frames I chose.
Watch the video above for all the basics on how I created this project. I found my simple white frames at Michael's and here's my campaign hardware
. If you don't want to use any tools, you can super glue these to the edges and just omit the screws. I used the super glue to secure them before adding screws (just makes it a bit easier). Just remember to let it dry 100% before continuing. Oh–and here's the ceramic planter set
I used to hang my plants.
I printed a combination of personal photos, one Dolly Parton pic and a couple prints from Arrow & Apple.
The finished wall is light and simple but still detailed and interesting. I love how it really fills up the space without being too busy. Our breakfast nook is starting to take shape!
It feels SO GOOD to start the decorating process. I can't wait to share more with you! If you have any questions about this project, leave them for me in the comments. And even if you don't have a question, I'm in the mood to chat, so leave me a comment.
Off to plan more GOLD projects because it's addictive! xx- Elsie
P.S. You can get $50 off the Canon PIXMA MG7720 Photo Printer by using the code 'ABM50', but you gotta hurry because the offer expires on Saturday.
Credits//Author and Photography: Elsie Larson. Video and Music: Jeremy Larson. Project Assistant: Laura Gummerman. Photos edited with A Beautiful Mess Actions.
12 Nov 14:30

7 Natural Ways to Make Your Home Smell Great for the Holidays
by Taryn Williford

It's said that smell is the sense with the closet ties to memory. As you prepare your home for the holidays with plenty of love, laughter and decoration, don't forget about ambiance. 'Tis the season to dim the lights, put on some soft music and, if you're so inclined, prepare one of these lovely and fragrant little recipes to fill your home with great memories.
<p><a href='http://www.apartmenttherapy.com/7-natural-ways-to-make-your-home-smell-great-for-the-holidays-212770'><strong>READ MORE »</strong></a></p>
10 Nov 16:20
Design Style 101: Scandinavian
by A Beautiful Mess
Shh.listenThose bunk beds!!!!!! Also: everything.
above: House & Home via Bright Bazaar
If you've been on the internet lately, you'll know that Scandinavian design is having a moment. And it's easy to see why! Traditional Scandinavian style is simple, clean, cheerful, and very achievable for basically any budget. When you think about this style, usually lots of white springs to mind, but the reality is that Scandinavian design can also have lots of vibrant color and fun patterns.
above: promotional image from retailer Gudruns Joden / below: Sandra Freij
SCANDINAVIAN PATTERNS
The patterns you'll find in traditional Scandinavian designs are typically simple, botanical illustrations in a symmetrical style. Animals are also common themes, such as the traditional dala horse (as seen in top image), most commonly seen in a poppy red hue. Modern Scandinavian patterns usually have bold colors and graphic, high contrast styles, like the oversize prints and patterns from the Finnish company Marimekko. (above sofa upholstered in Marimekko fabric)
above: Marimekko fabric
above: unknown with Marimekko wallpaper / unknown via homedit
A favorite Scandinavian designer is Austrian born Josef Frank whose patterns exhibited the folk-style traditional to Scandinavian style, but with a mod flair. You can purchase Josef Frank wallpaper and fabric for your home these days, but be ready to pay a pretty penny! Sometimes just investing in a yard or two will give you the perfect pop of pattern in a pillow or chair cover.
above: La Maison d' Anna G. / below: Josef Frank prints available from Svenskt
above: Anna Kern for Svenska Dagblaet / Sweet Paul Issue 2
above: House to Home / image from the book Scandinavian Design
by Lars Bolander
Scandinavian style has a long history, traditionally marked by simplicity, bright whites, natural wood tones, folk style ornamentation, and color washed furnishings and trims. Hues of medium blues, bright reds, and pleasant greens, pinks, and yellows are common throughout Scandinavian design. In old Dutch homes, folks used to build their beds into warm, closet-like spaces, and to save space, would hang spindle-backed chairs on the walls when they weren't being used. The modern version of Dutch and Scandinavian design isn't always about efficiency and space-saving solutions, though it is still both practical and beautiful. A lot of modern, Scandinavian-style homes showcase a mix of the traditional style of almost rustic simplicity alongside the sleek designs of forward-thinking designers who emerged in the 20th Century.
SCANDINAVIAN MODERN CLASSICS
A lot of iconic modern designs came from Scandinavian designers in the 1900s, and above you'll see some of the most popular pieces.
1. Wishbone chair by Hans J. Wegner (knock-off linked to down below)
2. Panthella lamp by Verner Panton
3. Artek stool by Alvar Aalto (knock-off available at Ikea)
4. Egg chair by Arne Jacobsen
5. PH5 hanging lamp by Poul Henningsen
6. Tulip side table by Eero Saarinen (knock-off linked to down below)
above: Better Homes and Gardens/ flodeau
GET THE LOOK
Want to add some Scandinavian style to your home but don't know where to begin? These things are a great start, and are pretty affordable too!
1. Bentwood pendant light
2. Flip clock (knock-off of the Karlsson Big Flip clock)
3. Marimekko teapot
4. Candle holder
5. Marimekko cereal bowl
6. Mongolian fur pillow
7. Panton floor lamp
8. Tulip side table
9. Wishbone chair
10. Grid pillow cover
11. Dala horse ornaments
above: House & Home / Anna Kern for Svenska Dagblaet
above: Nordic Days
STYLE TIPS
Paring down the color palette in your home and utilizing pops of color amidst a more neutral background is a great way to get the Scandinavian look if you can't really afford to do much redecorating. Instead of dark wood tones, try natural wood colors or painted wood instead. Combine sleek modern pieces like the iconic Panton chair with soft, rustic elements for the effortlessly chic looks shown here. Or it might be easier for you to find an old spindle-back chair and paint it a glossy black for a touch of Scandinavian charm. A classic windsor alongside streamlined pieces (think Ikea if your budget is anything like mine!) is a look that works wonders.
above: Real Living / Martha Stewart / below: Dust Jacket
If in doubt about how to go Nordic, your best bet is to just keep it simple! There is always elegance in simplicity, and I think that's really what we all love about Scandinavian style. -Mandi
Credits // Author: Mandi Johnson. Images: Noted individually.
03 Nov 20:00
Mix and Match to Create a Custom Table!
by A Beautiful Mess
If you've ever had to furnish a new space, then you know all about the hours it takes searching stores, vintage shops, thrift stores, online deal sites, all trying to find the perfect pieces for your home that won't completely break your bank. It's always hard when you have a specific idea in mind but can't find exactly what you're looking for. I wanted a small breakfast table to put next to one of our big windows that looks into our backyard, but I couldn't find exactly what I wanted. I kept thinking, "I wish I could put that top with that bottom," until I realized I could just search for the top and bottom separately, and then put whichever ones I wanted together. YES!
For the body, I decided to do a simple 36" round table top (it comes in a couple of different sizes), and I clamped the table to the legs first so I could make sure I liked it in the space before painting and attaching the legs. Looks good to me!
Since I was planning on painting the table (I chose Crystal Coral by Valspar), I bought a cheaper pine top, but if you would rather stain yours or let the wood grain come through, you would probably want to get something a little nicer like one of these hardwood tops instead (they have round and rectangle). You can even buy glass tabletops, but you'll have to use a table base that is one unit rather than 4 individual legs since you can't screw them into the glass. Even Ikea sells table tops if you are looking for more of a dining room table option, or you can make your own table top like Elsie and Emma did. I made the same one Elsie did for our dining room table after I saw how good hers looked (and how easy it was to make!).
Once you have your table top picked out, it's time to customize the legs! There are lots of options online, but these are a few of my favorites that I found as I looked around. I ended up picking these hairpin legs with a gold finish since I wanted something light that would match the gold fixture I planned to put above the table. A lot of the legs have different color choices and heights, so you can really get what you want for your project.
1. Hairpin pedestal
2. Alfred 700
3. Otto 700
4. Hilver
5. Lerberg
6. Traditional Tapered Leg
7. Estelle 700
8. Hairpin Leg
9. Fold Leg
10. Siri 700
11. Original Leg
Most legs can be attached with just a drill and a few screws. Since mine is a circle, I just marked the circle into four even parts and attached the legs on the lines so I knew they were evenly spaced.
I love that this project was pretty minimal work for getting the look I wanted, and the subtle gold legs I chose look great with the beautiful brass pendant light above the table. Just a quick coat of paint (or stain) for your top (or nothing at all if it comes exactly how you want it), and you're ready to attach your legs with a drill and a few screws—it's definitely taken me longer to put together furniture that came in a box! The table is a perfect size for the space and has just the right feel since I was able to pick all the elements. So next time you need a table, desk, or even coffee table, don't forget that you can be the boss and pick your own details! I'm so glad that I did! xo. Laura
Credits // Author and Photography: Laura Gummerman. Photo edited with A Beautiful Mess actions.
03 Nov 19:11

DIY Belart style clock and cozy kitchen snack bar — Patti and Darin’s MacGuyvered delights!
by pam kueber
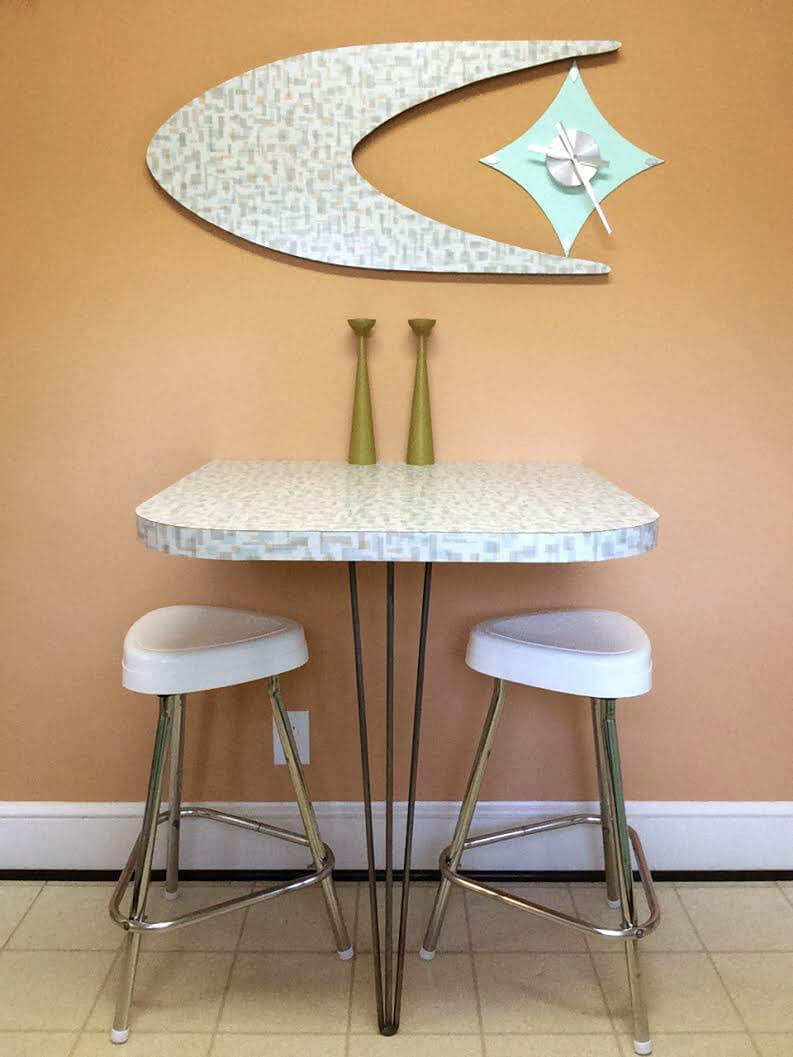 We showcased Patti and Darin’s delightful retro kitchen makeover yesterday. Today: A closer look at two ingenious features — a cute little snack or breakfast bar and a midcentury modern style boomerang clock. They made both of these for under $100 (not including the stools) — using leftover materials and just a few additional purchases.
DIY kitchen snack bar:
Patti bought the stools on ebay for $80 — they are marked Snyder Philadelphia. She had to cut the legs down to fit under the breakfast bar. She also purchased the hairpin table leg on ebay.
Patti wrote:
I’m very bad at always wanting something unique, one of a kind. Necessity breeds invention, you know, and I can never find EXACTLY what I’m looking for, so I usually have to make it up. For the snack bar, I wanted something simple that looked like it was probably in my kitchen originally (this is a modest ranch), and I wanted a place… to snack!
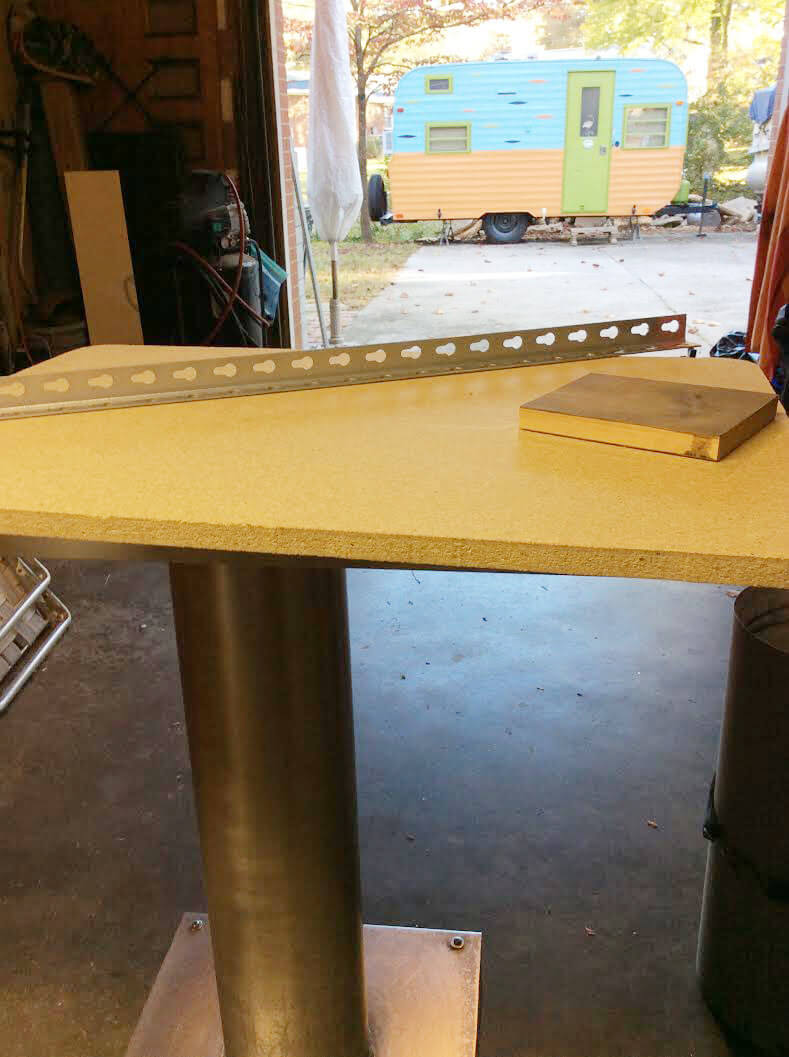
The snack bar substrate is 3/4″ particle board. I bought a 4×8 sheet at Home Depot and had them cut it for me to my rough dimensions because it’s hard for me to handle a full sheet by myself.
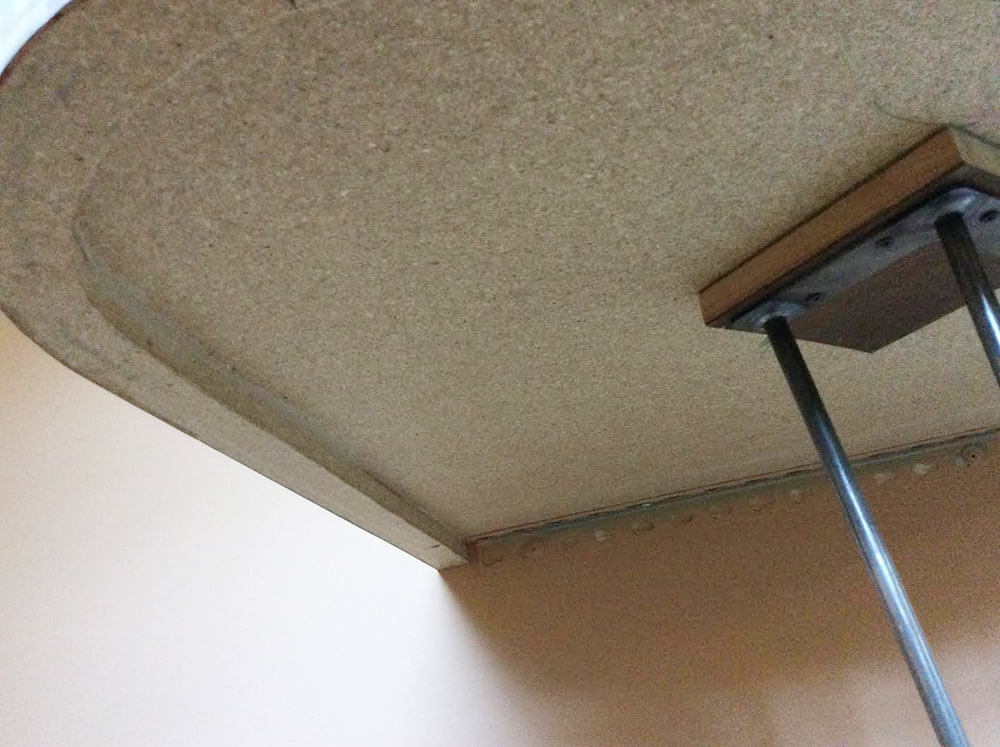
Anywho, I’m a McGyver-er from way back, so I cabbaged around the garage for scraps. I didn’t have screws short enough to attach the table leg to the bar, so I found a piece of 1×4 to use as a spacer. I attached the table to the wall with leftover shelving corners cut to 24″ and secured into the wall studs.

The bar was going to be 36″ square but it overpowered the space so I cut it down to 30″. And, it’s counter-height, so I had to cut 2″ off the bar stool legs cause they were too high.
DIY boomerang clock — Belart style
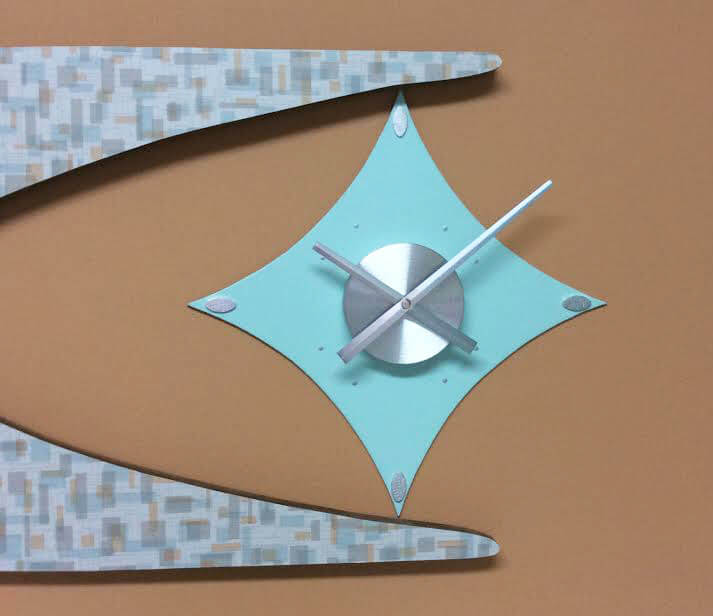
Then the wall above was too blah, and I found this clock I loved on eBay but it sold for $810. Yikes! And I thought, hey, I’ll just make my own!
This listing gave me the idea on the shape of my clock. I had laminate left over from the kitchen and particle board left over from a piece of MDF from making my platform bed. I drew out the shape, and Darin cut it out for me because his hand is steadier than mine
The clock is a scrap piece of Masonite board, I drew, he cut. I painted it to match the cabinets, clock mechanism from Amazon for $10.
The 3-6-9-12 spots are biscuits (I have a biscuit joiner!) and I wrapped them with aluminum foil (ha!) and the 1-2-4-5-7-8-10-11 dots are the wooden tip of a paint brush dipped in silver paint and dotted on. Voila!

 Voila indeed! Nicely done, Patti, thank you for sharing your design! And, I learned that “cabbage” can be used a verb — I am going to start doing that, too! Yay for all the MacGuyvers among us!
The post DIY Belart style clock and cozy kitchen snack bar — Patti and Darin’s MacGuyvered delights! appeared first on Retro Renovation.