Shared posts

03 Nov 19:03

unfussy eats: chickpea veggie bowl with lemon tahini dressing

by kickpleat

chickpea veggie bowl with lemon tahini dressing | everybody likes sandwiches

Please ignore the bad photos because they do not convey the deliciousness contained within! Bowl eating is my kind of food. A bunch of stuff, usually a mix of vegetables and grains, get mixed into a bowl and covered in a tasty dressing. It’s not fancy, but it’s pretty much how we eat most often around here. I love this bowl dinner because it contains a mix of both roasted and raw vegetables and would be easy to add your own spin based on what you had available.

chickpea veggie bowl with lemon tahini dressing | everybody likes sandwiches

It’s like an elevated salad that totally works for dinner. If you wanted to throw in leftover chicken, tofu or salmon, go right ahead! The dressing is a lemony tasting tahini version with the addition of nutritional yeast. It makes plenty that you’ll have enough leftovers, which is a good thing, as it’s delicious on a green salad too.

chickpea veggie bowl with lemon tahini dressing | everybody likes sandwiches

chickpea veggie bowl with lemon tahini dressing
1 T olive oil
1 large sweet potato, peeled and cubed
1/2 onion, large dice
1 t aleppo pepper
1 head of broccoli, cut into small florets
1 can of chickpeas, drained & rinsed
1/2 t cumin
kosher salt
1/2 cucumber, diced
1 red pepper, diced

your favourite cooked grains: I used farro & brown rice

lemon tahini dressing
Recipe adapted from Oh She Glows

1/4 c tahini
1/4 c nutritional yeast
1/2 c freshly squeezed lemon juice
3 T olive oil
2 garlic cloves
3-5 T water

Preheat oven 400F.

Cook  the grain of your choice, if using.

Add diced sweet potato and onion onto a silpat-covered baking tray. Drizzle with olive oil and sprinkle with aleppo pepper. Bake for 15 minutes. Remove from oven, toss and add in broccoli and chickpeas. Sprinkle with a little more olive oil, if needed, and some kosher salt and cumin. Bake for another 15-20 minutes or until sweet potato is tender.

Meanwhile, combine the dressing ingredients into a food processor until combined and smooth. Add additional water if needed.

In a bowl, add in your cooked grains and top with the vegetable chickpea mixture along with some cucumber and red pepper. Drizzle with tahini lemon sauce and serve with hot sauce, if needed. Serves 4, with additional sauce to be used throughout the week on your favourite salads.

26 Oct 21:56

Dip a Toe Into Bold Color: Painted Ceilings in the Bathroom

by Taryn Williford
Shh.listen

Painted ceilings or colored floors? OR BOTH???

The bathroom, to me, is the perfect testing ground for those who are scared to make bold decor decisions. It's a small room (which makes any project you might tackle in there a bit more affordable) and it's not a place where you spend a whole lot of time. So if you, say, make a huge mistake thinking that, yes, fuzzy wallpaper was definitely the way to go... you can at least live with it for a while. It won't be staring you down with it's wrongness in exactly the way a misstep in the living room would.

READ MORE »

26 Oct 13:40

Thomas creates a genius retro modern eclectic office / guest house

by Kate
Shh.listen

I am loving the bright blue floor color, and the tile work behind the pedestal sink is amaaaaaazing!

retro modern kitchenthomas250Retro, modern, eclectic, colorful and unexpected, Thomas Welles — owner of TG Architecture — has blended old and new together in surprising ways in his 1930s garage turned office + guest suite.  We’ve never seen a space quite like this before — if you pull all the palettes apart, it “shouldn’t” work. But Thomas is a pro: His choices are so artful, that the space turned out off-the-beaten-track perfect. We love it!

vintage chrome kitchen fanWe first discovered Thomas’ unique space when he emailed us about using a vintage fan grille from the stash of NOS Emerson Pryne vent fan grilles from House of Fans in his kitchen. However, when we saw a few glimpses his cottage, we wanted to see the whole thing.

Thomas initially wrote:

Pam,

Thanks for the compliment.  First I have to say that I love your blog!  I have read it for several years now, and it truly has morphed into a repository of knowledge of early/mid century craftsmanship.

This is a brand new efficiency sized kitchen that I designed for this space, which is a 1930’s garage that I converted to be a flex space (my office/ rec. room/ garden pavilion/ guest house).  We just call it “The Cottage”.

vintage chrome kitchen fan

I had purchased the Emerson Pryne fan cover when your story first ran about them being available through House of Fans. Back then, I was dying to contribute a picture to the original post. but construction was just starting on converting an old garage to a guest house, and now it is just finishing up.

vintage fan grille[Editor’s note: There still are some Emerson Pryne fan covers — in two sizes — left. See this story.]

I had also purchased a Nutone chromed knob but lost it during construction, so the standard Plastic Broan knob is on there temporarily. The larger Broan knob is starting to grow on me, and I am thinking of getting it chromed.

If you look closely, there are a number of other products that you have featured in your blog installed in this little kitchen.

retro modern kitchenretro modern

retro modern

Pam says she loves Loves LOVES the way the laminate goes up to the ceiling. GENIUS! The entire space is genius! She put the word ‘genius’ in the headline. She declares: This is what the future of contemporary mass-market interior design could/should look like!

retro modern

We pounce with questions for Thomas:

… The cabinet maker said he had fun making these
because all he does now is the same
TV show inspired greige/white,
full overlay, granite topped cabinets.

Did you make the cabinets?
I had a cabinet maker build the cabinets. The smaller the kitchen, the more it makes sense to custom build the cabinets to take advantage of every inch of space. I normally would be okay with pre-manufactured cabinets (provided they could do the same design/layout) because of the cost.
retro modernThe cabinets were designed to feel like they have been there for decades. However, they have more modern elements like wide drawers in the base cabinets instead of doors/shelves, and soft close drawer guides.
retro modern
Actually the cabinet maker said he had fun making these because all he does now is the same TV show inspired greige/white, full overlay, granite topped cabinets. The base cabinets were sanded smooth, have a couple coats of paint (spray applied) and a topcoat of high gloss clear. The wall cabinets and shelves are walnut with a satin clear coat. The star shaped vent design in the sink base was based on some vintage atomic starburst laminate I have on my kitchen wall in the main house.
retro modernretro modern
I presume the floor is painted concrete?
That is a heated concrete floor, and the color comes from an acid stain with a sealer. Triple S Chemical Products – Weathered Copper.
retro modernretro modernretro modernAre you a designer?
I am currently starting my own business after working almost 20 years for larger firms. I will be focusing on single family and small multi-family homes, and small commercial in the San Francisco Bay Area. My office will be in this space, which is on the side of my house here in San Bruno.
retro modernretro modernretro modernretro modern
A quick background: I started working on single family houses when I very young, having come from a family that has a small real estate business. After getting my education in Boston, I worked for architecture firms, initially focusing on historic rehab. That focus changed over the years to low-income multi-family housing, although I have also worked on everything from airports to high rises. After my daughter was born, all my priorities changed and l wanted to work for myself on smaller projects. Going back to my roots, as they say.
retro modern

Analyzing this space

Why does this space work so well — considering there are a variety of color palettes, patterns, styles, and finishes going on simultaneously?
Thomas used repetition to give the whole space, both inside and out, a cohesive feeling. How did he do it. By creating repetition and relationships. Some examples we can spot:
  • He’s repeated shapes like the circles in the windows, spun acrylic light fixtures, and NOS Emerson Pryne fan grille cover.
  • He’s repeated colors, such as the vivid bright yellow on the exterior door, kitchen cabinets, tile, patio furniture, and bathroom sink.
  • He’s even been able to skillfully blend five different wall surfaces in this small space: plain painted wall, reclaimed wood wall (which was original to the space, not added), wallpapered wall, tiled wall and laminate wall — by using color. Though all of the wall treatments differ greatly, they all have grey and white in them, which helps mixing them together feel intentional. The grey of the weathered wall blends into the grey and white of the dandelion wallpaper, which blends into the white and grey laminate wall, which blends into the white painted walls and tile with grey grout.
  • Even the patterns that Thomas uses relate to each other — both are dandelions. And did we mention how much we love that Thomas used laminate on a wall all the way up to the ceiling? Amazing!


retro modernretro modernretro modernretro modern

Thomas’ cottage is also a study in textures and temperatures. Note:

  • The rough texture of the reclaimed wood wall next to the smooth texture of the wood ceiling.
  • The visual texture created by the wallpaper and laminate designs next to the texture of the clear spun acrylic lights.
  • The warm wood window frames, cabinets and table near the industrial metal bathroom door and stainless steel refrigerator.
  • The cool aqua floors against the warm yellow cabinets.

Everywhere you look, there are new ‘visual collaborations’ to see.

retro modern retro modern retro modern retro modern

In one last email, Thomas added:

Thank you for making a story about the cottage, I had a lot of fun designing it; and while it is done to the point where we can use the space, there are still things to do (Isn’t that always the case?). I’m trying to find an appropriate exterior light fixture, and will be building some low, built-in bookcases under the two large windows. I am also torn on whether to paint the interior wood wall or leave it like it is… A wall like this is something you see all the time on those home improvement shows, and I normally hate it when I see designers add these indiscriminately. But in my case it was here originally. I figured I could leave it as-is for now, and make a decision later; but I have to admit that I kinda like it and would be just painting it just to buck the trend. I also have to tackle the landscaping. Please disregard the brown lawn; we are in the middle of a drought.

Thomas’ list of resources:

ThomasThomas, your space is a funky, creative retro modern eclectic work of art! Well done. What a great space to work and a fabulous getaway for guests. Thanks so much for sharing it with us!

Interested in working with Thomas? 

Thomas is in the process of building his company website — we will add it to the story when it is up and running — and until then, you can email him at his work address twelles@tgarc.com.

The post Thomas creates a genius retro modern eclectic office / guest house appeared first on Retro Renovation.

21 Oct 21:13

simple gifts with framebridge.

by erin

framebridge custom framing reading my tea leavesI admit that it feels early to start talking about holiday gifts. But the fact of the matter is that there are some gifts for which a long lead time pays off for everyone involved—givers and recipients. Here’s an idea for one such gift, sponsored by Framebridge.

Anyone who’s been reading for a while will be familiar with my fondness for temporary wall displays. Washi tape and paperclips and tiny tacks pull their weight as framing supplies in my house. I love moving things in and out of the space as makes my sense for my current frame of mind or whim or the particular postcard that came in the mail that day. I have a few of these little corners in my house and I wouldn’t trade them for anything. framebridge custom framing reading my tea leavesBut since Faye was born, I’ve saved a few small bits of ephemera that have taken on a little bit more meaning than the average post-marked envelope. There’s the moon phase calendar that I bought in San Francisco, destined for the nursery that we weren’t sure whether she’d have six months before she was born. There’s the letterpress card that came in a care package sent my way in the late winter that I was pregnant. The card bore the zodiac sign of Gemini, just like the baby in my belly. There’s the small envelope, hand-lettered by my friend Justine with Faye’s initials. For the last sixteen months they’ve each lived in different spots in our home—taped up to the wall; weighted down with paperclips and hung from tacks; propped against the bookshelf.framebridge custom framing reading my tea leavesIn effort to make art out of the ordinary—and in an admittedly sentimental mood—I’d begun to think about preserving them for the longterm. When Framebridge reached out with an opportunity to test-drive their service, I knew immediately what project I would tackle. It would be a gift to the whole family—and something that Faye might eventually take with her into her own home.

I chose simple rectangular frames that matched frames we’ve used for other art in our house. There’s something about a float mount that lends itself to this kind of ephemera, I think, and so I opted to have each piece floated against a white backdrop instead of hidden behind a more traditional mat.  I like the idea that you can still tell that Faye’s initials are printed onto an envelope and that the tape marks where I taped and re-taped the zodiac print are still visible.framebridge custom framing reading my tea leavesNever having used an internet-based framing service before, I admit that I wasn’t sure what to expect. The pricing is vastly more affordable than framing we’ve had done in the past—frames at Framebridge range from $39 – $149 depending on the size of your art—but I wondered if the frames would match the quality that we already had. Would the acrylic that Framebridge uses in lieu of glass meet my standards? Would they get my notes requesting a smaller-than-average border between the art and frame? Happily, the answer in each case was yes. And more than that, the process was simple, quick, and clear from placing my order, to sending in our art, to receiving the framed art back again. framebridge custom framing reading my tea leavesThe finished products themselves are lovely. I made ample use of the special request field available in the Framebridge order process and was able to request a smaller mat size than would have come automatically.  I was super pleased with the understated effect of a more subtle border around these particular pieces. Maybe best of all, the frames arrived ready to hang with small envelopes including all the necessary hardware. Literal minutes after our frames came through the door, we had them hanging in our bedroom.framebridge custom framing reading my tea leavesIf you’re among the most organized among us and already plotting your holiday gifts, here’s a wholehearted endorsement to give Framebridge a try. In our case we were able to elevate the ordinary and add something special to our home without giving up precious space.

In the spirit of holiday giving, Framebridge is offering Reading My Tea Leaves readers 20% off their first order with the code TEALEAVES20. The offer expires 1/31/2016.

This post was sponsored by Framebridge. All opinions are my own. Thanks so much for supporting the brands that support Reading My Tea Leaves.

16 Oct 17:16

Lemon Cupcakes with Lavender Frosting by Jessica

by Jessica

Behold: an adorable cupcake made of flowers and fruit!

I’d always been super wary of lavender in dessert or food in general. I certainly never tasted anything with lavender it in when I was young. And then as I got older and discovered that food could be flavored with that lovely purple thing, I was pretty darn shocked. I think that I was always afraid that my food would end up tasting like flowers? Shows what I know.


Lemon Cupcakes with Lavender Frosting

But! Two very distinct things changed my mind. Big time.

The first: a candle. Yes. A freaking candle. A few years ago, I worked at a candle store (I’m not a crazy cat lady, I’m a crazy candle lady) and one of my favorite scents was lavender vanilla. Seriously, it smelled like an ice cream shop. I don’t know how. It was so warm and inviting and sweet, but not headache-inducing sweet. It made me want to put lavender in some sort of delicious vanilla-infused dessert and consume it immediately.


Lemon Cupcakes with Lavender Frosting

But that didn’t happen. I was still a bit too freaked out, wasn’t confident in my own cooking or baking yet, and decided I’d get my fill of delicious lavender things by … well, by buying and burning all the lavender vanilla candles. Let’s just say that I’m still getting through the hoard.


Lemon Cupcakes with Lavender Frosting

Then. The magic moment. I watched what I can only describe as one of the most wonderful movies in the history of feel-good funny movies: It’s Complicated. And my spirit animal, Meryl Streep, made lavender honey ice cream in the middle of the night when she couldn’t sleep. And darnit, if Meryl (er, her character) was going to make lavender ice cream, then I was going to make lavender ice cream!

So I did. And I have never, ever looked back. Ever.


Lemon Cupcakes with Lavender Frosting

I’ve done the ice cream thing. I even made a lavender vanilla popcorn (candle-inspired, obvi) and I’ve done doughnuts, too. I’ve even done a lavender cocktail. But frosting for bright and citrusy cupcakes? Sounded like the best ever.


Lemon Cupcakes with Lavender Frosting

There a few ways to do this whole lavender thing. First, there is lavender extract. That makes things simple! Second, there is dried culinary lavender. This is what I use most often. I find it brings authentic lavender flavor to food. You can easily infuse milk and cream with culinary lavender but you can also just chop it up and throw it in the food.

Beware though: you only need a teeny bit or else your food WILL taste like flowers. Sort of.


Lemon Cupcakes with Lavender Frosting

Oddly enough, I also had a lemon lavender candle back in the day. This combo wasn’t inspired by that (surprisingly), but it works. Both the cake and frosting are light with just a hint of flavor. I almost like to think of it as vanilla cake with a hint of lemon and vanilla frosting with a hint of lavender. Adorable and cute to serve, delicious to eat, pretty on the eyes. If you have some living lavender around, throw it on top! Be all fancy and stuff.


Lemon Cupcakes with Lavender Frosting


16 Oct 13:56

How to Assemble the Perfect Fall Cheese Board by Gaby

by Gaby

It’s not a party unless there’s a cheese board involved! This season, I’m pulling out all the stops and breaking it down so we can all make the perfect fall cheese board.

While cheese is the most important part of all this, let’s start with all the other festive things that we need before assembling.


How to Assemble the Perfect Fall Cheese Board

Honey. I love to grab a chunk of honeycomb from my market. It pairs well with so many different cheeses—-especially goat cheese!

Fresh fruit. This time of year I like to mix some kind of grapes with fresh figs. It feels very harvest-ish to me, and that’s exactly what fall is all about!

Nuts. You can pick and choose based on your personal preference, but if you’re like me, you’ll add some Marcona almonds and candied walnuts to the cheese board. The almonds are savory and delicious and the walnuts have a little bit of sweetness to them from the candying process. They are a match made in cheese board heaven.

Olives. Because we need a little something briny. Castelvetrano olives are my olive of choice.

And finally, bread sticks and crackers. Grab a few different shapes, flavors and sizes to give the board some personality.

Okay, let’s get into the cheese!


How to Assemble the Perfect Fall Cheese Board

Aged cheese. I love an aged white cheddar. The little crystals that develop within the cheese during the aging process give it a little bit of a crunch, which perfectly complements what we have next!


How to Assemble the Perfect Fall Cheese Board

Soft cheese. I like goat cheese for this. For the one pictured above, I just rolled it in some herbes de Provence and it was ready to go. This one is what you should absolutely try with the honey. It’s a game-changer!


How to Assemble the Perfect Fall Cheese Board

Blue cheese. Any blue will work. I love something that’s a bit more mild and not completely overwhelming, since some people are opposed to blues. I always ask my cheesemonger what low intensity blues they have in stock, and more times than not, it goes over great with my guests. And if not, more for me!


How to Assemble the Perfect Fall Cheese Board

Firm cheese. Like a Mimolette. I used this one for a number of reasons. First and foremost, it’s freaking delicious. Second, it’s orange and I like to give the cheese board some color, since most cheese is white. And third, it’s a little bit sweet and a little bit nutty, and if you have any leftovers, it’s delicious when tossed with some pasta.


How to Assemble the Perfect Fall Cheese Board

Now all that’s left is assembly! Grab a big board and then start arranging. I like to keep things looking bountiful, so I’m all about presentation. Place the cheeses down first and then throw everything else around them. Things can hang off the board, they can be tucked into each other, you can add some of the fresh fruit when you need a colorful moment, and go to town. Voila! The perfect cheese board ready for all your fall entertaining!


15 Oct 16:47

Apple Spiced Pancakes by Dara

by Dara
Shh.listen

Apple pancakes mmmmmmm!

Weekends are for coffee on the couch, or outside on our comfy patio chairs in the summertime, and lazy breakfasts. Often my kids make themselves egg sandwiches on the weekend, complete with melted cheese and a side of fruit. However, if I give them the choice, they request pancakes or waffles in a heartbeat. For that matter, they would choose pancakes and waffles for dinner, too. I revel in the fact that I turn into “the best mum ever” when I make the easiest things for dinner!

As summer turns to fall, we start hoarding and eating apples as though they’re going out of style. Apples with peanut butter, apples in muffins and baked apples all grace our table. Last fall we discovered that grated apples make a wonderful addition to pancakes, and blend perfectly with a cinnamon and ground ginger-spiked batter. If you have a nut-free household, just leave out the pecans. I promise that these pancakes will win over every member of the family.

Here’s how to make them!


Apple Spice Pancakes

In a large bowl, whisk together the flour, baking powder, cinnamon, ginger and salt. I used whole wheat pastry flour because I like my breakfasts to be fiber-packed (stops me from snacking on chips before lunchtime!), but all-purpose flour would work just as well.


Apple Spice Pancakes

In a medium bowl, whisk the eggs.


Apple Spice Pancakes

Add the maple syrup and milk, and give the whole thing a good whisk. Nonfat milk is what I typically use, but any type of milk will do the trick.


Apple Spice Pancakes

Pour the milk mixture into the flour mixture, and stir everything together.


Apple Spice Pancakes

Core a couple of apples (I used Gala) and grate them on the big holes of a box grater. Stir the grated apples and some chopped pecans into the batter.

Heat a cast iron or nonstick skillet over medium heat, and lightly coat with cooking spray (for the cast iron skillet only). If you have an electric griddle, set it to 375ºF. Any of these will work, but I can never resist the beautiful pattern and texture produced by the cast iron pan.


Apple Spice Pancakes

Using a ¼ cup measuring cup, scoop the batter into the skillet, working with a few pancakes at a time. When the pancakes start to bubble on the surface, flip the pancakes and cook until cooked through.

Repeat with the remaining pancake batter, keeping the cooked pancakes warm in the oven or serving them as you go. My family loves their pancakes fresh out of the pan, so we keep a constant cook-and-eat rotation going. That’s what happens with growing boys in the house!


Apple Spice Pancakes

Serve the pancakes with maple syrup and fresh fruits or nuts. These are perfect for weekend brunch, but the leftover batter is great to have on hand for quick and easy weekday breakfasts!


14 Oct 22:57

At Home With Kimi Encarnacion

by A Beautiful Mess
Shh.listen

LOVE the colors of this home, especially the kitchen! Feels modern but also 50s retro.

At Home with Kimi EncarnacionCacti! At home with Kimi EncarnacionToday we are super excited to share Kimi Encarnacion's amazing home with you guys! We found Kimi on Instagram and were instantly obsessed with her space. It's SO fun and colorful, and a vintage-lovers dream! Her personality really shines through. Ready to see more?

Heck yeah! At Home with Kimi EncarnacionFun collectibles via At Home with Kimi Encarnacion"We lucked out when we found this little stucco beauty in San Clemente, CA. You can see the ocean out the front windows. It's pretty sweet. It was in original condition and just minutes from our favorite surf break. I knew it was our house before we walked through the front door. We weren't looking for an investment, we wanted a place we could live in forever. We got it from the original owners who came from Chicago to live the California dream in 1965 and spent the rest of their lives here. We got to keep a lot of their furniture and kitchen items. They must have thought the world of this place cuz you can still feel the love within these walls. 

Pink couch via At Home with Kimi EncarnacionThis chair! At Home with Kimi EncarnacionLiving room via At Home with Kimi Encarnacion"Everything in the house is vintage. Well, except for the sofas.  I had awesome 1950s couches for years that got voted out of the house by my menfolk due to comfort issues. You have to understand, my guys never speak up like that about any of my crazy ideas, so I finally gave in. Ended up being a huge win win! We had the pink and green couches custom made, patterned after classic styles, only made bigger and way more comfy. I love how they turned out. 

Kimi Encarnacion"I collected furniture and tchotchke for years waiting for the day I could turn it all loose in my very own home. It's all junk! Stuff people throw out that I happen to find. I've had a weekly habit of combing thrift shops since I was in high school, so I got in on the glory days of thrifting. Sometimes people just show up with the coolest stuff saying how I'm the only one they know who would appreciate it. The brown plycraft style chair in the front room was from a yard sale. It wasn't even for sale. I just saw it and made an offer. It belonged to the woman's grandma. It came with her from Sweden to the US and stayed with her till she passed away. I also have a favorite junk shop that is stuffed to the ceiling with furniture. They buy up estates, and I have found some awesome stuff there. It's just a matter of looking, really. If you have a strong sense of personal style, it's not hard to keep your eyes open for the best goodies.  

Red and green! At Home with Kimi EncarnacionLove this kitchen! At Home with Kimi EncarnacionLove this wall via At Home with Kimi EncarnacionKitchen cabinets via At Home with Kimi Encarnacion
"I have a big thing for kitschy oriental decor, gnomes, pixies and Christmas stuff. I'm always changing or adding something to the mix. Each time I bring a new piece into the place, it causes this decorating domino effect that ripples thru the entire house. My family says they can never find things. They go to sit in a chair and it's gone! I love change, but I won't bring just anything in. I have to absolutely love it. It has to feel really good. 

Kimi Encarnacion painted floor DIY"About that kitchen floor. The house came with it's original linoleum floors. They looked kind of like yellow spam with lot's of stains and fading. I ended up painting them instead of replacing them. It was way cheaper, plus I'm a small menu kinda girl and floor options tend to blow my mind. And there's that thing how I like everything done as soon as I think of it. I lightly sanded and primed them first. Next, I laid down two coats of flat interior wall paint. Then I filled a spray bottle with watered-down paint and adjusted the nozzle til the paint landed on the floor just right. It's kind of a process. You start in one corner and work your way across. After it's good and dry, top with three coats of water-based polyurethane. This is key and you have to do all three to get it to cover evenly. These floors wear great. I just redid the kitchen after about 8 years of use.

Green bedroom via At Home with Kimi EncarnacionFun vintage via At Home with Kimi EncarnacionWall decor via At Home with Kimi Encarnacion"I'm a total junkie for the way color looks against color. I think all color goes together. For me it's a matter of putting together the right lightness and brightness, using the properties of color to mix and match rather than following color rules. I got on a green and red kick early in life that hasn't seemed to fade. Big, bold color doesn't scare me at all. I've since added gold, peacock blue, a little orange and a lot of pink to my beloved red and green and it is totally working for me. I've only had the white walls in the front of the house for a few months. The airy feel they have in the daylight and the way the colors pop is fantastic. I'm not crazy at all about the way it looks at night though. While I am digging it for now, I can't promise it will last. I'm a color junkie at heart.

Red floor via At Home with Kimi EncarnacionBathroom decor via At Home with Kimi Encarnacion"I won't even begin to pick a favorite room. I love it all. The place is like a time warp. Friends say they get sucked in and can't leave. There's almost always music of some kind. I think there's a guitar in every room and we have big speakers set up in the front and back so you never miss out on the tunes. We've raised our boys here. It's the only house they've ever known. I guess we were serious when we said we wanted a place we could live in forever. This is home."

Thank you so much, Kimi! You can find more of Kimi via Honey of California and on Instagram. xo.

Credits// Author and Photography: Kimi Encarnacion.

13 Oct 17:54

Wooden Box Hanging Planter DIY

by A Beautiful Mess

Make a cute hanging planter from a round wooden box! (click through for tutorial)     I've been trying to think of more ways to add greenery to our new house, and while I love how my hanging gold bowl planters turned out, I needed something that could work on a smaller scale in our dining room area. I was playing around with making holders out of clay, but then I saw these little round wooden jewelry boxes and thought they would be just the right look once they were cut in half. Projects like these are the reason I love having a jig saw—they are super inexpensive and easy to use, but a whole new world of possibilities is opened to you when you have one. Don't be intimidated by the word "saw" because you can totally use this one!

Make a cute hanging planter from a round wooden box! (click through for tutorial)Supplies:
-small wooden jewelry boxes with removable lids
-jig saw
-glue
-balsa wood
-1/2" cup hooks
-small gold chain (check chain section of hardware store)
-waterproof caulk and sealer (optional)

Make a cute hanging planter from a round wooden box! (click through for tutorial) Use a small screwdriver to remove the lid from the box. Mark down the center of the bottom and sides of the box to divide the box in half. Use your jig saw to cut the box down the line into two equal halves (go down one side, across the bottom and up the other side).

Make a cute hanging planter from a round wooden box! (click through for tutorial)  Trace the open side of the box onto your balsa wood and cut out a back panel to close in your half box. Use glue to secure the balsa wood to the box and allow the glue to fully dry.

Make a cute hanging planter from a round wooden box! (click through for tutorial)    Paint the outside and top lip of the planter with paint. When the paint is dry, you can waterproof the inside of your planter if you plan on using live plants on your wall. I would seal the inside seams with a waterproof caulk and then spray the inside wood with a waterproof sealer. These are small plants in small containers, so they shouldn't need that much water at one time, but it's good to waterproof them to protect your wall and floor. I have been finding some really good faux succulents at craft stores lately, so I decided to put in real dirt but fake plants. The dirt totally helps trick you into thinking they are real, but you never have to remember to water them—WIN!

Once your planters are painted and sealed, screw in two cup hooks into the top back corners of the planter, and cut your chain to size with chain cutters.

Make a cute hanging planter from a round wooden box! (click through for tutorial)   I made a mockup with tape so I could see where I wanted the planters hung and how far down they should go. I would recommend doing something like this if you are hanging multiples in a group.

Make a cute hanging planter from a round wooden box! (click through for tutorial)        Add your plants into your mini wall planters, and you're ready to hang those babies!

Make a cute hanging planter from a round wooden box! (click through for tutorial)      Make a cute hanging planter from a round wooden box! (click through for tutorial)      Make a cute hanging planter from a round wooden box! (click through for tutorial)      I mean, would you have ever guessed that those planters used to be wooden jewelry boxes?? I love how they look grouped together in staggered lengths, but this would also be a great idea as singles to flank both sides of an entryway mirror or in a grouping with some colorful prints as well. You can also apply the same idea to larger boxes if you want a bigger wall planter. So don't be afraid to play with different shaped boxes if you find some you like. Just another DIY reminder to always "think outside the box"!! ;) xo. Laura

Credits // Author and Photography: Laura Gummerman. Photos edited with A Beautiful Mess actions.

25 Sep 22:12

Customize Your Closet Doors With Trim!

by A Beautiful Mess
Shh.listen

This would look so good in our house

Customize your closet doors with trim-so pretty! (click through for tutorial)      So, our new bedroom has a bit of a problem. It's a fine room. It's just, well, boring. It doesn't have giant picturesque windows or beams in the ceiling or a fireplace or well, much of anything that can give a room some personality. It's kind of just four walls and a few small windows that are weirdly high in the style of a midcentury modern house. That being said, I've made it my mission to add things into the room that give it some more personality, and I thought that customizing the double closet doors would be a great way to do that. I love all the trimmed closets and doors in Parisian apartments that make the room look so chic and expensive. So I thought it would be fun to add some trim details to our closet and bring a little of that vibe to the space.

Customize your closet doors with trim-so pretty! (click through for tutorial)          Customize your closet doors with trim-so pretty! (click through for tutorial)    Since we had metal doors on the closets, I had to first swap them out with flat front wooden doors the same size so I could build the trim on top of the doors. I couldn't find a link to the doors I bought, but I got them from Lowes so I would try your local home improvement place or door store if you need flat front doors. Each door will probably be installed a little differently, so just follow the directions for the doors you get.

Customize your closet doors with trim-so pretty! (click through for tutorial)   Once those were in, I used a tape about the same width as my trim pieces to decide what type of trim pattern I wanted to do. Since this is my first go at adding trim to doors like this and the trim I picked is already a pattern, I thought I would keep the design fairly simple. Once I had the tape estimate where I wanted it, I used a miter power saw to cut all the pieces to the right length. You can cut and fit trim pieces together at a 45 degree angle, but since I had the patterned trim with the squares, it seemed better to cut the ends off straight instead since it didn't seem like the pattern would line up as well on an angle. Trim wood can be pretty easy to cut by hand as well (especially the pieces that are made of softer wood like mine were). So you can also just use a hand saw and a miter box if you don't have a power saw. For this design I ended up using about 2 8' trim strips per door panel.

Customize your closet doors with trim-so pretty! (click through for tutorial)  Once I had the pieces cut, I used masking tape to hold each piece in place so I could make sure they all fit and so I could center the design. Once I was happy with it, I removed the tape on one piece at a time, used wood glue on the back of each strip, and nailed the trim in place with very small nails. It takes a bit of time to do all that. But remember...you're making your doors awesome, so quit whining and get back to work!

SIDE NOTE: Make sure to check and see if your doors fully open once you tape your trim pieces in place. It may sound like a no-brainer, buuuuut I totally forgot to do that, nailed and glued the whole door set in place, and then couldn't open the doors the whole way because the trim was in the way. D'oh! I had to rip off all the trim pieces, switch the door hardware the opposite way so the bad side was on the back, make a few cuts, and redo the whole thing on the other side. No fun at all!!!

Once the glue has dried, you can fill any gaps where the trim pieces come together with wood filler and lightly sand those parts smooth. I really wouldn't skip this step if you can. It helps make the separate pieces all look like one unit. If you get really fancy, you can even fill gaps between the crease where the trim hits the door front (kind of like you would with trim around doors or windows and the wall). 

Customize your closet doors with trim-so pretty! (click through for tutorial) Once your wood is looking good, pull the doors off and use a semi-gloss paint to paint the doors (I chose Beach Blanket by Valspar). Then put your doors back on when dry. I would suggest using painter's tape over the hardware where the doors come together when you paint so the metal doesn't stick together once you close the doors.

Customize your closet doors with trim-so pretty! (click through for tutorial)Drill a hole and install a door pull if there isn't one already on your doors, and your closet is back in business!

Customize your closet doors with trim-so pretty! (click through for tutorial)         Customize your closet doors with trim-so pretty! (click through for tutorial)       I. Love. These. DOORS! They add SO much to the room and look so custom compared to the basic doors that were there before. The trim looks sophisticated, but the color adds a pop of fun that modernizes a classic idea. The first few days of waking up to the new minty doors made me so happy. So even though it was a bit tedious of a project (especially with my big, stupid mistake), it was totally worth it, and I'm so happy with how they turned out. Looks like a good start to de-borifying our room if you ask me! xo. Laura

Credits // Author and Photography: Laura Gummerman. Photos edited with A Beautiful Mess actions.

25 Sep 22:11

Pepperoni Pizza Pull-Apart Bread by Joanne

by Joanne
Shh.listen

I will eat this WHOLE THING myself. Let's make it.

Every year I get tremendously excited for football season to come around. Not actually because of the football, but because of the football food! It’s funny how football has become so positively associated in my brain solely because of the food. I have absolutely no idea what’s going on in that game.


Pepperoni Pizza Pullapart Bread

This Pepperoni Pizza Pull-Apart Bread is one of my favorite game day recipes. I mean, a cast iron skillet filled with little knots of fluffy pizza dough coated in herbs, cheese, and spicy pepperoni? Such things will always excite me. And it’s so easy to make!


Pepperoni Pizza Pullapart Bread

To get started, combine warm water, yeast, and a tiny bit of sugar in the bowl of a stand mixer. Let it sit for 10 minutes until foamy. When the mixture gets foamy, it means the yeast is alive and well! Let’s proceed.


Pepperoni Pizza Pullapart Bread

Add bread flour, salt, and olive oil to the wet ingredients.


Pepperoni Pizza Pullapart Bread

Use the dough hook to stir the ingredients together until roughly combined.


Pepperoni Pizza Pullapart Bread

Then it’s time to attach the bowl to the mixer and knead with the dough hook for about 10 minutes, until smooth.


Pepperoni Pizza Pullapart Bread

Cover the bowl and let the dough rise for about an hour. It will have doubled in size, like this.


Pepperoni Pizza Pullapart Bread

And you’ll see stretchy, webby dough strands all over the sides of the bowl.


Pepperoni Pizza Pullapart Bread

Roll the dough into a rectangle and divide it into 16 strips.


Pepperoni Pizza Pullapart Bread

Now switch gears and cut some pepperoni slices into small triangles.


Pepperoni Pizza Pullapart Bread

Fry the pepperoni for a couple of minutes until crispy, then add minced garlic and red pepper flakes.


Pepperoni Pizza Pullapart Bread

Toss that around for a minute, then add fresh parsley and turn off the heat.


Pepperoni Pizza Pullapart Bread

Pour the pepperoni mixture into a bowl and combine with mozzarella and Parmesan cheese.


Pepperoni Pizza Pullapart Bread

Take the 16 dough strips and tie them into knots. Then add them into the pepperoni bowl.


Pepperoni Pizza Pullapart Bread

Give this all a toss until the knots are coated in the cheesy pepperoni goodness.


Pepperoni Pizza Pullapart Bread

Pour everything into a 12-inch cast iron skillet. It will look like there aren’t enough knots to make the skillet full and happy, but don’t worry.


Pepperoni Pizza Pullapart Bread

After another rise, it will look like this. Now the pizza bread is ready for a hot oven, where the dough will puff up and brown.


Pepperoni Pizza Pullapart Bread

Serve the bread warm, and enjoy its fluffy lightness.


Pepperoni Pizza Pullapart Bread

Enjoy!


25 Sep 22:08

Ultimate Grilled Cheese Sandwich by Julie

by Julie

Why am I calling these ultimate? First off, I love grilled cheese sandwiches. There are endless combinations, and honestly, since I love cheese, bread, and butter, I don’t think I’ve ever met a grilled cheese sandwich I didn’t love.

I also LOVE making fried egg grilled cheese sandwiches, so I was thinking of how to make an ultimate version. For starters, the egg yolk must be runny. But that’s my preference. You could, of course, customize this part if you prefer scrambled eggs or a completely cooked yolk.

The other components that make this an ultimate sandwich? Bacon and avocado! I love avocado in sandwiches, and bacon, well, who can say no to bacon!


Ultimate Grilled Cheese

To make this sandwich, start by cooking the bacon. I like to cut the pieces in half before cooking. After they finish cooking, place them on a paper-towel-lined plate to allow the grease to drain off until the bacon is cool enough to handle.


Ultimate Grilled Cheese

Next, fry the egg. I have these little mini cast iron skillets that are perfect for frying eggs. Make sure your skillet is well seasoned.

To fry the egg, add butter and let it melt.


Ultimate Grilled Cheese

Add the egg and season with salt and pepper. I cook my eggs for two minutes.


Ultimate Grilled Cheese

Flip and cook for another 45 seconds.


Ultimate Grilled Cheese

Prep the remaining ingredients: grate some sharp cheddar cheese, spread butter on the bread, and slice the avocado.


Ultimate Grilled Cheese

Now it’s time to stack! Turn the heat to medium. Take one slice of bread and put it on the skillet, buttered side down. (By the way, I like to use a nonstick skillet for making grilled cheese. You can use the same skillet you cooked the bacon in, just wipe the pan dry first.)

Add most of the cheddar cheese on top of the bread.


Ultimate Grilled Cheese

Then add the bacon. Mmm, bacon.


Ultimate Grilled Cheese

I like to add cheese on both sides of the bacon so that when it melts, it acts as the creamy delicious glue that holds the grilled cheese sandwich together.


Ultimate Grilled Cheese

Now it’s time to add the rest of the goodies! Add the fried egg on top.


Ultimate Grilled Cheese

The sliced avocado …


Ultimate Grilled Cheese

And then the Muenster cheese. (Muenster cheese rules!)


Ultimate Grilled Cheese

Top with the remaining slice of bread, buttered side up. Cook for 5 minutes, then gently flatten the sandwich. Carefully flip and cook for another 3 to 4 minutes, until the other side is nicely toasted as well.


Ultimate Grilled Cheese

A runny yolk, the combination of melted cheddar and Muenster cheese, warm avocado, crispy bacon … Oh yes, this is my ultimate grilled cheese sandwich!


Ultimate Grilled Cheese

What about you? What would you put in your ultimate grilled cheese sandwich?


23 Sep 14:38

Brunch Nachos

by Gaby
Shh.listen

Bronchos?

Where do I even begin?

 
I’m an Arizona girl turned California girl, and I believe nachos are a very important part of life. They’re quite versatile, too. You can whip them up at a moment’s notice, and they make particularly delicious lunches and dinners. But have you guys ever had BRUNCH NACHOS? I know, you’re welcome.


Brunch Nachos

My girlfriends and I were off on a weekend getaway in Palm Springs, and our last morning there, we had tons of leftovers for nachos and a dozen eggs. I decided we couldn’t waste any food and we needed to use everything up before packing up the car and heading back to Los Angeles. So brunch nachos were born.


Brunch Nachos

These have everything you put in your regular nachos, with softly scrambled eggs on top. You could easily add a fried egg or two, or perhaps poached eggs, but after making this countless times since Palm Springs, I’ve decided that scrambled is the way I like to go here.


Brunch Nachos

Load them up like the nacho artist you are, and add on different kinds of cheese, beans, corn and eggs. Then pop the whole thing into the oven until the cheese melts. Once the cheese is perfectly melted, quickly top with guacamole, salsa and sour cream.


Brunch Nachos

Then dig in! They are messy, fun to share, and absolutely perfect. You guys won’t be disappointed!


23 Sep 14:38

Bacon Cheeseburger Pizza

by Erica
Shh.listen

This pizza looks meh but I LOVE the use of parchment! DUH!

Some food marriages are a match made in heaven: they were just meant to be. Like cheesecake ice cream, or cronuts, or French onion soup grilled cheese. Bacon Cheeseburger Pizza definitely has a place on that list.

But I wasn’t always so sure it should be. The first time I heard of such a thing, I thought, “How could this possibly be good? Pickles on pizza?!” The first few bites changed my mind. It was amazing how much it actually tasted like a real cheeseburger! It quickly became one of my favorite pizza flavors.

So of course, I wanted to try my hand at making it at home. I threw what ingredients I had on hand onto a thin-crust dough and shoved it into the oven. To my surprise, it was excellent. In fact, my husband said it was even better than our favorite pizza-chain one.

Let me show you the simple steps to make it for yourself!


Bacon Cheeseburger Pizza

First, you’ll want to get your pizza dough going. I used a thin-crust recipe, but if you prefer a thicker crust, go with that!


Bacon Cheeseburger Pizza

While the dough is rising, fry some ground beef with onions.


Bacon Cheeseburger Pizza

Season with salt and ground black pepper. Cook a few slices of bacon as well.


Bacon Cheeseburger Pizza

About 20 minutes before the dough is done rising, preheat your oven to 450ºF (230ºC). Put a pizza stone in to preheat.

Once the dough has doubled, it’s time to get busy!


Bacon Cheeseburger Pizza

I like to roll my dough out on a piece of parchment paper—it makes it SO much easier to transfer the pizza to the stone in the oven. I’ve had my fair share of pizza spills. Not fun.


Bacon Cheeseburger Pizza

Next, I like to spread some butter all over the crust, right out to the edge. This accomplishes two things: it acts as a bit of a barrier so the sauce doesn’t make the crust soggy, and it adds some awesome flavor. You could also use the bacon grease from cooking the bacon instead of butter. That’s what I’m going to do next time, if I remember.


Bacon Cheeseburger Pizza

Now, squirt some ketchup all over the crust and spread it out with the back of a spoon. Because cheeseburgers and ketchup belong together.


Bacon Cheeseburger Pizza

Add cheddar cheese. LOTS of cheddar cheese.


Bacon Cheeseburger Pizza

Sprinkle the ground beef and onion mixture on top.


Bacon Cheeseburger Pizza

Add 2-3 slices of torn or chopped bacon.


Bacon Cheeseburger Pizza

Now the best part: pickles! I think this is what really makes this pizza taste like a cheeseburger. I like to use the pre-sliced ones, but you can always slice up whole ones if that’s all you have on hand.


Bacon Cheeseburger Pizza

Drizzle some mustard on top …


Bacon Cheeseburger Pizza

And finish it off with an extra squeeze of ketchup.


Bacon Cheeseburger Pizza

Slide the whole thing onto the pre-heated pizza stone. I find it’s easiest to put the pizza on a wooden cutting board or pizza peel before attempting the big transfer.


Bacon Cheeseburger Pizza

Bake for about 8–10 minutes, or until the crust is dark golden brown all the way across the bottom (use a metal spatula to lift up the crust and check), and the cheese is melty.


Bacon Cheeseburger Pizza

Allow to cool a bit, then slice it up using your favorite pizza cutting tool. I like to use a big knife.


Bacon Cheeseburger Pizza

You guys, you have no idea how difficult it was to take these photos. I just about gave in and gobbled down a slice. It smelled fabulous. I was in agony. I think this is the best pizza I’ve ever made.


Bacon Cheeseburger Pizza

Notes and tips:

1. I think that freshly grated cheese is much better than the pre-shredded bags you buy at the store. It just melts better in my opinion. You can quickly shred a lot of cheese using a food processor. Of course, the pre-shredded will work in a pinch.

2. I like my pizza crust on the sweet side, so I add a bit of extra sugar to the dough recipe. It helps to balance out the salty bacon and pickles.

3. Don’t cook your bacon too long because (of course) it cooks longer in the oven. Unless you like your bacon super crispy!


Bacon Cheeseburger Pizza

Also, I’m curious: What do you use to cut your pizza? Scissors? A knife? A pizza wheel? Ulu? Let me know in the comments!


23 Sep 14:35

End-of-Summer Quinoa Salad by Brenda

by Brenda

Every time I bring out the jar of sweet curry from the spice drawer, its warm, intoxicating scent draws little noses from around the house straight to the kitchen. And I don’t blame them. Curry is one of my favorites, too. Its flavor is full of depth from a variety of ingredients, and its scent is almost exotic. I really don’t know how anyone can resist it.

This End of Summer Quinoa Salad with Sweet Curry Vinaigrette is loaded with veggies, fresh from the garden’s harvest. And with a sweet curry vinaigrette, it’s a salad recipe that’s sure to return to your menu planning again and again.


End of Summer Quinoa Salad with Sweet Curry Vinaigrette

I don’t know about you, but it took me more than a few tries to officially hop on board the quinoa bandwagon. But then it finally clicked. The secret formula was in the use of a vinaigrette.


End of Summer Quinoa Salad with Sweet Curry Vinaigrette

I tend to like a variety of textures in my meals, and have always been drawn to the earthiness of grains and seeds. So when quinoa came fully on the scene a number of years ago, it felt like it would be a natural fit for my taste buds. I found myself liking quinoa dishes I’d order at restaurants, but I never really loved it when I made it at home myself.

Until I discovered the magic of folding a flavorful vinaigrette into the quinoa, that is.

A vinaigrette works like magic, soaking into the little nuggets of quinoa, softening it up a bit and infusing it with flavor. And the vinaigrette in this salad is particularly lovely. It’s sweet from honey, tangy from white balsamic vinegar, and warmed by oh-so-wonderful curry. I’ve found myself doubling this portion of the recipe, just to have extra to drizzle over fresh greens for lunch salads throughout the week ahead.


End of Summer Quinoa Salad with Sweet Curry Vinaigrette

Our garden isn’t a large one, mostly consisting of raspberries, strawberries, and tomatoes. This year we added to the mix some snap peas, bell peppers, and for the first time ever, a ground cherry plant (so fun and delicious!). And we always have a nice selection of fresh herbs. I don’t want to know a life without fresh herbs growing in my backyard!

I’ve been making this salad with tomatoes from our garden, yellow squash given to me by friends from church, and sweet corn and peppers from local vendors and farmers markets. This time of year is simply meant for indulging in all the glory from the garden.


End of Summer Quinoa Salad with Sweet Curry Vinaigrette

There’s a bonus with this quinoa salad, too, as it keeps very well for a few days in the refrigerator. I eat it morning, noon, and night. It’s awesome for breakfast with a couple of eggs, tossed with some fresh arugula for a lunch salad, or as a side dish for evening dinner. Bright and beautiful, and super tasty to boot.


23 Sep 14:24

Tomato Ginger Jam by Heather

by Heather

I have had a long and complicated relationship with tomatoes. Let me tell you the story.

I used to hate tomatoes. I just couldn’t do it. Perhaps it was something about those weird, squishy seeds. I remember being very young and watching my baby brother Jonny out in my mother’s vegetable garden. He had a halo of golden curls and chubby cheeks, and everyone would coo over him and fawn over what a good eater he was because he had a mouthful of cherry tomatoes, juice oozing over his chubby little arms as he reached for even more tomatoes. I was so jealous of the way he would win praises just for eating those tomatoes.


Tomato Ginger Jam

Jonny would also win dessert for his tomato-eating prowess. My aunt had a very strict clean-your-plate rule at her house, and while I tried my best with everything else, I just couldn’t get those last few tomatoes down. They were swimming in the bottom of my salad and sadly, that’s where they stayed. Alas, I still remember the gingerbread man I didn’t get.

Then there was that time my grandparents tried to get me to eat tomatoes. My dad’s parents lived right outside Chicago and the hot midwestern summers blessed them with a bountiful vegetable garden. Grampy just couldn’t believe he had a 10-year-old granddaughter who didn’t eat tomatoes. His solution: a fresh garden tomato slathered in mayonnaise. He insisted that I would love it. I don’t know whether I was too scared to tell him that the only thing I hated more than tomatoes was mayonnaise (it’s a well-documented fact) or if I simply hoped against hope that he might be right—maybe two wrongs would suddenly make a glorious right and I would love them both! Well, to his deep shock and horror and to my great disappointment, the mayo-slathered tomato wedge found itself making a very quick trip from my mouth to his spotless linoleum floor. (I know it sounds like I need therapy for my deep emotional tomato-based scars, but actually, that last story made me laugh out loud.)


Tomato Ginger Jam

There is, however, a happy ending to this saga. I did eventually learn to like tomatoes in high school, spurred by a bit of tentative salsa-dipping. You know, where you just get the liquid on the chip? With none of the chunky pieces? From there, I graduated to the real tomato stuff after discovering bruschetta. I think all the balsamic vinegar and fresh basil did it for me.

And now, as an adult, I absolutely LOVE tomatoes! I can finally appreciate their delicate sweetness and yes, even those juicy little bursts of seeds! I grow them in massive quantities in my own summer vegetable garden, and have one child who will eat them, and one who would rather eat anything else. (There’s hope for that one yet. I’m sure of it.)


Tomato Ginger Jam

One of the reasons I love this tomato ginger jam is that it’s sweet, a little spicy and sour, with a deeply concentrated tomato flavor. I love to serve it on a cheese platter (it’s best with goat cheese), but it would also be delicious with grilled fish or on a sandwich as a spread. This recipe also does well doubled, quadrupled, etc. And if I knew anything about canning (it’s on my bucket list), you can be sure I’d be canning an extra supply.


10 Sep 18:05

Baked Cheesy Apple Sandwiches

by A Beautiful Mess

Baked Apple and Cheese SandwichesI love a good baked sandwich this time of year. It's a great compliment to a salad or small bowl of soup. This is one of my favorites. It's sort of a vegetarian twist on the classic croque monsieur. I guess you could call this a croque pomme et fromage, maybe? It's a crispy apple and cheese sandwich. If any of our French speaking readers want to weigh in on this, feel free! 

Baked Apple and Cheese Sandwiches  Whatever you call it, this sandwich has it all: crispy apples paired with melted cheese all baked together on sourdough bread with pesto and spinach. The following recipe allows you to make three or four sandwiches at once, but if you are making less, just cut back on the amount of sauce (béchamel) you make at once.

How to make a baked apple and cheese sandwichBaked Cheesy Apple Sandwiches, makes four.

8 slices of sourdough bread
8 tablespoons of butter, divided
2 tablespoons pesto (store bought or homemade
1-2 apples (depending on size)
8 slices of provolone cheese
2 big handfuls of spinach
3 tablespoons flour
1/3 cup milk
salt + pepper
1-2 teaspoons chopped parsley for garnish, optional

First, I just assemble the sandwiches so they are ready once my sauce is done.

Best baked veggie sandwichMelt 3 tablespoons of the butter in a small bowl or dish. Brush onto the outside of two slices of bread. Assemble the sandwiches so each one has pesto, thinly sliced apple (I like to use a mandoline for this), spinach and a slice of provolone. 

Next, make your sauce by melting the remaining 5 tablespoons of butter in a small pot over medium heat. Whisk in the flour until a thick paste forms. Then whisk in the milk and season with a little salt and pepper. After a minute or so, it will begin to thicken into a gravy. Immediately remove from the heat and pour the sauce over the top of each sandwich. Add another slice of provolone cheese, and then bake the sandwiches under the broiler until bubbly and well toasted. You may need to rotate the pan so each sandwich gets toasted evenly, but just keep an eye on them so they don't burn.

Baked Apple and Cheese Sandwiches Top with a little chopped parsley and serve warm. You've gotta make these sometime this season, guys. They're seriously SO good. If you just can't get behind apples and cheese together, then you could change the apple out for sautéed mushrooms. Up to you. Enjoy! xo. Emma

Credits // Author and Photography: Emma Chapman. Photos edited with A Beautiful Mess actions.

08 Sep 18:23

DEAL: $750 worth of vintage vector graphics for $9

This week’s MightyDeal is $750 worth of vintage-style vector graphics – that’s 150 files across 880 MB – for a mere $9.

Easily change up the text, colors and details by customizing any of these illustrations with the included .EPS vector format. Scale these files up or down in size as much as you’d like without fear of losing a single ounce of detail, and use any of them for both commercial or personal purposes.

The professional collection of vintage vector illustrations usually sells for $750, but for a limited time only, you can get all 150 vectors for $9. That’s a savings of 99% off the regular price!

Check out the deal here.

08 Sep 16:12

Creamy Double Potato Soup

by A Beautiful Mess

Creamy Double Potato Soup (via abeautifulmess.com)  I call this soup creamy because, well, it is, but it doesn't have any actual cream in it. It's got a silky smooth texture and a subtle taste of cheese, but it's still totally vegan-friendly. This is a super comforting soup that you can feel good about eating.

Creamy Double Potato Soup (via abeautifulmess.com)And guess what else? I make this in my crockpot (also called a slow cooker). So you can throw this together in the morning, set the timer, and have soup ready within 5 minutes of arriving home after work or school later that day. It's like magic. ;)

How to make potato soup in the crockpotCreamy Double Potato Soup, serves 4-5. (or you can save some for another night and serve less)

2 russet potatoes
2 sweet potatoes
1 tablespoon chopped onion (much less than pictured above!)
8-10 baby carrots, or 2-3 regular (I always have baby ones around for snacking)
3 cloves of garlic
32 oz. vegetable stock
1 tablespoon nutritional yeast
1/4 teaspoon cayenne
salt and pepper to taste

First I peeled and gave my potatoes a rough chop. I cut up the onion and minced the garlic. Then I added all that to my crockpot along with the vegetable stock. I set my timer to cook on low for 8 hours.

Easy crockpot soup recipesLater that day I came home and added the nutritional yeast and cayenne. I used an immersion blender to blend everything together right in my crockpot, and that's how I got that silky smooth texture. Then taste and add salt and pepper as needed. Most store bought stocks will vary a great deal in how much sodium they contain, so wait to season with more salt until you can taste the (almost) finished soup.

If you've never cooked with nutritional yeast before, I highly recommend you try it! It's got a cheesy taste to it. So it's a great way to add that flavor without adding any dairy. 

Creamy Double Potato Soup (via abeautifulmess.com) Serve with a few chopped green onions, bread or roasted chickpeas. Wear comfy socks and get your Netflix on because this is a sit down and enjoy yourself kind of dinner. :) If you don't consume all the soup in one day, you can freeze leftovers in ice cube trays and thaw the cubes in a pot when you want to eat it another night. Enjoy! xo. Emma

Credits // Author and Photography: Emma Chapman. Photos edited with A Beautiful Mess actions.

04 Sep 14:08

5 Things Holding You Back From Creating a Truly Great Home

by Adrienne Breaux
Shh.listen

"Maybe you're busy at work. Or you'd rather just lay around. Or you think you can't do anything because you don't have a lot of money. Or you're not going to be here very long so why bother? Lack of effort — really trying to take the home you've got now and turning it into the home you want today — is a big road block on the road to creating a truly great home."

Want a truly great home? However you define a truly great home for you, there are a few things that can hold anybody back from achieving a great space that brings them peace, motivates them and is a place they love being in. Peruse this list to see if any of these items are keeping you from creating the kind of space you'd like to have.

READ MORE »

03 Sep 16:35

Homemade Whole Wheat Flatbread

by A Beautiful Mess

Homemade Whole Wheat Flatbread  I've been experimenting with whole wheat flours and alternative flours lately. Why? Well, to tell you the truth, over the past couple of months, I have been changing the way I eat. I'm trying to educate myself and make healthier choices. Which is a lifelong process, but as of late, I've been making some pretty big changes to my diet. It's been overall really, really positive and I'm loving the process.

One change is I've been seeking more whole grains and whole wheat (or unprocessed) flours. Experiments in baking tend to take longer because you can't just adjust as you go like with cooking. I've made some version of this flatbread recipe quite a few times this past month. Some turned out rock hard and completely inedible, while others although edible, were not very tasty. But this version, this one is a keeper. :)

Homemade Whole Wheat FlatbreadIn fact I would go so far as to say that if you served this to someone and didn't tell them it was made with mostly whole wheat, I don't think they'd be able to tell. Which wasn't exactly my goal, but I'm just trying to give you an idea of how the texture of this flatbread is. One thing that totally changed it from my original attempts: white whole wheat flour. What a revelation!

What is white whole wheat flourWhat the heck is white whole wheat flour? I had honestly never used it before. I've mostly been experimenting with whole wheat and then a few alternative flours (like spelt, teff and coconut flour). But then I saw a bag labeled white whole wheat flour at the grocery store (King Arthur brand), and I immediately had to give that a try. You can see a side by side comparison of all-purpose flour on the left and white whole wheat flour on the right in the above photo. Apparently it's just a whole wheat flour that's made from hard white wheat, so it has a more mild flavor and texture. Cool. I love whole wheat but it can be a little testy to work with in baking as it can drastically change the texture and taste of a recipe fast. 

Whole Wheat Flatbread, makes 6-8.

2 cups white whole wheat flour
1 cup all-purpose flour
1 1/4 cups warm water
2 1/4 teaspoons active dry yeast
1/2 teaspoon sugar
1 teaspoon salt

In a bowl or glass measuring cup, combine the warm water and sugar, stir to dissolve. Then sprinkle the yeast over the top and let that foam up for 5-6 minutes.

How to make flatbreadIn a large bowl, combine the flours and salt. Pour the yeasty water mixture in with the flour mixture and stir until a dough ball forms. Knead for 3-4 minutes. Place in a lightly oiled bowl, cover, and allow to rise for an hour.

Punch the dough down and divide into 6-7 small balls. On a floured surface, roll the balls until they are flat and about 1/4 inch thick or a little less. You don't have to flatten them into tortillas, but you don't want them too thick or they won't cook all the way through. 

Cook in a hot (medium/high heat) skillet with a little oil for 3-4 minutes on each side. They may puff a little as you cook them and that's OK! That's how those more pronounced brown spots are formed. 

Homemade Whole Wheat Flatbread So what the heck do you use flatbread for? Well, for breakfast you can spread a little peanut butter and sliced fresh fruit over it. For lunch you can make an open face sandwich for tuna, egg salad or whatever you like to eat at lunch. For a snack you can use flatbread for dipping or spreading hummus over (or other dips). And for dinner I highly recommend you add sautéed veggies, add some cheese and then broil for a minute or two for an easy and light pizza. I'm not saying you should eat flatbread at every meal—I'm just giving you options here. :) Any flatbread you don't consume the day you make it I recommend storing in a ziplock bag or wrapping in plastic wrap and keeping them in the refrigerator, as they will last a little longer that way. Just toast them a few minutes on the stove or in the oven when you're ready to eat. Enjoy! xo. Emma

Credits // Author and Photography: Emma Chapman. Photos edited with A Beautiful Mess actions.

02 Sep 14:19

How to Cook Bacon in the Oven

by Erica

One thing I remember from my childhood was the fear of burnt bacon. There was nothing my dad hated more. But somehow the bacon inevitably ended up singed. We even tried one of those microwave bacon gadgets, but to no avail.

In my teen years, I was determined to find a way to cook bacon without reducing it to ashes. I found that if I cooked it in a skillet over very low heat and flipped it often, it came out very evenly cooked. But it was so time-consuming and demanded so much attention that I dreaded making it.

Then I discovered that bacon cooks up beautifully in the oven—no turning necessary! I’ve been hooked ever since.

There are several ways to cook bacon in the oven. I’ll show you three methods and let you know which is my favorite!


How to Cook Bacon in the Oven

First off, we have The Cooling Rack Method. I lined my baking sheet with aluminum foil, placed the rack on top, and laid out the bacon. It’s okay if the bacon is touching—it will shrink up a lot while it cooks.


How to Cook Bacon in the Oven

Bake for about 20–30 minutes, or until it’s as crispy as you like it. I like mine about medium crispiness: not too limp, but not shatteringly crisp either.


How to Cook Bacon in the Oven

Remove to a paper-towel-lined plate.


How to Cook Bacon in the Oven

Look at that: a completely clean pan underneath!


How to Cook Bacon in the Oven

The next way I tried was The Parchment Paper Method. I simply lined the pan with parchment paper and placed the bacon on top.


How to Cook Bacon in the Oven

I was surprised that the bacon cooked more quickly than the cooling rack bacon. I was sure that the parchment would block the reflection of the pan and slow the cooking process.


How to Cook Bacon in the Oven

Isn’t it gorgeous?


How to Cook Bacon in the Oven

I was also very surprised to find that the pan underneath the parchment paper was clean. I thought some grease spots would leak through the parchment paper.


How to Cook Bacon in the Oven

The last approach I tried was The Directly-on-the-Pan Method. Pretty much just as it sounds.


How to Cook Bacon in the Oven

The bacon cooked up very nicely. This is actually the method that I’ve been using for years. But this way has the most cleanup.


How to Cook Bacon in the Oven

Lovely, lovely bacon.


How to Cook Bacon in the Oven

Of course, you can strain and save the grease for cooking, storing it in special grease storing containers or glass jars.

I know this is so granny, but I like to save yogurt or sour cream containers from time to time to pour cooled bacon grease into if I intend to get rid of it. Then I can just throw out the whole container. You can also freeze the grease before you put it in the bin on trash day.


How to Cook Bacon in the Oven

So, which is my favorite method?

I didn’t really see an advantage to cooking the bacon on a rack, other than that it cooked out more of the fat. The ends seemed to cook faster than the middle. And you have to scrub bacon bits off the rack.

The directly-on-the-pan method is very simple and works well, but there is a lot of cleanup. You have to soak the pan before you can wash it.

I really didn’t think this would be the case, but I liked the parchment method the best. It had the least cleanup, and the bacon cooked really nicely. But it’s important to pour off the grease and throw out the parchment quickly—I made bacon again and left the parchment on the pan for hours, and the grease soaked through.

You can get the same effect by lining your pan with aluminum foil, but I’m kind of a hippie health nut, so I don’t like to cook my food directly on aluminum.

Tips:

I cooked my bacon in a 400-degree oven, as directed on the package. If you’re cooking bacon ends and pieces or thick-cut bacon, a lower oven temperature works better. I cook uneven bacon at 350 degrees.

I like to check my bacon after 10–15 minutes of baking. When it’s getting close to being done, make sure to peek at it every few minutes. Bacon can go from not-quite-done to burnt very quickly.

I had heard that placing your bacon in the oven BEFORE you preheat it helps it to cook more evenly. I tried it with the first two batches, but I didn’t really see a big difference. It saves on energy, though!

It works best if you pour the grease out of the pan while it’s still warm. If you’re using a plastic container to hold the grease, make sure to wait until it cools a bit, otherwise it will warp or melt the plastic.

I don’t find the need, but if you’re really particular about cooking your bacon evenly, you can flip it halfway through the cooking time and also rotate the pan.


How to Cook Bacon in the Oven

Now, go make yourself a BLT with all that awesome bacon!


02 Sep 14:17

make-believe: pencil case.

by erin

I lost my pencil case on a train three years ago. And I haven't really recovered.

It was more of a pencil pouch. A thin tube in soft leather that I'd bought for myself in France where such a thing is called a trousse. Over the years I'd filled it with carefully selected treats from my travels: a German pencil sharpener, an eraser from the Czech Republic, pencils from France, a pen from Italy. But all of it was gone without fanfare when I left the poor thing on my seat on the MetroNorth commuter line.

Risk of loss and subsequent heartbreak aside, if you have a soft spot for souvenirs but aren't sure you need a whole lot of pint glasses or commemorative plates filling your shelves, filling a pencil case is a nice alternative. Picking up a pencil or pen to tote home as a keepsake becomes doubly nice when put to use. (Which is, of course, the point.) There's something nice about sharpening a pencil picked up from a stationery shop in Paris until there's nothing left but a tiny nub and then replacing it with another from a tiny shop in Tokyo.

I may not be headed back to school this fall, but that hasn't stopped me from daydreaming about my ideal pencil case (and travel itinerary). I can practically hear the dull rumble of rifling through the filled pouch. Here's what I'd put inside:

1. This beautiful Missouri-made pouch.
2. This multi-holed sharpener.
3. This Czech eraser.
4. This extra-shiny pencil.
5. This softer version of a classic.
6. This fountain pen, because why not?
7. The accompanying ink, because of course.
8. A chubby set of colored pencils.
9. This brass ruler.
10. These brass clip numbers. Because, fancy.

More make-believe, HERE.
02 Sep 13:57

Ikea, move over: Bertolini Steel Kitchens introduces affordable, ready-to-assemble metal kitchen cabinets to the U.S.

by pam kueber

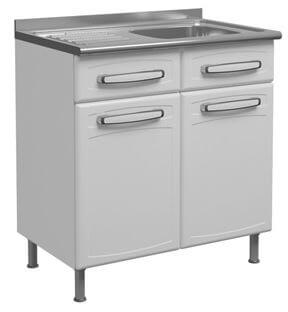
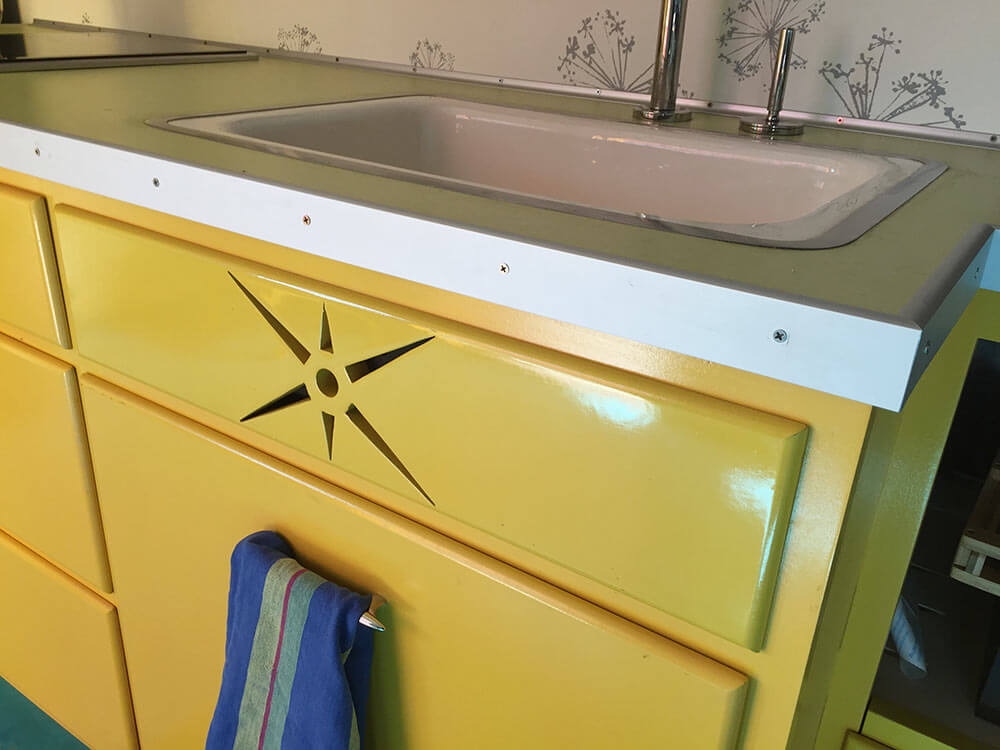
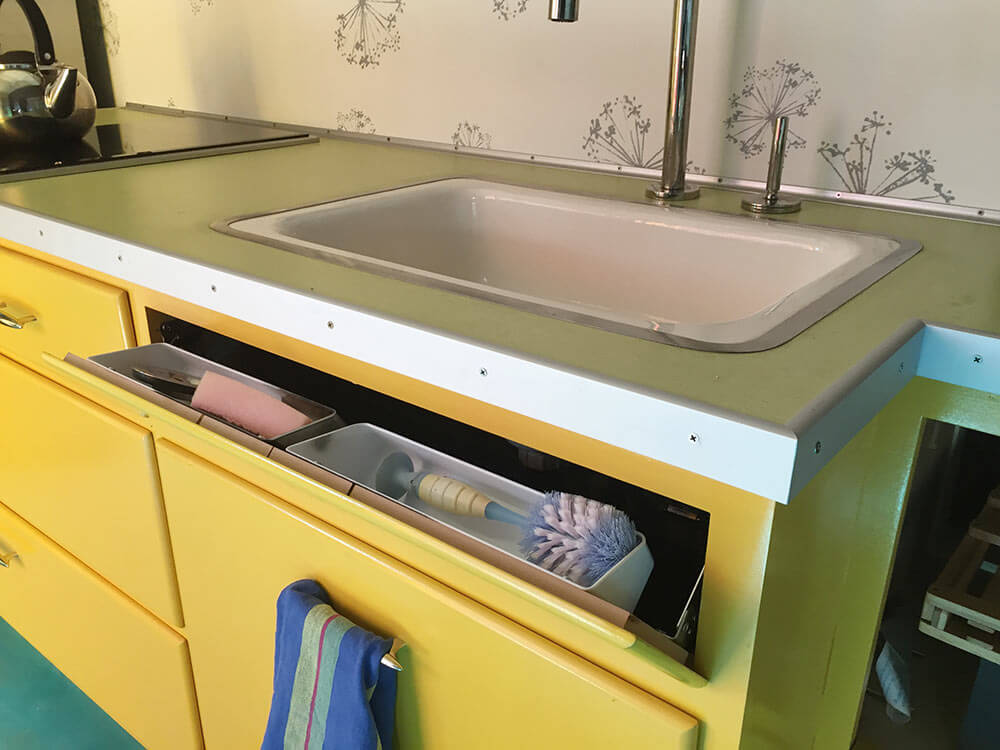
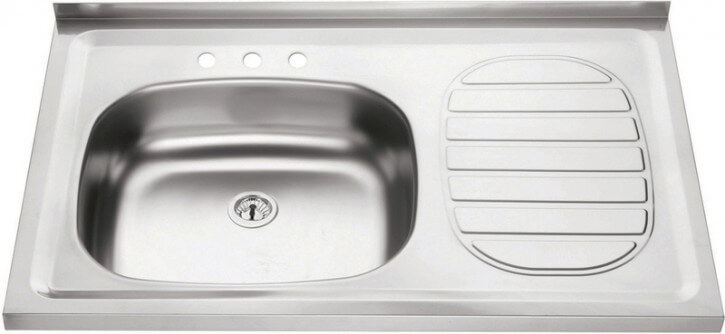
31″ steel sink base — including a drainboard sink (!), legs and pulls — just $173 [+ shipping]

bertolini kitchens
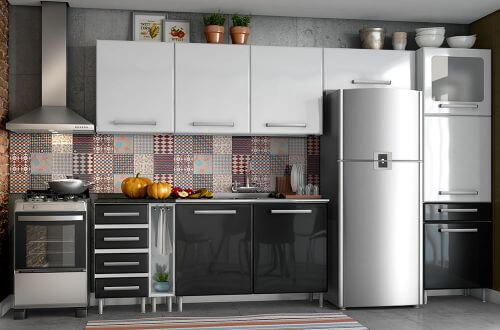
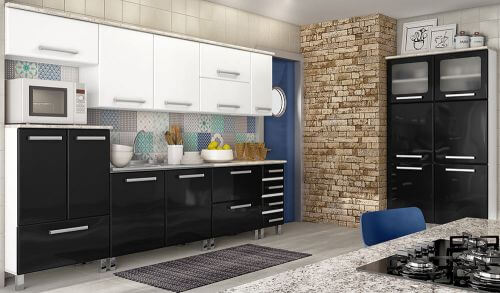
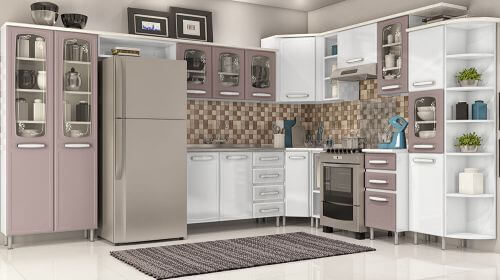
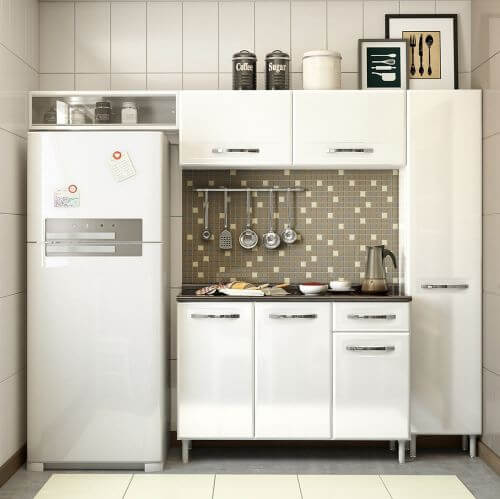
Watch out, Ikea: Bertolini Steel Kitchens, which has been manufacturing metal kitchen cabinets for 45 years in Brazil, is making its move on the U.S. market. Offering affordable, ready-to-assemble steel kitchens with seven door styles, Bertolini has signed six dealers in Florida, with more in the works.

Steel kitchen cabinets were immensely popular in midcentury America following World War II — we’ve identified more than 70 vintage brands. Considering that Americans are now comfortable with the idea of ready-to-assembly [thanks, Ikea!] AND considering the renewed popularity of retro style AND considering that, according our price comparison, Bertolini’s steel cabinets appear to be competitively priced vs. Ikea’s fiber- and particleboard cabinets, the question now is: Can Bertolini win over a new generation of buyers in the U.S., the world’s largest market for cabinets, to the value, benefits and aesthetics of metal kitchen cabinets?

modern steel kitchen cabinetsLuis Garcia, director, Bertolini Steel Kitchens USA, is leading the effort to set up distribution and sales here. In a phone interview, he told me that as Bertolini has become increasingly efficient, it’s been able to grow into new markets. The company today sells $300 million (USD) worth of steel kitchen cabinets globally. Latin America as a region accounts for the majority of sales. Bertolini cabinets are sold in Walmart in Mexico! Sales in South Africa also are strong.

Steel kitchen cabinets
In a news release earlier this month, the company said, “their entry into the U.S. market marks their intentions to extend the availability of their exclusive DIY modular steel kitchen cabinets to the entire North American region.” Stay tuned, Canada!

bertolini-kitchen-ivory-allegra

Allegra in Ivory – a special-order color

Driving the decision to enter the U.S. market, Garcia said, “is that they’re a bigger company, have grown more internationally, with sales in the millions. This growth has allowed them to drive down cost and improve quality, packaging and marketing materials. They continue to make changes to product according to new markets in term of sizes, colors and styles.

And, he said, “Finally, my belief is that the time was right now, and that consumers are more willing to assemble and use affordable steel kitchen cabinets.”

Single center no Holes bertolini sinkSingle center with holes stainless steel drainboard sink bertolini

stainless steel drainboard sink bertolini

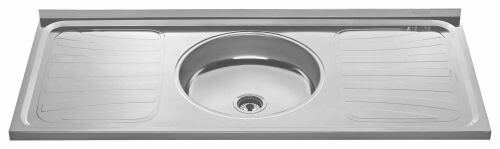
Full-width, integral stainless steel drainboards sinks are included in the price of all the sink bases.

Indeed, Garcia told me that Bertolini had looked at entering the U.S. market ten or 12 years ago, but a research firm advising the company expressed concern that consumers in the U.S. were not yet familiar enough the “knockdown” (KD) concept. That’s industry speak for assemble-it-yourself. Today, though, Ikea kitchen cabinets have taken the mystery out of the idea and in fact, those Ikea cabinets arguably have a cult following — at least at that price point in the market.

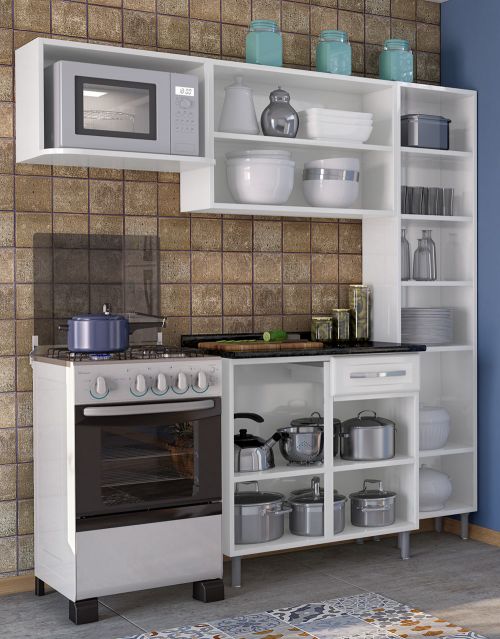
Bertolini seems to offer several benefits at similarly competitive prices. Not only does Bertolini make steel cabinets, but its KD sets are ready to rock and roll — they include legs, cabinets pulls, the laminate countertop and — get this — on sink bases, you get a stainless steel drainboard sink. I priced out a basic 30″(ish) sink base + sink + countertop at both. According to my comparison, Bertolini’s current list price [we’ll see if that holds up as the products are rolled out] is less — even so, they are made of steel — like Superman!  Note, there are a few product differences in my price comparison, though: Bertolini’s standard cabinets are about 3.5″ less deep than Ikea’s, and Bertolini’s larger drawers are wire bins. And, there is the issue of shipping. I am not Consumer Reports, though! There may be other pros and cons — on both sides — that we can assess when Bertolini’s cabinets can be placed side-by-side with Ikea’s and when consumer feedback about Bertolini’s entire value proposition — design + quality + price + ease of assembly + purchase experience — starts rolling in. 

Winning back U.S. customers’ affection for steel kitchen cabinets

Garcia acknowledged that a challenge in the U.S. will be reintroducing consumers to the benefits of steel kitchen cabinets. Here, everyone is now accustomed to wood — even though we may have memories of these cabinets. Luis himself remembers steel kitchen cabinets from his childhood — they were avocado green, and he thinks that his mother bought them from Sears.

Why did steel kitchen cabinets — once so popular — “aspirational”, even — fall out of favor in the U.S. I’ve written about this before — see my entire [Epic] history — but will repeat it in short:

  • Introduced in the 1920s or 1930s — very upscale — “hygenic” with the ability to fight spread of germs because mice and other vermin could not chomp through or on them
  • During World War II, massive build-up of steel production for armaments meant that after the war, the U.S. had all kinds of capacity to make steel — which then got poured into products. One of the main products: Steel cabinets
  • Popularity raged for 15 t0 20 years, into the early 1960s. Then, I hypothesize, a few things happened to change preferences:
  • 1) It’s possible steel prices increased, making steel kitchen cabinets less affordable.
  • 2) The one key downside of steel kitchen cabinets — that you cannot repaint them at will, easily — started to bother homeowners. With care, that painted enamel finish never wears off. You will get sick of it before it wears off.
  • 3) Marketeers — especially marketeers in the wood cabinet industry — pushed new doors styles not easily replicated in steel. The new styles had lots of molding on the front, much more decorative. Plus, they were just — new! Wood marketeers also pushed re-paintability as a feature. And yes, there is a “warmth” factor in wood, and it was likely symbiotic with the changing times.
  • The last steel kitchen cabinet company left standing was St. Charles, which was very upmarket, always the creme-de-la-creme. They stopped production in the early 2000s. The Viking Range company bought the brand and reintroduced steel cabinets in Dec. 2007, but they discontinued sales in Aug. 2012.

I love steel kitchen cabinets. Steel kitchen cabinets were the catalyst for my starting this blog. They definitely have benefits.

Bertolini points out: “Apart from the fact that they are Ready-to-Assemble (RTA), the cabinets are affordable and very easy to maintain, largely due to the mere fact that they are made of steel. The inherent properties of steel are passed on to the customer and maintained in the finished end-product line, such as being recyclable, non-toxic and harboring the ability to withstand harsh outdoor elements.”

As another example of a benefit, Garcia told me that they just finished a project outfitting 35 kitchens in St. Croix. St. Croix has a terrible termite problem, so the property owners wanted steel cabinets.

Nitty gritty

Some details about the Bertolini cabinet sets, from my research:

  • Entry level — no one is suggesting these are high-end cabinets.  [I don’t think anyone suggests Ikea are high-end either, hence I felt comfortable using that comp.] That said: Continue reading, and you will see reader Gert’s reaction to the Bertolinis that he just purchased and assembled: He called the doors “rather sturdy.”
  • You will not be able to order them online. You will need to order via a dealer. To find a dealer in your area, contact Bertolini directly.
  • Prices are the same for six of the door styles; Evidence [the flat slab door] is priced higher.
  • Measurements are in millimeters. See the catalog for the dimensions and then go online to translate. I am sure, that as Bertolini gets its distribution network in place, these will be converted to inches in the marketing materials.
  • Standard depth for base cabinets is 520 mm, which is 20.4724 inches; all the main styles offer an optional 600 mm depth, which is 23.622″, closer to the current U.S. standard of 24″ depths.
  • Note: A 20.7″ cabinet depth would be good for a bathroom! Can you say: Welcome backs, Lavanettes and Lavanities!
  • Similarly, standard wall cabinet sizes are a bit more dimunitive than current American standards — but upsizing is possible on a number of units.
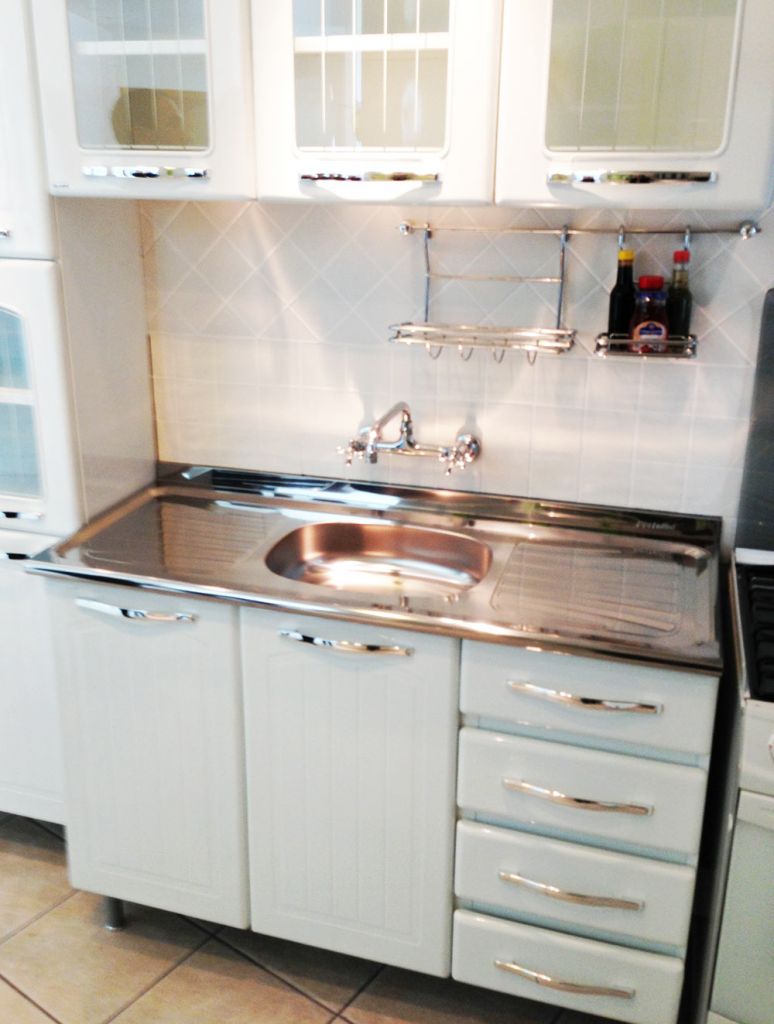
  • Sinks are shallower than what we’re accustomed to in the U.S. They are about six or seven inches deep, Garcia said. Note: I looked and Ikea has the same issue with some of their sinks.
  • Cabinet pulls are a plastic with a laminated finish when you order the six standard door styles. With Evidence you get aluminum pulls. You can order the aluminum pulls for other door styles as an upcharge.
  • There are rounded what-not shelves.
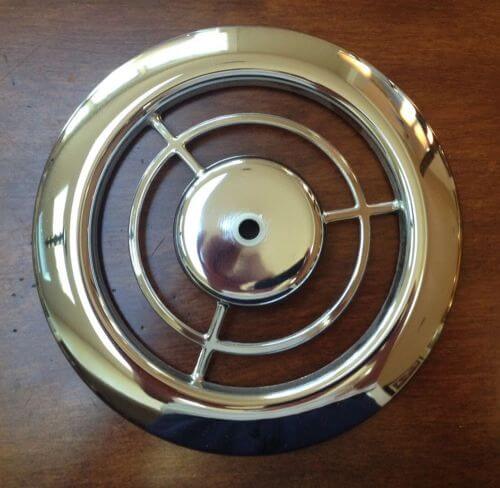
  • There are wide little undercabinets with sliding glass doors in the vein of of GE Cabinettes.
  • There are optional chrome legs.
  • Filler pieces are available.

To make them look more retro — ditch the legs:

  • Ditch those legs — too contemporary. Build a plinth to set them on (plinth = kickplate thingy underneath base cabinets), be sure everything is level, install the base cabinets on it, and cover the toe board with molding painted black. Or: Install them on the legs, then put a plinth cover over them. Ikea makes plinth covers, maybe they would work.

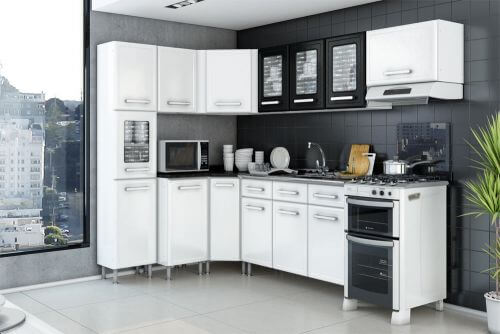
Seven Bertolini Steel Kitchens door styles:

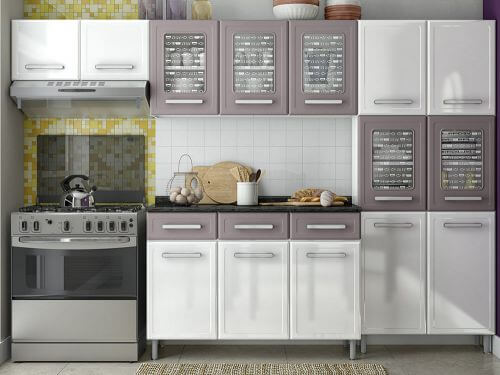
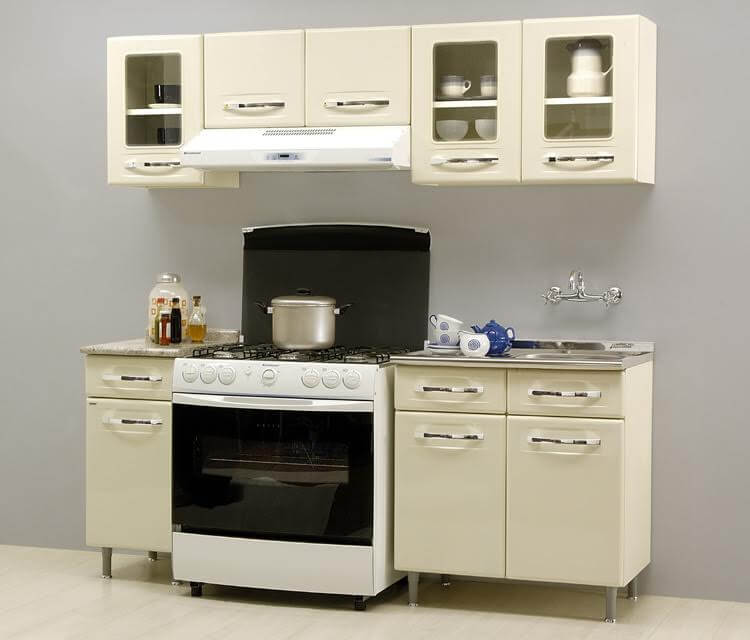
Bertolini Steel Kitchens “Allegra” door style:

bertolini-kitchens-allegra
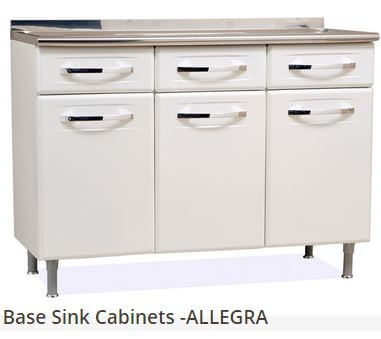
There is something really likeable about Allegra. For a midcentury modest — or modern — kitchen, the curvy pressed metal under the door and drawer pulls soften the contemporary edge imposed by those long cabinet pulls. That is: Modern — but not eschewing all ornamentation. The whole look reminds me of the earliest Genevas, with their plastic recessed handles. A few other early steel cabinet designs also had reminiscent curves. For the dampering effects of these Goldilocks curves on the contemporary pulls, Allegra is my favorite door style.

Coinkadinkally, we had a reader — Gert Berntsson in Sweden — post his Allegras on our Facebook page earlier this month. You can see their shape much better in his photos than in the CAD marketing images:

bertolini-kitchenbertolini-cabinets
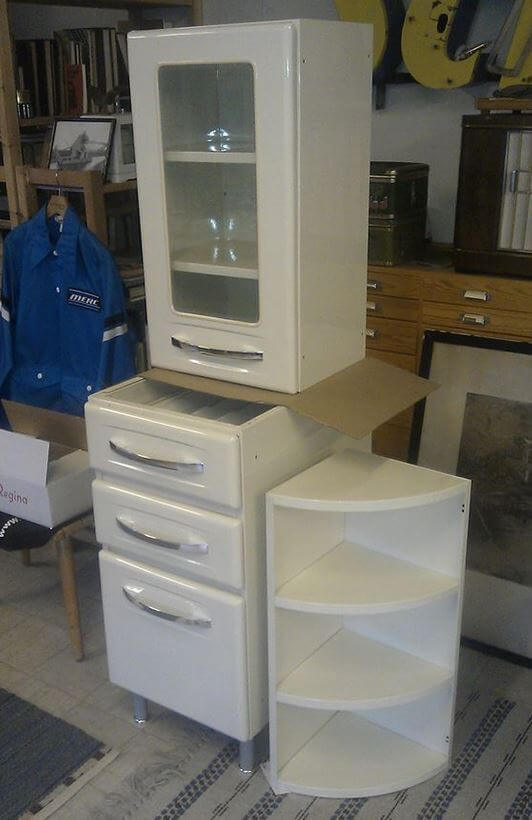
Gert told me via email, “I always check out the local hardware stores when travelling, and years ago I found the steel cabinets.” I guess he then was able to obtain them locally, although I did not pursue those details.

Anticipating that I would ask about his impression of the quality, Gert said that he hasn’t handled a vintage steel kitchen cabinet, so could not make the comparison. He said that the sides feel “a bit thin/flexible — but I haven’t yet fixed them to the wall and floor. I will have them on plinths. The paint work is good, handles are plastic but acceptable. The doors/fronts are double skin and rather sturdy, some small dents can be found, probably from production rather than transport.”

Gert also told me that this color is not white — it is ivory — and while it is not shown in the catalog, is available on demand.

THANK YOU, Gert!!!!

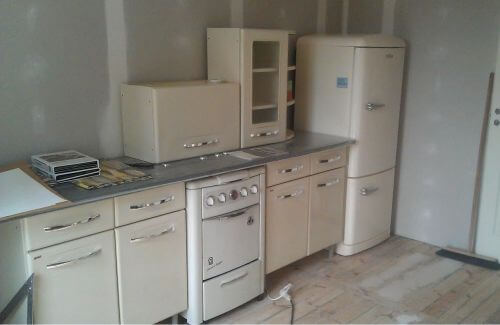
Yes, I asked Luis Garcia of Bertolini, and he confirmed you can order ivory — and beige, here in the U.S. He sent me these photos:

bertolini-allegra-ivorybertolini kitchens

bertolini-kitchens-beige

Discontinued “Personale” door style. But you can still get this color.

I LOVE that ivory! I think that it makes the cabinets even more retro-looking [rather than contemporary]. In general, my eyes can’t take bright white anymore. I would probably not pair it with white appliances, though. I’d go for stainless, or a color if I had the dough-re-mi.

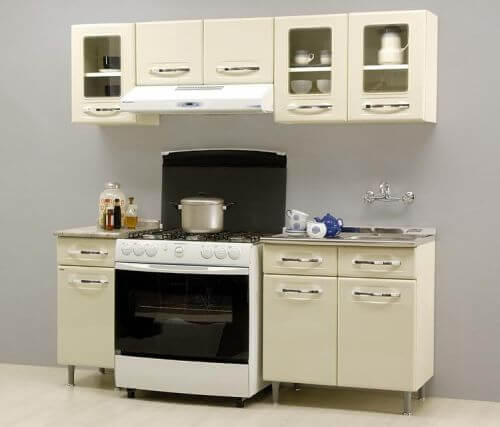
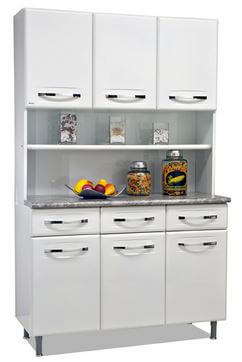
The value-priced “Pratica” package combines pre-selected options from Allegra:

modern steel kitchen cabinets“Pratica” is the name for Bertolini’s value-priced package of pre-selected Allegra cabinets, all boxed up and ready to go. Perfect for a small kitchen where a no-muss, no-fuss, low-priced installation is desired. There are a couple of different options, you can see them in this snip from the Bertolini-Brasil catalog:

pratico-packagesTwo choices of sink base… matched with four choices of the other three cabinets combined… and boom, out it goes. If you want to add pieces later, choose from the Allegra line to do so.

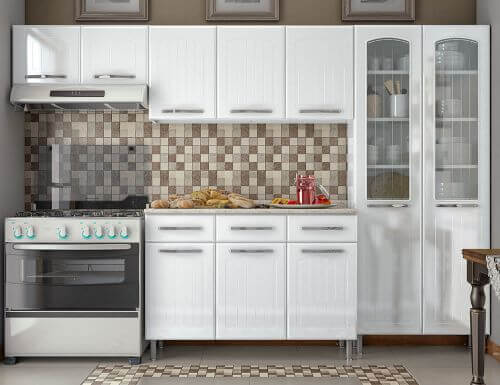
Bertolini Steel Kitchens’ “Classica” door style:

modern steel kitchen cabinets

In this CAD image, we get a sense of how the cabinets would look if they were set on a plinth, rather than on legs.

modern steel kitchen cabinetsmodern steel kitchen cabinets

Bertolini Classica steel kitchen cabinets

Not a CAD image — Classica as photographed in the showroom.

Bertolini Classica

Another photo of Classica in the showroom – [I think the pulls are not the standard aluminum pulls]

Classica has slab doors, which is what we see most on vintage steel kitchen cabinets. It is the only door style that comes with metal pulls — these are aluminum [you may special order them for other cabinets at an upcharge.] And, it also is the only door style that costs more than the others.

With the long, chunky aluminum cabinet pulls, I see these cabinets entering Dwell-contemporary [rather than Retro Renovation retro] mode. For that reason, I would hesitate to put these in a midcentury modest kitchen.

Bertolini Steel Kitchens “Gourmet” door style:

I also like the look of the Gourmet door style for a midcentury kitchen — either modest or modern. Dig that glass!!!
bertolini steel kitchen cabinets gourmet door stylebertolini-gourmet-kitchen-cabinetsbertolini steel kitchen cabinets gourmet door style

Bertolini Gourmet metal kitchen

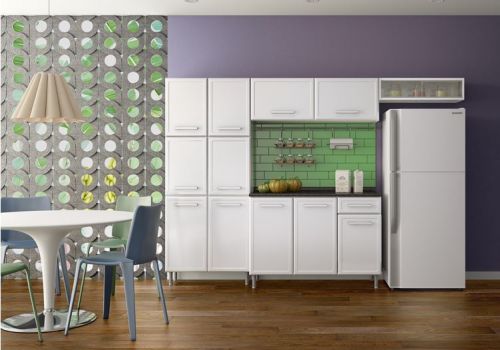
“Gourmet” kitchen cabinets photographed in the showroom

Bertolini kitchens Gourmet glass

I love the glass in Gourmet!

Bertolini Steel Kitchens “Evidence” door style:

Some additional curves go into Evidence, you get different glass, and the white pulls:

bertolini-kitchen-sink-base-evidencebertolini metal kitchen cabinets bertolini evidencesteel kitchen cabinets bertolini evidence

Bertolini Steel Kitchens “Ideal” door style:

These steel doors are pressed to look like cottage beadboard. Knowing what I do about historical steel kitchen cabinets, this style gives me cognitive dissonance, but here you go:bertolini-kitchens-ideal bertolini kitchens ideal door stylebertolini ideal kitchen

steel kitchen cabinets

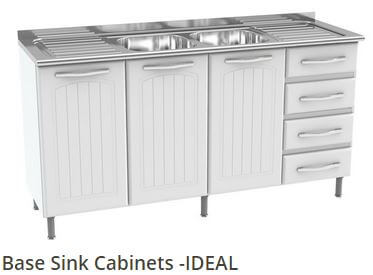
Ideal as photographed in the showroom (not a CAD image)

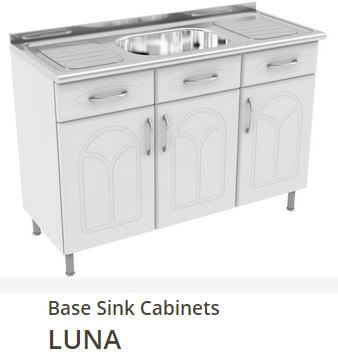
Bertolini Steel Kitchens “Luna” door style:

If I were to tie this to any decades, I’d say 1980s and early 1990s. Ditto the cognitive dissonance:

bertolini-luna-sink-base

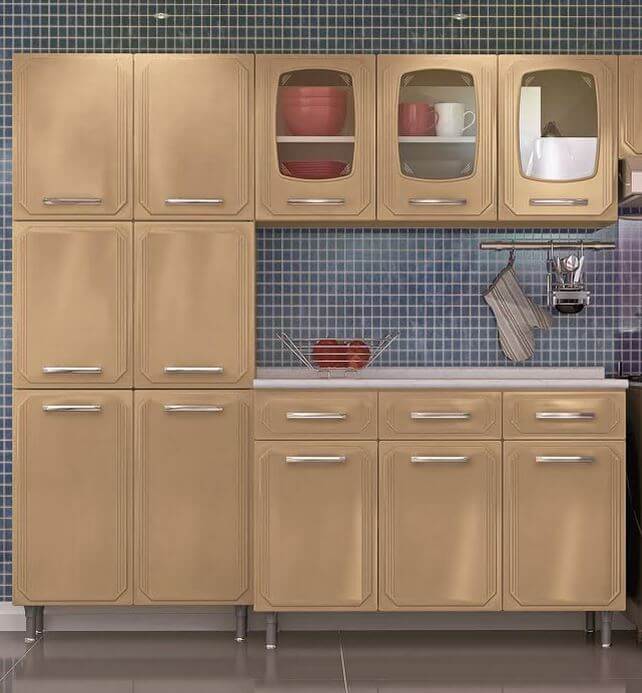
Pantry cabinet kits:

Pantry-cabinet-kits-bertolini

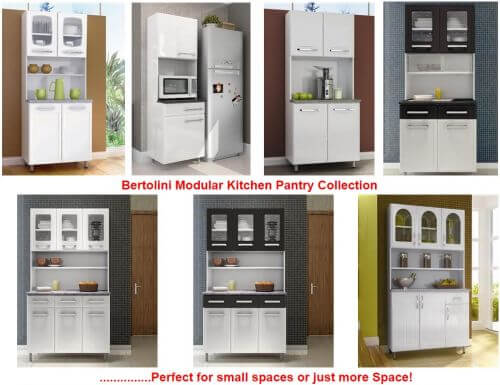
All the door styles can be made up into pantry cabinet kits, too.

Choosing cabinet pulls:

  • Most of the styles come with cabinet pulls that are some sort of plastic laminated with a metal-look finish. Classica comes with aluminum pulls — you can order up to these, if you like.
  • You could also looks for replacements elsewhere. Center-to-center measurements are in millimeters, I don’t know how tough it’s going to be to find these sizes in the U.S.:
    • 40cm door: 192mm/  or  (7-9/16”) inches
    • 60cm door: 256mm/  = (10-5/64) inches

Choosing a countertop:

carrara-laminate-bertoliniAll of the base units include a choice of laminate countertop in the price. To get as close to an historical look, I’d go with the Carrara. The way I understand the modularity of these kitchens is that: If you are screwing several units together, you are going to have the laminate countertop edges butting up one against another. In this case, if you can afford it, order your Bertolinis sans the countertops, then go to Home Depot or Lowe’s or another big box store, and order custom laminate countertops there. Or, check out Heffron’s for special-order retro laminates. See all of our research on kitchen countertops by clicking here.

Links to more information about Bertolini Steel Kitchen cabinets:

The post Ikea, move over: Bertolini Steel Kitchens introduces affordable, ready-to-assemble metal kitchen cabinets to the U.S. appeared first on Retro Renovation.

31 Aug 20:21

BLT Stuffed Avocados

by Joanne
Shh.listen

omg. omg.

If there’s one thing I get at the grocery store every time I go, it’s avocados. Avocado is like the bacon (aka ruler) of the plant world, and I must have it in my kitchen at all times (like bacon). You’ll find me eating avocado toast for breakfast most days, and all of my life’s BLTs have turned into BLATs. Avocado makes everything better!


BLT Stuffed Avocados on The Pioneer Woman: Food & Friends. (Recipe and post from Joanne Ozug of Fifteen Spatulas)

I have my father-in-law to thank for my frequent practice of stuffing avocados. A few years ago, he brought over shrimp salad stuffed avocados for Thanksgiving (a little odd, but delicious nevertheless), and since then I’ve been stuffing avocados with all sorts of yummy collections of ingredients. These BLT stuffed avocados are my favorite. Ripe avocados are filled with crispy bacon bits, homemade bacon fat croutons, tomatoes, and romaine. It’s one big happy family of flavor.


BLT Stuffed Avocados on The Pioneer Woman: Food & Friends. (Recipe and post from Joanne Ozug of Fifteen Spatulas)

To get started, cook four slices of thick-cut bacon in a skillet.


BLT Stuffed Avocados on The Pioneer Woman: Food & Friends. (Recipe and post from Joanne Ozug of Fifteen Spatulas)

While that cooks, cut two slices of sourdough bread into small cubes.


BLT Stuffed Avocados on The Pioneer Woman: Food & Friends. (Recipe and post from Joanne Ozug of Fifteen Spatulas)

When the bacon is crisp and finished cooking, remove to a paper towel lined plate and toss the bread cubes into the skillet.


BLT Stuffed Avocados on The Pioneer Woman: Food & Friends. (Recipe and post from Joanne Ozug of Fifteen Spatulas)

Cook for about five minutes, tossing often, until the croutons are golden and crisp.


BLT Stuffed Avocados on The Pioneer Woman: Food & Friends. (Recipe and post from Joanne Ozug of Fifteen Spatulas)

Chop the cooled crispy bacon up into small pieces.


BLT Stuffed Avocados on The Pioneer Woman: Food & Friends. (Recipe and post from Joanne Ozug of Fifteen Spatulas)

Hello, bacon + bacon fat croutons. Best friends forever.


BLT Stuffed Avocados on The Pioneer Woman: Food & Friends. (Recipe and post from Joanne Ozug of Fifteen Spatulas)

To prepare the tomatoes, slice through the middle hemisphere and push out the seeds and juice with your finger or a butter knife.


BLT Stuffed Avocados on The Pioneer Woman: Food & Friends. (Recipe and post from Joanne Ozug of Fifteen Spatulas)

Chop the tomatoes into small pieces, as well as some fresh romaine lettuce.


BLT Stuffed Avocados on The Pioneer Woman: Food & Friends. (Recipe and post from Joanne Ozug of Fifteen Spatulas)

Combine all the ingredients in a bowl.


BLT Stuffed Avocados on The Pioneer Woman: Food & Friends. (Recipe and post from Joanne Ozug of Fifteen Spatulas)

Then add a couple tablespoons of mayo, a sprinkle of salt, and some freshly cracked black pepper.


BLT Stuffed Avocados on The Pioneer Woman: Food & Friends. (Recipe and post from Joanne Ozug of Fifteen Spatulas)

Stir it all together to coat. The stuffing is now done!


BLT Stuffed Avocados on The Pioneer Woman: Food & Friends. (Recipe and post from Joanne Ozug of Fifteen Spatulas)

Slice 3 or 4 avocados in half through the middle, around the pit.


BLT Stuffed Avocados on The Pioneer Woman: Food & Friends. (Recipe and post from Joanne Ozug of Fifteen Spatulas)

Sprinkle the tops of the avocados with sea salt.


BLT Stuffed Avocados on The Pioneer Woman: Food & Friends. (Recipe and post from Joanne Ozug of Fifteen Spatulas)

Spoon a couple heaps of BLT filling into all of the avocado halves.


BLT Stuffed Avocados on The Pioneer Woman: Food & Friends. (Recipe and post from Joanne Ozug of Fifteen Spatulas)

It’s ready to eat and enjoy!


31 Aug 17:32

The Ultimate Guide to Hand Washing Your Laundry

by Jennifer Hunter
Shh.listen

Add to list of things to do before winter

Stop dropping big bucks at the dry cleaner. You really can clean your delicates at home in your bathroom sink as long as you do it the right way. Here's everything you need to know.

READ MORE »

31 Aug 13:41

Lettuce Wraps

by Ree
Shh.listen

Lettuce wraaaaaaaps!

Lettuce wraps are everything. Absolutely everything. And I know they’ve been around forever, and I know they’re everywhere, and I know I shouldn’t have worn turquoise mascara when I got my senior pictures taken back in the eighties. I get that. But I’m not sorry.

(For the lettuce wraps or the turquoise mascara.)

Here’s how I like to make them!

 
Lettuce WrapsFirst, make the marinade for the chicken, which is the cat’s meow, the bomb, and Heaven. It starts with hoisin sauce…


Lettuce WrapsAnd soy sauce


Lettuce WrapsNext, squeeze in a little Sriracha, also known as I Love the Stuff.


Lettuce WrapsA little rice wine vinegar (or heck, any vinegar!) is good…


Lettuce WrapsAnd some minced garlic and minced ginger.


Lettuce WrapsNext, just slice a couple of boneless, skinless chicken breasts into strips…


Lettuce WrapsAnd add them to the marinade, tossing it around to coat it. Then cover it and pop it in the fridge for a couple of hours. You’ll be soooooo glad you did.


Lettuce WrapsAfter that time, grill them on a grill pan (or you can saute them…)


Lettuce WrapsUntil they’ve got fabulous grill marks and are totally cooked through.


Lettuce WrapsOh, and one more thing! Grab a package of those super thin cellophane noodles and pour boiling water over them in a bowl.


Lettuce WrapsRead the package to see how long they need to sit; it doesn’t take long at all for them to be soft and tender and magical. Then rinse them in cold water so they’ll stop cooking…but also so they’ll be cool!


Lettuce WrapsGracious. Will you look at that chicken for a sec?

Oh, and what the heck, go ahead…take two secs!


Lettuce WrapsPile it on a board with shredded carrots (these are the packaged ones), sliced red cabbage, cilantro leaves, julienne cucumbers, and of course…lettuce leaves.


Lettuce WrapsInvite your friends over!

Or don’t, depending on how hungry you are.


Lettuce WrapsOh! Chopped peanuts! (Cashews are good, too!)

Oh, and another thing: Bean sprouts. Love those in lettuce wraps. I just didn’t have any.


Lettuce WrapsTo build the beautiful babies, grab a lettuce leaf and drizzle in a little sweet chili sauce…


DSC_0760Lay on a couple of pieces of chicken…


Lettuce WrapsThen throw on everything else: noodles, carrots, cabbage, cucumbers, cilantro, peanuts, a little more chili sauce (or hoisin or soy or Sriracha.)

(I didn’t take a photo of the lettuce wrap—or me—after I took my first bite. It wasn’t pretty.)

(But it sure tasted pretty.)

Enjoy, friends!

___________________

Note: The printable recipe is at the top of this post, over on the right sidebar. You can also access the printable recipe here:

Lettuce Wraps Printable Recipe

I’m still working to get the actual printable put into the post itself, but in the meantime, here’s the straight-up recipe if you’d like to see what’s in it!

Lettuce Wraps

Ingredients

1/3 cup Hoisin Sauce
1/3 cup Soy Sauce
2 Tablespoons Grated Ginger
1 Tablespoon Sriracha
1 Tablespoon Rice Wine Vinegar
3 cloves Garlic, Grated
2 whole Boneless, Skinless Chicken Breasts, Cut Into Strips
1/4 cup Chopped Cilantro
8 whole Butter Lettuce Leaves
1 cup Bean Sprouts
1 cup Thinly Sliced Red Cabbage
1 cup Julienne Carrots
1 cup Cucumber Slices
2 Tablespoons Chopped Peanuts
1 cup Cooked Thin Rice Noodles
Sweet Chili Sauce, For Serving

Instructions

For the chicken and marinade: Mix the hoisin sauce, soy sauce, grated ginger, Sriracha, rice wine vinegar and grated garlic in a large bowl or resealable plastic bag. Add the chicken strips and marinate, refrigerated, for 2 hours.

Heat a grill pan over medium-high heat.

Remove the chicken strips from the marinade and grill until cooked through, about 2 minutes per side. Transfer to a serving platter and sprinkle with the peanuts and cilantro.

For the lettuce and fillings: Set out the lettuce, bean sprouts, cabbage, carrots, cucumbers and rice noodles on the serving platter.

To assemble, use the butter lettuce leaves to contain the chicken and fillings. Add some chili and hoisin sauce, then roll them up and eat!


28 Aug 14:12

Make Your Own Rose Water Face Mist

by A Beautiful Mess

Make your own hydrating face mist! All natural ingredients- super easy DIYI've been a fan of face mists for a couple years now. (I've used this one and this one and love them both.) Recently, when I started looking at the ingredients in the mists, I realized this would be super easy to make at home. I customized the formula to my own preferences and it turned out super well. Today I'm here to share an easy recipe for making your own refreshing, hydrating face mist at home. 

Make your own hydrating face mist! All natural ingredients- super easy DIY In a glass spray bottle, combine—2 teaspoons Pure Aloe Vera, 1 teaspoon Pure Vitamin E Oil, 1 teaspoon Pure Argan Oil, 4 drops Geranium Essential Oil, 2 drops Ylang Ylang Essential Oil, 4 drops Peppermint Essential Oil, 6 tablespoons Pure Moroccan Rose Water. Next, fill half the remaining bottle with Unscented Witch Hazel Toner and then top it off with distilled water. Shake and spray. 

Other things I used—glass spray bottle (I used this one but on second thought a tinted bottle might be cuter since the oil and water do not mix, which my husband called "gross". Here's another good option.), tiny funnel, distilled water. 

If you don't have every single ingredient, it's OK! You can tweak the ingredients list a little. It's really not a big deal. Essential oils are kind of expensive if you only need them once, so I borrowed mine from a friend! 

Make your own hydrating face mist! All natural ingredients- super easy DIY  Make your own hydrating face mist! All natural ingredients- super easy DIY   Since this mist contains both oil and water, just shake it a little before you spritz! 

Oh—I also used letter stickers from the art section at the craft store to label my bottles (I made two. I'll share the second one sometime soon!) 

This face mist smells SO GOOD. I use mine in the morning (makes me feel more awake) and throughout the day I'll do a little spritz if I want to add a little moisture on top of my makeup. 

Make your own hydrating face mist! All natural ingredients- super easy DIY    As an added bonus, I've been using my new aloe and vitamin E oils on their own, just on my skin. So even though you do have to buy a bunch of ingredients to make this mist, it's good to know that it's stuff you can actually use anyway. Also you can use the ingredients to make refills for a long time, or make extras as gifts! 

xoxo- Elsie 

Credits// Author and Photography: Elsie Larson. Photos edited with A Beautiful Mess Actions

26 Aug 20:01

From sketch to advertisement: Louisa Kostich Cowan’s 1954 bedroom design

by pam kueber
Shh.listen

That bed piece! Headboard! Side tables! Dressing tables! Wall divider!

louisa cowan designHere’s a before-and-after of a different stripe: Up top, the original rendering for a 1954 Armstrong Flooring advertisement by Armstrong’s Louisa Kostich Cowan. And just below it: The rendering as it was actually built out and featured in publications. Hey — I spy George Nelson Bubble Lamp Pendants — don’t forget to enter our giveaway for one, contest ends tomorrow [Thursday, Aug. 27.]

louisa-cowan
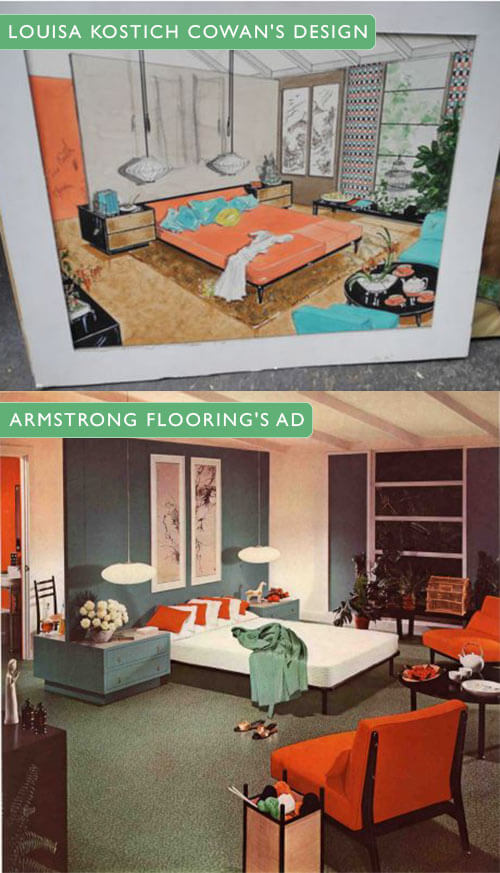
Above: This photo of Louisa Kostich Cowan’s rendering was taken by Al Reist of Reist Auctioneers, who ran the Cowan estate sale auction this summer. I connected with him, and he gave permission for us to feature it here. I had such a lovely talk with him about these drawings — like all of us, he was mesmerized.

mid century modern bedroom
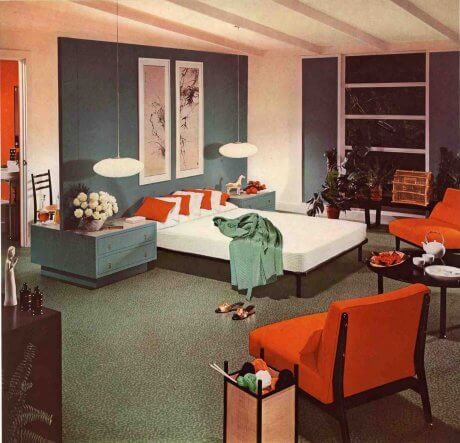
Above: This photo is taken from a very large image in my personal collection. So interesting, how Armstrong decided to keep the basic design, but changed up the palette. I will guess: Armstrong may have already had the orange lounge chairs, so to economize they reversed some things. Or perhaps, they decided to address other colors they were marketing this year? In any case: Such a beautiful bedroom!

The post From sketch to advertisement: Louisa Kostich Cowan’s 1954 bedroom design appeared first on Retro Renovation.

24 Aug 14:33

one-pot pasta.

by erin
one-pot pasta for camping and tiny apartments | reading my tea leavesWhile we were in Maine we attempted one-pot pasta for the first time. I've been meaning to make it for forever and what better excuse than camping to try something new and easy and that dirtes only one pot to boot?

The result was a delicious, creamy, wholly satisfying meal that required nary a strainer or second pot. A camping dream, but a tiny apartment dream, too.
one-pot pasta for camping and tiny apartments | reading my tea leaves
We opted for the classic approach ingredients-wise: olive oil, fresh tomatoes, sea salt, garlic, onion, and pasta. Because we were working with the cast iron pot that's slightly on the small side, I improvised on the measurements that I found on a few different recipes that I found online. I also decided to add fresh mozzarella while camping. Minus a slight foible in filling the pot with a bit too much cheese in an enthusiastic attempt not to have cheesy leftovers to deal with, the experiement worked and then some. I recreated the same here, with slightly less mozzarella. I'd say you can follow measurements I've provided if you want to, but you can also wing it depending on the size of your pan, and you'll probably end up a-ok.

To make preparation even easier, we used tiny sungold tomatoes and bocconcino mozzarella so that I didn't even need to dice tomatoes or cheese. I've used them here, too, but you can certainly make the same thing with diced tomatoes and cheese.
one-pot pasta for camping and tiny apartments | reading my tea leaves
One-Pot Pasta
adapted mostly from this recipe on Martha Stewart

What you need:
12 ounces of pasta (we used fusilli but you can use what you love)
1 small yellow onion, sliced
3-4 cloves of garlic
12 ounces sungold tomatoes (we didn't slice them, but they all burst beautifully)
a small handful (or so) bocconcino mozzarella (or cubed mozzarella)
1/2 teaspoon red pepper flakes
3-4 sprigs of basil, stalks removed
3 cups water (or enough to cover the ingredients)
olive oil
one-pot pasta for camping and tiny apartments | reading my tea leaves
What to do:
Add all of the ingredients to the pot, finishing with a generous glug or four of olive oil. Bring to a boil and then simmer for 10 minutes or so, until the water has evaporated and the pasta is al dente. Serve. Gloat.
one-pot pasta for camping and tiny apartments | reading my tea leaves
If you want a mess-free approach to meal cleanup, forgo the mozzarella. Even with using less of it, it was a little bit of a bear to clean up in round-two, too.

More tomato-y stuff, HERE.