For the last post in this series on dealing with large FBAs (for now), let’s talk about a subject that any sewist can use, regardless of whether she needs a large FBA or even any FBA: dart rotation. People talk about dart rotation a lot on sewing forums in fitting threads, but I’ve rarely run across a comprehensive discussion about the options for dart rotation, let alone a tutorial that actually shows you how to rotate a dart. The good news regarding all of this, though, is that dart rotation is actually pretty easy. In fact, if you can do a princess seam FBA, not only can you rotate a dart, you have a rotated a dart.
In this post, we’ll discuss why you might want to rotate a dart, go through a tutorial showing how to actually rotate a dart after performing your FBA, and talk about some of the location options and show some examples for dart rotation.
Why rotate a bust dart?
A sewist might choose to rotate a dart for two main reasons:
- To add or move a design element from one part of a bodice to another.
- To decrease the size of a large bust dart or remove a bust dart altogether. To learn a bit more about the issues caused by large bust darts, see my previous post: Large FBA Issues: Dealing with the Big Honkin’ Dart
How to rotate a dart
Before we go into all of the options of where you can rotate a dart, let’s walk through one example and show you how to actually perform this pattern alteration.
One of my favorite locations for dart rotation is the shoulder seam. This location can work particularly well if you’re altering a pattern that has a yoke detail at the shoulder, in which case you can change the dart into shirring. Shoulder shirring can provide the addition of both an unobtrusive, feminine detail to a blouse or dress and also provide additional shaping for the bust. If you’ve ever watched the television show Mad Men, pay attention to the costumes for the well-endowed Christina Hendricks’ character Joan Harris; many of Joan’s blouses have a combination of both darts and shoulder shirring.
To rotate a bust dart:
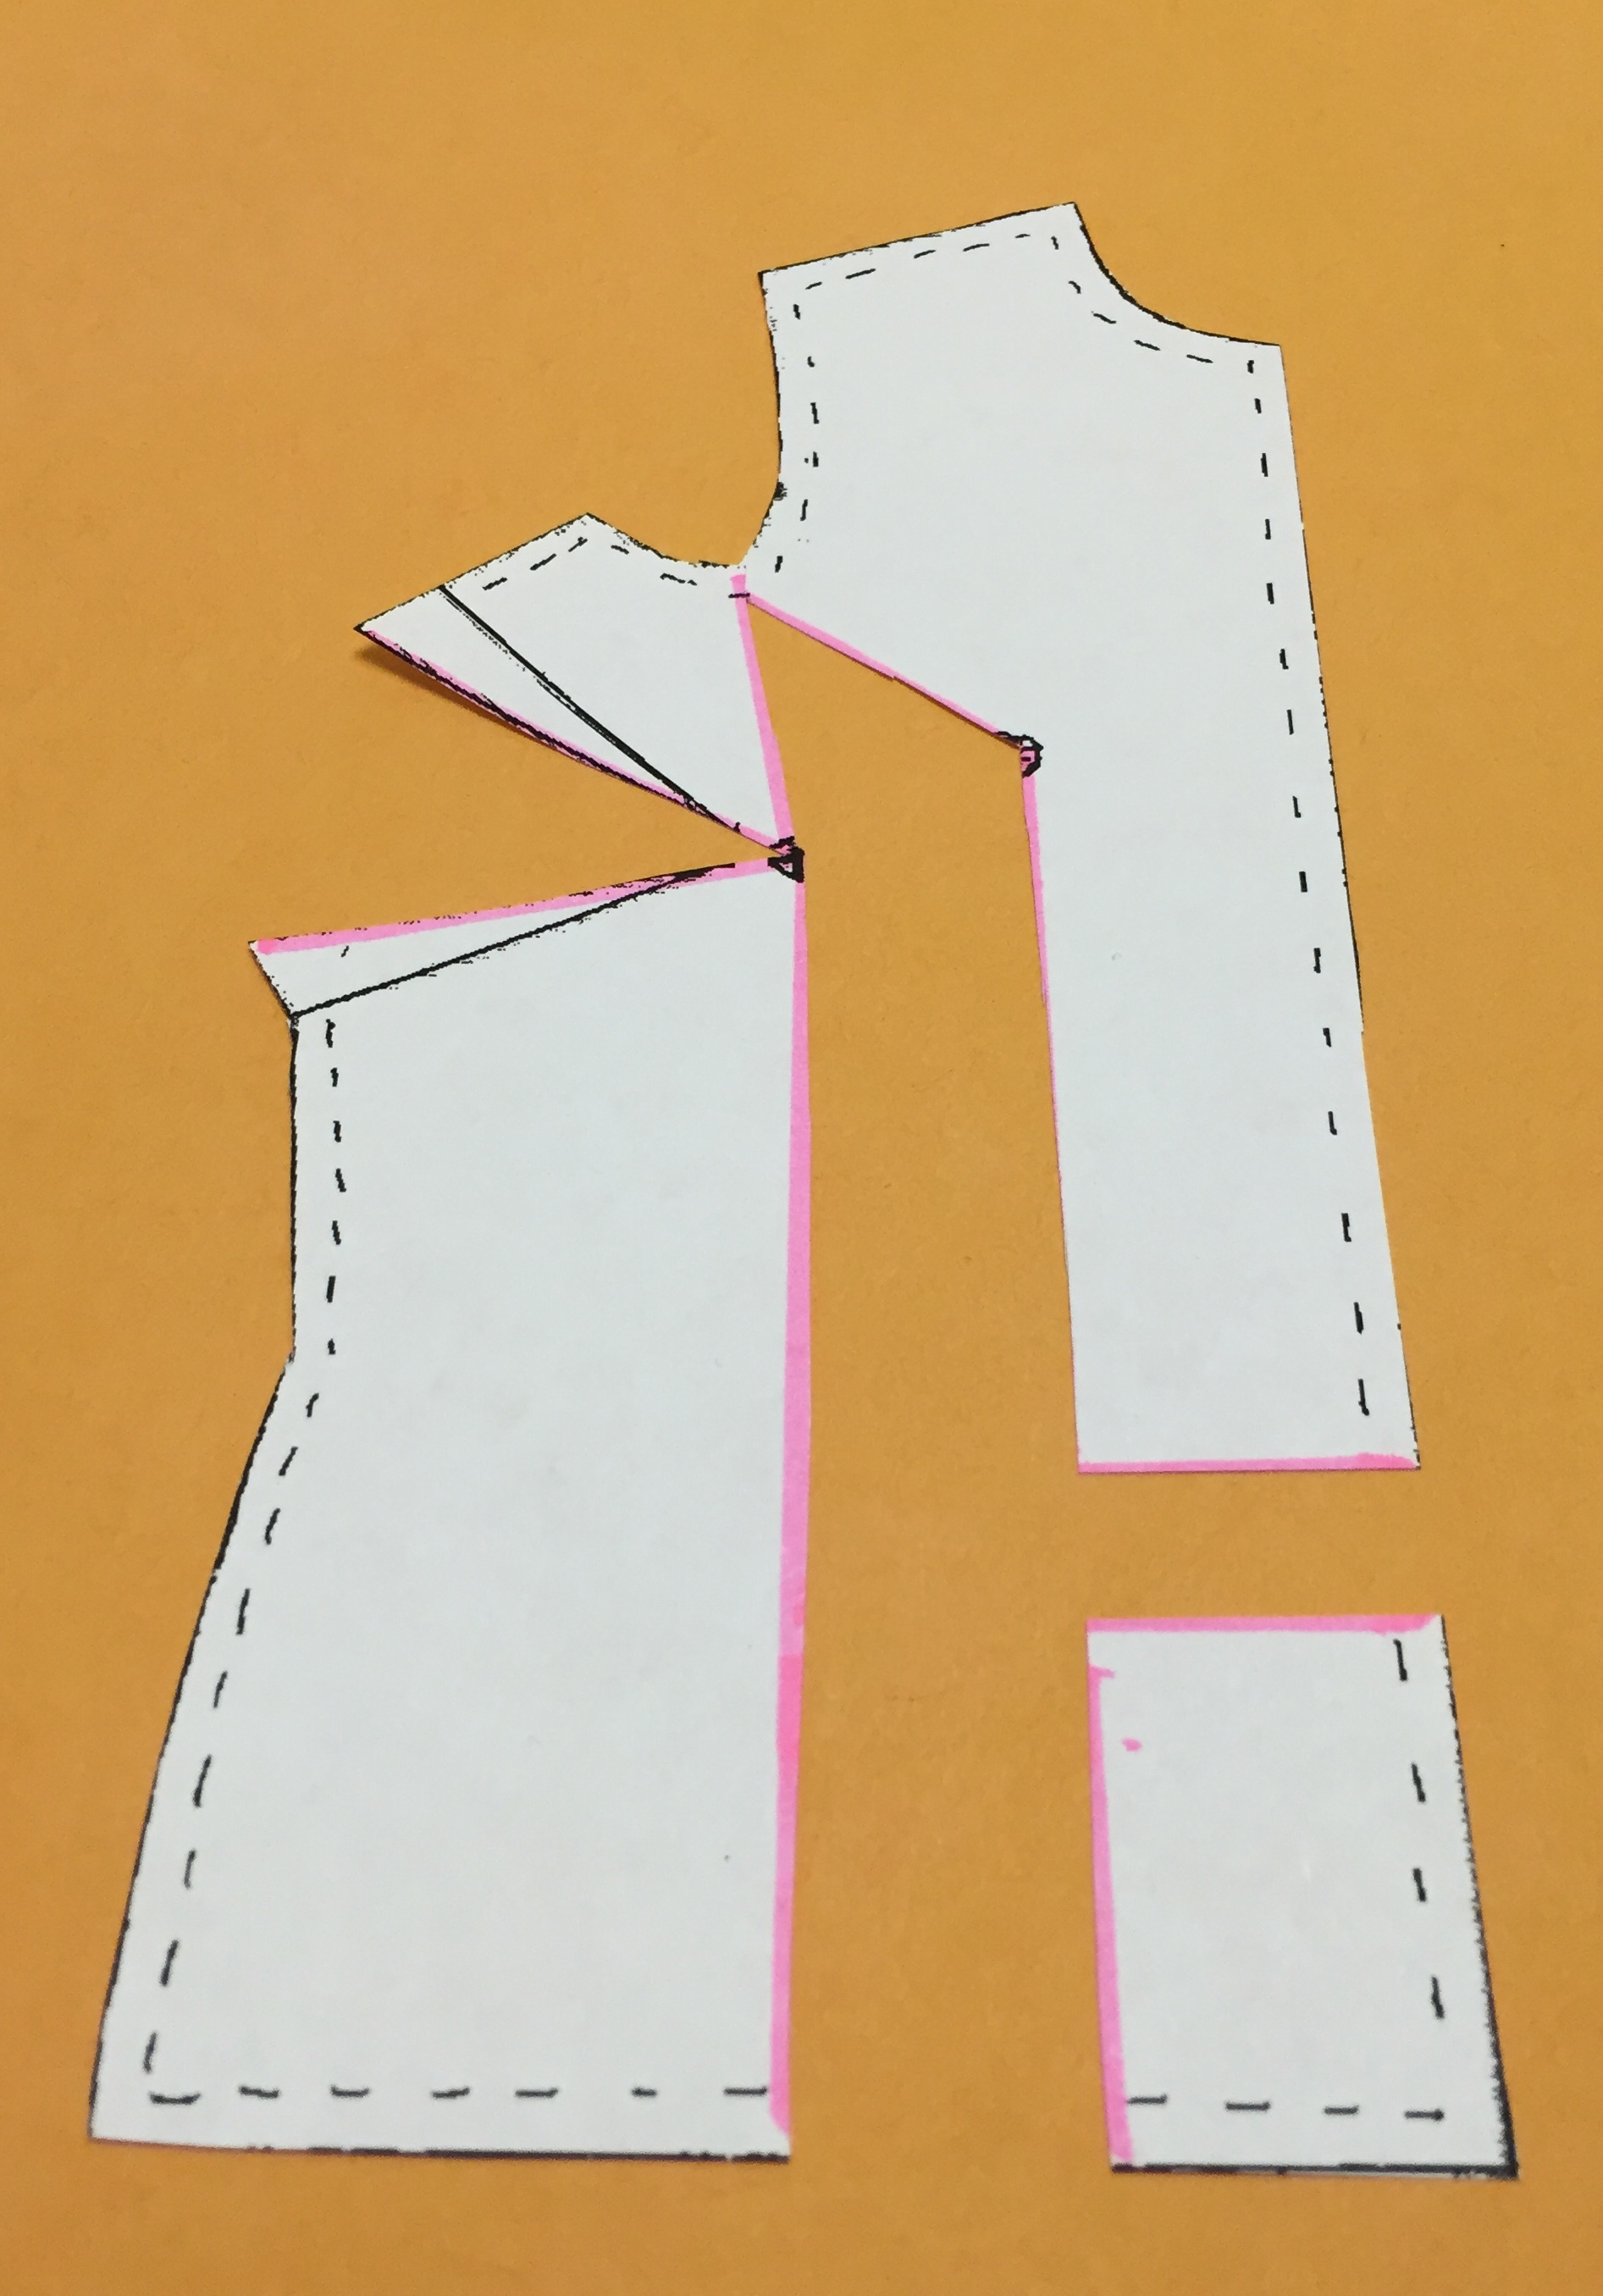
- Perform your FBA as you normally would; however, pin, but do not tape the FBA “fill in” paper. (See Tutorial: A Full Bust Adjustment on a One-Dart Bodice for basic FBA steps.) Note the Big Honkin’ Dart.
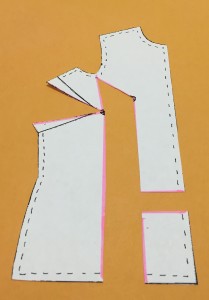
FBA with “Big Honkin’ Dart”
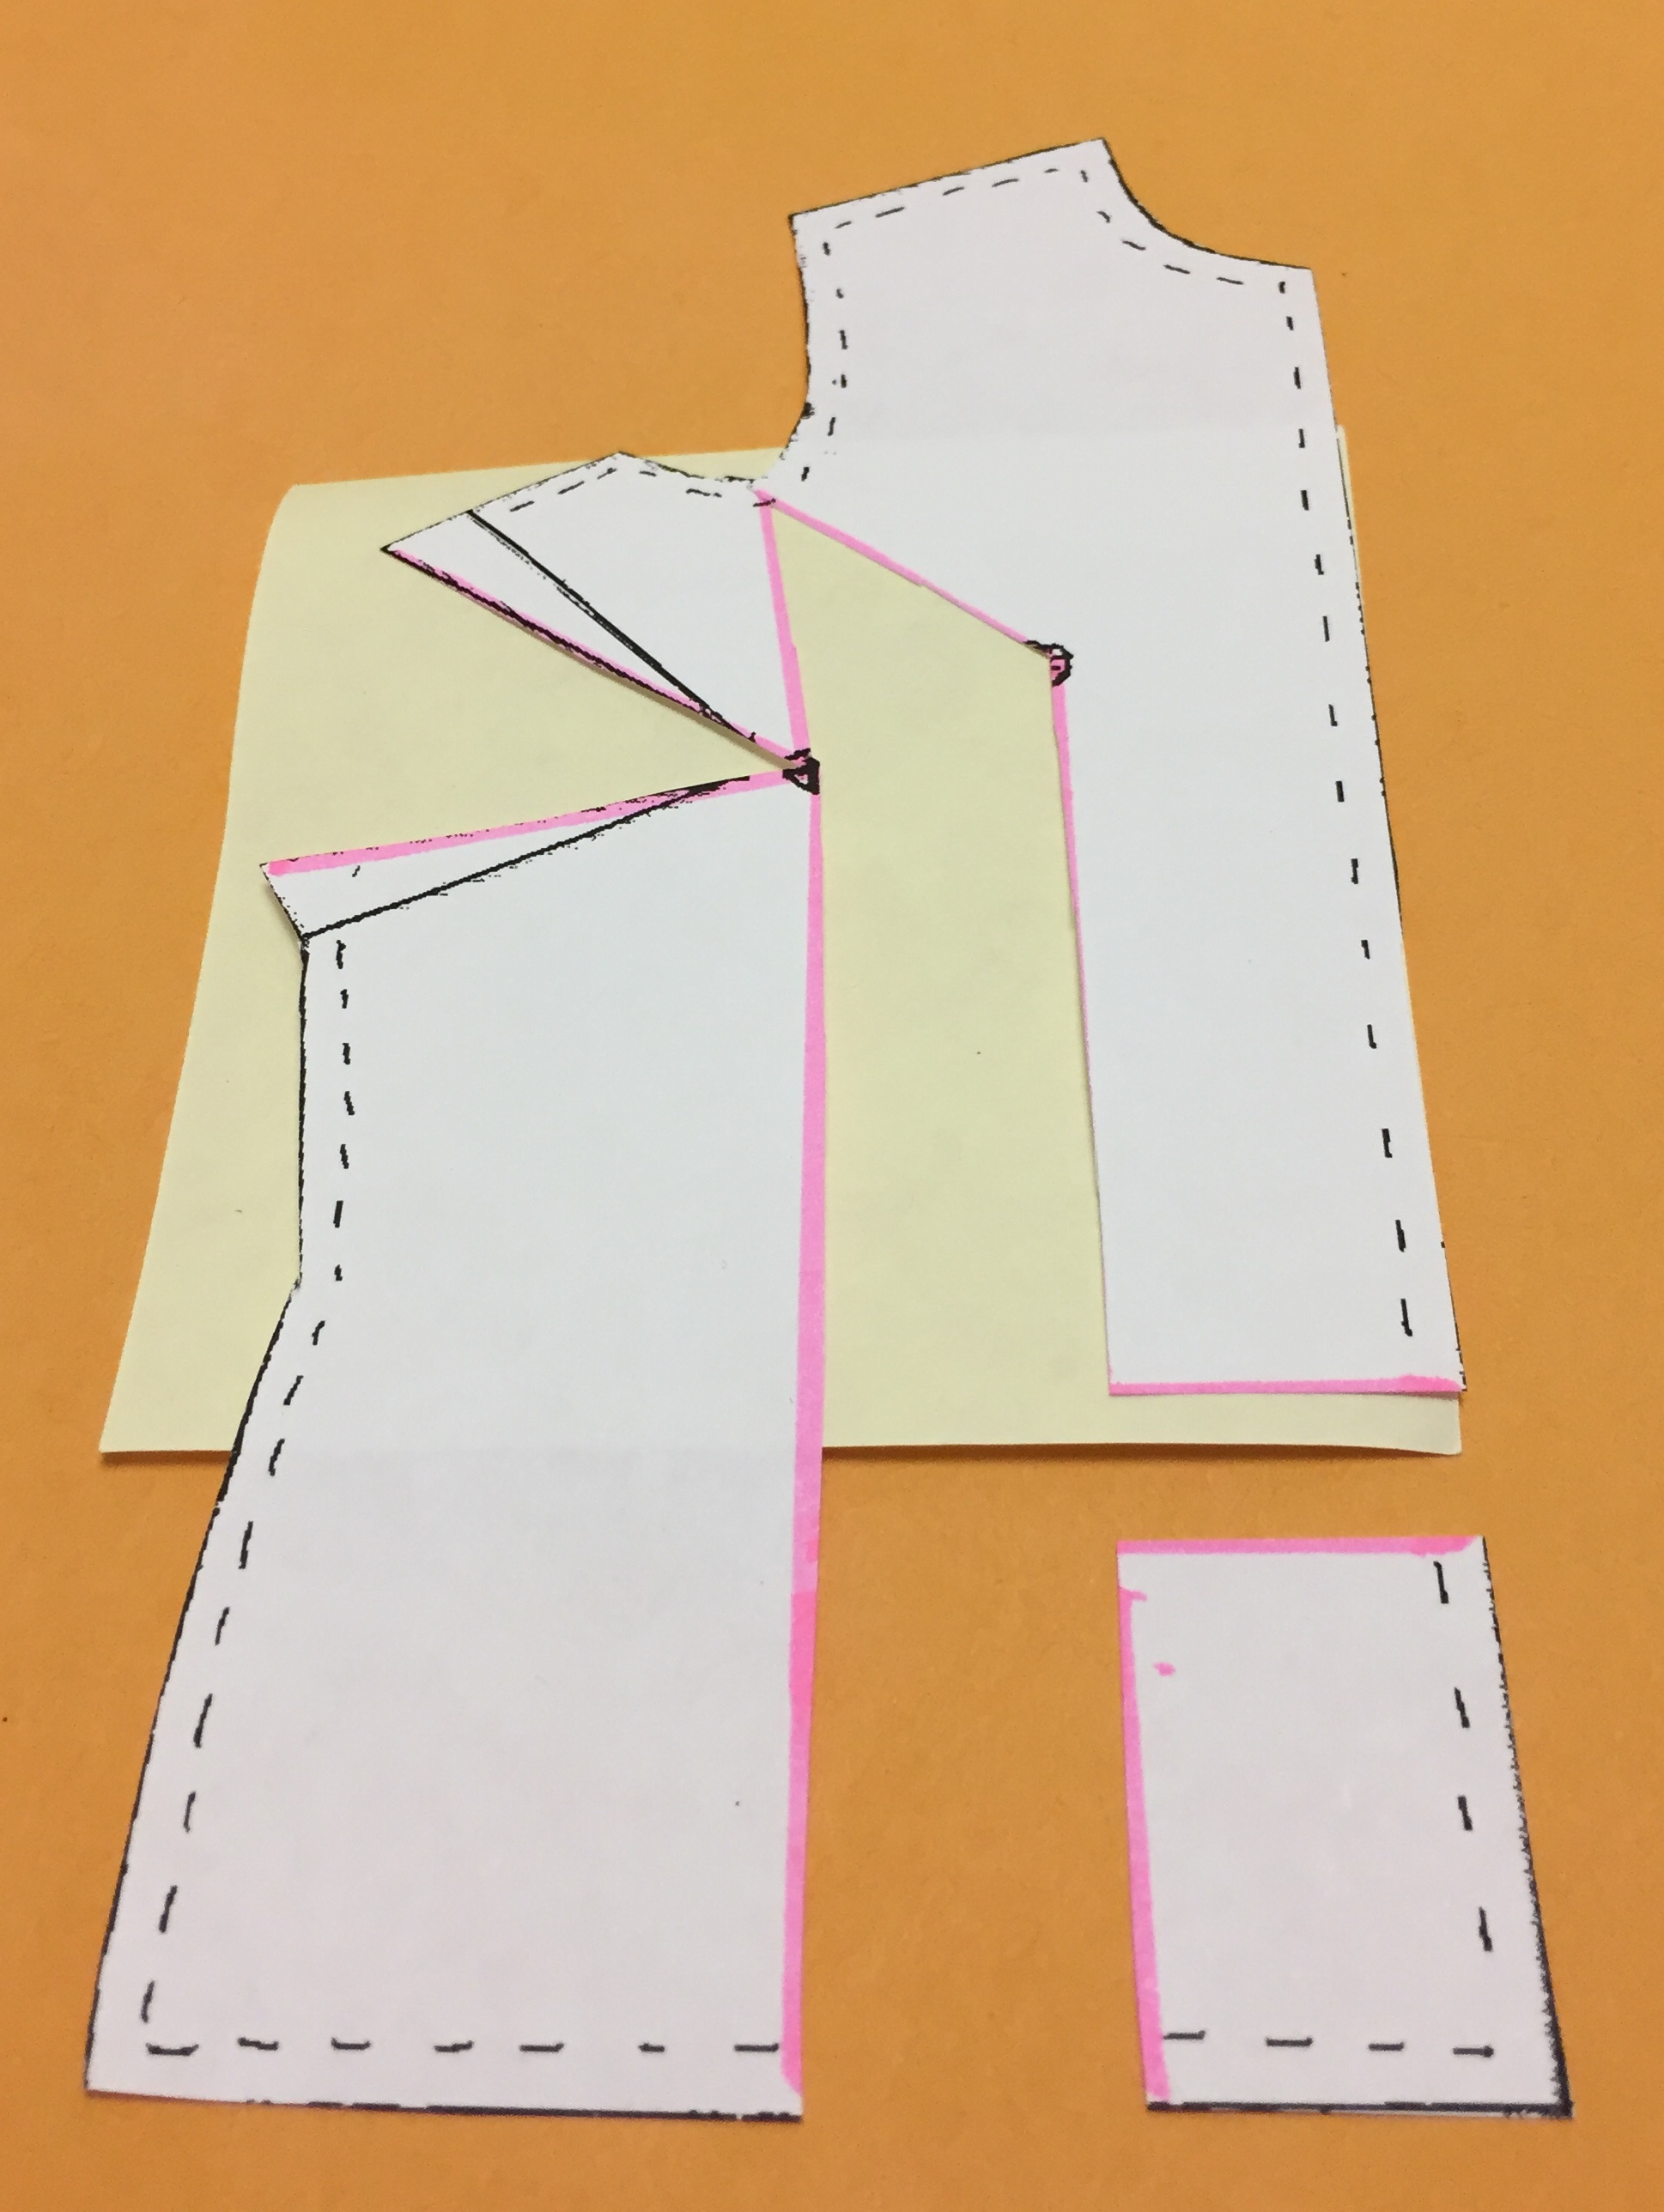
- Fill in the gaps with paper. (For the purposes of this tutorial, we’ll just partially fill in the gaps in the dart area that we’ll be manipulating.)

Fill in your FBA with paper.
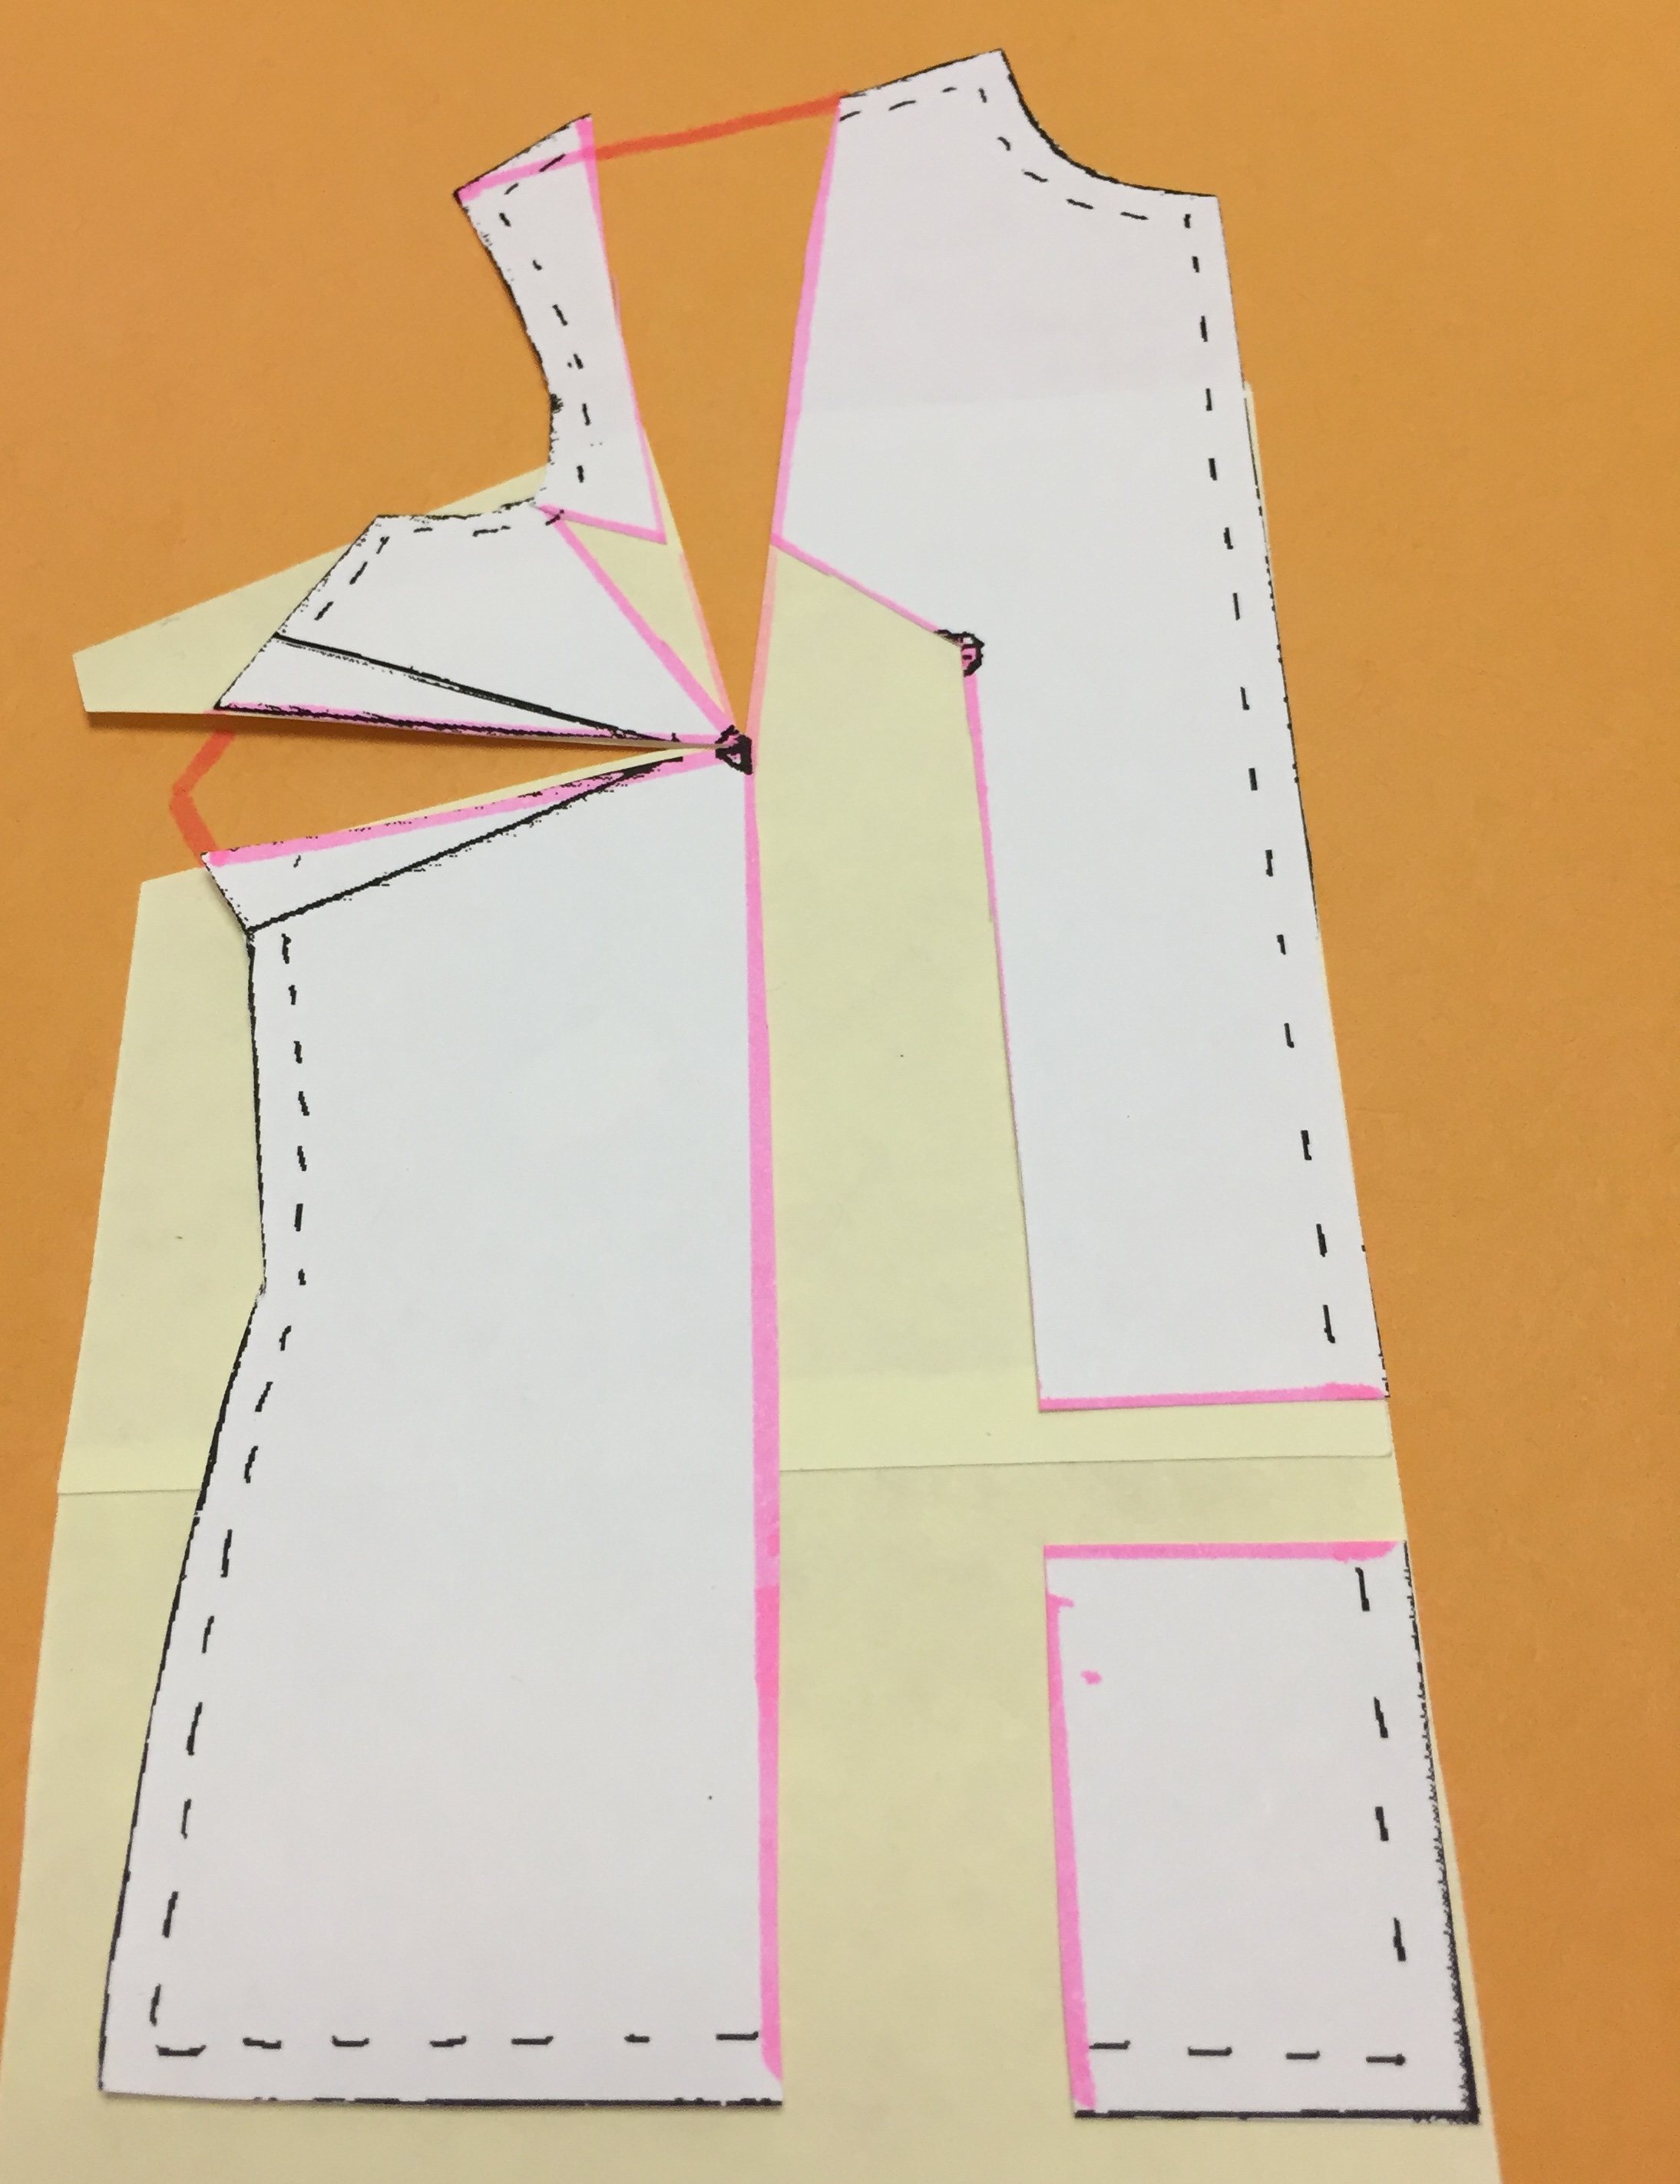
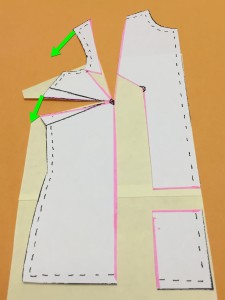
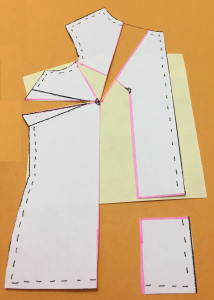
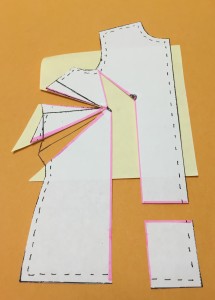
- Draw a line from the pattern’s bust apex to wherever you want your rotated dart’s legs to start. For this example, we’ll draw a line from the bust apex to the shoulder seam:

Draw a line from the bust apex to the new dart opening.
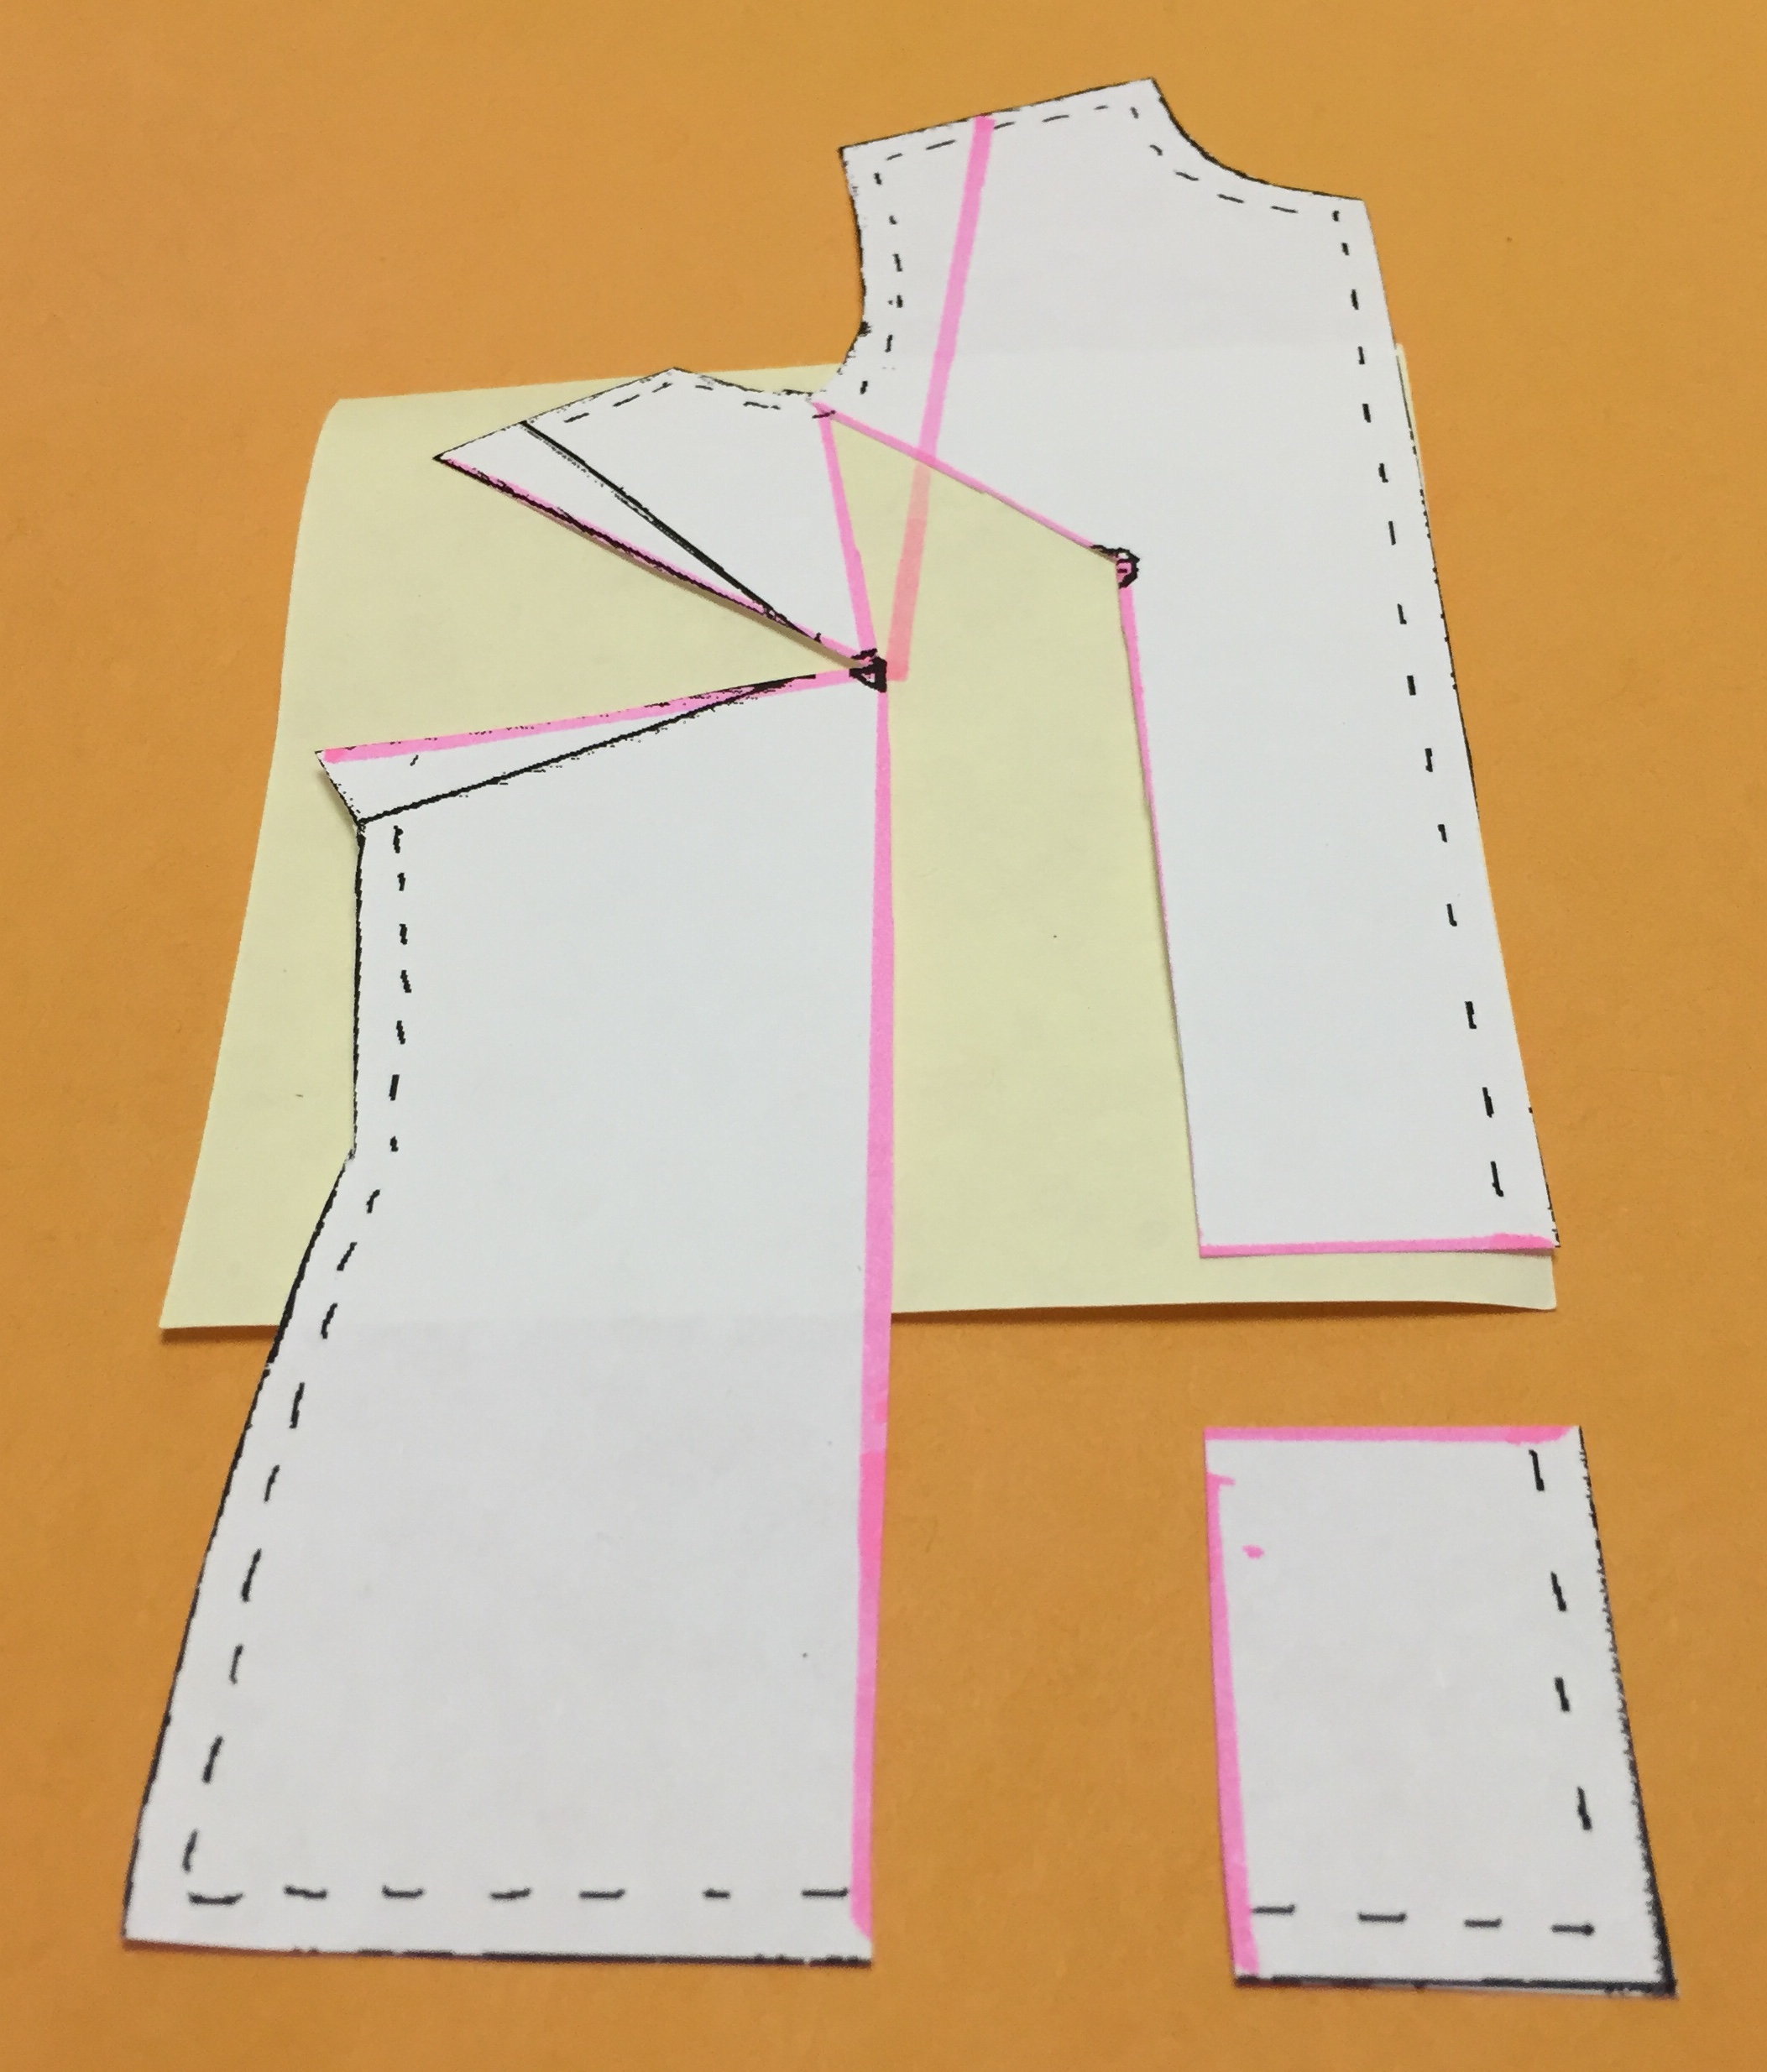
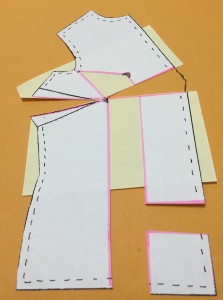
- Starting from where the line ends at the edge of the pattern piece (in this case, the shoulder seam), cut until just short of, but not through, the bust apex. The remaining snip of paper at the apex will become your hinge for dart rotation.
- Cut through and remove the paper filled in behind the horizontal bust dart. Stop just short of the apex, remembering that you want to create a hinge there.
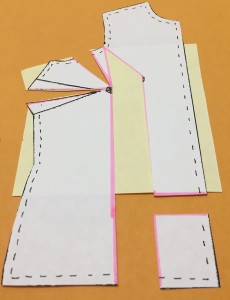
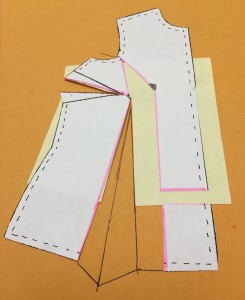
- Rotate the hinged part of your pattern piece to close the horizontal bust dart until that dart is a size that you’re comfortable with. You can even close the dart altogether, if your garment is a style where you’d rather not have a bust dart, such as in a knit top. As you close the bust dart, the cut that you just made from the shoulder seam to the bust apex will open up a new dart:
Rotate the hinged part of your pattern piece to close the bust dart an open the shoulder dart.
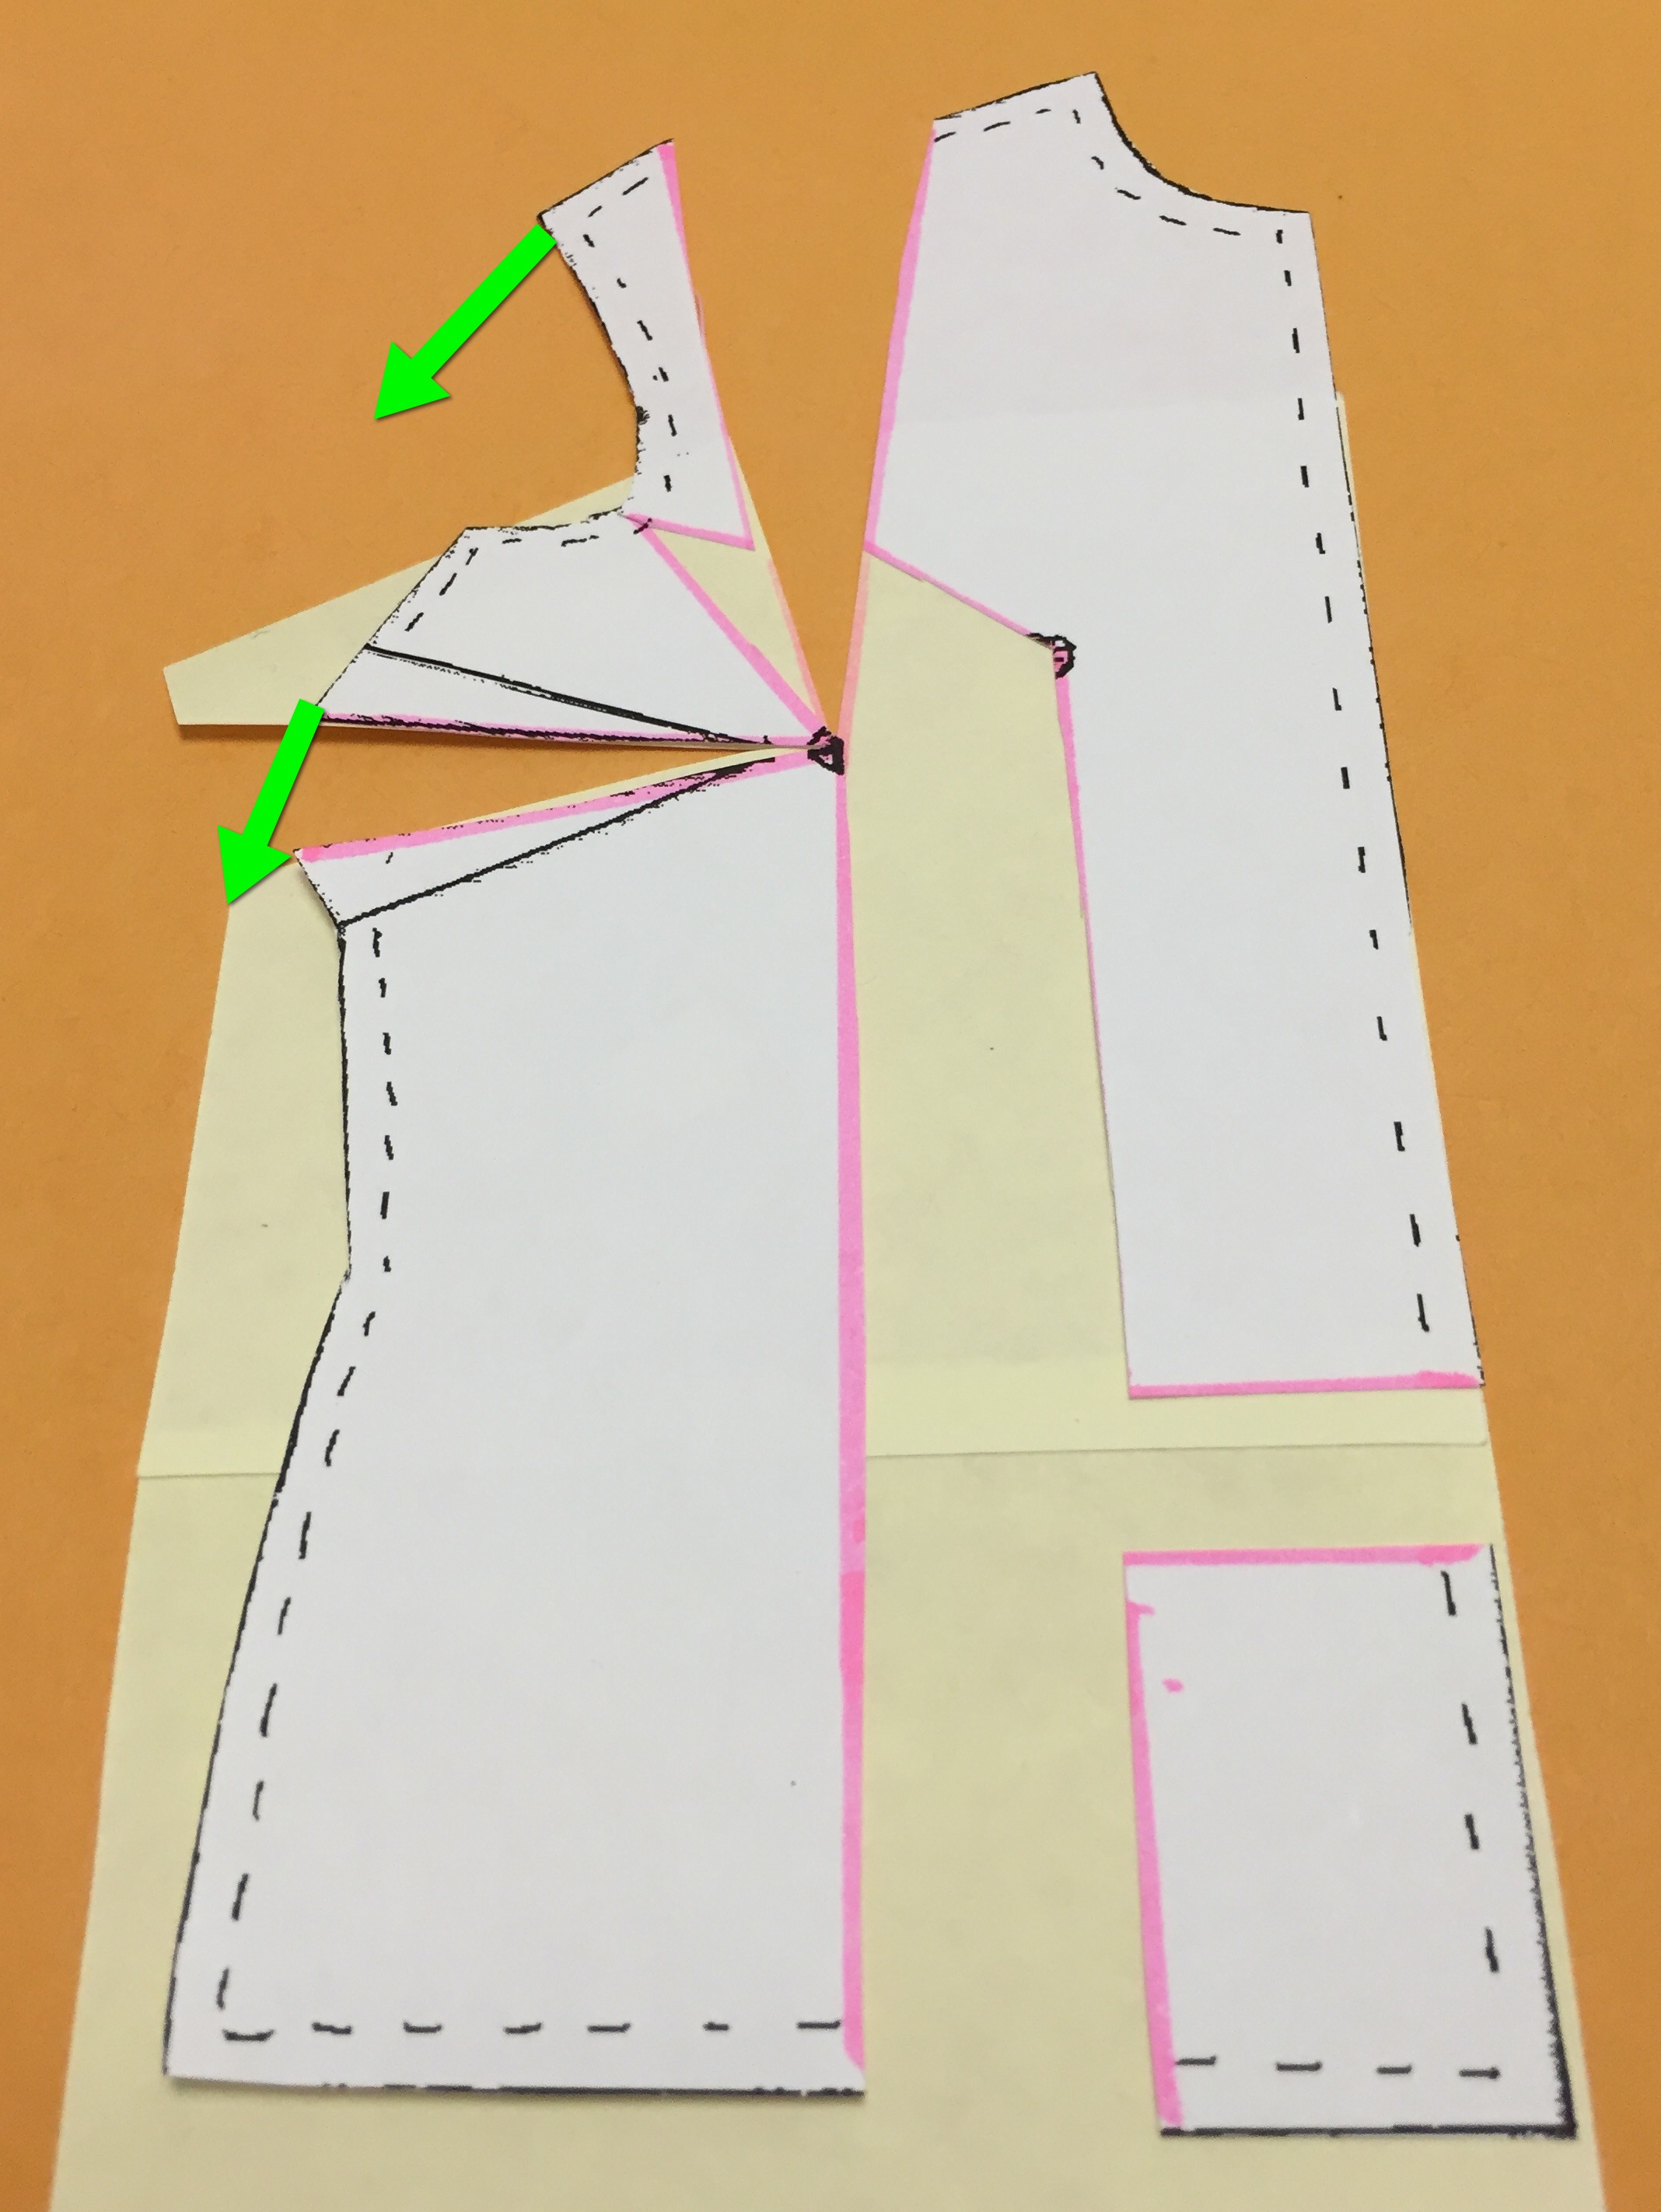
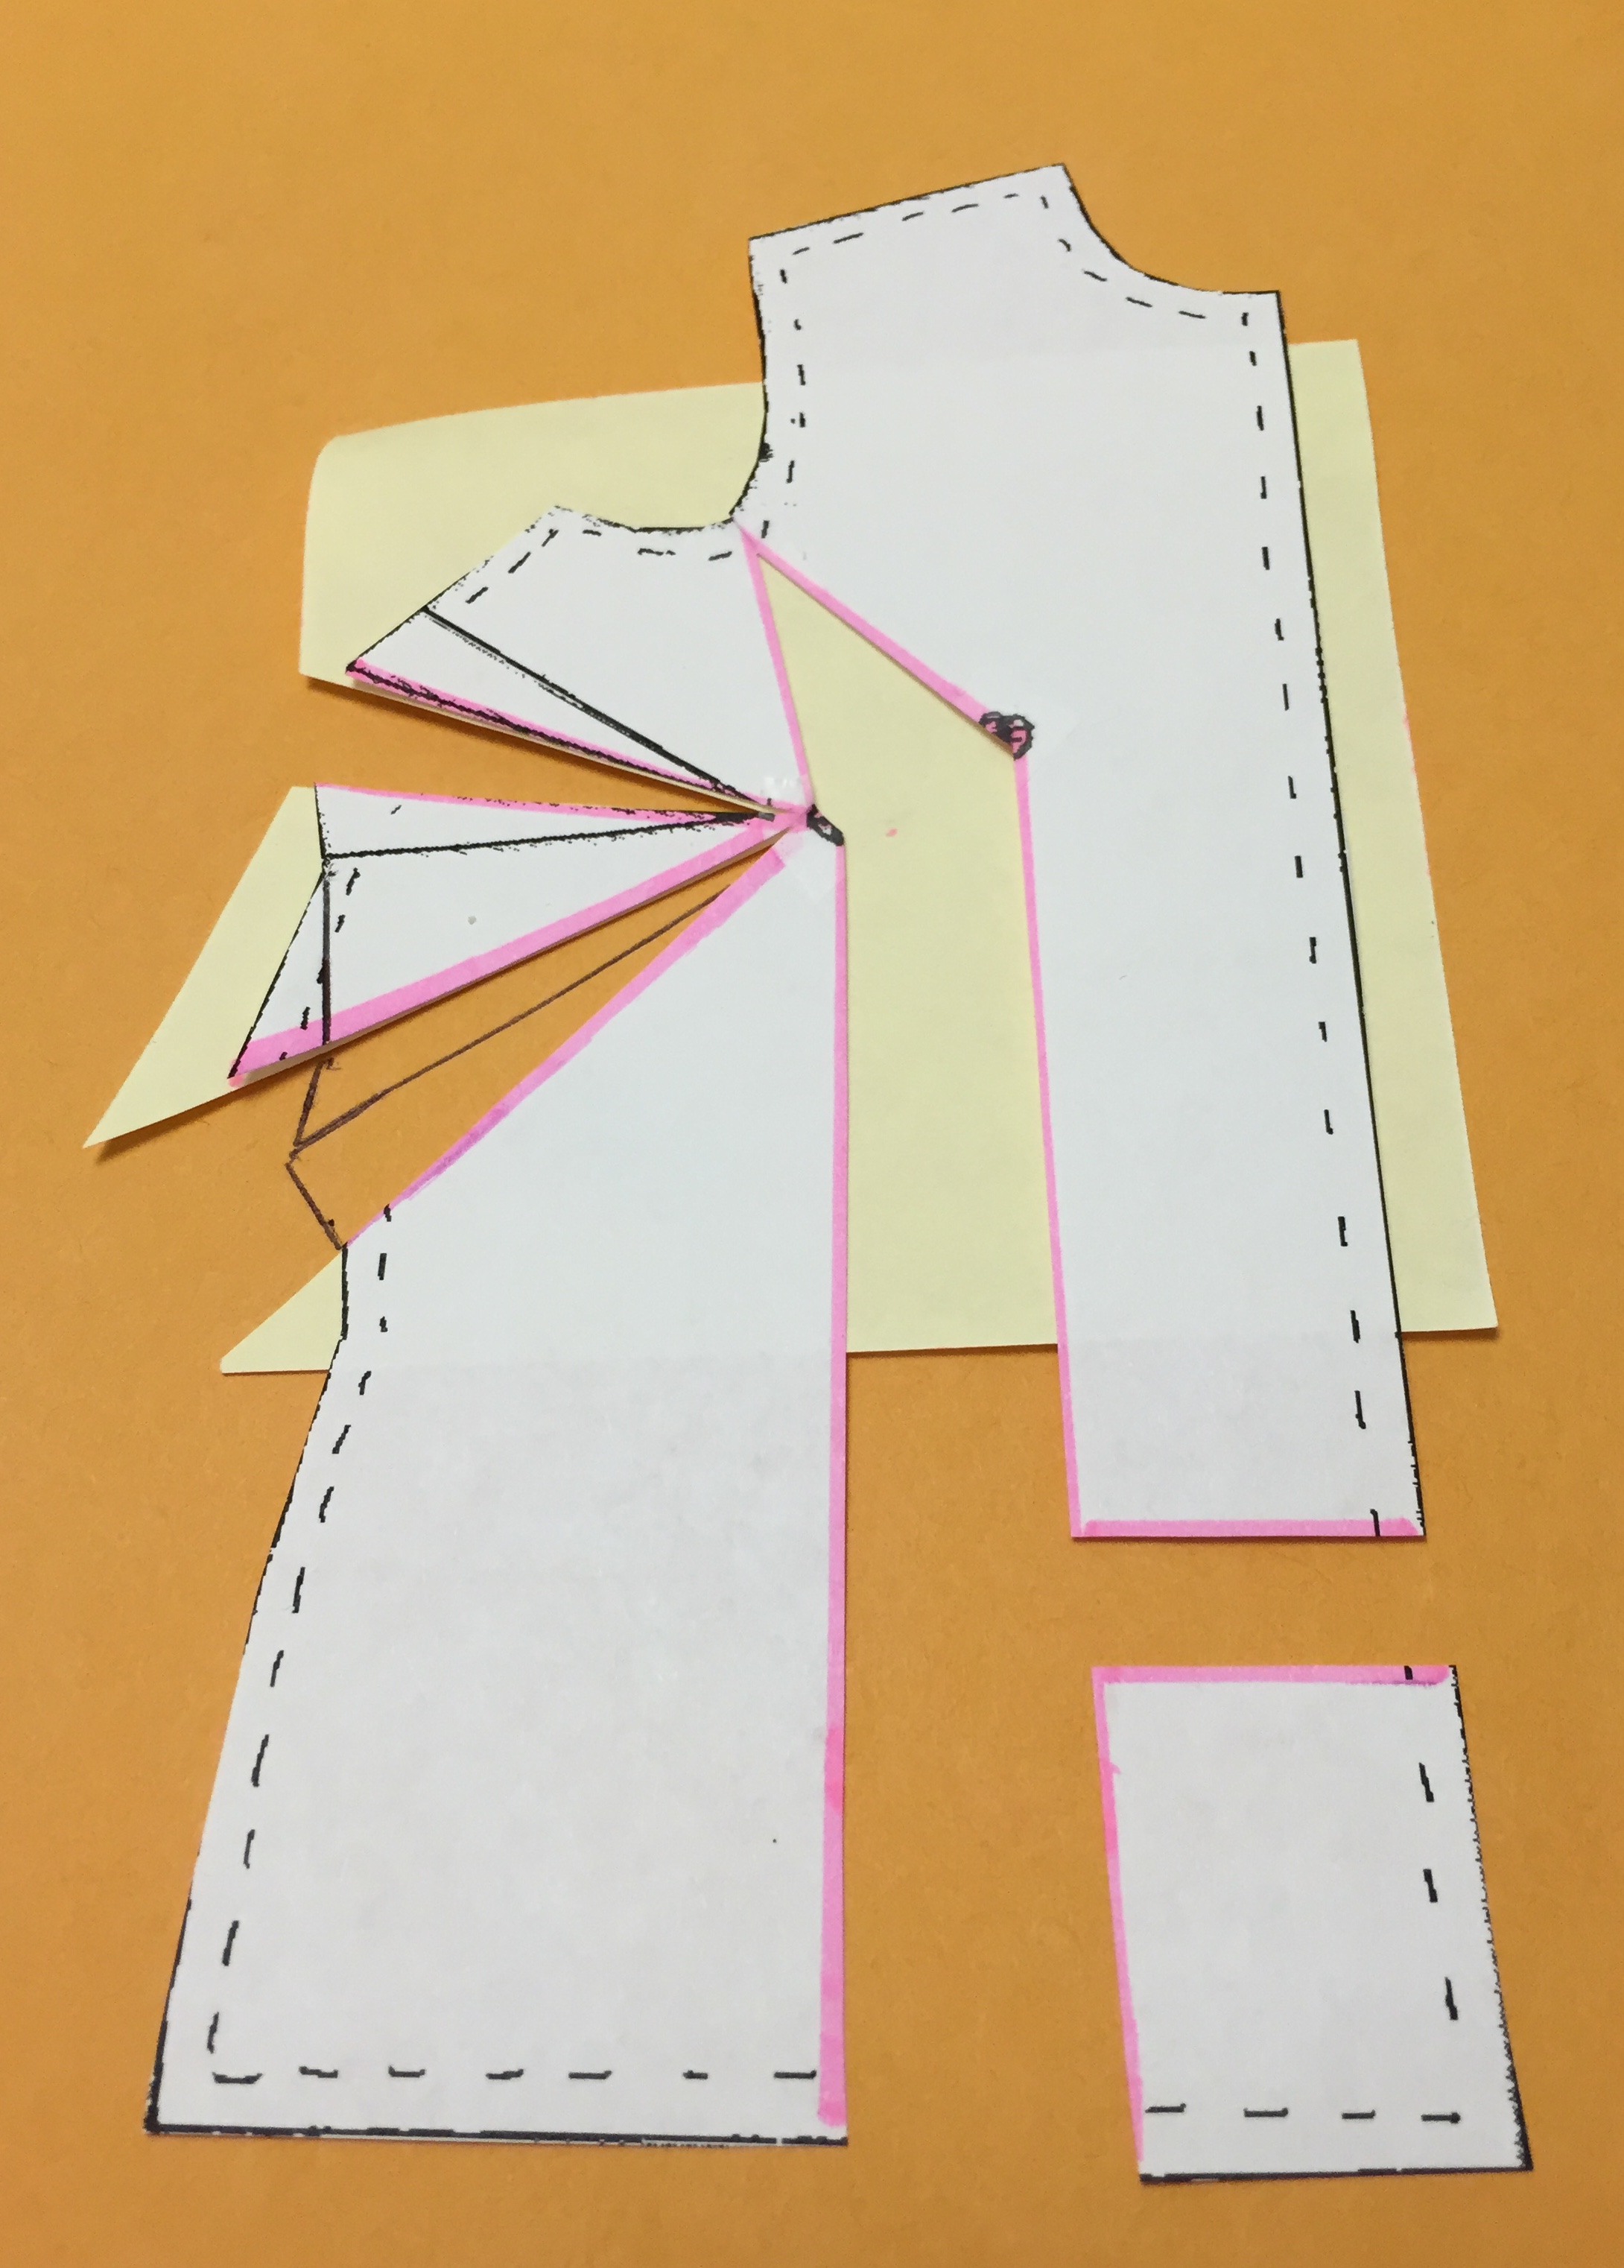
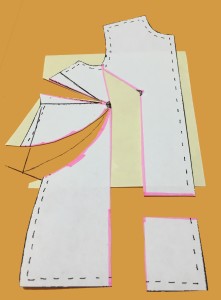
- Fill in the area behind the new dart with tissue or tracing paper and tape to secure the new dart. Notice how much more reasonably sized the horizontal bust dart is now!
- True and re-draw your seamlines for the new and altered dart.

Re-draw the seamlines for your new dart(s).
Dart rotation options and examples
If you’ve ever looked through Palmer-Pletsch’s Fit for Real People book, you might have run across a diagram similar to this one, which shows a variety of options dart rotation locations:
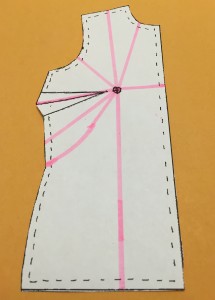
Commonly used dart rotation options
But when or why would you choose one dart rotation location over another? This part of the post will show examples of how a pattern piece might look with a rotated dart in each of the above locations and will discuss pattern styles that might lend themselves to having darts rotated to certain locations.
We’ll start with the armscye dart and work our way around the dart rotation diagram in a clockwise direction. Note that the examples in this section demonstrate a dart rotation performed after adding a fairly significant FBA so as to better illustrate what your pattern pieces might look like. I’m also leaving in the light yellow paper backing made to fill in the initial FBA to help you distinguish which paper was filled in when. Also note that when sewing one of these rotated darts, you’ll need to back the dart tip off from your bust apex just as you would normally do with a typical horizontal bust dart.
Armscye dart
An Armscye dart can help to reduce the size of a too-large armscye. I’ve found this location to work MUCH better in sleeveless rather than sleeved garments, but I know some women like this location for sleeved garments, as well. The great thing about rotating a dart to the armscye in a sleeveless garment is that a dart in this location can reduce or eliminate that gape that so many of us get at the armhole. As an example, the StyleArc Jodie dress incorporates an armscye dart.
Armscye dart
Don’t forget that you can also use this location for raglan sleeves. The HotPatterns Daytona Hoodie incorporates bust shaping in this way.
Shoulder dart (or shirring)
As shown in the tutorial steps, a shoulder dart, especially when converted to shirring, can provide an unobtrusive way for a pattern piece to absorb a large FBA and can even add a design element to your bodice. I love this option for blouses and dresses that have a shoulder yoke. New Look 6374 (a blouse style that’s currently popular in RTW) incorporates bust shaping via shoulder shirring.
Shoulder dart
Neckline dart (or pleats or shirring)
If your top or blouse pattern already has shirring or pleats at the neckline, you can rotate your dart to this location and either just increase the shirring or number of pleats or deepen the pleats themselves. Many peasant-style blouses and dresses incorporate these design elements. For example, Simplicity 1315 has pleats at the neckline. Or, for the BurdaStyle 05-2015 #132 sundress, you could rotate the dart to the neckline shirring–just make sure to keep your finished neckline size the same as the original pattern, or you’ll end up with a too-wide, gaping neckline.
Neckline dart
Center Front (CF) Bust dart (or shirring)
Look at Vogue V1447 and the HotPatterns Cote d’Azur dress. The Vogue incorporates a bust dart at the CF, while the HotPatterns dress has soft gathers in the same location. Both of these designs are based off of the same type of dart element but are just sewn differently. If your pattern has a CF seam, and you’d like to add an interesting dart or some shirring over your bust, this location might work well for you. However, a small amount of dart goes a long way in this instance, so if you need to rotate too much of your dart, either consider a different or an additional location.
Center front (CF) dart
Waist dart
Waist darts are probably the most common type of dart you’ll find after bust darts. If you’ve sewn more than a handful of garments in your sewing career, chances are that you’ve sewn a waist dart at some point. Waist darts are very effective at adding shaping to bodices at the waistline. Examples of patterns with waist darts include the famous McCall’s M6696 shirtdress and the Colette Crepe dress.
Waist dart
Curved French Dart
A curved French dart is similar to a bust dart, but the curved French dart starts near the waist or hip and curves up towards the bust point. This type of dart can be particularly flattering if you have a large difference between your bust and waist measurement or if you typically get diagonal draglines between your bust and hip in your woven blouses. While flattering, I, personally have trouble adding this type of dart without a fit buddy to help me get the dart placement correct on a muslin. You can see examples of curved French darts in the StyleArc Paris Dress and Marfy F3474.
Curved French dart
French Dart
The French Dart is a slight variation on your typical horizontal bust dart in that a French dart starts below the bust (sometimes as low as the waist or high hip) and points upwards to the bust apex. French darts tend to add a bit more shaping and be a bit more flattering on a larger bust than straight horizontal bust darts (although with a less striking difference than curved French darts). You tend to see this type of dart in shift dresses, since they provide a somewhat unobtrusive way to provide waist shaping. You can see examples of French darts in the HotPatterns Plain & Simple Shift Dress and New Look 6145.
French dart
A Note About Princess Seams
If you paid close attention while scrolling through the pictures in this post, you may have noticed that by combining two darts in certain locations, you’ll have the start of princess seams. An armscye dart + waist dart starts to make up an armscye princess seam, while a shoulder dart + waist dart starts to make up a shoulder princess seam. If you find darts difficult to fit to your body because of your bust, consider taking the next step beyond dart rotation and converting them to princess seams.
Finally…
If you’ve been intrigued in the past by the idea of incorporating multiple darts into your pattern alterations, I hope you found this post useful! It might seem little scary at first, but with a little bit of practice, you’ll be confidently rotating darts all over your bodice patterns.