Tres amigos se juntan con sus drones y echan una carrera veriginosa por el bosque. El resultado tiene una estética futurista y alucinante, que recuerda a las carreras de motos jet en 'El retorno del jedi'. Recomendadísimo verlo entero y con música.
Have you ever found yourself with an Oculus Rift strapped to your face, and no real idea what to do with it next? Allow me to make a suggestion: Hop into the cockpit of an X-Wing starfighter and enjoy a front-row seat for the Battle of Endor.
The video is taken from an Oculus Rift X-Wing simulator being developed by James Clement, who wrote on YouTube that it "still needs a lot of polish" but made it available for download for those who want to try it anyway. Unfortunately, it hasn't been updated since September; the most recent related video, a demonstration of a technical issue with flickering shadows, went up at the end of September.
The video starts off fairly slowly, but the intensity jumps up dramatically when the order to engage the capital ships at point-blank range comes in. Twisting around the massive Mon Calamari cruiser and then strafing the Star Destroyer provides a scale and sense of speed that the opening minutes lack, although it loses momentum again once the fighter dives into the exhaust port: There's no sense of anything at all happening beyond a pleasant, traffic-free cruise through a four-lane tunnel.
This kind of first-person, in-cockpit experience is exactly what the Oculus Rift is surely made for, and somewhat surprisingly, it doesn't take a whole lot of hardware to make it happen: According to the Oculus page, the Battle of Endor sim was tested on a 2.4 GHz dual-core AMD CPU with 6GB RAM, and a laptop with an unspecified 2.4 GHz CPU and 16GB of RAM. It's clearly not as polished as, say, Elite: Dangerous, but it's free. And it's Star Wars! Get the details at Oculus.com.
Cualquiera que haya jugado a los Batman de Rocksteady Studios esperará como agua de mayo el 'Batman Arkham Knight' de nueva generación. No solamente por eso mismo, por el cualitativo salto next-gen, repitiendo en PC y sumándose al reparto PS4 y Xbox One, sino por poder movernos por una ciudad de Gotham más grande y detallada y con la posibilidad de utilizar el icónico batmóvil.
Aunque hay un detalle más que hace que lo deseemos con más ganas. El Espantapájaros será aquí el principal villano, y ya sabemos que ha sido protagonista de uno de los mejores momentos en la historia de los videojuegos de Batman, con ese 'Batman Arkham Asylum' tan memorable.
Tampoco faltarán otros rostros conocidos, como Dos Caras, Enigma, El Pingüino, Poison Ivy o Harley Quinn (ésta jugable para los que reserven el juego), con un súper villano creado expresamente para el juego, el todavía misterioso Arkham Knight en el que está trabajando Rocksteady Studios.
Y ahora, para hacer más insufrible la espera, sus creadores nos brindan un nuevo tráiler, titulado "Gotham es mío", que vuelve a dejar claro que estamos ante uno de los grandes de todo 2015.
Muy mal lo tiene que hacer Rocksteady Studios para no volver a sorprendernos el 2 de junio...
Hunger is a sidescrolling platformer about a young girl escaping a labyrinth full of monsters. On paper it sounds like a whimsical little jaunt, but check out the teaser trailer below and you'll feel differently.
Dubbed 'suspense-adventure', the Tarsier Studios developed title looks terrifying. That's mostly thanks to the sound design, which is closer to Silent Hill than, say, Wonder Boy in Monster Land. Meanwhile, the puzzle-oriented platforming recalls Limbo, which was also pretty bloody terrifying. Tarsier Studios is responsible for a couple of LittleBigPlanet games as well as Tearaway Unfolded, so they've got plenty of experience building beautiful platformers.
Hunger is still early in development – and we don't know anything about which platforms it will appear on – but the trailer below is well worth a look.
¿Del 23 de julio de 2014 al 25 de febrero de 2015 cuántos días van? No hace falta que hagáis cálculos, son muchos. Siete largos meses son los que ha necesitado Just Add Water para corregir todos los defectos del 'Oddworld: New 'n' Tasty' de PS4 para luego preparar el resto de versiones.
La de computadoras es la primera que recibiremos, el ya citado 25 de febrero (miércoles), y mediante los servicios más populares, como GOG, Humble Store y Steam, desde donde se puede reservar para Linux, Mac y PC con un pequeño descuento para situarlo en unos apetecibles 17,99 euros.
Concluido el plazo de las reservas, su precio volverá a los 19,99 euros. Cantidad, en cualquier caso, más barata que la original de PS4, y eso que en esta nueva versión vienen de serie sus DLC.
Recordemos que ya en marzo saldrán las versiones para PS3 y Xbox One y en un futuro más lejano las de PS Vita y Wii U. En el caso de estas últimas, por las dificultades a nivel de optimización.
Después de un año de trabajo, el gran "Patelo" me mandó anoche el vídeo de su última creación: un motor W-32 en miniatura cuya estabilidad, como veréis en las imágenes, le permite colocar 4 monedas de canto encima sin que ni siquiera se muevan. Su nueva obra maestra tiene 850 piezas, 632 tornillos y le ha llevado 2.520 horas de trabajo.
Este motor, me cuenta Patelo, es un multicilíndrico en W "para sitios donde hay poco espacio", pero no se fabrica en la vida real para impulsar un barco porque como mucho se colocan en V-12. Además, explica, desarrollaría una enorme potencia en poco sitio, algo más propio de un Fórmula 1.
José Manuel Hermo Barreiro es un mecánico naval jubilado que desde hace unos años dedica su tiempo a una gran pasión la construcción de motores de aire comprimido en miniatura. Patelo cumple hoy 75 años y sigue sin atreverse a su sueño de construir la sala de máquinas de un trasatlántico porque piensa que le queda poco tiempo. Al paso que va, le digo yo, le veo construyendo motores con 120 años.
En Fogonazos hemos seguido su trabajo desde el principio (puedes ver aquí otros motores) y hace unos años nos fuimos a verle trabajar en su casa. El vídeo tiene ya cientos de miles de vistas en Youtube en su versión en castellano y en inglés. Yo no me lo perdería porque refleja el trabajo de un maestro. ¡Felicidades, Patelo! :)
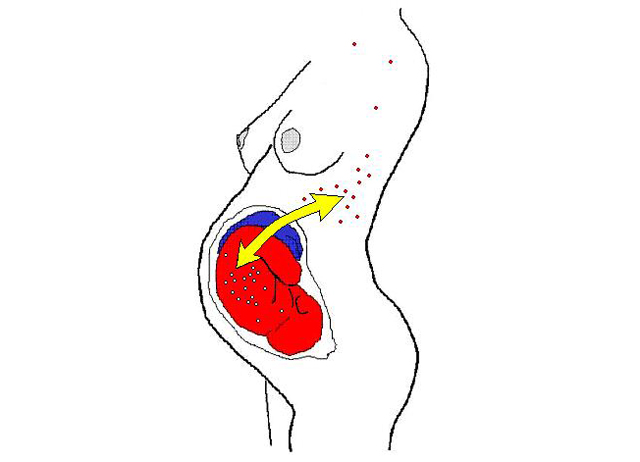
Estamos tan acostumbrados a pensar en nosotros mismos como entes individuales que el hecho de que existan células de otras personas viviendo dentro de nosotros nos resulta de lo más chocante. Pero se trata de un fenómeno conocido desde hace tiempo en ciencia y bautizado como Microquimerismo, que consiste básicamente en la existencia dentro de nuestro organismo de células de otros individuos con una carga genética diferente.
Hemos demostrado ya muchas veces que Gmail tiene la mejor aplicación web en el panorama de clientes de correo, incluso mejor que muchos clientes nativos. Pero sus trucos y habilidades van mucho más allá de lo que podemos hacer esa web: su misma dirección de correo esconde secretos.
Todos sabemos cómo son estas direcciones: fulanito@gmail.com. La enviamos a nuestros contactos para que nos envíen correos y listo. Pero y si os dijera que podemos filtrar remitentes o incluso crear direcciones de correo alternativas sin tener que registrar nuevas cuentas?
Podemos aprovechar, por ejemplo, que los servidores de Gmail ignoran los puntos en las direcciones de correo. De modo que fulanito@gmail.com, fula.nito@gmail.com y f.u.l.a.n.i.t.o@gmail.com son la misma dirección de correo, y cualquier correo que enviemos a esas direcciones serán recibidos por la misma bandeja de entrada. Así que no, no hace falta que juguéis con puntos al crear una nueva dirección de correo de Gmail ya que ninguna de las combinaciones que probéis estará disponible.
Otra combinación que podemos añadir a nuestra dirección de correo al mismo tiempo que seguimos recibiendo los mensajes que nos envíen es la de añadir cualquier cadena de caracteres válidos después de un "+". Así que fulanito@gmail.com, fulanito+45@gmail.com y fulanito+holaquetal siguen siendo la misma cuenta de correo.
Aplicaciones para las direcciones extra de Gmail
A primera vista estas manipulaciones con los correos de Gmail pueden parecer absurdas, pero con un poco de astucia podemos aprovecharlos para funciones útiles. Un ejemplo: cuando nos registremos en cualquier red social, podemos utilizar la dirección fulanito+redes@gmail.com.
De este modo, sabiendo que muchas redes nos inundan a boletines por correo, podremos crear un filtro en Gmail con el que mover cualquier mensaje que nos envíen a fulanito+redes@gmail.com hacia una etiqueta/carpeta que no moleste. O directamente a la papelera, claro.
Otro uso: si quieres tener 5 cuentas en Twitter, necesitarás cinco direcciones de correo... o cinco combinaciones con tu correo original. No te hará falta crear cinco cuentas de correo originales, bastará con añadir cinco palabras seguidas de un "+" en una sola cuenta de Gmail. Si se os ocurre otra manera de aprovechar esto, no dudéis en mencionarlo en nuestros comentarlos.
Google Earth Pro lleva más de una década siendo utilizada por empresas y grupos de investigación en todo el mundo para analizar terrenos, diseñar rutas o planear construcciones. Se trata de una potente herramienta, una versión profesional del clásico Google Earth que todos conocemos, cuya licencia hasta ahora estaba costando derca de unos 400 dólares.
Y decimos hasta ahora porque hace un par de días Google sorprendió a propios y extraños decidiendo hacer que estas licencias empezasen a ser gratuitas. ¿Pero cuales son las diferencias entre la versión convencional y la profesional de de Google Earth? ¿Qué es lo que el usuario medio saca de esta noticia?
Google Earth vs Google Earth Pro
Google Earth Pro mejora muchas de las características de su versión normal con funciones como una para el cálculo de área de polígonos que nos permite medir el desarrollo de terrenos y aparcamientos, o una de medición de círculos que nos permitirá determinar el radio afectado por un evento que determinemos.
Además, también nos permite imprimir imágenes con una resolución de 4800 x 3200 píxeles frente a los 1000 de la versión normal, importar hojas de cálculo permitiéndonos insertar hasta 2.500 direcciones de forma simultánea, o introducir datos SIG o de Información Geográfica mediante archivos ESRI Shapefile (.shp) y MapInfo (.tab).
Además, Google Earth Pro también incluye una serie de capas exclusivas con datos profesionales como los demográficos, catastrales o de tráfico, y un creador de películas que nos permitirá grabar un vídeo con una resolución de hasta 1920 x 1080 píxeles de lo que hagamos en el mapa, lo cual tiene tantas aplicaciones como podamos imaginar.
Cómo obtener nuestro Earth Pro gratis
Conseguir nuestra licencia para poder empezar a utilizar Google Earth Pro es tan sencillo como rellenar un formulario, en el que no sólo tendremos que introducir nuestros datos personales, sino que al ser un producto dirigido a empresas también nos pedirá indicar el nombre de la nuestra, nuestro cargo y o el sector en el que nos movemos. La licencia nos llegará inmediatamente y de forma totalmente gratuita.
Pero por si no queremos darle a Google nuestros datos de empresa, ahora también podemos saltarnos este paso, descargar el programa y cuando nos pidan la licencia introducir nuestro correo y el código GEPFREE como clave de licencia. Y voilá, ya podremos empezar a utilizar sin ningún problema nuestro Google Earth Pro.
Nos manda Javier este vídeo en el que un grupo de viajeros llega hasta la playa de Ko Mok, en Tailanda, pasando primero a través de la llamada cueva Esmeralda. El lugar es frecuentado por los turistas de la zona y hay algunas fotos y vídeos por ahí, pero esta perspectiva aérea tomada con un dron da una idea de lo flipante que es este rincón y de lo caprichosa que es la naturaleza en algunos lugares. Gracias por compartirlo, Javier! :)
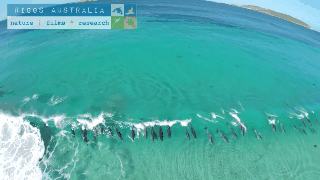
El fotógrafo Dave Riggs captó esta rarara secuencia con un dron en aguas australianas. Los delfines juegan con las olas y en un momento determinado se colocan en fila para coger la misma ola. Podéis ver el vídeo completo aquí ( vía Boing Boing)
The Tesla P85D has a mode called "Insane Mode," wherein it's capable of doing 0-60 in 3 seconds flat. Whether it's still silent for those first 5 miles per hour like the Prius, we may never know.
Great graphics do not necessarily make for a great game, but they do make for an awfully impressive virtual tour through a beautiful Parisian apartment. Like this one, for instance, created by Benoit Dereau, a "CG generalist and level designer," who said it's his first work in the Unreal Engine 4.
Obviously we're still a bit away from playing 60 FPS games at this level of visual fidelity, and Dereau said on the Polycount forums that "optimization was not the center of my work with this scene." But the texture quality, reflective surfaces, and lighting effects are spectacular, and even more remarkable is that it can all be generated with a standard-spec PC and a low-cost engine.
The actual demo isn't currently available; Dereau had released it but took it down earlier today to fix some bugs. An updated build is expected to be available tomorrow at BenoitDereau.com. Thanks, NeoGAF.
In some ways path tracing is one of the simplest and most intuitive ways to do ray tracing.
Imagine you want to simulate how the photons from one or more light sources bounce around a scene before reaching a camera. Each time a photon hits a surface, we choose a new randomly reflected direction and continue, adjusting the intensity according to how likely the chosen reflection is. Though this approach works, only a very tiny fraction of paths would terminate at the camera.
So instead, we might start from the camera and trace the ray from here and until we hit a light source. And, if the light source is large and slowly varying (for instance when using Image Based Lighting), this may provide good results.
But if the light source is small, e.g. like the sun, we have the same problem: the chance that we hit a light source using a path of random reflections is very low, and our image will be very noisy and slowly converging. There are ways around this: one way is to trace rays starting from both the camera and the lights, and connect them (bidirectional path tracing), another is to test for possible direct lighting at each surface intersection (this is sometimes called ‘next event estimation’).
Even though the concept of path tracing might be simple, introductions to path tracing often get very mathematical. This blog post is an attempt to introduce path tracing as an operational tool without going through too many formal definitions. The examples are built around Fragmentarium (and thus GLSL) snippets, but the discussion should be quite general.
Let us start by considering how light behaves when hitting a very simple material: a perfect diffuse material.
Diffuse reflections
A Lambertian material is an ideal diffuse material, which has the same radiance when viewed from any angle.
Imagine that a Lambertian surface is hit by a light source. Consider the image above, showing some photons hitting a patch of a surface. By pure geometrical reasoning, we can see that the amount of light that hits this patch of the surface will be proportional to the cosine of the angle between the surface normal and the light ray:
\(
cos(\theta)=\vec{n} \cdot \vec{l}
\)
By definition of a Lambertian material this amount of incoming light will then be reflected with the same probability in all directions.
Now, to find the total light intensity in a given (outgoing) direction, we need to integrate over all possible incoming directions in the hemisphere:
where K is a constant that determines how much of the incoming light is absorbed in the material, and how much is reflected. Notice, that there must be an upper bound to the value of K – too high a value would mean we emitted more light than we received. This is referred to as the ‘conservation of energy’ constraint, which puts the following bound on K:
\(
\int Kcos(\theta)d\vec\omega_i \leq 1
\)
Since K is a constant, this integral is easy to solve (see e.g. equation 30 here):
\(
K \leq 1/\pi
\)
Instead of using the constant K, when talking about a diffuse materials reflectivity, it is common to use the Albedo, defined as \( Albedo = K\pi \). The Albedo is thus always between 0 and 1 for a physical diffuse materials. Using the Albedo definition, we have:
The above is the Rendering Equation for a diffuse material. It describes how light scatters at a single point. Our diffuse material is a special case of the more general formula:
Where the BRDF (Bidirectional Reflectance Distribution Function) is a function that describes the reflection properties of the given material: i.e. do we have a shiny, metallic surface or a diffuse material.
Completely diffuse material (click for large version)
How to solve the rendering equation
An integral is a continuous quantity, which we must turn into something discrete before we can handle it on the computer.
To evaluate the integral, we will use Monte Carlo sampling, which is a very simple: to provide an estimate for an integral, we will take a number of samples and use the average values of these samples multiplied by the integration interval length.
Now we are able to build a simple path tracer for diffuse materials. All we need to do is to shoot rays starting from the camera, and when a ray hits a surface, we will choose a random direction in the hemisphere defined by the surface normal. We will continue with this until we hit a light source. Each time the ray changes direction, we will modulate the light intensity by the factor found above:
The idea is to repeat this many times for each pixel, and then average the samples. This is why the sum and the division by N is no longer present in the formula. Also notice, that we have added a (material specific) color. Until now we have assumed that our materials handled all wavelengths the same way, but of course some materials absorb some wavelengths, while reflecting others. We will describe this using a three-component material color, which will modulate the light ray at each surface intersection.
All of this boils down to very few lines of codes:
vec3 color(vec3 from, vec3 dir)
{
  vec3 hit = vec3(0.0);
  vec3 hitNormal = vec3(0.0);

  vec3 luminance = vec3(1.0);
  for (int i=0; i < RayDepth; i++) {
    if (trace(from,dir,hit,hitNormal)) {
       dir = getSample(hitNormal); // new direction (towards light)
       luminance *= getColor()*2.0*Albedo*dot(dir,hitNormal);
       from = hit + hitNormal*minDist*2.0; // new start point
    } else {
       return luminance * getBackground( dir );
    }
  }
  return vec3(0.0); // Ray never reached a light source
}
The getBackground() method simulates the light sources in a given direction (i.e. infinitely far away). As we will see below, this fits nicely together with using Image Based Lighting.
But even when implementing getBackground() as a simple function returning a constant white color, we can get very nice images:
and
The above images were lightened only a constant white dome light, which gives the pure ambient occlusion like renders seen above.
Sampling the hemisphere in GLSL
The code above calls a 'getSample' function to sample the hemisphere.
dir = getSample(hitNormal); // new direction (towards light)
This can be a bit tricky. There is a nice formula for \(cos^n\) sampling of a hemisphere in the GI compendium (equation 36), but you still need to align the hemisphere with the surface normal. And you need to be able to draw uniform random numbers in GLSL, which is not easy.
Below I use the standard approach of putting a seed into a noisy function. The seed should depend on the pixel coordinate and the sample number. Here is some example code:
Now there are some tricks to improve the rendering a bit: Looking at the formulas above, it is clear that light sources in the surface normal direction will contribute the most to the final intensity (because of the \( \vec{n} \cdot \vec\omega_i \) term).
This means we might want sample more in the surface normal directions, since these contributions will have a bigger impact on the final average. But wait: we are estimating an integral using Monte Carlo sampling. If we bias the samples towards the higher values, surely our estimate will be too large. It turns out there is a way around that: it is okay to sample using a non-uniform distribution, as long as we divide the sample value by the probability density function (PDF).
Since we know the diffuse term is modulated by the \( \vec{n} \cdot \vec\omega_i = cos(\theta) \), it makes sense to sample from a non-uniform cosine weighted distribution. According to GI compendium (equation 35), this distribution has a PDF of \( cos(\theta) / \pi \), which we must divide by, when using cosine weighted sampling. In comparison, the uniform sampling on the hemisphere we used above, can be thought of either to be multiplied by the integral interval length (\( 2\pi \)), or diving by a constant PDF of \( 1 / 2\pi \).
If we insert this, we end up with a simpler expression for the cosine weighted sampling, since the cosine terms cancel out:
vec3 color(vec3 from, vec3 dir)
{
vec3 hit = vec3(0.0);
vec3 hitNormal = vec3(0.0);
vec3 luminance = vec3(1.0);
for (int i=0; i < RayDepth; i++) {
if (trace(from,dir,hit,hitNormal)) {
dir =getCosineWeightedSample(hitNormal);
luminance *= getColor()*Albedo;
from = hit + hitNormal*minDist*2.0; // new start point
} else {
return luminance * getBackground( dir );
}
}
return vec3(0.0); // Ray never reached a light source
}
Image Based Lighting
It is now trivial to replace the constant dome light, with Image Based Lighting: just lookup the lighting from a panoramic HDR image in the 'getBackground(dir)' function.
This works nicely, at least if the environment map is not varying too much in light intensity. Here is an example:
If, however, the environment has small, strong light sources (such as a sun), the path tracing will converge very slowly, since we are not likely to hit these by chance. But for some IBL images this works nicely - I usually use a filtered (blurred) image for lighting, since this will reduce noise a lot (though the result is not physically correct). The sIBL archive has many great free HDR images (the ones named '*_env.hdr' are prefiltered and useful for lighting).
Direct Lighting / Next Event Estimation
But without strong, localized light sources, there will be no cast shadows - only ambient occlusion like contact shadows. So how do we handle strong lights?
Test scene with IBL lighting
Let us consider the sun for a moment.
The sun has an angular diameter of 32 arc minutes, or roughly 0.5 degrees. How much of the hemisphere is this? The solid angle (which corresponds to the area covered of a unit sphere) is given by:
\(
\Omega = 2\pi (1 - \cos {\theta} )
\)
where \( \theta \) is half the angular diameter. Using this we get that the sun covers roughly \( 6*10^{-5} \) steradians or around 1/100000 of the hemisphere surface. You would actually need around 70000 samples, before there is even a 50% chance of a pixel actually catching some sun light (using \( 1-(1-10^{-5})^{70000} \approx 50\% \)).
Test scene: naive path tracing of a sun like light source (10000 samples per pixel!)
Obviously, we need to bias the sampling towards the important light sources in the scene - similar to what we did earlier, when we biased the sampling to follow the BRDF distribution.
One way to do this, is Direct Lighting or Next Event Estimation sampling. This is a simple extension: instead of tracing the light ray until we hit a light source, we send out a test ray in the direction of the sun light source at each surface intersection.
Test scene with direct lighting (100 samples per pixel)
Here is some example code:
vec3 getConeSample(vec3 dir, float extent) {
// Formula 34 in GI Compendium
dir = normalize(dir);
vec3 o1 = normalize(ortho(dir));
vec3 o2 = normalize(cross(dir, o1));
vec2 r = rand2n();
r.x=r.x*2.*PI;
r.y=1.0-r.y*extent;
float oneminus = sqrt(1.0-r.y*r.y);
return cos(r.x)*oneminus*o1+sin(r.x)*oneminus*o2+r.y*dir;
}
vec3 color(vec3 from, vec3 dir)
{
vec3 hit = vec3(0.0);
vec3 direct = vec3(0.0);
vec3 hitNormal = vec3(0.0);
vec3 luminance = vec3(1.0);
for (int i=0; i < RayDepth; i++) {
if (trace(from,dir,hit,hitNormal)) {
dir =getCosineWeightedSample(hitNormal);
luminance *= getColor()*Albedo;
from = hit + hitNormal*minDist*2.0; // new start point
// Direct lighting
vec3 sunSampleDir = getConeSample(sunDirection,1E-5);
float sunLight = dot(hitNormal, sunSampleDir);
if (sunLight>0.0 && !trace(hit + hitNormal*2.0*minDist,sunSampleDir)) {
direct += luminance*sunLight*1E-5;
}
} else {
return direct + luminance*getBackground( dir );
}
}
return vec3(0.0); // Ray never reached a light source
}
The 1E-5 factor is the hemisphere area covered by the sun. Notice, that you might run into precision errors with the single-precision floats used in GLSL when doing these calculations. For instance, on my graphics card, cos(0.4753 degrees) is exactly equal to 1.0, which means a physically sized sun can easily introduce large numerical errors (remember the sun is roughly 0.5 degrees).
Sky model
To provide somewhat more natural lighting, an easy improvement is to combine the sun light with a blue sky dome.
A slightly more complex model is the Preetham sky model, which is a physically based model, taking different kinds of scattering into account. Based on the code from Simon Wallner I implemented a Preetham model in Fragmentarium.
Here is an animated example, showing how the color of the sun light changes during the day:
Now finally, we are ready to apply path tracing to fractals. Technically, there is not much new to this - I have previously covered how to do the ray-fractal intersection in this series of blog posts: Distance Estimated 3D fractals.
So the big question is whether it makes sense to apply path tracing to fractals, or whether the subtle details of multiple light bounces are lost on the complex fractal surfaces. Here is the Mandelbulb, rendered with the sky model:
Path traced Mandelbulb (click for larger version)
Here path tracing provides a very natural and pleasant lighting, which improves the 3D perceptions.
Here are some more comparisons of complex geometry: Default ray tracer in Fragmentarium
Path traced in Fragmentarium
And another one: Default ray tracer in Fragmentarium
Path traced in Fragmentarium
What's the catch?
The main concern with path tracing is of course the rendering speed, which I have not talked much about, mainly because it depends on a lot of factors, making it difficult to give a simple answer.
First of all, the images above are distance estimated fractals, which means they are a lot slower to render than polygons (at least of you have a decent spatial acceleration structure for the polygons, which is surprisingly difficult to implement on a GPU). But let me give some numbers anyway.
In general, the rendering speed will be (roughly) proportional to the number of pixels, the FLOPS of the GPU, and the number of samples per pixel.
On my laptop (a mobile mid-range NVIDIA 850M GPU) the Mandelbulb image above took 5 minutes to render at 2442x1917 resolution (with 100 samples per pixel). The simple test scene above took 30 seconds at the same resolution (with 100 samples per pixel). But remember, that since we can show the render progressively, it is still possible to use this at interactive speeds.
What about the ray lengths (the number of light bounces)?
Here is a comparison as an animated GIF, showing direct light only (the darkest), followed by one internal light bounce, and finally two internal light bounces:
In terms of speed one internal bounce made the render 2.2x slower, while two bounces made it 3.5x slower. It should be noted that the visual effect of adding additional light bounces is normally relatively small - I usually use only a single internal light bounce.
Even though the images above suggests that path tracing is a superior technique, it is also possible to create good looking images in Fragmentarium with the existing ray tracers. For instance, take a look at this image:
It was ray traced using the 'Soft-Raytracer.frag', and I was not able to improve the render using the Path tracer. Having said that, the Soft-Raytracer is also a multi-sample ray tracer which has to use lots of samples to produce the nice noise-free soft shadows.
References
The Fragmentarium path tracers are still Work-In-Progress, but they can be downloaded here:
The path tracers can be used by replacing an existing ray tracer '#include' in any Fragmentarium .frag file.
External resources
GI Total Compendium - very valuable collection of all formulas needed for ray tracing.
Vilém Otte's Bachelor Thesis on GPU Path Tracing is a good introduction.
Disney's BRDF explorer - Interactive display of different BRDF models - many examples included. The BRDF definitions are short GLSL snippets making them easy to use in Fragmentarium!
Inigo Quilez's path tracer was the first example I saw of using GPU path tracing of fractals.
Evan Wallace - the first WebGL Path tracer I am aware of.
Brigade is probably the most interesting real time path tracer: Vimeo video and paper.
I would have liked to talk a bit about unbiased and consistent rendering, but I don't understand these issues properly yet. It should be said, however, that since the examples I have given terminate after a fixed number of ray bounces, they will not converge to a true solution of the rendering equation (and, are thus both biased and inconsistent). For consistency, a better termination criterion, such as russian roulette termination, is needed.
Kawika Singson es un hawaiano apasionado por los volcanes que se dedica a fotografiar y filmar la lava. En esta grabación consigue acercarse muchísimo a uno de esos puntos donde la lava cae sobre el mar y se va solidificando. Aunque en Neatorama dicen que tomó muchas medidas de precaución (como guantes y recubrimiento para os brazos y un palo para acercar la cámara sin quemarse) acercarse tanto a uno de estas coladas es una locura. El resultado es espectacular, pero teniendo en cuenta los antecedentes de Kawika, uno se puede imaginar cualquier cosa.
Often the hardest part of traveling is navigating the local language. If you've ever asked for "pain" in Paris and gotten funny looks, confused "embarazada" with "embarrassed" in Mexico, or stumbled over pronunciation pretty much anywhere, you know the feeling. Now Google Translate can be your guide in new ways. We’ve updated the Translate app on Android and iOS to transform your mobile device into an even more powerful translation tool.
Instant translation with Word Lens The Translate app already lets you use camera mode to snap a photo of text and get a translation for it in 36 languages. Now, we’re taking it to the next level and letting you instantly translate text using your camera—so it’s way easier to navigate street signs in the Italian countryside or decide what to order off a Barcelona menu. While using the Translate app, just point your camera at a sign or text and you’ll see the translated text overlaid on your screen—even if you don't have an Internet or data connection.
This instant translation currently works for translation from English to and from French, German, Italian, Portuguese, Russian and Spanish, and we’re working to expand to more languages.
Have an easier conversation using the Translate app When talking with someone in an unfamiliar language, conversations can... get... realllllllly... sloowwww. While we’ve had real-time conversation mode on Android since 2013, our new update makes the conversation flow faster and more naturally.
Starting today, simply tap the mic to start speaking in a selected language, then tap the mic again, and the Google Translate app will automatically recognize which of the two languages are being spoken, letting you have a more fluid conversation. For the rest of the conversation, you won’t need to tap the mic again—it'll be ready as you need it. Asking for directions to the Rive Gauche, ordering bacalhau in Lisbon, or chatting with your grandmother in her native Spanish just got a lot faster.
These updates will be coming to both Android and iOS, rolling out over the next few days. This is the first time some of these advanced features, like camera translations and conversation mode, will be available for iOS users.
More than 500 million people use Google Translate every month, making more than 1 billion translations a day to more easily communicate and access information across languages. Today’s updates take us one step closer to turning your phone into a universal translator and to a world where language is no longer a barrier to discovering information or connecting with each other.
Posted by Barak Turovsky, Product Lead, Google Translate
Videos of my November presentations at code::dive in Wrocław, Poland, and at ConFu in Jurmala, Latvia, have recently been posted for your post-holiday time-killing pleasure.
The titles of my code::dive talks are "CPU Caches and Why You Care" and "Support for Embedded Programming in C++11 and C++14". To understand the comments I make at the beginning of the latter talk, it will be helpful to view Venkat Subramaniam's talk on Lightweight Design, because his talk--which is worth viewing both for its merit and for the fact that Venkat is such an engaging speaker--immediately preceded mine, and it motivates my opening remarks that might otherwise make no sense, including my decision to give my talk without shoes.
At ConFu, I was scheduled to give two talks, a keynote on interface design and a full-day tutorial on material in Effective Modern C++ (EMC++). The slot for my keynote was at the end of the day, but at the conference's opening keynote, I noticed that the room setup made it nearly impossible for the people in the back of the room to see the bottom third of the screen. I therefore spent the next several hours reformatting my slides to avoid using more than about the top two thirds of the screen, and I was very pleased with the way the talk went. The topic is "The Most Important Design Guideline," and though I've written and spoken about this guideline before (the guideline is to make interfaces easy to use correctly and hard to use incorrectly), this talk is the first time I felt like I really found a way to say what I wanted to say. If you're not convinced about the importance of the guideline from this presentation, I'm not going to be able to convince you.
The ConFu organizers and I had agreed that my EMC++-based tutorial wasn't going to be recorded, but somebody attending the tutorial decided to do it on his or her own. The audio and video quality is what you'd expect from an informal recording, but since it's at YouTube, I figure you might as well know about it. It's in six videos of about an hour each (which makes sense, because I give tutorial attendees a break every hour), and you'll find links to all six at my Online Videos Page. In fact, that page links to videos of each of my presentations and interviews that I'm aware of. If you're aware of an online video that should be included there, but isn't, please let me know.
It’s really, finally, truly, seriously-not-kidding, actually happening: reversible USB connectors are on the way. The USB Type C connector, a small connector that looks a bit like Apple’s Lightning cable, was ratified back in mid-2014. But we haven’t seen any electronics adopt Type C yet; it typically takes months, if not years, for specifications ratified by the USB Implementers Forum to make it into real products. They’re finally coming in 2015.
At this year's CES, we checked out a Type C cable plugged into a prototype circuit board and talked to the USB IF about when we'll start seeing the reversible connector show up in real hardware. We also saw a computer set up with USB 3.1, which raises USB’s total data bandwidth from 3.0’s 5 gigabits per second to 10 gigabits per second. As if USB wasn’t already having a good enough day, we heard about another recently ratified standard: power over USB increasing up to 100 watts.
USB cables have been carrying power for years, but the interface has never been rated to feed devices more than 10 watts. That’s why you can charge a smartphone over USB, or a tablet, with a larger power module. But a laptop? No way. Until now. The new Power Delivery spec allows for 100 watts of of power over USB, enough to charge laptops and just about any other personal electronic device you can think of.
For our daily use of USB, though, we’re more excited about the Type C connector. No more fumbling with a USB plug, getting it wrong, flipping it over, somehow getting it wrong again, and then flipping it back to the original orientation which was, apparently, actually right the first time. The plug is smaller, so it’s suited to a wider variety of devices, especially thin laptops.
USB representatives pointed out a common misconception about the format, which may confuse some people when USB Type C debuts. The cable itself, and the plug type, don’t determine what USB is capable of. USB Type C isn’t faster or slower or capable of handling more power than the ubiquitous Type A. It’s simply a new pipe to carry power and data. USB’s performance is determined by the hardware at each end of the cable: the controller and other circuitry in the host device (like your PC) and client device (like a mouse or external hard drive).
USB 3.1, which allows for 10 gigabit transfer speeds, is just starting to appear in some devices at CES. One of the MSI’s upcoming laptops will have USB 3.1, and the USB Implementers Forum was demonstrating an unfinished USB 3.1 board putting up some seriously impressive transfer speeds with a pair of SSDs in RAID. And this isn't finalized hardware, so USB 3.1 should be able to crack the 1 gigabyte barrier.
800 megabyte per second write speeds over USB? We'll take it.
The first phone USB Type C debuts in will unfortunately be using USB 2.0 (remember, that’s due to the controllers, not the connector type), and we don’t know how long it will be until Type C replaces the classic Type A plugs in smartphone cases, or when we’ll see USB 3.1 integrated into motherboards. Late 2015 is probably the earliest either of those things will happen. But the good news is that Type C cables will come in C-to-A configurations, C-to-micro USB, and so on. That should help the new connector spread while ensuring compatibility with the bajillion USB A ports out there.
And in another few years, if we all say very nice things about USB Type C, maybe we can finally say goodbye to the hateful rectangle that’s been with us oh so long. The future of USB starts in 2015. Be excited.
At CES this week, Intel announced that the Compute Stick—the company's $149 Chromecast-sized PC—will launch in March.
The Compute Stick is a great little piece of hardware. Like other streaming-stick machines, like the Chromecast, the Compute Stick plugs into an HDMI port on a TV or monitor. But instead of simply bringing streaming or smart-TV features, the Compute Stick packs a full PC experience.
The stick is powered by a Atom Z3735F processor, 2GB of RAM and 32GB storage. In other words, enough for a basic Windows install, but not much else. There's also a microSD card slot for further storage expansion, as well as Wi-Fi and Bluetooth.
In addition to the $149 Windows version, a lower-powered (1GB RAM, 8GB storage) Linux option will also be available for $89.
El acto de encender una cerilla, el rasgueo, los primeros chispazos, el incendio el fósforo y el fuego que consume la madera... todo ello pasa demasiado deprisa como para que el ojo humano aprecie algo más a un efecto pirotécnico fugaz. Con vídeos como el que encabeza esta entrada podemos contemplar lo que sucede con más detalle.
El vídeo está grabado a 2.000 fotogramas por segundo. Más tarde tenemos otro segmento a 10.000 fotogramas por segundo en el momento de apagar la cerilla debido a que «apagar la cerilla soplando es un proceso tanto o más complejo y rico en cuanto a las turbulencias producidas por la interacción entre el aire exhalado y la llama de la cerilla».
Publicado por la Agencia Espacial Europea y grabado desde la Estación Espacial Internacional (ISS), nunca nos cansamos de vídeos que nos muestran la Tierra desde un punto de vista cenital. Sobre todo si están en calidad 4k: cuadruplica la ofrecida por la alta definición (HD) y alcanza los 3840x2160 píxeles. Ideal para contemplar con más detalles los amaneceres y las auroras.
El vídeo en realidad es un timelapse realizado a partir de 2.500 fotos que el astronauta Alexander Gerst ha tomado durante sus seis meses a bordo. Aparte de detalles de la ISS, el vídeo contiene algunas magníficas auroras, amaneceres, y panorámicas en alta definición por todo el planeta.
Ya queda menos. El 2 de enero de 2015 está a la vuelta de la esquina. Sí, fastidia tener que esperar un poquitín más sabiendo que en Estados Unidos lleva a la venta desde el pasado 5 de diciembre, o que a Japón llegó incluso antes, a mediados de noviembre. Pero con estos temas ya se sabe...
El caso es que ya queda menos para echarle el guante a 'Captain Toad: Treasure Tracker', y muy pronto os traeremos su análisis para ver qué nos ha parecido al completar su más de 70 fases.
Por ahora con lo comentado tras pasar unas horas con él os bastará con saber que Nintendo lo ha vuelto a hacer. Aparte que por fin Toad cuenta con su propio videojuego, a pesar de que ya tuvo un escarceo dentro de un minijuego en el que demandó protagonismo. Salvo que ahora lo hace a lo grande y como el primer gran lanzamiento de Wii U en 2015. Y acompañado de Toadette, además.
Impresionante trabajo de Imanol Mújica, quien ha recopilado todas las secuencias nocturnas realizadas en sus viajes a Canarias en los últimos cuatro años (2011 – 2014). "Cuando te encuentras a solas con las estrellas en estos lugares tan privilegiados", escribe, "son muchos los sentimientos que te asaltan, te sientes infinitamente pequeño". Para conseguir estas imágenes, añade, también le ha tocado pasar "frío, hambre y por qué no decirlo algún que otro miedo”. Espero que lo disfrutéis. Gracias por el aviso, Imanol!
Si hacéis memoria recordaréis que Apple celebró el año pasado un evento llamado Hour of Code, con el que motivava a los más jóvenes a introducirse en el mundo de la programación con clases en las Apple Store estadounidenses. Un año después el Hour of Code se repite, y esta vez en las tiendas de todo el mundo.
Por lo tanto, las once Apple Store españolas tendrán un taller especial el 11 de diciembre por la tarde en tres sesiones diferentes donde los niños pueden adentrarse en los fundamentos de la programación. Nuestro mundo cada vez necesita a más desarrolladores, y estas jornadas pueden motivar a más de un curioso.
Las reservas ya se pueden hacer desde la web de las Apple Store españolas. Además, habrá eventos especiales donde representantes de algunas empresas darán charlas sobre programación en tiendas como la de Ginza en Japón, la de Regent Street de Londres o la del SoHo en Nueva York. Hora de que las jóvenes promesas entrenen esos dedos.
Sia ha estrenado una nueva canción llamada “Opportunity“, que aquí podemos escuchar. El tema estará incluido en la banda sonora de la película ‘Annie‘, que se estrenará en diciembre. La vocalista australiana junto a Greg Kurstin escribió esta nueva canción, donde la protagonista del filme Quvenzhané Wallis -quien hace de Annie- es la que la canta en una escena del filme.
La nueva versión de esta película -un remake del musical clásico- cuenta con la participación de Jamie Foxx, Cameron Diaz y la mencionada Quvenzhané Wallis, mientras que el soundtrack fue producido por Jay-Z y Will Smith. Recordemos que en julio de este año, Sia Furler publicó ‘1000 Forms of Fear’, su sexto álbum de estudio y el primero en los últimos cuatro años, un disco que desde la primer semana de su lanzamiento ha saltado a la primera posición de la lista de éxitos Billboard 200 de EE.UU., un logro alcanzado por primera vez por la cantante y compositora australiana.
El disco fue compuesto por Sia durante los últimos tres años y grabado finalmente en el Echo Studio de Los Ángeles (EE.UU.), contando en la producción con destacadas figuras como Greg Kurstin, Diplo, Christopher Braide y Jesse Shatkin. ‘1000 Forms of Fear’ marca una nueva etapa en la carrera de Sia, que a pesar del enorme éxito logrado como compositora de notables temas, incluyendo ‘Wild Ones’ para Flo Rida, ‘Titanium’ para David Guetta, ‘Diamonds’ para Rihanna, ‘Perfume’ para Britney Spears y ‘Pretty Hurts’ para Beyoncé, la artista se encontró sumergida en problemas de drogas y alcohol que logró superar el año pasado.


 Have an easier conversation using the Translate app
 The titles of my code::dive talks are "CPU Caches and Why You Care" and "Support for Embedded Programming in C++11 and C++14". To understand the comments I make at the beginning of the latter talk, it will be helpful to view Venkat Subramaniam's talk on Lightweight Design, because his talk--which is worth viewing both for its merit and for the fact that Venkat is such an engaging speaker--immediately preceded mine, and it motivates my opening remarks that might otherwise make no sense, including my decision to give my talk without shoes.
 At ConFu, I was scheduled to give two talks, a keynote on interface design and a full-day tutorial on material in Effective Modern C++ (EMC++). The slot for my keynote was at the end of the day, but at the conference's opening keynote, I noticed that the room setup made it nearly impossible for the people in the back of the room to see the bottom third of the screen. I therefore spent the next several hours reformatting my slides to avoid using more than about the top two thirds of the screen, and I was very pleased with the way the talk went. The topic is "The Most Important Design Guideline," and though I've written and spoken about this guideline before (the guideline is to make interfaces easy to use correctly and hard to use incorrectly), this talk is the first time I felt like I really found a way to say what I wanted to say. If you're not convinced about the importance of the guideline from this presentation, I'm not going to be able to convince you.
 The ConFu organizers and I had agreed that my EMC++-based tutorial wasn't going to be recorded, but somebody attending the tutorial decided to do it on his or her own. The audio and video quality is what you'd expect from an informal recording, but since it's at YouTube, I figure you might as well know about it. It's in six videos of about an hour each (which makes sense, because I give tutorial attendees a break every hour), and you'll find links to all six at my Online Videos Page. In fact, that page links to videos of each of my presentations and interviews that I'm aware of. If you're aware of an online video that should be included there, but isn't, please let me know.


