


No, this isn't from an upcoming Spider-Man movie, but rather a homemade Doctor Octopus costume that comes complete with working mechanical tentacles. He is typically portrayed as a stocky, myopic man who utilizes four powerful, mechanical appendages, and is obsessed with proving his own genius and destroying Spider-Man. Continue reading for more.


Featured Photographer, Joe Aguirre
I am really happy to feature the work of Joe Aguirre today. He is a great guy and a good friend. He is also one of the most prolific shooters I know, and always seems to have a ton of work to share. I have been pushing Joe for a while to be featured, as he has been on the site before, here, here and his bag here. Come and see the delightful work of Thoughtlesshero. Warning for those at work or on public transport, there are naked ladies inside.
First of all, welcome to JCH, please tell us about yourself
Thanks for having me, dude. I’m 29 and I live in San Francisco CA. I discovered my passion for photography in my early 20′s and have been teaching myself how to make photos ever since.
I wish there was more to say…I live in an amazing city and I always have a camera up to my face. I have a day job and I freelance sometimes… Mostly I make photographs for me. I shoot the things that interest me: city landscapes, strangers, my cat, and my asshole friends.

You shoot more than probably anyone I know, in a variety of formats and with different gear, why is this? Too many to choose or not settled on a combination you prefer?
I usually grab what’s closest to the door. My most used cameras are my Leica M6, Canon G12, and LC-A. I like different styles and genres of photography, and my cameras are useful tools to create different looking photographs. If I can get away with it, I love to use my Nikon F4 for hired work… When I sit and think about it, I realize I have so many cameras and so little of everything else – one pair of shoes and enough clothes for a week or so without needing to do laundry… I guess at some point I decided that I would rather have money for film than for a new pair of sneakers.

I see a lot of your work online, it seems to be a reflection of your lifestyle. How would you describe your photography?
I don’t know…I’m just there. Sometimes a shot will appear. If not, I just keep walking, or doing what I’m doing at the time. I would like to be deeper than that, but my photos are created from a need to make photos. Sometimes I try to create a concept, but I feel I work best by just going out and being places, and then editing down after. I find themes in my photos much easier that way.

How do you get yourself motived to shoot? What inspires you?
I just carry a camera everywhere. It’s as routine as leaving the house with my wallet and keys. My friends through photography give me a push, advice, and most importantly they give me the truth. It’s hard to let someone talk about my photos, especially if they are going to say what they don’t like, but I value certain people’s words when it comes to my photos. I have conversations daily with Justin Vogel, Emilio Banuelos, Matt Obrey and Christos Kapatos— all very different thinkers and shooters but they all have my respect and undivided attention when it comes to getting advice. It’s not often you can bond with a stranger and then feel close enough to let them in. Killing your darlings is a hard thing to do, but it has also made me stronger. I am motivated by the great images my friends produce— it drives me to keep loading my camera to go out and improve but also to stay confident.
What is the biggest challenge you currently face with your photography?
Honestly, my biggest problem is figuring out what to do with all of it. For now, I’m just going to learn as much as I can, shoot often, and remain as true to myself as possible.

What is an Icarus and what does it have to do with your photography?
Icarus is my F3 Savannah cat and best friend. He guards my cameras for me.
I hear you like to take pictures of nudey ladies too, is this true?
I do— I enjoy the interaction between subject and photographer. I like to photograph real people and not someone who is a model. Mostly my friends volunteer and it’s all pretty relaxed and not awkward. If I meet a stranger that I want to photograph nude I will hand them my card, explain to them that I’m not (that) creepy, and tell them that if they look at my website and if they are down then I would love for them to come over. So, if any of you readers are in San Francisco and like to listen to The Cure while being photographed and aren’t allergic to cats, send me an email!

Are there any photographers that inspire you or influence your work?
I admire Ying Tang, John Goldsmith (anyone in Strange.rs), Benjamin Heath, Richard Bram, Mike Avina.. – so many wonderful photographers. I am inspired by the interactions I have had with them – they are all amazing people with lots of good things to say. I feel very lucky to know a lot of the people I have met while living in San Francisco and being part of its vast photo community. Lots of alternative process photographers inspire me to constantly be creative and try new things as well.
When it comes to the masters, I am a huge fan of Alex Webb, Bruce Davidson, and Mark Cohen. If I could only own three photographs it would be one from each of them.
Where would you like to see your photography develop in the future?
I would like to stop being such a shithead and make photography my full time job. By the end of this year I will hopefully be working steady freelancing and possibly have a better set up for studio portraits.

Do you have any upcoming projects or new pieces that you would like to share with the readers of JCH?
Currently working on a few things, the hard part is getting to the editing phase. That’s when the harder part starts. I want to show more of my work in galleries and zines, and possibly make my own zine that will lead to a bigger art book.
Links
https://www.facebook.com/joe.aguirre.180
http://thoughtlesshero.com/
Thanks to Joe for being a good sport and finally sharing his work with us. He has been a big help in encouraging me with my work, so I love seeing his stuff on the site. Joe’s photography has a kind of purity that I don’t often see. If I didn’t know him better I would say almost a kind of innocence that comes through in his images. Hopefully now he will finally give me a print to put on my wall.
Please check out Joe’s links and make sure you come and comment.
Please remember that the images are reproduced with the kind permission of Joe Aguirre and may not be used or reproduced without permission
I have a bagel story I need to get off my chest. I love bagels! I don't know what it is. Maybe it's all the carbs. Those are supposed to be addictive, right? I really do get excited, when I walk into a bakery and see baskets or trays filled with different bagel options. And I'd like to say the best bagel I ever had was from some artisan bakery in San Francisco (or something equally as cool sounding), but the truth is the best bagel I ever had was from Panera Bread Co. It was a peanut butter and banana bagel that they immediately discontinued. Ah! I've asked many Panera employees over the years if they will ever bring this flavor back. But so far the answer is a very polite and vague no.
Of course I plan to make my own homemade version someday. It turns out that peanut butter banana is a difficult flavor to make because it involves adding two very moist ingredients into your bread dough. Dough can be so finicky. Anyway, I digress. This week my bagel journey continues with a concoction involving chocolate chips and granola. This bagel is almost like a dessert. And if you think chocolate has no place in a breakfast food might I point out the number one offender: donuts! Get angry at donuts, not me. Also, why are you so mad about chocolate? :)
Chocolate Chip + Granola Bagels
1 1/3 cup warm water
1 1/2 tablespoons sugar
2 teaspoons active dry yeast
3 1/4 cups bread flour
1/4 cup cocoa powder
1 1/2 teaspoons salt
1/2 cup mini chocolate chips
1/2 cup granola
1 egg
In a bowl, combine the water and sugar and stir to dissolve. Pour in the yeast and allow this to sit for 6-8 minutes, it should bubble/fizz slightly. In a larger bowl, whisk together the flour, cocoa, chocolate chips and salt. Once the yeast mixture has had time to activate, pour it in to the flour mixture and stir until a crumbly dough forms. Turn out onto a floured surface and knead for 6-7 minutes until the dough begins to become elastic-like. You can also do this in a stand mixer with a dough hook attachment. Place the dough in a lightly oiled bowl, cover and allow to rise in a warm place for 1 hour.
Turn the dough out onto a lightly floured surface and divide into eight equal pieces. Shape into a ball and press your finger through to form the center hole. Once you have shaped all the bagels, allow them to rest for 10 minutes or so. Now place them into a pot of boiling water. They should float. Let them cook for 45 seconds to 1 minute on each side, then remove to your prepared baking sheet.Whisk the egg plus 1 teaspoon water in a small bowl and brush this over each bagel. Sprinkle on the granola. Bake at 425°F for 20 minutes. Enjoy warm with a little peanut butter, cream cheese or (dare I say it) Nutella! xo. Emma

I know there are a few guides out there for home processing, some of which were instrumental in helping me get over my fears. All of these other guides seemed to be a little incomplete and that lack of detail made me wait longer than I should have before taking the plunge. In reality, it’s easy to do your film at home. Let me show you!
The first thing you are going to need is one of these magical things:

This is your ticket to daylight processing. No need for any darkness in your “darkroom” with one of these. The reels are convertible. In the small size they take 35mm film. Give one a twist and it extends to a size that takes 120 or 220 film. They fit on the central column as you can see in the picture.
So this one tank lets you do two 35mm rolls at once or one 120 or 220 roll. However, you can also process four sheets of 4×5 film at once in the tank if you remove both reels (you need to keep the central column to keep it light proof).
I bend them gently in half (emulsion side facing inwards) and hold the “tacos” together with a rubber band. I then arrange them around the central column.
Here is a 4×5 film “taco” and four of them arranged in the Paterson tank:


Look on an online camera shop for “C-41″. You will find they sell a three chemical powder kit called a “Press Kit”.
It may be by Jobo or Tetanol or something else but but if it is a three bath powder kit selling for around $30 then that’s the one!
You mix up the chemistry into three containers and each will be one litre when mixed. You need airtight containers which plastic containers are not (they breath), so I recommend glass.
A narrow neck will be a big help in keeping air out and a wide base will be a big help in not tipping them over when working. In fact, you could do a lot worse than the bottles I found in a discount store locally for a few dollars brand new:

They came with some cheesy glass stoppers that were not airtight. I replaced them with some laboratory stoppers that are. You will notice that the glass is not brown or opaque. That hardly matters. I store them in boxes in a dark cupboard. Light, heat and oxygen are the enemies of your chemistry. If you can keep them airtight, cool and dark they will last longer than your nerve to keep using them! My current batch was mixed more than six months ago.
The next thing you need (in addition to a bathroom with a bath and sink) is a good thermometer (or two) and a good funnel. Don’t cheap out here. I must have spent close to $20 on decent lab quality thermometers and a good lab quality glass funnel. I also have two beakers that I found I didn’t need but they come in handy for holding the thermometers and funnel.

C-41 chemistry is very temperature sensitive. The whole thing should take place at 39 degrees C plus or minus 1 degree. Of this the most important stage is the Development stage. The later stages of Blix and Stabilise are not as critical. This is where your good thermometers and bathtub come in. I chose thermometers that were long (for easy use and easy reading) and that were fast. You can test this in the shop. Squeeze the bulb and as long as you are not a vampire the temperature should start going up. Let go and it should come back down. The faster this happens the better. I found these “spirit” thermometers are pretty quick.
The funnel is necessary because the chemistry is re-usable. You will be pouring the chemistry back into the bottles and you will want to do it quickly. Pretty hard without a good funnel.
LabTimer. You really want this app for your iPad or something similar. Go ahead and download it while you are reading this. It’s free. Go ahead and set it up with the following four timers:

All downloaded and set up? We’re nearly ready! Go string up a line across the bathtub or shower stall and get some paper clips or metal office clips ready for when the film is done. It needs to be close to head height because a 36 exposure roll of 35mm film is pretty long.
Right, let’s soup some film!
Here’s an action shot taken during an actual processing run. Sorry for the crummy quality, anything done in the middle of a run has to be done in a limited space of time as we will cover in a minute:

(That’s my wife’s Hello Kitty bubble bath, I’d like to point out.)
Here’s the decode to that picture: On the left is my iPad in a non-slip silicone case with LabTimer running. The Blix bottle is on the ledge there with very little chemistry in it because all that chemistry is in the Patterson tank with my roll of 120 Kodak Portra 800. The Developer bottle is back in the bath water keeping warm and has one of my thermometers leant against it telling me the temperature of the water bath. The Blix bottle has my funnel in it because I will be pouring back into it when the timer goes off.
Preview over.
First step needs to be done IN THE DARK. I know, it’s a drag. After this step it’s all daylight, though so don’t fear. If you have a changing bag then use it. For the longest time I loaded my film in a room with no windows in the cupboard under a bedsheet at night. The room may not have been perfectly dark but the cupboard in the dark was pretty dark. Under the sheet it was even darker. Darkness is like security, it’s all about layers. Practice the film loading in the daylight with junk film or a roll you sacrifice for the purpose before you try it in the dark. There is a knack to it but it is pretty easy. For 35mm film make sure you cut off the “tongue” so you have a square edge. It will make life much simpler!
The reels twist and have a little ratcheting motion in them. What you need to do is feed the film into the outer edge of the spool at the start of the spiral and feed it in a few inches. After that, you simply twist the sides of the reel back and forth and it will draw the film in. When you get to the end of the roll you need to cut off the end (for 35mm) or detach the end from the backing paper (120 film). Keep feeding the film into the spool a few inches past where it is all in.

Once the film is on the reel or reels put them on the central column inside the tank and install the inner funnel shaped lid and click it into place. I usually stick my little finger in the hole in the middle and make sure I can feel the central column before I go out into the light. The tank is light tight with the funnel lid on and central column inside. Nevertheless you can still pour liquids into and out of it. This is the genius part!
That’s it for darkness! Everything else is in the light.
Proceed to your darkroo– er, bathroom. The rubber top lid of the tank should be somewhere where you can reach it. Now you are ready to get film wet. Once you get the film wet you are committed so make sure all is ready. Here is the checklist:
Run the taps on your sink and adjust until the water running out of the tap is 39 degrees C or 40. When the temperature has stabilised put the tank under the tap and fill it almost full with the warm water. With the Press Kit chemistry the film should pre-soak for one minute at the temperature that will be used for developing. This gets rid of some of the anti-halation layer chemistry, softens the film and gets everything up to the right temperature.
After one minute dump the water. It may be all kinds of crazy colours so don’t be alarmed! It depends on the film brand.
Immediately next, start pouring the Developer chemistry into the Paterson tank. Fill it until you can see the fluid coming up through the funnel top. In other words, an inch or so from full. Too much chemistry in the tank won’t hurt but too little will leave some of your film undeveloped so don’t waste time measuring, just make it close to full.
Put on the top rubber lid and work the seal around the edge, rotating the tank as you do. Once you are sure the lid is fully on keep skooching the tank around in a circle until you see you have used up about 15 seconds of the time on the timer. Stick the tank in the bath water. At three minutes left you will pick up the tank for your first inversions. Here is how they go:
This “four inversions” exercise takes place at every thirty seconds and is essential to proper working of the chemistry with the film. Don’t skip it. And try to keep close to the right times. This is the tricky part because any housekeeping and so on you want to do during the process must fit into the gaps between one set of inversions and the next!
For example, here’s how I generally do the Developer stage:
Now some people will have you stress down to the second on these timings. As I said, you do want to get the inversions going pretty regularly and close to on time but if the total Developer time is 3:25 or 3:40 it isn’t going to make a huge difference. Nevertheless, do your best.
Here’s how I manage the transition from Developer to Blix: I try to start pouring the Developer back in the bottle very close to zero on the timer. You won’t be able to do it instantly since you are pouring close to a litre of fluid so just pour it as fast as you can without mess and don’t worry about the extra seconds.
When you have poured it all out pour the Blix in. Again, as fast as you can without mess you want to get the tank fairly full and then follow the same procedure as above with getting the lid sealed and hopefully in the water by fifteen seconds after you started the timer.
Here’s how I play the Blix stage:
Let the fast running tap water fill the tank. Slosh it around as it is filling. When it is full dump all the water out in the sink shaking the tank as you empty it. Once empty immediately start filling again with the same sloshing motion. Keep doing this filling and emptying with a lot of motion until the Rinse timer goes off. The goal is to completely fill and completely empty the tank each time. This will get all the remaining chemistry off the film. When the timer finishes just dump the last tankful of water and turn off the tap.

The Stabiliser is the most relaxed of the chemicals. Pour it in and jiggle the tank for the first fifteen or twenty seconds then let it stand. Temperature doesn’t matter much at this stage so you don’t need to put it in the water. At the end of the time just pour it back in the Stabiliser bottle.
At this point I like to do a little final rinse with some distilled water. It just helps the film dry a little cleaner. I pour in a little distilled water and slosh it around and pour it out. I do this a few times with a small amount of water each time.
You are done! Feels good, doesn’t it?


Take the reels out. One at a time pull the film gently off the reels and hang each with a clip from the line. You will need one or two clips at the top as well as one or two at the bottom. The clips at the bottom are weights because the film will want to curl around like a snake as it dries. The weights will keep it from running into other films and will help the water run off by keeping the film fairly straight.
When the film is dry you just cut it down and sleeve it.
Just a few notes about the drying stage. Try not to let anything touch the film whilst it is drying. It will be very soft and easily damaged at this stage. If anything should get onto the film panic! No, don’t panic. Get some distilled water right away and pour it liberally down the film. If you catch it right away the distilled water should wash off whatever got on the film without damaging it. Allow the film to dry again on its own. Don’t worry about the appearance of the film until it is dry. It is normal for it to look cloudy or uneven until it is dry.
Make sure you clean everything you used. If you rinse it well and dry it right away you shouldn’t need anything more than water to keep it all clean. Store it away from dust and it should be ready for next time.

Film rocks! A photo I self-processed at home
Congratulations! You’ve helped keep film photography alive!
About the author: Sam Agnew is a professional photographer based in Doha, Qatar. Visit his website here. This post was originally published here.

Thanks to the prevalence of digital photography and the fact that camera stores seem to be closing left and right, it can be hard enough to find film in the first place these days. But if you shoot with ultra large or specialty format films, your job is even more difficult. Thankfully, Ilford is here to help.
Harman technologies Inc. — the folks behind the manufacture of Ilford film — are opening their annual window during which photographers can order as much custom-manufactured specialty film as their hearts desire.
Between Monday May 13th and Friday June 28th, Ilford will take orders for sheet film in formats up to 20 x 24 inches, 70mm film, 122 and 127 format film, and even 120 format backing paper in 100ft lengths for those of you that make your own film rolls at home.

This is the kind of film photographers like Tim Pearse would have to use for their ultra large format creations.
Film types to choose from include FP4+, HP5+, Ortho Plus and even Delta 100 Professional in specialist formats, with an additional 3 sizes now available.
Fortunately for exotic film shooters, you won’t be limited regarding the amount of custom-made specialty film you can order either. Ilford will wait to start manufacturing until after the window closes on June 28th. Once they have all the orders in, they’ll begin the process of fulfilling them at their factory in the UK, hoping to have the film in consumer’s hands by September.
For a full list of participating dealers and available items, head over to the Ilford website by clicking here or find out more about the promotion itself here.
(via The Phoblographer)
Image credit: Black & White by DaveBleasdale

The Darktimer – Darkroom photography app
Recently Paulo Brukmann contacted me with something that he had come up with in his spare time, an app for use in the darkroom. I think this is a very useful idea, so I thought it would be nice to share it with you. Mixing modern technology with classic techniques. Here are Paulo’s words about the app.
At the beginning of black and white photo printing, the paper’s contrast were only soft or hard contrast, with evolution the printing paper has now multi coatings in the surface that reacts differently with a certain light colors: multi-contrast or multi-grade paper. It helps the photographer to achieve the desired contrast in the print with color filters. Combining two filters exposures (split grade) will calibrate the photo for a better dynamic range.
It’s very annoying and time consuming setting up the manual timers for split grade printing in the darkroom. Each exposure the timer needs to be reset and setup and take notes.
Darktimer is designed to give an alternative fast way of darkroom splitgrade printing with an enlarger. The built in metronome produces sounds to help photographer controlling your exposure.

How Does it Work?
Before any print it’s good practice to make a test strip to calibrate the exposure and find the correct contrast filters to use.
The test strip button fires a loop timer to help the photographer making test strips before final print, it will sound a different beep every loop. The + and – will increase decrease the timer obviously.
After finding the correct exposure times, it’s time to print. For better results it’s recommended to do SplitGrade printing which combine printing with 2 contrast filters.
The timer filters Filter A and Filter B (in seconds) now can be set with the values of test strip. If extra zone burning in the printing job is needed, Burn A and Burn B can be set for each filter.
When Start button is pressed DarkTimer will sound 3 beeps before counting down, then the enlarger must be turned on until 0 is displayed. It will sound a pair of beep the end, then turn enlarger lamp off.
Switch the filter and click Filter B button, repeat the exposure process used in Filter A. Same process is used if needed to Burn A and Burn B buttons.
Save the printing job clicking on the (+) button at the top, set the parameters used on the enlarger such, filters grades,lens aperture, focal length, enlarger height, notes, roll id, info and notes.
Recall the printing jobs by clicking in the book button, it will display a Jobs list.
After selecting the job, DarkTimer will display a nice schematic with the values used in the print.
To load the Timer with the schematic press red play button at the top of schematic, Easy.
You can get the App here darktimer.dev76.org
Or through the appstore
Thanks for sharing this with us Paulo, it is cool to see people doing things like this on their own time. Perhaps it is time that JCH made an app…haha.
Japancamerahunter

One of the advantages of digital photography is having information about how each photo was shot embedded within the photograph’s file itself. This EXIF data is something photographers commonly jot down in notebooks as they walk around and shoot with their analog cameras.
Photographer Oriol Garcia wanted a better solution than manually writing down shot times and details. Since most people have smartphones now, why not make an extremely easy to use app that can document the info of every photograph taken? He ended up creating an app called PhotoExif that can do just that.
The iOS app helps you record information such as camera, lens, shutter speed, aperture, and GPS coordinates.
Instead of having to enter those details in manually character by character and number by number, the app is optimized for speed.
It allows you to store a catalog of cameras and lenses you use, and has an interface that mimics the design of an SLR camera. You select your lens, aperture, shutter speed, and focal length by simply turning digital sliders and dials:

Once those settings are selected, you can manually enter in some comments if you wish. Pressing the digital shutter button then records the information along with GPS coordinates and time.
Everything is organized into rolls of film. By the time you finish a roll, that roll’s digital counterpart in PhotoExif should have the same number of “exposures” and contain the necessary details for each one.

Tapping an individual roll of film will show you a list of photos you’ve taken:

Once you have your roll of physical film developed, you can easily bake the PhotoExif information directly into those digitized photos. Garcia has create a free companion desktop app called PhotoExifDesktop that applies each frame’s data to each digital frame on your computer:

You can find out more about PhotoExif on its official website, or purchase it for $2 over in the Apple App Store.

In September 2010, visual artist and filmmaker Rä di Martino set out on a quest to photograph and document old abandoned film sets in the North African deserts. The project had started when she discovered that it was common practice to abandon these sets without tearing them down, leaving them fully intact and crumbling over time, like archeological ruins.
Martino spent that month traveling around Chott el Djerid in Tunisia, finding and photographing three Star Wars sets in all for her photo series No More Stars and Every World’s a Stage.
Actually finding the sets wasn’t as easy as you might think. At first, Martino had only Google Maps as her guide, and when you’re in the desert, that just won’t do. It was only after a chance encounter with a driver who knew the desert well and a detour to ask directions at a police station that she finally stumbled upon her subject.
After finally reaching the so-called “ruins” of Luke Skywalker’s childhood, Martino spent the morning shooting on both digital and film, surprisingly moved by the memories of her own childhood that the set brought to the surface:


Interestingly enough, after the photos were published, Star Wars fans annoyed with the disheveled state of Skywalker’s fictional home spent $11,000 and worked with locals to restore the old set. Now tourists who are brave enough to explore the Tunisian desert may find themselves in a pristine slice of Tatooine history if they’re lucky.
To see more from Martino, including more photos from other well-known and abandoned film sets, check out her website here.
(via Laughing Squid)
Image credits: Photographs by Rä di Martino and used with permission.
 This is a video of some dudes demonstrating their custom built, 24-bottle bottle opener on a case of beer. Unfortunately for them, it leaves four unopened, underwhelming audiences worldwide and causing at least one blogger to question if we'll ever be able to open 24 beers at once. Still, I'm going to need it or one like it to open all the beer bottles at the club I'm opening. It's called, 'GW's Drink Alone Club'. It's really like two clubs in one because after eight it turns into 'GW's Drink Alone In The Dark Club'. Sometimes a friend or neighbor will come over too but I'll just be really quiet until they stop knocking and go away.
Hit the jump for the video.
This is a video of some dudes demonstrating their custom built, 24-bottle bottle opener on a case of beer. Unfortunately for them, it leaves four unopened, underwhelming audiences worldwide and causing at least one blogger to question if we'll ever be able to open 24 beers at once. Still, I'm going to need it or one like it to open all the beer bottles at the club I'm opening. It's called, 'GW's Drink Alone Club'. It's really like two clubs in one because after eight it turns into 'GW's Drink Alone In The Dark Club'. Sometimes a friend or neighbor will come over too but I'll just be really quiet until they stop knocking and go away.
Hit the jump for the video.
It's not the first time that Kwikset's dabbled in wireless locks, but today the company's introducing Kēvo, a smartphone- (and tablet-) friendly lock powered by UniKey. The concept is pretty simple: pair a handset (running a special app) with Kēvo via Bluetooth, and simply touch the deadbolt to lock or unlock your door. A keychain fob is also available for those who have not yet joined the smartphone revolution. Kēvo only responds to touch when an authorized device or fob is detected nearby. A triple tap lets anyone lock your door, which is useful if a visitor leaves after you. The deadbolt is battery-powered using four AA cells that last more than a year with normal operation. It features a ring of RGB LEDs for feedback and a standard physical key for backup.
Most of the magic is made possible by tech developed by UniKey. The key (natch) to the entire system is the Kēvo app which lets you manage eKeys. Once logged into the app, you can send and delete eKeys, or transfer them to another device (this also deletes the eKeys associated with a lost handset, for example) -- you can even create eKeys that only work once. Currently, the app is only available for iOS, which is a major limitation, but it supports push, email and SMS notifications and keeps a detailed log of which eKeys have accessed Kēvo and when. Pricing and availability remain a mystery, but all in all the system looks pretty clever. Stay tuned for more details, and check out the link below.
Filed under: Cellphones, Household, Tablets, Wireless, Software, Mobile, Apple
Source: Kwikset

Enemy rockets go up. ADAM makes'em go down... safely and in a grand explosion of fire. That's the name of Lockheed Martin's Area Defense Anti-Munitions system, or badass laser for short (to us, anyway), created to intercept and "negate" airborne rockets and drones. The aerospace company's been testing its portable, prototype system -- built with off-the-shelf parts -- since last summer, successfully proving ADAM's capability in detecting aerial threats at a distance of 5km or more and then obliterating those targets with its finely trained laser, or HEL beam (no, really), once they're within a 2km range. But why waste time with words when the the company's own slo-mo video paints a more vivid, shock and awe-some picture. Check it out after the break.
Filed under: Robots
Source: Lockheed Martin
You might be familiar with where it all started: the status board we put on our Panic office wall in 2010.
Since then, as you may know, we turned that status board into an iPad app called Status Board. Now everyone can have a cool, beautiful, data-packed status board on their desk or wall.
And since we built the app, we rebuilt our status board, making it twice as good! (Literally.)
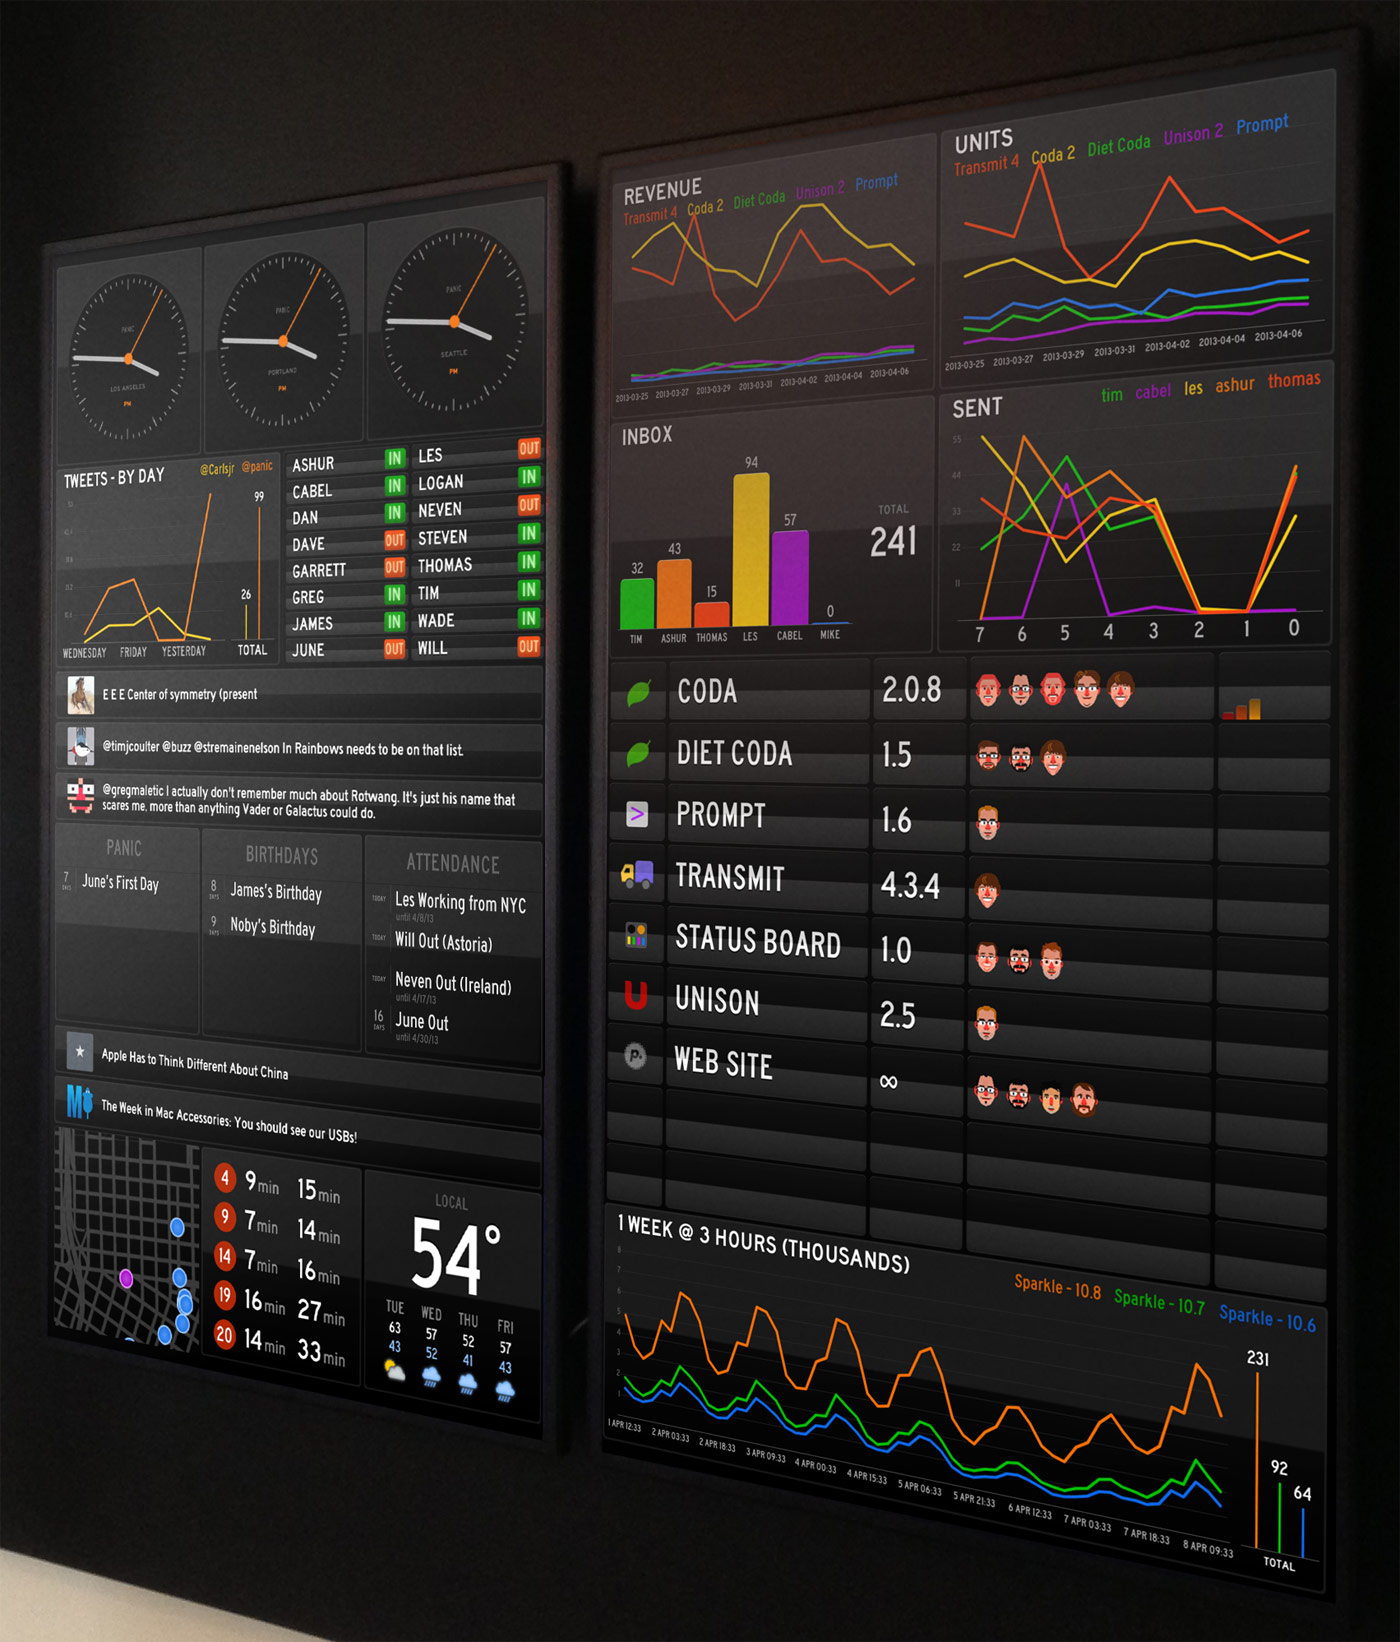
No, you’re not seeing double — this time we went with two goofy screens of stuff.
It’s pretty glorious.
Here are some implementation notes on our board:
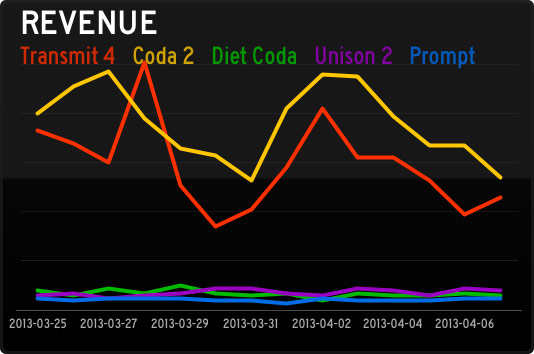 Traditionally Panic is quiet about how-are-we-doing data. It always feels like a possible distraction for our hard-working team. But we’re always changing, and this revenue Graph panel has been fascinating. Every day a script totals up our direct sales data, then retrieves our App Store sales data using AppFigures and their nice API. The totals get dumped into a database, and then we make that available via a simple PHP script that outputs JSON to the Status Board. That might sound tricky, but all told it took about a day of work to make happen.
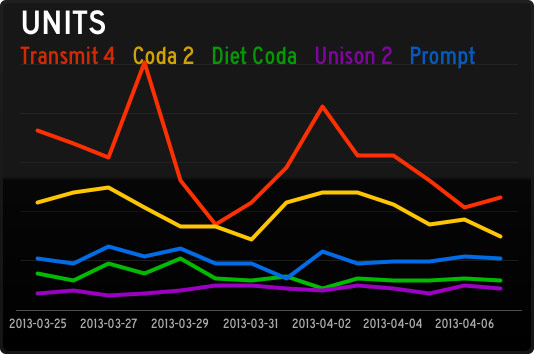 Units have been especially interesting since they reveal so much about the economics of (our) iOS software, as this Graph panel shows. Although (our) iOS apps sell a respectable number of units, the revenue they bring in barely charts compared to our Mac stalwarts. So far! We’re working hard on improving our iOS apps, and trying new ideas, in order to crack the iOS market a little bit more. (Sorry this chart was pre-Status Board, which is doing well!) By the way, Graph documentation is here.
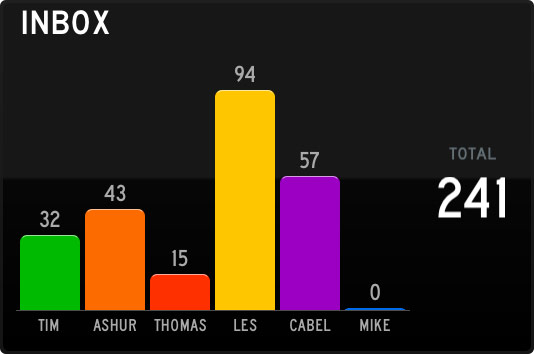 The Support team works tirelessly to fight this tide! This is just an Email panel, which ties into our IMAP server. It took about 3 minutes to set up, and has been incredibly useful to see what our support load is at a very quick glance. (On the server, each Support person shares a single “Help” IMAP account, which has folders for each support person, and a script distributes the incoming support requests round-robin style.)
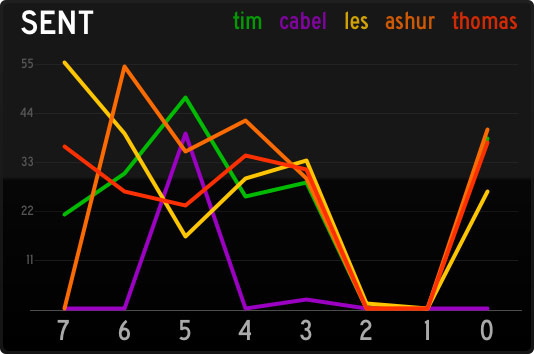 Conversely, this Graph panel this is a great way to quickly see how many support responses are going out the door. (Of course, it’s not a competition — it’s just for fun.) To get accurate Sent counts, we have a script that looks at both outgoing Twitter replies, and outgoing e-mails, and totals them up per-person into JSON.
 This list is using our Table panel, connecting to an HTML file on our server. (Table documentation is here.) This is an edited version to protect our secret projects, of course. A project list is always tricky, since it’s the most manually-updated thing on the board, and always runs the risk of being stale. But, it’s fun to see who’s working on what.
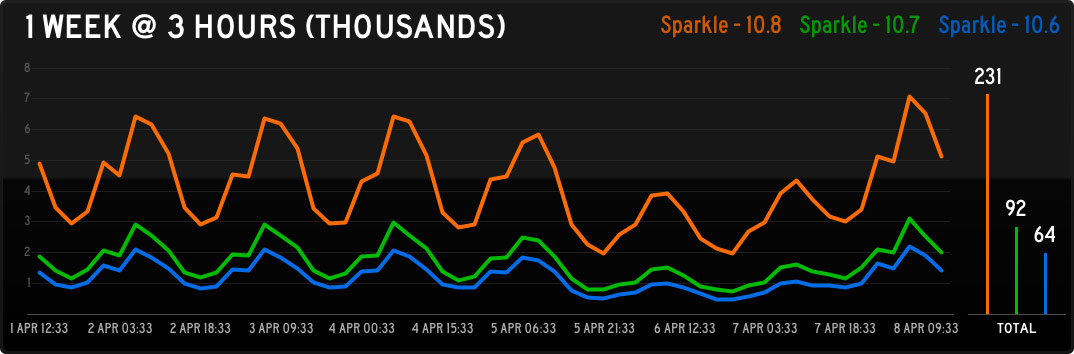
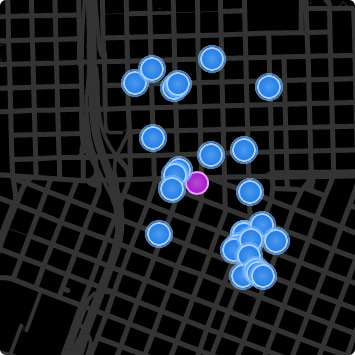 This is our car2go map, so we can quickly see if there are any cars near the office that we can hijack and drive home at the end of the day. It’s totally custom — we’re using the Do-It-Yourself panel so it’s just a little web page on our server. We signed up for the car2go API and combined their data with Google maps and some nice CSS animation. If enough people are interested, we might make this available to others. (Does your city have car2go?)
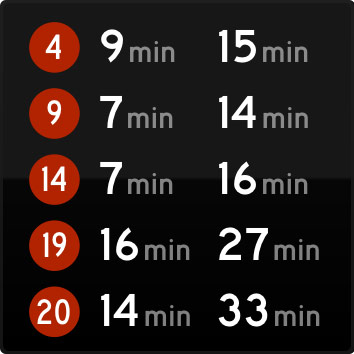 This is another Do-It-Yourself panel to show everyone’s bus lines. Sometimes end-of-the-day conversations are abruptly interrupted when we notice a bus is nearby. Logan has more recently made his own TriMet panel that we like a lot.
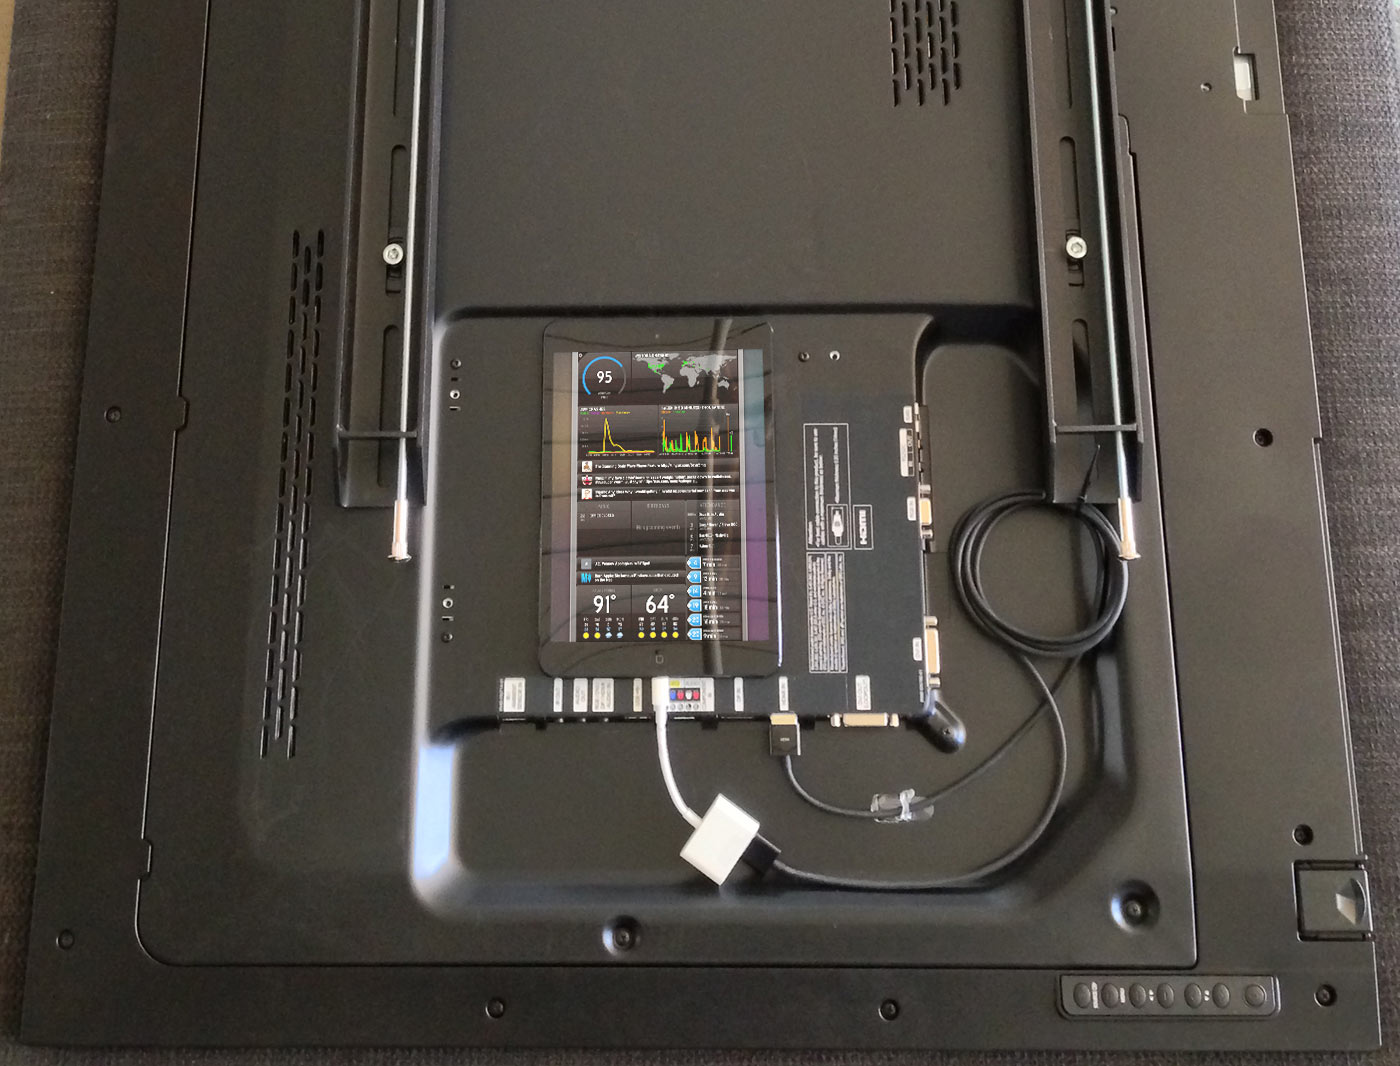
As people continue to build new things, our Status Board seems to change every week. Since taking these photos we’ve already added GoSquared, SNMP traffic graphs, and much more. That’s the best/worst thing about Status Board: it’s now so easy to make a cool Status Board that it’s hard to know when to stop. But hey, it’s fun!
If you’ve used Status Board to make a cool status board, send us a photo!
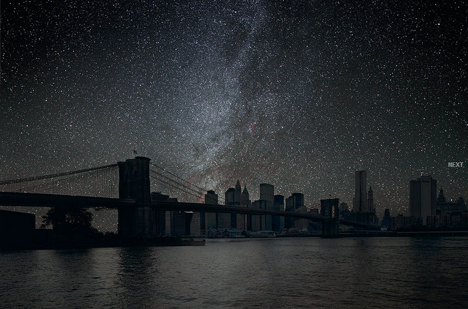
Massive power outages give us rare glimpses of darkened cities, but in normal conditions, there is simply no way to see the starry skies above the typical urban metropolis – but one photographer has found a way to simulate them.
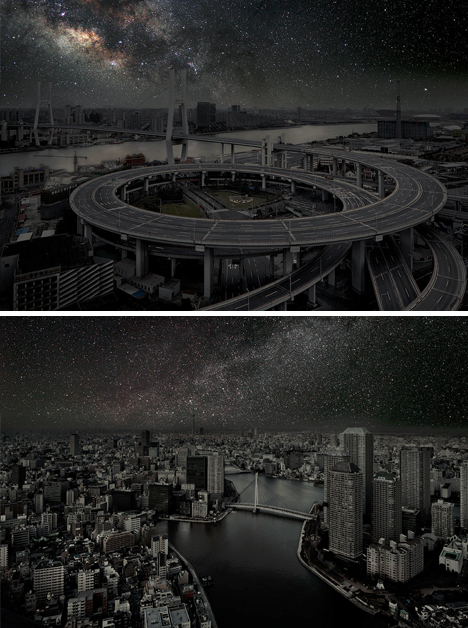
Thierry Cohen uses a multi-step process to create stunning visualizations (dubbed Darkened Cities) of would-be, could-be sights from New York to London, Shanghai to Sao Paulo … ones that the ordinary eye will rarely or never see naturally.
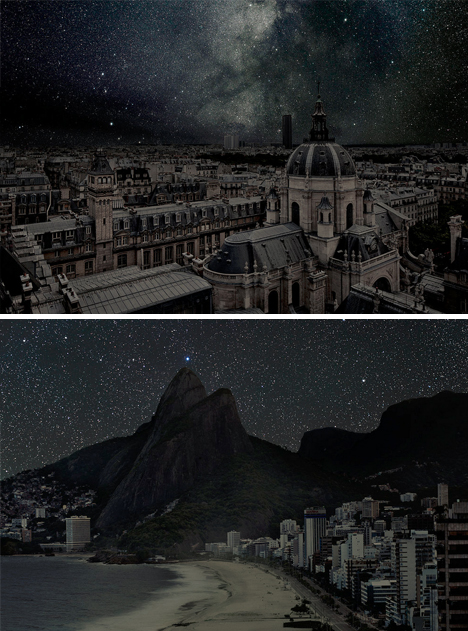
Cohen takes a series of shots of each of the cities themselves, and carefully removes illumination from the equation. Night sky photos from the same latitudes (adjusted for time and angle) are then layered into the background, creating a seamless illusion.
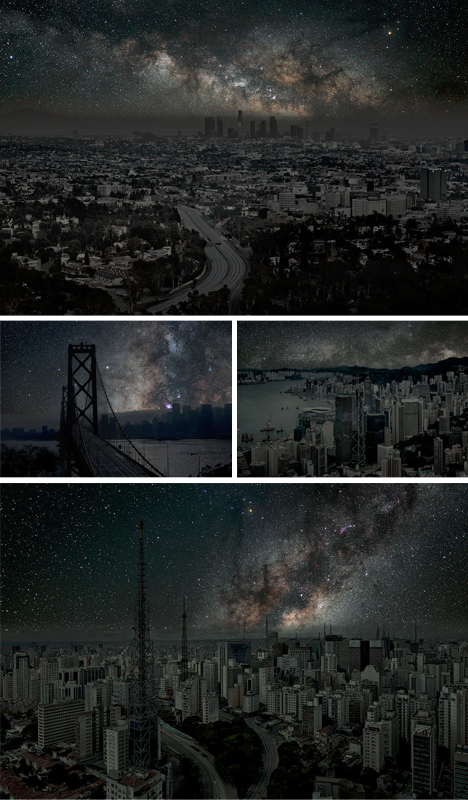
The results are at once mesmerizing, revealing the unseen potential for views of space right where we live, but also somewhat depressing – these are scenes that no one can actually ever see outside of deserts, at least unless disaster strikes.


|
 The developers behind popular Google Reader-based newsreading app Reeder said earlier this year the app would not die when Google's Reader service goes offline this summer. Customers concerned about this transition can breathe a sigh of relief as Reeder announced last night that it will switch to Feedbin as its back-end service.
Feedbin was created by San Francisco web developer Ben Ubois and is based on open source software. It has a robust API that'll sync subscriptions, articles and their read/starred states. There's also a web-based interface that allows you to manage your RSS feeds. Access to the web version costs US$2/month.
The iPhone version of Reeder will get Feedbin support soon, while the iPad and OS X version will be updated in the coming months.
Update: The developer behind Reeder confirmed on Twitter that Feedbin is not the only solution being implemented. It is just his favorite choice right now.
[Via The Loop]
Reeder to use Feedbin to power its newsreading feature (Updated) originally appeared on TUAW - The Unofficial Apple Weblog on Thu, 28 Mar 2013 10:00:00 EST. Please see our terms for use of feeds.


Tables, sofas, loungers, boxes for plants, bars … Everything made of pallets.


++ More information at Associação de Educação Ambiental e Desenvolvimento em Cabo Verde website !
Idea sent by Fanny Motard !
Say hello to Spot! Here is a multipurpose light that can be hung, hand-held, or simply placed on a surface. Imagine using it as a torch, desk lamp, ambient light, or wall light. Inspired by the functionality and versatility of industrial work lights, this adaptive light looks sexy just any place.
Spot is a design collaboration between the students of National University of Singapore – Division of Industrial Design (NUSDID) and Ecole Nationale Supérieure de Création Industrielle (ENSCI – Les Ateliers).
Designers: Gloria Ngiam, Nigel Geh & Guillaume Bloget


-
Yanko Design
Timeless Designs - Explore wonderful concepts from around the world!
Yanko Design Store - We are about more than just concepts. See what's hot at the YD Store!
(The Light With A Sweet Spot was originally posted on Yanko Design)
Related posts:
 |
 |
This morning we visited Doughnut Plant which we heard about via Saveur Magazine & our pal Naomi's instagram. :) It was only a short walk from our hotel. There were too many amazing flavors, so we ordered a bunch to sample and share. My favorites were the coconut and rose flavors, Emma liked Pistachio, Trey was into the Peanut Butter and Jam flavor, and Jeremy loved the Crème Brûlée.
We've really enjoyed this trip to NYC. It was mostly a work trip, but we were lucky enough to squeeze in quite a few quick meet-ups with friends and enjoy some otherworldly treats as well. I'll be back soon to share more photos from our trip. It's been incredibly productive and inspiring!
What did you do this weekend? xo. Elsie and Emma

Kaufmann.jensI really like it. It is totally nerdy.
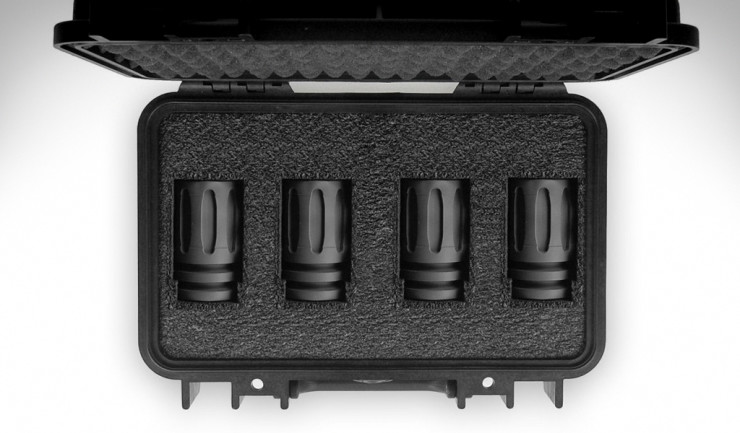
A mere $200 gets you this pelicanoid case with four of Muzzleshot's muzzle-suppressor-shaped shot-glasses, machined from solid aluminum and covered in a matte black anodized finish.
Muzzleshot (via OhGizmo) ![]()
|
|

"Veggietanic, a photo shared in the BB Flickr Pool by BB reader Domenic Bahmann (instagram, Twitter, Tumblr). Oh, hey, and he's selling an "Octopus Banana" print. Just look at it.

![]()
|
|

The new bundle is a set of plugins that previously cost $750.00, and includes tools to help you create black-and-white photos, selective color adjustment, sharpening, and of course HDR and color enhancements. These plugins are designed for Photoshop, Aperture and Lightroom.
NIK is offering a 15-day trial. Even better, current owners of any part of the latest versions of the NIK bundle can upgrade to the entire collection for free. Some registered users are getting emails about the free upgrade.
NIK Software fans have been on an uncertain road since Google acquired the company last September. Google turned its Snapseed photo enhancer into a free app and halted development on the Mac and Windows versions.
The future of the NIK professional tools, like HDR Efex Pro and Color Efex Pro has been in limbo, although Google had said the pro tools would stay around. It's nice to have gotten some clarity.
NIK has been well-regarded for 17 years. I'm not sure if these applications will continue on a rapid development schedule, but I think this offer represents a real bargain.
[via The Next Web]
NIK Software creates bundle of Mac Plugins, drops price 70% originally appeared on TUAW - The Unofficial Apple Weblog on Mon, 25 Mar 2013 16:00:00 EST. Please see our terms for use of feeds.
Kaufmann.jensAmazing lighting Idea. Might even work for a wedding.

Faced with another birthday party at Chuck E Cheese, a place my daughter loves but low ISOs do not, I decided to get creative. I shot a collection of photos with a set of three Yongnuo YN-560 and YN-560 II flashes with a diffuser cap/”omni bounce” inside of small lampshades placed along the table.
I wanted to go for a look like dinner around a table with candles/lamps sort of low key, pleasant ambiance kind of thing. I also wanted to shoot at lower ISOs to get some real nice images of my kid as keepsakes.

I don’t know if something like this would be viable/useful outside of a family event where I don’t care that I can see the bottoms of the lamps are actually flash bodies, but, I had thought that perhaps I could push the idea further in the future and hide the flashes in something that actually looks like a lamp. This was a prototype test run where at least I cared to get some decent shots.


Anyway, the flashes were all set at 1/64th power, zoomed out to 24mm, diffuser down, gelled 1/4 CTO, with Meike omnibounce-alike cap inside simple small white lampshades that I bought at Wal-mart for $3.50 each. The bounce caps (for bare-bulb-like effect) cost $5 each so the modifier cost was very low per flash.

Camera was a Nikon D800 + Sigma 35mm ƒ/1.4 set to 100 ISO most of the time, occasionally up to 200 ISO, 1/60-1/100s shutter, f/1.4-2 all varied depending on my whim. Just one image from this album is not lit with the lights, it’ll probably be obvious which one.


Keep in mind that this was merely my own kid’s birthday party and not some event I shot for pay. I figured it might be interesting to the strobists anyway due to the unusual approach I took to dealing with a low/mixed light setting where the ceilings were too high and unpredictably colored to bounce (and I don’t really like the eye-shadow effect of bounced flash anyway.)
About the author: Zachery Jensen is a photography enthusiast and software engineer based in Salt Lake City, Utah. Visit his website here, his Facebook page here, and his Flickr here. This article originally appeared here.
Kaufmann.jensReally cute.
 WXY Paper has just released the templates for these cute 5cm tall models. The file includes the template for RX-75-4 Guntank, RX-78-2 Gundam, RX-77-2 Guncannon and FF-X7 Core Fighter. You'll need these colored cardstocks: 2x white, 2x grey, 1 red, 1 blue and 1 yellow.
Without looking, take a minute to describe what you imagine a Jag looking like… chances are, you just described the classics AND the modern Jaguar XK-I concept. It’s an automotive brand that relies heavily on its name; a name originally synonymous with dramatic curves, top-notch materials, thoroughbred British performance, and overall star-quality of the earlier 50s and 60s models. It’s nice to see a Jag concept that embodies the roots of the brand when it was in its prime!
Designer: Mudit Gupta


-
Yanko Design
Timeless Designs - Explore wonderful concepts from around the world!
Yanko Design Store - We are about more than just concepts. See what's hot at the YD Store!
(Now this is a Jag was originally posted on Yanko Design)
No related posts.
|
|

Berlin-based engineer / artist Nik Nowak created SoundTank, a fully-functional tracked vehicle that sports six 12-inch mid-range drivers, three 18-inch subwoofers, and four tweeters for 4,000 watts of power. Continue reading for two videos and more information.
Seems in 2010 this training video got a green light. The Associated Press has the details.

The Online Lighting Diagram Creator is a web app for easily creating and sharing lighting diagrams. It was created back in 2009 by Sydney-based photographer and web developer Quoc Huy Nguyen Dinh. It’s an extremely simple tool through which you can create detailed diagrams by simply clicking and dragging.
The first version featured a toolbox of lighting objects on the left side…

…and a canvas on the right side. Click a tool to have it appear on the canvas. Drag the object around to reposition it. Hover your mouse over to see options for rotating the object, changing its layer priority, duplicating it, or deleting it. Here’s a canvas filled with various objects:

Once you’ve finalized your diagram, you can export it as a JPG or PNG file, or save it to a URL that you can then share with others.
After the first version gained some traction online, Dinh followed it up with a new version that’s currently called “Creator v3 beta.” This new tool is more advanced, and is also optimized for iPad use.

The different objects categories are now hidden behind a drop down menu, and appear in the box on the bottom when a category is chosen. The size and orientation of the objects can be adjusted using sliders once they’ve been dragged into the canvas.
Another new feature is the ability to add notes to saved diagrams. Notes can be up to 95 characters in length, and are added through the text field to the side of the diagram maker.
Head on over to the original Lighting Diagram Creator or to the Creator v3 beta to get started.
The Online Lighting Diagram Creator (via Imaging Resource)
 Measuring the resistance of a short length of conducting filament extruded from a standard hot end. The 1.75mm filament used as input was made by rolling and can also be seen.
 The Sony World Photography Awards 2013 winners in the Open, Youth and 3D categories have been announced today.
The 2013 Sony World Photography Award winners in the Open Category were selected from nearly 55,000 entries and hail from all regions of the globe.
The Open category winners include:

Architecture – Martina Biccheri, Italy

Arts and Culture – Gilbert Yu, Hong Kong

Enhanced – Hoang Hiep Nguyen, Vietnam

Low Light – Elmar Akhmetov, Kazakhstan

Nature & Wildlife – Krasimir Matarov, Bulgaria

Panoramic – Yeow Kwang Yeo, Singapore

People – Hisatomi Tadahiko, Japan

Smile – Ming Hui Guan, China

Split Second – Matías Gálvez, Chile

Travel – Manny Fajutag, Philippines
The 10 Open category Sony World Photography Awards winners will now compete for the Sony World Photography Awards Open Photographer of the Year title.
The overall winner will be announced at a gala ceremony in London on 25 April, and this photographer will receive $5,000 (USD).
All category winners receive a Sony A77 and will have their winning photos exhibited at Somerset House, in London, from 26 April – 12 May as part of the 2013 Sony World Photography Awards Exhibition.
What’s more, the winning photos will also be published in the 2013 edition of the Sony World Photography Awards book.
Click on the following pages to see the winning images from the Sony World Photography Awards 2013 Youth and 3D categories.
PAGE 1: Sony World Photography Awards 2013 Open Category winners
PAGE 2: Sony World Photography Awards 2013 Youth Category winners
PAGE 3: Sony World Photography Awards 2013 3D Category winner
READ MORE
16 new cameras we’d like to see in 2013
10 common camera mistakes every photographer makes
10 rules of photo composition (and why they work)
New Camera Anatomy: 12 key camera settings to get you started right