Shared posts

28 Jun 01:50

Sculptural Wall Hangings by Jacqueline Surdell

by Jaime Derringer

Sculptural Wall Hangings by Jacqueline Surdell

Fiber art is all the rage right now, but I’ve found it hard to really find standouts in this recent sea of wall hangings. However, I bumped into Jacqueline Surdell and fell in love with her large-scale rope macrame-weavings.

jacqueline-surdell-WorkI

jacqueline-surdell-WorkII

A Chicago native, she now lives and works in Los Angeles, CA where she creates large wall hangings inspired by her surroundings, particularly the city-scape and people of Los Angeles. Starting from a loom she creates as a base, her knotting techniques create jumbled knots that mutate and create sculptural effects that are powerful. I especially like that she uses all one color so you can focus on the texture and voids.

jacqueline-surdell-detail

jacqueline-surdell-Working

jacqueline-surdell-showroom

jacqueline-surdell-portrait


28 Jun 01:49

Daringly Unique Wallpapers and Wall Murals from Milton & King

by Jaime Derringer

The following post is brought to you by Milton & King. Our partners are hand-picked by the Design Milk team because they represent the best in design.

We all know that wallpaper and wall murals are back in a big way and here to stay, so when we stumble across a new resource full of refreshing patterns and designs, we jump all over it. Especially when that company partners with amazingly talented artists and designers to release their exclusive collections. That’s why we have fallen in love with Australian brand Milton & King!

Daringly Unique Wallpapers and Wall Murals from Milton & King

Their fun, exclusive designer wallpapers and wall murals are not only inspiring, but they become a huge focal point for your room. As a design lover (which if you’re reading this, you are too!) I understand every piece in a room is important, but sometimes you just gotta go with something that sings more loudly then the rest. Milton & King’s wallpapers and murals are incredibly expressive, telling the room’s story and creating an environment and an experience instead of just a space.

For too long Milton & King wallcoverings were only available to their Australian trade clients, but with the launch of their brand new online store, these design savvy manufacturers and their awesome papers have never been so accessible.

But be warned, you may end up losing yourself (and a few hours) searching through the endless range of hugely creative designs or flicking through some of the completed installs on Instagram.

Kemra's Vintage Drawers and Macaroons

Kemra’s Vintage Drawers and Macaroons

eBoy's Back Yello and Night Flower

eBoy’s Back Yello and Night Flower

From risk-taking wallpaper like Wallpaper Republic, children’s brand Muffin & Mani, faux wallpaper from Kemra and even a vintage collection of wallpapers from Erstwhile, their variety makes them a one-stop shop for all four—or five if you’re daring—walls.

And if you love Scandinavian design, their latest line from Ingrid & Mika is gonna be right up your alley.

Shop all Milton & King designs here.


28 Jun 01:46

Heath Ceramics Launches Mural, A Multidimensional Pattern

by Caroline Williamson

Heath Ceramics Launches Mural, A Multidimensional Pattern

Legendary pottery makers Heath Ceramics have launched Mural, the latest in their series of pre-configured pattern combinations for tile. The first in the series is called Twill and it uses the Little Diamond shape from their Dwell Patterns collection in six different glazes to create a multidimensional, mind-tripping pattern. Each of the eight color ways combines the six glazes, including matte and gloss, into a pre-selected, dynamic configuration.

Arctic

Arctic

Mural-Tile-Twill-heath-ceramics-2

Mural-Tile-Twill-heath-ceramics-3

Mural-Tile-Twill-heath-ceramics-4

Rhythm

Rhythm

Mural-Tile-Twill-heath-ceramics-6

Yarrow

Yarrow

Mural-Tile-Twill-heath-ceramics-8

Alabaster

Alabaster

Mural-Tile-Twill-heath-ceramics-10

Black Walnut

Black Walnut

Mural-Tile-Twill-heath-ceramics-12

Tide Pool

Tide Pool

Mural-Tile-Twill-heath-ceramics-14

Old Growth

Old Growth

Mural-Tile-Twill-heath-ceramics-16

Denim

Denim

Mural-Tile-Twill-heath-ceramics-18


28 Jun 01:44

Outdoor Architectural Pavilion Made of Self-Supported Shells

by Caroline Williamson

Outdoor Architectural Pavilion Made of Self-Supported Shells

Commissioned by the Edmonton Arts Council, Marc Fornes / THEVERYMANY designed and built Vaulted Willow, an “architectural folly” within Borden Park in Edmonton, Canada. Constructed out of 721 aluminum stripes, 14,043 connectors, and 60 epoxy concrete anchors, the architectural sculpture explores these lightweight, self-supported shells “through the development of custom computational protocols of structural form-finding and descriptive geometry.”

Vaulted-Willow-MARC-FORNES-THEVERYMANY-1a

The goal for the pavilion was to “resolve and delineate structure, skin and ornamentation into a single unified system.” The skin’s colorful gradient is formed through the careful layout of the individual shingles. Each one is similar to the next, yet they’re all unique and made through digital fabrication. The shingles overlap each other, much like shingles do on a roof, creating double thickness and a more solid structure.

Vaulted-Willow-MARC-FORNES-THEVERYMANY-1b

The idea for the colors comes from the surrounding park, but bumped up to verge on artificiality.

Vaulted-Willow-MARC-FORNES-THEVERYMANY-2

The structure is anchored to a 240 cubic foot concrete pad with 24 base plates. To complete, there was a crew of four people who assembled the prefabricated parts over the span of four days.

Vaulted-Willow-MARC-FORNES-THEVERYMANY-3

Vaulted-Willow-MARC-FORNES-THEVERYMANY-4

Vaulted-Willow-MARC-FORNES-THEVERYMANY-5

Vaulted-Willow-MARC-FORNES-THEVERYMANY-6

Vaulted-Willow-MARC-FORNES-THEVERYMANY-7

Vaulted-Willow-MARC-FORNES-THEVERYMANY-8

Vaulted-Willow-MARC-FORNES-THEVERYMANY-9

Vaulted-Willow-MARC-FORNES-THEVERYMANY-10

Vaulted-Willow-MARC-FORNES-THEVERYMANY-11

Vaulted-Willow-MARC-FORNES-THEVERYMANY-12

Vaulted-Willow-MARC-FORNES-THEVERYMANY-13


28 Jun 01:40

A Colorful Airport Lounge Designed to Excite

by Nanette Wong

A Colorful Airport Lounge Designed to Excite

Boarding lounges are probably the least exciting places in the airports. Normally built for pure function, airport gate design is often overlooked. When presented with the opportunity to design the inside of the departures terminal of the Henri Coanda International Airport in Romania, Robert Marin and Ionel Pascu of NUCA Studio jumped at the chance to create a positive and exciting space to surprise consumers during the emotional pre-travel state.

NUCAStudio-AirportLounge-8

The designers started off by creating more of a comfort zone than just a lounge. The furniture was meant to be ergonomic and suited for work with laptops or tablets, while also comfortable enough to be relaxing. The spatial arrangement and materials of the furniture absorb sound, reducing the terminal noise and shielding those sitting in the lounge.

NUCAStudio-AirportLounge-7

The furnishings stray away from solid colors – instead, the designers chose bright, primary colors for the floor to add a sense of playfulness. Bold color blocking, accentuated by strong geometric lines, infuses the users with cheer and provides a positive influence as they get ready to depart for a new adventure.

NUCAStudio-AirportLounge-1

NUCAStudio-AirportLounge-2

NUCAStudio-AirportLounge-4

NUCAStudio-AirportLounge-6

NUCAStudio-AirportLounge-9

NUCAStudio-AirportLounge-5

NUCAStudio-AirportLounge-11

NUCAStudio-AirportLounge-10

NUCAStudio-AirportLounge-12

NUCAStudio-AirportLounge-13

NUCAStudio-AirportLounge-14

Photos by Cosmin Dragomir.


28 Jun 01:37

Visually Stimulating Prints of Letters

by Caroline Williamson

Visually Stimulating Prints of Letters

London-based graphic designer Silvia Baz created Typeworks, a series of visually stimulating prints of letters. When you’re standing close, the black and white designs make the letters hard to see, but when you back away, they’re much more apparent.

Typeworks-Print-Silvia-Baz-2

The alphabetical prints, made with various sized black dots, were inspired by this quote from Goethe, “The hardest thing to see is what is in front of your eyes.”

Typeworks-Print-Silvia-Baz-3

Typeworks-Print-Silvia-Baz-4

Typeworks-Print-Silvia-Baz-5

Typeworks-Print-Silvia-Baz-6

Typeworks-Print-Silvia-Baz-7

Typeworks-Print-Silvia-Baz-8

Typeworks-Print-Silvia-Baz-9


28 Jun 01:36

&New: Modern, Minimalist Furniture Made of Steel

by Caroline Williamson

&New: Modern, Minimalist Furniture Made of Steel

Jo Wilton and Mirka Grohn are the British-Finnish design duo that launched &New, a modern furniture company that focuses on minimalist, airy designs. Using steel, the durable, strong material is the perfect option to achieve delicate looking pieces that are anything but.

AndNew-British-furniture-2

Each modern, powder-coated piece stands out with their bold, angled lines that are decked out in fun colors. On occasion, the steel is paired with different types of wood to finish out the design. This first collection includes side tables, sideboards, console tables, and clothes racks.

AndNew-British-furniture-2a

AndNew-British-furniture-2b

AndNew-British-furniture-3

AndNew-British-furniture-4

AndNew-British-furniture-5

AndNew-British-furniture-6

AndNew-British-furniture-7

AndNew-British-furniture-8


28 Jun 01:30

Buster + Punch LED Buster Bulbs Look Great Naked

by Gregory Han

Buster + Punch LED Buster Bulbs Look Great Naked

Buster + Punch first caught our eyes with their collection of lighting fixtures inspired by 2-wheeled motorcycle detailing, bulb fixtures so nice it seemed a shame to cover them up. Their latest update is a little more “Tesla Motors” infused into their vintage motorbike aesthetic, incorporating energy-efficient technology into their new line of LED Buster Bulbs.

BusterBulb-Crystal

BusterBulb-Smoked

BusterBulb-Gold

Available in gold, smoked and crystal colored glass, each 3W dimmable warm white LED bulb is designed as a statement piece, more about ambience than bright illumination. And since LEDs sip electricity at 1/20th the rate of traditional bulbs, Buster Bulbs should be creating a mood for a long time to come (10,000 hours, in fact), the machinist aesthetic deserving of keeping naked sans any shade over it in our opinion.

BusterBulb-parts-shot


27 Jun 18:54

submerged in tiffany blue

by chloé / plentyofcolour

plentyofcolour_hullblueall

plentyofcolour_hullblue2

plentyofcolour_hullblue1

plentyofcolour_hullblue3

plentyofcolour_hullblue6

plentyofcolour_hullblue8

plentyofcolour_hullblue5

Becoming fully immersed in one single colour? Now that would be a rather extraordinary, surreal experience. London-based artist Davide D’Elia brings the dream to life in his “Antivegetativa” installation at Ex Elettrofonica gallery in Rome. The gallery interior is transformed into a ship hull, dramatically immersed in Tiffany Blue. Davide used ‘anti-fouling’ paint, a specialized coating applied to the hull of ships to slow the growth of harmful organisms. I particularly love his use of old paintings. Vintage portraits, landscapes and sea scenes were found in Rome junkyards, flea markets and antique shops and then placed throughout the space. That detail, and the way the heavy turquoise cuts right across the canvas, really makes the experience feel deeply immersive. Hmm, I’m getting some home decor ideas…

(images via davide d’elia; spotted on designboom)

28 Apr 02:36

Interactive Projections of Cubic Designs by Aakash Nihalani

by Caroline Williamson

If you’ve ever peeped a look at anything Aakash Nihalani has done, chances are you were mesmerized from the get-go. His latest project, entitled Projections, is a series of interactive installations that fall in that category too because you won’t be able to stop staring at them.

This series shows cubic designs being projected onto a white wall. A sensor follows the viewer’s hand movements and the projected design reacts in real time with the help of coding and motion software. Once the viewer starts to interact with the piece, the true personality of it comes through and you notice the unique sculptural quality that each one has. The result is unpredictable and only determined by human interaction. Take a look!

Interactive Projections of Cubic Designs by Aakash Nihalani

Overlay

Overlay

Shuffle

Shuffle

Squares

Squares

Helen

Helen

Patturn

Patturn

Pattern 2

Pattern 2

Trail

Trail


22 Apr 01:32

Coleman Camp Stool

by Katie

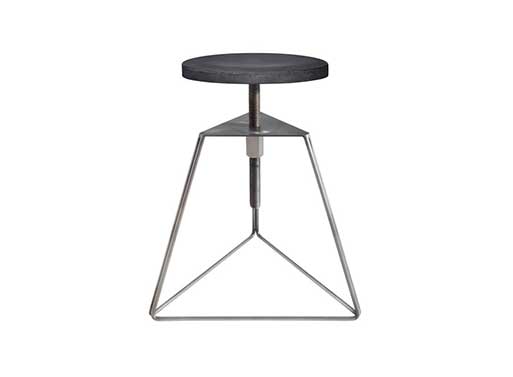
We’ve featured the Colman Stool by Greta de Parry before, but this Coleman Camp Stool comes in an adjustable 18-24″ height with a lower price point. So, just in case you’re looking for a smaller side table/stool, this one could be a good option, especially as the solid steel base and concrete top (several colors available) make it appropriate for indoor or outdoor use.

Coleman Camp Stool

21 Apr 19:13

Easy Beef Brisket

by Elise
Easy 3-ingredient Beef Brisket! Here's how to cook beef brisket in oven, slathered in a mixture of BBQ sauce and soy sauce. Just wrap in foil, and bake until falling apart tender. This beef brisket is simple and delicious.

Continue reading "Easy Beef Brisket" »

21 Apr 19:07

Smoky Garlic Oven Fries

by Beth M

I really  wanted to call these “OMG! They’re Crunchy!” Fries, but that doesn’t work very well for SEO purposes. My point is, I’m happy to have finally made some oven fries that are crispy and crunchy. Are they like deep fried fries? Well, no. Fries made in the oven will never be like real fries because the science behind the cooking is completely different, but it’s nice to finally have made some that are actually crispy rather than just strips of soft baked potato, ya know?

These little fries are an addictive snack or they can be a delightful side to dinner. You can season them with just about anything you want (think Parmesan, curry powder, ranch seasoning mix… anything), but I went with my favorite go-to combo of garlic and smoked paprika. It’s always a hit.

The secret to making these fries crispy is simple. Cut them THIN. There’s no special 10 step method like soaking in salt water and drying with a towel, just cut them thin. I did my best to show you in the step by step photos the easiest way to make them thin and uniform, because when you’re cooking thin anything, uniformity is key to keeping them all cooking at the same rate. If they’re all different shapes and sizes, you’ll have some shriveled and burned, and other soft and mushy. So, now’s a good time to start practicing those slicing skills!

Anywhooo, I enjoyed these fried a LOT (maybe too much) and can’t wait to try some more flavors. Feel free to share you favorite fry flavors with me in the comments below! :)

Smoky Garlic Oven Fries - BudgetBytes.com

4.6 from 8 reviews
Smoky Garlic Oven Fries
 
Prep time
Cook time
Total time
 
Total Cost: $2.84
Cost Per Serving: $0.71
Serves: 4
Ingredients
  • 2-2.5 lbs. russet potatoes $2.07
  • 2 Tbsp olive oil $0.32
  • 1 tsp (approx.) garlic powder $0.10
  • 1 tsp (approx.) smoked paprika $0.10
  • Generous salt & pepper $0.05
  • Non-stick spray $0.15
Instructions
  1. Preheat the oven to 400 degrees and prepare two baking sheets by covering them with foil and coating the foil with non-stick spray.
  2. Wash the potatoes well to remove any dirt or dust. Cut the potatoes into very thin, ¼ inch matchsticks, then divide them between the two baking sheets.
  3. Drizzle each sheet of potatoes with 1 Tbsp olive oil, then toss the fries to coat. Sprinkle the fries with garlic powder, smoked paprika, salt, and freshly ground pepper. Don't worry, they'll get tossed with the spices when they get stirred during the baking process.
  4. Bake the fries in the fully preheated 400 degree oven, stirring gently with a spatula every 15 minutes. Bake until the fries are brown and crispy, but still slightly moist in the center. The fries will bake at different rates, depending on how thinly they are sliced, so keep a close eye. My batch took approximately 45 minutes to bake.
3.2.2925

Smoky Garlic Oven Fries - BudgetBytes.com

Step by Step Photos

Before you begin, preheat the oven to 400 degrees and cover two baking sheets with foil. Coat each one in non-stick spray.

Slice PotatoesStart with two large russet potatoes, about 2 to 2.5 pounds total. Wash them well to remove any dust or dirt. Cut the potato in half lengthwise to give yourself a nice flat surface to slice on. Turn the potato onto the flat surface and carefully slice it into thin strips.

Potato Match SticksNext, take a few of the thin slices that you just cut and lay them down on their flat cut side. Cut lengthwise again, this time 90 degrees perpendicular to the original cuts, to make matchsticks. Did that make sense? I hope so.

Season FriesDivide all of your matchsticks between the two prepared baking sheets. Drizzle each one with one tablespoon of olive oil, then toss to coat. Even though you’re using olive oil here, it is getting mixed in with the starchy juices of the potatoes, which is why you want that extra layer of protection from the non-stick spray first. 

Once the potatoes are coated in olive oil, sprinkle garlic powder, smoked paprika, salt, and freshly cracked pepper over top. You don’t really have to measure the seasonings, just sprinkle them liberally (except the garlic, that can be strong, so go a little lighter with that). The seasonings will get tossed with the potatoes when you stir them during baking.

Baked FriesBake the fries in the preheated 400 degree oven, stirring once every 15 minutes, until they’re golden brown and crispy. The total amount of time needed will depend on your potatoes and how thinly they are cut, but mine took about 45 minutes (stirred twice). Use a spatula to help you gently stir the potatoes because they will be fairly delicate before they crisp up.

Bake Fry CloseupLook pretty good, huh? They were really good dipped in some chipotle ranch dressing that I had. MMmm.

Smoky Garlic Oven Fries - BudgetBytes.comOr you can do ketchup. Ketchup is always good.

The post Smoky Garlic Oven Fries appeared first on Budget Bytes.

21 Apr 19:02

Spinach and Feta Mashed Potatoes

by Beth M

So I’ve been really into potatoes lately. They’re just so cheap and you can do so many different things with them! Mashed potatoes in particular are great because they go with just about any meal and you have the sky as your limit when it comes to add-ins. This week I happened to have some leftover fresh spinach that I bought for my smoothie packs and a partial block of feta cheese, so I went with a “spinach feta” theme. I seasoned lightly with salt and pepper, plus a little garlic powder to provide a savory base. This is an elegant yet simple side dish that I know I’m going to make many, many more times.

I don’t know what it is with me and potatoes, but I really dislike both peeling and boiling them. So, for this recipe I left them “rustic” (read: “skin on” hehe) and cooked them the easy way—the microwave. They only took about 8 minutes in the microwave and there was no messy pot of boiling starchy potato water to deal with. I don’t use the microwave for many things, but I think that potatoes might be my new favorite use for it. Quick, easy, and little cleanup.

I served these delicious Spinach and Feta Mashed Potatoes with my Mini Garden Turkey Loaves and they were a match made in heaven.

Spinach and Feta Mashed Potatoes - BudgetBytes.com

5.0 from 2 reviews
Spinach and Feta Mashed Potatoes
 
Prep time
Cook time
Total time
 
Total Cost: $4.79
Cost Per Serving: $0.80 (about one cup each)
Serves: Approx. 6 cups
Ingredients
  • 2 to 2.5 lbs. russet potatoes $1.85
  • 3 Tbsp butter $0.27
  • ¼ tsp garlic powder $0.02
  • ½ tsp salt $0.03
  • Freshly cracked pepper $0.05
  • ¼ cup milk $0.11
  • 2 cups (packed) fresh spinach $1.34
  • 2 oz. crumbled feta $1.12
Instructions
  1. Wash the potatoes well, then prick the skin several times with a fork. Place the potatoes on a microwave safe plate and microwave on high for 5 minutes. Pierce the potatoes in the center with a fork to test for doneness. If they still feel crunchy in the center, microwave longer, one minute at a time, until they are tender in the middle (mine took about 8 minutes).
  2. Let the potatoes cool for just a few minutes. Slice the potatoes into several pieces to make them easier to mash, then transfer to a large bowl. Add the butter, garlic powder, salt, some freshly cracked pepper, and milk. Mash the potatoes until the butter is melted and the seasonings are evenly distributed.
  3. Add the fresh spinach and stir it into the potatoes. Allow the residual heat of the potatoes to partially wilt the spinach. Leaving the spinach only partially wilted gives the potatoes more texture and volume.
  4. Finally, crumble the feta cheese over top and fold it into the potatoes. Taste the potatoes and adjust the salt, pepper, or butter if needed.
Notes
Frozen spinach can be used for this recipe, although it will produce a different texture in the final product. Thaw the frozen spinach, then squeeze out as much moisture as possible before stirring it into the mashed and seasoned potatoes.
3.2.2925

Spinach and Feta Mashed Potatoes - BudgetBytes.comMini Garden Turkey Loaves - BudgetBytes.comPictured with Mini Garden Turkey Loaves.

Step by Step Photos

Clean and Prick PotatoesStart with about 2 to 2.5 pounds of russet potatoes. Wash the skin well, since it will be left in the mash, then prick them several times with a fork to allow steam to escape as they cook. You can bake these in the oven at about 375-400 degrees for 45-60 minutes, or you can cook them in the microwave, like I did. For the microwave, cook on high for 5 minutes, then test the doneness with a fork. Stick the fork in the center and see if it still feels crunchy. If so, cook longer, in one minute increments, until they are tender all the way through. Mine took about 8 minutes. (Or you can dice them and boil until tender.)

Cut PotatoesLet them cool just a bit so you can handle them, but make sure they’re still hot enough to melt the butter. I cut the potatoes into a few pieces to help facilitate the mashing process (I STILL don’t own a potato masher for some reason).

Butter Milk and SeasoningAdd the potato chunks to a large bowl along with 3 Tbsp butter, 1/4 cup milk, 1/4 tsp garlic powder, 1/2 tsp salt, and some freshly cracked pepper. Now, go to town and mash those taters.

Chunky Mashed PotatoesI purposely left my potatoes a little chunky. I like them that way and getting them smooth with just a fork is a bit tough, so this is as far as I mashed.

Wilted Spinach and FetaAdd about two packed cups of fresh spinach to the warm mashed potatoes, and stir it in. The heat from the potatoes will wilt the spinach a bit and the mechanical stirring and mashing will break up the leaves a little. I wanted the spinach to stay fairly fresh and only wilt a little so that it would have more texture. Once the spinach is stirred in, add 2oz. of crumbled feta, and fold it in.

Spinach and Feta Mashed Potatoes - BudgetBytes.comYou can give it one last taste to adjust the salt, pepper, or butter, but try not to start eating it all! ;)

P.S. These potatoes freeze really well. I froze most of them after cooking and have been reheating them all week. Delish!

The post Spinach and Feta Mashed Potatoes appeared first on Budget Bytes.

14 Apr 02:59

Sculptures Made from Repurposed PET Plastic Bottles

by Caroline Williamson

Sculptures Made from Repurposed PET Plastic Bottles

Most of us just toss our old plastic bottles (hopefully into the recycling) and probably don’t think about them again. Czech artist Veronika Richterová decided to do something with them and now creates sculptures from the repurposed PET plastic bottles. Since 2004, she’s devoted herself to creating with the malleable PET bottles into what she calls PET-ART. Take a small look at what she can do… from plants and cacti to jellyfish and beyond.

Veronika-Richterova-PET-Bottle-Sculptures-2

Veronika-Richterova-PET-Bottle-Sculptures-2a-cacti

Veronika-Richterova-PET-Bottle-Sculptures-2b

Veronika-Richterova-PET-Bottle-Sculptures-2c

Veronika-Richterova-PET-Bottle-Sculptures-3

Veronika-Richterova-PET-Bottle-Sculptures-3a-greenhouse

Veronika-Richterova-PET-Bottle-Sculptures-3b-plastic-island

Veronika-Richterova-PET-Bottle-Sculptures-3b

Veronika-Richterova-PET-Bottle-Sculptures-3c

Veronika-Richterova-PET-Bottle-Sculptures-4-mushrooms

Veronika-Richterova-PET-Bottle-Sculptures-5-jellyfish

Photos by Michal Cihlář.

h/t Colossal.


08 Apr 05:00

Cold Bruer Coffee Brewer

by Katie

If you thought cold coffee was for snobs or sugar junkies, think again. Cold brew coffee is often less acidic and less bitter than hot brewed coffee, and more palatable with milk. Using a slow-drip process with an adjustable valve, the Cold Bruer Coffee Brewer lets you play around with brew time to get your ideal cup. However, don’t think you’ll pull this sort of cold brewing off in a quick minute; the recommended brew time is a 6-hour span, at a drip per second.

Designers: Gabe Herz and Andy Clark

Material: Borosilicate glass, food-grade silicone, stainless steel
Size: 10″ h x 5″ w (25.4×12.7cm)

Details: Makes up to 4 cups

Cold Bruer Coffee Brewer

Also available on Amazon.

Updated price and link; originally posted Feb 11, 2015.

19 Mar 05:50

dream house: the artwork.

by victoria

dream house: the artwork / sfgirlbybay

lily.

when i finally move into my dream house (is it soon? please tell me it’s soon!), i’m probably going to be a bit more ‘adult’ about my artwork. and by that i mean i’d like to be more selective, a bit more thoughtful about what goes up on my walls, and probably a whole lot more minimal. but it’s hard for me to simply discard or give away art, so what i thought i’d do is select one nook in my future dream house and create a little gallery. that’s where most of my treasured photographs, sketches and paintings will live — in a small gallery of their very own. i’d like it to look something like these gallery walls here – well-intentioned, but not pretentious. just a simple collection of the artwork i love and can’t leave behind.

dream house: the artwork / sfgirlbybay

jenni kayne’s home, via one kings lane.

dream house: the artwork / sfgirlbybay

rob mills architecture.

dream house: the artwork / sfgirlbybay

SVK interior design.

dream house: the artwork / sfgirlbybay

bridget case photography for karine candice kong.

dream house: the artwork / sfgirlbybay

line klein photography for elle decoration dk.

dream house: the artwork / sfgirlbybay

felix forest photography, via the interiors addict.

dream house: the artwork / sfgirlbybay

photography by Frederikke Heiberg for inside out magazine.

dream house: the artwork / sfgirlbybay

a merry mishap.

dream house: the artwork / sfgirlbybay

bolig magasinet.

dream house: the artwork / sfgirlbybay

heidi lerkenfeldt photography for elle decoration.

dream house: the artwork / sfgirlbybay

la dolce vita.

18 Mar 18:40

Black Bean Chili

by Beth M
Jimena Azpeitia

saca los frijoles puercos golda! jaja

Chili is seriously one of my favorite parts of the fall-winter season. It’s super easy to make, the leftovers are amazing, and it’s incredibly cozy and hearty. It’s basically all I want to eat from September to March. 😅 Our classic chili recipe is great, but I also love this simple black bean chili because it has a slightly lighter, brighter flavor, and I just have a soft spot for black beans. Gimme all the black beans all of the time! So if you’re looking for something to meal prep for the week or just something to keep you warm as the air outside gets colder, give this black bean chili a try!

Overhead view of a bowl full of black bean chili with toppings.

What’s in Black Bean Chili

Rather than just substituting all black beans in my classic chili recipe, I also changed the flavor profile of this chili slightly. I used tangy diced tomatoes with green chiles, which gives the chili a nice brightness. I paired that with a little more cumin than usual for a slightly earthy base, and then added some smoked paprika because that smoky flavor pairs really well with the black beans. I also wanted the black beans to be the star of this show, so I actually used half the amount of ground meat as my classic chili, which helps keep it very budget-friendly as well!

Ingredients for Black Bean Chili

Here’s what you’ll need to make this delicious and hearty pot of black bean chili:

  • Onion and Garlic: Any pot of chili is going to start with plenty of onion and garlic to get those savory base flavors in place!
  • Ground Beef: I used only a half pound of ground beef for this recipe, but you can increase it to one pound if you prefer a more meaty chili. You can also substitute with ground turkey if preferred.
  • Tomatoes: I used a combination of diced tomatoes with green chiles and tomato paste for this chili. The diced tomatoes add texture and a zingy flavor (thanks to the green chiles) and the tomato paste adds richness and helps thicken the chili.
  • Herbs and spices: The spice mix for this chili starts with a hefty dose of chili powder, then we add some extra cumin for earthiness, a little smoked paprika, oregano, salt, and pepper. Feel free to add a little cayenne if you like your chili spicy!

Toppings for Chili

One of the reasons I love chili the most is all of the fun toppings you can add to your bowl. It’s a great opportunity to use up leftovers in your fridge or pantry, and it can just add tons of flavor, color, and texture to the meal! Here are some of my favorite toppings for black bean chili:

  • Fresh or pickled jalapeños
  • Diced red onion
  • Avocado
  • Sliced green onion
  • Cilantro
  • Crushed tortilla chips
  • Sour cream
  • Cheddar cheese
  • Fresh lime juice
  • Diced avocado
  • Pico de gallo
Overhead view of a pot full of black bean chili.

Serve with a side of Jalapeño Cheddar Cornbread!

Overhead view of a bowl full of black bean chili with toppings.
Print

Black Bean Chili

This easy and comforting black bean chili is rich, full of warm chili spices, and fast enough to pull together on a busy weeknight. 
Course Dinner, Lunch, Main Course
Cuisine American
Total Cost $9.19 recipe / $1.53 serving
Prep Time 10 minutes minutes
Cook Time 20 minutes minutes
Total Time 30 minutes minutes
Servings 6 (about 1.3 cups each)
Calories 358kcal

Ingredients

Instructions

  • Dice the onion and mince the garlic. Add the onion and garlic to a large pot with the olive oil and cook over medium heat just until the onions are softened (2-3 minutes).
  • Add the ground beef to the pot and continue to sauté until the beef is cooked through (5-7 minutes).
  • Add the drained black beans, diced tomatoes (with juices), tomato paste, chili powder, cumin, smoked paprika, oregano, and water. Stir everything to combine.
  • Place a lid on the chili and allow it to come up to a simmer. Let the chili simmer for about 15 minutes, stirring occasionally, to let the flavors blend and help the liquid thicken slightly.
  • Taste the chili and add salt as needed (this will depend on the salt content of your canned goods. I added about ½ tsp). Serve with your favorite chili toppings and enjoy!

See how we calculate recipe costs here.

Notes

*If you want a mild chili, you can use plain diced tomatoes instead of diced tomatoes with green chiles.

Nutrition

Serving: 1Cup | Calories: 358kcal | Carbohydrates: 46g | Protein: 22g | Fat: 11g | Sodium: 1292mg | Fiber: 17g
Side view of a bowl full of black bean chili with a spoon in the center.

How to Make Black Bean Chili – Step by Step Photos

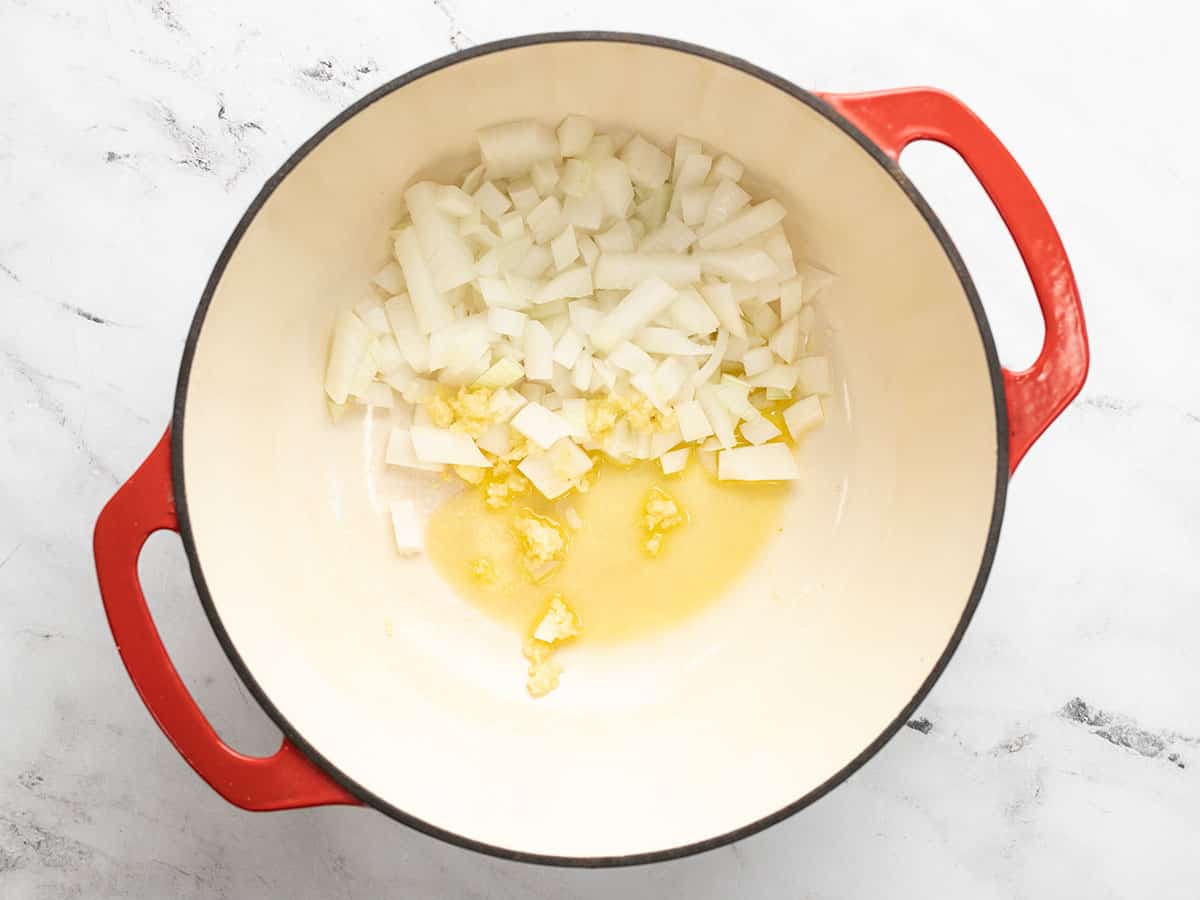
Onions, garlic, and oil in a soup pot.

Begin by dicing one yellow onion and mincing four cloves of garlic. Sauté the onions and garlic with 1 Tbsp olive oil in a large pot over medium-low heat until softened (2-3 minutes).

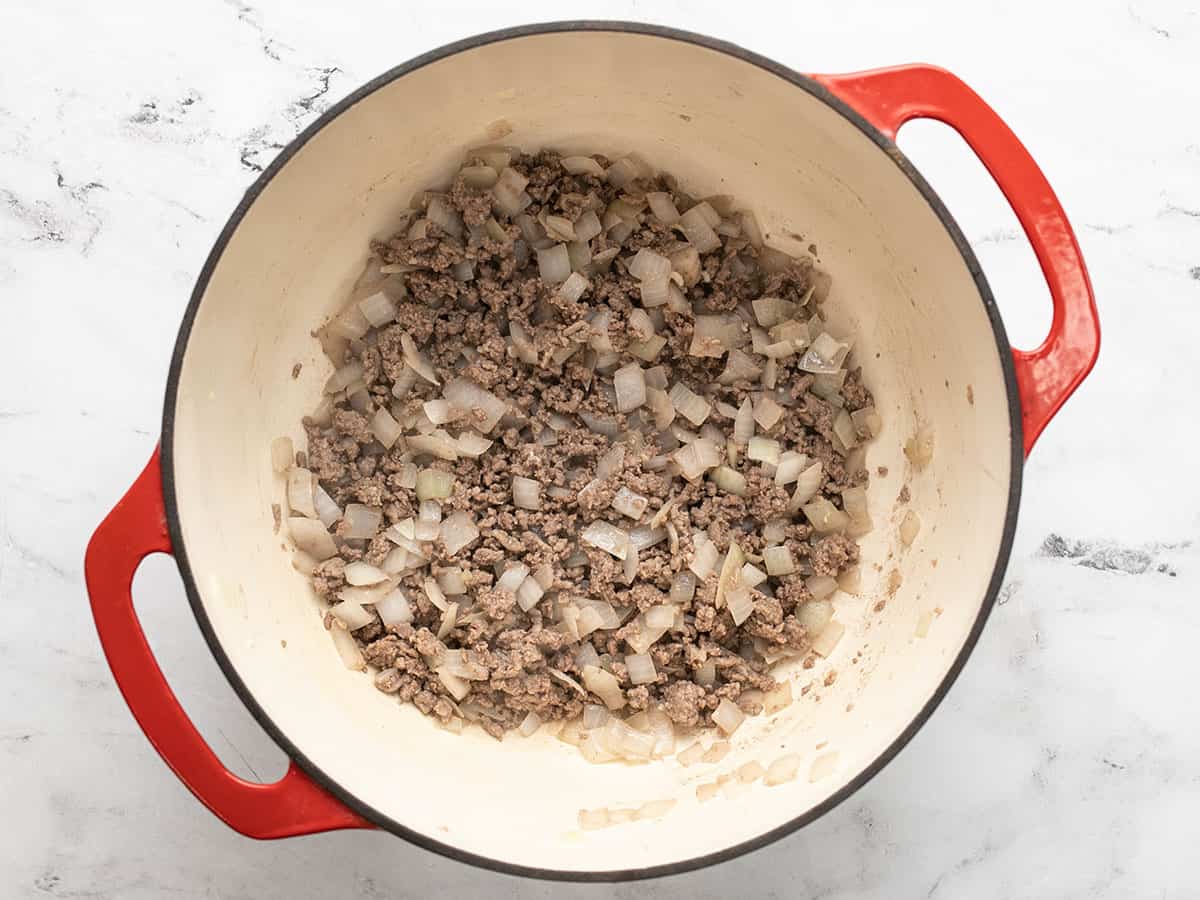
Browned beef in the pot with garlic and onions.

Add ½ pound ground beef (or turkey) and continue to sauté until the meat is cooked through.

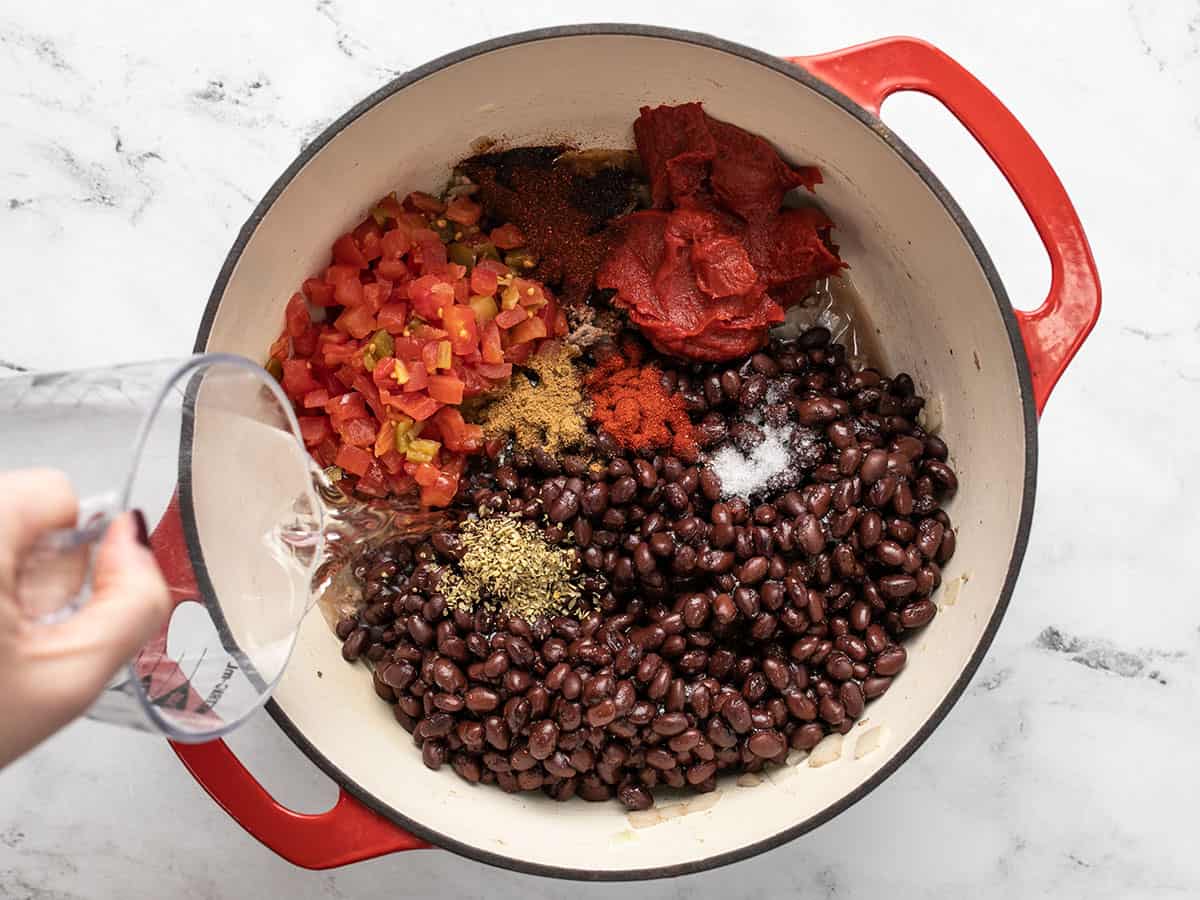
Tomatoes, spices, and water added to the soup pot.

Add three 15oz. cans of black beans (drained), one 10oz. can of diced tomatoes with green chiles (with the juices), one 6oz. can of tomato paste, 1 Tbsp chili powder, 1 tsp ground cumin, ½ tsp smoked paprika, ½ tsp oregano, ½ tsp salt, and 2 cups of water.

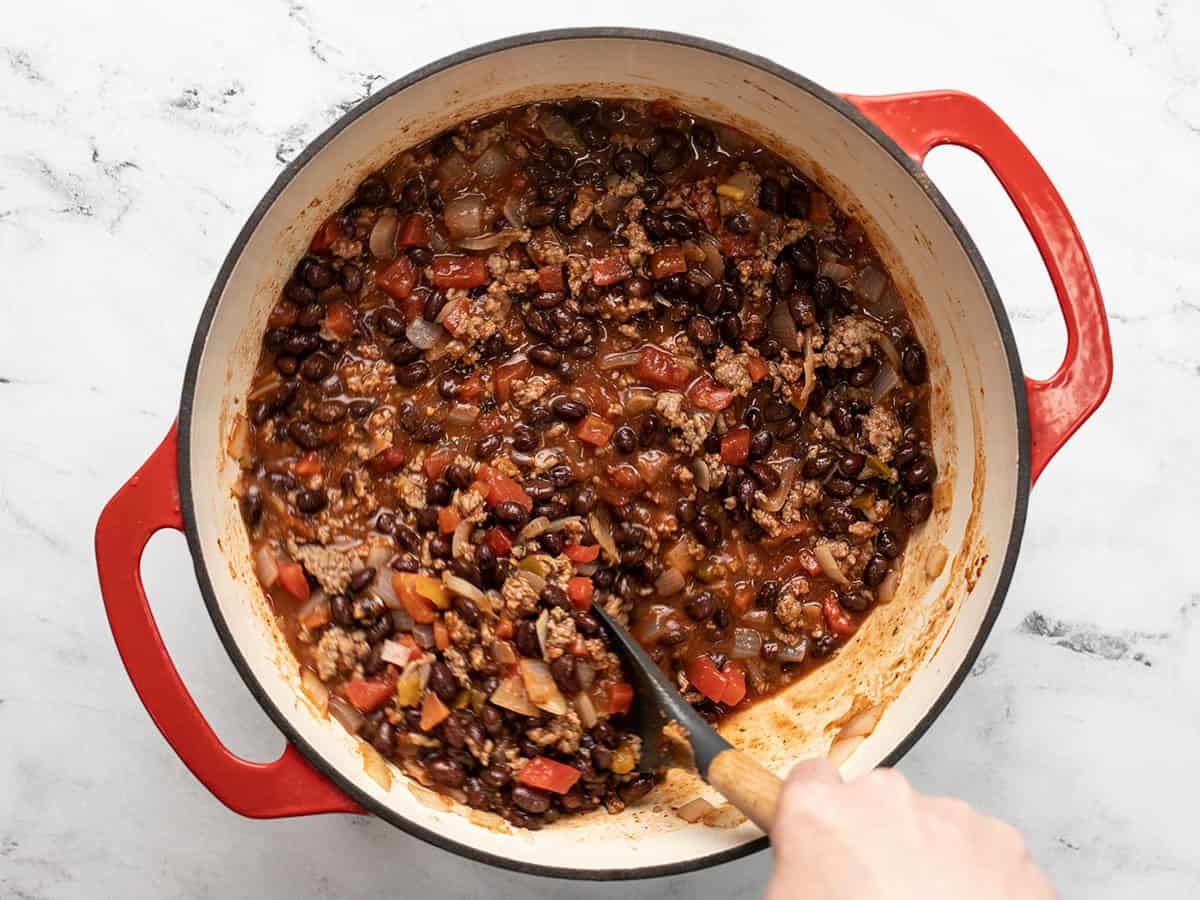
Chili ingredients in the pot, stirred, but not simmered.

Stir all of the ingredients together until evenly combined. Turn the heat up to medium-high, place a lid on the pot, and allow the chili to come up to a boil. Once it comes up to a boil, give the chili a stir, replace the lid, and reduce the heat to medium-low.

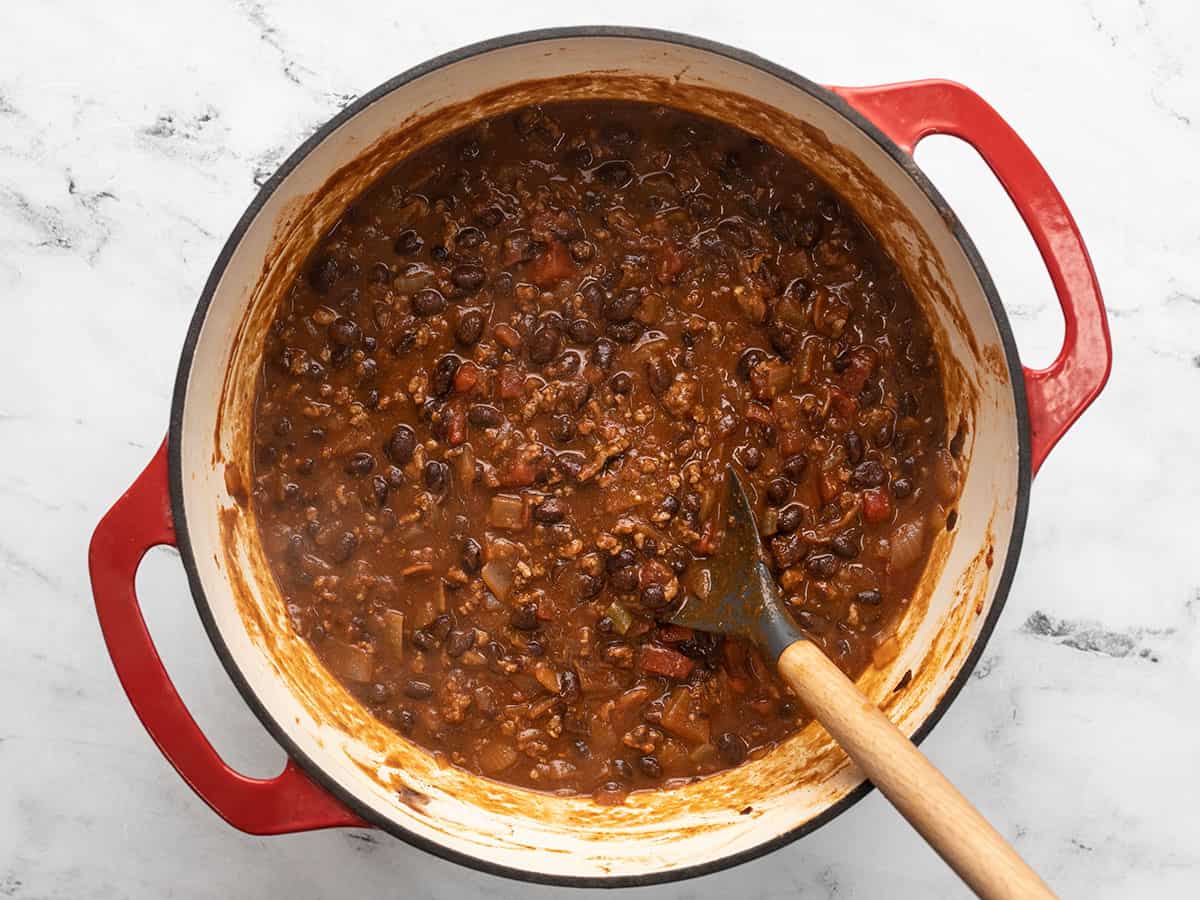
Simmered chili in the pot being stirred.

Let the chili simmer over medium-low heat for about fifteen minutes, which will help blend the flavors and thicken the sauce. Give it a taste and add salt if needed. I added about ½ tsp. And that’s it! You’re DONE making dinner! 

Overhead view of a pot full of black bean chili with toppings in the center of the pot.

Add your favorite toppings and go to town! Or divide it up into single-serving portions and refrigerate for really easy ready-to-heat meals for the rest of the week.

Overhead view of a bowl full of black bean chili with toppings.

The post Black Bean Chili appeared first on Budget Bytes.

17 Mar 18:51

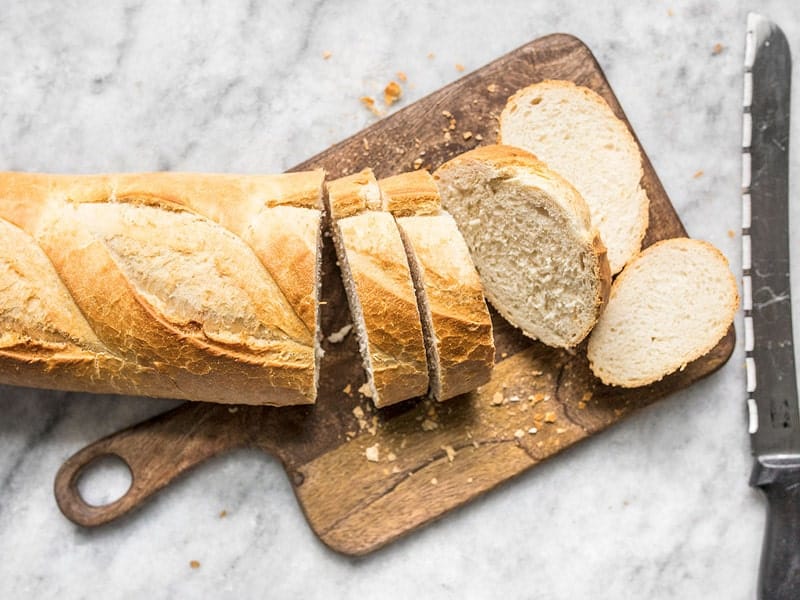
Homemade Freezer Garlic Bread

by Beth M

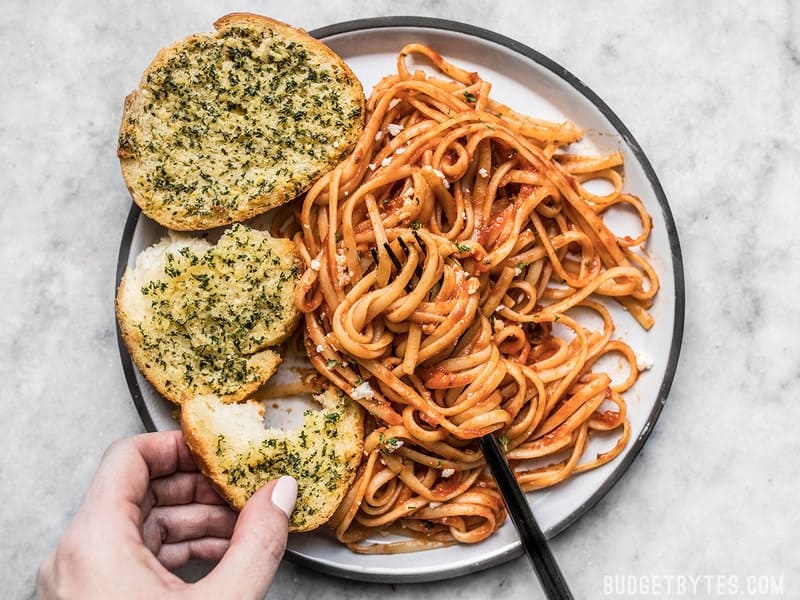
I’ve made my own garlic bread in the past and it’s to die for, but when do I ever need a whole loaf at once? While I probably could eat a whole loaf, I know deep down that it’s probably not a good idea (look at me being a responsible adult!). This Homemade Freezer Garlic Bread fixes that problem. Prepare the slices of garlic bread ahead, freeze them (unbaked), and then they’re ready and waiting for you whenever you get the craving, just like the kind you buy in a box at the store. 

What’s so great about this Freezer Garlic Bread? It’s super fast to prepare and then you have a whole stockpile of single serving slices that are ready to pop into the oven on a moments notice. Bake two slices or ten, it’s up to you! Plus, since you’re mixing up the garlic butter topping, you know exactly what’s in there (and what isn’t), which always makes me feel good.

Originally posted 3-4-15, updated 8-28-18.

Homemade Freezer Garlic Bread

Make your own homemade freezer garlic bread slices, ready to bake on demand. Bake two or ten frozen slices at a time, ready in minutes! Budgetbytes.com

Homemade Freezer Garlic Bread

Make your own homemade freezer garlic bread slices, ready to bake on demand. Bake two or ten frozen slices at a time, ready in minutes! 

  • 8 Tbsp salted butter, room temperature ($1.04)
  • 2 Tbsp olive oil ($0.32)
  • 4 cloves garlic, minced ($0.32)
  • 1/4 tsp garlic powder ($0.02)
  • 1/4 tsp salt ($0.02)
  • 1 Tbsp dried parsley ( $0.30)
  • 1 loaf French bread ($1.00)
  1. Add the butter, olive oil, minced garlic, garlic powder, salt, and parsley to a bowl. Mix the ingredients together until they form a fairly smooth mixture.

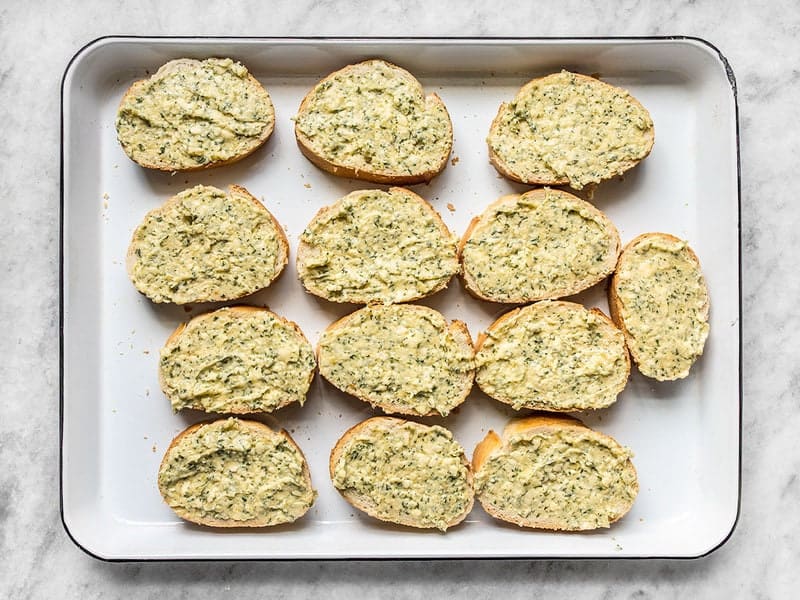
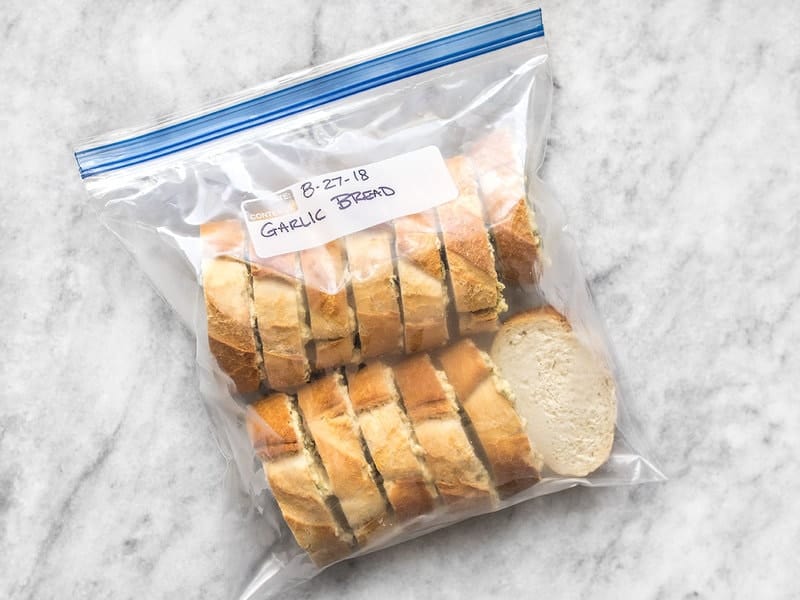
  2. Slice the French bread into 1-inch thick slices (12-16 slices, depending on the size of the loaf). Add 1/2 to 1 Tbsp of the garlic spread to each slice of bread and spread it from edge to edge. Arrange the slices on a baking sheet and then place them in the freezer for about 30 minutes to allow the butter to firm up. Once firm, transfer the garlic bread to a gallon-sized freezer bag for longer storage. Store in the freezer up to three months.

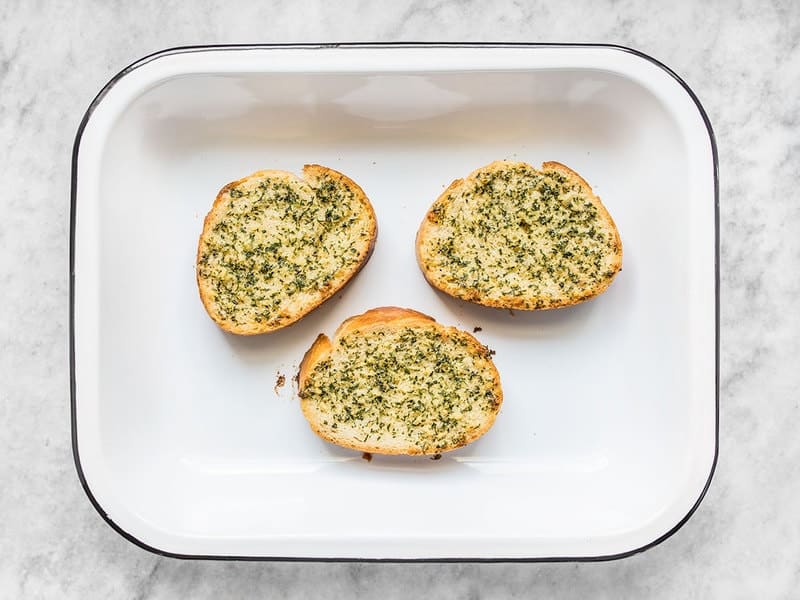
  3. To cook the frozen slices of garlic bread, preheat the oven to 400 degrees. Once the oven is heated, take as many slices out of the freezer as you’d like, and place them on a baking sheet. Bake for 10-15 minutes, or until the edges are golden brown.* If you prefer a softer garlic bread without crispy edges, wrap the slices in foil before baking.

*baking time may vary with the type of bread used.

Make your own homemade freezer garlic bread slices, ready to bake on demand. Bake two or ten frozen slices at a time, ready in minutes! Budgetbytes.com


Step by Step Photos


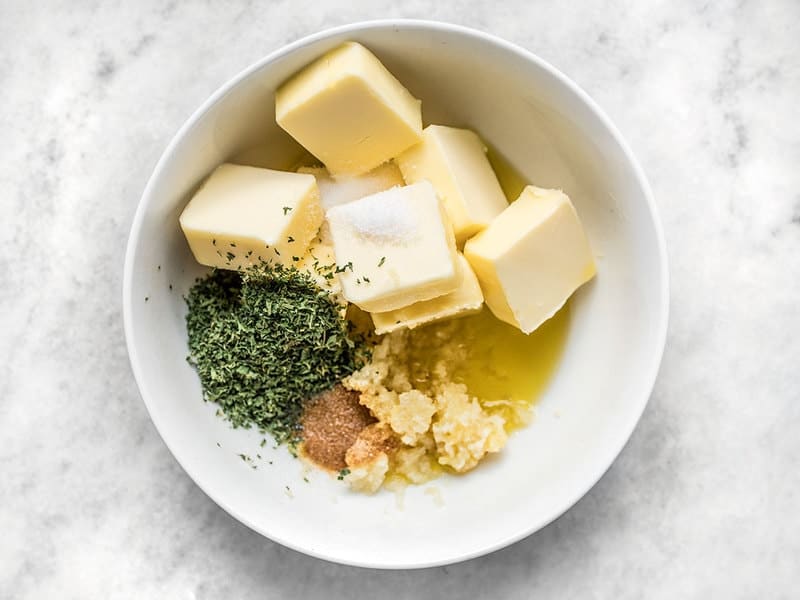
Garlic Spread Ingredients

In a bowl, combine 8 Tbsp room temperature salted butter, 2 Tbsp olive oil, 4 cloves garlic (minced) 1 Tbsp dried parsley, 1/4 tsp garlic powder, and 1/4 tsp salt. 


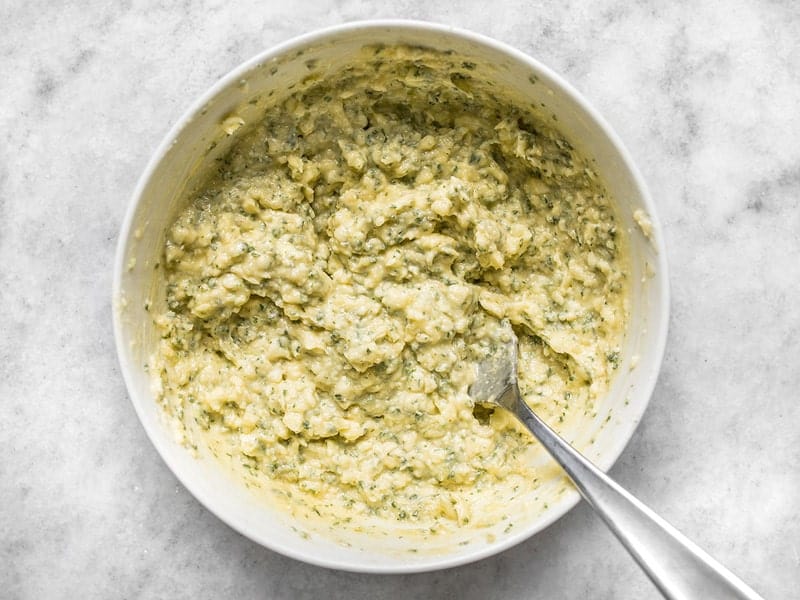
Mixed Garlic Spread

Mix them all up until it forms a fairly smooth mixture (a few chunks of butter are a-okay).


Slice French Bread

Take a loaf of French bread and slice it into 1-inch pieces (12-16 pieces, depending on the length of your loaf). 


Garlic Spread on Bread Slices

Place your bread slices on a baking sheet. Divide the garlic spread between your slices (about 1/2 to 1 Tbsp per slice) and spread it from edge to edge of the bread. Freeze the bread flat on the baking sheet for about 30 minutes, or until the garlic spread is firm (if you forget at 30 minutes and come back to it hours later, that’s okay. Just don’t leave it for more than a day or it could start to dry out or absorb rogue flavors.

Frozen Garlic Bread


Transfer the frozen garlic bread to a gallon-sized freezer bag for long term storage. Always make sure to label and date your frozen goods! 


To bake the frozen garlic bread, preheat the oven to 400ºF. Place your frozen slices on a baking sheet and once the oven is fully preheated, transfer the slices to the hot oven. Bake for 10-15 minutes, or until the edges of the garlic bread are golden brown. If you prefer a softer garlic bread rather than one with crispy edges, you can wrap the slices in foil before baking.


Make your own homemade freezer garlic bread slices, ready to bake on demand. Bake two or ten frozen slices at a time, ready in minutes! Budgetbytes.com

The post Homemade Freezer Garlic Bread appeared first on Budget Bytes.

15 Mar 07:06

Woven wall hangings

by Joanna Goddard
You know when you learn a new word and then suddenly start hearing it everywhere? Well, the same phenomenon is happening with wall hangings. My friend Audrey told me she was making them, and now I'm suddenly seeing them everywhere: house tours, on Instagram, in friends' apartments. They can be neon and graphic or neutral and abstract, and it's a cool twist on affordable art.

Here are a few places to find them:
Hazel & Hunter
Jujujust
MW Textiles
Urban Outfitters
Sunday in Color
Hollin Textiles
Wallflower WeavingsThoughts? Do you have a woven wall hanging? Would you?

P.S. Where to find affordable art.

(Top photo by Honey Lake Studio for Design*Sponge)
17 Feb 02:44

La Estampa como arte contemporáneo en el Munae

by Valeria Cepeda

El Museo Nacional de la Estampa del Instituto Nacional de Bellas Artes (MUNAE) en colaboración con Arprim, centre d’essai en art imprimé, presenta La estampa: entre la diversidad y la hibridación, una exposición en la que 10 artistas radicados en Quebéc Canadá, cuestionan hasta qué punto han evolucionado los procesos artísticos de la estampa en cuestión de nuevas tecnologías y disciplinas artísticas.

La estampa: entre la diversidad y la hibridación es una muestra colectiva, realizada bajo la curaduría de Émilie Granjonnos que nos deja  ver distintas posiciones estéticas y discursivas a partir del trabajo de los diez artistas que desarrollan la estampa con varias técnicas como: el grabado en hueco , la litografía , la fotolitografía , la serigrafía , la colografía y la impresión digital.

Esta exposición tendrá abiertas sus puertas hasta el 8 marzo para que aproveches y te des una vuelta, además puedes agendar una visita guiada en la página del Munae.

crop_3.-ivg_0_0_628_524_0_0_1256_1048image


Museo Nacional de la Estampa

Avenida Hidalgo núm. 39, en la Plaza de la Santa Veracruz.

Centro Histórico de la Ciudad de México a un costado del Teatro Hidalgo.


Author information

Valeria Cepeda
Valeria Cepeda

La Estampa como arte contemporáneo en el Munae publicado en La Ciudad de Frente.

06 Feb 20:41

Micro Design Trend: Factory Windows aka Black Metal-Framed Doors + Windows

by decor8

I’m forever spotting things that I think could be the next trend, like decorating with plants, taking a slower approach to living, brick walls painted white, adopting a more laid-back approach to flower arranging, and of course, Nordic design taking over Europe (and it truly has). All of these trends not only arrived but have stuck around, almost becoming a part of the bigger picture, of a more established design. But every now and then, I spot micro trends, and that is how I see factory windows, also referred to simply as black metal-framed doors and windows, — a micro trend yet a trend indeed. They are making a real comeback in both commercial design but also residential spaces – not just vintage ones but faux versions, too. And I think they’re all quite fabulous.

original-77305-najamunthe8

Home of fashion fashion designer Naja Munthe via Mad & Bolig

If you follow industrial design, you’ll note that concrete floors, soaring ceilings, brick or stone exposure, metal with raw wood furnishings and large bell-shaped pendant lights, also in metal, are hallmarks of industrial style. And of course, black-framed metal windows and doors with their grid-like patterning and squares, or rectangles, of glass. They are a great solution for when a homeowner or office places priority on creating a space with multiple functions without losing natural light.

I like them, not just because they bring a hint of nostalgia, even a bit of “edge”, to a space but also because they are practical. How so? First, they act as terrific space definers if you’re using them to divide a space. Next, they really let the light in. They’re also great for allowing privacy without sacrificing a sense of space – a room divided by glass still feels spacious – a wall wouldn’t accomplish that. Finally, paned windows and doors are quite practical because if you break one, you only need to replace a small panel of glass e vs. an entire sheet as in windows without panes. Maybe that’s why they were popular in factories years ago? If a metal part flew through the window off of a machine, only a panel needed to be replaced.

Whenever I see factory doors and windows, I think of the homes I’ve worked in while in Paris for my books. I think of old factories. I think of some of the restaurants I’ve been to in New York, London, Amsterdam and Copenhagen. I think of vintage schoolhouses. I remember some of the restored lofts in Lowell, MA that we toured back in 2006 (and almost purchased but, being in Lowell, we politely passed). I also think of creative spaces because I imagine lofts in cities that were only used in the flower power era to house artists. I remember seeing them in Sonoma at some of the wineries we toured or in LA at the stunning home of Amy Neunsinger when I worked on my first book.

I’ve also spotted more modern versions in Denmark when decor8 was invited to visit the home offices of Muuto so I sent my roving reporter, Emilie Gupta, to attend and photograph it for me.

9142456026_0f369cc9cd_o

Jon-oron-apartment

The Copenhagen home of music producer Jon Oron as photographed by Pernille Vest for Elle Decoration UK

57bf4cc7b1abc94b4b47bc226ad86a93

The Copenhagen home of music producer Jon Oron as photographed by Pernille Vest for Elle Decoration UK

572b9dc6312c9939b263b734d0698b0c

The Copenhagen home of music producer Jon Oron as photographed by Pernille Vest for Elle Decoration UK

BS_IMG_0666

Heidi Lerkenfeldt for Still Stars, Munich, Germany

79d660fbd9fb6cf28fb2b7b1bd88bf85

©Renee Arns styling & photography

PaulinaArcklinReneeHome003

©Renee Arns styling & photography

404333_349458158416902_1717432137_n

Fab Showroom Amsterdam by Bricks

bathroom_juliagreen_armellehabib_16

Photography: Armelle Habib

4721950fba0790f88b4f6c521c56b4be

My (un)Finished Home.

I’ve created a Pinterest board to share examples of rooms globally with black-metal framed doors and windows if you’d like to see it – click here.

What do you think? Do you like this look? Would you like them in your own home or office?

(images: source linked below photos)


27 Jan 17:20

By May

by Bloesem

Bloesem Living Quick Start | By May

If you are a patterns lover, you are sure to fancy this new Swedish brand, By May. Created by designers Johanna Örn and Maria Bergström, this brand features unique home interior products with strong emphasis on pattern design, colours and variety of materials. Their gorgeous collection include wallpapers, cushions covers and window films that will make playful additions to any home decor. The pattern that caught our eyes got to be the confetti series that looks oh so lovely on a cushion cover. We are already a big fan of their upcoming collection of Watoji Notebooks and can't wait to get our hands on them!

Bloesem Living Quick Start | By May

Bloesem Living Quick Start | By May

Bloesem Living Quick Start | By May

Bloesem Living Quick Start | By May

Bloesem Living Quick Start | By May

Bloesem Living Quick Start | By May

... By May

27 Jan 16:32

Gloria in excelsis

by admin
Jimena Azpeitia

vente mana, vamos al cine!

CALENDARIO-TREVI-92

When I arrived in Mexico City in 1990, a performer named Gloria Trevi had recently become a big star. At the time, she seemed like the perfect antidote to the prefabricated pop idols here, who all had the same nose jobs and blonde highlights in their hair, all sang the same treacly love ballads, and were known as pendejos televisos (assholes from Televisa, at the time the only, and still the predominant, Mexican television network).

Unlike her contemporaries, Trevi sang about violence against women, unplanned pregnancy, machismo, religion, and homelessness; her anthem “Pelo suelto” was more or less an ode to liberation. Even to this day I would be hard-pressed to name a Mexican woman in mainstream show business who challenged the social and political hierarchy of this country the way that she did.

trevi_somos2

The plot thickened in the year 2000, when Trevi, her manager Sergio Andrade and a colleague of theirs known as Mary Boquitas were arrested in Rio de Janeiro on charges of corrupting minors. The prosecution’s side of the story was that Trevi and Andrade corralled teenaged girls with the promise of making them pop stars but in fact sexually enslaved them. Trevi would spend close to five years in jail (in Brazil and then Mexico) before she was cleared of all charges due to lack of evidence. 

Trevi’s version of events was that Andrade was a Svengali figure who had controlled her life — and her money, and her record deals, and everything else about her — since she was sixteen. Of course it was hard to square this story with the star’s public image as a fiercely outspoken, independent and street-savvy young woman. I suppose we will never know the true story.

record

Nonethless, a 28-year-old Swiss German named Christian Keller directed a movie with a certain interpretation of Trevi’s story, which came out in Mexico at the beginning of January and opens across the U.S. on February 21. It took Keller, 28, ten years to get the film made. Most of the delays were due to opposition by the singer herself, despite the fact that she sold Keller the rights to her story and gave him and screenwriter Sabina Berman 30 hours of interviews from which they crafted their story.

Christian

Gloria distills 20 years of the singer’s life into a little over two hours. It’s a funny, lurid and at times disturbing tale with fantastic performances by both Sofía Espinosa in the title role and Marco Pérez as Sergio Andrade. Even if in the end it is a little hard to swallow the portrayal of Trevi as close to a sainted victim, I would recommend the film to anyone who is interested in Mexican pop culture.

ñora

Meanwhile, since her release from prison in 2005, Trevi has cut various records and continues to tour in the U.S., all over Latin America and in Spain. Now a señora on the cusp of her 47th birthday, she remains as big a star as ever.

27 Jan 02:32

Día de las Paellas. Más de 1000 paellas en las calles de Benicàssim

by Pakus
Jimena Azpeitia

se me antojo mmmm

Dia De Las Paellas 2La paella es uno de los platos más populares de la gastronomía de la Comunidad Valenciana por lo que son frecuentes las fiestas populares y concursos realizados en torno a esta receta. Una de las más peculiares es el Día de las Paellas, que se realiza desde hace más de 25 años en la localidad de Benicàssim y que en su pasada edición, reunió a más de 1000 paellas elaboradas por los vecinos en las calles.

Benicàssim es una importante localidad turística situada en la provincia de Castellón que es mundialmente famosa por la celebración del Festival de Música F.I.B., por la calidad de sus playas y sus Villas y porque que cada año está mejorando su oferta gastronómica apostando por la calidad de sus pinchos, arroces y platos de pescado.

Como este año pude asistir al Día de las Paellas, a continuación os cuento todos los detalles característicos de esta fiesta popular. El evento es muy atractivo ya que durante ese día familias y grupos de amigos se reúnen en torno a la paella, congregándose más de 20.000 personas en una fiesta gastronómica llena de humo de leña, bailes y verbenas populares, que se celebra tradicionalemente dentro del programa de actividades de las fiestas patronales de San Antonio Abad y Santa Águeda.

El almuerzo o parrillada popular

Paellas2Una de las actividades que ayuda a meterse en ambiente, es un almuerzo popular, invitación del Ayuntamiento, que consiste en un trozo de hogaza, un chorizo, una salchicha o longaniza y una morcilla, acompañados de una bebida, que los vecinos pueden asar en grandes montones de brasas, para comenzar el día con las fuerzas necesarias.

En los últimos años, este almuerzo se ha complementado dándole una finalidad solidaria, para la que se solicita un euro a los asistentes. La recaudación de este año se destinó a la Asociación Española contra el Cáncer, (AECC). Los vecinos acuden al almuerzo, armados de parrillas para asar, o utilizan pinchos en los que ensartan las viandas suministradas por el Ayuntamiento, aunque son muchos los que refuerzan el "menú" con chuletas, trozos de panceta y otros productos. Tras el almuerzo, comienza el Día de las Paellas propiamente dicho.

El Día de las Paellas de Benicàssim

Dia De Las Paellas 3Aunque en su origen el Día de las Paellas era un concurso de paellas, hoy en día es una simple fiesta popular en la que los vecinos elaboran sus paellas, para disfrutarlas con sus familiares o amigos, siendo bastante con apuntarse para solicitar un espacio a través del Ayuntamiento. Llegado el día de la celebración, el municipio deja en la calle un montón de arena para cada paella, para proteger la calzada y un saco de leña. También provee de mesas y hierros o trébedes a los que se han apuntado, que eligen sitio por orden de llegada.

Paellas 1La primera operación es extender la arena, colocar los hierros y la paella sobre ellos. Después hay que comprobar que está bien nivelada, añadiendo un buen chorreón de aceite para comprobarlo, calzando el trébede de forma adecuada.

Después, empieza el trabajo de colocar la leña, amontonándola de forma precisa para que pueda arder de forma uniforme, ofreciendo la temperatura idónea para saltear los distintos ingredientes, haciendo cocer el caldo y después, mantener la cocción del arroz, que tradicionalmente exige unos 8 minutos a fuego vivo para continuar después con otros 9 a fuego más bajo.

Echando Arroz Dia De Las Paellas BenicassimEsta labor es la mayor dificultad en la elaboración de los distintos arroces y más en los días en que hay algo de viento, que dificulta la cocción uniforme de los arroces la receta tradicional de la paella valenciana, y de otros arroces que cada vecino elabora con su receta familiar o con la que quiere disfrutar este año.

Aunque la mayoría de las paellas que vi en Benicàssim eran de pollo y verduras, también encontramos muchos arroces de marisco, muchos arroces con alcachofas procedentes de la vecina localidad de Benicarló y otros arroces más peculiares como los de galeras o una denominada "Paella Gallega" en la que el pulpo era protagonista.

Paellas Benicassim 1Desde las 11 de la mañana aproximadamente en que comienzan a instalarse los grupos para elaborar sus paellas, la gente que no cocina está en la calle, tomando el aperitivo, disfrutando de grupos de música, bandas aficionadas improvisadas por los asistentes y bandas profesionales contratadas por el municipio que actúan en los escenarios.

La animación es muy grande por lo que también es un gran día para la hostelería ya que, según nos contaron en algunos bares y restaurantes, es el día del año que más facturan al mediodía, porque aunque muchos comen en su paella callejera, hay muchos más visitantes que como yo acuden a ver el Día de las Paellas y comen en alguno de los restaurantes de Benicàssim.

Dia De Las Paellas BenicassimMientras yo recorría las calles de la población para ver cómo iba el proceso de elaboración de las paellas, fueron muchas las invitaciones que me hicieron los vecinos para que me sentara con ellos a su mesa o para que al menos probase su "receta infalible". Una gente encantadora disfrutando de su fiesta de forma muy hospitalaria.

En general, todos usaban las judías verdes planas o bachoquetas, y el garrofó, alubia blanca fresca, completadas con los ingredientes tradicionales como pollo y conejo o más innovadores o transgresores. Debo deciros que aunque la paella que comí en el restaurante Jota's La Pau estaba deliciosa, tampoco tenían nada que envidiarle algunas de las que probé por la calle, mientras hacía fotos de sus técnicas esperando que llegara la hora del almuerzo.

Ambiente Calle Paellas Benicassim

La fiesta popular continúa

Como el Día de las Paellas es una de las actividades festivas de Benicàssim con motivo de sus fiestas patronales de San Antonio Abad y Santa Águeda, los vecinos y visitantes continúan con la fiesta terminado el almuerzo. Tras devolver los hierros y mesas a los camiones del Ayuntamiento y recuperar la fianza, hay una gran oferta de ocio y entretenimiento que incluye multitud de conciertos y actividades musicales en directo tanto en pubs y locales de la ciudad como en escenarios al aire libre.

Paellas3Además de las actividades relacionadas con la música, también tenían lugar las clásicas actividades de verbena, caballitos, norias y otras atracciones de feria, que congregaron a las más de 25.000 personas que visitaron Benicàssim este día en el que también se puede aprovechar la ocasión para recorrer el paseo marítimo y disfrutar de las estupendas playas y edificaciones existentes o tomar una copa con amigos en el Sunset o algún otro de los animados locales nocturnos.

En resumen, mi experiencia con el Día de las Paellas de Benicássim 2015 ha sido muy grata, pero no puedo olvidar señalar un inconveniente que debéis tener en cuenta si visitáis Benicàssim el año que viene: el olor del humo de las 1000 paellas se adhiere con facilidad a la ropa y estaréis oliendo a humo unos cuantos días. Tenedlo en cuenta porque merece la pena acercarse a Benicàssim a disfrutar del Día de las Paellas.

En Directo al Paladar | Paella de verduras. Receta
En Directo al Paladar | Wikipaella, para defender la auténtica paella y el resto de arroces de la Comunidad Valenciana

-
La noticia Día de las Paellas. Más de 1000 paellas en las calles de Benicàssim fue publicada originalmente en Directo al Paladar por Pakus .


25 Jan 00:11

"My beauty uniform"

by Joanna Goddard
Jimena Azpeitia

esta super guapa esta mujer, siguela en instagram mana!

LaTonya Yvette is a Brooklyn-based stylist, blogger and mama of two. We're huge admirers of her Instagram and were thrilled when she agreed to share her beauty uniform. Here is her sweet morning ritual, top-secret perfume and the lipstick that looks great on everyone...
Read More >
24 Jan 03:53

Be a Cat Playhouse Architect with BLOCKS

by Nanette Wong

Be a Cat Playhouse Architect with BLOCKS

Poopy Cat (best name ever?) has recently launched and successfully funded their newest creation, BLOCKS within 5 days. BLOCKS is a modular package that contains beams, cubes, a tunnel, bridge, on ramp, and two types of connectors so you can easily build a personalized playhouse for your cat.

PoopyCat_Playhouse_067

Made out of recycled materials, it is 100% biodegradable. Despite how lightweight it is, the house is solid and can carry the weight of any cat.

PoopyCat_Playhouse_048

By being able to switch up the structure of your cat’s home, it provides mental and physical stimulation for cats of all ages.

PoopyCat_Playhouse_021


24 Jan 03:51

Peg-it-all Pegboards by Kreisdesign

by Caroline Williamson

Peg-it-all Pegboards by Kreisdesign

Designer Nikki Kreis, of Kreisdesign, has launched a storage solution based on the ever-practical pegboard called Peg-it-all Pegboards. The updated concept takes pegboards out of your garage and into the house giving you a really cool new way to store your smaller items.

Kreisdesign-Peg-it-all-Pegboards-2

Made of heavy-duty birch plywood, they feature large holes and rounded end pegs, along with accessories you can mount, like shelves and mirrors. Peg-it-all comes in the natural birch plywood or in black or white.

Kreisdesign-Peg-it-all-Pegboards-3

Kreisdesign-Peg-it-all-Pegboards-4

Kreisdesign-Peg-it-all-Pegboards-5


24 Jan 03:50

Illusion Chair by Gabriel Särkijärvi

by Jaime Derringer

Illusion Chair by Gabriel Särkijärvi

Made of birch wood and jute webbing, this simple chair actually has an artistic detail: an illusion of the designers face created out of the slatted backrest.

Illusion_Chair_Gabriel_Sarkijarvi5

Having always been fascinated by illusions, Swedish designer Gabriel Särkijärvi thought it would be unique to create a chair that incorporated an illusion. Using a raster technique, MDF boards were cut into templates by a laser cutter and those were then used to mill out the final rasters in birch.

The chair is haunting, which was also the goal of the designer; he wanted to create a personal artifact that could become a family heirloom, passed down from generation to generation. It could be a kind of remembrance of ancestors past… a beautiful and functional homage. His personal goal in creating one with his own face was to create something that a child could sit in, almost as if he is sitting in his fathers lap all the time.

Illusion_Chair_Gabriel_Sarkijarvi4

Illusion_Chair_Gabriel_Sarkijarvi7

Illusion_Chair_Gabriel_Sarkijarvi6

Illusion_Chair_Gabriel_Sarkijarvi2

Illusion_Chair_Gabriel_Sarkijarvi3

Gabriel can be reached at gabriel@sarkijarvi.se.


06 Jan 07:37

Pizza Slice Sleeping Bag

by swissmiss

pizza slice sleeping bag

My 4 year old son is completely obsessed with pizza. So much, he wants his upcoming birthday party to be pizza themed, inspired by the Secret Pizza Party book. Being a good mom, I am doing pizza research and stumbled upon this pizza slice sleeping bag. Made me laugh.