With my vision obscured by the rose-colored glasses that I evidently donned before every viewing of our house, I’d failed to properly take note of the condition of the kitchen floor. I knew something had to be done about it, but I wasn’t too concerned about exactly what. I figured I had a few options that involved either painting or covering up the existing vinyl tiles, but figured I’d just evaluate the situation properly once we got there.
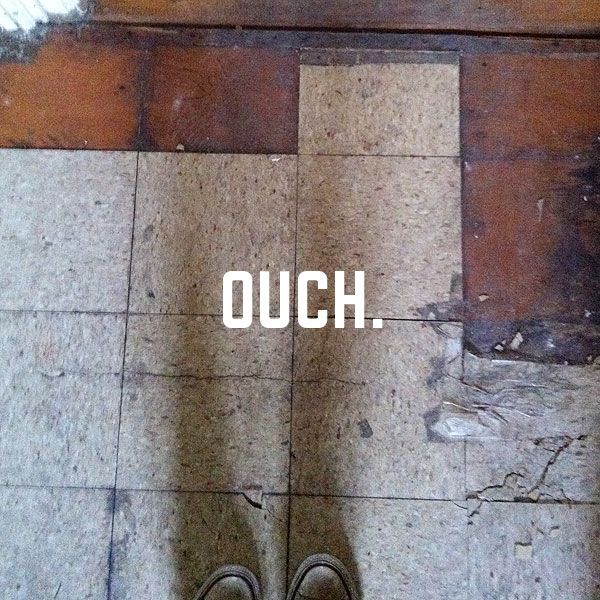
But then we got to the house. And the floor was like this. Yeah, parts of it were missing. Parts of it were crumbling. The rest of it was horrifically filthy. It was really, really bad.
In the process of cleaning up the crumbly bits and disposing of the tiles that had already completely separated from the subfloor, I realized that none of the tiles were really stuck down. Over the course of 50-60 years and the past two winters of the house freezing, all of the old adhesive holding the floor down had failed. So up came the tiles, one by one, with relative ease on our second night in the house.
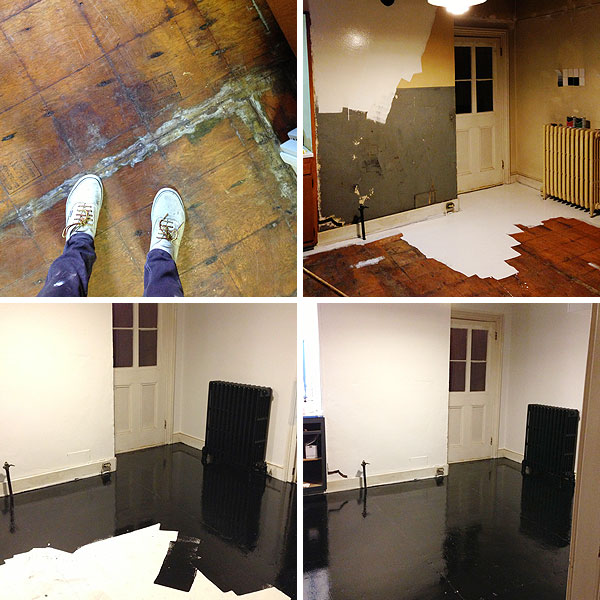
And then we were left with the old plywood underlayment. I thought briefly about removing the underlayment to expose the original pine-plank subfloor, but then I realized that there was actually a whole second layer of linoleum under the plywood underlayment, with an attending second layer of plywood underlayment over the original pine planks. There’s really no telling what kind of condition the pine subfloor will be in, but at BEST I would have had to sand and refinish or paint it (a decision I’m not really ready to make), and at worst I would have had to cover it all back up with something else. And because these layers of flooring run underneath the base cabinets and the radiator, we would have had to remove the base cabinets, the sink, and the radiator, then figure out the floor situation, then reinstall everything, and have the plumbing for the radiator altered to make up for the height difference between the old floor and the new floor, and…well, you see how complicated things get.
So, paint to the rescue! Paint fixes everything! Always! Right? This was my big plan:
1. Clean the underlayment.
2. Prime the underlayment.
3. Paint the underlayment.
4. Hooray new floor! Maybe throw a cute rug on top, and it would look great. (and by “great,” I mean good enough to see us through until we gut this whole crazy room someday.)
So I cleaned. And I primed. So far so good. Then I painted. Admittedly, we were doomed from the start because I did not buy the right type of paint. I should have bought a paint formulated especially for floors (usually called Porch & Floor Paint), which is much thinner and more durable than regular old paint. It should have been something like a satin finish. Instead, they didn’t seem to have that at Lowes (the paint person looked at me like I had three heads), and instead of figuring out where to buy the right thing, I just panicked and bought a can of Rustoleum Oil-Based Black Gloss paint.
When I decided to start painting (in the middle of the night, like you do), I thought maybe it looked kind of awesome and amazing. It was fun seeing the floor black instead of disgusting or white, so I felt like I did a good thing.
Then the next day rolled around. I went to inspect my handiwork.
In a matter of minutes, I worked myself up from “OK, so it’s not what I had in mind,” to “it definitely makes the seams and imperfections more noticeable…” to “Oh man, I walked on it and it immediately looks like a filthy garbage monster,” to “OH GOD MAKE IT GO AWAY MAKE IT GO AWAY PLEASE.”
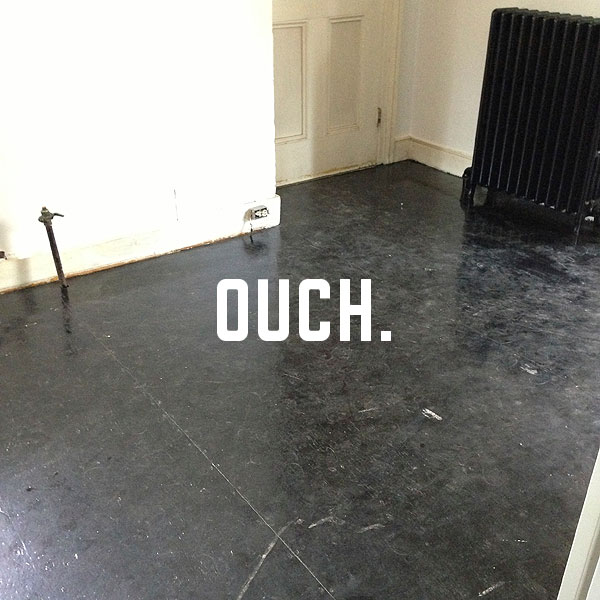
I had not done a good thing.
Now, I’m not the type to cry over shit like this. But if I were, I would have been sobbing. I hated my floor. Max hated my floor. My dogs looked at me like WTF is this, I hate you and your dumb floor. I could see it in their little judgmental dog-eyes. This was probably the lowest point in the whole kitchen renovation. On top of confronting my own failure as somebody who is generally OK at making ugly things look not-ugly, we also had Max’s whole family in town during this ordeal who witnessed how bad my floor looked. Everyone could see that it was bad. There was no hiding how bad it was. So there was personal failure, there was shame, and there was also a heat wave.
Oh yeah, the heat wave. When the weather first started hinting at getting hot, Max and I bought a window A/C unit for our bedroom, and figured that’s all we really needed to survive the summer. I can deal with a little heat during the day, so I wasn’t too concerned about the rest of the house heating up like a sweat lodge. But then it got hotter. And hotter. And hotter. And I was putting in very long days in the kitchen. And it was so hot. And I got SO. CRAZY.
After living with the newly painted floor for about 24 hours, something had to be done. I begged Max to let me rip it all up and expose the subfloor. I pleaded. The conversation was kind of like this:
Me: I HATE THIS FLOOR.
Max: Yeah, it’s not good. Sorry.
Me: PLEASE LET ME RIP IT UP.
Max: But you said that was a bad idea?
Me: FORGET WHAT I SAID LET ME RIP IT ALL UP I HATE IT.
Max: How are you going to get the cabinets out? How are you going to get the sink out? How are you going to get the radiator out? Maybe you should sit down.
Me: I’LL WORRY ABOUT ALL THAT TINA BRING ME THE AXE.
Max: I think it’s time to take my family out to brunch? We should go?
The next morning, I awoke early with a hankering for some soul-searching. I got in my car. I stopped to get iced coffee. I drove. I drove really far. I wanted to put as much distance between myself and my failed kitchen floor as I could. In a dramatic movie version of my life, this would have happened at night and it would have been storming and the water rushing over my windshield would have mirrored the tears flowing from my eyes. Also, I would have had a real problem like a break-up or a dead child or bunions, instead of a crappy paint job, but we do the best we can with what we have, am I right?
Heat wave. I was so tired and so fragile.

In the real version of my life, though, the weather was beautiful the Hudson River Valley is a gorgeous place with mountains and trees and blue skies and water, and none of this helped me nurse my bitterness. I also forgot that at some point I deleted the playlist off my iPod I filled with depressing songs I have to aid me in my periodic bouts of shame and failure, so I didn’t even have the right soundtrack. All of this nice stuff was super frustrating, since I really just wanted to feel awful by myself for a while. Stupid iPod. Stupid sunshine. Stupid mountains and beautiful lakes.
In the midst of all of this, I had a moment of clarity and I knew what needed to be done. Kind of. I knew enough. So I went to Lowes, and loaded up on black VCT (Vinyl Composition Tile) flooring, adhesive, and trowel. Then I got home.
Max: Where were you?? I got worried.
Me: I don’t know. I went for a drive. I got us a floor.
Max: OH THANK GOD CAN YOU INSTALL IT RIGHT NOW.
Since questionable decisions often beget more questionable decisions, I decided that I really didn’t need to worry about installing my floor 100% by the book, which is why I will not be posting instructions for this particular project. The deal with VCT is that it really should have a very even surface to adhere to, so you’re supposed to fill any seams in the underlayment or nail holes or anything like that with a special patching compound, wait for it to dry, and sand it all smooth. Any raised bumps in the flooring need to go, since they’ll end up looking about a thousand times worse through the tile, approximately. Then you’re supposed to figure out the center of the room and snap a series of semi-complicated math-y chalk-lines to show how your tiles should be aligned, since you shouldn’t really use a wall as a guide since walls are notoriously not-square, particularly in old houses. It’s all a little intimidating, but manageable, and in retrospect, I probably should have done everything right instead of cutting corners.
But…heat wave. Desperation. Failure. Shame. Here was my logic:
1. Well, I’ve already messed it up by painting the floor. This adhesive specifically says it isn’t supposed to go on top of paint. But some dude I found on some random message board on the Internet said it was probably OK, so I guess it’s definitely OK.
2. Whatever, so the floor will have imperfections. You know what else has imperfections? Oh, I don’t know, how about EVERYONE AND EVERYTHING IN THE WORLD (except Martha Stewart)?? I mean, seriously, what makes this floor so goddamned special?
3. Notwithstanding the incident when all of the tiles decided to crumble and pop up all at once, this subfloor was perfectly fine for the vinyl tiles that were here before. It did it once, it can do it again.
4. Realistically, this floor just has to look passably good and last somewhere between 5-10 years until we install the Dream Kitchen (hopefully?), so I guess I’ll just start spreading adhesive and making this thingy happen!
So that’s what I did. Adhesive. Let it tack up. Lay tile. Roll out the seams. Lather, rinse, repeat, for many hours.
About an hour into this process, my friends Anna, Evan, and Ilenia decided to drop by the house to see it for the first time and have a nice little visit. Because Anna is a VCT-laying veteran herself and master of doing things VERY WELL, I was anxious about her seeing the beginning stages of my handiwork, but hoped she would just tell me it would all be OK. She did not.
Anna: Oh! Ohhhh. Hmmmm. Yeah. Um. You know you’re supposed to start at the center, so the whole floor isn’t crooked? Like you really can’t rely on that wall.
Me: I know.
Anna: And, um, can you even use this adhesive over paint?
Me: I don’t know. KartRacer23 said probably, so I’m hoping it works.
Anna: You don’t think you should at least prime it again first?
Me: I don’t know. No. I don’t want to.
Evan: It’s, like, REALLY hot in here.
Max: RIGHT? THANK YOU. I’ve been telling Daniel that we need an A/C unit.
Anna: You don’t have an A/C unit??
Me: We have one in the bedroom.
Anna: But nothing down here?? Oh, that’s…bad. It’s probably too hot for this adhesive to ever dry.
Me: It’s fine.
Evan: Dude, you really need an A/C unit.
Me: I DON’T NEED ANYTHING I’M FINE JUST LIKE I AM EVERYONE LEAVE ME ALONE.
[Anna picks up one of my VCT tiles; it bends and breaks in her hand.]
Anna: Daniel, it’s so hot that the tiles are melting.
Me: THAT’S JUST HOW THEY ARE.
Anna: Are you OK? Do you need a little break?
Me: WHY IS EVERYONE LOOKING AT ME LIKE THIS I’M TOTALLY FINE I’M JUST GOING TO LAY THIS TILE NOW.
Anna: Evan, will you drive Max to Best Buy to get an A/C unit? Get the big portable kind.
Listen to your friends, folks. Max and Evan returned with the biggest, baddest A/C unit around. And iced coffees for all.
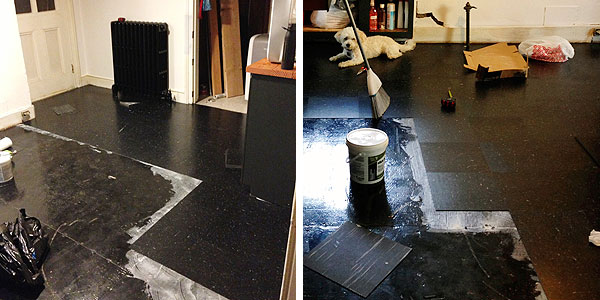
Things improved from there. I got the floor down. It looks terrific. Everyone was happy. Linus approves.
The floor is slightly crooked, and there are a couple little bumps here and there, but overall, I’m really happy with it. The adhesive seems to be holding on just fine, and I feel overall very optimistic about this floor surviving as long as it needs to and looking pretty great doing it.
I added new quarter-round around the baseboards and lower cabinets to finish everything off. It looks awesome.

Here you can kind of see how the black of the VCT relates to the grey-black-blue cabinets. I dig it. I still have to polish the floor with a special VCT finishing treatment——it comes with a slight waxy factory-finish, but it’ll be much shinier and a bit darker and better-looking after the polish. I wanted to wait until we were done creating crazy amounts of dust and debris in the kitchen before getting to that step, though (which I just finished doing yesterday. Hopefully. I think.). Aside from looking good, all of the VCT and supplies only cost about $200 (I used Tarkett brand, which is $.66 per square foot), so I feel good about going for a brand new floor and avoiding spending heaps of money. It’s also super easy to clean, and the pattern adds a nice little somethin’-somethin’ to the kitchen, I think. Much better if it was just painted, which would look really flat and unfinished, even if I had bought the right paint.

I’m intentionally being very vague about these after pictures because…the kitchen is almost done! I have to save a FEW little surprises for the reveal, right? Speaking of…I still need to do some final painting and beautifying and reattaching hardware and stuff, but I really want to have a reveal post up on Monday! Can I do it? I don’t know!
No, seriously, I don’t know.
Want to read about the kitchen renovation from start to finish? Pregame the reveal post like so:
1. Inspiration and a Plan!
2. The Kitchen Begins!
3. Endless Prep Work
4. Paint and Tile!
5. Cabinets and Grout!
6. DIY Wood Plank Countertops!


