Shared posts

30 Mar 02:40

Death by Roubo

by lostartpress

suicide

For those readers who are squeamish or easily offended, stop reading now.

For the rest of you, here is a little nugget of workbench history unearthed by Jeff Burks. It was published in the April 5, 1903, edition of the French illustrated newspaper Le Petit Parisien. Headlined: “Un étrange suicide,” it detailed the odd suicide of the joiner who ended his life with the help of his workbench.

Below is Jeff’s quick translation of the text. You can read it in the original French here.

A Strange Suicide

This is obviously a particular case of madness, that of the strange suicide of this joiner from Sainte-Ménehould, with whom all the press is occupied. Mr. Lemaître, the joiner in question, was sick for a long time; He was, in addition, suffering from paranoia; his rationale seemed very shaken.

Tired of suffering, he resolved to finish his own existence. But he did not use, like so many others, poison, the revolver or the rope; He wanted to be guillotined. He very patiently sharpened a spade, so it would be keen as a razor; he tied it to his joinery workbench, which had been loaded quite heavily with wood; then, using a piece of wood as a brace, he lifted his bench to 60 centimeters in height and spread himself on the ground so that, by removing the piece of wood, the spade would strike his neck.

These tragic preparations had taken a fairly long time. With a chisel, Mr. Lemaître knocked out the brace that was holding the workbench and the spade descended suddenly, working as a guillotine blade. Indeed, the carotid artery was severed and the head weakly attached to the body. The doctor who was called found him dead.

— Christopher Schwarz


Filed under: Workbenches
30 Mar 02:39

FPSRussia’s Home Raided by ATF

by Ray

fpsrussia

Over 40 ATF and FBI agents raided the property of Kyle Myers, a.k.a. FPSRussia the popular YouTuber who’s known to blow stuff up and shoot all sorts of awesome guns on camera for a living. The ATF raiding in an attempt to find illegal weapons or explosives, what did they find? Not a damn thing, they left empty-handed. The ATF suspected Myers of using explosives “with malicious intent,”according to ATF spokesperson Richard Coes.

Maybe it had something to do with the murder of Keith Ratliff, weapons manager of FPSRussia earlier this year. There’s more info on the raid over at Guns.com.

30 Mar 02:36

Rain Barrel!

by ryochiji

I finally got around to setting up the rain barrel I bought last year. The wet season only lasts a couple more months, but hopefully I’ll be able to harvest some water to help keep my cherry tree watered during the dry months. In any case, I’ll tell this story with pictures, so… here we go!

Bits and pieces. Let’s hope I have everything!
20130211-211739.jpg
Putting up the gutters. I intentionally hung them low so that snow would slide off without snagging them. I may eventually put rails on the roof to keep the snow there so that I can collect more water as it melts. I’ll need to assess whether the additional load on the roof will cause problems. I also set these up on the south side so that exposure to the sun willl hopefully keep things from freezing too badly.
20130211-211750.jpg
Gutters and downspout all finished. Part way down the downspout is the RainReserve rain diverter. Instead of diverting everything, it captures water that falls along the interior sides of the downspout, while allowing bigger pieces of debris (like leaves) to fall through. Or so the theory goes…
20130211-211809.jpg
Building a platform for the rain barrel, using the only flat surface within a half-mile radius.
20130211-211821.jpg
Setting up the base. One side sits on cement blocks, while the other side sits on ice and rocks. It’s what we call MGEP (Mostly Good Enough, Probably) — the impeccable standard to which things are built on Serenity Valley. Actually, I’m not entirely confident it’ll support the weight of a full 300gal tank (2400lb). I guess we’ll find out!
20130211-211958.jpg
Ta-da!!
20130211-211844.jpg
Close-up of the rain diverter and tank hookup. The green hose is the overflow, which could also be hooked up to a second tank.
20130211-211853.jpg


29 Mar 01:20

Andy Warhol Brillo Box Pouf

by Caroline Williamson

Andy Warhol Brillo Box Pouf

Andy Warhol Brillo Box Pouf in home furnishings art Category

Fab.com has lauched their first line of products and they are hitting the ground running with their inaugural release: the Andy Warhol Brillo Box Pouf. Designed as a collaboration between Quinze & Milan and The Andy Warhol Foundation, the foam pouf is a nod to Warhol’s original Brillo Box sculptures from 1964.

Andy Warhol Brillo Box Pouf in home furnishings art Category

The pouf is made of Quinze & Milan’s patented high-density QM FOAM™ and screenprinted with Brillo’s iconic logo.

Andy Warhol Brillo Box Pouf in home furnishings art Category

As Warhol said, “Pop Art is everywhere,” so why not bring a little bit of it to your home? I don’t know about you, but I’m dying to own one!

Andy Warhol Brillo Box Pouf in home furnishings art Category

Andy Warhol Brillo Box Pouf in home furnishings art Category

Andy Warhol Brillo Box Pouf in home furnishings art Category

Andy Warhol Brillo Box Pouf in home furnishings art Category


29 Mar 01:18

Yasutomo 2020 Wa-Ben Wallet

by mark

I recently realized I have never been satisfied with any wallet I’ve ever owned. It was time for that to change.

I thought about the Slimmy (which still looks pretty fantastic), until I remembered reading an interview with William Gibson. He talked about some crazy wallet made out of a material called Cuben.

Now this sounded promising. I headed off to Google and searched for “william gibson wallet.” The top result took me to a review of the Yasutomo Wa-Ben wallet at unfinishedman.com.

Chad’s review convinced me that the Yasutomo 2020 Wa-Ben wallet, made in Hong Kong by Jason Hung and touted as the world’s first Cuben Fiber wallet (specifically, Cuben Fiber CT9K.5), could be exactly what I was looking for.

So I slapped down an electronic $49.50 (post-paid from Hong Kong), and three weeks later I signed for my new wallet at the post office (it seems the people in charge of these decisions deem packages from Hong Kong as untrustworthy).

After carrying it around daily for about a week, I can say it was exactly what I was looking for.

The wallet is extremely light (0.69 ounces, according to the website), extremely thin (you can see through it!), and extremely durable. I often forget I’m even carrying it and have to frantically check my front pocket to see if it’s there. It always is.

It has six credit card pockets, two “hidden” pockets behind the card pockets, and two cash/note pockets, so there’s plenty of room to carry more than enough.

So here’s my short review. The Yasutomo 2020 Wa-Ben wallet is fabulous piece of gear, and I recommend it highly for anyone looking to lighten their everyday carry load.

-- Tom Fassbender

Yasutomo 2020 Wa-Ben Wallet
$50

Manufactured by Yasutomo 2000

29 Mar 01:17

How to Survive a Bear Attack: An Illustrated Guide

by Brett & Kate McKay
29 Mar 01:13

It's Amazing What You Find...

by Adrian Morgan
...underneath a thick layer of red fence paint. At least it helped preserve a little dinghy that was on her last legs, and destined as a flowerbed, if the present owner hadn't spotted her on eBay.

Before...

I have to say that she is the prettiest little dinghy I have seen for a long time, and most exquisitely put together, although the thwart knees do look a little heavier than strictly necessary.

One of the intriguing things about her was that she was orginally a sailing dinghy. You can see where I have glued in an oak filler in the slot. The trouble was that, in stripping out the centreboard case a lot of the keel's strength went with it, such that there was a horrible hump in the centre. This disappeared with a bit of gentle persuasion over a weekend, and with the slot well and truly filled, the keel is as straight as a die again. And the new timbers could then be taken over the keel to help add stiffness.

... and after.
The wood used is elm, and flawless, with no splits after what must be 30 or more years. She must have been well looked after in her youth, as the lands are not worn or scuffed, and the rubbing strip is intact. But all the steamed timbers were cracked, and had to be replaced with slightly heftier ones. Which is probably when her owner decided to put her on the market. A common thing now that the ordinary skills of retimbering a clinker dinghy reside in the hands of a handful of traditional boat builders, where once it was a routine job for an owner to steam in a new timber every so often.

So, after a great deal of scraping of red paint, and sanding and varnishing, she's ready for another 30 years. And just look at how the thwarts came up. Again, under the red Cuprinol lay some lovely Honduras mahogany to set off the elm and oak nicely.

I just wish I knew what she was. Anyone out there with a class or type? Length around 11ft, with a rig originally and centreboard. No idea what rig, but probably a little lugsail. And the builder? Almost too good to be professionally built, if you know what I mean. Just such a sweet boat. I almost wish she were mine...

PS I left the rubbing strakes in red fence paint as a reminder, and I think they look fine against the planking.


29 Mar 01:12

The miniature worlds of Maico Akiba

by Johnny

sekai2012_6

sekai-image2sekai-image1

Maico Akiba, whose series, “100 years later,” we previously featured, has another project simply titled SEKAI, or “world.” In it, she imagines miniature ecosystems growing on the backs of other animals. There are people but also remnants of civilization like electric poles or shops often overrun by weeds and vines. It’s almost like a reverse-Noah’s Arc.

In 2012 the series was commercialized in the form of cell phone straps. But I like the detail-heavy originals better.

solidsekai_2011_14

others_sekai2_1

others_sekai2_2others_sekai2_4

solidsekai_2011_04

solidsekai_2011_02

solidsekai_2011_05

28 Mar 00:09

Inside View: Edwood's Persian-esque Fighter

by TEOTWAWKI Blog / Alexander Wolf

When I reached out to Edwood for his thoughts on tomahawks, he also shared a little behind the scenes on a knife design that he is working on with knifemaker Thomas Pepper. Pictured above, it's a wicked looking, combat-oriented design, meant to be big enough to be effective, but small enough to be concealable.Of course, I had to get a few details around the thought process behind the design.

At some point in the future, this knife design may become available for purchase. Details are to be determined. Edwood is doing initial field testing right now, and I can only imagine what that consists of...

Anyways, enough intro junk and let's get down to business--here's what Edwood and Thomas had to say about their collaborative design.


Edwood:
I have always carried a knife; the reason behind why I carry a blade has changed over the years. During several incidents where I found myself extremely up close and personal with very bad people, I found that I had a need for a dedicated offensive blade as part of my gear, to aid in weapons retention and CQC. I have experimented with a lot of blade profiles and sizes for this specific use in my Libre Fighting training, and I have found that the Persian blade profile is the best for the job in my opinion, it offers the best balance between a slashing and stabbing weapon. And if you add a back edge to the knife it adds a lot of versatility when it comes to reverse edge knife work and weapons retention.
Another point I wanted to cover is the fact that it need multiple carry options, so that you could use the same knife for different jobs like overt operations and covert work.

Thomas Pepper:
Based on input from Edwood, we were looking for a persian-style blade that was 9.5" in overall length. The idea was to be able to mount the knife on a plate carrier or wear it discreetly on a belt. The blade needed to be between 4.5" and 5" to accommodate this, with a handle long enough to get good purchase. At the same time we did not want the overall form factor to be so long that it would not be able to be worn discreetly in plain clothes; we also wanted the knife to be long enough to be useful. We wanted it to be comfortable in the hand, thrust well (specifically in the mandritta and reversa styles), slash well and be usable in forward or reverse grip. The ability to conduct a back-cut with it (or to use it as a p'kal) was desired, so we sharpened the back clip. To combat tip breakage, we maintained a thick spine almost to the tip of the blade. In order to get good slicing ability we used a hollow grind and put some belly into the edge, with an 's' curve. 

At Edwood's request, we used cpms35vn steel and made it .21" thick.  To lighten it we put holes in the handle. On Edwood's example, we used a rubber matting for the handle grips. In another example we used green canvas micarta. The point was to make it not slippery. To aid this we put aggressive jimping on the spine and a deep choil at the guard/ricasso area to prevent a hand from sliding onto the blade.  We extended the pommel from the gripping area (with jimping) to facilitate pommel strikes and thumb capping.  Finally, we terminated the grinds so that there was not an abrupt change in blade thickness, but rather the grind flowed into the jimping and choil in a manner that facilitated thrusting but did not put one's fingers next to sharpened steel.
27 Mar 23:47

Video about man who makes ships in bottles

by David Pescovitz

Ray Gascoigne is a former shipwright. Well, he's still a shipwright but now the ships he builds fit inside bottles.

27 Mar 23:41

Filson Mackinaw Wool Vest

by mark

My Filson Mackinaw Vest is the single most utilitarian piece of clothing I own. And during the fall, winter, and early spring I wear it nearly every day. We’ve reviewed Filson in the past. They have a legendary reputation among hunters and outdoorsman for wool clothing that stays warm when wet, and holds up over time. This holds true for this vest, but I love it because it’s just as functional at home or in an office as it is in the field.

When I originally picked one up, I was wary that it might be unflattering given its fairly utilitarian design, and I figured I would mostly wear it while foraging. However, I have been pleasantly surprised over the past few months with how well it works paired with a nice shirt and tie (which, in my case, has secured a number of compliments), or a heavy sweater. I’m not here to defend the vest’s fashion statement, but rather pointing out that because it looks good I’m more likely to wear it on a daily basis. Mine is light gray, and looks good with almost every color combo. As far as sizing, Filson is better than most outfits in that these are sold according to jacket size, and can be ordered extra long for us tall guys.

Two things stand out about the Mackinaw vest. The first is that it has, by far, the best range of pockets on any piece of clothing I’ve ever owned. It has two hand warming pockets, which are great on a cold day because it means I don’t have to throw on a heavier jacket just to keep my hands warm when I head outside. It also means I have somewhere other than my back pocket to store my wallet (thus reducing the potential for back pain). It also features two chest pockets; the right easily fits a notepad, while the left is designed for holding writing instruments, or other tools (I keep a Maratac AAA flashlight, and a few pens and pencils).

The other major benefit of the Mackinaw vest is that I can wear it everyday without worrying about wear. I wear vests a lot, in part because I like that it doesn’t limit my arms, and because it’s a flexible piece of clothing.nWhat I have found is that most vests are NOT built for daily wear. Stitching comes undone, fabric begins to tear or pill, and in general they become limp and lifeless after just a few months. The beauty of the Filson is that its heavyweight felted wool and heavy-duty stitching make it near bulletproof. It doesn’t shed, pill, or wrinkle, and it looks good day in and day out. And because it’s a vest made of thick felted wool it can be worn over three seasons and across a really wide temperature range.

-- Oliver Hulland

Filson Mackinaw Wool Vest
$120

Available from Amazon

Manufactured by Filson

27 Mar 23:31

Photo


27 Mar 23:13

Jimi Hendrix on a gayageum

by Cory Doctorow

Luna Lee performs Jimi Hendrix's "Voodoo Chile" on a gayageum, a "traditional Korean zither-like string instrument" (Wikipedia). She freaking nails it. There's lots more if that strikes your fancy.

Voodoo Chile-Jimi Hendrix / Gayageum ver. by Luna (via Reddit)

27 Mar 23:12

Build A Space-Saving Roll-Out Pantry that Fits Between the Fridge and the Wall

by Alan Henry
Click here to read Build A Space-Saving Roll-Out Pantry that Fits Between the Fridge and the Wall If you have a little space between your fridge and the retaining wall next to it, or any space about six inches wide in your kitchen, this DIY roll-out pantry can hold a ton of canned goods and other non-perishables, roll out when you need it, and slide easily back into place when you're finished. More »


27 Mar 23:11

Project 590A1: Intro

by TEOTWAWKI Blog / Alexander Wolf

A few weeks back, I picked up a Mossberg 590A1, with some uncertain plans for performing some upgrades to the shotgun. Taking a cue from TSLRF's Project 870 (Thanks Ryan!), I thought I would let the T-Blog Tribe follow along as I went through the upgrades--and some trial/error--to the 590A1.

The 590A1 is, of course, an already upgraded version of the popular Mossberg 500. The 590A1 is the heavy-duty, milspec version of the 500, with all metal parts, a thicker barrel and a different magazine tube--the mag tube opens at the end, facilitating cleaning. Parts between the 590A1 and other 500 series shotguns are largely interchangeable; if you've got a 500 or 590 (or Maverick--I'm pretty sure those are patterned after the 500), you'll be able to follow along, too.


The 590A1 is probably needlessly heavy duty for most uses--the thick walled barrel especially--and is noticeably heavier than a standard 500. But, for rough use and dependability, the hard-use components are a good thing--the 590A1 was designed for military use and has served successfully with various branches of the military. For apocalyptic mutant zombie biker slaying, why the heck not go with the toughest thing out there?

Why a shotgun at all? Well, I'm a rifle dude first and foremost, but, let's face it, every arsenal needs a 12 gauge pump. Mine was lacking one, so I figured I might as well fill that hole in style. 12 gauge is super versatile, super common (as in you can still find it in stock!) and devastatingly effective in combat with the right loads. And, it was a weapon system that I was not particularly familiar with, and I was up or gaining some skills on a new platform.

Why choose the 590A1 over another design? To me, the Mossberg 500 series and Remington's 870 are largely interchangeable in terms of quality and ruggedness. I like the location of the Mossberg's controls a bit better, I like the look better, and, they tend to be easier to find in full-on combat configuration. Yes, I wanted a bayonet lug, 'cuz every end of the world shotgun needs to have that capability. So Mossberg it was.

My 590A1 is a 20" model--a bit long, but it also bestows the wielder with a full 8+1 shell capacity. Nine rounds of double aught buck is nothing to sneeze at.

Clearly, this ain't a duck gun. I shot some skeet with it on its first outing, and, well, the short-ish barrel and cylinder bore aren't the best combo for knocking clays out of the sky.

Naa, this is an evil-slaying black shotgun, amigos. And, over the course of this series, we're going to crank up is evil-slaying capabilities a couple notches.

Home defense? Of course. Go-to for ban states? Yep. Last stand against the undead? That too.

Ya, we're going to have a bit of fun with this one. Stay tuned for more.
27 Mar 23:02

Upholstery Basics: Circus Tent Kennel Cover

by Amanda Brown

My cutemeter is on overload after a month full of cuddly cats and darling dogs on Design*Sponge, so when I started brainstorming this month’s Upholstery Basics project, I consulted my cutest and furriest friend for some inspiration (though the clown collar was not her idea). For years, Pixie’s kennel has been a focal point and an eyesore in the corner of my bedroom, but after a few modifications, one striped sheet set transformed her ugly metal cage into Big Top Pee-wee, I mean Big Top Pixie. Don’t have pets? Choose your fabric and follow along to make a dust ruffle for your bed. — Amanda

dog kennel-9-1-tent pattern dog kennel-9-2-tent pattern dog kennel-9-4-tent pattern dog kennel-9-5-tent pattern dog kennel-9-6-tent pattern dog kennel-9-6-tent pattern dog kennel-1-1-opening shot dog kennel-1-23 dog kennel-3-172 dog kennel-9-tent pattern dog kennel-5-178 dog kennel-7-185 dog kennel-13-2 dog kennel-15-18 dog kennel-17-30 dog kennel-19-46 dog kennel-21-52 dog kennel-23-53 dog kennel-25-132 dog kennel-27-136 dog kennel-29-139 dog kennel-31-58 dog kennel-33-73 dog kennel-35-98 dog kennel-37-102 dog kennel-39-105 dog kennel-41-107 dog kennel-43-121 dog kennel-45-149 dog kennel-46 dog kennel-47-156 dog kennel-49-163 dog kennel-51-164 dog kennel-53-190 dog kennel-55-192

Read the full how-to after the jump . . .

(more…)


27 Mar 00:16

Cinnamon Roll Waffles

by Pintester

Sometimes my ineptitude is fortuitous. Allow me to explain. Today, I decided to try the cinnamon roll waffles I’ve seen on Pinterest.

Image from Lady Behind the Curtain

Image from Lady Behind the Curtain

To be honest, I had visions of ruining my waffle iron and/or burning down my kitchen… because that’s how cooking adventures tend to go at my house. The thing is, though, now that I’m the Pintester, it doesn’t bother me as much. Burning down my kitchen would just be the ultimate blog post, right? I mean, it would probably go viral or something, and I’d earn enough money to rebuild my kitchen. And, bonus, I could get rid of my piece-of-shit microwave that will not die. Win-win, as I see it.

So, emboldened by the hope of a remodeled kitchen, I hauled out my waffle iron and plugged it in.

IMG_0548

While it was heating up, I puttered around in the kitchen, unloading the dishwasher and destroying evidence of fast food consumption. (The calories don’t count if no one ever finds out about them, right?)

Only when I opened the waffle iron to put on the cinnamon rolls did I realize that my waffle iron is a mini waffle iron– much, much smaller than the one pictured in the source blog post. Hell.

IMG_0551

Also, my cinnamon rolls were strangely much less beautiful than the be-swirled ones on the source post, but I was really much more concerned about the size of my waffle iron. Sometimes size does matter. It’s just a fact of life. I briefly debated trying to put only two cinnamon rolls on the waffle iron and somehow distributing them among the tiny waffle shaped holes, but ultimately I had to think fast before it cooled off, so I just stuck one cinnamon roll in each hole, squished them down, and prayed.

IMG_0552

I should also mention that I did remember to spray the waffle iron with cooking spray. It’s a non-stick waffle iron, but it hasn’t actually been non-stick in many years. So I spray that sucker even when I’m making regular waffles.

The original blog post made a big point of saying you should be sure to check your cinnamon rolls frequently and don’t rely on the beeping, but I was afraid to look. So I just waited. I let it all cook and steam until the waffle iron beeped to tell me it was done.

IMG_0554

When I opened the lid, this happened:

IMG_0555_2

I was momentarily afraid that I’d forgotten to spray the top part and they would be stuck forever and ever amen, but I managed to get the cinnamon rolls off easily with a fork. (I find that a good fork cures many ills.)

Here’s where I began to really wonder why this whole experiment didn’t implode as I sort of expected it to… My waffle iron is tiny. My cinnamon rolls looked weird. My cooking spray skills are fair to middling, at best. So why did it turn out so well?

The reason, ironically, is that I fucked it all up before I even began by choosing the wrong cinnamon rolls.

These are the ones I was supposed to get:

IMG_0443-1152-640x480

These are the ones I actually got:

IMG_0557

Yes, apparently it’s actually the size of the cinnamon roll that matters more than the size of the waffle iron. (Hear that, Pillsbury Dough Boy? It’s all on you.) So if you have a small waffle iron like me, the cute little bitty cinnamon rolls totally work.

If you have a cavernous waffle iron, you need the extra large cinnamon rolls to fill it up.

Science.

waffles

Also, these cinnamon roll waffles are totally a success. Delicious, especially with the creamy, sticky, gooey frosting. Mm.

P.S. PENIS! I thought I could make it through this entire post without actually using the word “penis,” but I can’t. You should now go back and re-read and replace every instance of “cinnamon roll” with “penis.” The end.

Pin It
26 Mar 23:05

Gorm shelves into a fantabulous cat house

by Jules Yap

Materials: Gorm shelving unit (x4)

Description: Our 3 cats were in need of some extra space. They seemed to be outgrowing their small-ish enclosure and it was increasingly difficult to have to take them out and let them loose indoors since I was developing a bit of an allergy to their fur.

We had a narrow space behind the house which was roofed and enclosed by grills (e.g. bars on windows - quite common here in Malaysia), but was effectively still "open to the elements" and therefore quite airy. This was initially planned as an extra "wet-kitchen" for us, as well as a place for the washing machine which we didn't want running inside the house. However, we barely used it for anything other than washing so decided we could locate the cats there. They would be safe from access by the public/strangers but still effectively be outdoors.

My wife and I were considering various options; from having a new enclosure tailor built, to thinking about what could be modified to suit the purpose. In searching for inspiration online, we came across the chicken coop hack here on Ikeahackers (what luck!) and decided we could probably use something from IKEA as a starting point.


One trip to IKEA and we had it! The base enclosure is made of 3 large (55cm deep) Gorm shelves, tied together with bolts. We put heavy plastic netting around the entire thing, making sure to bolt the netting underneath the vertical beams of the shelf so as to hold them tightly in place. On the side, at about waist level, we fashioned a door using leftovers and offcuts of the basic materials we used in the rest of the build; this is nicely hinged and has a latch, and is used for retrieving/placing the cats from/to the enclosure, or for us to place food etc. The entire left side of the enclosure opens up for us to access litter and main water and food containers.

On the top we attached a smaller Gorm shelf (33cm depth) sitting horizontally to form a "penthouse" for the cats. This is accessed via a purpose built "staircase" through the centre unit of the base/bottom enclosure. The side of the penthouse opens up for us to access or to be left open when we want more air in/out. So far we found the cats to really like being in this top compartment. There enclosure rests against a wall, restricting visibility outside. The penthouse sits just above this wall, so I think the cats like being there to enjoy the nice view they get of trees and birds flying around.

The access door on the side has proven to be really useful, and was well worth the extra effort to build it. The solid hinges are really appreciated each time we open the door - feels very reassuring and "proper" (these are the chunky kind with nylon washers for smoothness, think they are used for normal doors). We attached a knob from some other IKEA build that didnt need it, and also added a latch to close and secure in the evenings. Each evening my wife really loves propping the door open and sitting on a stool outside the enclosure; taking the cats out in turns to cuddle them.

This was a 2 day build by me and my wife. We used mostly tools around the house and mainly had to buy netting, lots of screws, cable ties, in addition to the 4 Gorm units used. Looking at it now, we're really happy with it; it provides plenty of space for the three cats, and given the space constraint we had really is much better than anything we could have bought ready made. Is it better than having a tailor/purpose built enclosure? Time will tell I suppose!

Whats left now is to finish the wood. A bit confused as to what to do to seal/ finish/protect it, especially from termites. Appreciate any input and comments anyone has, on the build and especially on this front.

~ Cat-fanatic, Malaysia More hacks on IKEAHackers.net
26 Mar 23:03

Contingency Plans for the Zombie Apocalypse

by Survival Spot
26 Mar 00:11

Inspiring Documentaries on Netflix

by Tiffany

documentaries on Netflix

Unlike a lot of moms in the natural parenting blogosphere I don’t really harp on media and electronics too often. We are not a TV free house and never will be. My kids all have a TV, an xBox, and a computer in their bedrooms. We are plugged in and I quite enjoy it that way. For me it is more about balance and making sure we stay connected as a family and to the outdoors and other screen-free pursuits whilst still enjoying our screen time. I think our approach has worked pretty well.

My oldest plays video games with a historical bent and comes to me daily to tell me what historical things he learned on the game and then confirmed online for accuracy. These games have helped him discover that he LOVES history, especially as it relates to military and world wars. He just finds it all fascinating. My middle child plays a game daily that is all about architecture and world building. Both have gravitated towards educational games so I count myself lucky. Neither of them watches very much TV and both will happily spend 5-6 hours outside after school if the weather is nice. My youngest is my TV watcher and he watches a little more than I would like but happily he loves to watch Netflix documentaries about dinosaurs, prehistoric time periods, and animals.

I watch a handful of shows via primetime and cable network…they keep me from cancelling our cable. Though I always watch them later via DVR because I refuse to sit through commercials. I love True Blood, Justified, Game of Thrones, Dexter, Grimm, Person of Interest, Burn Notice, Lost Girl, and Elementary. I also love to watch Netflix and the amount of conscious and inspirational documentaries on it is amazing. For only $7.99 a month we are able to stream all of their content to our TVs…via xBox, Wii, and Roku. Sometimes it sucks me into TV that does not better my mind…like when I watched the first episode of Gossip Girl (just to see what the hullabaloo was all about) and then spent a week watching every single episode of every single season. :) Mostly though it enables us to watch all kinds of documentaries.

I recently asked fans on the NaturesMoms fan page what documentaries they were streaming via Netflix and here are some of the standouts…

Environmental Movies:

Bag It
No Impact Man
Vanishing of the Bees
Tapped
Gasland

Food/Health Documentaries:

Food Matters
Food, Inc
Fat, Sick, and Nearly Dead
Vegucated
Super Size Me
Forks Over Knives
Hungry for Change
Chemerical

Growing Food Documentaries:

Fresh
King Corn
Farmageddon
Dirt

Babies/Children:

The Business of Being Born
The Vaccine War
Loving Lampposts (about autism)

This is only a teeny tiny sampling. They have just about every kind of documentary/movie you could want from animals and national parks to religion and human rights stories. If you don’t have game consoles and you don’t want to watch on your computer I suggest a Roku. It is about the size of a deck of cards and allows you to stream all sorts of content …Netflix, Hulu, TED talks, exercise videos, etc.

What are you watching?

26 Mar 00:05

Charles Finn’s Microhomes

by Christina Nellemann

Charles Finn might just be the ultimate tiny house Renaissance Man. He’s a self-taught woodworker, an author, freelance writer, editor of the High Desert Journal, a literary and fine arts magazine, and his custom microhomes also allotted a full color spread in Lloyd Kahn’s “Tiny Homes, Simple Shelter” book.

Finn

Charles is originally from Vermont, but lived in Japan for a few years and admired the Japanese tea house designs. He eventually found himself in British Columbia living in a 7×12 foot vardo made by a woodworker friend. The vardo had no electricity or plumbing, but did have a 3-burner propane stove, a Jøtul woodstove and a set of deep-cycle batteries to run his laptop. After his first experience in a tiny home, he built his first “microhome” in Potomac, Montana out of lumber dismantled from old barns. The 8×12 foot cabin with a five foot loft became known as the Potomac Cabin.

“The entire cabin began with a daydream of wide windowsills so my cat, 42, could sit and look out,” Charles said in Kahn’s book. “The next winter I built a second and towed it into Missoula to show at a Farmer’s Market. It sold to the very first person who cycled by, along with a promise to create another.”

Charles is now building custom microhomes out of reclaimed and available materials. He mentions on his site that something the size of the Potomac Cabin will cost approximately $22,000 and a smaller 8×12 (like the Blue Room shown below) will cost around $14,000.

Finn2

The interior of the Potomac Cabin

Finn3

Lori’s Cabin

Finn4

Finn5

Interior of the first Potomac Cabin

Finn7

Lori’s Shed

Finn8

The Blue Room

Finn6

The Hut 1 and Hut 2


Finn9

The Hut 1 Kitchen


Finn10

The Hut 1 Living Room

Photos by Charles Finn/A Room of One’s Own

By Christina Nellemann for the [Tiny House Blog]

22 Mar 22:33

Friday Link Pack

by swissmiss

Physicist David Neevel built an OREO separator machine. I kid you not.

- This blog made me laugh: Real tough guys don’t need guns, they just need a positive, can-do attitude. (via)

- nbt.fm, hacker news for music articles and songs. (via)

- Thanks to my friend Ted I discovered Help Scout. It has streamlined our Tattly and Teuxdeux customer support. A real pleasure to use.

- Crafts project for the weekend: Painted Egg Cartons.

- Quarterly is a subscription service to wonderful things. And I am one of their contributors.

- Collaborative Consumption just launched their new site.

- My studiomate Sawyer is up for a .net Awards in the young designers category. He is one of the most talented young folks I’ve ever met. Let’s make sure he wins. Submit your vote.

- It’s been an exciting week. We released a brand neux TeuxDeux. If you like keeping lists, you should check out our simple to-do app.

- Don’t use Google Glasses too much. Else

- Real actors read Yelp reviews.

- Christoph Niemann tells the story of his lovely app. My son is crazy about it. Get it here.

- The bitterness of poor quality remains long after the sweetness of low price is forgotten. Here.

- Cool: Vimeo now lets you add filters and music to your videos right on their site.

- My friends over at spoonsisters.com have a super crazy sale going on. 50% on everything. Use discount code: enjoy50.

- Amazon Launches ‘Send to Kindle’ Button For Web Developers & WordPress Blogs

- The fine folks at Happy Cog Austin are looking to hire an Interactive Designer.

- Analog is Heavy is a collection of wallpapers for sale by Able Parris, available for just a $2 bill.

- Handy: MacSafe Adapter Keyring (via)

- Where to dispose of one time use and rechargeable batteries in the US.

- Don’t overpay for shipping.

- Will Ferrell talking to Jeff Garlin for 90 minutes. Wonderful. (via)

- Thanks to Frank Chimero for introducing me to the Pony Mixer.

22 Mar 22:28

Whiskey Cocktails: Two New Drinks for Spring

by Online Editors

I don't know about your neck of the woods, but here in New York it hardly feels like spring yet. It's freezing today. It's supposed to be freezing all weekend. And Monday's forecast calls for snow. Nonetheless, I'm ready for spring—ready for the trout, the gobblers, and some fresh, seasonal flavors—and if that means I have to live in denial for another week or so, so be it.

As root vegetables and apples begin to give way to asparagus and strawberries in my kitchen, it's also time to refresh the cocktail menu with drinks that help me cool off rather than stay warm. Typically, gin is my go-to warm-weather spirit, but the good folks at George Dickel have shared a couple whiskey drinks that are perfect for spring.

Both cocktails called for Dickel No. 8, but I used Dickel Rye—because that's what I had in my cabinet, and because I love rye. If you're a fan of 7&7's, then you'll really like the Captain Obvious. The pinch of salt and the lime juice are a fine touch. This would be a wildly refreshing drink after a hot day on the bass lake. As for the "shake," the coupe—which the recipe calls for—is not doing it any favors. I think it makes the drink look fancier than it needs to be. Basically, this is a spin on a Mint Julep—a good one, I should add. And while I can't suggest you serve it in a julep cup—that'd be unforgivable—feel free to dress it down with some more casual barware.

Captain Obvious
- 1.5  oz. Dickel whiskey or rye
- Pinch kosher salt (or a pickle)
- 6 oz. 7-Up
- 2 lime wedges squeezed in

Build in a mixing glass with ice, stir, and pour in a Collins glass filled with ice.

Frozen Mint "Shake"
- 1.5 oz.  Dickel whiskey or rye
- .75 oz. Lime juice
- 1 oz. simple syrup
- Mint leaves
- 1 dash of Angostura bitters

Build in a blender, add ice cubes, and blend until think. Pour into a chilled coup and garnish with mint.

We're going to start covering more drinks on the blog. If there's anything you'd especially like to read and learn about, let us know in the comments.

22 Mar 22:27

Treehouse Taster: 3 Wildly Different Types of Tree Houses

by Urbanist
[ By WebUrbanist in Architecture & Houses & Residential. ]

tree houses

Regular readers will know that this site love tree houses of all types, but in researching articles a few have slipped through the cracks, their stories and histories unknown, yet the images of them are too amazing to go un-shown.

tree house steampunk style

organic huge tree house

These more mysterious examples come from a combination of Pinterest and Repinly, and range from pragmatic well-constructed residences to wild and overgrown structures that seem to have grown alongside the trees they surround, with a few derelict and deserted ones somewhere in between. Above are two examples that seem organically evolved, pieced together around the growth of their trees.

tree house real frame

Of the sturdily-constructed sort, this one looks like a regular small family home simply lodged in the branches of a big deciduous monster and bolstered by basic framing.

tree house multi story

tree house of fairy tales

Finally, the tree homes of fairy tales – these two magical examples show that plans are one thing, but fantasy is another – sometimes the tree is just a foil for boisterous expressions of amazing and spontaneous architecture.

Share on Facebook

[ By WebUrbanist in Architecture & Houses & Residential. ]

[ WebUrbanist | Archives | Galleries | Privacy | TOS ]


21 Mar 23:46

Buying in Bulk is Green

by Tiffany

food storage in ball jars 

One of the biggest environmental problems we face is packaging waste. For most of the public every shopping trip they take results in lots and lots of packaging…cereal boxes, cans or bags of nuts, bags of rice and beans, plastic milk jugs, etc. There are quite a few steps we can take to reduce our contribution to the packaging waste stream and one huge one is to simply eat real, local foods and not the processed foods that are more typically found in boxes and plastic bags. Yet there are always going to be exceptions. These might include your favorite cheese that comes wrapped in a thin layer of plastic or the almonds you buy from your local grocer that come in a plastic bag. Eating real foods as opposed to processed is a big step in the right direction but it might not help you eliminate as much packaging as you’d like to.

Think about all the resources (energy, water, money) used to make the packaging that ends up going straight to a landfill where it may or may not biodegrade (mostly not, if it’s plastic). What can we do besides eliminate all our food favorites that come in a package? Well, buying in bulk enables us to keep buying the products we love while simultaneously reducing the amount of packaging. You buy less often but in more quantity. This enables you to save money typically but also reduce the packaging by shocking amounts. For some data on just how much can be saved check out the Bulk is Green Council (BIG), a non-profit organization dedicated to promoting the environmental and economical benefits of natural and organic bulk foods. They have a report on their site with some figures that show just how big of an impact you can make if you buy all the coffee you need for a year or all the peanut butter you need, in one purchase. Here is an infographic with some of the stats:

Bulk is better

Tips for Buying in Bulk

  • Shop the bulk bins at your local grocer as much as possible
  • Fill muslin  or cotton produce bags with loose rice, beans, cereal, flour, grains, seeds, nuts, etc.
  • Purchase foods from co-ops in large amounts (10-25 gallons or more)
  • Use a freezer & dehyrator to preserve foods so that you can buy in more quantity
  • Bring your own buckets, jars, bags, etc to your local farmers and farmer’s markets and stock up
  • Use large mason jars for storage
  • Use small stainless tins for loose spices and herbs
  • Shop your own pantry and use up what you have before buying new
  • Budget for large quarterly “bulk” grocery bills as opposed to weekly/monthly bills
  • Buy up-wrapped “wheels” of cheese instead of cut sections wrapped in plastic

If you are ready to make the commitment to do better about buying in bulk then you may want to sign the Love Bulk Foods pledge. They will be awarding bulk good gift baskets throughout the month of April to random people who have taken the pledge.

20 Mar 21:54

Dita’s Gown: A 3D Printed Dress

by Caroline Williamson

Ditas Gown: A 3D Printed Dress in technology style fashion art Category

I’ve witnessed many amazing things that come from the magic of 3D printing, but never in a million years would I imagine it transposing to the fashion world. Leave it to 3D master Francis Bitonti to make it a reality in this collaboration, Dita’s Gown, with designer Michael Schmidt Studios and Shapeways, one of the pioneers in the 3D printing world.

Ditas Gown: A 3D Printed Dress in technology style fashion art Category

Recently debuting on Dita Von Teese, the dress was created virtually with Schmidt designing it exclusively on his iPad and communicating with Bitonti via Skype. The process included the printing of 17 pieces and 3,000 joints that allow the dress to move as the body does. Shapeways did the printing of each piece and once complete, they were lacquered black and detailed with 13,000 black Swarovski crystals.

Ditas Gown: A 3D Printed Dress in technology style fashion art Category

The results are a curvy, meticulously designed dress that flows with the body. Awesome, right?

Photos by Albert Sanchez Photography.


Share This: Twitter | Facebook | Discover more great design by following Design Milk on Twitter and Facebook.
© 2013 Design Milk | Posted by Caroline in Art, Style + Fashion, Technology | Permalink | 1 comment

20 Mar 21:52

100 Years Later by Maico Akiba

by Johnny

maico akiba 100 years later (1)all images courtesy maico akiba

While we’re on the topic of corrosion, I want to showcase the work of Maico Akiba: illustrator, sculptor and frequent collaborator with Yusuke Kagari. When she’s not illustrating children’s books she spends her time on an ongoing project called 100 Years Later, in which she uses her painting skills to apply what she refers to as a coat of “aging paint.”

The concept is pretty straightforward – imagining what everyday items might look like in 100 years. In an apocalyptic kind of way. The realness of her paints are mind-boggling.

maico akiba 100 years later (7)

maico akiba 100 years later (6)maico akiba 100 years later (5)

maico akiba 100 years later (8)

maico akiba 100 years later (9)maico akiba 100 years later (2)

maico akiba 100 years later (3)

maico akiba 100 years later (4)


20 Mar 01:28

Survival Gear Review: Emmrod Fishing Pole

by Joel

Survival Fishing Pole Review

I do a lot of hiking in the back-country of Colorado and come across a lot of small streams and lakes.  I always thought it would be great to have a small, lightweight rod and reel to fish for trout while I’m exploring.  My wait is over.

By Murphy, a contributing author of SurvivalCache.com

Forge Survival Supply recently decided to pick up the line of Emmrod Compact Fishing Poles on the advice of a reader of Survival Fishing Pole ReviewSurvival Cache, who is a big fan of the Emmrod poles.  I decided to try the Emmrod compact fishing system for myself, specifically the Spinning Packrod.  The rod comes in two pieces; the handle and reel seat, and the rod tip section.  Disassembled it is 14″ in length and assembled it is 23″ long.  The rod has an aluminum tubing skeleton with a cork grip and reel seat.  The tip is made of stainless steel with a 6 coil spring rated for fish up to 10 lbs.  Interchangeable tip sections are available, so you can match the action of the tip to the size of fish you are fishing for!

Putting It Together

Tip sections range from 2 lb fish up to 150 lb fish.  To assemble the rod you “Simply” slide the tip section into the end of the handle section and push in until the rod stops.  Then rotate it 90 degrees and release.  The rod is now locked in place.  I say “Simply”, because it is not that easy to do.  It actually takes a bit of strength to push in and rotate.  To disassemble, just reverse the process.  After doing it a few times you get the hang of it and it becomes less awkward.  You can put the tip section in two different positions depending on the reel you plan on using.  With the tip-top facing down you can use a spin casting reel and with the tip-top facing up you can use a bait casting reel.

Survival Fishing Pole Review

This Packrod comes with the reel of your choice.  I prefer a spin casting reel.  The reel is made by Shakespere.  It has an on/off anti-reverse switch, a multi-disc drag system and a right or left hand retrieve, allowing you to position the handle on either side of the reel.  It also comes with line already attached to the spool.  Although, I am not sure what (lbs) test the line is that it comes with the packrod, it seemed sufficient for the fishing I was doing.

Does It Work?

When casting with a lure, it casts nicely and everything seemed to work just fine.  I tried setting it up two ways; one with the Survival Fishing Pole fishing line going through the coils, and the other with the fishing line NOT going through the coils and only through the tip-top.  Both ways had the same results.  Sometimes the fishing line would wrap around a couple of the coils in the rod tip section when casting.  Not enough to affect the function of the rod, but something to be aware of.

I did not catch any fish on the two back country fishing trips in which I tried this rod.  So, I’m not sure how the action is, YET, but that’s how it goes sometimes.  Like my father-n-law always says “The fishing was great, but the catching wasn’t so hot!”  I will continue my search for trout and the Emmrod will be there when I do.  With it’s compact size and weight there is no doubt that the Emmrod can find its way into your Bug Out Bag.

More information is available at Emmrod’s Website (Click Here)

All Photos by the SurvivalCache.com Team

Support SurvivalCache.com by shopping @ Amazon (Click Here)

Visit Sponsors of SurvivalCache.com

20 Mar 01:24

Bug Out Bag Meals: DYI MREs

by Guest Blogger

DSCN1833 300x225 Bug Out Bag Meals: DYI MREs
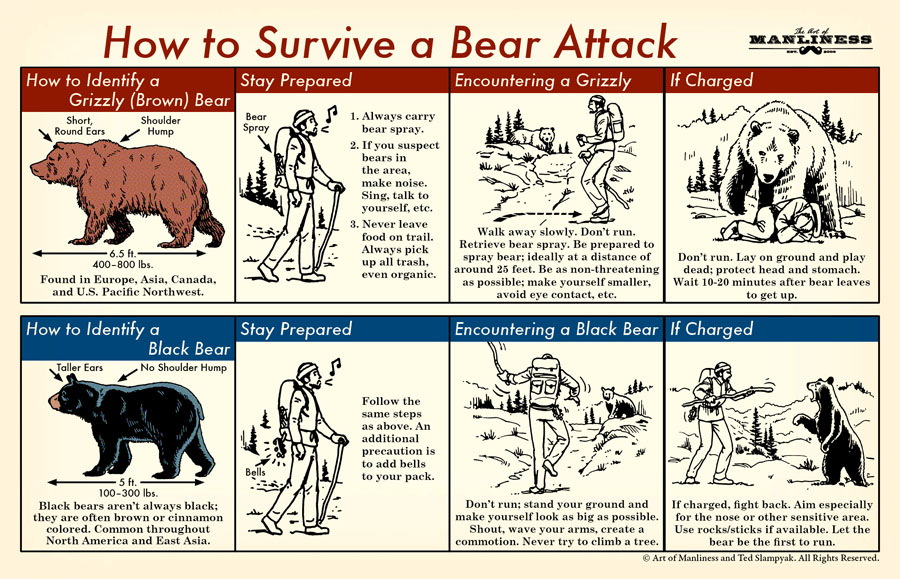
This guest post by Bam Bam and entry in our non-fiction writing contest.

My dh got me a food saver yesterday and I have wasted no time putting it to use. The first project was to seal up 25 lbs. of NY Strip that I bought on sale. The second project, the subject of this article, was to put together some shelf stable meals for our BOBs. The requirements were that the meals had to be nutritiously balanced and significantly cheaper than MREs. And I wanted the foods to be as close to our ordinary diet as possible so we don’t suffer digestive shock.

I got the inexpensive part down—the meals averaged out to about $3.33 per meal (for one person) with the dinners being slightly more expensive than breakfasts or lunches. The nutritious part still needs work. The inexpensive part was achieved largely by shopping at the dollar store and buying things from Publix BOGO.

For example, I purchased Monet crackers at the dollar store for less than half the price of our grocery store—same brand, same size, half price. To improve upon the nutritious part I plan on replacing the processed food with food from my garden that I dehydrate myself. This is going to be my next big step in meal planning—to take the meals in a jar idea to an all-new level.

(It is absolutely true that there is a learning curve to prepping. You start out by buying stuff that you will need. Then you refine your inventory and get into long-term food storage items. Then you actually learn to make/grow the stuff yourself and how to process it for long-term storage.)

I came up with some ideas that are worth sharing. The best breakfast idea I came up with is to put our regular cereal (Honey Bunches of Oats) into a food saver bag, and add dehydrated banana chips (another dollar store find) and two tablespoons of powdered milk. We can just add water to the bag, stir and eat right from the bag. (What I really want to do is learn to make my own granola from Mormon oatmeal, and then make my own trail mix and food saver that.)

DSCN1838 300x225 Bug Out Bag Meals: DYI MREs

Breakfast

The other important breakfast idea was to include Emergen-C Super Orange electrolyte replacement packets. You pour the packets into a cup of water and drink. I live in Florida and it is very easy to get dehydrated and loose electrolytes. I have also included salt and sugar packets in each meal. (This combo is known as “poor man’s Gatoraid.)

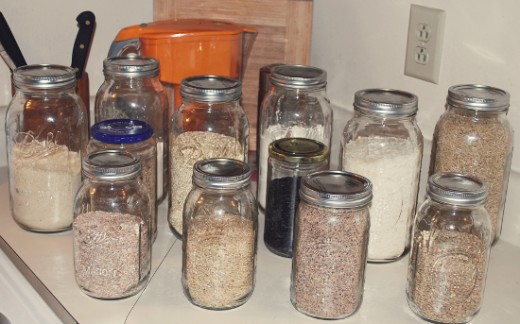
Lunch was more of a challenge. I opted to go with foil packs of premade tuna or chicken salad. (I got these on sale at Publix.) Then I placed individual servings of crackers in food saver bags and sealed them up. (Note: If you have a Food Saver you don’t have to buy the expensive pilot crackers for Emergency Essentials—you can buy cheap dollar store crackers and seal them up—no oxygen, no going stale.) The other lunch option was Top Ramen and canned chicken. I would like to get some freeze-dried veggies to add to the mix. (My dehydrator will be going full speed this year.)

For dinners I planned either Bear Creek chili with crackers or Korr Sides. The Korr sides are somewhat nutritious (they at least have green specks that resemble broccoli) but they take 15 minutes to cook. I am thinking that I can improve upon the Korr Sides by dehydrating my own veggies and adding minute rice and a bullion cube. I have planned on supplementing the Korr Sides with canned chicken.

In the future, I would like to dehydrate my own chicken. I think this would give me more versatility. I have 80 lbs. of Zaycon Food boneless, skinless chicken breast (antibiotic free and hormone free) on the way (for $1.79 lb. – Whoot! Whoot!). I want to try my hand at cooking and dehydrating my own chicken.

DSCN1841 300x225 Bug Out Bag Meals: DYI MREs

Lunch

Each meal is individually vacuum sealed so as to save space. Each meal contains eating utensils, extra napkins, salt and pepper, a drink mix packet and an individually wrapped wet wipe. I have added to the calorie count of meals by adding granola bars, power bars and Cliff bars. The lunches and dinners also have desserts: cookies, candy, chocolate bars, and brownies. I have not included gum in any of the meal bags, as we have gum packed in our BOBs already.

In terms of calories, I have tried to make each meal at least 800 calories. If we do have to bug out (hopefully in the vehicles so we don’t have to carry all this food on our backs), we will likely be under considerable stress. Having plenty of food is a good idea. It is very likely that we will encounter good Christian folk who need help; so having a little extra will be a good thing.

These meals will be supplemented with boxes of water and we have Berkey Sport water filters. If we are traveling by vehicle, we will have cases of water.

A central problem with this meal plan is cooking planning or rather fuel planning. (If we can remain at home, our preferred option, cooking will not be an issue as we have a gas stove and a propane camping stove with extra propane tanks (and the converter necessary to run a camping stove from a large tank of propane). And we have a forest behind our house for long term cooking needs.) If we bug out, cooking will be an issue. I can warm water for the coffee, oatmeal and grits using a candle and a camp cup. I have some fire bricks for cooking that are supposed to last half an hour. But I have not tested these yet. Another possibility is the cat food container stove fueled by alcohol. If we are forced to bug out, I need to come up with a better way to cook the Korr Sides.

Do you all have any recommendations?

Below are the meal bags I have put together: breakfast, lunch and dinner for three days for the two of us. Since diversity is essential, I would love to hear your ideas. What food items do you have in your BOB? How do you plan to cook these items?

Since getting my hands on a food saver, I have come to an appreciation of a whole new level of prepping. Before I got the food saver, our BOBs contained mostly snack foods—peanuts, jerky, granola bars, etc. But I would not want to be around myself if I hadn’t eaten a meal in three days. I don’t think my dh would want to be around me either. So my new focus will be on improving the nutrition of our BOB meals. It would be nice to reduce some of the weight as well. I would estimate that our meal bag weighs 25 lbs. I have some 5-gallon buckets that I am going to clean out. I will put our BOB meals in easy-to-carry buckets.

The next step in meal planning will be to pack meals for our dog and our four cats. I think we are going to need a separate BOB for our pets. That is on the “To Do List” for next week. Check list: canned cat food, dry cat food, dog food, dog cookies, and catnip to keep my cats totally stoned out of their minds. LOL

What do you think?

Breakfast

Day 1

  • Oatmeal (3 packets)
  • Granola Bar
  • Yogurt Bar
  • Coffee (Folgers Singles)
  • Sugar packets
  • Electrolyte replacement drink packet (Emergen-C)

Hard candy

Day 2

  • Grits (3 packets)
  • Granola Bar
  • Yogurt Bar
  • Coffee
  • Sugar packets
  • Electrolyte replacement drink packet
  • Hard candy

Day 3

  • Cereal (with banana chips and milk powder)
  • Granola Bar
  • Yogurt Bar
  • Coffee
  • Sugar packets
  • Electrolyte replacement drink packet
  • Hard candy

Lunch

Day 1

  • Tuna salad foil pack
  • Crackers
  • Chicken Noodle Soup (packet)
  • Power bar
  • Raspberry tea packet
  • Hard candy
  • Fun sized chocolate bars

Day 2

  • Chicken salad foil pack
  • Crackers
  • Chicken noodle soup (packet)
  • Power bar
  • Raspberry tea packet
  • Hard candy
  • Fun sized chocolate bars

Day 3

  • Tuna salad foil pack
  • Crackers
  • Top Ramen
  • Lemon aid packet
  • Freeze dried pineapple
  • Power bar
  • Hard candy
  • Fun sized chocolate bars

Dinner

Day 1

  • Korr Sides: Rice and Broccoli
  • Canned chicken
  • Crackers
  • Raspberry tea
  • Fun sized chocolate bars
  • Cookies

Day 2

  • Bear Creek Chili
  • Crackers
  • Beef jerky
  • Raspberry tea packet
  • Fun sized chocolate bars
  • Cookies

Day 3

  • Korr Sides: Noodles and Broccoli
  • Canned chicken
  • Crackers
  • Raspberry tea packet
  • Fun sized chocolate bars
  • Brownies

This contest will end on April 22 2013  – prizes include:

Well what are you waiting for – email your entries today. But please read the rules that are listed below first…  Bug Out Bag Meals: DYI MREs

Also be sure to check out the Preppers Cookbook – the Preppers Cookbook was a joint effort by Wolf Pack members that sent in their best recipes and food prep information and then that information was edited and put together by Bam Bam into a 160+ page cookbook. You can find it here – scroll down the page, you’ll find it near the bottom.


Originally at : The Survivalist Blog.net · Copyright © 2013 · All Rights Reserved.
CSW 190x60ad PROOF Bug Out Bag Meals: DYI MREs

20 Mar 01:22

FSS Council Tool Boy's Axe (Forestery Service Edition)

by OutdoorEnvy
Greetings Axe folk,  I finally received my Council Tool FSS Boy's Axe.  After a shipping mix up I didn't know if I would ever get it.  But I did.  Well this is literally just an out of box first impression look. 


head alignment was perfect and the head was hung very well.  No gaps and was seated firmly.


Grain was as bad as gets, horizontal as you can tell.  I would have obviously preferred vertical but will use this as is and see how it does.  There wasn't a run out in the grain and if it does break I'll just re-hang with a new handle.  So maybe an experiment of sorts.  I honestly think it will last quite a while the way it is.


I ordered this from Omaha Knife and they have a sharpening service but I did not order it.  This axe looks to have an after factory sharpening to me.  And my cutting test seemed to confirm this as it shaved hair and cut coupon paper with ease.  I'm certainly not complaining


 Well I plan to review this axe after using it some.  The folks at Rocky Mountain Bushcraft did a quick review you can see here.  I had been looking at this axe for quite a while and after seeing their review and talking to them about it I knew I'd have to try it.  My thoughts are pretty inline with there's at this point.  The paint on this head doesn't seem as thick as the other Council axe I've handled.  It's not globbed on the head.  It almost looks like someone made an effort to wipe it for a clean uniformity over it.  The handle itself has a thin lacquer applied to it.  Again it's not over done and actually feels alright.  I wish I had reference of a regular Council Boy's Axe for a real comparison and to see if this is worth the extra money.  The handle on this axe really is great.  It's thinner than any axe I've purchased in this size range.  It has a vintage feel to it.  Well for a while I'm going to use this axe as is.  I think that will be a more fair way to review it so no modifications will impact my thoughts on it.  I may strip the paint and sand the lacquer off down the road.  I'll just see how it goes with use.  For now though I am pleased and feel it's more than worth the $44.95 I paid for it.  shipping from Omaha Knife is $5, so for less than $50 to my door I am quite happy at this point.  The real opinion is yet to come.  So stay tuned...