Shared posts

25 Jul 23:32

Have You Noticed That John Barrowman Has Kissed, Licked or Groped All Your Favorite People?

by Stubby the Rocket

John Barrowman, Nathan FillionJohn Barrowman said in an interview that he often is asked to hold people’s hands on airplanes because they’re afraid to fly—and apparently are unaware that he’s terrified, too. It’s easy to forget sometimes that the actors who play characters we adore aren’t their beloved alter egos, and we can only imagine the requests made when you’re primarily known for being a super-suave ex-time agent from the 51st century who can never die.

Of course, there are ways in which John Barrowman might actually be Captain Jack Harkness. Like his habit of getting friendly with loads of fabulous beings from all across the globe. We have all the evidence you’ll ever need right here:

[He has kissed the Tenth Doctor, by the way. He fainted.]

Read the full article

20 Jul 03:07

How to Make a Knife from an Old Saw Blade

by Darren Bush

DSC_6344

Making a knife is a satisfying project on a number of levels. You’re creating a fundamental tool — one of the first tools ever made — and every time you pick it up, you’ll think, “Wow, I made this with my own hands.” And because you’re making the knife, you’ll be able to adjust its shape to fit your specific needs. The trickiest part of making a knife is the blade. If you have a forge handy, and can get your hands on some good tool steel, that’s great. If you don’t, you can still make a knife using an old Appalachian trick: recycling. That’s what we’ll do in this project.

Old saw blades are almost always made from high quality steel. You can find them in abundance at swap meets, garage sales, rummage sales, etc. The biggest advantage of using an old saw is the lack of metallurgy you need to do. The blade is already the right hardness for holding an edge, so you don’t need to treat the steel to make it a good knife. However, blanks cut from the saw are sometimes a little too flexible, but you can work around (or with) it.

The steel in this handmade knife will not be super-hard. This is not ideal because your knife will lose its edge quickly if you try to hack through wood, slice cardboard, or use it as a screwdriver. But, the good thing about softer steel is that you can bring it back to a razor-sharp edge with a few strokes of a sharpening stone. I actually prefer softer steel as I like a keen edge, and I carry a small sharpening stone with me. If you can shave your arm hair, your knife is sharp enough.

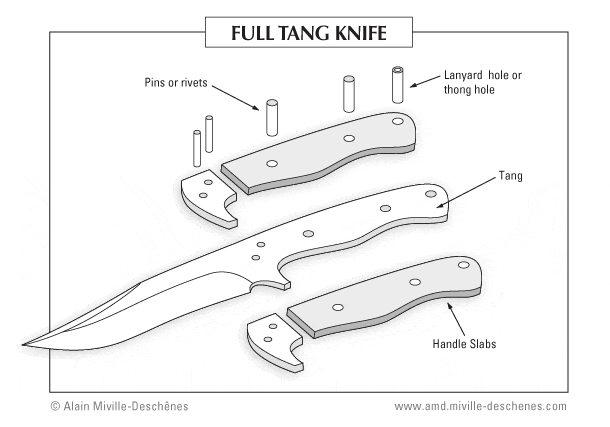
A knife can take many different forms and styles. In this project, we’re going to make what’s called a full-tang knife, meaning that the blade extends its full length into the handgrip of the knife. A partial tang extends only partially into the handle. A full-tang knife is, in my opinion, the easiest way to start making knives. It also produces a solid, sturdy knife that is less likely to break off at the handle.
full-tang-knife

Be nice to your knife and it will serve you well.

Materials List

  • Old saw blade
  • Thin cardboard manila file folder
  • Pencil
  • Scissors
  • Chalk or soapstone
  • Cold chisel
  • Hammer to drive the chisel
  • Sturdy piece of metal plate to use under your work
  • Metal files (coarse and fine)
  • Wire brush
  • Coarse (00) steel wool
  • Light oil (3-in-1 or gun oil)
  • Acetone
  • Cloth rags
  • Vise
  • C-clamps
  • Hardwood (oak, maple, cherry, etc.) for handle scales
  • Handsaw (Japanese pull saw preferred) if you’re cutting your own scales
  • Two-part Epoxy (slow-cure)
  • 3/16″ brass rod
  • Power drill
  • 3/16” sharp metal drill bit
  • Ball-pein hammer
  • Duct tape
  • 4-in-hand or a patternmaker’s rasp
  • Sandpaper (80 and 150-grit)
  • Cabinet scraper (optional)
  • Sharpening system of some sort
  • Ear plugs or hearing protection earmuffs

How to Make the Knife

Step 1: Prepare your pattern.
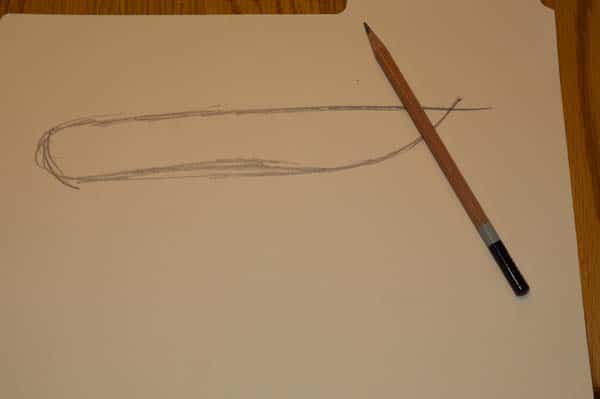
Step 1: Prepare your pattern. Your knife; your pattern! You can use an existing knife and trace it onto the cardboard, or you can design your own. In this case, I’m designing my own shape based on an old knife used by folks from the fur trade. Use a French curve to make sure your curves are consistent and more importantly, pretty. It’s a universal truth that a pretty shape in a tool or knife is a good shape.

Your knife; your pattern! You can use an existing knife and trace it onto the cardboard, or you can design your own. In this case, I’m designing my own shape based on an old knife used by folks from the fur trade. Use a French curve to make sure your curves are consistent and more importantly, pretty. It’s a universal truth that a pretty shape in a tool or knife is a good shape. When you get to the point that you’re happy with your shape, cut it out with a pair of scissors. In my knife design, I didn’t include a bolster or fingerguard like in the illustration above.

Step 2: Transfer the design to your metal stock.
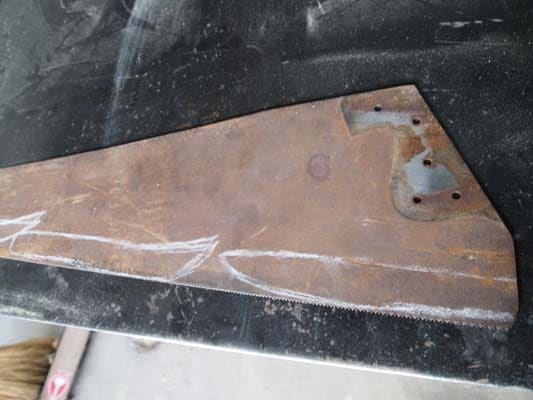
Step 2: Transfer the design to your metal stock. Using a piece of chalk or soapstone, trace your pattern onto the old saw blade. It doesn’t have to be perfect, as you will be using your eyes as you go, and you will be filing away any imperfections.

Using a piece of chalk or soapstone, trace your pattern onto the old saw blade. It doesn’t have to be perfect, as you will be using your eyes as you go, and you will be filing away any imperfections.

Step 3: Score the outline of your blade.
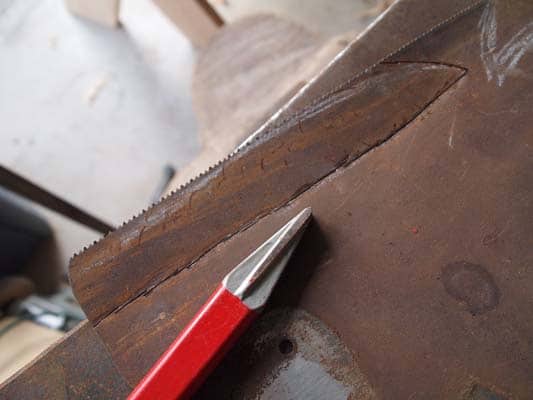
Step 3: Score the outline of your blade. Before you start this step, put on your hearing protection and place a large piece of metal plate under your metal stock. If you have an anvil, don’t work directly on it, as you would be driving hardened steel onto hardened steel. Something’s gotta give, and you really don’t want that something to break off the chisel and imbed itself in your body somewhere.

Before you start this step, put on your hearing protection and place a large piece of metal plate under your metal stock. If you have an anvil, don’t work directly on it, as you would be driving hardened steel onto hardened steel. Something’s gotta give, and you really don’t want that something to break off the chisel and imbed itself in your body somewhere.

Line up your chisel with your chalk line, take a deep breath and give it a good whack. It may not cut all the way through the blade, but the score it makes will suffice for now. Overlap the chisel marks as you work around the outline so there is one solid line, not a series of dashes. Take your time.

Step 4: Bust out the blade.
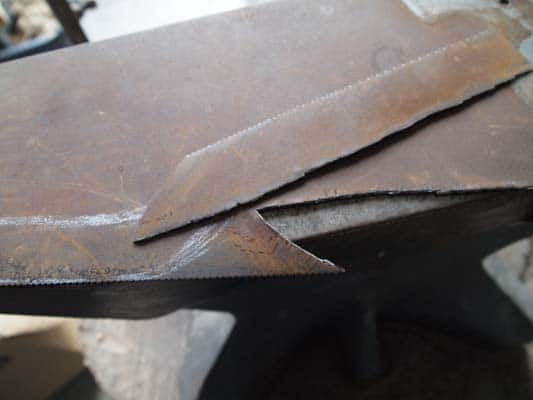
Step 4: Bust out the blade. Creating a sheer is what breaks the metal. I do this by placing the metal over the edge of an anvil and striking it with a hammer as close the scored line and the anvil as I can. If you don’t have an anvil, put your saw blade in a vise and tap the blade as close to the cut line as you can. If you did the chisel work well your knife blade should pop right out of the metal.

Creating a sheer is what breaks the metal. I do this by placing the metal over the edge of an anvil and striking it with a hammer as close the scored line and the anvil as I can. If you don’t have an anvil, put your saw blade in a vise and tap the blade as close to the cut line as you can. If you did the chisel work well your knife blade should pop right out of the metal.

Step 5: File the blade to shape.
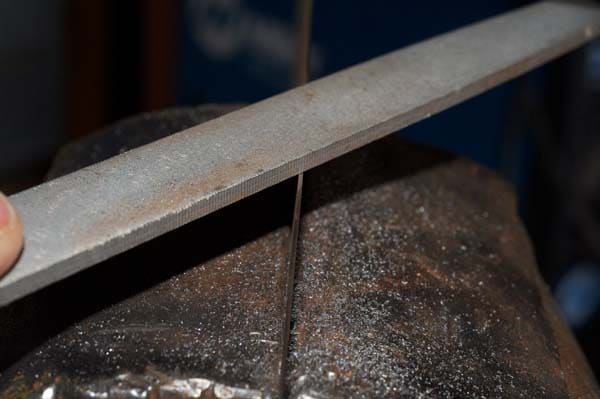
The chisel doesn’t leave the best edge, so you’ll need to dress up the piece with a file. For this step, it’s important to remember that sheet metal is resonant (that’s why people play hand saws with a violin bow). The sound of filing a piece of sheet metal is one of true torture. Minimize this by clamping the blade as close the vise as you can and be sure to wear your hearing protection.

Note: Do not attempt to put an edge on your knife yet. The edge should be perpendicular to the sides of the blade. Look for a consistent stripe the width of the blade. That tells you you’re ready for the next step.

Step 6: Start the handle.
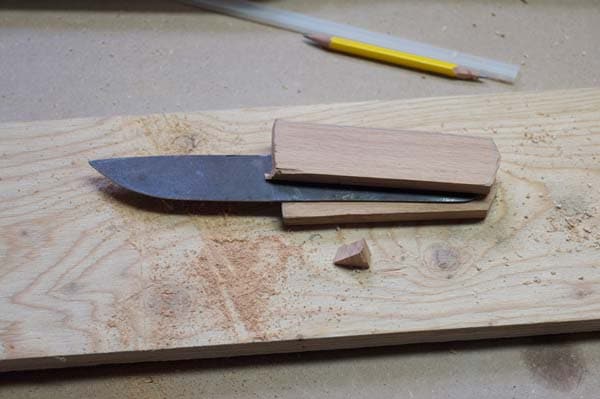
Step 6: Start the handle. We’re making a full-tang knife, which means the blade edge will be visible all the way around the handle. We’ll do this by adding a scale of wood to each side of the handle. (A scale is a flat piece of wood, bone, or some other material that will create the handle.) You can purchase pre-made scales or make your own. In this instance I’m making my own scales out of a few slats of oak trim I had laying around. Trace the outline of your blade on to your wood stock two times to create the shape of two scales. Then cut them out.

We’re making a full-tang knife, which means the blade edge will be visible all the way around the handle. We’ll do this by adding a scale of wood to each side of the handle. (A scale is a flat piece of wood, bone, or some other material that will create the handle.) You can purchase pre-made scales or make your own. In this instance I’m making my own scales out of a few slats of oak trim I had laying around. Trace the outline of your blade on to your wood stock two times to create the shape of two scales. Then cut them out.

Step 7: Clean and polish your blank.
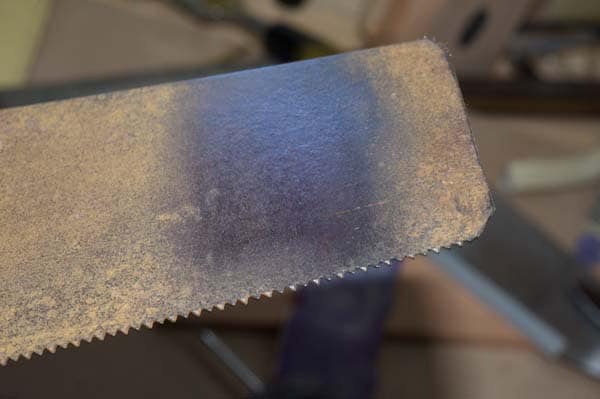
Step 7: Clean your blade. Clean the handle portion of your blank with steel wool and a little light oil (gun oil or 3-in-1 works great). After it’s clean (but not necessarily completely shiny), clean off the blank with some acetone to remove all traces of oil. Mixing oil and epoxy doesn’t work. You can get an idea of what the metal looks like from this image.

Clean your blank with steel wool and a little light oil (gun oil or 3-in-1 works great). After it’s clean (but not necessarily completely shiny), clean off the blank with some acetone to remove all traces of oil. Mixing oil and epoxy doesn’t work. You can get an idea of what the metal looks like from this image. Remember, no oils left or your scales won’t bond to the blank. You can do as much or as little as you want with this step. If you want your knife to have a more rustic look, use a little oil and steel wool (00, or double-aught, which means double zero). Steel wool comes in 00, 000, and 0000. The quadruple aught is used for fine polishing such as removing rust from a gun barrel. The 00 is fine for a knife, unless you’re really meticulous. I prefer to leave a little color in this type of rustic knife.

Step 8: Set up for your rivets.
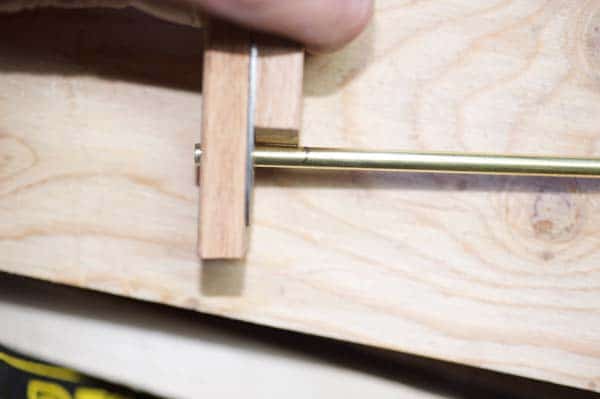
Step 8: Set up for your rivets. Rivets are attractive and will strengthen your knife. Do it right and you wouldn't need epoxy, but I like belts and suspenders.

Rivets are attractive and will strengthen your knife. Do it right and you wouldn’t need epoxy, but I like belts and suspenders.

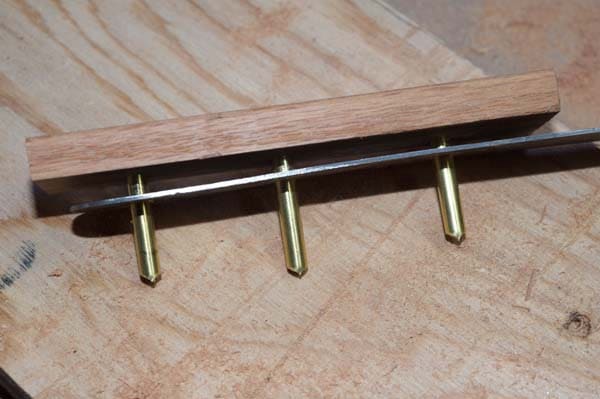
You will end up with three rivets through your knife blade. Start by drilling a hole through the tang, and line up one of your scales with the handle and drill through the scale. Make sure you are backing your scale with a piece of scrap plywood so it doesn’t split out when you drill through. Insert the rod through the tang and through the scale, plus 1/8″ as shown above. That’s where you want to end up eventually.

Put your second scale against the blade, add about 1/8″, and mark it with a pencil. You’ll use this later.

Do this two more times, and you should have one scale with holes, a blade with holes, and one scale without holes. Pull the rod from the holes if it’s still there, and use the blade as a template to mark the holes on the scale without holes. Make sure you’re drilling into the backside of the scale with the scale oriented properly (point end toward the point).

Now reinsert the rod into the first hole on the outside of the first scale, through the handle, and through the backside of the scale you just drilled. It should be tight with your 1/4″ marking still 1/4″ from the surface of the scale. If it’s right, great; cut it off with a hacksaw and insert the rod in the next hole. If make take a bit of fussing to get it right, and if you need to drill a little to make things line up, go for it. Just try to keep the wood holes round. Once that one is in, go to the next hole closest to the blade, and repeat the process. Now separate the scales from the blade, leaving the rods in. A screwdriver or a knife can help.

Step 9: Attach your scales to your knife.
Step 9: Attach your scales to your knife. Mix a little two-part epoxy, about the size of a half-dollar, and spread it on one side of the knife blank. (Do not use five-minute epoxy. It’s weak and doesn’t give you time to work.) Place a scale on the epoxy. Repeat this process on the other side of the blade. Now slide your scales back on the knife blade and tap into place. You might have to use an open vise to allow you to tap the scales into place, but they should go on fairly easily.
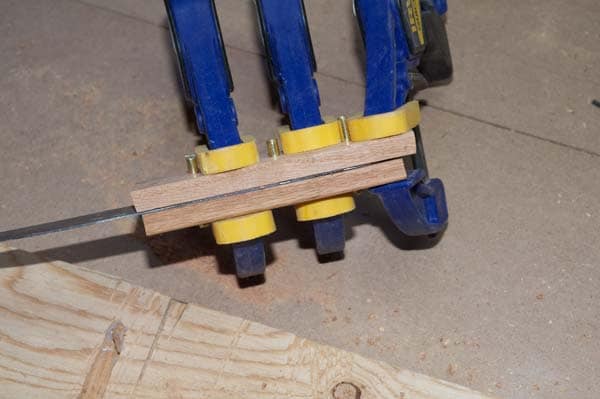
Mix a little two-part epoxy, about the size of a half-dollar, and spread it on one side of the knife blank. (Do not use five-minute epoxy. It’s weak and doesn’t give you time to work.) Place a scale on the epoxy. Repeat this process on the other side of the blade.

Now slide your scales back on the knife blade and tap into place. You might have to use an open vise to allow you to tap the scales into place, but they should go on fairly easily.

After both scales are attached and you’re confident the scales are in the right place, put a clamp or two on the scales and tighten until you see a little epoxy bead form along the edge between the scale and the knife blank. This is called squeeze-out and is a sign that you have a good bond. Once it oozes, stop clamping. You want a little epoxy in the space. Note that there's a LOT more rod sticking out than 1/8". That's because I didn't know how much I would need for a rivet, so there's more like 1/4" or more on each side.

After both scales are attached and you’re confident the scales are in the right place, put a clamp or two on the scales and tighten until you see a little epoxy bead form along the edge between the scale and the knife blank. This is called squeeze-out and is a sign that you have a good bond. Once it oozes, stop clamping. You want a little epoxy in the space.

Note that there’s a LOT more rod sticking out than 1/8″. That’s because I didn’t know how much I would need for a rivet, so there’s more like 1/4″ or more on each side.
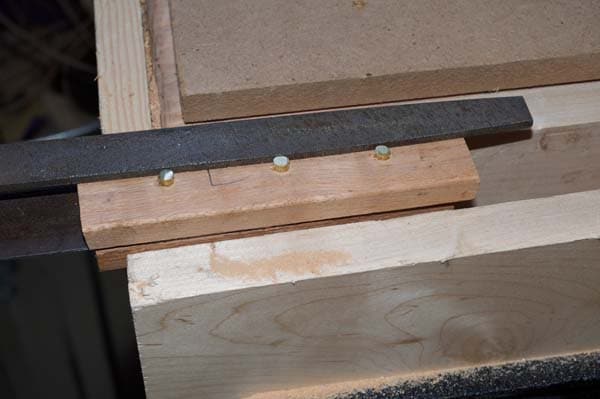
I dealt with the excess rod by filing it off. It's soft so it didn't take much.

I dealt with the excess rod by filing it off. It’s soft so it didn’t take much. Of course, you were smarter than me and benefited from my experience. You won’t have to do this.

Step 10: Pein your rivets.
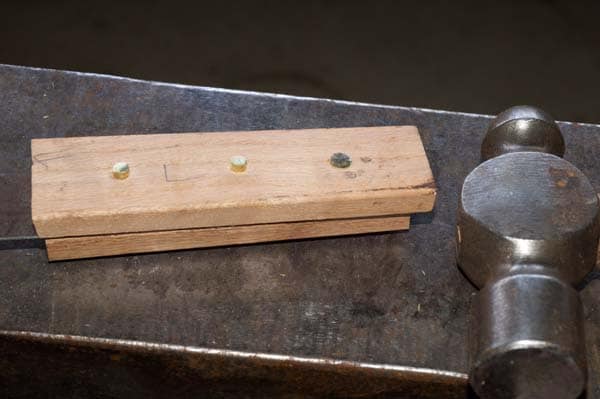
Step 9: Pein your rivets

The worst part about building things by yourself is that sometimes you can’t take pictures of a particular step. So I will be as descriptive as possible. Place your knife on a hard surface such as a metal plate or an anvil if you’re lucky enough to have one or know someone that does. Using the round side of a ball pein hammer (it’s called a pein for a reason), tap your brass rod, moving the hits in a slight circular motion, not hitting the rod straight in the middle. This allows the metal to mushroom a little bit. Pein your rivet for a few minutes, turn your knife over and repeat. If the rods don’t appear to be equal on each side, tap the rod so it sticks out a little more on the other side.

Continue to tap, turning the knife often as the rods (now rivets) approach the handle. As the rivet touches the scales, tap a little harder and recess (slightly) the rivets. Keep going and do the other two.

Step 11: Shape and sand the handle. 
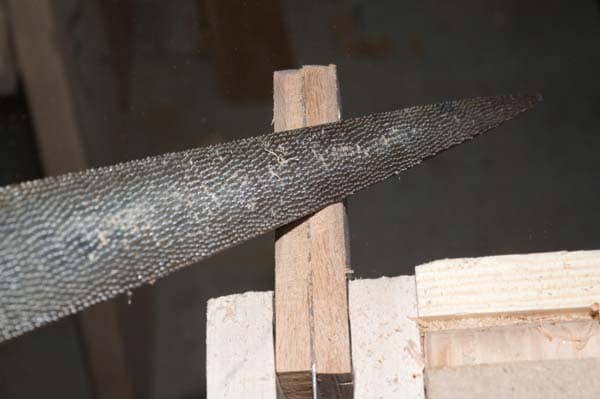
Step 10: Shape the handle. Clamp the handle in a vise and begin shaping your handle. There’s no set way to do this, but I find a 4-in-hand or patternmaker’s rasp works great. Take it easy, running the file mostly up and down at a 45 degree angle to the blade. Work slowly. If you get to close to the blade with your rasp you can dull the rasp.

Clamp the handle in a vise and begin shaping your handle. There’s no set way to do this, but I find a 4-in-hand or patternmaker’s rasp works great. Take it easy, running the file mostly up and down at a 45 degree angle to the blade. Work slowly. If you get to close to the blade with your rasp you can dull the rasp.

As you continue to shape with your rasp, check the handle frequently to make sure it is symmetrical and fits your hand nicely. Go slow; it’s easier to take off than put back.

When your handle is the shape you want, sand it with a heavier grit sandpaper (80 or so), then gradually use finer and finer grits until the handle is a smooth as you want it to be. Go ahead and sand your rivet heads to flatten them a little too. The metal is soft and the sandpaper will cut the metal just fine.

When sanding wood, you can tell you’re ready for the next finer grit when you can see no sanding marks from the previous grit. In other words, when you go to a 120 or 150-grit from an 80-grit, you should see no sanding marks that are from the 80-grit. If you move to finer grit too quickly, you’ll have more work to do when you step down for the next sanding.

Step 12: Finish your handle.
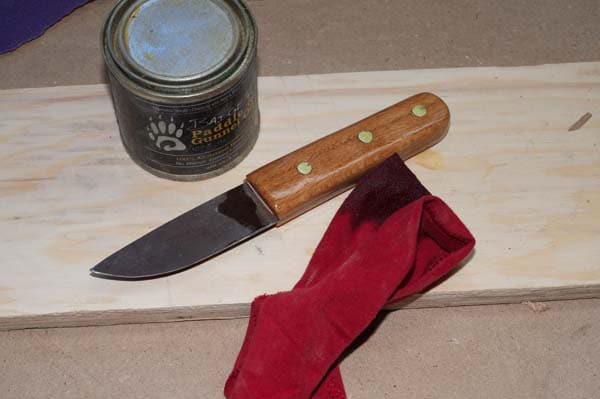
I like oiled finishes, so I used a hempseed oil to finish the handle. You can use whatever suits your fancy.

I like oiled finishes, so I used a hempseed oil to finish the handle. You can use whatever suits your fancy. The more coats of oil, the richer the look and you’ll be providing a lot of protection to your wood.

Step 13: Sharpen your blade.
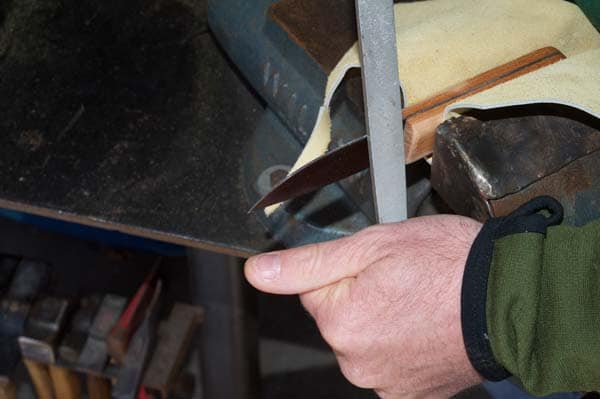
Wrap cardboard or leather around your finely sanded handle and secure with duct tape. Clamp the knife handle in your vise with the edge to be sharpened facing up. Put on your hearing protection. Using a file, start filing up and down the blade edges, holding the file at an approximately 20–22 degree angle to the blade. Visualize this distance by cutting a 45-degree angle in half. Do not drag the file, as it only cuts on the pushing stroke. Don’t file in one spot too much or you’ll create a low spot, which means a do-over if you want a good, true edge.
Wrap cardboard or leather around your finely sanded handle and secure with duct tape. Clamp the knife handle in your vise with the edge to be sharpened facing up. Put on your safety glasses and hearing protection. Using a file, start filing up and down the blade edges, holding the file at an approximately 20–22 degree angle to the blade. Visualize this distance by cutting a 45-degree angle in half. Do not drag the file, as it only cuts on the pushing stroke. Don’t file in one spot too much or you’ll create a low spot, which means a do-over if you want a good, true edge.

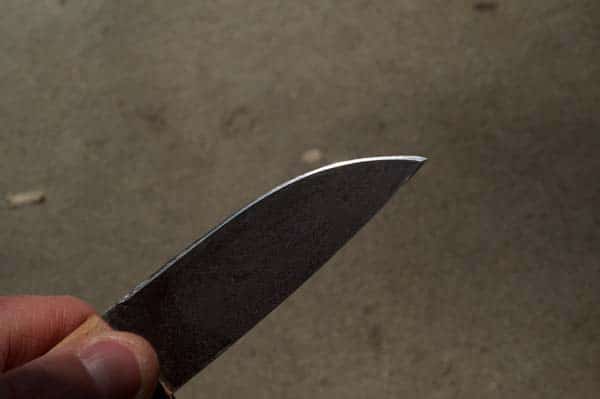
Do a few strokes on one side, then on the other. You’ll see your nice flat edge disappear as you remove metal. Watching this edge is a good indicator of how even your filing is. Most people (myself included) tend to screw up the tip by either not filing it enough, or letting the angle drift toward 25…28…30… Be careful and go slow. Stop when you have a filed edge that looks clean and straight.

Do a few strokes on one side, then on the other. You’ll see your nice flat edge disappear as you remove metal. Watching this edge is a good indicator of how even your filing is. Most people (myself included) tend to screw up the tip by either not filing it enough, or letting the angle drift toward 25…28…30… Be careful and go slow. Stop when you have a filed edge that looks clean and straight.

If you do mess this up, file the blade flat like you did in Step 5 and start over. Depending on the size of the blade, the tip may vibrate. Clamping a small C-clamp with a piece of scrap wood on the back of the blade can lessen vibrations (and keep your dogs, cats, and other creatures within earshot from howling at the sound).

Step 14: Hone the blade. You can use any sort of sharpening method: Diamond stones, Arkansas stones, Japanese wet stones, ceramic sticks; it doesn’t matter. You’re just refining the edge. When you’re done, cut something (preferably not yourself) to test the blade.

DSC_6344

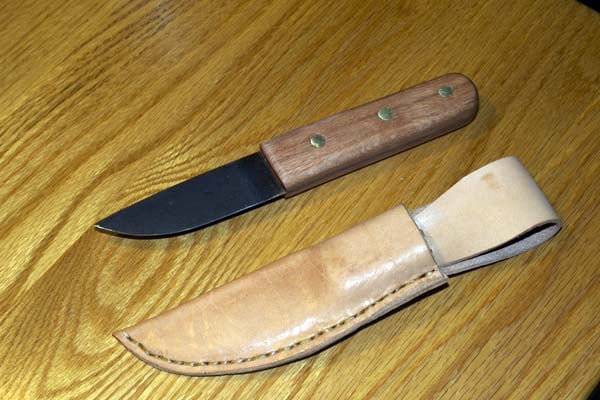
You’ll want to make a sheath like this for the knife, of course. That’s for another day.


20 Jul 03:04

Photographer Uses Civil War Era Tintype Camera to Capture Soldiers in Afghanistan

by Nick Leghorn

Tintype, c Ed Drew

The American Civil War was the first conflict in which cameras were widely used to capture the events and the people. Photographers would follow the troops, offering to take portraits of the men before battles to send home. They also photographed the aftermath to sell to newspapers. That’s the reason that the Library of Congress has a rather massive collection of soldier’s portraits from that era. The technology in use at the time was called “tintype” and produced a very distinct looking photograph. Now, a photographer named Ed Drew has used that same Civil War era technology to capture portraits and images from the current war in Afghanistan, and the resulting images are striking. You can find a collection of the pictures here. [via Reddit]

Share

18 Jul 23:06

Battle School Ain’t Like Dustin’ Crops in New Ender’s Game Battle School Clip

by Stubby the Rocket

Ender's Game Battle School clips

Harrison Ford welcomes us to Battle School in this new series of clips from Ender’s Game, featuring extended sequences of the initial alien invasion from the series. Look at how poorly we did! Look at how Mazer Rackham was the only professional in the room sky!

Wait, now we’re scared. Why did we sign up for Battle School?

[Ender’s Game Battle School clip]

Read the full article

16 Jul 01:28

How To Make Laundry Soap-Detergent

by Ken Jorgustin

how-to-make-your-own-laundry-soap-detergent

Make your own natural, non-toxic homemade laundry soap and save lots of money!

There are lots of laundry soap recipes online, many of them nearly identical with slight variations. I have found that for doing laundry, using just the following three basic ingredients will provide a good homemade recipe blend to get your clothes sparkling clean… for cheap!

 
how-to-make-homemade-laundry-soap-detergent

We have been using this laundry detergent recipe/formula for several years, and we have been thrilled with the results (and deep cost savings compared to retail laundry detergent)!


Homemade Laundry Detergent Ingredients


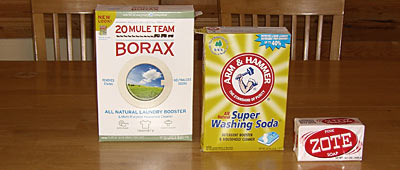
Borax

…is a natural mineral, sodium borate.
Borax has many beneficial uses and is found in laundry booster, certain hand soaps and in some toothpastes. It can be found at many stores as ’20 Mule Team Borax’ (pure borax). Buried deep in the Mojave Desert is one of the biggest and richest deposits of borax on the planet located in Boron, California.

Washing Soda

…also known as sodium carbonate, or soda ash, is produced in large quantities from common salt. In domestic use, it is used as a water softener during laundry and it effectively removes oil and grease stains. It is not toxic and does not contain harmful detergents or chemicals.

Bar Soap

…is soap, your typical ‘Ivory’ bar soap, or other.
ZOTE or Fels Naptha or Octagon are purpose made bar soaps for laundry.


Homemade Laundry Detergent Powdered Soap Recipe

2 cups of shaved bar soap (Ivory, ZOTE, Fels-Naptha, Octagon)
1 cup of Borax
1 cup of (Arm & Hammer) Washing Soda

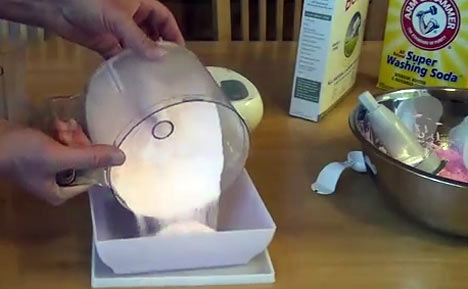
Shave the bar soap with a hand shredder/grater. Then combine all ingredients into a food processor. Mix until well blended together into powder, about 1 minute in a food processor.

It seems too good to be true, but that’s it!

make-laundry-soap

Use 1 tablespoon of this homemade laundry detergent per load. Up to 2 for a heavy load.

The cost is only pennies per load…

 
How-to make laundry soap video that I filmed a year ago…
We still use the same recipe – which only takes a few minutes to put together…

16 Jul 01:25

10 Best Bets for $75 or Less – Card Cases, Blackjack & more

by Joe

Seventy Five dollars. That’s a lot of money. It’ll get you a couple pairs of Levi’s, a nice dinner out, or a couple months at your local gym. Seventy Five dollars. It is a lot of money, especially if you spend it right. Ten picks follow, all for $75 or under, and some of them are much, much less.


1. Bespoke Post’s “Sweat”Box – $45.00 (sold out)

Bespoke Sweat

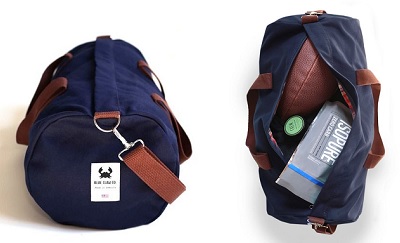
That’ll work. Incredible job by Bespoke Post and Blue Claw Co. once again. The Duffel is made in the USA, has almost 2500 cubic inches inside, and good looking enough to use as your main weekender / get-out-of-dodge bag. Used to use American Crew Forming creme myself for years. It’s a nice mix of hold + low shine. And a pound of protein powder on top of that? Sure. Not surprisingly, these are sold out. But, we got one on the way for an in-person + giveaway.


2. This American Life Podcast: Blackjack - Free

TAL Blackjack

The MIT Blackjack team. A church group who counted cards known as the “Holy Rollers”.  And a woman who lost so much money that she decided the best course of action was to… sue the casino she lost it to. An hour worth of Blackjack talk as told by the expert story tellers at This American Life.


3. Jack Spade Narrow Stripe Card Case – $26.25 w/ SOS13

Jack Spade Card Case

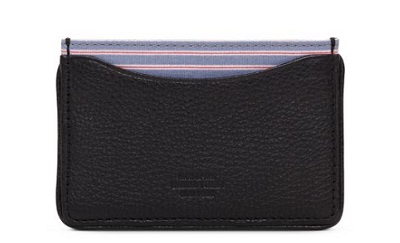
Just different enough. A little warm weather appropriate color, but not so much that it’ll get shelved when the leaves start to fall. Ships free as well. Code SOS13 takes an extra 25% off sale items and expires today.


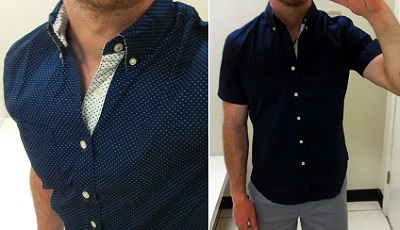
4. Stafford Prep Short Sleeve Button Down – $19.50 ($26)

stafford prep button down

Now that we’re in the dog days, many of us have gotten tired of our usual rotation of polos and t-shirts. No doubt that a short sleeve button up can go wrong quickly, but this one gets it right. A nice sized button down collar, a warm weather pattern, the contrasting placket is good, and it’s fitted and short enough that it actually looks pretty good untucked. Key here is to SIZE DOWN. Size shown: Small. Can be tucked in and belted for a cleaner look as well. One drawback… there is a little Stafford Prep logo tag at the waist, but that might be able to be taken off with a sharp scissors.


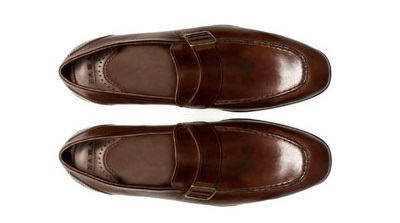
5. Zara Buckle Loafers – $39.99 ($89.90)

Zara Buckle Loafers

Well… these could either be outstanding, or terrible. The recently featured suede single monks were outstanding. Those were made in Spain, the suede was solid quality, and they were a steal during this ongoing summer sale. But cheap suede always trumps cheap leather. And while these have that Italian man having an espresso at a cafe on a Saturday morning look to them from a distance, who knows what they’ll look like up close. At least they ship and return free.


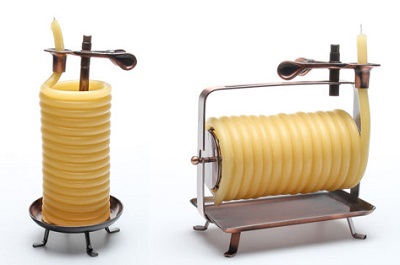
6. “Candle by the Hour” coil candles – $25 – $35

by the hour candles

Looks like something you’d have been more likely to find in Ben Franklin’s house instead of your Grandmama’s. Candles don’t have to be all girly. 20 min. per inch of exposed beeswax and the flame goes out once it hits the clip. Seems like it should have been a part of some sort of diabolical James Bond execution scene. Once the flame gets to a certain level… poof… in comes the swinging double bladed axe. Or something.


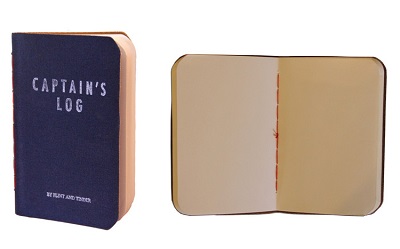
7. Flint and Tinder “Captain’s Log” – $14.00

Captains Log

Not cheap, but looks like a cross between a Field Notes notebook and a moleskin. 80 pages (Field Notes have 48). Made in the USA. At the end of a long day, it’s always good to write down some thoughts, all while enjoying a cup of tea… earl grey… hot… and OHMYGAWDNERDALERT!!!@!@!!@


8. Barbancourt Haitian Rhum 8 yr – $24.99

barbancourt

Brace yourself for quite possibly the worst endorsement ever: tastes like a blend of light brown sugar, grass, and sweaty socks. This stuff is… funky. If you’re used to something dark, dessert-like, and as easy as Zaya, this’ll take a bottle’s worth to get used to. But when you do get used to it, you’ll really appreciate this complex liquor produced by one of the tragically snake bit areas of the world. Not something you’re going to sip neat in the fall and winter, so ice it up now with maybe a dash of orange bitters and a lemon twist. Aged in oak 8 years. From cut sugar cane instead of molasses. Looking forward to trying the 15 yr at some point.


9. Gustin Made in the USA Japan Grey Oxford – $69.00

Gustin Oxford

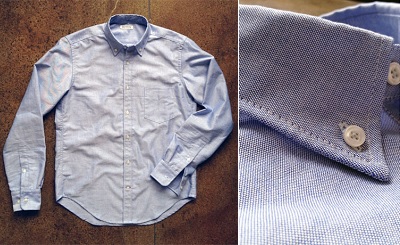
Expensive to the point of it being an investment, but nowhere near as expensive as other Made in the USA OCBDs. Gustin is the USA made selvage denim Kickstarter success story that many know about, and they’ve started to get into shirting now too. They’ve since moved off Kickstarter, but have kept a similar model for selling their clothes. You pledge to buy a product, and once a threshold is tipped, then Gustin goes into production. If a certain pair of jeans or a shirt doesn’t get enough people to sign on to buy one, it doesn’t go into production and your card isn’t charged. And so far… it looks like its working (you can see all of the successfully funded jeans / shirts on their site) Standby for a review of a pair of their denim later on this week. (Meanwhile, there are much cheaper OCBDs from L.E.C.  over here, and UNIQLO over here.)


10. UNIQLO Dry Button Down Shirt Collar Polo – $19.90

Uniqlo Button Down Polo

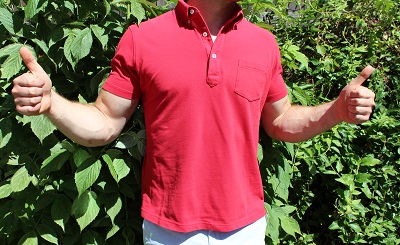
Another winner of a polo from UNIQLO that happens to not have the Michael Bastian name on it (seriously UNIQLO, make some more of those). One issue a lot of guys have with their polos is a floppy, curly, uncontrolled collar. One solution: A button down collar. These are a 75% cotton / 25% poly blend that is engineered to dry much quicker than a standard all cotton polo. Not super soft like jersy, but not scratchy either. And certainly not weighty like a fat pique polo. Great placket too. Sizes are scattered. Shown above: Medium, is sold out at post time. Here’s hoping they restock.

For other best bets under $75 from previous months, click here.

10 Jul 22:36

10 unnecessary, lifestyle-killing expenses

by Joe

Warning: The following is not a universal list. Far from it. In fact, many of these “expenses” are hugely valued among an enormous segment of the population. So much so that it might even seem offensive to label some of these things as simple “expenses.” Plenty of these things enrich and bring joy to those who have chosen to spend their money on them. There’s no intent to insult here. The purpose of this list is to get the undecided or inexperienced to at least consider the alternative of these otherwise expensive, societal defaults.

1. Children

How many of us are the products of a generation of parents who had kids because it was “the thing to do“?  Not having kids doesn’t necessarily mean you’re selfish. It means you’re not willing or currently unable to put another little “you” on this planet. Great parents should be applauded and respected. But kids cost money. If you’re not in a place to facilitate their happiness as well as your own, then maybe make a plan to get there or even reconsider.

2. A New Car

If no one bought new cars, there would be no used cars… but why exactly do people buy new cars? Of course there are a million reasons, but a good chunk of the new-car buying public might end up happier if they refused to buy a new car they only sorta want, and instead sought out and purchased a used version of a car they REALLY want.

3. Pricey College / Extra Education

There seems to be a developing, cultural addiction to higher-learning. Gotta get a degree from a big name school right? Not… really. Yes, a degree from a respected institution is going to make you more money in most fields. But if you’re going just to go, then you risk finding yourself getting lost in the lifestyle of pretend adulthood. You might end up getting a degree in something you really have no interest in. You graduate, start to work in that field, then decided to give it up only to… go back and start all over in something else. Find something you like. Focus on it. Make it happen, and don’t be afraid to jettison the cult of higher education if a solid opportunity to put your skills to work comes along. You can always go back. They’ll take your money.

college is expensiveMinimize the debt, maximize the experience.

4. A big, traditional wedding.

More often than not, these are stress-bombs that end up looking and feeling like elaborate stage productions with every ounce of the Bride and Groom’s personalities being stripped from the ceremony. It’s your day. The both of you. Do what you want to do. If that means getting married in a park, then having a nice dinner out with a close group of family and friends, and then a bar crawl in your wedding getups… then good on ya.

5. A big house

Every extra, unused room in a house = one less long weekend getaway you can take a year. Why do you need all that space unless you’re a homebody hoarder? Get out of the house man.

6. A Fat Mobile Phone Plan

There are plenty of options that’ll keep you relatively connected. And taking your nose out of your phone every so often is a good way to… look around at the world around you. The internet can answer all questions, but figuring out the answers for yourself without the help of the smartphone crutch is a great way to exercise your brain.

Phones are also expensiveLook at your phone. Is it really worth it? What would you do with the money if you downsized?

7. Not living close to where you work

Gas. Wear and tear on your mode of transportation. Lost time. It’s not always possible, but if you can find someplace to work that’s 10, maybe 20 minutes from where you sleep at night, you’re going to save a ton of money.

8. Cable TV or Satellite

If there’s a game on you have to see, hit up a sports bar or restaurant (or, actually buy tickets to it). Also, there’s always Netflix, Hulu, and Amazon prime for dramas and comedy. The day The History Channel became “History” and started running “reality” TV shows was the day Cable crossed a bloated sow rubicon.

9. “Vacations” to fulfill family obligations

If you have fun with your family, then by all means spend your vacation time with them. If they’re not that much fun to be around, and you keep blowing your vacation budget on trips of which the only purpose is to avoid guilt trips, then take a step back. It might be time to strongly reconsider the usual interpretation of “you can’t choose your family“.

10. Excessively Nice/Formal Clothes when you have no cause to wear them

Owning a tux is a fantastic thing. But if you don’t go to more than one black tie event every five years, then what’s the point? Same for expensive suits, shoes, etc… If you don’t have cause (or the honest desire) to wear the stuff, and it’s just going to sit in your closet, then get the most for your money on something less expensive that can be managed with careful upkeep. If you’re twenty years old, you might need a suit. Not five. Nice clothes can be a means to an end. But if your wardrobe spending habits are keeping you from going out and enjoying life… then it’s time to change.


We all can’t be Jack Donaghy. Actually, none of us can.

Additions are welcome in the comments. And what’s “lifestyle” mean to you anyway? It’s not as shallow as nice shoes and a closet full of slick clothes, is it? Leave it all below.

22 Jun 22:06

The Art of Relaxation: Bathtub and Hammock Combined by Splinter Works

by Lavinia

black hammock tub The Art of Relaxation: Bathtub and Hammock Combined by Splinter Works

The peaceful experience of kicking-back in a hammock has been further enhanced by combining it with the comfort of soaking in a hot bath. By literally elevating the experience of bathing into a suspended sculpture, the bathroom has been reinvented as a contemplative sanctuary for artful relaxation. Designed by Splinter Works for use in a wet room, Vessel is suspended from the walls and does not touch the floor. It is fixed with stainless steel brackets that can be covered over, or left revealed. The bath is filled using a floor standing tap and the waste water released through the base into a floor drain. A down-pipe drain can also be installed if a wet room setting is not possible.

design hammock tub The Art of Relaxation: Bathtub and Hammock Combined by Splinter Works

Vessel is made from carbon fiber which is utilized for its inherent strength and ability to be formed into complex curves, furthermore the weave of the fabric references the cloth of a typical hammock. Beneath the layers of carbon fiber lies a foam core, which insulates the tub, meaning the bath stays hot for considerably longer than normal. At 2.7m long, Vessel is longer than a regular bathtub, leaving plenty of room to share the experience. Custom sizes are available but it is also designed so that it can be trimmed up to 20 cm to allow for flexible installation. The project also comes in red, blue, yellow, pink, bronze and pure silver. [Photos and information provided via e-mail by Splinter Works]

bathtub hammock The Art of Relaxation: Bathtub and Hammock Combined by Splinter Works   hammock tub 4 The Art of Relaxation: Bathtub and Hammock Combined by Splinter Works hammock tub 5 The Art of Relaxation: Bathtub and Hammock Combined by Splinter Works hammock tub 6 The Art of Relaxation: Bathtub and Hammock Combined by Splinter Works hammock tub 7 The Art of Relaxation: Bathtub and Hammock Combined by Splinter Works hammock tub 8 The Art of Relaxation: Bathtub and Hammock Combined by Splinter Works hammock tub 9 The Art of Relaxation: Bathtub and Hammock Combined by Splinter Works hammock tub 10 The Art of Relaxation: Bathtub and Hammock Combined by Splinter Works hammock tub 12 The Art of Relaxation: Bathtub and Hammock Combined by Splinter Works hammock tub 13 The Art of Relaxation: Bathtub and Hammock Combined by Splinter Works hammock tub 14 The Art of Relaxation: Bathtub and Hammock Combined by Splinter Works hammock tub 15 The Art of Relaxation: Bathtub and Hammock Combined by Splinter Works hammock tub 16 The Art of Relaxation: Bathtub and Hammock Combined by Splinter Works hammock tub 17 The Art of Relaxation: Bathtub and Hammock Combined by Splinter Works hammock tub 18 The Art of Relaxation: Bathtub and Hammock Combined by Splinter Works hammock tub 19 The Art of Relaxation: Bathtub and Hammock Combined by Splinter Works hammock tub 20 The Art of Relaxation: Bathtub and Hammock Combined by Splinter Works hammock tub 21 The Art of Relaxation: Bathtub and Hammock Combined by Splinter Works hammock tub 22 The Art of Relaxation: Bathtub and Hammock Combined by Splinter Works

You're reading The Art of Relaxation: Bathtub and Hammock Combined by Splinter Works originally posted on Freshome.

The post The Art of Relaxation: Bathtub and Hammock Combined by Splinter Works appeared first on Freshome.com.

22 Jun 21:59

Charming Rustic Home Surrounded by Woodland and Meadows in Sweden

by Lavinia

architecture rustic house  Charming Rustic Home Surrounded by Woodland and Meadows in Sweden
Exhibiting a rustic design throughout, this Swedish property located on a large plot of 22,059 sqm with associated woodland and meadows in Sweden is truly charming. The house was originally built  in 1909 and recently renovated in 2007, a project which also included restoring the barn. The residential building has a very welcoming paved entrance from the private car park, extending up to the entrance door. It hosts a lovely living room with exposed beams, kitchen connected to the social areas, two tiled bathrooms, one bedroom with dressing room and an inviting patio.
design rustic house Charming Rustic Home Surrounded by Woodland and Meadows in Sweden
According to Skeppsholmen, the barn contains a large open room (suitable for guests), plenty of space for storage and a loft above. Large double doors open into the main interior on the first level from the parking lot. This is a property that inspires good vibes, perfect man-nature communion and to top it all, great design ideas. Have a look at the details and feel free to share your thoughts!

rustic house 7 Charming Rustic Home Surrounded by Woodland and Meadows in Sweden

rustic house 2 Charming Rustic Home Surrounded by Woodland and Meadows in Sweden rustic house 6 Charming Rustic Home Surrounded by Woodland and Meadows in Sweden rustic house 9 Charming Rustic Home Surrounded by Woodland and Meadows in Sweden rustic house 8 Charming Rustic Home Surrounded by Woodland and Meadows in Swedenrustic house 19 Charming Rustic Home Surrounded by Woodland and Meadows in Sweden rustic house 14 Charming Rustic Home Surrounded by Woodland and Meadows in Sweden rustic house 15 Charming Rustic Home Surrounded by Woodland and Meadows in Sweden rustic house 16 Charming Rustic Home Surrounded by Woodland and Meadows in Sweden rustic house 17 Charming Rustic Home Surrounded by Woodland and Meadows in Swedenrustic house 13 Charming Rustic Home Surrounded by Woodland and Meadows in Sweden  rustic house 24 Charming Rustic Home Surrounded by Woodland and Meadows in Sweden rustic house 23 Charming Rustic Home Surrounded by Woodland and Meadows in Sweden rustic house 22 Charming Rustic Home Surrounded by Woodland and Meadows in Sweden rustic house 21 Charming Rustic Home Surrounded by Woodland and Meadows in Sweden rustic house 20 Charming Rustic Home Surrounded by Woodland and Meadows in Sweden rustic house 18 Charming Rustic Home Surrounded by Woodland and Meadows in Sweden

You're reading Charming Rustic Home Surrounded by Woodland and Meadows in Sweden originally posted on Freshome.

The post Charming Rustic Home Surrounded by Woodland and Meadows in Sweden appeared first on Freshome.com.

17 Jun 23:52

10 Amazing Benefits of Babywearing

by Tiffany

10 Amazing Benefits of Babywearing

Attn: Wrap/Carrier Giveaway at the bottom of this post!

Why wear your baby? Simple: it is beneficial for both the baby and the parent.

1. Convenience. When we wear a baby, our hands are free to do other things like carry groceries, cook a meal, fold laundry, etc. It is far easier to run errands, take a walk to the park, and to navigate a crowded shopping area, farmer’s market or busy airport without the bulk of a stroller or carrying car seat. Many carriers also double as blankets, changing pads, nursing covers, etc. and lighten the load of baby essentials you might normally bring on an outing.

2. It promotes breastfeeding. Having your baby so close to your skin and their source of food promotes frequent and comfortable breastfeeding. In many instances, you will be able to walk around while feeding your baby in the carrier and no one will even notice that your wee one is having a snack.

3. It promotes physical development. Babies worn in a carrier close to the body are in tune with the parent’s heart rate, breathe, smell and movements. This in turn helps to regulate a baby’s own physical responses and activates his sense of balance.  This closeness mimics the environment your baby knew in the womb. This calms her and allows her to put energy into growing and learning instead of fussing for a caregiver. It also allows the parent to be secure in the knowledge that their little one is eating, sleeping, and breathing well. There is also evidence that contact like this helps premature babies put on weight and gain improvements in health. These results do not happen from swing or bouncer time.

4. It develops secure emotional attachment and sponsors emotional development. Research shows that babies that are held and carried are happier. They cry and fuss far less than babies who are not held and carried. A held baby who can hear his caretaker’s heartbeat and look into their face is secure in the knowledge that they are warm and safe. They are not flooded with the constant stress hormones accompanied by frequent crying and often are lulled effortlessly to sleep by the rhythmic motions they experience as they ride through the everyday activities of their parents.

5. It supports cognitive development. Babies who are held or worn are right up where the action is. They see all the people and places they pass as you go through their day. They are able to observe a parent cooking, folding laundry, using a library card, making change and the dozens of other interactions they have throughout the day. Babies who are held are participants in life and thus are spoken to directly by parents and by others on a much more regular basis than babies pushed in front of caregivers in strollers are. Babies are little observers in a quiet and alert state that encourages learning and brain stimulation.

6. It is a great way for dads, grandparents and other caregivers to bond with baby. When held or carried, babies are able to get to know the other important people in their lives in a much more intimate way than if the just sat on their knee. They are also becoming accustomed to the heartbeats, voices, rhythms and gestures of their fathers, grandparents, and other caregivers.

7. It is a great way to get back in shape postpartum. You have to carry your baby anyway. Wearing them distributes their weight more easily, encourages you to be a little more active, and provides you with a colorful accessory (the carrier) to jazz up your workout gear. You can even find workouts that are meant to be done while wearing your baby if you search online.

8. It can be a great tool to help a new mom combat the baby blues. Having a little person attached to your body is a great way to sneak in mood boosting snuggles and kisses and can help moms bond with their infants without feeling burdened by all of their needs.

9. It is easier than taking a stroller up the stairs or onto a bus. Enough said!

10. It is fun! You will have a more active and engaging life with your new baby, will have arms to spare for your other children and will meet a whole slew of new friends who baby wear too!

If you want a carrier like the one pictured above try the Moby GO baby carrier. Enjoy!

08 Jun 20:18

Because A Single Barreled Ring Cannon Is Never Enough

by Steve Johnson
ring guns

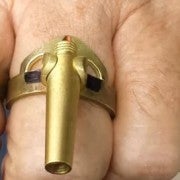
Mr. Wulle demonstrates his double barreled ring cannon and blunderbuss.


05 Jun 22:01

Ten Tips for Hand Saws and Blades

by Michael Colombo
I'll be the first to admit I haven't maintained these saws very well. Mea Culpa. But here's the take away: the longer one is a rip saw. Use it to cut along the grain. The shorter one is a cross-cut saw. Use it to cut across the grain.There are a plethora of reasons to choose a hand saw over an electric in certain situations. But if you want to try them out, there are some things you need to know. Here are ten tips to help you on your way.

Read the full article on MAKE

04 Jun 23:17

Marshall Fridge Packaging

by Diane Lindquist

05 31 13 MarshallFridge 1

Even the box has stage presence. Loud, like a rock star. Practical, like a roadie. In just 48 hours, the Marshall Fridge box, designed by Proximity garnered over 14 million impressions online. And a few weeks later, a formal complaint from UPS because it was too appealing to thieves. 


04 Jun 23:11

Sounds teenagers make

by John

James Harbeck analyzes some of the common annoying sounds in teenage speech.

What’s interesting to me is how difficult many of them are to write in dialogue. I often find myself placing them in scene description or another character’s parenthetical.

MARY

You’ll get another 4S. You don’t need a 5.

(off Caleb’s whiny gasp)

Yeah -- next time, don’t try to Snapchat your junk in a hot tub.

04 Jun 22:50

Henriksdal's new look

by Jules Yap

Materials: Henriksdal bar stool and wool yarn scraps

Description: Pimp up your stool with scraps of wool yarn: wrap different colors of yarn around the stool and tie under the seat.


~ Rosandra
04 Jun 22:47

Moms, your kids need these 3 things from you in a crisis

by thesurvivalmom
mom hug kids 300x199 Moms, your kids need these 3 things from you in a crisis

image by monkey mash button

1.  Confidence

When something bad or scary happens, your kids need to see a mom who is holding her head high with confidence, knowing that, somehow, everything will be fine. You may need to fake it, but confidence is contagious.

“If Mom says we’re going to be okay, then we’re going to be okay!”

You’ll see your kids straighten their backs and a gleam of resolution come into their eyes. They may not know exactly how all the pieces will fall into place, and you might not either, but with confidence you can move forward and tackle the impossible. Together.

2.  Courage

“Keep your fears to yourself, but share your courage with others.”
Robert Louis Stevenson

I love that quote so much that I included it in my book.

Fear depletes us of strength, but courage is energizing. It emboldens us to look past our current circumstances and know that we can tackle whatever comes. Your kids need to see that courage in your eyes. Just like confidence, it’s contagious.

3.  Comfort

Confidence and courage do a lot to comfort our children, but there’s nothing like a hug or a soft lap for cuddling. Gentle words, a kiss on the cheek, gathering the whole family together in a group hug — kids need that when they’re scared and when the world as they know it has fallen apart.

Moms, no matter what has happened or what you’re going through, don’t overlook your child’s need for comfort that can only come from you. A hug from grandma or a neighbor just isn’t the same.

The really cool thing about comforting a child is that you are comforted in return. That’s the payback, and it’s worth it.

© 2013, thesurvivalmom. All rights reserved.

The post Moms, your kids need these 3 things from you in a crisis by thesurvivalmom appeared first on The Survival Mom™. Be sure to check it out!

01 Jun 13:55

Unusual Use of Usual Things (38 pics)

by noreply@blogger.com (Crack Two)


01 Jun 13:44

I Always Knew German Was a Special Language (9 pics)

by noreply@blogger.com (Crack Two)


30 May 00:35

Feature: Taking Notes

by Chuck Cage

My father loved to write crap down. He’d dream up some idea or another, and he’d jot it down in one of a half-dozen little notebooks he used to carry around with him. I remember one time as a kid when I asked him about something, and to answer me he produced one of his older notebooks. Hell, I can’t remember what it was I asked. But I clearly remember him ruffling through page after page of drawings and scribbles, trying to find the answer. He paused on one page, which contained a crude (but surprisingly precise) drawing of a suitcase with two different kinds of wheels on it. “I really should’ve done something about that,” he said, tacitly suggesting he’d scooped the originator’s patent.

I tried to emulate him over the years, carrying around various cheap ringed notebooks like the ones he always stuck in his back pocket. The first real success I had at keeping a notebook long enough to reference it for information over a couple weeks old was with Moleskines. Since 2008 or so, though, I’ve gone mostly digital, snapping phone pics and doodling in various versions of electronic note-keeping apps.

I’d love to tell you that one or the other of these methods is the complete awesome, but really they each offer some advantages — and significant disadvantages. One size definitely doesn’t fit all. So in classic Toolmonger form, I’m going to run down some of the options I’ve tried so far. If you find one that really works for you (or if you have better ideas than mine!) please share in comments. I’ll be watching.

Read on past the jump for a comprehensive look at the options.

The Cheap Route

Obviously the best notes are the ones you actually write down, so there’s something to be said for carrying a lot of cheap-ass small notebooks instead of one or two nice ones. Above, you see my favorite candidate, the spiral. You can find these in all sorts of sizes, ranging from the standard 8-1/2″ x 11″ models college students used to take class notes in (back in the pre-laptop/tablet days) down to the little 2″ x 3″ promotional giveaways you used to find at every convention table. Generally you’ll find them only in line-ruled format, and they come in top-spiral and side-spiral layouts.

The low cost also makes them a bit more throw-away, too, as you’ll be a hell of a lot less concerned about carrying one in a shady place than you would a $10-$40 notebook. Of course, the ones small enough to pocket easily are also much too small for drawing, so these seem best targeted toward writing down quick numbers or specs, like the tire size on the car you’re thinking of buying (so you can find out what it’ll cost you to replace them) or the model number of the faucet in your bathroom (so you’ll get the right damn cartridge kit for it at the big box).

The Good: They’re cheap — like sometimes even free — and you can find ’em anywhere, so there’s really no excuse not to stash them anywhere and everywhere (or pick one up at the grocery store or gas station if you’re out). The small ones will fit in your back pocket — especially the top-ringed kind, which positions the spiral at the top of your pocket instead of drilling a crease in your ass (or worse yet, bending flat) when you sit down. You can rip out pages if you need to write something down for someone else.

The Bad: A corollary to the above is that the best notes are the ones you can find later. If you have 20 notebooks floating around, you’re unlikely to remember whether those bolt specs you jotted down two weeks ago are in the notebook in the truck, the one in your pocket, the one at your desk, or the one you lost at the flea market last Sunday. Also: The ring bugs the crap out of me. I’m left-handed, so the side ring creates a permanent hand tattoo after more than a minute of writing. (I generally turn them upside down.)  And I’ve never been good at holding a soft notebook in one hand while writing in it with the other.

The Moleskine

All the rage starting about a decade ago, Moleskines remind me a lot of the notebook in which my dad sketched his ill-fated suitcase idea. They’re perfect-bound with hard covers and a slightly-more-flexible spine. You also get an elastic strap, which you can use to band the book shut or hold the book open to the last unused page. Glued to the back binding you’ll find a small envelope in which you can stuff other people’s business cards, flyers, or other bits of free-form paper you happen to come across.

Certainly there’s a lot of nostalgia behind the Moleskine; the “philosophy” page of their website proclaims it the “heir and successor to the legendary notebook used by artists and thinkers over the past two centuries: among them Vincent van Gogh, Pablo Picasso, Ernest Hemingway, and Bruce Chatwin.” (So you’ve got that going for you.) The modern Moleskine began its life in 1997 in Italy, targeted at the artistic/literary type in Europe and the U.S., via distribution primarily in bookstores. A decade and a half later, you’ll find them all over the place in formats ranging from the original hardcover to smaller (and larger) softcovers. Best of all, Moleskine offers ruled, gridded, and blank versions. For shop use, I’m a fan of the grid, but lots of folks swear by the blank sheets.

The pocket model runs around $10-12, which makes it a little too expensive to have tons of them, but not really pricey enough to worry about.

A tip for the wise: The Moleskine’s Achilles heel is its spine. If you carry the book around in a back pocket, sit on it, throw it around, and generally abuse it like you would any notebook that goes everywhere you go, eventually the spine starts to weaken and break along the folds. After going through a couple in this manner, I finally started reinforcing the spine with a piece of 1″ black gaffer’s tape right from the start. If you cut the edges carefully, the tape looks pretty natural on the Moleskine, and I’ve never had one come apart after this. It also strengthens the spine enough that you can carry a pen by stabbing its clip into the Moleskine’s binding without fear of the spine meeting an early fate.

Tip #2: If you’re going to carry a pen on the spine, you have a couple of good choices. The small, bullet-shaped black Fisher “Space Pen” makes for the smallest (and least likely to poke your ass if you sit on it) form factor. If you don’t pocket the Moleskine and are concerned with appearances, you might like these made-to-fit square pens and pencils. Personally, I carried the Fisher for a while, then finally just started sticking whatever pen I had around on it.

The Good: They’re durable. They take quite a beating and reject small amounts of water (light rain, for example) when closed. The features (band, envelope) are all useful and not just for show or hipster cred. They stack and store well, too. I have a stack of the four or five that I filled while in my Moleskine phase, and they look pretty much like they did when I filled them. Lots of page format options. Enough pages to last a while, but not so many that it looks like a mini dictionary. Fits well in a pocket (and slightly-rounded corners make it comfy there). Not too pricey. Very functional.

The Bad: Not a whole lot, except for the fact that it’s not searchable. This may not matter to you, but I often found myself digging back through old ones trying to find something I wrote down a year ago. My solution to this was to write the date with a hashmark on the outside of the page whenever I wrote in it, so at least I could flip through and find the general vicinity of the note I sought. That’s about as good as you’ll get without digital copies.

Specialty Notebooks

Though I’ve seen plenty an old shop hand with a Moleskine (albeit with a bit more sawdust or grinder debris than most poets’), Moleskine’s target audience seems to be the coffee shop crowd. (You know, the people who stay there rather than stop in for coffee.) Since Moleskines have become so popular, there are now plenty of boutique offerings for those who want to buy their way above the average Moleskine riff-raff. For example, consider this one from Makr, featured on Uncrate a few days ago. I’m certainly not arguing that it’s pretty. Its Smyth-sewn binding is definitely a plus, as the stitched-together pages will hold together well and allow the notebook to lie flat when open. But $38 is a little steep, I think, making it more of a desk item than something you’re likely to carry in the shop. And though you get a choice of six colors, you’re stuck with blank pages in all of them.

The Good: Sexy. You’re the only one you’ll see with this pricey a notebook. Some of them are really well-made.

The Bad: $40 buys a lot of crap for your next project, making it a whole lot more likely to see the light of day instead of languishing as sketched ideas in your $40 notebook.

Going Digital

If you’re one of the millions of folks who regularly carries around a smartphone (read: something with a functional keyboard and apps), then you’ve already made the investment required to take digital notes. This also overcomes some of the past problems with the mismatch of high-buck electronics and shop environments; you probably carry the phone anyway, so why not use it to take some notes?

Besides various note-taking and sharing applications, your phone probably also has a pretty decent camera, which quite simply kicks ass for helping you remember little things like how stuff looked before you took it all apart or what that weird tool you saw at your buddy’s place looked like. We at Toolmonger use the hell out of our smartphone cameras, snapping pix of new and interesting things we come across to write about — or popping a photo of the A/C filter so we can remember its size.

The Good: SEARCH. Seriously, try finding some random garbage you scribbled down two years ago in a Moleskine. It’s not easy — and certainly not anywhere near as easy as typing a few key phrases into the search field and tapping right to your note. And pictures are invaluable. Sharing is dirt-simple, too, as easy as tapping a couple times to SMS, email, or send to a cloud storage site.

The Bad: Typing on smartphones sucks. Drawing on them sucks worse. While you can easily draw pretty little pictures in your Moleskine (or on the back of a napkin), drawing on an iPhone screen is an exercise in frustration. Granted, there now exist some handy apps to make drawing a bit easier, but you’ll have to learn them as opposed to simply scribbling away. Also: don’t forget the possibility of data loss. I lost my full Apple Notes library once a year ago, and I’ve been a lot more wary of keeping important information there ever since.

Conclusion

So what’s best for you? You’ll have to match up the above with your own needs to find out. If we had to choose just one, we’d probably choose our smartphones, followed closely by the Moleskine. We love the high-buck boutique notebooks, but we’re just way too cheap to actually order them. And even though we’re cheap, we’re not cheap enough for the spiral-bound offerings. Maybe they just have too much of a junior-high vibe.

Let us know, if you will, what you use, and most importantly, let us know why. We look forward to hearing from you! 

Spiral Notebooks
Moleskine Notebooks
Terra Cotta Sketchbook [Makr]

PS: I doubt Dad really did invent the rolling suitcase first, as my experience must’ve been around 1975 or so. Still, I bet he came up with it independently.

30 May 00:28

The Marshall Fridge

by Kyle Troutman

The Marshall Fridge

Back in 1962, drum teacher Jim Marshall opened up a small music shop in London. Fast-forward to now, his shop has morphed into the iconic global brand, Marshall. The company is known for their awesome amps that churn out their signature Marshall “crunch.”

The Marshall Fridge is the company’s way of bringing the essence of their amps to any pad—no guitar skills necessary. You get Marshall’s classic style—in refrigerator form—that stores sodas or ice-cold beers (Gin, for me).

The Marshall Fridge in technology home furnishings Category

It’s made from materials that Marshall often turns to for their amps including authentic logos, brass control panels, and fret cloth. It also has a small freezer, interior lighting, and tempered etched glass shelves.

The Marshall Fridge in technology home furnishings Category

You’ll even save a few bucks on the energy bill since it has an A+ energy consumption rating. Now, that’s what I’m talking about!


27 May 00:30

Cooking with Rast!

by Jules Yap

Materials: Bedside rast

Description: I've assembled 2 Rast bedside tables. I place them on their side and put one against the other creating 2 big cabinets and one narrower in the middle. On the left cabinet I inserted some compensated shelves.


On the right side I added a door creating a pantry and on the other side I built a frame where I glued a clear plastic sheet which is the oven door. The back of the cabinet is made by a compensated base where I laid a wooden bar to hang the kitchen tools. It is all being painted with water colours. It has a real bargain tap. Total price approximately €30.00.

~ Erika
25 May 22:38

Lenovo Gets Designy with Table Concepts for Their IdeaCentre Horizon PC

by Jaime Derringer

Lenovo Gets Designy with Table Concepts for Their IdeaCentre Horizon PC

Lenovo teamed up with three design teams to create collaborative table stations for their IdeaCentre Horizon Table PC. The idea was that because their high-concept PC created a real-life togetherness and technology, that it would be fun to fuse form and function to showcase the possibilities and use of this type of computer.

Lenovo Gets Designy with Table Concepts for Their IdeaCentre Horizon PC in technology home furnishings Category

IdeaCentre Horizon Table PC

Lenovo Gets Designy with Table Concepts for Their IdeaCentre Horizon PC in technology home furnishings Category

The Treehouse (also top photo)
Designed by Judson Beaumont of Straight Line Designs, Treehouse creates a magical world of whimsy to bring children and people of all ages together.

Lenovo Gets Designy with Table Concepts for Their IdeaCentre Horizon PC in technology home furnishings Category

The Nest
Input Creative Studio designers Brooke Lichtenstein and Yiannos Vrousgos blend a modern take on the nesting table idea with the Lenovo Horizon, redefining family game night.

Lenovo Gets Designy with Table Concepts for Their IdeaCentre Horizon PC in technology home furnishings Category

AT-UM
UM Project designer François Chambard wanted to give people a central hub to power their creation engine with a digital twist.

I can imagine a lot of options for a PC like this, especially when it comes to giving work presentations or demonstrations, classroom learning, and creative uses such as art, movie-making or web development. What would you use it for?


25 May 22:37

Be Ready For Your Next Wildlife Encounter

by Survival Spot
25 May 22:18

Sophisticated Rustic Feel: Impressive Wood And Stone House by Eduarda Correa

by Raphaelle

Impressive House in Brazil Sophisticated Rustic Feel: Impressive Wood And Stone House by Eduarda CorreaMeet this impressive house designed by Eduarda Correa. Away from the city rush and away from the chaos, in a place where relaxation reigns, in Morro do Chapéu, Bahia, Brazil, there’s a spacious luxury house, characterised by sophistication. The excessive use of wood and stone define its personality. The residence looks like a palace and it features wonderful views over the mountains. Zen and peaceful, this exquisite living space is absolutely gorgeous. High-end facilities, impressive design and expensive decorations. On top of that, a warm home environment and a sophisticated rustic kind of feel. Some would say that, this house has it all.

Wooden Details2 Sophisticated Rustic Feel: Impressive Wood And Stone House by Eduarda CorreaLike we previously mentioned, the house is equipped with everything, in order to make you feel like you’re living inside a palace. You’ve got the sophisticated rooms with panoramic views, your very own home theatre to watch whenever you like whatever you like, without depending on a sharp movie schedule and a wine cellar for tasteful evenings. The precious interior boasts stunning works of art, such as sculptures and paintings. Neat, bright and elegant, this spectacular residence is one of those lovely homes we’ve always wanted to wake up in the morning.

Wonderful Views Sophisticated Rustic Feel: Impressive Wood And Stone House by Eduarda CorreaBeautiful Details Sophisticated Rustic Feel: Impressive Wood And Stone House by Eduarda CorreaGorgeous Decor Sophisticated Rustic Feel: Impressive Wood And Stone House by Eduarda CorreaPersonal Items Sophisticated Rustic Feel: Impressive Wood And Stone House by Eduarda CorreaOrnaments Sophisticated Rustic Feel: Impressive Wood And Stone House by Eduarda CorreaStunning Details Interior Design Sophisticated Rustic Feel: Impressive Wood And Stone House by Eduarda CorreaElegance1 Sophisticated Rustic Feel: Impressive Wood And Stone House by Eduarda CorreaWood Excess Sophisticated Rustic Feel: Impressive Wood And Stone House by Eduarda CorreaHome Cinema Sophisticated Rustic Feel: Impressive Wood And Stone House by Eduarda CorreaWine Room1 Sophisticated Rustic Feel: Impressive Wood And Stone House by Eduarda CorreaLovely Wine Cellar Sophisticated Rustic Feel: Impressive Wood And Stone House by Eduarda CorreaSophisticated Atmosphere Sophisticated Rustic Feel: Impressive Wood And Stone House by Eduarda CorreaPalace Nearby the Mountains Sophisticated Rustic Feel: Impressive Wood And Stone House by Eduarda CorreaGreen Oasis Sophisticated Rustic Feel: Impressive Wood And Stone House by Eduarda CorreaEvening View4 Sophisticated Rustic Feel: Impressive Wood And Stone House by Eduarda CorreaNight View Landscape Sophisticated Rustic Feel: Impressive Wood And Stone House by Eduarda CorreaWonderful Palace Sophisticated Rustic Feel: Impressive Wood And Stone House by Eduarda Correa

You're reading Sophisticated Rustic Feel: Impressive Wood And Stone House by Eduarda Correa originally posted on Freshome.

The post Sophisticated Rustic Feel: Impressive Wood And Stone House by Eduarda Correa appeared first on Freshome.com.


25 May 22:16

World’s Largest LEGO Model: Star Wars X-Wing Starfighter

by Steph
[ By Steph in Art & Sculpture & Craft. ]

LEGO Star Wars X-Wing 1

Forty-two times larger than the toy set currently available in stores, this Star Wars X-Wing Starfighter is made of over five million LEGO bricks weighing a whopping 45,000 pounds. Assembled in the LEGO model shop in Kladno, Czech Republic, the model is 43 feet long and 11 feet high with a wing span of 44 feet. It was unveiled in New York City’s Times Square on May 23rd, and will be on display for Memorial Day weekend before reaching its final destination at Legoland in California.

LEGO Star Wars X-Wing 2

The model had to be carefully engineered with a steel framework system in order to withstand all of the travel, breakdown and re-assembly required to transport it across the Atlantic Ocean and from one side of America to the next.

LEGO Star Wars X-Wing 3

It took an international team of designers, builders, engineers, mechanics and logistics experts over a year to devise the plan that brought the massive model from concept sketches to reality. The time it took to construct the model, which is made using the same LEGO bricks sold at retail, was 17,336 hours, or about four months.

LEGO Star Wars X-Wing 4

The model can seat multiple fans in the cockpit for photo opportunities, and its four rear engines light up to a glowing neon red. “We thought it would be a great idea to say ‘What if you took this, scaled it up to the size of what a real X-wing looks like, and here’s the end result,’” LEGO Master Builder Erik Varszegi told MTV Geek.

Share on Facebook

[ By Steph in Art & Sculpture & Craft. ]

[ WebUrbanist | Archives | Galleries | Privacy | TOS ]


25 May 22:14

A Quick Fix – Removing Mildew Smell From Laundry

by Tiffany

As the weather warms my kids are staying outside longer. The garden house is already being turned on for quick sprinkler sessions when they get overheated from play. Soon they will be in the pool. All of this means wet clothing, wet swimsuits, and lots of towels. I cannot keep up with the amount of wet clothing and towels that come with spring and summer so I have to accept that I am going to have a fair amount of stinky laundry to wash…laundry with that icky mildew smell. So how do I get it out? I absolutely detest getting out of the shower and reaching for a towel, only to bring it to my face and realize that it smells noxious even though it’s technically been ‘cleaned’. Gross!

I describe my very effective plan of action here, it works for all laundry items that have mildewed:

Stinky towels and how to clean them without harsh chemicals

Hope it helps!

08 May 01:08

The Modern Woodsman – Concepts for Redefining Tradition

by Ross Gilmore

For those of you who have been following my blog over the years, it has probably become clear that I have had a hard time defining my place within the outdoor community. While my approach and my relationship to the wilderness has always been clear in my mind, it has been challenging to find a group that shares my approach to woodsmanship. That is why you have seen me post on subjects that are not ordinarily found on the same blog or forum; from mountaineering, to backpacking, to bushcraft, to fishing, etc. I have been trying to fit my relationship with the wilderness within all or some of these groups, eventually giving up in the attempt, and focusing on the things that for me best define woodsmanship.

What am I rambling about? I’ll try to explain. This post, or more precisely, this concept, started to bounce around in my head about six month or so ago when I watched a video by Dave Canterbury about a concept he called the 21st Century Longhunter. In his project, Dave Canterbury set out to create a modern version of the traditional longhunter. If you are not familiar, the longhunter is a term used to describe an 18th century hunter or explorer who undertook long term, long distance expeditions into the American wilderness. The term was originally applied to hunters from Virginia who ventured into Tennessee in order to hunt for furs and large game. Later the term began to be used for explorers and back country travelers who undertook similar long distance trips into the wilderness. These men would establish a camp deep in the woods, with the help of equipment carried by their pack horses (two for each man according to accounts), and from there traveled (a lot of the time on foot) in small groups, or at times even alone, over great distances, getting as many resources from the land as possible, and traveling only with the supplies they could carry. 

3916135365_ac15a82d09_z

The above is a picture of Mark Seacat, long distance hunter and mountaineer.

When I saw the project, it struck me as being exactly the thing I had been searching for. The concept of the longhunter very closely mirrored my desired relationship with the woods, and my concept of woodsmanship. The thing to which I had aspired, was precisely that: being able to undertake long term trips, deep into the wilderness, only with supplies one could carry and what could be gathered from the surrounding environment.

Unfortunately, my excitement soon turned to disappointment, as Dave clearly had a different idea for the project than I did. While I had hoped that he would present a modern version of the longhunter, fully re-envisioned with modern skills, equipment and techniques, Dave instead focused on recreating the 18th century longhunter as he was with artifacts and equipment that could easily be purchased today, such as using a shotgun as a muzzleloader, or using oilcloth instead of oiled canvas.

Even so, the project had helped define in my mind the concept that I had been trying to pursue during my time in the woods. After giving it some thought, my lack of creativity lead me to call the concept “The Modern Woodsman”. In this post I will try to give a definition for the term and explain how it is connected to the activities about which I have been posting about over the past few years.

For me, as mentioned above, the modern woodsman is a person who is able to undertake long term trips, deep into the wilderness, only with supplies one could carry and what could be gathered from the surrounding environment. He is able to navigate through the bush; he can travel over varied and difficult terrain and during any season and weather; he can properly plan the supplies needed for an excursion of a particular duration, both in terms of the resources that must be brought and what can realistically be obtained from the environment through which the travel will occur. Most importantly, he is not limited to the technology or skill of any particular time period. He uses technology, skills and equipment based on efficiency and practicality. He applies modern hunting techniques, modern understanding of nutrition, and modern climbing, mountaineering, and packrafting techniques. His equipment includes tools that are best suited for the task without consideration for nostalgia and sentimentality. The gear is centered around portability, so that it can be transported over long distances and difficult terrain. The skills he implements are designed for efficiency, not showmanship, and while his equipment is modern, it is designed to function over extended periods of time.

river-crossing-brown2

The above is a picture of Andrew Skurka, long distance backpacker.

In effect, the modern woodsman is a reinterpretation of the longhunter in his role as a back country explorer. It takes the longhunter and imagines what skills and outdoor equipment he would have used had he had the resources and information at his disposal that we have available to us today in terms of the outdoor community. Imagine Daniel Boone or Lewis and Clark if they had the ability to select their gear from what was available to us today and with the knowledge that we currently possess.

For many years now, I have been trying to fit the concept of the woodsman that I outlined above into one of the existing outdoor communities. In my opinion, there hasn’t been a good fit. From what I have seen, each community embraces a particular aspect, but then rejects the rest. To give a few examples, the backpacking community embraces long distance travel, modern equipment and techniques, as well as modern understanding of nutrition and trip planning. On the other hand however, the backpacking community largely rejects off trail travel, use of natural resources, hunting, etc. The bushcraft community focuses on using natural resources and developing related skills, but largely rejects modern equipment and techniques, and often involves huge amounts of gear that is not portable over long distances. The mountaineering community has developed methods and techniques for traveling over very difficult terrain, but again makes little use of natural resources, hunting, etc. 

Over the years, I have bounced around between the different groups, and have tried to use the skills and approaches from each one of them and combine them to create what I see as the modern woodsman. To be sure, during that time I have encountered people who have taken a similar approach to woodsmanship, and even though they each have their preferred discipline, they have employed skills and techniques from all the different communities in the pursuit of the woodsman I have described. Each of them is certainly much more accomplished that I can ever hope to be, but I have looked to those people for inspiration. Here I am referring to long distance hunters like Mark Seacat, long distance backpackers like Andrew Skurka, and mountaineers like Conrad Anker. While focusing on their chosen field, each of those men has implemented cross disciplinary skills, techniques and equipment in order to undertake long distance and long term travel into the wilderness.

Altitude Everest Film Project, 2007

The above is a picture of Conrad Anker, climber and mountaineer.

It is important to note that I am not pointing to the above people as a way of saying that each woodsman should be equally involved in hunting, backpacking and mountaineering. Learning from all those disciplines and applying the techniques they have developed however is important.

Why do I write this? Well, as the title indicates, I hope to offer this concept as a tool for redefining woodsmanship in the modern context. My experience has been that too often woodsmanship is defined in terms of what was, or what will be (in some post apocalyptic bug out situation) rather than what is. As a result we too often become historical recreationists or preppers in our attempts to become woodsmen. I don’t think that is necessary, and as I have written in a previous post, woodsmanship can be so much more if we embrace the knowledge and technology that we have developed over the years. I think we spend too much time dividing ourselves by discussing who we are not, and what stylistic choices we have made in defining our woodsmanship, instead of looking at all the people who spend extensive amounts of time in the woods and learning from them. We focus too much on trying to recreate some mythical woodsman of a past golden age, instead of trying to expand and embrace woodsmanship as what it can be. The concept of the Modern Woodsman should allow for the existence of woodsmanship now, today. We do not need to live in the past, or in some post apocalyptic future in order to be woodsmen. We don’t need to live in an imaginary world where we pretend it is the 19th century, nor do we need to imagine ourselves as future survivalists, living on squirrel meat in the woods behind the house while fighting invading communist armies in order to be woodsmen. Now, today, there are woodsmen amongst us. This weekend, their next vacation, they will be in the woods, using everything we have learnt and developed as outdoorsmen over the centuries, to accomplish wonderful things, in many ways far surpassing what was possible ever before.

It is in pursuit of this concept that I have been attempting to write here on this blog over the past few years. My hope is to provide for the theoretical possibility of a modern woodsman, who is not constrained by the confines of tradition, dogma, fashion, or sentimentality. To write of a woodsman who is focused on practicality, both when it comes to skill and equipment, who pushes the boundaries of woodsmanship by embracing the developments in skill and technology that other woodsmen have pioneered, regardless of whether it was done a hundred years ago or yesterday. To imagine a longhunter who sets out to survey an unexplored wilderness over the mountains, and can do so by using outdoor equipment we have available today, can plan his food rations using modern knowledge of nutrition, can travel over mountains and difficult terrain using modern mountaineering techniques, cross rivers with modern packrafting technology, and yes, perhaps supply food for himself along the way with the use of modern hunting and fishing techniques and equipment. Most importantly, to write of woodsmanship that exists today.

This is certainly not a model that would be appealing to everyone, nor should it be. My only goal is to put it forward as a possibility and to explain what I have been doing so far, and will hopefully continue to do. The idea of the Modern Woodsman is something that appeals to me, and I wanted to share my thoughts on the subject with you in a more concise manner than I have done before. 

02 May 22:01

Pet-Ready Emergency Kit – What You Should Have…

by Ken Jorgustin

A list of ideas of things to have for your pet emergency kit, in case of disaster or having to evacuate last minute.

Original source: Pet-Ready Emergency Kit – What You Should Have…

01 May 01:01

These Maps of the TARDIS Interior Are Maddening, Beautiful

by Chris Lough

TARDIS interior maps Doctor Who

Doctor Who episode “Journey to the Centre of the TARDIS” recently gave us a look inside the Doctor’s infinitely-sized ship, a look that viewers had been waiting almost 50 years to see. And while the events of the episode would defy any sane cartographer’s efforts, the attempt nevertheless must be made.

[Maps of the interior of the TARDIS]

Read the full article

29 Apr 23:35

Combine: An Eco-Chic Picnic Set from Bold_a design company

by Caroline Williamson

Combine: An Eco-Chic Picnic Set from Bold_a design company

Bold_a design company launched a portable picnic set called Combine, which joins sustainable materials with a new concept for replacing the standard picnic basket.

Combine: An Eco Chic Picnic Set from Bold a design company in style fashion home furnishings Category

The reusable table set brings fun and informality to on-the-go dining with its minimal design that basically houses everything you need all in one stackable unit. The kit features two large bowls, a divided bowl, a pot for sauces, along with plates, cups, and coasters for six people. All the components stack vertically and are transported in a heat-molded silicone bag.

Combine: An Eco Chic Picnic Set from Bold a design company in style fashion home furnishings Category

Made with an eco-friendly bamboo multilaminate and a moldable composite of bamboo fibers and rice hulls, Combine comes in 11 bright colors for you to choose from.

Combine: An Eco Chic Picnic Set from Bold a design company in style fashion home furnishings Category