Shared posts

06 Jun 13:50

Worth the trouble

by tara

I went back and forth on whether or not I should write about these rhubarb Danishes. The trouble is, they're fussy. The dough requires a start the night before you want to bake, and so does macerating the rhubarb, and that's still only two of the three components done. And that dough, one that usually accepts a boost of whole wheat, demands all-white flour for truly gratifying puff and flake in this free-standing rendition. What's more, the quantities are awkward; in regards to the volume of rhubarb, there is the need for a certain surface area, not really weight, making it difficult to pin down a specific amount. A batch of the almond cream  (the last piece to this puzzle) yields more than needed; in light of which, there's the option of making only a half recipe with clumsy math, or doubling the pastry and rhubarb, or accepting that there will be leftover and making almond croissants with what remains.

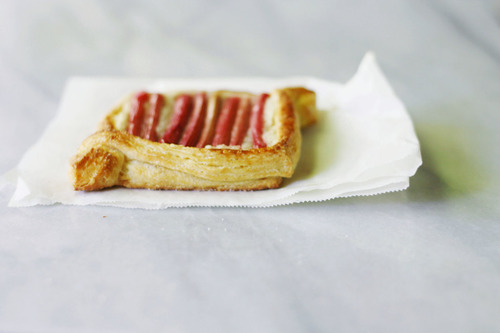
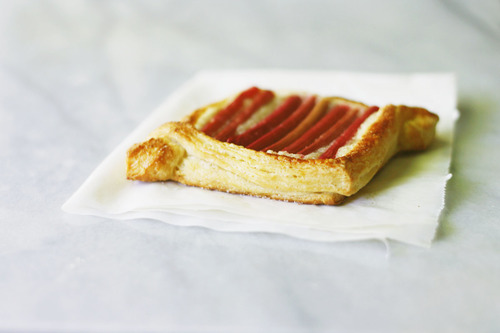
After the details and wait, these Danishes are frustratingly good. The pastry is crisp at the edge but tender still. The almond cream is fragrant and ever-so-slightly-gritty, providing delineation between the smooth layers of the pastry below and the yielding rhubarb above; rhubarb which, only lightly sweetened, retains a glinting sharpness, cutting back the richness of the overall bite. 

WIthout naming names, there's a few folks who have made habit of putting away two (two!) per sitting, with no crumb neglected on the plate. By all accounts these Danishes are worth the trouble. 

plain3.jpg

Scratch that. It's not trouble to make these, it's work. Not even difficult work, only an involved process. 

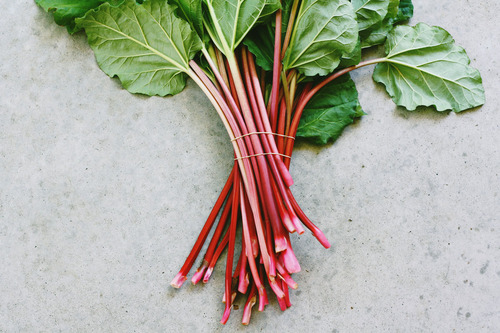
There was a reason behind the endeavour, besides really liking the idea of rhubarb Danishes, and that was the rhubarb itself. Sean brought bunches from a farm stand, two big bundles of stalks a few feet in length with leaves attached. He laid them in my arms in much the way a bouquet is handed to a crowned beauty queen, cradled in the crook of the elbow. These hot pink lookers, firmly pliant and none wider than my index finger, they called for similar pageantry. 

They needed a proper stage, not hidden under a crust or crumble, but left as they were for the most part and shown off. Danish dough as backdrop to neatly rowed rhubarb would do exactly that.

IMG_80712.jpg

I also know myself well enough to admit that I made these Danishes because I was avoiding another job I should have been doing. As I have a tendency to do when I'm daunted. I look for a different challenge to skirt around the one that really scares me.

I finally got around to listening to the audio copy of "The War of Art" (Warner Books, 2002) by Steven Pressfield that Sean put on my phone. When I've been playing it for a while and stop, I feel as though I've broken the surface after being underwater. It's an immersive listen, as Pressfield accounts the process and pitfalls of a creative life. I've been thinking of getting a hard copy, wanting to have the words laid out before me instead of rewinding and replaying the recording as often as I do. 

The first chapters of the book are about resistance, about what it means to commit yourself to work. In talking about the difficulties in getting started and the dangerous fear of coming to the end of a project, I thought about aiming for the middle. That comfortable place when momentum is behind you and you're not thinking yet about the sprint to the finish. It's when we fall into stride. Infuriatingly, despite anxiety of beginning, the only way to get there is by putting your head down, setting your shoulders, and simply do the work. 

There's no way around it; the following recipe reads long and boring and far too much effort to be worth it. It's doable. Promise. I've made them once a week for the last three.  As Pressfield says: 

"Set one foot in front of the other and keep climbing."

(I keep repeating that part.) 

OBDanish.jpg

RHUBARB DANISHES WITH ALMOND CREAM

A collection of recipes. The ingredients for the almond cream (with added vanilla bean) come from Bouchon Bakery (Artisan, 2012) by Thomas Keller and Sebastien Rouxel. It is a book you want on your shelf when it comes to anything baked, full of insights and tricks, and essential recipes. With great respect to the authors, I've rewritten their instructions — with larger capacity stand mixers, I find the small batch of almond cream (as this amount is called in the book) easier to make by hand, especially if you chose to halve the recipe. What's below reflects that.

FOR THE RHUBARB

  • Approximately 1 1/2 pounds (700g) fresh rhubarb, trimmed of leaves but left whole
  • 1/3 cup granulated sugar
  • 2 tablespoons water
  • seeds scraped from half a vanilla bean, plus the pod

FOR THE PASTRY

  • One recipe quick Danish dough, with white bread flour used to replace the same quantity of whole wheat

FOR THE ALMOND CREAM (makes approximately 1 1/2 cups, more than needed)

  • 1/2 cup + 2 1/2 tablespoons (73 grams) almond meal
  • 2 1/4 teaspoons (7 grams) all-purpose flour
  • 2.5 ounces (73 grams) unsalted butter, at room temperature
  • 1/2 cup + 2 tablespoons (73 grams) powdered sugar
  • Seeds scraped from half a vanilla bean
  • 2 tablespoons + 2 teaspoons (44 grams) lightly-beaten eggs, see note

TO ASSEMBLE

  • 1 egg, beaten for egg wash, see note
  • Granulated or sanding sugar for sprinkling


METHOD

Up to 24 hours before you want to bake, trim the rhubarb stalks to fit in a 9x13-inch dish. Combine the sugar, water, vanilla bean and pod in a saucepan. Bring to a boil over medium heat, then reduce the heat to low and simmer for 2-3 minutes, stirring, until the sugar is fully dissolved. Pour the hot syrup over the prepared rhubarb, turning the stalks to coat. Leave at room temperature to cool, then cover and place in the fridge at least overnight and as much as a full day, shuffling the rhubarb around in the syrup now and again.

The night before you want to bake, start the Danish dough. (You will complete the folds and finishing in the morning.)

The next day, about 2 hours before you want to bake, make the almond cream. Sift the almond flour into a medium bowl; break up any lumps in the sieve, and add to the bowl. Sift in the all-purpose flour and whisk together. 

Place the butter in a medium bowl and beat with a silicone spatula or a hand mixer until the butter lightens to about the consistency of mayonnaise and holds a peak when the spatula is lifted. Sift in the powdered sugar, stir to incorporate. Once blended, beat the sugar and butter together until fluffy, around 3 minutes. Scrape down the bottom and sides of the bowl. Add the almond mixture in 2 additions, stirring to combine, then stir in the vanilla. Pour in the eggs and mix until smooth. Transfer to an airtight container, pressing a piece of plastic wrap against the surface to prevent a skin from forming. Refrigerate until cold, about 2 hours. (The cream can be made up to 4 days ahead of time.)

30 or so minutes before you want to bake, finish the Danish dough by completing 5 turns (folds). Chill for 20 minutes. (Dough can be made ahead and frozen, then defrosted in the fridge before using.)

To assemble, preheat an oven to 375°F / 190°C. Line a baking sheet or half sheet pan with parchment paper and set aside.

On a lightly-floured work surface, roll the Danish dough to a 11x22-inch rectangle. Cut the dough into eight 5 1/2-inch squares. Refer to this diagram, and decide which shape you want to make. If making the vol-au-vent or envelope as I did, working one at a time, fold each square diagonally onto itself (forming a triangle, with corners lined up neatly). Leaving a thin border, cut a thin line starting from the bottom right corner of the triangle, parallel to the edge, almost up to the top. Repeat on the other side, leaving the tip attached. Unfold the package, brush with egg wash, then pull one of the cut edges over the other, lining it up with the interior edge of the square. Do the same with the other side, pressing lightly to seal, then place on prepared baking sheet. Repeat with remaining squares.

Spread the well of each shaped Danish with about 1 tablespoon of almond cream. Remove rhubarb from the sugar syrup, draining any excess liquid back into the dish. Trim the rhubarb to fit the pastries and line them up to cover the almond cream. (There may be rhubarb left over, do not discard.) Sprinkle entire Danish with sugar. Set aside to rise in a warm, draft-free area for 20 minutes. 

Meanwhile, pour the rhubarb sugar macerating liquid into a saucepan along with any remaining rhubarb, cut to into chunks. Bring to a boil over medium heat, then reduce the heat to a simmer. Cook, stirring, but not breaking up the rhubarb, until the liquid has thickened to a light syrup. With a slotted spoon, remove the rhubarb from the syrup. Turn off the heat but leave the syrup on the stove to keep warm.

Bake pastries in the preheated oven until puffed and golden, around 20 minutes. With a pastry brush, glaze the rhubarb and almond filling with the syrup. Remove the pastries to a baking rack to set for a few minutes, then serve warm. 

The Danishes are best eaten the day they are made. 

Notes: 

  • You may have egg left over from making the almond paste.  This can be kept aside and used for the egg wash. (If amount looks scant, you can bulk it up with a bit of heavy cream.)
  • The rhubarb removed from the syrup can be recombined with any extra glaze and served over ice cream or yogurt.  
  • If process shots will be of some aid, here is one, and another
23 May 12:35

Rhubarb Mousse Pie

by Ferdzy
And if you don't want a Mousse Pie, you can just put it in a bowl or bowls, and call it Mousse. Either way, this is a nice tart-but-not-too-tart rhubarb dessert.  I do like mousses etc, that are set with a firm meringue rather than whipped cream - so much lighter. The egg yolks do give it some more substance and help tone down the sourness of the rhubarb. Very nice!

8 servings
30 minutes prep time - add 3 hours for cooling and setting

Rhubarb Mousse Pie

Make the Crust:
2 cups (200 grams) graham cracker crumbs
1/3 cup unsalted butter

Preheat the oven to 350°F. 

Crush the crackers to fine crumbs. Melt the butter. If you are using a glass pie plate, the butter can be put right into the plate and melted in the microwave. Add the crumbs to the butter and mix well, until there are no dry crumbs left. Press them against the edges and bottom of the pie plate to form a crust.

Bake the crust for 10 minutes. 

Make the Filling:
4 cups diced rhubarb
1 tablespoon water
2 tablespoons plain gelatine
1/4 cup cold water
3 large egg yolks
3 large egg whites
1/4 teaspoon cream of tartar
3/4 cup sugar

Put the rhubarb and tablespoon of water into a pot, and cook over medium heat, stirring frequently, until the rhubarb is cooked and mostly disintegrated; about 15 minutes. Watch and stir carefully; this is a dry mix and until the rhubarb begins to cook and exude juice, it is at risk of scorching.

While it cooks, sprinkle the gelatine over the quarter cup of cold water in a small bowl. Let it soak until needed.

When the rhubarb is cooked, allow it cool for about 5 minutes. Whisk the egg yolks in a bowl, and slowly mix in a bit of the cooled rhubarb. Then, beat the egg and rhubarb mixture into the pot of rhubarb. Return it to medium heat, and cook, stirring constantly,  until slightly thickened. Remove from the heat, and stir in the soaked gelatine until well dissolved. Set the rhubarb mixture aside to cool as  you proceed.

Put the egg whites with the cream of tartar and sugar in the top of a double boiler, and put onto a pot of simmering water. Beat the egg whites until they are very stiff and starting to set; about 5 minutes.

Immediately fold or briefly beat them into the rhubarb mixture until evenly mixed. Scrape the filling into the prepared pie crust and spread it out evenly. Chill the pie until set; at least 2 hours.


Last year at this time I made Broiled Rhubarb.
14 May 23:38

Integrating C++11 in your diet

by DEADC0DE
Even for a guy like me who despises C++ and is happy to escape from it as often as possible, the reality of daily work still involves mostly C++ programming.

Being "good" at C++ is mostly a matter of having a good diet. Of course you try to write "sane" C++, staying C as much as possible, using a "safe" subset of the language (1 2 3 etc...), using static code checkers (vs2012 analysis at least, even if I've found it to be quite lax) and so on, these things have been written over an over. The bottom line is, you find your subset of things that are usable and of rules that never should be broken.

Now, parts of the new C++11 standard are coming into mainstream compilers (read, Visual Studio 2012) and so I had to update my "diet" to incorporate a few new, useful features (mostly C++ trying to look like C#, which ain't bad).

This is my small list of things you should consider to start using (at least on PC, for tools etc...).
  • Use today:
    • Auto - Variable type inference. Really, makes a big difference in readability and it's essential for things like stl iterators and so on. It's "deeper" than just shorthand notation as well, as it infers type it always avoids nasty implicit conversions and forces you to write everything explicitly. Also, it propagates changes, so if you change a type (e.g. constness) of a function parameter, you don't have to waste time on all the local types. It also enables new things with templates (but who cares) and lambdas. Note: VaX now supports auto and it shows the inferred type!
    • Lambdas - Simple, much better than function pointers, and also support closures which are the real deal, with a decent, explicit syntax. As C++ doesn't have garbage collection they have restrictions lambdas in other languages don't face, that's to say, you have to think of how you capture things and what are their lifetimes, but it's something we're used to by now (and made "easier" by the explicit capturing syntax, which forces you to think about what you're doing). Still you might want to fallback to regular functor objects when you need to make more explicit what you're doing in the "capturing" constructor/destructor but that's fine. Be sure to know what they really are (typeless objects on the stack... actually, their type can be captured locally by "auto", it avoids a conversion to function<>). Note that "auto" also works on lamba parameters, which is really great, and that you can pass "captureless" lambdas as function pointers too.
    • Type traits are fundamental, now you can static_assert away all your hacks (e.g. memset to zero a type? assert is POD...). True, we had them in Boost already, so this could be seen as "minor", but not many companies in my line of work would like to depend on Boost (even if depending only on traits is reasonable), re-implementing them is not trivial (unlike say, static_assert) and so this being part of the official standard is great. Also, the availability of Boost's ones lowers the preoccupation about compatibility.
    • Range based for - int array[5] = { 1, 2, 3, 4, 5 }; for (int& x : array)... Small, but saves some typing and every other language does have it...
    • Override and Final for virtual functions. Maybe in then years we'll even have "out" for non-const reference/pointer parameters...
  • Would use today, but not yet widespread (that to me, means non implemented by VS2012...):
    • Non-static member initializer - The ability to initialize member variables at the point of declaration, instead of having to add code to your constructors
    • Constexpr - Compile-time constant expressions. Could be nifty, i.e. can remove the need of hacks to do compiletime conversion of strings to hashes...
    • Delegating constructors - (suported in VS2013) A small addition, calling constructors from initializer lists of other constructors, it's useful but we already have workarounds and anyhow, you should really initialize things outside your constructor and never use exceptions. Even less interesting is constructor inheritance.
    • Raw string literals - (supported in VS2013) Another small addition, but important in some contexts, now you can have string literals that don't need escape codes, which is handy.
    • Unrestricted unions - Will enable having unions of types with non-trivial constructors which are not allowed today. No new syntax == good
    • Sizeof of member variables without an instance - The lack of this is really counter-intuitive and maddening 
  • Questionable/proceed with care/better to be avoided if possible:
    • Tl;Dr; don't use anything that adds more rules/alternative syntax for things that can be done already. Don't use templates, especially if you think you really found a cool way to use them (i.e. for anything that does not have to do with collections). Don't read Alexandrescu. Don't be smart.
    • Initializer lists - (suported in VS2013) These are nice, but they add more ways/rules to the resolution of constructors which is never great, function resolution rules in C++ are already way too complex. In some cases they're ok or even the only way to go (containers), but I would prefer to avoid them in custom classes and if there is another way around.
    • Variadic templates - (supported in VS2013) more template hackery. The syntax is quite ugly as well (...... or ...,... or ... ..., yes, let's try everything), but to be fair there are certain uses that might be worth allowing them in your code. An example is std::tuple. For "library" code only.
    • R-value references - They generated a lot of noise and you probably know about them (surely, you'll need to know about them), they do make a big difference in the STL (see this for an introduction) but the truth is, you probably already are careful to avoid temporaries (or objects!) and you don't do much work in your constructors... This is mostly good news for the STL and for the rare reasonable uses of templates (unfortunately, we didn't get concepts... so yes, C++ templates are still awful). They are complex. And that is NOT good, C++ is already obscure enough.
    • Typed enums - This is actually nice, but it adds yet more things to remember to the language, I'm undecided. The main good part of it is that typed enums don't automatically cast to integers (remember that vice-versa is already not true)
    • No_except. You shoulnd't use exceptions anyways.
    • Extern templates - Could reduce code bloat due to templates by not having them instantiated in all translation units. It doesn't mean you don't have to have all your templates in your headers though, it's a bit of a mess to use. You shouldn't use many templates anyhow, right? It's better to use less templates than think "extern" will patch the issue
  • Minor/Already doable with C++98 workarounds/Not often needed
    • __FUNC__ - Officially added to the existing __FILE__ and __LINE__
    • Minimal GC support - You're not likely going to use this, but it's good-to-know.
    • Static_assert - Chances are that you already know what this is and have macros defined. This new one has a better output from the compiler than your own stuff. The standardization of type traits is what makes static_assert very useful though.
    • Alignment - Chances are that you already have some compiler-dependent functions and macros etc defined (and also that you have aligned containers and aligned new, which C++11 still lacks... but hey, support for GC! no aligned new but support for GC... bah...). Chances are, they are clearer, more complete and easier to use than std::align, std::aligned_storage, std::max_align_t and all the crap. Also VS2012.2 std::align seems broken :|
    • Decltype - "Grabs" a type from an expression, fixes some old problems with templates, chances are that you'll never run into this other than some questionable uses in typedef decltype(expression)
    • Nullptr - Fairly minor, tl;dr NULL is now (also) called nullptr, which is a little bit better
    • Foward declaration of enums - Fairly minor, does what it says
    • Explicit conversion operator - (supported in VS2013)  Patches an ugly hole in the language with implicit conversions. You should ban all the implicit conversions (don't implement custom cast operators and mark all constructors as explicit) anyways and always use member functions instead, so you shouldn't find yourself needing it often...It has some usefulness with templates (which you should mostly avoid anyhow...)
    • Explicitly deleting or defaulting auto-generated class functions - Today, you should always remember to declare the functions C++ currently automatically implements for classes (private without implementation if you're not implementing them). This new extension will make that somewhat easier.
I've left out the new library features. C++11 introduced support for concurrency (atomics, threading support, fences, tasks, futures etc...) new smart pointers (unique/shared/weak with their corresponding "make" functions), containers (unordered_map, unordered_set, forward_list, array and std::optional) and so on.
Truth is, they are all nice enough and even needed, but they still fall short of what most people will need when crafting high performance applications (the domain of C++? surely, what we do in realtime rendering...) and chances are you already have rolled your own, optimized versions over these years which could still be even better than what the early compilers will provide on a given platform. E.G. over all these years we still don't have fundamental stuff like a fixed_vector, static_vector, and sorted/unsorted vector/list hybrid (buckets), concurrency is made of threads and not real tasks/jobs (thread pools), still no SIMD/instruction level parallelism etc.

C++ as a language is still so much behind on what matters for performance (regardless of Bjarne's wet dreams), we are and we will still be crafting our own stuff/relying on compiler extensions and intrinsics. We did well with that, we'll do well still.

Rant (can't be avoided when I write about C++): You'll be hearing (or already heard) a lot about "modern" C++, referring to C++11. It's a marketing lie, as most of what they did. Fundamentally, C++11 does not address any of the big issues C++ suffers from (bad defaults, pitfalls, half-arsed templates etc... basically the SIZE of the language and the quality of it), instead it's mostly concerned with "catching up" the back of the box feature list (and making an half-arsed attempt at that, as most things can't be done properly anyways...).
It doesn't even attempt to deprecate anything, it managed to kill the most useful features devoted at simplifying it (template concepts!), it adds a TON of new syntax while keeping the old defaults (no_except, the controls for automatic class functions...) thus hoping that you just remember to use it, and it adds a TON of features squarely aimed at crazy-template-metaprogramming users that most sane people will never allow anyways.
We don't do obfuscated C++ contests because it would be to easy already, with C++11, it would become really crazy...

If you want a full overview, see:
14 May 23:34

An Illustrated History Of Gas Masks

by Vincze Miklós

The gas mask has a history that dates back thousands of years, though it wasn't until World War I that it became nightmare fodder for Doctor Who and countless other stories. Here is a sometimes terrifying history of the gas mask, from its beginnings through the present day.

Playing leapfrog, 1934

Above. Able seamen at the Royal Navy Anti-Gas School at Tipnor, Portsmouth play leapfrog wearing gas masks, to accustom them to carrying out strenuous tasks in respirators, on January 22 1934.

(Photo by William Vanderson/Fox Photos/Getty Images)

The common sponge, ancient Greece

According to the Popular Mechanics (January 1984):

"The common sponge was used in ancient Greece as a gas mask, a compress, a contraceptive – and, of course, for bathing."

(via Wikimedia Commons/Tom Oates)

Banū Mūsā Gas Mask, c. 850 A.D

This gas mask was designed by the Banu Musa brothers in Baghdad, Iraq to protect workers working in polluted wells. The device was mentioned in the brothers book "Book of Ingenious Devices" that describes 100 inventions.

(Illustrations are from the brothers' book, but not about the gas mask, via Wikimedia Commons 1 - 2)

Plague Doctor's Mask

The bird-like beak mask was often filled with sweet or strong smelling herbs or spices – lavender, mint, camphor or dried roses. They've believed it would banish the evil smells.

(via Wikimedia Commons/Traité de la peste, 1721 and etsy/Tom Banwell)

Alexander von Humboldt's mask, 1799

It was the first device with respirator, invented for miners by a Prussian mining official Alexander von Humboldt.

(via Asher Rare Books)

A smoke protecting apparatus for firemen by John and Charles Deane, 1823

In the early 1820s John Deane have seen a burning stable with trapped horses in it. To get through the smoke and rescue all the horses he put on an old knight-in-armor helmet air-pumped by a hose from a fire brigade water pump. The saving was successful, and in 1823 John and Charles Deane have invented the Smoke Helmet:

"An apparatus or machine to be worn by persons entering rooms or other places filled with smoke or other vapour, for the purpose of extinguishing fire or extricating persons or property therein."

The device was a single copper helmet with a long leather hose attached to the rear. A long leather hose was attached to the rear. Five years later it was converted for underwater use.

(via Submerged)

Lewis Haslett: "Inhaler or Lung Protector", 1847, patented in 1849

It allowed breathing through a nose or mouthpiece fitted with two one-way clapper walves. The filter was made of wool or other porous substances with water could keeping out dust.

(via Google Patent Search)

The charcoal air-filter of John Stenhouse, 1854 (patented in 1860 and 1867)

In the copper-framed mask there was powdered wood charcoal between the two hemispheres. The charcoal could be replaced through a small door in the wire gauze.

(via Wikimedia Commons)

John Tyndall's respirator, 1871

The Irish physicist took Stenhouse's mask and added a filter of cotton wool saturated with charcoal, lime and glycerin. The new device has filtered smoke and some noxious gases from air.

(via Wikimedia Commons and steampunksp)

Samuel Barton's respirators, 1874

This respirator had rubber-and-metal face cover, glass eyepieces, rubber-coated hood and a metal canister on the front of the mask contained lime, glycerin-soaked cotton wool and charcoal.

(via Google Patent Search/148868)

Smoke-Excluding Mask, George Neally, 1877 and 1879

The first version had a filter carried on the chest, but two years later he patented another version with the filter mounted directly on the facepiece.

(via Google Patent Search - 1 and 2)

Fleuss Apparatus, 1878

The rubberized mask covered the whole face was connected via tubes to a breathing bag.

(via History of Diving Museum)

Vajen-Bader Smoke Protector

The Indianapolis-based company produced smoke protectors from 1881.

(via Fire Museum Network)

Loeb's Respirator, 1891

The German Bernhard Loeb's protective equipment had a triple-chambered metal canister that was attached directly to the closed helmet.

(via Google Patent Search/533854)

Muntz Respirator, 1902

The proper duckface from the first years of the 20th century is a full head-covering mask with a sponge- and a carbon-based filter.

(via Google Patent Search/703948)

Safety Hood and Smoke Protector, Garret A. Morgan, 1912, patented in 1914.

This device had a cotton hood with two hoses which hung down the floor, allowing the wearer to breath the air found there.

In 1916 he won an acclaim for his device after they've used the device to rescue some men from the gas- and smoke-filled tunnels beneath Lake Erie in the Cleveland Waterworks.

(via Google Patent Search - 1 and 2)

The British Army Black Veil Respirator

After the first gas attack ever near Ypres in Belgium (22 April 1915), some Allies were dead because of the chlorine gas. The British reaction was really quick: they've made some respirators from cotton mouth pads with a long cloth. The pads provided no protection when dry, so the Black Veil could work for about five minutes against a normal concentration of chlorine.

(via Australian War Memorial)

A German soldier from the WWI

(via Old Photos)

Hypo helmet or British Smoke Hood, 1915

Constructed by Dr. Cluny MacPherson of Royal Newfoundland Regiment after he saw a German putting a bag over his head after a gas attack.

The Hypo helmet contained glycerin and sodium thiosulphate that protected against chlorine. Two and a half million had been made.

(via Gunboards and Wikimedia Commons/Imperial War Museums)

GM-15 (Gummimaske-15) from Germany, WWI

(via Gasmasklexikon, Wikimedia Commons/German Federal Archive)

Three workers demonstrating the different types of gas masks used in mine rescue work, 1925

(Photo by Fox Photos/Getty Images)

Dustbowl masks, c. 1935

Three girls modelling various dustbowl masks to be worn in areas where the amount of dust in the air causes breathing difficulties, circa 1935.

(Photo by Bert Garai/Keystone/Hulton Archive/Getty Images)

Finnish civilian gas mask from 1939

(via Wikimedia Commons)

Gas Protection, 1941

Three air raid wardens wearing a new type of gas mask, designed for the elderly and those with chest complaints, during a mock gas attack in which tear gas was released in Esher High Street on 5th April 1941.

(Photo by A. Hudson/Topical Press Agency/Getty Images)

Mickey Mouse Gas Mask, 1942

Thes gas masks were produced by the Sun Rubber Products Company from early 1942, with Walt Disney's approval to protect children in case of an American chemical attack.

(via colordonor and terrapapers)

Gas Mask Wedding on Miyakejima, Izu Islands, Japan

The land is atop an active volcanic chain that has erupted six times in the 20th Century. In 2000, all of the islands residents were evacuated, but in 2005 they were allowed to return permanently but were required to carry gas masks.

(via imgur)

Slicing onions

(via emorfes)

A Member Of The U.S. Air Force 51St Security Forces Squadron Talks On The Radio Through His Chemical/Biological Protective Mask, January 6, 1999

(Photo By Usaf/Getty Images)

(The main picture of the post is from 1917, Hulton Archive/Getty Images)

05 May 21:16

Helmets of Holy Roman Emperor Charles V circa 1540 (by...

27 Apr 11:56

GIF of Yu Darvish's consistent delivery

by Jason Kottke

One of the most formidable tools in a pro baseball pitcher's arsenal is the consistency of pitching motion when throwing different kinds of pitches. If your delivery looks the same to an opposing batter when throwing a 95-mph fastball, a 80-mph curve, and a 85-mph change-up, well, you've really got something there. Texas pitcher Yu Darvish is ripping up the AL this year with a 4-1 record, 1.65 ERA, and 49 strikeouts, which prompted Drew Sheppard to layer five of Darvish's pitches on top of one another in an animated GIF:

Yu Darvish

All the Darvishes use the same delivery but the five balls end up crossing the plate at very different times and locations. A perfect use of time merge media to illustrate just how difficult it must be stand in there against the controlled athleticism of a pitcher at the top of his game. "The Mona Lisa of GIFs" indeed. (via @djacobs)

Update: Here's a video demonstrating similar consistency in Roger Federer's serve:

I remember NBC using this technique at various points during the last couple of Olympics as well. (via @agonde)

Tags: baseball   sports   Yu Darvish
27 Mar 15:04

Pistachio chicken (Fustukiyyeh)

by Joumana

Fustukkieh

You are unlikely to find this dish in a contemporary Middle-Eastern cookbook; the recipe goes back to the 10th century. I read about it in La cuisine de Ziryab (Ziryab’s kitchen) by Farouk Mardam-BeyThe book is a collection of essays on traditional Arab ingredients such as figs, dates, olive, bulgur, chickpeas, artichoke, fava bean or saffron with recipes for each taken from the tradition of both Arab and non-Arab countries of the region, such as Iran, Turkey or Spain. 

The recipe is  simple: Chicken breasts are briefly cooked then shredded;  covered in water, pistachio and almond powder and a pinch of sugar and cooked gently for a little while longer. The pistachios and almonds turn into a paste and coat the chicken with their delicate flavor. 

I was reading that the Arabs of the medieval courts produced at least a dozen cookbooks and this is the simplest version of the fustukiyyeh (word meaning made of pistachios). 

Original recipe calls for shredding the chicken breasts as fine as possible.

INGREDIENTS: 2 servings

  • 1 whole chicken breast, cut in 2 or 3 pieces
  • 1/4 cup almond flour
  • 1/4 cup pistachio flour
  • 2 Tbsp. unsalted butter
  • 1 Tbsp granulated sugar
  • salt to taste

METHOD:

  1.  Place the chicken breasts in a saucepan; add 1 1/2 cups of water and a dash of salt. Bring to a simmer and cook the breasts for 7 minutes. Remove the breasts and shred them using 2 forks; place them back in the saucepan and  add the butter, almond, pistachio flour and sugar and simmer a few minutes longer covering the pan until the breasts are thoroughly cooked. Serve. 

NOTE: Pistachio and almond flour can be made by drying the peeled nuts in a 300 oven first for 5 to 10 minutes; cool then transfer to a food processor or coffee grinder and reduce to a powder. To peel the nuts, boil them in water for 2 minutes, drain and peel; spread them  on kitchen towels for one hour or longer.

IMG_0305

This man sells rolls (called kaak) topped with sesame seeds; the rolls get stuffed with cheese (similar to mozzarella, called akkawi). Then he roasts the roll in a little furnace, flipping it every few minutes until the cheese is melted. Cost US$1.

15 Mar 20:48

Shakshuka

by David

Shakshuka

I’ve been meaning to get into the Shakshuka groove ever since I had it for breakfast at Nopi in London, and on my trip to Israel, where this North African dish wowed me – and my taste buds – every morning. Although various versions abound, the most widely known Shakshuka involves eggs softly cooked in a hot skillet of spiced tomato sauce. I’ve had plenty of spicy foods in my life, but the complex seasoning in the sauces that I’ve tasted in the ones I had lingered with me for months afterward, and I had no choice but to make it at home. (Or move to London – or North Africa.)

Continue Reading Shakshuka...

11 Mar 12:18

Pistachio Sandesh / Pista Sondesh : A Bengali Sweet

by noreply@blogger.com (Hamaree Rasoi)

Sandesh/ Sondesh ( Sweet with cottage cheese) and a Bengali Foodie both complement each other.  There is not a single instance where you visit a Bengali’s house during evening and you are not offered a plate of shandesh. Moreover, we Bengalis are known for having a sweet tooth ( another reason why Bengali language is adjudged as the Sweetest language by UNESCO). So my dear friends indulge in a variety of sandeshes to your heart’s fill and you won’t at all regret it. I have added pistachio powder to chenna to make it flavored one.

Ingredients:
2 Ltr Full cream Milk
2 tbsp Lemon juice
3/4 cup Sugar(powdered) {you can adjust the sweetness }
1/2 cup Pistachio powder
1 tsp Rose water
1 tsp Cardamom powder 
2-3 green Color drops is optional.(I added here nice color)
Few strands of Saffron for decoration
Few Pistachios for decoration

Method:
To make chenna first, take a pan and bring the milk to boil on low flame. Stir occasionally to avoid getting scorch from bottom. Then add lemon juice and milk will start to curdle. This is called cottage cheese or paneer / chenna. Once you see water turning slight green turn off the heat and drain the water through a cheese cloth. Now wash the chenna under running water to wash off the lemon flavor. Do not squeeze out the excess water with your hand just tie the sides of cheese cloth together and hang to enable the water to drain away.

Knead chenna well with your finger tips and knead until the cracks on chena starts to disappear. And the chenna becomes smooth. Now add sugar, saffron strands, pista powder, rose water, cardamom powder and again knead well. The art lies in kneading, the more you knead the less grainy texture at the end.

Now take a non stick pan and add this mixture and fry on low heat. Stir continuously till the mixture leaves the sides of the pan. Remove from heat. Leave this mixture for a minute to cool and then take a little mixture in your hand and roll it into a small ball or you can design them beautifully by Sandesh molds. Decorate the sandesh with some chopped pistanchios and saffron strands.

10 Mar 20:53

Ellasonitiko (Slow Roasted Pork Belly With Crackling)

by Peter Minakis

IMG_1739Last summer was a hot one and avoid the cities and stay near the beaches where most of my friends and family are, anyways. Once the temperatures get cooler, the evenings longer – that’s when it’s time to head into the city and explore without sweating off half your body weight.

September is a wonderful time of year to visit Greece – less tourists, cheaper airfares and hotels and better service. This the period I use to wander and discover more hidden gems in Thessaloniki and last year I found one right under everyone’s nose – near the Kamara.PowerPoint Slide Show - [salonika [Compatibility Mode]] 05022013 53631 PM

The Arch of Galerius (Kamara) was built in the early 4th century AD and commissioned by then Roman Emperor Galerius. Today, the Kamara remains one of Thessaloniki’s most recognized landmarks (second only to the White Tower) and thousands of rendezvous have been arranged here.IMG_6108-1

Got a date? Meet in front of the Kamara. Arranged to take an out of towner for a tour of the city? Meet at the Kamara. Friends/parea from all over the city need a meeting point? Kamara!

I found myself waiting around the Kamara and just to the left of the arch did I find this corner eatery on Egnatia called Dia Xoipos. As you can guess from the name of the shop, these guys specialize in pork from souvlakia to kontosouvli, there’s some chicken through in there too!IMG_8623

What attracted me to this shop is the tied and rolled meats that were slowly roasting in their rotisserie: classic pork kontosouvli, beef and a tied and rolled pork belly that I just had to try!

The outside of the belly was crisp, the inside juicy and the belly had a stuffing of chopped sun-dried tomatoes, cracked coriander seeds and oregano (or so I remember).IMG_8620

The fellas at Dia Xoipos called it Ellasonitiko (from Ellassona, Thessaly) and today I’m going to share with you my version. You will need a whole side of pork belly (about 15 -17lbs) with the rind/skin on, some butcher’s twine, herbs, spices, sun-dried tomatoes, olive oil, sea salt, ground pepper and lots of time. Lots of time. This recipe requires that you prep 3 days in advance – mostly for ensuring crisp crackling.IMG_8640

I recently was given some wonderful Prince Edward Island (PEI) pork from friend and butcher, Rob Brady of Brady meats in Waterloo, Ontario. The quality of meats at Brady’s is never questioned, the butchering…impeccable!

The joy in eating this meet is the juicy, flavourful meat contrasted with the crisp, crackling that you are rewarded with after treating this wonderful piece of meat with tender loving care. Make no mistake, pork belly does contain alot of fat but much of renders, leaving you with a delicious, moist meat and crisp crackling.IMG_8642

Ellasonitiko (Slow-Roasted Pork-Belly With Crackling)

(makes 25 servings)

1 whole pork belly (approx. 15-17lbs)

olive oil

fine sea salt

Filling

1 cup sun-dried tomatoes

1 Tbsp. fennel seeds, crushed

1 Tbsp. coriander seeds, crushed

sea salt & fresh ground pepper

3-4 Tbsp. of finely chopped fresh rosemary

3-4 Tbsp of fresh thyme leaves

2-3 tsp. sweet paprika

12-15 cloves of garlic, smashed

  1. Get a kettle of water boiling and place a wire rack over a sink and place your belly on the rack. Once the water is aboil, pour it over the skin of the belly then pat-dry (this step helps crisp the skin). Score the skin with a very sharp knife and set aside.
  2. In the meantime, add your sun-dried tomatoes in a food processor and pulse until the sun-dried tomatoes  are chopped into small pieces.
  3. Coarsely crush your fennel and coriander seeds with a rolling pin, heavy bottomed pot or spice grinder and set aside. Flip your pork belly to expose the inside and season generously with sea salt, ground pepper and now sprinkle the fennel, coriander, rosemary and thyme and paprika smear in the minced garlic.
  4. Now lay the chopped sundried tomatoes lengthwise along the center of the belly. Roll-up the belly and tightly tie-up the pork belly. Place on a wire rack over a baking tray and place in a fridge uncovered for 3 days (the dry air of the fridge will again help crisp the skin later).
  5. On the third day, take your pork belly out of the fridge and allow to come to room temperature. Pre-heat your oven 450F and position the rack in the upper-middle of the oven.
  6. Rub the outside of your pork belly with olive oil and generously sprinkle with sea salt and rub into skin (and cracks). When your oven reached 450F, place the pork belly in the oven and roast for about 30 minutes or until you see the ski crisp, bubble and crackling has formed.
  7. Remove the pork belly, lower your rack to the middle of the oven and lower the heat to 300F. Slow roast your pork belly for 4-5 hours, occasionally draining off the fat from the roasting pan (allows for a dryer roast).
  8. Remove from the oven, allow to cool uncovered for at least an hour before slicing. Serve with Greek fries or roasted Greek potatoes. Pair with a Kechbari Savatiano-roditis restina.IMG_1771

Post Footer automatically generated by Add Post Footer Plugin for wordpress.

© 2013, Peter Minakis. All rights reserved. If you are not reading this post in a feed reader or at http://kalofagas.ca then the site you are reading is illegally publishing copyrighted material. Contact me at truenorth67 AT gmail DOT COM. All recipes, text and photographs in this post are the original creations & property of the author.


Ellasonitiko (Slow Roasted Pork Belly With Crackling) was first posted on March 10, 2013 at 10:49 am.
©2012 "Kalofagas - Greek Food & Beyond". Use of this feed is for personal non-commercial use only. If you are not reading this article in your feed reader, then the site is guilty of copyright infringement. Please contact me at truenorth67@gmail.com

The post Ellasonitiko (Slow Roasted Pork Belly With Crackling) appeared first on Kalofagas - Greek Food & Beyond.

19 Feb 19:58

Laab

Laab (Thai Minced Pork Salad)-photo SERVES 2-4

INGREDIENTS⅓ cup canola oil
3 tbsp. mashed garlic
4 red Thai chiles, stemmed and minced
10 oz. ground pork
1 tsp. crushed red chile flakes
1 tsp. Chinese five-spice powder
1 tsp. freshly grated nutmeg
1 tsp. kosher salt
¼ tsp. ground black pepper
¼ tsp. ground coriander
¼ tsp. ground cardamom
2 tbsp. minced mint, plus more to garnish
1 tbsp. minced scallions, plus more to garnish
1 tbsp. minced cilantro, plus more to garnish
2 tsp. fish sauce
Thinly sliced kaffir lime leaves, lemongrass, shallots, cucumbers, and cherry tomatoes to garnish

INSTRUCTIONS1. Heat oil in a 12" skillet over medium heat. Add garlic and chiles, and cook, stirring, until fragrant, about 2 minutes. Add pork, chile flakes, five-spice, nutmeg, salt, pepper, coriander, and cardamom, and cook, stirring, until pork is browned, about 2 minutes. Stir in mint, scallions, cilantro, and fish sauce, and cook until pork is done, about 4 minutes.

2. Transfer to a large serving bowl, and top with scallions, cilantro, kaffir leaves, lemongrass, shallots, mint, cilantro, cucumbers, and... Get the recipe >>


15 Feb 15:47

Lamb Stifado

by Ferdzy
Lamb Stifado is a traditional Greek lamb stew, loaded with onions, tomatoes, and spices. Since there is no reason not to use canned tomato products for this, it can be made all through the winter. Serve it with crusty bread, rice or mashed potatoes, along with a salad or green vegetable. It is extremely easy to make, and it is best made in advance then reheated, like most stews.

Traditionally this is made with tiny whole onions, but I prefer it with the onions chopped up so that they cook down into more of any even sauce.

The only thing that might be considered remotely difficult about making this is fishing out all the pieces of spice later on. Do your best, but warn anyone eating it to keep an eye out for them. I suppose it would make more sense to keep them enclosed in a spiceball or teaball while the stew cooks, but I always seem to forget. They could also be tied in a piece of muslin if you don't have one big enough.

4 servings
2 hours 30 minutes - 30 minutes prep time

Lamb Stifado
900 grams (2 pounds; about 6) medium onions
4 to 6 cloves of garlic
4 tablespoons olive oil
500 grams (1 pound) boneless stewing lamb
2 cups diced tomatoes
1 cup tomato sauce
2 to 3 bay leaves
a 1" to 2" piece of cinnamon stick
6 to 8 allspice berries
3 or 4 whole cloves
1 teaspoon cumin seed
1/2 cup red wine
1/4 cup red wine vinegar
salt & pepper

Peel and chop the onions, fairly coarsely. Peel and mince the garlic.

Heat a tablespoon of oil in a large skillet, and cook half the onions until softened and reduced in volume, and somewhat browned. Remove them to the stew pot. Repeat withe the remaining onions, this time adding the garlic a minute or two before removing the onions to the stew pot.

Heat the remaining oil in the skillet, and add the lamb, cut in bite-sized pieces, being sure they are dry and well spaced out. Cook until brown, turning them to brown them all over. Add them to the stew pot.

Add the remining ingredients to the stew pot, and bring to a simmer. Simmer for 1 to 2  hours, stirring occasionally. Like most stews, this keeps and reheats well; indeed it is better reheated.
12 Feb 15:23

Slow-Roasted Leg of Lamb (The Greek Way)

by Peter Minakis

IMG_8298Greeks know their way around lamb and we unabashedly cook it well and I mean well done. Do not confuse well done with dry, hard to chew meat. You are not going to experience this here.

I treat a leg of lamb much like a lamb shank, brown the meat then place in a roasting pan with aromatics, seasoning and some braising liquid. The fat from the lamb leg melts way, the connective tissues break down and the braising liquid helps transform the muscular leg of lamb into a succulent, flavourful meat that is cooked well, juicy and very flavourful.

The flavour profile is classic Greek with the generous use of garlic, thyme, oregano, rosemary and some bay leaves as well. The lamb is studded with slivers of garlic, sweet paprika balances the lemon juices and some olive oil and white wine bring the pan juices together.

While the lamb is roasting I baste it with pan juices, flip the leg to evenly cook and prevent any dryness and this foolproof recipe will please those who love lamb and even gain some new fans!IMG_8301

Slow-Roasted Leg of Lamb

(serves 8-10)

1 leg of lamb (bone in) or 2 short-cut legs of lamb (6-8lbs.)

1 head of garlic

fine sea salt

fresh ground pepper

approx. 2 tsp. garlic powder

approx. 2 tsp. sweet paprika

2 medium onions, peeled & quartered

1 cup dry white wine

2-3 sprigs of fresh rosemary

10 sprigs of fresh thyme

2-3 tsp. dried Greek oregano

2-3 bay leaves

juice of 2 lemons

1/2 cup extra-virgin olive oil

hot water

salt and pepper to taste

  1. Peel the skins off the garlic clove and slice them into slivers. Stick a paring knife into the lamb and make a hole, then slip a sliver of garlic. Repeat and insert as many slivers of garlic as you can.
  2. Pre-heat your oven to 550F and place the rack in the middle position. Drizzle your lamb with some olive oil and season with salt, pepper, garlic powder and paprika. Place the leg of lamb in a roasting pan that just fits the leg. Place in your pre-heated oven and roast uncovered for about 10-15 minutes or until browned, then flip the leg and roast for another 10-15 minutes.
  3. Remove the lamb from the oven and reduce the heat to 350F. Place the quartered onions around the lamb, add any remaining slivers of garlic, add the herbs (thyme, bay, rosemary, oregano) and squeeze in the lemon juice and pour the wine into the pan. Add the olive oil and enough hot water to cover  third of the lamb.
  4. Cover and place the lamb back in the oven for 2 hours (add more hot water if needed), baste the lamb once an hour. After two hours, flip the leg of lamb (add more water if necessary and adjust seasoning of liquid with salt and pepper).IMG_8288
  5. After 3 hours, the leg of lamb shoulder be a deep brown and the bones will be exposed and the meat should show signs of separating from the bone.
  6. Remove the lamb from the oven, baste with liquid and allow to rest. Serve with Greek roast potatoes or pair with roast potatoes tossed in leg of lamb drippings.
  7. Pair with a Papaioannou Estate Agiorghitiko red Nemea.

*TIP: Have some peeled potatoes (quartered) to roast in another roasting pan and drizzle with olive oil and season with salt and pepper. Pour enough pan juices from the lamb leg to come up a third of the way on the potatoes and toss to coat. Taste, adjust seasoning and crank your oven up to 450F and place the potatoes in the oven to roast for 35-40 minutes or until fork-tender (the lamb will stay warm covered in the roasting pan on the stove-top).IMG_8303


Post Footer automatically generated by Add Post Footer Plugin for wordpress.

© 2013, Peter Minakis. All rights reserved. If you are not reading this post in a feed reader or at http://kalofagas.ca then the site you are reading is illegally publishing copyrighted material. Contact me at truenorth67 AT gmail DOT COM. All recipes, text and photographs in this post are the original creations & property of the author.

Slow-Roasted Leg of Lamb (The Greek Way) was first posted on February 10, 2013 at 9:50 pm.
©2012 "Kalofagas - Greek Food & Beyond". Use of this feed is for personal non-commercial use only. If you are not reading this article in your feed reader, then the site is guilty of copyright infringement. Please contact me at truenorth67@gmail.com

The post Slow-Roasted Leg of Lamb (The Greek Way) appeared first on Kalofagas - Greek Food & Beyond.

23 Jan 20:32

French fries, Aleppo-style

by Joumana
Alexei.sumila

This sounds tasty.


fries from Aleppo

To say that Aleppo’s cuisine is famous in the Middle-East would be stating the obvious. In fact, one of Lebanon’s premier chef, Mrs.  Marlene Mattar, has recently published a cookbook devoted to the cuisine of this wonderful city, Maedat Marlene men Halab.

This recipe for French fries, Aleppo-style, is one of many I tried from her book. It combines Aleppo flavors with the straight-forward French fries and is, of course, delicious.

INGREDIENTS:

  • 2 lbs potatoes
  • oil for frying
  • Sauce: 1 tbsp mashed garlic (4 cloves)
  • 5 Tbsp olive oil
  • 1 Tbsp ground coriander
  • 1 tsp cinnamon
  • 1 Tbsp red pepper paste (mild)
  • 2 Tbsp fresh lemon juice
  • salt, to taste
  • 1/2 tsp of paprika or chili powder
  • parsley to garnish (optional)
  1.  Peel the potatoes and cut in matchsticks-size. 
  2. Prepare the sauce: Heat the olive oil in a small skillet and add the coriander, cinnamon, mashed garlic and the red pepper paste and lemon juice. Stir to combine and set aside. (This step can be prepared a day ahead).
  3. Dry the potatoes thoroughly with paper napkins; het the oil to 375F and fry the potatoes till golden. Remove the french fries and drain. Place the fries over the sauce and stir gently to combine. Sprinkle with paprika or chili powder and garnish with parsley. Serve warm or at room temperature. Aleppo fries

Deir el-Qamar

Deir el-Qamar (Convent of the moon),  former capital of Mount-Lebanon,  offers many historic landmarks and is nestled in the Chouf Mountains, South-East of Beirut by 30 miles.

18 Jan 16:16

Chicken Vindaloo

Alexei.sumila

Probably well known enough, but i'm saving recipe for myself... that and to break the dust off our sharing.

Chicken Vindaloo-photo SERVES 4-6

INGREDIENTS1 tbsp. whole black peppercorns
1 tbsp. black mustard seeds
2 tsp. cumin seeds
2 tsp. coriander seeds
1 tsp. fenugreek seeds
5 whole cloves
1 1" stick cinnamon
¼ cup Hungarian paprika
¼ cup palm vinegar
1 tsp. ground turmeric
1 tsp. light brown sugar
16 cloves garlic, minced
1 2" piece ginger, peeled and minced
2 lb. boneless, skinless chicken thighs, cut in half
3 tbsp. canola oil
2 large yellow onions, finely chopped
10 thin green Indian chiles, stemmed, seeded, and minced
1 lb. small new potatoes, cut in half (cut in quarters if large)
Cooked white rice, for serving

INSTRUCTIONS1. Heat peppercorns, mustard, cumin, coriander, and fenugreek seeds, cloves, and cinnamon in a 12" skillet over medium-high heat, and cook, swirling pan occasionally, until lightly toasted, about 2 minutes. Transfer to a bowl, and let cool; working in batches, transfer spices to a spice grinder and process until finely ground. Transfer to a small food processor along with paprika, vinegar, turmeric, sugar, ¼ of the garlic, and half the ginger; puree until... Get the recipe >>


31 Dec 01:44

Kopi Jahe (Indonesian Coffee with Ginger)

Alexei.sumila

Intersting

Kopi Jahe-photo SERVES 6

INGREDIENTS6 tbsp. coarsely ground coffee
1 3"-piece ginger, smashed
3½ oz. palm sugar, coarsely chopped

INSTRUCTIONSBring coffee, ginger, and sugar to a boil in a 2-qt. saucepan with 6 cups water. Reduce heat to medium; cook, stirring until sugar is dissolved.
Get the recipe >>
05 Dec 15:54

Julköttbullar (Swedish Meatballs for Christmas)

by Rachel Rappaport
Alexei.sumila

I think these are worth making just for the name alone.


Ingredients:
1/3 lb very lean ground beef
1/3 lb ground pork
1/3 lb ground veal*
1/2 cup fresh breadcrumbs
1/3 cup milk (or, more traditionally, cream)
1/2 small onion, grated
1/4 teaspoon white pepper
1/2 teaspoon allspice
pinch ginger (optional)
pinch nutmeg (optional)
1 egg, beaten

Directions:
Preheat oven to 350.

Place the breadcrumbs and milk (cream) in a medium bowl. Allow to soak 5 minutes. Add the remaining ingredients and mix until well combined. Form into very small (walnut-sized) meatballs. Heat some oil in a oven safe pan (I used a cast-iron skillet). Add the meatballs and saute until browned on all sides. Place the pan in the oven and bake for 10-20 minutes or until the meatballs are fully cooked. Serve immediately.

*Or you can use a mix of just beef and pork. I had all three so that is what I used. I found that Swedish cookbooks often suggest a mix of beef and elk(!) but that's a little difficult to find here.
My thoughts:
Last year we went to Lucia Fest at the American Swedish Historical Museum in Philadelphia and it re-sparked my interest in making Swedish foods at home. We don't have much in the way of Swedish cuisine here in Baltimore beyond Ikea but whenever I am in NYC, I always visit Swedish restaurants and even better, Sockerbit, the Swedish candy store. I love it but it is much more affordable to make the food at home.

I had read up on (and made a couple!) traditional Christmas foods last year but it was a little too late to share most of the recipes. This year I tracked down some julmust (Swedish Christmas soda) to fortify myself and went about creating some recipes for these Swedish treats.

Perhaps the easiest and most "friendly" recipe are these meatballs. Very similar to köttbullar, the more everyday Swedish meatballs, these are heavily spiked with allspice and are found on the julbord, the Christmas smörgåsbord. Or if you are not up to hosting a full julbord, served with some potatoes, gravy and lingonberry preserves for lunch or dinner. They are so good and simple to make. Some recipes call for just pan frying the meatballs but I think they get crisper and cook more evenly with the method I shared here.

I'm hoping to tackle some more Swedish dishes this season so look for them later this month. In the meantime, check out pepparkakor, a tasty cookie for Christmas and Ärtsoppa (Swedish Yellow Pea Soup) and Kåldolmar (Swedish Stuffed Cabbage) which aren't Christmas recipes per se, but very tasty! All recipes, text and photographs on Coconut & Lime are the original creations and property of Rachel Rappaport and are for personal, nonprofit use only. Do not post or publish anything from this site without written permission from the author. E-mail me (coconutlimeblog @gmail.com) with any questions.
27 Nov 14:27

Mrouzia (Honey-Braised Lamb Shanks)

Alexei.sumila

Yey lamb!

Mrouzia (Honey-Braised Lamb Shanks)-photo SERVES 4

INGREDIENTS¼ olive oil
3 tbsp. unsalted butter
4 lamb shanks, frenched, if desired
Kosher salt and freshly ground black pepper, to taste
1 large white onion, finely chopped
1 cup golden raisins
2 tbsp. ras el hanout (available at The Spice House, or make your own)
¼ tsp. crushed saffron threads
1 stick cinnamon
1 cup blanched whole almonds
⅔ cup honey
Toasted sesame seeds, to garnish

INSTRUCTIONS1. Heat oil and butter in an 8-qt. Dutch oven over medium-high heat. Season lamb generously with salt and pepper, and cook, turning as needed, until well browned all over, about 12 minutes. Transfer lamb to a plate; set aside.

2. Add onion to pot, and cook, stirring, until soft, about 4 minutes. Add raisins, ras el hanout, saffron, and cinnamon, and cook, stirring, until fragrant, about 2 minutes. Add lamb, almonds, honey, and 3 cups water, and bring to a boil; reduce heat to medium, and cook, partially covered, until lamb is very tender, about 3½ hours. Divide shanks and sauce among serving plates, and sprinkle each with sesame seeds.

Get the recipe >>


10 Nov 22:14

New York Museum Boasts 2,000-Year-Old Ancient Egyptian d20

by Mike Kayatta
Alexei.sumila

Shweet

Next time you swing your +3 flaming longsword at an owlbear, you may be following in the footsteps of pharaohs.

View Article

07 Nov 21:38

La Cuisine Lyonnaise - Rognons d'Agneau à la Moutarde

by L Vanel
Alexei.sumila

I'd replace kidneys with some other offal but the sauce sounds damn tasty.


This morning while out stocking up on the good eggs for a class on French sauces with the children, I saw the girl who smokes the bacon and she had, in addition to her regular lamb cuts, very attractively priced rognons d'agneau or lamb kidneys for one euro each.  Knowing that Loic was home working on his calculations, I decided to surprise him with a quick plate of rognons d'agneau à la moutarde when I got home.  We are alike in that we both consider offal in its many forms to be comfort food.  This is one of the many things that endears him to me. He appreciates my love for this type of dish and I never have to ask if he's in the mood.

Many of the cheap cuts so beloved to the Lyonnais take a while to prepare.  Sweetbreads have to be soaked, cheeks, tripes and various other delicious cuts must be slow cooked.  But not rognons.  The most time consuming part of rognons is finding them, ultra fresh.  When they fall in your lap straight from the producer like this, the only thing to do is to put everything else aside and cook them up, immediately.  This dish is so simple, it literally took me 15 minutes from start to finish to get it on the table with chunks of baguette au levain.  Followed by a salad and a sliver of cheese, this dish kicked off an afternoon of sauce making in style.


Rognons d'Agneau à La Moutarde

- 4 lamb kidneys
- 2 dozen  white button mushrooms, small
- 2 tbsp. butter, or 20 grams
- 1/4 cup fortified Muscat wine, or 5 cl
- 1/2 cup creme fraiche, or 10 cl
- 1 tbsp. dijon mustard
- 3 tbsp. parsley, minced fresh leaves
- salt & black pepper, to season

Clean the white button mushrooms and slice them in half.
Remove the fat the kidneys are encased in, and split them in half, removing as much filament from the inside as possible, peeling the thin film that encases them as well.  Season them with salt and pepper.  Heat the butter in a hot pan and toss the kidneys in the hot butter for 4 to 5 minutes, and reserve.


Toss the mushrooms in the same pan for 3 minutes, then add the wine.  Bring it to a fast boil, then add the creme fraiche. Reduce by 1/3.
Lower the heat and whisk the mustard into the sauce and then add the kidneys, tossing to coat with the sauce.  Allow the kidneys to reheat gently and transfer to individual plates.  Top with minced fresh parsley and serve with chunks of fresh baguette.

Servings: 2
Come visit!
02 Nov 19:53

Murgh Korma (Creamy Chicken Curry)

Murgh Korma (Creamy Chicken Curry)-photo SERVES 6-8

INGREDIENTS2 lb. boneless, skinless chicken thighs and breasts, cut into 2″ chunks
1 tbsp. plus 1 tsp. minced ginger, plus one 2″ piece, peeled and sliced
1 tbsp. minced garlic, plus 3 cloves, thinly sliced
1 tbsp. fresh lemon juice
Kosher salt, to taste
¼ cup blanched almonds
¼ cup raw cashews
1 tbsp. poppy seeds
¾ cup canola oil
1 tbsp. black peppercorns
2 tsp. fennel seeds
12 dried rose petals (optional)
3 green cardamom pods
2 whole cloves
1 bay leaf
½ stick cinnamon
3 large yellow onions, thinly sliced
3 green serrano chiles, stemmed and minced
1 tsp. ground turmeric
½ tsp. paprika
1 cup plain yogurt
6 tbsp. heavy cream
Cooked rice, for serving

INSTRUCTIONSToss chicken, 1 tbsp. minced ginger, minced garlic, juice, and salt in a bowl; chill 1 hour. Purée almonds, cashews, poppy seeds, and ⅓ cup water in a blender; set nut paste aside. Heat ½ oil in a 6-qt. saucepan over medium-high heat. Add peppercorns, fennel, rose petals, cardamom, cloves, bay leaf, and cinnamon; cook... Get the recipe >>


26 Oct 13:57

Almond Saffron Milk (Badam Milk) Recipe by Manjula, Indian Exotic Drink

by Manjulaskitchen
Alexei.sumila

A bit of work but it sounds tasty...

Almond Saffron Milk (Badam Milk) Recipe by Manjula, Indian Exotic Drink
View full recipe at www.manjulaskitchen.com Almond Saffron Milk Badam Milk Recipe by Manjula Ingredients: 20 Oz full milk 10 almonds 10 pistachios 1/4 teaspoon cardamom powder 2 tablespoons sugar adjust to taste few strands of saffron For Garnishing: 1 teaspoon thinly sliced pistachios
From: Manjulaskitchen Views: 85452 317 ratings
Time: 03:50 More in Entertainment
25 Oct 17:06

Tomato-Pomegranate Vinaigrette

by janet @ the taste space
Alexei.sumila

I think it requires a note to share?

If my Pinterest boards tell you anything, I am scouring the web for interesting dressings.

Each week, I try to make a new dressing to add to whatever wandering salad I may concoct for lunch. Toss it with whatever random veggies I have in the fridge or plucked from the garden.

For this month’s Random Recipe challenge, we were urged to pick a pantry item and randomly try a recipe with it. I picked pomegranate molasses and then randomly picked Turquoise, a cookbook I have been neglecting but adamant about trying more of the drool-worthy recipes.

I landed squarely on the tomato-pomegranate dressing, spiced with thyme, shallots and garlic. I was initially perplexed by the recipe since it seemed to be a dressing infused with the flavours instead of being pureed directly into the dressing. So, I experimented. I made half of the recipe through the suggested (infused) method, and half of the dressing was simply pureed. The verdict? Both were good and more surprisingly to me, the blended dressing was creamier. I thought the pureed shallot and garlic would make this a scary dressing, but it wasn’t. It wasn’t as tart and acidic as the infused dressing. However, once mixed with my veggie medley, it was perfect. Both versions were nice.

Here, in the photos, I paired the dressing with thinly sliced collards, shredded beets and carrots, thinly sliced Roman beans and toasted sunflower seeds. I massaged some of the dressing directly with the collards (like I do for my raw kale salads) and then drizzled more dressing for the rest of the veggies. As you can see, the collard greens didn’t wilt as much as kale, but it made for a tasty salad, mellowing the collards for a simple salad. Later, I also found the dressing paired well with my standard concoction of tomatoes, cucumber, green beans, chickpeas and lettuce.

Looking for another great salad with pomerganate molasses? This one with bulgur and chickpeas (aka, The Old Best Salad Ever) was how I got hooked onto pomegranate molasses!

Do you have any favourite salad dressings?

This is my submission to Deb for this week’s Souper Sundays and to this month’s Random Recipes for cupboard items.

Tomato-Pomegranate Vinaigrette
Adapted from Turquoise

2 tbsp hazelnut oil (or oil of choice, like extra virgin olive oil)
1/4 cup red wine vinegar
2 tbsp pomegranate molasses
1 tomato, chopped (deseeded if you must but I didn’t)
3 shallots, halved
1 garlic clove, halved
4 sprigs fresh thyme
salt and pepper, to taste (I didn’t add any salt)

1. Combine all ingredients. Refrigerate overnight. Strain or puree in a blender. Keep refrigerated.

Makes 1/2 cup.


Filed under: Salads Tagged: beet, carrot, collard, dressing, garlic, hazelnut oil, Middle Eastern, pomegranate molasses, red wine vinegar, Roman bean, salad, shallot, sunflower seed, thyme, tomato, Turkish, vegan, vegetarian
25 Oct 13:43

Make it at home: The Beast's Sweet Potatoes with Pecans and Maple Syrup

Alexei.sumila

Mmm sweet potatoes.

Chefs’ recipes

With a name like Beast, you’d be correct in assuming that Scott and Rachelle Vivian’s west-side bistro is dedicated to all things hooved and clawed. But not exclusively.

Here’s their recipe for a dish that works just as well as a main course at a vegan pot-luck supper as it does alongside a haunch of wild boar. Add a final dollop of whipped cream or yogurt and you’ve got dessert.

“It’s all about the maple vinaigrette,” says chef Scott. “You can put that shit on anything!”

2 sweet potatoes (about 2 lbs)

3 tbs olive oil

35g pecans, halved and toasted

1 bunch green onions, chopped

1/4 cup coriander leaves, picked from stem

1/4 tsp dried chili flakes

30g sultana raisins

salt and pepper

pansy blossoms (optional)

The dressing:

4 tbs olive oil

2 tbs maple syrup

1 tbs sherry vinegar

2 tbs fresh squeezed 

orange juice

1 tbs fresh squeezed lemon juice

2 tsp grated fresh ginger

1/2 tsp ground cinnamon

Preheat oven to 400F. Cut the sweet potatoes into 1-inch cubes and place them in a mixing bowl. Drizzle with the olive oil and season with salt and pepper. Toss until well coated. Spread them on a baking tray lined with parchment paper and roast for 30 minutes or until tender.

To make the dressing, whisk all the ingredients, then season with salt and pepper to taste.

Once cooked, return the sweet potatoes to a clean mixing bowl. Add green onions, coriander, chili flakes, pecans and raisins. Add the dressing and gently mix. Season with salt, if needed. Dress with edible pansies. Serve warm with wilted dandelion greens, a whole grain like wheatberries or farro and some crusty rustic bread.

Dinner Wednesday to Saturday 5 to 11 pm. Brunch Saturday and Sunday 10 am to 3 pm. Closed Monday, Tuesday, holidays. Licensed. Access: one step at door, washroom on same floor.


23 Oct 17:49

Про СОБР «БУЛАТ»

Alexei.sumila

I can has share?

Оригинал взят у onepamop в Про СОБР «БУЛАТ»

Посетили с фото-рекламно-просветительскими целями расположение СОБР «БУЛАТ» КМ ГУВД Московской области. Бойцы СОБРа, как будет видно на множестве фотографий, используют тактическую обувь производства компании «БУТЕКС». Компания специализируется на производстве ботинок специального назначения для охранных, армейских структур и подразделений МВД.

Двум наиболее внимательным зрителям, точнее и полнее других указавших какие именно модели тактической обуви используют бойцы СОБР «БУЛАТ» и какими именно образцами стрелкового оружия вооружены бойцы СОБР «БУЛАТ» — полагается добротный приз. Они получат по паре новеньких ботинок спецназначения от компании «БУТЕКС». Победители, которых выберет руководство компании, будут объявлены здесь же в понедельник, 27 августа 2012 года.

UPDATE: Определены победители мини-конкурса от компании «Бутекс»: это почтеннейшие wall_e81 и Василий Саковец. Просьба победителям связаться по электронной почте onepamop()gmail.com для координации вопроса о вручении заслуженных призов. Спасибо за участие!

Кроме того, принимаются всевозможные вопросы, адресованные бойцам и командирам СОБР «БУЛАТ», предполагается, что во время следующего визита найдётся возможность получить на большинство заданных вопросов развёрнутые ответы.

P.S. Во время съёмок бойцам СОБРа было предложено при всякой возможности действовать (ходить, сидеть, бежать и целиться) как в боевой обстановке. Поэтому всякого рода замечания из серии «не так стоит, не так держит, неправильно целится» лучше из разряда интернет-экспертной оценки обратить в разряд вопроса из серии «почему он делает это так, для чего это и как помогает в боевой обстановке?» Предположу, что так будет не только вежливее и тактичнее, но и, по итогам, интереснее.


Другие репортажи о спецназах:

Специальная огневая подготовка: соревнования спецназов
Летний рейд в составе Курганского ОМСН
Зимние стрельбы в составе Курганского ОМСН
Боевая группа 45-го полка спецназа ВДВ
Разведчики специального назначения. 45-й полк спецназа ВДВ
16-я отдельная бригада спецназа, Тамбов


23 Oct 17:47

UK Museums Run Competition

According to this BBC article, two museums in Britain are running a competition for young, wannabe curators. The Yorkshire Museum is reworking its medieval gallery, and the York Castle Museum is reworking its toy exhibition, and they want people aged sixteen to twenty four to submit ideas for the new look. If you win, you'll be given a budget ranging from £2000 to £6000 to create them, but ""It must be different to anything they have seen in other museums." Amy Parkinson of the York Museums Trust also explained "Any ideas involving digital or new technologies would be welcome, but the idea could use any medium at all." The Yorkshire Museum web site has more info on both contests.