Nice sentiment, but anyone who buys iPhones isn't going to care how big it is. If Apple makes it, it's exactly what they always wanted :p
As soon as Apple announced the new, larger iPhones, cries went up, prompted by the sheer size of the new devices. Will it fit in the pocket of my skinny jeans? How will it sit in my small hands? Can it double as a cheeseboard? These valid questions are hard to answer without a tangible representation with which to test. Read More
It's official: you get a 2-hour refund window to return paid apps and games from the Google Play Store. To be clear, you've been able to do this for some time. It's just that Google has now updated the refund policy on the Google Play support site to reflect the change. Good for us. [Android Police]
4iiii’s has kicked off what will be a frenzy of power meter activity here at Interbike this week. In doing so, as the post headline implies, they’ve jumped onboard with the plans to further drive the price of power meters down into a larger cycling audience. They’ve introduced their latest product – Precision – which is their power meter offering that sits at $399US (with dual left/right sensor support at $749US).
I’ve had a chance to ride with the units on a ride, as well as to spend considerable time doing everything from installing the unit myself to calibration of the sensor. And, I did this all on a decked out power-meter laden bike. Just me, Precision…and three other power meters. Of course, a single data point of one ride doesn’t mean the product will be flawless (or failure bound). Rather, it’s just a first glimpse at things. And with that, let’s begin the walk through.
A Brief Overview:
The Precision is in many ways a lot like the Stages Power Meter, except with two key differences: It can be installed yourself, and it can be installed on both crank arms (versus just left-only with Stages). Well, that and being about 40% cheaper (or more, depending on how you purchase it).
Precision is all based around these two tiny pods. These prototype pods are slightly larger than your average running footpod, and the bulk of the size is really dedicated to the CR2032 coin cell battery contained within. The actual innards of strain gauges, accelerometers, and ANT+/Bluetooth Smart communications chips are quite small. However, the next prototype versions (and production versions), will significantly reduce the sides, effectively eliminating the sloped section (which currently contains additional wiring connectors for development logging capabilities).
These pods are then installed on the inside of your crank arms. You can install it in a left-only configuration, as seen lately on a number of power meters (Stages Power, ROTOR Power LT, Garmin Vector-S, Polar Keo Power Essential), or you can install it in a dual-sensor configuration.
In a dual sensor configuration you install it on both the left and right crank arms. This nets you a complete picture of your power output (watts), and thus minimizes issues with left/right balance.
These pods are installed by you (yes, you) using a calibration tool that’s included inside the kit. The pods are basically cemented on. You can remove the pod from the crank arm, but the process does destroy the pod. However your crank arm would be fine (Tip of the day: Would likely be cheaper to just buy a new crank arm).
Precision communicates with your head unit using either ANT+ or Bluetooth Smart. So it’s just a matter of which protocol your head unit uses. It’ll transmit all your standard power meter metrics on both sides, but I’ll dive into that a bit later on.
Now those that have followed the moves and players in the industry may find it interesting to know the person behind 4iiii’s Precision: Keith Wakeham. Those with good memories will remember it was Keith that about 2 years ago published plans for his open-source power meter design, which was a DIY approach to building a power meter. While that unit has no resemblance to today’s Precision, the learning from Keith’s efforts no doubt contributed heavily to it. Prior to that, he worked in the nuclear industry on strain gauges. 4iiii’s snatched him up last fall and they’ve been plugging away since. The power meter world is indeed a small place.
With that, let’s begin installation.
Installation & Calibration:
I want to first point out that the tools you see here are NOT consumerized yet. Which means that while the process is final, the actual tools that you’ll get in the package will be smaller, more user friendly and generally look ‘pretty’. They haven’t begin the manufacturing of those tools yet, since that’s about the last thing you’d do in terms of manufacturing.
And, despite how this process looks – it was actually silly easy. You can complete it in less than 5 minutes…at most.
For the installation I completed it on a single crank arm on the desk of a Fairfield Inn hotel. No fancy workbench was needed, and while I effectively had a nuclear engineer guiding me through it – there’s no need for that either.
Every kit comes with these tools (or again, a variant of them). they are:
1) A clamp
2) A two-part epoxy
3) A tool to squirt out the epoxy
4) A guide to fit the pod to the crank arm.
You can see all of them below:
To begin, you’ll need a crank arm, or two, depending on how many pods you’re installing. You’ll be using this little tool that helps to align the best installation spot for the pod on your crank arm.
The tool then holds the Precision pod in a perfect little grooved area. The pod’s backing is covered with a protective tape.
The first step is to take a pencil and simply mark the area on the crank arm where the pod will go.
We’ll then use the included sandpaper to lightly sand this area, which helps to increase the ability for the glue to hold.
Then we simply clean it off with a couple of swipes of swabs, which removes the sanded material. There’s also one more swipe with a gauze pad.
Now we’re ready to add a tiny little bit of glue. The glue gun will automatically mix the two epoxy’s perfectly, without any air bubbles.
You don’t need much epoxy.
You’ve got approximately 20 minutes until the epoxy starts to set. So you don’t have to worry about rushing. Heck, you could even go out and run a fast 5K.
Next, you’ll go ahead and remove the protective tape backing on the unit and place it in its tray:
Then, simply flip it over onto the crank arm. The tool settles into the pedal attachment area, keeping things snug.
Finally, we add a clamp. The clamp has a little rubber piece on the opposite side to protect against scratches.
You’ll leave the whole rig alone for 6 hours. Depending on the temperature outside (if hot), it can be a bit less. But really, just leave it alone. The photo you see throughout the post with the crank arm by itself were all taken the morning after with the completed unit.
Now, the piece I didn’t get to cover here was the calibration. The calibration will use a separate tool that has a ‘S’ type load cell in it. The tool comes in the kit, and is only used to calibrate. The tool will have three little grooves where you can hang a weight from it. The load cell can determine the weight within .01% accuracy, which then allows them to further calibrate the power meter. The user will place the weight at each of the three groves briefly, which in turn provides just enough differences in torque to properly calibrate the unit. The whole process should only take a couple minutes at most.
The unit is smart enough to determine whether it’s assigned to the left or right side, based on the torque and direction. Additionally, it’ll use private-ANT to pair itself up to the secondary pod if you bought that.
Connecting to a head unit, usage:
The 4iiii’s unit connects to head units using either ANT+ or Bluetooth Smart. To start, we’ll go with ANT+ since it’s the most dominant in the cycling world. For that, I just used an Edge 810. Of course, you can use any head unit that supports the power meter protocol.
Next, I’ll go ahead and have it search for a power meter to pair, where it’ll find the 4iiii’s on my bike:
Next, to prepare for a ride we’ll go ahead and calibrate it by setting a zero offset, similar to other power meters. This is typically done within the settings menu of the bike profile.
From here, you’re pretty much ready to go. While riding you’ll get total power displayed, as well as individual left/right power (assuming you purchased the dual sensor package).
All of this data is recorded by your head unit for later analysis in whatever apps you normally use, like Training Peaks or Strava:
Now, if you’re more of the Bluetooth Smart persuasion, you can pair with that as well. For example, the Polar V650 pairing with the 4iiii’s unit. Alternatively, you could use the Wahoo Fitness app on the phone which allows you to more easily send data to all sorts of 3rd party partners.
From a usage standpoint, it’s very similar to other power meters. You’ll complete a zero-offset at the beginning of a ride, but beyond that it’ll pretty much take care of itself.
Looking at the pod itself, there will no doubt be very valid questions on the adhesive and ensuring that it stays where it should, and that it isn’t impacted by weather or the accidental slip of the foot. All issues I’ll definitely be looking into as part of my in-depth review. In talking with 4iiii’s, it’s an area they’ve spent a lot of time in with respect to the specific glue chosen. Out of all the areas that they talked about where things weren’t quite finalized/firm yet, this was the one area they seemed very sure of.
The Test Data:
I started out this morning prior to sunset. Given my time constraints of the day I went with a single 40-minute ride for today, along with a secondary short section on the trainer. The ride was done on park roads in Lake Mead National Recreation Area. The same place I often do testing of devices when I stay in Vegas. The route is also used by a number of triathlons too.
Here’s the illustrated version of the power meters used in this morning’s tests:
As you can see, I’ve got the following units on the bike. We didn’t use my bike due to not quite having enough current generation prototype units to part permanently with. I did however bring my PowerTap to install, and we unboxed a set of Vectors that we installed on the bike together. The SRM and 4iiii’s unit was already in place. So I had complete control over two of the power meters, and they had prepared the other two.
SRM: Crank spider based
Garmin Vector: Pedal based
PowerTap G3: Rear wheel hub based
4iiii Precision: Left/right crank arm based
All of this data is then fed into two different spots. First is to conventional cycling head units, in my case the Garmin Edge 1000 and 810 for the Vector (1000) and PowerTap (810) data. And two additional 810’s for the SRM and 4iiii’s data. I have a few of them in my collection. These units all act as ‘backup’ of my data.
Second, it’s also fed into the much more important tool, the North Pole Engineering WASP ANT+ data consolidator. It allows me to seamlessly record everything as one coherent and complete picture. This removes the complexity of matching up files afterwards. The WASP then transmits to the phone via WiFi, where the data is recorded in real-time.
Without further ado, here’s what that ride data looked like at the ‘50,000’ ft view:
I excluded the SRM data, since for whatever reason the WASP wasn’t collecting that stream. So I need to manually re-process and normalize that data from the backup data files, which I’ll do later today.
Looking at the data however, you see at a high level things trend fairly well. You see that the Precision is a bit lower than the others. In talking with Keith, we saw that beforehand and believe that’s due to some minor drops he’s seeing with that particular pod, thus causing a lower overall value. You see one unexplained spike towards the very end, oddly enough as I was coming into the parking lot coasting.
Now, let’s dig a bit deeper into the differences between them. After all, I’m more interested in where they differ than where they are the same. This is where it’s important to remember that no two power meters will read identically – no matter how hard you will try. There are inherent accuracy limitations (usually 1%-2.5%), along with differences in placement. This means that a PowerTap will inherently read a lower wattage than a Garmin Vector – as Vector is closer to the source of the power (you). In order to make this graph make sense, I’ve tossed out those last few seconds of the ride (since that would hugely skew things and was an outlier).
First, here’s all three smoothed with a 10-second rolling average. I’ll use that as the baseline:
Next, we’ll look at the CP, which helps us to identify how they trended over chunks of the ride. I used Golden Cheetah to create this. Below you’ll see all four power meters (including the SRM). You’ll see that by and large they are pretty similar. We see slightly more variation at the top-end, with the 4iiii’s unit being low throughout (as expected from earlier notes).
You can see down at the bottom the average power values (be careful of looking at that), along with the max power values for a few different timeframes from 10-seconds up to 8-minutes. This helps a bit to make those values more relatable.
Finally, let’s look at cadence.
Eek. As you can see, this is a bit all over the map. And, to be fair to them – they expected that. The noted the night before the ride that they had just switched the component doing cadence to what they’ll use in the final production version and they hadn’t had a chance yet to optimize the algorithms there. Of course, in most power meters cadence is a key factor in determining power. Yet, I’m not as concerned about this particular component, only because accelerometer based cadence is at this point well understood in the cycling industry. So it’s mostly a case of them optimizing their new component algorithms as many other companies have recently done (Garmin, Stages, Power2Max, Polar, Brim, etc…).
I also did a short 9 minute test on a trainer, just to get some ‘smooth’ data to see what it looks like.
I’ll be uploading that data a bit later today.
Oh, and for those wondering about that gap in the middle around the 30 minute marker on the outdoor ride? That’s when the derailleur decided to try and establish a close and continuing relationship with the spokes on the wheel, thus injecting the chain down in the gap between the cassette and the spokes. It wasn’t pretty undoing.
You are welcome to download the raw data for your own analysis, all of it is located here. You may publish your own analysis of the data, though, I do ask you link back to the source post here. If you want a simpler version, you can just look at the Garmin Connect file online here.
Misc Details & FAQ:
Below are some random details and facts, along with what I suspect will be the most common questions.
Crank Compatibility (general): More or less anything with a flat surface. Conversely, I couldn’t however use my ROTOR crank arms on another bike, because those arms have grooves that the gauges wouldn’t be able to measure correctly. They’ve tested the last three generations of the Shimano 105, Ultegra and Dura-Ace cranks, as well as the Deore XT. Within SRAM, the Rival OCT, and then on the mountain bikes the X9. Within FSA the Energy crank arms.
Carbon Cranks: Thus far their testing “looks good” according to them, but they’re continuing to test cranks there.
Crank Length/Width: There are no inherent issues here with larger or oversized cranks. The only potential tricky area would be if your crank arm has some sort of weird bending or shaping that leave it no flat surface. For example, on the VERVE Infocrank (another power meter), it curves around and thus there isn’t any flat space to mount the pod. But that’s extremely rare (and likely not an issue for anyone in the world except me).
Chain and frame clearance: You’ll need approximately 9mm of clearance for the final production pod. Of course, where you install it will change the clearance required. Typically there is more clearance near the bottom bracket, and less clearance near the end of the crank arm. from a length standpoint, the exact length is still being finalized and will roughly be in the range of ~28mm wide by ~40mm long.
The Calibration Kit: This is sorta the funny special sauce. This is used to calibrate the sensor with hanging weights and a ‘S’ type load cell that will attach to your crank arm. The kit by itself costs $100, whereas it’s included in the $399 price point (but not the $349 pod package).
Temperature Compensation: The unit utilizes “active learning temperature compensation”, which is a fancy way of saying that they record zero offsets at different temperatures and slowly build up a database of different temperature compensation points. This will be triggered by you, and helps 4iiii’s get around the fact that the install isn’t being temperature calibrated at a facility elsewhere.
Battery Life: The unit utilizes a CR2032 coin cell battery – the same as most other sensors on the market. You can find it for a couple dollars easily around the world. 4iiii’s claims a battery life of about 200 hours. Obviously, I’ve not yet had a chance to test that.
Weight: Each pod weighs 10g. I have not yet personally verified this, though I have no reason to doubt it.
Weatherproofing: IP65 rated, which is slightly better than IPX7, as it protects against water jets versus just immersion. Thus allowing you to spray down your bike.
ANT+ Connectivity: The unit is able to transmit via ANT+ to any other standard cycling head unit that supports the ANT+ power meter profile. Today that’s every Garmin cycling and triathlon focused device above $200, the PowerTap Joule, Timex Cycling and Triathlon units, Magellan Cyclo and Up units, and many others. The unit supports sending the following metrics: Total Power, Left/Right Power, Torque Effectiveness, Pedal Smoothness. Of course, you must have a power meter head unit that supports those specific metric types. It broadcasts both Bluetooth Smart and ANT+ concurrently at all times (no impact on battery).
Bluetooth Smart Connectivity: The unit is able to transmit via Bluetooth Smart to any cycling head unit that supports the Bluetooth Smart power meter profile. Right now this is essentially the Suunto Ambit3, the Polar V800 (later this month), the Polar V650 (October), and then smart-phone driven apps and devices like the Wahoo RFLKT. The unit supports sending the following metrics: Total Power, Left/Right Power, along with some similar metrics for torque effectiveness. Of course, you must have a power meter head unit that supports those specific metric types. It broadcasts both Bluetooth Smart and ANT+ concurrently at all times (no impact on battery).
Pricing: The unit is priced at $399US for one pod (left or right only), or a dual option at $749US (both left/right pods). You can upgrade later for $349US with the PM-100 (pod without calibration kit). Pricing outside the US is TBD. The SKU name for the single pod is the PMK-100 (with calibration kit), and the left/right secondary pod is PM-100. The acronym comes from: : Precision Module Kit. Note again that you can install a single pod on either side. If a friend/shop/etc has the 4iiii’s calibration tool, then you can simply get the cheaper $349 SKU (PM-100) and use their calibration tool.
Shipping Date: 4iiii’s states they will begin shipping this year (Q4 2014). I should point out that in the 7 or so years I’ve been writing this blog only one power meter company hit their initial timeline estimates: Stages Power. They did so by having a similar plan as 4iiii’s in terms of waiting until the ‘last minute’ to announce.
Some summarizing thoughts:
At Eurobike, virtually every industry person asked me what I thought of left only power meters. My response was basically the same to everyone: I believe that left only power meters are in some ways a temporary thing. While Stages set the precedent, they did so not just in data collection location (left), but in price. But despite common thinking they didn’t put the price elevator at the lobby, but rather about 20-30 floors up from where their elevator can go. For now, that elevator has sat there and Stages has raked in the dough and outsold other power meters in some cases 10-20 to 1 (in talking with many local bike shops).
You saw other companies join in the left-only ‘thang’ by introducing their own variants at cheaper and more accessible price points. Then we saw a new entrant – Watteam’s PowerBeat – jump into the fray with promises of a $499 power meter for next summer. Meanwhile at the higher end, we’ve seen the price of Garmin Vector temporarily drop $400, while also introducing cheaper left only options. And we’ve seen SRAM’s Quarq restructure prices as well to lower them.
While some might think the end-goal here is a $500 left-only power meter, they’d be hugely mistaken. We’ll also be seeing more entrants in the lower-priced but higher data quality market by time the week is over, which starts to create a cyclical effect. Left-only units will drive current prices lower further, and left/right will take its pricing place. Then the cycle will repeat. It’ll repeat for the simple fact that companies like 4iiii’s and Stages have the manufacturing cost basis power to drive those prices incredibly low.
Of course, just like Stages – that’ll depend heavily on these new entrants (such as 4iiii’s) having a product that’s accurate across a wide range of riders and equipment, and a wide range of environments. And I suspect also like Stages, they’ll too have some initial teething bumps along the way. All power meter companies do.
My testing showed initial promise, not perfection, but promise. But it’s just that – a first ride. Once I get v2 prototype units on my bike I’ll be able to develop a much bigger bank of data to work from and establish whether or not the Precision and their self-install method is a viable option in the market. I’m actually less concerned about 4iiii’s ability to technically resolve any outstanding issues. It’s a beta product, if it was production they’d be selling them tomorrow. In my discussions with them about their outstanding technical issues, it felt to me like they had a very clear grasp on what had to be done, but it was more of a timing thing. They had been focusing on OEM installations (i.e. from a crankset company), and then changed gears to be self-install – so their attention got diverted a bit in the last month.
I also don’t have any concerns about manufacturing of Precision’s pods itself – 4iiii’s has a long history in manufacturing already. My only concern is that I don’t quite think they’ll get all this done by the end of the year. I suspect we’re likely looking at January-March of next year. Though, I suppose there’s likely not a lot of difference riding-wise between December and February (no matter which side of the equator your on).
For now though, it’s definitely an exciting time to be in the power meter market.
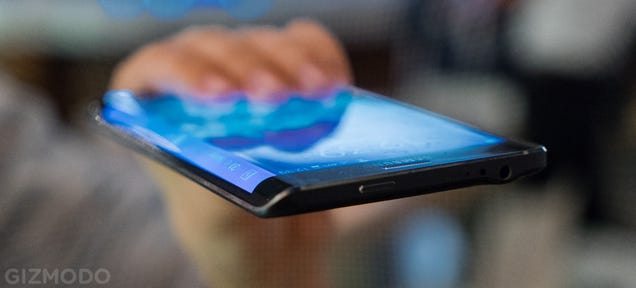
At Unpacked, Samsung's annual Note-centric launch event, the Korean-based technology giant offered a two-for-one special. The major highlight was the Galaxy Note 4 , the next phablet phone in a prestigious line of stylus devices, and then there was this quirky little guy: The Galaxy Note Edge.
There are holes in Curiosity wheels. There have always been holes — the rover landed with twelve holes deliberately machined in each wheel to aid in rover navigation. But there are new holes now: punctures, fissures, and ghastly tears.
This is the first smart watch I've seen that I would actually want to buy.
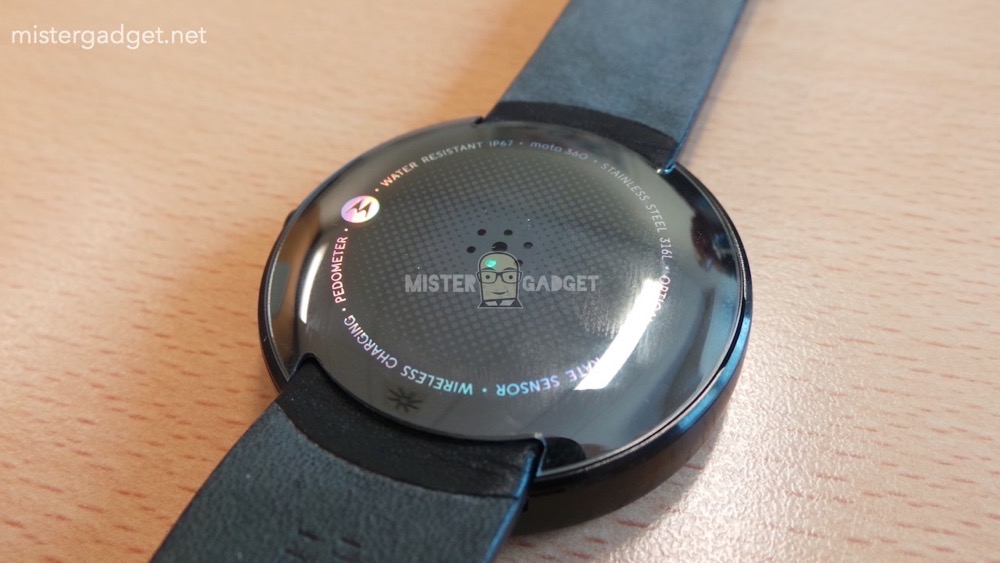
Notice the circular stickers attached to the Moto 360 in the picture at the top of this post? Those were included on the device that we photographed at Google I/O, which were measures taken by Motorola to hide certain aspects of the device that they weren’t quite ready to talk about. Now, take a look at the image below from Mr. Gadget, who spent enough time with the device without those stickers on to give us a mini review while also outing all sorts of specs that had yet to see confirmation. It should be instantly clear why Motorola had those stickers in place.
As is seen on the Moto 360 below (without those stickers), the device is water resistant at an IP67 rating, does indeed come in stainless steel (316L), has an optical heart rate sensor, pedometer, and of course, wireless charging. All of that info, was hidden by Motorola under a couple of stickers used at I/O.
As for other goodies, Mr. Gadget claims that the battery lasts at least 2.5x longer than the LG G Watch, which if we look at our time with it, could mean 2.5 days without having to charge it. That would be, simply put, remarkable. He mentions that the device doesn’t seem too big for his wrist, especially when compared to other watches. He also talked about the display when compared to those of the LG and Samsung watches, but the translation from Google makes it difficult to decide if he is claiming it to be better or worse.
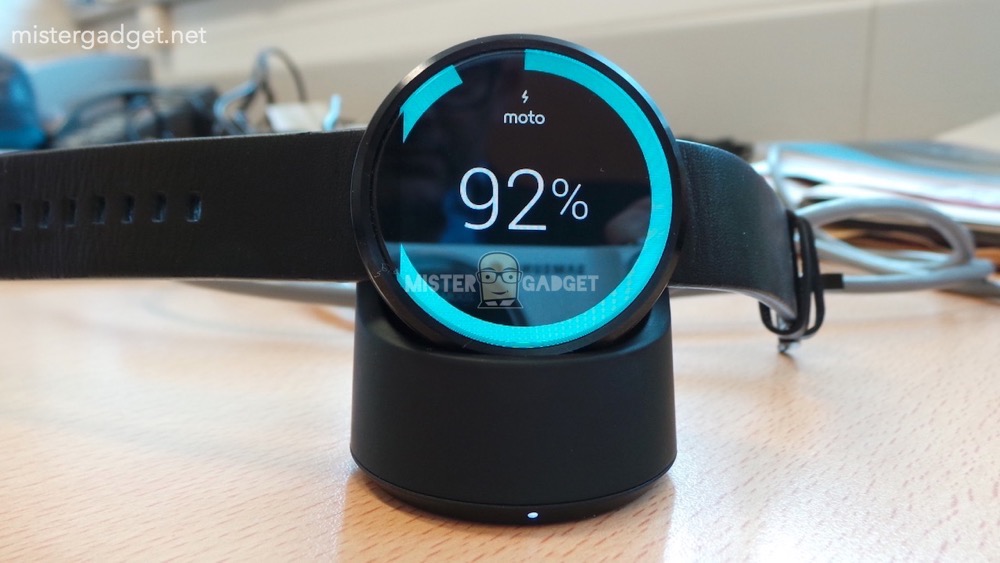
Finally, check out this hot wireless charging action.
We may not have a release date after all these months, but our excitement over Motorola’s round smartwatch just increased, again.
If you want to see a massive gallery of the Moto 360 from this leak, hit up this link.
By Roman Nurik, lead designer for the Google I/O Android App
Every year for Google I/O, we publish an Android app for the conference that serves two purposes. First, it serves as a companion for conference attendees and those tuning in from home, with a personalized schedule, a browsing interface for talks, and more. Second, and arguably more importantly, it serves as a reference demo for Android design and development best practices.
Last week, we announced that the Google I/O 2014 app source code is now available, so you can go check out how we implemented some of the features and design details you got to play with during the conference. In this post, I’ll share a glimpse into some of our design thinking for this year’s app.
On the design front, this year’s I/O app uses the new material design approach and features of the Android L Developer Preview to present content in a rational, consistent, adaptive and beautiful way. Let’s take a look at some of the design decisions and outcomes that informed the design of the app.
Surfaces and shadows
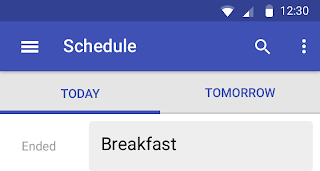
In material design, surfaces and shadows play an important role in conveying the structure of your app. The material design spec outlines a set of layout principles that helps guide decisions like when and where shadows should appear. As an example, here are some of the iterations we went through for the schedule screen:
First iterationSecond iterationThird iteration
The first iteration was problematic for a number of reasons. First, the single shadow below the app bar conveyed that there were two “sheets” of paper: one for the app bar and another for the tabs and screen contents. The bottom sheet was too complex: the “ink” that represents the contents of a sheet should be pretty simple; here ink was doing too much work, and the result was visual noise. An alternative could be to make the tabs a third sheet, sitting between the app bar and content, but too much layering can also be distracting.
The second and third iterations were stronger, creating a clear separation between chrome and content, and letting the ink focus on painting text, icons, and accent strips.
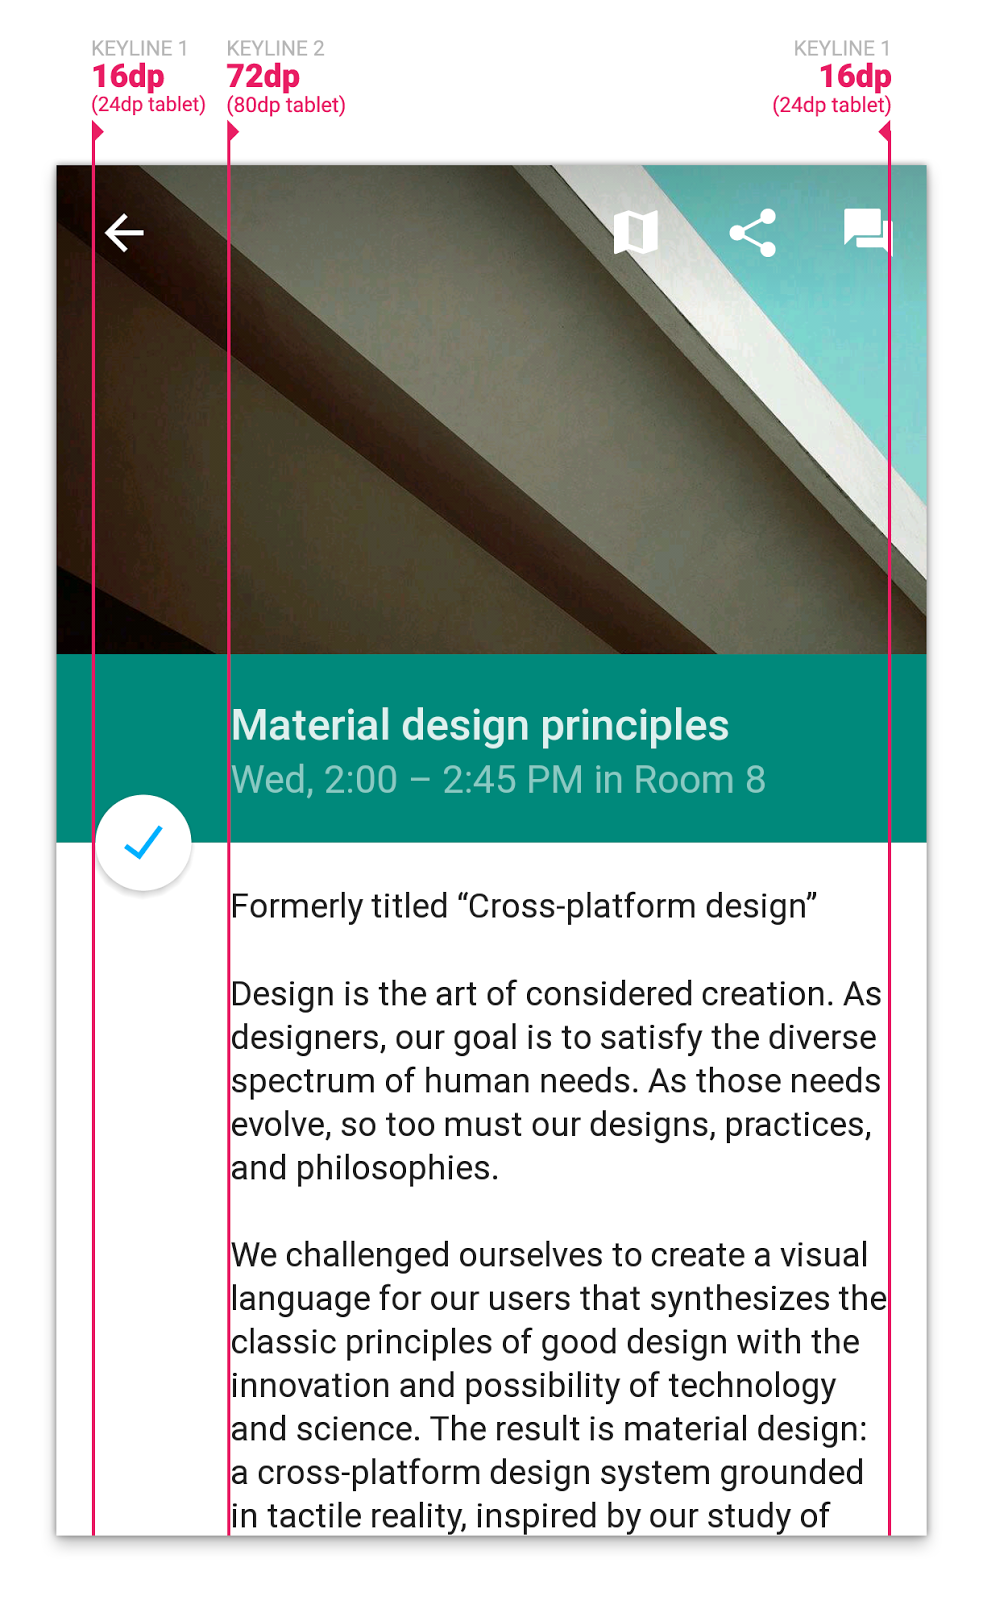
Another area where the concept of “surfaces” played a role was in our details page. In our first release, as you scroll the details screen, the top banner fades from the session image to the session color, and the photo scrolls at half the speed beneath the session title, producing a parallax effect. Our concern was that this design bent the physics of material design too far. It’s as if the text was sliding along a piece of paper whose transparency changed throughout the animation.
A better approach, which we introduced in the app update on June 25th, was to introduce a new, shorter surface on which the title text was printed. This surface has a consistent color and opacity. Before scrolling, it’s adjacent to the sheet containing the body text, forming a seam. As you scroll, this surface (and the floating action button attached to it) rises above the body text sheet, allowing the body text to scroll beneath it.
This aligns much better with the physics in the world of material design, and the end result is a more coherent visual, interaction and motion story for users. (See the code: Fragment, Layout XML)
Color
A key principle of material design is also that interfaces should be “bold, graphic, intentional” and that the foundational elements of print-based design should guide visual treatments. Let’s take a look at two such elements: color and margins.
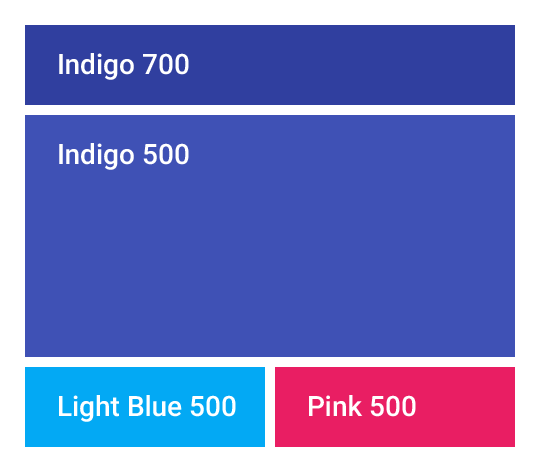
In material design, UI element color palettes generally consist of one primary and one accent color. Large color fields (like the app bar background) take on the main 500 shade of the primary color, while smaller areas like the status bar use a darker shade, e.g. 700.
The accent color is used more subtly throughout the app, to call attention to key elements. The resulting juxtaposition of a tamer primary color and a brighter accent, gives apps a bold, colorful look without overwhelming the app’s actual content.
In the I/O app, we chose two accents, used in various situations. Most accents were Pink 500, while the more conservative Light Blue 500 was a better fit for the Add to Schedule button, which was often adjacent to session colors. (See the code: XML color definitions, Theme XML)
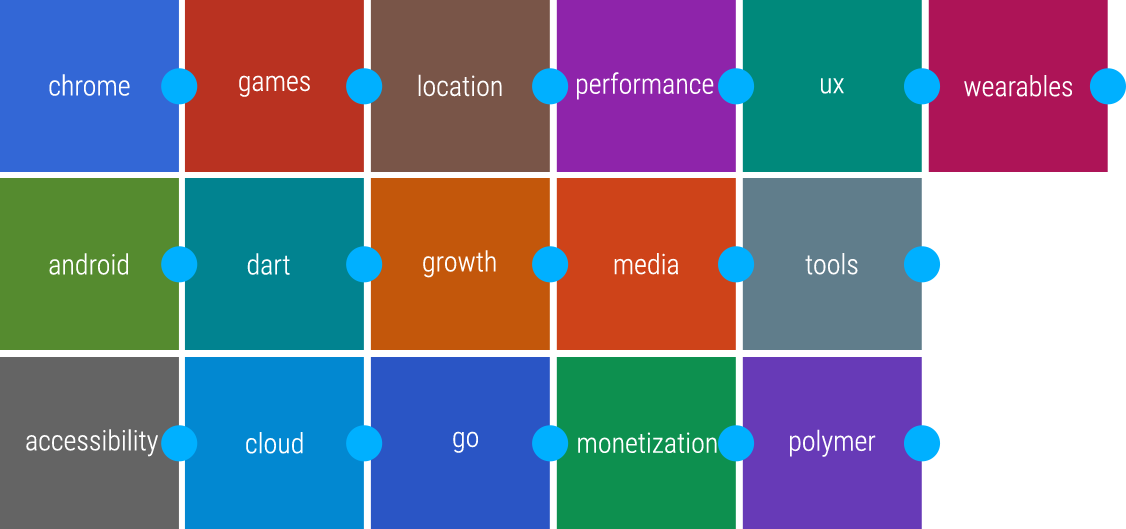
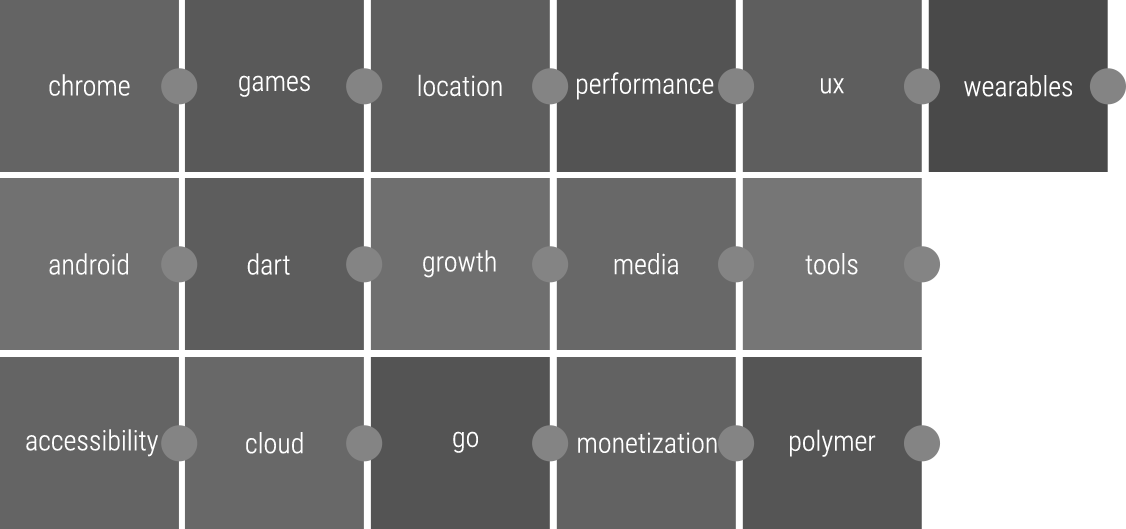
And speaking of session colors, we color each session’s detail screen based on the session’s primary topic. We used the base material design color palette with minor tweaks to ensure consistent brightness and optimal contrast with the floating action button and session images.
Below is an excerpt from our final session color palette exploration file.
Session colors, with floating action button juxtaposed to evaluate contrastDesaturated session colors, to evaluate brightness consistency across the palette
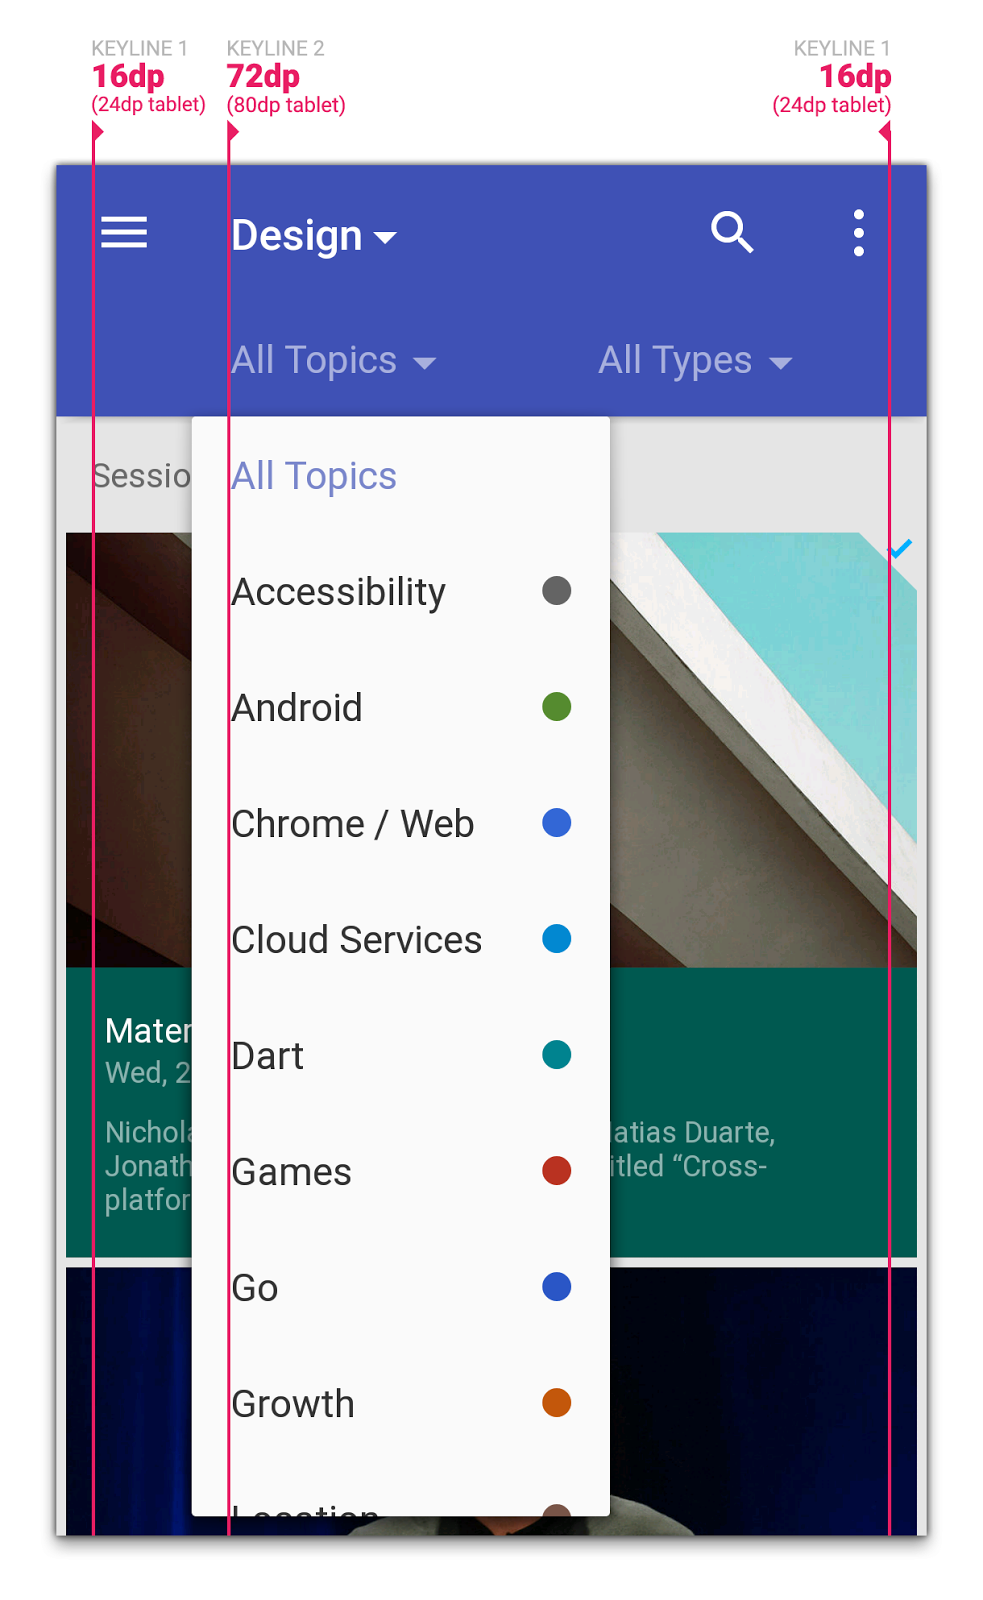
Margins
Another important “traditional print design” element that we thought about was margins, and more specifically keylines. While we’d already been accustomed to using a 4dp grid for vertical sizing (buttons and simple list items were 48dp, the standard action bar was 56dp, etc.), guidance on keylines was new in material design. Particularly, aligning titles and other textual items to keyline 2 (72dp on phones and 80dp on tablets) immediately instilled a clean, print-like rhythm to our screens, and allowed for very fast scanning of information on a screen. Gestalt principles, for the win!
Grids
Another key principle in material design is “one adaptive design”:
A single underlying design system organizes interactions and space. Each device reflects a different view of the same underlying system. Each view is tailored to the size and interaction appropriate for that device. Colors, iconography, hierarchy, and spatial relationships remain constant.
Now, many of the screens in the I/O app represent collections of sessions. For presenting collections, material design offers a number of containers: cards, lists, and grids. We originally thought to use cards to represent session items, but since we’re mostly showing homogenous content, we deemed cards inappropriate for our use case. The shadows and rounded edges of the cards would add too much visual clutter, and wouldn’t aid in visually grouping content. An adaptive grid was a better choice here; we could vary the number of columns on screen size (seethecode), and we were free to integrate text and images in places where we needed to conserve space.
Delightful details
Two of the little details we spent a lot of time perfecting in the app, especially with the L Developer Preview, were touch ripples and the Add to Schedule floating action button.
We used both the clipped and unclipped ripple styles throughout the app, and made sure to customize the ripple color to ensure the ripples were visible (but still subtle) regardless of the background. (See the code: Light ripples, Dark ripples)
But one of our favorite details in the app is the floating action button that toggles whether a session shows up in your personalized schedule or not:
We used a number of new API methods in the L preview (along with a fallback implementation) to ensure this felt right:
View.setOutline and setClipToOutline for circle-clipping and dynamic shadow rendering.
android:stateListAnimator to lift the button toward your finger on press (increase the drop shadow)
RippleDrawable for ink touch feedback on press
ViewAnimationUtils.createCircularReveal for the blue/white background state reveal
AnimatedStateListDrawable to define the frame animations for changes to icon states (from checked to unchecked)
The end result is a delightful and whimsical UI element that we’re really proud of, and hope that you can draw inspiration from or simply drop into your own apps.
What’s next?
And speaking of dropping code into your own apps, remember that all the source behind the app, including L Developer Preview features and fallback code paths, is now available, so go check it out to see how we implemented these designs.
We hope this post has given you some ideas for how you can use material design to build beautiful Android apps that make the most of the platform. Stay tuned for more posts related to this year’s I/O app open source release over the coming weeks to get even more great ideas for ways to deliver the best experience to your users.
Apple and Samsung have agreed to drop all non-U.S. litigation. The announcement came late Tuesday in a release first reported by the Financial Times. In the joint statement, the two tech giants said they “…have agreed to drop all litigation between the two companies outside the United States.”
Terms of the agreement were not disclosed. But, as noted in the statement, this… Read More
The camera in the Galaxy S5 is pretty awesome. In our review, we noted that Samsung is once again leading the charge for mobile optics with the release of this year’s flagship phone. The GS5′s camera can take pictures with incredible detail, thanks to its 16MP sensor, but also does a fantastic job of capturing brilliant colors when it needs to without overdoing it.
To continue to show how impressive their cameras can be, Samsung released the video above, which takes us on a tour of Trieste, Italy during a day from sunrise to sunset. The video was shot entirely with a Galaxy S5. While it’s obvious that some sort of professional crew was behind it all, you can’t help but be impressed by the results.
Bit of a lengthy review, but this sounds horrendous. Samsung need to get their shit together.
On Friday I unboxed and got all set Samsung’s Gear Fit activity tracker. This is the company’s first direct attempt at competing with activity monitors from the likes of traditional players like Nike and FitBit, as well as newer entrants such as Garmin and Polar.
The unit was announced about 45 days ago back at Mobile World Congress in Barcelona, along with the Samsung Galaxy S5 phone, and the Samsung Gear 2 smart-watch. Both of which I’ve also got here (oh, all of which I paid for). My interest in these devices is primarily from an athletic standpoint. I don’t much care about the pure phone aspects of the S5, but rather things like the optical heart rate sensor on it, as well as the Gear 2 and Gear Fit.
For this weekend though, I just focused primarily on the Gear Fit. Mostly, because its screen is so pretty that anything else would distract my attention from it. So with that brief intro, let’s start with some basics.
Getting setup:
Inside the box you’ll find some instructions as well as the unit, a charging cable, and a small quick start guide.
The charging cable setup is a bit interesting. It uses a small attachment that has a female micro-USB connector on it, along with a male micro-USB cable hard-set into an outlet plug. This is awkward only in that most people these days want to be able to just plug the micro-USB charging cable straight into your laptop or other USB port. Thus, instead, I dug up one of the 382 other micro-USB cables around the house and used that instead to charge from my laptop.
From there it was time to get everything all configured. This is where things got a bit…non-awesome. First, I had to get the Samsung Gear Fit Manager app, via the Samsung Apps store. That is of course different from the standard Google Play store. So, once you get that downloaded, then you can pair with the Gear Fit device.
Now that you’ve got it paired, it’ll update the firmware on the Gear Fit. Perfectly reasonable request – and common to just about any device that hits the market running these days.
After the firmware update completed a few minutes later I tweaked some minor settings, like which wrist I wore it on and the orientation of the display.
Next, I went back into the Gear Fit app and realized that in order to see any activity tracker data I’d need to download another app – the Samsung Fitness with Gear app. This app is what consolidates data from the Gear Fit, and puts it on your phone.
Once that’s installed, it requires you to create an account. By itself, that’s not too big of a deal, since all activity trackers require an online account of some sort. But at this point I’m now three apps deep to just look at my data (Samsung Apps, Samsung Gear Fit Manager, Samsung Fitness with Gear or S Health).
Which app you use actually depends a bit on what phones you have. If you’ve got the S4 or S5 you get ‘S Health’. Before that though, you get the crappy ‘Fitness with Gear’ app.
Which, is true on a technicality. You can use the Gear Fit Manager as well as Fitness with Gear. Except, the Fitness with Gear app is so horribly limited in functionality that it’s basically useless. Thus, the need for S Health. What’s silly here is that there’s zero technical reason Samsung can’t let the S3 download S Health. As long as you’re on Android 4.3, you’d have Bluetooth Smart access required for all the sensors and device connectivity. I suspect though, that the issue might actually be that the S3 doesn’t support ANT+ (technically it can too, Samsung just hasn’t turned it on for most regions), and since the S Health app so visibly connects to ANT+ devices on the S4 and S5 (where it is enabled), it’s more of a marketing strategy than anything else.
Day to day activity tracker, sleep tracking:
With everything all setup I was ready to tackle the world. So I slipped on the device and went about my business. Which in this case, was mostly just odds and ends around the house. It was about 30-45 minutes later that I wondered why I still hadn’t seen any steps recorded. So, I walked circles around the couch a bunch, thinking perhaps it needed a bit more walking. But alas, nothing.
That’s when I realized that you actually have to turn on the pedometer function on the unit in order to track steps. Yes, seriously. I can’t make this stuff up.
Without remembering to ‘Start’ the ‘Pedometer’, it won’t actually record any steps at all. Thankfully, once you do start that function, it just hangs out and stays on forever. While I can see some minor edge cases that you might want to turn it off (such as automatically if in cycling mode), no other activity tracker on the market does that. And honestly, for good reason: It’s stupid. It’s far too easy to forget to turn it back on, and thus, you’d have no daily activity tracking.
In any case, in comparing it against another activity tracker – the Garmin Vivofit, I found it roughly in line. As I often note in Activity Tracker reviews, you’re never going to get two devices to match. And who knows which one is actually correct – but, it was at least in the same ballpark. The same with a different day and the FitBit Zip, in that case at over 10,000 steps they were within 500 steps, which is actually kinda good for these devices.
You can view your steps at any time by configuring the main Fit screen to show current steps, and progress against your goal (by default, 10,000 steps per day). Once you hit the goal, you’ll get that gold coin seen below:
Now, as I noted above, your experience will actually vary depending on if you have an older device or not. If you have an S3 for example, you get Fitness with Gear. That app is super-clunky and often pulls up with malformed pages:
And as I found out, despite linking a Samsung account – that data actually goes nowhere. For example, when I then added the S5 to the mix, the data didn’t show up in S Health there in my history. And, you actually can’t get the Fitness with Gear app on the S4/S5. So effectively, Samsung built a cloud-based service that lacks the cloud. We’ll just call that a rock.
If I break out the S5 however, and use S Health, then things get a bit better. Your heart rate data and exercises will transfer to the S Health App. However, your pedometer data (that’s the step data) and sleep data from the Gear Fit won’t. Instead, you’ll just get a big fat zero there:
It’s only when you start the pedometer using that ‘Start’ button on the phone that it starts counting steps…from the phone, not from the Gear Fit.
Here, let me re-word the ludicrous nature of this again: The Gear Fit device can’t actually by default transmit step data to Samsung’s premier fitness app on their premier phone. Or, said another way:
Think I’m off my rocker? Here’s a fun thing to do if you have some time. Go use this Google Image search, now, look at every press review written thus far – specifically, the ones that show the S Health app open next to the Gear Fit. What do you notice? Not a single photo has the step numbers the same between the two units. Further, the vast majority of them show the app with zero steps on the phone.
The only way to get step data to show on the phone is to simply press the ‘start’ button on the phone and track steps there. Thus defeating the entire point of purchasing the Gear Fit. (Update: with latest version of app just released, you can now select the data source).
But wait…it gets better (there’s more)! Check out some of my screenshots earlier from the older ‘Fitness with Gear’ app (not available on the newer S4/S5). What did you notice? Steps? Sleep? Yup.
While those two items don’t transfer by default to the premier ‘S Health’ app for their newest devices, but do transfer to the older app ‘Fitness with Gear’ app. Of course, they aren’t really saved to the cloud – but, at least you can sorta see them. Thus, I can only summarize Samsung’s solution as follows: Don’t buy our new phones.
Moving along….Since my writing here is more sport-focused than not, I’ll just briefly note that the unit does bridge the gap into some of the smart wearable’s areas by offering the ability for applications to enumerate alerts to the device. For example, text messages, Twitter notifications and the like are all visible on the device. Albeit with lots of scrolling depending on the orientation, but, you can at least get the gist of the message.
Additionally, the unit can be used to control other Samsung media devices with your phone. For example, you could control a TV while on your trainer.
(Update 6:16PM: The latest version of S Health has just been released, which now enables you to actually select which data to view via this obscure setting. To access it: S Health App > Pedometer > Three Dots > Phone Data to View > Select Device > Gear Fit. Good, progress. But still mind-boggling it doesn’t do it by default like every other fitness tracker on the entire planet.)
Optical Heart Rate & Sports:
The Gear Fit, along with the Gear 2, as well as the S5 phone – all come with the ability to measure heart rate optically. Each however, has slightly different ways of doing it. The Gear Fit and Gear 2 both use a green optical sensor – whereas the S5 uses a red optical sensor. The differences in the sensor come from slightly different technologies used, which in turn target different use cases and often by different companies.
Looking specifically at the Gear Fit’s sensor, I reasoned that since it was there to measure heart rate – it would be there to use the heart rate in a fitness activity. Since…you know…the name of the device is ‘Gear Fit’. But, it’s also there to just take resting heart rate measurements as well.
To do that you’ll go ahead and swipe on down in the display and go to ‘Heart Rate’, which brings you here, ready to start measurement.
It’ll briefly illustrate to you how to conduct the measurement and then send you on your way:
Most of the time, in my experience, the sensor will fail to read anything, resulting in a number of different error messages. Like the Eskimos with a hundred words for snow, Samsung seemingly has a hundred error messages for failure.
But, eventually even the blind squirrel finds the nut – and sometimes it does succeed:
This data is then also transmitted back to both S Health, as well as the Fitness with Gear app.
Next, we’ll do an actual exercise activity. In this case, we’ll swipe to the exercise option to start an ‘exercise’. In my case, I decided to go for a ride. It was just an hour riding out and about.
So I selected ‘Cycling’, which then talks to the phone via Bluetooth to grab your GPS location. The Gear Fit does not include GPS inside of it, and depends on the phone for this. If there’s no phone available, the Gear Fit will not be able to start the activity.
It’ll go ahead and measure your heart rate and then immediately give you a three second count-down to start riding:
Once that’s started it’ll display your heart rate up top, along with your distance, speed, and activity time.
As a general rule, I’ve found that the heart rate while cycling was never accurate. At least, not when compared to four other heart rate monitoring devices I was wearing. All of those agreed within 1-2 BPM. The Gear Fit was about 30-100bpm off. Which, is basically the difference between telling a police officer you were going between 55MPH and 125MPH in that 25MPH school zone.
Next, I took it running on an interval workout. It’s a hard workout and thus has high intensity mixed with immediately low intensity as you alternate between running hard and the 90-second rest breaks.
I found that throughout my 8x800m workout, some of the intervals it tracked the HR fairly well, within a beat or two of a traditional HR strap:
But about half the time it was just off in left field, showing me at 80BPM when I was closing in on 180BPM. I would have loved to show you the actual heart rate data on a chart, comparing to the two. But more on why I can’t do that in a minute.
Of course there are other challenges. First is that the display doesn’t stay on. You can set it to stay on for up to 5 minutes, but the default is only a handful of seconds. 5 minutes isn’t bad, but then it burns through battery like yule logs on Christmas. Additionally, the touch-screen often takes two taps to get it to recognize my single tap. This is true both in exercise mode and outside it – with or without sweat.
Compared to a traditional GPS running unit, the distance was off a fair bit, and I rarely saw paces as accurate. Which is sorta odd given it’s not terribly difficult to pull from the GPS. There’s also many quirks, like you’ll see paces such as 72:00/mile show up. Of course, most modern GPS units put in caps of about 25:00/mile and then just show pace as standing still.
After the workout you can save the activity and it’ll show you some summary stats. These stats are accessible via the history option. This is fairly nice, and far better than anything else on the market today from the perspective of being able to see it on the device.
When it comes to the data side of things the S Health app is supposed to be the gateway for your data. But ultimately, I found that while it downloaded my workouts, there wasn’t really much I could do with them. For example, it has a nice summary page, but then when I clicked on the GPS map page – it found nothing. And somehow despite recording HR max and average data, it gave me nothing for the HR and pace graphs:
Adding insult to injury, there’s no way to get the data out of the platform. It’s stuck there…forever. Basically, like the below screenshot:
App integration: Strava and others on the way
Before wrapping up, it should be noted that all is not lost on the application front, even if the device is limited. Samsung has opened up the Gear Fit to some limited 3rd party development. Right now, that happens to include Strava and RunKeeper.
In the case of Strava, you’ll use the main Strava Android app and as long as you have the Gear Fit paired with the phone via Bluetooth the Strava App will automatically leverage the display for a handful of screens of data.
It should be noted that heart rate data is not accessible to Strava today with the Gear Fit (it is with the Gear2 however). Hopefully Samsung will change that. Nonetheless, Strava will display heart rate data from a paired heart rate strap if you happen to have it. And, based on what I showed above in the optical HR sensor section – that’s probably for the best anyway.
The app supports the ability to display real-time segment information for your favorite segments that you stumbled into on your route, or for segments that are deemed ‘important’ by Strava. By default it’ll show you racing against your previous PR for that segment, unless you’ve never raced that segment in which case it’ll race against the KOM record holder.
I’ll be playing more with the app in the coming weeks on the Gear2, as well as poking at it a bit more on the Gear Fit. It’s cool though to see Strava throwing some resources at projects like these and taking a chance on new hardware and devices.
Initial Thoughts Summary:
When the Gear Fit was introduced at MWC in the gigantic sprawling ballroom – everyone in the room gasped at how incredible the display was for a wrist-based unit. But, looks have turned out to be deceiving. When it comes to being a fitness-focused devices, as the name implies, it falls short.
Not so much actually because of the hardware, but because of fumbled integration on software. The irony there being that they executed and put together an incredibly complex and stunning piece of hardware, but when it came to the simple things on software it unraveled.
For example, having 3-4 Samsung apps to talk to the device is overkill, especially when those apps don’t do basic things like communicate biographic or (by default) step information between the device and your account. For a fitness device, that’s as fundamental as a steering wheel on a car. Without age/gender/weight/height/steps, no amount of calorie information will be in the right ballpark.
When I look at functionality as an activity monitor, it sorta works on the device, but mind-bogglingly doesn’t send that data anywhere. How is it that in the age of connected everything, this doesn’t transmit the single thing it’s designed to do? Dear 1985, they’d like your clicky little cereal box step-pedometer back.
Looking at the sports angle, the optical sensor is on a good day, barely half-functional. And thus, there’s really no point in using it. Further, as I saw in my testing the unit just pulls calorie metrics from a lottery system. How is it that I run nearly 8 miles and only burn 285 calories?
Of course, for many, the single biggest hurdle will be that it only works with Samsung devices. Thus, without a Samsung phone/tablet, the device won’t show a single thing beyond ‘Connect your phone’.
I’m honestly dumbfounded. It’s as if nobody on the entire Samsung team ever stood back, looked at any of the fitness trackers on the market (even the worst of the worst) and copied anything that users actually use or value in an integrated activity tracker device. Never mind more 2010-ish features like social connectivity, competitions, or the like.
This is a product I wanted to love, but ultimately, it just ended up being a huge disappointment. Hopefully Samsung can iterate quickly on the software, and move the platform forward to something that someone might actually want to buy. In the meantime, mine is going into my desk drawer.
(Updated to note that latest version of app now enables you to select which device the step comes from, phone or Gear Fit.)
USB cables have never been the most frustration-free things in the tech world, and many of us (myself included) have yet to plug one in correctly on our first attempts. The new design, known as USB Type-C, has been officially confirmed by the USB Implementers Forum (IF) at Intel's Developer Forum conference today.
The main changes include a small, reversible connector on both sides, meaning you can plug your phone and laptop into either end rather than the "bigger one on the laptop, smaller one on the phone" philosophy we work with already.
Type-C cables will be fully supporting 10Gbps transfer rates found on the USB 3.1 specification, and they'll do this while having USB ends measuring just 8.35x2.55mm -- keep in mind that, despite the fact that this is much smaller than the traditional USB connector, this is larger than Micro-USB.
Specifications for Type-C will likely be completed by the IF in July 2014 according to CNET, which means we'll likely see some cables to try out by the end of the year. The transition for mainstream PC and mobile device manufacturers, however, will likely be slower.
Also according to CNET, here are the current design attributes of the cable:
It'll make an audible click when plugged in correctly.
It's designed to accommodate future USB incarnations with higher data-transfer speeds.
It'll support USB's growing role in carrying power to operate and charge devices through the USB Power Delivery technology.
It's designed to be plugged and unplugged 10,000 times.
Are you ready to finally stop getting laughed at by your Lightning connector-toting iPhone buddies? Let us know down in the comments.
Samsung is known for putting amazing displays in its flagship smartphones. I’ve been a huge fan of Super AMOLED screens ever since the original Galaxy S, which featured amazing colors and a digitizer that was integrated into the glass, giving the user the feeling that he or she was touching the interface itself. And with every new Galaxy device, the Super AMOLED technology has gotten better. The displays can be a bit oversaturated, but they become fairly accurate when used in professional mode.
Unsurprisingly, the display on the Samsung Galaxy S5 is even better than the previous versions. What, though, is just how well it performs in testing. DisplayMate put the Galaxy S5′s screen to the test and came away with some amazing conclusions. Not only is the S5′s display far better than its predecessors in pretty much every way, it’s also the best display that Displaymate has used.
According to the reports, the Galaxy S5 is the most accurate display ever tested on a smartphone or tablet when in Cinema mode. That’s an incredible feat considering that AMOLED tech has been known for being somewhat inaccurate. The S5′s display is also 22 percent brighter than the one found on the Galaxy S4 and 12 percent brighter than the Galaxy Note 3′s screen.
The Galaxy S5 also features a super dimming mode that can it make its screen very dark when necessary. According to DisplayMate’s testing, the display on the S5 is 27 percent more efficient than the one found on the S4. AMOLED is already a very efficient technology, so this should give the Galaxy S5 some amazing battery life.
With such a glowing review of its display that’s supported with testing, I can’t wait to get my hands on the Galaxy S5. I adore AMOLED and the Galaxy Note 3′s display blew me away, so I am very excited to check out the screen on the Galaxy S5. What are your thoughts on this? Is AMOLED finally ready to take over LCD?
With April Fools' taking place tomorrow, Google will look to continue its long running stand as the king of pranks. With tons of cash to spend on elaborate ideas, the company has become known for over-the-top jokes; featuring celebrities, fantastic videos, and a ton of custom software to go along with the schemes.
The latest prank from Google is the Pokémon Challenge, which is an attempt by the company to hire a "Pokémon Master." In order to get the gig, folks from all over the world must explore their surroundings using Google Maps, capturing Pokémon. The first to "catch 'em all" will win the position at Mountain View.
So, is there a real job opening? Probably not. Is this another great April Fools' joke from Google? Absolutely!
Watch the full video explaining the Pokémon Challenge below.
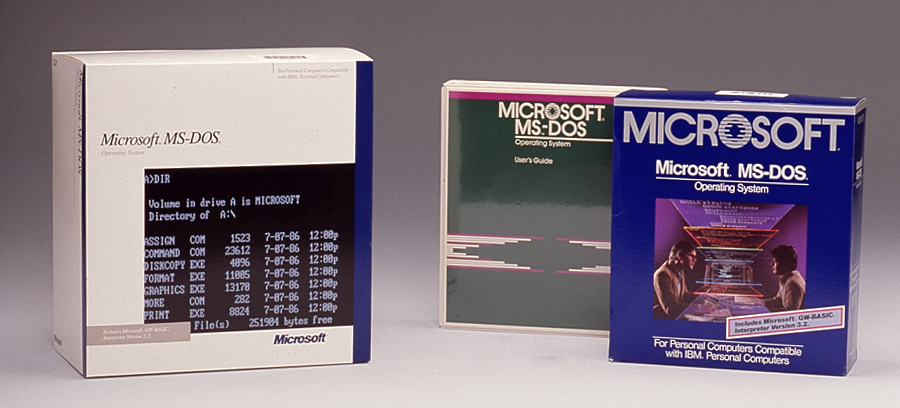
Microsoft has dusted off the source code for MS-DOS and Word for Windows—some of the most popular and widely used software of the 80s—making it freely available to download from the the Computer History Museum.
Coding: how hard can it be ? Take a few ideas, type a few lines of letters and numbers, sprinkle with some rarely used punctuation marks and—boom—you have software! Right?
Ever wanted to watch the world—in real-time HD—from space? Well prepare to experience what it'd be life if the world was your very own video game and check out a few planes landing at the Bejiing airport. It'll be the coolest planespotting you've ever done.
If you watched the Oscars last night and are at all interested in technology, then you know who the real winner was. Samsung. Not only did Samsung pay for four well-placed commercials during breaks, but their phones were everywhere throughout the show. Host Ellen Degeneres pulled out Samsung devices a handful of times on and off stage, but the most memorable involved the Galaxy Note 3 and a "selfie" that is now the most retweeted Tweet of all time.
Early in the show, Ellen dropped down into the audience, gathered up some of the biggest names in Hollywood (including Bradley Cooper, Jennifer Lawrence, Julia Roberts, Brad Pitt, Meryl Streep, Angelina Jolie, Kevin Spacey, and Lupita Nyong'o), and had Cooper hold out a Note 3 to take a picture (seen above) of the entire crew that would be Tweeted. It's actually a pretty cool picture, but during the entire clip, the Note 3 is front-and-center and couldn't be more well-placed.
And yes, the Tweet featuring the photo taken has now been retweeted well over 2.5million times.
There is marketing, and then there is what Samsung does. Love 'em or hate 'em, they are on some run here in terms of creating a brand. If you thought 2014 was the year that Samsung slowed, you may want to turn off your TV, not go to movie theaters, stop reading anything involving a celebrity, avoid sporting events, and bypass electronics stores.
Here is a clip of the selfie taking place:
And here are all of the ads that played during the event:
At the official unveiling of the Galaxy S5 earlier this week, Samsung demoed an intelligent battery saving technique that turns the screen black and white to extend battery life considerably. In addition to its own customizations, Samsung has revealed that the Galaxy S5 will feature three additional battery saving optimizations from LucidLogix. LucidLogix develops power saving solutions that enables you to extend your device’s battery life. Its Xtend line of battery saving features that include NavExtend, WebExtend and GamExtend will be included in the Galaxy S5, which should make the device much more energy efficient.
Lucid’s NavExtend focuses on increasing battery life when using GPS and navigation utilities. It does so by throttling the GPU just so that it matches the minimum requirements needed by the GPS client. Usually when using navigation, the GPU runs full-tilt, which leads to a heavy strain on the battery. NavExtend intelligently manages the GPU so that more battery is conserved, with a claimed increase in battery life by as much as 25%. The throttling of the GPU means that the device does not run too hot as well. Lucid has mentioned that the NavExtend technology will work “transparently and flawlessly with leading navigation software”.
Similarly, WebExtend works by increasing battery life by up to 25% while surfing the Internet. It uses a combination of GPU and CPU throttling to achieve this, and Lucid claims that all major Android browsers work with WebExtend. Finally, GameExtend is a utility that has already been used on the Galaxy Note 3 to manage the device resources better while undertaking heavy-duty tasks like gaming. These Lucid technologies in addition to Samsung’s own tweaks mean that the Galaxy S5 will likely be one of the most energy efficient devices this year.
One of the new features Samsung introduced with the Galaxy S5 is a fingerprint sensor. At the launch event, Samsung announced that the fingerprint scanner can be used for much more than unlocking the device, and that they would be working with third party vendors in creating additional functionality. The first such functionality seems to be biometric payment authentication. PayPal announced that from next month, users will be able to use the Galaxy S5 to authenticate their purchases directly without having to enter an additional PIN number or password. This mode of authentication is much more secure to using a password, which can be stolen.
The PayPal client will be able to authenticate users based on a unique encrypted key that contains a user’s biometric information. Gerben van Walt Meijer, Marketing Manager of Samsung Mobile Netherlands says that this functionality is designed to make it easier for users to buy things online. ”People are increasingly looking for mobile solutions that make their lives easier. The GALAXY S5 is the result of innovation that purely on people-oriented. Whether you’re talking about online payment convenience or improve your health with personal fitness coach and built-in pulse sensor, the S5 offers.” Samsung is betting on other vendors utilising the features allowed by the fingerprint sensor to make user authentication easier.
It definitely looks like one of the better watches.
Samsung’s Gear Fit was one of the most innovative products that were unveiled over the course of the week at the Mobile World Congress, and the GSMA seems to agree with that statement as it bestowed the “Best Mobile Device” to the Gear Fit yesterday. The Gear Fit is unique in that it combines the utility offered by a fitness tracker and a smartwatch. The design of the device is also quite striking, with the 1.84-inch curved AMOLED screen offering wide viewing angles and a higher resolution than the Gear 2 and Gear 2 Neo. The Gear Fit also comes with a real-time heart monitor and syncs activity information to Samsung’s S Health. The device also has a battery life that is claimed to be twice as long as the Gear 2 and Gear 2 Neo.
Samsung’s Galaxy Gear missed the brief entirely as to the function a smartwatch should serve, but the manufacturer more than redeemed itself with the Gear Fit. The design of the device is unobtrusive and minimalistic, but not too out of the way that you won’t notice an incoming notification. The true testament to the amount of interest in the Gear Fit can be gauged when you see that it has managed to overshadow the announcement of the Galaxy S5. Availability details of the device aren’t known yet, but the Gear Fit is scheduled to hit shelves at the start of the second quarter.
T-Mobile CMO Mike Sievert is pumped about Samsung’s new Galaxy S5 smartphone: Today, the executive tweeted that Samsung’s latest flagship is a record-breaker at the carrier, with over 100,000 pre-registrations in under 48 hours since its announcement. 100,000+ pre-registrations in 2 days is a new record at @TMobile #GalaxyS5 !!— Mike Sievert (@SievertMike) February 26, 2014… Read More
Suck at Flappy Bird? Don't worry, most humans do. Even if you're smart, the game is so silly it won't reward your intelligence. But do you know how you could outsmart Flappy Bird? By building a Flappy Bird terminator. Two guys from China used their frustration to make a robot who basically kicks ass at Flappy Bird. Watch it. It uses a webcam to figure out how many taps is needed to clear the pipes and a robotic arm made from an old hard drive and a tip of a stylus. Hasta la vista, birdy.
I'm pleased, it doesn't have any killer features that make me want to upgrade. Think I'll wait for the S6!
Looking for the full spec list of the new Samsung Galaxy S5? Here you go.
We are looking at a 2.5GHz quad-core processor, 5.1-inch FHD Super AMOLED display, 2GB RAM, 16MP camera, 2800mAh battery, LTE, Android 4.4.2, and both fingerprint and heart rate sensors. Pretty cool stuff.
Camera: HDR (Rich tone), Selective Focus, Virtual Tour Shot, Shot&More
IP67 Dust and water Resistant
Ultra Power Saving Mode
Download Booster
S Health 3.0
Quick Connect
Private Mode
Kids Mode
Google Mobile Services: Chrome, Drive, Photos, Gmail, Google, Google+, Google Settings, Hangouts, Maps, Play Books, Play Games, Play Newsstand, Play Movie & TV, Play Music, Play Store, Voice Search, YouTube
 As soon as Apple announced the new, larger iPhones, cries went up, prompted by the sheer size of the new devices. Will it fit in the pocket of my skinny jeans? How will it sit in my small hands? Can it double as a cheeseboard? These valid questions are hard to answer without a tangible representation with which to test. Read More


 Apple and Samsung have agreed to drop all non-U.S. litigation. The announcement came late Tuesday in a release first reported by the Financial Times. In the joint statement, the two tech giants said they “…have agreed to drop all litigation between the two companies outside the United States.”
Terms of the agreement were not disclosed. But, as noted in the statement, this… Read More
Apple and Samsung have agreed to drop all non-U.S. litigation. The announcement came late Tuesday in a release first reported by the Financial Times. In the joint statement, the two tech giants said they “…have agreed to drop all litigation between the two companies outside the United States.”
Terms of the agreement were not disclosed. But, as noted in the statement, this… Read More


. If you experience sudden tingling, nausea, or vomiting, perform a factory reset immediately. Do not submerge in water; phone will drown. Exterior may be frictionless. Prolonged use can cause mood swings, short-term memory loss, and seizures. Avert eyes while replacing battery. Under certain circumstances, wireless transmitter may control God.")