


These awesome vintage comic book hair barettes can be found here!

Back in March we posted about the dramatic backlit cut paper sculptures of art duo Hari & Deepti (Harikrishnan Panicker and Deepti Nair). They’ve since produced quite a few more wonderfully atmospheric works for a recently completed show at the Black Book Gallery in Denver.


photos via Black Book Gallery
via Colossal

Communication at work or home would be very different for us if we took the canine approach. I'm not sure that it would be better. But I'm certain that blog comments would be even more interesting to experience.
YOU are! So slide on up here and let’s have some munchies!


The marine eels and other members of the superorder Elopomorpha have a leptocephalus larval stage, which are flat and transparent. This group is quite diverse, containing 801 species in 24 orders, 24 families and 156 genera (super diverse).
Leptocephali have compressed bodies that contain jelly-like substances on the inside, with a thin layer of muscle with visible myomeres on the outside, a simple tube as a gut, dorsal and anal fins, but they lack pelvic fins. They also don’t have any red blood cells (most likely is respiration by passive diffusion), which they only begin produce when the change into the juvenile glass eel stage. Appears to feed on marine snow, tiny free-floating particles in the ocean.
This large size leptocephalus must be a species of Muraenidae (moray eels), and probably the larva of a long thin ribbon eel, which is metamorphosing, and is entering shallow water to finish metamorphosis into a young eel, in Bali, Indonesia.
Is it just me or does he look REALLY excited about where ever (s)he’s going?
BBY EEL

Most teenagers deal with plenty of stress, from school to homework to their home life, but oftentimes teens don’t have to deal with unusual embarrassments like Rain has. This 16-year-old kid had to deal with his parents, Dale and Rochelle, waving as he left for school. Not wanting to endure the embarrassment any longer, Rain told his mother, “Don’t let dad go out there again.” Instead of listening to his son, however, Dale had something else in store.
The pictures below show Dale’s clever response to his son’s request.


(via wimp.com)
Most teenagers deal with plenty of stress, from school to homework to their home life, but oftentimes teens don’t have to deal with unusual embarrassments like Rain has. This 16-year-old kid had to deal with his parents, Dale and Rochelle, waving as he left for school. Not wanting to endure the embarrassment any longer, Rain told his mother, “Don’t let dad go out there again.” Instead of listening to his son, however, Dale had something else in store.
The pictures below show Dale’s clever response to his son’s request.
(via wimp.com)


In the 7 years of running Street Anatomy I’ve had the pleasure of listening to and reading about artists’ motivations for using human anatomy in their work. It ranges from having parents with medical backgrounds, to dealing with a chronic disease, to a fascinating anatomy lesson in school, and beyond. Romanian illustrator Aitch, was not so impressed with her past encounter with anatomy. Aitch says of her experience,
“I chose to work on this project because i always had an issue with the human anatomy. All those years in college and at the university made me so bitter to the academic/strict ways of dealing with the human form in such a degree that, now, my whole style is based on avoiding realistic body shapes and embracing awkward proportions and weird-fun characters.”
Her series titled “Beautiful Us” puts specific anatomy on display in a storybook feel, isolating organs and crafting a magical environment around them. All created in rich watercolor on paper.
View more of Aitch’s stunning work at aitch.ro and Behance! She also sells prints of her work via Society 6, although none of her anatomy series is available yet.
A persistent and adorable weasel desperately tries to play with an evasive white-footed orange kitten who seems to be trying just as hard to avoid playtime with his persistent little friend.

Halloween is just around the corner, and these zombie chia pets are the perfect finishing touch to all your spooky decor. You can choose from an arm reaching up out of the grave, Lifeless Lisa, or Creepy Holden. Better yet, buy all three and you’ll have the makings a a zombie chia family.
See more pictures after the break.


Product Page ($16.99 via The Green Head)

Though I’ve seen hundreds of pieces of Star Wars art over the years, every one is slightly different. Artists constantly show me different ways to see the saga, and Eric Tan’s posters for the original trilogy definitely have that effect. While I wouldn’t necessarily call his posters minimalist, they have that simple but effective vibe. I love how Darth Vader figures prominently in the layout of the first two but takes a backseat in the Return of the Jedi art.
Tan, a designer for Disney, said he’s never had more fun on a project. It shows.
See more pictures of the art after the break.


Product Page ($399.95/each via /Film, photos via Eric Tan)


Get ready to turn your house into the safest version of Gotham City ever with these small Bat-Signals. Made by Geekhex, the 3D printed Bat-Signals are built to be inserted into a candle with prongs; you’ll be able to summon a tiny Batman in a heartbeat. You can order the signal in various types of metal and choose from Bat-Signals over the ages including designs from 1992, 2001, 2003, and 2008.
See the other eras of Bat-Signals available and see them in action after the break.


Product Page ($35 via Oh Gizmo)

Artist Filipe Carvalho has created beautiful and very simple images of the characters from Star Wars using something called Flat Design. Rather than complex, detailed images, he uses only a few colors and shapes to convey an entire character. The results are pictures we’d love to have hanging on the wall.
See more examples after the break.


(Movie Pilot via Nerdist)

If you’re not one, you likely know one. You know, that guy with a quirky sense of humour, always wearing novelty trinkets for kicks and giggles? Yeah, so here’s another one for his arsenal: Intestine Socks. They are exactly what they sound like. Actually, no, they’re nothing like that. They’re not, you know, made from guts. They just look like them. And they cost $11 a pair.
[ Product Page ] VIA [ BoingBoing ]
The post Intestine Socks, For Those With A Strange Sense Of Humour appeared first on OhGizmo!.

The ALU Collar from San Francisco-based MEMA Pets features CNC machined aluminum hardware with sustainable cork and hemp webbing, and a Neodymium magnet buckle (one of the most powerful permanent magnets in the world). Simply put, it’s “the dog collar, re-designed”. And? It’s awesome.


While this collar isn’t available for purchase quite yet, you can sign up to be notified when it’s available for pre-order through MEMA Pets‘ website.
 I made this Orange Chicken on my Food Network show a few weeks ago, and I just realized yesterday that I’d never shared the recipe here on my totes cray recipe blog. So yesterday, as I whipped some up for lunch, I took photos and documented the step-by-step process. For I am a foodblogger. And that’s what foodbloggers do.
As I explained on the show, wherein I whipped up my girls’ and my favorite Chinese take-out dishes, every Friday when we go to Tulsa to our all-day homeschool co-op, one of the rewards the girls and I look forward to is a lunch from Panda Express. To three females who live on an isolated ranch, being less than 5 minutes away from drive-through Chinese food is enough to keep us going back to co-op week after week. My preferences can fluctuate wildly between things like Kung Pao Chicken and Beijing Beef—whatever I’m in the mood for—and Alex’s stay more in the Beef-and-Broccoli realm. But for Paige, it’s all Orange Chicken, all the time. She loves it and can’t get enough.
Here’s how to make Orange Chicken in the comfort of your own kitchen! It’s a very citrusy, very sweet chicken dish; Definitely worth trying if you’ve never had it before.
 First get the chicken ready. I used boneless, skinless chicken thighs, because I love their texture and flavor—particularly in Chinese dishes. But chicken breasts will work just fine, too; just be sure to cut whatever chicken you use into small, bite-sized pieces.
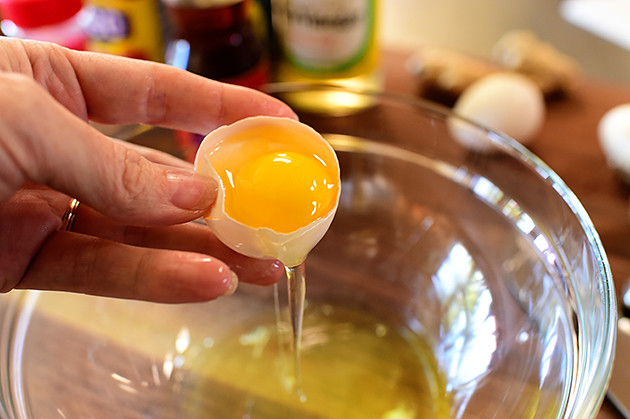 Now, for orange chicken (and other similar sticky chicken dishes), the coating for the chicken is key! It starts with 4 egg whites. I do the back-and-forth-between-the-two-halves-of-the-shell thing, but you can separate the whites however your heart, soul, or family tradition dictates.
 To the egg whites, add some cornstarch…
 And whisk it together…
 Until the mixture is totally combined and a little bit frothy.
 So now, just throw in the chicken pieces…
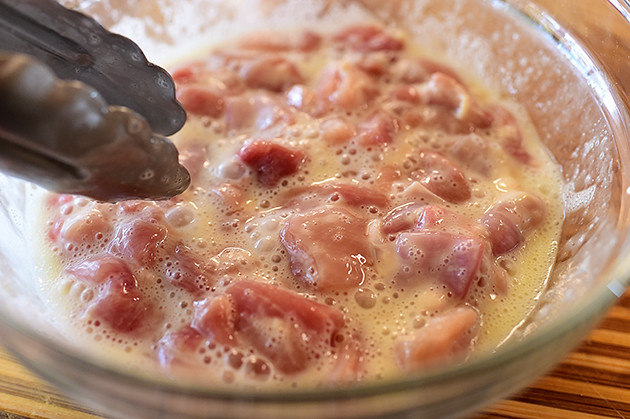 And smush them around so that they’re all coated in the egg white/cornstarch mixture. Just let them sit in there for 5 to 10 minutes while you get the sauce going.
 I used a nonstick skillet, which works really well, but you can use any skillet…or just a saucepan. The sauce starts with orange juice! Easy peasy.
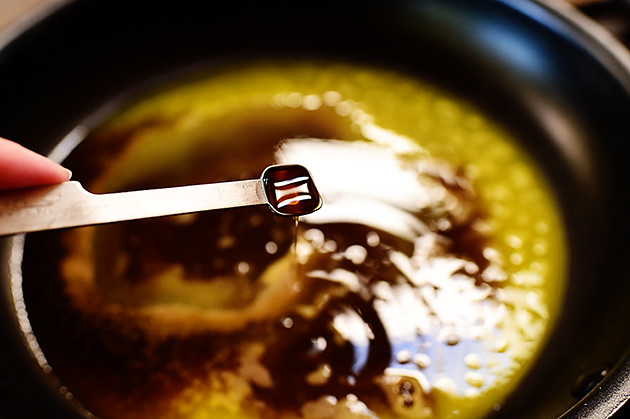
 Then comes all the other good stuff: Soy sauce…
 Brown sugar (or you can use white sugar or even honey instead!)…
 Vinegar (this is rice vinegar, but you can just use regular white vinegar)…
 Sesame oil (there’s nothing like it in the world)…
 A little salt…
 Some red pepper flakes (the spice is very nice!)…
 Some garlic (I grated it in with a microplane, but you can just mince it if you prefer)…
 The garlic is important in the sauce, so don’t skip it.
Sorry to be bossy.
 Next up: Fresh ginger, if you can get it. Just cut a piece, slice off the skin…
 And grate it or mince it, just like you did the garlic.
 Finally, a little orange zest.
Orange zest is so purty.
And so citrusy.
And so…zesty.
Yum.
 Whisk it around until it’s all combined and heat it over medium-low heat until it’s heated through and barely starting to thicken.
I’ll say this more than once, but it’s important: Be sure to taste the sauce and add more of whatever your tastebuds want. Some folks like more soy, some like more garlic or ginger, some need a little more salt. I think this sauce is highly personal…so just use my quantities as a guide.
 Now it’s time to fry the chicken: Heat some vegetable or peanut oil (I used the latter) over medium heat, or until it registers around 350 on an oil thermometer—not too hot, but not too cool! Then, using tongs, carefully drop individual chicken pieces in so they won’t stick together. You’ll need to do this in 4 or 5 different batches; you don’t want to crowd the pan or it’ll be a royal mess.
IMPORTANT: If you have small kids in the house, please ALWAYS put pots of hot oil on the back burner. Curious kiddos can reach up and grab handles…and terrible accidents can happen! So hot oil = backburner. Thank you for listening to Pioneer Woman.
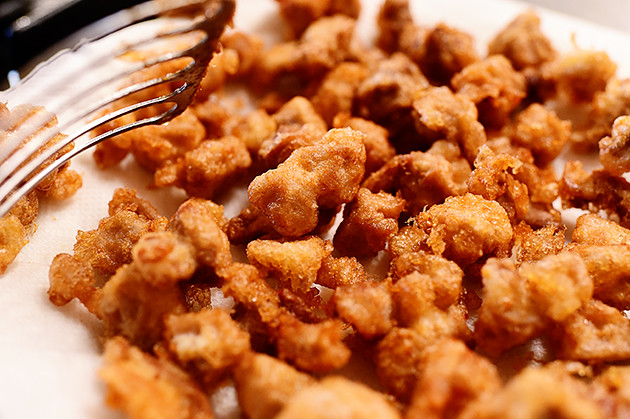
 Let the pieces fry for 2 to 3 minutes for the first stage. They’ll be slightly golden, but not dark yet (if they browned really quickly, the oil’s too hot.)
 Take them out…
 And set them on a paper towel-lined plate. Keep going until all the chicken has been fried.
 Then comes the fun part. Grab a batch of the fried chicken from the plate…
 And plunge it back into the hot oil for another minute. This just “solidifies” the coating and gives it a little more structure…whatever that means. Ha. And truth be told, it would probably be fine just to fry the chicken all the way through during the first frying stage. This is just the way I do it, man. I’m old and set in my ways.
 When the chicken has fried for the additional minute, drain it on a new paper towel. Note that the coating isn’t hard and crisp as it would be if you’d used a batter; it’s very light. Just right!
 Now it’s just time to finish up the sauce: Combine a little cornstarch…
 With a little water…
 And pour this into the sauce, whisking it to combine.
 Turn up the heat just long enough to let the cornstarch thicken the sauce…
 Then remove it from the heat…
 And throw in the chicken!
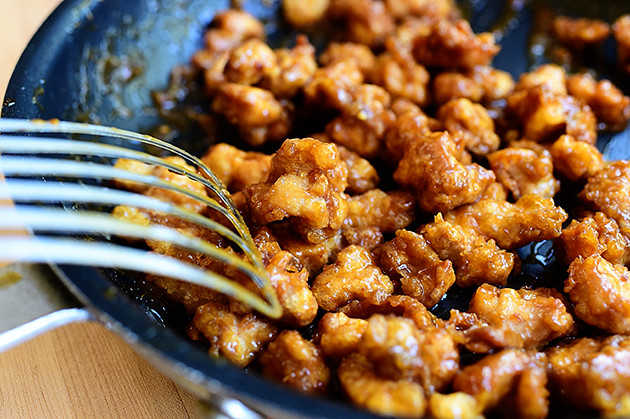 Quickly toss it around to get the chicken all coated. There is not an abundance of sauce—just enough to coat the chicken.
 I really wanted to drive home the orange, so I grated up some more zest…
 And tossed it in. (You can see the benefit of the nonstick skillet here; all the sauce ends up on the chicken rather than stuck to the pan!)
 Now, of course, you can serve the orange chicken with chow mein or fried rice…but it’s absolutely lovely on its own. (One thing a savory side dish like fried rice or noodles can do, though, is provide a counter to the sweetness of the chicken. Food for thought.)
 A little sliced green onion adds a little extra prettiness…and flavor, of course.
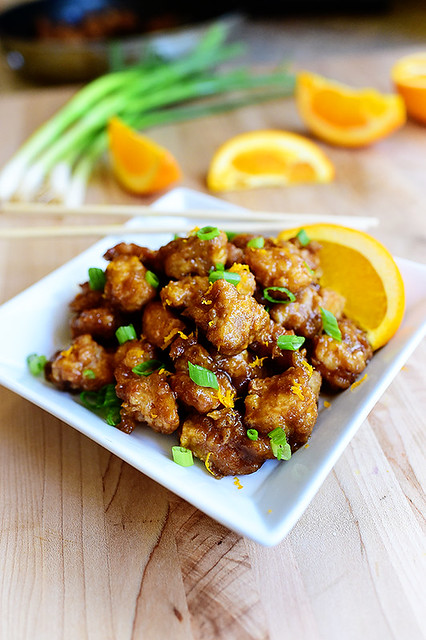 Very flavorful, very citrusy, very good! If you’re a fan of orange chicken, give this one a try sometime. Just remember that you can customize the sauce to your taste, adding more ginger, garlic, soy…anything that makes you happy in life!
 Here’s the handy dandy printable.
For the chicken: In a large bowl, whisk together the cornstarch and egg whites with a fork until almost frothy, about 1 minute. Add the chicken to the mixture and allow to sit for 5 to 10 minutes.
For the sauce: Meanwhile, put the orange juice, soy sauce, sugar, vinegar, sesame oil, salt, crushed red pepper, garlic and ginger (and orange zest, if using) in a small nonstick skillet and whisk together. Heat until bubbling and starting to thicken, about 3-4 minutes.
Whisk together the cornstarch and 1/4 cup water in a small bowl and add 1 to 2 tablespoons of the cornstarch slurry to the sauce. Mix in and thicken for 1 minute. (If sauce gets overly thick, just add in another 1/4 cup water and whisk in.)
Heat about 2 inches of vegetable oil in a heavy-bottomed pot until a deep-fry thermometer inserted in the oil registers 350 degrees F. In batches, carefully drop a few pieces of chicken into the oil (drop them in one by one to keep them from sticking together) and move it around, 2-3 minutes or until light golden. Let the pieces drain on a plate lined with paper towels for 2 to 3 minutes. Then drop them back into the oil for 1 minute to really solidify the coating.
Toss the chicken in the sauce and serve immediately with orange zest and sliced green onions on the top.
Posted by Ree | The Pioneer Woman on September 8 2014
Baking is all about sharing. Sharing recipes, sharing techniques, and most definitely sharing biscuits!
It’s time for our second challenge in the Baking Bootcamp series with King Arthur Flour! You blew me away by baking the Triple Berry Braided Bread with me for our first challenge. Hundreds of you participated and made the most lovely loaves of bread studded with summer berries. I’m so happy you took the time to bake with me! It really means so much. Let’s do it again, shall we!?

For this month’s Baking Bootcamp Challenge, we’re exploring King Arthur Flour’s Self-Rising Flour. It’s a wonderfully light white flour combined with non-aluminum baking powder and salt. It’s absolutely perfect for biscuits, pancakes, and muffins. It’s a staple in my kitchen when it comes to perfectly fluffy, no-fuss biscuits. Hop on this bandwagon and let’s get baking! Below I’ll offer some alternatives for a DIY self-rising flour and a gluten-free option. I want all of us in biscuit mode!
Here is a reminder of how Baking Bootcamp works:
Four Flours + Four Recipes Challenges + One Instagram #bakingbootcamp
+ Four Awesome Sets of Prizes!
The idea is simple!
• Make these Apple Pie Biscuits (they’re sooo delicious!) and take a picture of your creation!
• Follow @joythebaker and @kingarthurflour on Instagram
• Photograph your beautiful biscuits and post them to Instagram with the hashtag #bakingbootcamp
• When you submit a photo, you’ll be entered to win a one year supply of King Arthur Flour and a Baking Essentials box valued at $250!! Official rules and details can be found here.
I’ll be answering questions and sharing your photographs here on Joy the Baker. By entering the challenge you’ll also have amazing Apple Pie Biscuits in your kitchen, so… you really can’t lose.
Let’s get started!
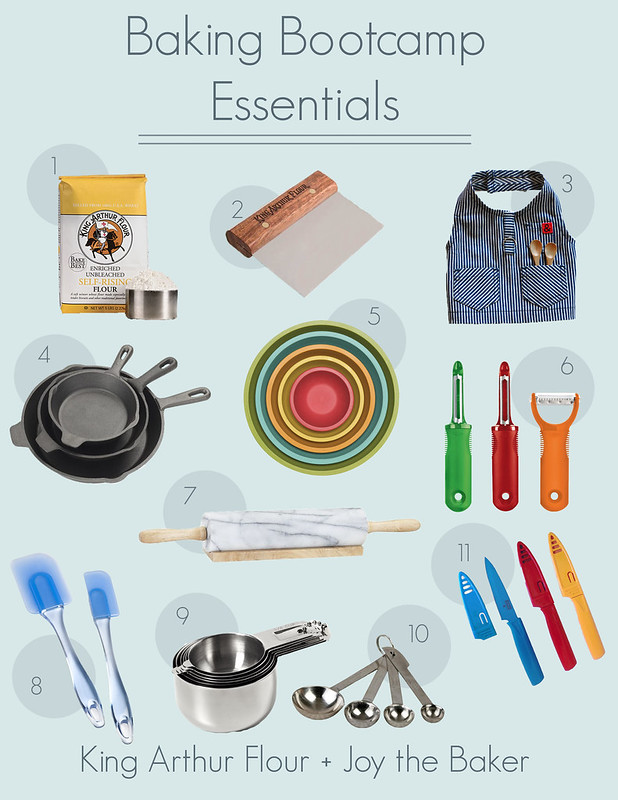
1 • King Arthur Unbleached Self-Rising Flour is perfectly soft and rolls out beautifully for these tender biscuits.
2 • I use this King Arthur Flour Bench Knife just about everyday in my kitchen. It’s perfect for scraping little dough bits from the countertop… something a sponge just pitifully attacks. You might also use the bench knife to slice though the center of the rolled dough. It’s sharp too! I love this tool!
3 • Kitchen fashion is important to me. Hedley & Bennett understands my needs for a functional, durable, totally chic apron. Not too frilly. I always want to be more badass than 50′s housewife-y in the kitchen.
4 • My Cast Iron Skillets are a staple in my everyday kitchen. Some are more successfully seasoned than others, but I try to keep some cast iron specifically for savory and other just for sweets.
5 • Having Colorful Mixing Bowls is the kitchen equivalent of having a great black dress in your closet. Necessary treat.
6 • Vegetable Peelers with good finger grips to peel apples in a flash!
7 • I inherited a Marble Rolling Pin from a family friend and now I don’t know how I’ve gone without one for so long! This piece has great weight and can be chilled in the refrigerator prior to rolling to keep our doughs more amiable.
8 • Don’t skimp on good Silicone Spatulas. The ones that melt along with the butter are just infuriating.
9 • Is it normal to have a completely mismatched set of Measuring Cups, or should I just treat myself to a matching set like this? Don’t answer that…
10 • Same goes for the Measuring Spoons… it’s nice to have a full matching set.
11 • I go through Paring Knives like I go through socks. How is it possible to have them one day and then lose them the next? I don’t know. Clearly I have an issue.
Let’s get baking! #bakingbootcamp
photos in this post by Jon Melendez.
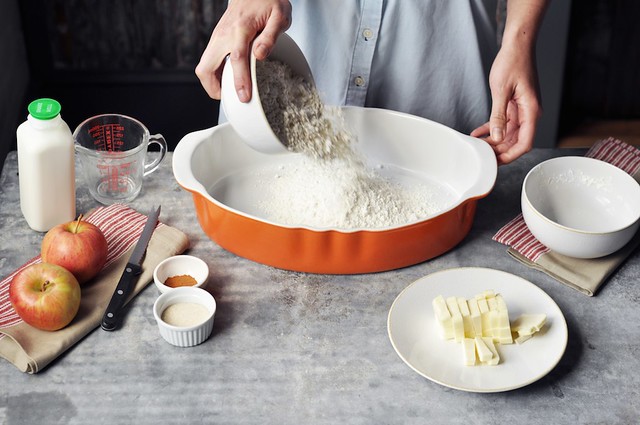
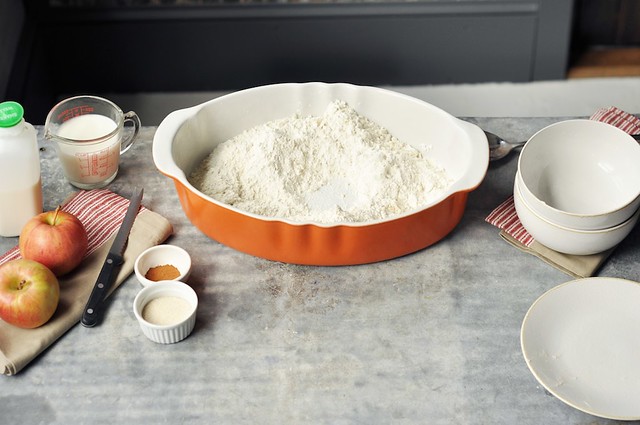
This super easy biscuit recipe features King Arthur Flour’s Unbleached Self-Rising Flour. I encourage you to go buy a bag and experience just how convenient it is! Self-rising flour has a lower protein content (8.5%) than all-purpose flour (11.7%) because it’s made using a soft wheat flour rather than the hard wheat flour that makes up all-purpose flour. The lower protein content makes the flour extra light, creating wonderfully tender biscuits.
Self-rising flour also contains non-aluminum baking powder and a dash of salt so we don’t have to deal with measuring spoons and extra additions.
How to make your own Self-Rising Flour: 1 cup all-purpose flour + 1 1/2 teaspoons baking powder + 1/4 teaspoon salt. Of course, if using all-purpose flour, the protein content will be a bit higher. Whisk together until thoroughly combined.
How to make your own Gluten-Free Self-Rising Flour: 1 cup King Arthur Gluten-Free Multi-Purpose Flour + 1 1/2 teaspoons baking powder + 1/4 teaspoon salt + 1/2 teaspoon xanthan gum.
For more on flour, check out Baking 101: The Difference Between Baking Flours.
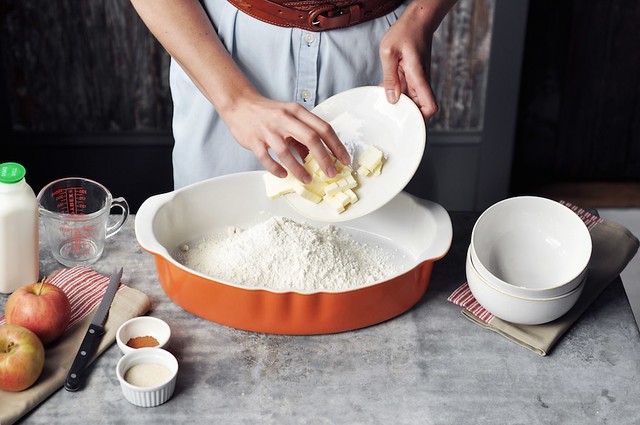
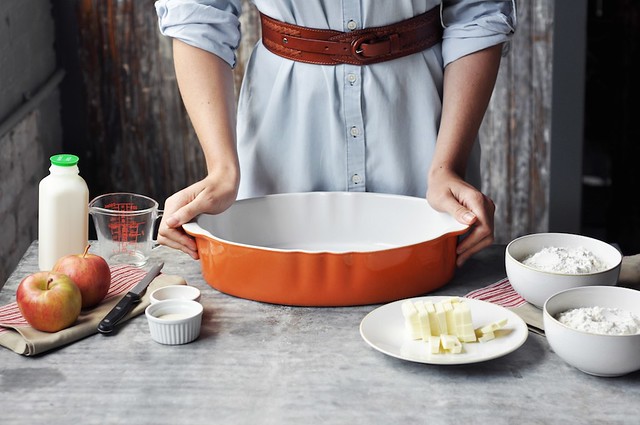
Cold butter is cut into small cubes and added to the flour. The colder the butter the better!
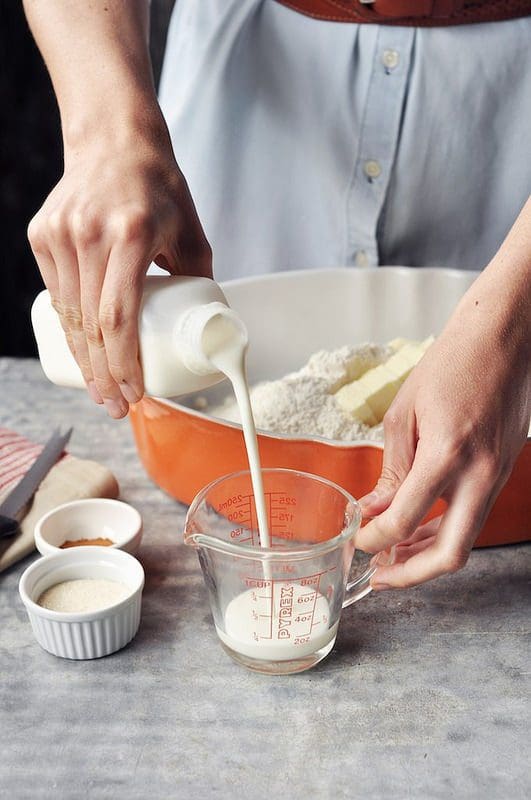
Measure out the cold buttermilk before your hands get dirty.
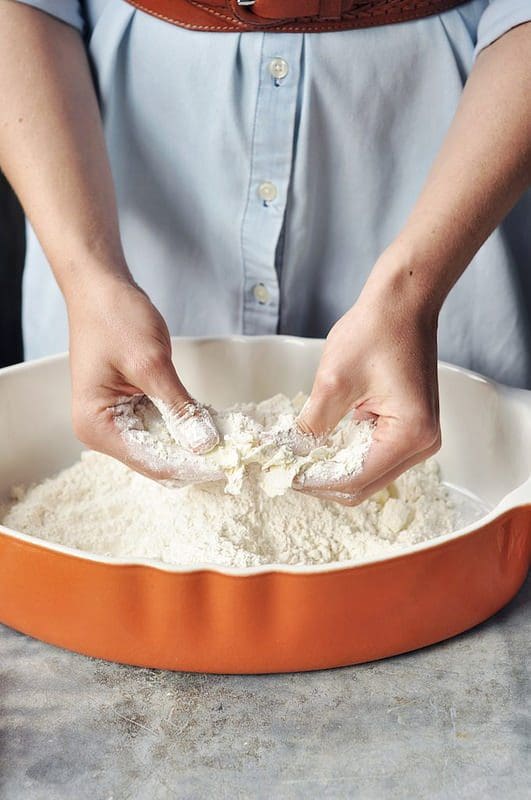
Using your fingers, break the butter down into the flour.
Quickly press the butter and flour in between your fingers creating little bits of butter throughout the flour.
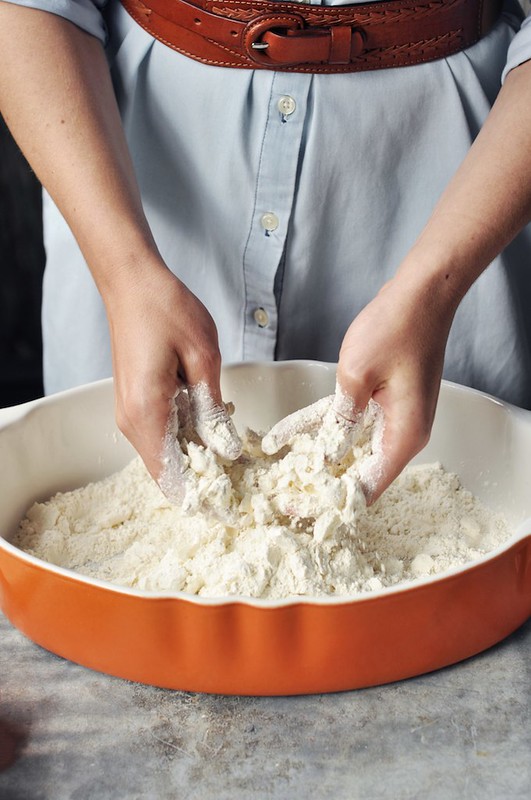
If you work quickly, breaking down the butter into the flour will take about 4 minutes. The result will be butter bits that are the size of oat flakes and small peas.
Add granulated sugar.
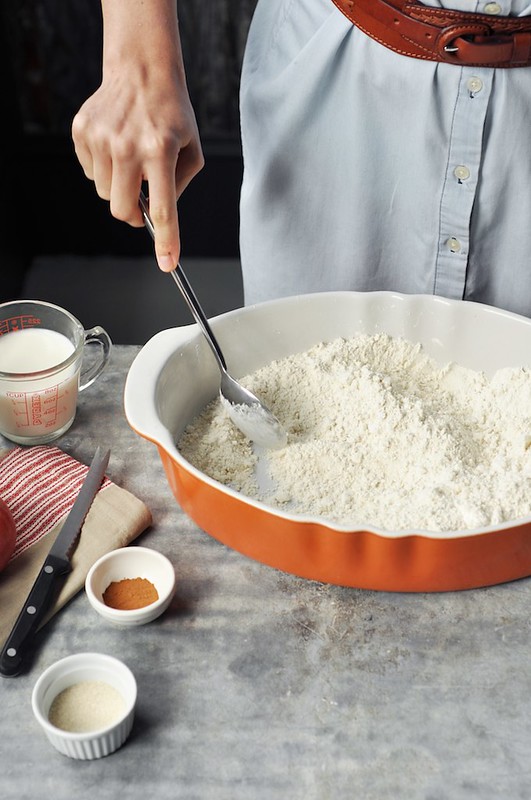
And stir the mixture together.
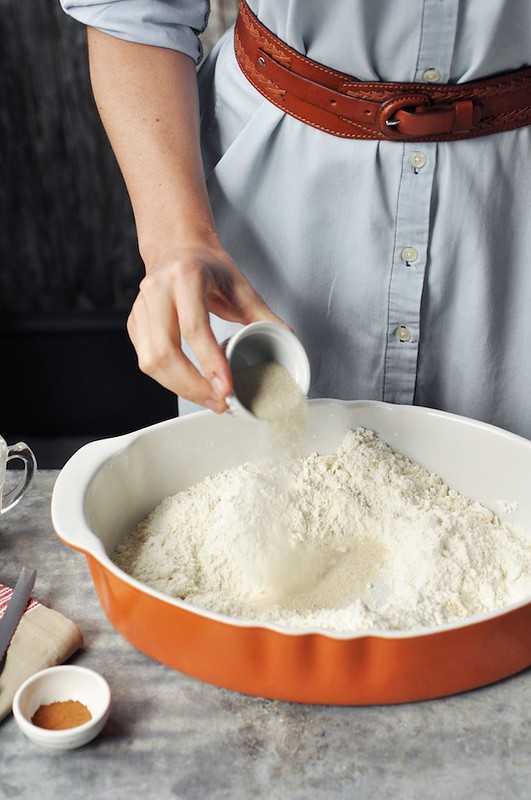
If that seems easy, it was! Baking powder and salt are already in the flour!
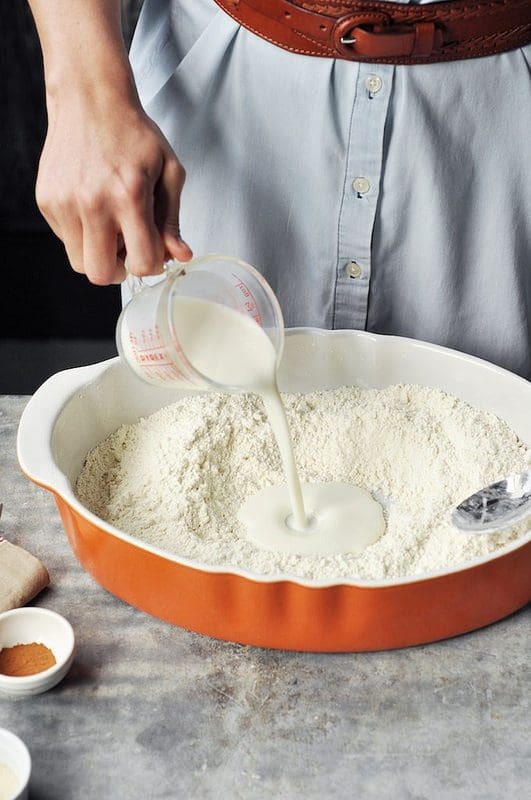
Add the cold buttermilk.
If you’re out of buttermilk, you can make your own buttermilk substitute using one of these feisty tips.
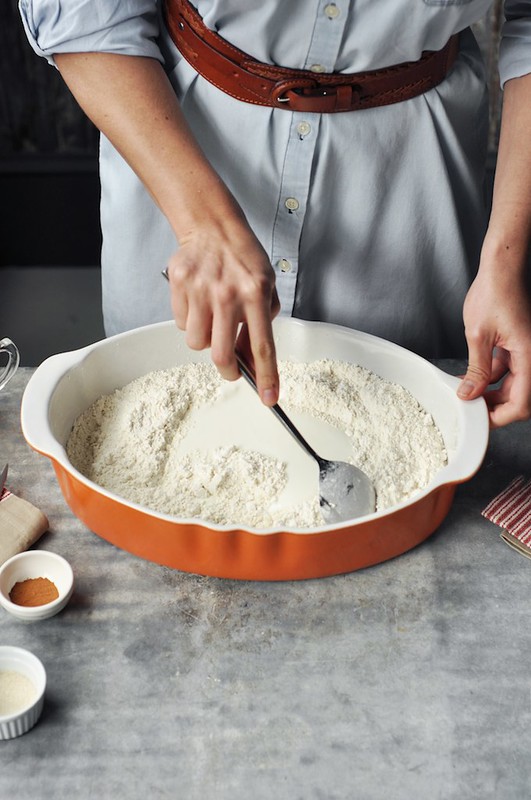
Begin to stir the dry ingredients into the buttermilk.
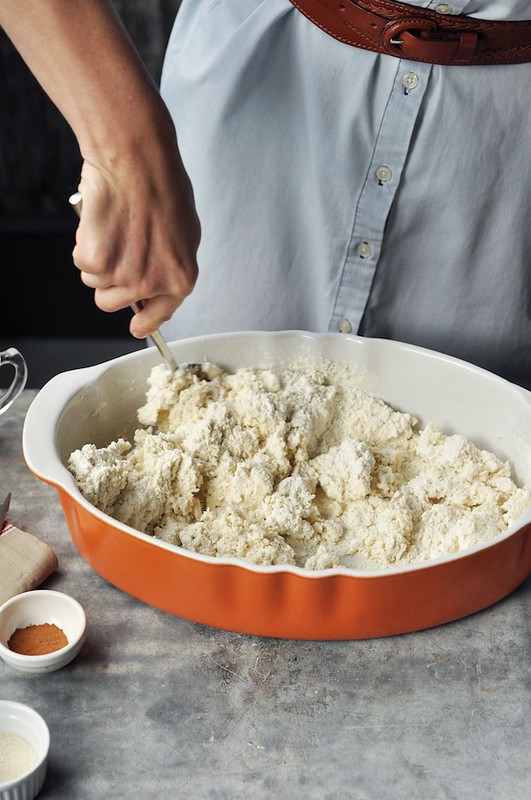
The biscuit dough will feel rather fluffy and wet.
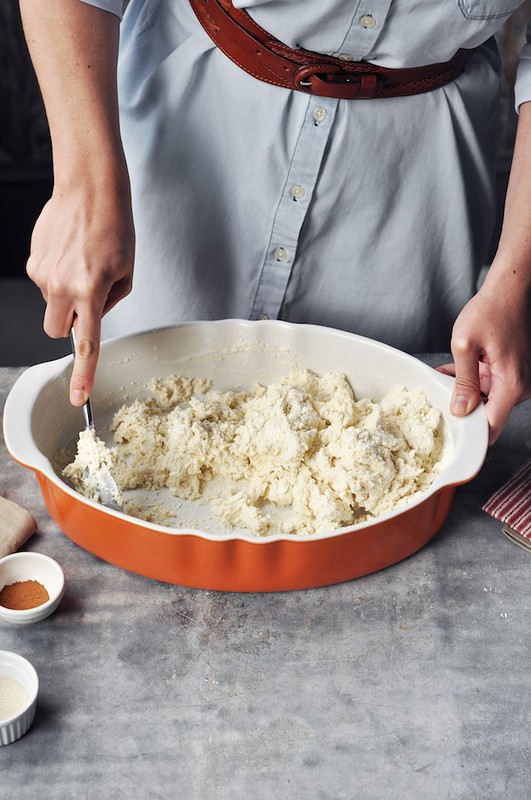
You’re on the right track! Once all of the dry ingredients are worked into the buttermilk (you may need to add a splash of extra buttermilk), place it in the refrigerator for just a few moments while you make the apple filling.
If you’re using your own homemade self-rising flour or gluten-free self-rising flour, you’ll want to add the full 3/4 cup of buttermilk.
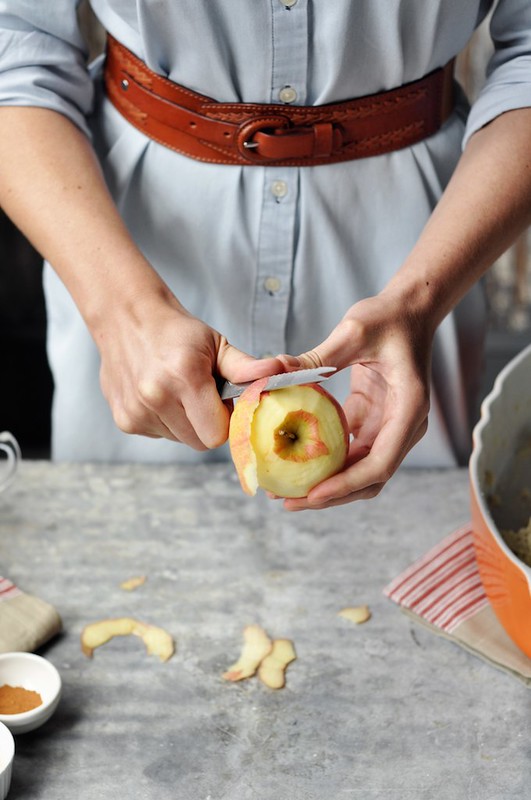
Using either a paring knife or vegetable peeler, peel an apple. I like Fuji apples for this recipe because they’re both crisp and sweet.
This is how my grandmother slices apples (and everything else), and I wonder how old I’ll be when I finally feel comfortable with this move. Don’t be like me, or my grandmother. Slice safely.
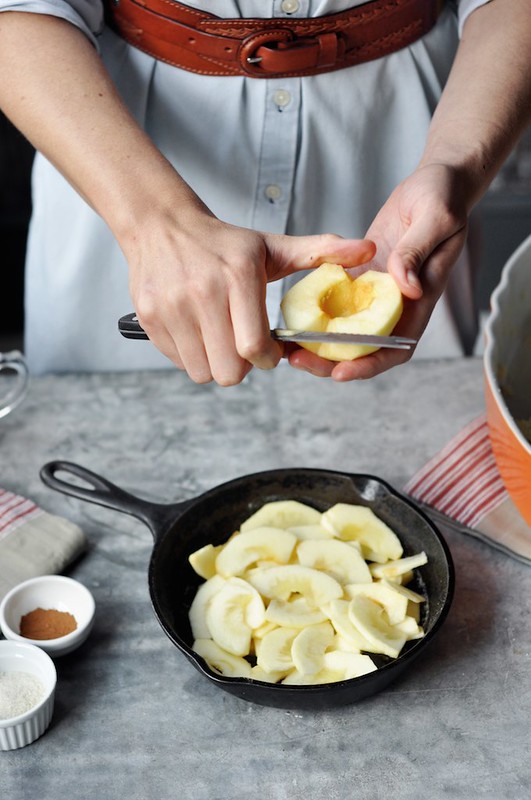
Add the apple slices to a skillet of melted butter. Add cinnamon.
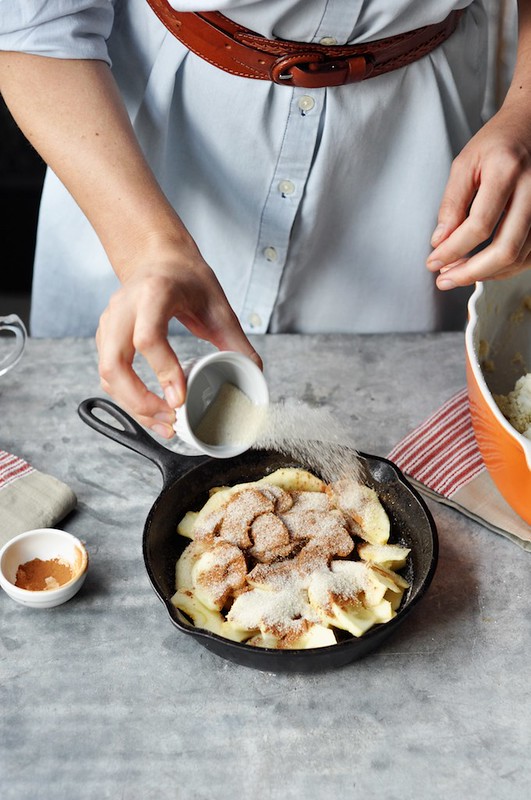
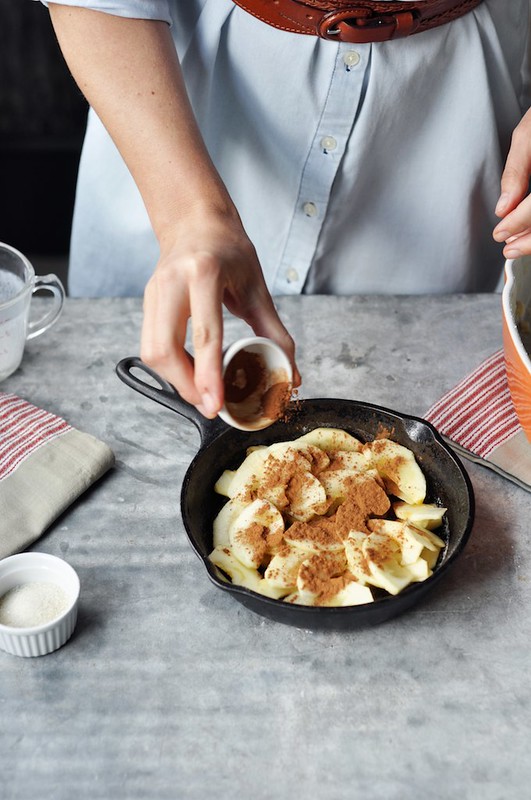
Add sugar, too!
Cook the apples down for just a bit to melt the sugar and meld the spices. The apples won’t be cooked all the way through, but they’ll finish softening in the oven.
Remove the skillet from the heat and allow to cool while you roll out the dough.
Back to the biscuit dough!
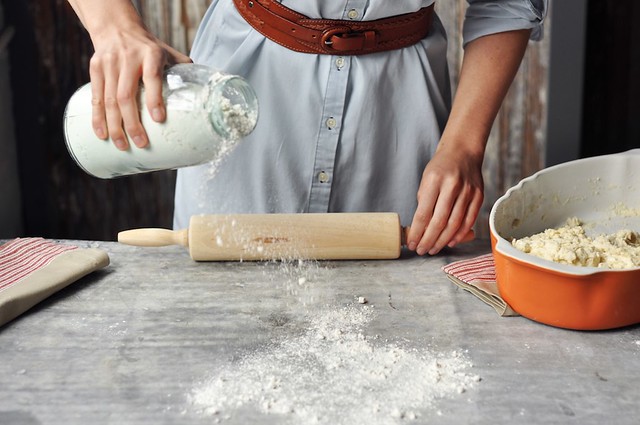
Generously dust a work surface with all-purpose flour.
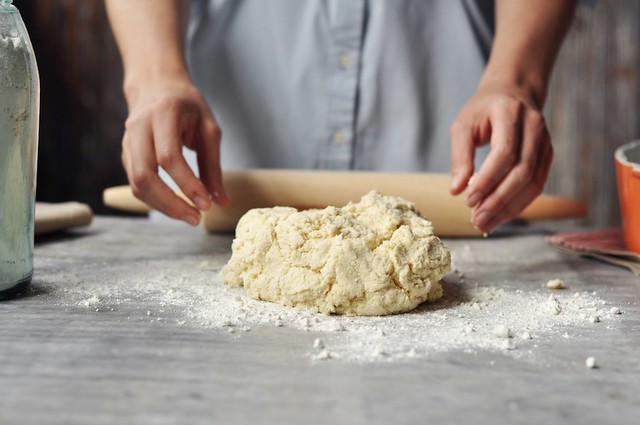
The dough should be moist but not overly wet.
Onto the floured surface we go!
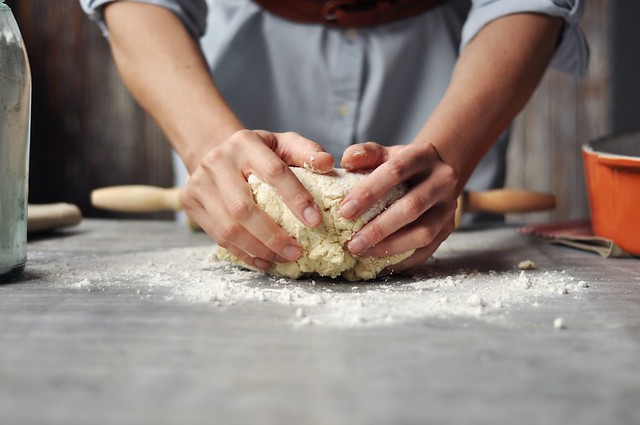
Knead the dough three or four turns. We want to create a cohesive dough, but not overwork the dough at all.

Use your hands to shape the dough into rough rectangle shape.

Pat it down to a 1-inch thickness.
Sprinkle a rolling pin with more all-purpose flour.

Begin to roll the dough using a firm and even pressure. Try to keep the rectangle shape as much as possible.
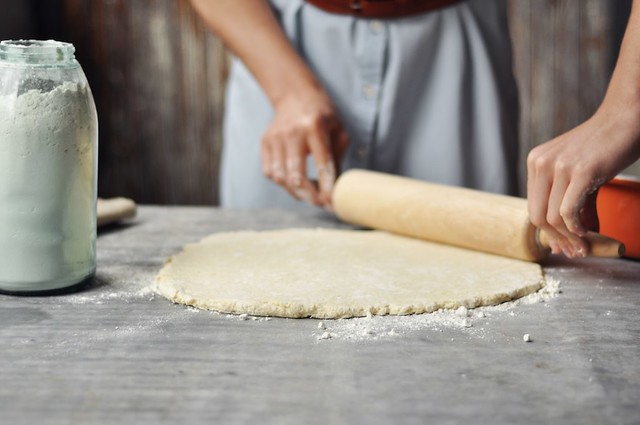
Roll the dough to a 1/2-inch thickness, about 7 x 10-inches. Move the dough around the surface a bit to ensure that it’s not sticking; this will become important later when we’re folding the dough.
Time for the apples!

Spread the apples in a mostly even layer across half of the biscuit dough.
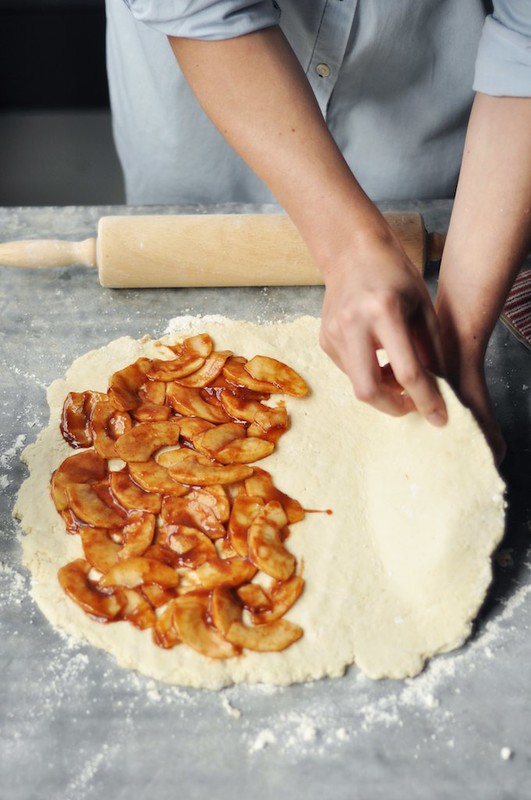
Gently fold the dough over the apples.

Use your hands to gently press the seams together.

Use the palms of your hand to nudge and suggest the filled biscuit dough back into an 8″ x 6″ rectangle rectangle if the edges have rounded a bit.

Be the boss.
A friendly boss, but definitely the boss.
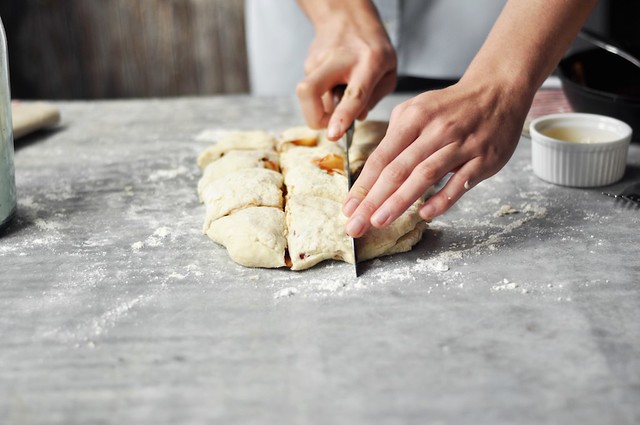
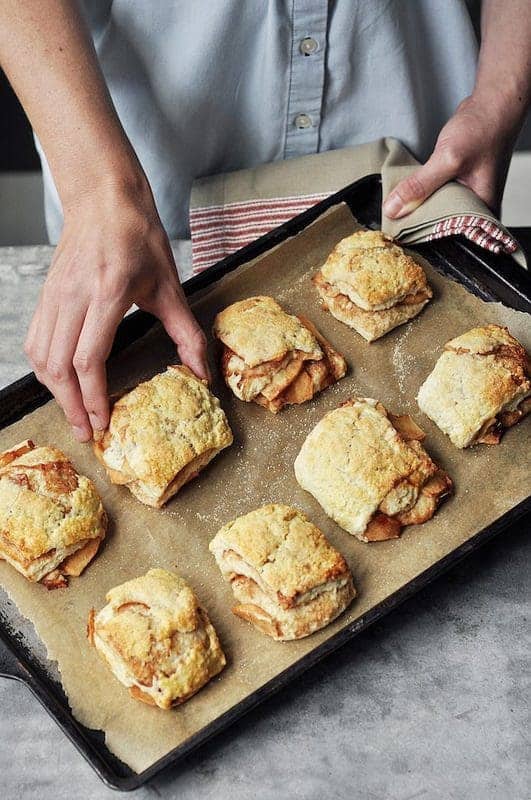
Use a large and sharp knife to cut 12 small biscuits. Flour the knife a bit if it gets too sticky.
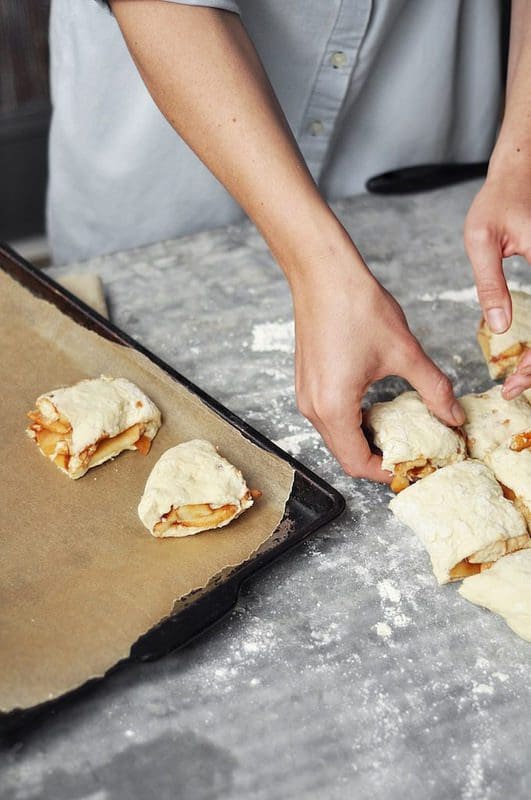
Place the biscuits on a parchment-lined baking sheet.
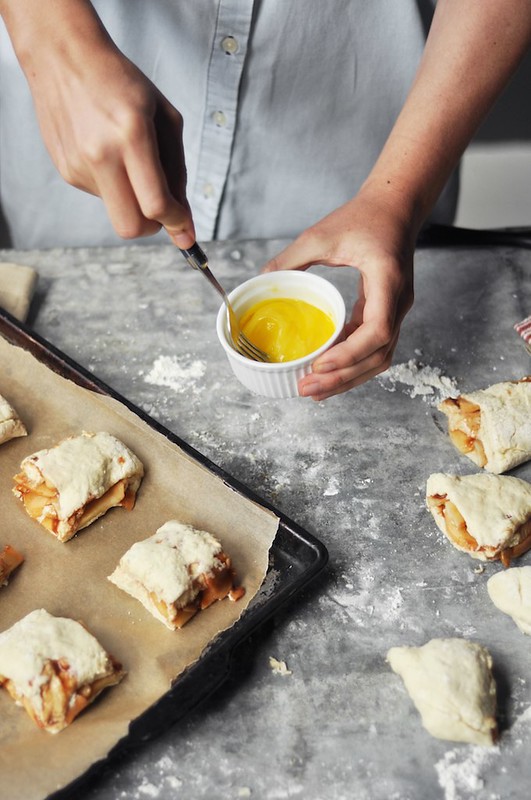
Beat an egg. Lightly brush the tops of each biscuit, for browning.

Generously sprinkle with granulated sugar and cinnamon.
Take a coffee break, but be careful that your rolling pin doesn’t roll right off the table. The biscuits will bake up in about 12 minutes!
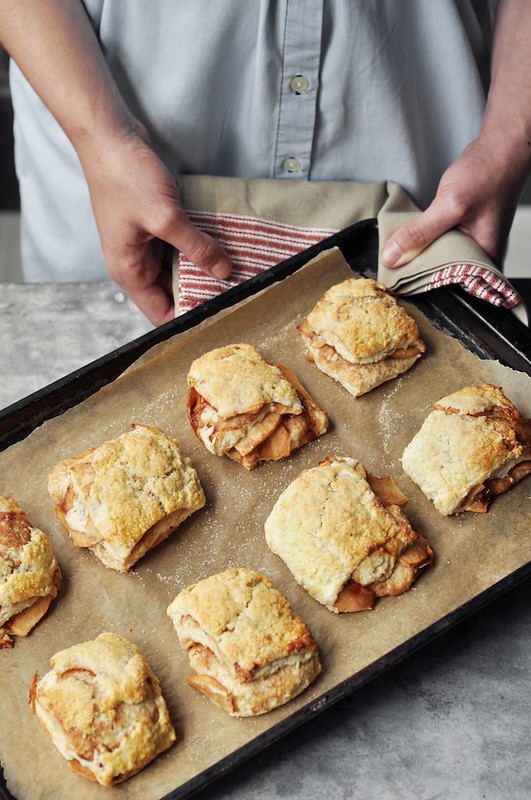
Now it’s your turn! Take on the challenge! Share your beautiful biscuits with us on Instagram #bakingbootcamp. You have until October 11th to submit your photos to be entered to win a one-year supply of King Arthur Flour and a Baking Essentials Box valued at $250. Official rules and details here. Leave any questions about the recipe in the comments below and check back here for all of your baking photos!
This post is brought to you by Joy the Baker in partnership with King Arthur Flour.
Prep Time: 20 minutes
Cook Time: 15 minutes
12 biscuits
Join King Arthur Flour and Joy the Baker for a second baking challenge. Bake these delicious biscuits, post a picture to instagram with the #bakingbootcamp between September 10th - October 10th for a chance to win a year of free flour from King Arthur Flour and a gift basket of prizes worth $250! Thank you for baking along with us!
Ingredients
Instructions
The post Baking Bootcamp: Apple Pie Biscuits appeared first on Joy the Baker.
Wow, one week of the SNAP Challenge is over and I can’t believe how many thoughts I’ve had so far. I could write a ten page paper on my feelings, experiences, and observations already… but I’ll try to keep it short (yeah, right). I also want to thank everyone for their insightful comments and support while I take on this challenge. You’ve helped me dive deeper and discover more.
Before I begin the summary, I want to discuss one aspect of the challenge. The SNAP challenge rules state that you shouldn’t use any food purchased prior to starting the challenge. I’m not following that rule because I don’t feel like it’s very realistic or a responsible way to eat on a budget. Sure, some SNAP recipients will start out with no kitchen supplies, but maybe some do. Each person’s SNAP experience will be unique and involve several variables. I can’t replicate anyone else’s experience, so I have to try to mimic what my own would be. I’m approaching this challenge as if I had to suddenly go on SNAP and will definitely utilize some of my pantry staples. Those staples will not be counted as free and as I replenish those pantry staples throughout the month, I will have to do so within my weekly budget of $30. A good portion of what I bought during week one will actually be spread out and used during the following weeks, so it only makes sense that I also would have had some things left over from previous weeks. And hey, this challenge isn’t perfect, but it’s still incredibly insightful. My goal isn’t to get every detail perfect, but to draw attention to and start the conversation about food insecurity, as well as recalibrate my own spending and food consumption habits to be less wasteful.

Here is everything I bought during my shopping trip for week one. Not a whole lot, right? I bought some pantry staples from the bulk bins at Whole Foods (rice, oat bran, chickpeas, almonds), and picked up the rest of my fresh and canned goods at my neighborhood grocery store. I stocked up on some frozen greens because that’s a super easy and inexpensive way to add veggies to your meals. I splurged on feta because it ads a lot of flavor, but only used 1/4 of that block this week. The rest will be used in the following weeks.

Here are my receipts (with a couple notes on volumes that I made for the bulk items. I had to measure them when I got home for correct calculations).
What did I use that was already in my pantry? Admittedly, more than I planned to. I did not plan very well this first week, so I found myself scavenging through my fridge and pantry just looking for something to kill my hunger. I used soy milk, eggs (I’ll have to replenish both next week), a couple tortillas, butter, peanut butter, tea, brown sugar, cinnamon, hot sauce… well, a lot of things. Week one did not go well.

My main meal throughout the week was the Soy Dijon Chicken with Sweet Potatoes, plus 1/2 cup of Seasoned Rice, plus 1/2 cup of frozen broccoli florets. I pre-portioned them out so that I could grab them and go without thinking twice, or giving myself an opportunity to think about eating something else. Each one of these bowls cost $1.49.

I cooked one pound of chickpeas from dry in my slow cooker (1 lb. dry, unsoaked chick peas plus 6 cups water, on high for about 5 hours). I only used half of the batch this week and froze the second half for use next week.

My secondary meal throughout the week was Curried Chickpeas with Spinach. I used frozen spinach this time, less olive oil, and the chickpeas that I cooked from dry, so the total batch came to $4.25 and I got about 5 servings, for a cost per serving price of $0.85. Unfortunately, I got so busy and had so many unexpected things pop up this week that I wasn’t able to even cook this recipe until day 4.

Cabbage is super cheap and I wanted some more vegetables in my plan, so I made a half batch of this Vinaigrette Slaw with Feta. I used only red cabbage this time (half head) and halved the other ingredients as well. Luckily, I had the bottom of a bottle of Caesar dressing left over in my fridge that was waiting to be used up. This batch cost me $2.28 and I got 4 servings, for a cost per serving of $0.46.

After I got home from the grocery store I realized that I had NO FRUIT in my plan for the week. I had used up all but a few dollars of my weekly budget, so I turned to this melon that had been sitting in my fridge, uncut, for almost a week. I had let the melon go and it was already starting to have that over ripe sweet smell, like it was on the brink of rotten. I was determined to not let it go to waste, so I cut it up, divided it into 8 portions, and froze almost all of it. I eat the frozen portions while still frozen, like a frozen treat, because once they thaw they are not very good. Ick. But, you have to do what you have to do. The melon cost me $2.99 the week before, or $0.37 per portion.
So, that’s what I made the first week. I realized about mid way through day two that I did not plan well and this week was going to be really awful because of it. Add to that all the drama of the home buying process and trying to show my apartment to prospective new tenants, and I had a complete disaster of a week. I didn’t get a chance to make the curried chickpeas until day 4, so I ended up filling in my meal gaps with pita, peanut butter, and eggs. It was not good. I would consider week one a FAIL.
As I just mentioned, week one was a disaster, but it showed me how much planning and how meticulous you have to be to actually make a budget like this work. Is that level of dedication realistic? Not very much so, especially if you have a family to take care of or are working two jobs (although some people DO make it work, and I applaud you!). Even with my well stocked kitchen and all of my background with cooking and portioning, I still needed to put in more effort to make this work. There were many nights of the week that I just fought off my hunger with a pita and peanut butter instead of a real meal. After only a few days I was so hungry that I was looking for calories everywhere and anywhere. It was bad. So, here is my daily breakdown with relfections:
Daily Total: $2.53
Reflection: Having to keep a tally of the total cost of my groceries as I picked items from the shelves brought me back to the early days of the blog, when I had to eat on a budget like this. I felt more responsible doing so, but wondered if people saw what I was doing and felt bad for me because I had to be so careful about every penny. I still have a positive outlook and am feeling good about the challenge.
Daily Total: $3.22
Reflection: This is the day that crazy stuff started happening with the home buying process. I was stressed, busy, and didn’t have time to calculate my daily food costs to know where I was coming in, or to make the curried chickpeas. I ate an egg in a tortilla for dinner and was hungry most of the day (except the hour or two after lunch). If I had time to calculate my daily cost, I would have known to eat more, but what? I didn’t have much in my fridge and no time to cook.
Daily Total: $4.11
Reflection: By today, my brain was screaming “FOOD!” at me all day long and seriously affecting my concentration. No, more accurately, it was screaming, “CHIPS, WENDY’S, PIZZA, CAKE!” My body wanted calories and in any form it could get them… and it’s only been 3 days. Imagine going a whole month, finally getting your SNAP benefits replenished, and finally going to the grocery store. Do you think you’d make healthy decisions? I can honestly say that I wouldn’t. My body was now in control and health was not even on the radar. I just wanted calories. I still didn’t have time to make the chickpeas today.
Daily Total: $3.94
Reflection: I still hadn’t had time to calculate my daily food costs, so I had no idea where I was coming in. I did, however, finally have time to make the curried chickpeas and I was so happy for a change of flavor, plus they were super filling. Finally a little relief. I had woken up so hungry that I ate two eggs for breakfast. That might have been the first day that I didn’t feel like I was going to die waiting for my lunch break.
Daily Total: $3.25
Reflection: I really can’t believe how delicious every single commercial for food looks. Things I never would have been tempted by before, like Wendy’s or those nasty looking cappuccino flavored potato chips, I could seriously devour and love every second of it. It’s fascinating how hunger can change your tastes and perceptions. My body was still screaming at me for calories and blocking out most every other thought. I’m still relying on eggs/peanut butter in pita because it’s fast and kills my hunger.
Daily Total: $2.47
Reflection: Today I really started to lose it. I thought about sneaking a bag of chips from the store. No one would know, right? Ack. I can’t do that. I needed calories so bad that I ate butter in pita bread. I started scouring my cupboard and freezer for something different to eat because I was sick of the same ‘ol food. I found one last frozen serving of my Slow Cooker Black Bean Soup and ate that. It was SO. GOOD. That made me feel like I broke the rules, but OMG, I felt full and happy for a minute. I had my favorite snack for dinner: stove top popcorn with Cajun seasoning (and butter because apparently I want that on everything now).
Daily Total: $3.51
Reflection: I broke into my stash of feta today because I NEEDED CHEESE. I realized that dairy goes a really long way towards filling me up and making me feel satisfied because I’ve been craving cheese and yogurt for a couple days now. I’m definitely working that into next week’s menu. I CAN’T WAIT to go grocery shopping and try a new approach next week, because this sucked. Oh, and I finally got a chance to sit down and start calculating my daily costs and saw how low I was coming in. ARG. I could have been eating more all week. *sigh* Failure.
Total Consumed: $23.30
Grocery Total (incl. tax): $28.13
This did not work at all. I’ll try again next week with a different approach. Even with all the advantages working in my favor (pantry staples, cooking equipment like a slow cooker, cooking skills, food knowledge, easy access to grocery store(S), etc.) this just did not work and was not sustainable. I wanted to eat fast food every day. I wanted to go splurge and spend 2-3 days worth of food budget on a pizza or burger. What would I do if I had children? I am full of a mix of emotions—gratitude, guilt, and sadness.
The post SNAP Challenge: Week 1 Summary appeared first on Budget Bytes.

West Paw has recently introduced a new member of their Zogoflex line of durable toys: the Toppl, a stuffable puzzle toy designed to entertain clever and curious pups. The bouncy, chewable Toppl can be stuffed with treats and tasties, and dogs can roll, wobble, and bounce it to retrieve the treasure. Here’s the special twist: small and large Toppls interlock to make an even more challenging game. Check out (recyclable, BPA- and phthalate-free) Toppl over at West Paw.


The characters from Charlie Brown fit right into any environment, and the art featured in Dorkly’s list of the best Charlie Brown mash-up pieces proves it. The illustrations feature Charlie Brown, Linus, Snoopy, and the rest of the gang in well-known television series, comics, and movies. The above image by Matthew J. Fletcher putting Charlie Brown into the role of Star-Lord from Guardians of the Galaxy is perfect.
See a couple more of our favorites after the break.

by Adams Pinto

by Zio Adams
Check out the entire list at Dorkly.
For the entire month of September, I’ll be participating in the SNAP Challenge and attempting to eat on $4.50 per day. Read more here.
If there’s one thing I knew right away, it was that I was going to have to bulk out my meals considerably with inexpensive beans and grains to stay under $4.50 per day. Instead of using plain old rice, I made a big batch of seasoned rice the first day, which will be used as a base for multiple meals throughout the week (and maybe the whole month).
I used brown jasmine rice for this recipe for two reasons: jasmine rice has way more flavor than regular white rice and whole grain rice is way more filling. That being said, it can be made with plain white rice if desired. Just adjust the cooking time and water to rice ratio to compensate. This recipe can also be made in a rice maker.
I got my brown jasmine rice from the bulk bins at Whole Foods, which is a luxury that most people who rely on SNAP benefits probably don’t have. There aren’t many Whole Foods Markets around and even though my regular grocery store has bulk bins, their prices are higher and selection is more limited. That being said, you can do the same thing with plain white rice, if needed. My rice was $2.69/lb. and I bought about 3 cups, which came out to be $0.61 per cup of uncooked rice (or about 3 cups cooked rice). This is more expensive than plain white rice, but I was able to work it into my budget, so I did. Stay tuned throughout the week to see how I used the rice in my meals!

 In a heavy bottomed pot, combine 2 cups of rice, 1/2 tsp garlic powder, 1/2 tsp dried thyme, 1/4 tsp crushed red pepper, 3/4 tsp salt, and 4 cups of water. Stir briefly to evenly distribute the ingredients.
 Cover the pot with a lid, then place it over high heat. Allow the pot to come to a full boil, then turn the heat down to low and let it simmer for 30 minutes. After 30 minutes, turn the heat off and allow it to rest and continue to steam in the residual heat for 20 minutes. After 20 minutes, fluff the rice and serve.
 It may not seem very revolutionary, but when working with a limited budget, it’s important to make sure every meal is as satisfying as possible. I plan to eat pretty much the same thing throughout the week, so I have to make sure it’s damn delicious so that I keep coming back! Ha!
Stay tuned to see the different ways I use this rice throughout the week.
The post SNAP Challenge: Seasoned Rice appeared first on Budget Bytes.
For the entire month of September, I’ll be participating in the SNAP Challenge and attempting to eat on $4.50 per day. Read more here.
Whew. I meant to post this days ago, but this week has been out of control! More about that when I do my SNAP Challenge week one summary on Monday.
I loved the Soy Dijon Pork Tenderloin that I made ages ago and have wanted to use the same marinade for chicken for quite some time. Chicken thighs are cheap, so I figured that it might be a good cornerstone meal for the first week of my SNAP Challenge. The sweet-salty marinade was just as delicious as I remembered!
To add a little extra flavor, nutrients, and bulk, I cubed a sweet potato and layered that in the roasting dish before adding the chicken and the marinade. The sweet potato added a nice sweetness to the dish and definitely helped keep me full. That was a good decision. I also doubled the marinade to provide plenty of sauce to cook the potatoes in, plus drizzle over the rice and vegetables that I served on the side.


 Prepare the marinade by stirring together 1/4 cup Dijon mustard, 1/4 cup soy sauce, 2 Tbsp vegetable oil, 2 Tbsp brown sugar, 2 cloves minced garlic, and some freshly cracked pepper.
 I used about 2 lbs. of chicken thighs, which was eight pieces. Two of the pieces were pretty small, so I counted those as one serving, for a total of 7 servings for this dish. Depending on the size of the thighs, you might get about 8 servings.
 Add the chicken thighs and prepared marinade to a zip top bag or a shallow dish. Refrigerate the chicken thighs as they marinate for at least 30 minutes. If preferred, you can mix up the marinade before work and let them marinate all day so it will be ready to cook when you get home.
 When you’re ready to start dinner, begin to preheat the oven to 375 degrees. Peel and cube one sweet potato (about 1 lb.) and lay the cubes in the bottom of a casserole dish. Cut the cubes into no larger than 3/4 inch pieces so that they cook through completely while in the oven.
 Lay the marinated chicken thighs over the sweet potatoes and pour ALL of the marinade over top. Cover the dish with foil and bake for 45 minutes. Remove the foil after the first 30 minutes to let the top brown.
 After it bakes, spoon some of the yummy juices over top of the chicken.
 Don’t let that delicious juice go to waste! I used mine to moisten and season the rice and vegetables that I served with the chicken. It’s SO good.
Stay tuned to see how I worked this into my SNAP Challenge meal plan!
The post SNAP Challenge: Soy Dijon Chicken Thighs with Sweet Potatoes appeared first on Budget Bytes.

.jpg)


---
Like this blog? Buy my book The Devil Wears Scrubs

Artist Karla Mialynne has created a series of hyperrealistic animal illustrations that she presents along with the various pencils, markers, and other tools used to create each image. She has more illustration work on her Instagram account. Some of her works are available for purchase at Original Urban Style.


photos by Karla Mialynne
via reddit, Bored Panda


Brazilian digital artist Marcel Fukuwara helped shape these ads for the government of the state of Ceará in Brazil. The ad’s message, “The Real Power is in You,” encourages people to donate their organs to save lives. I think it’s a fun concept for a serious topic and very well executed to top it all off!
Credits:
Marcel Fukuwara – Moderler
Sandro Grasset – Render
Marcus Vinicius – Art Director
Ad Agency – Propeg
Studio – Z-axis
View more of Marcel’s incredible 3D projects on Behance!

Finger Hands are deeply unsettling finger puppets shaped like tiny human hands. They come in a set of five, allowing the wearer to perform a creepy “high twenty-five.” Finger Hands are available for purchase at Archie McPhee.


images via Archie McPhee
submitted via Laughing Squid Tips


California-based sculptor, Krisztianna, creates these eerily exquisite Day of the Dead inspired mounted female heads after coming home from her day job as an Art Director at an advertising agency. She calls the heads Muertitas, recalling the importance of the Day of the Dead culture to her and her family when she was growing up. Kristztianna says, “Birth, death, and rebirth are all fascinating concepts, and the the art of the sugar skull is a powerful visual that helps me express my joy of life and respect of finality.”
Driven by a fascination with storytelling, each Muertita represents a season captured by the crowning floral arrangements surrounding each face. The sculptures are made from a mix of styrofoam, paper maché, wire, clay, wood, acrylic, synthetic flowers, twine, pins, glue, sealant, screws, and as Kristzianna says, “lots of love.”
View more of Kristzianna’s work and information about the Muertitas at krisztianna.com.
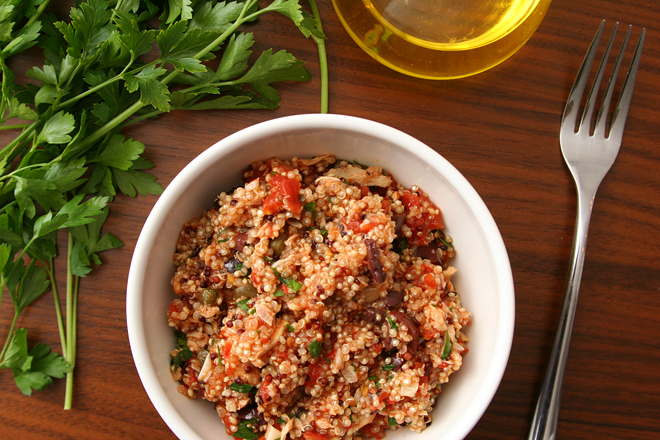
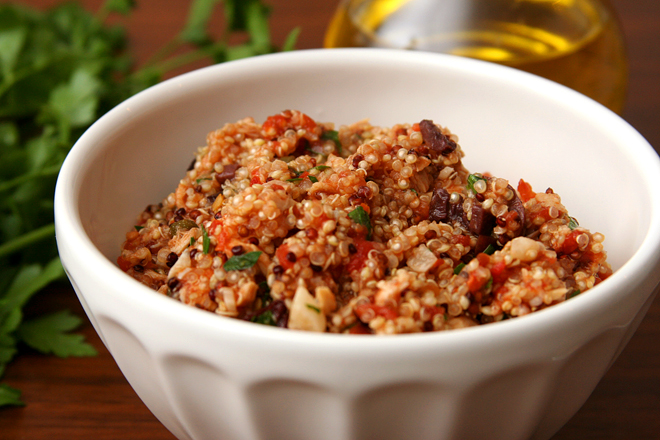
Based on whether it leaves a bunch of half-used ingredients leftover, this may not be the best single-person dinner, but it’s one of my favorite meals for when Dave is out of town anyway. For years, Dave didn’t like anchovies or olives, so those were the things I ate when he traveled. He’s come around to both, but the tradition has stuck, and this has become a treat for myself while he’s gone.
It’s very similar to the pasta version, but I like to think quinoa is a little healthier than pasta. Certainly, quinoa has a stronger, earthier flavor, which required adjustments in the other ingredients. More briny olives, more salty capers, and more bitter parsley were all necessary to stand out next to the quinoa.

Even if it doesn’t fulfill my no-leftover-bits-of-ingredients rule for single-person dinners, it meets the rest of my criteria – easy, healthy, minimal dishes. Fortunately, I like it so much that I’m willing to make it twice in one week while Dave travels, which is the perfect way to use up the half cans of tomatoes and tuna leftover from one serving. That puts this back on the list of great meals for cooking for one.
Printer Friendly Recipe
Quinoa Puttanesca (adapted from Cook’s Illustrated’s Spaghetti Puttanesca)
4 servings
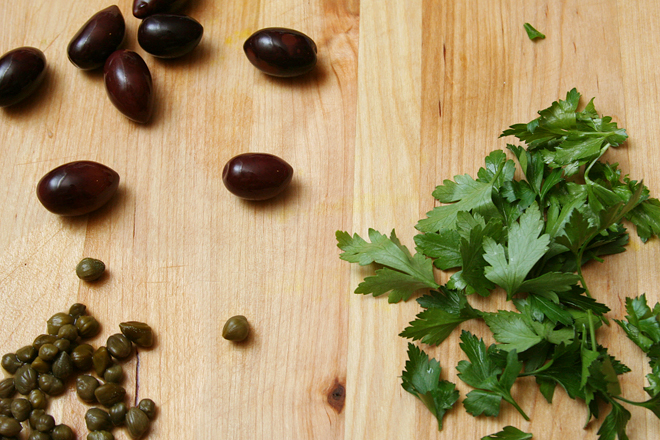
I use the higher amount of anchovies, because I love them, but I understand that not everyone shares that opinion. The tuna is not at all traditional in puttanesca, but it increases the protein of this one-pot dish.
1 tablespoon olive oil
1 teaspoon red pepper flakes
6 cloves garlic, peeled and minced
6-8 anchovies, minced
8 ounces (1⅓ cups) quinoa, rinsed and drained
1 (28-ounce) can whole tomatoes, coarsely diced in the can with scissors
2 (5-ounce) cans solid white tuna in water, drained and flaked into bite-sized pieces (optional)
¼ cup capers, drained
1 cup kalamata olives, finely chopped
¼ cup minced parsley
In the medium saucepan over medium heat, heat the olive oil, red pepper flakes, garlic, and anchovies until sizzling and fragrant, 2-3 minutes. Add the quinoa, tomatoes with their juice, and tuna (if using). Increase the heat to medium-high and bring to a simmer. Once the mixture simmers, cover, reduce the heat to low, and simmer for 15 minutes. Stir once, then replace the cover, remove the pot from the heat, and let set for another 15 minutes. Stir in the capers, olives, and parsley; serve immediately.


