Want a full tour of our newly renovated kitchen in 4,390 words or less? Well settle in and sip some LaCroix, because this is the post for you.
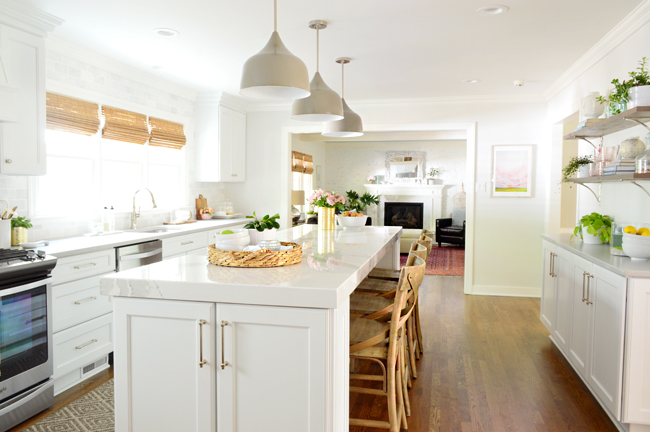
Shall we begin with a few before and afters? You probably remember this view from our living room where you couldn’t actually see the kitchen.
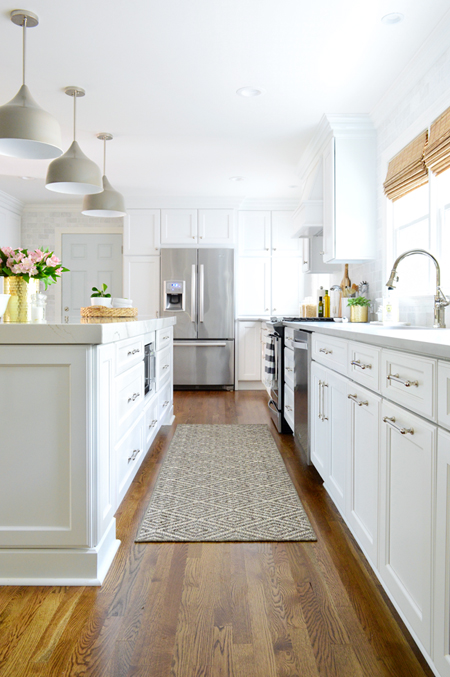
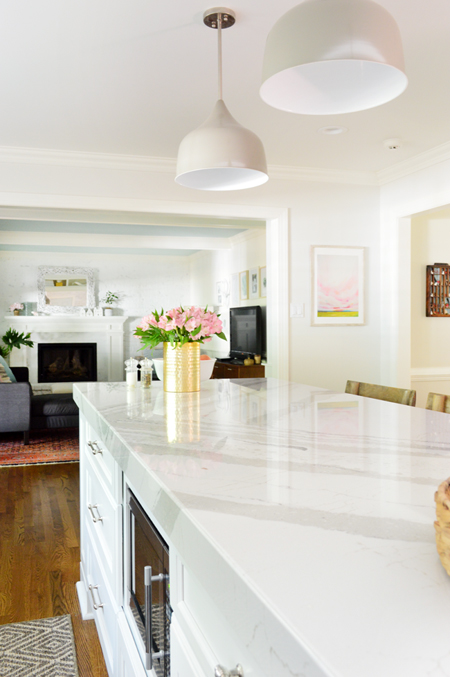
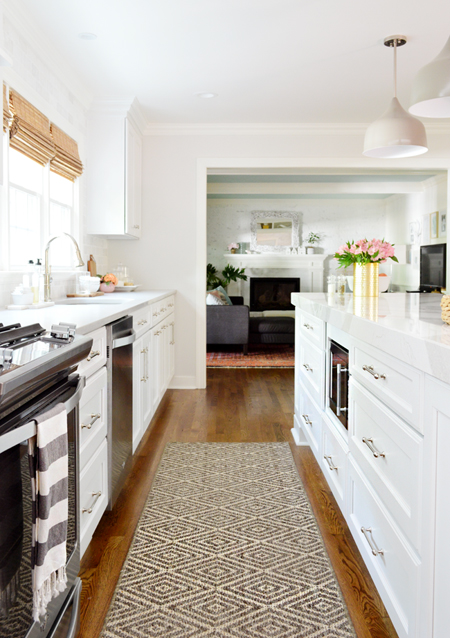
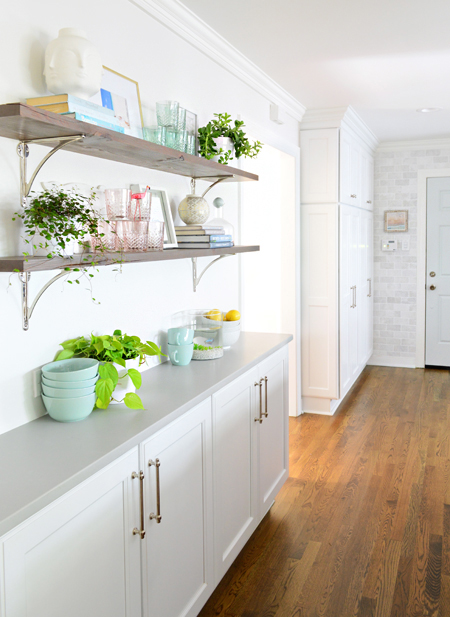
Well, now it looks like this:
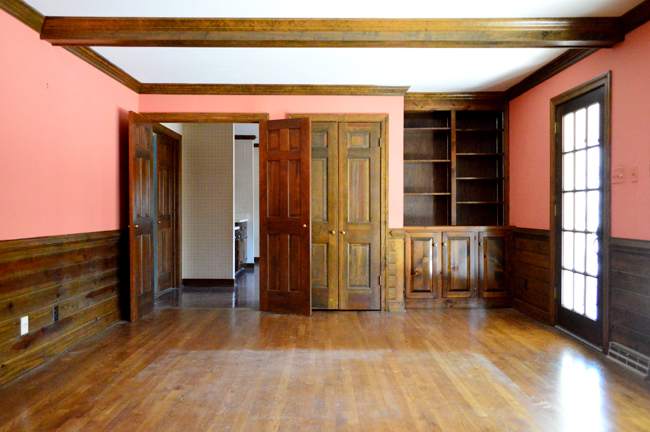
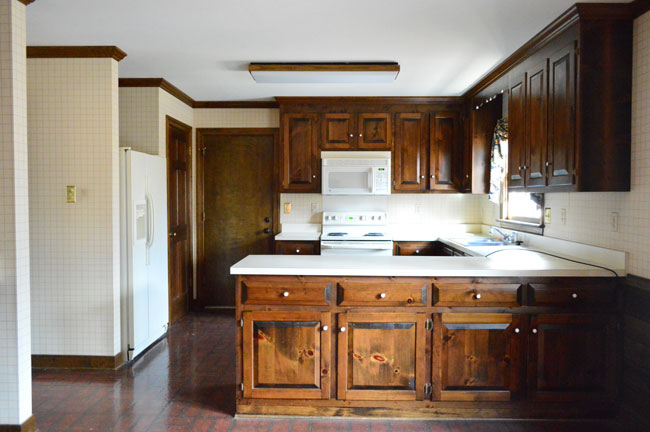
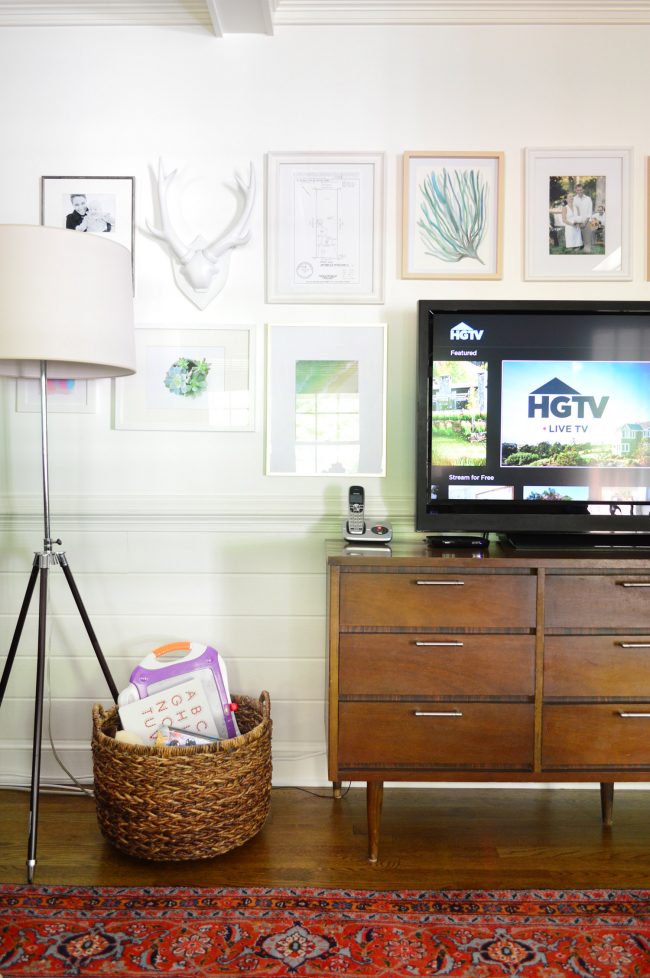
And here’s the old view from the other side, which is what you saw when you stepped in the door from the garage.
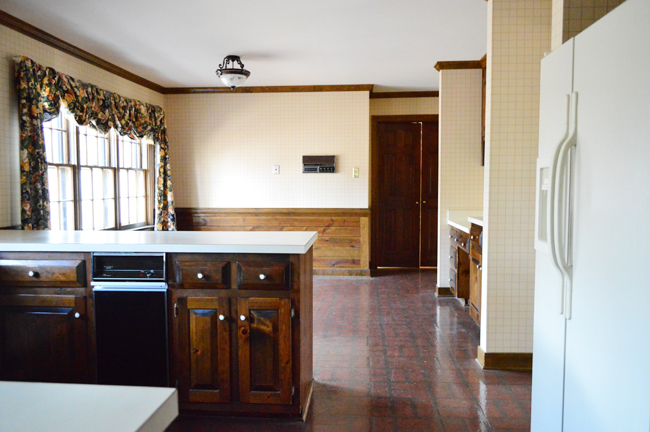
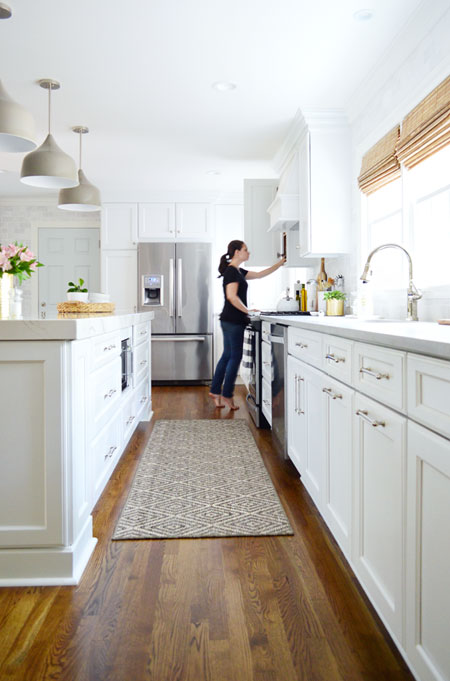
These days it’s looking a little different.
There’s obviously TONS of stuff to cover about this space, but today our main goal is to dish out lots of after photos and tell the story behind the major material choices that we made in the room (since we previously covered planning the layout and gutting & rebuilding). So let’s start with the cabinets.
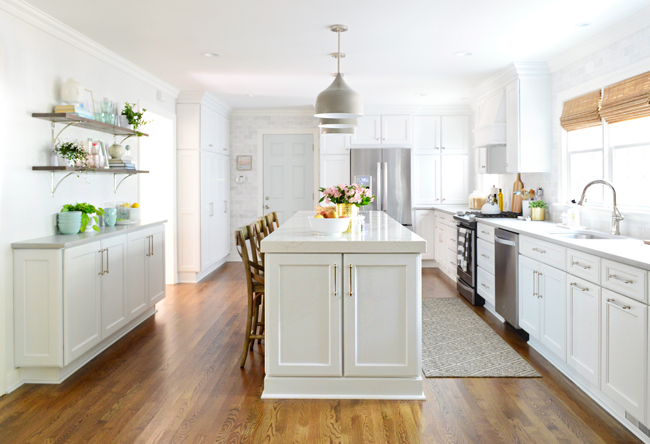
Cabinets
You guys know we’re suckers for a white kitchen (we did one in our first and second house and loved ’em). So there wasn’t ever much doubt in our mind that it’s what we’d do here – especially since the trees in our backyard block a fair amount of morning light in here, and well: white cabinets = maximum brightness.
Side note: this week’s podcast, episode #20, is all about white walls (are they overdone? Played out? Still awesome? Only pretty in photos but stark in person? We interviewed two other bloggers about it, and weighed in ourselves).
As we mentioned in our last kitchen post, we decided to order our cabinets through a local company called Chesapeake Bay Cabinet Company. We’ve worked with them on builder spec homes, so it made sense to collaborate on our own house since we enjoy working with them and love their finished product. We considered a few brands of cabinets that they sell, but ended up going with Quality Cabinets for a number of reasons: nice solid craftsmanship, soft close drawers that come standard, and being able to upgrade to a 5 piece drawer (one with a recessed panel instead of a flat front).
We also appreciate that their stock white cabinet color is a nice crisp white with only a tiny hint of gray. Sometimes stock white cabinets can skew more yellow or blue/gray than you might prefer, so bringing home a sample door to make sure it doesn’t clash with all of your house’s white trim (or your counter/tile selections) is always a good call. Even though we love a clean-lined shaker door, we went with a fairly traditional door style with a double beveled edge because it felt like it added a little something extra while fitting the character of our house.
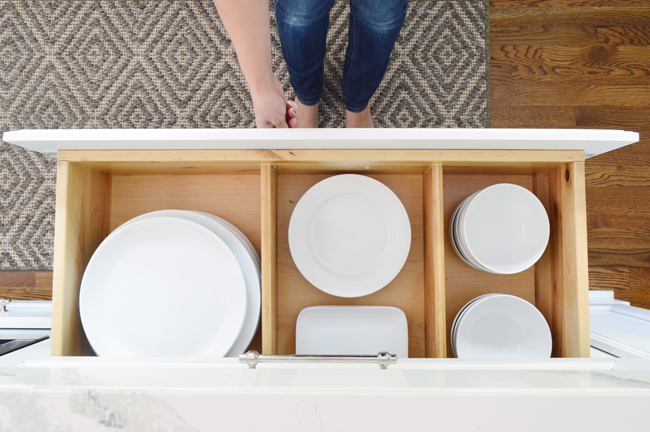
We’ll get more into how we organized and arranged the cabinets in another post, but we went with A LOT of drawer bases. Almost the whole island is basically big, deep, drawers. I know. Hubba, hubba.
Some of you might be wondering why we didn’t do an Ikea kitchen. While we’ve used (and loved!) Ikea cabinetry in our laundry room & our bonus room, for such a big project where we’ve already mentioned that speed was a motivating factor, we thought these were our best choice. Our experience with Ikea is also that it takes some ingenuity to pull off some of the finishing touches (trim, filler strips, etc) to make sure everything looks balanced and fully fills the space you want it to fill (remember this?). So we just felt more confident working with our local guys to make sure we could pull off everything we wanted to do in here.
Counters
Having worked with several materials by this point (granite, corian, marble, laminate, and even concrete) we actually knew pretty quickly that we wanted to go with quartz. Quartz is a man-made counter that utilizes natural quartz to look and feel like real stone, while dodging some of real stone’s hassles (it’s less prone to scratching and doesn’t need to be re-sealed). It’s non-porous, so it stands up better to juice, oil, wine, tomato, coffee and other kitchen stains along with not holding onto bacteria, like raw chicken goo. So since we plan to be here for the long haul (and, well, #kids) it felt like the smartest choice for us. Plus you already heard how their 11ft super slabs solved our island size conundrum.
We were initially attracted to a Cambria quartz style called Ella, which is white-ish with some subtle movement that mimics marble (it looks sort of like Carrera) so it felt like a solid choice #counterpun. But then we came across a slightly bolder design called Brittanicca, which has a more pronounced pattern with a bit more contrast and wider, larger-scale veining.
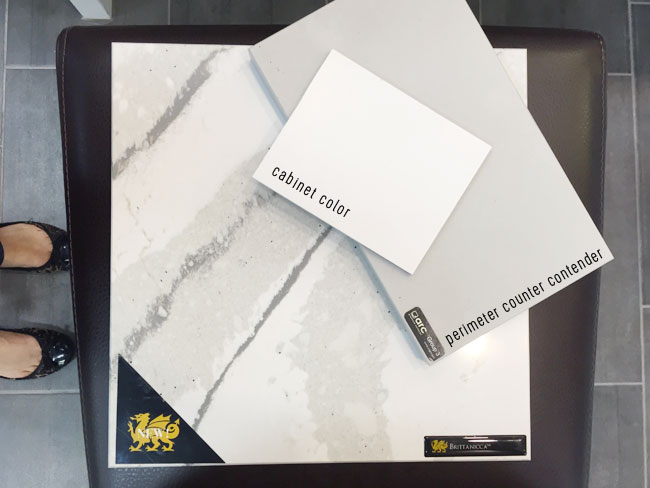
Although the sample of it was surprisingly large, we knew it was too big of a decision to make without seeing a full slab in real life (we’ve been down that road before). So we went to a few local stone yards and fabricators until we could lay our eyes on a nice big slab of it. And when we finally tracked one down in person, we knew it was the one. We thought the thicker, larger-scale veining would make for a nice accent in the middle of the room. Especially when paired with a softer more concrete-like choice on the perimeter cabinets.
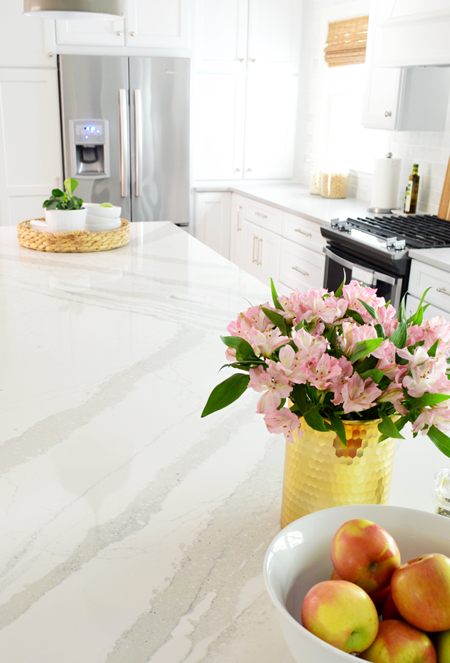
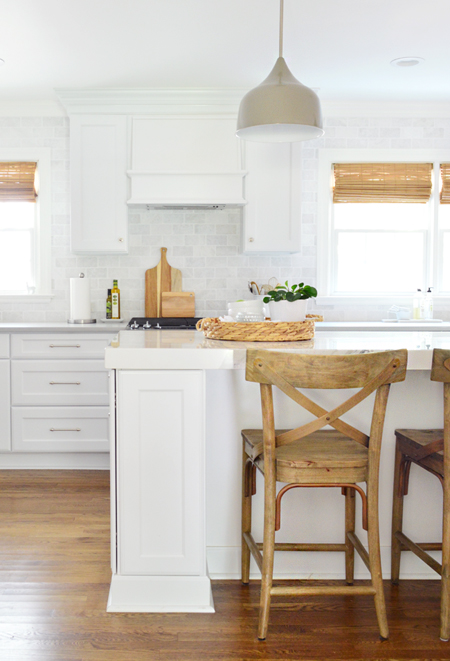
We also literally “went big” with the island and chose to do it triple-thick (3″ vs. the standard 1.25″ profile). With such a large island (that beast is 10′ long) we thought it might look extra cool with something more substantial on top. It’s one of those “special choices” that we initially worried wouldn’t register nearly as much as something more obvious and statement-y… you know, like a bold look-at-me paint color or a giant chandelier. So we had a few “will this choice even be noticeable?” discussions where we almost backpedaled and decided not to bother. But all that worry vanished as soon as it was installed. It’s one of our favorite things about the entire remodel, and it’s the #1 thing people comment on when they walk in.
The secret is that it’s not actually extra thick. Whenever someone asks how it’s done, we liken it to the lid of a shoe box. It just has side pieces around the edges that were mitered and glued to look as if it’s truly a super thick solid slab. And since they were able to cut all the sides from the same slab, the only extra cost was for fabrication – not extra material. You can also see from the photo below that it sits atop a big piece of thick plywood, which snugly supports the slab. And yes, it took SIX guys to carry it in. Not because it’s so heavy (well, it is heavy) but mostly because the original four guys that showed up were having trouble getting a good grip on the thicker edge, so they called in two more guys for backup.
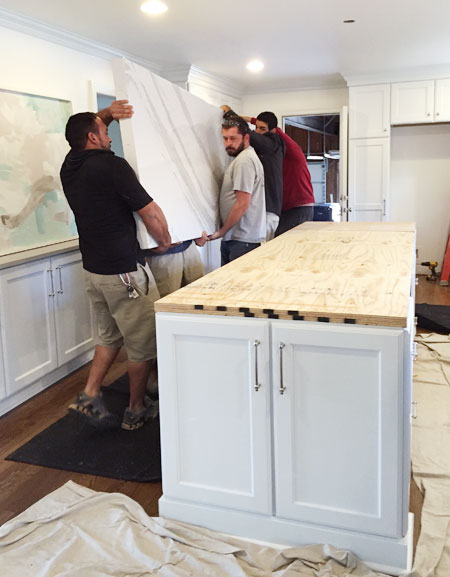
Side note: the island veining is always harder to see in photos than in real life since it’s so shiny and reflects the white ceiling in pics, but that photo above, of the guys carrying it in, actually captures it pretty well. It’s definitely not mostly white looking. The veins are large and in charge and impossible to miss when you see it in person.
Oh and the first fabricator we visited said we’d need a seam in our island, not because they didn’t have a big enough slab, but because they didn’t think it could be transported into the house. So we got a second opinion from a second local fabricator and they told us they’d happily send more guys to carry it if we wanted something without a seam. They also had an extra thick mitered counter right in their showroom, so we knew they could pull off the look. The lesson here? Don’t stomp on your dreams based on just one opinion. Also, in the ever-wise words of Selena Gomez: the heart wants what it wants.
For the perimeter counters, we liked the color of our previous concrete-covered counters so much that we decided to go with a quartz that mimicked them. So we brought some samples home from a bunch of different makers to see how they compared.

The winner was the bottom-middle one, since its warm undertones matched the warmth of Brittanica’s veining. It’s called Ice-Zement, by Compac. The cool thing is that it comes in a gloss or a matte finish, so we went with the matte one since it’s more like concrete and allows the shiny island to stand out in its own right. Oh and we ordered the perimeter quartz from a different fabricator because they were running a better deal on that color. So it’s just another reminder to shop around!
Hardware, Faucet, & Shelf Brackets
As popular as brass and gold are these days, we felt more confident that we’d like a polished nickel tone in here for the long haul, so we went with that for all of the “permanent” fixtures. And although I had pinned LITERALLY TEN MILLION BRIDGE FAUCETS, we ended up with a nice functional pull-down faucet with one handle, because John is the function police and he said it would have bugged him (and probably me) to have to use two handles to adjust the water temperature instead of one. In the end I love this faucet, so don’t tell him this, but he was right.
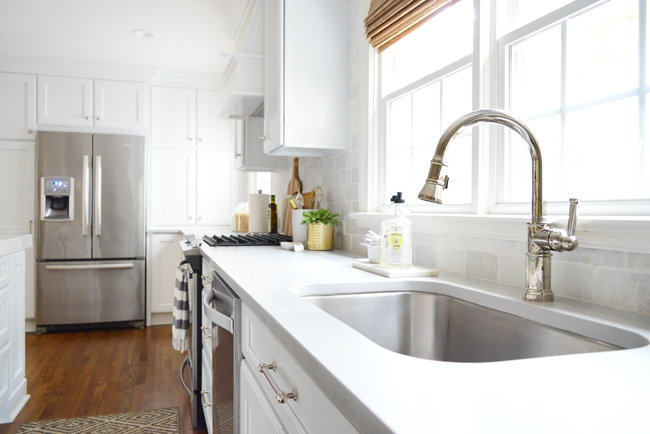
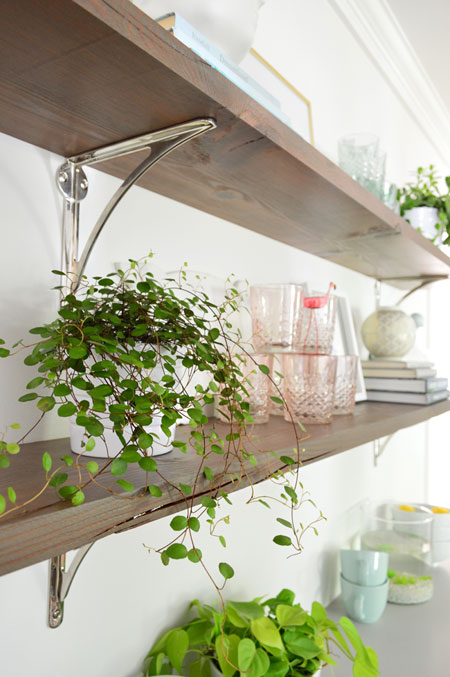
We also went with polished nickel shelf brackets and cabinet hardware, which both feel nice and weighty and solid. Polished nickel has a slightly warmer undertone than chrome (see the almost-gold hints in our shiny faucet above?) while chrome has more of a shiny-blue undertone that feels cooler. Both are pretty, but between the wood floors, woven blinds, and some of the warmer veining in the island, we thought some subtle warmth in the metal would be nice.
One thing we kind of agonized over was deciding which cabinets got pulls (handles) and which ones got knobs. We eventually settled on all the cabinets above the counter getting knobs, and everything that went below the counter getting pulls. And to make life somewhat easier, everything that earned a pull got the same sized pull.
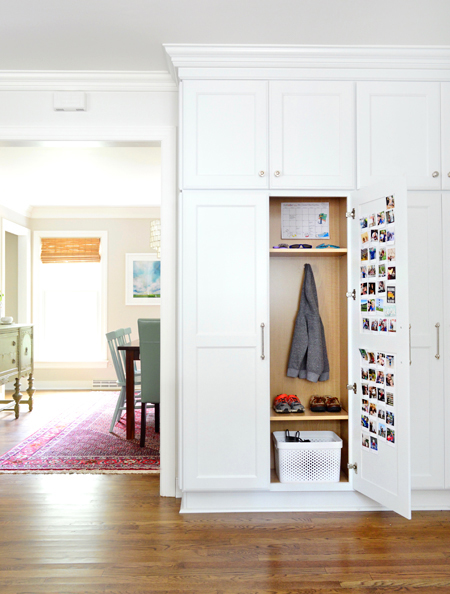
We debated getting longer ones for the pantry and the hidden mudroom cabinets with extra long doors, but we worried they’d look bolder or more emphasized, so we’re glad we just stuck with keeping them consistent. For anyone who doesn’t know what the heck a hidden mudroom is (and why we wanted one in the corner of our kitchen), here’s a post with a lot more info about them.
Appliances
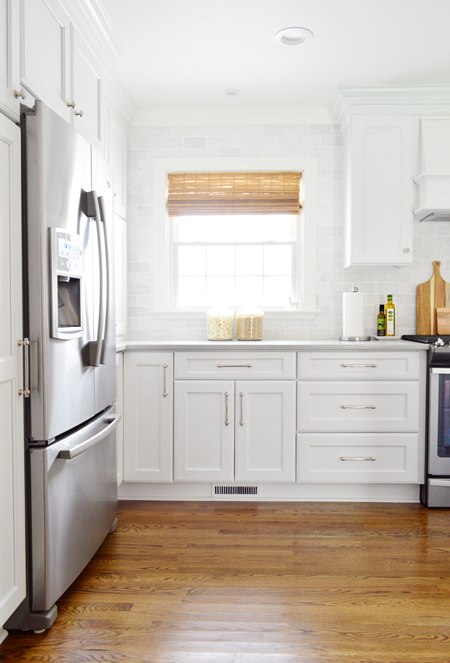
You may have noticed two pictures ago that we have a counter-depth fridge. We made this call a while back after our old dishwasher suddenly died on Christmas of 2014 (ho, ho, ho, womp womp). We debated replacing it with a cheap interim dishwasher from Craigslist, but decided it would be nice to take the plunge and replace everything so we’d have a matching set that we could enjoy for a while before the reno, as well as after it (years of living with a painted fridge, a black dishwasher, and an almond stove meant we were more than ready for appliances that were the same color).
We briefly considered doing white appliances (sometimes we hear whispers that the stainless trend is running its course) but we actually like the metal breaking up all the white cabinetry in here. Plus, some of the newer trendy white appliances were super ice-y looking… almost like a blue-white. So they looked kind of clashy with our door and counter samples.
The other reason we got the new set back in 2014 is that I found an awesome Whirlpool super-sale coupon that expired just a week later on New Year’s Eve. So we made some quick decisions and have been very happy so far… especially with the counter-depth fridge and our crouching-tiger-hidden-dishwasher (it’s so quiet you can’t even tell when it’s running).
At that time we also made the call to switch from an electric stove to a gas one. It was cheaper than we thought (a few hundred dollars) to extend the gas line from our fireplace to the old spot where our stove sat in the original kitchen layout, and even less than that ($50!) to have it moved to the new location later when we began our reno. We LOVE the look of the gas stove, we LOVE cooking on the gas burners, and we love that we got a slide-in range (see how there’s no metal “stove backsplash” poking up and overlapping our wall of tile?).
One thing we don’t love is that we’re still getting the hang of baking in the gas/convection oven. Fancy dishes that I make like crescent rolls tend to be a little on the crispy side. Can you tell that we bake a lot?
Everything is the Whirlpool Gold Series, so for anyone who wants specific links, here’s our counter depth fridge, our slide-in gas stove, and our dishwasher. We’re coming up on our 2 year anniversary with them and – apart from finicky baking times – have no complaints. And as a side note, it’s kind of nice to have separated the cost of new appliances from the rest of the remodel. Although remodeling around new-ish appliances was a little nerve-wracking at times (thank goodness for padded moving blankets).
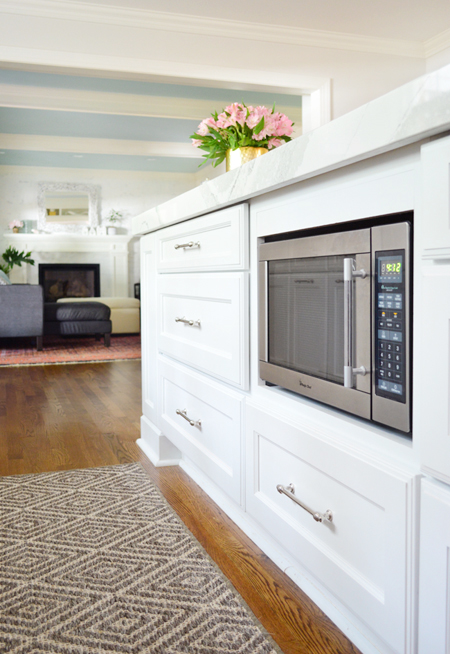
Oh and we got a few questions about the under-counter microwave on Facebook & Instagram. We considered a few other spots, but after a lot of debate, this location won out. And after months of use we can say that we’ve been really happy with it. We’ve been fortunate that our kids don’t mess with it at all – although we hear they sell microwaves with number combos you press to unlock the door if you have that issue. We briefly considered buying one of those fancy drawer microwaves but already owned this one, and those can be surprisingly pricey ($800+ for a microwave!). So far, so good.
Also, I’m short. As demonstrated by this next picture. So reaching down around 18″ to put something in, and carefully lifting it back up to the counter isn’t really any more trouble than reaching up around 18″ to put something in and carefully lifting it back down to the counter (like I used to do with our over-range/upper cabinet microwaves). John, who is the opposite of short, reports that it’s not a big deal for him (“it’s not like I don’t bend down to load the dishwasher” says he). Also, what am I looking for here? My mind? Maybe it was my youth? Wait, I think it was my travel coffee mug. Yup, that was it.
Lighting
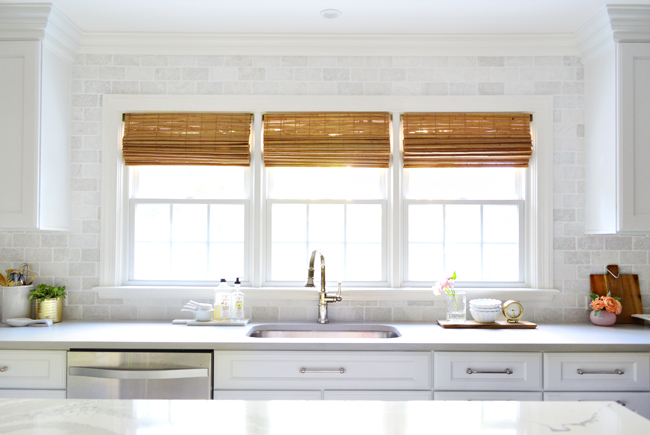
Adding several recessed lights was a no-brainer, since the previous three-bulb situation in the old kitchen wasn’t cutting it. Now there are three can lights running parallel on either side of the island plus five other “accent” lights – all on dimmers. We were tempted to add some of those cool metal sconces above each of the two windows, but our electrician said it would be tough to get an electrical box in (thick window header beams run behind there). So we added small spotlight recessed lights in the ceiling, which have been great. Subtle, but helpful for illuminating those places at the counter (or at the sink) that could have been blocked by your own shadow if the only light source was behind you.
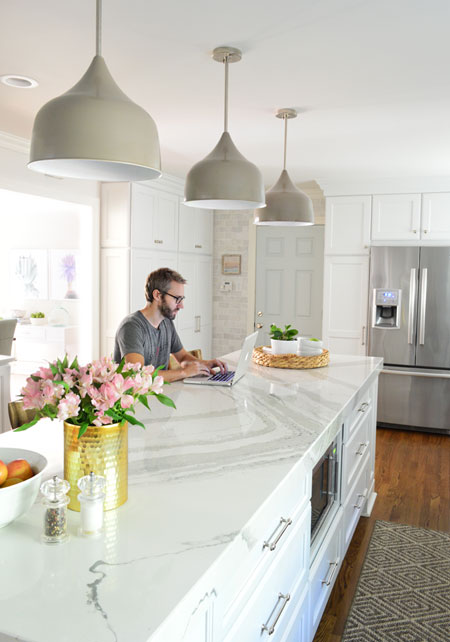
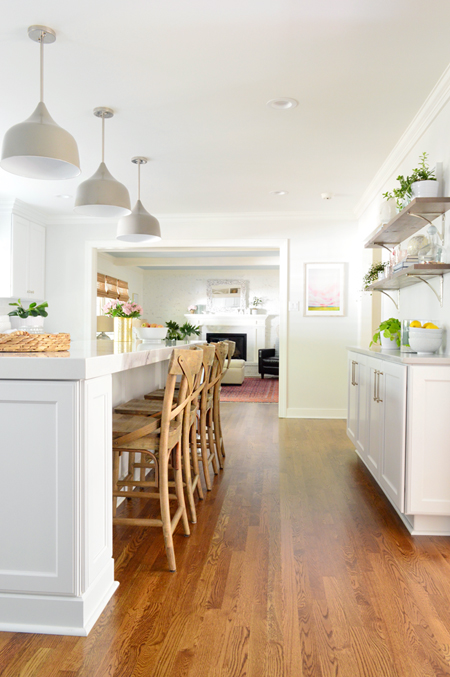
As functional as all of our new recessed lights are, our favorite lighting additions are our three island pendants. They actually weren’t the original lights that we chose (we have a giant “mistakes” post in the works) but the short story is that the original lights we bought didn’t pack enough visual weight (they looked pinheaded over such a large island), so we designed some new ones through Shades of Light that work a lot better and feel more proportionate for the room.
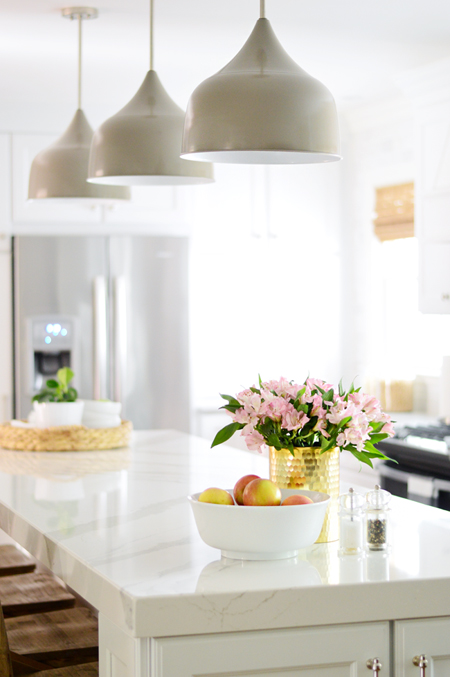
We probably thought longer and harder than two people have ever thought about kitchen pendants (seriously, it was borderline ridiculous – after you make a mistake you feel like you need to spend THE REST OF YOUR LIFE overthinking things so you don’t fall into the same trap). We ended up combining a polished nickel rod (both to tie into our polished nickel hardware and to look tidier than the typical exposed cord or chain) and a nice large metal dome (14″ versus smaller 8″-10″ ones) that could be factory finished in any color. We went with this mid-toned “putty” hue that was deep enough to not disappear in the room, but light enough to not be overbearing. It also ties nicely into the veins of the counter.
We didn’t just want to make them for ourselves, so Shades of Light put them into production and they’re available in 6 different colors (I love the light blue and soft pink ones – and that dark charcoal guy would look awesome in a room with dark lower cabs). They also can convert into semi-flush mount fixtures, so you could hang them in an office, bathroom, hall, foyer, etc.
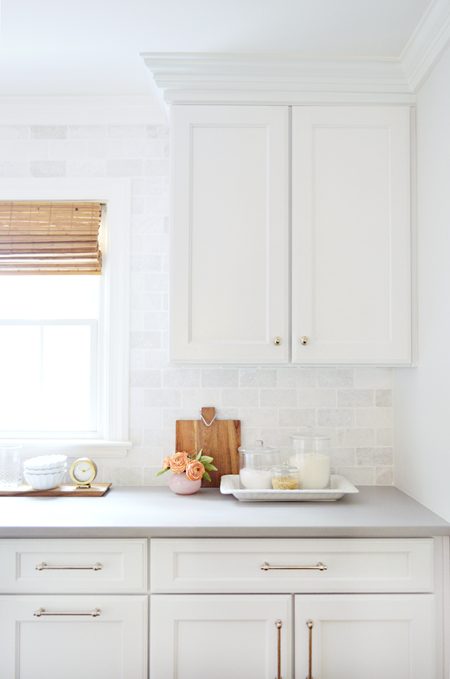
Wood / Natural Accents
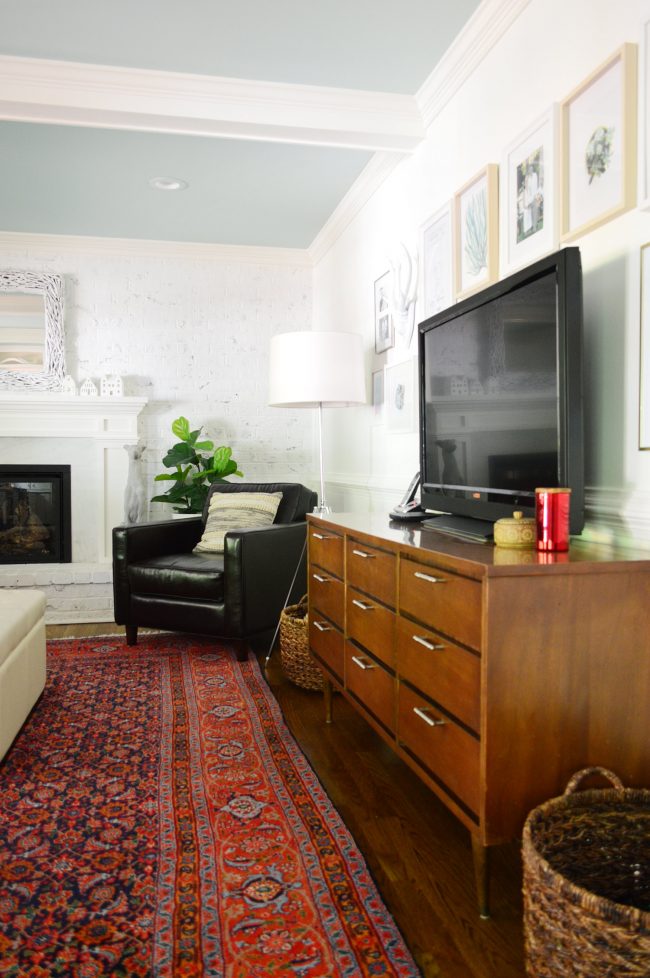
Admittedly, a lot of the bones of the room are gray and white. They’re warm grays and whites, but they could still risk veering the whole space into Starksville fast. So we wanted to add some more texture and contrast with lots of warm wood and natural materials. Obviously the wood floor throughout is a big help to keep everything feeling warmer and less sterile, but additional elements like the woven blinds, four wood stools, some cutting boards, and the woven trays were definitely an intentional choice.
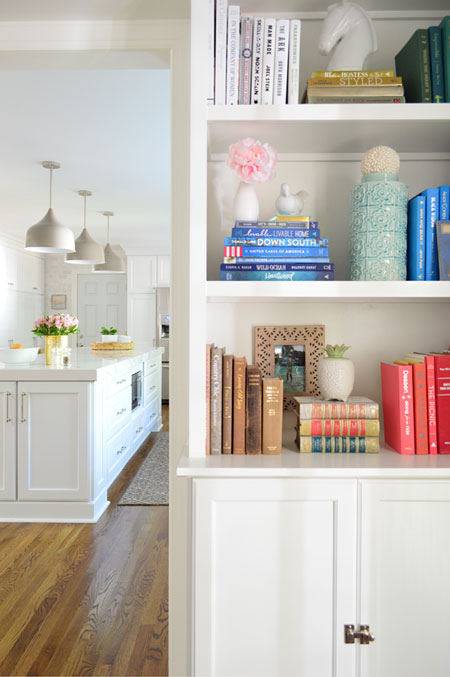
We also opted for some open shelves, which were a fun DIY that we’ll break down another time – but it’s essentially some reclaimed lumber that we found locally and stained in a cool series of experiments. Like mad freaking scientists. Who were dying to make an amazing discovery. And also to have a kitchen again.
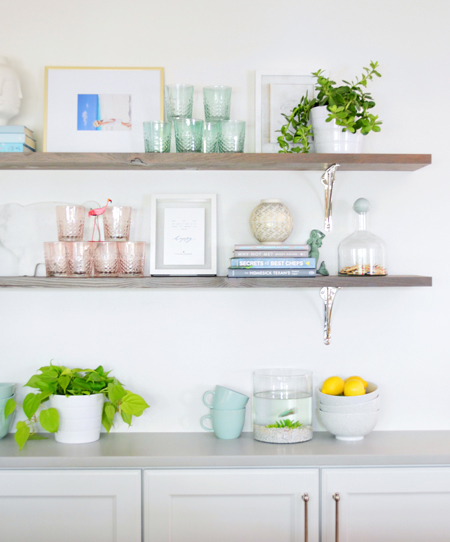
You’re also seeing the room in a somewhat “autumn” moment, where I basically went nuts at Target and bought all of their new gold accents (two vases, a little gold clock, and a gold frame) and sprinkled them around the room while impersonating Oprah. “YOU GET SOME GOLD! YOU GET SOME GOLD! EVERYBODY GETS SOME GOOOOOLLLLLLD!” Except I only had like four gold things, so that brought me back to reality real quick. Which probably was a good thing because John can only tolerate so much gold before he starts making Scrooge McDuck jokes.
That’s another reason why we love the light, neutral, and natural-toned selections that we went with for the permanent parts of the room: it’s a nice flexible backdrop where I can swap in different accessories whenever I get fidgety and want to festoon the kitchen with different vases and frames and planters and all of the other accessories of which I have “enough to operate a small gift shop” (says John, who tends to exaggerate).
Tile & Paint
We knew we wanted to go to the ceiling again with our backsplash tile (we loved that look in our last kitchen), so we intentionally left a seven inch “reveal” around the windows. That essentially means that we sized the cabinets so they didn’t crowd the window trim, and instead allowed an even gap around the windows so that the tile can be seen going all the way up to the ceiling.
We chose this tile – a matte, tumbled marble – because it’s a classic look that relates nicely to the brick fireplace wall in the living room that’s now visible just beyond the kitchen. Both add a subtle texture to each room without being too visually demanding.
We also sealed the heck out of it (three times, buffed on in three different directions to make sure we didn’t miss any spots) so we hopefully won’t have to worry about any staining. So far they have endured some pretty epic grease and soy sauce splatters (both the white grout and the tile).
Originally we just installed it on that big window wall, but we both separately came to the conclusion (while sitting on the sofa and staring at the kitchen) that we should continue the tile around the door too. There was this sort of “jinx! I was just thinking that!” moment where we both thought we were saying something intrepid and unique, but we were essentially just agreeing with each other. Adding tile to that wall around the door also helped the “mudroom” cabinets (to the left, below) feel more connected to the rest of the kitchen.
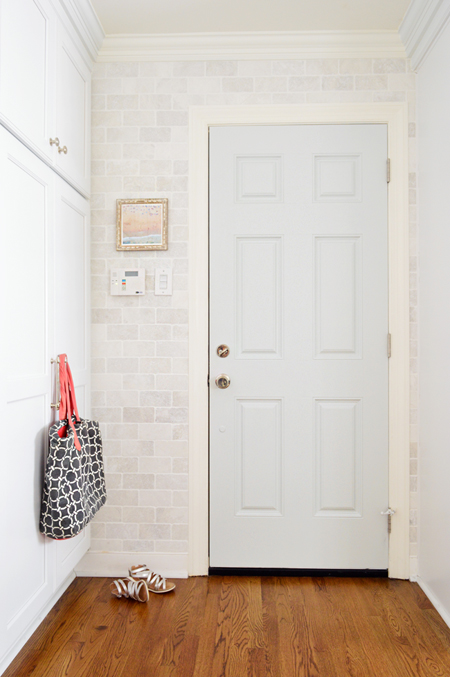
It also helped that door area feel more polished and took the focus off the fact that the door isn’t centered. It couldn’t be moved due to a metal structural beam in the garage that runs right beside it, and as much as my balance-loving brain wants to shift it sometimes, having that extra space on one side has made the mudroom function better. Like when someone (usually under the age of 7) leaves a mudroom door open (or three!) or a pair of shoes (or three!) out on the floor, the garage door doesn’t open into them since there’s extra room on that side.
Here’s a close-up of the tile next to the door (which is painted Lime Light by Behr). We didn’t get this color right on the first try. Actually took us three tries. If at first you don’t succeed… paint, paint again. And again.
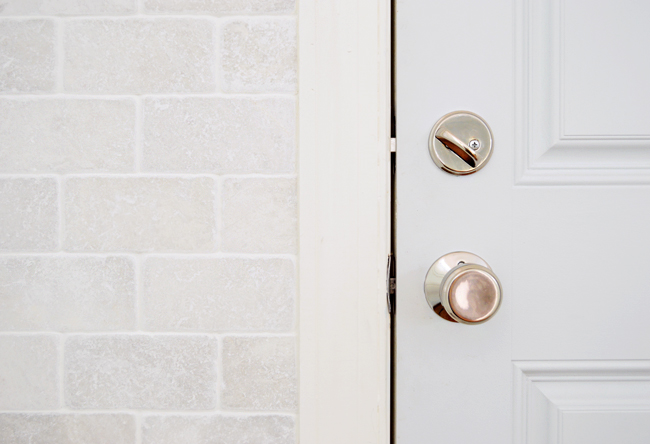
Oh and we got a new door. We wanted to switch the swing of it so it opened towards the mudroom cabinets, so we took the opportunity to get a nicer paneled door than the flat metal one that was there before. Also, new doorknob. Polished nickel of course.
The rest of the walls are painted Irish Mist by Behr, the same color that we used in our bonus room. We like how it’s just slightly darker than the white cabinets and trim, while also picking up some colors in the backsplash tile. It nicely falls away and lets other things steal the spotlight, like the tile, the pendants, the shelving, the hardware, the extra large sink window, and our veiny island.
Sources
I know I probably skipped over some stuff (so many pics! so many things to say!) but we’ll do our best to cover anything we missed in a future post. For now, I’m going to leave you with some mood boards and source lists, in the hopes of answering all those “where’d you get that?” questions that are hovering out there in the internet ether.
Also, since we get so many questions about mixing metals, this board is a good demonstration that it’s totally cool to mix finishes, we just try to limit it to 2-3 per room (more might look too crazy) and we make sure each one shows up a few times so nothing feels random or like the odd man out. There are some gold accessories and some polished nickel fixtures/hardware (along with some stainless appliances in the mix) and it all plays nicely together.
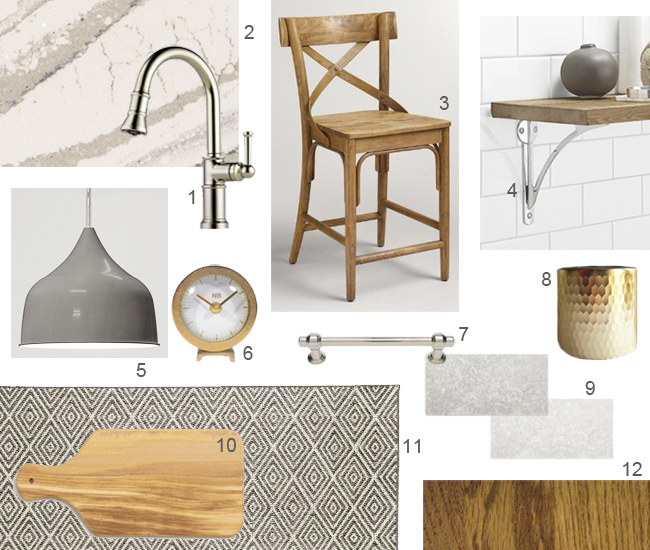
- Pull-down polished nickel faucet
-
Veiny quartz island counters (and here are the gray quartz perimeter counters)
- Counter height wood stools
-
Polished nickel shelf brackets (our reclaimed wood shelves were local, but they also sell these)
-
Metal dome pendants (they come in 5 other colors)
-
Gold clock (it makes me think the white rabbit might drop by)
-
Polished nickel hardware pull (here’s the coordinating knob)
- Gold 8″ cylinder vase
- Tumbled marble backsplash tile
- Wooden cutting board
- Gray diamond sisal runner
-
Minwax Provincial stain (on our oak hardwood floors)
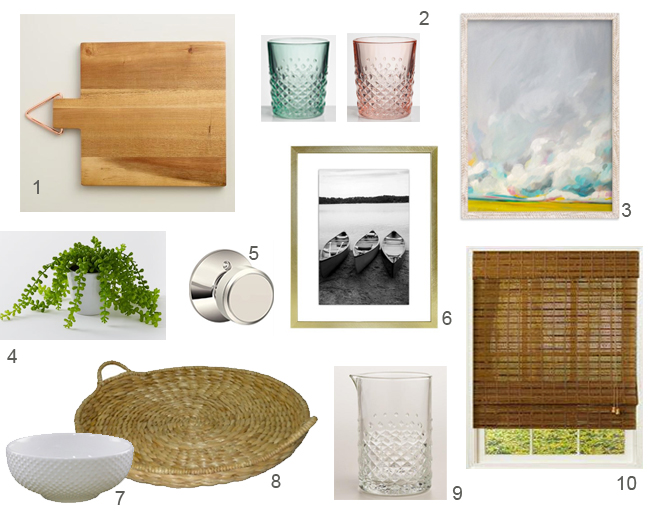
And what’s another mood board? Here are some more room sources for ya, including my very favorite drinking glasses, dotted bowls, and gold frames:
-
Square cutting board (I silver paint-penned the copper handle)
-
Carats DOF glasses (podcast listeners already know they’re my drinking glass soul mates)
-
Emily Jeffords painting (we chose “whitewashed herringbone” for the frame)
- This is here to represent greenery, which adds life to a kitchen (try: pathos, jade plants, succulents)
- Polished nickel door knob
-
Thin gold frame (I keep going back and buying more for other rooms)
-
White dotted cereal bowls (I love leaving them out in the woven tray on the island)
- Woven tray
-
Pretty faceted pitcher (I like putting one bloom from a grocery store bouquet in there)
-
Woven blinds (ours are from Home Depot a while back, but these are similar)
Some other items that I’ve liked adding are: a stack or two of books (we have some about vineyards, recipes, and beyond on our open shelves), personal photos (we have a framed favorite of the kids), cloth napkins that are easy to grab (ours are in that woven tray on the counter with the bowls), and some pretty enough salt & pepper shakers to leave out on the island full-time. Oh, and a few candles that smell good never hurt. It really is those little at-the-end touches that make a room feel like home.
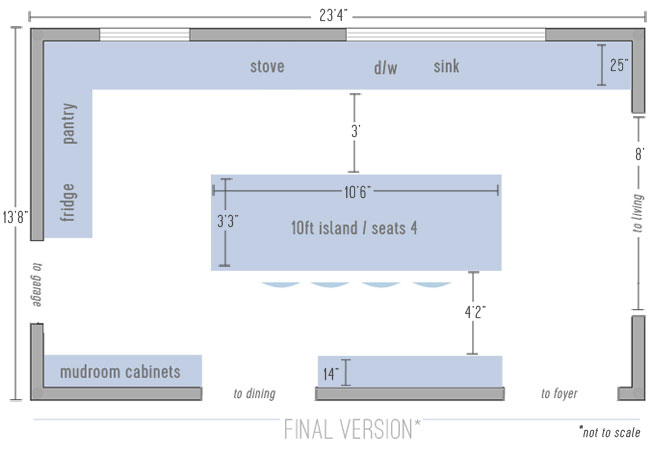
There were also several of you out there who have similar room layouts and wondered if you could get dimensions from us to see if you can fit an island… so here’s a rendering for ya. We worried our island might feel tight, but it has felt open and awesome, most likely thanks to the shallower-than-normal cabinetry that we chose for behind the stools (14″ deep vs 25″), which ensures that there’s extra passing room, even if people are sitting in the stools.
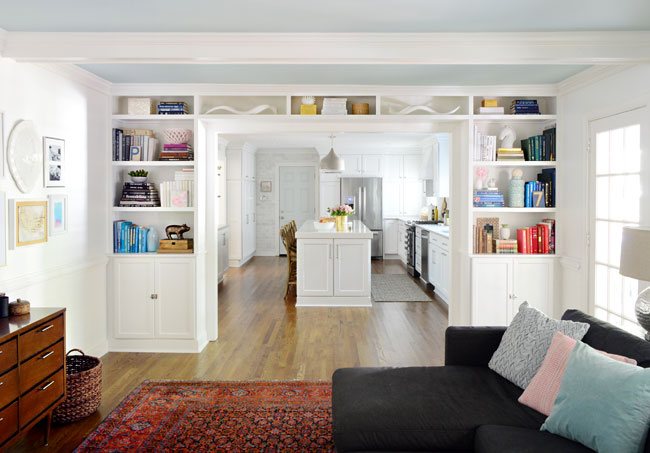
And before we go… one more before…
…and after. This time we could step back a little more to take this shot, thanks to a certain wall being gone.
So thar she blows. The kitchen we waited years (and years!) to tackle, that took months (and months!) to complete, but managed to be shared in three posts. Internet magic I tell you. We still want to spill more details about how we organized the kitchen (what we store where), what mistakes we made (oy, the mistakes!), how we made/stained our reclaimed shelves, and how we constructed these new built-ins in the living room (one of my favorite parts of the entire project!).
So there are still a ton of pics and words to come… but man it feels good to show you guys this space. And to finally be rid of those faux-brick linoleum floors!
Psst – If you’re looking for paint colors and source lists for every room in our house, this page has you covered.
* This post contains affiliate links*
The post Kitchen Remodel Chapter #3: The Big Reveal appeared first on Young House Love.


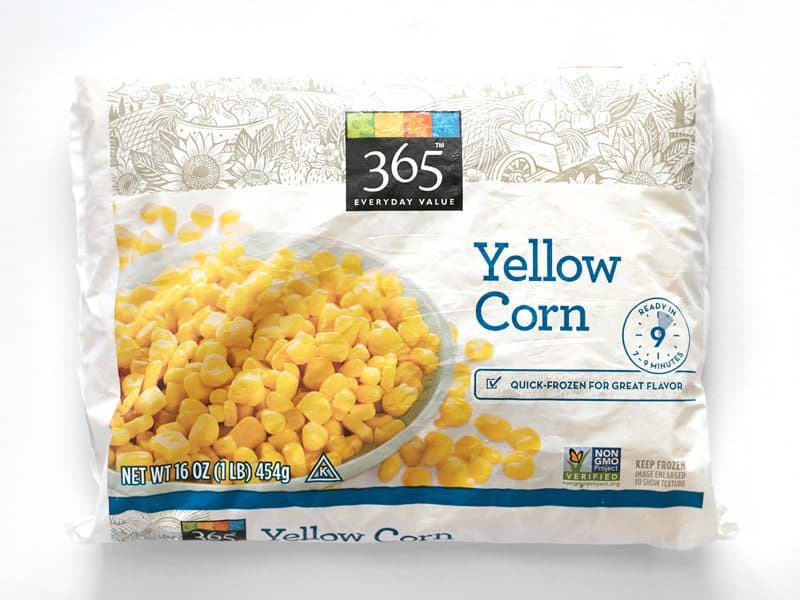 If you haven’t already, take one pound of frozen corn kernels out of the freezer to thaw. If you are planning on charring them in a skillet like I did, they need to be completely thawed. Also, preheat the oven to 400ºF.
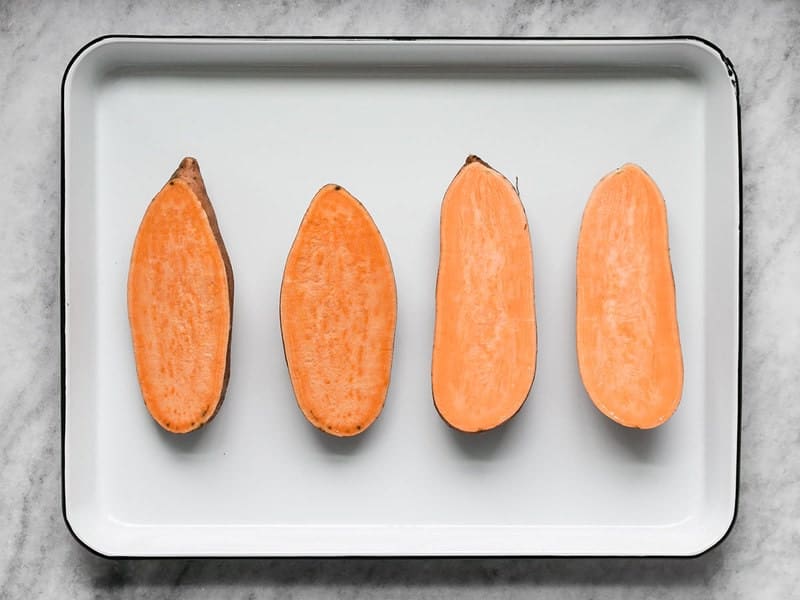
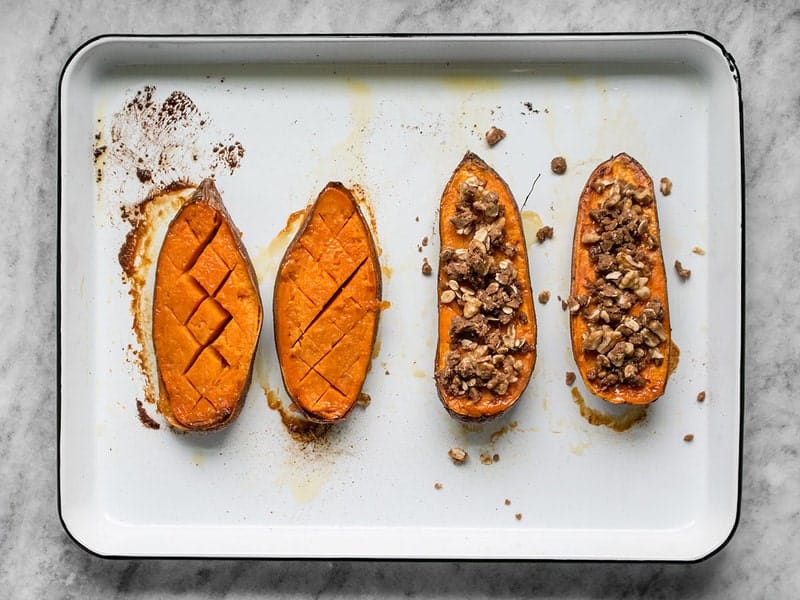
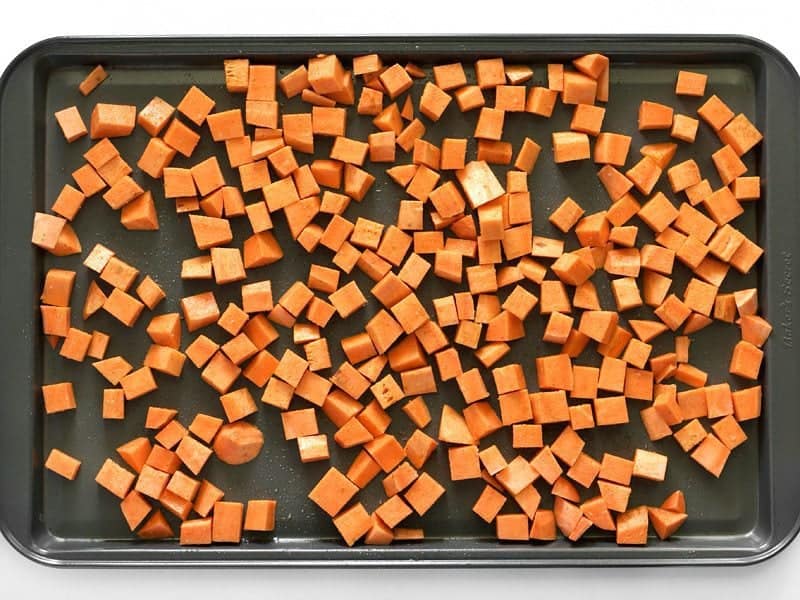 Peel and dice about 1.5 lbs. sweet potatoes (that was two small sweet potatoes for me, or one really large one). Place them on a baking sheet and drizzle with 2 Tbsp of cooking oil. Sprinkle 1 tsp cumin on top and a pinch or two of salt. Toss until all the sweet potatoes are coating in oil and spices.
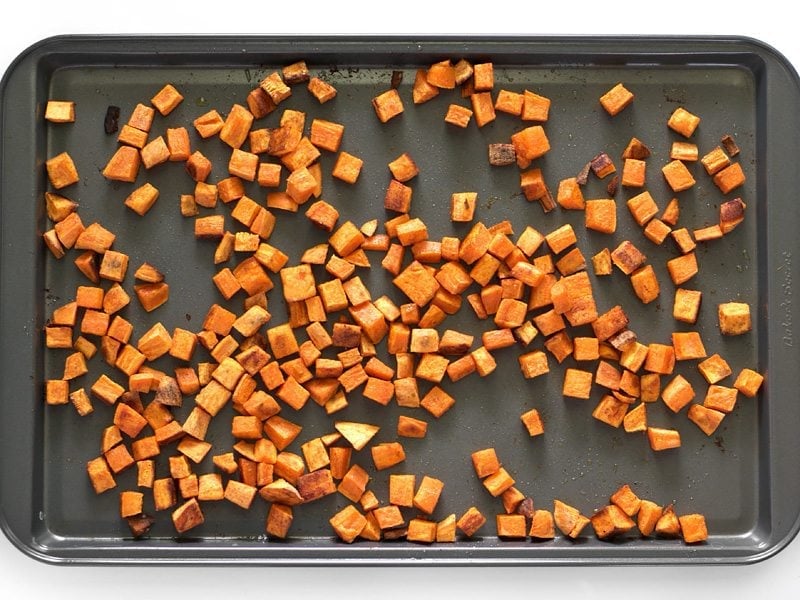 Roast the sweet potatoes in the preheated oven for about 30 minutes, or until they are soft and slightly brown on the edges. Total cooking time will depend on how small you cut them, so be mindful. Let them cool slightly.
 While the sweet potatoes are roasting, prepare the lime crema. Zest one fresh lime (I use a small-holed cheese grater). Add about 1 tsp of the zest and 1 Tbsp of the lime juice to an 8oz. tub of sour cream. Also add one small clove of garlic (minced) and about 1/4 tsp salt. Stir to combine, then taste and adjust the lime juice as you see fit. Refrigerate the crema until ready to use.
 If you’re not using frozen corn that came pre-roasted, heat a large skillet over medium to medium-high heat. Once hot, add 2 Tbsp cooking oil and swirl to coat the surface of the skillet. Add the thawed corn kernels and let them cook until browned and blistered on the edges. Avoid stirring too often as this won’t allow the corn time to blacken. Season with a pinch or two of salt and let the corn cool slightly.
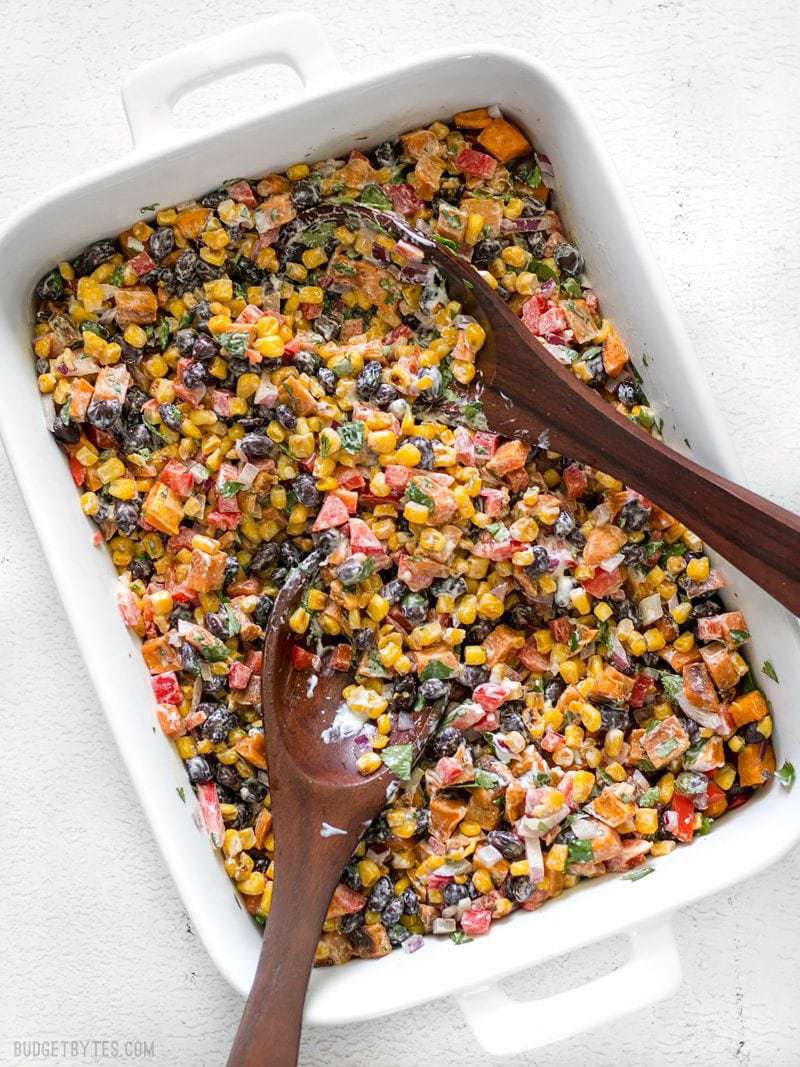
 Drain and rinse a 15oz. can of black beans. Finely dice one red bell pepper and 1/4 of a red onion. Pull the leaves from 1/4 bunch of cilantro, and give them a rough chop. Combine the roasted sweet potatoes, charred corn, black beans, red bell pepper, red onion, and cilantro in a large bowl or dish.
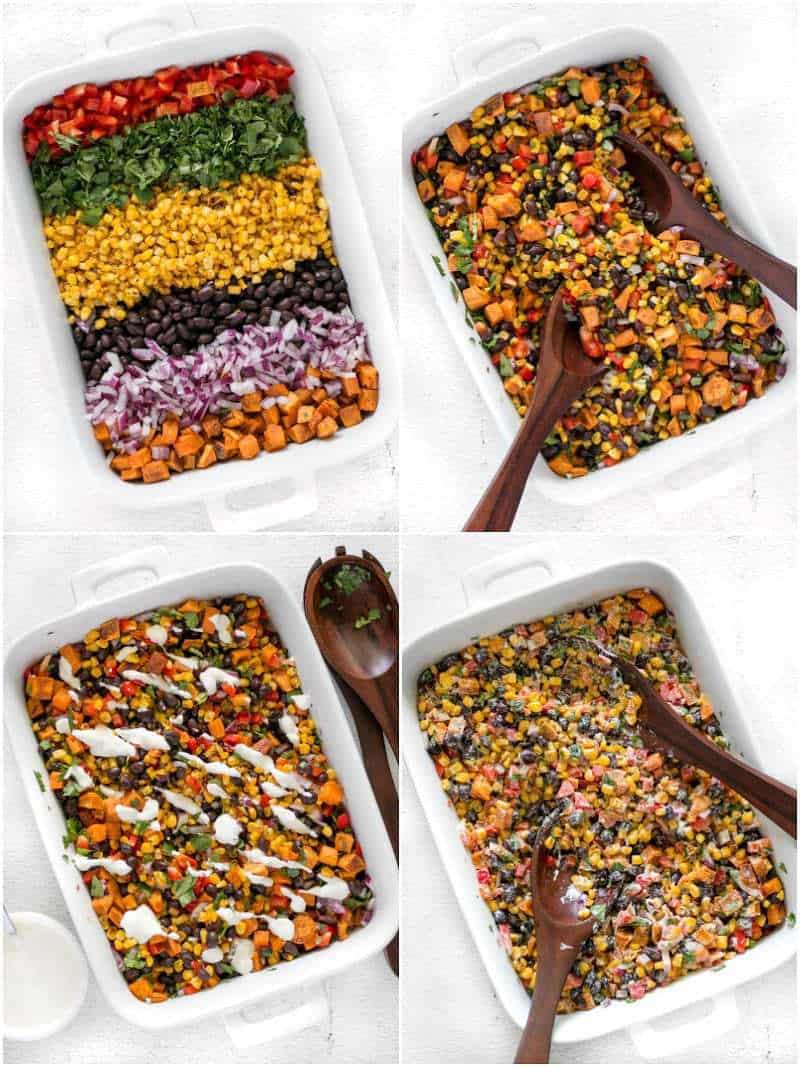 Stir the salad ingredients to combine. If you’re meal prepping this salad, refrigerate it just like this without the dressing. If you’re going to serve it, add some of the crema, then stir until there is a light coating over the whole salad. Add more crema to the top of each serving. That pop of tart lime is more noticeable when you have some drizzled on top in addition to the light coating.
 And that’s it! This Roasted Sweet Potato Rainbow Salad is SUPER FRESH.


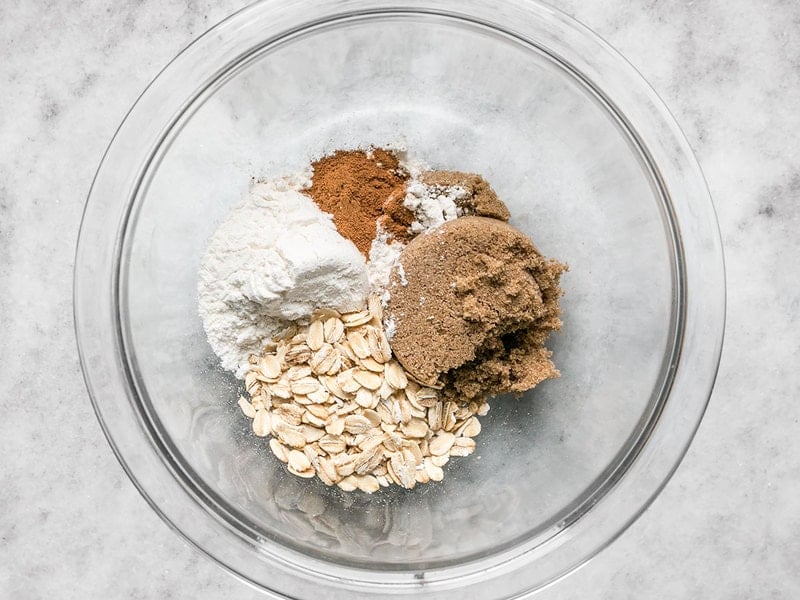
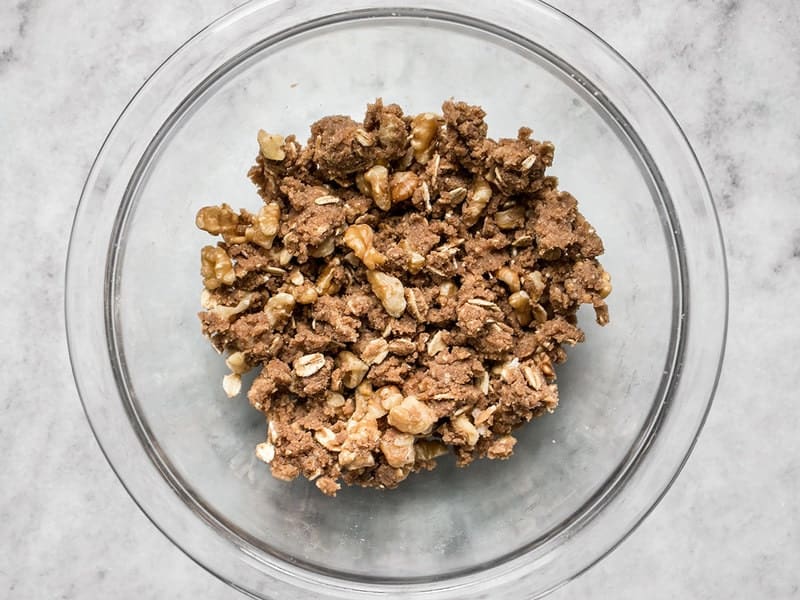
 Weekend mornings, particularly in fall, were made for baking. To me, there is not much better than wandering around still in cozy pajamas able to open the windows just a crack to let in the crisp fall air while making something delicious in the kitchen. There is an excellent chance cinnamon will be involved. Doughnuts often seem like a huge ordeal because of the frying involved (ugh, frying), but really, they don’t require much more effort than other baked goods. There are several little breaks throughout the process making them an ideal weekend project. And in the end, the frying is totally worth it, because doughnuts! Apple cider doughnuts…with cinnamon sugar coating. Let’s make them already, okay?!
 Though I generally prefer yeasted doughnuts, these are incredibly good cake doughnuts. I was very pleased with the texture and flavor, and they didn’t go stale nearly as quickly as I would have expected. Overall these were fun to make and even more fun to eat. I would love to hear how well you fare against that little unassuming bowl of doughnut holes because as it turns out, I was powerless to its presence. I wandered past that bowl so many times for so many “reasons”, and suddenly it turned up empty and me with cinnamon sugar all over my lips. I know nothing, I swear! Make some doughnuts this weekend, loves. You won’t be sorry.