You want a piece of this, diaper baby? C’mon, Matilda, let’s put on the gloves and waltz a few rounds! Yeah, you better run, ya overgrown rat! And keep runnin’!

Filed under: Uncategorized Tagged: Unusual Animals

You want a piece of this, diaper baby? C’mon, Matilda, let’s put on the gloves and waltz a few rounds! Yeah, you better run, ya overgrown rat! And keep runnin’!

Jackie Rabbit, an artist in Roanoke, Virginia, made this crisp and striking tattoo. She calls it the "Heart Tree." The blood of the long buried heart flows up into the living tree, emerges as leaves before falling down to the ground in death.
goats balancing on a flexible steel ribbon
Click PLAY or watch it on YouTube.
(via Gymnast Crossing)
Soft-boiled eggs are my new obsession. The whites of the eggs are firm, but the yolk stays silky, creamy, and in a liquid gold state. It’s a little like a cross between butter and melted cheese. They’re seriously divine. And they’re not just for breakfast! I enjoy soft-boiled eggs with toast, as an addition to bowl meals, as a topper for salads or soup (hello, ramen!), or just as a quick snack. I pretty much add soft-boiled eggs to everything I eat, no matter what time of day. Are you ready to see how easy it is?

Soft-boiled eggs are my new obsession. The whites of the eggs are firm, but the yolk stays silky, creamy, and in a liquid gold state. It’s a little like a cross between butter and melted cheese. They’re seriously divine. And they’re not just for breakfast! I enjoy soft-boiled eggs with toast, as an addition to bowl meals, as a topper for salads or soup (hello, ramen!), or just as a quick snack. I pretty much add soft-boiled eggs to everything I eat, no matter what time of day. Are you ready to see how easy it is?
The short answer is that it takes six minutes to soft boil an egg with fully set white and a liquid yolk, or 3-5 minutes if you prefer softer, slightly unset whites near the yolk. The long answer is that it also depends on the size of your egg and the technique used to boil the egg.
The recipe below is formulated for large eggs that are still cold from the refrigerator. In the U.S. large eggs weigh approximately 56-62 grams. You can use this method for other-sized eggs, just be aware that you will need to adjust the time up or down, depending on the size of your egg. Other factors that may affect the cooking time include high elevation, the type of cookware used, and starting temperature of your egg. Start with six minutes for large eggs and adjust the time until you find the exact amount of time needed to achieve your perfect soft-boiled egg.

The diagram above shows how long to cook large eggs (cold) to achieve soft or hard boiled eggs and everything in between.
Using the steaming method, I find 12 minutes to be perfect for a hard boiled egg with a fully set yolk. If you prefer to use a full water bath instead of the steaming method, check out my tutorial for hard boiled eggs.
Half of the time spent when boiling eggs is just waiting for the water to boil, so I like to use a combination of boiling water and steam. To create the steam you only need one inch of water in the pot, which comes to a boil in just a few quick minutes instead of several minutes for a full pot of water. The steam from the boiling water is then trapped under the lid, it surrounds the egg and cooks the egg just as quickly and evenly as a full pot of water. The quick steaming method allows you to cook your soft-boiled egg in just six minutes, or about the amount of time that it takes to start making your coffee or toast a piece of bread.
If you want to see how to make soft or hard-boiled eggs using a full pot of water, check out my tutorial for how to make hard-boiled eggs.
Soft boiled eggs in the shell will last in the refrigerator for about two days. To reheat the refrigerated soft boiled eggs, just repeat the initial cooing process with half the time. Bring about an inch of water to a boil in a small saucepot, add the egg, and let steam for 3 minutes instead of six.
Soft boiled eggs go well with so many different foods that I find myself adding them to almost all my meals (“put an egg on it!”). I add soft boiled eggs to everything from noodles and rice bowls to salads and toast. When you break open that liquid gold yolk is like adding a deliciously rich sauce to your meal. Here are a few recipes where a soft boiled egg can really take your meal to the next level:


See how we calculate recipe costs here.
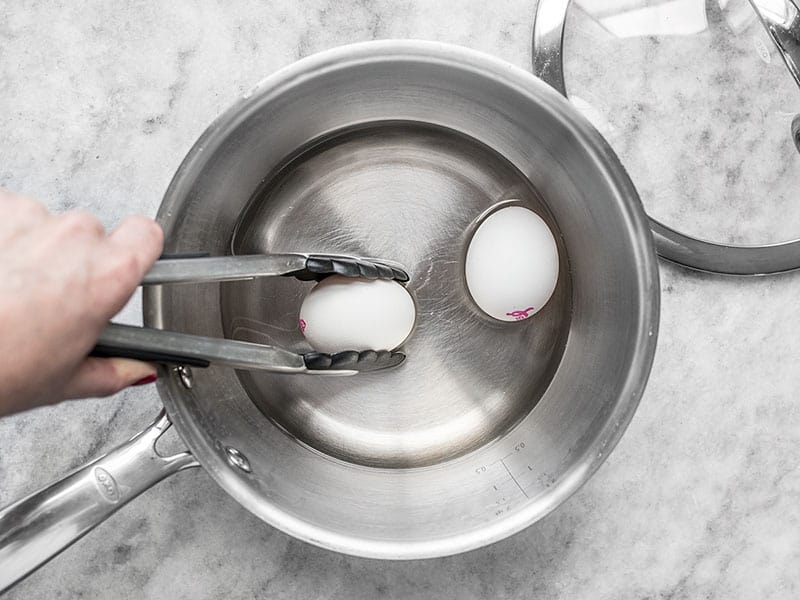
Add one inch of water to a sauce pot. Yes, you only need ONE INCH of water. Use the smallest pot you have that will house the number of eggs you’re making, so they’re in a single layer in the pot. I usually only do one or two eggs at a time, but this same technique can be used for any number of eggs. Place a lid on the pot and bring the water to a rolling boil over high heat. Once boiling, gently place the large egg(s) into the pot. Tongs or a slotted spoon makes this easier to do without burning your finger tips.

After adding the egg(s) to the pot, put the lid back on top, and set a timer for six minutes. The lid holds in the steam, which surrounds the eggs with even heat, cooking them quickly and evenly.

After exactly six minutes, turn off the burner, and use the tongs to transfer the eggs to an ice bath. Allow the eggs to cool until they’re no longer too hot to handle, or let them sit in the ice bath until you’re ready to eat. Just make sure you don’t let them sit at room temperature after steaming, otherwise they will continue to cook with their residual heat, and the yolks will continue to solidify.

Carefully tap the egg on a hard surface to crack the shell, then gently peel it away. You’ll need to be gentle because the inside is still liquid and the egg will be somewhat soft and wobbly. Begin peeling on the fat end, which often has an air-bubble that separates the shell from the whites, and makes an easy spot to separate the two. Give it a quick rinse after removing the shell to get rid of any shell fragments.

And now it’s time for that magic moment… OMG the runny yolk is liquid perfection! *squeal* Just so you can see a close up of the awesome results… The whites are completely solid and the yolk is ALL liquid. How perfect is that? I feel like I won the lottery.
The post How To Make Soft Boiled Eggs appeared first on Budget Bytes.
hello everyone, It has been a long time! it has been a crazy time for me, and the fact that this picture is from finland I suppose illustrates that. anyway, here is the behind the scenes of my latest picture “finland”. it was taken on a frozen lake with the most amazing snow on it. the snow flakes were gigantic (in fact, you can see them in the picture if you zoom in) and so light, fluffy and crunchy you could literally blow them away just by sweeping your hand near them.
this was one of my favorite pictures to color grade, it just worked, and along the way of adding the littlefolk I learned some new techniques. lets get started. this picture was taken with my Nikon d7000 and a 35mm f/1.8 at f/1.8. the big footprints are mine, and the little ones I made with my glove. it is a collage of 6 pictures so the final shot was equivalent to a 25mm f/1.3 (calculated using this lovely extension calculator). first thing I do is merged the 6 shots:
since the sun was setting, I didn’t have a chance to photograph my models before the sun set. turns out, there wasn’t another sunny day for the rest of the time we were in finland. I always try to match conditions as closely as possible between my littlefolks and their backgrounds, but I really wanted this picture to be of one of the people from finland (Tiina) and also the family’s lovely dog (Eddie). there was nothing for it, I had to take the pictures in cloudy weather. this added a lot of extra work for me, but, all’s well that ends well.
Tiina was standing there holding onto the leash, while someone off to the left called Eddie. this made him strain at the leash and put both of them in perfectly natural positions. I didn’t really like any of the shots I got for both of them, so I used Eddie from one and Tiina from another:
I placed them onto the scene and very roughly cut them out using masks and a brush. I then set the blend mode of both of their layers to Multiply. basically what Multiply does is make the image only appear where it is darkening the image below it, if it is brighter than what is under it, it disappears. this worked because the snow they are standing on is much brighter than what they are being photoshopped into, but they are much darker. this saved me a lot of time hand cutting them out, and creates a more perfect edge than one could ever create any other way, preserving the slight blurriness at the edge. the problem is, they are slightly transparent, and a little dark. to fix this I could have changed the blend mode to Darken (basically like Multiply but with a more sharp cutoff between dark and light) but that makes the edge of them 100% pixel perfectly sharp, which never looks good. so I make copies of each of them, set the blend mode to Normal and erased the entire edge of them so they only existed inside the originals. now they still have slightly transparent edges, but I usually make edges of littlefolk a little transparent anyway, it blends them in. also, it will come in handy later. using the magic wand I select the rough shape of both of them and apply that to a mask in a levels adjustment layer. in the adjustment I up the blues and greens in the shadows a bit to better match the background image:
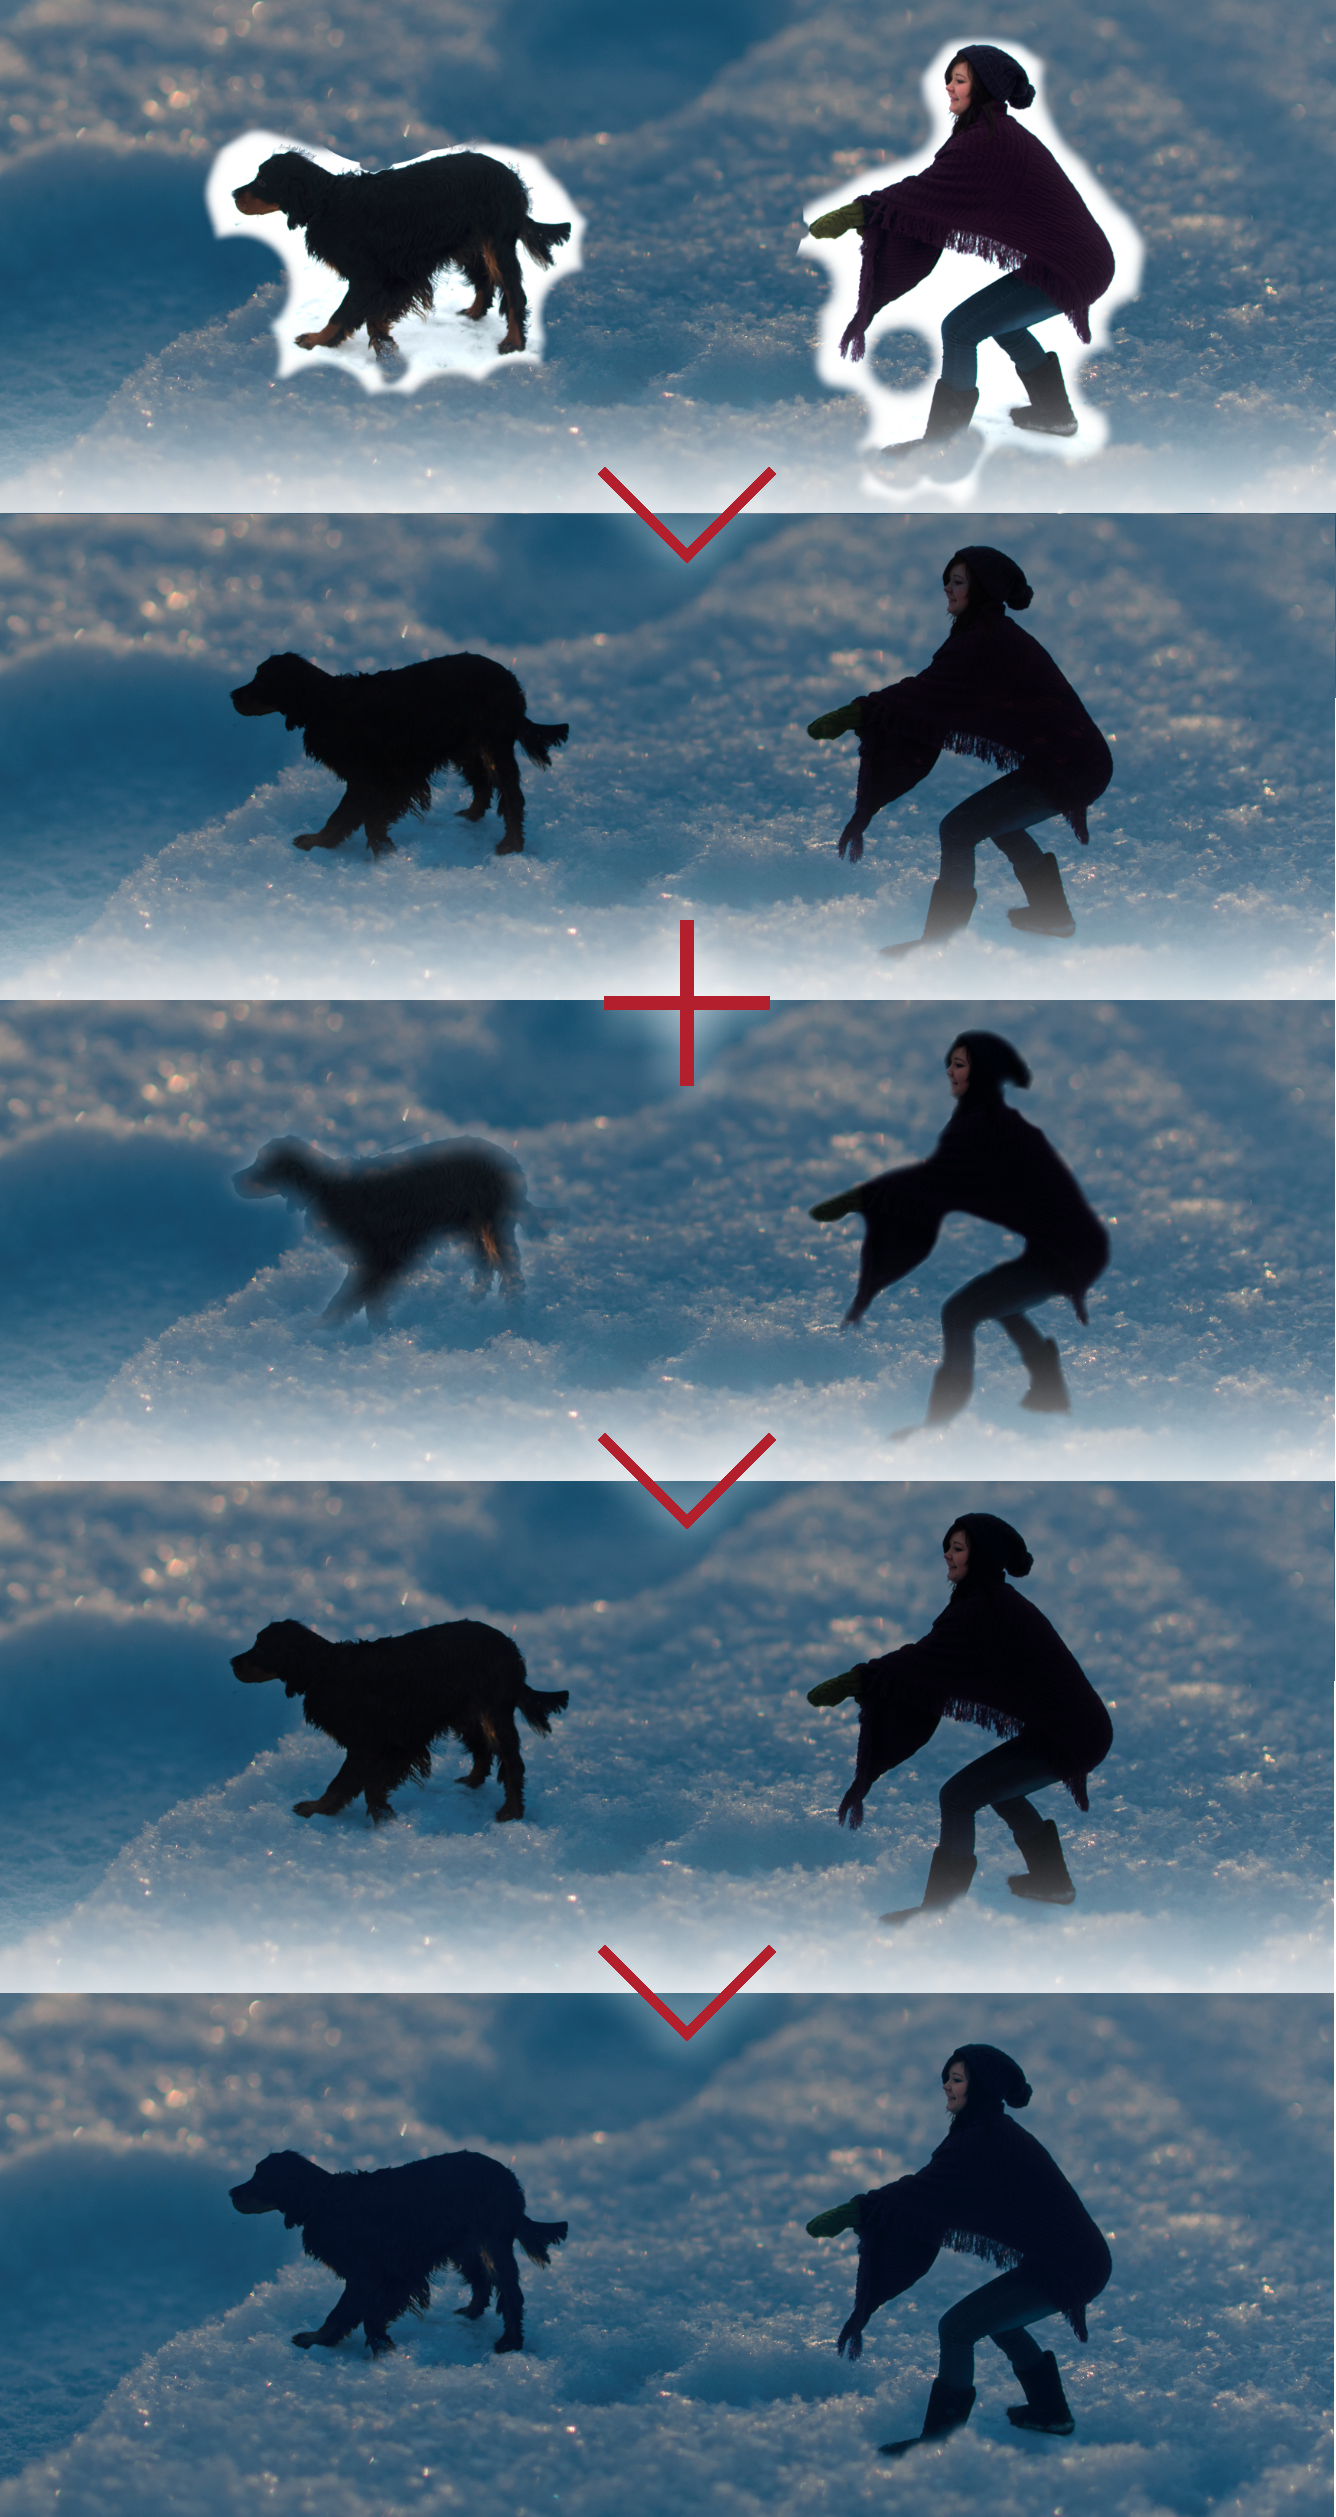
now I got done with all of that and… somehow they just don’t fit. this is the issue with the fact that the picture of them was taken in very different conditions then the background was. to fix this, I thought that adding bright fringes to the edges of them, like would appear when shooting this low angle into the sun, might fix the problem. how I went about doing that is by copying Eddie and Tiina (the ones set to Multiply, not the Normal blend mode ones with the edges erased). for the moment, I hide the originals (the little eyeball button next to the layer). now I invert the colors on both of the new copies, and set the blend mode of both to Screen. Screen, is the exact opposite of Multiply. instead of only appearing where it darkens what is below it, it only exists where it brightens what is below it. after inverting the colors, the snow around them is black, so it disappears, but they are almost white. I now put these copies underneath the originals, and make the originals visible again. using transform, I make the copies slightly bigger than the originals, so they are peaking out in a lot of places. now, the fact that the edges of the characters was slightly transparent means the this new bright layer underneath is affecting the edge a little, which really sells the effect: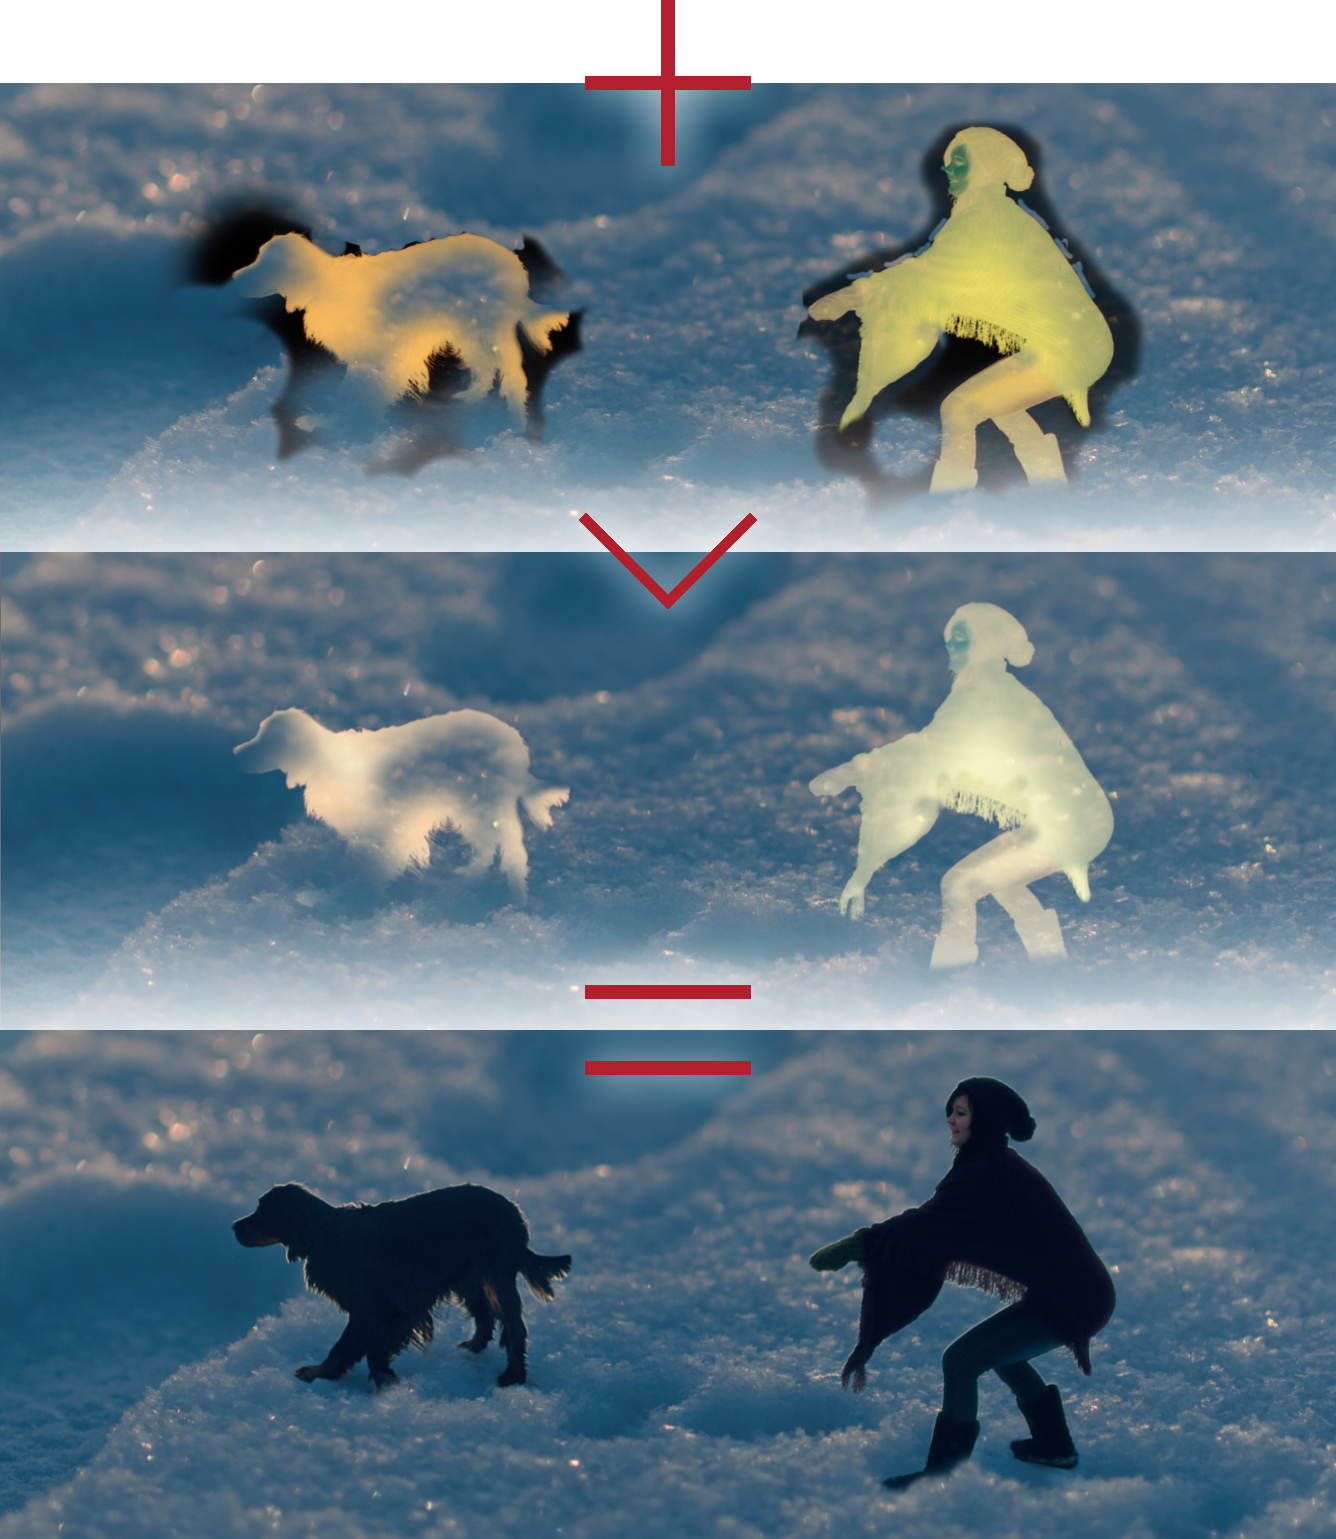
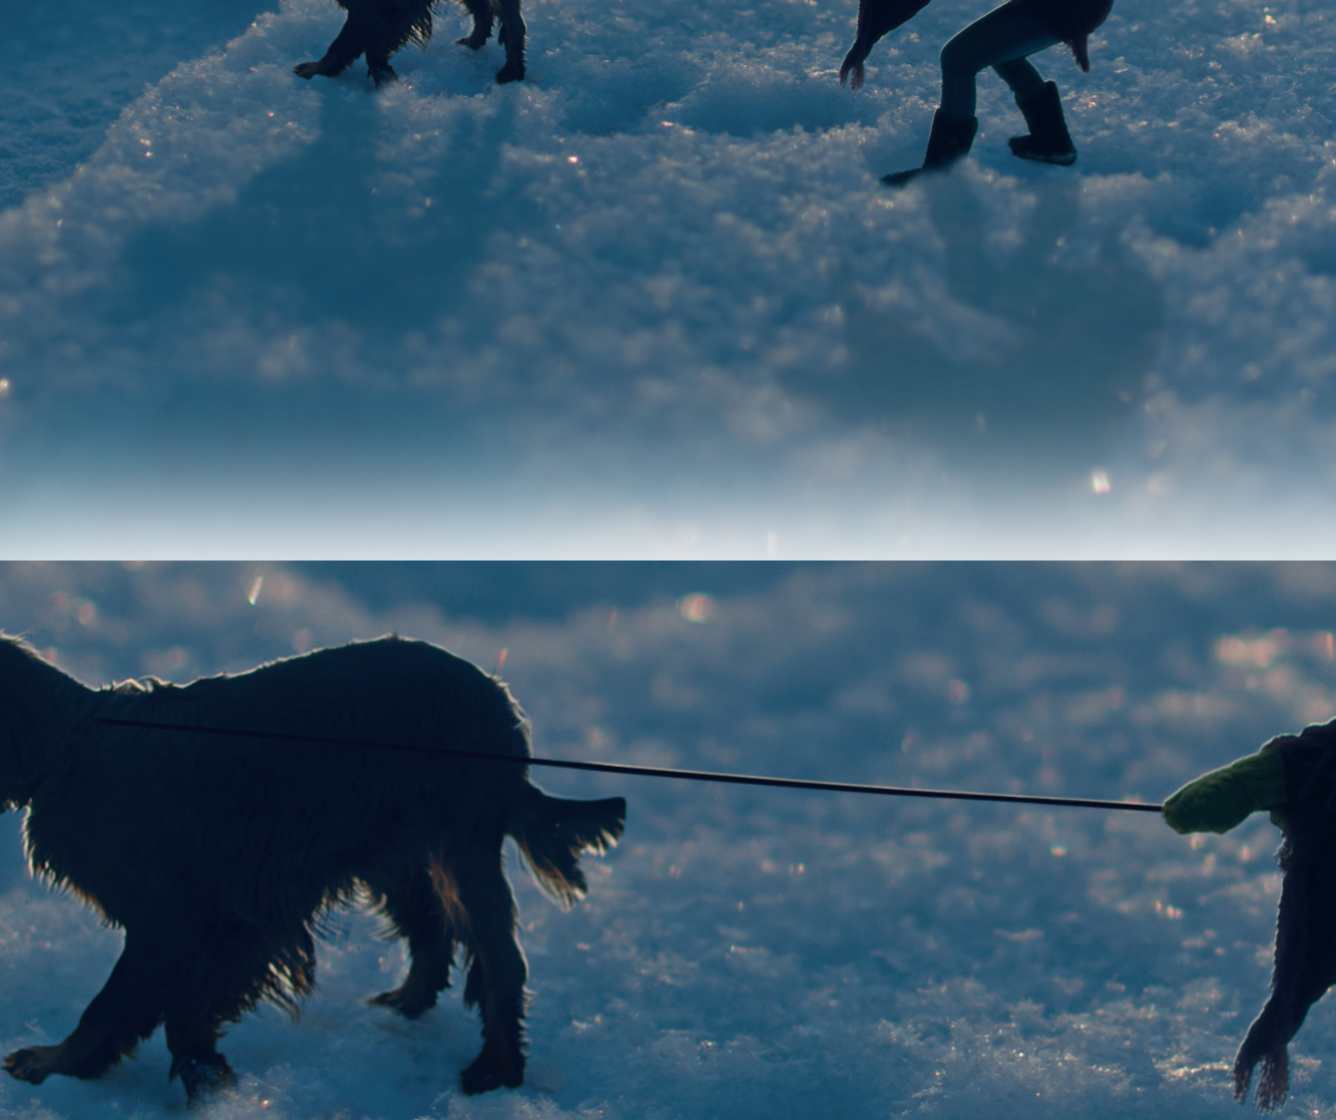
I now drew the shadows in, (just mirrored versions of the originals, with the colors changed to a blue slightly darker than the snow around them). the leash is just a drawn line with an outer glow and an emboss:
now for the color editing. the first thing I do to a lot of pictures, is try a Black and White layer, set to Overlay. it adds amazing structured contrast to flatter images. very rarely though, do I have one on 100% opacity. it is almost always is way too much. for this one though, since the “shadows” were actually only slightly below medium gray, it worked fantastically. I didn’t really like what it did to the sky though, so I masked out that area. I then added a vignette with a levels adjustment. both of these adjustments were bellow Eddie and Tiina, because they darken the image a lot, and the models were a little too dark already. above Eddie and Tiina, I decided to enhance the sun flare. I did this by creating a levels adjustment, bringing up the red, and lowering the blue channels. with a gradient in a mask, I made this only affect the area around the sun. I copied this adjustment and made the affected area a bit bigger, and in a new layer I drew a large off-white splotch around the sun, at low opacity. this flare helps the image not be too monotone blue, and makes it feel a little more like sunset: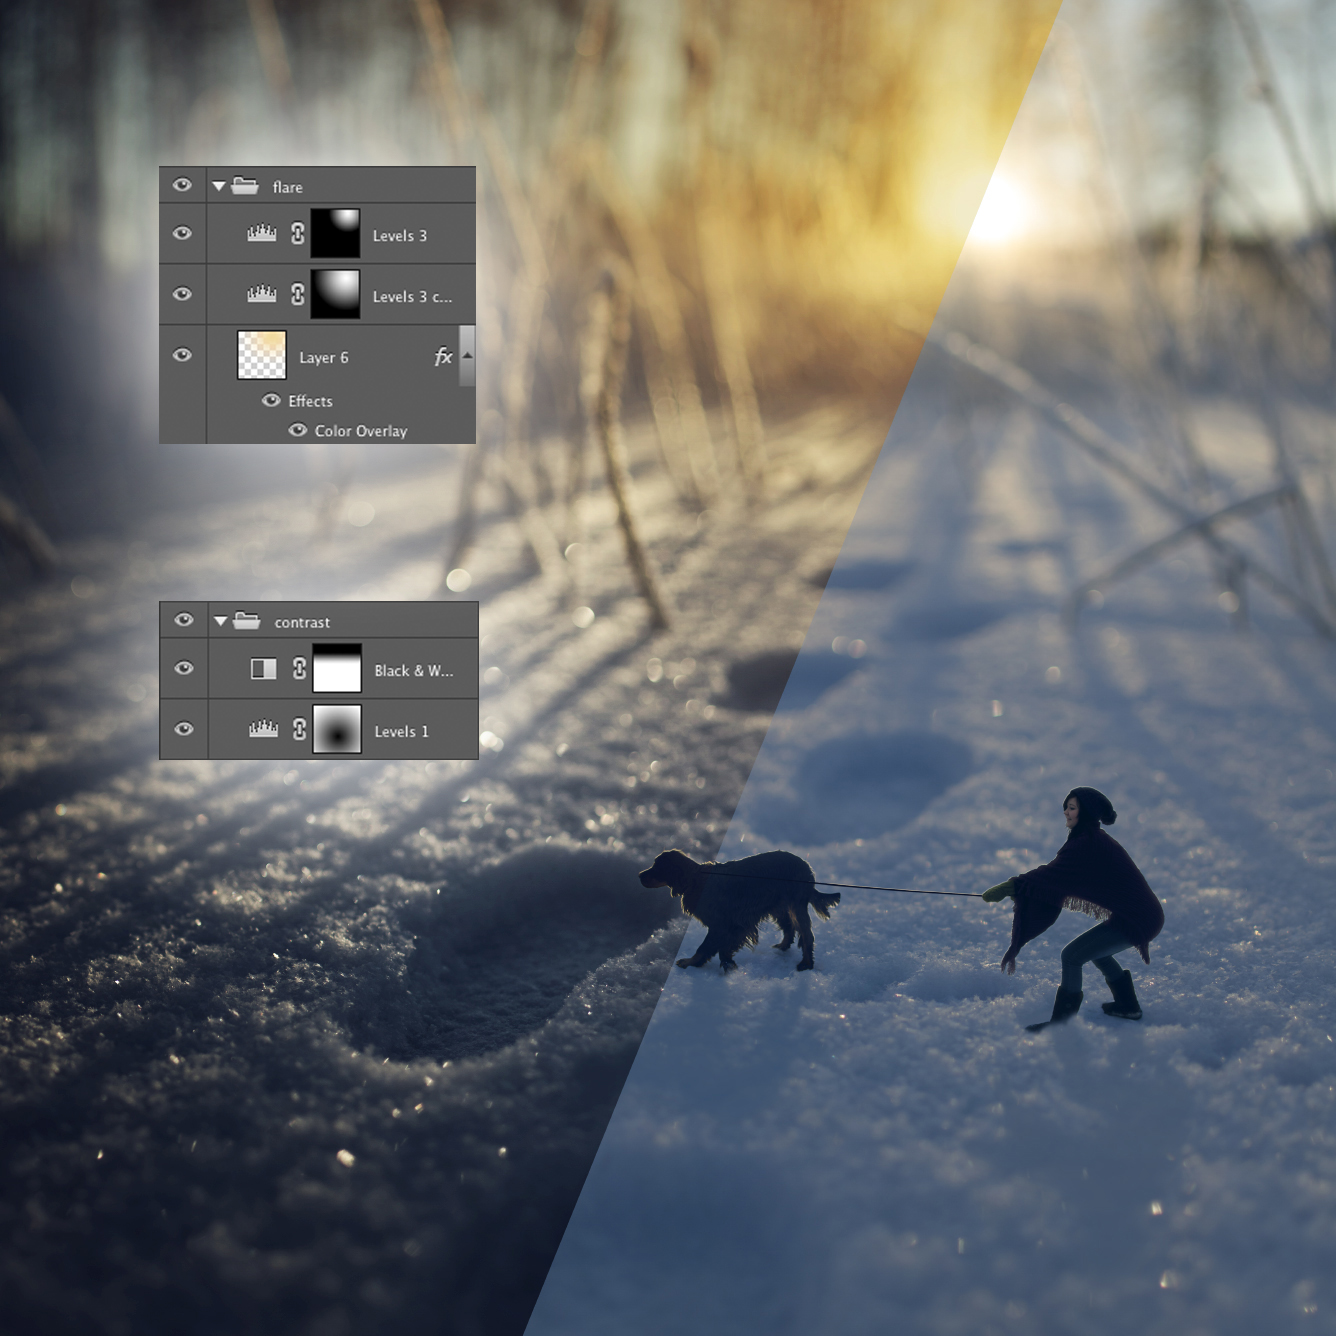
and that is it! this was a fun picture to edit, because I found some new workarounds, and learned some new techniques. I hope you learned something new as well.
you can see the full size picture on flickr, and keep up to date with new stuff like this on my facebook page.
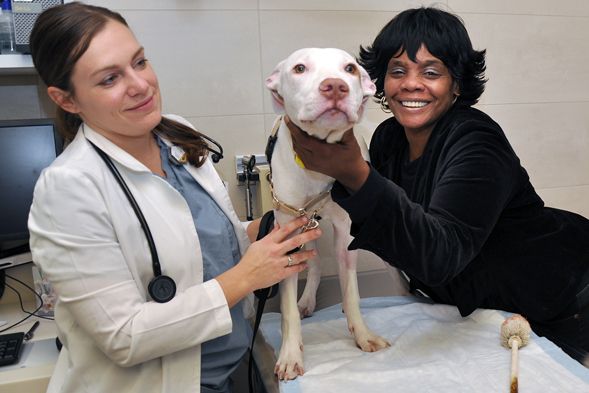
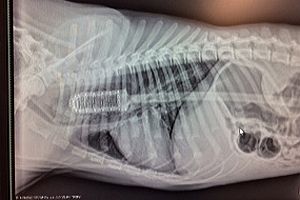 When your pooch starts acting weird and not eating or drinking, you know you need to take him to the vet. What you might not know is that he ate something weird when you weren't home.
In Petey's case, that something weird was seriously weird. In fact, it's hard to believe it fit in the five month old dog's body at all. That's because Petey ate a toilet bowl scrubber -a whole 15" toilet bowl scrubber.
After a quick surgery, vets were able to remove the brush and Petey is now recovering just fine. “It was the one of the most remarkable things I have ever seen in veterinary medicine and the strangest surgery I have ever performed,” said veterinarian Dr. Yvonne Kline.


Norwegian graphic designer/illustrator, Daniel Brokstad created this fantastic medical illustrative type set that he says is “playful and fun for an otherwise serious setting.” It certainly is! Each letterform is so creative, well thought out, and can easily stand on their own.
Daniel is a talented young designer who is currently traveling the world freelancing.
View more of Daniel’s work at danielbrokstad.com!
There’s a new love in my life, and I want to introduce you to him. He’s thin, satisfying, and rich.

His name is Salami Chip. He is everything I’ve ever wanted on an appetizer platter.
I baked very thin slices of salami on a baking sheet for about 10 minutes. The edges crisp up in the oven, and the entire slice will crisp up as it cools. I prefer pre-sliced Genoa salami, and unless you have the knife skillz of a ninja, I don’t think you could slice your own salami thin enough for this preparation.

I like dragging Mr. Chip through this white bean dip with roasted garlic quite frequently. Pair this with a buttery Chardonnay, and you have an appetizer that I could eat every day at happy hour. Salami (we’re on a first name basis, you know) is totally transformed in the oven to a crispy, addictive chip you just can’t quit.
If you’re hosting a party, plan on about 2 ounces of salami per person. I buy the 4 ounce package, and the Mr. and I enjoy it on Fridays while I cook a leisurely date night meal.
Yes, these chips really are as good as they sound. Bake up some salami chips for the big football thing going on sometime soon. What’s it called? The soup bowl? The fantastic bowl? Oh, it’s the Superbowl. Right. Is that a big deal? I have no idea. I’m just over here eating meat chips and loving life.

(...)
Click to continue reading and see the recipe... Salami Chips + White Bean Dip (251 words)
© Christina for Dessert for Two, 2014. |
Permalink |
34 comments |
Add to
del.icio.us
See more: beans, hummus, meat, salami, white bean
Pomegranate, rosemary, and goat cheese combine in this grown up version of the classic cheese ball. Serve it at your next get together or party.
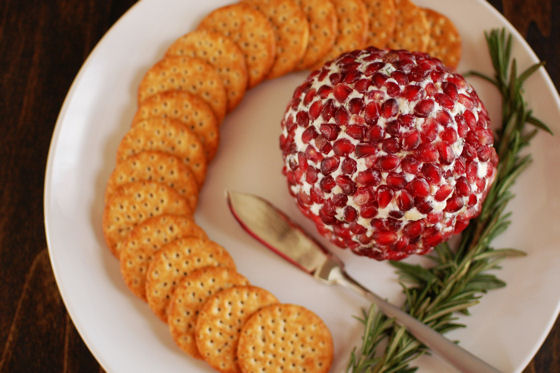
Would you guys believe this is the first cheese ball I’ve made in my adult life? How crazy is that? When I was a kid, there was always a cheeseball at the big Christmas meal with the family. It was cream cheese based and had ham on the outside. Slathering some of that cheese and ham goodness on some buttery crackers was a real treat. At least, it seemed like a treat since that was the only time of year we got to eat something like that.
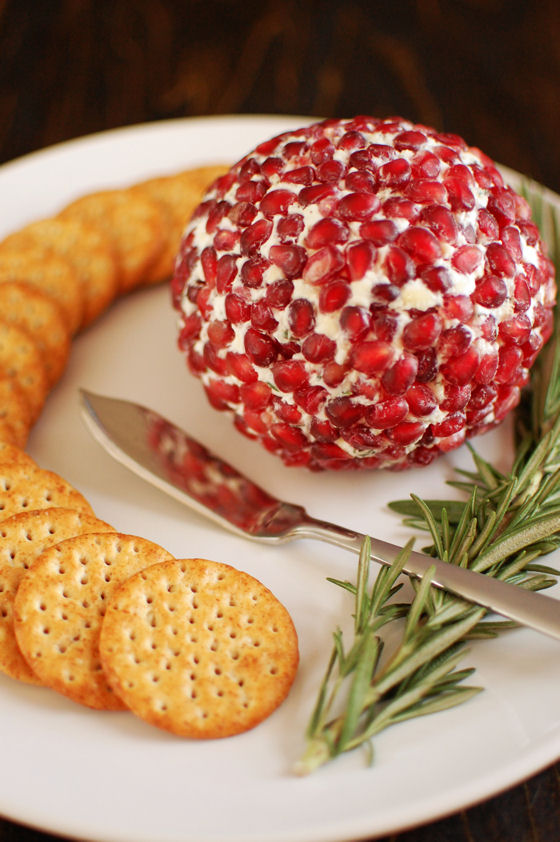
This cheese ball is not the cheese ball of your childhood. It’s a sophisticated cheese ball combining unexpected flavors. The cheese spread itself contains three kinds of cheese: cream cheese, goat cheese, and white cheddar. Then it’s got some rosemary in there as well. After the cheese spread has been formed into it’s ball shape, it’s rolled in my all-time-favorite winter ingredient: pomegranate seeds.
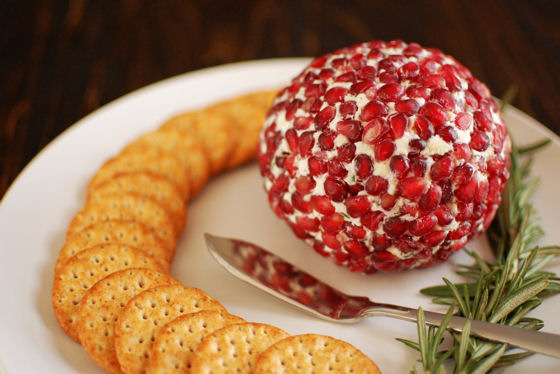
These little jewels are what make the cheese ball shine. They provide a burst of juice that counters the saltiness of the cheese. The crunch they provide balances well with the creaminess of the cheese. Basically, if you can’t find pom arils, don’t make this cheese ball. They make the recipe. If you can find pomegranate seeds, then make this cheeseball for your next get together. Or bring it to a Superbowl party. It might not be traditional football food, but everyone around you will thank you.
Two Years Ago: My Go-To Cream Cheese Frosting and Roasted Pumpkin and Squash Soup with Sage
Three Years Ago: Chocolate Bacon Cupcakes with Caramel Frosting and Spinach with Pan Roasted Red Peppers and Goat Cheese
Four Years Ago: Pretzel Chocolate Chip Cookies and Overnight French Toast
Five Years Ago: Raspberry Meringue Cookies
“I am the Lorax. I speak for the trees!”

Emperor Tamarin Monkey image via Bored Panda.

Remember this story from June of last year? A fellow named Josh drove up from Florida to Atlanta to get a Goldie Puppeh, and we asked for suggestions for a name. Well, he picked one!


“Needless to say, after getting my puppy I was consumed by that for a few months so I apologize I never followed up. I ended up naming him Enzo, after Enzo Ferrari because I am a car nut! He’s my first dog…I could have never imagined how much work it was going to be! Anyway, I just put this video online of him and thought you might enjoy it.” -Josh.
And just think, he coulda named him Yugo, Kia, or Hyundai! Needless to say…Enzo has grown. Exponentially.


A couple of years back, a Russian woman began taking photos of her sons with various animals.


Whether the animals are big or small..

You can tell that these little fellows have quite a bond with the critters.

Mail Online quotes Elena Shumilova, “Children and animals – they’re my life. As a mum of two sons we spend a lot of time on the farm, so I often shoot my boys with dogs, rabbits and ducks.”

“When shooting these pictures, I largely trust my intuition and inspiration when I compose photos of my children with animals.”

“I get inspired mainly by desire to express something I feel, though I usually cannot tell exactly what that is until I have taken the shot of them with the animals.”


Photos from Caters/Mail Online.

… recreational wind tunnels, frequently advertised as “indoor skydiving” or “bodyflight“, … have also become a popular training tool for skydivers. …
The start of this montage features cool wind tunnel acrobatics.
Click PLAY or watch it on YouTube.
via @GregRoe1

If you’re tired of threatening enemies with a scientific instrument, point an artist’s tool at them instead! Etsy seller Carved Crayons (maker of the awesome Game of Thrones house sigil crayons) just tried out this Doctor Who design for the first time. It’s the 11th Doctor’s screwdriver, and the artist used melted wax from other crayons to apply different colors to the sonic. Given his dislike for childish things, the War Doctor probably wouldn’t approve – we, however, do.
Bonus: see Dalek and TARDIS crayons after the break.


Product Page ($40 and up via Tumblr)
    
|

Minnesota brothers Austin, Connor and Trevor Bartz spend their winters in their hometown of New Brighton building giant snow sea creatures.
Not content with building the standard old school snowmen of yore, the three teens spent a grand total of 95 hours over the course of 3.5 weeks building a 20-foot snow shark. They collected snow from their neighbors, and stored the excess fluffy stuff in their garage–if it’s too cold, snow won’t pack properly, so they had to wait until it warmed up. The boys documented the construction process over on Youtube, and you can watch the clip after the break.
Check out more pics of past projects along with the video after the break…


(via 22 Words)
|
|


The vanitas-like nature and pencil execution of these skulls is beautiful. Created by Warsaw based graphic designer + illustrator Tomasz Majewski.
Looksh like Tippy the Fainting Squirrel picked shta wrong week shta quit shta ferment’d berriesh cocktailsh! (honk-shu, honk-shu) Jush one more leetle… (honk-shu, honk-shu)
Via YouTube

Airports are giant stress-centers this month. He’s traveling here, she’s traveling there, and they gottabethererightnow. Cue the Wag Brigade, please.

As part of the San Francisco SPCA’s Animal Assisted Therapy Program (AAT), Wag Brigade volunteers will be regularly visiting SFO terminals with their certified therapy dogs.

The dogs will wear personalized vests that read “Pet Me!” and ID them as Wag Brigade volunteers. The goal is to provide stress relief and make travel more enjoyable for SFO passengers.


 |
| "You want a piece of me?" |
 |
| "We have sharp teeth for a reason, Phil. Let's use them." |
 |
| Her hunting ancestors must be horrified. |

The combination of Kool-Aid and pickles, cleverly named Koolickles, is quite possibly the creation of the world’s most ingenious stoner or a convenience store clerk with much too much time on his hands. I probably just described the exact same person, but either way, there is no denying that Koolickles are becoming a snacking phenomenon.
But do Koolickles live up to the hype?
Alisa.wraygorgeous!!!


Can I melt that?
If the answer is yes, I’m most likely going to make a grilled cheese sandwich.
I was named Most Likely To Make The Best Grilled Cheese Sandwich On Earth in high school… because that category existed (in my dreams).
I’ve been building up to this moment. I’ve been waiting for the stars to align, the persimmons to ripen, and the Brie to appear in the refrigerator. This is that moment realized.
This sandwich makes me feel rich. Like, cash-money rich. (I’m not.) (It’s cool.)

In other grilled cheese related news:
Spinach and Artichoke Grilled Cheese Sandwich

Original photography shot with the Canon EOS 5D Mark III digital SLR. The filmmaker’s camera.
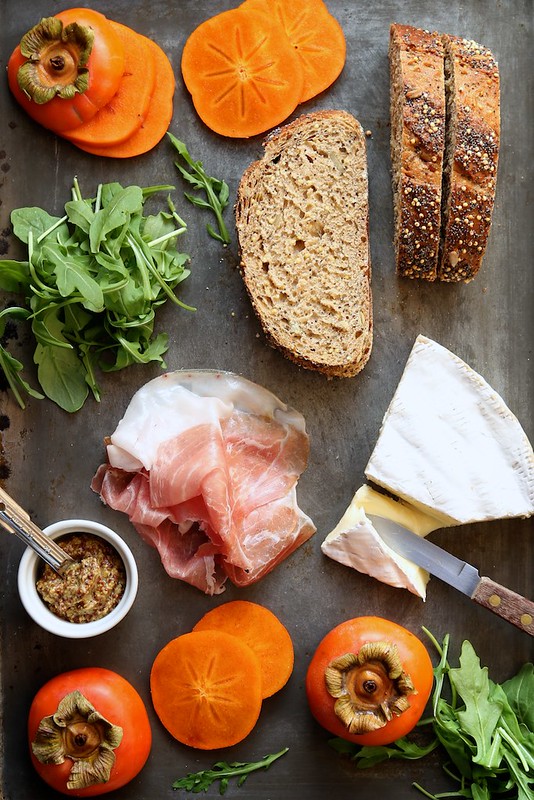
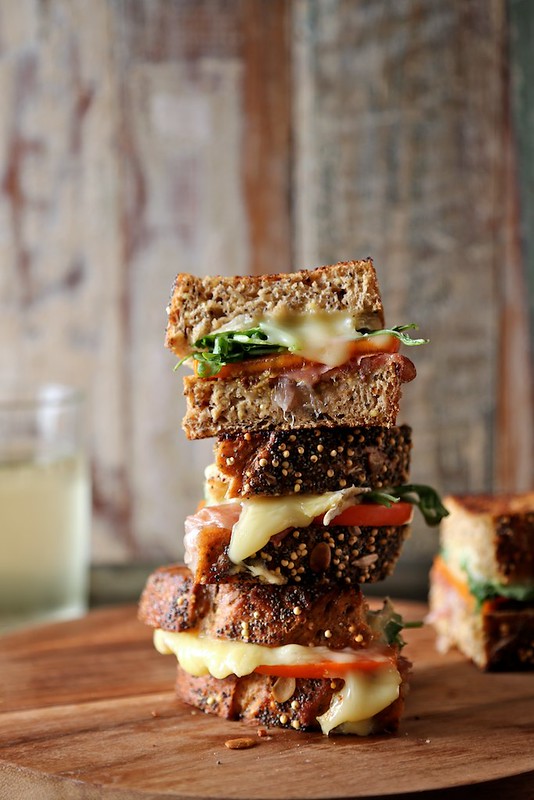
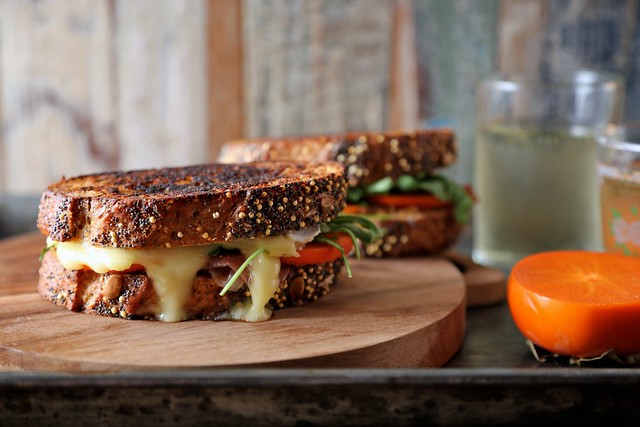
This almost feels too good to be true. We’re hitting every flavor range. Sweet persimmon. Salty prosciutto. Tangy mustard. Spicy mustard. Creamy Brie. Crisp and crunchy whole grain bread .
Yea, it’s serious.
We might have stumbled upon the most perfect sandwich situation.

Everything is stacked and layered. Mustard atop the whole grain bread, then prosciutto, sliced persimmon, and fresh arugula.

Brie cheese is generously spread on the remaining two bread slices Rind and all. Don’t be scared.

A good, old-fashioned sandwich smash.
By now our butter is melting in a skillet… and now would be a good time to pour the wine too.

Sandwiches are grilled on both sides. I go a little overboard with my toasting. Maybe I like things a little burnt.
Sweet and salty. Totally seasonal. Crisp and creamy. I mean… this sandwich has it all.
I used Fuyu persimmons. They’re the firmer of the two and I think they’re the most delicious. When ripe, they’ll be slightly soft and easily sliced. Pile up that bread! Fuyu persimmons won’t last long in the markets. We’ve got to get at this while we can!
Oh! Speaking of persimmons, this Pear and Persimmon Caprese Toast I made last year is a total win!
Persimmon Prosciutto and Brie Grilled Cheese
makes 2 sandwiches
4 slices whole wheat seeded bread
2 tablespoons whole grain mustard
4 slices prosciutto
1 Fuyu persimmon, thinly sliced
2 small handfuls fresh arugula
2 to 4 ounces Brie cheese, depending on how much cheese you like
1 tablespoon butter for grilling
Spread mustard on four slices of bread. Layer on two slices of prosciutto, two slices of persimmon, and a small handful of arugula onto two slices. Spread Brie cheese onto the other two (mustard-covered) bread pieces. Sandwich the two parts together.
Heat butter in a medium skillet over medium heat. Place sandwiches in the pan, Brie side down, and grill until cheese is melted and bread is toasted to a golden brown. Flip sandwiches and cook until golden.
Remove from the skillet. Slice in half and serve immediately.


Graphic designer and artist Kristy Patterson-D’anna has trained under Motley Crue’s Nikki Sixx and St. John Knit’s Kelly Gray creating designs for their rockstar clothing line Royal Underground. Kristy is very heavily influenced by anatomy, dividing her time between doctor visits from various illnesses, medical research, and creating artwork stemming from her interpretation/experience of the two.
Her prints are available for purchase at Society6!


