Shared posts

21 Jan 04:33

a chanterelle popover | cooking with larry and colleen

by Sarah

chanterelle mushroom | the vanilla bean blog
chanterelle popover | the vanilla bean blog

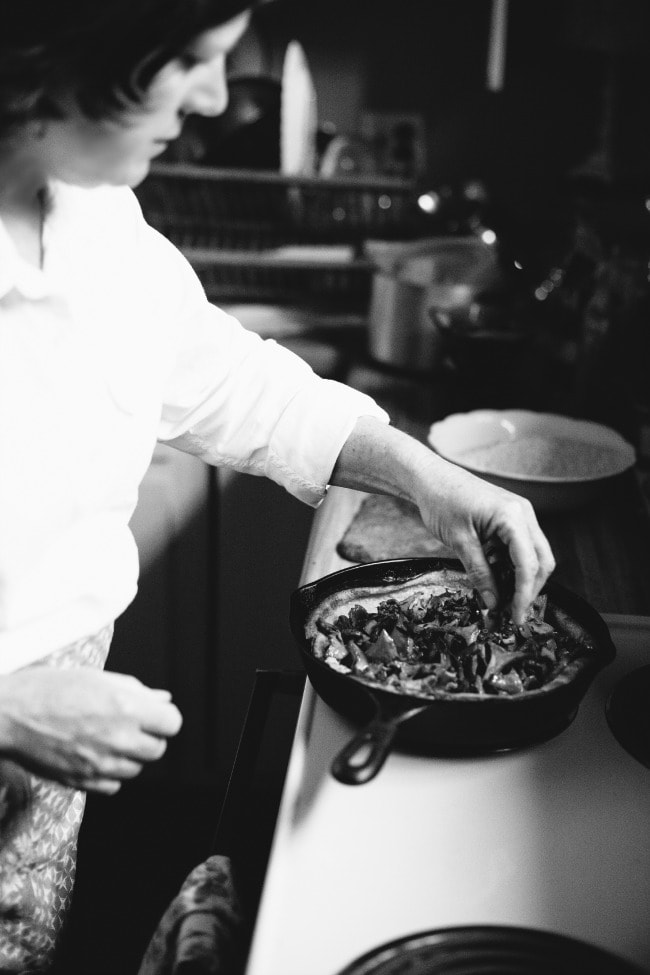
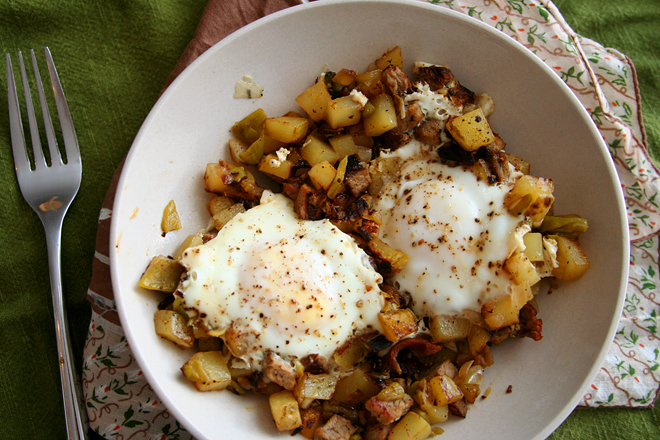
A few weeks ago I spent some time with Larry and Colleen. We ate several meals together: a dinner tucked away in a corner of a bookstore, candles lit and wine bottles uncorked, laughing and talking of life and work and life yet again. Then there was breakfast the next morning: dark coffee with cream and scones leaking blackberries and lemon. Larry lost himself in the local paper, Colleen stepped into the kitchen to make a second breakfast, and my little hobbit heart burst. She whisked and poured and soon brought it forth: a fresh-foraged chanterelle popover, straight from the pages of Deborah Madison’s Local Flavors. I had never had chanterelles before, and devoured them eagerly. Their texture was far removed from the shiitake, a mushroom I have tried to appreciate over and over, but  their spongy texture always hindered me. But chanterelles! these mushrooms were smooth and easy; they mingled in the cream and nestled right down in the pancake.

We sat there, eating together again. We were silent, mostly, but chewing loudly; tasting ten years of words already spoken. They were there, in butter, and cream, and eggs. They whispered with each motion of the fork, each cut of the knife. We swallowed them together, and then set out for a long walk and time in the garden. We reached the front door and flung it wide open; we walked through to a bright blue sky and another decade of breaking bread together.
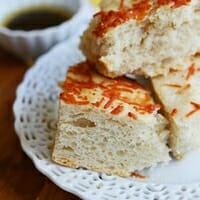
chanterelle popover | the vanilla bean blog
Chanterelle Popover
adapted from Deborah Madison

Not much is changed from the original recipe, although I did add a bit more cream, as we had wished for a bit more ‘sauce’.

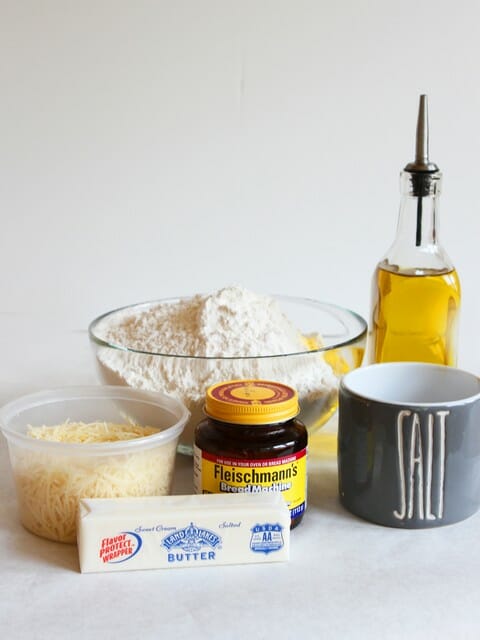
1 pound chanterelles (or other mushroom, buttom mushrooms will work fine)
4 tablespoons butter
4 large eggs
1 cup whole milk
salt and pepper, to taste
3/4 cup all-purpose flour
2-3 tablespoons freshly grated Parmesan cheese
4 tablespoons heavy cream
1 teaspoon thyme, minced
1 tablespoon parsley leaves

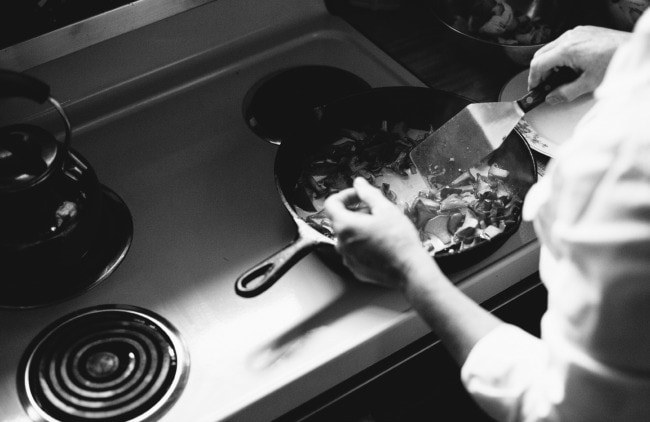
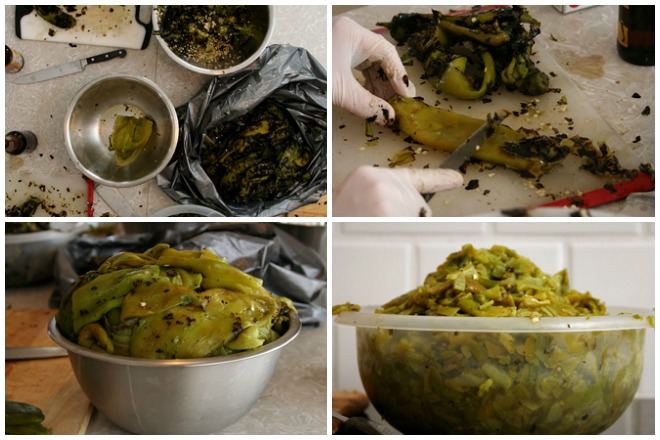
Clean the mushrooms, and slice them. Set aside.

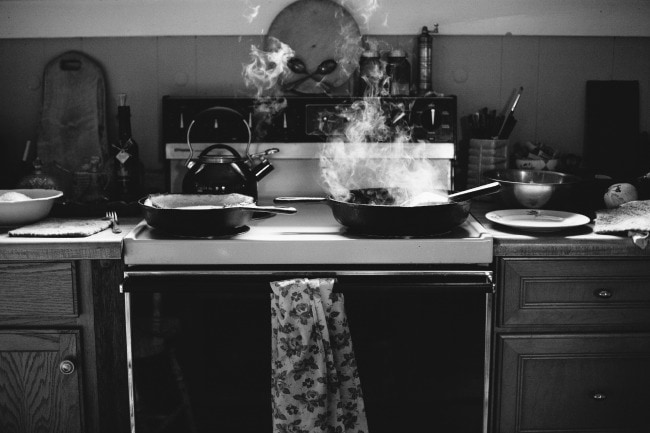
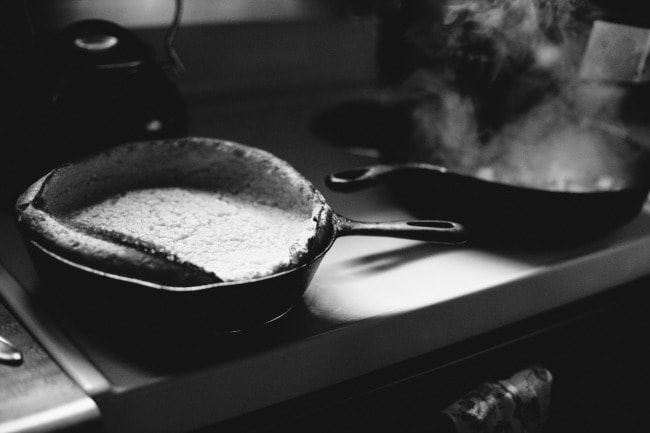
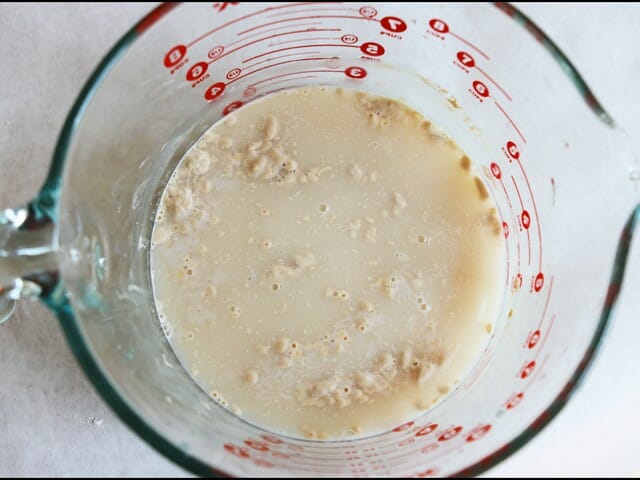
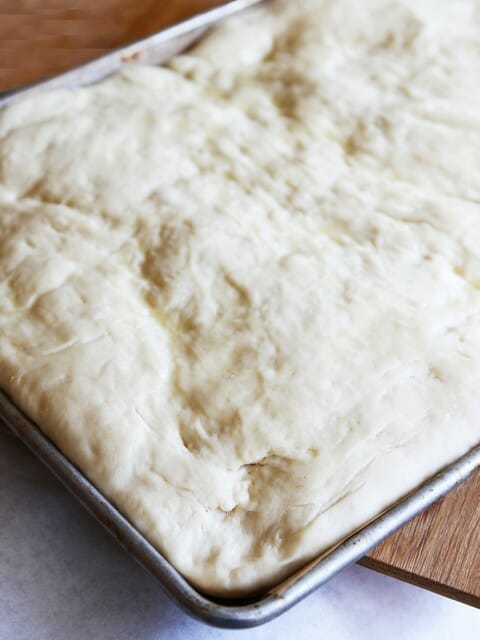
Preheat the oven to 400. Put 2 tablespoons of butter in a 10-inch cast iron skillet, and place it in the warm oven. Whisk together the eggs, milk, and 1/2 teaspoon of salt together. Add the flour slowly, and whisk until the batter is smooth. (Carefully) take the hot skillet out of the oven, and brush the melted butter inside the skillet and around the rim of the skillet. Add the cheese to the batter, and then pour it into the hot skillet. Place the skillet in the oven, and bake for 20 minutes (it will rise high over the edge of the skillet and puff in the center).

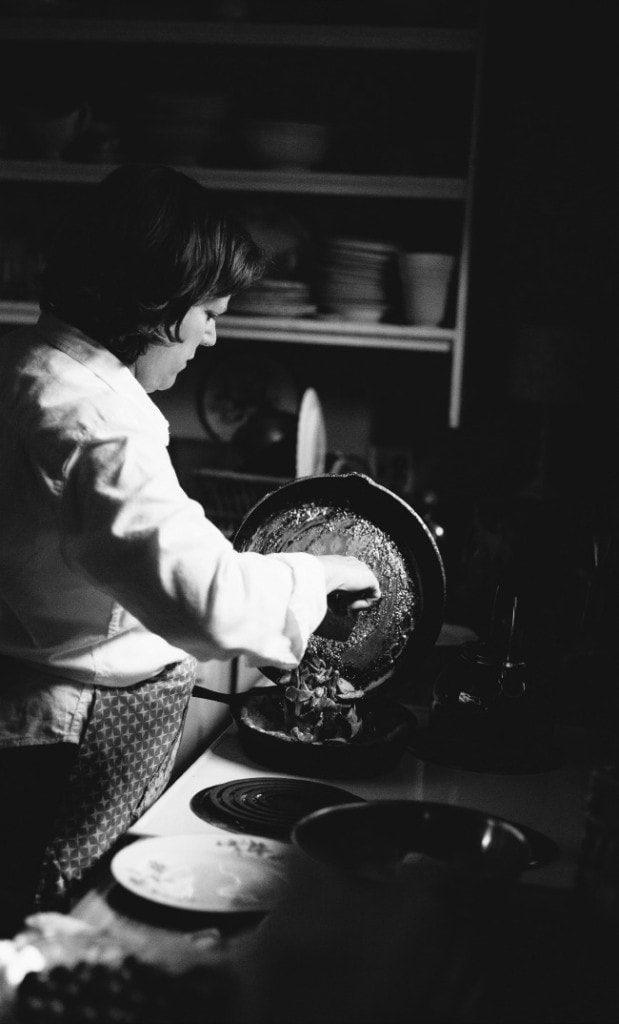
Melt the remaining butter (2 tablespoons) over high heat in another pan. Add the mushrooms with a pinch of salt, and cook until they begin to give off their juices. Cook the mushrooms until tender (about 5 more minutes) . Stir in the cream to the mushrooms and juices and allow to thicken slightly. Season them with pepper, and then stir in the thyme and parsley.

When the popover is finished cooking, remove from the oven and spoon the mushroom mixture into the center. Slice into wedges and serve.
chanterelle popover | the vanilla bean blog

12 Nov 01:10

Thee Geeky Paper Quilled Sculptures Are Amazing

by Amy Ratcliffe

quilling fett

Quilling is an art form that uses strips of paper that are coiled or rolled in various shapes to make a design. It probably takes an insane amount of patience to get it just right, and artist Alia Syed clearly has it. She’s used her skills to create some fantastically geeky paper quilled sculptures. The Boba Fett art pictured above happens to be my favorite but her paper creations also include Darth Vader, Iron Man, Batman, Master Chief, a Decepticon and more.

Check out more examples of her paper art after the break.

quilling batman

quilling halo

quilling iron man

quilling transformers

quilling vader

(Lustik via Neatorama)


06 Nov 23:54

Rebels Can Perfect Their Aim By Using These Target Posters

by Amy Ratcliffe

star wars shooting argets 1

We know Stormtroopers have terrible aim, but Rebels avoid that problem by practicing on these target prints. The designs by Sneaky Studios feature Darth Vader, a Stormtrooper holding Leia hostage, Boba Fett, and a rancor. Other than clearly marked target areas, the posters also have nice details that make them look official. You can spot the Rebel Alliance symbol on each target as well as details on each enemy. The rancor’s poster has good advice: “split second shoot or don’t shoot scenario.”

I want all of these for my knife board.

Check out Boba Fett and a rancor target posters after the break.

star wars shooting targets 2

star wars shooting targets 3

Product Page ($31.89 via IT)


31 Oct 03:31

McKayla not impressed 2004

by coach Rick

Watching old videos & Charlotte caught me doing the not impressed face… Again https://t.co/16e20aQ7i2

— McKayla Maroney (@McKaylaMaroney) October 27, 2013

(via Mashable)

30 Oct 04:04

Superhero in Training: Geek Workout Gear

by Lindz

When I was in school, I was pretty much convinced that I didn’t have an athletic bone in my body. I preferred the comfort of art club, marching band, and my video games over team sports. However, all that changed when I discovered weightlifting earlier this year.

I’ve finally found something that I not only love and makes me stronger, but that also makes me feel like a superhero in training. However, when it come to geek clothes to workout in, I’m sorely lacking.

Inspired by this Instagram photo from Her Universe where she’s rocking a Wonder Woman shirt, I was curious to see what options are out there for active geeks.

2408blk-w484h484z1-31824-training-to-be-batman il_570xN.453260650_8za92408blk-w484h484z1-31907-beast-mode-x-men

Activate Apparel

Activate Apparel creates tanks and tees with some great geeky slogans. All the options come in women’s sizes and in a variety of colors. Even better, most of them are on sale currently!

2408blk-w484h484z1-31824-training-to-be-batman

Training To Be Batman

2329atb-w484h484z1-31902-run-like-the-doctor-just-told-you-to

Run Like The Doctor Just Told You To

2329ind-w484h484z1-31845-train-like-youve-been-picked-for-the-triwizard-tournament

Triwizard Tournament

2329blk-w484h484z1-31851-workin-my-puff-into-tuff

Workin’ My Puff Into Tuff

2408atg-w484h484z1-31866-training-to-be-an-agent-of-shield

Agent of Shield

2408blk-w484h484z1-31907-beast-mode-x-men

Beast Mode (X-Men)

This Princess Runs

If running is more your speed, then take a look at This Princess Runs.

il_570xN.446008944_28kn

Wonder Woman Inspired Running Costume

il_570xN.471247690_16t2

Captain America Women’s Running Shirt

il_570xN.453260650_8za9

Wonder Woman Sports Bra

il_570xN.360336934_rvap

Batgirl Inspired Running Shirt

Under Armor

These were brought to my attention on our Facebook page, so I just had to include them! Under Armor offers some great geeky alternatives to help you stay dry during your workouts.

V5-1250469-090_HTF

Ombre Womnder Woman Semi-Fitted T-shirt

V5-1250464-001_HTF

Supergirl Fitted T-Shirt

V5-1250465-428_HTF

Batgirl Fitted T-shirt

Which is your favorite choice? Personally, I think I may pick up that Batman tank, because honestly, who doesn’t want to be Batman? Although, the Beast Mode tank makes me giggle to no end!

If you know of other companies that make geeky options for workout clothes, send them our way!

(All images obtained from their respective websites)

(Disclaimer: Set to Stunning is not responsible for the quality of merchandise or your satisfaction. We have no affiliation or connection to Activate Apparel, or This Princess Runs, and are not compensated for our recommendations or reviews.)


19 Oct 00:54

Calvin And Hobbes Creator Says There Won’t Be A Film Adaption Anytime Soon In Rare Interview

by Amy Ratcliffe

calvin and hobbes

Bill Watterson doesn’t give many interviews; however, Mental Floss managed to snag one with the creator of Calvin And Hobbes for their December issue. They’ve posted some of the interview online and have addressed one of the obvious questions: will Calvin and Hobbes ever be animated?

The familiar characters seem perfect for an on-screen adaptation and some have taken it upon themselves to animate them. But, Watterson points out that film is a different game. When Mental Floss specifically pointed out the competency of Pixar, Watterson replied:

The visual sophistication of Pixar blows me away, but I have zero interest in animating Calvin and Hobbes. If you’ve ever compared a film to a novel it’s based on, you know the novel gets bludgeoned. It’s inevitable, because different media have different strengths and needs, and when you make a movie, the movie’s needs get served. As a comic strip, Calvin and Hobbes works exactly the way I intended it to. There’s no upside for me in adapting it.

Selfishly, I’m bummed because I’d love to see the comic strip introduced to a new generation in that medium. They’ll probably find it in print anyway, but I think a movie would be a more direct route. You’ve got to respect Watterson’s wishes though, and I do admire him for sticking to his guns.

Be sure to go to Mental Floss to read more of the long interview excerpt.


12 Oct 04:39

traveler BTS

by zev hoover

here is a quick behind the scenes on my latest picture ‘traveler’. just a simple littlefolk, but here is a bit of what went into making it.

here is the picture I started with:

ITT_7506

I then took a bunch of extension pictures of the surrounding area:

Screen Shot 2013-10-11 at 4.56.22 PM

merged them all together:

Screen Shot 2013-10-11 at 4.39.45 PM

then I cropped and fuzzed the edges of all the pictures, and here is the background done!:

Screen Shot 2013-10-11 at 4.43.12 PM

now here is the picture of aliza I used:

Screen Shot 2013-10-11 at 5.01.31 PM

I cut out the background, and placed her into the composition, here is a close-up of with and without shadows:

Screen Shot 2013-10-11 at 4.45.12 PM

then I added the color correction:

Screen Shot 2013-10-11 at 4.51.57 PM

and thats it! the final picture (bigger on flickr):

Screen Shot 2013-10-11 at 5.13.38 PM

as I sad above, just a simple shot, but think it came out pretty well mainly owing the the incredible light and colors this time of year.

a lot more to come, but probably not very soon as what aliza and I are working on at the moment is by far our most ambitious and exciting project to date.  stay tuned!

zev

07 Oct 02:18

Nibble Cake Pan

by HolyCool

Nibble Cake PanNibble Cake PanNibble Cake Pan
Baked a cake that you want to taste without ruining the shape of it? The Nibble Cake Pan makes this possible by having a small cake holder for baking a sample of your cake. As soon as your yummy creation is done, pick out the small cake and give it a taste without ruining your actual cake. Simply brilliant! Made of carbon steel with silicone coating + Silicone mold for the small cake. $21.99

Buy it here

The post Nibble Cake Pan appeared first on HolyCool.net.

05 Oct 16:56

This Is The Best Picture Of Sir Ian McKellen And Sir Patrick Stewart Ever

by Geek Girl Diva

mckellen+stewart

This may be the most amazing picture of Sir Ian McKellen and Sir Patrick Stewart the world has ever seen.

We know the pair has been spending time in NYC rehearsing @TwoPlaysInRep
with Harold Pinter’s No Man’s Land and Samuel Beckett’s Waiting for Godot. During that time, they’ve been taking pictures of their New York adventures.

Then Sir Ian McKellen tweeted this picture.

Coney souvenir! #gogodididonyc @TwoPlaysInRep pic.twitter.com/1i6hjDzJbC

— Ian McKellen (@IanMcKellen) October 2, 2013

Homies forever, indeed.

I love these two. So, so much.

(via The Mary Sue)


16 Sep 19:28

A Brain is for Eating

by Jennifer von Glahn
Alisa.wray

omg sierra. awesome!

A Brain is for Eating by Dan and Amelia Jacobs

A Brain is for Eating by Dan and Amelia Jacobs

I think I’ve stressed before on here that I am terrified of zombies; I couldn’t pass this little beauty up when I found it. Originally a Kickstarter campaign written by Dan and Amelia Jacobs, the lovely book has all the organs we know and love and it even rhymes:

Though brains is our diet
Let’s waste not a sliver
Enjoy heart, spleen and lungs
Both kidneys and liver

I just love the delightful illustrations by Scott Brundage. Colorful and lighthearted, the children’s little gory faces are still adorable. The book can be pre-ordered at abrainisforeating.com!


16 Sep 05:12

Vodka With a Backbone

by Vanessa Ruiz

Johannes Schulz Spine Vodka (1)

Johannes Schulz Spine Vodka (4)

Johannes Schulz Spine Vodka (2)

Johannes Schulz Spine Vodka (3)

Johannes Schulz Spine Vodka (5)

Hamburg-based designer Johannes Schulz wanted to create a strong and trustworthy vodka with backbone—literally with backbone. The wide shouldered vodka bottle stands with a full spine and rib cage suspended in the clear glass bottle, a sign that the vodka has nothing to hide. Of course this is only a concept for now. Johannes designed it after graduating from an international communication design school in Hamburg.  His vision, “a real drink for real men.”

View more of Johannes’ design work at johannes-schulz.com.


[spotted by Liz]


15 Sep 05:09

WE NEED A DOCTOR.

by Dr. Zombie

NO TIME FOR ANYTHING. 

 
Emergency departments come in many different shapes and sizes. Small, large, quiet, busy, country, urban, blah blah blah. Some departments operate on a one big room type of strategy, where all patients are placed into the same unit, regardless of complaint. Emergency departments can also be broken up into different areas to better streamline patient care, such as directing patients with minor ailments to a fast track department, moderate complaints to an urgent care unit, and the sickest to the main department ("the Main"). 

I work in the latter. Sometimes its great, such as when you're working a fast track day after a few days in the Main - you know that although you will see many more patients, the acuity will be low, nobody will die, and the worst part of your day will be saying "no" to the guy that comes in telling you that he lost his Percocet and he only had his 90 pill prescription filled yesterday.  Another nice aspect of having the department split up into different units is that we have a large number of attending physicians that are on, at any given time. Two people will man the main, and there will be one doctor in urgent and one in the fast track unit. Four doctors - and we can all help each other out if the need arises. 

Or so I thought.  

The other day, I had a little emergency of my own. I came into the Main for a morning shift. After seeing a few patients, and drinking a couple of coffees, I had... well, I had to leave the department for a few minutes. If I was Al Bundy, I would have folded up a newspaper under my arm and announced to the room that I'd be gone for awhile.  

Anyway, I'm about a minute into my leisurely escapade, when an announcement blares over the PA system:

"We need a doctor in room 8. Can we please get a doctor in room 8!"

Knowing that my partner was also working in the department, another physician was in urgent care, and a third was in fast track, I thought that one of them would get to the room first. That annoucement is never made unless a doctor isn't immediately available. Nonetheless, I began the process of getting out of the bathroom - just in case. It was a good thing that I did, because the next thing that I heard was.

"Doctor in room 8, stat!"  

Shit. 

It took me all of twenty seconds to wash my hands, and dry them on my scrubs as I trotted to the department. Sure enough, I was the first doctor in the room. A young man had been brought in by paramedics as an overdose, and the nurses had already had him lined and were hooking him up to the monitor. This was the report:

"Yeah, we got a call from somebody that said that this guy was on the ground and wasn't responding. Nobody was there when we got there, so we had to kick the door in. He was surrounded by liquor bottles but we didn't find any drug paraphernalia. We gave him some naloxone and he woke up a little, but that's all we got."

Okie dokie. I start calling out orders while I examine the patient... he's drowsy and confused but attempting to follow commands. The nurses have more naloxone at the bedside, so he is given a small dose and doesn't improve at all. He's denying any drug use, and appears very uncomfortable and quite diaphoretic. When the blood pressure cuff read 230/120 mmHg, I know that this man may be a little sicker than just a simple overdose. He is rushed to CT, where he is unfortunately found to have a brain bleed. He begins decompensating, requires intubation, multiple infusions, neurosurgery consultation, and a trip to the Intensive Care Unit. 

I get back to my seat, feeling down for his family, and feeling as though I've lost my opportunity for a bowel movement. That puppy isn't coming back until I start to drive home and I'm stuck in traffic. I can picture myself now, sweating while I pull into the driveway and running into my home, ignoring the dog and making a beeline to the bathroom.  Great. 

The other doctor that I am working with is sitting at his computer, beside mine, charting on his own patients. After a minute, he looks over at me and we have this brief conversation: 

Other doctor (OD): What happened in 8?
Dr. Z: Oh. Young alcoholic came in obtunded, ended up having a brain bleed. Pretty shitty. 
OD: Yeah, that sucks. I'm really sorry that I wasn't able to get into the room before you, but I was in the middle of an LP
Dr. Z: Oh, no worries. I was in the middle of a BM. Yours was probably more important. But less satisfying. 

We laughed, and then we realized we still had more than 8 hours to go in our shift, and the laughter died. Like I do, inside, every day. 

15 Sep 04:40

When I break out of my surgical gown at the end of a case

13 Sep 15:11

Asiago Sandwich Focaccia

by Kate @ Our Best Bites

Cheesy Asiago Focaccia from Our Best BitesYou guys…fall is coming! Some of you might already be experiencing fall-ish weather, but it’s still, like, 104 degrees in the afternoon, so I’m just cranking up the air conditioner and burning fall candles and pretending. Living in a state of denial. It’s pretty much essential to my mental and emotional well-being.

One of my favorite things to do when the weather is not like the fiery breath of Mount Doom is bake bread. Rolls and French bread and breadsticks and whole wheat bread and Hunger Games rolls, but since the second half of last year just kind of fell into a black hole for me, I’ve got a lot of making up to do and one of my goals this year is to experiment with lots of different kinds of bread baking.

I’ve mentioned before that in college, I worked at a sandwich shop/bakery called Kneaders for a couple of years. Working there was, well, food service, which is always a delight. But the actual food itself was amazing. I think the last time I was in Utah, I ate there at least 3 times.

One of the things it’s known for is its cheesy focaccia bread that is a popular choice for their sandwiches. I couldn’t totally replicate it at home, but this is definitely a contender when the real deal is on the other side of the country.

If yeast breads give you anxiety (or if it’s been awhile since you’ve used yeast), check out our tips on how to work with yeast before you get started.

You’re going to need active dry yeast (I use bread machine yeast), warm water (my rule of thumb is a temperature that would be comfortable for a hot shower but not so hot that you would be uncomfortable washing your hair or face in), sugar, all-purpose white flour, salted butter, kosher salt, extra-virgin olive oil, and shredded Asiago cheese (or you could use one of those 3-cheese Italian blends that has Asiago, Romano, & Parmesan).

asiago focaccia from our best bites


Add 1 tablespoon of sugar

asiago focaccia from Our Best Bites

and 2 tablespoons of yeast to 2 cups of warm water.

asiago focaccia from Our Best Bites

Stir to combine.

asiago focaccia from Our Best Bites

Allow to stand for 10 minutes or until light and frothy.

asiago focaccia from Our Best Bites

Place 4 cups of the flour in the bowl of a stand mixer and whisk in the 2 teaspoons of salt. Mix in the melted butter. Add the yeast mixture

asiago focaccia from Our Best Bites

and mix until a sticky dough forms. Add the remaining flour, 1/2 cup at a time, until a smooth dough forms that pulls away from the sides of the bowl and forms a ball in the center. Knead on low speed for 5 minutes.

asiago focaccia from Our Best Bites

When done kneading, cover with a clean towel and allow to rise for 1 hour.

asiago focaccia from Our Best Bites

After one hour, lightly spray an 18×12″ pan with non-stick cooking spray. Punch down the dough

asiago focaccia from Our Best Bites

asiagofocaccia10

and press it into the pan (you can use a rolling pin to help make things smooth; start pressing in the middle and work your way out to the edges).

asiago focaccia from Our Best Bites


Cover and allow to rise for 45 minutes.

While the dough is rising, heat the oven to 375. When the dough is done rising, g

asiago focaccia from Our Best Bites

ently brush the surface of the dough with olive oil. Using your fingers, gently press the dough to form dimples. Sprinkle with asiago cheese

asiago focaccia from Our Best Bites

and bake for 25-30 minutes or until golden brown on top. If the cheese appears to be browning too fast, lightly lay a piece of aluminum foil over the bread while it’s baking.

To make into sandwich bread, cut the bread into 6″ squares. Slice each square in half lengthwise and lay the top layer cheese-side down. Place the sandwich fillings on the bottom half and then top with the cheesey top layer. Slice the sandwich in half at an angle, forming 2 triangular sandwiches.

If you just want to eat it (I totally get that), rip off pieces and dip in extra-virgin olive oil sprinkled with balsamic vinegar.

asiago focaccia from Our Best Bites

Makes 6 sandwich squares. Or a pan full of bread for eating (which would probably serve 12 people, unless one of them is pregnant or has a really awesome case of PMS.)

asiago focaccia from Our Best Bites

    Print This!    

Asiago Sandwich Focaccia
Recipe by Our Best Bites

Ingredients:

2 tablespoons active dry yeast (I use bread machine yeast)
2 cups warm water (about 105-115 F)
1 tablespoon white sugar
5-6 cups all-purpose flour
1/4 cup butter (1/2 stick), melted
2 teaspoons kosher salt
2-3 tablespoons extra-virgin olive oil
1 cup shredded Asiago cheese

Instructions:

In a large measuring cup or a small mixing bowl, combine the warm water, sugar, and yeast. Allow to stand for 10 minutes or until light and frothy.

Place 4 cups of the flour in the bowl of a stand mixer and whisk in the 2 teaspoons of salt. Mix in the melted butter. Add the yeast mixture and mix until a sticky dough forms. Add the remaining flour, 1/2 cup at a time, until a smooth dough forms that pulls away from the sides of the bowl and forms a ball in the center. Knead on low speed for 5 minutes.

When done kneading, cover with a clean towel and allow to rise for 1 hour. After one hour, lightly spray an 18×12″ pan with non-stick cooking spray. Punch down the dough and press it into the pan (you can use a rolling pin to help make things smooth; start pressing in the middle and work your way out to the edges). Cover and allow to rise for 45 minutes.

While the dough is rising, heat the oven to 375. When the dough is done rising, gently brush the surface of the dough with olive oil. Using your fingers, gently press the dough to form dimples. Sprinkle with asiago cheese and bake for 25-30 minutes or until golden brown on top. If the cheese appears to be browning too fast, lightly lay a piece of aluminum foil over the bread while it’s baking.

To make into sandwich bread, cut the bread into 6″ squares. Slice each square in half lengthwise and lay the top layer cheese-side down. Place the sandwich fillings on the bottom half and then top with the cheesey top layer. Slice the sandwich in half at an angle, forming 2 triangular sandwiches.

If you just want to eat it (I totally get that), rip off pieces and dip in extra-virgin olive oil sprinkled with balsamic vinegar.

Makes 6 sandwich squares. Or a pan full of bread for eating.


P.S. If you haven’t already, check out the $100 Kroger Gift Card Giveaway!

The post Asiago Sandwich Focaccia appeared first on Our Best Bites.

12 Sep 01:00

Pumpkin Spice Doughnut Muffins

by Tracy

I don’t care that it was 92 degrees outside yesterday, nor that the heat wave continues today – my oven has continued to operate in full force, and it’s been baking up all things pumpkin. Fortunately, after today the weather should resume with much cooler temperatures – which is fine by me!

While I was planning what to bake first, I thought about making pumpkin spice doughnuts with my doughnut pan – but since I sort of already did that (and they were pretty delicious), I thought back to those infamous doughnut muffins from a few years back, and decided to spruce them up with some pumpkin spice goodness.

Plus, since these are made in a regular muffin pan, you don’t need a special pan for making doughnuts – although you could certainly bake these in one if you wanted! I plan to experiment with a mini-muffin pan next time myself to make some “doughnut holes” for snacking. Enjoy!


...Read the rest of Pumpkin Spice Doughnut Muffins on Sugarcrafter.net


© Sugarcrafter, 2009-2013. | Permalink | 10 comments | Post tags: doughnut, muffins, pumpkin

11 Sep 16:01

When we try to visit with friends after 8 pm during rotations.

image

09 Sep 23:43

Brown Butter Baked Doughnuts

by joythebaker

IMG_4642

I’m really just thinking about the future.

This weekend I bought a doughnut baking pan.  I’d always thought baking doughnuts was for the birds… literally.  For some reason, lately I’ve been daydreaming about future doughnuts:  pumpkin with maple glaze, chocolate with peppermint frosting, and candy bar cupcakes for Halloween (because yes, I’m that crazy).

It’s just a bit too early to dive into Fall flavors, so I thought I’d break in ye olde doughnut baking pan with some browned butter.  Browned butter is forever in season, as are doughnuts.  We must have a win.

doughnuts

This is the most natural way to make doughnuts… on my desk with boards and napkins, a big camera, a tripod, and sprinkles everywhere.  Not true, but it’s real life anyway.

IMG_4468

It’s amazing how easy it is to make baked doughnuts.  Why didn’t I know this before now!?

All we need is flour, sugar, leavening, egg, buttermilk, brown butter and nutmeg.  The usual suspects.  We’ve been down this road before… but the road ends in Doughnut Town.  Yes, I just said that.

IMG_4474

I love recipes that come together with a bowl and large soon.

Would you judge me if I told you that this is also my cereal bowl?

IMG_4489

All in the dang bowl.  All of it.

IMG_4497

This doughnut batter is just about right.  It’s best not to overmix it.  Overmixing makes for a tough doughnut and that’s the last thing we want.

IMG_4509

You can use a piping bag to divide the dough between the doughnut molds.  I find that a small spoon does the trick.

Also… pastry bags are not fun to clean.  Think about it.

IMG_4510

This recipe makes enough batter to fill a six doughnut pan.  Two for you.  Four for lucky friends.

IMG_4519

The glaze comes together while the doughnuts cool.

Powdered sugar, cocoa powder, and enough milk and vanilla extract to make the glaze spreadable.

IMG_4550

I dipped the doughnuts top-side-up.  The tops are smooth which make them the perfect base for chocolate glaze (and sprinkles).

IMG_4598

This feels like such success!

IMG_4623

I’ll tell you now, I should have gotten a doughnut pan a loooong time ago!  These baked cake doughnuts are so delicious, so soft and tender, soooo chocolate glazed!  I’m smitten.

I also love that I don’t have to heat a pot of oil and bust out the candy thermometer.

I work in a very small kitchen, and I’m not a fan of unnecessary pans.  I thought doughnut pans were considered unnecessary, but I’m pretty sure I was wrong.

True story:  these baked doughnuts are six of the happiest things I’ve made this year.  There are sprinkles involved, too.  I mean….

Brown Butter Baked Doughnuts with Chocolate Glaze

adapted from Doughnuts

makes 6 baked doughnuts

Print this Recipe!

For the Doughnuts:

1 cup all-purpose flour

3/4 teaspoon baking powder

1/4 teaspoon baking soda

1/2 teaspoon salt

1/2 teaspoon freshly grated nutmeg

1/3 cup granulated sugar

3 tablespoons unsalted butter (but we’ll only use 2 tablespoons of browned butter for the recipe)

1 large egg

1/2 cup buttermilk

1 teaspoon pure vanilla extract

For the Chocolate Glaze:

1 1/2 cups powdered sugar

4 tablespoons unsweetened cocoa powder

pinch of salt

3 to 4 tablespoons milk

1 teaspoon pure vanilla extract

Place a rack in the upper third of the oven and preheat oven to 350 degrees F.  Lightly grease a doughnut pan and set aside.

In a medium bowl, whisk together flour, baking powder, baking soda, salt, nutmeg, and sugar.  Set aside.

In a small saucepan over medium-low heat, melt butter.  Butter will begin to crackle and pop as it melts.  That’s the water melting out of the butter.  Once the water has evaporated the butter will quiet down and begin to brown.  Keep an eye on it, it browns quickly.  The butter will begin to smell nutty.  Remove from heat and immediately transfer browned butter (brown bits and all) to a small bowl.

In a small bowl whisk together egg, buttermilk, and vanilla extract.  Measure out 2 tablespoons of browned butter and whisk into the wet ingredients.

Add the wet ingredients all at once to the dry ingredients.  Stir together until no flour bits remain and all of the ingredients are well combined.  Try not to overmix the batter.  That might create rubbery doughnuts.

Use a small spoon to dollop batter into the prepared pan.  Smooth out and fill each doughnut in the pan three-quarters full with batter.

Place in the oven and bake for 8 to 10 minutes.  Keep an eye on them and try not to over-bake them.  Remove from the oven and allow to cool in the pan before inverting onto a wire rack to cool completely.

While the doughnuts cool, make the glaze.

To make the glaze, in a medium bowl whisk together powdered sugar, cocoa powder, and salt.  I didn’t sift my powdered sugar.  I was able to whisk the lumps out.  If you have stubborn powdered sugar, sifting before is best.

Add 2 tablespoons of milk and vanilla extract.  Whisk to combine.  Add more milk as necessary to create a thick but still just pourable glaze.

Once the doughnuts are completely cool, dip top-side-down into the chocolate glaze.  Return to the wire rack and sprinkle with toppings.  Allow to set for about 30 minutes before stacking or serving. Doughnuts are best within 2 days.  

07 Sep 23:36

LA Bakery Tour- Part 2

by admin

Happy Friday! Remember last week when I told you about my trip to Joan’s on Third? Well that was just a part of my LA Bakery tour. There was a whole lot of other dessert tasting going on that day. Allow me to take you along on my dessert bliss. Looking back at these photos is pretty fun for me, because everything was so new. Erin is my dessert buddy; we bring each other desserts all the time. We were also celebrating a new chapter in her life. She recently resigned from her job and is now traveling Europe for the time being. Jealous!

Our first stop of the day was at Frosted Cupcakery , which was close to her house. Frosted offered a wide variety of flavors and some usual ones as well, like an orange cream cheese. My goal for the day was to try different flavors, so no chocolate, vanilla or red velvet. I opted for a Gluten-Free Mango with Pineapple Cream Cheese. This was probably exactly the opposite of what I would normally get, but I don’t usually see this type of flavor in a gluten-free option. I was pleasantly surprised by how moist the cupcake was, but I could not really taste the mango. The frosting was my favorite part. I was also totally in love with their little cupcake toppers!

Our next spot was a mission. We were on the hunt for a CRONUT! Erin had found a spot near the fashion district in LA called Semi-Sweet Bakery. We were on a race against the clock because the next batch was coming out of the oven at noon and we knew they sold out quick. We lucked out and got some of the last cronuts from the batch. A cronut is basically a deep fried croissant. It was slightly crispy on the outside and soft in the middle. It was my favorite treat of the day, especially because it was warm and fresh. It was worth the drive to find it!

We trecked through the fashion district to our next stop, Bottega Louie. This place was huge. They had a full restaurant (that was packed) attached to the bakery which featured three very large cases of decadent European desserts. The real show stopper for me were all the Macaroon displays. I am not a fan of Macaroons but I am in love with the wide variety of colors you can make them in. If you like Macaroons, this is a must visit. I opted to try a Beignet, which was quite different from what I expected.

On our way back across town, we stopped at the famous BabyCakes Bakery. BabyCakes offers a different type of dessert. Their desserts are all-natural, organic and allergen-free. They are wheat, gluten, vegan, dairy and soy free and they also do not used refined sugar wherever possible. I was really impressed by how many desserts they offered for the size of their store front. From cupcakes to donuts and cookie and brownies, they had it all covered. I went a little big here, because I have heard how good everything is and it is rare that you find allergen-free desserts. I got a coffee donut with an espresso glaze, a chocolate chip cookie, a princess brownie and a carrot cake cupcake. I was really impressed with the frosting and the carrot cake cupcake. It was filled with spices, and one of the most different carrot cake cupcakes I have ever had. It certainly was not lacking any flavor!

We hopped back in the car and drove to Joan’s on Third for lunch. You can read about it here, it was quite the eventful lunch! After lunch, we had one final stop at Milk LA for some ice cream. The line was out the door and only got worse behind us. Granted it was hot, it was pretty clear that this was the spot! I was really impressed by their offering of ice cream sandwiches, bakery goods and their ice cream. I couldn’t stomach an ice cream sundae or a milkshake, so I opted for an Ice Cream Cookie Sandwich. I got two chocolate chip cookies  with a blueberry crumble ice cream inside. We only took a few bites, but the ice cream was so amazing. I was particularly impressed with the crumble in the ice cream and I would have taken home a whole pint if I didn’t have a two hour drive home!

After the last stop, I had no more room in my stomach and was on a total sugar high. There is no doubt in my mind that I hadn’t even scratched the surface of what LA has to offer for bakeries. So my next trip will be focused in another area of LA with a whole new list of bakeries. I would love some suggestions! Happy weekend everyone!

07 Sep 00:05

steak and egg green chile hash

by bridget

steak egg chile hash 5

Where was this Hatch green chile mania back when I lived on the opposite side of the country from New Mexico? Back then, I had to have my mom send me boxes of fresh green chiles from Albuquerque. She’d pack newspaper in the boxes to help keep the chiles dry, poke holes in the box, and pay out the wazoo for overnight shipping. (Clearly I owe my mom a drink or two.) When they’d arrive, I’d broil them in batches until the skins turned black, then peel, chop, and bag them up. One time I forgot about wearing gloves, resulting in the worst burn I’ve ever had, not from temperature, but from spice.

green chile 2013

But that was years ago. Now I just head down to the local grocery store, buy 2 huge burlap sacks of fresh chiles, and bring it out to the guy roasting them in the parking lot. (Actually, I never do this; it’s become Dave’s errand.) Back at home, Dave and I put on latex gloves and start peeling, seeding, and stemming the chiles. At some point I’ll transition from peeling to chopping and bagging. The whole process takes about 4 hours, and at the end, we have a shelf in the freezer dedicated to our stash.

steak egg chile hash 1

I grew up in Albuquerque, and my family did this when I was a kid, as well. It’s only recently when anyone outside New Mexico could find Hatch green chiles. In fact, the “Hatch” title is a bit of a misnomer – Hatch is a place, not a variety of chile. Green chiles are grown in Hatch, but they’re also grown in the rest of the state. This year, Dave bought our green chiles from a farm in Artesia, so technically they’re not Hatch green chiles at all, but since people seem to recognize Hatch as a type of chile, we’ll stick with that title.

steak egg chile hash 2

Most New Mexicans don’t need a recipe for how to use their green chiles. They just add them to their favorite foods – there’s no Hatch chile macaroni and cheese, there’s just your favorite macaroni and cheese recipe with chiles stirred in. The same goes for cheeseburgers, pizza, grilled cheese sandwiches…are you seeing a pattern? Green chile is really good with carbs and cheese.

steak egg chile hash 3

In this case, we don’t need cheese, just steak, leftover if you have it. Because green chiles are also really good for breakfast – migas and huevos rancheros are my favorite two breakfasts, and now this is up there too. And fortunately, now that “Hatch” green chiles are making their way to almost all corners of the country, you can actually make this for yourself. That is a very good thing.

steak egg chile hash 4

Printer Friendly Recipe
Steak and Egg Green Chile Hash

Serves 4

Depending on how hot your chiles are, you might want to use less (or more) than this.

Photos show a half recipe made in a 9-inch skillet.

12 ounces Yukon gold potatoes, diced into ¼- to ½-inch cubes
2 tablespoons olive or canola oil
salt
1 large onion, diced
8 ounces cooked steak, diced
½ cup Hatch green chiles, roasted, peeled, and chopped
8 eggs
ground black pepper

1. In a medium microwave-safe bowl, combine the potatoes, 1 tablespoon olive oil, and ½ teaspoon salt. Cover and microwave on high for 1 minute. Stir, then return to the microwave for another minute. Stir again, and if the potatoes are not softened to their centers, repeat the microwaving until they are; larger cubes will need more time.

2. In a 12-inch nonstick skillet over medium heat, heat the remaining 1 tablespoon of oil until it flows like water when the pan is tilted. Add the onion and a pinch of salt and cook, stirring occasionally, until translucent. Add the potatoes and steak and cook, without stirring, until the bottom is lightly browned, about 2 minutes. Stir and cook for another 2 minutes without stirring. Stir in the green chiles. Taste for seasoning and add salt if necessary.

3. Using the back of a spoon, create 8 wells in the hash. Break one egg into each well; season with salt and pepper. Cover the pan and cook, without stirring, until the white is set, about 6 minutes. Serve immediately.

06 Sep 23:33

Historical Medical Text Transformed into Anatomical Art by Dr. Stephen Gaeta

by Vanessa Ruiz

Beat Poetry heart print by Dr Stephen Gaeta available at the Street Anatomy Store

San Francisco based physician-scientist and designer, Dr. Stephen Gaeta has just released a new typography lung print titled, Airway, in his series of popular science typography prints. Sold exclusively at the Street Anatomy Gallery Store, Airway features text from the 1628 treatise Exercitatio Anatomica de Motu Cordis et Sanguinis in Animalibus (An Anatomical Exercise on the Motion of the Heart and Blood in Living Beings) by William Harvey, in which he first postulates the circulation of blood from the right side of the heart through the lungs into the left side before perfusing the rest of the body. A truly significant realization in medical history turned turned into a beautiful design.

Unlike most PhD’s, Stephen didn’t just want to hang a diploma on his wall after completing his dissertation on cardiac arrhythmia. Instead he used the words of his dissertation to create an image of a heart as a “visually appealing testament to his work.” The diploma heart was redesigned using an 1809 monograph on cardiology (shown further down). He continues to create typographical anatomy and science images using text from classic scientific masterpieces. You can see and purchase the entire series exclusively at the Street Anatomy Gallery Store!

Airway print by Dr Stephen Gaeta available at the Street Anatomy Store

‘Airway’ by Dr Stephen Gaeta 18″ x 24″ on eco-friendly smooth gloss stock  $35

Airway print by Dr Stephen Gaeta available at the Street Anatomy Store

Airway print by Dr Stephen Gaeta available at the Street Anatomy Store

Airway print by Dr Stephen Gaeta available at the Street Anatomy Store


Beat Poetry now available as an 18″ x 24″ print

Beat Poetry heart print by Dr Stephen Gaeta available at the Street Anatomy Store

‘Beat Poetry ‘ by Dr Stephen Gaeta 18″ x 24″ on eco-friendly smooth gloss stock $35

Beat Poetry heart print by Dr Stephen Gaeta available at the Street Anatomy Store

Beat Poetry heart print by Dr Stephen Gaeta available at the Street Anatomy Store

View more anatomical art at the Street Anatomy Gallery Store!


06 Sep 21:31

Owlet smart sock

Owlet smart sock transmits a child's heart rate, oxygen levels, skin temperature, sleep quality and..(Read...)

05 Sep 22:21

Petco Has a Star Wars Section Now

by Geek Girl Diva

yoda+toy

Petco has selling Star Wars pet toys and accessories so you can have the nerdiest pets on the planet. From a Princess Leia doggie t-shirt to a Darth Vader cat teaser, they’ve got you covered.

It’s really adorable. I want some and I don’t even have a pet!

Grab your pet, take a few and look at the pictures after the break. I’m curious to see what they think.

chewbacca+hoodie

chewbacca+toy

leia+cat+hat

leia+dog+t-shirt

vader+cat+teaser

star+wars+cat+toys

star-wars-pet-toys-5

star-wars-pet-toys-6

You can check out more Star Wars pet stuff at the Petco site.

(via Incredible Things)


04 Sep 16:07

berry tart with mascarpone cream

by bridget

mascapone fruit tart 4

In late August, I always start to get a little bit panicked about the end of summer. This, despite the long six months of summer we get in southern New Mexico and despite the months of temperatures reaching nearly 100 degrees. This, despite the breathtaking beauty of upstate New York’s fall, despite the pumpkins and apples, football and fall fairs that I loved when I lived there.

mascapone fruit tart 2

But for me, fall can’t beat summer. I love being not just warm, but hot. The 4th of July is my favorite holiday. Homegrown tomatoes are my favorite food. I love wearing skirts and hate wearing pants.

mascapone fruit tart 1

I love peaches and zucchini and berries. I already made Dave’s favorite pie once this summer, not that it isn’t good enough to have more often. But I was hosting an Italian-ish dinner party so wanted an Italian-ish dessert. This was perfect. A sweet cookie crust, a simple mascarpone-based creamy layer, lots of fresh berries, and none of that gelatinous shellack that fruit tarts often include. The custard layer was similar to pastry cream, but it required just a few minutes of mixing instead of egg-separating, heating, tempering, whisking, straining, and cooling.

mascapone fruit tart 3

It’s been a long, hot summer here. My tomato plants haven’t done well, although I’m grateful for the occasional fruit they do give. But I’m as ready as I ever am to move on to fall. I’m thinking about braising and roasting. But I can’t quite shake that tug of dread to say goodbye to my favorite season, and fresh berries are just part of the reason.

mascapone fruit tart 5

Printer Friendly Recipe
Berry Tart with Mascarpone Cream
(crust rewritten from Dorie Greenspan’s Baking: From my Home to Yours; filling adapted from Gourmet via epicurious)

Crust:
1½ cups all-purpose flour
½ cup (2 ounces) confectioners’ sugar
¼ teaspoon salt
1 stick plus 1 tablespoon (9 tablespoons) very cold (or frozen) unsalted butter, cut into small pieces
1 large egg yolk

Filling:
1 cup (8 ounces) mascarpone cheese
⅓ cup well-chilled heavy cream
¼ cup (1.75 ounces) sugar
1½ cups raspberries
1½ cups blueberries
1½ cups blackberries
2 tablespoons red currant jam or raspberry jelly
2 tablespoons dark berry liqueur such as blueberry, blackberry, or cassis or port

1. For the crust: Put the flour, confectioners’ sugar, and salt in a food processor and pulse to combine. Scatter the butter over the dry ingredients and pulse until the butter is coarsely cut, with some pieces the size of oatmeal flakes and some the size of peas. Stir the yolk with a fork and add it a little at a time, pulsing after each addition. Process in long pulses until the dough forms clumps and curds; the sound of the machine working will change. Scrape the sides of the processor bowl to incorporate any unmixed dry ingredients.

2. Grease a 9-inch fluted tart pan with a removable bottom. Press the dough evenly over the bottom and up the sides of the pan. Freeze the crust for at least 30 minutes before baking.

3. Center a rack in the oven and heat the oven to 375 degrees.

4. Spray a piece of aluminum foil with nonstick spray and fit the foil, oiled side down, tightly against the crust. Put the tart pan on a baking sheet and bake the crust for 25 minutes. Carefully remove the foil. If the crust has puffed, press it down gently with the back of a spoon. Bake for another 8 minutes or so, or until it is firm and golden brown. Transfer the tart pan to a rack and cool the crust to room temperature before filling.

5. For the filling: In a bowl with a whisk or an electric mixer, beat together the mascarpone, cream, and sugar until the mixture holds stiff peaks. Spoon the mixture into the shell, spreading it evenly.

6. In a large bowl, combine the raspberries, blueberries, and blackberries. In a small saucepan, simmer the jam and port, stirring, until reduced to about 3 tablespoons; pour over the berries. With a rubber spatula, gently stir the berries to coat evenly. Mound the berries decoratively on the mascarpone cream. The tart may be assembled 2 hours ahead and chilled; bring to room temperature and remove the sides of the pan before serving.

04 Sep 16:06

Modern Waterproof Dog Beds from Cloud7

by Capree Kimball

Modern Waterproof Dog Beds from Cloud7 in beds furniture

We’re big-time obsessed with German design studio Cloud7′s modern dog wares, particularly their high-quality beds — which is why I was so stoked to see that their signature “Sleepy” bed style is now available in a waterproof version!

Modern Waterproof Dog Beds from Cloud7 in beds furniture

Modern Waterproof Dog Beds from Cloud7 in beds furniture


Share This: Twitter | Facebook | Don't forget that you can follow Dog Milk on Twitter and Facebook.
© 2013 Dog Milk | Posted by capree in Beds + Furniture | Permalink | No comments
28 Aug 00:56

Dog Feeds Baby Goats With Special Milk Pants

Dog feeds baby goats with special milk pants...(Read...)

28 Aug 00:52

When my family asks how I'm doing

26 Aug 21:25

Espresso Cheesecake Brownies

by Annie

Do you have a food that you crave constantly, sort of as your baseline?  For me, that food is brownies.  About once a day or so I think, “I should bake brownies!”  In reality I actually make them about two or three times per year since, for me, they come packaged with a total loss of self control.  Recently though, I was in need of a little baking therapy.  Brownies were an obvious starting point but rather than just make my favorite classic version, I was in the mood for something with a bit of flair.  In this case, the flair came in a layer of espresso flavored cheesecake and a sweet, rich sour cream topping.

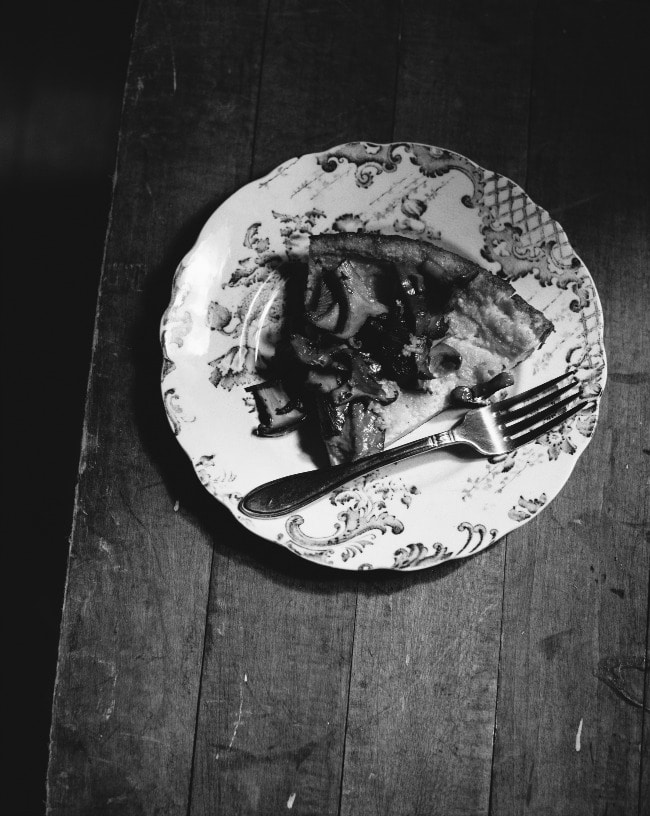
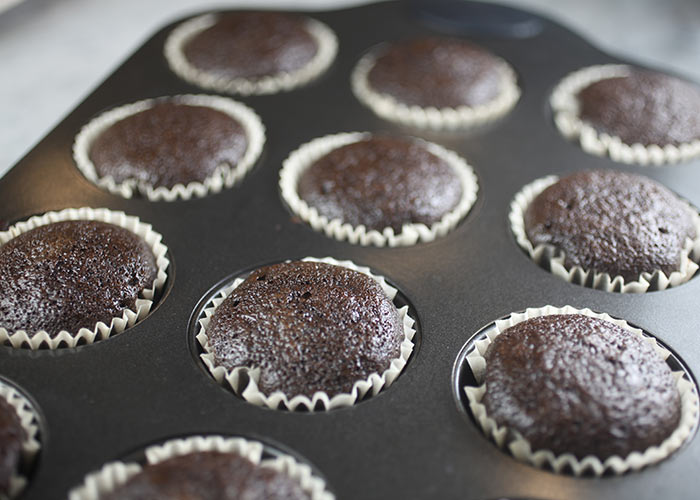
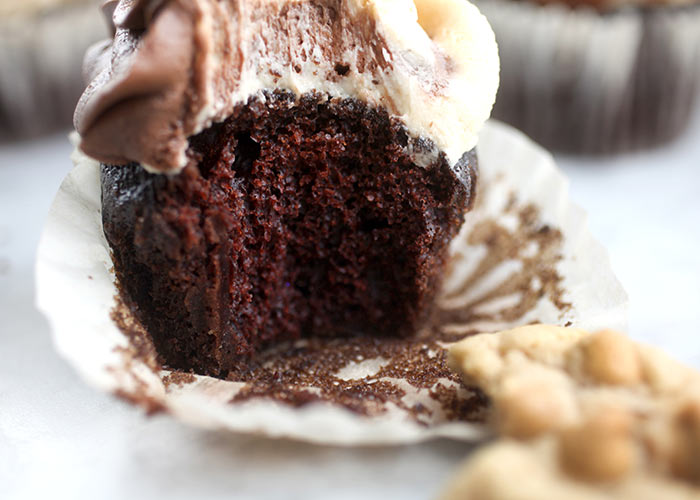
Part brownie, part cheesecake (my other favorite dessert) plus coffee thrown into the mix?  Heaven, I tell you.


Recipe: Espresso Cheesecake Brownies

Yield: 16 servings


Ingredients:

For the brownie layer:
½ cup all-purpose flour
¼ tsp. baking powder
Pinch of salt
5 tbsp. unsalted butter, cut into 5 pieces
4 oz. bittersweet chocolate, coarsely chopped
1/3 cup granulated sugar
2 large eggs
½ tsp. vanilla extract

For the cheesecake layer: 
1½ tsp. espresso powder
1 tbsp. very hot tap water
8 oz. cream cheese, at room temperature
2/3 cup granulated sugar
½ tsp. vanilla extract
2 large eggs
¼ cup sour cream
1 tbsp. all-purpose flour

For the sour cream topping: 
1¼ cup sour cream
¾ cup confectioners’ sugar, sifted


Directions:

Preheat the oven to 350˚ F.  Line an 8 x 8-inch baking pan with foil.  Lightly grease the foil.  In a small bowl, combine the flour, baking powder and salt.  Whisk to blend, and set aside.  Combine the butter and chocolate in a large heatproof bowl.  Microwave in short intervals (about 20-30 seconds), stirring in between, until the mixture is just fully melted and smooth.  Add the sugar to the chocolate mixture and whisk to blend.  Whisk in the eggs and vanilla extract.  Blend in the flour mixture just until incorporated and no streaks remain.  Spread the batter into the prepared pan in an even layer and set aside.

To make the cheesecake layer, combine the espresso powder and water in a small bowl and whisk until the powder is dissolved.  In the bowl of an electric mixer, beat the cream cheese on medium-high speed until light, about 2 minutes.  Gradually blend in the sugar and continue to beat until light and fluffy, about 2 minutes more.  Blend in the vanilla extract, and then the eggs one at a time, scraping down the bowl after each addition.  Add the dissolved espresso mixture to the bowl and blend in.  Beat in the sour cream and then the flour.  Pour the cheesecake batter over the brownie layer and smooth into an even layer.

Bake about 30-35 minutes, just until the center of the cheesecake layer is set and doesn’t shake much when lightly jiggled.  Remove the pan to a wire cooling rack.  Once cooled to room temperature, cover and chill at least 2 hours in the refrigerator.

To make the topping, combine the sour cream and confectioners’ sugar in a small saucepan.  Warm over low heat, stirring occasionally, just until the sugar is dissolved.  Spread the mixture over the cheesecake portion of the brownies and smooth into an even layer.  Chill once more, at least 1 hour before slicing and serving.


Source

slightly adapted from Baking: From my Home to Yours by Dorie Greenspan via Smells Like Home

21 Aug 02:09

Chocolate Peanut Butter Cupcakes

by Bakerella

Chocolate Peanut Butter Cupcakes

It’s been weird being in moving limbo the last few weeks. I definitely don’t like having all my pans packed up. And all my stuff boxed away. But I’m almost unpacked. At least the boxes labeled pantry are in the pantry. That’s pretty close. I have a long way to go on getting that all organized.

Since I’ve been blogging, I’ve been storing things anywhere I could find a spot and now I’ll finally have a place where I can see my supplies in a central location. And I’m way excited. It’s been kind of like Christmas unpacking things already and finding five years worth of stuff I didn’t even remember I had. Out of sight is definitely out of mind. But not any more.

Oven

The first thing I unpacked though were my baking pans. A good place to start. Especially since I have a new oven to work. One 18 years newer than my last one. Yikes and Yay! I was actually kind of nervous … like meeting someone new and hoping you’ll be good friends. But you have to hang out together for a while first to find out.

Ingredients

So, I decided to break the ice with a cupcake recipe I make all the time. I thought it would be a good way to see how it compares to my old oven in terms of baking times and such.

Baking

So far so good.

Chocolate Cupcakes

Really good!

Peanut Butter

And I made chocolate and peanut butter frostings to go with it.

Creamy

And whipped up some peanut butter cookies to go on top of it.

Chocolate Peanut Butter Cupcakes

But, that was really just an excuse for me to try out some basic cookies in the oven, too.

So I stuck them on top of the cupcakes.

Peanut Butter Chips

I rolled chilled cookie dough into small balls and then rolled balls with peanut butter chips in my hand, instead of stirring them into the dough to make sure each little cookie was well covered in chips.

Frostings

Oh… and the frosting. Peanut butter and chocolate. I’m easy.

Place a decorator bag fitted with a 1M tip into a large glass and spoon even amounts of chocolate and peanut butter frosting on each side.

Frosting

Fill the bag, twist off the end and squeeze evenly until the frostings fill the tip.

IMG_0346

Then pipe pretty swirls.

Chocolate Peanut Butter Cupcake

And put a cookie in it.

Chocolate Peanut Butter Cupcakes

And then take it out and eat the cookie.

Chocolate Peanut Butter Cupcakes

And then eat the cupcake.

Cupcake Wrappers

And then keep eating. I mean share with friends.

Chocolate Peanut Butter Cupcakes

Servings: 18 cupcakes

Ingredients

  • CHOCOLATE CUPCAKES
  • 1 1/2 cups all-purpose flour
  • 2/3 cup cocoa
  • 1 1/3 cups sugar
  • 1 teaspoon baking soda
  • 1/2 teaspoon baking powder
  • 1/2 teaspoon salt
  • 2 eggs
  • 1/3 cup oil
  • 1 teaspoon vanilla
  • 2/3 cup milk
  • 2/3 cup hot water
  • PEANUT BUTTER COOKIES
  • 1/2 cup butter, room temperature
  • 1/2 cup sugar
  • 1/2 cup packed brown sugar
  • 2/3 cup creamy peanut butter
  • 1 egg
  • 1 teaspoon vanilla
  • 1 1/4 cup all-purpose flour
  • 1/2 teaspoon baking soda
  • 1/2 teaspoon baking powder
  • 1/4 teaspoon salt
  • 8 oz. peanut butter chips
  • FROSTINGS
  • 1 cup butter, room temperature
  • 2/3 cup creamy peanut butter
  • 4 cups confectioners sugar
  • 1/4 cup cocoa
  • 2 Tablespoons milk

Instructions

  1. FOR CUPCAKES: Preheat oven to 350 degrees.
  2. Fill cupcake tray with cupcake liners.
  3. In a large bowl, mix dry ingredients together with a wire whisk. Add eggs, oil, vanilla and milk and mix until combined. Add hot water and mix. It will be very liquid.
  4. Fill cupcake liners about 2/3 full. Pour into liner with a large spouted measuring cup for ease.
  5. Bake for 15 minutes or until done. Cool and make the cookies.
  6. FOR COOKIES: Note: You can make these ahead of time.
  7. Beat butter and sugars for 3-4 minutes until creamy. Add the peanut butter, egg and vanilla and mix until combined.
  8. In another bowl, stir the dry ingredients with a wire whisk and then add to the peanut butter mixture and stir until combined.
  9. Wrap dough in plastic wrap and refrigerate for a few hours or overnight.
  10. Preheat oven to 350 degrees. Roll dough into small balls about an inch or so in diameter. Chill again if necessary and then roll in peanut butter chips.
  11. Place on a parchment lined baking sheet and bake for 10-14 minutes. Cool.
  12. FROSTINGS: For chocolate frosting, beat 1/2 cup butter until creamy. Add 1 teaspoon vanilla and mix. Slowly add 2 cups confectioner's sugar and cocoa and mix until combined. Add 1 Tablespoon milk and mix until creamy and smooth. For peanut butter frosting, beat 1/2 cup butter and 2/3 cup peanut butter until creamy. Add 1 teaspoon vanilla and mix. Slowly add 2 cups confectioners sugar and mix until combined. Add 1 Tablespoon milk and mix until creamy and smooth. Fill a decorator bag fitted with a 1M tip with chocolate frosting on one half and peanut butter frosting on the other. Squeeze bag to force frosting into the tip and swirl frosting on cupcakes. Top with a little peanut butter cookie.
Source: Bakerella.com

Chocolate Peanut Butter Cupcakes

Enjoy!

21 Aug 01:54

Whenever patients ask me to explain something,

20 Aug 00:55

Ancient device

by Fizzy
My husband was reading my toddler a Berenstein Bears book the other day. I heard the following exchange:

Toddler: "Doggy!"

Husband: "Right, that's a doggy."

Toddler: "Mama."

Husband: "Right, that's the mama."

Toddler: "Door."

Husband: "Right, that's the door."

Toddler: "What that?"

She was pointing to something that looked like this:


Husband: "That's a phone. That's what they used to look like."

---

Like the cartoons on this blog? Purchase the cartoons from this blog in handy book form from Lulu or from Amazon