Amazon has suspended thousands of third-party sellers for price gouging during the COVID-19 pandemic, but sellers have found a loophole to avoid detection when raising prices: labeling their products as "collectibles," even if there's no conceivable way they could be. The Verge reports: Take this Bowflex dumbbell set, which my colleague Casey Newton encountered while browsing Amazon. Before it sold out in mid-March, Amazon had been selling the weights for $279. This week, the only available weights were from 20 sellers who were offering the dumbbells for between $899 and $1,275 (with free shipping). All had listed the item as "collectible." The automated systems that detect price gouging appear not to monitor products if their condition is listed as "collectible" rather than "new."
[...]
The collectible loophole has existed for some time, sellers say, but before the pandemic, it was rarely used, because sellers only ran into price ceilings when an item was unusually popular and in short supply [...]. But with COVID-19, entire product categories -- cleaning supplies, webcams, home gym equipment -- saw unprecedented demand. Supply-chain disruptions meant some items were already running low, and safety concerns in Amazon's warehouses meant they took longer to restock and ship out. Amazon, and then sellers with normally priced goods, quickly sold out. The remaining sellers raised their prices, sometimes deliberately and sometimes using automated repricing software, and started running into price ceilings. As Amazon's marketplace came under strain, mechanisms that typically work in the background were brought to the fore.
About six years ago, a colleague I’ll call Tom, because that’s his name, forwarded me a link to the ‘WASD CODE’; a keyboard focused on the needs of programmers, designed with the help of Stack Overflow’s Jeff Atwood.
I had no idea at the time that there were people actually dedicating themselves to creating keyboards beyond the stock fare shipping with computers. As I read and re-read the blurb, I was smitten.
The keyboard that started an obsession: The WASD CODE. (Large preview)
So it came to be that shortly after, I spent $220 on my first mechanical keyboard. I imagine that many of you reading this, who have never had a mechanical keyboard, will wonder if I was of sound mind. For those that have, they likely understand entirely.
For some, mechanical keyboards elicit the same nuanced fanaticism as typography. Let me qualify that analogy.
For those who get drawn into typography, it can become an obsession. The need to choose just the right font for a heading. The ability to spend hours pouring over the descenders of various ‘g’ glyphs. The endless marveling at the merits of Helvetica.
Others, meanwhile, would be happy to just use Lobster and move on.
Just as someone versed in typography can explain to you why a font makes you feel a certain way or has a particular effect on the reader, a mechanical keyboard proponent can extol the virtues of their keyboard, their choice of switches, their particular layout and materials chosen. Take a look at the breadth of variety on offer.
I can’t tell you what’s so bad about using Lobster, but I’m going to take a shot at explaining why you might want to try a mechanical keyboard and feel a greater physical connection to the primary tool of your trade.
Our Primary Input Mechanism
For decades, keyboards have been the primary mechanisms by which we interact with our computers.
If you spend 8 hours a day working, and maybe half of that typing, for a 5-day week and 48-week working year, that’s 960 hours of typing on your keyboard every year! Despite that sobering figure, most of us just use whatever keyboard is shipped with the computer.
Look down at the grubby, unloved implement beneath your fingers. When was the last time you actually sharpened that sword? How often do you use each of the keys you press? Are the most used keys within easy reach? What about the tactility? How do the keys themselves feel? Is the travel of the keys helpful? Do you wish the travel was greater? Do you wish it was less? What about the sound? Does it annoy you? Does it annoy those around you? Do you have helpful shortcuts to adjust your volume? Skip a music track? Perform an oft-used set of keystrokes? Or what about an easy way to toggle between typing on your computer and typing into your phone?
Mechanical keyboards exist to answer as many of these questions as possible.
What Is A Mechanical Keyboard?
Generally speaking, it’s possible to define a keyboard as mechanical if it uses mechanical switches for each key.
Firstly, let’s consider the everyday alternative to mechanical switches. Typical, inexpensive, everyday computer keyboards often employ rubber dome switches. As the name implies, these are constructed with a sheet of rubber domes above electrical switches. You press down on a key and the dome collapses causing the key to be switched. You lift up your finger a little and the rubber dome plops back into shape and the key is no longer pressed. Rubber dome switches are popular because they are so cheap compared to manufacture. However, they are certainly not the best way of solving the problem of registering a keypress.
Mechanical switches offer a range of tactility unavailable with rubber dome keyboards.
Mechanical keyboards are enjoying a renaissance, which although has been going on for a number of years, is really starting to gain more widespread adoption since being embraced by the gaming community.
Now, before we get much further into this, I feel it’s my duty to be quite candid. I often read people justifying mechanical keyboards due to the fact that they ‘last longer’. Whilst this is possibly true, I don’t ever remember wearing a keyboard out. And you could probably buy a lifetime of budget keyboards and still have change left compared to the costs of a mechanical keyboard.
Buying a mechanical keyboard is not an exercise in sound economics. It’s about finding the best possible version, for you, of a tool you use almost every day. A keyboard that has just the right layout, feel, and aesthetics. Once you have your keyboard, I like to think you will rise every morning chanting the mechanical keyboard owners Creed:
“This is my keyboard. There are many like it, but this one is mine.
My keyboard is my best friend. It is my life. I must master it as I must master my life.
Without me, my keyboard is useless. Without my keyboard, I am useless. I must type my keyboard true. I must type faster than my colleague who is trying to better me. I must program things before he does. I will...”
The sheer wealth of permutations when it comes to mechanical keyboards can be mind-boggling. In this article, we will concentrate on the broadest strokes. The considerations we feel are most important to understand if you entertain purchasing a mechanical keyboard.
Arguably the single most obvious distinguishing feature of a mechanical keyboard compared to a ‘normal’ keyboard is the switches.
There are a plethora of different mechanical switches for keyboards. They can be most easily categorized by the physical shape and stem mounting. The latter is the protruding mount that the keycaps attach to. The switch ‘type’ is the defining characteristic of the switch itself — typically categorized as ‘linear’, ‘clicky’ or ‘tactile’.
Physical Switch Differences
Far and away, the most common physical type of switch is ‘Cherry MX’ as well as the now numerous Cherry MX clones.
Historically, due to patents, the manufacturer, Cherry was the only brand able to make switches with their mount system. Now their patent has expired, there are a number of other manufacturers offering comparable and compatible switches for less.
Nowadays, it isn’t necessary to get hung up on getting a board with genuine Cherry brand switches. I’d argue that there are brands being far more progressive and innovative in switch development these days. Kailh is a Chinese brand that not just makes comparable switches for MX mounts with color designations (such as ‘Blue’, ‘Green’, ‘Red’, and so on) to approximate the equivalent Cherry switch (we’ll cover color designations for switches in a moment), but they also produce ‘box’ switches which are IP56 dust and water-resistant, as well as ‘speed’ switches aimed at gamers. These have shorter travel resulting in quicker switch actuation. Hence, the ‘Speed’ moniker.
Kailh produce comparable and often more interesting switches than the original Cherry models. (Large preview)
There are also many other fine key switch types that bear no relation to Cherry — Topre being a personal favorite. Topre switches are designed and built in Japan and give a marvelous tactile feel that some swear by. However, they are expensive and subsequently less common.
If you want a decent idea of the most popular options, take a look at the list available on the Keyswitch guide at the Mechanical Keyboards store.
Key switches — especially Cherry MX and variants — are typically labeled by color; for example, ‘Blue’ or ‘Brown’. Different colors are attributed to different switch types; most typically, a switch that is either linear, tactile, or clicky.
Whilst trying to describe the way a key switch feels in words might seem like an exercise in futility, I’m going to attempt just that regardless.
A linear switch is just like a linear animation, there are no curves, you press down and the resistance feels constant all the way down until the switch ‘bottoms out’.
A tactile switch is more like an easeInQuart animation curve; there is a sort of bump at the top you have to get over and then it moves down like a linear switch until bottoming out. This little bit of tactile resistance at the top of the keypress is what earns them the label of ‘tactile’.
A clicky switch is a bit more simple to communicate. It has a similar kind of bump at the top like a tactile switch but makes an audible click on actuation (or both directions in the case of Kailh Box Whites, for example).
For each switch type, there are differing key switch ‘weights’; that is, how much force is required to make the switch do its thing. Key switch actuation force is often measured in cN units (centinewton). Again, colors are arbitrarily assigned. So, for instance, a Kailh Box Red is a soft linear switch whilst a Kailh Box Black is also a linear but heavier. There’s no real sense to the color designations, simply that Cherry made them originally and now others follow suit.
Now, in a geeky topic, the subject of key switches can take on proportions of geekiness even I get uncomfortable with.
So, in the interests of trying to keep you with me, the TL;DR of keyboard switch types is this: If you are looking for a mechanical keyboard (perhaps your first one), opt for a board with Cherry MX, or Cherry MX compatible switches such as those made by Kailh. Choose a switch type which, at least on paper, sounds appealing. Buy it, and see how you get on.
To offer just a little more broad guidance:
Like the idea of linear switches? Go for Cherry MX or compatible red switches.
If a tactile switch seems like it would be your bag, opt for MX brown or compatible switches. If you can find a good offer on a Topre-based board a Happy Hacking or Realforce, that would be a solid choice, too.
Does a clicky switch appeal? MX Blue or compatible switches for you.
I’m making such broad recommendations because ultimately it’s all preference anyway. However, if you do go for switches with an MX mounting stem, then you give yourself the greatest number of options when it comes to keycaps.
Despite telling you it is all preference, we thought it might be useful to try and describe the differences in the mechanical keyboards switches from first-hand experience.
Subjective Switch Feel
We tried a number of different Kailh switches in a 87-Key TKL keyboard for comparison. We also tried a WASD CODE v2 with MX Blue switches, and a WASD CODE v3 board with Zealio switches. In addition, we also tried the Happy Hacking Professional Hybrid with Topre switches.
Kailh Box Whites have a little click as the key travels down and again on the way back up, a Cherry Blue MX switch just clicks on the way down. Both are pleasant and give satisfying feedback. It’s easy to get addicted to the thick-thock-thick-thock rhythm as you type with clicky switches! However, a loud clicky keyboard is perhaps not the best choice if you work in a shared office space. Unless, that is, you want to exact ‘death by a thousand clicks’ revenge on Bob in accounts for his ridiculous booming voice!
In terms of tactile switches, the Kailh Speed Copper feels like they have a little more resistance than a standard Kailh Brown. The Kailh Speed Coppers felt very similar to the Zealio switches in the WASD CODE board. It would take a real enthusiast to be able to discern any difference in a blind test. If you were to ask me today which switch to opt for as the best ‘all rounder’ I would suggest the Kaihl Brown or Speed Copper, or the Zealio switches. All felt great for typing/coding with the tactile feel providing a nice compromise between feel and volume.
The Kailh Speed Silver switches have similar weight/resistance to the Kailh browns but as they are linear, the resistance is felt all the way down the keypress. The sound is slightly higher-pitched in the Silver than the Browns, and the Copper Kaihls are a deeper sound still.
The Topre switches are different again. They provide a tactile feel that is simply impossible to replicate in a Cherry style keyboard. There is a consistency and solidity to the keys which every keyboard enthusiast should try at some point.
I must emphasize once again that these are very fine margins. Any of these switches are going to provide a level of feedback far exceeding that of a standard ‘off the shelf’ keyboard.
Keyboard Layouts And Sizes
With the touchy-feely issue of switches dealt with, let’s move on to the next wall of acronyms and abbreviations. These deal with the keyboard layout.
Keyboard Sizes
A keyboard layout is most typically defined first and foremost by its size. Going smallest to largest:
“40%” diminutive layout where many keys are doubled up, requiring an additional key to be pressed alongside the desired one. Unless you have a specific reason to have one, I couldn’t recommend this layout for practical purposes;
“60%” typically a normal key layout minus a dedicated arrow key cluster, home/end/page up and page down or function keys;
“65%” compact like a 60% but usually incorporating at least an arrow cluster;
“75%” usually brings in a distinct function row;
“TKL” the ‘Ten Key-Less’ is a more conventional layout, think of a ‘normal’ keyboard minus the number pad section;
Full size; the typical keyboard layout complete with function keys, number pad, and arrow cluster.
For a good feel of the many layout variations, take a look at this guide on Drop.
Note: There are popular layouts that are sub-distinctions of these sizes. For example, the Happy Hacking Keyboard layout, or ‘HHKB’ as it is often referred to, is a layout over 20 years old and originally designed for UNIX users. It remains incredibly popular because it was designed around the philosophy of keeping hands around the home row, something that perpetuates for Vim users today.
The legendary HHKB keyboard has it’s own, oft imitated, 60% layout. (Large preview)
Ergonomic Keyboards
Some people stumble into mechanical keyboards in the search for a more ergonomic keyboard. One area where mechanical keyboards can honestly claim some bragging rights is in the variety of ergonomic boards and layouts on offer.
For example, consider the Ergodox EZ. This keyboard is completely split (albeit apart from a wire connecting the two halves) and enjoys the increasingly popular feature of a ‘hotswap’ printed circuit board. This means that you can easily swap out one lot of mechanical switches for another depending upon your preference. That’s certainly a good thing.
It’s common to start with mechanical keyboards favoring one switch type and then as time goes on you grow to prefer another. This way, you don’t have to buy a whole new keyboard; just replace the switches. The Ergodox EZ is also entirely programmable meaning you can adjust any key to do whatever you like. The layout choices are genuinely almost infinite.
The ErgoDox EZ is an ergonomic split design keyboard with a fully programmable PCB and hotswap PCB. (Large preview)
The ErgoDox EZ’s initial layout is itself, certainly unconventional. There’s not just the split to get accustomed to, the Ergodox EZ also has ‘ortholinear’ key layout, casting aside the staggered key layout which we have become accustomed to (a throwback to typewriters where staggering the keys was a mechanical necessity). Thankfully, the Ergodox EZ also enjoys supporting software that teaches and tests your accuracy and ultimately improves your typing speed.
Regardless of how you feel about the aesthetics, if you’re someone who suffers from a condition such as RSI, such factors are likely to pale into insignificance. As long as you are prepared to invest some time re-learning your typing, it might be the best $350 you can invest in your personal hardware, and perhaps even personal well-being.
Hotswap and programmable keyboards are getting more and more common but they remain largely a feature of ‘build your own’ keyboards. Building your own keyboard is a whole other related topic beyond the remit of this article. But be sure to let us know if that is a topic you’d like us to cover.
ANSI Or ISO
There is also the consideration of regional peculiarities; for users in the Western world this boils down to ANSI (American National Standards Institute), with the straight enter key one row high, or ISO (International Organization for Standardization), typified with the angular enter key taking up two rows of height.
The biggest differentiator in the Western world is the ISO or ANSI layout. (Large preview)
Whilst these might be the most distinct visual differences, they are not the only ones.
However, for simplicity, unless you have a reason not to, it makes the most sense to stick with the ANSI/ISO layout you use currently. Although, it is worth pointing out there are considerably more choices for keycaps and board layouts when it comes to ANSI. More than you would ever want to know about ANSI and ISO layouts can be found on Wikipedia.
Analysing Your Key Presses
At first glance, some of the smaller layout sizes such as 60% and 65% might seem completely impractical. However, you might be surprised to know just how little you use certain keys.
Rather than guessing, you can answer that question with cold hard data by logging your keystrokes for a few weeks. There are a number of programs to do this. I used Loggerman.
Loggerman runs in the background and counts up all your key presses. It then lets you run a report to show a heatmap of where your keypresses actually are. Here’s my own heat map for a three-week period.
Use a key logger to find out which keys you really need. (Large preview)
Despite the image showing a Macbook, I wasn’t actually typing on one; I was typing on a WASD Code v3 TKL. Therefore, if you do this kind of analysis, it’s necessary to think about where the keys you press a lot are on your own keyboard. What interested me looking at that was that whilst a lot of general key presses were around the centre, there are big concentrations on the escape key at the top left, the delete key, nearly top right and the arrow cluster bottom right.
I’m usually writing in Vim these days, so if you’re wondering why the escape key is used so much, it’s to exit ‘insert’ mode. Any developer wouldn’t be surprised to see delete and the arrow keys featuring heavily in my usage though — although Vim purists would berate me for not using h,j,k and l more!
So, what to take from this? If I was in the market for another keyboard, and the honest truth is, I probably always will be, I might think about looking for a layout where the physical distance between my most used keys is less. For example, something like a 65% where the escape key is on the first row and the arrow cluster is nearer to my right hand. In addition, perhaps ideally, have the backspace key (confusingly often labelled as ‘delete’ on Mac hardware, despite the fact that delete should remove characters going forward) a row further down so it’s easier to reach. Or something like the ErgoDox EZ where I can put the keys anywhere I like!
A counter situation to this might be someone who deals with numbers a lot. In that situation, a dedicated number pad would likely make a lot of sense and steer the layout decision that way.
The take away is there are lots of variations on layouts. The likelihood is that there is a keyboard layout that probably better suits your needs than the layout you use currently.
Case Construction And Connectivity
The majority of mechanical keyboards are wired. Whether that is USB-C, or Mini-USB, there is a wire going from board to computer.
However, if you switch devices frequently, or travel a lot, messing around with cables is something you don’t have to put up with. Many of the well-known mechanical keyboard brands such as Filco, Matias, Corsair, Ducky, Atom and HHKB all have wireless variants.
When it comes to case construction, the two common materials are aluminium or plastic. Like most choices, there isn’t a right or wrong, just a preference. Although wireless boards tend to be plastic to save weight and improve signal from the Bluetooth controllers.
Things that are genuinely useful to consider though are boards that make some accommodation for cable location. For example, if your nearest USB port is on the left of your computer, it might be a pain if the keyboard’s port is on it’s right side. Some keyboards have multiple ports. Some, such as the WASD mentioned at the outset have channels built into the case so you can route the cable however you like. That’s a feature I don’t see often enough from other brands but I certainly miss it when it isn’t there.
Cable routing is nice addition, helping to prevent excess cable across your desktop. (Large preview)
Aesthetically, there is a wider choice of case colors in aluminium with even cerakoting and electrophoretical coating an option. But as you might imagine, with great beauty comes great expense.
Feast your eyes on the RAMA Koyu. It’s made from a single piece of solid brass, hand polished to a mirror finish! No eating crisps at your desk with this keyboard!
If they hadn’t already sold out, it could have been yours for $1000, although keycaps and switches are extra!
RAMA is to keyboards what Rolls Royce is to cars. How about a keyboard made from solid brass? (Large preview)
Keycaps
One of the biggest draws of a mechanical keyboard is that you can easily swap out the keycaps for a different set. As we discussed in the section on key switch types, the most popular switch type, when it comes to keycaps, is ‘Cherry MX’ compatible. Therefore, by far the most ubiquitous keycap mount is Cherry MX style.
However, within the realms of the MX mount connection type there are a great many options. There are choices in terms of materials used, key profiles, and legend marking method. Let’s look at each of those.
Here are some images of popular key profile types:
SA
These are quite high keys and enjoy a sculpted shape down the rows (if you were looking at the keys side on).
“Lime” is a double-shot keycap set in SA profile made by Signature Plastics in ABS plastic. (Large preview)
DSA
DSA are a lower key and although they have a slightly curved top to each key like the SA, they do not have a sculpted shape down the rows.
“Ferrous” is a keycap set by Signature Plastics made in PBT with a DSA profile. (Large preview)
If you are just starting with a mechanical keyboard, I’m not sure it’s useful to worry too much about the key profile. However, it might be interesting to consider the kind of options available.
You might also see row numbers mentioned; this has most relevance if you are looking at a sculpted set of keys.
Row refers to the location of the keys on the keyboard and is most important when ordering a sculptured keycap family. On a standard QWERTY board, the “number” row is row 1; the “Q” row is row 2; the “A” row is row 3; the “Z” row and the space bar row are row 4; the upper “function key” row can be either row 5 style or row 1 style.
A Realforce keyboard with different shape keycaps on different rows. (Large preview)
It is also important, if ordering an after-market set of keycaps, to consider how many of each size of key you are getting. Most keycaps are single unit, referred to as ‘1u’. Wider keys are designated in full and quarter increments. For example, the Alt, Cmd and Ctrl keys on the WASD keyboard I’m typing on as I write this are each 1.25u wide, the Tab key is 1.5u, and so on. Larger keys such as Shift and Space often have more than one mount underneath and these connect onto the board with a stabilizer (or ‘stab’, as they are referred to in mechanical keyboard circles).
Legend Marking
The three most common means of marking the legend onto each key (e.g. the E on the key for E) are double-shot, dye-sublimation and laser-etching.
Double-shot involves taking two different colors of plastic and putting one within the other; the contrasting colors creating the legend.
Dye-Sublimation, or ‘Dye-Sub’, as it is more commonly termed is a process where the markings are dyed into the plastic. Think of it like a tattoo for keycaps!
Purists will argue that double-shot creates slightly crisper legends but with high quality dye-sublimation, from a reputable brand like Signature Plastics, I think the difference is academic.
Laser etching is just as it sounds, a laser etches the legend into the keycap. However, compared to dye-sublimation or double-shot, laser etched tends to wear away far sooner and are therefore far less popular.
Keycap Materials
The overwhelming majority of keycaps are made of some sort of plastic. We won’t cover more exotic materials for keycaps here.
ABS is the plastic typically used with ‘double-shot’ key-caps. It’s a softer plastic, hence more pliable. You tend to get the widest variety of color options with double-shot but the downside is that the ABS plastic can go shiny over time. This manifests with keyboards with the most used keys visibly shiny compared to the others.
PBT plastic doesn’t tend to get shiny over time as ABS does but dye-sublimation doesn’t make as many color options possible. However, it does typically enjoy a slightly textured surface which some prefer.
As ever, it’s a preference thing.
I’ve been spending the last month switching between a keyboard with SA Lime which is a double-shot ABS plastic SA profile keycap set, and a keyboard with DSA Ferrous, a DSA profile PBT set. My personal preference is the PBT set as I enjoy the slight friction from the PBT but the ABS set is certainly no hardship!
Summary
Let me try and distill everything we’ve been through here.
Firstly, mechanical keyboards offer a level of tactility in keyboards that is simply not achievable elsewhere. Furthermore, with many boards offering programmability, it means your keyboard no longer needs to adhere to the standard layout you are used to. Each key can do whatever you want it to!
You can get a layout that suits the way you use your keyboard; compact 60%, all-rounder TKL or full size with number pad plus everything in-between.
If you are someone who suffers from RSI or, simply feel your comfort might improve with a more ergonomic keyboard, mechanical keyboards like the ErgoDox EZ should be top of your list of hardware to investigate.
There is a gamut of keyboard switches available. Audible clicky switches, smoother tactile switches and fast linears are all available. If you can’t find any to try first, consider buying a board with a hot-swappable PCB. This means you can try out other switch types at your convenience without needing to replace an entire keyboard. You don’t need to go with genuine Cherry switches, manufacturers like Kaihl offer great alternatives.
Needing a portable keyboard does not mean sacrificing on quality! Keyboards like the Happy Hacking Professional Hybrid offer a premium switch feel with Bluetooth connectivity.
You can get keycaps of every conceivable colorway and profile. Take a look at Signature Plastics website for an idea of the breadth of choice available.
If you want a ‘one-stop shop’ take a look at WASD Keyboards. Not only do they offer ANSI and ISO layouts, you can also pick the color of the case, every single key color and the type of legend on the keycaps!
Manufacturers And Suppliers
Here’s a reference and reminder of all the suppliers and manufacturers mentioned through this piece.
Happy Hacking Keyboards using the revered Topre switches and the oft-imitated HHKB 60% layout.
WASD
Makers of the CODE keyboard. Offer unsurpassed choice when it comes to ordering a bespoke mechanical keyboard.
ErgoDox EZ
Ergonomic mechanical keyboards with incredible choice of switches, colors. Also feature hot-swappable PCBs and programmable layout.
After this, there is no turning back. You take the blue pill—the story ends, you wake up in your bed and believe whatever you want to believe. You take the red pill—you stay in Wonderland, and I show you how deep the rabbit hole goes.
Pre-manufactured mechanical keyboards might not be the end of your journey. It’s possible they might just be the beginning.
For the truly obsessed you can opt to build your own mechanical keyboard. It’s not as wacky a proposition as it might sound. Think of it like a Lego kit for keyboards. Choose the exact material, switch type, case style, color and flash it with whatever set of instructions you like.
In the meantime, have a think about that device you interact with day in and day out. Perhaps every key press could be that much more enjoyable, easier and satisfying if you took the time to consider that there may be something better just waiting for your attention.
John Gruber: Ten years ago today, Steve Jobs introduced the iPad on stage at the Yerba Buena theater in San Francisco. [...] Ten years later, though, I don't think the iPad has come close to living up to its potential. [...] Software is where the iPad has gotten lost. iPadOS's "multitasking" model is far more capable than the iPhone's, yes, but somehow Apple has painted it into a corner in which it is far less consistent and coherent than the Mac's, while also being far less capable. iPad multitasking: more complex, less powerful. That's quite a combination.
Consider the basic task of putting two apps on screen at the same time, the basic definition of "multitasking" in the UI sense. To launch the first app, you tap its icon on the homescreen, just like on the iPhone, and just like on the iPad before split-screen multitasking. Tapping an icon to open an app is natural and intuitive. But to get a second app on the same screen, you cannot tap its icon. You must first slide up from the bottom of the screen to reveal the Dock. Then you must tap and hold on an app icon in the Dock. Then you drag the app icon out of the Dock to launch it in a way that it will become the second app splitting the display. But isn't dragging an icon out of the Dock the way that you remove apps from the Dock? Yes, it is -- when you do it from the homescreen.
So the way you launch an app in the Dock for split-screen mode is identical to the way you remove that app from the Dock. Oh, and apps that aren't in the Dock can't become the second app in split screen mode. What sense does that limitation make? On the iPhone you can only have one app on screen at a time. The screen is the app; the app is the screen. This is limiting but trivial to understand. [...] On iPad you can only have two apps on screen at the same time, and you must launch them in entirely different ways -- one of them intuitive (tap any app icon), one of them inscrutable (drag one of the handful of apps you've placed in your Dock). And if you don't quite drag the app from the Dock far enough to the side of the screen, it launches in "Slide Over", an entirely different shared-screen rather than split-screen mode. The whole concept is not merely inconsistent, it's incoherent. How would anyone ever figure out how to split-screen multitask on the iPad if they didn't already know how to do it?
[...] As things stand today, I get a phone call from my mom once a month or so because she's accidentally gotten Safari into split-screen mode when tapping links in Mail or Messages and can't get out. I like my iPad very much, and use it almost every day. But if I could go back to the pre-split-screen, pre-drag-and-drop interface I would. Which is to say, now that iPadOS has its own name, I wish I could install the iPhone's one-app-on-screen-at-a-time, no-drag-and-drop iOS on my iPad Pro. I'd do it in a heartbeat and be much happier for it. The iPad at 10 is, to me, a grave disappointment. Not because it's "bad", because it's not bad -- it's great even -- but because great though it is in so many ways, overall it has fallen so far short of the grand potential it showed on day one. To reach that potential, Apple needs to recognize they have made profound conceptual mistakes in the iPad user interface, mistakes that need to be scrapped and replaced, not polished and refined. I worry that iPadOS 13 suggests the opposite -- that Apple is steering the iPad full speed ahead down a blind alley. Further reading: The iPad's original software designer and program lead look back on the device's first 10 years.
In addition to AMD's open-source Linux driver developers being busy in recent weeks bringing up the Renoir APU support, today we've seen the first baby steps towards bringing up "Dali" as another upcoming AMD APU...
(dlfp) - <M4rotte> Pinaise, c’est un coup de genou de chez coup de genou qu’il s’est pris le mec… [url] je me demande si l’autre s’est fait mal au genou :)
This tutorial is the final of a three-part series by Brad Westfall. We'll learn how to manage state across an entire application efficiently and in a way that can scale without dangerous complexity. We've come so far in our React journey, it's worth making it across the finish line here and getting the full bang-for-our-buck out of this development approach.
Redux is a tool for managing both data-state and UI-state in JavaScript applications. It's ideal for Single Page Applications (SPAs) where managing state over time can be complex. It's also framework-agnostic, so while it was written with React in mind, it can even be used with Angular or a jQuery application.
Plus, it was conceived from an experiment with "time travel" — true fact, we'll get to that later!
As seen in our previous tutorial, React "flows" data through components. More specifically, this is called "unidirectional data flow" — data flows in one direction from parent to child. With this characteristic, it's not obvious how two non parent-child components would communicate in React:
React doesn't recommend direct component-to-component communication this way. Even if it did have features to support this approach, it's considered poor practice by many because direct component-to-component communication is error prone and leads to spaghetti code — an old term for code that is hard to follow.
React does offer a suggestion, but they expect you to implement it on your own. Here's a section from the React docs:
For communication between two components that don't have a parent-child relationship, you can set up your own global event system. ... Flux pattern is one of the possible ways to arrange this.
This is where Redux comes in handy. Redux offers a solution of storing all your application state in one place, called a "store". Components then "dispatch" state changes to the store, not directly to other components. The components that need to be aware of state changes can "subscribe" to the store:
The store can be thought of as a "middleman" for all state changes in the application. With Redux involved, components don't communicate directly between each other, but rather all state changes must go through the single source of truth, the store.
This is much different from other strategies where parts of the application communicate directly between each other. Sometimes, those strategies are argued to be error prone and confusing to reason about:
With Redux, it's clear that all components get their state from the store. It's also clear where components should send their state changes — also the store. The component initiating the change is only concerned with dispatching the change to the store and doesn't have to worry about a list of other components that need the state change. This is how Redux makes data flow easier to reason about.
The general concept of using store(s) to coordinate application state is a pattern known as the Flux pattern. It's a design pattern that compliments unidirectional data flow architectures like React. Redux resembles Flux, but how close are they?
Redux is "Flux-like"
Flux is a pattern, not a tool like Redux, so it's not something you can download. Redux though, is a tool which was inspired by the Flux pattern, among other things like Elm. There are plenty of guides out there that compare Redux to Flux. Most of them will conclude that Redux is Flux or is Flux-like, depending on how strict one defines the rules of Flux. Ultimately, it doesn't really matter. Facebook likes and supports Redux so much that they hired it's primary developer, Dan Abramov.
This article assumes you're not familiar with the Flux pattern at all. But if you are, you will notice some small differences, especially considering Redux's three guiding principals:
1. Single Source of Truth
Redux uses only one store for all its application state. Since all state resides in one place, Redux calls this the single source of truth.
The data structure of the store is ultimately up to you, but it's typically a deeply nested object for a real application.
This one-store approach of Redux is one of the primary differences between it and Flux's multiple store approach.
2. State is Read-Only
According to Redux docs, "The only way to mutate the state is to emit an action, an object describing what happened."
This means the application cannot modify the state directly. Instead, "actions" are dispatched to express an intent to change the state in the store.
The store object itself has a very small API with only four methods:
store.dispatch(action)
store.subscribe(listener)
store.getState()
replaceReducer(nextReducer)
So as you can see, there's no method for setting state. Therefore, dispatching an action is the only way for the application code to express a state change:
var action = {
  type: 'ADD_USER',
  user: {name: 'Dan'}
};

// Assuming a store object has been created already
store.dispatch(action);
The dispatch() method sends an object to Redux, known as an action. The action can be described as a "payload" that carries a type and all other data that could be used to update the state — a user in this case. Keep in mind that after the type property, the design of an action object is up to you.
3. Changes are made with Pure Functions
As just described, Redux doesn't allow the application to make direct changes to the state. Instead, the dispatched action "describes" the state change and an intent to change state. Reducers are functions that you write which handle dispatched actions and can actually change the state.
A reducer takes in current state as an argument and can only modify the state by returning new state:
// Reducer Function
var someReducer = function(state, action) {
  ...
  return state;
}
Reducers should be written as "pure" functions, a term that describes a function with the following characteristics:
It does not make outside network or database calls.
Its return value depends solely on the values of its parameters.
Its arguments should be considered "immutable", meaning they should not be changed.
Calling a pure function with the same set of arguments will always return the same value.
These are called "pure" because they do nothing but return a value based on their parameters. They have no side effects into any other part of the system.
Our first Redux Store
To start, create a store with Redux.createStore() and pass all reducers in as arguments. Let's look at a small example with only one reducer:
// Note that using .push() in this way isn't the
// best approach. It's just the easiest to show
// for this example. We'll explain why in the next section.

// The Reducer Function
var userReducer = function(state, action) {
  if (state === undefined) {
    state = [];
  }
  if (action.type === 'ADD_USER') {
    state.push(action.user);
  }
  return state;
}

// Create a store by passing in the reducer
var store = Redux.createStore(userReducer);

// Dispatch our first action to express an intent to change the state
var store.dispatch({
  type: 'ADD_USER',
  user: {name: 'Dan'}
});
Here's a brief summary of what's happening:
The store is created with one reducer.
The reducer establishes that the initial state of the application is an empty array. *
A dispatch is made with a new user in the action itself
The reducer adds the new user to the state and returns it, which updates the store.
* The reducer is actually called twice in the example — once when the store is created and then again after the dispatch.
When the store is created, Redux immediately calls the reducers and uses their return values as initial state. This first call to the reducer sends undefined for the state. The reducer code anticipates this and returns an empty array to start the initial state of the store.
Reducers are also called each time actions are dispatched. Since the returned state from a reducer will become our new state in the store, Redux always expects reducers to return state.
In the example, the second call to our reducer comes after the dispatch. Remember, a dispatched action describes an intent to change state, and often times carries the data for the new state. This time, Redux passes the current state (still an empty array) along with the action object to the reducer. The action object, now with a type property of 'ADD_USER', allows the reducer to know how to change the state.
It's easy to think of reducers as funnels that allow state to pass through them. This is because reducers always receive and return state to update the store:
Based on the example, our store will now be an array with one user object:
store.getState(); // => [{name: 'Dan'}]
Don't Mutate State, Copy It
While the reducer in our example technically works, it mutates state which is poor practice. Even though reducers are responsible for changing state, they should never mutate the "current state" argument directly. This is why we shouldn't use .push(), a mutation method, on the state argument of the reducer.
Arguments passed to the reducer should be considered immutable. In other words, they shouldn't be directly changed. Instead of a direct mutation, we can use non-mutating methods like .concat() to essentially make a copy of the array, and then we'll change and return the copy:
var userReducer = function(state = [], action) {
  if (action.type === 'ADD_USER') {
    var newState = state.concat([action.user]);
    return newState;
  }
  return state;
}
With this update to the reducer, adding a new user results in a copy of the state argument being changed and returned. When not adding a new user, notice the original state is returned instead of creating a copy.
There's a whole section below on Immutable Data Structures which sheds more light on these types of best practices.
You may have also noticed that the initial state now comes form a ES2015 default parameter. So far in this series we've avoided ES2015 to allow you to focus on the main topics. However, Redux is much nicer with ES2015. Therefore, we'll finally start using ES2015 in this article. Don't worry though, each time a new ES2015 feature is used, it will be pointed out and explained.
Multiple Reducers
The last example was a nice primer, but most applications will need more complex state for the entire application. Since Redux uses just one store, we'll need to use nested objects to organize state into different sections. Let's imagine we want our store to resemble this object:
{
  userState: { ... },
  widgetState: { ... }
}
It's still "one store = one object" for the entire application, but it has nested objects for userState and widgetState that can contain all kinds of data. This might seem overly simplistic, but it's actually not that far from resembling a real Redux store.
In order to create a store with nested objects, we'll need to define each section with a reducer:
ES2015 Alert! The four main "variables" in this example will not be changed, so we'll define them as constants instead. We're also using ES2015 modules and destructuring.
The use of combineReducers() allows us to describe our store in terms of different logical sections and assign reducers to each section. Now, when each reducer returns initial state, that state will go into it's respective userState or widgetState section of the store.
Something very important to note is that now, each reducer gets passed its respective subsection of the overall state, not the whole store's worth of state like with the one-reducer example. Then the state returned from each reducer applies to its subsection.
Which Reducer is Called After a Dispatch?
All of them. Comparing reducers to funnels is even more apparent when we consider that each time an action is dispatched, all reducers will be called and will have an opportunity to update their respective state:
I say "their" state carefully because the reducer's "current state" argument and its returned "updated" state only affect that reducer's section of the store. Remember, as stated in the previous section though, each reducer only gets passed its respective state, not the whole state.
Action Strategies
There are actually quite a few strategies for creating and managing actions and action types. While they are very good to know, they aren't as critical as some of the other information in this article. To keep the article smaller, we've documented the basic action strategies you should be aware of in the GitHub repo that goes along with this series.
Immutable Data Structures
The shape of the state is up to you: it can be a primitive, an array, an object, or even an Immutable.js data structure. The only important part is that you should not mutate the state object, but return a new object if the state changes." - Redux docs
That statement says a lot, and we've already alluded to this point in this tutorial. If we were to start discussing the ins and outs and pros and cons of what it means to be immutable vs mutable, we could go on for a whole blog article's worth of information. So instead I'm only going to highlight some main points.
To start:
JavaScript's primitive data types (Number, String, Boolean, Undefined, and Null) are already immutable.
Objects, arrays, and functions are mutable.
It's been said that mutability on data structures is prone to bugs. Since our store will be made up of state objects and arrays, we will need to implement a strategy to keep the state immutable.
Let's imagine a state object in which we need to change a property. Here are three ways:
// Example One
state.foo = '123';

// Example Two
Object.assign(state, { foo: 123 });

// Example Three
var newState = Object.assign({}, state, { foo: 123 });
The first and second examples mutate the state object. The second example mutates because Object.assign() merges all its arguments into the first argument. But this reason is also why the third example doesn't mutate the state.
The third example merges the contents of state and{foo: 123} into a whole new blank object. This is a common trick that allows us to essentially create a copy of the state and mutate the copy without affecting the original state.
The object "spread operator" is another way to keep the state immutable:
Object.assign() and spread operators are both ES2015.
In summary, there are many ways to explicitly keep objects and arrays immutable. Many devs use libraries like seamless-immutable, Mori, or even Facebook's own Immutable.js.
I very carefully choose which other blogs and articles this one links to. If you're not understanding immutability, read the reference links from above. This is a very important concept for being successful with Redux.
Initial State and Time Travel
If you read the docs, you may notice a second argument for createStore() which is for "initial state". This might seem like an alternative to reducers creating initial state. However, this initial state should only be used for "state hydration".
Imagine a user does a refresh on your SPA and the store's state is reset to the reducer initial states. This might not be desired.
Instead, imagine you could have been using a strategy to persist the store and then you can re-hydrate it into Redux on the refresh. This is the reason for sending initial state into createStore().
This brings up an interesting concept though. If it's so cheap and easy to rehydrate old state, one could imagine the equivalent of state "time travel" in their app. This can be useful for debugging or even undo/redo features. Having all your state in one store makes a lot of sense for these and many reasons! This is just one reason why immutable state helps us.
I didn't mean to create a Flux framework. When React Europe was first announced, I proposed a talk on 'hot reloading and time travel' but to be honest I had no idea how to implement time travel.
Redux with React
As we've already discussed, Redux is framework-agnostic. Understanding Redux's core concepts first is important before you even think about how it works with React. But now we're ready to take a Container Component from the last article and apply Redux to it.
First, here is the original component without Redux:
ES2015 Alert! This example has been slightly converted from the original. It uses ES2015 modules and arrow functions.
Sure, it does its Ajax request and updates its own local state. But if other areas in the application need to change based on the newly acquired user list, this strategy won't suffice.
With the Redux strategy, we can dispatch an action when the Ajax request returns instead of doing this.setState(). Then this component and others can subscribe to the state change. But this actually brings us to a question of how do we setup the store.subscribe() to update the component's state?
I suppose I could provide several examples of manually wiring up components to the Redux store. You can probably even imagine how that might look with your own approach. But ultimately, at the end of those examples I would explain that there's a better way, and to forget the manual examples. I would then introduce the official React/Redux binding module called react-redux. So let's just jump straight to that.
Connecting with react-redux
Just to be clear, react, redux, and react-redux are three separate modules on npm. The react-redux module allows us to "connect" React components to Redux in a more convenient way.
We've imported the connect function from react-redux.
This code might be easier to follow from the bottom-up starting with the connection. The connect() function actually takes two arguments, but we're only showing one for mapStateToProps().
It might look weird to see the extra set of parenthesis for connect()(). This is actually two function calls. The first, to connect() returns another function. I suppose we could have assigned that function to a name and then called it, but why do that when we can just call it immediately with the second set of parenthesis? Besides, we wouldn't need that second function name to exist for any reason after it's called anyways. The second function though needs you to pass a React component. In this case it's our Container Component.
I understand if you're thinking "why make it look more complex than it has to be?", but this is actually a common "functional programming" paradigm, so it's good to learn it.
The first argument to connect() is a function that should return an object. The object's properties will become "props" on the component. You can see their values come from the state. Now, I hope the function name "mapStateToProps" makes more sense. Also notice that mapStateToProps() will receive an argument which is the entire Redux store. The main idea of mapStateToProps() is to isolate which parts of the overall state this component needs as its props.
For reasons mentioned in #3, we no longer need getInitialState() to exist. Also notice that we refer to this.props.users instead of this.state.users since the users array is now a prop and not local component state.
The code example makes an assumption about how the user reducer works which may not be apparent. Notice how the store has userState property. But where did that name come from?
What about the .users property of userState? Where did that come from?
While we didn't show an actual reducer for the example (because it would be in another file), it's the reducer which determines the sub properties of its respective state. To ensure .users is a property of userState, the reducer for these examples might look like this:
In our Ajax example, we only dispatched one action. It was called 'USER_LIST_SUCCESS' on purpose because we may want to also dispatch 'USER_LIST_REQUEST' before the Ajax starts and 'USER_LIST_FAILED' on an Ajax failure. Be sure to read the docs on Asynchronous Actions.
Dispatching from Events
In the previous article, we saw that events should be passed down from Container to Presentational Components. It turns out react-redux helps with that too in cases where an event simply needs to dispatch an action:
In the Presentation Component, we can do onClick={this.props.toggleActive} just as we did before but this time we didn't have to write the event itself.
Container Component Omission
Sometimes, a Container Component only needs to subscribe to the store and it doesn't need any methods like componentDidMount() to kick off Ajax requests. It may only need a render() method to pass state down to the Presentational Component. In this case, we can make a Container Component this way:
import React from 'react';
import { connect } from 'react-redux';
import UserList from '../views/list-user';
const mapStateToProps = function(store) {
  return {
    users: store.userState.users
  };
}
export default connect(mapStateToProps)(UserList);
Yes folks, that's the whole file for our new Container Component. But wait, where's the Container Component? And why don't we have any use of React.createClass() here?
As it turns out, the connect() creates a Container Component for us. Notice this time we're passing in the Presentational Component directly instead of creating our own Container Component to pass in. If you really think about what Container Components do, remember they exist to allow the Presentational Component to focus on just the view and not state. They also pass state into the child view as props. And that's exactly what connect() does — it passes state (via props) into our Presentational Component and actually returns a React component that wraps the Presentational one. In essence, that wrapper is a Container Component.
So does that mean the examples from before are actually two Container Components wrapping a Presentational one? Sure, you can think of it that way. But that's not a problem, it's just only necessary when our Container Component needs more React methods besides render().
Think of the two Container Components as serving different but related roles:
Hmm, maybe that's why the React logo looks like an atom!
Provider
In order for any of this react-redux code to work, you'll need to let your app know how to use react-redux with a <Provider /> component. This component wraps your entire React application. If you're using React Router, it would look like this:
import React from 'react';
import ReactDOM from 'react-dom';
import { Provider } from 'react-redux';
import store from './store';
import router from './router';

ReactDOM.render(
  <Provider store={store}>{router}</Provider>,
  document.getElementById('root')
);
It's not required, but there is another npm project called react-router-redux. Since routes are technically a part of UI-state, and React Router doesn't know about Redux, this project helps link the two.
Do you see what I did there? We went full circle and we're back to the first article!
Final Project
The final project guide for this series allows you to make a small "Users and Widgets" Single Page App:
As with the other articles in this series, each comes with a guide that has even more documentation on how the guide works at GitHub.
Summary
I really hope you've enjoyed this series as much as I have writing it. I realize there are many topics on React we didn't cover (forms for one), but I tried to stay true to the premise that I wanted to give new users to React a sense of how to get past the basics, and what it feels like to make a Single Page Application.
While many helped, a special thanks goes to Lynn Fisher for the amazing graphics she provided for the tutorials!
Director
Philip Lord Chris Miller Peter Atencio Jason Woliner Phil Traill
Guion
Andy Bobrow Will Forte Emily Spivey Tim McAuliffe Liz Cackowski
Musica
Mark Mothersbaugh
Fotografia
Christian Sprenger
Reparto
Will Forte Kristen Schaal January Jones Cleopatra Coleman Mel Rodriguez Alexandra Daddario
Productora
20th Century Fox Television
Genero
Serie de TV Accion Comedia Ciencia ficcion | Supervivencia
Serie de TV Phil Miller es un hombre que en el a o 2022 despierta siendo el ultimo hombre de la Tierra y busca supervivientes a lo largo del pais
Rearrange pdf document coming from a simplex document feed scanner, feeded first with odd pages, then with even pages from the end. Needs pdftk >1.44 w/ shuffle.
Ya sea momentáneo o permanente, ese pitido que a veces oímos no deja de ser algo muy molesto y ocasionado por la edad y por estar expuestos cada vez más a sonidos a alto volumen. Como casi todo tiene un nombre científico, tinnitus, y está originado en el cerebro, curiosamente, en lugar de en alguna parte del sistema auditivo. Para tratarlo y curarlo, o al menos paliarlo, se ha lanzado una aplicación web llamada Tinnitracks que asegura que acaba con esta molesta dolencia.
Se trata, en realidad, de un una aplicación web que ha sido creada por la startup alemana Sonormed y utiliza una terapia del sonido que, según ellos, aprovecha la habilidad del cerebro para adaptarse constantemente y aprender nuevas cosas. Cómo toda startup y promesas de este tipo, puede generar cierta incertidumbre sobre su eficacia, pero llega avalada por haber sido una de las ganadoras de la competición SXSW´s Accelerator, celebrada el pasado fin de semana y contar con la participación de Senhheiser, una marca que es un peso pesado en el mercado del audio.
Terapia sonora con nuestras propias canciones
Lo más curioso es que la aplicación actúa directamente con las canciones que llevamos en el móvil, analizando cada una de ellas y filtrando las frecuencias que causan el tinnitus (también llamado acúfenos o tinito en su castellanización). En concreto, Tinnitracks lo que hace es seleccionar las canciones más adecuadas de nuestra colección, filtrar las frecuencias como acabamos de comentar y subir esta canción a un reproductor online para iniciar la terapia, al que podemos acceder desde el ordenador, móvil o tablet, y pronto tendrá una aplicación dedicada. Es decir, nos hará una colección de canciones basadas en las que, en teoría, nos gustan para que podamos iniciar las sesiones que acabarán con el molesto zumbido que tenemos en ocasiones o permanentemente en el oído.
El “tratamiento” que se prescribe desde los creadores de esta aplicación es de entre una y dos horas al día con la selección de canciones hecha y filtrada por Tinnitracks durante seis meses. Indican que si se sigue este tratamiento, el resultado es la curación tanto de los síntomas esporádicos o leves como los crónicos. La prueba de su eficacia, por tanto, tendrá que esperar unos meses, primero porque de momento al servicio sólo puede accederse mediante el navegador del smartphone, tablet o el ordenador. De camino vienen ya las apps para iPhone y Android que han prometido que llegarán en apenas unas semanas.
Nada es gratis
Y ahora viene la pega más importante, nadie dijo que esto fuera gratis. La licencia de Tinnitracks durante un año para poder filtrar las canciones de nuestra biblioteca y crear esta terapia cuesta, nada menos, que 539 euros. Eso son cerca de 45 euros al mes que, dependiendo del grado de tinitus que suframos, puede ser mucho o poco, pero como siempre, esto solo será una ayuda si llevamos un tratamiento paralelo y controlado por un neurólogo.
¿Habéis sufrido o padecéis estos síntomas? ¿Le daréis una oportunidad a esta terapia? Contadnos vuestro caso y si habéis utilizado sistemas parecidos para tratarlo.
Serie de TV. Terror. Ciencia ficción | Zombis. Futuro postapocalíptico. Gore. Cómic
SINOPSIS Serie de TV (2010-Actualidad). Narra la historia de un apocalipsis zombie. Un grupo de supervivientes, dirigidos por el policía Rick Grimes, viaja a través de los Estados Unidos tratando de poner sus vidas a salvo. Rick es el ayudante del Sheriff de un pueblo de Georgia, que permaneció en coma durante la irrupción de la plaga. Aunque el leit motiv de la serie -cuyo episodio piloto está dirigido y escrito por Frank Darabont- sea el apocalipsis zombie, la narración se centra más en las relaciones entre los personajes, su evolución y comportamiento en las situaciones críticas.
REPARTO Andrew Lincoln, Jon Bernthal, Sarah Wayne Callies, Laurie Holden, Jeffrey DeMunn, Steven Yeun, Norman Reedus, Emma Bell, Chandler Riggs, IronE Singleton, Melissa Suzanne McBride, Jeryl Prescott, Andrew Rothenberg, Michael Rooker, Noah Emmerich, Lauren Cohan, Pruitt Taylor Vince, Danai Gurira
PRODUCTORA Emitida por la cadena AMC; Circle of Confusion / Valhalla Motion Pictures / Darkwoods Productions / AMC Studios
PREMIOS
2010: Nominada al Globo de Oro: Mejor Serie de TV drama
2010: 3 nominaciones al Emmy: Mejor maquillaje, efectos visuales, montaje sonoro.
En este vídeo de GreenPeace se muestran unas imágenes muy clarificadoras de la deforestación que APRIL esta llevando acabo en Indonesia. Esta empresa esta siendo financiada por el Banco Santander aunque según parece el banco por dirigido Ana Botín cede ante Green Peace por razones más que obvias (Ver Aquí - www.meneame.net/story/banco-santander-cede-ante-greenpeace)
Ya había avisado hace unos días Motorola a los usuarios de sus Moto G de 2013 que se fueran preparando y actualizaran ciertas aplicaciones para prepararse para recibir Android 5.0.2 Lollipop. Parece que el tiempo ha llegado aunque, como de costumbre, con los consabidos “soak test”, es decir, las pruebas previas a la liberación de la OTA que ya ha empezado su despliegue y será cuestión de días su desembarco oficial.
Los primeros indicios parten de Canadá en esta ocasión, donde los usuarios de terminales Motorola Moto G de primera generación, es decir, aquellos lanzados en 2013, están ya recibiendo la actualización a Android 5.0.2 Lollipop para sus terminales, aunque parece que está limitada a la versión 3G de 8 GB en los primero soak test.
Y es que el inicio de la actualización pasa siempre por este primer estadio, el de las pruebas para comprobar si la OTA es estable y no da problema con un grupo reducido de usuarios. Es probable que muchos os preguntéis ¿cómo elige Motorola a estos “privilegiados”? Pues la realidad es que es algo al alcance de cualquier usuario de sus terminales. En el siguiente enlace os contamos los pasos que hay que hacer para, si Motorola lo considera oportuno, entrar a formar parte de este selecto grupo de usuarios.
La versión que llegará es Android 5.0.2 lollipop
Por otra parte, la versión que llega es Android 5.0.2 Lollipop, razón por la que la compañía ya pidió disculpas por el retraso y el incumplimiento de su promesa de tener lista la actualización antes de los 90 días después del lanzamiento de Lollipop. Los problemas de los Nexus de Google con las primeras versiones del software ha hecho que los fabricantes se esperen a tener lista una iteración más estable para iniciar el proceso de desarrollo de su OTA, que por otra parte si queréis conocer los pasos que lleva y por qué tarda tanto a veces en llegar, os lo contamos hace unos días en este reportaje.
Habrá que esperar aún para conocer cómo va el despliegue de la versión definitiva y pública, que como siempre se hará de forma gradual y por zonas, por lo que estaremos atentos a las alertas en los Motorola Moto G españoles para ver si pronto nos sorprenden como ha hecho la compañía en Canadá.
Any time you use a shorthand property in CSS, you set all the values for all the properties it deals with. It's not a bug, it's just how CSS works. I've seen it confuse people plenty of times. Let's shine a light on the issue to hopefully make it more understood.
Here's an example:
.module {
  background-repeat: no-repeat;
  background: url(lion.jpg);
  /* Oops! This will repeat. */
}
The shorthand CSS background property overrides all the sup properties. The default value for background-repeat is repeat, so by not declaring it in the shorthand, it gets set to that default value.
It works that way for every single one of the background sub properties:
.module {
  /* This will get set to `repeat` */
  background-repeat: no-repeat;

  /* This will get set to `0 0` */
  background-position: top right;

  /* This will get set to `auto auto` */
  background-size: 100px;

  /* This will get set to `scroll` */
  background-attachment: fixed;

  /* This will get set to `border-box` */
  background-origin: content-box;

  /* This will get set to `border-box` */
  background-clip: padding-box;

  /* This will get set to `transparent` */
  background-color: red;

  /* This will get overridden */
  background-image: url(cool.png);

  /* OVERRIDE */
  background: url(lion.jpg);
}
This is the case with box model (and related) stuff, like:
.module {
  margin-right: 20px;
  margin: 10px;
  /* margin-right will be 10px now */

  padding-top: 30px;
  padding: 10px;
  /* padding-top will be 10px now */

  border-left: 1px;
  border: 0;
  /* border-left will be removed */
}
Fonts is another situation where you can accidentally reset yourself:
p {
  /* Will get reset to what is set in shorthand (required) */
  font-family: Sans-Serif;

  /* Will get reset to what is set in shorthand (required) */
  font-size: 24px;

  /* Will get reset to `normal` */
  line-height: 2;

  /* Will get reset to `normal` */
  font-style: italic;

  /* will get reset to `normal` */
  font-weight: bold;

  /* will get reset to `normal` */
  font-variant: small-caps;

  /* OVERRIDE */
  font: 16px Serif;
}
Note that the shorthand requires at least the font-family and font-size to work.
Lists are yet another:
ul {
  /* Will get reset to what is set in shorthand */
  list-style-type: square;

  /* Will get reset to `outside` */
  list-style-position: inside;

  /* Will get reset to `none` */
  list-style-image: url(cooldot.png);

  /* OVERRIDE */
  list-style: disc;
}
The flex property as part of flexbox layout is also shorthand:
.flex >  span {
  /* Will be reset to `auto` (or `main-size` if supported) */
  flex-basis: 150px;

  /* Will be reset to `1` */
  flex-grow: 0;

  /* Will be reset to `1` */
  flex-shrink: 0;

  /* OVERRIDE */
  flex: auto;
}
This is an unusual one though, as rather than the shorthand resetting things you might not want reset, it resets them in ways you probably do want reset and might not even know it. Fantasai:
We (the Flexbox spec editors) strongly recommend not using the longhands of 'flex' unless you really, really want to cascade in flex settings from some other style rule, so I'd suggest somehow discouraging the use of 'flex-grow/shrink/basis' here (or, preferably, leaving it out/in an advanced section). The shorthand resets things in appropriate ways, and will therefore result in fewer cascading errors. Please use the shorthand!
Here's a Pen with some of this stuff in real code.
Hoy, la próxima gran versión de HTTP ha dado un gran paso para convertirse en una realidad; oficialmente ha acabado y se mueve hacia estar totalmente estandarizada. Según un blog de Mark Nottingham, presidente del IETF HTTP Working Group, el estándar se completó hoy y está en camino la RFC Editor que pasa por procesos editoriales antes de ser publicado como un estándar. HTTP/2 es un gran acuerdo; es la próxima gran versión del Hypertext Transfer Protocol, que marca el cambio más grande desde 1999, cuando se adoptó.
La sortie de la version stable 3.19 du noyau Linux a été annoncée le dimanche 8 février 2015 par Linus Torvalds. Le nouveau noyau est, comme d’habitude, téléchargeable sur les serveurs du site kernel.org. Le détail des évolutions, nouveautés et prévisions se trouve dans la seconde partie de la dépêche.
Pour rappel, la page wiki rédiger des dépêches noyau signale quelques possibilités pour aider à la rédaction et s’y impliquer (ce que tout inscrit peut faire, ne serait‐ce que traduire^Wsynthétiser les annonces de RC).
DRM : la gestion du mode graphique atomique approche à grands pas
AMD/ATI : ajout du pilote AMDKFD pour la gestion de HSA
Intel : gestion initiale de la famille Skylake
NVIDIA : gestion initiale des nouveaux processeurs graphiques Maxwell
Réseau
Pilote pour la gestion des communications entre conteneurs
Sécurité
Intel Memory Protection Extensions (MPX)
Correction de l'appel système setgroups()
Systèmes de fichiers
OverlayFS multi couche
Données inline pour CephFS
Virtualisation
Gestion de Xen sur les systèmes non-cohérents
Annonces des RC par Linus Torvalds
RC-1
La version RC1 est sortie le samedi 20 décembre 2014 :
Donc, cela fait deux semaines à un jour près et la phase d’intégration est terminée.
Considérant combien de contributions sont arrivées tardivement, j’estime difficile de me préoccuper de quiconque déciderait de placer la limite plus loin que ceux qui l’ont déjà fait. Cela dit, il n’y a peut‐être aucun vrai retardataire — et à la vue de la taille de la RC1, il ne doit vraiment pas y en avoir beaucoup. Non seulement je pense qu’il y a plus de contributions qu’il n’y en avait dans linux-next : c’est historiquement une des plus grosses RC1 (du moins par les commits). Nous en avons eu de plus grosses (les 3.10 et 3.15 ont été précédées de longues phases d’intégration), mais ce n’était clairement pas une petite phase d’intégration.
En tout cas, nous avons eu des changements de tous les côtés, y compris une nouvelle architecture (Nios II). Mon « journal de fusion résumé » est joint et, comme d’habitude, je veux souligner qu’il attribue les contributions aux personnes me les envoyant, ce qui n’est en général pas du tout la même chose que les gens qui écrivent effectivement le code, même s’il y a évidemment un recoupement.
Dans les grandes lignes, cela ressemble à une sortie plutôt normale. À peu près deux tiers de mises à jour de pilotes, avec à peu près la moitié du reste qui sont des mises à jour d’architectures (et, non, les correctifs du nouveau Nios II ne sont pas du tout prédominantes, c’est à peu près pour moitié de l’ARM, dont la prise en charge du nouveau Nios II représente moins de 10 % des mises à jour d’architecture en nombre de lignes). Le sixième restant est « divers » : réseau, mises à jour des en‐têtes, documentation, systèmes de fichiers, outils et cœur du noyau (à peu près dans cet ordre).
Évidemment, les vacances arrivant, je m’attends à ce que les quelques prochaines semaines soient plutôt calmes, mais nous verrons bien. J’ose espérer que les gens auront le temps de tester cela entre tous leurs laits de poule,
Linus
RC-2
La version RC2 est sortie le dimanche 28 décembre 2014 :
Cette RC est minuscule, pour des raisons évidentes.
Je ne m’attends pas à ce que cela dure, mais nous aurons probablement une autre semaine de calme relatif avant un vrai retour à la normale.
À peu près 80 % de pilotes (le DRM formant la grande majorité), avec quelques petits correctifs concernant ARM64, l’audit et quelques petits mono‐lignes çà et là à d’autres endroits.
Linus
RC-3
La version RC3 est sortie le lundi 5 janvier 2015 :
Elle a été repoussée d’un jour — non pas à cause de problèmes de développement particuliers, mais simplement parce que je carrelais une salle de bain hier. Mais la RC3 est maintenant sortie, et les choses sont demeurées raisonnablement calmes. J’espère vraiment que cela signifie que le 3.19 a l’air bon, mais il est tout aussi probable que les gens récupèrent encore de leur période de vacances.
Un peu plus de trois quarts des changements concernent les pilotes — surtout du réseau, de la gestion de température, la couche de périphériques d’entrée, le son et la gestion de l’alimentation. Le reste est divers — systèmes de fichiers, infrastructure réseau, quelques correctifs d’architectures, etc. Mais l’ensemble est plutôt petit.
Donc, allez‐y, testez,
Linus
RC-4
La version RC4 est sortie le dimanche 11 janvier 2015.
Une autre semaine, une autre RC.
Les choses sont restées raisonnablement calmes, bien que nous ayons aussi eu quelques régressions de dernière minute dans la gestion de la mémoire. Heureusement, la plupart d’entre elles ont été corrigées rapidement, ne laissant qu’un problème avec ARM64 toujours en suspens.
Donc, allez plus loin et testez plus encore. Je serai en déplacement pour les deux prochaines semaines à cause du LCA, mais je devrais avoir Internet, et, si les choses continuent à être raisonnablement calmes, je ne pense pas que mon voyage soit réellement perceptible. Finalement, on est dans les temps, à l’inverse de plusieurs sorties de l’année dernière.
Quoi qu’il en soit, la version courte de mon journal de fusion en annexe donne les détails, mais à part les correctifs du kgdb apparaissant comme une activité inhabituelle sous kernel/debug/, les choses semblent plutôt normales : une majorité de mises à jour de pilotes (pilotes graphiques, pinctrl, HID, réseau), des mises à jour d’architectures (principalement x86 cette fois, quelques trucs mineurs pour ARM[64]) et quelques correctifs sur les outils (principalement perf).
Linus
RC-5
La version RC5 est sortie le dimanche 18 janvier 2015 :
Une autre semaine, une autre RC.
Sortie plutôt normale, même si j’aurais souhaité qu’en RC5 nous nous soyons calmés davantage. Mais, non, avec les quelques inclusions dans l’arborescence des pilotes notamment, elle est en fait plus grosse que ne l’était la RC4.
Cela dit, ce n’est pas comme s’il y avait quoi que ce soit de particulièrement effrayant là‐dedans.
Le bogue mémoire ARM64 que j’ai mentionné comme mis en attente dans les notes de la RC4 a été corrigé un jour après cette précédente RC, et le reste a l’air plutôt standard. Surtout des pilotes (réseau, USB, cible SCSI, couche bloc, contrôleur mémoire, TTY, etc.), mais aussi des mises à jour d’architectures (ARM, X86, S/390 et quelques petites corrections sur PowerPC), quelques mises à jour de systèmes de fichiers (FUSE et NFS), des corrections de traçage et quelques corrections des outils d’analyse de performance.
La version courte de mon journal avec les détails est en annexe.
Allez‐y, testez.
Linus
RC-6
La version RC6 est sortie le dimanche 25 janvier 2015 :
Une autre RC, une autre semaine plus proche de la sortie. Et celle‐ci est légèrement plus petite que ne l’était la RC5, bien que plus petit encore serait toujours mieux.
Mais, comme la RC5, aucun des changements ne semble particulièrement effrayant et plus d’un quart ont été appliqués à la version stable, donc les choses ont l’air d’être sur les bons rails. Je m’attends, pour l’heure, à faire une RC7 la semaine prochaine, avec le 3.19 final dans deux semaines, selon le calendrier habituel.
Les statistiques ont l’air tout à fait normales, avec un correctif comprenant à peu près 70 % de changements pour les pilotes (le retour en arrière d’un pilote pour les ordinateurs portables Dell représente le plus gros des correctifs, mais il y a le réseau, les médias, les pilotes graphiques, les entrée‐sorties GPIO, le son…) et à peu près 14 % de mises à jour d’architectures (x86 et ARM sont les plus grosses, mais il y a d’autres petites mises à jour également) et le reste se répartit un peu partout (mises à jour de documentation, du réseau, mises à jour de systèmes de fichiers — principalement Btrfs, etc.).
La version courte du journal des changements propose une sorte de résumé détaillé pour les gens qui veulent avoir une idée de ce qu’il s’est passé. Rien de vraiment particulier ne s’en distingue.
Linus
RC-7
La version RC7 est sortie le dimanche 1er février 2015 :
Tout semble être assez calme et normal, donc ce sera probablement la dernière RC, à moins que quelque chose d’inattendu ne survienne soudainement. Ce qui veut dire que j’aimerais voir plus de gens tester l’utilisation ce bébé [N. D. T. : chiot est le terme employé par Linus], juste pour validation.
Les statistiques de cette TC sont plutôt normales — à peu près 50 % de pilotes, 20 % de mises à jour d’architectures (pour la plupart ARM et ARM64, quelques x86), avec les systèmes de fichiers apparaissant un peu plus que d’habitude (largement dus aux changements dans le système de quotas), le reste étant « divers » — outils de test de performance, quelques changements mineurs dans le noyau et la mémoire virtuelle, etc.
Mais tout cela est assez petit. La version courte du journal des changements est jointe pour les curieux,
Alors, rien de bien passionnant et bien que que j’ai été tenté plusieurs fois de faire une RC8, il n’y avait vraiment aucune raison à cela.
À titre d’exemple, Sasha Levin a utilisé KASan et a trouvé un bogue intéressant dans les verrous tournants paravirtualisés. Mais, il s’est avéré qu’il était présent depuis toujours, et il n’est même pas évident qu’il puisse vraiment être déclenché dans la pratique. Nous le corrigerons et l’indiquerons dans la version stable, et aussi tentant que cela fût, ça n’était pas une raison valable pour retarder le 3.19.
Et les véritables corrections qui ont été faites (voir la version courte du journal de changements) étaient toutes franchement petites, à l’exception de quelques changements de taille moyenne dans InfiniBand qui étaient tous des suppressions de code qui n’était tout simplement pas prêt.
Donc, il est sorti — venez le récupérer. Et, par conséquent, la fenêtre d’intégration pour le 3.20 est évidemment désormais ouverte aussi.
Linus
Les nouveautés
Architecture
Allwinner
Cartes de développement
Deux nouvelles cartes de développement font leur apparition dans la liste des matériels supportés. La Banana Pi est une carte embarquée peu chère, très flexible et adaptée pour un usage au quotidien ou en tant que carte de développement. Pour un montant assez correct, vous disposerez d’un système monopuce Allwinner A20 (ARM Cortex-A7 double‐cœur, 1 GHz, processeur graphique Mali-400 MP2), de 1 Gio de mémoire vive DDR3, d’un connecteur HDMI et LVDS, de l’USB 2, du SATA, d’un contrôleur Ethernet Gigabit et d’un en‐tête d’extension où vous pourrez brancher plein de choses.
La A20-OLinuXino-Lime2 est une carte de développement en matériel libre produit par OLimex. Elle dispose d’un système monopuce Allwinner A20 (double‐cœur Cortex A7 cadencé à 1 GHz, un processeur Mali-400), 1 Gio de mémoire vive DDR3, un connecteur HDMI Full HD 1080p, un connecteur LCD (4,3″, 7,0″ et 10,1″), de l’USB 2.0, un contrôleur Ethernet Gigabit, un lecteur de carte microSD, un connecteur SATA et permet de pouvoir connecter jusqu’à 160 GPIO. Ces deux cartes sont désormais prises en charge par le noyau Linux mainline.
A80
Le Allwinner A80, développé par la société Allwinner Technology, est le premier système monopuce de la série Allwinner A8X. Il dispose de l’architecture Big.LITTLE d’ARM avec huit cœurs, dont quatre Cortex A7 à basse consommation, et quatre autres cœurs Cortex A15 à haute performance.
La puce intègre un processeur graphique PowerVR G6230 gérant OpenCL 1.1, OpenGL 3.0, OpenGL ES Next 3.0 et 2.0. Par rapport à ses prédécesseurs, il intègre la prise en charge de l’USB 3, le décodage matériel H.265 et la prise en charge de caméras dont la définition peut atteindre 16 mégapixels.
Le Allwinner A80 est désormais pris en charge par le noyau. La carte de développement Optimus A80, sortie au même moment que le système monopuce, est également prise en charge.
prise en charge de l’unité de gestion d’alimentation (PMU) pour les Exynos 5420 et Exynos 3250 ;
gestion de la mise en veille en mémoire (suspend to ram) pour le Exynos 5420.
AMD Seattle
Les processeurs AMD Seattle sont maintenant gérés par Linux. Ce sont les premiers processeurs grand public de la firme AMD à être basés sur l’architecture ARM 64 bits (ARMv8-A Cortex A57) et non pas x86. Ils embarquent notamment un coprocesseur cryptographique.
Device tree overlay — surcouche d’arborescence matérielle
Le Device tree est une structure de données chargée au démarrage du noyau qui décrit la topologie et certaines informations matérielles. Le code du noyau qui gère certains microcontrôleurs ou même certains pilotes viennent ensuite y chercher des informations afin de s’initialiser correctement.
Cela permet d’avoir un code beaucoup plus générique avec moins d’informations codées en dur. Le souci est qu’il a été écrit de façon statique par ses créateurs, par conception et architecture logicielle. C’est extrêmement pratique et puissant pour exprimer plein de contraintes, mais cela reste lourd et complexe à mettre en place sur des cartes dont les possibilités matérielles ou la topologie peuvent rapidement changer, comme c’est le cas sur une BeagleBone ou une Raspberry Pi, par exemple.
Cette version du noyau introduit une nouvelle fonctionnalité : le Device tree Overlay. L’overlay est une fonctionnalité qui permet de venir modifier à chaud une portion de cette arborescence matérielle sur un noyau en train de tourner, ou de venir greffer une portion d’un autre device tree par dessus un autre qui est déjà en cours d’exécution. Cela va permettre de résoudre pas mal de problèmes, comme ceux évoqués plus haut.
Pour de plus amples informations au sujet du Device tree, je vous invite à lire ce paragraphe de notre précédente dépêche et cet article.
ARM Coresight
La technologie ARM Coresight est maintenant prise en charge par le noyau. Coresight est un mécanisme de débogage matériel d’un système monopuce ARM qui inclut une partie JTAG et une partie de traçage et de débogage de matériel et bus matériel assistée, nous nous focaliserons ici sur cette dernière.
Il est aujourd’hui très complexe de porter un nouveau système monopuce au sein du noyau ou d’un système d’exploitation temps réel, et de comprendre précisément et finement ce qu’il se passe à l’intérieur. Il y a, en effet, énormément de contrôleurs et de composants interconnectés : processeur graphique, contrôleur d’accès direct à la mémoire (DMA), processeur de traitement de signal (DSP), AMBA bus, etc. Cela peut rendre la tâche d’un développeur extrêmement ardue, afin de savoir quel signal est levé dans le processeur et à quel moment (IRQ, DMA), ou quel flux de données transite sur un bus. C’est précisément là que Coresight intervient.
Le problème lié à l’année 2038 est toujours là. Les fonctions internes do_settimeofday(), timekeeping_inject_sleeptime(), et mktime() ont maintenant des remplaçants sûrs pour le bogue de l’année 2038. Dans chaque cas, la nouvelle version ajoute « 64 » au nom de la fonction, et passe au type time64_t ou timespec64 pour représenter le temps. Maintenant, il est possible de rendre obsolètes les anciennes versions et la conversion du code peut commencer.
Gestion des « interruptions hiérarchiques par domaine »
La prise en charge des interruptions hiérarchiques par domaine a été fusionnée au cœur du gestionnaire d’interruptions. Cette gestion est rendue nécessaire pour une prise en compte correcte du matériel complexe qui a de multiples contrôleurs d’interruptions, liés de différentes manières. Voir le nouvel article ajouté à Documentation/IRQ-domain.txt pour un peu plus d’informations.
ftrace
Les filtres utilisés à l’intérieur du sous‐système ftrace gèrent maintenant l’opérateur logique NON « ! » dans les expressions.
Option SO_INCOMING_CPU pour getsockopt()
Une nouvelle option de getsockopt() apparaît, SO_INCOMING_CPU. Elle retourne le processeur sur lequel un traitement est en cours pour une socket donnée. Lorsqu’elle est utilisée avec du matériel à multiples files d’attente sur les grands systèmes, cette option peut permettre à une application de diviser le travail entre les processeurs, maximisant ainsi le débit.
Appel système execveat()
L’appel système execveat() a été fusionné. Comme pour les autres appels système terminant par at (à), il faut un descripteur de fichier pour le répertoire à utiliser comme point de départ pour trouver le fichier exécutable. Il peut également être utilisé pour exécuter un fichier binaire directement à partir d’un descripteur de fichier ouvert, permettant une meilleure mise en œuvre de l’appel système fexecve() trouvé sur d’autres systèmes de type UNIX.
Binder, le système de communication inter‐processus d’Android quitte la partie instable
Malgré quelques réclamations sur la liste de diffusion, le code du système de communication inter‐processus (IPC) Binder d’Android a été déplacé de staging vers la branche principale du noyau. En fin de compte, c’est une interface de programmation qui a été livrée sur des millions de systèmes et qui doit être gérée d’une manière ou d’une autre.
Pilotes graphique libres
Divulgation complète : Cette partie a été écrite par le contributeur habituel, mais celui‐ci travaille maintenant pour Intel. Son discours peut donc être biaisé. Ce contributeur a cependant affirmé sur son blog qu’il resterait factuel et juste envers tous les pilotes, comme il s’est efforcé de le faire depuis le début de ses contributions. Cette partie reflète uniquement son opinion et pas celle de son employeur.
DRM (Direct Rendering Manager)
Les travaux sur la gestion atomique du mode graphique avancent fortement dans cette nouvelle version. Pour rappel, cette gestion atomique permet à une application telle que le serveur X de changer les paramètres de tous les plans graphiques (exposés par l’interface de programmation universal plane, intégrée dans Linux 3.15) à la fois, ce qui permet par exemple à un compositeur d’utiliser les plans graphiques pour faire le rendu vidéo au lieu d’utiliser les shaders. Ces plans graphiques sont plus efficaces, car ils sont généralement capables d’afficher les vidéos dans leur format natif (YUV) sans avoir à être convertis en RVB. De plus, ils sont généralement capables de redimensionner la taille d’une image de façon matérielle.
Sans la gestion atomique des plans graphiques, il est impossible pour un compositeur de migrer dynamiquement le rendu d’une image d’un plan graphique à un autre ou de faire la composition en utilisant des shaders. Une fois cette gestion stabilisée, il deviendra possible d’économiser de l’énergie grâce à cette technique. Pour l’instant, cette nouvelle interface est masquée par une option noyau. Plus d’informations sont disponibles dans la demande d’intégration 3.19 et sur le blog du mainteneur du pilote i915.
La deuxième principale nouveauté est l’ajout de deux nouvelles propriétés DRM afin de fournir une meilleure gestion des écrans par les processeurs graphiques virtuels [commit]. Ces propriétés en lecture seule sont à destination du serveur X et des environnements de bureau, afin qu’ils puissent positionner les écrans de la même façon que dans la machine hôte. Il faudra donc attendre quelques mois afin que le serveur graphique et les environnements de bureau utilisent ces propriétés. Le pilote de processeur graphique virtuel qxl, utilisé par KVM, a été modifié afin de lire ces propriétés depuis l’hôte avant de modifier les propriétés nouvellement ajoutées.
Pour AMD, la version 3.19 du noyau apporte un changement très important, l’introduction du pilote AMDKFD (AMD Kernel Graphic Driver) qui permet d’exposer une interface bas niveau à destination des applications utilisant le calcul générique sur un processeur graphique (GPGPU). Cette interface permet de tirer parti du modèle de programmation HSA (Heterogeneous System Architecture) qui vise à permettre une collaboration plus rapide entre le processeur graphique et le processeur central. Pour plus d’information sur HSA, vous pouvez consulter la page Wikipédia ou le site d’AMD. Pour plus d’informations concernant le code, vous pouvez consulter les demandesd’intégration.
Une autre nouveauté est l’amélioration de la gestion du ventilateur. Jusqu’à présent, le ventilateur était géré par un circuit intégré externe, configuré par le BIOS. Cependant, de nouveaux processeurs graphiques nécessitent maintenant une gestion du ventilateur par le noyau, comme c’est le cas pour le pilote Nouveau. Ce problème a été découvert et documenté dans un rapport de bogue par un utilisateur Radeon, il y a plus d’un an. Cet utilisateur a commencé par faire de la rétro‐ingénierie du pilote propriétaire grâce à l’outil MMIOTRACE, qui est également utilisé par le projet Nouveau et a trouvé la liste des écritures nécessaires pour pouvoir gérer manuellement la vitesse du ventilateur. Cependant, en novembre, Alex Deucher d’AMD a fourni des correctifs plus complets, afin d’apporter cette gestion manuelle du ventilateur. Ces correctifs ont finalement été intégrés dans Linux 3.19. Il faudra cependant attendre au moins Linux 3.20 avant que cette gestion soit exposée via l’interface de HWMON. Pour plus d’informations, vous pouvez consulter le rapport de bogue qui détaille tout l’historique.
Outre ces changements, la gestion d’énergie pour la famille Canary Island s’améliore, ainsi que la gestion des espaces d’adressage par contexte graphique. Pour plus d’information, vous pouvez consulter les demandesd’intégration.
Intel (pilote i915)
Dans cette nouvelle version, le pilote i915 apporte une gestion basique des processeurs graphiques Intel Skylake qui succèdent à la famille Broadwell et qui devraient être disponibles à la vente en septembre 2015.
Malheureusement, contrairement à ce qui a été annoncé dans la dépêche précédente, la gestion du PPGTT (Per‐Process Graphics Translation Table) n’a pas pu être activée pour les processeurs Haswell à cause d’un bogue avec la gestion des contextes. Le PPGTT devrait cependant être activé dans Linux 3.20 pour les processeurs Broadwell.
La gestion atomique du mode graphique continue d’avancer, même si rien n’est encore utilisable. Dans cette nouvelle version, plusieurs portions du code ont été découpées en une partie de validation et une partie pour appliquer les changements. Ceci permet au pilote de prévenir si une combinaison n’est pas possible avant de commencer à appliquer les changements. Une version préliminaire devrait être disponible dans Linux 3.20, si l’on en croit les dires du mainteneur i915.
La gestion des modes d’affichage en espace utilisateur — le User-based ModeSetting (UMS) —, ancêtre de l’actuelle gestion en espace noyau — Kernel-based ModeSetting (KMS) — qui fut introduite en 2009, commence à être supprimée du noyau. Il aura donc fallu 5 ans entre la suppression de la gestion du mode d’affichage en espace utilisateur dans le pilote X.Org xf86-video-intel et la suppression du code correspondant dans le noyau.
Étonnamment, cette nouvelle version apporte des correctifs pour des familles plutôt anciennes. Ainsi, les générations 3 et 4 ont reçu une meilleure prise en charge de la remise à zéro de l’état après un blocage du processeur graphique. De même, les processeurs graphiques i830M devraient avoir une gestion fonctionnelle de l’affichage.
Lors de la demande d’intégration, Linus a fait remarquer qu’un message d’avertissement était généré dans le journal noyau lors du démarrage. Après investigation, Linus « pas content » Torvalds a rappelé pourquoi il est inacceptable qu’une telle modification se soit retrouvée sur son ordinateur et a fait valoir son opinion en disant qu’il y avait un manque flagrant de tests.
Bien d’autres modifications importantes sont présentes dans cette nouvelle version. Si vous voulez en savoir plus, vous pouvez consulter l’habituel compte‐rendu détaillé des modifications de Daniel Vetter (mainteneur i915). Vous pouvez aussi consulter la demande d’intégration i915.
NVIDIA (pilote Nouveau)
Le changement principal pour Nouveau dans cette version est la gestion très préliminaire des nouveaux processeurs graphiques de la famille Maxwell. Il est maintenant possible d’avoir un affichage fonctionnel, mais sans aucune accélération. Cette accélération n’est en effet pas facile à fournir, car il est impossible d’envoyer le microcode de changement de contexte sans passer par le processeur de gestion d’énergie. Comme ce microcode doit nécessairement être signé par NVIDIA, Nouveau utilise celui inclus avec le VBIOS. Il reste donc à écrire ce microcode de changement de contexte.
NVIDIA a proposé de fournir son microcode avec les droits de redistribution, afin qu’il soit possible pour l’équipe de Nouveau de fournir une accélération graphique sur les générations futures. Malheureusement, il n’y a eu encore aucune concrétisation ; par conséquent, l’équipe ne sait pas quand l’accélération sera disponible.
NVIDIA poursuit son effort en ajoutant la gestion de la tension d’alimentation pour le GK20A présent dans le Tegra K1. Ce travail est indispensable pour la gestion du changement de fréquence, qui devrait arriver dans la prochaine version du noyau.
NVIDIA a également répondu à une question de Pierre Moreau (un troisième développeur Nouveau français actif !) concernant le rôle d’un registre qui, s’il est mal configuré, empêche Nouveau de fonctionner sur son MacBook Pro. Pierre a ainsi pu écrire un correctif qui a été accepté dans Linux 3.19.
GPU des systèmes monopuces
Le pilote Tegra pour les systèmes monopuces de NVIDIA a reçu la gestion des plans graphiques universels [commit]. Le pilote peut également utiliser l’IOMMU du système, lorsque celle‐ci est disponible. Cela permet, par exemple, de ne plus avoir à allouer une grosse portion contiguë de mémoire, l’IOMMU se chargeant de mettre les pages dans le bon ordre dans l’espace d’adressage [commit]. Pour finir, plusieurs améliorations liées à l’affichage ont été faites pour les liens DSI. Pour plus d’informations, vous pouvez consulter la demande d’intégration.
Le pilote MSM, à destination des processeurs graphiques Adreno de Qualcomm, reçoit dans cette version la gestion de la famille a4xx. Pour profiter de la 3D, il sera cependant nécessaire d’utiliser Mesa 10.5, qui devrait sortir dans les prochaines semaines. Une autre amélioration majeure est la conversion du code d’affichage, afin d’utiliser la nouvelle interface de gestion atomique d’un mode graphique introduite dans cette version. Pour plus d’informations, vous pouvez consulter les différentesdemandes d’intégration.
Le pilote Exynos, pour les processeurs graphiques Samsung, a reçu la gestion du système monopuce Exynos 4415, ainsi qu’un gros effort de nettoyage et débogage du code. Pour plus d’informations, vous pouvez consulter la demande d’intégration.
Réseau
La couche réseau a un nouveau sous‐système pour recourir au matériel approprié pour les fonctions de commutation et routage.
eBPF et socket réseau
Pour Linux 3.18, Alexei Starovoitov avait activement travaillé à introduire un nouvel appel système bpf(). Celui‐ci permet la gestion de programmes BPF étendu. Ce système se veut générique et indépendant de la partie réseau. Ce sera un moyen d’envoyer depuis l’espace utilisateur des filtres compilés dynamiquement par LLVM à divers sous‐systèmes (réseau, sécurité). Cependant, dans la pratique, on ne pouvait pas encore utiliser la structure créée.
Une première implémentation pour les sockets réseau est maintenant disponible. Malgré le nom de Berkeley Packet Filter, cette implémentation ne permet pas encore la création de filtres. Pour l’instant, la structure n’a accès en entrée qu’au paquet réseau et non à toutes les métadonnées présentes dans la structure du noyau (skb). En sortie, elle n’a accès qu’à une table de hachage partagée avec l’espace utilisateur.
Cela en limite l’usage à la collecte de statistiques (des exemples sont disponibles), mais d’autres applications devraient être possibles dans les prochains cycles de développement.
Nouveau pilote pour gérer les connexions réseau entre conteneurs
Le nouveau pilote ipvlan permet la création de réseaux virtuels pour l’interconnexion de conteneurs. Il est conçu pour fonctionner avec les espaces de noms en réseau. Il est un peu comme le pilote macvlan existant, mais il fait son multiplexage à un niveau plus haut dans la pile.
Lors de la création de plusieurs espaces de noms, conteneurs ou invités (sous‐hôtes) sur un hôte, plusieurs modes de connexion au réseau sont généralement disponibles (hôte seulement, NAT, pont réseau).
Dans le cas d’un pont réseau (l’équivalent d’un switch), l’hôte possède une interface physique (généralement appelée maître), éventuellement une interface représentant le pont, et une interface reliée (esclave) pour chaque sous‐hôte.
Le plus généralement, on utilise le pilote bridge (cf.man brctl). Il est cependant utile de limiter les interactions de chaque sous‐hôte. Là où macvlan répartit les paquets en fonction de l’adresse MAC (niveau 2), ipvlan peut le faire en fonction de l’adresse IP (niveau 3).
Pagination à la demande pour InfiniBand
La couche InfiniBand prend maintenant en charge la pagination à la demande. Cette fonction permet le paramétrage d’un emplacement RDMA et est remplie par des défauts de page lorsque la mémoire est effectivement utilisée, évitant ainsi le blocage d’une zone mémoire quand ça ne serait pas nécessaire.
Sécurité
Intel Memory Protection Extensions (MPX)
La prise en charge, pour les programmes en espace utilisateur, de la technologie MPX spécifique aux processeurs Intel a été ajoutée. Les processeurs disposant de cette extension matérielle (architecture Skylake, qui n’est pas encore disponible) pourront contrôler les accès à la mémoire en vérifiant notamment qu’ils sont effectués dans une région valide. Cette protection peut empêcher l’exploitation de vulnérabilités de type dépassement de mémoire tampon.
Pour que cette fonctionnalité soit efficace, il faut donner au processeur beaucoup d’informations sur les différentes zones mémoire dont l’accès est valide. Il est donc probable que l’adoption de cette technologie se fasse progressivement. La prise en charge dans la suite de compilateurs GCC ainsi que dans la bibliothèque glibc est en cours d’intégration. Plus de détails dans l’article sur LWN.net, dans la dépêche sur le noyau 3.14 et dans la documentation du noyau [correctifs].
seccomp et ARM64
L’architecture ARM64 peut maintenant faire usage du sous‐système seccomp.
Correction de l'appel système setgroups()
Le comportement de l’appel système setgroups() a été modifié pour corriger une éventuelle faille de sécurité. Ce problème a été expliqué dans un article de LWN.net, lorsqu’un développeur a essayé d’introduire dans Linux un moyen de réduire les privilèges d’une application. En effet, enlever un utilisateur d’un groupe peut parfois augmenter les privilèges, et quelques administrateurs utilisent les droits UNIX de cette façon.
Le problème est que Linux propose déjà à un utilisateur de diminuer ses privilèges lorsque celui‐ci s’exécute dans un espace de noms utilisateur. Cela a été corrigé dans cette nouvelle version, mais ce changement peut casser certaines applications.
Chargement non voulu de modules noyau
Dans certains cas, il était possible de charger des modules noyau non nécessaires sans avoir besoin d’être super‐utilisateur (root). Plus de détails sont disponibles dans cet article de Mathias Krause.
LSM
IMA & EVM
Un méchanisme (hook) a été ajouté pour charger un certificat X.509 directement dans le trousseau de clés IMA chargé de la vérification d’intégrité [correctifs : 1, 2, 3, 4 et 5].
SMACK
Pour qu’un processus puisse poser un verrou sur un fichier sur lequel il n’a que le droit d’accès en lecture, il doit disposer du mode d’accès SMACK « lock » (cf.dépêche noyau 3.13). L’étiquette « _ » étant utilisée comme étiquette pour le système de base, un processus quelconque ne peut verrouiller en lecture l’un de ces fichiers que si une règle est définie.
Comme c’est une opération très courante, l’étiquette « _ » a été modifié pour se comporter légèrement différemment, en autorisant le verrouillage en lecture pour tous les processus. Cela implique que les processus avec l’étiquette « ^ », qui peuvent lire tous les fichiers d’un système, peuvent désormais aussi les verrouiller en lecture. Ce changement a été effectué pour simplifier les politiques SMACK [correctif].
OverlayFS gère maintenant plusieurs couches. Il est utilisé pour les CD autonomes (live CD), car il permet de rendre inscriptible une couche en lecture seule, en y ajoutant une zone en lecture‐écriture.
Ceph avec des données inline
Le système de fichiers distribué Ceph gère les données inline pour augmenter les performances, principalement pour les petits fichiers, comme le font déjà ext4 et Btrfs. Il gère maintenant également le chiffrement des messages entre les clients et les serveurs.
Pour rappel, Ceph est un système de fichiers réparti sans point individuel de défaillance (SPOF), avec une bonne gestion de l’extensibilité.
SquashFS avec LZ4
SquashFS gère la compression LZ4 qui est une compression peu gourmande en temps processeur. SquashFS est un système de fichiers compressé en lecture seule, utilisé par les CD autonomes (live CD), par exemple.
Btrfs
Le RAID 5 et le RAID 6, pris en charge nativement par le Btrfs, sont améliorés. Le changement à chaud des disques est aussi mieux pris en charge. Il y a énormément de corrections de bogues, y compris une corruption après un crash ou dans une condition d’erreur.
F2FS
Une nouvelle option de montage nommée fastboot réduit un certain nombre de vérifications effectuées lors du montage du système de fichiers, et accélère donc potentiellement le démarrage du système d’exploitation.
NFS
Le client et le serveur NFS prennent maintenant en charge les options NFS 4.2 ALLOCATE et DEALLOCATE. La première peut être utilisée pour demander la préallocation du stockage d’un fichier, tandis que la seconde est utile pour libérer un emplacement.
Divers
La multi‐file de blocs est améliorée et est prise en charge dans le pilote NVMe, qui gère les disques à mémoire Flash SSD directement reliés au bus PCI Express.
La prise en charge de la virtualisation KVM pour l’architecture Itanium (IA64) a été supprimée. Elle n’était pas maintenue et, apparemment, n’était pas utilisée non plus.
Xen
Cette nouvelle version du noyau apporte une gestion complète des processeurs n’ayant pas de cohérence pour leurs caches, comme c’est le cas dans les processeurs ARM. L’hyperviseur a donc reçu un mécanisme permettant d’effectuer les opérations de maintenance de cache nécessaires sur ces processeurs.
Le pilote SCSI spécifique pour les machines virtuelles (virtio_scsi) peut faire usage de la gestion des files matérielles multiples (blk-mq : présentation sur blk-mq) qui est implémentée dans le noyau depuis la version 3.13 [correctif].
Prise en charge de l’enlèvement à chaud des interfaces réseau virtuelles (vNIC) [correctif].
Le bilan en chiffres
En ce qui concerne les statistiques du cycle de développement du noyau 3.19, le site LWN.net a publié son traditionnel article récapitulatif.
En nombre de modifications, on se situe à 12 461, soit environ 1 300 modifications de plus que la version précédente du noyau. Le nombre de contributeurs est, quant à lui, de 1 422. Ce nombre est resté relativement constant sur la dernière année.
Le développeur ayant écrit le plus de modifications est H. Hartley Sweeten (463) pour son travail de nettoyage des pilotes Comedi. Du côté des développeurs ayant le plus modifié de lignes, Malcolm Priestley remporte la palme grâce à son travail d’amélioration sur le pilote vt6655.
Environ 200 entreprises ont participé à l’élaboration de ce noyau. En tête, on retrouve Intel, qui a effectué 12 % des changements que l’on peut trouver dans cette nouvelle version. En deuxième place, Red Hat a contribué pour 8,3 % des changements. Il est cependant important de noter que les développeurs sans affiliation ont effectué 10,9 % des modifications, soit juste un peu moins qu’Intel, alors que les personnes non identifiées ont écrit 7,5 % des modifications. On peut donc dire, bien que le noyau soit majoritairement écrit par des employés d’entreprises, que les contributeurs indépendants sont toujours les bienvenus et sont même une majorité !
Appel à volontaires
Cette dépêche est rédigée par plusieurs contributeurs dont voici la répartition :
le mainteneur d’une section de la dépêche est responsable de l’organisation et du contenu de sa partie, il s’engage également à l’être dans le temps jusqu’à ce qu’il accepte de se faire remplacer ;
un contributeur est une personne qui a participé à la rédaction d’une partie d’une section de la dépêche, sans aucune forme d’engagement pour le futur.
Malgré cette équipe importante, beaucoup de modifications n’ont pas pu être expliquées par manque de temps et de volontaires.
Nous sommes particulièrement à la recherche de mainteneurs pour les sections Systèmes de fichiers et Réseau, les précédents n’ayant pas donné de signes de vie pendant la rédaction des dernières dépêches.
Si vous aimez ces dépêches et suivez tout ou partie de l’évolution technique du noyau, veuillez contribuer dans votre domaine d’expertise. C’est un travail important et très gratifiant qui permet aussi de s’améliorer. Il n’est pas nécessaire d’écrire du texte pour aider, simplement lister les commits intéressants dans une section aide déjà les rédacteurs à ne pas passer à côté des nouveautés. Essayons d’augmenter la couverture sur les modifications du noyau !


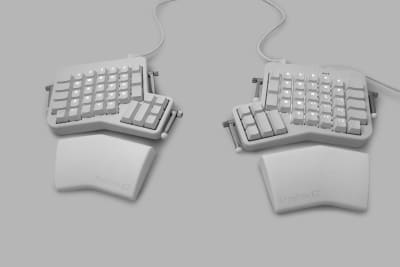
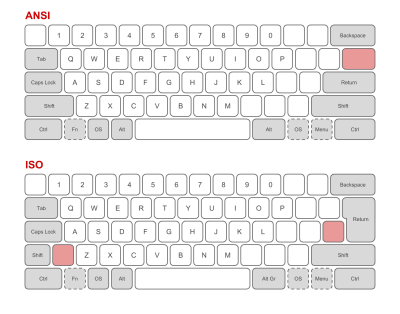


 (dm, ra, il)
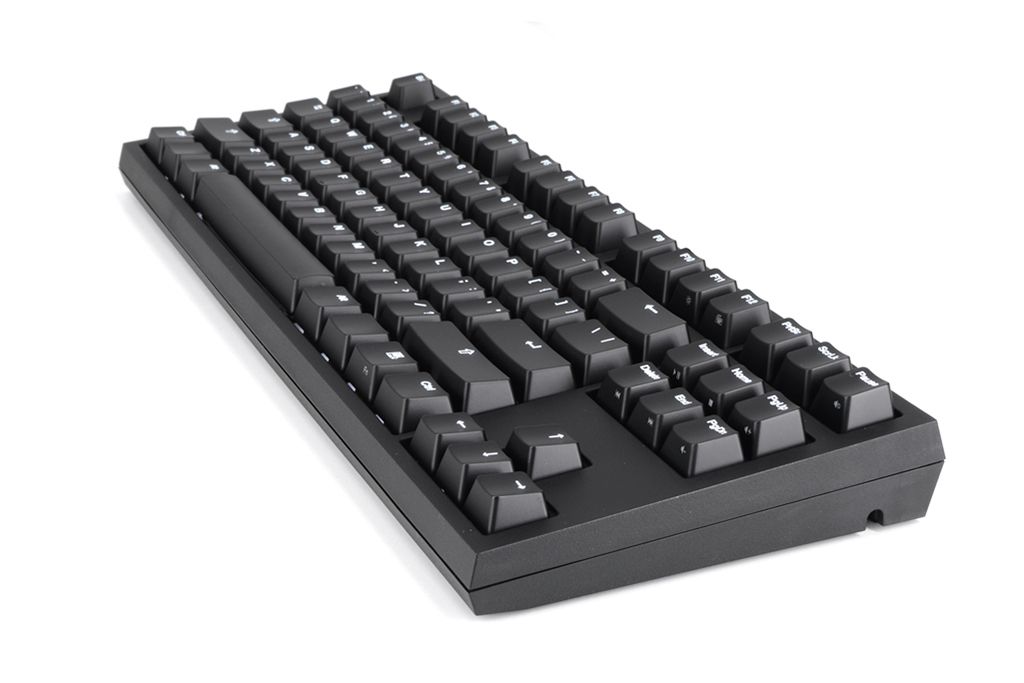


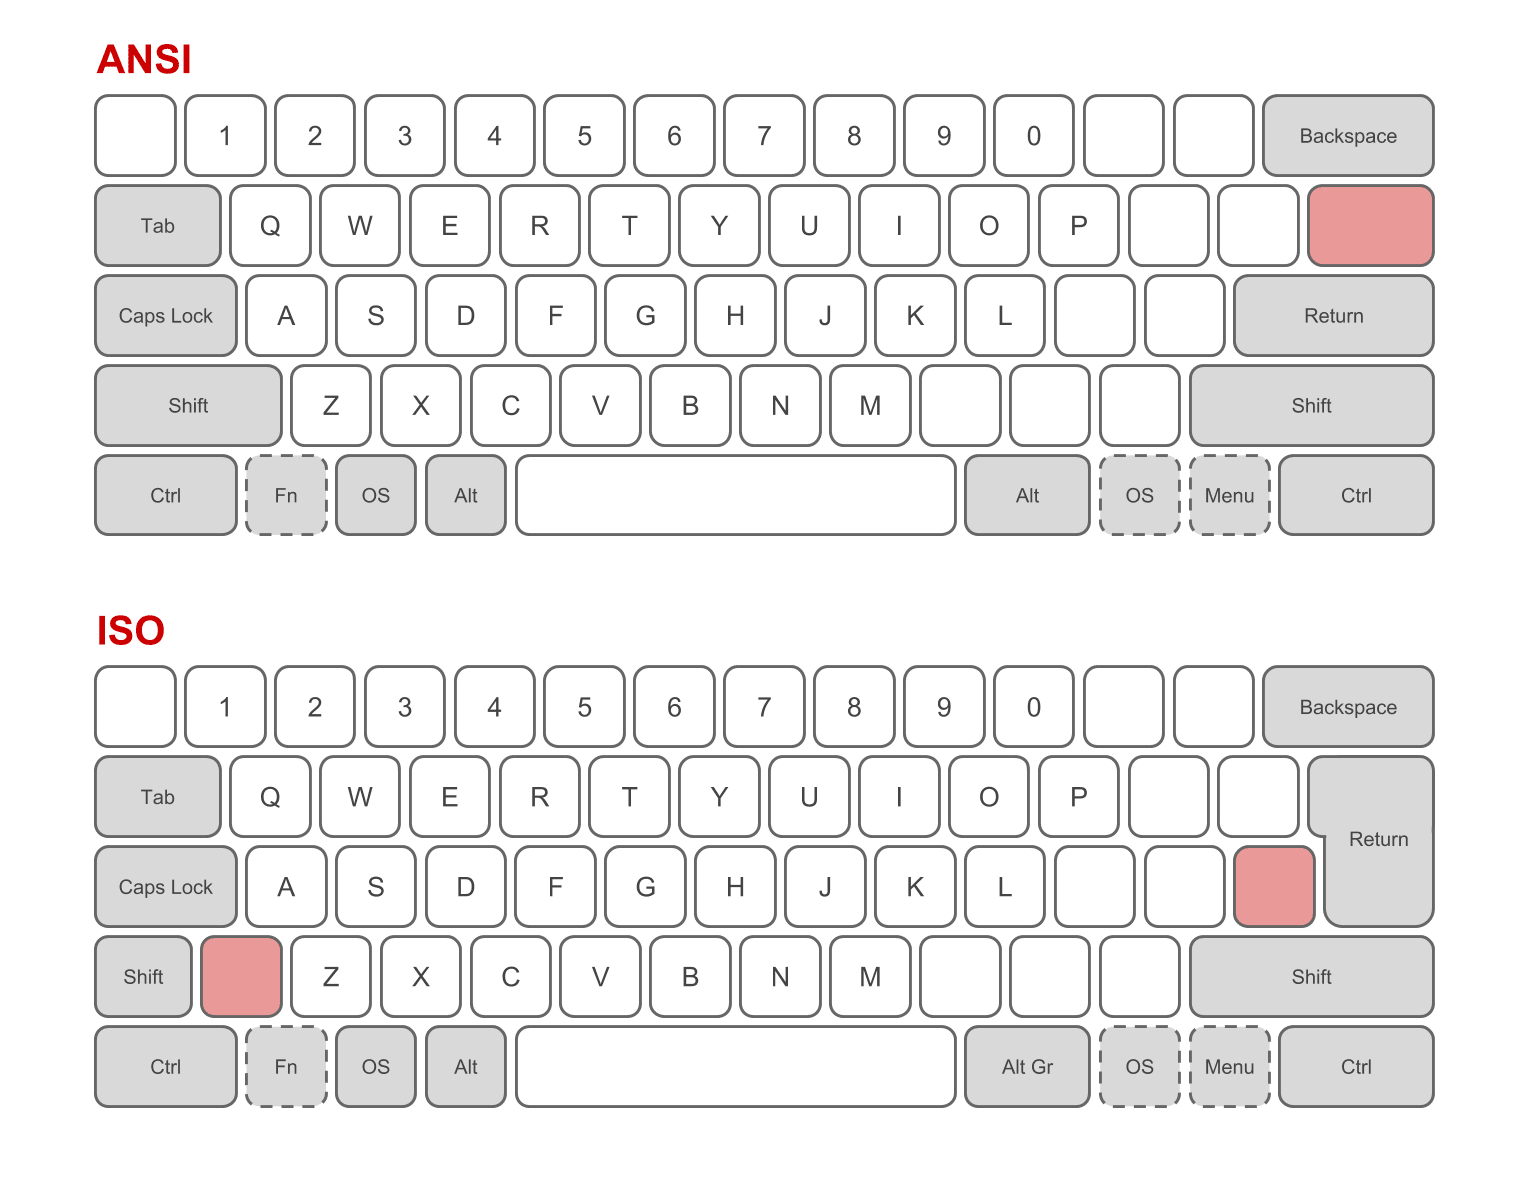


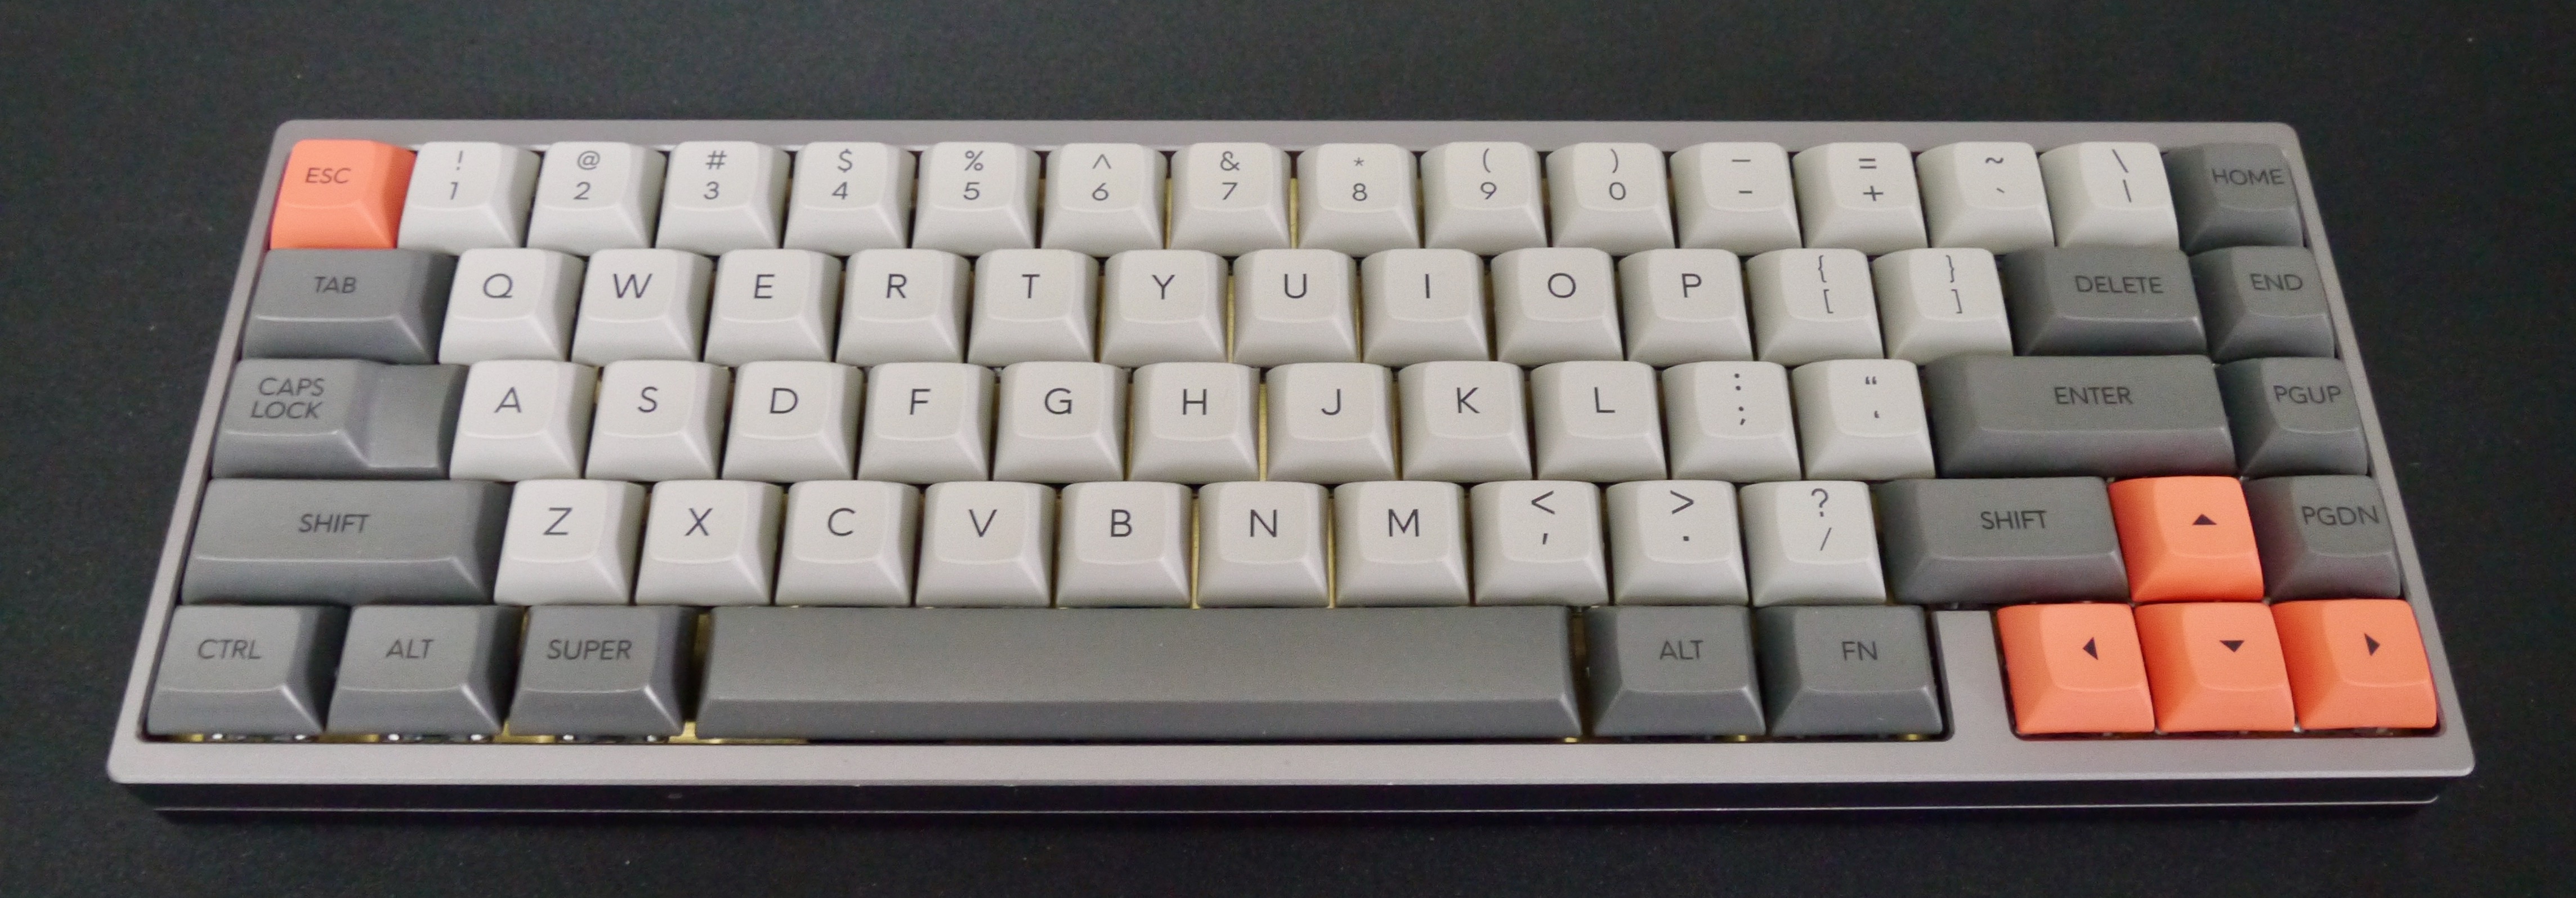


![Descargar The Last Man on Earth - Temporada 1 [HDTV 720p][Cap.105][AC3 5.1 Español Castellano]](http://www.divxatope.com/uploads/images/fichas/f/thumbs/386254_the-last-man-on-earth---temporada-1--hdtv-720p-ac3-5-1-cap-5.jpg) Director
Philip Lord Chris Miller Peter Atencio Jason Woliner Phil Traill
Guion
Andy Bobrow Will Forte Emily Spivey Tim McAuliffe Liz Cackowski
Musica
Mark Mothersbaugh
Fotografia
Christian Sprenger
Reparto
Will Forte Kristen Schaal January Jones Cleopatra Coleman Mel Rodriguez Alexandra Daddario
Productora
20th Century Fox Television
Genero
Serie de TV Accion Comedia Ciencia ficcion | Supervivencia
Serie de TV Phil Miller es un hombre que en el a o 2022 despierta siendo el ultimo hombre de la Tierra y busca supervivientes a lo largo del pais
Director
Philip Lord Chris Miller Peter Atencio Jason Woliner Phil Traill
Guion
Andy Bobrow Will Forte Emily Spivey Tim McAuliffe Liz Cackowski
Musica
Mark Mothersbaugh
Fotografia
Christian Sprenger
Reparto
Will Forte Kristen Schaal January Jones Cleopatra Coleman Mel Rodriguez Alexandra Daddario
Productora
20th Century Fox Television
Genero
Serie de TV Accion Comedia Ciencia ficcion | Supervivencia
Serie de TV Phil Miller es un hombre que en el a o 2022 despierta siendo el ultimo hombre de la Tierra y busca supervivientes a lo largo del pais

![Descargar The Walking Dead - Temporada 5 [HDTV 1080p][Cap.512][AC3 5.1 Español Castellano]](http://www.divxatope.com/uploads/images/fichas/f/thumbs/378267_the-walking-dead---temporada-5--hdtv-1080p-ac3-5-1-cap-12.jpg) Serie de TV. Terror. Ciencia ficción | Zombis. Futuro postapocalíptico. Gore. Cómic
SINOPSIS Serie de TV (2010-Actualidad). Narra la historia de un apocalipsis zombie. Un grupo de supervivientes, dirigidos por el policía Rick Grimes, viaja a través de los Estados Unidos tratando de poner sus vidas a salvo. Rick es el ayudante del Sheriff de un pueblo de Georgia, que permaneció en coma durante la irrupción de la plaga. Aunque el leit motiv de la serie -cuyo episodio piloto está dirigido y escrito por Frank Darabont- sea el apocalipsis zombie, la narración se centra más en las relaciones entre los personajes, su evolución y comportamiento en las situaciones críticas.
REPARTO Andrew Lincoln, Jon Bernthal, Sarah Wayne Callies, Laurie Holden, Jeffrey DeMunn, Steven Yeun, Norman Reedus, Emma Bell, Chandler Riggs, IronE Singleton, Melissa Suzanne McBride, Jeryl Prescott, Andrew Rothenberg, Michael Rooker, Noah Emmerich, Lauren Cohan, Pruitt Taylor Vince, Danai Gurira
PRODUCTORA Emitida por la cadena AMC; Circle of Confusion / Valhalla Motion Pictures / Darkwoods Productions / AMC Studios
PREMIOS
2010: Nominada al Globo de Oro: Mejor Serie de TV drama
2010: 3 nominaciones al Emmy: Mejor maquillaje, efectos visuales, montaje sonoro.
Serie de TV. Terror. Ciencia ficción | Zombis. Futuro postapocalíptico. Gore. Cómic
SINOPSIS Serie de TV (2010-Actualidad). Narra la historia de un apocalipsis zombie. Un grupo de supervivientes, dirigidos por el policía Rick Grimes, viaja a través de los Estados Unidos tratando de poner sus vidas a salvo. Rick es el ayudante del Sheriff de un pueblo de Georgia, que permaneció en coma durante la irrupción de la plaga. Aunque el leit motiv de la serie -cuyo episodio piloto está dirigido y escrito por Frank Darabont- sea el apocalipsis zombie, la narración se centra más en las relaciones entre los personajes, su evolución y comportamiento en las situaciones críticas.
REPARTO Andrew Lincoln, Jon Bernthal, Sarah Wayne Callies, Laurie Holden, Jeffrey DeMunn, Steven Yeun, Norman Reedus, Emma Bell, Chandler Riggs, IronE Singleton, Melissa Suzanne McBride, Jeryl Prescott, Andrew Rothenberg, Michael Rooker, Noah Emmerich, Lauren Cohan, Pruitt Taylor Vince, Danai Gurira
PRODUCTORA Emitida por la cadena AMC; Circle of Confusion / Valhalla Motion Pictures / Darkwoods Productions / AMC Studios
PREMIOS
2010: Nominada al Globo de Oro: Mejor Serie de TV drama
2010: 3 nominaciones al Emmy: Mejor maquillaje, efectos visuales, montaje sonoro.