Shared posts

24 Apr 15:02

AWS Elastic Beanstalk for Docker

by AWS Evangelist

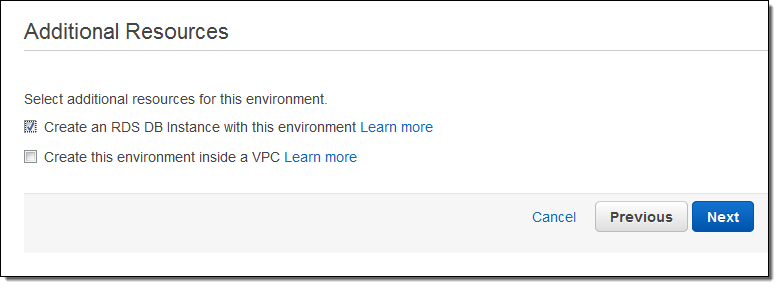
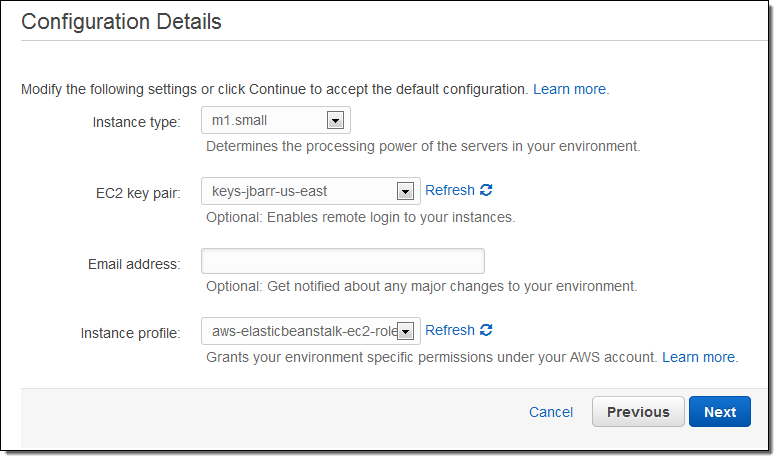
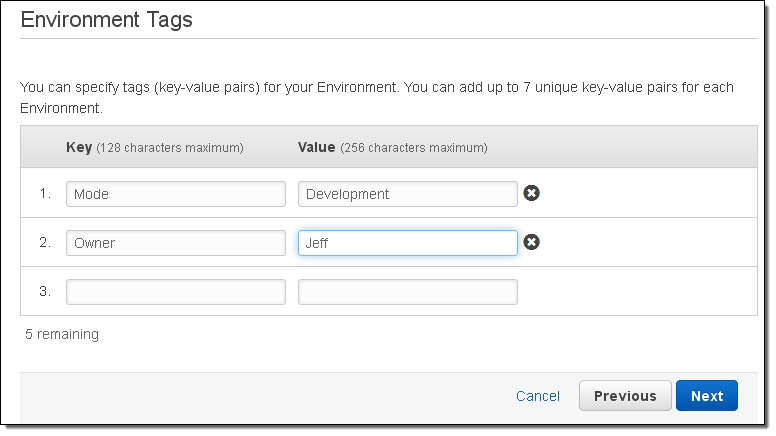
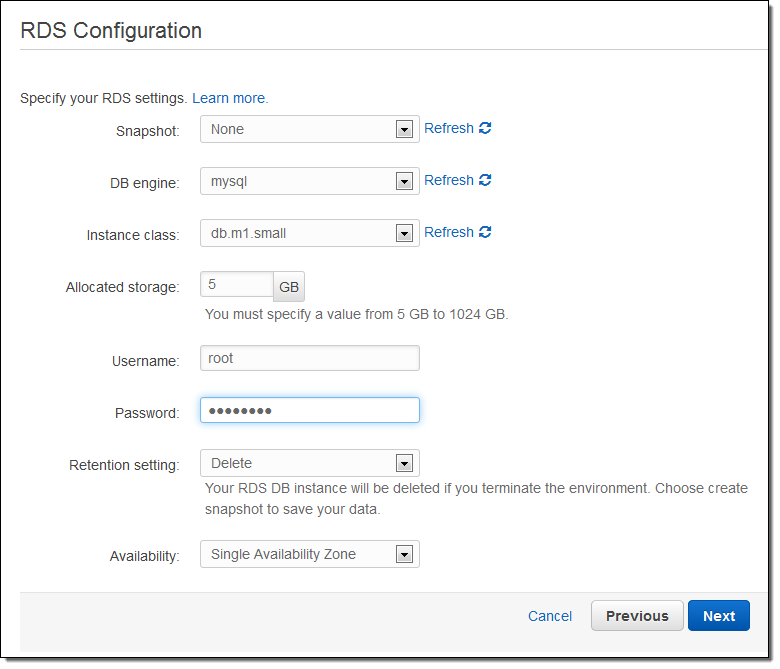
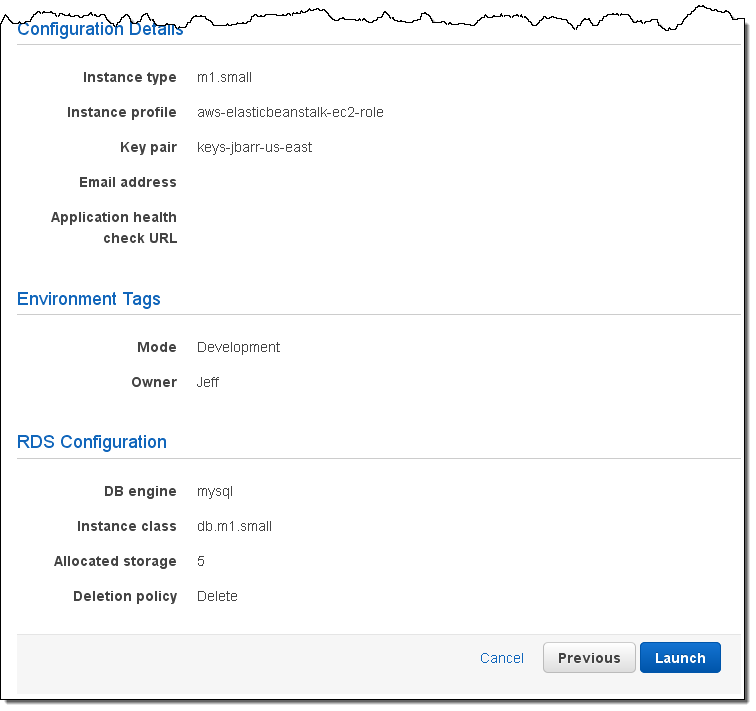
AWS Elastic Beanstalk makes it easy for you to deploy and manage applications in the AWS cloud. After you upload your application, Elastic Beanstalk will provision, monitor, and scale capacity (Amazon EC2 instances), while also load balancing incoming requests across all of the healthy instances.

Docker automates the deployment of applications in the form of lightweight, portable, self-sufficient containers that can run in a variety of environments.  Containers can be populated from pre-built Docker images or from a simple recipe known as a Dockerfile.

Docker's container-based model is very flexible. You can, for example, build and test a container locally and then upload it to the AWS Cloud for deployment and scalability. Docker's automated deployment model ensures that the runtime environment for your application is always properly installed and configured, regardless of where you decide to host the application.

Today we are enhancing Elastic Beanstalk with the ability to launch applications contained in Docker images or described in Dockerfiles. You can think of Docker as an exciting and powerful new runtime environment for Elastic Beanstalk, joining the existing Node.JS, PHP, Python, .NET, Java, and Ruby environments.

Beanstalk, Meet Docker
With today's launch, you now have the ability to build and test your applications on your local desktop and then deploy them to the AWS Cloud via Elastic Beanstalk.

You can use any desired version of the programming language, web server, and application server. You can configure them as you see fit, and you can install extra packages and libraries as needed.

You can launch existing public and private Docker images. Each image contains a snapshot of your application and its dependencies, and can be created locally using a few simple Docker commands.To use an image with Elastic Beanstalk, you will create a file called Dockerrun.aws.json. This file specifies the image to be used and can also set up a port to be exposed and volumes to be mapped in to the container from the host environment. If you are using a private Docker image, you will also need to create a .dockercfg file, store it in Amazon S3, and reference it from the Authentication section of Dockerrun.aws.json.

You can also use a Dockerfile. The Docker commands contained in such a file will be processed and executed as part of the Auto Scaling configuration established by Elastic Beanstalk. In other words, each freshly created EC2 instance used to host an Elastic Beanstalk application will be configured as directed by your Dockerfile.

Regardless of which option you choose, you always upload a single file to Elastic Beanstalk. This upload can be:

  1. A plain Dockerfile.
  2. A plain Docker.aws.json file.
  3. A Zip file that contains either Dockerfile or Docker.aws.json, along with other application assets.

The third option can be useful for applications that require a number of "moving parts" to be present on the instance. If you are using a Dockerfile, you could also choose to fetch these parts using shell commands embedded in the file.

Docker in Action
Let's create a simple PHP application using Elastic Beanstalk for Docker! The first step is the same for every Elastic Beanstalk application -- I simply fill in the name and the description:

Then I choose Docker as the Predefined Configuration. This application will not need to scale very high, so a single instance environment is fine:

The moving parts are in a single directory, with src and web subdirectories and a Dockerfile at the root:

I zipped them up into a single file like this (note that I had to to explicity mention the .ebextensions directory)

Then I upload the file to Elastic Beanstalk:

With the file uploaded, I can now create an Elastic Beanstalk environment. This will be my testing environment; later I could create a separate environment for production. Elastic Beanstalk lets me configure each environment independently. I can also choose to run distinct versions of my application code in each environment:

The PHP application makes use of a MySQL database so I will ask Elastic Beanstalk to create it for me (I'll configure it in a step or two):

Now I choose my instance type. I can also specify an EC2 keypair; this will allow me to connect to the application's EC2 instances via SSH and can be useful for debugging:

I can also tag my Elastic Beanstalk application and the AWS resources that it creates (this is a new feature that was launched earlier this week):

Now I can configure my RDS instance. The user name and the password will be made available to the EC2 instance in the form of environment variables.

The following PHP code retrieves the user name and the password:

<?php
  define('DB_NAME', getenv('RDS_DB_NAME'));
  define('DB_USER', getenv('RDS_USERNAME'));
  define('DB_PASSWORD', getenv('RDS_PASSWORD'));
  define('DB_HOST', getenv('RDS_HOSTNAME'));
  define('DB_TABLE', 'urler');
?>

The last step before launching is to confirm all of the settings:

Elastic Beanstalk shows me the status of the application and the environment, with dynamic updates along the way:

After a few minutes the environment will be up and running:

The application is just a click away:

After I have created an environment, I can update the source code, create a new ZIP file, and deploy it to the environment in a matter of seconds.

AWS Elastic Beanstalk for Docker is available in all AWS Regions and you can start using it today!

-- Jeff;

PS - The Elastic Beanstalk team holds office hours every Thursday morning. Join them this coming week for Part 3 of a continuing series and learn how to Develop, Deploy, and Manage for Scale with Elastic Beanstalk and CloudFormation.

24 Apr 15:01

MySQL 5.5 to MySQL 5.6 Upgrade Support for Amazon RDS

by AWS Evangelist

The Amazon Relational Database Service (RDS) takes care of almost all of the day to day grunt work that would otherwise consume a lot of system administrator and DBA time. You don't have to worry about hardware provisioning, operating system or database installation or patching, backups, monitoring, or failover. Instead, you can invest in your application and in your data.

Multiple Engine Versions
RDS supports multiple versions of the MySQL, Oracle, SQL Server, and PostgreSQL database engines. Here is the current set of supported MySQL versions:

You can simply select the desired version and create an RDS DB Instance in a minutes.

Upgrade Support
Today we are enhancing Amazon RDS with the ability to upgrade your MySQL DB Instances from version 5.5 to the latest release in the 5.6 series that's available on RDS.

To upgrade your existing instances, create a new Read Replica, upgrade it to MySQL 5.6, and once it has caught up to your existing master, promote it to be the new master. You can initiate and monitor each of these steps from the AWS Management Console. Refer to the Upgrading from MySQL 5.5 to MySQL 5.6 section of the Amazon RDS User Guide to learn more.

For MySQL 5.5 instances that you create after today's release, simply select the Modify option corresponding to the DB Instance to upgrade it to the latest version of MySQL 5.6. If you are using RDS Read Replicas, upgrade them before you upgrade the master.

Version 5.6 MySQL offers a number of important new features and performance benefits including crash safe slaves (Read Replicas), an improved query optimizer, improved partitioning and replication, NoSQL-style memcached APIs, and better monitoring.

The InnoDB storage engine now supports binary log access and online schema changes, allowing ALTER TABLE operations to proceed in parallel with other operations on a table. The engine now does a better job of reporting optimizer statistics, with the goal of improving and stabilizing query performance. An enhanced locking mechanism reduces system contention, and multi-threaded purging increases the efficiency of purge operations that span more than one table.

Planning for Upgrades
Regardless of the upgrade method that is applicable to your RDS DB Instances, you need to make sure that your application is compatible with version 5.6 of MySQL. Read the documentation on Upgrading an Instance to learn more about this.

-- Jeff;

21 Apr 20:30

What happened last night

by jon

Last night, at 6:08pm EDT, the Zencoder service went offline due to a database failure. We began working on the problem immediately, but unfortunately our primary approach to solving the problem was unsuccessful, and the secondary approach took an extended period to implement. In total, the service was unavailable for six hours and 18 minutes.

Here is a detailed description of what happened, why, and why it will never happen again.

What happened

The Zencoder stack relies on a PostgreSQL database, among other things. We believe PostgreSQL to be an excellent database – fast, reliable, scalable, and well-designed. Many services rely upon PostgreSQL, and we have run it successfully since Zencoder’s inception.

For reasons we are still investigating, an internal PostgreSQL database process (autovacuum) stalled while running on a single table in our database. This ultimately caused the database to stop accepting new transactions, effectively putting it in “read-only” mode. At this time, we believe the underlying problem may have been a bug in the version of PostgreSQL we were using, but we are still verifying this.

Within minutes, engineers were alerted to the problem and started an operation that should have unfrozen the database. This process takes time, especially on a large database, but we expected that it would finish in relatively short order. Unfortunately, this process stalled, possibly due to the same issue that caused the problem in the first place.

In parallel with this, we considered failing over to a standby server. We have redundant database servers (along with redundancy across the rest of our stack), and if this were a hardware failure, we could have failed to our secondary server within minutes. Unfortunately, the issue was replicated onto the secondary database as well, and so this was not an option.

Eventually, we determined that the operation itself was not working. We decided to take a more drastic step, and stood up a new stack. Jobs started processing again by 12:26am EDT.

What we will do

As a response to this incident, we have already begun multiple layers of improvements.

First, we have upgraded to a newer version of PostgreSQL that is not susceptible to the particular bug we identified.

Second, we are working on our database configuration and monitoring to ensure that the conditions that led to the problem will not happen again.

Beyond that, we are working on indirect improvements, including faster recovery in the face of a catastrophe and additional layers of redundancy, that will minimize the impact of future problems.

(Our full response to the incident is still being determined, since we are still verifying the root cause for the operation’s failure, but we are happy to share more information with customers who are interested as we make progress in the coming days.)

We sincerely apologize for the problem and for the impact that it caused to our customers. We pride ourselves on operating reliably at very high scale, and we will work hard to make sure this never happens again.

12 Apr 10:36

Heartbleed Hit List

by jwz
The Passwords You Need to Change Right Now:

Some Internet companies that were vulnerable to the bug have already updated their servers with a security patch to fix the issue. This means you'll need to go in and change your passwords immediately for these sites. Even that is no guarantee that your information wasn't already compromised, but there's also no indication that hackers knew about the exploit before this week. The companies that are advising customers to change their passwords are doing so as a precautionary measure.

Also, if you reused the same password on multiple sites, and one of those sites was vulnerable, you'll need to change the password everywhere. It's not a good idea to use the same password across multiple sites, anyway.

Go buy 1password already.

Heartbleed should bleed X.509 to death:

4 companies controlling 90.6% of the internet's secrets. This is fucking insane. Do you have any reason to trust this lot with anything, no less the security of 90.6% of all your 'secure' internet traffic? Do you honestly believe that the NSA/GCHQ didn't see this and say "Well that could be a lot worse"?

What we have done here is fitted our doors with some mega heavy duty locks, and given the master keys to a loyal little dog. Sure, he barks at you with a smile, but can you ever be sure he won't be distracted by an appealing steak from your worst enemy? Of course not, he's a fucking dog. We've seen two-faced dogs before - one was called RSA. They just loved that NSA steak.

Schneier:

At this point, the probability is close to one that every target has had its private keys extracted by multiple intelligence agencies. The real question is whether or not someone deliberately inserted this bug into OpenSSL, and has had two years of unfettered access to everything. My guess is accident, but I have no proof.

I'm hearing that the CAs are completely clogged, trying to reissue so many new certificates. And I'm not sure we have anything close to the infrastructure necessary to revoke half a million certificates.

Possible evidence that Heartbleed was exploited last year.

Also I'd like to point out again that nearly every security bug you've experienced in your entire life was Dennis Ritchie's fault, for building the single most catastrophic design bug in the history of computing into the C language: the null-terminated string. Thanks, Dennis. Your gift keeps on giving.

Previously, previously, previously, previously.

04 Apr 18:15

Partial commits in GitHub for Mac

by robrix

Sometimes when you’re in the zone, you get a ton of work done before you have a chance to pause and commit. You want to break the commit down to describe the logical changes you’ve made, and it doesn’t always break down cleanly file by file. You want to select some parts of your changes to commit at a time. That’s easy in GitHub for Mac.

Select one or more lines to commit by clicking on the line numbers in the gutter. In the latest release, you can select a block of changes at a time. Hover over the right hand side of the line numbers to get a preview of what will be selected, and click to select.

Animated gif of GitHub for Mac single line/block selection

You can select multiple lines or blocks of changes by clicking and dragging. The left of the line numbers will select line by line, and the right will select block by block.

Now you can commit your selected changes, leaving the rest for a later commit.

31 Mar 22:16

Collaborating with Lists

by raganwald

At GitHub, we use lists for collaborating on software development, because lists are a simple and powerful tool for collaborating on anything. That's why we're introducing better visualization of list arrangements in our rendered prose diff view.

In Markdown, making a list is incredibly easy. You can make an unordered list by preceding list items with either a * or a -.

* Item
* Item
* Item

Nested lists are very useful for associating supplementary information such as notes to an item. To nest a list, indent the nested items:

* A list item
  * A nested list's first item
  * A nested list's second item
  * A nested list's third item
* Another list item

For example, many teams use issues and pull requests to keep track of what they're working on right now, and use a Backlog to keep track of features that haven't been scheduled yet:

The Product Backlog

Tracking Changes Over Time

Being able to see changes over time gives teams a perspective on the features and requirements that have been added to projects. We can see at a glance when features are added:

Added Items

Removed:

removed Items

Or changed:

Changed Items

Whether numbered or not, the order of items is usually significant. Rendered prose diffs show you when items have been moved up or down:

Moved Items

Work together, better

It's easy to see when list items have been added, removed, changed, or moved, just as it's easy to review changes to all of your documents in GitHub.

And unlike other products that place your documents in their own "silos," you can use as much or as little of the GitHub toolset to manage and track your documents. Pull requests, organizations, commits, repos, issues, comments, source diffs, and rendered prose diffs: Everything is available and everything works together with your development tools.

GitHub makes collaborating with lists 1,337% more awesome by tracking and visualizing the changes over time using the same powerful tools your team already uses to manage your code.

27 Mar 08:38

AWS Price Reduction #42 - EC2, S3, RDS, ElastiCache, and Elastic MapReduce

by AWS Evangelist

It is always fun to write about price reductions. I enjoy knowing that our customers will find AWS to be an even better value over time as we work on their behalf to make AWS more and more cost-effective over time. If you've been reading this blog for an extended period of time you know that we reduce prices on our services from time to time, and today’s announcement serves as the 42nd price reduction since 2008.

We're more than happy to continue this tradition with our latest price reduction.

Effective April 1, 2014 we are reducing prices for Amazon EC2, Amazon S3, the Amazon Relational Database Service, and Elastic MapReduce.

Amazon EC2 Price Reductions
We are reducing prices for On-Demand instance as shown below. Note that these changes will automatically be applied to your AWS bill with no additional action required on your part.

Instance Type Linux / Unix Price Reduction
Microsoft Windows Price Reduction
M1, M2, C1 10-40% 7-35%
C3 30% 19%
M3 38% 24-27%

We are reducing the prices for Reserved Instances as well for all new purchases. With today’s announcement, you can save up to 45% with on a 1 year RI and 60% on a 3 year RI relative to the On-Demand price. Here are the details:

Instance Type Linux / Unix Price Reduction
Microsoft Windows Price Reduction
  1 Year
3 Year
1 Year
3 Year
M1, M2, C1 10%-40% 10%-40% Up to 23% Up to 20%
C3 30% 30% Up to 16% Up to 13%
M3 30% 30% Up to 18% Up to 15%

Also keep in mind that as you scale your footprint of EC2 Reserved Instances, that you will benefit from the Reserved Instance volume discount tiers, increasing your overall discount over On-Demand by up to 68%.

Consult the EC2 Price Reduction page for more information.

Amazon S3 Price Reductions
We are reducing prices for Standard and Reduced Redundancy Storage, by an average of 51%. The price reductions in the individual S3 pricing tiers range from 36% to 65%, as follows:

Tier New S3 Price / GB / Month
Price Reduction
0-1 TB $0.0300 65%
1-50 TB $0.0295 61%
50-500 TB $0.0290 52%
500-1000 TB $0.0285 48%
1000-5000 TB $0.0280 45%
5000 TB or More $0.0275 36%

These prices are for the US Standard Region; consult the S3 Price Reduction page for more information on pricing in the other AWS Regions.

Amazon RDS Price Reductions
We are reducing prices for Amazon RDS DB Instances by an average of 28%. There's more information on the RDS Price Reduction page, including pricing for Reserved Instances and Multi-AZ deployments of Amazon RDS.

Amazon ElastiCache Price Reductions
We are reducing prices for Amazon ElasticCache cache nodes by an average of 34%. Check out the ElastiCache Price Reduction page for more information.

Amazon Elastic MapReduce Price Reductions
We are reducing prices for Elastic MapReduce by 27% to 61%. Note that this is addition to the EC2 price reductions described above. Here are the details:

Instance Type EMR Price Before Change
New EMR Price
Reduction
m1.small $0.015 $0.011 27%
m1.medium $0.03 $0.022 27%
m1.large $0.06 $0.044 27%
m1.xlarge $0.12 $0.088 27%
cc2.8xlarge $0.50 $0.270 46%
cg1.4xlarge $0.42 $0.270 36%
m2.xlarge $0.09 $0.062 32%
m2.2xlarge $0.21 $0.123 41%
m2.4xlarge $0.42 $0.246 41%
hs1.8xlarge $0.69 $0.270 61%
 hi1.4xlarge $0.47 $0.270 43%

With this price reduction, you can now run a large Hadoop cluster using the hs1.8xlarge instance for less than $1000 per Terabyte per year (this includes both the EC2 and the Elastic MapReduce costs).

Consult the Elastic MapReduce Price Reduction page for more information.

We've often talked about the benefits that AWS's scale and focus creates for our customers. Our ability to lower prices again now is an example of this principle at work.

It might be useful for you to remember that an added advantage of using AWS services such as Amazon S3 and Amazon EC2 over using your own on-premises solution is that with AWS, the price reductions that we regularly roll out apply not only to any new storage that you might add but also to the existing data that you have already stored in AWS. With no action on your part, your cost to store existing data goes down over time.

Once again, all of these price reductions go in to effect on April 1, 2014 and will be applied automatically.

-- Jeff;

21 Mar 08:09

ELB Connection Draining - Remove Instances From Service With Care

by AWS Evangelist

AWS Elastic Load Balancing distributes incoming traffic across multiple Amazon EC2 instances:

You can use Elastic Load Balancing on its own, or in conjunction with Auto Scaling. When combined, the two features allow you to create a system that automatically adds and removes EC2 instances in response to changing load:

In either case, the Elastic Load Balancer equitably routes traffic across all of the instances that are currently registered with it and deemed to be healthy based on configured health checks

In a large, active system, several different types of application and capacity management activities will take place from time to time. For example:

  • Auto Scaling will add a new instance to the Auto Scaling Group.
  • Auto Scaling will remove an existing instance from the Auto Scaling Group.
  • An existing instance will fail its health checks and be taken out of service.
  • Running software on an existing instance will be updated in-place.
  • Existing instances will be gradually replaced with new ones that contain updated software.

While these activities are potentially underway, the Elastic Load Balancer is accepting incoming requests and routing them to healthy instances. A busy system might be processing tens of thousands of requests per second. Some of these requests might finish within milliseconds. Others, perhaps backed by complex database queries or involving file downloads, might take seconds or even tens of seconds.

Connection Draining
Today's new feature sits squarely at the intersection of the activities I described above and the stream of incoming requests.

In order to provide a first-class use experience, you'd like to avoid breaking open network connections while taking an instance out of service, updating its software, or replacing it with a fresh instance that contains updated software. Imagine each broken connection as a half-drawn web page, an aborted file download, or a failed web service call, each of which results in an unhappy user or customer.

You can now avoid this situation by enabling the new Connection Draining feature for your Elastic Load Balancers. You can do this from the AWS Management Console, the AWS Command Line Interface, or by calling the ModifyLoadBalancerAttributes function in the Elastic Load Balancing API. You simply enable the feature and enter a timeout between one second and one hour. Connection Draining is enabled by default for load balancers that are created using the Console.

In order to enable Connection Draining using the AWS Management Console you must use the new version of the EC2 console. To enable it, visit the EC2 tab, click on Load Balancers and look for the "cartoon bubble" in the top right corner:

Click on the bubble to enable the new version of the console;

Select one of your load balancers, and click on the Instances tab:

Look for Connection Draining and click on Edit:

Click to enable Connection Draining and set the desired timeout. Click Save and you are good to go!

When Connection Draining is enabled and configured, the process of deregistering an instance from an Elastic Load Balancer gains an additional step. For the duration of the configured timeout, the load balancer will allow existing, in-flight requests made to an instance to complete, but it will not send any new requests to the instance. During this time, the API will report the status of the instance as InService, along with a message stating that "Instance deregistration currently in progress." Once the timeout is reached, any remaining connections will be forcibly closed.

AWS CloudFormation supports Connection Draining as well as the recently released Access Logs feature. Here is a sample AWS CloudFormation template (launch stack) for provisioning an Auto Scaling Group, load balanced with an Elastic Load Balancer with Connection Draining enabled, and Access Logs delivered to an S3 bucket.

You can start using this new feature today. Read the documentation for Connection Draining if you would like to learn more.

-- Jeff;


19 Mar 09:38

Route 53 and CloudTrail Checks for the AWS Trusted Advisor

by AWS Evangelist

The AWS Trusted Advisor monitors your AWS resources and provides you with advice for cost optimization, security, performance, and fault tolerance. Today we are adding five additional checks that will be of benefit to users of Amazon Route 53 (Domain Name Services) and AWS CloudTrail (recording and logging of AWS API calls). With today's launch, Trusted Advisor now performs a total of 37 checks, up from just 26 six months ago.

New Checks
There are four Route 53 checks and one CloudTrail check. Let's start with Route 53, and take a look at each check.

As you may know, Route 53 is a highly available and scalable DNS (Domain Name Service) web service. When you use Route 53 for a domain, you create a series of record sets. Each record set provides Route 53 with the information needed to map a name to a set of IP addresses. Today we are adding a set of checks to help you to use Route 53 in the most effective way possible.

The Latency Resource Record Sets check looks for proper and efficient use of latency record sets. A proper record set will always contain records for more than one AWS Region.

The MX and SPF Resource Record Sets check helps to improve email deliverability by checking for an SPF record for each MX record.

The Failover Resource Record Sets check verifies the configuration of record sets that are used to implement failover to a secondary resource set.

The Deleted Health Check check looks for record sets that refer to health checks which have been deleted.

AWS CloudTrail records and logs calls to the AWS API functions. The CloudTrail Logging check verifies that logging is properly configured and working as expected.

Check Today
If you have signed up for AWS Support at the Business or Enterprise level, you have access to the Trusted Advisor at no additional change.

-- Jeff;


15 Mar 09:34

Prophet: My first commercial web site design project (1996)

by Jason Fried

With the big name change from 37signals to Basecamp, I’ve been feeling a bit nostalgic. So I decided to go back to the beginning and dig up some old work. Thank you Wayback Machine!.

Back in 1996, I landed my first web design freelance gig. I was still in college, so this was very much a part time endeavor. I learned basic HTML by viewing source and deconstructing other sites. I knew my way around Photoshop 3 just enough to be dangerous. So it was time to do some selling.

I looked around the web for sites that I thought I could improve. My interest was in finance at the time, so I reached out to a variety of financial sites. I often sent a short email to whatever email address I could find on a given site. Usually it was webmaster@domain.com.

I don’t have any of those original emails anymore, but they went something like this:

Hi there-

My name is Jason. I'm a web designer in Tucson Arizona.

I think your site is pretty good, but I think I can make it better. If you'd like, I'd be happy to put together a one page redesign of your home page to show you what I can do. It'll take about a week.

Let me know if you're interested.

Thanks!

-Jason

As you might imagine, hardly anyone returned my email. But a few did. And one of those folks was Tim Knight, the owner of Prophet Information Systems.

Tim took me up on the offer, so I whipped up a quick redesign idea for him. Unfortunately I don’t have that work handy anymore, but ultimately it was good enough for him to hear me out on a complete redesign.

I pitched him a full site redesign (which I think was a few “templates” and a home page) for $600. He bought it. Tim became my first ever web design client. He was the first person to really bet on me like that. I’ll never forget that.

I can’t remember if I met with Tim in person before I delivered the first few design ideas, but we met a few times during the project. His company (which was just him) was based out in Palo Alto. So I’d find some time to head out there on the weekends in between classes. Or maybe I skipped classes, I don’t remember.

We went back and forth via email and phone and finally we landed on something we were both happy with.

So here’s the big reveal. Here’s my first ever commercial web design project from back in 1996.

The home page / splash page looked like this.

When you clicked enter, you went to a menu page. Remember when web sites had splash pages and menu pages? It was such a simpler, clearer time back then. Here’s what the menu page looked liked:

If you clicked one of the links, you’d end up on a page like this:

One of the things I really miss about that era of web design was the “links” page. Most sites back then linked up other sites that they liked or respected. It was a cool mutual admiration society back then. Companies weren’t afraid of sending their traffic elsewhere – we were all so blown away that you could actually links to other sites that we all did it so generously. Here was the links page at Prophet:

Last, one of the other things I really miss about that era was the ability to sign your work. There was often an understanding between the designer and the owner that you could have a credits page or a link at the bottom of the site showing who did the work. So here was the credits page (“Spinfree” was my freelance name):

You can actually walk through the whole site using the Wayback Machine. Here’s Prophet Information Services as it was in October of 1996.

It’s fun to look back and see where you started, who took a shot on you, how you did, and where you’ve been since. I’m so grateful that Tim saw enough of something in me to give me a chance (or maybe he just saw a cheap $600 price tag ;). Regardless, it changed everything for me.

Tim also taught me a lot about technical trading, so not only did I get $600 and my first client, but I learned a bunch too. I was a finance major, so it was fun to get some real-life exposure to technical trading. They didn’t teach this stuff in school, and Tim was a good mentor. I couldn’t ask for anything more. In the years after, I did a few more site designs for Tim at Prophet. He was a great client.

Here’s Tim today on LinkedIn. He blogs at Slope of Hope. In 2010 he wrote a book on technical trading called Chart Your Way To Profits. And to complete the small world loop, Tim has a show on TastyTrade network which is based here in Chicago. Good times.

So what about you? Who gave you your first shot? Who was your first client? Care to share some (embarrassing) early work?

14 Mar 11:49

The bug in Gmail that fixed itself

A couple of years ago I listened to Werner Vogels talk a bit about treating large computing systems like biological systems. We shouldn’t try and stop the virus — the predator — instead, we should design systems that can provide self-correcting forces against contaminated systems. Preventing failures and bugs was futile.

You may gather from my surprise that I’m not a distributed systems engineer — but the idea of accepting that you will purposefully allow bugs that will cause failure was kind of mind blowing. Before then, my mindset had always been to prevent bugs to prevent failure. I had a similar feeling when I first watched Dietrich Featherston talk about Radiology + Distributed Systems — a similarly alternate perspective on monitoring and measurement.

And so it made me incredibly happy to read this bit from Google’s post-mortem of Gmail’s outage:

Engineers were still debugging 12 minutes later when the same system, having automatically cleared the original error, generated a new correct configuration at 11:14 a.m. and began sending it; errors subsided rapidly starting at this time.

The system was able to fix the bug faster than the engineers. This isn’t anything revolutionary or mind blowing. But it’s kind of awesome to see it succeed in the real world.

14 Mar 11:47

Amazon ElastiCache - Now With Redis 2.8.6

by AWS Evangelist

Amazon ElastiCache makes it easy for you to create, operate, and scale an in-memory cache. Because ElastiCache contains support for the Memcached and Redis engines, it is compatible with a wide variety of existing applications.

I'm happy to announce that ElastiCache now supports version 2.8.6 of Redis and that you can start using it today:

New Features
The new release of Redis includes support for lots of cool new features. Here are some of the most important ones:

Partial Resynchronization With Slaves - If the connection between a master node and a slave node is momentarily broken, the master now accumulates data that is destined for the slave in a backlog buffer. If the connection is restored before the buffer becomes full, a quick partial resync will be done instead of a potentially longer full resync. You can use the new repl-backlog-size parameter to set the size of the buffer and the repl-backlog-ttl parameter to control its time to live, measured in seconds since the last successful communication  between the master and the slave.

Better Consistency Support - You can now configure Redis to stop accepting write operations if less than a certain number of slaves are connected (the min-slaves-to-write parameter) or if the time lag between master and slave has become unacceptably high (the min-slaves-max-lag parameter).

New SCAN Commands - You can use the new SCAN, HSCAN, ZSCAN, and SSCAN commands to incrementally iterate over a Redis collection. You can opt to scan all elements or only those which match a regular expression pattern.

Keyspace Event Notification - Redis client apps can now subscribe to PubSub channels in order to receive notification of changes that affect a data set. The subscription model is very flexible and can be configured to generate one or more events in response to a wide range of operations on the data set. You can read about Redis Keyspace Notifications to learn more.

As I mentioned earlier, this new version of the Redis engine is available now and you can start using it today. You can launch a new ElastiCache for Redis cluster or you can upgrade an existing cluster to version 2.8.6.

-- Jeff;


07 Mar 15:10

Access Logs for Elastic Load Balancers

by AWS Evangelist

AWS Elastic Load Balancing helps you to build systems that are highly scalable and highly reliable. You can automatically distribute traffic across a dynamically-sized collection of Amazon EC2 instances, and you have the ability to use health checks to keep traffic away from any unhealthy instances.

Access Logs
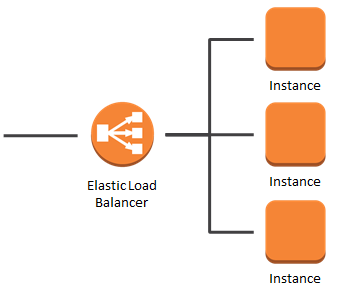
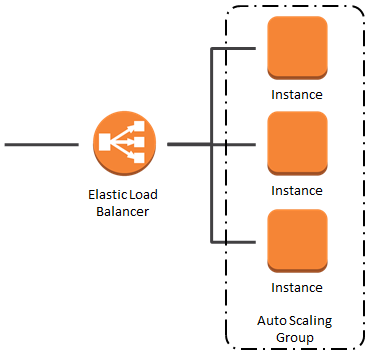
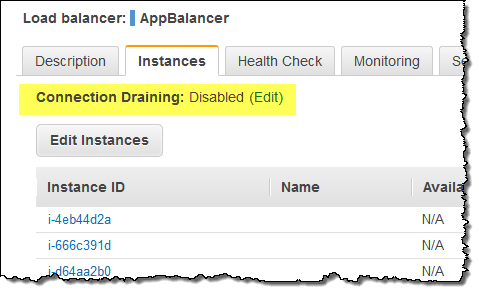
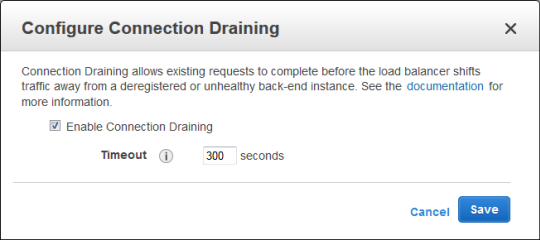
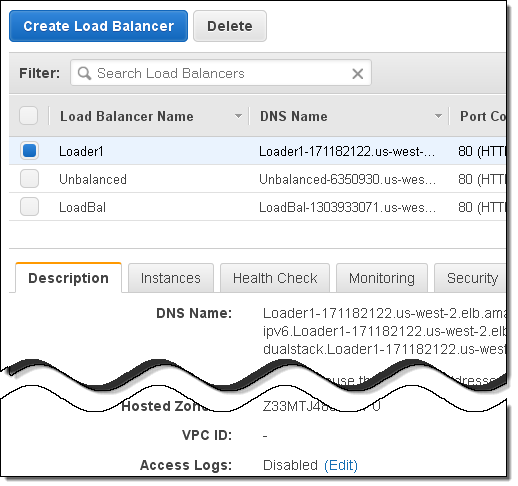
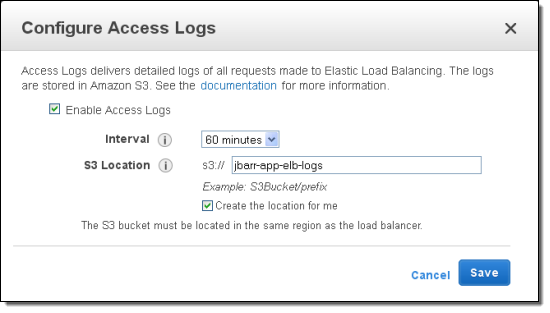
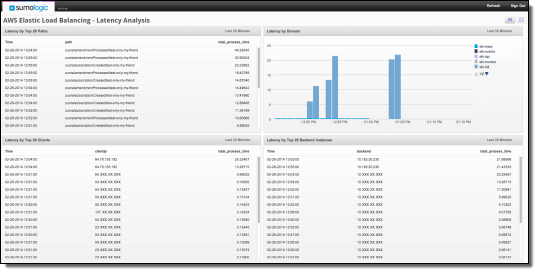
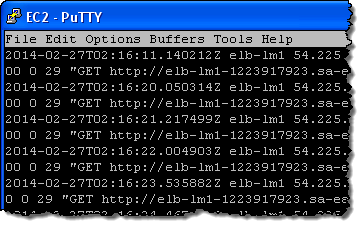
Today we are giving you additional insight into the operation of your Elastic Load Balancers with the addition of an access log feature. After you enable and configure this feature for an Elastic Load Balancer, log files will be delivered to the Amazon S3 bucket of your choice. The log files contain information about each HTTP and TCP request processed by the load balancer.

You can analyze the log files to learn more about the requests and how they were processed. Here are some suggestions to get you started:

Statistical Analysis - The information in the log files is aggregated across all of the Availability Zones served by the load balancer. You can analyze source IP addresses, server responses, and traffic to the back-end EC2 instances and use the results to understand and optimize your AWS architecture.

Diagnostics - You can use the log files to identify and troubleshoot issues that might be affecting your end users. For example, you can locate back-end EC2 instances that are responding slowly or incorrectly.

Data Retention - Your organization might have a regulatory or legal need to retain logging data for an extended period of time to support audits and other forms of compliance checks. You can easily retain the log files for an extended period of time.

Full Control
Access Logs are disabled by default for existing and newly created load balancers. You can enable it from the AWS Management Console, the AWS Command Line Interface (CLI), or through the Elastic Load Balancing API. You will need to supply an Amazon S3 bucket name, a prefix that will be used to generate the log files, and a time interval (5 minutes or 60 minutes).

This new feature can be enabled from the new version of the EC2 console. To enable this version, click on Load Balancers and then look for the "cartoon bubble" in the top right corner:

Click on the bubble to enable the new version of the console:

To enable Access Logs for an existing Elastic Load Balancer, simply select it, scroll to the bottom of the Description tab, and click on Edit:

Select the desired configuration and click Save:

You will also have to make sure that the load balancer has permission to write to the bucket (the policy will be created and applied automatically if you checked Create the location for me when you enabled access logs.

Log files will be collected and then sent to the designated bucket at the specified time interval or when they grow too large, whichever comes first. On high traffic sites, you may receive multiple log files for the same period.

You should plan to spend some time thinking about your log retention timeframes and policies. You could, for example, use S3's lifecycle rules to migrate older logs to Amazon Glacier.

You can disable access logs at any time, should your requirements change.

Plenty of Detail
In addition to the bucket name and the prefix that you specified when you configured and enabled access logs, the log file name will also include the IP address of the load balancer, your AWS account number, the load balancer's name and region, the date (year, month, and day), the timestamp of the end of the logging interval, and a random number (to handle multiple log files for the same time interval).

Log files are generated in a plain-text format, one line per request. Each line contains a total of twelve fields (see the Access Logs documentation for a complete list). You can use the Request Processing Time, Backend Processing Time, and Response Processing Time fields to understand where the time is going:


Log Processing With Elastic MapReduce and Hive
A busy web site can easily generate tens or even hundreds of gigabytes of log files each and every day. At this scale, traditional line-at-a- time processing is simply infeasible. Instead, an approach based on large-scale parallel processing is necessary.

Amazon Elastic MapReduce makes it easy to quickly and cost-effectively process vast amounts of data. It uses Hadoop to distribute your data and processing across a resizable cluster of EC2 instances. Hive, an open source data warehouse and analytics package that runs on Hadoop, can be used to pull your logs from S3 and analyze them.

Suppose you want to use your ELB logs to verify that each of the EC2 instances is handling requests properly. You can use EMR and Hive to count and summarize the number of times that each instance returns an HTTP status code other than 200 (OK).

We've created a tutorial to show you how to do exactly this. I'll summarize it here so that you can see just how easy it is to do large-scale log file analysis when you have the proper tools at hand.

You need only configure the S3 bucket to grant access to an IAM role, and then launch a cluster with Hive installed. Then you SSH in to the master node of the cluster and define an external table over all of the site's log files using the following Hive command:

CREATE EXTERNAL TABLE elb_raw_access_logs (
     Timestamp STRING,
     ELBName STRING,
     RequestIP STRING,
     RequestPort INT,
     BackendIP STRING,
     BackendPort INT,
     RequestProcessingTime DOUBLE,
     BackendProcessingTime DOUBLE,
     ClientResponseTime DOUBLE,
     ELBResponseCode STRING,
     BackendResponseCode STRING,
     ReceivedBytes BIGINT,
     SentBytes BIGINT,
     RequestVerb STRING,
     URL STRING,
     Protocol STRING
)
ROW FORMAT SERDE 'org.apache.hadoop.hive.serde2.RegexSerDe'
WITH SERDEPROPERTIES (
          "input.regex" = "([^ ]*) ([^ ]*) ([^ ]*):([0-9]*) ([^ ]*):([0-9]*) ([.0-9]*) ([.0-9]*) ([.0-9]*) (-|[0-9]*) (-|[0-9]*) ([-0-9]*) ([-0-9]*) \"([^ ]*) ([^ ]*) (- |[^ ]*)\"$"
        )
LOCATION 's3://mybucket/path';

Now you can run the query (number of non–200 responses grouped by backend, URL, and response code):

SELECT
  COUNT(*) AS CountOfNon200, BackendIP, BackendResponseCode, URL
FROM elb_raw_access_logs
WHERE BackendResponseCode <> 200
GROUP BY BackendIP, BackendResponseCode, URL
ORDER BY CountOfNon200 DESC;

You could go even further, writing a script to perform multiple Hive queries or using the AWS Data Pipeline to process log files at hourly or daily intervals.

Read the ELB Log Processing Tutorial to learn more.    

Partner Products
AWS partners Splunk and Sumo Logic have been working to support this new feature in their tools.

Splunk's Hunk app can map requests to geographic locations and plot the source of client requests:

Splunk can also measure and display latency over time:

Read the Splunk blog post to learn more about this new feature.

The Sumo Logic Application for Elastic Load Balancing displays key metrics and geographic locations on one page:

The product can also measure and analyze latency:

You can read their blog post to learn more about this new feature.

Start Logging Now
This feature is available now and you can start using it today!

-- Jeff;

04 Mar 09:15

Tracking Parity

by Fred Emmott
HHVM has a large suite of unit tests that must pass in several build configurations before a commit reaches master. Unfortunately, this test suite passing doesn’t tell you if HHVM can be used for anything useful – so we periodically run the test suites for popular, open source frameworks. The frameworks test page is now public, […]
01 Mar 00:44

Xaprb now uses Hugo

I’ve switched this blog from Wordpress to Hugo. If you see any broken links or other problems, let me know. I’ll re-enable comments and other features in the coming days.

Why not Wordpress? I’ve used Wordpress since very early days, but I’ve had my fill of security problems, the need to worry about whether a database is up and available, backups, plugin compatibility problems, upgrades, and performance issues. In fact, while converting the content from Wordpress to Markdown, I found a half-dozen pages that had been hacked by some link-farm since around 2007. This wasn’t the first such problem I’d had; it was merely the only one I hadn’t detected and fixed. And I’ve been really diligent with Wordpress security; I have done things like changing my admin username and customizing my .htaccess file to block common attack vectors, in addition to the usual “lockdown” measures that one takes with Wordpress.

In contrast to Wordpress or other CMSes that use a database, static content is secure, fast, and worry-free. I’m particularly happy that my content is all in Markdown format now. Even if I make another change in the future, the content is now mostly well-structured and easy to transform as desired. (There are some pages and articles that didn’t convert so well, but I will clean them up later.)

Why Hugo? There are lots of static site generators. Good ones include Octopress and Jekyll, and I’ve used those. However, they come with some of their own annoyances: dependencies, the need to install Ruby and so on, and particularly bothersome for this blog, performance issues. Octopress ran my CPU fan at top speed for about 8 minutes to render this blog.

Hugo is written in Go, so it has zero dependencies (a single binary) and is fast. It renders this blog in a couple of seconds. That’s fast enough to run it in server mode, hugo server -w, and I can just alt-tab back and forth between my writing and my browser to preview my changes. By the time I’ve tabbed over, the changes are ready to view.

Hugo isn’t perfect. For example, it lacks a couple of features that are present in Octopress or Jekyll. But it’s more than good enough for my needs, and I intend to contribute some improvements to it if I get time. I believe it has the potential to be a leading static site/blog generator going forward. It’s already close to a complete replacement for something like Jekyll.

01 Mar 00:43

A review of Bose, Sony, and Sennheiser noise-cancelling headphones

I’ve used active noise-cancelling headphones for over ten years now, and have owned several pairs of Bose, one of Sony, and most recently a pair of Sennheiser headphones. The Sennheisers are my favorites. I thought I’d write down why I’ve gone through so many sets of cans and what I like and dislike about them.

Bose QuietComfort 15 Acoustic Noise Cancelling Headphones

Bose QuietComfort 15 Acoustic Noise Cancelling Headphones

I’m sure you’re familiar with Bose QuietComfort headphones. They’re the iconic “best-in-class” noise-cancelling headphones, the ones you see everywhere. Yet, after owning several pairs (beginning with Quiet Comfort II in 2003), I decided I’m not happy with them and won’t buy them anymore. Why not?

  • They’re not very good quality. I’ve worn out two pairs and opted to sell the third pair that Bose sent me as a replacement. Various problems occurred, including torn speakers that buzzed and grated. I just got tired of sending them back to Bose for servicing.
  • They’re more expensive than I think they’re worth, especially given the cheap components used.
  • They don’t sound bad – but to my ears they still have the classic Bose fairy-dust processing, which sounds rich and pleasant at first but then fatigues me.
  • They produce a sensation of suction on the eardrums that becomes uncomfortable over long periods of time.
  • They can’t be used in non-cancelling mode. In other words, if the battery is dead, they’re unusable.
  • On a purely personal note, I think Bose crosses the line into greed and jealousy. I know this in part because I used to work at Crutchfield, and saw quite a bit of interactions with Bose. As an individual – well, try selling a pair of these on eBay, and you’ll see what I mean. I had to jump through all kinds of hoops after my first listing was cancelled for using a stock photo that eBay themselves suggested and provided in the listing wizard. Here is the information the take-down notice directed me to.

On the plus side, the fit is very comfortable physically, they cancel noise very well, and they’re smaller than some other noise-cancelling headphones. Also on the plus side, every time I’ve sent a pair in for servicing, Bose has just charged me $100 and sent me a new pair.

Sony MDR-NC200D

Sony MDR-NC200D

When I sent my last pair of Bose in for servicing, they replaced them with a factory-sealed pair of new ones in the box, and I decided to sell them on eBay and buy a set of Sony MDR-NC200D headphones, which were about $100 less money than new Bose headphones at the time. I read online reviews and thought it was worth a try.

First, the good points. The Sonys are more compact even than the Bose, although as I recall they’re a little heavier. And the noise cancellation works quite well. The passive noise blocking (muffling) is in itself quite good. You can just put them on without even turning on the switch, and block a lot of ambient noise. The sound quality is also quite good, although there is a slight hiss when noise cancellation is enabled. Active cancellation is good, but not as good as the Bose.

However, it wasn’t long before I realized I couldn’t keep them. The Sonys sit on the ear, and don’t enclose the ear and sit against the skull as the Bose do. They’re on-the-ear, not over-the-ear. Although this doesn’t feel bad at first, in about 20 minutes it starts to hurt. After half an hour it’s genuinely painful. This may not be your experience, but my ears just start to hurt after being pressed against my head for a little while.

I had to sell the Sonys on eBay too. My last stop was the Sennheisers.

Sennheiser PXC 450 NoiseGard Active Noise-Canceling Headphones

Sennheiser PXC 450 NoiseGard Active Noise-Canceling Headphones

The Sennheiser PXC 450 headphones are midway in price between the Bose and the Sony: a little less expensive than the Bose. I’ve had them a week or so and I’m very happy with them so far.

This is not the first pair of Sennheisers I’ve owned. I’ve had a pair of open-air higher-end Sennheisers for over a decade. I absolutely love them, so you can consider me a Sennheiser snob to some extent.

I’m pleased to report that the PXC 450s are Sennheisers through and through. They have amazing sound, and the big cups fit comfortably around my ears. They are a little heavier than my other Sennheisers, but still a pleasure to wear.

The nice thing is that not only does noise cancellation work very well (on par with Bose’s, I’d say), but there is no sensation of being underwater with pressure or suction on the eardrums. Turn on the noise cancellation switch and the noise just vanishes, but there’s no strange feeling as a result. Also, these headphones can work in passive mode, with noise cancellation off, and don’t need a battery to work.

On the downside, if you want to travel with them, they’re a little bigger than the Bose. However I’ve travelled with the Bose headphones several times and honestly I find even them too large to be convenient. I don’t use noise-cancelling headphones for travel, as a result.

Another slight downside is that the earcups aren’t completely “empty” inside. There are some caged-over protrusions with the machinery inside. Depending on the shape of your ears, these might brush your ears if you move your head. I find that if I don’t place the headphones in the right spot on my head, they do touch my ears every now and then.

Summary

After owning several pairs of top-rated noise-cancelling headphones, I think the Sennheisers are the clear winners in price, quality, comfort, and sound. Your mileage may vary.

01 Mar 00:43

How to Tune A Guitar (Or Any Instrument)

Do you know how to tune a guitar? I mean, do you really know how to tune a guitar?

Guitar Closeup

I’ve met very few people who do. Most people pick some notes, crank the tuners, play some chords, and endlessly fidget back and forth until they either get something that doesn’t sound awful to their ears, or they give up. I can’t recall ever seeing a professional musician look like a tuning pro on stage, either. This really ought to be embarrassing to someone who makes music for a career.

There’s a secret to tuning an instrument. Very few people seem to know it. It’s surprisingly simple, it isn’t at all what you might expect, and it makes it easy and quick to tune an instrument accurately without guesswork. However, even though it’s simple and logical, it is difficult and subtle at first, and requires training your ear. This is a neurological, physical, and mental process that takes some time and practice. It does not require “perfect pitch,” however.

In this blog post I’ll explain how it works. There’s a surprising amount of depth to it, which appeals to the nerd in me. If you’re looking for “the short version,” you won’t find it here, because I find the math, physics, and theory of tuning to be fascinating, and I want to share that and not just the quick how-to.

If you practice and train yourself to hear in the correct way, with a little time you’ll be able to tune a guitar by just striking the open strings, without using harmonics or frets. You’ll be able to do this quickly, and the result will be a guitar that sounds truly active, alive, energetic, amazing — much better results than you’ll get with a digital tuner. As a bonus, you’ll impress all of your friends.

My Personal History With Tuning

When I was a child my mother hired a piano tuner who practiced the “lost art” of tuning entirely by ear. His name was Lee Flory. He was quite a character; he’d tuned for famous concert pianists all over the world, toured with many of them, and had endless stories to tell about his involvement with all sorts of musicians in many genres, including bluegrass and country/western greats. My mother loved the way the piano sounded when he tuned it. It sang. It was alive. It was joyous.

For whatever reason, Lee took an interest in me, and not only tolerated but encouraged my fascination with tuning. I didn’t think about it at the time, but I’m pretty sure he scheduled his visits differently to our house. I think he allowed extra time so that he could spend an hour or more explaining everything to me, playing notes, coaching me to hear subtleties.

And thus my love affair with the math, physics, and practice of tuning began.

Beats

The first great secret is that tuning isn’t about listening to the pitch of notes. While tuning, you don’t try to judge whether a note is too high or too low. You listen to something called beats instead.

Beats are fluctuations in volume created by two notes that are almost the same frequency.

When notes are not quite the same frequency, they’ll reinforce each other when the peaks occur together, and cancel each other out when the peaks are misaligned. Here’s a diagram of two sine waves of slightly different frequencies, and the sum of the two (in red).

Beats

Your ear will not hear two distinct notes if they’re close together. It’ll hear the sum.

Notice how the summed wave (the red wave) fluctuates in magnitude. To the human ear, this sounds like a note going “wow, wow, wow, wow.” The frequency of this fluctuation is the difference between the frequencies of the notes.

This is the foundation of all tuning by ear that isn’t based on guesswork.

Before you go on, tune two strings close together on your guitar or other instrument, and listen until you can hear it. Or, just fret one string so it plays the same note as an open string, and strike them together. Bend the string you’ve fretted, a little less, a little more. Listen until you hear the beats.

Bending String

The Math of Pitch

Musical notes have mathematical relationships to one another. The exact relationships depend on the tuning. There are many tunings, but in this article I’ll focus on the tuning used for nearly all music in modern Western cultures: the 12-tone equal temperament tuning.

In this tuning, the octave is the fundamental interval of pitch. Notes double in frequency as they rise an octave, and the ratio of frequencies between each adjacent pair of notes is constant. Since there are twelve half-steps in an octave, the frequency increase from one note to the next is the twelfth root of 2, or about 1.059463094359293.

Staying with Western music, where we define the A above middle C to have the frequency of 440Hz, the scale from A220 to A440 is as follows:

Note     Frequency
=======  =========
A220     220.0000
A-sharp  233.0819
B        246.9417
C        261.6256
C-sharp  277.1826
D        293.6648
D-sharp  311.1270
E        329.6276
F        349.2282
F-sharp  369.9944
G        391.9954
G-sharp  415.3047
A440     440.0000

We’ll refer back to this later.

The Math Of Intervals

If you’ve ever sung in harmony or played a chord, you’ve used intervals. Intervals are named for the relative distance between two notes: a minor third, a fifth, and so on. These are a little confusing, because they sound like fractions. They’re not. A fifth doesn’t mean that one note is five times the frequency of another. A fifth means that if you start on the first note and count upwards five notes on a major scale, you’ll reach the second note in the interval. Here’s the C scale, with the intervals between the lowest C and the given note listed at the right:

Note  Name  Interval from C
====  ====  ===============
C     Do    Unison
D     Re    Major 2nd
E     Mi    Major 3rd
F     Fa    4th (sometimes called Perfect 4th)
G     So    5th (a.k.a. Perfect 5th)
A     La    Major 6th
B     Ti    Major 7th
C     Do    Octave (8th)

On the guitar, adjacent strings form intervals of fourths, except for the interval between the G and B strings, which is a major third.

Some intervals sound “good,” “pure,” or “harmonious.” A major chord, for example, is composed of the root (first note), major third, fifth, and octave. The chord sounds good because the intervals between the notes sound good. There’s a variety of intervals at play: between the third and fifth is a minor third, between the fifth and octave is a fourth, and so on.

It turns out that the intervals that sound the most pure and harmonious are the ones whose frequencies have the simplest relationships. In order of increasing complexity, we have:

  • Unison: two notes of the same frequency.
  • Octave: the higher note is double the frequency.
  • Fifth: the higher note is 3/2s the frequency.
  • Fourth: the higher note is 4/3rds the frequency.
  • Third: the higher note is 5/4ths the frequency.
  • Further intervals (minor thirds, sixths, etc) have various relationships, but the pattern of N/(N-1) doesn’t hold beyond the third.

These relationships are important for tuning, but beyond here it gets significantly more complex. This is where things are most interesting!

Overtones and Intervals

As a guitar player, you no doubt know about “harmonics,” also called overtones. You produce a harmonic by touching a string gently at a specific place (above the 5th, 7th, or 12th fret, for example) and plucking the string. The note that results sounds pure, and is higher pitched than the open string.

Harmonics

Strings vibrate at a base frequency, but these harmonics (they’re actually partials, but I’ll cover that later) are always present. In fact, much of the sound energy of a stringed instrument is in overtones, not in the fundamental frequency. When you “play a harmonic” you’re really just damping out most of the frequencies and putting more energy into simpler multiples of the fundamental frequency.

Overtones are basically multiples of the fundamental frequency. The octave, for example, is twice the frequency of the open string. Touching the string at the 12th fret is touching it at its halfway point. This essentially divides the string into two strings of half the length. The frequency of the note is inversely dependent on the string’s length, so half the length makes a note that’s twice the frequency. The seventh fret is at 1/3rd the length of the string, so the note is three times the frequency; the 5th fret is ¼th the length, so you hear a note two octaves higher, and so on.

The overtones give the instrument its characteristic sound. How many of them there are, their frequencies, their volumes, and their attack and decay determines how the instrument sounds. There are usually many overtones, all mixing together into what you usually think of as a single note.

Tuning depends on overtones, because you can tune an interval by listening to the beats in its overtones.

Take a fifth, for example. Recall from before that the second note in the fifth is 3/2 the frequency of the first. Let’s use A220 as an example; a fifth up from A220 is E330. E330 times two is E660, and A220 times three is E660 also. So by listening to the first overtone of the E, and the second overtone of the A, you can “hear a fifth.”

You’re not really hearing the fifth, of course; you’re really hearing the beats in the overtones of the two notes.

Practice Hearing Intervals

Practice hearing the overtones in intervals. Pick up your guitar and de-tune the lowest E string down to a D. Practice hearing its overtones. Pluck a harmonic at the 12th string and strike your open D string; listen to the beats between the notes. Now play both strings open, with no harmonics, at the same time. Listen again to the overtones, and practice hearing the beats between them. De-tune slightly if you need to, to make the “wow, wow, wow, wow” effect easier to notice.

Take a break; don’t overdo it. Your ear will probably fatigue quickly and you’ll be unable to hear the overtones, especially as you experiment more with complex intervals. In the beginning, you should not be surprised if you can focus on these overtones for only a few minutes before it gets hard to pick them out and things sound jumbled together. Rest for a few hours. I would not suggest doing this more than a couple of times a day initially.

The fatigue is real, by the way. As I mentioned previously, being able to hear beats and ignore the richness of the sound to pick out weak overtones is a complex physical, mental, and neurological skill — and there are probably other factors too. I’d be interested in seeing brain scans of an accomplished tuner at work. Lee Flory was not young, and he told me that his audiologist said his hearing had not decayed with age. This surprised the doctor, because he spent his life listening to loud sounds. Lee attributed this to daily training of his hearing, and told me that the ear is like any other part of the body: it can be exercised. According to Lee, if he took even a single day’s break from tuning, his ear lost some of its acuity.

Back to the topic: When you’re ready, pluck a harmonic on the lowest D string (formerly the E string) at the 7th fret, and the A string at the 12th fret, and listen to the beats between them. Again, practice hearing the same overtones (ignoring the base notes) when you strike both open strings at the same time.

When you’ve heard this, you can move on to a 4th. You can strike the harmonic at the 5th fret of the A string and th 7th fret of the D string, for example, and listen to the beats; then practice hearing the same frequencies by just strumming those two open strings together.

Soundhole

As you do all of these exercises, try your best to ignore pitch (highness or lowness) of the notes, and listen only to the fluctuations in volume. In reality you’ll be conscious of both pitch and beats, but this practice will help develop your tuning ear.

Imperfect Intervals and Counting Beats

You may have noticed that intervals in the equal-tempered 12-tone tuning don’t have exactly the simple relationships I listed before. If you look at the table of frequencies above, for example, you’ll see that in steps of the 12th root of 2, E has a frequency of 329.6276Hz, not 330Hz.

Oh no! Was it all a lie? Without these relationships, does tuning fall apart?

Nautilus

Not really. In the equal-tempered tuning, in fact, there is only one perfect interval: the octave. All other intervals are imperfect, or “tempered.”

  • The 5th is a little “narrow” – the higher note in the interval is slightly flat
  • The 4th is a little “wide” – the higher note is sharp
  • The major 3rd is even wider than the 4th

Other intervals are wide or narrow, just depending on where their frequencies fall on the equal-tempered tuning. (In practice, you will rarely or never tune intervals other than octaves, 5ths, 4ths, and 3rds.)

As the pitch of the interval rises, so does the frequency of the beats. The 4th between A110 and the D above it will beat half as fast as the 4th an octave higher.

What this means is that not only do you need to hear beats, but you need to count them. Counting is done in beats per second. It sounds insanely hard at first (how the heck can you count 7.75 beats a second!?) but it will come with practice.

You will need to know how many beats wide or narrow a given interval will be. You can calculate it easily enough, and I’ll show examples later.

After a while of tuning a given instrument, you’ll just memorize how many beats to count for specific intervals, because as you’ll see, there’s a system for tuning any instrument. You generally don’t need to have every arbitrary interval memorized. You will use only a handful of intervals and you’ll learn their beats.

Tuning The Guitar

With all that theory behind us, we can move on to a tuning system for the guitar.

Let’s list the strings, their frequencies, and some of their overtones.

String  Freq    Overtone_2  Overtone_3  Overtone_4  Overtone_5
======  ======  ======      ======      =======     =======
E       82.41   164.81      247.22      329.63      412.03
A       110.00  220.00      330.00      440.00      550.00
D       146.83  293.66      440.50      587.33      734.16
G       196.00  392.00      587.99      783.99      979.99
B       246.94  493.88      740.82      987.77      1234.71
E       329.63  659.26      988.88      1318.51     1648.14

Because the open strings of the guitar form 4ths and one 3rd, you can tune the guitar’s strings open, without any frets, using just those intervals. There’s also a double octave from the lowest E to the highest E, but you don’t strictly need to use that except as a check after you’re done.

For convenience, here’s the same table with only the overtones we’ll use.

String  Freq    Overtone_2  Overtone_3  Overtone_4  Overtone_5
======  ======  ==========  ==========  ==========  ==========
E       82.41               247.22      329.63 
A       110.00              330.00      440.00
D       146.83              440.50      587.33      734.16
G       196.00              587.99                  979.99
B       246.94              740.82      987.77
E       329.63              988.88      

Tuning the A String

The first thing to do is tune one of the strings to a reference pitch. After that, you’ll tune all of the other strings relative to this first one. On the guitar, the most convenient reference pitch is A440, because the open A string is two octaves below at 110Hz.

You’ll need a good-quality A440 tuning fork. I prefer a Wittner for guitar tuning; it’s a good-quality German brand that is compact, so it fits in your guitar case’s pocket, and has a small notch behind the ball at the end of the stem, so it’s easy to hold in your teeth if you prefer that.

Wittner A440 Tuning Fork

Strike the tuning fork lightly with your fingernail, or tap it gently against your knee. Don’t bang it against anything hard or squeeze the tines, or you might damage it and change its pitch. You can hold the tuning fork against the guitar’s soundboard, or let it rest lightly between your teeth so the sound travels through your skull to your ears, and strike the open A string. Tune the A string until the beats disappear completely. Now put away the tuning fork and continue. You won’t adjust the A string after this.

If you don’t have a tuning fork, you can use any other reference pitch, such as the A on a piano, or a digitally produced A440.

Tuning the Low E String

Strike the open low E and A strings together, and tune the E string. Listen to the beating of the overtones at the frequency of the E two octaves higher. If you have trouble hearing it, silence all the strings, then pluck a harmonic on the E string at the 5th fret. Keep that tone in your memory and then sound the two strings together. It’s important to play the notes together, open, simultaneously so that you don’t get confused by pitches. Remember, you’re trying to ignore pitch completely, and get your ear to isolate the sound of the overtone, ignoring everything but its beating.

When correctly tuned, the A string’s overtone will be at 330Hz and the E string’s will be at 329.63Hz, so the interval is 1/3rd of a beat per second wide. That is, you can tune the E string until the beats disappear, and then flatten the low E string very slightly until you hear one beat every three seconds. The result will be a very slow “wwwoooooowww, wwwwoooooowww” beating.

Tuning the D String

Now that the low E and A strings are tuned, strike the open A and D strings together. You’re listening for beats in the high A440 overtone. The A string’s overtone will be at 440Hz, and the D string’s will be at 440.50Hz, so the interval should be ½ beat wide. Tune the D string until the beats disappear, then sharpen the D string slightly until you hear one beat every 2 seconds.

Tuning the G String

Continue by striking the open D and G strings, and listen for the high D overtone’s beating. Again, if you have trouble “finding the note” with your ear, silence everything and strike the D string’s harmonic at the 5th fret. You’re listening for a high D overtone, two octaves higher than the open D string. The overtones will be at 587.33Hz and 587.99Hz, so the interval needs to be 2/3rds of a beat wide. Counting two beats every three seconds is a little harder than the other intervals we’ve used thus far, but it will come with practice. In the beginning, feel free to just give it your best wild guess. As we’ll discuss a little later, striving for perfection is futile anyway.

Tuning the B String

Strike the open G and B strings. The interval between them is a major 3rd, so this one is trickier to hear. A major 3rd’s frequency ratio is approximately 5/4ths, so you’re listening for the 5th overtone of the G string and the 4th overtone of the B string. Because these are higher overtones, they’re not as loud as the ones you’ve been using thus far, and it’s harder to hear.

To isolate the note you need to hear, mute all the strings and then pluck a harmonic on the B string at the 5th fret. The overtone is a B two octaves higher. Search around on the G string near the 4th fret and you’ll find the same note.

The overtones are 979.99Hz and 987.77Hz, so the interval is seven and three-quarters beats wide. This will be tough to count at first, so just aim for something about 8 beats and call it good enough. With time you’ll be able to actually count this, but it will be very helpful at first to use some rules of thumb. For example, you can compare the rhythm of the beating to the syllables in the word “mississippi” spoken twice per second, which is probably about as fast as you can say it back-to-back without pause.

Tune the B string until the beats disappear, then sharpen it 8 beats, more or less.

Tuning the High E String

You’re almost done! Strike the open B and E strings, and listen for the same overtone you just used to tune the G and B strings: a high B. The frequencies are 987.77Hz and 988.88Hz, so the interval is 1.1 beats wide. Sharpen the E string until the high B note beats a little more than once a second.

Testing The Results

Run a couple of quick checks to see whether you got things right. First, check your high E against your low E. They are two octaves apart, so listen to the beating of the high E string. It should be very slow or nonexistent. If there’s a little beating, don’t worry about it. You’ll get better with time, and it’ll never be perfect anyway, for reasons we’ll discuss later.

You can also check the low E against the open B string, and listen for beating at the B note, which is the 3rd overtone of the E string. The B should be very slightly narrow (flat) — theoretically, you should hear about ¼th of a beat.

Also theoretically, you could tune the high B and E strings against the low open E using the same overtones. However, due to imperfections in strings and the slowness of the beating, this is usually much harder to do. As a result, you’ll end up with high strings that don’t sound good together. A general rule of thumb is that it’s easier to hear out-of-tune-ness in notes that are a) closer in pitch and b) higher pitched, so you should generally “tune locally” rather than “tuning at a distance.” If you don’t get the high strings tuned well together, you’ll get really ugly-sounding intervals such as the following:

  • the 5th between your open G string and the D on the 3rd fret of the B string
  • the 5th between the A on the second fret of the G string and the open high E string
  • the octave between your open G string and the G on the 3rd fret of the high E string
  • the octave between your open D string and the D on the 3rd fret of the B string
  • the 5th between the E on the second fret of the D string and the open B string

If those intervals are messed up, things will sound badly discordant. Remember that the 5ths should be slightly narrow, not perfect. But the octaves should be perfect, or very nearly so.

Play a few quick chords to test the results, too. An E Major, G major, and B minor are favorites of mine. They have combinations of open and fretted notes that helps make it obvious if anything’s a little skewed.

Chord

You’re Done!

With time, you’ll be able to run through this tuning system very quickly, and you’ll end up with a guitar that sounds joyously alive in all keys, no matter what chord you play. No more fussing with “this chord sounds good, but that one is awful!” No more trial and error. No more guessing which string is out of tune when something sounds bad. No more game of “tuning whack-a-mole.”

To summarize:

  • Tune the A string with a tuning fork.
  • Tune the low E string 1/3 of a beat wide relative to the A.
  • Tune the D string ½ of a beat wide relative to the A.
  • Tune the G string 2/3 of a beat wide relative to the D.
  • Tune the B string 7 ¾ beats wide relative to the G.
  • Tune the high E string just over 1 beat wide relative to the B.
  • Cross-check the low and high E strings, and play a few chords.

This can be done in a few seconds per string.

If you compare your results to what you’ll get from a digital tuner, you’ll find that with practice, your ear is much better. It’s very hard to tune within a Hz or so with a digital tuner, in part because the indicators are hard to read. What you’ll get with a digital tuner is most strings are pretty close to their correct frequency. This is a lot better than the ad-hoc tuning by trial-and-error you might have been accustomed to doing, because that method results in some intervals being tuned to sound good but others badly discordant. The usual scenario I see is someone’s B string is in good shape, but the G and the E are out of tune. The guitar player then tunes the B string relative to the out-of-tune E and G, and then everything sounds awful. This is because the guitarist had no frame of reference for understanding which strings were out of tune in which directions.

But when you tune by listening to beats, and get good at it, you’ll be able to tune strings to within a fraction of a cycle per second of what they should be. Your results will absolutely be better than a digital tuner.

I don’t mean to dismiss digital tuners. They’re very useful when you’re in a noisy place, or when you’re tuning things like electric guitars, which have distortion that buries overtones in noise. But if you learn to tune by hearing beats, you’ll be the better for it, and you’ll never regret it, I promise. By the way, if you have an Android smartphone, I’ve had pretty good results with the gStrings app.

Tune-o-phone

Advanced Magic

If you do the math on higher overtones, you’ll notice a few other interesting intervals between open strings. As your ear sharpens, you’ll be able to hear these, and use them to cross-check various combinations of strings. This can be useful because as you get better at hearing overtones and beats, you’ll probably start to become a bit of a perfectionist, and you won’t be happy unless particular intervals (such as the 5ths and octaves mentioned just above) sound good. Here they are:

  • Open A String to Open B String. The 9th overtone of the open A string is a high B note at 990Hz, and the 4th overtone of the open B is a high B at 987.77HZ. If you can hear this high note, you should hear it beating just over twice per second. The interval between the A and B strings is a minor 7th, which should be slightly narrow. Thus, if you tune the B until the beating disappears, you should then flatten it two beats.
  • Open D String to Open E String. This is also a minor 7th interval. You’re listening for a very high E note, at 1321.5Hz on the D string, and 1318.5 on the E string, which is 3 beats narrow.
  • Open D String to Open B String. The 5th overtone of the D string is similar to the 3rd overtone of the B string. This interval is about 6 and 2/3 beats wide. This is a bit hard to hear at first, but you’re listening for a high F-sharp.

Systems for Tuning Arbitrary Instruments

The guitar is a fairly simple instrument to tune, because it has only 6 strings, and 4ths are an easy interval to tune. The inclusion of a major 3rd makes it a little harder, but not much.

It is more complicated, and requires more practice, to tune instruments with more strings. The most general approach is to choose an octave, and to tune all the notes within it. Then you extend the tuning up and down the range as needed. For example, to tune the piano you first tune all the notes within a C-to-C octave (piano tuners typically use a large middle-C tuning fork).

Once you have your first octave tuned, the rest is simple. Each note is tuned to the octave below it or above it. But getting that first octave is a bit tricky.

There are two very common systems of tuning: fourths and fifths, and thirds and fifths. As you may know, the cycle of fifths will cycle you through every note in the 12-note scale. You can cycle through the notes in various ways, however.

The system of thirds and fifths proceeds from middle C up a fifth to G, down a third to E-flat, up a fifth to B-flat, and so on. The system of fourths and fifths goes from C up a fifth to G, down a fourth to D, and so on.

All you need to do is calculate the beats in the various intervals and be able to count them. The piano tuners I’ve known prefer thirds and fifths because if there are imperfections in the thirds, especially if they’re not as wide as they should be, it sounds truly awful. Lively-sounding thirds are important; fourths and fifths are nearly perfect, and should sound quite pure, but a third is a complex interval with a lot of different things going on. Fourths and fifths also beat slowly enough that it’s easy to misjudge and get an error that accumulates as you go through the 12 notes. Checking the tuning with thirds helps avoid this.

Tuning a Hammered Dulcimer

I’ve built several many-stringed instruments, including a couple of hammered dulcimers. My first was a home woodworking project with some two-by-four lumber, based on plans from a book by Phillip Mason I found at the library and decided to pick up on a whim. For a homebuilt instrument, it sounded great, and building an instrument like this is something I highly recommend.

Later I designed and built a second one, pictured below. Pardon the dust!

Dulcimer

Tuning this dulcimer takes a while. I start with an octave on the bass course. Dulcimers can have many different tunings; this one follows the typical tuning of traditional dulcimers, which is essentially a set of changing keys that cycle backwards by fifths as you climb the scale. Starting at G, for example, you have a C major scale up to the next G, centered around middle C. But the next B is B-flat instead of B-natural, so there’s an F major scale overlapping with the top of the C major, and so on:

G A B C D E F G A B-flat C D...

It’s easy to tune this instrument in fourths and fifths because of the way its scales are laid out. If I do that, however, I find that I have ugly-sounding thirds more often than not. So I’ll tune by combinations of fifths, fourths, and thirds:

G A B C D E F G A B-flat C D...
^-------------^                 (up an octave)
      ^-------^                 (down a fifth)
      ^---^                     (up a third)
  ^-------^                     (down a fifth)

And so on. In addition to using thirds where I can (G-B, C-E), I’ll check my fifths and fourths against each other. If you do the math, you’ll notice that the fourth from G to C is exactly as wide as the fifth from C to G again is narrow. (This is a general rule of fourths and fifths. Another rule is that the fourth at the top of the octave beats twice as fast as the fifth at the bottom; so G-D beats half as fast as D-G.)

When I’m done with this reference octave, I’ll extend it up the entire bass course, adjusting for B-flat by tuning it relative to F, and checking any new thirds that I encounter as I climb the scale. And then I’ll extend that over to the right-hand side of the treble course. I do not use the left-hand (high) side of the treble course to tune, because its notes are inaccurate depending on the placement of the bridge.

With a little math (spreadsheets are nice), and some practice, you can find a quick way to tune almost any instrument, along with cross-checks to help prevent skew as you go.

Tuning a Harp

Another instrument I built (this time with my grandfather) is a simplified replica of the Scottish wire-strung Queen Mary harp. This historical instrument might have been designed for some golden and silver strings, according to Ann Heyman’s research. In any case, it is quite difficult to tune with bronze or brass strings. It is “low-headed” and would need a much higher head to work well with bronze or brass.

Harp

Tuning this harp is quite similar to the hammered dulcimer, although it is in a single key, so there’s no need to adjust to key changes as you climb the scale. A simple reference octave is all you need, and then it’s just a matter of extending it. I have never tuned a concert harp, but I imagine it’s more involved.

Tangent: I first discovered the wire-strung harp in 1988, when I heard Patrick Ball’s first volume of Turlough O’Carolan’s music. If you have not listened to these recordings, do yourself a favor and at least preview them on Amazon. All these years later, I still listen to Patrick Ball’s music often. His newest recording, The Wood of Morois, is just stunning. I corresponded with Patrick while planning to build my harp, and he put me in touch with master harpmaker Jay Witcher, and his own role model, Ann Heymann, who was responsible for reinventing the lost techniques of playing wire-strung harps. Her recordings are a little hard to find in music stores, but are worth it. You can buy them from her websites http://www.clairseach.com/, http://www.annheymann.com/, and http://www.harpofgold.net/. If you’re interested in learning to play wire-strung harp, her book is one of the main written sources. There are a variety of magazines covering the harp renaissance in the latter part of the 20th century, and they contain much valuable additional material.

Beyond Tuning Theory: The Real World

Although simple math can compute the theoretically correct frequencies of notes and their overtones, and thus the beats of various intervals, in practice a number of factors make things more complicated and interesting. In fact, the math up until now has been of the “frictionless plane” variety. For those who are interested, I’ll dig deeper into these nuances.

The nuances and deviations from perfect theory are the main reasons why a) it’s impossible to tune anything perfectly and b) an instrument that’s tuned skillfully by ear sounds glorious, whereas an instrument tuned digitally can sound lifeless.

Harmonics, Overtones, and Partials

I was careful to use the term “overtone” most of the time previously. In theory, a string vibrates at its fundamental frequency, and then it has harmonic overtones at twice that frequency, three times, and so on.

However, that’s not what happens in practice, because theory only applies to strings that have no stiffness. The stiffness of the string causes its overtones to vibrate at slightly higher frequencies than you’d expect. For this reason, these overtones aren’t true harmonics. This is called inharmonicity, and inharmonic overtones are called partials to distinguish them from the purely harmonic overtones of an instrument like a flute, which doesn’t exhibit the same effect.

You might think that this inharmonicity is a bad thing, but it’s not. Common tones with a great deal of inharmonicity are bells (which often have so much inharmonicity that you can hear the pitches of their partials are too high) and various types of chimes. I keep a little “zenergy” chime near my morning meditation table because its bright tones focus my attention. I haven’t analyzed its spectrum, but because it is made with thick bars of aluminum, I’m willing to bet that it has partials that are wildly inharmonic. Yet it sounds pure and clear.

Woodstock Percussion ZENERGY3 Zenergy Chime

Much of the richness and liveliness of a string’s sound is precisely because of the “stretched” overtones. Many people compare Patrick Ball’s brass-strung wire harp to the sound of bells, and say it’s “pure.” It may sound pure, but pure-sounding is not simple-sounding. Its tones are complex and highly inharmonic, which is why it sounds like a bell.

In fact, if you digitally alter a piano’s overtones to correct the stretching, you get something that sounds like an organ, not a piano. This is one of the reasons that pianos tuned with digital tuners often sound like something scraped from the bottom of a pond.

Some digital tuners claim to compensate for inharmonicity, but in reality each instrument and its strings are unique and will be inharmonic in different ways.

Some practical consequences when tuning by listening to beats:

  • Don’t listen to higher partials while tuning. When tuning an octave, for example, you should ignore the beating of partials 2 octaves up. This is actually quite difficult to do and requires a well-developed ear. The reason is that higher partials will beat even when the octave is perfect, and they beat more rapidly and more obviously than the octave. Tuning a perfect octave requires the ability to hear very subtle, very gradual beats while blocking out distractions. This is also why I said not to worry if your low E string and high E string beat slightly. When tuned as well as possible, there will probably be a little bit of beating.
  • You might need to ignore higher partials in other intervals as well.
  • You might need to adjust your tuning for stretching caused by inharmonicity. In practice, for example, most guitars need to be tuned to slightly faster beats than you’d expect from pure theory.
  • Cross-checking your results with more complex intervals (especially thirds) can help balance the stretching better, and make a more pleasing-sounding tuning.
  • You might find that when using the “advanced tricks” I mentioned for the guitar, the open intervals such as minor 7ths will beat at different rates than you’d predict mathematically. However, once you are comfortable tuning your guitar so it sounds good, you’ll learn how fast those intervals should beat and it’ll be a great cross-reference for you.

Sympathetic and False Beats

It’s often very helpful to mute strings while you’re tuning other strings. The reason is that the strings you’re tuning will set up sympathetic vibrations in other strings that have similar overtones, and this can distract you.

When tuning the guitar, this generally isn’t much of a problem. However, be careful that when you tune the low E and A strings you don’t get distracted by vibrations from the high E string.

When tuning other instruments such as a hammered dulcimer or harp, small felt or rubber wedges (with wire handles if possible) are invaluable. If you don’t have these, you can use small loops of cloth.

In addition to distraction from sympathetic vibrations, strings can beat alone, when no other note is sounding. This is called a false beat. It’s usually caused by a flaw in the string itself, such as an imperfection in the wire or a spot of rust. This is a more difficult problem, because you can’t just make it go away. Instead, you will often have to nudge the tuning around a little here, a little there, to make it sound the best you can overall, given that there will be spurious beats no matter what. False beats will challenge your ear greatly, too.

In a guitar, false beats might signal that it’s time for a new set of strings. In a piano or other instrument, strings can be expensive to replace, and new strings take a while to settle in, so it’s often better to just leave it alone.

Imperfect Frets, Strings, Bridges and Nuts

I’ve never played a guitar with perfect frets. The reality is that every note you fret will be slightly out of tune, and one goal of tuning is to avoid any particular combination of bad intervals that sounds particularly horrible.

This is why it’s helpful to play at least a few chords after tuning. If you tune a particular instrument often you’ll learn the slight adjustments needed to make things sound as good as possible. On my main guitar, for example, the B string needs to be slightly sharp so that a D sounds better.

It’s not only the frets, but the nut (the zeroth fret) and the bridge (under the right hand) that matter. Sometimes the neck needs to be adjusted as well. A competent guitar repairman should be able to adjust the action if needed.

Finally, the weight and manufacture of the strings makes a difference. My main guitar and its frets and bridge sound better and more accurate with medium-weight Martin bronze-wound strings than other strings I’ve tried. As your ear improves, you’ll notice subtleties like this.

Fretting

New Strings

New strings (or wires) will take some time to stretch and settle in so they stay in tune. You can shorten this time by playing vigorously and stretching the strings, bending them gently. Be careful, however, not to be rough with the strings. If you kink them or strain them past their elastic point, you’ll end up with strings that have false beats, exaggerated inharmonicity, or different densities along some lengths of the string, which will make it seem like your frets are wrong in strange ways.

The Instrument Flexes and Changes

If an instrument is especially out of tune, the first strings you tune will become slightly out of tune as you change the tension on the rest of the instrument. The best remedy I can offer for this is to do a quick approximate tuning without caring much about accuracy. Follow this up with a second, more careful tuning.

This was especially a problem with my first hammered dulcimer, and is very noticeable with my harp, which flexes and changes a lot as it is tuned. My second hammered dulcimer has a ¾ inch birch plywood back and internal reinforcements, so it’s very stable. On the downside, it’s heavy!

Temperature and humidity play a large role, too. All of the materials in an instrument respond in different ways to changes in temperature and humidity. If you have a piano, you’re well advised to keep it in a climate-controlled room. If you’re a serious pianist you already know much more than I do about this topic.

Friction and Torque in Tuning Pin and Bridges

For guitarists, it’s important to make sure that your nut (the zeroth fret) doesn’t pinch the string and cause it to move in jerks and starts, or to have extra tension built up between the nut and the tuning peg itself. If this happens, you can rub a pencil in the groove where the string rides. The graphite in the pencil is a natural lubricant that can help avoid this problem.

Of course, you should also make sure that your tuning pegs and their machinery are smooth and well lubricated. If there’s excessive slop due to wear-and-tear or cheap machinery, that will be an endless source of frustration for you.

Tuning Pegs

On instruments such as pianos, hammered dulcimers, and harps, it’s important to know how to “set” the tuning pin. While tuning the string upwards, you’ll create torque on the pin, twisting it in the hole. The wood fibers holding it in place will also be braced in a position that can “flip” downwards. If you just leave the pin like this, it will soon wiggle itself back to its normal state, and even beyond that due to the tension the wire places on the pin. As a result, you need to practice tuning the note slightly higher than needed, and then de-tuning it, knocking it down to the desired pitch with a light jerk and leaving it in a state of equilibrium.

This technique is also useful in guitars and other stringed instruments, but each type of tuning machine has its own particularities. The main point to remember is that if you don’t leave things in a state of equilibrium and stability, they’ll find one soon enough, de-tuning the instrument in the process.

References and Further Reading

I tried to find the book from which I studied tuning as a child, but I can’t anymore. I thought it was an old Dover edition. The Dover book on tuning that I can find is not the one I remember.

You can find a little bit of information at various places online. One site with interesting information is Historical Tuning of Keyboard Instruments by Robert Chuckrow. I looked around on Wikipedia but didn’t find much of use. Please suggest further resources in the comments.

In this post I discussed the equally-tempered tuning, but there are many others. The study of them and their math, and the cultures and musical histories related to them, is fascinating. Next time you hear bagpipes, or a non-Western instrument, pay attention to the tuning. Is it tempered? Are there perfect intervals other than the octave? Which ones?

Listening to windchimes is another interesting exercise. Are the chimes harmonic or do they have inharmonicity? What scales and tunings do they use? What are the effects? Woodstock chimes use many unique scales and tunings. Many of their chimes combine notes in complex ways that result in no beating between some or all of the tones. Music of the Spheres also makes stunning chimes in a variety of scales and tunings.

As I mentioned, spreadsheets can be very helpful in computing the relationships between various notes and their overtones. I’ve made a small online spreadsheet that contains some of the computations I used to produce this blog post.

Let me know if you suggest any other references or related books, music, or links.

Enjoy your beautifully tuned guitar or other instrument, and most of all, enjoy the process of learning to tune and listen! I hope it enriches your appreciation and pleasure in listening to music.

Guitar Soundhole

Suggested links from various sources:

Picture Credits

28 Feb 10:18

Debugging before node inspector

by @CWMma

28 Feb 10:18

Getting started with cluster management

by nkcmr

28 Feb 10:17

process.on('uncaughtException',...) in production

by @dscape

28 Feb 10:17

Throwing a few setTimeouts at the problem

28 Feb 10:16

Enhanced OAuth security for SSH keys

by pengwynn

We just added more granular permissions so third party applications can specifically request read-only access, read/write access, or full admin access to your public SSH keys.

You're in control

As always, when an application requests access to your account, you get to decide whether to grant that access or not.

screen shot 2014-02-24 at 4 16 32 pm

Revoke with ease

In addition to these finer-grained permissions, we're also making it easier to revoke SSH access to your data. If an OAuth application creates an SSH key in your account, we'll automatically delete that key when you revoke the application's access.

0123998e-9052-11e3-8c2a-7e024c50f7c1

To help you track security events that affect you, we'll still email you any time a new key is added to your account. And of course, you can audit and delete your SSH keys any time you like.

You can read about the new changes in more detail on the GitHub Developer site.

28 Feb 10:13

Amazon EC2 Console Improvements

by AWS Evangelist

We have made some important improvements to the EC2 Management Console. Late last year we introduced the Launch Instance Wizard and AWS Marketplace Integration. We also updated the look and feel of key console pages.

Today we are updating the remaining pages of the console with a new look and feel and a host of new features.

In order to see the new and updated pages, simply click the Try it out link after you open the console:

Let's take a look at the new features!

Cloning Security Group Rules
You can now copy the rules from an existing security group to a new one by selecting the existing rule ad choosing Copy to new from the Actions menu:

Managing Outbound Rules in VPC Security Groups
You can now edit the outbound rules of a VPC Security Group from within the EC2 console (this operation was previously available from the VPC console):

Deep Linking Across EC2 Resources
The new deep linking feature lets you easily locate and work with resources that are associated with one another. For example, you can move from an instance to one of its security groups with a single click:

Compare Spot Prices Across AZs
The updated Spot Pricing History graph makes it easier for you to compare Spot prices across Availability Zones. Simply hover your cursor over the graph and observe the Spot prices across all of the Availability Zones in the Region:

Tagging of Spot Requests
You can now add tags to requests for EC2 Spot instances:

Updated Pages
The Events, Spot Requests, Bundle Tasks, Volumes, Snapshots, Security Groups, Placement Groups, Load Balancers, and Network Interfaces pages now use the new look and feel.

-- Jeff;

28 Feb 10:12

Auto Scale DynamoDB With Dynamic DynamoDB

by AWS Evangelist

Amazon DynamoDB is a fully-managed NoSQL database. When you create a DynamoDB table, you provision the desired amount of request capacity, taking in to account the amount of read and write traffic and the average size of each item. You can change this capacity (up or down) as you gain a better understanding of your application's requirements.

Many independent developers have built and published tools to facilitate the use of DynamoDB in a wide variety of environments (see my DynamoDB Libraries, Mappers, and Mock Implementations post for a fairly complete list).

Today I would like to tell you about Dynamic DynamoDB, an open source tool built by independent developer Sebastian Dahlgren. This flexible and highly configurable tool manages the process of scaling the provisioned throughput for your DynamoDB tables.

New CloudFormation Template
Sebastian has created a CloudFormation template that you can run to start using Dynamic DynamoDB with just a couple of clicks. You can configure Dynamic DynamoDB to scale your tables up and down automatically, and you can restrict scaling activities to certain time slots. You can scale read and write throughput capacity independently using upper and lower thresholds, and you can set minimums and maximums for each value. Finally, Dynamic DynamoDB supports a circuit-breaker. Before it performs any scaling activities, it can verify that your application is up and running. This final check will avoid spurious scale-down activities if your application is experiencing other problems.

This template lives at https://raw.github.com/sebdah/dynamic-dynamodb/master/cloudformation-templates/dynamic-dynamodb.json .

The template launches a t1.micro EC2 instance with the Dynamic DynamoDB package pre-installed. The instance is managed by an Auto Scaling group, and will be replaced if it fails. Because Dynamic DynamoDB makes calls to the DynamoDB API on your behalf, the template prompts you for your AWS credentials:

As always, use of an IAM user is advised. You'll need full access to DynamoDB APIs and resources, and read-only access to CloudWatch APIs and resources.

The template also requests an EC2 key pair for SSH access and the name of an S3 bucket for storage of the Dynamic DynamoDB configuration.

Configuring Dynamic DynamoDB
After the template has done its thing, SSH to the newly created EC2 instance, log in as ec2-user, and edit the configuration file in /etc/dynamic-dynamodb/dynamic-dynamodb.conf (you have lots of configuration options):

Dynamic DynamoDB runs as a service (dynamic-dynamodb) and can be stopped, started, and restarted if necessary. The configuration file is automatically backed up to S3 on each start or restart. The service will start automatically if it finds a valid configuration file in S3. You will have to start it yourself (sudo service dynamic-dynamodb start) after you first edit the configuration file.

Dynamic DynamoDB can be started in "dry run" mode. In this mode it will check the tables and make scaling decisions based on the configuration information, but it will not actually make any changes to the provisioned throughput.

Dynamic DynamoDB in Action
AWS customer tadaa (case study) uses DynamoDB to power their iPhone photo app. Here's what they had to say about it:

…when we moved from our self-administered database to Amazon DynamoDB, we eliminated the burdens of scaling in favor of predictable response times and infinite table sizes. That was a very easy business decision to make.

They use Dynamic DynamoDB to automatically adjust their DynamoDB capacity. Earlier this week they tweeted the following picture to show it in action:

The blue line represents the average amount of write capacity consumed. The red line represents the amount of write capacity that is provisioned. As you can see, Dynamic DynamoDB is able to alter the amount of provisioned capacity in response to changing conditions. After the developers at tadaa deployed an updated version of their code, the amount of write capacity consumed by their application declined precipitously.  Dynamic DynamoDB detected this change, and reduced the amount of provisioned write capacity accordingly.

Sebastian does not charge for Dynamic DynamoDB but you will pay the usual charges for the t1.micro instance. You can also install Dynamic DynamoDB on an existing instance if you'd like.

Read Sebastian's CloudFormation Template documentation to get started with Dynamic DynamoDB.

-- Jeff;

19 Feb 02:08

Rendered Prose Diffs

by raganwald

Today we are making it easier to review and collaborate on prose documents. Commits and pull requests including prose files now feature source and rendered views.

Click!

Click the "rendered" button to see the changes as they'll appear in the rendered document. Rendered prose view is handy when you're adding, removing, and editing text:

Replace a paragraph

Editing text

Or working with more complex structures like tables:

Edit Table

Non-text changes appear with a low-key dotted underline. Hover over the text to see what has changed:

HREF change

Building great software is about more than code. Whether you're writing docs, planning development, or blogging what you've learned, better prose makes for better products. Go forth and write together!

19 Feb 02:04

New Features for Route 53 - Improved Health Checks, HTTPS, Record Modification

by AWS Evangelist

Amazon Route 53 is a highly available and highly scalable DNS service. Route 53 is able to meet the needs of complex enterprises, while remaining simple enough to be a good fit for personal websites.

Today we are adding some useful new features to Route 53: Improved Health Checks (including HTTPS support), and a new record modification API.

Improved Health Checks
The logical (domain name) to physical (IP address) mapping that you get when you use a DNS service such as Route 53 greatly simplifies the process of building applications and services that are highly available. Route 53 improves on this fundamental DNS property by adding health checks and DNS failover capabilities. You can easily configure Route 53 to check the health of your website on a regular basis, and to switch to a backup site if the primary one is unresponsive.

You can now configure your Route 53 health checks to use the presence of a designated string in a server response to indicate that the server is performing as desired. The string (up to 255 characters long) must appear in the first 5,120 bytes of the response body.

You can use this feature in a couple of different ways. You can check the website itself to make sure that the HTML it serves up contains an expected string. Or, you can create a status checking routine and use it to check the health of the server from an internal or operational perspective. Suppose I take the latter route and decide that accessing check_server.php will return a simple XML string containing the status of the server. Here's how I would configure a Route 53 health check for this use case:

The implementation of the health check inside of check_server.php can be as simple or as complex as desired. A simple implementation might do nothing more than verify that the server has access to an associated database. A more complex implementation could check the server's load average, verify that expected disk volumes are presented and have some free space, and so forth.

While I'm on the subject of health checks, I should also mention that you can now create health checks for secure web sites that are available only over SSL. In other words, you can confirm that the web server is responding to requests made over HTTPS. Of course, you can combine this new feature with string match health checks in order to verify that your secure web site is returning the correct content.

Record Modification API
Many of our customers use the Route 53 API to make programmatic changes to their DNS record sets. We have added the UPSERT (update / insert) operation to the ChangeResourceRecordSets function simplify the process of creating new record sets and modifying existing ones. Code that makes use of UPSERT will be cleaner, simpler, and more efficient.

-- Jeff;

12 Feb 15:16

Webhooks level up

by kdaigle

Webhooks are by far our most widely adopted integration, but they've always been buried in a big list of external services. Today, we're making some major improvements in the way you configure, customize, and debug your webhooks.

First, webhooks are a lot more prominent in your repository settings page.

webhooks

You can now configure webhooks directly in your repository settings, instead of having to use the API. You can also choose specific events and a payload format (JSON!).

new webhook

Once you've configured a hook, the new deliveries section helps you track, troubleshoot, and re-send a webhook event payload.

deliveries

If you've never used webhooks, we've even got a brand new guide to help you get started. Happy integrating! :sparkles:

08 Jan 09:52

Introducing GitHub Traffic Analytics

by Caged

The holidays are over and we're getting back into the shipping spirit at GitHub. We want to kick off 2014 with a bang, so today we're happy to launch Traffic analytics!

You can now see detailed analytics data for repositories that you're an owner of or that you can push to. Just load up the graphs page for your particular repository and you'll see a new link to the traffic page.

traffic-link2

When you land on the traffic page you'll see a lot of useful information about your repositories including where people are coming from and what they're viewing.

github traffic

Looking at these numbers for our own repositories has been fun, sometimes surprising, and always interesting. We hope you enjoy it as much as we have!

01 Jan 17:30

GoDrone - A Parrot AR Drone 2.0 Firmware written in Go

by Felix Geisendörfer

Merry Christmas (or Newtonmas if you prefer) everybody.

Today I'm very happy to release the first version of my favorite side project, GoDrone.

GoDrone is a free software alternative firmware for the Parrot AR Drone 2.0. And yes, this hopefully makes it the first robotic visualizer for Go's garbage collector : ).

At this point the firmware is good enough to fly and provide basic attitude stabilization (using a simple complementary filter + pid controllers), so I'd really love to get feedback from any adventurous AR Drone owners. I'm providing binary installers for OSX/Linux/Windows:

http://www.godrone.io/en/latest/index.html

But you may also choose to install from source.

Depending on initial feedback, I'd love to turn GoDrone into a viable alternative to the official firmware, and breathe some fresh air into the development of robotics software. In particular I'd like to show that web technologies can rival native mobile/desktop apps in costs and UX for providing user interfaces to robots, and I'd also like to promote the idea of using high level languages for firmware development in linux powered robots.

If you're interested, please make sure to join the mailing list / come and say hello in IRC:

http://www.godrone.io/en/latest/user/community_support.html

30 Dec 17:30

"Look at mah new framework, it does all the things!"