I can never seem to remember the correct command
inotifywait -e modify -m -r /home/dir
I can never seem to remember the correct command
inotifywait -e modify -m -r /home/dir
We released a new version of HHVM today. This one includes all the hard work from our lockdown (detailed post to follow) and the ability to use HHVM with FastCGI.
I want to share with you our new release process. Instead of just arbitrarily cutting the source tree at a certain point, we are going to exactly mirror the internal Facebook release. That means the open source release will benefit from the week of internal testing and cherry-picks that are done getting hhvm ready to run facebook.com. Facebook does an hhvm push every 2 weeks, but this is a bit too fast for most distributions. So, for now, we are going push distro packages every 8 weeks and adjust if needed. We also want to do nightly package releases, so expect those to come out when we get some time (or complain loudly if you want them sooner).
As always, if you want to become the packager for a distro, great! Bundle it up and then update the wiki.
I also have a really exciting announcement: Travis CI now supports HHVM by default! It is really easy to test your projects against HHVM, just add
php:
  - hhvm
to your .travis.yml file and now every diff will ensure your project works on HHVM. If you notice any problems, please open an HHVM issue for language problems or Travis CI issue for testing problems. In the meantime, you can special case for hhvm by adding the following to your code:
if (defined('HHVM_VERSION')) {
  // do clowny hack while your issue/pull request is being worked on
}
And now for the 2.3 goods. It is exciting to note that this release was ~20% CPU reduction for running facebook.com compared to HHVM 2.2.0.
Here is the full changelog for your enjoyment:
ZipArchive
preg_replace /e supportget_mem_usage() no longer can be negativefileinfo extensionwordwrap() fixesPDO::sqliteCreateFunction()NumberFormatter
Locale
DatePeriod
PharData
implode() about collectionsTraversable
?int) is incorrect$f = [$cls_or_instance, 'method']; $f()
As you know, we launched our new compute optimized instance family (C3) a few weeks ago, and wow, are we seeing unprecedented demand across all sizes and all Regions! As one of our product managers just told me, these instances are simply "fast in every dimension." They have a high performance CPU, matched with SSD-based instance storage and EC2's new enhanced networking capabilities, all at a very affordable price.
We believed that this instance type would be popular, but would not have imagined just how popular they've been. The EC2 team took a look back and found that growth in C3 usage to date has been higher than they have seen for any other newly introduced instance type. We're not talking about some small percentage difference here. It took just two weeks for C3 usage to exceed the level that the former fastest-growing instance type achieved in twenty-two weeks! This is why some of you are not getting the C3 capacity you're asking for when you request it.
In the face of this growth, we have enlarged, accelerated, and expedited our orders for additional capacity across all Regions. We are working non-stop to get it in-house, and hope to be back to more normal levels of capacity in the next couple of weeks.
-- Jeff;


Whether it's reviewing community changes to an Open Source project, or using GitHub Flow on a private project, we all spend a lot of time looking at diffs. But to really understand a code change, we sometimes need to see more than just the default three lines of context.
Today we’re excited to announce a new feature that makes this possible. Using the new unfold button in the gutter of a diff, you can reveal additional lines of context with a click.

You can keep clicking unfold until you've revealed the whole file, and the feature is available anywhere we render diffs.
Happy code reviewing!
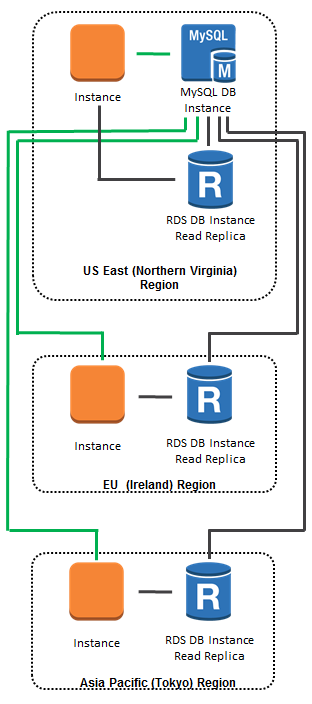
You can now create cross-region read replicas for Amazon RDS database instances!
This feature builds upon our existing support for read replicas that reside within the same region as the source database instance. You can now create up to five in-region and cross-region replicas per source with a single API call or a couple of clicks in the AWS Management Console. We are launching with support for version 5.6 of MySQL.
Use Cases
You can use this feature to implement a cross-region disaster recovery model, scale out globally, or migrate an existing database to a new region:
Improve Disaster Recovery - You can operate a read replica in a region different from your master database region. In case of a regional disruption, you can promote the replica to be the new master and keep your business in operation.
Scale Out Globally - If your application has a user base that is spread out all over the planet, you can use Cross Region Read Replicas to serve read queries from an AWS region that is close to the user.
Migration Between Regions - Cross Region Read Replicas make it easy for you to migrate your application from one AWS region to another. Simply create the replica, ensure that it is current, promote it to be a master database instance, and point your application at it.
You will want to pay attention to replication lag when you implement any of these use cases. You can use Amazon CloudWatch to monitor this important metric, and to raise an alert if it reaches a level that is unacceptably high for your application:

As an example of what you can do with Cross Region Replicas, here's a global scale-out model. All database updates (green lines) are directed to the database instance in the US East (Northern Virginia) region. All database queries (black lines) are directed to in-region or cross-region read replicas, as appropriate:
Creating Cross-Region Read Replicas
The cross-region replicas are very easy to create. You simply select the desired region (and optional availability zone) in the AWS Management Console:

You can also track the status of each of your read replicas using RDS Database Events.
All data transfers between regions are encrypted using public key encryption. You pay the usual AWS charges for the database instance, the associated storage, and the data transfer between the regions.
Reports from the Field
I know that our users have been looking forward to this feature. Here's some of the feedback that they have already sent our way:
Isaac Wong is VP of Platform Architecture at Medidata. He told us:
 Medidata provides a cloud platform for life science companies to design and run clinical trials faster, cheaper, safer, and smarter. We use Amazon RDS to store mission critical clinical development data and tested many data migration scenarios between Asia and USA with the cross region snapshot feature and found it very simple and cost effective to use and an important step in our business continuity efforts. Our clinical platform is global in scope. The ability provided by the new Cross Region Read Replica feature to move data closer to the doctors and nurses participating in a trial anywhere in the world to shorten read latencies is awesome. It allows health professionals to focus on patients and not technology. Most importantly, using these cross region replication features, for life critical services in our platform we can insure that we are not affected by regional failure. Using AWS's simple API's we can very easily bake configuration and management into our deployment and monitoring systems at Medidata.
Joel Callaway is IT Operations Manager at Zoopla Property Group Ltd. This is what he had to say:
 Amazon RDS cross region functionality gives us the ability to copy our data between regions and keep it up to date for disaster recovery purposes with a few automated steps on the AWS Management Console. Our property and housing prices website attracts over 20 million visitors per month and we use Amazon RDS to store business critical data of these visitors. Using the cross region snapshot feature, we already transfer hundreds of GB of data from our primary US-East region to the EU-West every week. Before this feature, it used to take us several days and manual steps to do this on our own. We now look forward to the Cross Region Read Replica feature, which would make it even easier to replicate our data along with our application stack across multiple regions in AWS.
Time to Replicate
This feature is available now and you can start using it today!
You may also want to investigate some of our other cross-region features including EC2 AMI Copy, RDS Snapshot Copy, DynamoDB Data Copy, and Redshift Snapshot Copy.
-- Jeff;
Many AWS customers run CPU-bound, compute-intensive workloads on Amazon EC2, often using parallel processing frameworks such as Hadoop to distribute work and collect results. This includes batch data processing, analytics, high-performance scientific computing, 3D rendering, engineering, and simulation.
To date these needs have been met by the existing members of our compute-optimized instance families -- the C1 and CC2 instance types. When compared to EC2's general purpose instance types, the instances in this family have a higher ratio of compute power to memory.
Hello C3
Today we are introducing the C3 family of droids instances. Compared to C1 instances, the C3 instances provide faster processors, approximately double the memory per vCPU and SSD-based instance storage.
As the newest member of our lineup of compute-optimized instances, the C3's were designed to deliver high performance at an economical price. The C3 instances feature per-core performance that bests that provided by any of the other EC2 instance types, at a price-performance ratio that will make them a great fit for many compute-intensive workloads.
Use the Cores
Each virtual core (vCPU) on a C3 instance type is a hardware Hyper-Thread on a 2.8 GHz Intel Xeon E5-2680v2 (Ivy Bridge) processor. There are five members of the C3 family:
| Instance Name | vCPU Count | Total ECU | RAM | Local Storage | Hourly On-Demand |
| c3.large | 2 | 7 | 3.75 GiB | 2 x 16 GB SSD | $0.15 |
| c3.xlarge | 4 | 14 | 7 GiB | 2 x 40 GB SSD | $0.30 |
| c3.2xlarge | 8 | 28 | 15 GiB | 2 x 80 GB SSD | $0.60 |
| c3.4xlarge | 16 | 55 | 30 GiB | 2 x 160 GB SSD | $1.20 |
| c3.8xlarge | 32 | 108 | 60 GiB | 2 x 320 GB SSD | $2.40 |
Prices are for Linux instances in US East (Northern Virginia).
Protocols
If you launch C3 instances inside of a Virtual Private Cloud and you use an HVM AMI with the proper driver installed, you will also get the benefit of EC2's new enhanced networking. You will see significantly higher performance (in terms of packets per second), much lower latency, and lower jitter.
Update: Read the documentation on Enabling Enhanced Networking on Linux Instances in a VPC to learn how to do this.
Getting Technical
As you may have noticed, we are specifying the underlying processor type for new instance types. Armed with this information, you can choose to make use of specialized instructions or to tune your application to exploit other characteristics (e.g. cache behavior) of the actual processor. For example, the processor in the C3 instances supports Intel's AVX (Advanced Vector Extensions) for efficient processing of vector-oriented data in 256-bit chunks.
Some Numbers
In order to measure the real-world performance of the new C3 instances, we launched a 26,496 core cluster and evaluated it against the most recent Top500 scores. This cluster delivered an Rmax of 484.18 teraflops and would land at position 56 in the June 2013 list. Notably, this is over twice the performance of the last cluster that we submitted to Top500. We also built an 8,192 cluster, which delivered an Rmax of 163.9, putting it at position 210 on the Top500 list.
Launch One Now
The C3 instances are available today in the US East (Northern Virginia), US West (Oregon), EU (Ireland), Asia Pacific (Singapore), Asia Pacific (Tokyo), and Asia Pacific (Sydney) Regions. You can choose to launch C3 instances as On-Demand, Reserved Instances, or Spot Instances.
-- Jeff;
I know that many AWS customers are interested in building applications that run in more than one of the eight public AWS regions. As a result, we have been working to add features to AWS to simplify and streamline the data manipulation operations associated with building and running global applications. In the recent past we have given you the ability to copy EC2 AMIs, EBS Snapshots, and DynamoDB tables between Regions.
RDS Snapshot Copy
Today we are taking the next logical step, giving you the ability to copy Amazon RDS (Relational Database Service) snapshots between AWS regions. You can initiate the copy from the AWS Management Console, the AWS Command Line Interface (CLI), or through the Amazon RDS APIs. Here's what you will see in the Console:
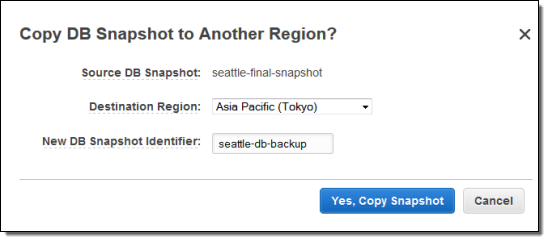
You can copy snapshots of any size, from any of the database engines (MySQL, Oracle, or SQL Server) that are supported by RDS. Copies can be moved between any of the public AWS regions, and you can copy the same snapshot to multiple Regions simultaneously by initiating more than one transfer.
As is the case with the other copy operations, the copy is done on an incremental basis, and only the data that has changed since the last snapshot of a given Database Instance will be copied. When you delete a snapshot, deletion is limited to the data that will not affect other snapshots.
There is no charge for the copy operation itself; you pay only for the data transfer out of the source region and for the data storage in the destination region. You are not charged if the copy fails, but you are charged if you cancel a snapshot that is underway at the time.
Democratizing Disaster Recovery
One of my colleagues described this feature as "democratizing data recovery." Imagine all of the headaches (and expense) that you would incur while setting up the network, storage, processing, and security infrastructure that would be needed to do this on your own, without the benefit of the cloud. You would have to acquire co-lo space, add racks, set up network links and encryption, create the backups, and arrange to copy them from location to location. You would invest thousands of dollars in infrastructure, and the same (if not more) in DBA and system administrator time.
All of these pain points (and the associated costs) go away when you copy backups from Region to Region using RDS.
-- Jeff;
I've become a huge fan of touch computing. I believe that most things we think of as "computers" will be de-facto tablets, either in our pocket, in our hands, possibly even mounted on our wrists or forearms.
I can't wait for the iPad 5 this week (I'll be ordering three), and my Surface Pro 2 should arrive this week too. Because it is a blazingly fast, modern Intel machine, I like to use the Surface Pro to predict where tablet performance ought to be for everyone in 2 to 3 years. I think of it as an iPad 7.
My main complaint with the Surface Pro is the incredibly lackluster battery life. Granted, this is a classic Intel x86 box we're talking about, not some efficient ARM system-on-a-chip designed to run on a tiny battery. Still, I was hopeful that the first Surface Pro with Haswell inside would produce giant gains in battery life as Intel promised. Then I saw this graph:
So WiFi web browsing battery life, arguably the most common user activity there is on a computer these days, goes from 4.7 hours on the Surface Pro to 6.7 hours on the Surface Pro 2, a 42% increase. That's a decent increase, I suppose, but I was hoping for something more like 8 hours, something closer to doubling of battery life – to bring the Surface Pro in line with other tablets.
Nearly 7 whole hours of WiFi web browsing for a real computer in tablet form factor … that's not bad, right? Let's see how the 2013 MacBook Air does, which spec-wise is about as close as we can get to the Surface Pro 2. The screen is somewhat lower resolution and not touch capable, of course, but under the hood, the i5-4200u CPU and LPDDR3 RAM are nearly the same. It's a real computer, too, using the latest Intel technology.
The Surface Pro 2 has a 42 Wh battery, which puts it closer to the 11 inch Air in capacity. Still, over 11 hours of battery life browsing the web on WiFi? That means the Air is somehow producing nearly two times the battery efficiency of the best hardware and software combination Microsoft can muster, for what I consider to be the most common usage pattern on a computer today. That's shocking. Scandalous, even.
UPDATE: Turns out the Surface 2 Pro was shipped with bad firmware. Once updated, the WiFi adapter enters lower idle power states and this helps a lot, going from 6.6 hours of browsing time to 8.3 hours, a 25% improvement! That puts it much more in line with the rest of the field, at least, even if it doesn't achieve Mac like runtime.
It's not exactly news that Windows historically doesn't do as well as OS X on battery life. Way back in 2009, AnandTech tested a MacBook Pro with multiple operating systems:
| 2009 15-inch MacBook Pro (73WHr battery) | OS X 10.5.7 | Windows Vista x64 SP1 | Windows 7 RC1 |
| Wireless Web Browsing (No Flash) Battery Life | 8.13 hours | 6.02 hours | 5.48 hours |
That's fine, I knew about this discrepancy, but here's what really bothers me:
(It's true that Bay Trail, Intel's new lower power CPU from the Atom family, achieves 8.6 hours of WiFi web browsing. That's solidly in the middle of the tablet pack for battery life. But all the evidence tells me that the very same hardware would do a lot better in OS X, or even iOS. At least Intel has finally produced something that's reasonably competitive with the latest ARM chips.)
Perhaps most damning of all, if you take the latest and greatest 13" MacBook Air, and install Windows 8 on it, guess what happens to battery life?
One of the best things about the standard 2013 MacBook Air 13" is that it has record-breaking battery life of 14 hrs 25 min (with the screen brightness at 100 cd/m², headphones plugged in and the Wi-Fi, Bluetooth and keyboard backlighting turned off). Under Windows 8 the results are more mixed [..] in the same conditions it lasts only 7 hrs 40 min. That's still very high—it's better than the Asus Zenbook Prime UX31A's 6 hours and the Samsung Series 7 Ultra's 5 hours—but it's only half the astronomical 14 hours + that the 13" MacBook Air is capable of.
Instead of the 26% less battery life in Windows that Anand measured in 2009, we're now seeing 50% less battery life. This is an enormous gap between Windows and OS X in what is arguably the most common form of computer usage today, basic WiFi web browsing. That's shameful. Embarrassing, even.
I had a brief Twitter conversation with Anand Shimpi of Anandtech about this, and he was as perplexed as I was. Nobody could explain the technical basis for this vast difference in idle power management on the same hardware. None of the PC vendors he spoke to could justify it, or produce a Windows box that managed similar battery life to OS X. And that battery life gap is worse today – even when using Microsoft's own hardware, designed in Microsoft's labs, running Microsoft's latest operating system released this week. Microsoft can no longer hand wave this vast difference away based on vague references to "poorly optimized third party drivers".
Apple is clearly doing a great job here. Kudos. If you want a device that delivers maximum battery life for light web browsing, there's no question that you should get something with an Apple logo on it. I just wish somebody could explain to me and Anand why Windows is so awful at managing idle power. We're at a loss to understand why Windows' terrible – and worsening! – idle battery life performance isn't the source of far more industry outrage.
| [advertisement] How are you showing off your awesome? Create a Stack Overflow Careers profile and show off all of your hard work from Stack Overflow, Github, and virtually every other coding site. Who knows, you might even get recruited for a great new position! |
Masters of Doom is the story of John Carmack and John Romero creating the seminal games Wolfenstein 3D, Doom, and Quake.
It's an amazing work on so many levels – but primarily because of the exhaustive research the author undertook to tell this story.
To re-create the story of the Two Johns, I conducted hundreds of interviews over six years, often with each person on multiple occasions. After moving to Dallas in the fall of 2000 for research, I became known in offices, barbecue joints, and bars around town as “the guy writing the Book.” John Romero and John Carmack each spent dozens of hours in person answering my most picayune questions: how they were feeling, what they were thinking, what they were saying, hearing, seeing, playing. What they and others couldn’t recall, I unearthed from websites, newsgroups, e-mails, chat transcripts, and magazines (though I drew from some of these articles, I made a point of getting the gamers’ own versions of what happened as well). I also played a delirious amount of games: at home, online, and at a couple tournaments (yeah, I lost).
I spent six months transcribing all my taped interviews. From this material, I assembled a narrative of dialogue and description that re-creates the events as faithfully and accurately as possible. As often as appropriate, I told the story from each person’s point of view to give readers the different perspectives.
It's unusual to find a book about a contentious, complex friendship and business relationship that both parties sign off on – and even a decade later, regularly recommend to people interested in their personal back stories. But it is a testament to just how right Kushner got this story that both Romero and Carmack do. This is exactly the sort of meticulously researched, multiple viewpoint biography that you'd want to read about important people in your industry. In that sense, it's kind of the opposite of the Jobs biography, which I liked well enough, but it presented one viewpoint, and often in a very incomplete, sloppily researched way. I would kill to read a book this good about Jobs.
In a way, I grew up with these guys. I am almost exactly the same age they are. I missed the Wolfenstein 3D release because I was still in college, but come December 1993, there I was, bursting with anticipation waiting for the release of Doom along with every other early PC gamer. And who gave Doom its name? Oddly enough, Tom Cruise did.
I've had a lifelong love affair with first person shooters since encountering Wolf3D and Doom. I played about every Doom engine game there was to death. I even had a brief encounter with Romero himself on the modem based multiplayer hub DWANGO where I proverbially "sucked it down". And after the Internet hit around '95, I continued to follow Quake development obsessively online, poring over every .plan file update, and living the drama of the inevitable breakup, the emergence of GLQuake and 3D accelerators, and the road to Quake 3.
It is also an incredibly inspiring story. Here's a stereotypical group of geeky programmers from sketchy home backgrounds who went on to … basically create an entire industry from scratch on their own terms.
Shareware. Romero was familiar with the concept. It dated back to a guy named Andrew Fluegelman, founding editor of PC World magazine. In 1980, Fluegelman wrote a program called PC-Talk and released it online with a note saying that anyone who liked the wares should feel free to send him some “appreciation” money. Soon enough he had to hire a staff to count all the checks. Fluegelman called the practice “shareware,” “an experiment in economics.” Over the eighties other hackers picked up the ball, making their programs for Apples, PCs, and other computers available in the same honor code: Try it, if you like it, pay me. The payment would entitle the customer to receive technical support and updates.
The Association of Shareware Professionals put the business, largely domestic, between $10 and $20 million annually—even with only an estimated 10 percent of customers paying to register a shareware title. Forbes magazine marveled at the trend, writing in 1988 that “if this doesn’t sound like a very sound way to build a business, think again.” Shareware, it argued, relied not on expensive advertising but on word of mouth or, as one practitioner put it, “word of disk.” Robert Wallace, a top programmer at Microsoft, turned a shareware program of his called PC-Write into a multimillion-dollar empire. Most authors, however, were happy to break six figures and often made little more than $25,000 per year. Selling a thousand copies of a title in one year was a great success. Shareware was still a radical conceit, one that, furthermore, had been used only for utility programs, like check-balancing programs and word-processing wares. [Shareware] had never been exploited for games.
Does anyone even remember what shareware is? What is the equivalent to shareware today? Distributing software yourself on the Internet? Sort of. I'd say it's more analogous to the various app stores: Google Play, Apple App Store, Windows Store. Going directly to the users. But they found shareware games didn't work, at least initially:
When it came time to distribute the games, Scott took a long, hard look at the shareware market. He liked what he saw: the fact that he could run everything himself without having to deal with retailers or publishers. So he followed suit, putting out two text-based games in their entirety and waiting for the cash to roll in. But the cash didn’t roll; it didn’t even trickle. Gamers, he realized, might be a different breed from those consumers who actually paid for utility shareware. They were more apt simply to take what they could get for free. Scott did some research and realized he wasn’t alone; other programmers who had released games in their entirety as shareware were broke too. People may be honest, he thought, but they’re also generally lazy. They need an incentive.
Then he got an idea. Instead of giving away the entire game, why not give out only the first portion, then make the player buy the rest of the game directly from him? No one had tried it before, but there was no reason it couldn’t work. The games Scott was making were perfectly suited to such a plan because they were broken up into short episodes or “levels” of play. He could simply put out, say, fifteen levels of a game, then tell players that if they sent him a check he would send them the remaining thirty.
You know how game companies spent the last 5 years figuring out that free games with 100% in-app purchases are the optimum (and maybe, only) business model for games today? The guys at id had figured that all out twenty seven years ago. Those sounds you hear in the distance are a little bit of history repeating.
Id Software was more than a unique business model that gave almost all the power to the programmers. It was the explosive combination of shareware delivery with a particular genius programmer inventing new techniques for PC games that nobody had seen before: John Carmack. It may sound prosaic and banal now, but smooth scrolling platforming, texture mapped walls, lighting models, and high speed software 3D rendering on a PC were all virtually unheard of at the time Carmack created the engines that made them commonplace.
Carmack, like Abrash, is a legend in programming circles, and for good reason. The stories in this book about him are, frankly, a little scary. His devotion to the machine borders on fanatical; he regularly worked 80 hour weeks and he'd take "vacations" where it was just him and a computer alone in a hotel room for a whole week – just for fun, to relax. His output is herculean. But he also realizes that all his hard work is made possible by a long line of other programmers who came before him.
Al had never seen a side scrolling like this for the PC. “Wow,” he told Carmack, “you should patent this technology.
Carmack turned red. “If you ever ask me to patent anything,” he snapped, “I’ll quit.” Al assumed Carmack was trying to protect his own financial interests, but in reality he had struck what was growing into an increasingly raw nerve for the young, idealistic programmer. It was one of the few things that could truly make him angry. It was ingrained in his bones since his first reading of the Hacker Ethic. All of science and technology and culture and learning and academics is built upon using the work that others have done before, Carmack thought. But to take a patenting approach and say it’s like, well, this idea is my idea, you cannot extend this idea in any way, because I own this idea—it just seems so fundamentally wrong. Patents were jeopardizing the very thing that was central to his life: writing code to solve problems. If the world became a place in which he couldn’t solve a problem without infringing on someone’s patents, he would be very unhappy living there.
In that spirit, Carmack regularly releases his old engines under GPL for other programmers to learn from. Don't miss Fabien Sanglard's epic deconstruction of the Doom 3 codebase, for example. That's only one iteration behind the current id engine which was used for Rage and (apparently) will be used for the upcoming Doom 4.
One of my very favorite quotes of all time comes at the end of the book.
Carmack disdained talk of highfalutin things like legacies but when pressed would allow at least one thought on his own. “In the information age, the barriers just aren’t there,” he said. “The barriers are self-imposed. If you want to set off and go develop some grand new thing, you don’t need millions of dollars of capitalization. You need enough pizza and Diet Coke to stick in your refrigerator, a cheap PC to work on, and the dedication to go through with it. We slept on floors. We waded across rivers.”
And indeed they did, as the book will attest. Both @ID_AA_Carmack and @romero are still lifelong, influential, inspiring members of the game and programming communities. They are here for the long haul because they love this stuff and always have.
The ultimate point of Masters of Doom is that today you no longer need to be as brilliant as John Carmack to achieve success, and John Carmack himself will be the first to tell you that. Where John was sitting in a cubicle by himself in Mesquite, Texas for 80 hours a week painstakingly inventing all this stuff from first principles, on hardware that was barely capable, you have a supercomputer in your pocket, another supercomputer on your desk, and two dozen open source frameworks and libraries that can do 90% of the work for you. You have GitHub, Wikipedia, Stack Overflow, and the whole of the Internet.
All you have to do is get off your butt and use them.
| [advertisement] Hiring developers? Post your open positions with Stack Overflow Careers and reach over 20MM awesome devs already on Stack Overflow. Create your satisfaction-guaranteed job listing today! |
To follow up with our recent two-factor authentication security feature, we are giving users more insight into their active browser sessions.
Under Account settings > Security History you will see a list of all your active sessions with the ability to remotely revoke them.

This summer we made it easier to release your software. Today, you can fully automate those releases via the
Releases API Preview. ![]()
![]()
![]()
You can even upload binaries in a single step:
curl -H "Authorization: token <yours>" \
     -H "Accept: application/vnd.github.manifold-preview" \
     -H "Content-Type: application/zip" \
     --data-binary @build/mac/package.zip \
     "https://uploads.github.com/repos/hubot/singularity/releases/123/assets?name=1.0.0-mac.zip"
Check out the full API docs for details, and go build something!
annyang! is an awesome little JavaScript library by Tal Ater that adds voice commands to your site via webkitSpeechRecognition. Using annyang! is as easy as:
if (annyang) {
  // Let's define a command.
  var commands = {
    'show tps report': function() { $('#tpsreport').show(); }
  };

  // Initialize annyang with our commands
  annyang.init(commands);

  // Start listening.
  annyang.start();
}
You’ll definitely want to see this one in action, so make sure to visit the project’s homepage where there are multiple demos.
annyang! only works in browsers that support webkitSpeechRecognition, so it should be used as an enhancement to your site unless you have a very specific audience.
And if you’re wondering about the name… yes. It is in reference to the hilarious Arrested Development character by the same (phonetic) name. Tal took creative liberty with the spelling to make sure the name wasn’t too annoying for those who don’t get the reference.
I pleaded with Tal to match the official spelling, but he simply responded with further Arrested Development references. I think the guy might have a problem. ;)
The post annyang! lets your users control your site with voice commands appeared first on The Changelog.
If you use Amazon DynamoDB, you may already be using AWS Data Pipeline to make regular backups to Amazon S3, or to load backup data from S3 to DynamoDB.
Today we are releasing a new feature that enables periodic copying of the data in a DynamoDB table to another table in the region of your choice. You can use the copy for disaster recovery (DR) in the event that an error in your code damages the original table, or to federate DynamoDB data across regions to support a multi-region application.
You can access this feature by using a new template that you can access through the AWS Data Pipeline:

Select the template and then set up the parameters for the copy:

Enter the table names for the source and destination, along with their respective regions. The Read and Write Percentage Allocation is the percentage of the table's total capacity units allocated to this copy. Then, set up the frequency of this copy, the start time for the first copy, and optionally the end time.
You can use the Data Filtering option to choose between four different copy operations:
Full Table Copy - If you do not set any of the Data Filtering parameters, the entire table -- all items and all of their attributes -- will be copied on every execution of the pipeline.
Incremental Copy - If each of the items in the table has a timestamp attribute, you can specify it in the Filter SQL field along with the timestamp value to select against. Note that this will not delete any items in the destination table. If you need this functionality, you can implement a logical delete (usig an attribute to indicate that an item has been deleted) instead of a physical deletion.
Selected Attribute Copy - If you would like to copy only a subset of the attributes of each item, specify the desired attributes in the Columns field.
Incremental Selected Attribute Copy - You can combine Incremental and Selected Attribute Copy operations and incrementally copy a subset of the attributes of each item.
Once you have filled out the form, you will see a confirmation window that summarizes how the copy is going to be accomplished. Data Pipeline uses Amazon Elastic Map Reduce (EMR) to perform a parallel copy of data directly from one DynamoDB table to the other, with no intermediate staging involved:

The usual AWS data transfer charges apply when you use this facility to copy data between DynamoDB tables.
Note that the AWS Data Pipeline is currently available in the US East (Northern Virginia) Region and you'll have to launch it from there. It can, however, copy data between tables located in any of the public AWS Regions.
This feature is available now and you can start using it today!
-- Jeff;
Dockerception! http://t.co/zsWgK3t7jz
— Solomon Hykes (@solomonstre) September 5, 2013
It’s Dockerception! Docker can now run within Docker
One of the (many!) features of Docker 0.6 is the new “privileged” mode for containers. It allows you to run some containers with (almost) all the capabilities of their host machine, regarding kernel features and device access. Among the (many!) possibilities of the “privileged” mode, you can now run Docker within Docker itself.
In that post, Jérôme also links out to his dind (Docker-in-Docker) repo at the tail end which includes the Dockerfile, the wrapper, and some extra documentation.
If you’re new to Docker, check out episode #89: Linux containers, Docker and dotCloud with Solomon Hykes
The post Docker can now run in Docker, in Docker, in Docker, in… appeared first on The Changelog.
Graphical user interfaces (e.g. the AWS Management Console) are great, but nothing beats the expressiveness of the command line!
Today we are releasing the AWS Command Line Interface (CLI). The AWS CLI provides a single, unified interface to a very large collection of AWS services. After downloading and configuring the CLI you can drive Amazon EC2, Amazon S3, Elastic Beanstalk, the Simple Workflow Service, and twenty other services (complete list) from your Linux, OS X, or Windows command line.
Download and Configure
The Getting Started page contains the information that you need to know in order to download and configure the AWS CLI. You'll need to have Python (any version from 2.6.x up to 3.3.x) installed if you are on Linux or OS X, but that's about it. You can install the CLI using easy_install, pip, or from a Windows MSI.
You can set your AWS credentials for the CLI using environment variables or a configuration file. If you are running the CLI on an EC2 instance, you can also use an IAM role.
I recommend that you create an IAM user (I called mine awscli) so that you have full control of the AWS operations that can be performed from the command line. For testing purposes, I used the all-powerful Administrator Access policy template. In practice I would definitely use a more restrictive template.
Running Commands
The AWS CLI commands take the form:
$ aws SERVICE OPERATION [OPTIONS]
The SERVICE is the name of the service, except in the case of Amazon S3, where it is s3api. The s3 service is used to invoke a very powerful set of file manipulation commands that I will describe in a moment.
The OPERATION is the name of the corresponding AWS API function -- describe-instances, list-buckets, and so forth. You can issue the help operation to see a list of all available operations for the service:
$ aws ec2 help
Each operation generates its output in JSON format by default. You can use --output text and --output table to request text and tabular output, respectively. Here are samples of all three:


The jq (JSON Query) tool makes it easy for you to process JSON data. For example, a recent post on Reddit asked about extracting tag data for an EC2 instance. Here's how to solve that problem by using the AWS CLI and jq:
$ aws ec2 describe-instances --output json | jq .Reservations[].Instances[].Tags[]
{
  "Key": "Name",
  "Value": "DevServer"
}
S3 File Operations
The AWS CLI also supports a set of S3 file operations. You can list (ls), copy (cp), move (mv), and sync (sync) files (S3 objects). You can also make (mb) and remove (rb) S3 buckets. Here are a couple of examples:
$ aws s3 mb s3://jbarr-book-code
make_bucket: s3://jbarr-book-code/

$  aws s3 sync . s3://jbarr-book-code
upload: CVS/Entries to s3://jbarr-book-code/CVS/Entries
upload: .cvsignore to s3://jbarr-book-code/.cvsignore
upload: Makefile to s3://jbarr-book-code/Makefile
upload: CVS/Repository to s3://jbarr-book-code/CVS/Repository
upload: LICENSE.txt to s3://jbarr-book-code/LICENSE.txt
upload: README to s3://jbarr-book-code/README
upload: NOTICE.txt to s3://jbarr-book-code/NOTICE.txt
upload: TODO.txt to s3://jbarr-book-code/TODO.txt
upload: aws.dot to s3://jbarr-book-code/aws.dot
upload: CVS/Root to s3://jbarr-book-code/CVS/Root
upload: aws_meta.dot to s3://jbarr-book-code/aws_meta.dot
upload: aws_meta.php to s3://jbarr-book-code/aws_meta.php
...

$ aws s3 ls s3://jbarr-book-code

Bucket: jbarr-book-code
Prefix:

      LastWriteTime     Length Name
      -------------     ------ ----
                           PRE CVS/
                           PRE magpierss-0.72/
2013-09-03 20:53:54         63 .cvsignore
2013-09-03 20:53:55       9189 LICENSE.txt
2013-09-03 20:53:55        401 Makefile
2013-09-03 20:53:55        406 NOTICE.txt
2013-09-03 20:53:55        470 README
2013-09-03 20:53:55       2190 TODO.txt
2013-09-03 20:53:55       5941 aws.dot
2013-09-03 20:53:55     763110 aws_meta.dot
...

$ touch ch4*.php

$ aws s3 sync . s3://jbarr-book-code
upload: ch4_simple_crawl.php to
s3://jbarr-book-code/ch4_simple_crawl.php
upload: ch4_ec2_setup.php to s3://jbarr-book-code/ch4_ec2_setup.php
The file operations will automatically make use of parallelized multi-part uploads to Amazon S3 for large files and for groups of files. You can also use the --recursive option on the cp, mv, and rm commands in order to process the current directory and all directories inside of it.
A Few More Options
Some of the AWS commands accept or require large amount of text or JSON content as parameters. You can store parameters values of this type in a file or in a web-accessible location and then reference it as follows:
$ aws ec2 authorize-security-group-ingress --group-name MySecurityGroup  --ip-permissions file://ip_perms.json

$ aws ec2 authorize-security-group-ingress --group-name MySecurityGroup --ip-permissions http://mybucket.s3.amazonaws.com/ip_perms.json
View Source
The AWS CLI is an open source project and the code is available on GitHub at http://github.com/aws/aws-cli. You can browse the source, enter suggestions, raise issues, and submit pull requests for desired changes.
-- Jeff;
We launched Amazon ElastiCache about two years ago, and have steadily added features ever since. In the last two years we have added auto discovery, additional cache node types, and reserved cache nodes. We've reduced prices several times and we have added support for additional AWS Regions and VPC.
Today we are taking a big leap forward by adding support for a second in-memory caching engine. In addition to the existing support for Memcached, Amazon ElastiCache now supports the popular Redis key-value store. If you are already running Redis on-premises or on an EC2 instance, it should be very easy for you to upgrade to ElastiCache, while gaining the benefits of a fully managed service that is easy to launch, monitor, scale, and maintain.
What's Redis?
Like its cousin Memcached, Redis is a key-value store. In short, you provide Redis with a key and a value to store data. Later, you provide the key and Redis returns the data. Redis builds on this model by giving you the ability to store structured data using atomic operations. This flexibility can make Redis a better match for your application's own data structures and can often simplify the cache management layer of your application. Redis supports the following data types:
Redis also supports atomic, high-level operations on items of each type. For example, you can push new elements on to the head or tail of a List, use strings as incrementing or decrementing atomic counters, add members to sets, intersect or union two sets to form a new set, manipulate hashes and hash fields, and much more.
Any key can have an associated Time To Live (TTL), after which the key and the value(s) associated with it will be removed. This feature allows you to fine-tune the caching model to store enough data to keep your application efficient and responsive, without consuming a disproportionately high amount of memory in the cache node.
Redis supports the Lua programming language. You can invoke Lua scripts from your client application; these scripts can in turn invoke other Redis operations and have access to the stored keys and data.Getting Started With Redis
AWS CloudFormation provides an easy way to create and manage a collection of AWS resources, provisioning and updating them in an orderly and predictable fashion. You can launch a Redis cluster within minutes using a new CloudFormation template which provisions a Redis cluster and a PHP application to connect to the cluster. Click  to launch the stack now (the usual AWS charges apply), or download the sample ElastiCache Redis template and use it later.
You can launch a Redis cluster from the AWS Management Console. Start by switching to the ElastiCache tab and clicking this button:

Then work your way through the Launch Cache Cluster Wizard. Choose "redis" for your Engine on the first page:
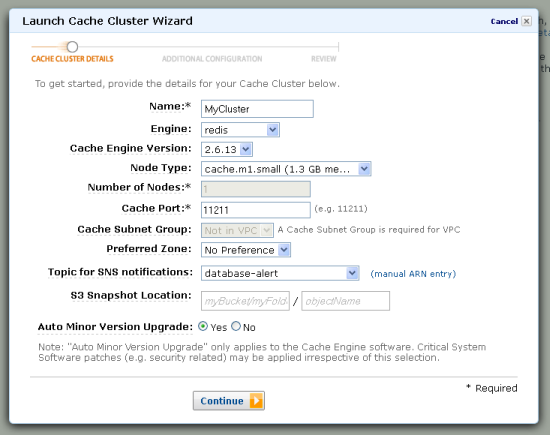
If you have an existing on-premises installation of Redis, you can create a snapshot of your cache (an RDB file), upload it to an Amazon S3 bucket, and use it to preload your ElastiCache node running Redis. In the future, we expect to give you the ability to create similar snapshots of your own cache nodes.
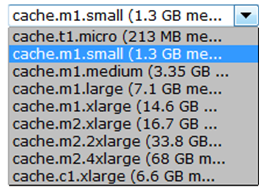
You can choose any one of the following nine cache node types:
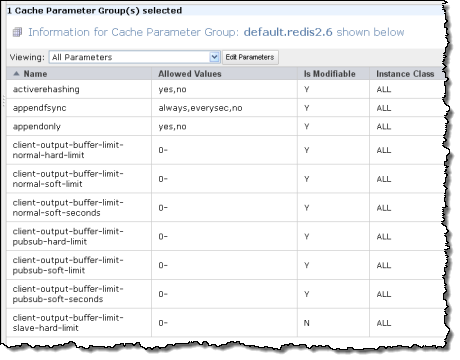
You can choose a Cache Security Group and a Cache Parameter Group on the second page of the wizard. You can also choose an appropriate Maintenance Window. The default Parameter Group for Redis gives you control of over thirty parameters:
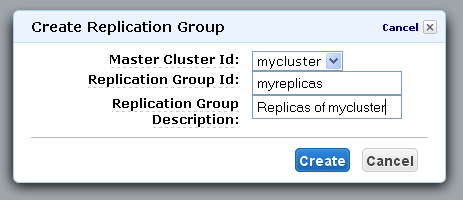
After your Redis Cache Cluster is up and running, you can easily create a replication group and add nodes to it in order to increase the read throughput of the cluster:
Implementation Notes
Here are a few things to keep in mind as you start to plan your implementation of Amazon ElastiCache for Redis:
Learning About Redis
If you are new to the Redis programming and storage model, you may want to start out with the interactive tutorial. After you have mastered the basics, download a Redis client for the language and environment of your choice, then add sophisticated caching to your application.
We will be hosting a Redis webinar on September 26th to tell you more about this product. Space is limited so sign up now.
Start Today
You can launch Redis cluster nodes today in all public AWS Regions. If you are new to Amazon ElastiCache, you can get started with Amazon ElastiCache for Redis as part of the AWS Free Usage Tier. As part of this tier, you can use 750 hours of ElastiCache for Redis on a micro node for one year.
-- Jeff;
This article was featured on Hacker News. More comments there.
More and more sites are written in flat HTML. Hosted on GitHub pages, S3, etc. The advantages are clear: ridiculously low to no hosting costs, it can hardly ever break, and with things like Jekyll and Octopress it can still be fun to maintain. And with JavaScript frameworks such as Angular you could build entire apps clientside. The downsides are clear too: no central point of knowledge makes interaction between users hard.
However with services like Disqus, and (my own startup) Transloadit, it gets more and more feasible to just run a flat site and have external services cover for not running serverside code and a database yourself.
In this post I’m going to show you how easy it is to make file uploading possible even if your site is just a single page of HTML.
Now this certainly is not very secure. Although your S3 credentials will be encrypted inside Transloadit’s account, very little will stop wrong-doers from filling up your S3 bucket by re-using references they can find in the HTML code. They won’t be able to delete or change existing files in your bucket, but it’s still annoying-to-extremely-harmful, depending on what you are building.
For a few usecases (a 4chan clone / intranet page / etc) it might be an okay tradeoff. If not, you’ll have to enrich this example with signatures, but that will require serverside code to shield off secret keys from prying eyes.
In this example, we’ll use Amazon S3 buckets to store the files, but Transloadit also supports Rackspace Cloudfiles and (s)FTP as storage targets.
First of all
Bucket Name
Access Key ID and the Secret Access Key
API Key found here
just_save_to_s3, write down the template_id, and save the following content in it:1 2 3 4 5 6 7 8 9 10 |
|
As you can see, this Transloadit Template now knows how to store any uploads thrown at it.
Now just create the HTML page and refer to the template_id that contains the encoding / uploading
instructions:
1 2 3 4 5 6 7 8 9 10 11 12 13 14 15 16 17 18 19 20 21 22 23 24 25 26 27 28 29 30 31 32 33 34 35 36 37 38 39 40 41 42 43 |
|
And that’s it. An upload button will appear and all files uploaded will be added to your bucket!
Now if you need to perform extra operations on the uploads (like extracting thumbnails from video,
extracting the contents of a zip, etc), just add some steps to your template. Here are some examples.
Again, note that this is not the best/recommended way to use Transloadit, but after hearing from customers who had a usecase for this, I thought I’d share : )
The following is a guest post by Pankaj Parashar. Pankaj wrote to me about some pretty cool styled progress elements he created. I asked if he'd be interested in fleshing out the idea into an article about styling them in general. Thankfully, he obliged with this great article about using them in HTML, styling them with CSS as best as you can cross-browser, and fallbacks.
Here is the basic markup for the progress element:
<progress></progress>As per the standard defined by W3C, the progress element represents the completion progress of a task. A progress element must have both a start tag (i.e. <progress>) and an end tag (i.e. </progress>), even though it looks like a replaced element (like an input). This is good though, as it helps with fallback content as we'll cover later.
Apart from the global attributes, it can have two more attributes:
max - Indicates how much task needs to be done before it can be considered as complete. If not specified the default value is 1.0.value - Indicates the current status of the progress bar. It must be greater than or equal to 0.0 and less than or equal to 1.0 or the value of the max attribute (if present).A progress bar can be in two states - indeterminate and determinate.

Based on your combination of browser and operating system, the progress bar can look different. Zoltan "Du Lac" Hawryluk covers the cross browser behavior of progress element in great depth in his article on HTML5 progress bars (which is definitely worth reading). Wufoo has some screenshots of how it looks on other operating systems on their support page for progress.
It's pretty easy to target and style an indeterminate progress bar because we know that it doesn't contain the value attribute. We can make use of CSS negation clause :not() to style it:
progress:not([value]) {
   /* Styling here */
}Throughout this article, we'll only focus on styling the determinate state of the progress bar. So let's change the state by adding the max and value attribute.
<progress max="100" value="80"></progress>Without applying any CSS, the progress bar looks like this in Chrome 29 on Mac OS 10.8.

max attribute doesn't change the state of the progress bar because the browser still doesn't know what value to represent.This is pretty much all that we can do in HTML as rest of the work is done by CSS. At this stage let's not worry about the fallback techniques for supporting older browsers that don't understand the progress element.
We can target determinate progress bars using the progress[value] selector. Using progress only is fine as long as you know that you do not have any indeterminate progress bars in your markup. I tend to use the former because it provides clear distinction between the two states. Just like any other element we can add dimensions to our progress bar using width and height:
progress[value] {
  width: 250px;
  height: 20px;
}
This is where the fun part ends and things get complicated because each category of browsers provide separate pseudo classes to style the progress bar. To simplify things, we don't really care about which versions of each browser support the progress element, because our fallback technique will take care of the rest. We classify them as follows:
Google Chrome, Apple Safari and the latest version of Opera (16+) falls into this category. It is evident from the user agent stylesheet of webkit browsers, that they rely on -webkit-appearance: progress-bar to style the appearance of progress element.

To reset the default styles, we simply set -webkit-appearance to none.
progress[value] {
  /* Reset the default appearance */
  -webkit-appearance: none;
   appearance: none;

  width: 250px;
  height: 20px;
}
On further inspecting the progress element in Chrome Developer Tools, we can see how the spec is implemented.

WebKit/Blink provides two pseudo classes to style the progress element:
-webkit-progress-bar is the pseudo class that can be used to style the progress element container. In this demo we'll change the background color, border-radius and then apply inset box shadow to the progress element container.-webkit-progress-value is the pseudo class to style the value inside the progress bar. The background-color of this element by default is green which can be verified by inspecting the user-agent stylesheet. For this demo we will create a candystrip effect using linear-gradient on background-image property.First we'll style the -webkit-progress-bar (the container):
progress[value]::-webkit-progress-bar {
  background-color: #eee;
  border-radius: 2px;
  box-shadow: 0 2px 5px rgba(0, 0, 0, 0.25) inset;
}
Next we'll style the -webkit-progress-value (the bar) with multiple gradient backgrounds. One for striping, one for top to bottom shadowing, and one for left to right color variation. We'll use the -webkit- prefix for the gradients since we're using it for the progress bar itself anyway.
progress[value]::-webkit-progress-value {
  background-image:
	   -webkit-linear-gradient(-45deg,
	                           transparent 33%, rgba(0, 0, 0, .1) 33%,
	                           rgba(0,0, 0, .1) 66%, transparent 66%),
	   -webkit-linear-gradient(top,
	                           rgba(255, 255, 255, .25),
	                           rgba(0, 0, 0, .25)),
	   -webkit-linear-gradient(left, #09c, #f44);

    border-radius: 2px;
    background-size: 35px 20px, 100% 100%, 100% 100%;
}
At the time of writing only WebKit/Blink browsers support animations on progress element. We'll animate the stripes on -webkit-progress-value by changing the background position.
@-webkit-keyframes animate-stripes {
   100% { background-position: -100px 0px; }
}

@keyframes animate-stripes {
   100% { background-position: -100px 0px; }
}
And use this animation on the -webkit-progress-value selector itself.
-webkit-animation: animate-stripes 5s linear infinite;
animation: animate-stripes 5s linear infinite;At the time of writing only WebKit/Blink browsers support pseudo elements ::before and ::after on progress bar. By simply looking at the progress bar, it is not possible to tell the actual value. We can solve this problem by displaying the actual value right at the tail-end of the progress bar using either ::before or ::after.
progress[value]::-webkit-progress-value::before {
  content: '80%';
  position: absolute;
  right: 0;
  top: -125%;
}
Interestingly, content: attr(value) doesn't work on progress bars. However, if you explicitly specify the text inside the content attribute, it works! I haven't been able to find out the reason behind this behavior. Since this works only on WebKit/Blink browsers, there is no good reason to embed content inside pseudo elements, at least for now.
Similarly, ::after is used to create nice little hinge effect at the end of the progress bar. These techniques are experimental and not really recommended to be used if you are aiming for cross-browser consistency.
progress[value]::-webkit-progress-value::after {
  content: '';
  width: 6px;
  height: 6px;
  position: absolute;
  border-radius: 100%;
  right: 7px;
  top: 7px;
  background-color: white;
}Similar to WebKit/Blink, Firefox also uses -moz-appearence: progressbar to paint the progress element.

By using appearence: none we can get rid of the default bevel and emboss. This unfortunately leaves behind a faint border in Firefox which can be removed by using border: none. This also solves the border issue with Opera 12.
progress[value] {
  /* Reset the default appearance */
  -webkit-appearance: none;
     -moz-appearance: none;
          appearance: none;

  /* Get rid of default border in Firefox. */
  border: none;

  /* Dimensions */
  width: 250px;
  height: 20px;
}
Firefox provides a single pseudo class (-moz-progress-bar) we can use to target the progress bar value. This means that we cannot style the background of the container in Firefox.
progress[value]::-moz-progress-bar {
  background-image:
    -moz-linear-gradient(
      135deg,
      transparent 33%,
      rgba(0, 0, 0, 0.1) 33%,
      rgba(0, 0, 0, 0.1) 66%,
      transparent 66%
    ),
    -moz-linear-gradient(
      top,
      rgba(255, 255, 255, 0.25),
      rgba(0, 0, 0, 0.25)
    ),
    -moz-linear-gradient(
      left,
      #09c,
      #f44
    );

  border-radius: 2px;
  background-size: 35px 20px, 100% 100%, 100% 100%;
}
Firefox doesn't support ::before or ::after pseudo classes on progress bar, nor does it allow CSS3 keyframe animation on progress bar, which gives us a slightly reduced experience.
Only IE 10+ natively supports progress bar, and only partially. It only allows changing the color of the progress bar value. IE implements value of the progress bar as the color attribute rather than the background-color.
progress[value]  {
  /* Reset the default appearance */
  -webkit-appearance: none;
     -moz-appearance: none;
          appearance: none;

  /* Get rid of default border in Firefox. */
  border: none;

  /* Dimensions */
  width: 250px;
  height: 20px;

  /* For IE10 */
  color: blue;
}The progress element is natively supported in: Firefox 16+, Opera 11+, Chrome, Safari 6+. IE10+ is partially supports them. If you want to support older browsers, you've got two options.
Lea Verou's excellent polyfill adds almost full support for Firefox 3.5-5, Opera 10.5-10.63, IE9-10. This also adds partial support in IE8. It involves including progress-polyfill.js file in your HTML and adding CSS selectors that the script file uses. To know more about its usage, check out the CSS source code of the project page.
This is my preferred (no-js) approach. It makes use of a common technique that is also used by audio and video elements.
<progress max="100" value="80">
    <div class="progress-bar">
        <span style="width: 80%;">Progress: 80%</span>
    </div>
</progress>
Simulate the look and feel of progress bar using div and span inside the progress tag. Modern browsers will ignore the content inside the progress tag. Older browsers that cannot identify progress element will ignore the tag and render the markup inside it.
.progress-bar {
  background-color: whiteSmoke;
  border-radius: 2px;
  box-shadow: 0 2px 3px rgba(0, 0, 0, 0.25) inset;

  width: 250px;
  height: 20px;

  position: relative;
  display: block;
}

.progress-bar > span {
  background-color: blue;
  border-radius: 2px;

  display: block;
  text-indent: -9999px;
}
It is fairly common to use both the techniques in conjunction and it is perfectly safe for production sites. Once you get hold of styling a single progress bar, then adding styles for multiple progress bars is merely an exercise which can be accomplished using classes.
See the Pen Skillset using HTML5 progress bars with CSS3 animations by Pankaj Parashar (@pankajparashar) on CodePen
The demo should run fine for all the browsers including Internet Explorer (down to IE 8). The progress bar color is blue in all the versions of Internet Explorer. Opera 11 and 12 doesn't permit changing the progress bar color. Hence, it shows the default green color. The demo uses additional markup to display some meta information about the progress bar and the percentage value.
For additional reading, check out the HTML5 Doctor article. It covers some similar ground but has some bits about a few additional attributes as well as how to update the bar with JavaScript if you need that.
The HTML5 progress Element is a post from CSS-Tricks
jekyll-liquid-plus will be essential to Octopress 3.0 themes. If you’re writing Jekyll templates, check it out. https://t.co/F62ZPFiTLr
— Brandon Mathis (@imathis) August 28, 2013
For those of you running a Jekyll or Octopress powered blog, Brandon Mathis has been working like crazy on Octopress 3.0, determining what it is and isn’t, and along the way breaking off pieces to release as independent gems.
His goal in doing this, is to allow Jekyll users to be able to install a few gems and be able to use most of Octopress’s goodies without having to change a thing.
Yesterday, he announced Jekyll Liquid Plus.
Jekyll Liquid Plus includes:
From this Alpha post from Brandon:
My goal for Octopress is to be a writer-focused usability layer on top of Jekyll and a cohesive framework for building themes and plugins. Octopress will work alongside Jekyll without getting in the way at all. It’s shaping up nicely.
Is it safe to say that Octopress 3.0 is coming soon? Many are waiting with baited breath. My guess is that with this and the other independent gems Brandon has released, he is getting close.
Check out the source for Jekyll Liquid Plus on GitHub.
Subscribe to Weekly to hear about more projects from Brandon.
The post Super powered Jekyll templating with Jekyll Liquid Plus appeared first on The Changelog.
If you use Amazon RDS, you probably understand the ease with which you can create read replicas to increase the scalability and performance of your database-backed applications.
Today we are extending this feature to decrease replica creation time, increase snapshot performance, and give you even more read throughput.
Let's take a closer look...
Parallel Replica Creation
You can now create multiple read replicas in quick succession (limited to a total of five per master). You no longer have to wait for one creation operation to complete before starting the next one. This new feature will save you time and reduce your administrative burden when creating and maintaining multiple read replicas.
Snapshots and Point in Time Recovery
You have always been able to create database snapshots and to perform point in time recovery operations on your master database instance. You can now perform the same operations on read replicas, as long as you are running MySQL 5.6.

Second-Tier Replicas
You can now create second-tier read replicas if you are running version 5.6 of MySQL. You can create a couple of different topologies using this new feature. First, you can use a single first-tier replica to shift the replication load from the primary instance to the replica in the first tier, like this:

Second, you can use multiple first-tier and second-tier replicas to prepare for an extremely high level of read traffic:

You can create up to five first-tier replicas. Each of these can support up to five second-tier replicas. Therefore, one master can support thirty replicas.
In any architecture where replicas are present, you must be aware of the phenomenon known as replication lag. Each of the replicas must obtain the log data from the master and then apply it locally. You can monitor the replication lag (as seen by each replica) in the AWS Management Console:

You can use Provisioned IOPS on the replicas and you can choose between eight distinct DB Instance types, starting from the Micro DB Instance and going all of the way up to the High Memory Quadruple Extra Large.
As always, these features are available now and you can start using them today.
-- Jeff;
Ever find yourself needing to
All of these use cases and more are served by ngrok, a reverse proxy written in Go that creates a secure tunnel between a public endpoint and a locally running web service. Need a visual?

You download ngrok as a dependency-free binary, unzip it, and drop it in your $PATH. Then you’re up and running in a single command. For instance:
ngrok localhost:3000
The app shows you the URL to share and the web server to connect to for analysis:

It has a free server component that doesn’t require signing up, but there are additional features if you have an account.
The entire code base is open source under the Apache license and available on GitHub.
The post ngrok tunnels your localhost to the internet for sharing and replay appeared first on The Changelog.
Update: The fugitive vim plugin supports the same feature via
:Gbrowse - thanks to @CrypticSwarm for the tip!
In my never-ending quest to automate my work flow, I recently came up with a neat little vim trick I'd like to share.
One of the things I do quite frequently, is pasting links to GitHub files/lines in email and chat conversations, e.g. Protocol.js#L144. So far my workflow for this has been to navigate to the GitHub repo, hit "t" to select the file, click on the line I want, and then copy the address bar location into my clipboard.
After doing this several times in a row the other day, I decided to automate it. The first piece of the puzzle was to create a git alias for determining the GitHub URL of the current repository to put into my ~/.gitconfig file:
[alias]
    url =! bash -c 'git config --get remote.origin.url | sed -E "s/.+:\\(.+\\)\\.git$/https:\\\\/\\\\/github\\\\.com\\\\/\\\\1/g"'
This allows me to easily get the URL of the current repository I am in, e.g.:
$ git url
https://github.com/felixge/node-mysql
Now I can do cool things like quickly opening this URL in my browser:
$ git url | xargs open
# or
$ open `git url`
But that still requires me to manually navigate to the file / line I am currently interested in, and I'm lazy. So I came up with this key binding for my ~/.vimrc:
nnoremap <leader>o :!echo `git url`/blob/`git rev-parse --abbrev-ref HEAD`/%\#L<C-R>=line('.')<CR> \| xargs open<CR><CR>
Now I can simply press ",o" ("," is my leader key), and my browser will automatically navigate to the file/line underneath my cursor.
Feel free to adopt this for your editor / environment and let me know if you make any improvements. For example, one thing I didn't get around to yet is opening visual selections as line ranges.
dotCloud’s Docker — a project which makes managing Linux containers easy, previously covered here and discussed on episode #89 — is inspiring & enabling a bunch of open source Platforms as a Service (PaaS).
One of the first (and definitely the smallest) of these is Dokku by Jeff Lindsay.
Dokku weighs in at under 1,000 lines of Bash and offers the same git-push-based app deployment made famous by Heroku and emulated by many PaaS providers. After installation and some configuration, you can deploy to your own mini-Heroku using one of the many supported buildpacks.
Here’s what deploying Heroku’s example Node.js app looks like with Dokku:
$ cd node-js-sample
$ git remote add progrium git@progriumapp.com:node-js-app
$ git push progrium master
Counting objects: 296, done.
Delta compression using up to 4 threads.
Compressing objects: 100% (254/254), done.
Writing objects: 100% (296/296), 193.59 KiB, done.
Total 296 (delta 25), reused 276 (delta 13)
remote: -----> Building node-js-app ...
remote:        Node.js app detected
remote: -----> Resolving engine versions

... blah blah blah ...

remote: -----> Application deployed:
remote:        http://node-js-app.progriumapp.com
It’s exciting to see how much can be done with so little code. Dokku is MIT licensed and hosted on GitHub.
The post Deploy apps to your own mini-Heroku with Dokku appeared first on The Changelog.
GitHub user jehna has fashioned a runaway hit with his unique way of constructing difficult regular expressions.
VerbalExpressions turns the often-obscure-and-tricky-to-type regular expression operators into descriptive, chainable functions. The result of this is quite astounding. Here’s the example URL tester from the README:
var tester = VerEx()
            .startOfLine()
            .then( "http" )
            .maybe( "s" )
            .then( "://" )
            .maybe( "www." )
            .anythingBut( " " )
            .endOfLine();
This style may be off-putting to old-school regex pros, but even they would have to admit that it’s quite approachable and easy to reason about.
The main project is a JavaScript library, but in the world of open source the more success you have, the more ports you get.
VerbalExpressions has been ported to so many other languages that a GitHub organization was created just to host them all. I think this idea struck a real nerve.
The post Stop writing Regular Expressions. Express them with Verbal Expressions. appeared first on The Changelog.

Submitted by @maxogden

Submitted by @maxogden


