Guga Alves
Shared posts
Onde buscar trabalho remoto? Links para você!

50 Extensions and Plugins for Extending Bootstrap
Bootstrap itself is already chock-full full of useful tools, extensions and components, and is more than enough to kick-start most web projects. But there will be times where the basic components are not quite enough for what you need. That is where this post comes in. We have assembled 50 extensions, plugins and addons for extending Bootstrap.
Rather than group the extensions into relevant categories, as we normally would, we have instead opted to create an A-Z listing, which should make it much easier for you to find the addon you are looking for.
Everything you could possibly need is included below, from buttons, breadcrumbs and calendars, to tree menus, video players and WYSIWYG editors. If you feel we have missed anything please do include it in the comments below.
A-Z of Plugins and Add-Ons for Extending Bootstrap
Accessibility
Accessibility Plugin – This plugin adds accessibility mark-up to the default components of Bootstrap. Components include: Alert; Tooltip; Popover; Modal Dialog; Dropdown Menu; Tab Panel; Collapse; Carousel.
Basic Buttons
CSS3 Microsoft Modern Buttons – A lightweight library of Microsoft-style buttons uses CSS3 to create versatile and stylish buttons.
Breadcrumbs
Bootstrap-Breadcrumb – A Bootstrap JavaScript plugin that allows you to programmatically manipulate breadcrumb navigation.
Calendar
Bootstrap-Calendar – A Full view calendar based on Twitter Bootstrap.
Carousel
Bootstrap Modal Carousel – A collection of plugins for displaying a carousel in fullscreen modal window.
Checkbox
prettyCheckable – A jQuery plugin for replacing the default checkboxes and radio inputs.
Color Picker
Simple Color Picker – A very simple and lightweight (200 lines of JS and 100 lines of CSS) jQuery color picker for Bootstrap.
Combobox
Bootstrap Combobox – A combobox plugin that integrates well with Bootstrap.
Contact Form
Bootstrap-Contact – A simple PHP contact form using Bootstrap and the jQuery validation plugin.
jQuery Gridform – A jQuery plugin for creating complex table-based forms with Bootstrap.
Datepicker
Datepicker – A plugin for adding a datepicker field to any element.
Date Range Picker – This date range picker component creates a drop-down from which you can select a range of dates.
ClockPicker – A unique clock-style timepicker for Bootstrap.
Dialog Boxes & Alerts
Bootbox.js – A small JS library that allows you to create programmatic dialog boxes using Bootstrap’s modals.
Bootstrap Prompts – An plugin to replace the alert(), prompt(),confirm() notifications on the browser when using Twitter Bootstrap with modals.
Bootstrap Confirmation – A plugin that replaces popovers with confirmation dialogs.
File Upload
jQuery File Upload – A file upload widget which features multiple file selection, drag & drop, progress bars, validation and preview images.
Form Validation
BootstrapValidator – A jQuery plugin for vaildating forms within Bootstrap.
jqBootstrapValidation – Another jQuery validation framework for Bootstrap forms. Validator – A simple and user-friendly form validator plugin for Bootstrap.
HTML Tables
Tablecloth.js – Building off Bootstrap, this is is a jQuery plugin that helps you easily style HTML tables.
Navigable Table – A Bootstrap plugin for smooth navigation across table inputs.
Image Gallery
Image Gallery – This plugin shows images and videos in the modal dialog of the Bootstrap. It features swipe, mouse & keyboard navigation, transition effects, fullscreen support and on-demand content loading.
In-Place Editing
X-editable – A library that allows you to create editable elements on your Bootstrap page.
Layout Grid
jQDrawBootstrapGrid – A simple jQuery plugin that draws grid columns to a Bootstrap enabled layout. 
Lightbox
Lightbox – A simple lightbox plugin based on the Bootstrap modal plugin.
Magnify
Magnify – A JS plugin for adding a magnifying glass to images on mouseover.
Markdown
Bootstrap Markdown – A plugin for enabling Markdown editing in Bootstrap.
Modal Windows
Bootstrap Modal – This plugin extends Bootstrap's native modals to provide additional functionality (responsive, stackable, Ajax…).
Bootstrap Scroll Modal – A modification of the Bootstrap Modal plugin that allows for unlimited modal height with full page scrolling.
Navigation
metisMenu – An easy menu jQuery plugin for Bootstrap 3.
Contextmenu – A context menu plugin for Bootstrap.
Pagination
bootpag – A jQuery plugin helps you create dynamic pagination with Bootstrap.
jQuery Pagination – A plugin that simplifies the usage of Bootstrap's Pagintion by using appropriate classes: .pagination, .active and .disabled.
Progress Bars
Bootstrap Progressbar – A multi-color progress bar component for Bootstrap.
Ratings
Bootstrap Star Rating – A jQuery star rating plugin for Bootstrap that supports fractional star fill and RTL input support.
Social Buttons
Social Buttons for Bootstrap – A pure CSS social sign-in button library.
Selects
bselect – A plugin for styling the <select> element in Bootstrap.
Bootstrap Multiselect – A JQuery based plugin for using select inputs with the multiple attributes.
MultiSuggest – A useful plugin that extends the default Bootstrap Typeahead component.
Tags
Bootstrap Tags – A jQuery plugin for adding tagging functionality Bootstrap.
Tokenfield – An advanced tagging jQuery plugin for Bootstrap with its focus on keyboard navigation and copy/paste support.
Table of Contents
Tocify – A jQuery plugin that dynamically generates a table of contents. It can be optionally styled with Bootstrap or jQueryUI Themeroller.
Tabs
Tabcordion.js – A simple jQuery plugin that transforms a set of Bootstrap tabs into a Bootstrap accordion.
tabcollapse – A plugin that switches the Bootstrap Tabs component to collapse for small screens.
Tree Menu
EasyTree – A very basic tree-view jQuery plugin for Bootstrap.
BootstrapTreeNav – A Javascript plugin for Bootstrap for creating tree navigation menus.
Video Player
Bootstrap Video Player – A customizable HTML5 video player plugin for jQuery based on Bootstrap's UI.
Website Tour
Bootstrap Tour – A quick and easy way to build your product tours with Bootstrap Popovers.
WYSIWYG
bootstrap-wysihtml5 – A Javascript plugin that makes it easy to create simple WYSIWYG editors.
Summernote – A simple WYSIWYG editor for Bootstrap.
The post 50 Extensions and Plugins for Extending Bootstrap appeared first on Speckyboy Design Magazine.
Related posts:
3 ferramentas eficientes para migração de banco de dados no WordPress
Um dos desafios da migração de um site WordPress é localizar e substituir uma URL no banco de dados e as atualizar para o novo endereço do site. São ainda mais links para atualizar em uma instalação multisite, e você pode estar trabalhando com um banco de dados maior do que um blog convencional. Hoje vamos olhar para algumas ferramentas úteis que irão tornar a sua vida muito mais fácil na hora da migração de um site.
Plugin WP Migrate DB: requer acesso de administrador
Se você tiver acesso à administração do WordPress, uma das maneiras mais fáceis de fazer as mudanças é usar o plugin WP Migrate DB. Não tem muito mistério, você irá digitar o o seu novo caminho de URL e de arquivos e o plugin exportará uma versão atualizada do banco de dados, que você poderá utilizar para importar para um banco de dados vazio em seu novo servidor. 
Plugin Search and Replace: requer acesso de administrador
No caso de você já ter migrado o site para o novo servidor e já ter importado o banco de dados, você tem algumas opções diferentes para a realização de seu trabalho de localizar e substituir o endereço do site. Um deles é usar o phpmyadmin ou uma ferramenta semelhante para atualizar as URLs do site de origem e para que você possa voltar para a administração do WordPress. Nesse ponto, você pode usar um plugin como o Search and Replace para atualizar URLs, nome do site ou qualquer outra coisa que é necessário. Este plugin permite que você pesquise também buscas mais detalhadas, como ID, conteúdo de um post, Guid, Títulos, excerpts, meta-dados, comentários, comentários de um autor, email do comentário, URL no comentário, tags / categorias e descrições de categorias
Script Search and Replace DB: não necessita de acesso de administrador
Outra opção que particularmente tenho dado preferência é o script Search and Replace DB. Não é um plugin de WordPress, mas é muito fácil de usar. Este script PHP preserva strings PHP serializadas ao realizar uma pesquisa e substituição. Você faz o upload do script para seu site, a varredura de todas as tabelas e, em seguida, digita a URL que deseja localizar e a que deseja usar para substituir.  Embora você possa usar esse script com Drupal, Joomla ou qualquer CMS semelhante, ele foi feito para funcionar bem com as necessidades específicas de migrações do WordPress e inclui algumas características-chave:
- Lida com várias serializações aninhados (às vezes presente em valores transitórios)
- Lida com alterações multi-byte Unicode de forma segura (importante para nomes de domínio internacionalizados)
A coisa mais importante a se lembrar depois de usar o Search and Replace DB é que você deve lembrar de removê-lo de seu servidor quando o serviço estiver finalizado. Caso contrário, ele representa um sério risco de segurança. Claro que existem muitas mais ferramentas do que as que listados aqui, que desempenham funções semelhantes. Estes três acima são os que eu testei várias vezes e achei mais fácil e mais eficiente para fazer tal tarefa. Você sabe de todas as outras ferramentas de migração? Que tal nos contas nos comentários?
Posts Relacionados
- Migração do WordPress: Movendo o WordPress com o PhpMyAdmin
- Wiziapp: criando seu aplicativo para iPhone com alguns cliques
- Otimizando seu blog WordPress para os buscadores
- Prós e contras de se utilizar um Tema Premium WordPress
- Itens importantes que você deve saber antes de atualizar seu WordPress para o 3.0
3 ferramentas eficientes para migração de banco de dados no WordPress
Post originalmente publicado no Tudo Para WordPress por Guga Alves
Dynatable: Interactive Table Plugin with jQuery & HTML5
Dynatable is a funner, semantic, interactive table plugin using jQuery, HTML5, and JSON. And it’s not just for tables. The purpose of Dynatable is to provide a simple, extensible API, which makes viewing and interacting with larger datasets easy.
Dynatable provides a framework for implementing the most common elements out of the box, including sorting, searching and filtering. Above all, Dynatable is a clean and elegant API that is fun to use.

Requirements: jQuery, HTML5 Framework
Demo: http://www.dynatable.com/
License: GPL License
Sponsors
Professional Web Icons for Your Websites and Applications
A Set of Flat & 3D Progress Button Styles
Progress Button Styles is a set of flat and 3D progress button styles where the button itself serves as a progress indicator. 3D styles are used for showing the progress indication on one side of the button while rotating the button in perspective.
Please note that they are using transitions on pseudo-elements which are still not supported in some browsers (e.g. Safari and Mobile Safari). Also note that we need transform-style: preserve-3d support for the 3D styles, which neither IE10 nor IE11 support.

Requirements: -
Demo: http://tympanus.net/Development/ProgressButtonStyles/
License: License Free
Sponsors
Professional Web Icons for Your Websites and Applications
Adaptive Backgrounds jQuery Plugin
Adaptive Backgrounds is a jQuery plugin for extracting dominant colors from images and applying it to its parent element. This plugin utlizes the <canvas> element and the ImageData object, and due to cross-site security limitations, the script will fail if one tries to extract the colors from an image not hosted on the current domain,unless the image allows for Cross Origin Resource Sharing.

Requirements: jQuery Framework
Demo: http://briangonzalez.github.io/jquery.adaptive-backgrounds.js/
License: MIT License
Sponsors
Professional Web Icons for Your Websites and Applications
How to Create a Justified Gallery with jQuery
Justified Gallery is a jQuery plugin that allows you to create a high quality justified gallery of images. Fill all the spaces. It automatically align images to a justified gallery keeping their original aspect ratio.
The plugin is based on the concept that you have various thumbnails for a single image. In fact, you can configure the gallery to show your images in different sizes, and also the plugin may decide to resize some images to fill the remaining empty space. Hence, the plugin needs thumbnails with different sizes to guarantee high quality pictures.

Requirements: jQuery Framework
Demo: http://miromannino.com/projects/justified-gallery/
License: Creative Commons License
Sponsors
Professional Web Icons for Your Websites and Applications
How to Add Multi-Column Content in WordPress Posts (No HTML Required)
Do you want to add multi-column content to your WordPress posts?
Columns can be used to create engaging layouts for your posts and pages. They make it easier for you to organize your content. They can also improve readability as your website visitors quickly scan the text.
In this article, we will show you how to easily add multi-column content to your WordPress posts without writing any HTML code.

Why Add Multi-Column Content in WordPress?
Traditional print media, like newspapers and magazines, have been using multi-column layouts since the very early days of printing.
Their goal was to make it easier for users to read the smaller text while utilizing the available space economically.
Single-column layouts are more commonly used on the web. However, multi-column grids are still useful for highlighting content and making it easier to scan and read.
For example, if you run a magazine website, then you can use a multi-column layout to organize your content. It will give it the same feel as you would find in a physical magazine.
Organizing your content in multiple columns is also helpful if you are publishing comparisons, research papers, and other interactive content on your WordPress website. It helps improve readability and boost engagement.
That said, let’s see how you can add multi-column content in the block and classic editor. You can simply click the links below to jump ahead to the method you want to use:
Adding Multi-Column Content in WordPress Block Editor – The Easy Way
Creating multi-column content, also known as grid column content in WordPress, is now easy because it is a default feature. The WordPress Block Editor includes a Columns block.
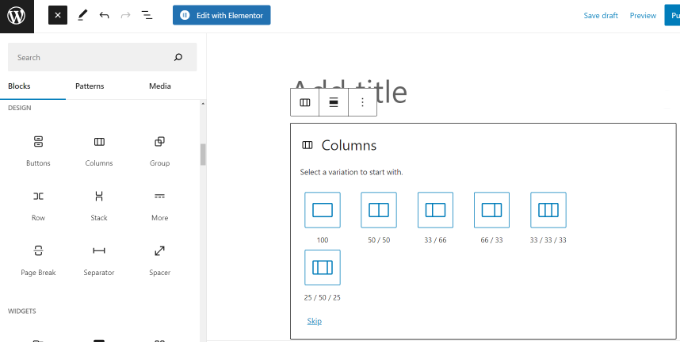
To add a multi-column layout, you need to create a new post or edit an existing one. Once you are in the content editor, click on the ‘+’ icon at the top to add a block.
Next, you need to select the Columns block in the ‘Design’ tab.

Next, you will need to select the number of columns and layouts you would like to use for your blog post.
WordPress will show you different options to choose from. For example, you can pick a 50/50 column layout, use a 33/66 layout, and more.
After choosing a layout, you can add blocks to your columns. The Columns block allows you to add blocks inside each column.
For example, you can select the Paragraph block and add content to it.

You will also be able to see the block settings in the right column of the post-edit screen in the settings panel. Here, you can edit the width of the columns.
In addition to the text, you can also add images and embed videos in WordPress columns.
Simply take the mouse to one of the columns, and click the ‘+’ button to add a block. You can also add a block by typing ‘/’ and then the block name.
For example, we added an image in one column and some text in the other column.

Adding Multiple Columns in Old WordPress Classic Editor
If you haven’t upgraded your WordPress to Gutenberg and are still using the Classic Editor, then you will need to install a separate plugin for creating a grid column layout.
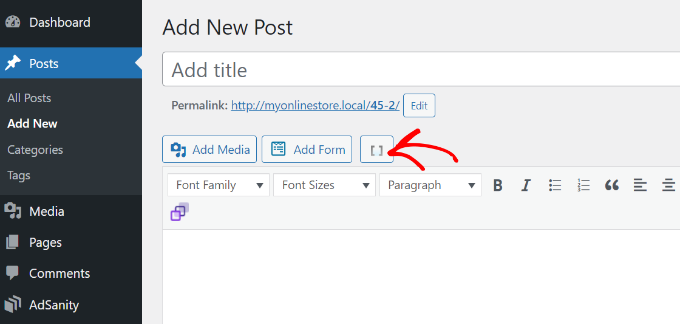
First, install and activate the Column Shortcodes plugin. For detailed instructions, follow our step-by-step guide on how to install a plugin in WordPress.
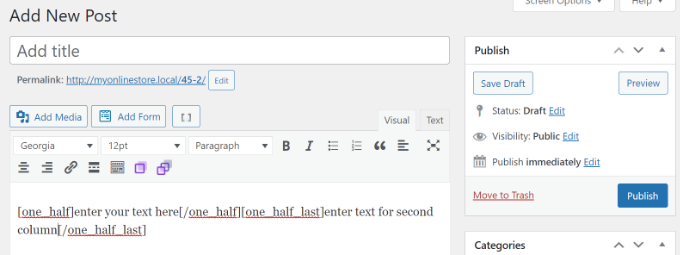
Upon activation, you can create a new post or edit an old one. Once you are in the classic editor, simply click on the ‘[ ]’ button in the toolbar.
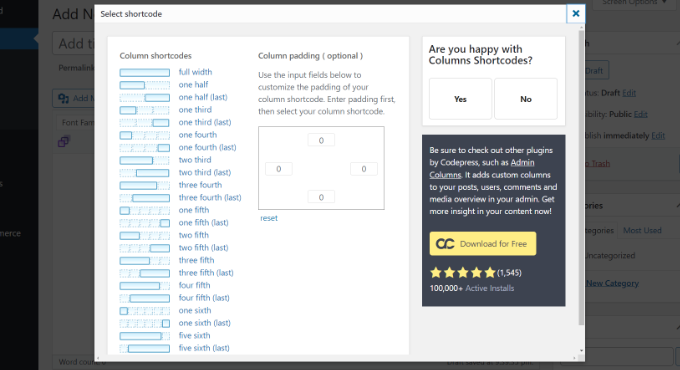
The plugin will now show you a list of column shortcodes for your blog post.
You can choose any layout you would like to add to your WordPress blog. There are also options to edit the column padding.
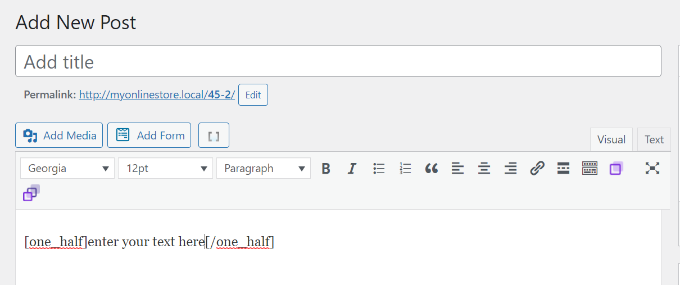
Once you have selected a shortcode, it will automatically appear in the classic editor. For instance, we picked the ‘one half’ shortcode for this tutorial.
You can then enter your content between the shortcodes.
Next, you can click the shortcode icon ‘[ ]’ again to add another column shortcode.
Let’s add the ‘one half (last)’ shortcode to show two columns next to each other. From here, you just need to add your content to the other column.
After that, you can preview your post and publish it.
Here’s how it looked on our test site.

We hope this article helped you learn how to add multi-column content in WordPress posts and pages. You may also want to see our simple guide to WordPress SEO and our expert picks for the must-have WordPress plugins for business sites.
If you liked this article, then please subscribe to our YouTube Channel for WordPress video tutorials. You can also find us on Twitter and Facebook.
The post How to Add Multi-Column Content in WordPress Posts (No HTML Required) first appeared on WPBeginner.
How to Add Custom Shortcut Links to WordPress Toolbar
By default WordPress displays a toolbar on top of all pages to logged in users. You can take control of the WordPress admin bar, turn it off when viewing site, or even disable it for all users except administrators. However, this toolbar can be utilized in many ways, particularly if you run a busy website with multiple authors. In this article, we will show you how to add custom shortcut links to WordPress toolbar.
Why or When You Need to Add Custom Shortcut Links to WordPress Toolbar?
By default the toolbar shows useful links to WordPress adminstration screens, allowing users to quickly access different sections of their website.
However, everyone has links that they visit a lot when writing posts or working on their site. For example, links to an external resource, service, or website. These links can be added to WordPress toolbar as custom shortcut links allowing you and your users easy access to those locations directly from your site or the admin area.
Adding a Custom Shortcut Link to WordPress Toolbar
To add a custom shortcut link to the WordPress toolbar, you need to simply copy and paste the following code in your theme’s functions.php file or in a site-specific plugin.
// add a link to the WP Toolbar
function custom_toolbar_link($wp_admin_bar) {
	$args = array(
		'id' => 'wpbeginner',
		'title' => 'Search WPBeginner',
		'href' => 'https://www.google.com:443/cse/publicurl?cx=014650714884974928014:oga60h37xim',
		'meta' => array(
			'class' => 'wpbeginner',
			'title' => 'Search WPBeginner Tutorials'
			)
	);
	$wp_admin_bar->add_node($args);
}
add_action('admin_bar_menu', 'custom_toolbar_link', 999);
This sample code adds a link to a Google Custom Search engine, which can be used to search for WordPress tutorials on WPBeginner. It uses the function add_node with the arguments described in the array. You need to replace the id, title, href, and meta items with values for your own custom link.

How to Add a Group of Custom Links in Toolbar
We showed you how to add a custom link to the toolbar, but what if you wanted to add multiple links and create a custom menu with handful shortcuts of your own? To do that you can group multiple shortcuts under one parent item. The child nodes under the parent link will appear when a user takes the mouse on the parent link. Here is an example of how to add a group of custom links in WordPress toolbar.
/*
* add a group of links under a parent link
*/

// Add a parent shortcut link

function custom_toolbar_link($wp_admin_bar) {
	$args = array(
		'id' => 'wpbeginner',
		'title' => 'WPBeginner',
		'href' => 'https://www.wpbeginner.com',
		'meta' => array(
			'class' => 'wpbeginner',
			'title' => 'Visit WPBeginner'
			)
	);
	$wp_admin_bar->add_node($args);

// Add the first child link

	$args = array(
		'id' => 'wpbeginner-guides',
		'title' => 'WPBeginner Guides',
		'href' => 'http://www.wpbeginner.com/category/beginners-guide/',
		'parent' => 'wpbeginner',
		'meta' => array(
			'class' => 'wpbeginner-guides',
			'title' => 'Visit WordPress Beginner Guides'
			)
	);
	$wp_admin_bar->add_node($args);

// Add another child link
$args = array(
		'id' => 'wpbeginner-tutorials',
		'title' => 'WPBeginner Tutorials',
		'href' => 'http://www.wpbeginner.com/category/wp-tutorials/',
		'parent' => 'wpbeginner',
		'meta' => array(
			'class' => 'wpbeginner-tutorials',
			'title' => 'Visit WPBeginner Tutorials'
			)
	);
	$wp_admin_bar->add_node($args);

// Add a child link to the child link

$args = array(
		'id' => 'wpbeginner-themes',
		'title' => 'WPBeginner Themes',
		'href' => 'http://www.wpbeginner.com/category/wp-themes/',
		'parent' => 'wpbeginner-tutorials',
		'meta' => array(
			'class' => 'wpbeginner-themes',
			'title' => 'Visit WordPress Themes Tutorials on WPBeginner'
			)
	);
	$wp_admin_bar->add_node($args);

}

add_action('admin_bar_menu', 'custom_toolbar_link', 999);

In this example code, first we added a custom shortcut link. Next, we added another custom link and made it a child of the first link. We added the parent link id by adding the argument 'parent' => 'wpbeginner'. Then we repeated this to add another link under the same parent link. We have also used a child link as a parent link to show you how to add sub-items to a sub-item in the your custom links menu.
We hope this article helped you add custom link shortcuts to WordPress toolbar on your website. For questions and feedback please leave a comment comment.
What would you add as a custom shortcut link in your WordPress toolbar?
To leave a comment please visit How to Add Custom Shortcut Links to WordPress Toolbar on WPBeginner.
Lowest Rates for SMX Social Media Marketing Expire Friday
Please visit Search Engine Land for the full article.
Write HTML & CSS Faster with Emmet
As a web developer, we have always been searching for a tool to increase our workflow and productivity. And today’s post is dedicated for web developers who frequently work with HTML and CSS, as we are going to take a look at a tool that allows us to write these two essential web languages (much) faster – Emmet.
Recommended Reading: Working With Code Snippets In Sublime Text
Emmet is the extending development of ZenCoding, which is written purely with JavaScript. While in this demonstration I’m going to use Sublime Text, Emmet is also available for many code editors including TextMate, Coda, Eclipse, Notepad++, and Adobe DreamWeaver.
Installing Emmet
Head over to this page to find and download Emmet for your code editor. If you are using Sublime Text, like I am, Emmet can be installed easily through Package Control.

Once installed, you may need to restart Sublime Text.
Writing HTML with Emmet
Most current editors probably have a similar built-in functionality. For example, in Sublime Text we simply write <ul> and hit the Tab key, it will automatically expand into a complete unordered list with the <li> element.

We can also write the following div.class to assign HTML class in the element.

Emmet, in this case, extends this functionality further, allowing us to write complex HTML structures in a more simplified way with abbreviations or aliases, similar to the one in CSS. So, if you are familiar with CSS syntax already, you should get used to it quickly.
In addition, Emmet documentation provides a massive list of abbreviations and aliases and the uses, which could be very intimidating for the first-timer. But, here are some of the basic things that I think you should know – at least.
Child Element
As we mentioned, Emmet uses syntax similar to CSS. In CSS we have a direct child selector which is represented with the > sign. In Emmet, we use this operator to add child elements as well. For example:

Sibling Element
Sibling refers to the element in the same nesting level. In CSS, we can select sibling element with the plus + sign. Similarly we can use it to add sibling elements with Emmet.

Assigning ID or Class
We can select an element with its id attribute using the # sign in CSS. With Emmet, we use # to assign ID attribute to element, and as we have shown you before we can also assign an HTML class in the element, the same way we select the element class. For example:

When we do not specify the element, as you can see above, Emmet will use <div> as the default. If we want to be more specific, we can declare the element type before the class or the ID name, like so.

Specifically for the HTML class, we can assign multiple classes in one element in this way.

Assigning Attribute
In CSS, we use square bracket to select attribute. The same way can also be applied with Emmet for assigning attribute to the generated element.

Multiplication
Emmet also allows us to add HTML element in specific numbers using the asterisk (*) sign, which can be a time saver. In this example, we add an <h3> and four <h4> under a <section> element.

Basic HTML Document
We can build basic structure in an HTML document in a snap with Emmet. Given the example of basic HTML5 structure, we can do it this way.

Lorem Ipsum
Lastly, this is one of my favorites in Emmet. Sublime Text comes with a shortcut to generate the lorem ipsum dummy text. We simply write lorem and hit Tab, and it will expand to around 5 to 7 lines of lorem ipsum.
Emmet, in this case, works slightly different. With Emmet, we can specify how many words to generate. Say, we want only 3 words, we can write lorem3:

Specify how long you want your lorem ipsum text to be.
Using Emmet in CSS
We can also write CSS with Emmet. Similar to HTML, it extends the aliases into a complete CSS property as well as its value. Let me show you one example: say we want to add a padding with the value of 10px, we simply write p:10 and hit the Tab key, and it will automatically expand it topadding: 10px, as follows.

Or, if we want to hide elements, we can do either with visibility or display property. With Emmet, we can write these CSS properties this way.

However, despite the advantages, when it comes to CSS, I still prefer using the auto-complete feature from my code editor as it is simply more convenient for me. Plus, memorizing these CSS aliases is a bit harder than for HTML, although, you can refer to the cheatsheet of Emmet aliases for CSS as well as HTML here.
Conclusion
Emmet is really a brilliant tool, and I think it is an essential tool for web developers. The only downside perhaps is the learning curve required for first-timers, but once you pick it up, it can significantly boost your productivity. You can write HTML and CSS faster than ever before.
So, have you tried this tool? Share your thought in the comment section below.
Related posts:
    
|
Let Visitors Control Your Site with Voice Commands
Annyang is a tiny javascript library that lets your visitors control your site with voice commands. Annyang has no dependencies, weighs less than 1kb, and is free to use and modify. It plays nicely with all browsers, progressively enhancing browsers that support SpeechRecognition, while leaving users with older browsers unaffected. It is licensed under MIT License.

Requirements: JavaScript Framework
Demo: https://www.talater.com/annyang/
License: MIT License
Sponsors
Professional Web Icons for Your Websites and Applications
30 Creative Ideas to Light Up Your Room
Visit hongkiat.com for full content.
Ultimate Infographic Resource Kits For Designers
To create a full infographic requires a lot of research and time. You have to expend the effort of crawling through Google to locate crucial bits of information and statistics. But there is also a large visual component based around gradients, buttons, vectors, icons, and other graphics.

I have put together a collection of resources which should prove useful to infographics designers. There is a growing steady flow of requests for infographics when you consider how saturated the market has already become. More blogs and websites are publishing fancy infographics and the trend is not slowing down!
Why not try your hand at creating one with the help of some free resources? As a reminder, do click in the links to get to the download source or for more information.
Recommended Reading: 30 Templates & Vector Kits To Design Your Own Infographic
Full GUI Kits
These PSD/AI kits are some of the most helpful when you are just getting started. The majority of these GUI kits are modeled around a specific infographic UI, which includes charts and text and other graphics. If you are unsure of where to start I would recommend picking up a GUI kit and playing around with various elements.
Between all these various GUI kits you will find both vector shapes and PSD graphics. Presentation is the biggest condition when building an infographic image. A very otherwise plain-looking infographic defeats the purpose of using colorful graphics & banners in the first place!
These detailed kits may be downloaded from a number of various resources online. See if any of these graphics can match up nicely with your own interests.


Huge Infographic Elements Vector Pack


Vector Elements
Adobe Illustrator is the most common editing tool for vectors. However Photoshop and a few other image editing tools also allow for playing with vector graphics. These icons and layouts are easy to scale larger or smaller since the shapes do not lose quality.
Each of the vector sets includes really helpful scalable graphics like icons, pie charts, display sliders, speech bubbles, process forms, and plenty of other related goodies. It isn’t worth trying to squeeze a majority of these into your infographic. It will take up a lot of time and might not look so good by the time you are finished.
Instead you should plan out the idea for your infographic along with the pieces of information which should be included. Then you can more accurately find vector elements which compliment the design and present understandable concepts to your readers.

100 Infographic Vector Elements


![]()


Data Visualization
Aside from eye-grabbing icons you also need to present data in an easy-to-digest format. Some graphics designers prefer to use flat design trends so the elements are not distracting from the main content. But others like the visualization of a 3-D landscape with bar graphs, line charts, and other similar features. The end goal is really up to you but there are a number of resources to help with this process.
Check out these data visualization freebies which can definitely steer you in the right direction. Between all of these freebies you can find a matching display format to work with nearly any type of data. Historical dates, prices, growth over time, the possibilities are nearly endless if you keep your imagination open.


WeGraphics Vector Elements Vol2

Interface Features
Infographics will not just require typical data visualization techniques. There are other common graphics you can use like badges, stickers, and buttons to showcase smaller tidbits of information. Think about other alternatives like progress steps in a web form.
The beauty of creating an infographic is that you can bend the rules to include almost any element, as long as it fits well within the whole design. Digital interfaces are fickle but easy to manipulate in the right context.
Some of these features may be too complex or unnecessary for your projects. This is especially true if you are just beginning in the world of infographics, however these interfaces might also spark a creative idea which you can build using any of these templates. Keep your thoughts open about other interface ideas because there are so many unique ways to present data.


Fresh Infographics Icons Set #1
![]()
Fresh Infographics Icons Set #2
![]()


Pie Charts & Workflow Diagrams

Graphics & Icon Sets
What would any infographic be without the cute sideline graphics? Although admittedly not as important as the main content, graphics are an integral part of the infographic culture. Designing an image to catch people’s attention and bringing facts to light about more obscure topics are at the heart of infographics. There are a number of free icons to be found all around the Internet, but I feel these icons can be most properly utilized within the realm of infographic design.


Stitched Vector Speech Bubbles

![]()


![]()


Closing
Having some graphics design skills will certainly aid in the process of designing an infographic. Not only do you need to handle research on a particular topic, but also the layout and presentation of this information. The most insightful infographics will capitalize on white space along with related imagery to get their point across. I do hope these free graphics will get you started along the path to building some of the best infographics you can imagine.
Related posts:
|
|
30 Open Source HTML/CSS Projects from CodePen
I have always been a supporter of CodePen ever since I found the website. It is an online HTML/CSS/JS code editor where you can build ideas and test them in real-time. Developers can also share their pens with others all around the world! It is a great web application which allows frontend developers to practice their skills from any computer with Internet access.
I’ve gone through the latest pens and gathered 30 of the best code samples. Projects which are free to duplicate will have an open source license on the codes. Ideally these can save you time and stress when attempting to build more convoluted interfaces. Granted you may not find a use for all of these concepts. But it is worth skimming the collection just to see what is out there and what is possible when building with CodePen’s IDE.
Flat Navigation Menu

Switch Inputs

Progress Meter

Pure CSS City Sunset

Intro Animation

Flip Menu Gallery

Animated Bubbles

Flat Navigation Tabs

Parallax Keyframes

Fixed Sticky Menu

Fullscreen Background Image

Mini Toggle Nav

Path-Style Flyout Menu

iOS-Style Definition List

Big Pressable Button

Flat Responsive Form Inputs

Self-Numbered Lists

CSS3 Knob Animation

iOS Sliding Navigation

Dynamic Color Palettes

Pure CSS Breadcrumbs

Basic Image Slider

Custom HTML5 Range Slider

CSS3 Animated FAQ

Circle Image Captions

Multi-Colored 3D Buttons

Simple Buttons

CSS3 Image Captions

Customized Form Inputs

HTML5/CSS3 Dashboard Interface

Tools & Webapps for Creating your own Infographics
Infographics have become all the rage with Internet lovers. They provide quick & easy factual information related to a certain topic. I have always loved the idea but never thought it would catch on so quickly. Looking over Google you can find so many examples of refined infographics on nearly any subject.
But there are also many designers who want to get into the craft. Making your own infographic is very hard work, since you’ll need to do research on topics to gather statistics & data. But if you are fairly well-versed in a subject then it is obviously worthwhile trying your hand at some different graphics. Check out these online resources and see if you can learn anything new about the art of infographic design.
Piktochart

First up we have Piktochart which is an online webapp for creating infographics. The website is seriously fantastic and it provides a lot of staple features you would expect such as templates and graphic icons. There are some other premium account plans which offer better templates and no watermark branding.
However when just getting started I think Piktochart is a fun application to play with. You can study how other designers are making charts in the user showcase. By practicing with some of your own ideas it can be really easy to generate quality infographics with a bit of practice.
easel.ly

To compare another online infographics builder, the website Easelly is beautiful with its own full showcase gallery. Designers may publish their full infographics or templates onto the website and share them with the world. But you can also edit these infographic templates to setup any data formats you like! It is really easy and certainly the best tool for newbies.
My favorite part about Easel.ly is the large user-contributed showcase. This contains many template files which you can revamp to look like your own custom infographic. But there are also many fully-completed GUI sets which are submitted for inspiration. Their online visual editor tools are not difficult and they grow on you quickly, with a bit of practice. Plus you can get started without even signing up for an account.
Infogram

The new startup Infogram provides another beautiful interface to mockup your own infographics online. The website is currently in beta, yet does allow for open signups from anyone. There are a number of pre-formatted templates which you can build upon.
Also you can organize creations into various libraries for sharing. With a pro plan you can even download infographics as full PNG/PDF files. Infogram comes across like a more advanced web application for designers who want a premier infographics editing suite. The pro plan runs at $18/month or $180/year which may not be feasible for everyone. But even their free online editor is worth playing around to see what kind of tools are at your disposal.
Visually

What infographics resource article could be complete without mentioning Visually? This site has grown very quickly to include a number of dedicated members who design, gather data, and publish content online. Visually isn’t just a sharing network for data visualisations. It is a meeting ground where you can work with others to create your own infographics.
The website has a marvelous online gallery which includes hundreds if not thousands of different examples. These infographics are often shared elsewhere on the web, but get republished into Visually as an archive. It can be fun going through all the categories to see what designers have created.
But as I mentioned earlier, Visually really offers some quality services for creating infographics. You do not need to be a designer or a researcher to put together all the sources. Check out the Visually marketplace for some detailed price guidelines. Even smaller projects may end up costing over $1,000 so it’s not exactly cheap, but glossing over their past examples it is safe to assume you will get what you pay for.
Vizualize.me

Here we have another web application in beta called Vizualize.me. The site is dedicated more towards online resumes than infographics. But the design styles are formatted just like you would expect to see in an infographic – stats, organized data, charts, and other such graphical elements.
I think Vizualize is opening into a new market which hasn’t really been needed until recently. Resume’s have usually been created in a word processor with static text. It is only recently with the popularity of the Internet have we seen a rise in graphically-enhanced resumes. The site is still very small but it’s growing fast, and certainly worth paying attention to see what else the team has planned for the future.
Freebie Resources
Along with these online web applications it is worthwhile to mention some freebies you can download. All of these resources are PSD or AI files which contain infographic templates & common interface items. The GUI kits are fantastic because you can play with shapes and graphs to learn how you might design your own.
Infographic Vector Elements

MediaLoot Vector Infographic Kit

Oil Theme Business Infographic Vector

Elements of Food Infographics Vector

Closing
There are likely many other freebies to be found elsewhere online. This collection is a great way to get started practicing your own ideas with other designer’s GUI kits. I would highly recommend skimming the other resources listed here since most are devoted to online infographic design. Also if you know of similar resources I may have missed, please feel free to share with us in the post discussion area below.
Responsive Video jQuery Plugin
For the longest time I had been using this responsive video script to resize all my videos on the fly. Recently it started giving me some issues since most sites like YouTube starting changing up how they embedded their videos. I decided to go back to square one to figure out a better approach.
After reading Chris Coyier’s Rundown of Handling Flexible Media the option I thought would work best included equal parts CSS and jQuery.
So I give to you my Responsive Video jQuery Plugin:
/**
 * jQuery.responsiveVideo
 * Version 1.1
 * Copyright (c) 2014 c.bavota - http://bavotasan.com
 * Dual licensed under MIT and GPL.
 * Date: 01/16/2014
 **/
( function($) {
	$.fn.responsiveVideo = function() {
		// Add CSS to head
		$( 'head' ).append( '<style type="text/css">
				.responsive-video-wrapper {width:100%;position:relative;padding:0}
				.responsive-video-wrapper iframe,
				.responsive-video-wrapper object,
				.responsive-video-wrapper embed {position:absolute;top:0;left:0;width:100%;height:100%}</style>' );

		// Gather all videos
		var $all_videos = $(this).find( '
				iframe[src*="player.vimeo.com"],
				iframe[src*="youtube.com"],
				iframe[src*="youtube-nocookie.com"],
				iframe[src*="dailymotion.com"],
				iframe[src*="kickstarter.com"][src*="video.html"],
				object,
				embed' );

		// Cycle through each video and add wrapper div with appropriate aspect ratio if required
		$all_videos.not( 'object object' ).each( function() {
			var $video = $(this);

			if ( $video.parents( 'object' ).length )
				return;

			if ( ! $video.prop( 'id' ) )
				$video.attr( 'id', 'rvw' + Math.floor( Math.random() * 999999 ) );

			$video
				.wrap( '<div class="responsive-video-wrapper" style="padding-top: ' + ( $video.attr( 'height' ) / $video.attr( 'width' ) * 100 ) + '%" />' )
				.removeAttr( 'height' )
				.removeAttr( 'width' );
		} );
	};
} )(jQuery);
I put the whole thing up on BitBucket so you can go there to see some examples. Also feel free to contribute if you discovers ways to improve on the code.
A Great Source of Design Inspiration
Is a design task turning into a Herculean one for you? If that is the case, then you will love The Design Inspiration. It is an online resource by designers for designers, and it gathers together logos, illustrations and patterns that act as a showcase of talent and as a source of inspiration.
You can also see how many times each design has been visualized, and arrive at some sort of conclusion as regards which ones are the most popular right now. TDI stands as a true inspirational resource. If your muse has taken a week off, you can always count on it to do the job. And they do make sure that you are getting the freshest and best quality design inspirations daily.

Source: http://thedesigninspiration.com/
Sponsors
Professional Web Icons for Your Websites and Applications
Transform Textfield into Fullscreen Editor with jQuery
jQuery Fullscreen Editor Plugin transforms textfields to customizable editors, either it can be used within a form or standalone. You can set the Maximum width and height for fullscreen editor. You can show semi-transparent overlay behind the editor in fullscreen mode as well. The transition effect while switching fullscreen mode can be fade or slide-in.

Requirements: jQuery Framework
Demo: http://burakson.github.io/fseditor/
License: MIT License
Sponsors
Professional Web Icons for Your Websites and Applications
Collaboration Made Easy with TogetherJS Library
TogetherJS is a free, open source Javascript library by Mozilla that adds collaboration features and tools to your website. By adding TogetherJS to your site, your users can help each other out on a website in real time.
TogetherJS is implemented in Javascript; no software or plugins to install, and it’s friendly with existing web pages, while still letting developers customize the experience. TogetherJS is built and hosted by Mozilla, so you know it’s safe to use.

Requirements: JavaScript Framework
Demo: https://togetherjs.com/
License: Mozilla Public License 2.0
Sponsors
Professional Web Icons for Your Websites and Applications
Easily Add Product Tours with Hopscotch Framework
Hopscotch is a framework to make it easy for developers to add product tours to their pages. Hopscotch accepts a tour JSON object as input and provides an API for the developer to control rendering the tour display and managing the tour progress.
Hopscotch has several events to which you can assign callbacks. These events include start, end, next, prev, show, close, error. For the next, prev, and show events, you can assign callbacks within step definitions as well as in the tour itself.

Requirements: JavaScript Framework
Demo: http://linkedin.github.io/hopscotch/
License: Apache License
Sponsors
Professional Web Icons for Your Websites and Applications
Generate Random Users with RandomUser API
RandomUser is an API that provides you with a randomly generated user. These users can be used as placeholders in web mockups, and will save you time from creating your own placeholder information. You can use AJAX or another method to ask RandomUser for a randomly generated user easily. RandomUser gives you a couple ways to control the results that the system outputs.

Requirements: JavaScript Framework
Demo: http://randomuser.me/
License: Creative-Commons License
Sponsors
Professional Web Icons for Your Websites and Applications
The Complete Guide to Proper JavaScript Usage With WordPress
I remember thinking “What the heck do we need JavaScript for, when we have Flash?” when I was fourteen. Although I still remember how I enjoyed coding stuff with ActionScript 2.0 back then, I saw how much one can achieve with JavaScript and fell in love with it. I’m not an expert on JavaScript (yet) but I can say I’m over and done with Flash for a long time.
When it comes to WordPress, the biggest blogging platform and content management system worldwide, JavaScript is – of course – very useful for many things: content sliders, lightbox galleries, slick shopping carts, UI elements like tabs or accordions… you name it. But how exactly should we use JavaScript with WordPress?
Returning or echoing a bunch of HTML script elements is one way to do it – and it’s wrong. In this tutorial, we’re going to see how to enqueue JavaScript files inside our pages and how to pass translatable data to the JavaScript code.
The Two Problems While Using JavaScript in WordPress Projects
There are basically two important problems you may encounter if you inject JavaScript files directly into WordPress with HTML code:
-
Duplicate code on the same page: Let’s say you created a WordPress plugin and you need to include jQuery. You
echothe properscripttag in the<head>and it works! But what if another plugin wants to use jQuery as well – how would it know that jQuery is already loaded in the<head>? It wouldn’t, and even if the other plugin includes jQuery the right way, the page would still have two instances of jQuery, because you’re not. -
Problems with translation: Let’s say that you’re creating a lightbox gallery plugin and you need to pass strings like “Next”, “Previous” and “Image X of Y”. How do you do it without echoing inline JavaScript in the
<head>?
The Right Way to Use JavaScript With WordPress
The solution to the first problem is simply “registering” and “enqueueing” the JS files with the two core functions of WordPress: wp_register_script() and wp_enqueue_script(). The second problem’s solution is even easier: The core wp_localize_script() function allows you to pass translatable data into your JS code.
Registering JavaScript Files
Before you can “enqueue” the JavaScript files, you should “register” them first. And that’s done simply using a function called wp_register_script():
<?php wp_register_script( $name, $url, $dependencies, $version, $load_in_footer ); ?>
Some notes on the parameters:
- Name (required, string): The name of the script. You can choose any name you want, providing that’s not used by another script.
- URL (required, string): The URL of the script. No need to explain this, right? :)
-
Dependencies (optional, array): The name(s) of other scripts that our script depends on. For example, if your script depends on jQuery, it will need to be loaded after jQuery. In this case, you should use
array( 'jquery' )for this parameter. -
Version (optional, string): The version number for your script. You can choose between providing a string, setting the parameter to
nullor leaving it empty. If you set it to string, that’s going to be added to the output code likemy-script.js?ver=1.2. If you leave the parameter empty, the version of your WordPress installation will be added as the version number. If you set it tonull, nothing will be added. -
Load in Footer (optional, boolean): When you enqueue this registered script, it will be loaded in the
<head>section. But if you set this parameter totrue, it will be loaded right before the closing<body>tag.
You can also “deregister” scripts that are already registered by the core or other plugins with the wp_deregister_script() function. It only accepts a 'name' parameter, which you provide the name of the script to be “deregistered”. Obviously.
There are a bunch of scripts on the WordPress Codex that are already registered in the core. Although, you should double-check the list for the current version of WordPress, since it refers to WordPress version 3.3 and might be out of date.
Enqueueing JavaScript Files
You can register a script but that doesn’t mean that it’s going to be loaded automatically. After registering your scripts, you should “enqueue” them with the wp_enqueue_script() function:
<?php wp_enqueue_script( $name, $url, $dependencies, $version, $load_in_footer ); ?>
Some notes on the parameters:
- Name (required, string): The name of the script.
- URL (optional, string): The URL of the script. As you can see, this time the URL parameter is optional because if you already registered the script, you can just provide the name and you’re good to go. But if you didn’t register your script, you must provide a URL for this parameter.
- Dependencies (optional, array): The name(s) of other scripts that our script depends on.
- Version (optional, string): The version number for your script.
-
Load in footer (optional, boolean): If set to
true, the script will be loaded right before<body>closes.
You can also “dequeue” scripts with the wp_dequeue_script() function. Similar to the wp_deregister_script() function, it only accepts a 'name' parameter.
You can check the “state” of a script with the wp_script_is() function. For example, if you want to check if ‘my-script‘ is enqueued, simply use wp_script_is( 'my-script', 'queue' ) in an if statement.
Hooks to Enqueue Your Scripts
The right way to enqueue your scripts (and styles, too) is using the hooks below:
- wp_enqueue_scripts – This one enqueues scripts in the front end of your website.
- admin_enqueue_scripts – This one enqueues scripts in the back end of your website.
- login_enqueue_scripts – This one enqueues scripts in your login screen.
<?php
function my_scripts_loader() {
	wp_enqueue_script( 'my-js', 'filename.js', false );
}
add_action( 'wp_enqueue_scripts', 'my_scripts_loader' );
?>
Due to compatibility issues, you mustn’t use the hooks named admin_print_scripts or admin_print_styles.
For further reading on including JavaScript (and CSS!) in your themes and plugins, you can refer to How to Include JavaScript and CSS in Your WordPress Themes and Plugins by Japh Thomson on Wptuts+.
Passing Translatable Data Inside JavaScript
When it comes to localization, JavaScript is always a problem with WordPress… because so many people doesn’t know the neat little function called wp_localize_script():
<?php
$l10n_data = array(
	'nextItem' => __( 'Next', 'my-script' ),
	'prevItem' => __( 'Previous', 'my-script' ),
	'imageTitle' => __( 'Image %d of %d', 'my-script' )
);

wp_localize_script(
	'name-of-the-script', // (required) the name of the script, 'my-script' for example
	'nameOfTheObject', // (required) the name of the script, 'my-script' for example
	$l10n_data // (required) the data to be passed, which can be translatable with the __() function
);
?>
After registering, enqueueing and localizing the script, you can pass the localized variable in your script by using the name of the object and names of the data, like alert( nameOfTheObject.prevItem );!
You can refer to Pipping Williamson’s article for a more thorough analysis.
Wrapping Up
There is a reason why WordPress is the biggest content management system in the world: Its power comes from its flexibility. And I believe this tutorial proves (once again) how flexible it is.
This tutorial covers pretty much what WordPress offers about JavaScript usage for our projects. Do you have any more tips or techniques on JavaScript and WordPress? Tell us about it!
666 Fresh Conversion Rate Optimization Tips – Curated by Oli Gardner

Every time you share this post on social, a parent develops a sense of style for their children.
Why?
Because most lists like this are so overwhelming they’re useless.
Why is this one different?
Because I read every… single… one.
And I did that to dig out the very best advice, tips, and lessons from this huge collection of posts.
Was it smug to have my name in the title? Of course it was. But it took me forever to put this together.
Almost every post is from 2013 so you know they contain the latest thinking on the subject of conversion rate optimization. I say “almost” because some were so good that they warranted being here even if they were a tad older.
Here’s what I’d recommend you do to get the most out of these tips:
- For starters, bookmark this page immediately (Mac: Command-D, PC: Cntrl-D)
- Look down the list today and find something to read based on the insights I’ve pulled
- Come back once per day and choose one and only one post to read – to maximize what you learn
- I’d also appreciate it if you could share the post with those buttons over on the left-hand side. Hugs.
Quick Conversion Tips Every Marketer Needs to Know
This is an excellent quick read from Neil Patel. The tip that resonated with me most was this one:
Tip Takeaway
Macro conversions are better than micro conversions – it doesn’t matter if you increase click-through from one step to another. All that matters is if more people buy from you. Focus on the big picture when testing instead of trying to maximize how many people move onto the next step.
The Holy Grail of eCommerce Conversion Optimization – 91 Point Checklist and Infographic
This is an epic post. One of the best takeaways for me is number 27 – Encourage users to leave reviews. The description in this part is quite tactical, and I’d like to add something to the content here.
Tip Takeaway
Having customers add reviews to your product pages can be a huge factor in improving your conversion rate for one simple reason: comparison shopping. Reviews are one of the most looked at elements of social proof when people are shopping, both online and instore. Mobile research is changing how people make purchasing decisions – searching for reviews while comparing different options. According to telMetrics, 46% of shoppers reported they exclusively use their mobile device to conduct pre-purchase research for local products and services.
Uncommon Conversion Rate Optimization Tips You Can Use Today
This post mentions that you should test your privacy statements/policies as different things work for different people/sites.
Tip Takeaway
It shows examples of two different approaches from Tim Ferriss and Neil Patel, where Neil offers a standard 100% privacy and no spam statement, whereas Tim uses a list of 7 reasons why you should subscribe to his email list including privacy statements next to phrases like “Subscribers are smart and hot”.
Landing Page Headline Formulas Tested
Part of this interesting post includes three case studies about landing page headline A/B tests.
Tip Takeaway
The concept is to compare three types of headline:
- Benefit based headline (what will I get from this?)
- Loss aversion (what am I missing out on if I don’t act?)
- Question (entice the visitor by asking a question)
To quote Michael Aagard (split test junkie and the author of the post):
“In all three case studies, the benefit headline performed best while loss aversion came in second place, followed by the question headline that came in last. These were just 3 case studies with an accumulated sample size of a little over 50.000 visitors. However, the results are representative of the overall pattern I see, when I perform landing page headline tests: a clear headline that focuses on a benefit generally performs best.”
The Importance of A/B Testing: 24 Marketing Experts on Their Most Surprising A/B Test
I like the A/B test example by Crystal (Anderson) O’Neill in this post.
Tip Takeaway
It’s based on using a press mention of an award win to enhance social proof. Even though the press mention is now 3 years old, pages containing the mention continue to outperform based on click-through-rate and conversion rate.

Low-Hanging Fruits for Increasing Website Speed (and Conversions)
The message here is simple, speed your site up for higher conversions.
Tip Takeaway
This isn’t especially new information… most of us have heard stats about reducing page load speed to get a conversion lift, but it never hurts to get a reminder. What I’d do is read the “Impact on Conversions” to get the stats which should inspire you to implement some of the 11 tactics listed to improve your site speed.
Point Checklist For Creating The Ultimate Landing Page
This is one of my own. What I like about this post is the fact that it’s an interactive checklist you can use to score your landing page.
Tip Takeaway
The most useful element of the concept being that any items left unchecked on the list can be used to create your own to-do list of improvements you can add into a new A/B test page variant.
Conversion Optimization Case Studies
Another excellent resource when looking for examples of interesting conversion optimization case studies.
Tip Takeaway
Number 5 is a great example of why you should start the story of your landing page with a clear value proposition. The original page has no clear purpose. Your eyes dart around the page to try and find some semblance of priority, but there is none. It’s impossible to be inspired to take action when there is no clear way to do so. The winning variation on the other hand, provides a single clear focused message and call to action – so that people can immediately understand the benefit of interacting with the page.
Simple A/B Tests That Can Increase Conversions by 10% or More
Neil Patel shares 7 A/B test case studies here. Nothing particularly new, but always very interesting to look through examples like this to fuel your own testing ideas.
Tip Takeaway
Number 7 is my favourite. A very simple CTA position change yielded a 38% conversion lift. The position change was to place the CTA above a video as opposed to below. The reason was that people stopped scrolling at the video.
tips to optimize your online store and increase conversion rates
A strong point is illustrated by the example page in the “Address Pain Points” section about half way down the post.
It states very succinctly that “pain points don’t hurt when addressed up front”. Notice how the example addresses two ecommerce pain points at the top of the page: free shipping, and an easy returns policy.

Critique time: I love a good page critique as those of you who know me will know by now. What I’d do to improve this page is:
- Add some contrast! The page is almost entirely red. Focus on a few key elements here and tie them together with content.
- Following on from that point. I’d knock back all of the red elements except the logo, 60% off sale image, and the two pain point addressing elements. That way you immediately get your sale across, and your eye will then connect the dots between the sale and the fact that you can get free shipping and easily return your items. This would be easier on a landing page of course as it’s not a site change, but the idea is a universally useful concept.
Tip Takeaway
This is interesting because it is a nice reality check. The lesson here is to test with and without social proof, and also the type of social proof. If you can understand the motivation of a customer, you can add something relevant.
For instance, if it’s an ecommerce page where a visitor may be in comparison shopping mode, you must have customer reviews. This level of proof is a key component in how people do their research online before a purchase.

Unconventional Landing Page Strategies To Increase Conversions
It’s important to spend some of your time learning new approaches to conversion rate optimization. The discipline is constantly evolving due it’s wave of popularity and business importance.
Tip Takeaway
There are many great examples here to inspire you to think differently, my favourite being this one:
The blog comment landing page
Having a contextually relevant landing page for a blog comment can be a powerful example of thoughtful execution. Like the Quora thread mentioned earlier, you should only go the extra mile like this if you are creating impressive and psuedo epic comments. This will make people want to learn more about your expertise. Discovering a custom landing page for the comment will capture people’s attention.
I’d recommend having a title that is a reflection of the closing argument you make in the comment.
What you shouldn’t do is to end the relationship there and jump into a sales pitch – that will come across as sleazy. Continue to show your expertise by discussing the topic in more detail.
Then you can add a call to action. I’d say something like, “If you found this interesting, you might want to subscribe to my blog where I talk about this type of thing regularly.” Gold.
Creative Landing Page Design Examples – A Showcase and Conversion Critique
There’s nothing better than landing page examples to provide inspiration and insight into your own design.
Tip Takeaway
In this lengthy post, 36 pages get critiqued according to the 7 rules of conversion centered design: encapsulation, contrast, directional cues, whitespace, try before you buy, social proof, and urgency.
Example #1 shows a nice balance of 3 good points and 4 bad ones. Plenty to learn from this one.
21 Ways You’re Screwing Up Your Landing Pages (And What To Do About It)
This is an excellent page because it has excellent examples for each of the 21 points. It’s also nice and meaty so there’s a ton to learn here.

Case Studies & Success Stories
This is an ongoing series of case studies from Visual Website Optimizer. Reading through these should give you some A/B test inspiration, and there are plenty of eye openers here that one wouldn’t expect.
Tip Takeaway
I like this one Customer Review Widget Increases Sales by 58.29% for an eCommerce Website as it really drives home the point about needing customer reviews on an ecommerce page. This is to enhance the social proof for comparison shoppers – including the all important phone review checkers in brick and mortar stores.
Steps to the Ultimate Lead Capture Landing Page
This post explains in detail the complexities of a lead generation landing page, breaking it down into 15 steps.
Tip Takeaway
A really useful part is step #2, which explores which types of content/giveaway you should be using depending on what stage your target is in: prospect, lead or customer. Oh, and it uses scrabble tiles to illustrate each point.
Simple Online Copywriting Case Studies with Examples from Real A/B Tests
I have to go with #1 here – 6.64% increase in downloads by changing the font color.
Tip Takeaway
It’s an excellent example of contrasting colors on your landing page. If you look at the page in question, you’ll notice that the headline was the same color as most of the other elements on the page. But changing the color it stood out more and the value proposition will be read more often.
Obvious A/B Tests You Should Try
I like Test #11: Button colors. Ooh, button color. Really? Why would I pick that one?
If you ever do a button color test #yawn, then go for contrast first – that’s a better road to success.
Tip Takeaway
You should read the first one here as it’s an excellent example of iterative A/B testing to improve your conversion rate. It’s proof that you should never stop testing and that every page can be better. Awesome.
Tests to Increase Your Landing Page Conversion Rate, Starting Today
Ooh, the first tip here links to a free tool – The Emotional Marketing Value Headline Analyzer.
Tip Takeaway
It can tell you how your headline will be perceived: intellectual, empathetic, or spiritual. This could be of great assistance when you know about your customers’ motivation for arriving on your landing page.
Number 8 is also good, showcasing the use of a directional cue in the form of a person looking at your conversion goal. We are naturally predisposed to follow the line of sight of other people – and it’s a great design tactic to use on your landing page.

Tip Takeaway
Basing your CTA copy on the benefit to the visitor is much more powerful than pointing out how you will use their email. Focus on them not you.
5 Email Subject Line Strategies That Will Increase Your Open Rates
Number 3 here is very interesting.
Tip Takeaway
When you have a series of emails going out using lifecycle marketing (e.g. via a drip campaign), you can see an increase in open rates if you create a feeling of progression in your email subject lines. What’s missing though is an explanation of how you would go about creating this in terms of your writing style – although including the number of your place in the course you will help (a standard usability practice).
6 Ways To Re-Optimize Your Email Auto-responder Campaign To Improve Opens, Clicks, and Sales
Number 5 “Ignore The 7 Email Follow-Up Myth” is a good one here.
Tip Takeaway
It talks about how different industry verticals and sales use cases can benefit from differently placed offers during a drip campaign. It’s likely that after a while, your subscribers can become overwhelmed or just bored with your content and unsubscribe or stop opening your emails – meaning they could miss out on your offer email entirely. I’m going to test this one.
Top Landing Pages Tips Right from the Industry Experts
Number 8 here talks about a concept known as analysis paralysis. In this instance the example talks about having too many social share buttons. Not only is this overwhelming in terms of the number of options, it makes it harder to find your sharing method of choice.
Tip Takeaway
I like to refer to this as “the toothpaste trance”.
The Toothpaste Trance is a psychological phenomenon where there is so much choice for the same product that you end up just picking at things randomly. This is like a homepage vs. landing page. One (a landing page) has a distinct and obvious CTA and the other (a homepage) often has between 20 and 70 things to do. Make it easy for people and they’ll take advantage of your offer more often.
Another great example of this is an experiment that was done based on the number of jam choices available at a stall in a supermarket.
Less is More – The Supermarket Jam Experiment
A real world example of the psychology of ‘less is more’ comes from an experiment conducted in a supermarket in 2000 by S. S. Inyengar and M. R. Leper. A jam tasting stall was erected to allow shoppers to sample the different flavors of jam available for purchase. The test compared the impact of varying the number of choices between 24 and 6.

You’re probably familiar with analysis paralysis, from spending too long in the toothpaste aisle trying to make a buying decision. (Source)

In the case of the 24 flavors, only 3% of those who tasted the samples went on to purchase the jam, compared to a whopping 30% purchase rate when only 6 flavors were available. This demonstrates a phenomenon known as analysis paralysis, where too many options actually results in no decision being made.
7 Universal Conversion Optimization Principles
This one is an ebook so you’ll have to part with your email to get it.
Tip Takeaway
But having read it – you’ll see my testimonial on the landing page – I can vouch for this being one of the most informative and interesting reads of this year when it comes to A/B testing case studies and principles.
To quote the description from the landing page: “Insights and experience from 4 years of research and over 350 A/B tests distilled into one 26-page free ebook”.
Get it. You won’t regret it.
6 Lesser-Known Ideas to Improve Conversion Rates of Your Website
Interesting tactic in number 2 here. It talks about giving the current Coupon Codes on the checkout page for an ecommerce site.
Tip Takeaway
The theory being that if you have a coupon code field, then people will head to Google to find one – potentially running into distractions or even worse, someone that’s bidding on your keywords which can result in your competitor getting your business.
30 Quick Content Marketing Tips Every Marketer Needs to Know
These tips are about content marketing, which is top of mind for many marketers these days, which is why I’m including it.
Tip Takeaway
It’s a great quick read with a load of quick tips you can start implementing to optimize your content marketing efforts.
The standout for me? Number 16. “Don’t be a link whore. Link out to other sites within your content. It doesn’t matter if it is your competition; link out to those who benefit the reader the most. This will help other sites to notice you, encourage them to share your content and potentially even link back.”
I can attest to how well this works. By benefitting your readers with useful resources, you are setting yourself up to receive more back links.
9 Critical Components for Optimized Marketing Emails
This post is a great read because it combines theory with actionable advice. I wish every blog post did this (how am I doing?).
Tip Takeaway
In number 3, they explain how you can personalize your emails beyond the standard first name intro, suggesting that you leverage all of your available data throughout the email, such as company name job title etc.
Tip Takeaway
If you are doing ecommerce, one of the biggest reasons for poor conversions is the lack of high quality and decently sized images. If you are buying online, particularly clothing items, you must be able to make an informed decision.
This is backed up by Zappos.com where they’ve taken it to the next level by including videos showcasing the shoes. Epic.
Principles of Persuasive Web Design
This is one of the best conversion optimization posts you will read this year.
Tip Takeaway
Peep Laja digs very deep into how to use persuasion to increase conversions. #3 visual hierarchy is my favourite because it makes you think about the mental paths that your visitors will experience when arriving on your page. Again, this post has a plethora of examples to explain each point.
7 A/B Testing Blunders That Even Experts Make
Seven things you shouldn’t do. I always like this type of post because it can make you go “oops! I do that” and make you rethink your tactical implementations.
Tip Takeaway
Blunder #4 is the best, it drives home the need to do some research to develop a hypothesis prior to beginning your A/B testing.
Learn more about the landing page optimization and A/B testing process and how to create a hypothesis.
The Top 5 Surprising Tips from A/B Tests
Great insight from WiderFunnel here. In my opinion the best is the Morgan Freeman tip. Check it out.
Tip Takeaway
Sometimes it’s okay to make assumptions.
25 Smart Landing Pages for Collecting Leads [+10 Tips for Your Next Page]
If you’re doing lead gen, then this is a must read. It’s got a ton of example landing pages and advice at the end for your own page.
Tip Takeaway
Number 1 is my favourite here. I’ve critiqued multiple Right Signature landing pages and they always do a great job.
And there we have it! Six hundred and sixty six conversion rate optimization tips. Remember to bookmark the page and give it a share on social for me. I’ll owe you one.
Got any more tips from 2013? Share them in the comments and we can grow the number.
Cheers.

Content Analysis with the WordPress SEO plugin
We’ve been rather busy with the WordPress SEO plugin the last few days. We did a release yesterday and a quick follow up today to fix a few collisions with other plugins. Loads of cool small fixes in there, but one in particular that I think is worth highlighting as it’s something other plugin developers might want to pick up on: a small but important change to our content analysis functionality.
 For quite a while now, the WordPress SEO plugin has had a page analysis function baked in. The name is misleading, which is why I’ll be changing it soon, as it’s actually not page analysis, but content analysis. If you give it a focus keyword to test for, it analyses the content of your post and gives you hints and tips on how to improve it.
Every once in a while, we’ll get bug reports, on GitHub or through email, telling us that we’re wrong, and that we should analyse the entire page when doing the content analysis. I disagree, which is why we’re not doing it. Let me tell you why I disagree first.
Web Page Segmentation and Content Analysis
Search engines have been able to analyse the content of pages on a block level for quite a while now. Going into the specifics would take too much time here, but if you’re interested, read this post by Bill Slawski from 2009 or even this one, about a Google patent from 2006. Basically, search engines are able to tell what the content bit of a page is, what the sidebar is, what the footer is, etc. Using that segmentation, they judge your page by judging just the content section of it.
Building block level recognition like that into my content analysis function would be…. Undoable. Especially because we know what the content is, so we can just take that and ignore all the other bits. Oh and I’m not even half way smart enough to do the kind of segmentation search engines do and keep your WordPress site running smoothly.
So the content analysis just fetches the posts or pages content and runs it analysis on that. It’s clean, it’s simple and it’s rather fast.
The Issue with Focussing on Post Content Analysis
There’s one issue with this approach. The issue is that WordPress is being used more and more as a CMS. People are adding different blocks of content to pages in more and more ways. Plugins like Pods and Advanced Custom Fields are allowing people to be more flexible with their content blocks. We had to come up with something for that.
Another issue was that we didn’t parse shortcodes when doing the content analysis, causing us not to recognise galleries correctly, the native gallery or galleries added with for instance Next Gen Gallery. This meant we didn’t properly recognise all the images in a post and thus couldn’t output them in XML sitemaps and OpenGraph tags.
Now you might remember from installing the plugin, if you’re a user, that we ask permission to anonymously track data about your site, we collect that data specifically for these kinds of problems. Through this tracking database, which currently tracks about 650,000 sites, we looked at how big this particular issue was. We know that of users who run our WordPress SEO plugin, about half of the sites we track, 10% also run Next Gen Gallery. Pods and Advanced Custom Fields aren’t as popular, but they are both growing, rapidly. So it’s a serious and growing problem. Time to fix it.
The solution
Yesterday, in 1.4.14, we had a first patch that tried to parse shortcodes to discover images for use in our OpenGraph tags. The results were painful. Apparently, loads of plugin developers don’t really understand how a shortcode should work according to its API, so it broke, on loads of sites, horribly. Several plugins suddenly failed, simply because we were doing a do_shortcode outside of the main body and the shortcodes were echoing instead of returning their content or doing rather ugly things to the post_content attribute of the post global. I have to say: that shouldn’t happen. But it did.
So we released 1.4.15 today, which reverted that code. And now we’re left with only one option: providing plugin developers out there with a simple filter. This filter is called wpseo_pre_analysis_post_content and takes 1 argument: a string containing the post’s content. It’s used in several spots within the WordPress SEO plugin, with more to come, and it allows plugin developers to add their custom fields content to the content the plugin analyses by just adding on to that string.
It’s a simple enough change for us to make, but it opens up a world of possibilities. I hope people will use it and I’d love for you to tell us in the comments if you do!
This post first appeared on Yoast. Whoopity Doo!