Shared posts

15 Sep 18:33

Self-Extinguishing Candlestick

by Kelly

Moment by Lars Beller for Hay dezeen sqb

We love this design from Lars Beller Fjetland for Hay, via dezeen.

As the wick burns, the wax melts and releases the needle, allowing the weight to swing down – pulling with it a domed cap that falls over the flame to put it out. The weight can be adjusted to accommodate candles of different sizes.

Read more.

12 Sep 05:42

Microwaving Things Outside of the Microwave!

by James Hobson

DISCLAIMER: DO NOT TRY THIS AT HOME!

Ever wonder what would happen if you took a magnetron out of a microwave, strapped it to a stick, and pointed it at random everyday objects? Well, lucky for you a couple young Russians recorded their research before they presumably hurt themselves and were hospitalized, or maybe just became infertile — or caused cataracts — point is don’t do it.

They’ve taken a magnetron out of a microwave, and tied a soup can to the side of it to focus the microwaves. After discovering this, they did the next logical step — point it at various things and see what happens.

In this specific video (they have lots…) you can see them create plasma inside light bulbs, melt light bulbs, light up vacuum tubes, fluorescent bulbs, liquefy metal, and even catch a glimpse of radio waves.

Again, please don’t try this at home. You can watch more on their channel to satisfy your curiosity though.

[Thanks for the tip Keith!]


Filed under: tool hacks
11 Sep 20:53

Strange Signals? Sigidwiki!

by Elliot Williams

If you’ve gotten into software-defined radio (SDR) in the last five years, you’re not alone. A lot of hackers out there are listening in to the previously unheard. But what do you do when you find an interesting signal and you don’t know what it is? Head on over to the Signal Identification Wiki! You’ll find recordings and waterfall plots for a ton of radio signals categorized by frequency band as well as their use.

Or, conversely, maybe you’ve just got a new radio and you want to test it out. What would be a fun challenge to receive? Signals in the catalog range from the mundane, like this smart home energy meter from California, or a Chrysler tire-pressure monitoring system to (probably) secret military or intelligence transmissions.

If you’re looking at a waterfall plot and you’re not sure what to make of it, the sigidwiki is worth a look. And it’s a wiki, so if you’ve got a cool signal and you want to add it, create an account and get to it!

Thanks to [mkie] for the tip!


Filed under: radio hacks
10 Sep 23:10

Retrotechtacular: So You Want to Be a Weldor

by Kristina Panos

Welding is one of those things that takes minutes to learn and years to master. It requires coordination, strength, and a good pair of eyes. This vocational guidance video from the early 1940s touches on these points and more for those considering careers in welding. The narrator jumps right in, discussing welding types, equipment operation, and employment opportunities in both the welding field itself and other fields that use welding techniques.

Oxy-acetylene welding is one of the oldest methods of fusing metal. A flame fueled by a specific mixture of pure oxygen and acetylene gas heats the metal welding rod and the work piece to plasticity, which allows them to join together. An oxy-acetylene setup can also be used to cut metal, though a special cutting torch with a kind of oxygen turbo boost lever is required. The work piece is heated to red-hot at the point along the edge where the cut will start. The oxygen-rich flame will cut right through the piece.

Spot welding is an electrical method for joining thinner sheets of metal. The pieces are slid between two copper electrodes. When current is applied to the electrodes, the sheet metal’s resistance makes the metal heat up to a fusible temperature. Depressing the foot pedal brings the electrodes together, and the two sheets are joined.

Arc welding is another kind of electrical technique. The work piece is grounded to the generator, and current is applied through a welding rod. Touching the rod to the work piece closes the circuit and creates an arc. The heat melts the metal of the joint and the welding rod, fusing them together. Higher-quality welds can be achieved by using a specially coated rod, which shields the joint from environmental impurities.

Believe it or not, they actually take one or two safety precautions in this film. Hardly anybody operates a torch without goggles or a full mask, and most of the weldors are wearing leather aprons and gloves. There’s even a special uniform for pipeline weld inspectors that can double as a barbershop quartet getup.

Retrotechtacular is a weekly column featuring hacks, technology, and kitsch from ages of yore. Help keep it fresh by sending in your ideas for future installments.


Filed under: Hackaday Columns, Retrotechtacular
04 Sep 23:18

Being Picked up by a Swarm of Drones May Become Reality

by James Hobson
Daniel Isaza

@David Pelaez

In case you haven’t seen it yet, this video has been taking the internet by storm. The YouTube user [Gasturbine101] has successfully taken flight in his home made multi-rotor flying machine.

It’s a massive array of high powered brushless motors with props, fifty-four in fact, all counter-rotating. It has a weight of 148kg (we assume this includes the inventor), and produces a maximum lift of 164kg. Apparently it’ll even last for about 10 minutes. The props are grouped into six, using Hobbyking stabilizers to balance the flight.

He calls it the Swarm.

We’re starting to see more and more drones capable of carrying humans. Is this the future of transportation? From commercial companies promising flying cars in drone form, to even more unsafe examples of strapping far too many motors onto a single frame… it looks like the age of home-made flying machines is here.

[via Sploid]


Filed under: drone hacks, transportation hacks
04 Sep 23:12

B787 Jet Engine with Thrust Reverser #3DPrinting

by Noe Ruiz

Punk Rocker shared on YouTube:

GE GEnx-1B 3D Printed B787 Jet Engine with Thrust Reverser

Printed in a Prusa i3 3D printer with ABS Plastic, 0.3mm nozzle 0.1mm layer height.

Specs.
– 100mm diameter 18 blades.
– 24 outlet guide vanes.
– 34mm diamenter 18 blades internal turbine for cooling the motor.
– Thrust reverser, complete system with translating cowl, blocker doors and cascades.
– NTM 1400kv 35mm motor

Full throttle run test with a 3S battery.
Thrust Reverser test at half throttle.

Build thread in RCgroups

Mayden flight soon…


649-1
Every Thursday is #3dthursday here at Adafruit! The DIY 3D printing community has passion and dedication for making solid objects from digital models. Recently, we have noticed electronics projects integrated with 3D printed enclosures, brackets, and sculptures, so each Thursday we celebrate and highlight these bold pioneers!

Have you considered building a 3D project around an Arduino or other microcontroller? How about printing a bracket to mount your Raspberry Pi to the back of your HD monitor? And don’t forget the countless LED projects that are possible when you are modeling your projects in 3D!

04 Sep 21:42

Demonstrating Science at Harvard University

by Mike Szczys

What if there was a job where you built, serviced, and prepared science demonstrations? This means showing off everything from principles of physics, to electronic theory, to chemistry and biology. Would you grab onto that job with both hands and never let go? That was my reaction when I met [Dan Rosenberg] who is a Science Lecture Demonstrator at Harvard University. He gave me a tour of the Science Center, as well as a behind the scenes look at some of the apparatus he works with and has built.

Electronics and Physics Demo Gear

DSC_0212

Here is a great example of what a physical demo for electronic principles is all about. When it comes time to explain inductors, [Dan] rolls this baby out for the professors and makes sure it’s ready to go in time for class. The giant pipe is wrapped with wire and connects to the schematic board on the front of the rack.

Microwave source Illuminates this light bulb on a stick

Of course it’s not just electronics that are covered in Harvard’s Science Center. Here is a microwave demonstration that uses this large black horn to generate the waves. The small incandescent light bulb is held in some plastic tubing on the end of a stick. Insert it into the path of the radio waves and it lights up. We wonder if your hand will feel hot if you don’t keep it out of the line of fire?

DSC_0214Speaking of waves, stored right next to the inductor demonstration is a wave table that projects the patterns onto a screen. This is a really clever setup that predates the proliferation of document cameras in classrooms.

You can make out a plate of glass laying flat. Just to the right and above is an audio speaker mount to face down at the plate of glass. To use the apparatus you pool water on top of the glass, and connect the speaker to a signal generator. Light shines up from below the glass, and reflects the wave patterns in the water on mirror which is mounted at a 45-degree angle to project the image onto the back of the white screen. I remember seeing these wave demonstrations on a reel-to-reel film in High School physics class. I think the apparatus easily doubles the cool-factor in this demo compared to a pre-recorded video.

Oil-filled tube for standing waves Really big meter Faraday cage fire tornado demo

For standing waves and wavelengths there is a long, clear oil-filled tube. A speaker at one end produces the waves which, when tuned to the correct wavelength produce a very visible standing wave. There are fluorescent tubes built-in to make the oil easily visible.

Dan posed next to the really big meter for scale. Again you can easily get a headless meter and project its output on a screen but you have to admit that this just feels more awesome. I think the same about demonstrating fire tornadoes and locking a freshman in a Faraday cage as the electricity storm (demo) rages around them.

Cabinets full of demos Piles of "circuit boards" Can I say I studied at Harvard?

This was really just the tip of the iceberg. The storage rooms are lined with cabinets full of demos, and every bit of floorspace is occupied by larger builds or collections like this pile of circuit illustration boards.

Because this was an impromptu tour I was only able to take pictures of the areas for which [Dan] is responsible. But we did get to walk through the chemistry and biology staging areas. In addition to these physical exhibits, the Demonstration Services are responsible for preparing chemicals for those demos and cleaning up afterward. There was even a 7-foot tall double-helix of a bit of human DNA that was about 2-feet in diameter. [Dan] assembled this from a kit with thousands of parts. He used the Tom Sawyer method of doing the tedious work in the lunch area — attracting students like flies who were eager to help.

Building these Demos

Giant micrometer (works) built in this shop DSC_0207 [Dan] saves hard drive magnets Art made of old motor commutators More HDD magnets

If you want to build great stuff you need a shop and tools. [Dan] and a couple of his colleagues have a small bit of office space, but hop through one door and enter this sizable workshop. There are a ton of awesome machine tools; somehow I only snapped a picture of one-half of the shop, there is another area behind me with the rest of the gear.

As with any hacker, [Dan] likes to keep a well-populated junk bin. Shelves around this area are decorated with art made from the leavings. I really enjoyed the sculptures made of old motor commutators. It’s also hard to miss the stacks of hard drive magnets adorning many of the metal surfaces. There are hundreds of them and [Dan’s] sure he will find a really cool use for them some day.

First Programmable Computer in the US

The Harvard Mark I Diagram of the computer DSC_0196 Input registers Component parts This tape has the program on it

A big bonus on this trip is the huge computer installed in the building’s lobby. This is the Harvard Mark I, the first programmable computer built in the United States. The machine takes a program on the input tape, along with the positions of a huge settings register, and automatically calculates an output. It was used during the Manhattan Project to calculate implosion models used when developing Trinity, the first atomic bomb.

This Chain is a Lie and Demonstration Services Videos

DSC_0190

It’s always fun to throw a bit of a riddle into the tour. In the same part of the lobby as the Mark I (seen here from behind) there is a sculpture of a molecule, along with its makeup labeled on the stairway behind it. [Dan] tells me “the chain is a lie” but my chemistry chops are lacking so I couldn’t work it out myself. Can you spot the problem? If so, leave your explanation in the comments below.

If you find these Science Lecture Demonstrations as fascinating as I do, you’ll want to grind through their YouTube channel. I picked out two of my favorites below. The first features [Dan] showing the paramagnatism of Oxygen. The second is a blast from my childhood; a fission demonstration using mousetraps and ping pong balls that I first remember seeing at a very young age on the Mr. Wizard’s World television program.

Now if that isn’t even enough for you, all of the demos are cataloged on the Demonstration Services webpage.


Filed under: Featured, misc hacks
01 Sep 04:16

10 Fun Experiments featuring Liquids

by Stephanie

Check out this video featuring 10 different experiments you can do at home! From YouTube user brusspup via ufunk:

1. Slow motion ball:

You need a thick liquid, preferably honey, a heavy ball, and a sphere shaped container. Place the heavy ball in the lower half of the sphere. Fill the lower half of the container with honey a little more than half.
If you use too little or too much, it will affect the motion of the ball.

See more

29 Aug 22:30

Watch Where You Point That ‘Scope: Police Mistake Telescope for a Gun

by Nancy Atkinson
Levi Joraanstad, a student at North Dakota State University displays his telescope, which police mistook for a rifle. Image via WDAY TV, Fargo, North Dakota.

Levi Joraanstad, a student at North Dakota State University displays his telescope, which police mistook for a rifle. Image via WDAY TV, Fargo, North Dakota.

One more thing amateur astronomers might need to worry about besides clouds, bugs, and trying to fix equipment malfunctions in the dark – and this one’s a little more serious.
(...)
Read the rest of Watch Where You Point That ‘Scope: Police Mistake Telescope for a Gun (496 words)


© nancy for Universe Today, 2015. | Permalink | 18 comments |
Post tags: amateur astronomy, Telescopes

Feed enhanced by Better Feed from Ozh

26 Aug 04:00

Working V6 Engine Made Out Of Paper

by Rebecca Houlihan

This working paper model of a V6 engine is super cool. via Youtube

Working model of V6 engine is fully made of paper (only pistons side surfaces covered with scotch tape). The model runs on compressed air.

Read more

25 Aug 22:35

Growing objects: 3D Printed Zoetropes #ArtTuesday

by Jessica

Via BOOOOOOOM! Check out more information here.

“Growing Objects” is a series of kinetic sculptures that illustrate algorithmic growth processes. Inspired by 19th century zoetropes, these interactive sculptures consist of 3D printed objects that when spun and illuminated animate the development of complex forms; when still, they allow the viewer to examine each step of the growth process.

Read more.


Screenshot 4 2 14 11 48 AMEvery Tuesday is Art Tuesday here at Adafruit! Today we celebrate artists and makers from around the world who are designing innovative and creative works using technology, science, electronics and more. You can start your own career as an artist today with Adafruit’s conductive paints, art-related electronics kits, LEDs, wearables, 3D printers and more! Make your most imaginative designs come to life with our helpful tutorials from the Adafruit Learning System. And don’t forget to check in every Art Tuesday for more artistic inspiration here on the Adafruit Blog!
25 Aug 07:39

Time injected circle clock #ArtTuesday #clocks

by Jessica

Thanks to Christopher for sending in this blog tip! Check out more here.

A sinus is a repetitive function of time, after each cycle returning at its starting point. In reverse, time is a function of sinus. Time is rotation. The earth’s rotation around its axis forms the principle of our time.

A digital clock is quantifiable. There is no uncertainty about the exact time, the digits are readable in an instant, leaving no room for interpretation. Does the digital clock influence the way we behave? How important is it to know the exact time? What are we losing with this punctual approach? Can it be a minute more or less?

Time Injected Circles is a clock where the digits merge with imagination. When time exists as a pattern, watching time becomes an event. The viewer is invited to experience the passing of time, instead of just being a user of it.

Read more.


Screenshot 4 2 14 11 48 AMEvery Tuesday is Art Tuesday here at Adafruit! Today we celebrate artists and makers from around the world who are designing innovative and creative works using technology, science, electronics and more. You can start your own career as an artist today with Adafruit’s conductive paints, art-related electronics kits, LEDs, wearables, 3D printers and more! Make your most imaginative designs come to life with our helpful tutorials from the Adafruit Learning System. And don’t forget to check in every Art Tuesday for more artistic inspiration here on the Adafruit Blog!
23 Aug 17:03

Hilarious DARPA Robots Falling Video

by Elliot Williams

If you’re worried about Skynet, take a quick gander at the outtakes reel (YouTube, inlined below the break) from the DARPA Robotics Challenge (DRC) and you’ll feel a lot better. The IEEE Spectrum reporters assigned to the DRC took a break from their otherwise serious coverage and made this funny compilation of all the multi-million dollar robotic fails to go along with this article.

robot_fallingIt’s hard not to empathize with the robots, and we’ll admit that we winced a little bit with the first couple falls. (But after three or four, started breaking out in maniacal laughter.)

So you’re probably safe from the Terminator for at least a couple of years. But before you start getting too smug, human, remember what happened with the DARPA Grand Challenge that focused on autonomous cars; no teams finished in 2004, but five teams finished just a year in a reasonably tight race. The DARPA Challenges are as much about learning as anything else.

And bear in mind, as you watch these robots falling over while trying to turn a doorknob, that they’ve sat down in and driven a car in a previous phase of the trial. That’s pretty darn cool.


Filed under: robots hacks
23 Aug 08:05

Augmented Reality Sandbox Using a Kinect

by James Hobson

Want to make all your 5 year old son’s friends jealous? What if he told them he could make REAL volcanoes in his sandbox? Will this be the future of sandboxes, digitally enhanced with augmented reality?

It’s not actually that hard to set up! The system consists of a good computer running Linux, a Kinect, a projector, a sandbox, and sand. And that’s it! The University of California (UC Davis) has setup a few of these systems now to teach children about geography, which is a really cool demonstration of both 3D scanning and projection mapping. As you can see in the animated gif above, the Kinect can track the topography of the sand, and then project its “reality” onto it. In this case, a mini volcano.

Full instructions are available from UC Davis, which is a much better guide than we remember the last time we looked in on this project. Between this and augmented reality pinball, is the future of consumer electronics to cheap out and use AR? Why build something when you can project it?

[Thanks for the tip Rolinger!]


Filed under: Kinect hacks, Virtual Reality
19 Aug 06:05

Announcing Comet Catalina

Will Comet Catalina become visible to the unaided eye? Will Comet Catalina become visible to the unaided eye?


19 Aug 03:13

Ferrofluid Clock is a Work of Art

by Will Sweatman

It is not usually too difficult to separate functionality from art. Consider a clock. It’s a machine that has a clear and distinct function. It provides information. Nothing could be more different from a clock on a wall than a piece of artwork.  A painting, for instance has no clear function and provides no information. It’s just…art. It’s nice to look at. If we were to ask you to build a functioning, information providing clock that is also a piece of artwork, you would surely have your hands full. Where would you even start? If your name was [Zelf Koelma], you’d grab a bottle of ferrofluid and build us a beautiful, almost mesmerizing clock.

clock_01
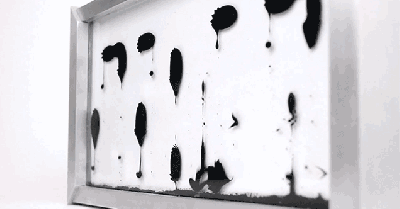
There’s little to no information on the details of how the clock works other than the use of ferrofluid. But it’s not hard to guess that it uses dozens of electromagnets and an Arduino. You can even pick one up for a cool $8,300 if you’re lucky enough to get a spot on the list, as he’s only making 24 of them.

Want to make one of your own? Pick up some ferrofluid and keep us updated. We’d love to hear from you in the comments on how you’d implement a build like this one. We had a fun time hearing your ideas when we covered the clock made of clocks.

Thanks to [Itay] for the tip!


Filed under: clock hacks, slider
16 Aug 20:32

Spectacular Celestial Fireworks Commemorate Perihelion Passage of Rosetta’s Comet

by Ken Kremer
Sequence of OSIRIS narrow-angle camera images from 12 August 2015, just a few hours before the comet reached perihelion. Credits: ESA/Rosetta/MPS for OSIRIS Team MPS/UPD/LAM/IAA/SSO/INTA/UPM/DASP/IDA

Sequence of OSIRIS narrow-angle camera images from 12 August 2015, just a few hours before the comet reached perihelion. Credits: ESA/Rosetta/MPS for OSIRIS Team MPS/UPD/LAM/IAA/SSO/INTA/UPM/DASP/IDA
See hi res images below

A spectacular display of celestial fireworks like none ever witnessed before, burst forth from Rosetta’s comet right on time – commemorating the Europeans spacecraft’s history making perihelion passage after a year long wait of mounting excitement and breathtaking science.

As the European Space Agency’s (ESA’s) Rosetta marked its closest approach to the Sun (perihelion) at exactly 02:03 GMT on Thursday, August 13, 2015, while orbiting Comet 67P/Churyumov–Gerasimenko, its suite of 11 state-of-the-art science instruments, cameras and spectrometers were (...)
Read the rest of Spectacular Celestial Fireworks Commemorate Perihelion Passage of Rosetta’s Comet (915 words)


© Ken Kremer for Universe Today, 2015. | Permalink | 10 comments |
Post tags: 67P, Comet 67P, comet 67P perihelion, Comet 67P/Churyumov–Gerasimenko, Comets, esa, NASA, perihelion, philae lander, rosetta, rosetta 67P, Rosetta NAVCAM, rosetta philae, Rosetta spacecraft

Feed enhanced by Better Feed from Ozh

14 Aug 18:28

Launch Footage From A Raspberry Pi Camera #piday #raspberrypi @Raspberry_Pi

by Rebecca Houlihan


PSAS launch footage from one of 2 Raspberry Pis on board via Rasperry_Pi

On July 19th 2015 Portland State Aerospace Society launched their “LV2.3″ rocket with advanced flight computer to about 5 kilometers above the Central Oregon desert.

Read more

998Each Friday is PiDay here at Adafruit! Be sure to check out our posts, tutorials and new Raspberry Pi related products. Adafruit has the largest and best selection of Raspberry Pi accessories and all the code & tutorials to get you up and running in no time!

13 Aug 16:24

The first transistor-based differential equation analyzer

by adafruit

Tumblr Nsyi51Adqd1T3Cxt2O1 500

The first transistor-based differential equation analyzer @ Scout’s Atomic Flash.

AKAT-1 – The first transistor-based differential equation analyzer built by Polish computer science and engineering pioneer, Jacek Karpiński at the Polish Academy of Science’s Institute of Automatics in 1959.

Gorgeous.

10 Aug 01:25

Laser Cut Your Own Vinyl Records

by Richard Baguley

[Amanda Ghassaei] has created an awesome hack for making your own vinyl records using a laser cutter from an MP3 file. Her excellent hack uses a Processing sketch that converts a digital audio file into a vector graphics file, which is then burned onto vinyl using a laser cutter. We saw a demo of this at the FabLab11 conference, and it’s an impressive hack.

One of the best parts of her write up are the details of how she arrived at the appropriate processing settings to get the record sounding as good as possible, but still be cuttable. It’s an object lesson in how you iterate on a project, trying different approaches and settings until you find the one that works. She also decided to take it a few steps further, cutting records on paper and wood for the ultimate eco-friendly record collection.

Audiophiles should avoid this technique though. Due to limitations in the resolution of the laser cutter, [Amanda] ended up having to reduce the bandwidth of the audio signal to 4.5Khz and use a 5-bit sampling depth. That translates to a rather tinny-sounding record. Vinyl record snobs can breathe easy: this isn’t going to replace their beloved white-hot stampers. For the rest of us, there are always records etched into tortillas.


Filed under: laser hacks, musical hacks, news
06 Aug 14:16

Build a Baby Plasma Cutter–Right Now!

by Al Williams

What hacker doesn’t want a plasma cutter? Even if you aren’t MacGyver, you can probably build this one in a few minutes using things you have on hand. The catch? You probably can’t cut anything more than tin foil with it, and it is probably more a carbon-air arc gouger (which uses plasma) than a true plasma cutter. Still, as [Little Shop of Physics] shows on the video, it does a fine job of slicing right through foil.

If you are like us, you are back now after getting four 9V batteries, some tin foil, a pencil lead, and some clip leads and trying it. If you have more self-restraint than we do, you might want to think about what you are going to put the tin foil over. In the video, they used a laundry basket and a rubber band, but anything that keeps the foil suspended would do the trick.

Although it isn’t really a practical plasma cutter, we were thinking about strapping something like this to a 3D printer and cutting foil stencils. The jagged edges on the video are, hopefully, more from being operated by hand and less from the jagged mini-lightning bolt vaporizing the foil.

The video repeatedly talks about lead, but a pencil lead is confusingly not made of lead. It is actually graphite (a form of carbon) which makes it a good (and inexpensive) electrode for this application, even though it is mixed with a clay binder.

If you want something more practical, prepare to spend at least a few hundred dollars or more. You’ll need a source of gas (or maybe a few gasses), a high voltage supply in the MHz range, and a hefty constant current DC power supply. You might also want to throw in LinuxCNC.


Filed under: cnc hacks, misc hacks
04 Aug 05:19

1940 Popular Science One-Tube, One-Control Radio

by clem.law@usa.net


1945AugustPSreceiverSeventy-five years ago, the August 1940 edition of Popular Science provided an admittedly ingenious solution to a nonexistent problem, in the form of this one-control radio.  The set is a rather unremarkable crystal detector followed by a one-tube audio amplifier.  In other words, it will pull in about as many stations as any other crystal set, only louder.

The gimmick is that the set has but one control, a tuning knob combined with an on-off switch.  In other words, instead of turning the set off by clicking the volume control (which it doesn’t have), you turn it off by rotating the tuning control to the bottom of the dial.

This was accomplished by coupling the shaft of the variable condenser to a rheostat.  Before doing so, you flow solder over the windings of the rheostat, turning it into an on-off switch.

I suppose this adds a certain level of convenience.  But whatever seconds are gained by not having to disconnect the battery are lost by the set’s having three separate antenna connections.  One connection is for maximum selectivity, another is for maximum sensitivity at the expense of selectivity, and a third is for use with a short antenna.  The antenna switching is done not with a switch, but by manually moving the antenna to a different connector.

Still, it’s an attractive little minimalist set.

Click Here For Today’s Ripley’s Believe It Or Not Cartoon


04 Aug 05:19

Système Solaire Interactive

04 Aug 05:16

Access a Drum Machine from your Browser #MusicMonday

by Stephanie

NewImage

From Create Digital Music:

Open a new tab, and suddenly you have a powerful, sequenced drum synth making grooves. Give it a shot:

https://irritantcreative.ca/projects/x0x

Or read more. (This latest creation came out in June.)

This is either the future of collaborative music making or the Single Greatest Way To Make Music While Pretending To Do Other Work I’ve ever seen.

But, as a new effort works on sharing music scores in the browser, it’s worth checking up on the Web Audio API – the stuff that makes interactive sound possible – and connections to hardware via MIDI.

And there’s a lot going on, the sort of fertile conversation that could lead to new things.

Read more

04 Aug 05:11

Dissolve Steel Drill Bits in Alum from the Grocery

by Dan Maloney

Breaking a stud or a bolt is a pretty common shop catastrophe, but one for which a fair number of solutions exist. Drill it out, shoot in an extractor, or if you’re lucky, clamp on some Vise-Grips and hope for the best. But when a drill bit breaks off flush in a hole, there aren’t a lot of options, especially for a small bit. If the stars align, though, you may follow this video guide to dissolve the drill bit and save the part.

Looks like [Adam Prince] lucked out with his broken bit, which he was using to drill the hole for a pin in a small custom brass hinge. It turns out that a hot solution of alum (ammonium aluminum sulfate), which is available in the spice rack of your local supermarket, will dissolve the steel drill bit without reacting with the brass. Aluminum is said to be resistant to the alum as well, but if your busted bit is buried in steel, you’re out of luck with this shop tip.

We’re a bit disappointed that [Adam]’s video ends somewhat abruptly and before showing us the end result. But a little Googling around reveals that this chemical technique is fairly well-known among a group that would frequently break bits in brass – clockmakers. It remains to be seen how well it would work for larger drill bits, but the clocksmiths seem to have had success with their tiny drills and broaches.

As for the non-dissolved remains of the broken bit, why not try your hand at knife making?


Filed under: chemistry hacks, tool hacks
04 Aug 02:38

Building a Battery from Molten Salt

by Al Williams

During World War II a scientist named Georg Otto Erb developed the molten salt battery for use in military applications. The war ended before Erb’s batteries found any real use, but British Intelligence wrote a report about the technology and the United States adopted the technology for artillery fuses.

Molten salt batteries have two main advantages. First, you can store them for a long time (50 years or more) with no problems. Once the salt melts (usually from a pyrotechnic charge), the battery can produce a lot of energy for a relatively short period of time thanks to the high ionic conductivity of the electrolyte (about three times that of sulfuric acid).

[OrbitalDesigns] couldn’t find a DIY version of a molten salt battery so he decided to make one himself. Although he didn’t get the amount of power you’d find in a commercial design, it did provide 1.6V and enough power to light an LED.

The electrolyte was a mixture of potassium chloride and lithium chloride and melts at about 350 to 400 degrees Celsius. He used nickel and magnesium for electrodes. Potassium chloride is used as a salt substitute, so it isn’t dangerous to handle (at least, no more dangerous than anything else heated to 400 degrees Celsius). The lithium compound, however, is slightly toxic (even though it was briefly sold as a salt substitute, also). If you try to replicate the battery, be sure you read the MSDS for all the materials.


Filed under: chemistry hacks, misc hacks
29 Jul 16:46

Hattori Hanzō Katana (Kill Bill) build (video)

by Jessica

Cool video from AWE me on forging the sword from Kill Bill.

Every other Monday, our team of blacksmiths and craftsman will be building some of your favorite weapons, and some weapons that you’ve never seen before. This week, we’re using traditional techniques to forge Hattori Hanzō’s Katana wielded by Black Mamba in Kill Bill.

Read more.

27 Jul 15:18

Mesmerizing Animated Turntable Embroidery #MusicMonday

by Kelly

Deea8e2300a96da709477ca0a2bf810d

Beautiful work from artist Elliot Schultz! From designboom.

schultz has designed and embroidered six animated sequences onto discs with a shape and size inherited from 10″ vinyl records. motion — such as a dizzying maze of moving cubes, an endlessly walking character with a cane, and squirming sequence of worms — is activated when a strobe light illuminates the discs in sync with each embroidered frame. flipping the discs upside down reveals a hidden part of the creative process, exposing the messy, untrimmed thread beneath, while also allowing the viewer to watch the animation in reverse. 

Read more.

26 Jul 17:13

Inside Amazon’s Shipping Machine #makerbusiness

by adafruit

Adafruit 0159
Inside Amazon’s Shipping Machine @ MIT Technology Review.

At a new fulfillment center in New Jersey, humans and robots work together in a highly efficient system.

Read more.

26 Jul 16:20

Shedding Light on the Mechanics of Film Projection

by Kristina Panos

Do you know how a film projector works? We thought we did, but [Bill Hammack] made us think twice. We have covered the Engineer Guy’s  incredibly informative videos many times in the past, and for good reason. He not only has a knack for clear explanation, the dulcet tones of his delivery are hypnotically soothing. In [Bill]’s latest video, he tears down a 1979 Bell & Howell 16mm projector to probe its inner workings.

Movies operate on the persistence of vision (POV) principle, which basically states that the human brain creates the illusion of motion from still images. If you’ve ever drawn circles and figure eights in the nighttime air with a sparkler or perused a flip book, then you’ve experimented with POV.

A film projector is no different in theory. Still images on a strip of celluloid are passed between a lamp and a lens, which project the images on to a screen. A device called a shuttle advances the film by engaging its teeth into the holes on the edge of the film and moving downward, pulling the film with it. The shuttle then disengages its teeth and moves up and forward, starting the process again.

shuttersFilm is projected at a rate of 24 frames per second, which is sufficient to create the POV illusion. A projector’s shutter inserts itself between the lamp and the lens, blocking the light to prevent projection of the film’s physical movement. But these short periods of darkness, or flicker, present a problem. Originally, shutters were made in the shape of a semi-circle, so they block the light half of the time. Someone figured out that increasing the flicker rate to 60-70 times per second would have the effect of constant brightness. And so the modern shutter has three blades: one blocks projection of the film’s movement, and the other two simply increase flicker.

[Bill] explains how the projector reads the optical soundtrack. He also delves into the mechanisms that allow continuous sound playback alongside intermittent projection of the image frames. You’ll never look at a projector the same way again.

Want to know more about optical soundtracks? Check out this Retrotechtacular that explores the subject in detail.

Thanks for the tip, [Sean].


Filed under: teardown