Shared posts

01 Aug 21:36

Tail call optimization in ECMAScript 6

by Axel Rauschmayer

ECMAScript 6 offers tail call optimization, where you can make some function calls without growing the call stack. This blog post explains how that works and what benefits it brings.

What is tail call optimization?

To understand what tail call optimization (TCO) is, we will examine the following piece of code. I’ll first explain how it is executed without TCO and then with TCO.

    function id(x) {
        return x; // (A)
    }
    function f(a) {
        let b = a + 1;
        return id(b); // (B)
    }
    console.log(f(2)); // (C)

Normal execution

Let’s assume there is a JavaScript engine that manages function calls by storing local variables and return addresses on a stack. How would such an engine execute the code?

Step 1. Initially, there are only the global variables id and f on the stack.

The block of stack entries encodes the state (local variables, including parameters) of the current scope and is called a stack frame.

Step 2. In line C, f() is called: First, the location to return to is saved on the stack. Then f’s parameters are allocated and execution jumps to its body. The stack now looks as follows.

There are now two frames on the stack: One for the global scope (bottom) and one for f() (top). f’s stack frame includes the return address, line C.

Step 3. id() is called in line B. Again, a stack frame is created that contains the return address and id’s parameter.

Step 4. In line A, the result x is returned. id’s stack frame is removed and execution jumps to the return address, line B. (There are several ways in which returning a value could be handled. Two common solutions are to leave the result on a stack or to hand it over in a register. I ignore this part of execution here.)

The stack now looks as follows:

Step 5. In line B, the value that was returned by id is returned to f’s caller. Again, the topmost stack frame is removed and execution jumps to the return address, line C.

Step 6. Line C receives the value 3 and logs it.

Tail call optimization

    function id(x) {
        return x; // (A)
    }
    function f(a) {
        let b = a + 1;
        return id(b); // (B)
    }
    console.log(f(2)); // (C)

If you look at the previous section then there is one step that is unnecessary – step 5. All that happens in line B is that the value returned by id() is passed on to line C. Ideally, id() could do that itself and the intermediate step could be skipped.

We can make this happen by implementing the function call in line B differently. Before the call happens, the stack looks as follows.

If we examine the call we see that it is the very last action in f(). Once id() is done, the only remaining action performed by f() is to pass id’s result to f’s caller. Therefore, f’s variables are not needed, anymore and its stack frame can be removed before making the call. The return address given to id() is f’s return address, line C. During the execution of id(), the stack looks like this:

Then id() returns the value 3. You could say that it returns that value for f(), because it transports it to f’s caller, line C.

Let’s review: The function call in line B is a tail call. Such a call can be done with zero stack growth. To find out whether a function call is a tail call, we must check whether it is in a tail position (i.e., the last action in a function). How that is done is explained in the next section.

Checking whether a function call is in a tail position

We have just learned that tail calls are function calls that can be executed more efficiently. But what counts as a tail call?

First, the way in which you call a function does not matter. The following calls can all be optimized if they appear in a tail position:

  • Function call: func(···)
  • Dispatched method call: obj.method(···)
  • Direct method call via call(): func.call(···)
  • Direct method call via apply(): func.apply(···)

Tail calls in expressions

Arrow functions can have expressions as bodies. For tail call optimization, we therefore have to figure out where function calls are in tail positions in expressions. Only the following expressions can contain tail calls:

  • The conditional operator (? :)
  • The logical Or operator (||)
  • The logical And operator (&&)
  • The comma operator (,)

Let’s look at an example for each one of them.

The conditional operator (? :)
    const a = x => x ? f() : g();

Both f() and g() are in tail position.

The logical Or operator (||)
    const a = () => f() || g();

f() is not in a tail position, but g() is in a tail position. To see why, take a look at the following code, which is equivalent to the previous code:

    const a = () => {
        let fResult = f(); // not a tail call
        if (fResult) {
            return fResult;
        } else {
            return g(); // tail call
        }
    };

The result of the logical Or operator depends on the result of f(), which is why that function call is not in a tail position (the caller does something with it other than returning it). However, g() is in a tail position.

The logical And operator
    const a = () => f() && g();

f() is not in a tail position, but g() is in a tail position. To see why, take a look at the following code, which is equivalent to the previous code:

    const a = () => {
        let fResult = f(); // not a tail call
        if (!fResult) {
            return fResult;
        } else {
            return g(); // tail call
        }
    };

The result of the logical And operator depends on the result of f(), which is why that function call is not in a tail position (the caller does something with it other than returning it). However, g() is in a tail position.

The comma operator (,)
    const a = () => (f() , g());

f() is not in a tail position, but g() is in a tail position. To see why, take a look at the following code, which is equivalent to the previous code:

    const a = () => {
        f();
        return g();
    }

Tail calls in statements

For statements, the following rules apply.

Only these compound statements can contain tail calls:

  • Blocks (as delimited by {}, with or without a label)
  • if: in either the “then” clause or the “else” clause.
  • do-while, while, for: in their bodies.
  • switch: in its body.
  • try-catch: only in the catch clause. The try clause has the catch clause as a context that can’t be optimized away.
  • try-finally, try-catch-finally: only in the finally clause, which is a context of the other clauses that can’t be optimized away.

Of all the atomic (non-compound) statements, only return can contain a tail call. All other statements have context that can’t be optimized away. The following statement contains a tail call if expr contains a tail call.

    return «expr»;

Tail call optimization can only be made in strict mode

In non-strict mode, most engines have the following two properties that allow you to examine the call stack:

  • func.arguments: contains the arguments of the most recent invocation of func.
  • func.caller: refers to the function that most recently called func.

With tail call optimization, these properties don’t work, because the information that they rely on may have been removed. Therefore, strict mode forbids these properties (as described in the language specification) and tail call optimization only works in strict mode.

Pitfall: solo function calls are never in tail position

The function call bar() in the following code is not in tail position:

    function foo() {
        bar(); // this is not a tail call in JS
    }

The reason is that the last action of foo() is not the function call bar(), it is (implicitly) returning undefined. In other words, foo() behaves like this:

    function foo() {
        bar();
        return undefined;
    }

Callers can rely on foo() always returning undefined. If bar() were to return a result for foo(), due to tail call optimization, then that would change foo’s behavior.

Therefore, if we want bar() to be a tail call, we have to change foo() as follows.

    function foo() {
        return bar(); // tail call
    }

Tail-recursive functions

A function is tail-recursive if the main recursive calls it makes are in tail positions.

For example, the following function is not tail recursive, because the main recursive call in line A is not in a tail position:

    function factorial(x) {
        if (x <= 0) {
            return 1;
        } else {
            return x * factorial(x-1); // (A)
        }
    }

factorial() can be implemented via a tail-recursive helper function facRec(). The main recursive call in line A is in a tail position.

    function factorial(n) {
        return facRec(n, 1);
    }
    function facRec(x, acc) {
        if (x <= 1) {
            return acc;
        } else {
            return facRec(x-1, x*acc); // (A)
        }
    }

That is, some non-tail-recursive functions can be transformed into tail-recursive functions.

Tail-recursive loops

Tail call optimization makes it possible to implement loops via recursion without growing the stack. The following are two examples.

forEach()
    function forEach(arr, callback, start = 0) {
        if (0 <= start && start < arr.length) {
            callback(arr[start], start, arr);
            return forEach(arr, callback, start+1); // tail call
        }
    }
    forEach(['a', 'b'], (elem, i) => console.log(`${i}. ${elem}`));
    
    // Output:
    // 0. a
    // 1. b
findIndex()
    function findIndex(arr, predicate, start = 0) {
        if (0 <= start && start < arr.length) {
            if (predicate(arr[start])) {
                return start;
            }
            return findIndex(arr, predicate, start+1); // tail call
        }
    }
    findIndex(['a', 'b'], x => x === 'b'); // 1
15 Jul 02:20

Designing the Perfect Hyperlink — It’s Not as Simple as You Think

by Jacob Gube
Abhisek Pattnaik

Hyperlinks

Designing the Perfect Hyperlink — It's Not as Simple as You Think

Hyperlinks are the glue that holds the Web together. Without links, the Web would be a very different place, that’s if it would exist at all. Using a simple HTML element — the <a> element –you can create a bond with any other web page on the Internet. Hyperlinks are magical.

Hyperlinks are fundamental to the Web. They are always just there. Maybe that’s why many site owners and web designers don’t pay them the attention they deserve.

The design of the HTML <a> element is crucial in the user’s reading experience; we should take enough time to design them well.

I’m about to share with you some hyperlink design tips that will lead to a better user experience, enhanced web accessibility, and maybe even bring improvements to your search engine rankings.

Hyperlinks Need to Look Like Hyperlinks

All your hyperlinks need to stand out and clearly say to your readers, "Hey I’m a link. You can click on me."

Hyperlinks should appear interactable.

As web designers, we like to innovate and experiment with different navigation techniques, but sticking with certain design conventions is important.

One of the things that need to remain conventional is our hyperlinks.

According to a study in link readability, the regular Web user sees blue-and-underlined text as links.

Blue and underlined is a good standard to stick to, for no other reason than it’s what we Internet users have been acclimatized ourselves to.

Examples of Hyperlink Designs

Below you will see 3 different hyperlink designs. They are from top newspaper websites.

On the surface, these are all good hyperlink designs. They are some shade of blue. They stand out amongst the surrounding body of text.

But why is The New York Times hyperlink design better than the other two examples?

Allow me to explain.

A Simple Way to Test Your Hyperlink Design

Let me show you an easy method of testing if your hyperlinks clearly stand out from its surroundings.

If you blur and remove the color from the design, you will see what stands out if someone was quickly skimming or reading the page or if someone has particular problems with their vision such as low-vision or color blindness. (Read more about color testing tools.)

You can do this by:

Modifying your CSS property values for <a> and <p> elements to blur them and remove their colors

Taking a screenshot and editing it in Photoshop

  1. Image > Adjustments > Desaturate
  2. And then Filter > Blur > Gaussian Blur

Let’s look back to our earlier examples, but this time we are going to view them when they are blurred and in black and white.

Here is The Guardian’s; you can see that the hyperlink is hard to spot:

BBC uses a bold font weight to create emphasis on their hyperlinks, which is marginally better than The Guardian’s hyperlink design because it at least stands out a bit more.

With The NY Times, it’s still possible to work out where the link is.

The Problem with Underlining Links

Now here’s where it gets tricky.

Here is where hyperlink design gets a bit unsimple.

Here is where our convention of underlining links fail.

There is a study that shows that readability decreases when we underline the text in our hyperlinks.

The study says that underlined links have "seriously underestimated effects on the usability of Web pages."

The study reports that our current convention of underlining hyperlinks "can significantly reduce the readability of the text."

The researchers go as far as saying, "alternatives should be carefully considered for the design of future Web browsers."

Essentially, the researchers are saying that our current conventions for hyperlinks — underlined text — should be changed systemically.

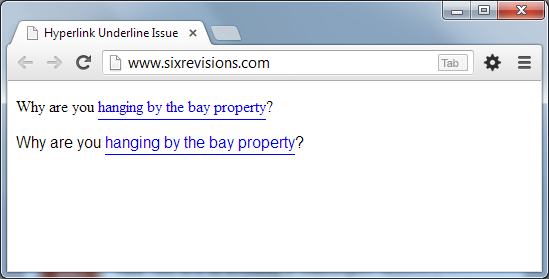
The reason why underlined hyperlinks reduces legibility is that certain characters that go below the base line — characters with descenders extending below the underline such as p, g,  j, and q — are getting affected by the text-decoration: underline CSS property value.

Here is the default style of hyperlinks in the Google Chrome web browser (version 28):

What’s the Solution to This Readability Issue?

We can fix this readability issue ourselves. We don’t have to wait for a change in the way web browsers render underlined text by default.

How? We can use the CSS border-bottom property instead of the CSS text-decoration property to underline our hyperlink elements.

Using the border-bottom property can place the underline a few pixels below the affected characters, making the hyperlink easier to read.

Here is the CSS used for the image above:

a {
	text-decoration: none;
	padding-bottom: 3px;
	border-bottom: 1px solid blue;
}

Even more powerful than just fixing a readability issue, we can also control the underline’s style independently from the hyperlink text color, thereby decoupling these two components of a hyperlink.

For example, we can reduce the hyperlink underline’s distinctiveness to make the text more legible, or we can make it more distinctive to make the entire hyperlink design really stand out.

For the purpose of illustration, I changed the underline color just a little bit, making it a lighter shade of blue:

CSS:

a {
	text-decoration: none;
	padding-bottom: 1px;
	border-bottom: 1px solid #8d8df3;
}

Make Hyperlink Text Longer

This next concept I’m going to discuss goes a bit into content strategy territory (which is a big part of web design process).

Some of you might dislike this suggestion because it deals with the content creation process, and some of you might not have control over that part of the web development process.

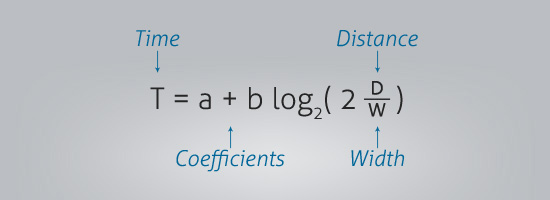
The basis for this next tip I’m going to share is Fitts’s Law.

The concept of Fitts’s Law is simple. The law states that the larger something is, the easier it is to see and interact with.

That makes sense, especially in the context of touchscreen devices where the size of your elements matter, where the input device (our fingers) is less precise than a mouse pointer.

Using a finger to click on a hyperlink can be a pain; often times you will have to zoom in for small links, adding an additional barrier towards users getting the action they desire (which is to interact with the hyperlink).

But there is only so much we can do with the style of our links.

We can bold them, underline them, change their color.

How about making them bigger by changing their font size?

If we change the <a> element’s font-size property, it affects the reading flow, and can affect the consistency of our line-heights.

Look at how the continuity of the reading experience is disrupted by increasing the font size of hyperlinks:

So we can’t expand them vertically. We will need to expand them horizontally.

User-friendly SEO Benefits

Having longer anchor text is a user-friendly SEO tactic. That is, hyperlinks with longer link titles is better for users according to Fitts’s Law, but it also has the nice side benefit of being better for search engine rankings.

Anchor text should be descriptive and should tell the user and search engines what the page you are linking to is about, according to Google’s Search Engine Starter Guide.

Say you were writing about walls.

Compare the two ways a hyperlink is used in these sentences below:

"I would like to talk about advanced wall-building techniques. Click here to learn how to build a basic wall because what I will talk about is beyond the basics."

Versus:

"I would like to talk about advanced wall-building techniques. You will need to learn how to build a basic wall because what I will talk about is beyond the basics."

Not only is the second version better for our user, but it is additionally better for search engines too because there is more context than the anchor text that just says "here".

Should Hyperlinks be Blue?

According to a study by Google blue links got more clicks than greenish-blue links.

The study I referenced earlier about underlined text readability likewise affirms that Web users immediately recognize links when they are blue and underlined.

However, in my opinion, not all hyperlinks absolutely need to be blue.

The important thing about hyperlink design is that your links are obviously links.

If you can achieve that with a different color other than the conventional blue color, go for it.

Microsoft Development Network (MSDN) supports this concept.

The fundamental guideline about designing hyperlinks "is users must be able to recognize links by visual inspection alone—they shouldn’t have to hover over an object or click it to determine if it is a link," according to their link design pattern guideline. They didn’t say anything about links needing to be blue.

There are some cases where blue-colored links aren’t the best option.

For example, if the background color makes it hard to read blue links, then usability and readability triumphs over the standard blue link convention.

Always do what is best for the user, even if that means breaking conventions.

Summary

Here are the big ideas:

  1. Designing hyperlinks should be well-thought-out.
  2. Blurring and removing color from the design is a quick way of demonstrating how well your links stand out.
  3. Underlined text is a strong and familiar convention. The problem with underlining text, though, is that readability decreases. The solution is to use CSS to remedy the issue.
  4. Using longer descriptive anchor text can improve usability (Fitts’s Law), with the added benefit of being better for search engines.
  5. The one thing that is important in the design of hyperlinks is this: hyperlinks should obviously look like hyperlinks.

Related Content

About the Author

John Macpherson is a freelance web designer and marketer based in the beautiful Aberdeen, Scotland. Web Payload is a design resource he’ll be launching soon, follow them on Twitter @webpayload. His personal ramblings can be found at @johneemac.

The post Designing the Perfect Hyperlink — It’s Not as Simple as You Think appeared first on Six Revisions.

15 Jul 01:44

Valve introduces Pipeline, teaches high school students how to get a job in gaming

by Sean Hollister
Abhisek Pattnaik

Job Gaming

2013-07-12_1742_large

Valve sounds like an incredible place to work, if its "Handbook for New Employees" is any indication, but the game developer responsible for Half-Life, Team Fortress, and Portal typically hires extremely experienced, talented individuals. Where does that leave you if you're a student who dreams of working at game development grandeur, but don't know where to start? You might be able to try Pipeline, an experimental Valve project designed to introduce high school students to the video game industry and impart some of Valve's knowledge.

Continue reading…

15 Jul 01:06

OAuth 2.0 – The Good, The Bad & The Ugly

by Agraj Mangal
Abhisek Pattnaik

All about Oauth

In a world dominated by social media, it’s hard to not come across a client application which you have used to access restricted resources on some other server, for example, you might have used a web-based application (like NY Times) to share an interesting news article on your Facebook wall or tweet about it. Or, you might have used Quora’s iPhone app that accesses your Facebook or Google+ profile and customizes the results based on your profile data, like suggesting to add/invite other users to Quora, based on your friends list. The question is, how do these applications gain access to your Facebook, Twitter or Google+ accounts and how are they able to access your confidential data? Before they can do so, they must present some form of authentication credentials and authorization grants to the resource server.


Introduction to OAuth 2.0

OAuth is often described as a valet key for the web.

Now, it would be really uncool to share your Facebook or Google credentials with any third-party client application that only needs to know about your Friends, as it not only gives the app limitless and undesirable access to your account, but it also has the inherent weakness associated with passwords. This is where OAuth comes into play, as it outlines an access-delegation/authorization framework that can be employed without the need of sharing passwords. For this reason, OAuth is often described as a valet key for the web. It can be thought of as a special key that allows access to limited features and for a limited period of time without giving away full control, just as the valet key for a car allows the parking attendant to drive the car for a short distance, blocking access to the trunk and the on-board cell phone.

However, OAuth is not a new concept, but a standardization and combined wisdom of many well established protocols. Also worth noting is that OAuth is not just limited to social-media applications, but provides a standardized way to share information securely between various kinds of applications that expose their APIs to other applications. OAuth 2.0 has a completely new prose and is not backwards compatible with its predecessor spec. Having said that, it would be good to first cover some basic OAuth2.0 vocabulary before diving into further details.

  • Resource Owner : An entity capable of granting access to a protected resource. Most of the time, it’s an end-user.
  • Client : An application making protected resource requests on behalf of the resource owner and with its authorization. It can be a server-based, mobile (native) or a desktop application.
  • Resource Server : The server hosting the protected resources, capable of accepting and responding to protected resource requests.
  • Authorization Server : The server issuing access grants/tokens to the client after successfully authenticating the resource owner and obtaining authorization.
  • Access Token : Access tokens are credentials presented by the client to the resource server to access protected resources. It’s normally a string consisting of a specific scope, lifetime and other access attributes and it may self contain the authorization information in a verifiable manner.
  • Refresh Token : Although not mandated by the spec, access tokens ideally have an expiration time which can last anywhere from a few minutes to several hours. Once an access token is expired, the client can request the authorization server to issue a new access token using the refresh token issued by the authorization server.

What’s Wrong With OAuth 1.0?

OAuth 1.0′s major drawback was the inherent complexity needed to implement the spec.

Nothing really! Twitter still works perfectly fine with OAuth 1.0 and just started supporting a small portion of the 2.0 spec. OAuth 1.0 was a well thought spec and it allowed exchange of secret information securely without the overhead imposed by SSL. The reason why we needed a revamp was mostly based around the complexity faced in implementing the spec. The following are some areas where OAuth 1.0 failed to impress:

  • Signing Every Request : Having the client generate signatures on every API request and validating them on the server everytime a request is received, proved to be major setback for developers, as they had to parse, encode and sort the parameters before making a request. OAuth 2.0 removed this complexity by simply sending the tokens over SSL, solving the same problem at network level. No signatures are required with OAuth 2.0.
  • Addressing Native Applications : With the evolution of native applications for mobile devices, the web-based flow of OAuth 1.0 seemed inefficient, mandating the use of user-agents like a Web Browser. OAuth 2.0 have accommodated more flows specifically suitable for native applications.
  • Clear Separation of Roles : OAuth 2.0 provides the much needed separation of roles for the authorization server authenticating and authorizing the client, and that of the resource server handling API calls to access restricted resources.

OAuth 2.0 in Depth

Before initiating the protocol, the client must register with the authorization server by providing its client type, its redirection URL (where it wants the authorization server to redirect to after the resource owner grants or rejects the access) and any other information required by the server and in turn, is given a client identifier (client_id) and client secret (client_secret). This process is known as Client Registration. After registering, the client may adopt one of the following flows to interact with the server.

Various OAuth Flows

OAuth 2.0 brings about five new flows to the table and gives developers the flexibility to implement any one of them, depending on the type of client involved:

  • User-Agent Flow : Suitable for clients typically implemented in user-agents (for example, clients running inside a web browser) using a scripting language such as JavaScript. Mostly used by native applications for mobile or desktop, leveraging the embedded or external browser as the user-agent for authorization and it uses the Implicit Grant authorization.
  • Web Server Flow : This makes use of the Authorization Code grant and is a redirection-based flow which requires interaction with the end-user’s user-agent. Thus, it is most suitable for clients which are a part of web-server based applications, that are typically accessed via a web browser.
  • Username and Password Flow : Used only when there is a high trust between the client and the resource owner and when other flows are not viable, as it involves the transfer of the resource owner’s credentials. Examples of clients can be a device operating system or a highly privileged application. This can also be used to migrate existing clients using HTTP Basic or Digest Authentication schemes to OAuth by converting the stored credentials to an access token.
  • Assertion Flow : Your client can present an assertion such as SAML Assertion to the authorization server in exchange for an access token.
  • Client Credentials Flow : OAuth is mainly used for delegated access, but there are cases when the client owns the resource or already has been granted the delegated access outside of a typical OAuth flow. Here you just exchange client credentials for an access token.

Discussing each flow in detail would be out of the scope of this article and I would rather recommend reading the spec for in-depth flow information. But to get a feel for what’s going on, let’s dig deeper into one of the most used and supported flows: The Web Server Flow.

The Web Server Flow

Since this is a redirection-based flow, the client must be able to interact with the resource owner’s user agent (which in most cases is a web browser) and hence is typically suited for a web application. The below diagram is a bird’s eye view of how the end-user (or the resource owner) uses the client application (web-server based application in this case) to authenticate and authorize with the authorization server, in order to access the resources protected by the resource server.

webserverflow

Authenticate & Authorize the Client

The client, on behalf of the resource owner, initiates the flow by redirecting to the authorization endpoint with a response_type parameter as code, a client identifier, which is obtained during client registration, a redirection URL, a requested scope (optional) and a local state (if any). To get a feel for how it really works, here’s a screenshot of how a typical request/response would look like:

step1Request

This normally presents the resource owner with a web interface, where the owner can authenticate and check what all permissions the client app can use on the owner’s behalf.

allowAccess

Assuming that the resource owner grants access to the client, the authorization server redirects the user-agent back to the client using the redirection URL provided earlier, along with the authorization code as shown by the response below.

step1Response

Exchange Authorization Code for Tokens

The client then posts to another authorization endpoint and sends the authorization code received in the earlier step, along with the redirection URL, its client identifier and secret, obtained during client registration and a grant_type parameter must be set as authorization_code.

step2Request

The server then validates the authorization code and verifies that the redirection URL is the same as it was in the earlier step. If successful, the server responds back with an access token and optionally, a refresh token.

step2Response

Request Restricted Resources Using Access Tokens

The client can now consume the APIs provided by the implementation and can query the resource server for a restricted resource by passing along the access token in the Authorization header of the request. A sample CURL request to Google’s Blogger API to get a blog, given its identifier, would look like this:

	$ curl https://www.googleapis.com/blogger/v3/blogs/5223788876950011016 -H 'Authorization: OAuth ya29.AHES6ZRTj1GNxAby81Es-p_YPWWNBAFRvBYVsYj2HZJfJHU'  

Note that we have added the Access token as an Authorization header in the request and also escaped the token by including it in single quotes, as the token may contain special characters. Keep in mind that escaping the access token is only required when using curl. It results in sending the following request:

step3Request

The resource server then verifies the passed credentials (access token) and if successful, responds back with the requested information.

step3Response

These examples are courtesy of OAuth2.0 Playground and are typical to how Google implements the spec. Differences might be observed when trying the same flow with other providers (like Facebook or Salesforce) and this is where interoperability issues creep in, which we discuss a bit later.

Refreshing Access Token

Although not mandated by the spec, but usually the access tokens are short-lived and come with an expiration time. So when an access token is expired, the client sends the refresh token to the authorization server, along with its client identifier and secret, and a grant_type parameter as refresh_token.

step4Request

The authorization server then replies back with the new value for the access token.

step4Response

Although a mechanism does exist to revoke the refresh token issued, but normally the refresh token lives forever and must be protected and treated like a secret value.


What’s Wrong With OAuth 2.0?

The Good Stuff

Going by the adoption rate, OAuth 2.0 is definitely an improvement over its arcane predecessor. Instances of developer community faltering while implementing the signatures of 1.0 are not unknown. OAuth 2.0 also provides several new grant types, which can be used to support many use-cases like native applications, but the USP of this spec is its simplicity over the previous version.

The Bad Parts

There are a few loose ends in the specification, as it fails to properly define a few required components or leaves them up to the implementations to decide, such as:

Loose ends in the OAuth 2.0 spec are likely to produce a wide range of non-interoperable implementations.

  • Interoperability: Adding too many extension points in the spec resulted in implementations that are not compatible with each other, what that means is that you cannot hope to write a generic piece of code which uses Endpoint Discovery to know about the endpoints provided by the different implementations and interact with them, rather you would have to write separate pieces of code for Facebook, Google, Salesforce and so on. Even the spec admits this failure as a disclaimer.
  • Short Lived Tokens: The spec does not mandate the lifetime and scope of the issued tokens. The implementation is free to have a token live forever. Although most of the implementations provide us with short-lived access tokens and a refresh token, which can be used to get a fresh access token.
  • Security: The spec just “recommends” the use of SSL/TLS while sending the tokens in plaintext over the wire. Although, every major implementation has made it a requirement to have secure authorization endpoints as well require that the client must have a secure redirection URL, otherwise it will be way too easy for an attacker to eavesdrop on the communication and decipher the tokens.

The Ugly Spat

It took IETF about 31 draft versions and the resignation of the lead author/developer Eran Hammer from the committee to finally publish the spec. Eran sparked a controversy by calling the spec “a bad protocol and a case of death by a thousand cuts”. According to him, the use of bearer tokens (sending tokens over SSL without signing them or any other verification) over the user of signatures (or MAC-Tokens), used in OAuth 1.0 to sign the request, was a bad move and a result of division of interests between the web and enterprise communities.


Conclusive Remarks

The spec surely leaves many extension points out in open, resulting in implementations that introduce their own parameters, in addition to what the spec already defines, and makes sure that implementations from different providers can’t interoperate with each other. But going with the popularity and adoption rate of this framework, with every big player in town (Google, Twitter, Facebook, Salesforce, Foursquare, Github etc.) implementing and tweaking it the way it suits them, OAuth is far from being a failure. In fact, any web application that plans to expose their APIs to other web applications must support some form of authentication and authorization and OAuth fits the bill here.

For Further Reading