
Bunker.jordan
Shared posts
11 Jul 19:18
Scary Leviathan Cosplay
by Amy Ratcliffe

Season eight of Supernatural featured monsters known as Leviathans. Their faces were actually just giant jaws, and when they opened their mouths they were frightening and gross. BtVSFigs forum user willowswalok thought it would be freaky to cosplay as a Leviathan for London Comic Con. He sculpted the mouth mask and teeth onto a mannequin head, made a mold, and cast the mask in latex. He painted it with skin tones (the texture looks natural!) and used a clear elastic strap to keep the mask on his head. The finishing touch was using black fabric on the interior of the mask so no one could see his face. I would have been creeped out if I came across this costume at a convention.

via BtVSFigs
11 Jul 19:17
Optimus Prime Cosplay Looks Ready to Roll Out
by Amy Ratcliffe

Optimus Prime got a slightly different look in Transformers 4, and Pablo Bairan built a costume to match it. The robot cosplay is completely mobile and plays sounds. Pablo said he built the armor from “foam assisted rubber,” and you can see what it looks like without the paint and finishing touches in the work in progress photo of Optimus Prime’s feet below. Everything you see there was made from scratch except for the blue slippers.


Watch a sound and movement test at Pablo’s Facebook page.
via Cheezburger
Bunker.jordan likes this
11 Jul 19:13
Purdue’s Ultra-Flexible Circuits #WearableWednesday
by Becky Stern

A combination of water-dissolving thread and Ecoflex elastomer has produced a stretchy sewn zigzagging circuit capable of stretching 500%, according to researchers at Purdue:
Now, a Purdue team has come up with a far simpler, less-costly alternative: Use a standard sewing machine to create ultra-stretchable interconnects out of conventional wire. The wire is sewn in a zigzag pattern and embedded in a rubbery, stretchable “elastomer” called Ecoflex, manufactured by Smooth-On Inc.
The interconnect is capable of stretching 500 percent of its length, which could allow for new applications. Researchers used their technique to demonstrate a stretchable “inductive strain sensor” for monitoring expansion of an inflatable urinary catheter balloon. Such an elastic technology could have applications in stretchable garments that people might wear to interact with computers or for therapeutic purposes. (Purdue University photo/Babak Ziaie)
Download PhotoThe researchers have demonstrated that the interconnect is capable of stretching 500 percent of its length.
“This compares to only a few percent for an ordinary metal connection,” said Ziaie, leading the research with doctoral student Rahim Rahimi. “The structures are also highly robust, capable of withstanding thousands of repeated stretch-and-release cycles.”
via medGadget
Bunker.jordan likes this
11 Jul 19:12
Five Ways to Use Old Purses and Tote Bags in Cosplay
by Amy Ratcliffe
No matter how much I try to keep the number down, old tote bags pile up in my closet. People hand them out at events and conventions, and while I can use a few of them for shopping and keeping supplies for current craft projects organized, I definitely don’t need as many of them as I own. The same goes for old purses. Even though I don’t buy expensive purses, I still don’t like to dispose of old beat up ones. Fortunately, you can salvage some of the pieces for costumes. Here are five suggestions on how to use old purses and tote bags in cosplay:

Lassos – Need a Lasso of Truth for a Wonder Woman costume? You can make your own by using a long strap from an old leather or pleather purse. Cut off the strap, glue the ends so they won’t fray, and spray paint it gold. Done and done. You could also use a strap to make a prop whip.
Vests or bodices – If one of your old purses is made from leather – real or fake – you can cut it apart and include it in a patchwork vest or bodice or other piece of clothing like a cloak or a skirt. To get the most out of the material, use a seam ripper to break the purse apart along each side. Once you’ve sliced it open, you can remove the interior lining and any attached zippers.
Aprons – Tote bags come in a variety of fabrics from heavy canvas to thin cotton. If you have the latter and it’s white, you could cut it apart and use it to make an apron for a Belle (Beauty and the Beast) or Alice (Alice in Wonderland) costume. Depending on the size of the tote, the apron might be a little smaller than what you see on screen.
Incorporate it into your costume – One of the trickiest parts of cosplay is figuring out where to put your wallet, phone, and other essentials while cosplaying. If you’re cosplaying a character like Indiana Jones, you’re in luck since a messenger bag is part of the ensemble. If your character doesn’t have a backpack or bag though, you can modify an existing one to at least match what you’re wearing. Dressed as Link from Legend of Zelda? Paint your bag with rupees or to look like his shield.

Armor or weapon spikes – Yes, it seems like you can use practically anything to make armor or add to it. If any of your old purses or carry-on bags comes with feet, you can remove them and use them to make spikes/studs on armor or weaponry. They would look particularly cool on gauntlets or shin protectors. The above photo shows how they were used on armor for a Warrior Fiona from Shrek costume.
Bunker.jordan likes this
11 Jul 19:12
Making Supernatural’s Demon-Killing Knife
by Amy Ratcliffe

Back in the early seasons of Supernatural, a demon named Ruby showed up with a dagger capable of taking down other demons. When it was introduced, it was one of the most powerful weapons we’d seen on the series and once the Winchesters ended up with it, they didn’t let it go. The knife would make a great prop if you’re dressing as either Ruby, Sam, or Dean, and DeviantArt user Mother of Moths figured out how to make the dagger with thick cardstock. She used the following materials:
- 3mm thick card (or the back of a sketch pad)
- a craft knife
- pencil and biro (black)
- PVA (preferably a weather resistant one)
- 22mm width pipe
- newspaper and tape
- paint and silver spray paint
- sand paper
- a glue gun
You have to draw the outline of the blade on the card and add the symbols seen on the blade (Tumblr is a good resource for reference images). Then:
step 3.
Carefully cut out the blade with the craft knife (i almost cut myself multiple times, please be careful!) It won’t slice all the way through at first, so do it twice. make sure to have something underneath it so you don’t ruin the surface you are working on.step 4.
Sand down the areas that are a little rusty and then start priming it for the spray paint, use the pva glue and give it multiple coats until it feels and looks pretty solidstep 5.
get the pvc pipe and put it over a source of heat (i used the hob) use a pair of tongs so you don’t burn yourself. and then put it down on a surface and press down with a cloth over it. After that, it should be a squashed pipestep 6.
build up the shape using newspaper and tape.
Get more details at Mother of Moths’ DeviantArt page.

via Pinterest
Bunker.jordan likes this
11 Jul 19:11
Nicholas Manousos “Tourbillon 1000%” – 3D printed functional horological model #3DxEducation #3DxReplica #3DThursday #3DPrinting
by Matt
Nicholas Manousos “Tourbillon 1000%” – 3D printed functional horological model:
The tourbillon was invented by Breguet in 1795 and patented in 1801. It was intended to counter the effects of gravity on the escapement. Today their usefulness is controversial, but the allure remains. In my opinion, a tourbillon is the ultimate expression of mechanical beauty.
3D printing turns the traditional paradigm of manufacturing around, allowing for extremely rapid prototyping. The 1000% scale is a result of the resolution capabilities of today’s 3D printers, but it has an unexpected benefit. It allows people to hold the usually too delicate tourbillon in their hands, see clearly every single part at work, and therefore fully comprehend the mechanics. Tourbillon 1000% is the result of 3 years of engineering and design.
Tourbillon 1000% is not intended to be a timekeeper, but rather an educational device. Thermoplastics may experience characteristic changes when exposed to extreme temperatures.


Every Thursday is #3dthursday here at Adafruit! The DIY 3D printing community has passion and dedication for making solid objects from digital models. Recently, we have noticed electronics projects integrated with 3D printed enclosures, brackets, and sculptures, so each Thursday we celebrate and highlight these bold pioneers!
Have you considered building a 3D project around an Arduino or other microcontroller? How about printing a bracket to mount your Raspberry Pi to the back of your HD monitor? And don’t forget the countless LED projects that are possible when you are modeling your projects in 3D!
The Adafruit Learning System has dozens of great tools to get you well on your way to creating incredible works of engineering, interactive art, and design with your 3D printer! We also offer the LulzBot TAZ – Open source 3D Printer and the Printrbot Simple Metal 3D Printer in our store. If you’ve made a cool project that combines 3D printing and electronics, be sure to let us know, and we’ll feature it here!
Tertiarymatt, Bunker.jordan likes this
11 Jul 19:09
How to Make a Sailor Scout Uniform
by Amy Ratcliffe

A new adaptation of Sailor Moon, Sailor Moon Crystal, is almost here! The series premieres on July 5th on Hulu, and if you’re dying to make a Sailor Scout costume, DeviantArt user SparklePipsi has a incredibly detailed tutorial. She goes through each step of making the sailor fuku (the Sailor Scout uniforms) – you just have to purchase the pattern. It’s the Green Pepper “Crystal Lake” Skating Pattern. You only need about 1.5 yards of lycra and a couple colors of poplin, and lots of white ribbon. Even though you have a pattern, SparklePipsi has made a few sailor fukus and offers helpful tips – especially when it comes to the pleats. Plus, you have to make modifications to the pattern. Here’s her advice on adding the Sailor V shape to the skirts:
First, lay your skirt out flat with the front side facing up and the middle pleat centered. On the middle pleat, measure 8” from the bottom of the skirt and mark that point with a pin. Then continue to use pins to mark out the V shape of the skirt, with the top of the V ending at either side of the skirt. Refer to the picture to the left for this.
Once you mark where the V should go, stay stitch along the line you made with your pins, making sure to keep your pleats nice and flat. Once it’s all stay stitched, cut out the V like the picture in the lower right.
Now flip it over and repeat with the back of the skirt, except this time mark the tip of the V at about 9.5” from the bottom of the skirt.
You can download the complete tutorial as a PDF at DeviantArt.
Photo by Artistic Expressions
Bunker.jordan likes this
11 Jul 19:08
BioShock Kitty Splicer Mask
by Amy Ratcliffe

Splicers are the big bads in BioShock and BioShock 2; they’re twisted in both body and mind and they’re scary. They wear masquerade masks for extra spook factor, and some of the masks resemble animals such as rabbits and cats. Roxy Lee wrote a step-by-step explaining how to make the kitty splicer mask. She started with a dollar store cat mask and only used items she had around her house. The first few steps:
Step 1:
- Take mask,you can purchase these at party stores or craft stores, try to rub off as many sparkles as possible with sand paper then trim the ribbon on the side and lay it flat on an old ironing board or flat surface. If there are no sparkles skip and go ahead to step 2!Step 2:
- Prime it first with white primer (not pictured and only if mask is not already white) then spray a very light thin coat of gold spray paint over top, do not worry about not getting an even coat, this helps with detailing it later.Step 3:
- When the paint is not TOO dry go in with a dry sponge and pull up pieces of the paint in areas to get an older weathered feel, then when fully dry shape mask in areas adding cracks, cut out broken pieces, I broke off the left side of the mask and added Jagged areas with sharp craft scissors and an X-acto blade until I was happy with the broken look.

Read the full tutorial at Geek x Girls.
Rosalind, Bunker.jordan likes this
11 Jul 19:07
Captain America: Winter Soldier Costume
by Amy Ratcliffe

Every time there’s a new movie, Captain America’s uniform goes through changes. That’s true for any superhero, actually. For Winter Soldier, his costume was toned down a little and the stripes in the middle were removed. Replica Props Forum user HenryTJO11 finished a replica of the costume in March, and he did an amazing job making it look just like the one in the film. The helmet was made using a base of Pepakura, and he used a plastic shield that he ended up reinforcing with metal rings. He broke down the stealth uniform as follows:
With the suit we decided it’s a 2 piece (jacket and trousers) with the jacket being slightly longer so it can tuck into the trousers. We also decided that the jacket is in 3 pieces. The shoulders that go round the neck and rest on the shoulders with a strap going round the bicep. The under part (darker material in the ref pics) which would be made of a more flexible and stretchy material and then the outer part (the blue part of the suit) would be a tougher material in the places that dont move (chest, back, forearms and abs) with foam inserts on the chest, abs, forearms and shoulders. He also said he would make the white/silver parts out of urethane.
He took a creative approach to keep Cap’s shield in place on his back:
For those wondering about how I hook the shield to my back, it’s quite simple. We attached a thin strip of leather to each of the handles on the back and then a tiny metal hook to the top of the back buckle thingy. The strip also gets covered by my arm when I’m holding the shield so you can’t notice it at all.
We were going to put a magnet on the middle of the shield and to the back of the buckle but this is the Disguise shield and it’s domed alot more than the movie one is so the magnets wouldn’t have been able to make contact. I am able to hook the shield onto my back myself so that’s a plus.


Read more about the build at The RPF.
Bunker.jordan likes this
09 Jul 22:05
Diablo’s Witch Doctor Costume
by Amy Ratcliffe

Diablo III’s Witch Doctor is one creepy looking character, and Instructables user andysmeech did an excellent job translating it from screen to real life. He used a combination of everyday objects like wire clothes hangers and building materials such as expanding foam to achieve the finished look. Here’s how he made the head piece:
As you can see I saved the hassle of having like 18 steps on this project by stitching the images together for your pleasure [pictured below]. The first image to the left is my backbone to the whole mask. I started by buying a cheap plastic mask. Attached to the plastic mask is a paper towel role with a wired clothes hanger through it to make the long horns, two cardboard nub horns and an added forehead piece, and sideburn armor. Everything is taped to hold it in place. the next image (top right) is the back bone covered in Great Stuff – it is a spray insulation foam from the hardware store. Once I covered the mask with foam I let it dry for a whole day. Once it was dry I started to carve the foam to take shape of the face and horns. Once I was was done the carving I painted the mask with spray paint and acrylics.
He said the small details really made this costume. He made the ear plugs and bone piercing with modeling clay and painted them with acrylic. The neck piece was made from rope, and he used a piece of a cheap curtain to make the tassel pendant. The potion bottles are plastic bottles filled with food coloring and water.

Read more at Instructables.
Bunker.jordan likes this
09 Jul 22:03
 Every Tuesday is Art Tuesday here at Adafruit! Today we celebrate artists and makers from around the world who are designing innovative and creative works using technology, science, electronics and more. You can start your own career as an artist today with Adafruit’s conductive paints, art-related electronics kits, LEDs, wearables, 3D printers and more! Make your most imaginative designs come to life with our helpful tutorials from the Adafruit Learning System. And don’t forget to check in every Art Tuesday for more artistic inspiration here on the Adafruit Blog!
Jólan van der Wiel – Magnetised clay defies gravity to form ceramics #ArtTuesday
by Matt
Jólan van der Wiel – Magnetised clay defies gravity to form ceramics, from Dezeen:
…For his Magnetism Meets Architecture project, Jólan van der Wiel created a series of ceramic objects using a process that exploits the conflicting properties of natural materials and processes.
He starts by adding water to clay to create slip – a suspension of clay particles in water with the consistency of cream. More commonly used for decorating ceramic objects, slip’s liquid state means a mould would usually be required to construct something from it. The designer mixes in metal powder to make the slip magnetic. It is then applied onto a rotating surface and slowly built up using a nozzle.
Passing a magnetic field through the material provides an opposing force to gravity. The counter force draws the slip upwards and suspends it in place as it dries and hardens.
“Gaudi’s small model of La Sagrada Familia was quite inspiring for this project,” Van der Wiel told Dezeen. “He used gravity to calculate the final shape of the building. I thought, ‘What if he had to power the turn off the gravitational field for a while?’ Then he could have made the building straight up.”
The project is part of ongoing research into the applications of magnetic forces, which Van der Wiel conducted at the European Ceramic Workcentre in Den Bosch…..


Every Tuesday is Art Tuesday here at Adafruit! Today we celebrate artists and makers from around the world who are designing innovative and creative works using technology, science, electronics and more. You can start your own career as an artist today with Adafruit’s conductive paints, art-related electronics kits, LEDs, wearables, 3D printers and more! Make your most imaginative designs come to life with our helpful tutorials from the Adafruit Learning System. And don’t forget to check in every Art Tuesday for more artistic inspiration here on the Adafruit Blog!
09 Jul 22:02
Monster Hunter Blademaster Barioth Armor
by Amy Ratcliffe

In Capcom’s Monster Hunter, one of the best kinds of armor available is the Barioth set. Instructables user MandaBear created an impressive reproduction of the Barioth armor for a female blademaster. She put together an incredibly thorough tutorial on the processes she used to make everything from the helm to the boots. She combined a lot of techniques and supplies including EVA foam, Wonderflex, Apoxie sculpt, and acrylic paint. She sewed together several different types of fabric ranging from cotton spandex to deerskin. She started the process by examining a ton of screen shots from the game and internet.
The base of the helmet is a Pepakura pattern from a character in Halo:
After getting a [really] rough base, I started layering Paperclay to add up some bulk and flesh out the dimensions. After the Paperclay, I threw on some poly resin, Apoxie Sculpt, and spot putty. Sanded that until it was ready for paint.
I started working on scaling for the fangs and deciding how to fit all this crap on the wig and wear all, as comfortably as possible.
The fangs were sketched out by hand on paper and copied to make the right and left mirrored images. I sculpted them in Super Sculpey. I made very crappy, flimsy, poorly thought out molds of the teeth in latex. Had I know then what I know now, I’d have done these as box molds. Derp.
I took one Punky in 613A, harvested most of the wefts off, and hand stitched them back into another Punky in 613A.
To fit the armored part of the helm to the wig, I removed the wefts from the crown.
After I stitched the extra wefts into the back of the wig, I added arches of fabric covered boning every so many inches horizontally, like a Bumpit, teased, and hairsprayed for as much volume as I could manage.

Read more at Instructables.
Christopher Lantz, Bunker.jordan likes this
09 Jul 22:02
Forbidden Fruit #ArtTuesday
by Jessica

Forbidden Fruit Via Kyle Bean.
Concept & set design for a dark, tongue-in-cheek project for The Gourmand. Collaboration with Photographer Aaron Tilley.


baron, Bunker.jordan likes this
09 Jul 21:59
I've been writing a monthly column for Classic Bike Guide for over a year now, and I tend to focus my essays on motorcycle culture, when not simply poking fun. A few columns have hit a nerve, but none more so than my meditation on the Custom bike-building scene, and the struggles I've observed with my friends, trying to make a business of their craft, or art, or vision. The BikeExif post on the demise of Spain's Radical Ducati inspired my thoughts last March, when I wrote 'Instafamous/Instabroke', as did a conversation with David Borras, also of Spain, who's El Solitario is recognized globally, yet he and his crew daily confront the realities of running a business to support David's radical design sensibility. Chris Hunter of BikeExif asked to reproduce the essay, which I think is a first for his website; no motorcycle images! Not all my readers frequent BikeExif, but might enjoy the read. Thanks to Classic Bike Guide for ok'ing the BikeExif post, and this one too:
"I’ve been mucking around with old motorcycles since the 1980s, and like many, financed my bike habit via the sport of Arbitrage. That is, turning a profit on a bike after giving it some love.
It wasn’t an income; the only people living off the motorcycle game were (impoverished) moto-journalists and employees of legitimate dealerships. I knew lots of fellows, and a few ladies, who spent all their time repairing and modifying bikes, and none aspired to be anything but a garagiste. At the time, Von Dutch lived in a trailer, Ed Roth had long-ago lost his Revell contract, and only bands sold t-shirts.
It never occurred to us that someday we’d be aglow with some sort of notoriety. But ‘some sort’ is now within the purview of every human on the planet, via the joys of InstaFame. A downloadable phone trick has the power to make us globally recognizable in weeks. Via the savvy curation of images, we trigger a mutual oxytocin drip in our fans and ourselves, liking and being liked, tapping away like starving lab monkeys, who’ve chosen the button for ‘attention’ over the one for ‘food’.
It’s fame, man, to the hungry end, and maybe even bigger when you’re dead; is that the ghost of TuPac or Indian Larry I hear laughing over posthumous sales? Don’t think I’m judging; I owe the mysterious gods of the Internet a debt of gratitude for my own lifestyle; let’s just hope I don’t owe them my soul.
The shimmering dust of glamour has always coated parts of the motorcycle scene, and right now it’s falling on handsome, bearded guys wearing heritage work clothing and riding ’69-clone choppers or knobby-tyred customs, or girls doing seat-top acrobatics aboard same.
The original meaning of ‘glamour’ was the art of enchantment, a spell-caster’s ability to create an illusion around a person, place, or thing. And while the packs of self-paparazzing blogo-grammers crowding custom bike events are indeed beautiful and achingly cool, I fear our glamour is a spell cast in the mirror.
A mix of hopes and pleasures motivate today’s custom motorcycle builders; the joy of creativity mingled with glow of Web attention, and now there’s an established recipe for making a ‘cool’ bike, tested via the comments section on a hundred moto-blogs.
It’s easy to mistake the whoosh of online chatter for a wind to fill your sails, and a virtual wind is exactly that, while selling garage-altered metal to strangers has always been difficult. Savvy shops sell logo’d up clothing and calendars and keyfobs, scattering brand stickers in an Autumn of moto-foliage… but even such sales will only pay the bills, not the salary of a desperately-needed employee – or your own.
There are two ways to profit in business; large sales volumes with small profit margins, or high-end retail, and the successful moto-businesses sell the tanks and levers and rearsets the Wannabes need for an InstaFamous custom.
At the rich end of the spectrum, the market for hundred grand choppers evaporated in 2008, and I know exactly one builder who’s sold an art-gallery motorcycle for big bucks. Every other shop, then, is in competition for a limited audience, even if it seems at times that ‘everyone’ thinks we’re cool and ‘everyone’ wants your bikes…but is that the magic mirror?
The first signs of iCustom casualties have recently appeared even in the luminous portal of Bike EXIF; shops going belly up, euphemistically ‘starting other projects’, i.e., jobs which pay. It hasn’t exactly been a Gold Rush (that’s happening in the App-creation world itself), and I know young bike builders don’t expect to get rich.
Still, it seems the business of pushing aesthetic boundaries with a motorcycle is best trod with a trust fund springing your step, or proceeding with deep humility and little expectation of worldly increase; the hackneyed rule for artists.
I’ve spoken with genius motorcycle builders whose controversial but gloriously innovative customs have netted them almost zero sales. A ‘like’ isn’t a dollar. But then again, as they slowly go broke or accustomed to reduced circumstances, the refrain is ‘there’s nothing I’d rather be doing’.
The coolest bike boom since the 1970s has kids buzzing like bees at Wheels + Waves, DirtQuake, and Born Free, and featured in popular books like the ‘The Ride’, to which I contributed. Riding bikes while young, beautiful and creative is a heady cocktail, as is the glamour of InstaFame.
But let’s not confuse the rain of electrons, following our every move, for a rain of cash. Because in the end, bikes are just motorcycles, but business is business."
[Want to read this in Spanish? Click here.]
Want theVintagent.com in your mailbox? Sign up here!
INSTAFAMOUS, INSTABROKE
by The Vintagent
 |
| My monthly Classic Bike Guide page, with an illustration by Martin Squires |
 |
| The hilarious illustration of 'self-papparizing blogo-grammers' from BikeExif |
It wasn’t an income; the only people living off the motorcycle game were (impoverished) moto-journalists and employees of legitimate dealerships. I knew lots of fellows, and a few ladies, who spent all their time repairing and modifying bikes, and none aspired to be anything but a garagiste. At the time, Von Dutch lived in a trailer, Ed Roth had long-ago lost his Revell contract, and only bands sold t-shirts.
It never occurred to us that someday we’d be aglow with some sort of notoriety. But ‘some sort’ is now within the purview of every human on the planet, via the joys of InstaFame. A downloadable phone trick has the power to make us globally recognizable in weeks. Via the savvy curation of images, we trigger a mutual oxytocin drip in our fans and ourselves, liking and being liked, tapping away like starving lab monkeys, who’ve chosen the button for ‘attention’ over the one for ‘food’.
It’s fame, man, to the hungry end, and maybe even bigger when you’re dead; is that the ghost of TuPac or Indian Larry I hear laughing over posthumous sales? Don’t think I’m judging; I owe the mysterious gods of the Internet a debt of gratitude for my own lifestyle; let’s just hope I don’t owe them my soul.
The shimmering dust of glamour has always coated parts of the motorcycle scene, and right now it’s falling on handsome, bearded guys wearing heritage work clothing and riding ’69-clone choppers or knobby-tyred customs, or girls doing seat-top acrobatics aboard same.
The original meaning of ‘glamour’ was the art of enchantment, a spell-caster’s ability to create an illusion around a person, place, or thing. And while the packs of self-paparazzing blogo-grammers crowding custom bike events are indeed beautiful and achingly cool, I fear our glamour is a spell cast in the mirror.
A mix of hopes and pleasures motivate today’s custom motorcycle builders; the joy of creativity mingled with glow of Web attention, and now there’s an established recipe for making a ‘cool’ bike, tested via the comments section on a hundred moto-blogs.
It’s easy to mistake the whoosh of online chatter for a wind to fill your sails, and a virtual wind is exactly that, while selling garage-altered metal to strangers has always been difficult. Savvy shops sell logo’d up clothing and calendars and keyfobs, scattering brand stickers in an Autumn of moto-foliage… but even such sales will only pay the bills, not the salary of a desperately-needed employee – or your own.
There are two ways to profit in business; large sales volumes with small profit margins, or high-end retail, and the successful moto-businesses sell the tanks and levers and rearsets the Wannabes need for an InstaFamous custom.
At the rich end of the spectrum, the market for hundred grand choppers evaporated in 2008, and I know exactly one builder who’s sold an art-gallery motorcycle for big bucks. Every other shop, then, is in competition for a limited audience, even if it seems at times that ‘everyone’ thinks we’re cool and ‘everyone’ wants your bikes…but is that the magic mirror?
 |
| The demise of Radical Ducati, as per this example, inspired this essay... |
Still, it seems the business of pushing aesthetic boundaries with a motorcycle is best trod with a trust fund springing your step, or proceeding with deep humility and little expectation of worldly increase; the hackneyed rule for artists.
I’ve spoken with genius motorcycle builders whose controversial but gloriously innovative customs have netted them almost zero sales. A ‘like’ isn’t a dollar. But then again, as they slowly go broke or accustomed to reduced circumstances, the refrain is ‘there’s nothing I’d rather be doing’.
The coolest bike boom since the 1970s has kids buzzing like bees at Wheels + Waves, DirtQuake, and Born Free, and featured in popular books like the ‘The Ride’, to which I contributed. Riding bikes while young, beautiful and creative is a heady cocktail, as is the glamour of InstaFame.
But let’s not confuse the rain of electrons, following our every move, for a rain of cash. Because in the end, bikes are just motorcycles, but business is business."
[Want to read this in Spanish? Click here.]
Want theVintagent.com in your mailbox? Sign up here!
09 Jul 21:58
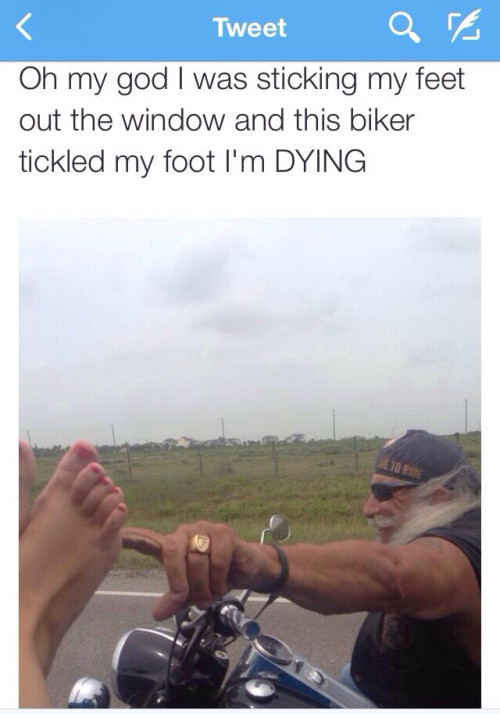
This might be staged, but I wouldn’t be surprised either...
This might be staged, but I wouldn’t be surprised either way. Totally hilarious.
"Oh my god I was sticking my feet out the window and this biker tickled my foot I’m DYING." posted to @piggiesoink twitter.
Rosalind, Tertiarymatt and -1 others like this
09 Jul 21:58
1957: A woodchopping competition at the Royal Easter Show in Sydney
by Jacqui

Tertiarymatt, Bunker.jordan likes this


09 Jul 21:57
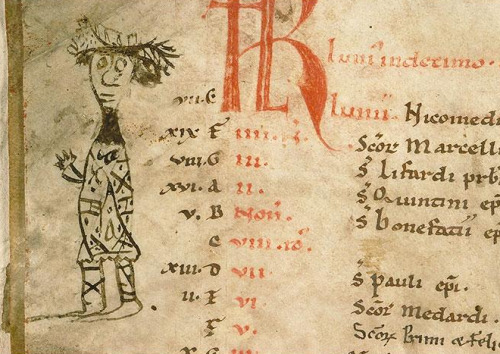
1444 - 1445: Dragon in the bedroom
by Amanda
Detail of a miniature of Nectanebus and Olympias in bed, with a dragon at the foot of the bed.
From Poems and Romances (the ‘Talbot Shrewsbury book’). Royal 15 E VI.


Bunker.jordan likes this
09 Jul 21:53


The Asbury Discovery Center is now open!
by Jillian Northrup
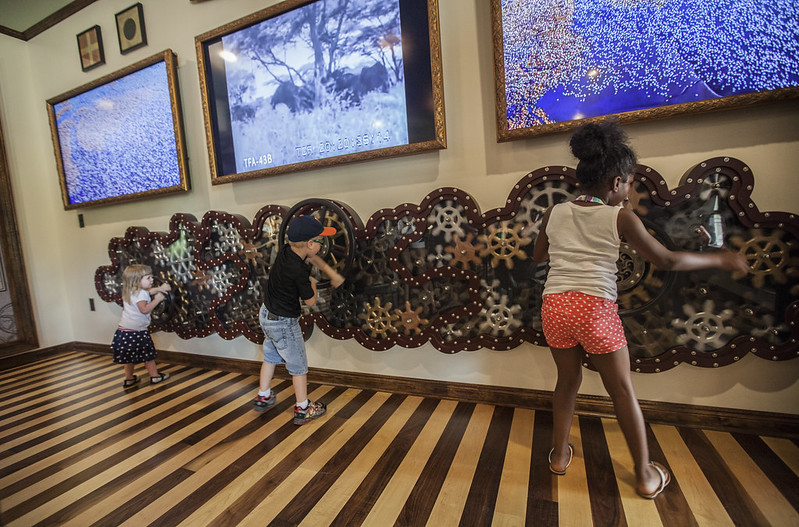
We could not be more pleased with the opening of the Asbury Discovery Center this summer, a project we have been working on since last year. It all came out beautifully, filled with moving gears, secret doors and hidden treasures. Not to mention reptiles!

The Asbury Discovery Center is the latest addition to the Hattiesburg, MS Children's Zoo. And we were given the task of designing it, and fabricating many of the components.
The main attraction in the front of the building is a large grassy area for Galapagos Tortoises to roam, complete with a small building for them to retreat inside to.
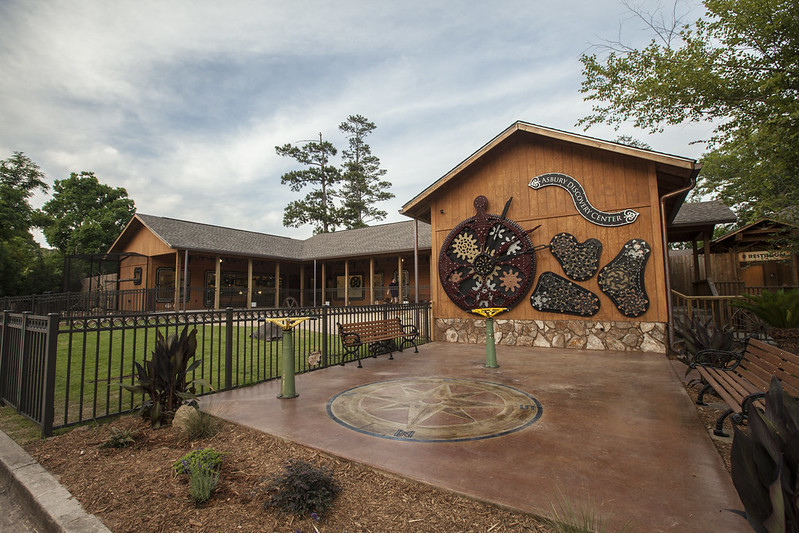
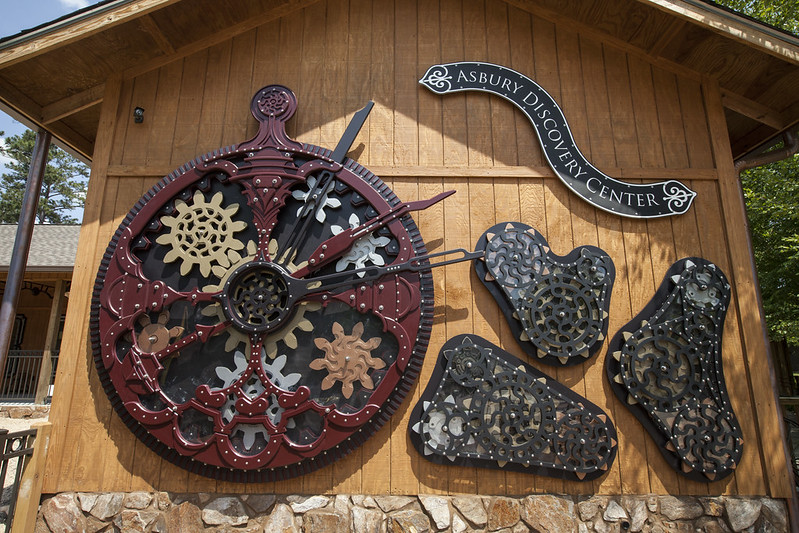
The front of that small building welcomes visitors with an interactive gear wall. It all spins!
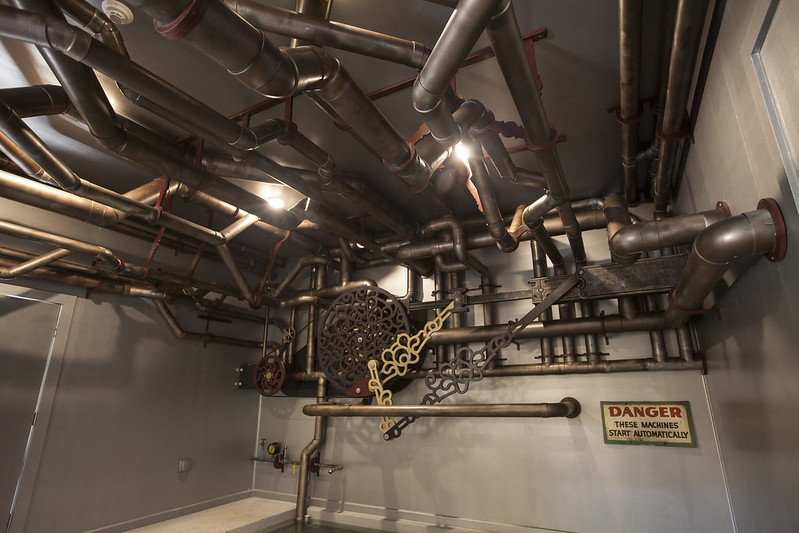
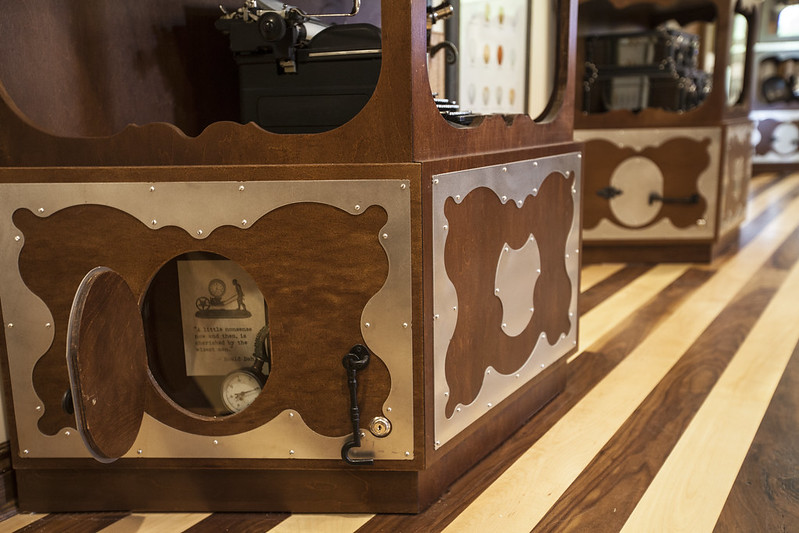
Inside the Tortoise House is designed to look like an engine room, complete with electrically turning piston.
The walkways are lined with rotating fans overhead, decorative arches and window and door frames.
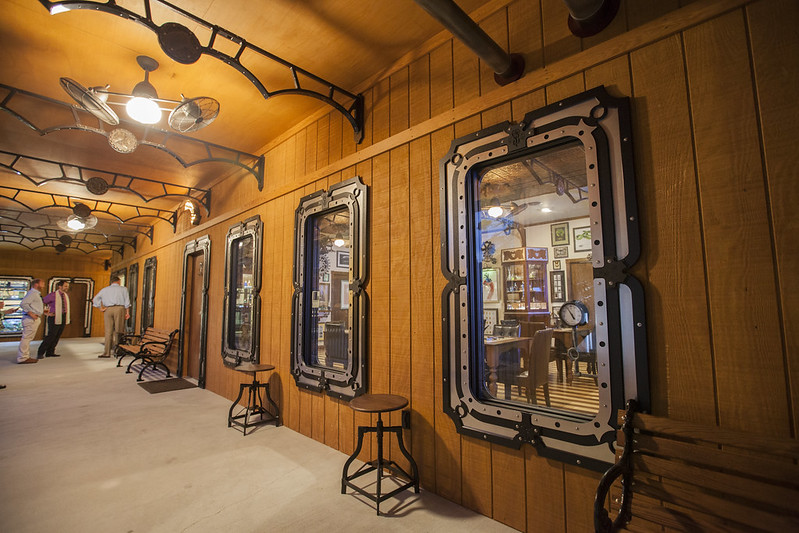
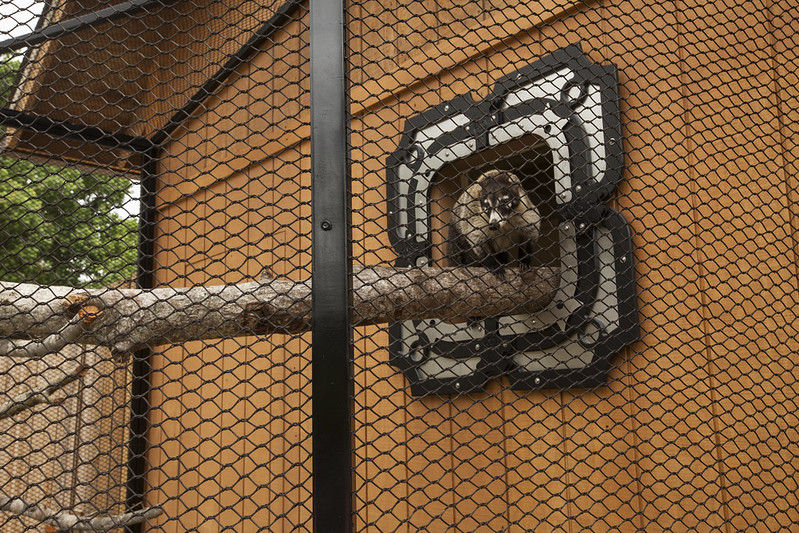
The window and door frames peek into all kinds of animal enclosures, like this cute critter
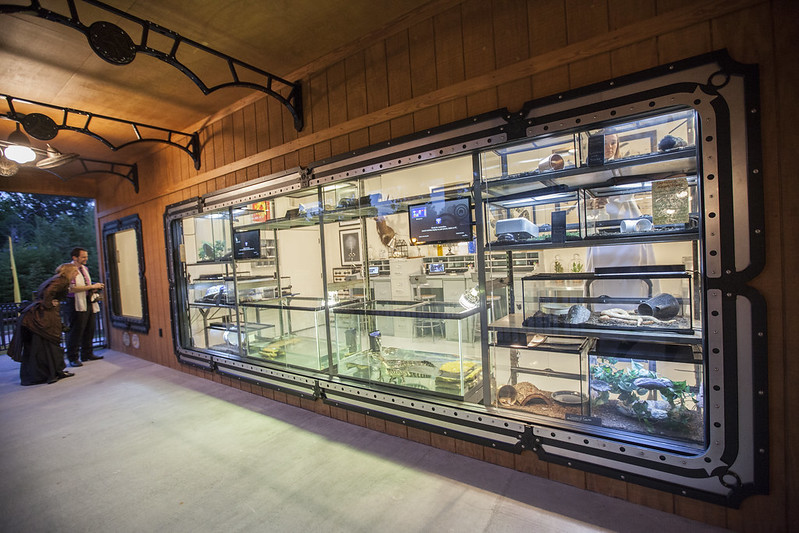
And this enormous window that looks into the reptile enclosure
Finally, when you get into the main education room, there is even more to see, and even more to interact with!
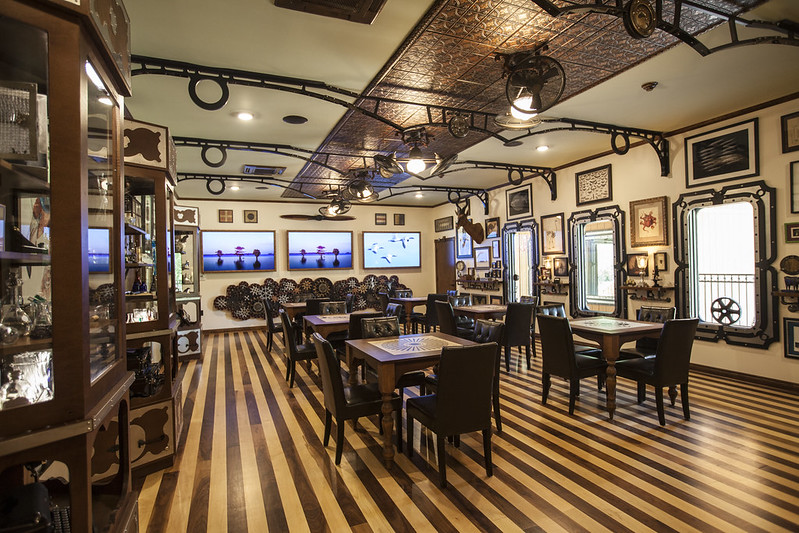
A gear wall at the end of the room is a delight for all the children.
And small doors down at the base of the cabinets are waiting to be discovered.
See more about this project on our Asbury Discovery Center project page.
Bunker.jordan likes this
09 Jul 21:16

New Murals from Etam Cru on the Streets of Oslo and Montreal
by Christopher Jobson

Bezt

Bezt & Sainer / Etam Cru
Two fantastic new murals today from Sainer and Bezt of Etam Cru. The first, depicting a girl holding birdhouses was completed last month in Montreal as part of the second MURAL Festival. The second, featuring an imaginative boy brushing his teeth, was just completed in Oslo by both Sainer and Bezt. See more of both pieces over on StreetArtNews.
Nuno Cruz, Tertiarymatt and 4 others like this
09 Jul 21:16
Section: Medical
Tags: 3D Printing, Bioprinting, University of Sydney
Related Articles:

Vascular network bio-printing brings 3D-printed organs one step closer
by Stu Robarts

Section: Medical
Tags: 3D Printing, Bioprinting, University of Sydney
Related Articles:
- Scientists create artificial vascular networks using sugar
- New bioprinting technique creates thicker, healthier tissue
- Scientists come a step closer to growing replacement kidneys
- Building artificial organs using ‘biological Legos’
- Unique droplet network 3D printer produces synthetic tissues
- New technique for regenerating blood vessels to aid treatment of vascular disease
Tertiarymatt, Bunker.jordan likes this
09 Jul 00:41


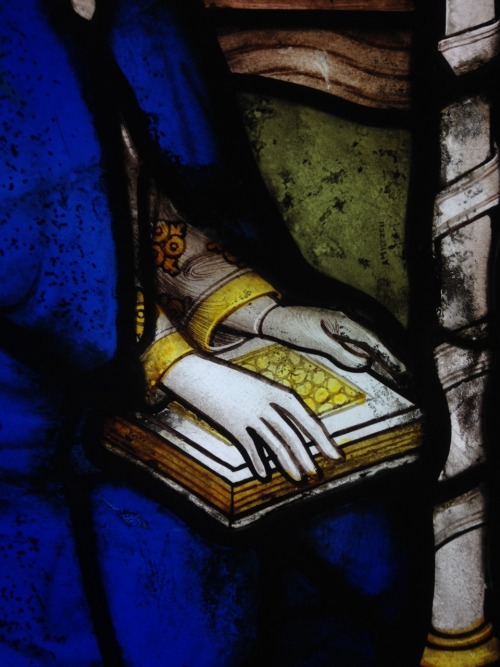
Up close and personalI made these images today and they are...
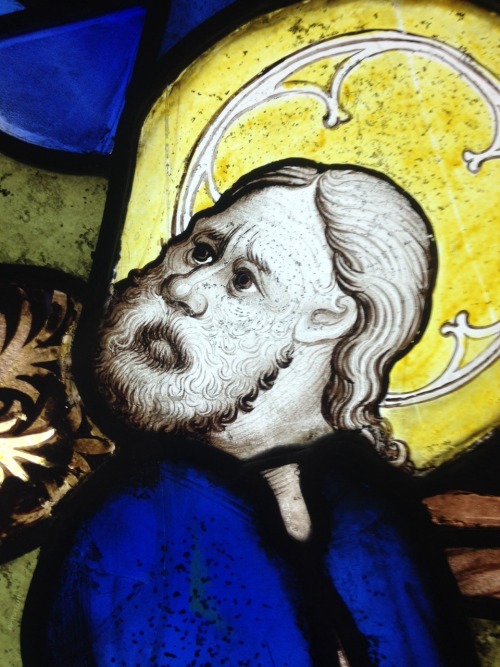
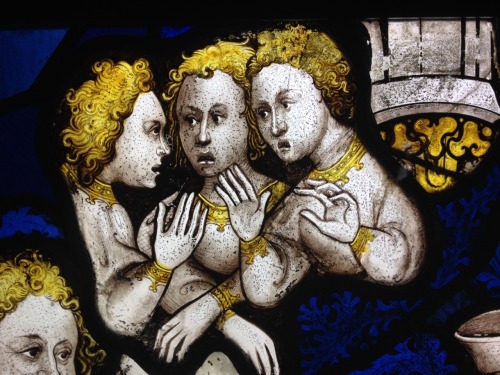
Up close and personal
I made these images today and they are quite special. The expressive medieval faces - and a pair of hands - are part of the stained-glass “Great East Windows” at York Minster and they date from 1408. Not many people have seen these details from this close, for the simple reason that they are normally positioned twenty meters or so above ground level. Except for now. They are presently being restored and thus taken down, one segment at the time, to be treated by experts. Visiting the cathedral gets you face to face - literally if you want - with these 700-year-old individuals. It is sensational to see them the way the artisans did when they made them, especially knowing they will soon be out of reach again, perhaps for centuries to come.
Pics (my own): York Cathedral, restoration exhibition.
Tertiarymatt, Bunker.jordan and -1 others like this
08 Jul 23:09
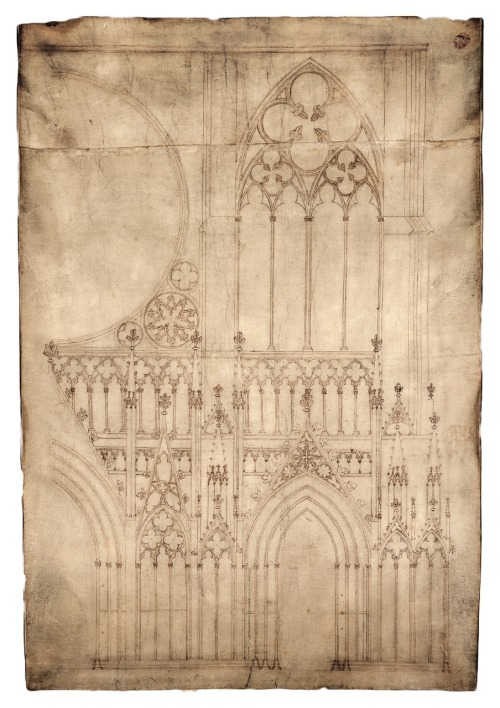
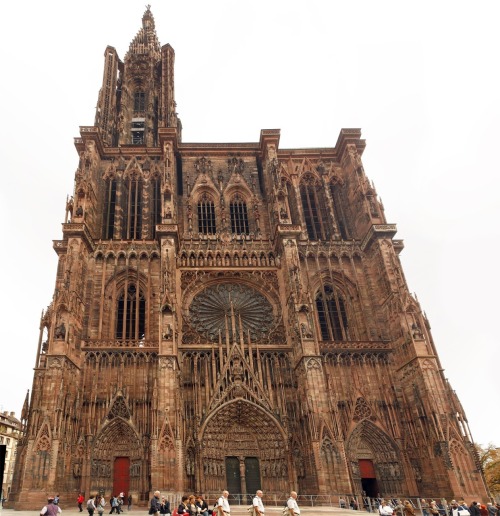
Blueprint of medieval cathedralThis is cool. The top image shows...
Blueprint of medieval cathedral
This is cool. The top image shows a drawing on parchment from the 1260s. It is one of the earliest existing architectural drawings and depicts the façade, or front, of Strasbourg Cathedral in France. The “blueprint” almost stands a meter tall. What’s so special about this medieval artifact is that it still exists: single sheets rarely survive from the Middle Ages (with the exception of charters). Equally special is that we can compare the drawing to the real thing (lower pic): it is not hard to recognizes the big round window in both drawing and real building - note also the door underneath it and the pointy window to the right. How great that we are given a peek on the medieval architect’s drawing board. Ironically, he did not live to see his creation built, because the cathedral was finished in the 14th century.
Pic: Musée de l’Oeuvre Notre-Dame, Strasbourg, Inv. no. 2. More about the drawing here. The photograph is from this blog.
Bunker.jordan and -1 others like this
08 Jul 23:08
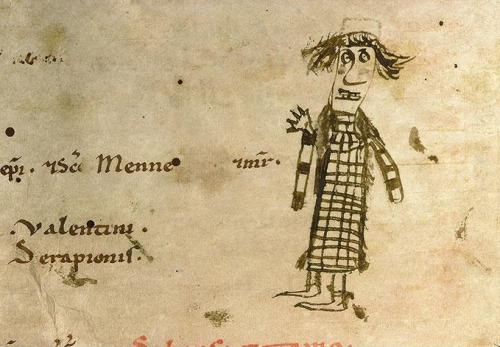
Funny medieval doodles With their wild hair and frantic gaze,...
Funny medieval doodles
With their wild hair and frantic gaze, these doodled men look like fools. They are waving as if to seek contact with the reader. The thing is, the reader is busy singing and listening to a sermon. That is because these 800-year-old images are found in a Missal, a book used during Holy Mass. What a shock it must have been for the serious user of the book, to flip the page and suddenly find yourself face to face with these funny creatures. And what a great contrast: a serious book with silly drawings.
Pic: Paris, Bibliothèque Sainte-Geneviève, MS 95 (Missal, 12th century). More about the manuscript here.
firehose, Bunker.jordan and -1 others like this
08 Jul 19:26

New Lifelike Paper Birds by Diana Beltran Herrera
by Christopher Jobson


Year after year, artist and designer Diana Beltran Herrera (previously) continues to astound with her near perfectly accurate reproductions of birds using paper. The fragile sculptures shown here are a mix of private commissions and pieces for several luxury brands who use her work in displays and advertising. Originally from Columbia, Herrera studied in Bogota before spending time in Finland to study ceramic sculpture. She is now currently working on an M.A. in fine art at UWE Bristol and creates paper birds in her spare time. She most recently spoke at Pictoplasma in Berlin and had work at Centrespace in Bristol. You can see many more paper creations over on Flickr. (via Yatzer)
donotreply, Tomwalton and 5 others like this
03 Jul 20:51


Let’s Play a Game With the Restoration Hardware Catalog
by David Malki
Bunker.jordanI would play this game.

The Restoration Hardware Cube of Paper
Did your household recently receive a 12-pound block of Restoration Hardware catalogs? Mine sure did!
At first I thought “What a waste!”, but then I realized that if I went on to buy just one $1200 lamp, it would pay for a lifetime of sending me catalogs.
But, since I won’t buy said lamp: It is indeed a waste!
The top catalog pictured, “Interiors”, features staged scenes full of furniture and accessories, artfully arranged into picturesque tableaux from some imprecise notion of “the past”.
In case you’re not familiar with Restoration Hardware, it’s a home furnishings store that specializes in recreating and adapting period items — you could easily decorate a Restoration Hardware kitchen with brass Versailles drawer-pulls, a hanging lamp styled after something from a 1910s button factory, a breakfast table made of reclaimed Russian barnwood, and a stove hood patterned after the innards of a famous Belgian clock.
Sometimes the items they sell are relatively straightforward, such as a steamer trunk coffee table.
Other times, they’re strange, like a floor lamp patterned after Sputnik.
Their catalogs are full of this same dissonance: some artifacts that are handsome, if peculiar, homages to styles of the past; others that are bizarre mass-produced old-and-distressed clutter existing solely for the sake of looking old and distressed.

The catalog descriptions, however, are what I want to point out specifically. They’re mostly compound phrases, like the above:
Reproduction of a found French woodcarving from the early 19th century, ravaged by time and the elements.
Same with this canoe-shaped curtain (the most logical of all shapes for curtains):

Vintage architect’s model, or “maquette”, of a canoe constructed of solid oak slats.
You could mix and match the second half of those sentences and I wouldn’t even blink. My favorite descriptions in the catalog are the ones that read like the two halves were pulled out of two separate hats. See if you can match these first halves:
1) Inspired by the voluptuous form of a vintage hayrack…
2) Replica of an architectural rosette fragment cast in resin…
3) Reproduction of a pair of Baroque architectural brackets from a Parisian theater…
With these latter halves:
A) …with the weathered appearance of stone.
B) …our cast iron table is topped with timeworn, reclaimed oak.
C) …reimagined as a mirror.
(Answers: 1-B; 2-A; 3-C)
Okay Here’s the Game
The Restoration Hardware company went to the trouble of compiling these catalogs and mailing them to me — no mean feat. So the least I can do is put them to use. I call the game Restoration Hogwash.
It follows the rules of the game Balderdash. First, one player looks through the catalog, and chooses an image, placing a sticky note over the description.

Then, all other players take a slip of paper or an index card and write down a made-up description for that item.
Meanwhile, the person who chose the picture transcribes the real description.
Everyone turns in their slips to the first player, who mixes them up and reads them all aloud.
After everyone has heard all the descriptions, players each vote for the description they think is the real one. The object of the game is to fool the other players into picking your made-up description (by making it sound convincing), instead of the real one.
Players score one point for each person who is fooled into picking their fake description, as well as one point if they pick the correct description themselves.
The chaise pictured above? Here’s the real description:

Reproduction of a 100-year-old Hungarian sleigh, crafted of solid elm with a tea-stained burlap cushion.
That is printed right there in the catalog and I’m still not convinced it’s not made-up.
Now, A Challenge For You
Here’s another picture from the catalog, of a table that is also a pillar for some reason:

Leave a comment on this post and write your own one-sentence catalog description for this piece.
This won’t be a contest to get it right — don’t bother figuring out the correct description. Just some fun to see who can write the best made-up version.
I’ll reprint my favorite comments in a future post! And if you play Restoration Hogwash, let me know how it goes!!
cookiestork, firehose and one other like this
03 Jul 16:51

Final 24 hours to get your kickstarter-exclusive Augie book!
Once again, thank you so much for your support, and sorry about all the nags!


July 01, 2014
Final 24 hours to get your kickstarter-exclusive Augie book!
Once again, thank you so much for your support, and sorry about all the nags!
Nuno Cruz, Bunker.jordan and 3 others like this
01 Jul 22:08
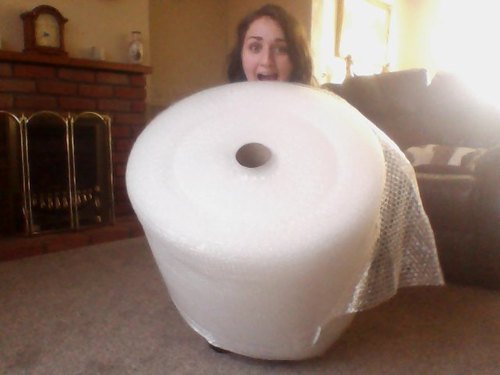
I'M NOT SURE WHY BUT THERE'S A GIANT ROLL OF BUBBLE WRAP IN MY LIVING ROOM
I AM EXCITED
I HAVE LIKE 6 ASSIGNMENTS BUT WHEN I DO THIS IT GOES POP POP POP SO THIS IS MORE IMPORTANT
Tertiarymatt, firehose and one other like this