


Eurovisión, donde cualquier cosa puede pasar
Siempre pienso qué pensaran los de fuera al ver este festival…
MissplacedMira, Zo XD
Siempre pienso qué pensaran los de fuera al ver este festival…
MissplacedTHIS! (aunque probablemente aquí no llegue a cuajar >_
MissplacedMira lo que puedes hacer con los cierres de las bolsas del pan de molde en vez de tirarlos, Maiko XD

CONTRIBUTED BY COURTNEY FRY

Admittedly, I am a linguaphile — I choose to study other languages for fun. In fact, learning Japanese was one of the things that most appealed to me about moving to Okinawa. However, my previous studies in Spanish and Portuguese did nothing to prepare me for immersion in Japanese; they don’t even use the same alphabet! Though I am starting from scratch and more than a little overwhelmed, I am still determined to, if not master it, at least scratch at the surface of proficiency in this language before I leave the island.
 My best friend in learning Japanese so far has been my iPhone. It is always with me, and whenever I have a few spare minutes, I can study a little, whether that is while I am eating lunch or standing in line at the commissary. There are plenty of apps on the market, both free and for a fee. I have tried dozens of them and the following are my favorites … and they are all free!
For phrases or “survival Japanese”:
If you just want to learn some basic phrases to help you get around, I recommend “Learn Japanese” by Codegent. It is divided into basic categories like, “Greetings,” “General Conversation,” and “Eating Out.” You can see the kanji for each word/phrase, see the pronunciation in romaji (that is, roman letters like you are reading now), and listen to the word/phrase at normal speed or slowed down.
Choose one phrase each day, and listen whenever you have a few seconds of free time. You’ll be surprised how much you pick up!
You can also save a list of favorites, which is surprisingly helpful. My personal recommendation is to ignore the kanji and just listen, listen, listen and then start repeating! It is quite user-friendly and doesn’t have any ads, either.
 For Hirigana/Katakana:

My Favorite…
“Japanese Please”, by Ron B. Yeh at Squarepoet, Inc., is by far my favorite app for learning basic Japanese writing. Once you have a basic understanding of the kana, this is wonderfully helpful!
The “Hirigana Find” and “Katakana Find” games are really helpful in retention and recall. They also have lists of “fun words” and “useful words” that use only the kana that you know, which is a great way to practice your knowledge.
Their section on numbers and basic kanji are also great. I highly recommend this app! It is also free of advertisements.
For Kanji
“Japanese Please” (see above). Seriously, guys, I really like this app. Ron B. Yeh will get you started with your basic kanji, which you can then use as the building blocks to expand your repertoire of kanji later, if you’d like. This app has only 100 kanji, but they are the 100 most-commonly used kanji, including numbers (which are easy, I promise!). I spent ten minutes with the kanji section of this a few days ago, and then had to run some errands. I noticed the few kanji that I had managed to pick up everywhere as I drove around.
 If you want more Kanji, you can download (for free) the extended version of “Kana” by the folks at The Japanese Page. It is called “JP Free” and has many, many kanji and phrases.
I like that it has the pronunciation written in kana, and that you can listen to the words. This is also great for building your vocabulary. The words are divided into practical categories like food, weather, and time.
For Linguaphiles
 If you really like grammar and knowing all the rules, check out Tae Kim’s Guide to Learning Japanese. It is set up like a textbook and uses all the linguistic jargon that you could ever want: particles, state-of-being, transitive and intransitive verbs, and more! If this gives you nightmarish flashbacks to your high school foreign language class, then you will want to skip this one!
There you have it! As a final note, for best results I recommend downloading and using the apps in the order that they are listed in this article. And don’t skip the kana! I promise they are easier to learn than they seem, and it will really enrich your experience on the island to be able to read signs, menus, and posters at even a very basic level.
Do you use any other apps that you would recommend? Please share in the comments!
Missplaced¡Teletransporte!¡TELETRANSPORTE! ¬¬

En Internet encontramos todo tipo de utilidades y servicios que usamos de forma diversa para objetivos diferentes. Sin embargo, hay veces en que te gustaría poder unir dos servicios en uno, o al menos comunicarlos entre sí de alguna forma, para hacerlos más prácticos todavía. Ésa es precisamente la filosofía detrás de IFTTT.

IFTTT, acrónimo de la expresión If This Then That, es una herramienta online que une diferentes aplicaciones y servicios para hacerlos todavía más útiles. Su funcionamiento está resumido en su nombre: if this, then that ("si esto, lo otro"). Es decir, si pasa esto, haz esto otro. Por ejemplo, si hago una foto en Instagram, envía una copia a Dropbox; o si marco un artículo en Feedly para leer más tarde, envíalo a Pocket para que lo lea allí.
IFTTT funciona con estas pequeñas instrucciones, llamadas recetas (recipes), y hay miles de ellas, para todos los gustos, compartidas por todos los usuarios de IFTTT. Si tienes curiosidad por esta práctica herramienta y te animas a usarla, aquí tienes unas cuantas recetas de IFTTT para ir abriendo boca.

Si cambio mi foto de perfil en Facebook, cámbiala también en Twitter.
Si comparto un enlace en Facebook, tuitea ese mismo enlace.
Si actualizo mi estado en Facebook, ponlo también en Twitter.
Si subo una foto a Facebook, envía una copia a Dropbox.
Si me etiquetan en una foto en Facebook, envía una copia de esa foto a Google Drive.
Si me etiquetan en una foto en Facebook, envía una copia de esa foto a Dropbox.
Si guardo una foto en un álbum concreto de mi iPhone, súbela a Facebook.
Si escribo un artículo en mi Tumblr, compártelo como enlace en Facebook.
Si publico algo en mi blog de Wordpress, envíalo a mi página en Facebook.
Si comparto un enlace en Facebook, archívalo en Evernote.

Si recibo un email de nuevo seguidor en Twitter, envía a ese nuevo seguidor un tuit de bienvenida.
Si publico un tuit nuevo, guarda una copia en un Excel de Google Drive.
Si marco como favorito un tuit con un enlace, envía ese enlace a Pocket.
Si publico un tuit con el hashtag #fb, publícalo también en Facebook.
Si publico un tuit nuevo, guarda una copia en Evernote.
Si marco un tuit como favorito, guárdalo en Evernote.
Si publico un nuevo artículo en mi blog de Blogger, comparte el enlace en Twitter.
Si publico un nuevo artículo en mi blog de Wordpress, comparte el enlace en Twitter.
Si subo una foto nueva a Flickr, compártela en Twitter.

Si publico una foto en Instagram, guarda una copia en Dropbox.
Si publico una foto en Instagram, guarda una copia en Evernote.
Si publico una foto en Instagram, guarda una copia en Google Drive.
Si publico una foto en Instagram, guarda una copia en SkyDrive.
Si publico una foto en Instagram, publícala también en mi blog de Wordpress.
Si publico una foto en Instagram, publícala también en mi blog de Blogger.
Si hago un like a una foto en Instagram, guarda una copia de esa foto en Dropbox.

Si hago una foto con mi iPhone, envía una copia de la misma por email.
Si hago una foto con iPhone, envía una copia a Dropbox.
Si añado un nuevo contacto a mi iPhone, cópialo a un Excel en Google Drive.
Si recibo un adjunto en Gmail, envía una copia del fichero a Dropbox.
Si recibo un adjunto en Gmail, envía una copia del fichero a Evernote.

Si etiqueto un email en Gmail como "ToDo", crea un recordatorio en Google Calendar a modo de tarea.
Si marco un email en Gmail con una estrella, envíalo a Pocket.
Si marco un email en Gmail con una estrella, añádelo a una nota con una lista de tareas en Evernote.
Si marco un email en Gmail con una estrella, añade una nueva tarea a Wunderlist.
Ver álbum de fotos | Leer 35 recetas de IFTTT que querrás probar en Chica Geek
| Piled Higher & Deeper by Jorge Cham |
www.phdcomics.com
|
|
 |
||
|
title:
"Post-Doctor Who, Pt. 3" - originally published
10/11/2013
For the latest news in PHD Comics, CLICK HERE! |
||
MissplacedMaldito Think Geek que ya no hace envíos fuera de USA >_
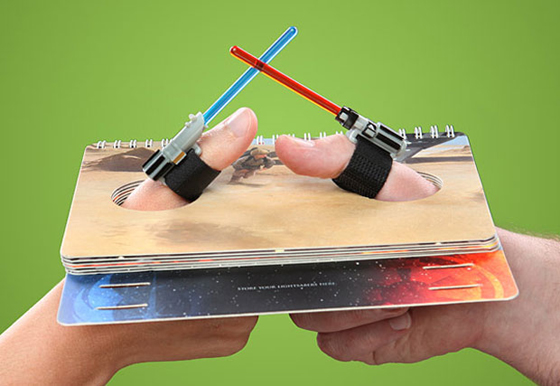
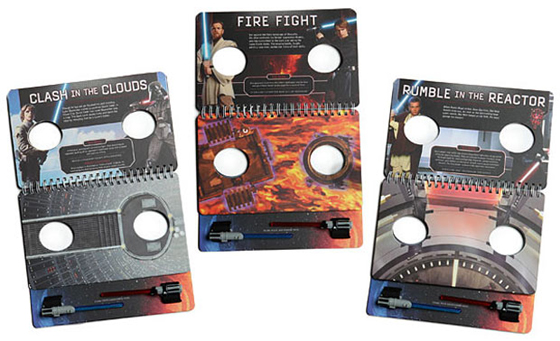
Está claro que el merchandising de Star Wars no tiene límites. Hemos visto por aquí los objetos más extraños, pero siempre acaban apareciendo cosas que nos vuelven a sorprender, porque todavía no se nos había ocurrido que pudieran existir. La última locura basada en la popular saga es nada menos que un set para lucha de pulgares con espadas láser, que además cuenta con diferentes localizaciones para retar a un amigo.
No sé si el juego viene con unas reglas específicas, pero ya me estoy imaginando torneos mundiales de “pulgares láser”. Al tiempo…
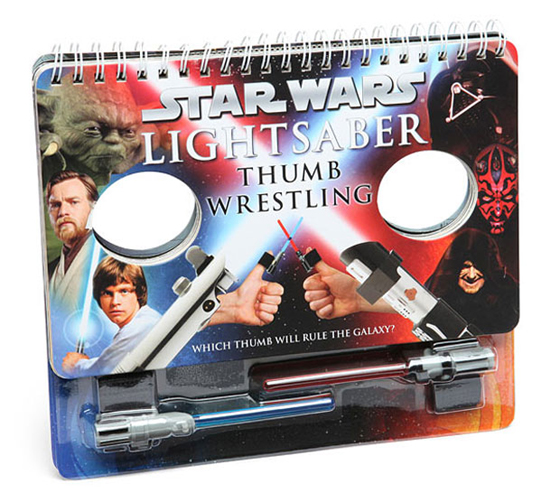
13 dólares cuesta en Think Geek este extraño producto.
Vía: Technabob

Para planificar tu día necesitas dos herramientas básicas: un calendario o agenda y un gestor de tareas. Casi todo el mundo ya utiliza una agenda, pero he encontrado muchas personas que no tienen un buen gestor de listas.
Si ya has encontrado el mejor gestor de tareas, este artículo no es para ti, pero si estás evaluando algunas opciones disponibles, tengo algunos consejos.
Aunque todos necesitamos un gestor de tareas, siempre hay que acordarte que los hábitos productivos son mucho más importante que la herramienta. Lo digo porque si empiezas con una herramienta en lugar de desarrollando tus hábitos, corres el riesgo de adaptar tu forma de trabajar a las opciones ofrecidas por la aplicación elegida.
Es mejor primero crear los hábitos y, una vez que sabes cómo trabajas y qué necesitas, elegir luego la herramienta que se adapta mejor a estos hábitos. De esta forma también evitas tener que aprender cómo funciona la aplicación mientras estás trabajando en tus hábitos.
Una lista de tareas no es una herramienta complicada, pero existen unos criterios mínimos que debe cumplir:
En mi opinión, estas funciones son la base absoluta para cualquier gestor de tareas y creo que todas las herramientas que vas a encontrar las tienen.
Vamos a ver también algunas opciones que no son imprescindibles, pero que pueden facilitarte la vida.
Una aplicación no sólo consiste de sus funciones, también hay otros aspectos para tener en cuenta:
Creo que estos son los puntos más importantes para tener en cuenta. ¿Qué criterios usas para elegir un gestor de tareas? Compártelo en los comentarios.
MissplacedQuesoooooooo


MissplacedIt's so fluffy I'm gonna die!!!
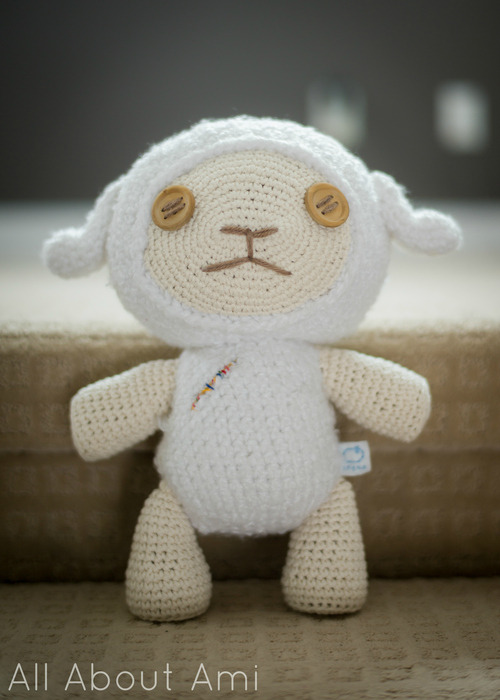
Make your own Cotton the sheep/lamb from "Oblivion Island”, Haruka’s brave, loyal and sweet cherished stuffie!
Materials:
Note: I worked in continuous rounds (vs. joined rounds).
***PLEASE follow along with my step-by-step blog post HERE to better understand this written pattern and to visually see how to connect the parts with all my photos!
***IMPORTANT NOTE: There is technically a “right" and “wrong" side of crochet when working in the round. Read about this in my blog post HERE. When working with the beige yarn, ensure the right side is facing outwards. When working with the white fluffy yarn, ensure the wrong side is facing outwards as this is the fluffier side (read about this HERE).
FACE
Using beige yarn,
Chain 10
R1: Starting from second chain from hook, Sc 8 and 3 sc in next ch. Turn and Sc 8, 3 sc in next ch [we are making an oval by crocheting around the chain]. (22 sts)
R2: Sc 9, 2 sc in next sc, Sc 10, 2 sc in next sc, Sc 1 (24 sts)
R3: *Sc 5, 2 sc in next sc*, rep 4 times. (28 sts)
R4: *Sc 6, 2 sc in next sc*, rep 4 times (32 sts)
R5: *Sc 7, 2 sc in next sc*, rep 4 times (36 sts)
R6: *Sc 3, 2 sc in next sc*, rep 9 times (45 sts)
R7: *Sc 4, 2 sc in next sc*, rep 9 times (54 sts)
R8-9: Sc 54
R10: *Sc 8, 2 sc in next sc*, rep 6 times (60 sts)
R11: Sc 60
R12: *Sc 5, 2 sc in next sc*, rep 10 times (70 sts)
Fasten off.
HEAD
Using white fluffy yarn,
R1: Position beige face so that the ‘right’ side is facing you. Pick up 60 stitches between Rounds 10 and 11 of face working clockwise (this will ensure that the ‘wrong’ side or ‘fluffier’ side of the white yarn will be facing outwards). [Note: when following my step-by-step blog post HERE, I worked in the incorrect direction for the first round, so disregard the photos for this part.] To see the technique of picking up stitches, watch this video here.
R2: Front post single crochet 60. [See how to front post single crochet HERE.]
R3: *Sc 9, 2 sc in next sc*, rep 6 times (66 sts)
R4: *Sc 10, 2 sc in next sc*, rep 6 times (72 sts)
R5-8: Sc 72
R9: *Sc 10, dec 1*, rep 6 times (66 sts)
R10: *Sc 9, dec 1*, rep 6 times (60 sts)
R11: Sc 60
R12: *Sc 8, dec 1*, rep 6 times (54 sts)
R13: *Sc 7, dec 1*, rep 6 times (48 sts)
R14-15: Sc 48
R16: *Sc 6, dec 1*, rep 6 times (42 sts)
R17: Sc 42
Begin stuffing head. Sew on wooden eyes, nose and mouth with brown yarn. Top line of nose/mouth can be embroidered right ontop of initial series of chain stitches of beige face. Optional: Add cardboard piece to muzzle for more definition. Reference picture here.]
R18: *Sc 5, dec 1*, rep 6 times (36 sts)
R19: *Sc 4, dec 1*, rep 6 times (30 sts)
R20: *Sc 3, dec 1*, rep 6 times (24 sts)
R21: *Sc 2, dec 1*, rep 6 times (18 sts)
Finish stuffing head.
R22: *Sc 1, dec 1*, rep 6 times (12 sts)
Fasten off and weave in end. Note: if hole is still large (depending on the yarn you use), do R23: *Dec 1*, rep 6 times (6 sts) and then fasten off.
EARS (make 2)
R1: 7 sc in Magic Ring (7 sts)
R2: 2 sc in each sc around (14 sts)
R3: *Sc 6, 2 sc in next sc*, rep 2 times (16 sts)
R4-7: Sc 16
R8: *Sc 2, dec 1*, rep 4 times (12 sts)
R9: *Sc 4, dec 1*, rep 2 times (10 sts)
R10: *Sc 3, dec 1*, rep 2 times (8 sts)
R11: *Sc 2, dec 1*, rep 2 times (6 sts)
R12: Sc 6
Fasten off and leave long end for sewing. Sew onto head.
BODY
Using white fluffy yarn,
Chain 10
R1: Starting from second chain from hook, Sc 8 and 3 sc in next ch. Turn and Sc 8, 3 sc in next ch [we are making an oval by crocheting around the chain]. (22 sts)
R2: Sc 9, 2 sc in next sc, Sc 10, 2 sc in next sc, Sc 1 (24 sts)
R3: *Sc 2, 2 sc in next sc*, rep 8 times. (32 sts)
R4: *Sc 3, 2 sc in next sc*, rep 8 times (40 sts)
R5-12: Sc 40
R13: *Sc 6, dec 1*, rep 5 times (35 sts)
R14-18: Sc 35
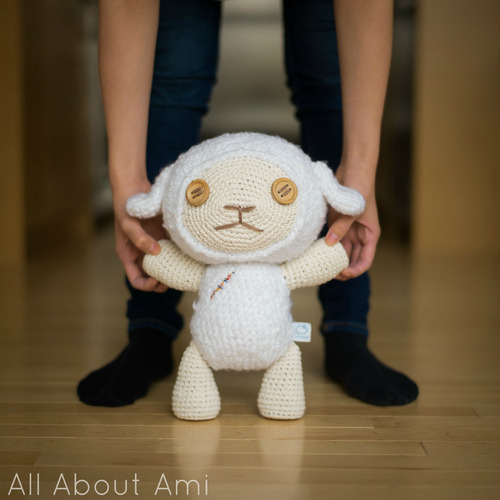
Fasten off and leave long end for sewing. Embroider scar onto body using various colours of embroidery floss. Stuff body and attach to head.
LEGS (make 2)
R1: 6 sc in Magic Ring (6 sts)
R2: 2 sc in each sc around (12 sts)
R3: *Sc 1, 2 sc in next sc*, rep 6 times (18 sts)
R4: *Sc 2, 2 sc in next sc*, rep 6 times (24 sts)
R5: In back loops only, Sc 24.
R6-9: Sc 24
R10: *Sc 2, dec 1*, rep 6 times (18 sts)
R11-14: Sc 18
R15: *Sc 1, dec 1*, rep 3 times. Sc 9. (15 sts)
R16: *Sc 1, dec 1*, rep 2 times. Sc 9. (13 sts)
R17: Sc 1, dec 1, Sc 9 (12 sts)
R18: Sc 1, dec 1, Sc 8 (11 sts)
R19: *Sc 1, dec 1*, rep 3 times. Dec 1. (7 sts)
Fasten off and leave long end for sewing. Stuff and attach to body. Reference picture found in step-by-step blog post HERE. [Optional: Add circular piece of hard paper/cardboard before stuffing to make the bottom of the legs flat.]
ARMS (make 2)
R1: 4 sc in Magic Ring (4 sts)
R2: 2 sc in each sc around (8 sts)
R3: *Sc 1, 2 sc in next sc*, rep 4 times (12 sts)
R4: *Sc 2, 2 sc in next sc*, rep 4 times (16 sts)
R5: *Sc 3, 2 sc in next sc*, rep 4 times (20 sts)
R6: In back loops only, Sc 20.
R7-14: Sc 20
R15: *Sc 1, dec 1*, rep 4 times. Sc 8 (16 sts)
R16-17: Sc 16
Fasten off and leave long end for sewing. Stuff and attach to body. [Optional: Add circular piece of hard paper/cardboard before stuffing to make the bottom of the arms flat.]
TAIL
R1: 7 sc in Magic Ring (7 sts)
R2: 2 sc in each sc around (14 sts)
R3-6: Sc 14
Fasten off and leave long end for sewing. Sew onto body.
TAG
Cut rectangular piece of white felt. Sew middle of rectangle onto body. Fold piece and sew ends together. Embroider logo on tag connecting both sides together.
Now you’ve made your own life-size Cotton, a new fluffy friend who is so soft and perfect for hugs and snuggles!
As always, don’t forget to send me photos of your work as I LOVE to see how your projects turn out! Find me on Facebook, Twitter, and Instagram (@AllAboutAmi) or e-mail me (all_about_ami@hotmail.com) your pics!
Cotton from “Oblivion Island: Haruka and the Magic Mirror” is copyright of Production I.G. This pattern is copyright of Stephanie of All About Ami (April 2013). Please do not claim this pattern as your own. If you wish to share this pattern, you may link to this pattern but please do not reprint it on your site. You may keep a copy for your own personal use but you may not sell or distribute it, or sell items made from this pattern.
Additional note: The very talented Sarah of "Repeat Crafter Me" made this adorable lamb hat and has posted the pattern for free on her blog! We just so happened to use the exact same white fluffy yarn too ("Loops & Threads’ Country Baby Loom”), so you can use up your extra yarn to make this sweet project! You can check it out HERE! Now you can make Cotton AND a matching baby lamb hat :)