Shared posts

03 Sep 19:20

Announcing HTTP/2 support for all customers with Azure CDN from Akamai

by Manling Zhang

We are pleased to announce HTTP/2 is now available for all customers with Azure CDN from Akamai. This feature is on by default, all existing and new Akamai standard profiles (enabling from Azure portal) can benefit from it with no additional cost.

HTTP/2 is designed to improve webpage loading speed and optimize user experience. All major web browsers already support HTTP/2 today. Though this protocol is designed to work with HTTP and HTTPS, most of the browsers only support HTTP/2 over TLS.

Key HTTP/2 benefits include:

  • Multiplexing and concurrency: Allow multiple requests sent on the same TCP connection
  • Header compression: Reduce header size for faster transfer time
  • Stream prioritization and dependencies: Prioritize resources to transfer important data first 
  • Server push (not supported currently): Allow server to "push" responses proactively into client caches

Next steps

We'll work on HTTP2 support for Azure CDN from Verizon in the next few months.

Read also

Is there a feature you'd like to see in Azure CDN? Give us feedback.

31 Aug 13:55

JSON support is generally available in Azure SQL Database

by Jovan Popovic

We are happy to announce that you can now query and store both relational and textual data formatted in JavaScript Object Notation (JSON) using Azure SQL Database. Azure SQL Database provides simple built-in functions that read data from JSON text, transform JSON text into table, and format data from SQL tables as JSON.

You can use JSON functions that enable you to extract value from JSON text (JSON_VALUE), extract object from JSON (JSON_QUERY), update some value in JSON text (JSON_MODIFY), and verify that JSON text is properly formatted (ISJSON). OPENJSON function enables you to convert JSON text into a table structure. Finally, JSON functionalities enable you to easily format results of any SQL query as JSON text using the FOR JSON clause.

What can you do with JSON?

JSON in Azure SQL Database enables you to build and exchange data with modern web, mobile, and HTM5/JavaScript single-page applications, NoSql stores such as Azure DocumentDB that contain data formatted as JSON, and to analyze logs and messages collected from different systems and services. Now you can easily integrate your Azure SQL Database with any service that uses JSON.

Easily expose your data to modern frameworks and services

Do you use services that exchange data in JSON format, such as REST services or Azure App Services? Do you have components or frameworks that use JSON, such as Angular JS, ReactJS, D3, or JQuery? With new JSON functionalities, you can easily format data stored in Azure SQL Database as JSON and expose it to any modern service or application.

Easy ingestion of JSON data

Are you working with mobile devices or sensors, services that produce JSON such as Azure Stream Analytics or Application Insight, or systems that store data in JSON format such as Azure DocumentDB or MongoDB? Do you need to query and analyze JSON data using well-known SQL language or tools that work with Azure SQL Database? Now, you can easily ingest JSON data and store it into Azure SQL Database, and use any language or tool that works with Azure SQL Database to query and analyze loaded information.

Simplify your data models

Do you need to store and query both relational and semi-structured data in your database? Do you need to simplify your data models like in NoSQL data platforms? Now you can combine structured relational data with schema-less data stored as JSON text in the same table. In Azure SQL Database you can use the best approaches both from relational and NoSQL worlds to tune your data model. Azure SQL Database enables you to query both relational and JSON data with the standard Transact-SQL language. Applications and tools would not see any difference between values taken from table columns and the values extracted from JSON text.

Next steps

To learn how to integrate JSON in your application, check out our Getting Started page or Channel 9 video. To learn about various scenarios that show how to integrate JSON in your application, see demos in this Channel 9 video or find some scenario that might be interesting for your use case in these JSON Blog posts.

Stay tuned because we will constantly add new JSON features and make JSON support even better.

31 Aug 07:29

What’s New in C# 7.0

by Mads Torgersen - MSFT

What follows is a description of all the planned language features in C# 7.0. With the release of Visual Studio “15” Preview 4, most of these features are coming alive. Now is a great time to take them for a spin and tell us your thoughts!

C# 7.0 adds a number of new features and brings a focus on data consumption, code simplification and performance. Perhaps the biggest features are tuples, which make it easy to have multiple results, and pattern matching which simplifies code that is conditional on the shape of data. But there are many other features big and small. We hope that they all combine to make your code more efficient and clear, and you more happy and productive.Please use the “send feedback” button at the top of the Visual Studio window to tell us if something is not working as you expect, or if you have thoughts on improvement of the features.There are still a number of things not fully working in Preview 4. In the following I have described the features as they are intended to work when we release the final version, and called out in notes whenever things don’t yet work as planned. I should also call out that plans change – not least as the result of the feedback we get from you! Some of these features may change or disappear by the time the final release comes out.

If you are curious about the design process that led to this feature set, you can find a lot of design notes and other discussion at the Roslyn GitHub site.

Have fun with C# 7.0, and happy hacking!

Out variables

Currently in C#, using out parameters isn’t as fluid as we’d like. Before you can call a method with out parameters you first have to declare variables to pass to it. Since you typically aren’t initializing these variables (they are going to be overwritten by the method after all), you also cannot use var to declare them, but need to specify the full type:

public void PrintCoordinates(Point p)
{
    int x, y; // have to "predeclare"
    p.GetCoordinates(out x, out y);
    WriteLine($"({x}, {y})");
}

In C# 7.0 we are adding out variables; the ability to declare a variable right at the point where it is passed as an out argument:

public void PrintCoordinates(Point p)
{
    p.GetCoordinates(out int x, out int y);
    WriteLine($"({x}, {y})");
}

Note that the variables are in scope in the enclosing block, so the subsequent line can use them. Most kinds of statements do not establish their own scope, so out variables declared in them are usually introduced into the enclosing scope.

Note: In Preview 4, the scope rules are more restrictive: Out variables are scoped to the statement they are declared in. Thus, the above example will not work until a later release.

Since the out variables are declared directly as arguments to out parameters, the compiler can usually tell what their type should be (unless there are conflicting overloads), so it is fine to use var instead of a type to declare them:

p.GetCoordinates(out var x, out var y);

A common use of out parameters is the Try... pattern, where a boolean return value indicates success, and out parameters carry the results obtained:

public void PrintStars(string s)
{
    if (int.TryParse(s, out var i)) { WriteLine(new string('*', i)); }
    else { WriteLine("Cloudy - no stars tonight!"); }
}

Note: Here i is only used within the if-statement that defines it, so Preview 4 handles this fine.

We plan to allow “wildcards” as out parameters as well, in the form of a *, to let you ignore out parameters you don’t care about:

p.GetCoordinates(out int x, out *); // I only care about x

Note: It is still uncertain whether wildcards make it into C# 7.0.

Pattern matching

C# 7.0 introduces the notion of patterns, which, abstractly speaking, are syntactic elements that can test that a value has a certain “shape”, and extract information from the value when it does.

Examples of patterns in C# 7.0 are:

  • Constant patterns of the form c (where c is a constant expression in C#), which test that the input is equal to c
  • Type patterns of the form T x (where T is a type and x is an identifier), which test that the input has type T, and if so, extracts the value of the input into a fresh variable x of type T
  • Var patterns of the form var x (where x is an identifier), which always match, and simply put the value of the input into a fresh variable x with the same type as the input.

This is just the beginning – patterns are a new kind of language element in C#, and we expect to add more of them to C# in the future.

In C# 7.0 we are enhancing two existing language constructs with patterns:

  • is expressions can now have a pattern on the right hand side, instead of just a type
  • case clauses in switch statements can now match on patterns, not just constant values

In future versions of C# we are likely to add more places where patterns can be used.

Is-expressions with patterns

Here is an example of using is expressions with constant patterns and type patterns:

public void PrintStars(object o)
{
    if (o is null) return;     // constant pattern "null"
    if (!(o is int i)) return; // type pattern "int i"
    WriteLine(new string('*', i));
}

As you can see, the pattern variables – the variables introduced by a pattern – are similar to the out variables described earlier, in that they can be declared in the middle of an expression, and can be used within the nearest surrounding scope. Also like out variables, pattern variables are mutable.

Note: And just like out variables, stricter scope rules apply in Preview 4.

Patterns and Try-methods often go well together:

if (o is int i || (o is string s && int.TryParse(s, out i)) { /* use i */ }

Switch statements with patterns

We’re generalizing the switch statement so that:

  • You can switch on any type (not just primitive types)
  • Patterns can be used in case clauses
  • Case clauses can have additional conditions on them

Here’s a simple example:

switch(shape)
{
    case Circle c:
        WriteLine($"circle with radius {c.Radius}");
        break;
    case Rectangle s when (s.Length == s.Height):
        WriteLine($"{s.Length} x {s.Height} square");
        break;
    case Rectangle r:
        WriteLine($"{r.Length} x {r.Height} rectangle");
        break;
    default:
        WriteLine("<unknown shape>");
        break;
    case null:
        throw new ArgumentNullException(nameof(shape));
}

There are several things to note about this newly extended switch statement:

  • The order of case clauses now matters: Just like catch clauses, the case clauses are no longer necessarily disjoint, and the first one that matches gets picked. It’s therefore important that the square case comes before the rectangle case above. Also, just like with catch clauses, the compiler will help you by flagging obvious cases that can never be reached. Before this you couldn’t ever tell the order of evaluation, so this is not a breaking change of behavior.
  • The default clause is always evaluated last: Even though the null case above comes last, it will be checked before the default clause is picked. This is for compatibility with existing switch semantics. However, good practice would usually have you put the default clause at the end.
  • The null clause at the end is not unreachable: This is because type patterns follow the example of the current is expression and do not match null. This ensures that null values aren’t accidentally snapped up by whichever type pattern happens to come first; you have to be more explicit about how to handle them (or leave them for the default clause).

Pattern variables introduced by a case ...: label are in scope only in the corresponding switch section.

Tuples

It is common to want to return more than one value from a method. The options available today are less than optimal:

  • Out parameters: Use is clunky (even with the improvements described above), and they don’t work with async methods.
  • System.Tuple<...> return types: Verbose to use and require an allocation of a tuple object.
  • Custom-built transport type for every method: A lot of code overhead for a type whose purpose is just to temporarily group a few values.
  • Anonymous types returned through a dynamic return type: High performance overhead and no static type checking.

To do better at this, C# 7.0 adds tuple types and tuple literals:

(string, string, string) LookupName(long id) // tuple return type
{
    ... // retrieve first, middle and last from data storage
    return (first, middle, last); // tuple literal
}

The method now effectively returns three strings, wrapped up as elements in a tuple value.

The caller of the method will now receive a tuple, and can access the elements individually:

var names = LookupName(id);
WriteLine($"found {names.Item1} {names.Item3}.");

Item1 etc. are the default names for tuple elements, and can always be used. But they aren’t very descriptive, so you can optionally add better ones:

(string first, string middle, string last) LookupName(long id) // tuple elements have names

Now the recipient of that tuple have more descriptive names to work with:

var names = LookupName(id);
WriteLine($"found {names.first} {names.last}.");

You can also specify element names directly in tuple literals:

    return (first: first, middle: middle, last: last); // named tuple elements in a literal

Generally you can assign tuple types to each other regardless of the names: as long as the individual elements are assignable, tuple types convert freely to other tuple types. There are some restrictions, especially for tuple literals, that warn or error in case of common mistakes, such as accidentally swapping the names of elements.

Note: These restrictions are not yet implemented in Preview 4.

Tuples are value types, and their elements are simply public, mutable fields. They have value equality, meaning that two tuples are equal (and have the same hash code) if all their elements are pairwise equal (and have the same hash code).

This makes tuples useful for many other situations beyond multiple return values. For instance, if you need a dictionary with multiple keys, use a tuple as your key and everything works out right. If you need a list with multiple values at each position, use a tuple, and searching the list etc. will work correctly.

Note: Tuples rely on a set of underlying types, that aren’t included in Preview 4. To make the feature work, you can easily get them via NuGet:

  • Right-click the project in the Solution Explorer and select “Manage NuGet Packages…”
  • Select the “Browse” tab, check “Include prerelease” and select “nuget.org” as the “Package source”
  • Search for “System.ValueTuple” and install it.

Deconstruction

Another way to consume tuples is to deconstruct them. A deconstructing declaration is a syntax for splitting a tuple (or other value) into its parts and assigning those parts individually to fresh variables:

(string first, string middle, string last) = LookupName(id1); // deconstructing declaration
WriteLine($"found {first} {last}.");

In a deconstructing declaration you can use var for the individual variables declared:

(var first, var middle, var last) = LookupName(id1); // var inside

Or even put a single var outside of the parentheses as an abbreviation:

var (first, middle, last) = LookupName(id1); // var outside

You can also deconstruct into existing variables with a deconstructing assignment:

(first, middle, last) = LookupName(id2); // deconstructing assignment

Deconstruction is not just for tuples. Any type can be deconstructed, as long as it has an (instance or extension) deconstructor method of the form:

public void Deconstruct(out T1 x1, ..., out Tn xn) { ... }

The out parameters constitute the values that result from the deconstruction.

(Why does it use out parameters instead of returning a tuple? That is so that you can have multiple overloads for different numbers of values).

class Point
{
    public int X { get; }
    public int Y { get; }

    public Point(int x, int y) { X = x; Y = y; }
    public void Deconstruct(out int x, out int y) { x = X; y = Y; }
}

(var myX, var myY) = GetPoint(); // calls Deconstruct(out myX, out myY);

It will be a common pattern to have constructors and deconstructors be “symmetric” in this way.

As for out variables, we plan to allow “wildcards” in deconstruction, for things that you don’t care about:

(var myX, *) = GetPoint(); // I only care about myX

Note: It is still uncertain whether wildcards make it into C# 7.0.

Local functions

Sometimes a helper function only makes sense inside of a single method that uses it. You can now declare such functions inside other function bodies as a local function:

public int Fibonacci(int x)
{
    if (x < 0) throw new ArgumentException("Less negativity please!", nameof(x));
    return Fib(x).current;

    (int current, int previous) Fib(int i)
    {
        if (i == 0) return (1, 0);
        var (p, pp) = Fib(i - 1);
        return (p + pp, p);
    }
}

Parameters and local variables from the enclosing scope are available inside of a local function, just as they are in lambda expressions.

As an example, methods implemented as iterators commonly need a non-iterator wrapper method for eagerly checking the arguments at the time of the call. (The iterator itself doesn’t start running until MoveNext is called). Local functions are perfect for this scenario:

public IEnumerable<T> Filter<T>(IEnumerable<T> source, Func<T, bool> filter)
{
    if (source == null) throw new ArgumentNullException(nameof(source));
    if (filter == null) throw new ArgumentNullException(nameof(filter));

    return Iterator();

    IEnumerable<T> Iterator()
    {
        foreach (var element in source) 
        {
            if (filter(element)) { yield return element; }
        }
    }
}

If Iterator had been a private method next to Filter, it would have been available for other members to accidentally use directly (without argument checking). Also, it would have needed to take all the same arguments as Filter instead of having them just be in scope.

Note: In Preview 4, local functions must be declared before they are called. This restriction will be loosened, so that they can be called as soon as local variables they read from are definitely assigned.

Literal improvements

C# 7.0 allows _ to occur as a digit separator inside number literals:

var d = 123_456;
var x = 0xAB_CD_EF;

You can put them wherever you want between digits, to improve readability. They have no effect on the value.

Also, C# 7.0 introduces binary literals, so that you can specify bit patterns directly instead of having to know hexadecimal notation by heart.

var b = 0b1010_1011_1100_1101_1110_1111;

Ref returns and locals

Just like you can pass things by reference (with the ref modifier) in C#, you can now return them by reference, and also store them by reference in local variables.

public ref int Find(int number, int[] numbers)
{
    for (int i = 0; i < numbers.Length; i++)
    {
        if (numbers[i] == number) 
        {
            return ref numbers[i]; // return the storage location, not the value
        }
    }
    throw new IndexOutOfRangeException($"{nameof(number)} not found");
}

int[] array = { 1, 15, -39, 0, 7, 14, -12 };
ref int place = ref Find(7, array); // aliases 7's place in the array
place = 9; // replaces 7 with 9 in the array
WriteLine(array[4]); // prints 9

This is useful for passing around placeholders into big data structures. For instance, a game might hold its data in a big preallocated array of structs (to avoid garbage collection pauses). Methods can now return a reference directly to such a struct, through which the caller can read and modify it.

There are some restrictions to ensure that this is safe:

  • You can only return refs that are “safe to return”: Ones that were passed to you, and ones that point into fields in objects.
  • Ref locals are initialized to a certain storage location, and cannot be mutated to point to another.

Generalized async return types

Up until now, async methods in C# must either return void, Task or Task<T>. C# 7.0 allows other types to be defined in such a way that they can be returned from an async method.

For instance we plan to have a ValueTask<T> struct type. It is built to prevent the allocation of a Task<T> object in cases where the result of the async operation is already available at the time of awaiting. For many async scenarios where buffering is involved for example, this can drastically reduce the number of allocations and lead to significant performance gains.

There are many other ways that you can imagine custom “task-like” types being useful. It won’t be straightforward to create them correctly, so we don’t expect most people to roll their own, but it is likely that they will start to show up in frameworks and APIs, and callers can then just return and await them the way they do Tasks today.

Note: Generalized async return types are not yet available in Preview 4.

More expression bodied members

Expression bodied methods, properties etc. are a big hit in C# 6.0, but we didn’t allow them in all kinds of members. C# 7.0 adds accessors, constructors and finalizers to the list of things that can have expression bodies:

class Person
{
    private static ConcurrentDictionary<int, string> names = new ConcurrentDictionary<int, string>();
    private int id = GetId();

    public Person(string name) => names.TryAdd(id, name); // constructors
    ~Person() => names.TryRemove(id, out *);              // destructors
    public string Name
    {
        get => names[id];                                 // getters
        set => names[id] = value;                         // setters
    }
}

Note: These additional kinds of expression-bodied members do not yet work in Preview 4.

This is an example of a feature that was contributed by the community, not the Microsoft C# compiler team. Yay, open source!

Throw expressions

It is easy to throw an exception in the middle of an expression: just call a method that does it for you! But in C# 7.0 we are directly allowing throw as an expression in certain places:

class Person
{
    public string Name { get; }
    public Person(string name) => Name = name ?? throw new ArgumentNullException(name);
    public string GetFirstName()
    {
        var parts = Name.Split(" ");
        return (parts.Length > 0) ? parts[0] : throw new InvalidOperationException("No name!");
    }
    public string GetLastName() => throw new NotImplementedException();
}

Note: Throw expressions do not yet work in Preview 4.

30 Aug 16:41

Cruising

by Phil Haack

Last week my family and I went on a cruise to Alaska with four other families and we didn’t die. Not that we should expect to die on a cruise, but being confined with a bunch of kids on a giant hunk of steel has a way of making one consider one’s mortality.

Cruise ship parking lot

Not only did we not die, but I learned a thing or two. For example, it’s common knowledge that the constant wave like motion of a ship can make one queasy. I learned that I could counteract that effect. Drink just the right amount of alcohol and its effect cancels out the queasiness in a process called phase cancellation. Look it up, it’s SCIENCE.

Glacier

We went on a Holland America cruise to Alaska in part because a family friend is a Senior VP at the cruise line and they convinced us it’d be a good idea. The cruise tends to cater to an older crowd than something like Disney Cruises. Even so, it worked pretty well for us. It meant that the pool was never too crowded.

I used to live in Anchorage, Alaska. This ensured I was ready with the puns for our first port, Juneau.

Me: Where’s our first stop?
Friend: Juneau Alaska.
Me: Yes, I know Alaska. But what city?
Friend: Juneau.
Me: If I knew, I wouldn’t ask.

This was when I wisely ducked away.

But since you like puns, here’s a couple of other Alaska related puns as told by my coworker, Kerry Miller:

Hey pal, Alaska the questions here
I really do appreciate the way Alaska survived the 2008 financial crisis. Their secret? Fairbanks.

Lesson here, puns are awesome.

Juneau

Back to the cruise. Our friend arranged a couple behind the scenes tours. One was below deck where we got to see the galley where all the food is made and the storage facilities. I was particularly excited to tour the room where they stock all the liquor.

The logistics of stocking a ship of two thousand passengers and one thousand crew is mind boggling. They take a very data driven approach tracking every meal ordered so they can predict what supplies they need given the specific trip, time of year, and audience.

One thing we noticed while touring the storage was they stocked expensive premium sticky rice for the crew that was different from the rice they usually served to customers. We noticed this because we’re Asian and good rice is important.

It turns out that the crew is predominantly Filipino and Indonesian and our friend noted that if they tried to cut costs with cheaper rice, they’d face a revolt. They know this because they’ve seen how much of a hit to morale cheaper rice was on other cruise lines. He fought hard to keep the quality rice because it’s important to keep the crew’s morale high. Not just with rice, but also by enlisting and empowering the crew itself to notice when conditions could be better and to do something about it.

Lesson here, foster a culture where people are empowered to find and fix problems rather than always looking to you to fix it and things actually will improve.

And we noticed the impact of high morale. We were really impressed with the quality of service. The crew always seemed genuinely happy and friendly. Perhaps it’s years of practice in the service industry, but I’ve been to nice hotels where everyone is nice, but you get the sense they don’t really care about you. I really got the sense the crew cared.

So the lesson here is to stock the good rice. Happy people do better work in every way.

Alaska Raptor Center

Another port we stopped in was beautiful Sitka. We took a tour of the Alaska Raptor Center where they rehabilitate injured raptors such as eagles and owls and release them into the wild when they’re strong enough fliers to be on their own.

Our second tour was of the bridge where the Dutch captain showed us the navigation systems and the controller for the ship. The view from the bridge was quite spectacular. We asked the captain whether he’d been on any trips where anyone fell overboard. No, but there was one trip where a very drunk passenger dropped anchor while they were out to sea. At the next port, the passenger tried to sneak off but they had the authorities waiting and they had camera footage of the incident.

Lesson here, phase cancellation only works when the wavelengths are equivalent amplitude. In other words, don’t overdo the drinking.

The ship had a place for kids called “Club Hal” where you could drop kids off for a few hours at a time and go enjoy some Pina Coladas (to help with motion sickness of course). They had a lot of structured activities and a few X-boxes set up. Naturally, since this was convenient for us, my kids hated it. Over time, they warmed up to it a little as the kids at Club Hal held a revolt and demanded more kids choice activities and got their way.

Lesson here, it’s important to balance a bit of structure with letting kids choose what they want to do.

Now I’m back home and back to work and after a few days, the ground has stopped moving, so all in all, a successful trip. We didn’t have internet access for most of the time and I think that was a huge factor in me feeling refreshed by the end. I definitely recommend when you take vacation, fully disconnect from work and even the internet. It’ll do you a lot of good and the tire fire on Twitter will still be there when you get back.

Lesson here, take a vacation now and then, eh?

25 Aug 08:55

Mesmerizing Motels of the Atomic Age (20 photos)

Mark Havens spent his childhood exploring the Jersey Shore's kitschy jewel: Wildwood. Once home to the country's largest concentration of midcentury hotel architecture, the barrier island's distinctive plastic-palm facade has given way to modern condominium development. “As motel after motel was demolished, I gradually began to realize that some part of myself was being destroyed as well,” Havens said. He started photographing the tourist destination nearly 10 years ago, capturing the kidney-shaped pools, the looping neon signs, and the barrage of faded colors before they were gone. The images have been collected for his book, Out of Season,  published this month.

The pool deck of the Blue Marlin Motel, built in 1962, pictured in 2005 (Mark Havens)
12 Aug 18:55

There’s a new Rogue One: A Star Wars Story trailer, and it’s awesome

by Jonathan M. Gitlin

(credit: Disney)

Are you getting excited about December? We are—and not because of the presents. Disney just dropped the official trailer for Rogue One: A Star Wars Story, which hits theaters December 16th. The film is the studio's first foray outside the adventures of the characters we've grown up with, taking place shortly before the events depicted in Episode IV. The Empire is completing work on the Death Star, and the Rebellion needs to find its weakness; it recruits Jyn Erso (played by Felicity Jones) to do so.

This isn't our first look at Rogue One. Disney released a trailer early in April replete with visuals of AT-ATs storming tropical beaches set to a melancholy piano riff of John Williams' "Force theme" punctuated by a wailing siren riff guaranteed to light up anyone's secondary somatosensory cortex. But this new trailer takes a slightly different tone, perhaps the result of studio displeasure which led to several weeks of reshoots earlier this summer.

It does give us a better look at several characters, though. There's Chirrut Imwe (played by Donnie Yen), a blind warrior living on Jedha—a planet that's the source of those little crystals that make lightsabers work. And Cassian Andor (Diego Luna), a captain in the Rebellion working with Erso to steal the plans to the Death Star, accompanied by a laconic droid, K2SO (Alan Tudyk). Oh, and we also get another peek at Saw Gerrera (Forest Whitaker) looking a lot like a pirate in power armor.

Read 1 remaining paragraphs | Comments

10 Aug 06:24

Two tools for quick and easy web application load testing during development

by Scott Hanselman

I was on the ASP.NET Community Standup this morning and Jon mentioned a new tool for load testing called "Netling." This got me to thinking about simple lightweight load testing in general. I've used large enterprise systems like SilkTest  as well as the cloud based load testing tools like those in Azure and Visual Studio. I've also used command-line tools like WCAT, an old but very competent load testing tool.

I thought I'd take a moment and look at two tools run locally. The goal is to see how easily I can do quick load tests and iterate on the results.

Netling

Netling is by Tore Lervik and is a nice little load tester client for easy and quick web testing. It's open source and on GitHub which is always nice. It's fun to read other people's code.

Netling includes both a WPF and Console client and is cleanly factored with a Core project that does all the work. With the WPF version you do test and then optionally mark that test as a baseline. Then you can make small changes as you like and do a quick retest. You'll get red (bad) or green (good) results if things get better. This should probably be adjusted to ensure it is visible for those with red-green color blindness. Regardless, it's a nice clean UI and definitely something you'll want to throw into your utilities folder and call upon often!

Do remember that it's not really nice to do load testing on web servers that you don't own, so be kind.

Note that for now there are no formal "releases" so you'll need to clone the repo and build the app. Fortunately it builds very cleanly with the free version of Visual Studio Community 2015.

Netling is a nice load tester for Windows

The Netling console client is also notable for its cool ASCII charts.

D:\github\Netling\Netling.ConsoleClient\bin\x64\Debug [master ≡]> .\netling.exe http://www.microsoft.com -t 8 -d 20


Running 20s test @ http://www.microsoft.com/
Threads: 8
Pipelining: 1
Thread afinity: OFF

1544 requests in 20.1s
Requests/sec: 77
Bandwidth: 3 mbit
Errors: 0
Latency
Median: 99.876 ms
StdDev: 10.283 ms
Min: 84.998 ms
Max: 330.254 ms


██
███
████████████████████ █ █ █
84.998 ms =========================================================== 330.254 ms

D:\github\Netling\Netling.ConsoleClient\bin\x64\Debug [master ≡]>

I'm sure that Tore would appreciate the help so head over to https://github.com/hallatore/Netling and file some issues but more importantly, perhaps chat with him and offer a pull request?

WebSurge

WebSurge is a more fully featured tool created by Rick Strahl. Rick is known in .NET spaces for his excellent blog. WebSurge is a quick free download for personal use but you should register it and talk to Rick if you plan on using it commercially or a lot as an individual.

WebSurge also speaks the language of the Fiddler Web Debugging Proxy so you can record and playback web traffic and generate somewhat sophisticated load testing scenarios. The session files are just test files that you can put in source control and share with other members of your team.

image

I realize there's LOT of choices out there.  These are just two really quick and easy tools that you can use as a developer to easily create HTTP requests and then play back at will and iterate during the development process.

What do YOU use for load testing and iterating on performance during development? Let us all know in the comments.


Sponsor: Big thanks to Redgate for sponsoring the feed this week. Could you deploy 1,000 databases? Imagine working in a 70-strong IT team, with 91 applications and 1,000+ databases. Now imagine deployment time. It’s not fiction, it’s fact. Read FlexiGroup's story.


© 2016 Scott Hanselman. All rights reserved.
     
09 Aug 04:44

Add Swagger to ASP.NET Core Web API

by Talking Dotnet

Swagger is a simple yet powerful representation of your RESTful API. Once integrated with WEB API, it becomes easy to test the API without using any third-party tool. In this post, we will see how to add Swagger to ASP.NET Core Web API.

Add Swagger to ASP.NET Core Web API

Let’s create an ASP.NET Core Web API project. The default Web API template comes with a controller named “Values” with some GET, POST, PUT and DELETE method. Once the WEB API project is created, just run the app. You will see the following. There is no UI. There isn’t a list of all API methods and any other detail about them.

ASP.NET Core Web API without Swagger
Here, Swagger can be great help. To configure Swagger, we need to add the required nuget package for it. So open project.json and add the following line under dependencies section and save it. Visual studio will restore the package.

dependencies": {
    "Microsoft.NETCore.App": {
      "version": "1.0.0",
      "type": "platform"
    },
    "Swashbuckle": "6.0.0-beta901"
  },

Now open Startup.cs file to add swagger service to middleware.

public void ConfigureServices(IServiceCollection services)
{
    // Add framework services.
    services.AddApplicationInsightsTelemetry(Configuration);
    services.AddMvc();
    services.AddSwaggerGen();
}

And also add the highlighted lines code in Configure method.

public void Configure(IApplicationBuilder app, IHostingEnvironment env, ILoggerFactory loggerFactory)
{
    loggerFactory.AddConsole(Configuration.GetSection("Logging"));
    loggerFactory.AddDebug();

    app.UseApplicationInsightsRequestTelemetry();
    app.UseApplicationInsightsExceptionTelemetry();

    app.UseMvc();
    app.UseSwagger();
    app.UseSwaggerUi();
}

Now run the app and guess what still no swagger UI . Well to see swagger UI, append /swagger/ui to the Web API URL. For example, if you are running on localhost, then URL should be,
http://localhost:61820/swagger/ui/

Set Swagger URL as launch URL

But every time, appending /swagger/ui to URL is pain. This can be fixed and swagger URL can be set as application’s launch URL. To set it, right-click on Project -> select properties -> navigate to debug tab. On debug tab, change Launch URL value to “swagger/ui”.

Setting Swagger URL as Launch URL

When you run the app with Swagger URL, you should see following.

ASP.NET Core Web API with Swagger
Here you can see Values controller with all the API methods along with HTTP verb settings. And different colors are used for different verbs to easily identify actions. Clicking on any method will give you details about accepted parameters, return type and allows you to test the method.

We achieved this with minimal configuration and without any customization. Swagger can be customized to include your own API description, show method’s XML comments, show enum values as string and many more. Let’s do some customization.

Add API Description

To add your own description, add the following highlight code to ConfigureServices method of Startup.cs. You can add version number, title, description, author details and any terms to use the API.

public void ConfigureServices(IServiceCollection services)
{
    // Add framework services.
    services.AddApplicationInsightsTelemetry(Configuration);
    services.AddMvc();
    services.AddSwaggerGen();
    services.ConfigureSwaggerGen(options =>
    {
        options.SingleApiVersion(new Info
        {
            Version = "v1",
            Title = "My API",
            Description = "My First ASP.NET Core Web API",
            TermsOfService = "None",
            Contact = new Contact() { Name = "Talking Dotnet", Email = "contact@talkingdotnet.com", Url = "www.talkingdotnet.com" }
        });
    });
}

Run the app and you should see the description on top as highlighted in below image.

WebAPI with customized swagger description

Add action’s XML Comments

By default, swagger does not use XML comments which we put on top of actions. But there is an option to display them with Swagger UI. First, we need to enable a setting in our project so that when the project is built, all the XML comments get saved in a XML file and then swagger can use it to display the comments.

To enable it, right-click on project -> select properties option then on Build tab. And on build tab check “XML documentation file” option.

Enable XML documentation for Swagger
By enabling this option, all xml comments of your project are saved in a XML file with the name [your assembly].xml. And this file is saved in bin\[Debug/Release]\newcoreapp1.0 folder. We need to supply location of this file to Swashbuckle’s IncludeXMLComments method.

Add a method in Startup.cs to get the path of generated XML. This code to get XML path will work in your local environment as well as in production environment.

private string GetXmlCommentsPath()
{
    var app = PlatformServices.Default.Application;
    return System.IO.Path.Combine(app.ApplicationBasePath, "WebAPIWithSwagger.xml");
}

And now add code to include XML comments in ConfigureService method.

public void ConfigureServices(IServiceCollection services)
{
    // Add framework services.
    services.AddApplicationInsightsTelemetry(Configuration);
    var xmlPath = GetXmlCommentsPath();
    services.AddMvc();
    services.AddSwaggerGen();
    services.ConfigureSwaggerGen(options =>
    {
        options.SingleApiVersion(new Info
        {
            Version = "v1",
            Title = "My API",
            Description = "My First ASP.NET Core Web API",
            TermsOfService = "None",
            Contact = new Contact() { Name = "Talking Dotnet", Email = "contact@talkingdotnet.com", Url = "www.talkingdotnet.com" }
        });
        options.IncludeXmlComments(xmlPath);
    });
}

Now let’s add some XML comments to our actions. I added XML comments to all the actions. Here is XML comment written for Delete method.

// DELETE api/values/5
/// <summary>
/// Delete API Value
/// </summary>
/// <remarks>This API will delete the values.</remarks>
/// <param name="id"></param>
[HttpDelete("{id}")]
public void Delete(int id)
{
}

Now run the app, you should see XML comments.

Swagger showing XML comments

It’s good to see that XML comments converted into beautiful documentation. Isn’t it?

Showing Enum values as string

Another customization, we can make it to display enum values as strings. By default, it will be displayed as numbers. Let’s add an enum and modify Get method to accept enum type parameter.

public enum eValueType
{
    Number,
    Text
}

And updated Get method is,

// GET api/values/5
/// <summary>
/// Get API values by ID
/// </summary>
/// <param name="id"></param>
/// <param name="type">Type of Value</param>
/// <returns></returns>
[HttpGet("{id}")]
public string Get(int id, eValueType type)
{
	return "value";
}

Run the app and see the swagger UI for this method. The enum values are displayed in the dropdown as numbers. Based on number, it’s difficult to identify the string value for enum.

Swagger Without DescribeAllEnumsAsStrings
Swashbuckles has method DescribeAllEnumsAsStrings() which needs to be added to code to display enum values as string.

services.ConfigureSwaggerGen(options =>
{
    options.SingleApiVersion(new Info
    {
        Version = "v1",
        Title = "My API",
        Description = "My First Core Web API",
        TermsOfService = "None",
        Contact = new Contact() { Name = "Talking Dotnet", Email = "contact@talkingdotnet.com", Url = "www.talkingdotnet.com" }
    });
    options.IncludeXmlComments(xmlPath);
    options.DescribeAllEnumsAsStrings();
});

And now run the app. You should see actual enum string values in drop down instead of numbers. Quite useful.

Swagger With DescribeAllEnumsAsStrings

There is also a method named DescribeStringEnumsInCamelCase to covert enum string values in camel case.

Summary

Swagger is really useful. It provides an UI to your WEB API which helps in testing the API’s easily. And integrating this with ASP.NET Core WEB API is also quite simple and straight forward.

Thank you for reading. Keep visiting this blog and share this in your network. Please put your thoughts and feedback in comments section.

The post Add Swagger to ASP.NET Core Web API appeared first on Talking Dotnet.

06 Aug 09:33

Collecting Windows 10 "Anniversary Edition" Keyboard Shortcuts

by Scott Hanselman

The new Windows 10 Calendar widget is lovelyI'm a big fan of keyboard shortcuts.

There's a fantastic list of Windows 10 shortcuts *inside* the Windows 10 Insiders "Feedback Hub" app. The in-app direct link (not a web link) is here but I think the list is too useful not to share so I don't think they will mind if I replicate the content here on the web.

There is also a nice support page that includes a near-complete list of Keyboard Shortcuts for Windows 7, 8.1 and 10.

"We asked our engineers on the team to share some of their favorite (and lesser-known) keyboard shortcuts for Windows 10. Here is the list!"

Note: [NEW] denotes a new keyboard shortcut introduced in the the Windows 10 Anniversary Update.

Quick access to basic system functions:

  • Ctrl + Shift + Esc: Opens Task Manager.
  • WIN + F: Opens the Feedback Hub with a screenshot attached to your feedback. 
  • WIN + I: Opens the Settings app. 
  • WIN + L: Will lock your PC. 
  • WIN + X: Opens a context menu of useful advanced features.
  • WIN + X and A: Opens Command Prompt with administrative rights. 
  • WIN + X and P: Opens Control Panel. 
  • WIN + X and M: Opens Device Manager.
  • WIN + X and U then S: Puts your PC to sleep. 
    • Scott: Or just push the power button on most laptops or close the lid
  • WIN + Down: Minimizes an app. 
  • WIN + Up: Maximizes an app. 

Capturing what’s on your screen:

  • Alt + PrtScrn: Takes a screenshot of open window and copies to your clipboard. 
  • WIN + PrtScrn: Takes a screenshot of your entire desktop and saves it into a Screenshots folder under Photos in your user profile. 
  • WIN + Alt + R: Start/stop recording your apps & games. 

Mastering File Explorer:

  • Alt + D in File Explorer or browser: Puts you in the address bar. 
  • F2 on a file: Renames the file. 
  • Shift + Right-click in File Explorer: Will give you option to launch Command Prompt with whatever folder you are in as the starting path. 
  • Shift + Right-click on a file: “Copy as path” is added to the context menu.
    • Scott: These two are gold. Copy as path has been around for years and is super useful.

For the taskbar:

  • WIN + <number>: Opens whatever icon (app) is in that position on the taskbar. 
  • [NEW] WIN + Alt + D: Opens date and time flyout on the taskbar.  
    • Scott: I love the new calendar stuff in Windows 10. You just click the clock in the corner and you get not only clock and calendar but also your agenda for the day from your calendar. I think Windows 10 should include more stuff like this going forward - integrating your mail, calendar, plan, trips, commutes, directly in the OS and not just in Apps. That's one of the reasons I like Live Tiles. I like to see information without launching formal apps.  I like widgets on iOS and Android.
  • WIN + S: Search for apps and files. Just type the app name (partially) or executable name (if you know it) and press Enter. Or Ctrl + Shift+ Enter if you need this elevated.
  • WIN + Shift + <number>: Opens a new window of whatever icon (app) is in that position on the taskbar (as will Shift + Click on the icon). 
  • WIN + Shift + Ctrl + <number>: Opens a new window of whatever icon (app) is in that position on the taskbar with administrative rights. 

Remote Desktop and Virtual Desktop:

  • CTRL + ALT + Left Arrow: VM change keyboard focus back to host.   
  • CTRL + ALT + HOME: Remote Desktop change keyboard focus back to host.

For example, in a VM, CTRL + ALT + Left Arrow then ALT + TAB lets you get focus back and switch to an app on your dev machine besides the VM.

Cortana:

  • [NEW] WIN + Shift + C: Opens Cortana to listen to an inquiry. 

Other neat keyboard shortcuts:

  • Alt + X in WordPad: Using on a selected character or word in WordPad will show/hides the Unicode.
  • Alt + Y on a UAC prompt: Automatically chooses yes and dismisses the prompt. 
  • Ctrl + mouse scroll-wheel: Scrolling will zoom and un-zoom many things across the OS. Middle clicking on the mouse scroll-wheel will dismiss tabs, open windows in taskbar, and notifications from the Action Center (new). 
  • Shift + F10: Will open the context menu for whatever is in focus. 

Here are some useful keyboard shortcuts on Surface devices: 

  • Fn + Left arrow: Home
  • Fn + Right arrow: End
  • Fn + Up arrow: Page Up
  • Fn + Down arrow: Page Down
  • Fn + Del: Increases screen brightness.
  • Fn + Backspace: Decreases screen brightness.
  • Fn + Spacebar: Takes a screenshot of the entire screen or screens and puts it into your clipboard. 
  • Fn + Alt + Spacebar: Takes a screenshot of an active window and puts it into your clipboard.

What are YOUR favorite keyboard shortcuts for Windows?


Sponsor: I want to thank Stackify for sponsoring the blog this week, and what's more for gifting the world with Prefix. It's a must have .NET profiler for your dev toolbox. Do yourselves a favor and download it now—free!


© 2016 Scott Hanselman. All rights reserved.
     
06 Aug 06:40

Pourquoi les baleines à bosse sauvent-elles des phoques ? Mystère...

by webmaster@futura-sciences.com (Futura-Sciences)
Les baleines à bosse protègent leurs petits des attaques des orques, mais elles interviennent aussi pour sauver des phoques et d’autres cétacés. Les chercheurs qui ont étudié ce phénomène sur 115 cas rapportent même celui d’une baleine qui vint au secours d’un poisson. Pourquoi font-elles cela ?...
01 Aug 05:56

There are limits to 2FA and it can be near-crippling to your digital life

by Ars Staff

A video demonstration of the vulnerability here, using a temporary password. (credit: Kapil Haresh)

This piece first appeared on Medium and is republished here with the permission of the author. It reveals a limitation in the way Apple approaches two-factor authentication, or "2FA," which is most likely a deliberate decision. Apple engineers probably recognize that someone who loses their phone won’t be able to wipe data if 2FA is enforced, and this story is a good reminder of the pitfalls.

As a graduate student studying cryptography, security and privacy (CrySP), software engineering and human-computer interaction, I've learned a thing or two about security. Yet a couple of days back, I watched my entire digital life get violated and nearly wiped off the face of the Earth. That sounds like a bit of an exaggeration, but honestly it pretty much felt like that.

Here’s the timeline of a cyber-attack I recently faced on Sunday, July 24, 2016 (all times are in Eastern Standard):

That’s a pretty incidence matrix

That’s a pretty incidence matrix (credit: Kapil Haresh)

3:36pm—I was scribbling out an incidence matrix for a perfect hash family table on the whiteboard, explaining how the incidence matrix should be built to my friends. Ironically, this was a cryptography assignment for multicast encryption. Everything seemed fine until a rather odd sound started playing on my iPhone. I was pretty sure it was on silent, but I was quite surprised to see that it said “Find My iPhone Alert” on the lock screen. That was odd.

Read 20 remaining paragraphs | Comments

31 Jul 07:31

Exploring a minimal WebAPI with .NET Core and NancyFX

by Scott Hanselman

WOCinTechChat photo used under CCIn my last blog post I was exploring a minimal WebAPI with ASP.NET Core. In this one I wanted to look at how NancyFX does it. Nancy is an open source framework that takes some inspiration from Ruby's "Sinatra" framework (get it? Nancy Sinatra) and it's a great alternative to ASP.NET. It is an opinionated framework - and that's good thing. Nancy promotes what they call the "super-duper-happy-path." That means things should just work, they should be easy to customize, your code should be simple and Nancy itself shouldn't get in your way.

As I said, Nancy is open source and hosted on GitHub, so the code is here https://github.com/NancyFx/Nancy. They're working on a .NET Core version right now that is Nancy 2.0, but Nancy 1.x has worked great - and continues to - on .NET 4.6 on Windows. It's important to note that Nancy 1.4.3 is NOT beta and it IS in production.

As of a few weeks ago there was a Beta of Nancy 2.0 on NuGet so I figured I'd do a little Hello Worlding and a Web API with Nancy on .NET Core. You should explore their samples in depth as they are not just more likely to be correct than my blog, they are just MORE.

I wanted to host Nancy with the ASP.NET Core "Kestrel" web server. The project.json is simple, asking for just Kestrel, Nancy, and the Owin adapter for ASP.NET Core.

{
  "version": "1.0.0-*",
  "buildOptions": {
    "debugType": "portable",
    "emitEntryPoint": true
  },
  "dependencies": {
    "Microsoft.NETCore.App": {
      "version": "1.0.0",
      "type": "platform"
    },
    "Microsoft.AspNetCore.Server.Kestrel": "1.0.0",
    "Microsoft.AspNetCore.Owin": "1.0.0",
    "Nancy": "2.0.0-barneyrubble"
  },
  "commands": {
    "web": "Microsoft.AspNet.Server.Kestrel"
  },
  "frameworks": {
    "netcoreapp1.0": {}
  }
}

And the Main is standard ASP.NET Core preparation. setting up the WebHost and running it with Kestrel:

using System.IO;

using Microsoft.AspNetCore.Builder;
using Microsoft.AspNetCore.Hosting;

namespace NancyApplication
{
public class Program
{
public static void Main(string[] args)
{
var host = new WebHostBuilder()
.UseContentRoot(Directory.GetCurrentDirectory())
.UseKestrel()
.UseStartup<Startup>()
.Build();

host.Run();
}
}
}

Startup tells ASP.NET Core via Owin that Nancy is in charge (and sure, didn't need to be its own file or it could have been in UseStartup in Main as a lambda)

using Microsoft.AspNetCore.Builder;
using Nancy.Owin;
namespace NancyApplication
{
   public class Startup
    {
        public void Configure(IApplicationBuilder app)
        {
            app.UseOwin(x => x.UseNancy());
        }
   }
}

Here's where the fun stuff happens. Check out a simple Nancy Module.

using Nancy;
namespace NancyApplication
{
        public class HomeModule : NancyModule
    {
        public HomeModule()
        {
            Get("/", args => "Hello World, it's Nancy on .NET Core");
        }
    }
}

Then it's just "dotnet restore" and "dotnet run" and I'm in business. But let's do a little more. This little bit was largely stolen from Nancy's excellent samples repository. Here we've got another route that will respond to a GET to /test/Scott, then make and return a new Person() object. Since I'm going to pass in the Accept: application/json header I'll get JSON back.

using Nancy;
 
namespace NancyApplication
{
    public class HomeModule : NancyModule
    {
        public HomeModule()
        {
            Get("/", args => "Hello from Nancy running on CoreCLR");
            Get("/test/{name}", args => new Person() { Name = args.name });
        }
    }
    public class Person
    {
        public string Name { get; set; }
    }
}

I'm using the Postman application to test this little Web API and you can see the JSON response below:

Postman shows a JSON object coming back from a GET request to a Web API

Nancy is a very complete and sophisticated framework with a LOT of great code to explore. It's extremely modular and flexible. It works with ASP.NET, with WCF, on Azure, with Owin, alongside Umbraco, with Mono, and so much more. I'm looking forward to exploring their .NET Core version as it continues development.

Finally, if you're a new open source contributor or are considering being a First Timer and help out an open source project, you might find the idea of getting involved with such a sophisticated project intimidating. Nancy participates in UpForGrabs and has some issues that are marked as "up for grabs" that could be a good starter point where you could help out a deserving project AND get involved in open source.

* WoCTechChat photo used under CC


Sponsor: Thanks to Aspose for sponsoring the feed this week! Aspose makes programming APIs for working with files, like: DOC, XLS, PPT, PDF and countless more.  Developers can use their products to create, convert, modify, or manage files in almost any way. Aspose is a good company and they offer solid products. Check them out, and download a free evaluation!


© 2016 Scott Hanselman. All rights reserved.
     
28 Jul 14:01

Dark Patterns are designed to trick you (and they’re all over the Web)

by Ars Staff

Allow Harry Brignull to explain.

It happens to the best of us. After looking closely at a bank statement or cable bill, suddenly a small, unrecognizable charge appears. Fine print sleuthing soon provides the answer—somehow, you accidentally signed up for a service. Whether it was an unnoticed pre-marked checkbox or an offhanded verbal agreement at the end of a long phone call, now a charge arrives each month because naturally the promotion has ended. If the possibility of a refund exists, it’ll be found at the end of 45 minutes of holding music or a week’s worth of angry e-mails.

Everyone has been there. So in 2010, London-based UX designer Harry Brignull decided he’d document it. Brignull’s website, darkpatterns.org, offers plenty of examples of deliberately confusing or deceptive user interfaces. These dark patterns trick unsuspecting users into a gamut of actions: setting up recurring payments, purchasing items surreptitiously added to a shopping cart, or spamming all contacts through prechecked forms on Facebook games.

Dark patterns aren’t limited to the Web, either. The Columbia House mail-order music club of the '80s and '90s famously charged users exorbitant rates for music they didn’t choose if they forgot to specify what they wanted. In fact, negative-option billing began as early as 1927, when a book club decided to bill members in advance and ship a book to anyone who didn’t specifically decline. Another common offline example? Some credit card statements boast a 0 percent balance transfer but don’t make it clear that the percentage will shoot up to a ridiculously high number unless a reader navigates a long agreement in tiny print.

Read 31 remaining paragraphs | Comments

27 Jul 05:38

Application Insights: Work item integration with GitHub

by Mike Gresley

Just over a month ago, I announced a new feature set for Application Insights: work item integration with Visual Studio Team Services. Today, I have more good news for those trying to integrate their analytics into their workflow. We just finished work on a similar experience for GitHub. In a matter of minutes, you can configure your Application Insights resource to write issues containing valuable Application Insights data directly to your GitHub project.

Configuring work item integration

Configuring the integration for an Application Insights resource with GitHub works very similarly to the procedure used for VSTS. Simply navigate to your settings blade for that resource. You’ll note an item in the “Configure” section of the settings blade that says “Work Items.”

Click on this, and the configuration blade for work items will open. Note that the “Tracking System” drop-down at the top of the configuration blade is now active and has two choices, one of which is GitHub.

image

Choose GitHub. Then all you need to do is fill out the URL that maps to the GitHub project you want to connect.

image

Once that information is in place, you can click on the Authorize button, where you will be redirected to authorize access in your selected GitHub project so work items (issues) can be written there.

image

Note: If you are not already logged in to GitHub, you will also be prompted to do so at this time.

Once you’ve completed the authorization process, click OK. You’ll see a message stating “Validation Successful” and the blade will close. You’re now ready to start creating issues in GitHub!

Creating work items

Creating work items from Application Insights is very easy. There are currently two locations from where you can create work items: Proactive detection and individual instances of activity (i.e., exceptions, failures, requests, etc.). I will show you a simple example of the latter, but the functionality is identical in either case.

In this example, I’m looking at a test web app I published to Azure. I started to drill into the activity for this app by looking at the Failures blade (but we could also get to this same information through the Search button or the Metrics Explorer).

image

We can see I have a number of exceptions that fired on this web app. If I drill into this group of exceptions, I can see the list and choose an individual exception.

image

Looking at the detail blade for this exception, we see there are now two buttons available at the top of the blade that read “New Work Item” and “View Work Items.” To create a work item, I simply click on the first of these buttons and it opens the new work item blade.

image

As you can see, just about everything you need in your average scenario has been filled out for you. All of the detailed information we have available for this exception has been added to the details field. You can override the title if you wish, or you can add to the captured details. When you’re ready to create your work item, just clicked on the “OK” button and your issue will be written to GitHub.

Viewing work items

Once you’ve created one or more work items in Application Insights, you can easily view them in GitHub. If you are in the Azure portal, the detail blade for the event associated to the work item(s) will have the “View Work Items” button enabled. To see the list, simply click the button.

image

If you click the link for the work item that you want to view, it will open in GitHub:

image

Note that the issue has a link at the bottom that will allow users viewing the issue in GitHub to navigate back to the Azure portal and Application Insights.

That’s all there is to it! As you can see, this functionality is very easy to set up, and creating issues from Application Insights is a snap.

As I detailed in my previous post about VSTS work item integration, we have a lot of future plans for improving this functionality. Completing the integration with GitHub was part of our “support for other ALM systems” goal, and we’ve also delivered on our goal of “links back to Application Insights” (this capability has also been added to the VSTS work items created from Application Insights).

This is another great milestone for this feature set, but we still have a lot of goals ahead of us, like the ability to set up multiple profiles, automatically create work items based upon events, and adding other source points for creating the work items (e.g., alerts). We will continue to improve and evolve work item integration to allow for more flexibility and more seamless integration into your everyday workflow.

As always, please share your ideas for new or improved features on the Application Insights UserVoice page. For any questions visit the Application Insights Forum.

26 Jul 09:33

Serverless Architectures

One of the latest architectural styles to appear on the internet is that of Serverless Architectures, which allow teams to get rid of the traditional server engine that sits behind their web and mobile applications. Mike Roberts has been working with teams that have using this approach and has started writing an evolving article to explain this style and how to use it. He begins with describing what "serverless" means - with a couple of examples of how more usual designs become serverless.

more…

26 Jul 06:46

A Peek into F# 4.1

by Visual FSharp Team [MSFT]

Later this year, we’re going to ship a new version of Microsoft’s tools for F#. This will include support for F# 4.1, featuring important incremental improvements to the language that have been developed in conjunction with F# users and contributors. Our tools will also include a cross-platform, open-source F# 4.1 compiler toolchain for .NET Framework and .NET Core, suitable for use on Linux, macOS/OS X, and Windows. We are also updating the Visual F# IDE Tools for use with the next version of Visual Studio.

The Visual F# Tools for F# 4.1 will be updated to include support for editing and compiling .NET Core and .NET Framework projects. The Visual F# Tools will also include incremental fixes and integration with the new Visual Studio installation process. Additionally, we are currently working towards support for Roslyn Workspaces in the Visual F# Tools. By using Roslyn Workspaces, the Visual F# Tools will “plug in” to tooling innovations made in Visual Studio and be able to offer a more modern editing experience.

In this blog post, we explore what we plan to ship in more detail. For followers of our primary GitHub repository these specifics will already be familiar, however we thought it useful to bring them together into a single post. This post doesn’t cover the many generic improvements to Visual Studio, .NET and Xamarin which F# aso benefits from.

Finally, we are partnering with the F# community, including other groups at Microsoft, to ensure that F# 4.1 support is rolled out across the wide range of tooling available for F# 4.1. This includes support in Visual Studio Code, Xamarin Studio, and the popular Visual F# Power Tools for Visual Studio.

Support for the .NET Standard and .NET Core

Our compiler and scripting tools for F# 4.1 will be the first version to offer support for .NET Core. This is in addition to the existing support for .NET Framework 4.x development. When you write F# code on .NET Core today, you’re using a pre-release of F# 4.1 and this compiler toolchain.

Our tools for F# will continue to fully support .NET Framework development in a backwards-compatible way. This includes compiling existing projects created with earlier versions of Visual Studio and running existing scripts using F# Interactive (fsi.exe). Support for the latest versions of the .NET Framework is being added to these tools.

The Microsoft compiler tools for F# 4.1 are compatible with the .NET Standard, and thus are fully compatible with .NET Core and .NET Framework. The FSharp.Core library supports the .NET Standard, which allows you to use it for both .NET Core and .NET Framework development.

On Linux and macOS/OS X, the F# compiler runs as a .NET Core component, as .NET Framework is not supported on those platforms. You can also run the F# compiler as a .NET Core component on Windows.

Currently, this support is in alpha. Our aim is that the RTM support for .NET Core will coincide with the official release of F# 4.1.

Getting Started with F# 4.1 on .NET Core

Note: At the time of writing, .NET Core 1.0 SDK tooling is still in preview. Details here are likely to change as that tooling evolves.

To get started on .NET Core, install the .NET Core 1.0 SDK Preview 2 tooling.

Next, create a directory somewhere on your machine, open a command line, and type:

dotnet new -l f#

This will drop three files in your directory: a project.json file, an F# source file, and a NuGet.Config file.

  1. Delete the NuGet.Config file.
  2. Change the project.json file to the following:

Now you can restore packages, build the project, and run it to see output with the following commands:

$ dotnet restore
$ dotnet build
$ dotnet run

To learn more about getting started with F# on .NET Core, read Getting Started with F# on .NET Core.

New Language Capabilities in F# 4.1

The F# 4.1 programming language introduces a number of new language capabilities focused on programmer flexibility and incremental improvements in focused areas of the language. The F# language was been developed collaboratively with F# users and the community, including many contributions from Microsoft.

Struct Tuples and Interop with C# 7/VB 15 Tuples

The tuple type in F# is a key way to bundle values together in a number of ways at the language level. The benefits this brings, such as grouping values together as an ad-hoc convenience, or bundling information with the result of an operation, are also surfacing in the form of struct tuples in C# and Visual Basic. These are all backed by the ValueTuple type.

To support the ValueTuple type and thus support interop with C# and Visual Basic, tuple types, tuple expressions, and tuple patterns can now be annotated with the struct keyword.

Here’s how looks:

Note that struct tuples are not capable of being implicitly represented as reference tuples:

Additionally, struct tuples allow for performance gains when in a situation where many tuples are allocated in a short period of time.

Status: In Progress

Author: Microsoft

RFC: https://github.com/fsharp/FSharpLangDesign/blob/master/RFCs/FS-1006-struct-tuples.md

Struct Records

In F# 4.1, a record type can be represented as a struct with the [<Struct>] attribute. This allows records to now share the same performance characteristics as structs, without any other required changes to the type definition. Here’s an example:

There are some key behavioral things to note for struct records:

  • To use mutable fields within the record, any instance of the record must also be marked as mutable.
  • Cyclic references cannot be defined in a struct record.
  • You cannot call the default constructor for struct records, like you can with normal F# structs.
  • When marked with the CLIMutableAttribute, a struct record will not create a default constructor, because structs implicitly have one (though as stated above, you can’t call it from F#).

Status: Complete

Author: Will Smith

RFC: https://github.com/fsharp/FSharpLangDesign/blob/master/RFCs/FS-1008-struct-records.md

Struct Unions (Single Case)

In the spirit of more support for structs, in F# 4.1 the single case of the Union type will also be capable of being represented as a struct with the [<Struct>] keyword. Single case Union types are often used to wrap a primitive type for domain modelling. This allows you to continue to do so, but without the overhead of allocating a new type on the heap. Here’s an example:

Similar to struct records, single case struct unions have a few behavioral things to note:

  • You cannot have cyclic references to the same type be defined.
  • You cannot call the default constructor, like you can with normal F# structs.

Status: Completed

Author: Microsoft

RFC: https://github.com/fsharp/FSharpLangDesign/blob/master/RFCs/FS-1014-struct-unions-single-case.md

Fixed Keyword

In .NET Intermediate Language (IL), it is possible to “pin” a pointer-typed local on the stack. C# has support for this with the fixed statement, preventing garbage collection within the scope of that statement. This is useful for native interop scenarios. This support is coming to F# 4.1 in the form of the fixed keyword used in conjunction with a use binding. Here’s an example:

There are some behavioral characteristics to note here:

  • The usage of fixed corresponds with a use to scope the pointer, e.g. use ptr = fixed expr.
  • Like all pointer code, this is an unsafe feature. A warning will occur when you use this.

Status: Completed

Author: Microsoft

RFC: https://github.com/fsharp/FSharpLangDesign/blob/master/RFCs/FS-1015-support-for-fixed.md

Underscores in Numeric Literals

We’re also bringing support for placing underscores in numeric literals with F# 4.1. This enables you to group digits into logical units to make numeric literals easier to read. Here’s an example:

Status: Completed

Author: Avi Avni

RFC: https://github.com/fsharp/FSharpLangDesign/blob/master/RFCs/FS-1005-underscores-in-numeric-literals.md

Caller Info Argument Attributes

This allows for the ability to mark arguments to functions with the Caller Info attributes CallerLineNumber, CallerFilePath, and CallerMemberName. These attributes allow you to obtain information about the caller to a method, which is helpful for tracing, debugging, and creating diagnostic tools. Here’s an example:

Status: Completed

Author: Lincoln Atkinson and Avi Avni

RFC: https://github.com/fsharp/FSharpLangDesign/blob/master/RFCs/FS-1012-caller-info-attributes.md

Adding a Result Type

Similar to the Rust language Result enum type, we are adding support for a Result<'TSuccess, 'TError> type. A sibling of the Option<'T> type, Result<'TSuccess, 'TError> is being added to support the use case of wanting to consume code which could generate an error without having to do exception handling.

Only the type and three functions are being added at this time – map, mapError, and bind. These three functions will aid in composing functions which return Results. Other functionality, extending APIs in FSharp.Core, and more are under discussion in the Result type RFC Discussion.

Here’s an example:

You might ask, “why do this when you already have Option<'T>?”. This is a good question. When you consider the execution semantics of your code, Result and Option fill a similar goal when accounting for anything other than the “happy path” when code executes. Result is the best type to use when you want to represent and preserve an error that can occur during execution. Option is better for when you wish to represent the existence or absence a value, or when you want consumers to still account for an error, but you do not care about preserving that error.

Status:

Addition of the Type Completed

Uncontentious functionality Completed

Author: Oskar Gewalli

RFC: https://github.com/fsharp/FSharpLangDesign/blob/master/RFCs/FS-1004-result-type.md

Mutually Referential Types and Modules Within the Same File

This addition to the language allows for a collection of types and modules within a single scope in a single file to be mutually referential. The way this is specified is with the rec keyword in a top level namespace or module, e.g. module rec X, namespace rec Y.

Similar to the opt-in nature of the and keyword used to allow functions and types to be mutually referential, this allows you to opt-in to doing so over larger scopes.

This solves a common problem in a number of scenarios, such as needing to construct extra types to hold static methods and static values, organizing helper functions into modules, raising an exception in members of a type and expecting the exception to carry data of that same type, and so on.

Here’s an example:

Status: Completed

Author: Microsoft

RFC: https://github.com/fsharp/FSharpLangDesign/blob/master/RFCs/FS-1009-mutually-referential-types-and-modules-single-scope.md

Implicit “Module” Suffix on modules which share the same name as a type

With this feature, if a module shares the same name as a type within the same declaration group (that is, they are within the same namespace, or in the same group of declarations making up a module), it will have the suffix “Module” appended to it at compile-time.

This pattern, giving a module which is related to a type the same name as that type, is a common pattern which was traditionally supported by the [<CompilationRepresentation(CompilationRepresentationFlags.ModuleSuffix )>] attribute, as such:

With F# 4.1, this is now implicit, so you can omit the attribute:

Status: Completed

Author: Microsoft

RFC: https://github.com/fsharp/FSharpLangDesign/blob/master/RFCs/FS-1019-implicitly-add-the-module-suffix.md

Byref Returns

C# 7 is adding support for byref locals and byref returns to support better high performance scenarios. This will result in libraries which use these features. F# already has support for ref locals with ref cells, but to date has had no support for consuming or generating byref-returning methods. This support is coming in F# 4.1.

Note At the minimum, F# 4.1 will support consuming byref-returning methods. At the time of writing, ref returns are not complete for C# and the work in F# is still in very early stages.

Status: In Progress

Author: Microsoft

RFC: https://github.com/fsharp/FSharpLangDesign/blob/master/RFCs/FS-1020-byref-returns.md

Error Message Improvements

Lastly, there has been an incredible community-driven effort to improve error messages across the language. There are a few themes in these improvements, most notably in adding or improving suggested fixes with information the compiler already has.

Here’s a sample of one of the improvements. When compiling the following code,

Output with F# 4.0 looks this:

error FS0039: The record label 'With' is not defined.

Output with F# 4.1 will look like this:

error FS1129: The record label 'With' is not defined. Maybe you want one of the following:

Width

In this case, a suggestion is made based on record labels that the compiler already knows to be defined. These kinds of improvements are helpful for people new to F#, where the impact of more arcane error messages can negatively influence someone’s decision to keep using that language.

This is an ongoing process, and we’ll continue to see improvements to error messages even past F# 4.1. If you notice an error message that you feel is hard to understand, please create an issue on the Visual F# repository with an example and a proposed improvement! We’d love to improve error messages further.

Issue tracking improvements: https://github.com/Microsoft/visualfsharp/issues/1103

Notable contributors: Steffen Forkmann, Isaac Abraham, Gauthier Segay, Jan Wosnitza, Isak Sky, Danny Tuppeny

Trying these new features out

The best way to try out F# 4.1 is to use pre-releases of the F# compiler tools for .NET Core, as described earlier in this blog post. You can also build the current Visual F# Compiler from source..

Rolling out F# 4.1

We are partnering with the F# community, including other groups at Microsoft, to ensure that F# 4.1 support is rolled out across the very wide range of tooling available for F# 4.1.

In particular:

  • The Xamarin team at Microsoft are actively incorporating F# 4.1 support into the F# support in Xamarin Studio.
  • The Mono packaging team is updating the packages available to include F# 4.1.
  • The F# community is integrating F# 4.1 support in the F# Compiler Service component, used by many editing and compilation tools.
  • We are working with the F# community to help update the F# support in the Visual F# Power Tools and ensure it works smoothly with the next release of Visual Studio.
  • The F# community are already actively integrating support for F# 4.1 into support for Visual Studio Code and Atom through the Ionide project.
  • The F# community are integrating support for F# 4.1 into many other tools, include Fable, an F# to ECMAScript transpiler, and into the F# support for Emacs and Vim.

The Visual F# Tools

Note: The timeline for this support may be Update 1 of Visual Studio “15” rather than RTM. There is no definite date at this time.

The Visual F# Tools for F# 4.1 will be updated to include support for editing and compiling .NET Standard projects, in addition to .NET Framework projects. .NET Standard is the common subset of APIs between .NET Core, .NET Framework, and Mono. To learn more about the .NET Standard, read The .NET Standard Library. The Visual F# Tools will also include incremental fixes and integration with the new Visual Studio installation process.

The final area for F# 4.1 is integrating the F# language service with Roslyn Workspaces. This will modernize the F# IDE experience in Visual Studio, making it comparable to C# and Visual Basic and opening the doors to future IDE innovation. Once this work is completed, many IDE features will “light up” automatically, such as IntelliSense filters.

For the uninitiated, a language service is a way to expose components of a compiler to tooling. For a simple example, when you “dot” into a class and see all the available methods, properties, and other types, the tooling has inspected that component of the Syntax Tree which corresponds to your code, gathered available type information, and displayed it for you. This is possible with the language service of the programming language you are using.

Because F#, the Visual F# Tools, and Roslyn are all open source, future productivity features in the F# editing experience for Visual Studio can also be added by the F# community.

Summary

The upcoming release described in this blog post is an exciting step in Microsoft’s tools for F#, featuring significant language improvements and cross-platform .NET Core support. Support for F# 4.1 is also being rolled out across the F# world. We invite you to use the preliminary versions of these language and tooling features today through alpha versions of our cross-platform compiler toolchain for .NET Core. Whether doing .NET Framework or .NET Core development, we invite you to help contribute to the development of the tools on the Visual F# GitHub repository.

Cheers, and happy F#-ing!

– The Visual F# Team

26 Jul 06:35

Service Bus and the new Azure portal

by Shubha Vijayasarathy

Some of you may be surprised to hear that Service Bus messaging, Azure Event Hubs, and Azure Relay are all worked on by the same team. While there are certainly many similarities between these services, there are also just as many different use cases. As we plan to offer these services in the new Azure portal, there is an upcoming change regarding namespaces. In the past, Service Bus Messaging, Event Hubs and Service Bus Relay all shared a common namespace.

What sort of changes can I expect?

  • Beginning in August 2016, Service Bus Messaging and Azure Event Hubs will be available in the new Azure portal.
  • When Messaging and Event Hubs become available, newly created namespaces will be unique to the corresponding service. For example, Event Hubs will have an Event Hubs only namespace, and not support messaging or Relay. If you want to use each service, you will need to create a namespace for each.
  • For Event Hubs customers that also used messaging, you will not be able to see your Event Hubs listed under your namespaces.
  • In late October 2016, Relay will be available on the new Azure portal.
  • All of these services will be in preview until at least late October 2016.

One key point to make, none of these changes will have any runtime impact on current namespaces. Our current portal will still support the mixed namespace types but not for long. The support lasts to help customers to successfully migrate to new namespace types under the specific services. Moving forward we want our customers to create queues and topics under the Messaging namespace type, event hub under the Event Hub namespace type and relay under Relay namespace type.

Why are we doing this?

We are using the new Azure Portal as an opportunity to take care of some technical debt. While Service Bus messaging, Azure Event Hubs and Azure Relay are all similar, they are also very different. Breaking these services out into their own namespaces will allow us to optimize our infrastructure, and therefore improve performance. In addition, we would like to make things simpler for our customers in the future, as we have received a lot of feedback about the confusion surrounding how these services are related. The separation will allow us to simplify documentation, provide better reporting on service health, and provide an overall improvement to customer experience and support.

Will I see my existing namespaces under different services in the new portal? Watch this space for posts covering migration scenarios.

We would love to see your questions and feedback. Follow and participate in the conversation on Service Bus Forum or in the comments section below.

25 Jul 05:57

The Raspberry Pi Has Revolutionized Emulation

by Jeff Atwood

Every geek goes through a phase where they discover emulation. It's practically a rite of passage.

I think I spent most of my childhood – and a large part of my life as a young adult – desperately wishing I was in a video game arcade. When I finally obtained my driver's license, my first thought wasn't about the girls I would take on dates, or the road trips I'd take with my friends. Sadly, no. I was thrilled that I could drive myself to the arcade any time I wanted.

My two arcade emulator builds in 2005 satisfied my itch thoroughly. I recently took my son Henry to the California Extreme expo, which features almost every significant pinball and arcade game ever made, live and in person and real. He enjoyed it so much that I found myself again yearning to share that part of our history with my kids – in a suitably emulated, arcade form factor.

Down, down the rabbit hole I went again:

I discovered that emulation builds are so much cheaper and easier now than they were when I last attempted this a decade ago. Here's why:

  1. The ascendance of Raspberry Pi has single-handedly revolutionized the emulation scene. The Pi is now on version 3, which adds critical WiFi and Bluetooth functionality on top of additional speed. It's fast enough to emulate N64 and PSX and Dreamcast reasonably, all for a whopping $35. Just download the RetroPie bootable OS on a $10 32GB SD card, slot it into your Pi, and … well, basically you're done. The distribution comes with some free games on it. Add additional ROMs and game images to taste.

  2. Chinese all-in-one JAMMA cards are available everywhere for about $90. Pandora's Box is one "brand". These things are are an entire 60-in-1 to 600-in-1 arcade on a board, with an ARM CPU and built-in ROMs and everything … probably completely illegal and unlicensed, of course. You could buy some old broken down husk of an arcade game cabinet, anything at all as long as it's a JAMMA compatible arcade game – a standard introduced in 1985 – with working monitor and controls. Plug this replacement JAMMA box in, and bam: you now have your own virtual arcade. Or you could build or buy a new JAMMA compatible cabinet; there are hundreds out there to choose from.

  3. Cheap, quality IPS arcade size LCDs. The CRTs I used in 2005 may have been truer to old arcade games, but they were a giant pain to work with. They're enormous, heavy, and require a lot of power. Viewing angle and speed of refresh are rather critical for arcade machines, and both are largely solved problems for LCDs at this point, which are light, easy to work with, and sip power for $100 or less.

Add all that up – it's not like the price of MDF or arcade buttons and joysticks has changed substantially in the last decade – and what we have today is a console and arcade emulation wonderland! If you'd like to go down this rabbit hole with me, bear in mind that I've just started, but I do have some specific recommendations.

Get a Raspberry Pi starter kit. I recommend this particular starter kit, which includes the essentials: a clear case, heatsinks – you definitely want small heatsinks on your 3, as it dissipate almost 4 watts under full load – and a suitable power adapter. That's $50.

Get a quality SD card. The primary "drive" on your Pi will be the SD card, so make it a quality one. Based on these excellent benchmarks, I recommend the Sandisk Extreme 32GB or Samsung Evo+ 32GB models for best price to peformance ratio. That'll be $15, tops.

Download and install the bootable RetroPie image on your SD card. It's amazing how far this project has come since 2013, it is now about as close to plug and play as it gets for free, open source software. The install is, dare I say … "easy"?

Decide how much you want to build. At this point you have a fully functioning emulation brain for well under $100 which is capable of playing literally every significant console and arcade game created prior to 1997. Your 1985 self is probably drunk with power. It is kinda awesome. Stop doing the Safety Dance for a moment and ask yourself these questions:

  • What controls do you plan to plug in via the USB ports? This will depend heavily on which games you want to play. Beyond the absolute basics of joystick and two buttons, there are Nintendo 64 games (think analog stick(s) required), driving games, spinner and trackball games, multiplayer games, yoke control games (think Star Wars), virtual gun games, and so on.

  • What display to you plan to plug in via the HDMI port? You could go with a tiny screen and build a handheld emulator, the Pi is certainly small enough. Or you could have no display at all, and jack in via HDMI to any nearby display for whatever gaming jamboree might befall you and your friends. I will say that, for whatever size you build, more display is better. Absolutely go as big as you can in the allowed form factor, though the Pi won't effectively use much more than a 1080p display maximum.

  • How much space do you want to dedicate to the box? Will it be portable? You could go anywhere from ultra-minimalist – a control box you can plug into any HDMI screen with a wireless controller – to a giant 40" widescreen stand up arcade machine with room for four players.

  • What's your budget? We've only spent under $100 at this point, and great screens and new controllers aren't a whole lot more, but sometimes you want to build from spare parts you have lying around, if you can.

  • Do you have the time and inclination to build this from parts? Or do you prefer to buy it pre-built?

These are all your calls to make. You can get some ideas from the pictures I posted at the top of this blog post, or search the web for "Raspberry Pi Arcade" for lots of other ideas.

As a reasonable all-purpose starting point, I recommend the Build-Your-Own-Arcade kits from Retro Built Games. From $330 for full kit, to $90 for just the wood case.

You could also buy the arcade controls alone for $75, and build out (or buy) a case to put them in.

My "mainstream" recommendation is a bartop arcade. It uses a common LCD panel size in the typical horizontal orientation, it's reasonably space efficient and somewhat portable, while still being comfortably large enough for a nice big screen with large speakers gameplay experience, and it supports two players if that's what you want. That'll be about $100 to $300 depending on options.

I remember spending well over $1,500 to build my old arcade cabinets. I'm excited that it's no longer necessary to invest that much time, effort or money to successfully revisit our arcade past.

Thanks largely to the Raspberry Pi 3 and the RetroPie project, this is now a simple Maker project you can (and should!) take on in a weekend with a friend or family. For a budget of $100 to $300 – maybe $500 if you want to get extra fancy – you can have a pretty great classic arcade and classic console emulation experience. That's way better than I was doing in 2005, even adjusting for inflation.

[advertisement] At Stack Overflow, we put developers first. We already help you find answers to your tough coding questions; now let us help you find your next job.
15 Jul 08:29

Microsoft wins: Court rules feds can’t use SCA to nab overseas data

by Cyrus Farivar

(credit: Robert Scoble)

In a case closely watched by much of the tech industry, an appellate court has ruled in favor of Microsoft, finding that the company does not have to turn over the contents of an Outlook.com user’s inbox to American investigators because that user’s data is held abroad, in Ireland.

In a 43-page decision handed down on Thursday, the 2nd Circuit Court of Appeals overturned the lower court’s ruling, finding that the Stored Communications Act, which allows domestically held data to be handed over to the government, does not apply outside the United States.

In December 2013, authorities obtained an SCA warrant, which was signed by a judge, as part of a drug investigation and served it upon Microsoft. When the company refused to comply, a lower court held the company in contempt. Microsoft challenged that, too, and the 2nd Circuit has vacated the contempt of court order, writing:

Read 6 remaining paragraphs | Comments

14 Jul 16:01

Un bot parmi nous ? – 3ième partie

by Philippe Beraud - MSFT

La première partie de ce billet vous a permis de constituer le squelette de votre bot et de l’enregistrer sur le site de Microsoft dédié afin de définir les éléments clés qui permettront aux différents utilisateurs de communiquer avec votre bot.

La seconde partie s’est proposée de vous donner une vue d’ensemble du Bot Framework et a introduit LUIS (Language Understanding Intelligence Service).

Dans cette troisième et dernière partie de ce billet, il est temps de mettre toutes ces informations en perspective en mettant en œuvre l’ensemble des points clés abordés jusqu’à présent sur un petit projet.

Mise en œuvre et exemples : Open Data RATP

Dans toutes les grandes villes de France, un service de transport en commun est proposé et certains d’entre eux propose une grande variété de données issues de leur réseau en libre accès via l’Open Data. C’est le cas notamment de la RATP.

Nous allons donc combiner ces données « Open Data » mises à disposition par la RATP, le Bot Framework et LUIS, afin de mettre en place un bot simple permettant de demander les horaires de passages d’un type de locomotion, sur une ligne donnée et ce à un arrêt précis.

Cet exemple devrait vous procurer une bonne compréhension de la façon dont les différentes briques logicielles abordées dans les deux parties précédentes s’assemblent, et dans ce contexte, des interactions entre ces dernières.

Les données que nous allons utiliser sont disponibles ici, et plus particulièrement .

Grace à celles-ci, nous récupérons et disposons donc les informations concernant les lignes, arrêts, trajets et heures de passage pour tous les critères précédents. Les relations entre les différentes entités sont présentées/synthétisées dans le schéma ci-dessous.

Figure 1 : Interactions entre les entités fournies par le STIF ( Stif)

Le but étant de pouvoir interroger notre bot sur le prochain passage d’un moyen de transport sur une ligne et à un arrêt donné.

Mise en place du modèle LUIS

Afin de débuter notre projet, nous allons créer une application sur LUIS, et lui apprendre à reconnaitre les différentes expressions qui nous intéresses ici.

Comme nous l’avons déjà évoqué, LUIS suit un modèle d’entrainement assez simple. Il suffit de lui fournir des phrases, issues du langage naturel, et de le guider dans l’extraction des différentes variables contenues dans la phrase (les Entities).

Tout ceci s’effectue simplement via l’interface web de LUIS. Outre les phrases que vous lui fournirez, LUIS sera en mesure par la suite de vous proposer des phrases qu’il aura rencontré dans votre environnement de production afin d’enrichir son modèle.

Figure 2 : Interface générale de LUIS

Compte tenu de ces éléments, la première étape consiste donc à définir les actions que devra tenter de prédire LUIS en fonction de l’entrée fournie. Ces actions sont appelées comme mentionné précédemment des Intents dans l’interface, et vous pouvez en définir autant que vous le souhaitez ! 🙂

A chaque fois qu’une phrase sera soumise à votre modèle LUIS, ce dernier émettra une probabilité pour chacune des actions que vous aurez définie au préalable.

Nous allons commencer par créer notre première action, qui définira l’action « Prochain passage ». Nommez cet Intent comme vous le souhaitez, de manière assez explicite (en gardant à l’idée que vous devrez utiliser ce nom dans votre code C#).

Cette action nécessite des paramètres qui sont :

  • Le type de transport voulu
  • La ligne de transport
  • L’arrêt sur cette ligne

Nous allons donc devoir définir ces paramètres, ou Entities pour LUIS. Encore une fois, vous êtes libre du nom que vous donnez à vos Entities, cependant, elles aussi seront utilisées par la suite dans le code C# du bot.

Un exemple de ce que vous devriez obtenir est présenté dans la figure suivante :

Figure 3 : Exemple de définition des Intents et Entities dans LUIS

  • TRANSPORTATION_TYPE : Le moyen de transport
  • TRANSPORTATION_ROUTE : La ligne
  • TRANSPORTATION_STOP : L’arrêt
  • TRANSPORTATION_DIRECTION : La direction de la ligne (bonus)

Ces informations devront donc être extraites directement par LUIS à partir d’une phrase.

L’étape suivante consiste à entrainer notre modèle pour qu’il commence à reconnaitre les phrases qui doivent déclencher notre action (Intent) et extraire les bonnes parties qui définissent nos paramètres.

Pour cela, vous devez fournir à LUIS des phrases (Utterrances) manuellement, ou via un outil d’importation dans l’interface web.

A la suite de quoi vous devrez définir chaque entité dans chaque phrase, ainsi que l’action correspondante :

Après quelques exemples, vous devriez voir LUIS devenir meilleur et commencer à inférer les paramètres ainsi que l’action associée.

Dans la partie droite de l’interface vous pouvez visualiser les résultats de l’entrainement du modèle, modèle dont vous pouvez forcer l’entrainement via le bouton Train situé en bas à gauche de cette même interface.

Figure 5 : Visualisation des performances du modèle

Une fois notre modèle est entrainé et prêt, nous allons récupérer les informations nécessaires à son intégration dans le Bot Framework.

Pour se faire, il nous faut récupérer l’AppID et le AppName de notre application :

Figure 6 : Récupération des informations d’identification du modèle LUIS

Intégration de LUIS dans notre application

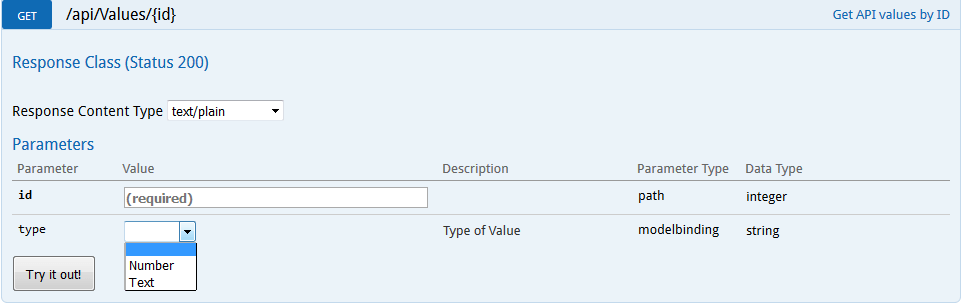
A ce stade, notre bot ne fait que renvoyer la longueur de la chaine de caractère qu’il reçoit. Nous allons commencer à le guider en intégrant le modèle LUIS entrainé afin qu’il puisse interagir avec nous.

Commençons par créer un nouveau dossier Dialogs dans notre projet, lequel contiendra toutes les classes dérivées de Dialog. Puis, créez une classe RatpDialog laquelle aura la charge de traiter les messages entrants et de faire appel à LUIS.

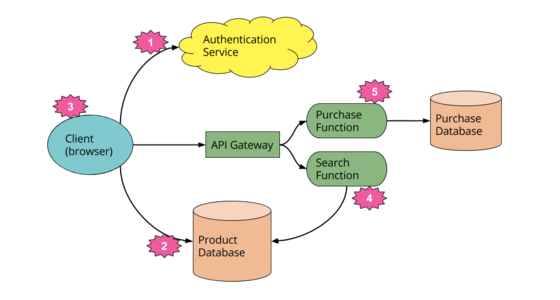
Figure 7 : Architecture actuelle du projet

Votre classe RatpDialog n’est encore qu’une coquille (vide). Afin qu’elle soit compatible avec les Dialog du Bot Framework, il est donc nécessaire qu’elle hérite d’un descendant de IDialog et dans notre cas d’un LuisDialog. Ce dernier encapsule l’appel à l’API de LUIS et fournit directement le résultat de cet appel.

Pour commercer, nous allons ajouter les informations d’identification de notre modèle LUIS afin que le Bot Framework puisse aller récupérer les informations du modèle et traiter les demandes.
Pour cela, il suffit simplement de décorer notre classe dérivée de LuisDialog de la manière suivante :

Figure 8 : Informations d’identification pour l’API LUIS

Les informations AppId et Subscription Key sont récupérables depuis l’interface web de LUIS, via le bouton App
Settings. Au cas où vous n’auriez pas de clé d’abonnement (Subscription Key), vous pouvez en ajouter une en vous rendant sur le portail Azure, et en ajoutant un nouveau service cognitif, de type LUIS, gratuitement.

Figure 9 : Création d’un service cognitif

Veillez à bien choisir Language Understanding Intelligent Service (LUIS) comment type d’API. Une fois créé, vous pourrez accéder à la clé de souscription dans l’interface de gestion du service Azure. Vous n’aurez plus qu’à coller cette dernière dans le champ Subscription Key (dans le menu App Settings) sur LUIS, et à l’ajouter.

Dans un Dialog « simple », vous devez surcharger la méthode StartAsync afin de définir la méthode qui traitera les requêtes (Vous trouverez plus d’informations ici).

Pour un LuisDialog, celle-ci est d’ores et déjà implémentée, et intègre donc :

  • L’interrogation de l’API de LUIS,
  • La conversion du résultat
  • Et l’émission de celui-ci vers le point de terminaison (méthode) spécifiée.

Chaque action (Intent) que vous avez défini dans votre modèle LUIS doit donc posséder un point de terminaison afin de pouvoir être traitée par le bot.

Pour déclarer un point de terminaison, il vous suffit simplement d’annoter la méthode voulue à l’aide d’un LuisIntent, avec en paramètre, le nom de l’Intent associé.

Figure 10 : Exemple de décoration d’une méthode comme point de terminaison

Comme vous pouvez le constater, cette méthode récupère un contexte global, associé à la conversation courante, ainsi qu’un objet contenant le résultat de l’appel au modèle LUIS. Cet objet fournit des accesseurs vers les Entity inférées, les probabilités pour chacun des Intent que vous pourriez avoir défini, etc.

Enfin, vous pouvez extraire les différents paramètres issus des déductions de LUIS directement dans votre méthode, tel qu’en témoigne la capture ci-dessous :

Figure 11 : Exemple d’extraction des Entities inférées par LUIS

Suite à quoi, il ne vous reste plus qu’à vous concentrer sur la partie métier de votre dialogue.

Intégration du modèle de données

Les données mises à disposition par la RATP sont fournies sous la forme de plusieurs fichiers CSV. Nous avons choisi d’importer ces données dans une base de données SQL Azure, afin de faciliter l’interrogation de celles-ci.

Afin de créer notre base de données, nous nous rendons dans le portail de gestion Azure, afin d’ajouter un service de stockage (Rubrique Données + stockage => SQL Database).

Figure 12 : Création de la base de données sur Azure

Il vous suffira alors de rentrer les informations concernant votre serveur de base de données, son nom, le nom d’utilisateur à utiliser pour l’administration, le mot de passe de celui-ci et l’emplacement de votre base.

Enfin, n’oubliez pas de spécifier le nom de la base de données à créer sur le serveur.

Figure 13 : Création d’un nouveau serveur de base de données

Sur la Figure 7 précédente, vous pouvez constater que le dossier App_Data comporte un sous-dossier ratp_data. Ce fichier n’est pas inclus dans l’archive joint à cet article ici. De fait, il s’agit simplement des données mises à disposition par le STIF sur le site de l’Open Data, lesquelles sont assez volumineuses (environ 1Go).

Le script de génération de la structure de la base, au format SQL, est quant à lui, joint à l’archive précédente.

Afin d’importer nos données, nous avons simplement utilisé le logiciel SQL Server 2016 Import/Export. Ce dernier propose la mise en place d’ETL (Extract Transform Load) simple depuis de multiples sources de données. Aucune modification particulière ayant été apportée au projet, nous ne détaillerons pas ce processus.

Il convient de noter que dans le cas où vous utiliserez un autre outil d’importation, les bases de données SQL Azure sont compatibles avec le protocole SQLServer. Vous pouvez donc aisément utiliser ce type de sortie pour votre importation.

Une fois nos données importées, nous pouvons commencer à développer notre modèle côté client. Pour se faire, nous utilisons Entity Framework, lequel va automatiquement gérer les classes nécessaires pour refléter la structure de notre base.

Dans le dossier Models, ajoutez un nouvel élément ADO.NET Entity Data Model et sélectionnez EF Designer from database.

Figure 14 : Création d’un contexte EntityFramework depuis une base de données existante

Choisissez New Connection et spécifiez Microsoft SQL Server en tant que source de données. Remplissez les informations demandées :

  • Nom du serveur
  • Authentification : SQLServer authentification
    • Username
    • Password
  • Nom de la base de données que vous avez créée.

Cette étape va permettre à Visual Studio d’ajouter les entrées nécessaires dans le fichier de configuration, et d’initier la création des classes du modèle à partir de la structure de la base.

Une fois réalisé, vous devriez obtenir un fichier .edmx dans votre dossier Models, qui contiendra toutes les informations et classes nécessaires pour utiliser votre base de données dans le projet.

La structure générée devrait être semblable à celle-ci-dessous.

Figure 15 : Structure générée par ADO.NET

Afin de pouvoir utiliser le contexte généré pour la base de données, vous devez instancier un objet, dont le nom est celui que vous avez spécifier lors de l’ajout de la ressource ADO.NET Entity Data Model.

Par exemple, dans notre cas, nous avons choisi de nommer notre modèle « ratpbotdemodbEntities », utilisons alors ce dernier pour instancier un objet de type ratpbotdemodbEntities pour manipuler les données stockées en base.

Par commodité, nous avons décidé d’utiliser une classe outil, RatpHelper encapsulant l’interrogation de la base. Libre à vous de suivre ce modèle, ou d’utiliser directement votre Data Model votre Dialog.

Enfin, pour récupérer l’heure de prochain passage désirée, nous récupérons le moyen de transport voulu, puis les différentes lignes utilisant ce moyen de transport, en essayant de cibler un arrêt spécifique vis-à-vis de son nom. Si l’arrêt en question est trouvé, nous trions les heures de passages à cette heure par rapport à la différence entre l’heure actuelle et l’heure théorique de passage en valeur absolue. Il nous suffit alors de renvoyer la première valeur, celle dont l’heure de passage est la plus proche.

// Récupération du moyen de transport (TRAM, Métro, RER, etc.)
var mean = db.TBL_RATP_MEAN_TYPES.Where(x => 
       x.MEAN_TYPE_NAME.Equals(meanName, StringComparison.InvariantCultureIgnoreCase)).First();

// Récupération des lignes utilisant ce moyen de transport
var route = mean.TBL_RATP_ROUTES.Where(r => 
       r.ROUTE_NAME.Equals(lineName, StringComparison.InvariantCultureIgnoreCase));

// Recherche d'un arrêt, dont le nom correspond à celui spécifié, et dont le moyen de // transport et la ligne concorde avec les paramètres
var st = db.TBL_RATP_STOPS.Where(x => 
       x.STOP_NAME.Contains(stopName)).SelectMany(x => x.TBL_RATP_STOP_TIMES);

// Si l'on trouve un arrêt de transport, on les heures de passes par rapport à la 
// différence entre l'heure de passage et l'heure actuelle
// On récupère la plus proche
if (st.Count() > 0)
{
       return st.Select(s => s.STOP_TIMES_DEPARTURE)
                    .ToList()
                    .Where(t => t.TotalSeconds > DateTime.Now.TimeOfDay.TotalSeconds)
                    .OrderBy(t => Math.Abs((DateTime.Now.TimeOfDay - t).TotalSeconds)).ToList();
}
else
{
       return Enumerable.Empty().ToList();
}

Intégration avec le contrôleur

Maintenant que nous avons un dialogue disposé à interagir avec les participants de la conversation, il est nécessaire de connecter celui-ci à la conversation afin qu’il soit en mesure de recevoir les messages.

Cette opération est faite via le contrôleur qui a la charge de rediriger les messages vers le dialogue approprié. Les messages sont toujours émis vers le contrôleur « messages », c’est pourquoi vous avez un MessagesController dans votre dossier Controllers.

Par défaut, les contrôleurs sont liés à une URL particulière, dont le formalisme est le suivant :

http://masuperurl.fr/<controllerName>/

Les requêtes du bot sont envoyées via la méthode HTTP POST et automatiquement exposées en tant qu’objet de type Message par le Framework.

Un message peut-être de différents types, lesquels indiquent le type d’évènement auquel doit répondre le bot. Dans notre cas, nous nous intéresserons uniquement aux messages de type « Message ».

Enfin, pour rediriger une requête vers un dialogue spécifique, il suffit d’utiliser l’utilitaire de conversation et d’attendre de manière asynchrone le résultat de l’opération dans le dialogue.

Figure 16 : Gestion asynchrone du routage d’une requête vers un dialogue

Ainsi, si le message est de type « Message », le message est redirigé vers un nouveau dialogue.

En guise de conclusion

Toutes ces informations vous ont permis de mettre en œuvre le Bot Framework, LUIS, ASP.NET, entityframework, ce qui, fait un bon tour d’horizon des technologies Microsoft. Afin de tester votre bot, vous pouvez démarrer celui-ci localement, et tester directement ces réactions avec le Bot Emulator, comme présenté sur la capture ci-dessous :

Ceci clôt notre exploration des bots et par la même notre série de billet. Nous espérons que cette dernière nous aura donné l’envie de vous lancer. Que le bot soit avec vous 😉

NavigoBot

14 Jul 15:57

Un bot parmi nous ? – 2nde partie

by Philippe Beraud - MSFT

La première partie de ce billet vous a permis de constituer le squelette de votre bot et de l’enregistrer sur le site de Microsoft dédié afin de définir les éléments clés qui permettront aux différents utilisateurs de communiquer avec votre bot.

Il est désormais temps de faire vos premiers pas avec le Bot Framework.

Premier pas avec le Bot Framework

La première étape pour commencer à utiliser votre bot consiste à télécharger l’émulateur vous permettant d’interagir avec votre bot.

L’émulateur est disponible en téléchargement ici.

Figure 1 : Interface de l’émulateur

Cet émulateur se présente sous la forme d’un logiciel de messagerie simple, agrémenté de quelques fonctionnalités additionnelles, présentent dans les applications « réelles », telles que :

  • L’ajout du bot à une conversation
  • La suppression du bot d’une conversation
  • Entrée d’un utilisateur dans la conversation
  • Départ d’un utilisateur de la conversation
  • Fin de la conversation
  • Ping
  • Suppression des données d’utilisateurs stockées

Suite à cela, il vous faudra configurer votre application afin qu’elle ait en sa possession les informations d’authentification qui vous ont été fournies lors de l’enregistrement de votre bot (les mêmes que dans l’émulateur).

Pour se faire, rendez-vous dans le fichier Web.config, et remplacez les valeurs des clés AppId et AppSecret (tout en haut du fichier) par les valeurs présentent sur l’interface de gestion de votre bot.

Figure 2 : Visualisation des informations d’authentification du bot

Une fois toutes ces actions effectuées, vous devriez être en mesure de lancer votre bot en local dans Visual Studio, et ainsi pouvoir interagir avec lui via l’émulateur :

Architecture du modèle d’application pour le Bot Framework

Maintenant que notre bot est configuré et fonctionnel, nous allons commencer à pouvoir rentrer un peu plus dans le détail des fonctionnalités proposées par le Bot Framework. Nous allons voir les différentes interfaces permettant de mettre en place des interactions de haut niveau avec notre bot.

Contrôleur et routage

Dans son mode de fonctionnement, le Bot Framework se présente comme une simple API REST utilisant donc le protocole HTTP pour formuler des requêtes et recevoir des réponses. L’architecture du projet est donc très similaire à tout projet ASP.NET, sans la partie « vue ».

Chaque application contient donc un ou plusieurs, contrôleurs qui sont en charge de :

  • Recevoir les requêtes,
  • Vérifier les paramètres et/ou traiter ces derniers,
  • Et éventuellement interagir avec la base de données,

Afin de générer la réponse.

(Ces contrôleurs sont placés dans le dossier Controllers de votre application)

Figure 3 : Contrôleur de base fournit avec le modèle du Bot Framework

Le contrôleur n’est que la partie émergée de l’iceberg, cependant, quelques notions sont à savoir :

  • Le nom de votre contrôleur est important. Il détermine l’URL qui permettra de cibler celui-ci. Par exemple, MessagesController sera accessible via http://host:port/messages
  • Afin de recevoir une requête sur votre contrôleur, vous devez posséder dans celui-ci une méthode qui correspond avec la méthode HTTP (GET, POST, PUT, etc.) qui véhiculera le message. Dans le contrôleur de base fournit, on peut voir qu’une méthode POST est exposée permettant d’interagir via HTTP POST.
  • La classe Message est fournie par le Bot Framework et contient tout le contexte actuel dans lequel le message a été envoyé (la langue, les participants, les pièces jointes, etc.)

Pour la suite, il vous faudra installer la bibliothèque manuellement en ouvrant le gestionnaire de paquets NuGet et en installant Microsoft.Bot.Builder via la commande Install-Package.

Figure 4 : Installation de la bibliothèque Microsoft.Bot.Builder

Dialogues

La première abstraction fournie par cet outil concerne les interactions entre le bot et une ou plusieurs personne. Dans un dialogue, il est nécessaire de posséder un contexte, potentiellement de pouvoir faire des parallèles avec d’autres idées cohérentes dans le contexte actuel, etc.

C’est ce que tend à fournir l’interface IDialog, laquelle peut prendre en argument le type des réponses émises par les implémentations dérivées.

Elle permet aussi de faciliter la mise en œuvre d’une approche « avec état » (statefull) se traduisant ainsi par un contexte sauvegardé entre plusieurs messages.

En outre, cette interface supporte potentiellement toutes les spécialisations que vous saurez, à n’en pas douter, apporter à votre bot ; les ingénieurs de Microsoft ont mis à votre disposition des dialogues génériques, tels que PromptDialog ou Chain.

Ces derniers vous permettent notamment de solliciter l’intervention de l’utilisateur (PromptDialog) en demandant une confirmation, un nombre ou encore un choix, et, plus important, ils utilisent des mécanismes de validation de l’entrée fournie par l’utilisateur. Chain quant à lui vous permets de chainer simplement vos dialogues, à l’image d’une liste chainée.

L’interface IDialog est donc la première brique mettant en œuvre l’interaction nouvelle génération via le Bot Framework.

Formulaires

A l’image de ceux que l’on peut trouver sur le web, permettant de saisir différentes informations, et de valider celles-ci, les formulaires sont présents dans la bibliothèque, et ce, avec divers points d’entrés.

La première méthode consiste à laisser le bot automatiquement inférer les champs nécessaires pour remplir le formulaire. Pour se faire il suffit de définir une classe contenant tous les champs requis, et d’utiliser la classe IFormBuilder afin de générer automatiquement les instructions pour le bot. Un exemple est disponible ici.

La seconde reprend les bases de la première, mais vous apporte une flexibilité accrue sur les actions possibles, le type des champs de données, prend en charge les demandes de confirmation, etc.

Pour se faire, un langage spécifique de modèle a été créé et permet d’exprimer certaines informations de manière dynamique. Les spécifications de ce « micro langage » sont disponibles ici.

Par exemple :

[Prompt(“What kind of {&} would you like? {||}”)]
public SandwichOptions? Sandwich;

  • {&} : Description du champ dont on souhaite définir la valeur
  • {||} : Enumération des choix possibles (de manière automatique si le type est une enum)

Vous pouvez agir sur différents aspects des réponses du bot :

  • La manière dont le renseignement d’un champ spécifique est demandé à l’utilisateur
  • La manière générale dont les renseignements sont demandés à l’utilisateur
  • La manière générale dont les demandes de redéfinitions sont demandées à l’utilisateur
  • Indiquer l’optionalité d’un champ
  • La manière dont sera générée la représentation textuelle d’une énumération

Toutes ces personnalisations sont disponibles ici.

Dialogues avancés avec LUIS (Language Understanding Intelligence Service)

Laissez nous vous présenter LUIS

L’une des fonctionnalités majeures proposées par le bot s’effectue en collaboration avec LUIS (Language Understanding Intelligent Service) qui vous rend possible le traitement du langage naturel par un ordinateur.

LUIS est à l’heure actuelle dans une phase avancée de développement, et est de fait d’ores et déjà disponible pour vos développements. LUIS fournit des APIs REST afin d’interagir avec le bot, le rendant totalement agnostique au langage de programmation que vous utilisez.

La configuration et le suivi des performances de LUIS s’opèrent via son interface web sur laquelle sont détaillées un certain nombre d’informations.

Figure 5 : Interface de gestion d’une application LUIS

LUIS se base sur 3 concepts principaux :

  • Les Intents : Ils correspondent à des actions, lesquelles seront déduites via le texte
  • Les Entities : Ce sont les variables de votre modèle, c.à.d. les éléments clés d’une phase
  • Les Utterances : Les expressions et phases qui seront ingérées par LUIS

Figure 6 : Schéma haut niveau du fonctionnement de LUIS

Enfin, afin de rendre LUIS fonctionnel, vous devrez l’entrainer en amont à extraire les entités importantes. Pour cela, il suffira de rentrer des phrases type dans l’interface web, et d’identifier les entités ainsi que l’action qui en résulte. Suite à quoi, LUIS pourra être en mesure de prédire automatiquement ces informations.

Un exemple détaillé vous est proposé dans la suite de ce billet.

Intégration dans le Bot Framework

La combinaison de LUIS et du Bot Framework peut donc s’avérer être très bénéfique notamment, via cette capacité d’extraction, puis de restitution des informations pertinentes déduites directement du langage naturel.

Pour cela, le Bot Framework fournit une interface de haut niveau pour manipuler le service LUIS, en encapsulant toute l’interaction avec LUIS, vous permettant de vous concentrer uniquement sur la plus-value que vous apportera LUIS.

Le point d’entrée de LUIS dans le Bot Framework s’effectue via la classe LuisDialog et les différentes annotations liées : LuisModel, LuisIntent. Ainsi, vous pouvez dériver de la classe LuisDialog pour proposer votre implémentation spécifique, et décorer les méthodes adéquates de votre classe dérivée, afin qu’elles réagissent à une action spécifique.

Enfin, le Bot Framework expose toutes les informations reçues après un appel à LUIS via les classes LuisResult, IntentRecommendation et EntityRecommendation. Cette dernière fournit des méthodes afin de récupérer les différentes variables (Entities) extraites par votre modèle LUIS.

Nous en avons terminé avec cette seconde partie qui nous a permis d’aborder le Bot Framework et de vous en proposer, nous l’espérons, une vue d’ensemble.

Vous pouvez compléter cette vue d’ensemble avec la session suivante Building a Conversational Bot: From 0 to 60 de la conférence #Build2016. Le code associé est disponible ici sur la forge GitHub.

Dans la troisième et dernière partie de ce billet, nous allons « digérer » toutes ces informations en mettant en œuvre l’ensemble des points clés abordés jusqu’à présent sur un petit projet.

14 Jul 15:51

Un bot parmi nous ? – 1ère partie

by Philippe Beraud - MSFT

Lors de la conférence #Build2016, Microsoft a dévoilé bon nombre de nouveauté, dont notamment, une toute nouvelle façon d’interagir avec des robots, au moyen de notre langage naturel.

Cette nouvelle manière de communiquer fournit une nouvelle manière pour les utilisateurs d’interagir avec les services qui leur sont proposés.

Cette bibliothèque logicielle gratuite mise à disposition sous licence libre par Microsoft sur la forge communautaire GitHub permet en autres choses :

  • De traduire automatiquement dans plus de 30 langues,
  • D’utiliser la puissance de LUIS (Language Understanding Intelligence System) pour extraire l’information directement depuis le langage naturel,
  • Ou encore de fournir des connecteurs pour intégrer votre bot dans différentes applications de communication très répandues.

Dans la suite de ce billet, nous allons recenser les possibilités offertes par le bot, ainsi que leur implémentation au moyen d’exemples concrets. J’en profite pour remercier très sincèrement Morgan Funtowicz actuellement en stage au sein de l’équipe pour cette contribution J

Figure 1 : Exemple de mise en œuvre du Bot Framework

Installation dans Visual Studio et génération du squelette de l’application

Nous allons utiliser le langage de programmation C# tout au long de notre exemple. Aussi, nous utiliserons Microsoft Visual Studio (VS par la suite) comme environnement de développement intégré (IDE) principal.

(Si vous ne disposez pas (encore) de VS, vous pouvez télécharger gratuitement et installer Microsoft Visual Studio Community 2015 ici.)

Pour une première application, je vous propose d’installer le modèle fournit par Microsoft disponible à ici.

Une fois téléchargé, placer l’archive zip directement dans le dossier %USERPROFILE%\Documents\Visual Studio 2015\Templates\ProjectTemplates\Visual C#.

Relancez VS et créez un nouveau projet Bot Application (File -> New Project -> Installed -> Templates -> Visual C# -> Bot Application)

Figure 2 : Création d’un projet Bot Application dans VS 2015

En utilisant le modèle fournit, vous devriez obtenir une solution donc la structure est identique à celle-ci :

Figure 3 : Structure de l’application générée par le modèle

La structure est similaire à tout projet ASP.NET. Voici quelques compléments d’informations à ce propos :

  • Dossier App_Start. Contient les différents fichiers de configuration nécessaires à votre application. Notamment le format utilisé pour les messages (JSON ici), la police de routage des requêtes, etc.
  • Dossier Controllers. Contient les points de terminaison des requêtes HTTP reçues. Ces contrôleurs sont responsables du traitement de la requête, la génération et l’envoi de la réponse.
  • Fichier Web.config. Contient les informations d’authentification de votre bot (que nous aborderons plus précisément dans la prochaine partie de ce billet). Ce fichier contient aussi les références vers les différentes bibliothèques utilisées ainsi que les éventuelles chaines de connexion à des bases de données pour Entity Framework.

Afin de terminer la mise en place du projet, nous allons maintenant déployer cette application dans l’environnement d’exécution Microsoft Azure via le service Web App. A ce propos, un niveau gratuit est disponible pour ce service. Ceci nous sera des plus utile notamment pour les phases de développement d’application.

Avant de continuer, si vous ne possédez pas de compte Azure, nous vous invitons à vous rendre sur cette page, afin d’en créer un, gratuitement.

Pour se faire, un simple clic droit sur votre solution, puis Publish.

Figure 4 : Publication d’une application dans VS

Une interface s’ouvre, vous proposant différents moyens de publication, choisissez Microsoft Azure App service comme illustré ci-après.

Figure 5 : Publication dans Azure App Service

La prochaine fenêtre vous demande de fournir les informations de votre compte Azure, si ce n’est pas déjà fait, connectez-vous à ce dernier via le bouton Add and account en haut à droite.

Choisissez l’abonnement que vous souhaitez utiliser, et enfin, créez un nouveau App Service. (Vous pouvez aussi réutiliser un App Service si vous en possédez déjà un)

Figure 6 : Connexion à votre compte Azure

Donnez un nom à votre App Service, et, éventuellement, créez un groupe de ressources spécifique pour votre bot (par exemple : bot_ressources), et créer un nouveau App Service Plan (veillez à bien spécifier South Europe comme localisation de votre service) :

Figure 7 : Création du plan d’application

Une fois créé, que toutes les étapes sont validées, vous devriez être en mesure de publier votre application :

Figure 8 : Informations de publication sur Azure

Conservez bien ces informations, elles vous seront nécessaires pour enregistrer votre bot à l’étape suivante.

Mise en place de la configuration du bot

Avant de pouvoir interagir avec votre bot, il est absolument nécessaire d’enregistrer celui-ci sur le site de Microsoft dédié afin de définir les éléments clés qui permettront aux différents utilisateurs de communiquer avec votre bot.

Rendez-vous donc sur la page, et commencez par enregistrer votre bot en procédant de la façon suivante :

Figure 9 : Comment accéder à la page d’enregistrement du bot

Suite à cette opération, vous devriez vous retrouver avec un (imposant) formulaire vous demandant de saisir de nombreuses informations. Rassurez-vous, certaines informations sont nécessaires uniquement lors du passage en production de votre bot.

Afin de pouvoir commencer, les seules informations à remplir sont les suivantes :

  • Name : Le nom que vous souhaitez donner à votre bot
  • Description : Une description qui permet aux personnes intéressées par votre bot d’en savoir un peu plus sur lui 😉
  • Endpoint : L’URL du point de terminaison Azure obtenue dans la phase de publication de l’étape précédente
  • Publisher : L’entité émettrice du bot
  • Bot Privacy URL : Une URL permettant d’accéder à la politique sur la protection de la vie privée concernant votre bot. Dans notre cas, nous mettrons la même URL que pour l’information Endpoint
  • AppID : Un identifiant qui permet d’identifier votre bot de manière unique

Une fois ces informations renseignées, vous devriez être en mesure d’enregistrer votre bot dans votre console de gestion.

Après quoi, une interface récapitulative s’affichera :

Figure 10 : Interface de gestion d’un bot

Dans cette interface, vous pouvez retrouver toutes les informations précédemment renseignées telles que le nom bot, l’URL permettant de communiquer avec votre bot, ainsi que les informations d’authentification auprès de celui-ci.

De plus, un outil vous permet de tester directement la connexion avec le bot, en entrant simplement un message.

Enfin, sur la partie droite de la page, sont listés les différents canaux d’intégration disponibles pour votre bot : Un canal représente une application tierce pour laquelle un connecteur est disponible afin d’interfacer l’application et votre bot.

Ainsi, par exemple, il vous est possible, sans code supplémentaire, d’intégrer votre directement à Skype, Slack, etc.

Vous êtes à ce stade fin prêt(e) pour rentrer dans les « arcanes » du Framework bot. Ce sera l’objet d’une prochaine partie du billet 😉

Nous en restons ici pour cette première partie. Stay tuned !

14 Jul 09:49

Self-care matters: Pay yourself first

by Scott Hanselman

My son
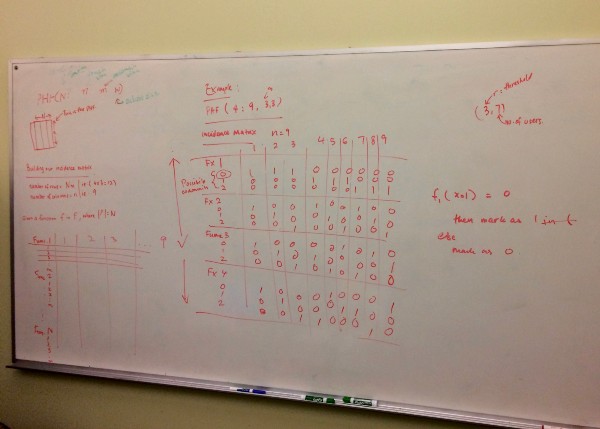
I was meeting with a mentee today and she was commenting how stressed out she was. Overwhelmed with work, email, home, life, dinners, the news, finances...you know. LIFE. I am too. You likely are as well.

We spent about on the phone talking about how to make it better and it all came down to self-care. Sometimes we all need to be reminded that we matter. It's OK to take a moment and be selfish. You are the center of your universe and it's important to take time for yourself - to appreciate your value.

Depending on your personality type, you may give so much of yourself to your family, your work, your family and friends that you forget what's at the core! You! If you don't take care of yourself then how will you take care of everyone else?

This may seem obvious to you. If it does, that's cool. Click away. But sometimes obvious things need to be said and for my mentee and I, today, we needed to hear this and we needed a plan.

Here's some of our ideas.

  • Cancel a meeting.
    • Maybe cancel two. If you look at your day with absolute dread, is there a ball that you can drop safely? Perhaps ask a coworker if they can handle it for you?
  • Pay yourself first
    • Finances are a stressor for everyone. My wife and I used to argue about little $5 debit card things because they not only added up but they filled up the register, were hard to track, and generally distracted us from important stuff like the rent. Now we get an allowance. I don't use a credit card, I have a certain amount of cash each week (we get the same amount). I can buy Amazon Gift Cards or iTunes cards, I can eat at Chipotle whenever, or buy an Xbox game. Now when an Xbox game shows up she is interested in hearing about the game, not sweating how it was purchased. Pay yourself first.
  • Setup Formal Me-Time
    • Once a week my wife and I have a day off. From each other, from the family, just...off. I leave at 5pm and come back late. She does the same. Sometimes I see a movie, sometimes I walk around the mall, sometimes I code or play Xbox. The point is that it's MY TIME and it's formal. It's boxed and it's mine. And her time is hers. You shouldn't have to steal an hour when you're super stressed. PAY yourself an hour, up front.
    • We also do a weekly date night. Always. Gotta prioritize. I hate hearing "we haven't seen a movie or had a dinner in years...you know, kids." Nonsense. Get a sitter from the local uni and pay yourself first with TIME.
  • Self-care
    • Schedule a massage. Have your nails done (everyone should do their nails at least once). Get a haircut. Dance. Clean your office. Sleep. Do whatever it is that feeds your spirit.
  • Say no
    • Sometimes "No. I just can't right now." is enough to stop an email thread or a something when you feel you just can't. Drop the ball. Life is somewhat fault tolerant. Use your judgment of course, but truly, unless your software is saving babies, maybe take a break. Even an hour or a "mental health day" helps me no burn out.

Do you pay yourself first? Do you need to be reminded that you deserve health and happiness? Let me know in the comments.


Sponsor: Big thanks to Redgate for sponsoring the feed this week. Have you got SQL fingers? Try SQL Prompt and you’ll be able to write, refactor, and reformat SQL effortlessly in SSMS and Visual Studio. Find out more!


© 2016 Scott Hanselman. All rights reserved.
     
14 Jul 06:54

Google Bloks veut apprendre aux enfants à coder

by Benoit

Google vient de lancer son projet Bloks, une plateforme hardware connecté pour apprendre aux enfants les principes du code.

Au dernier CES, il y avait le kit Lego WeDo 2.0 et Code-a-Pillar chez Fisher Price.

A l’occasion du Mobile World Congress 2016, nous avions aussi pu découvrir le projet de Samsung et BBC pour apprendre à coder avec des cartes programmables.

Et même des projets plus modestes comme le robot Kamibot pour reprogrammer un petit robot. Bref, savoir coder devient de plus en plus clé dans notre société et Google l’a bien compris en lançant son Projet Bloks.

Google lance le Projet Bloks

Pour cela, la société de Mountain View s’est associée avec Paulo Blikstein de l’université de Stanford et Ideo, société spécialisée dans le design.

Les 3 partenaires ont voulu « créer une plate-forme open hardware que les chercheurs, les développeurs et les concepteurs puissent utiliser pour construire des expériences de codage physiques » pour les enfants.

Celui est composé de trois parties. Le Brain board, une carte Rasberry Pi Zero gérant la connectivité et pouvant se connecter en Wifi ou Bluetooth.

Fonctionnement de Bloks

Les autres éléments sont des Base boards : différents blocs de commandes définissant les instructions à communiquer. Et enfin les Pucks, ces petits palets représentant l’action à executer.

Ceux-ci peuvent avoir différentes formes utiliser différentes matières, mais :

« en l’absence de composants électroniques actifs, ils sont tous bon marché et faciles à construire. Au minimum, tout ce dont vous aurez besoin pour faire un Puck c’est un morceau de papier et de l’encre conductrice ».

Leur assemblage n’est d’ailleurs pas forcément linéaire et il est possible d’agencer les boutons comme bon vous semble.

Chaque base contient un moteur haptique ainsi que des LED afin de fournir un retour à l’utilisateur, mais ils peuvent également commander le haut-parleur présent sur le Brain Board. Bref, chacun peut en créer suivant ses besoins et ses envies.

En les assemblants, les enfants peuvent executer une procédure complète, chaque bloc représentant une action défini. Google juge que cette méthode d’apprentissage plus social et sensorielle est nettement mieux adaptée aux mécanismes de compréhension des enfants.

Comme chaque carte est reprogrammable, il est possible de changer les instructions ou d’en condenser plusieurs dans un seul palet. L’eventail de possibilité reste très large.

Nous sommes au tout debut du programme, mais Google a déjà lancer un test auprès de différentes écoles. Si les résultats sont concluant, la multinational se mettra en marche de l’étendre.

Via

11 Jul 22:05

Announcing TypeScript 2.0 Beta

by Daniel Rosenwasser

Today we’re excited to roll out our beta release of TypeScript 2.0. If you’re not familiar with TypeScript yet, you can start learning it today on our website.

To get your hands on the beta, you can download TypeScript 2.0 Beta for Visual Studio 2015 (which will require VS 2015 Update 3), or just run

npm install -g typescript@beta

This release includes plenty of new features, such as our new workflow for getting .d.ts files, but here’s a couple more features just to get an idea of what else is in store.

Non-nullable Types

null and undefined are two of the most common sources of bugs in JavaScript. Before TypeScript 2.0, null and undefined were in the domain of every type. That meant that if you had a function that took a string, you couldn’t be sure from the type alone of whether you actually had a string – you might actually have null.

In TypeScript 2.0, the new --strictNullChecks flag changes that. string just means string and number means number.

let foo: string = null; // Error!

What if you wanted to make something nullable? Well we’ve brought two new types to the scene: null and undefined. As you might expect, null can only contain null, and undefined only contains undefined. They’re not totally useful on their own, but you can use them in a union type to describe whether something could be null/undefined.

let foo: string | null = null; // Okay!

Because you might often know better than the type system, we’ve also introduced a postfix ! operator that takes null and undefined out of the type of any expression.

declare let strs: string[] | undefined;

// Error! 'strs' is possibly undefined.
let upperCased = strs.map(s => s.toUpperCase());

// 'strs!' means we're sure it can't be 'undefined', so we can call 'map' on it.
let lowerCased = strs!.map(s => s.toLowerCase());

Control Flow Analysis for Types

TypeScript’s support for handling nullable types is possible thanks to changes in how types are tracked throughout the program. In 2.0, we’ve started using control flow analysis to better understand what a type has to be at a given location. For instance, consider this function.

/**
 * @param recipients  An array of recipients, or a comma-separated list of recipients.
 * @param body        Primary content of the message.
 */
function sendMessage(recipients: string | string[], body: string) {
    if (typeof recipients === "string") {
        recipients = recipients.split(",");
    }

    // TypeScript knows that 'recipients' is a 'string[]' here.
    recipients = recipients.filter(isValidAddress);
    for (let r of recipients) {
        // ...
    }
}

Notice that after the assignment within the if block, TypeScript understood that it had to be dealing with an array of strings.
This sort of thing can catch issues early on and save you from spending time on debugging.

let bestItem: Item;
for (let item of items) {
    if (item.id === 42) bestItem = item;
}

// Error! 'bestItem' might not have been initialized if 'items' was empty.
let itemName = bestItem.name;

We owe a major thanks to Ivo Gabe de Wolff for his work and involvement in implementing this feature, which started out with his thesis project and grew into part of TypeScript itself.

Easier Module Declarations

Sometimes you want to just tell TypeScript that a module exists, and you might not care what its shape is. It used to be that you’d have to write something like this:

declare module "foo" {
    var x: any;
    export = x;
}

But that’s a hassle, so we made it easier and got rid of the boilerplate. In TypeScript 2.0 you can just write

declare module "foo";
declare module "bar";

When you’re ready to finally outline the shape of a module, you can come back to these declarations and define the structure you need.

What if you you depend on a package with lots of modules? Writing those out for each module might be a pain, but TypeScript 2.0 makes that easy too by allowing wildcards in these declarations!

declare module "foo/*";

Now you can import any path that starts with foo/ and TypeScript will assume it exists. You can take advantage of this if your module loader understands how to import based on a certain patterns too. For example:

declare module "*!text" {
    const content: string;
    export = content;
}

Now whenever you import a path ending with !text, TypeScript will understand that the import should be typed as a string.

import text = require("./hello.txt!text");
text.toLowerCase();

Next Steps

One feature you might be wondering about is support for async functions in ES3 & ES5. Originally, this was slated for the 2.0 release; however, to reasonably implement async/await, we needed to rewrite TypeScript’s emitter as a series of tree transformations. Doing so, while keeping TypeScript fast, has required a lot of work and attention to detail. While we feel confident in today’s implementation, confidence is no match for thorough testing, and more time is needed for async/awaitto stabilize. You can expect it in TypeScript 2.1, and if you’d like to track the progress, the pull request is currently open on GitHub.

TypeScript 2.0 is still packed with many useful new features, and we’ll be coming out with more details as time goes on. If you’re curious to hear more about what’s new, you can take a look at our wiki. In the coming weeks, a more stable release candidate will be coming out, with the final product landing not too far after.

We’d love to hear any feedback you have, either in the comments below or on GitHub. Happy hacking!

25 Jun 07:17

Adding a Custom Inline Route Constraint in ASP.NET Core 1.0

by Scott Hanselman

ASP.NET supports both attribute routing as well as centralized routes. That means that you can decorate your Controller Methods with your routes if you like, or you can map routes all in one place.

Here's an attribute route as an example:

[Route("home/about")]

public IActionResult About()
{
//..
}

And here's one that is centralized. This might be in Startup.cs or wherever you collect your routes. Yes, there are better examples, but you get the idea. You can read about the fundamentals of ASP.NET Core Routing in the docs.

routes.MapRoute("about", "home/about",

new { controller = "Home", action = "About" });

A really nice feature of routing in ASP.NET Core is inline route constraints. Useful URLs contain more than just paths, they have identifiers, parameters, etc. As with all user input you want to limit or constrain those inputs. You want to catch any bad input as early on as possible. Ideally the route won't even "fire" if the URL doesn't match.

For example, you can create a route like

files/{filename}.{ext?}

This route matches a filename or an optional extension.

Perhaps you want a dateTime in the URL, you can make a route like:

person/{dob:datetime}

Or perhaps a Regular Expression for a Social Security Number like this (although it's stupid to put a SSN in the URL ;) ):

user/{ssn:regex(d{3}-d{2}-d{4})}

There is a whole table of constraint names you can use to very easily limit your routes. Constraints are more than just types like dateTime or int, you can also do min(value) or range(min, max).

However, the real power and convenience happens with Custom Inline Route Constraints. You can define your own, name them, and reuse them.

Lets say my application has some custom identifier scheme with IDs like:

/product/abc123

/product/xyz456

Here we see three alphanumerics and three numbers. We could create a route like this using a regular expression, of course, or we could create a new class called CustomIdRouteConstraint that encapsulates this logic. Maybe the logic needs to be more complex than a RegEx. Your class can do whatever it needs to.

Because ASP.NET Core is open source, you can read the code for all the included ASP.NET Core Route Constraints on GitHub. Marius Schultz has a great blog post on inline route constraints as well.

Here's how you'd make a quick and easy {customid} constraint and register it. I'm doing the easiest thing by deriving from RegexRouteConstraint, but again, I could choose another base class if I wanted, or do the matching manually.

namespace WebApplicationBasic

{
public class CustomIdRouteConstraint : RegexRouteConstraint
{
public CustomIdRouteConstraint() : base(@"([A-Za-z]{3})([0-9]{3})$")
{
}
}
}

In your ConfigureServices in your Startup.cs you just configure the route options and map a string like "customid" with your new type like CustomIdRouteConstraint.

public void ConfigureServices(IServiceCollection services)

{
// Add framework services.
services.AddMvc();
services.Configure<RouteOptions>(options =>
options.ConstraintMap.Add("customid", typeof(CustomIdRouteConstraint)));
}

Once that's done, my app knows about "customid" so I can use it in my Controllers in an inline route like this:

[Route("home/about/{id:customid}")]

public IActionResult About(string customid)
{
// ...
return View();
}

If I request /Home/About/abc123 it matches and I get a page. If I tried /Home/About/999asd I would get a 404! This is ideal because it compartmentalizes the validation. The controller doesn't need to sweat it. If you create an effective route with an effective constraint you can rest assured that the Controller Action method will never get called unless the route matches.

If the route doesn't fire it's a 404

Unit Testing Custom Inline Route Constraints

You can unit test your custom inline route constraints as well. Again, take a look at the source code for how ASP.NET Core tests its own constraints. There is a class called ConstrainsTestHelper that you can borrow/steal.

I make a separate project and setup xUnit and the xUnit runner so I can call "dotnet test."

Here's my tests that include all my "Theory" attributes as I test multiple things using xUnit with a single test. Note we're using Moq to mock the HttpContext.

public class TestProgram

{

[Theory]
[InlineData("abc123", true)]
[InlineData("xyz456", true)]
[InlineData("abcdef", false)]
[InlineData("totallywontwork", false)]
[InlineData("123456", false)]
[InlineData("abc1234", false)]
public void TestMyCustomIDRoute(
string parameterValue,
bool expected)
{
// Arrange
var constraint = new CustomIdRouteConstraint();

// Act
var actual = ConstraintsTestHelper.TestConstraint(constraint, parameterValue);

// Assert
Assert.Equal(expected, actual);
}
}

public class ConstraintsTestHelper
{
public static bool TestConstraint(IRouteConstraint constraint, object value,
Action<IRouter> routeConfig = null)
{
var context = new Mock<HttpContext>();

var route = new RouteCollection();

if (routeConfig != null)
{
routeConfig(route);
}

var parameterName = "fake";
var values = new RouteValueDictionary() { { parameterName, value } };
var routeDirection = RouteDirection.IncomingRequest;
return constraint.Match(context.Object, route, parameterName, values, routeDirection);
}
}

Now note the output as I run "dotnet test". One test with six results. Now I'm successfully testing my custom inline route constraint, as a unit. in isolation.

xUnit.net .NET CLI test runner (64-bit .NET Core win10-x64)

Discovering: CustomIdRouteConstraint.Test
Discovered: CustomIdRouteConstraint.Test
Starting: CustomIdRouteConstraint.Test
Finished: CustomIdRouteConstraint.Test
=== TEST EXECUTION SUMMARY ===
CustomIdRouteConstraint.Test Total: 6, Errors: 0, Failed: 0, Skipped: 0, Time: 0.328s

Lots of fun!


Sponsor: Working with DOC, XLS, PDF or other business files in your applications? Aspose.Total Product Family contains robust APIs that give you everything you need to create, manipulate and convert business files along with many other formats in your applications. Stop struggling with multiple vendors and get everything you need in one place with Aspose.Total Product Family. Start a free trial today.


© 2016 Scott Hanselman. All rights reserved.
     
21 Jun 13:47

Forgotten (but Awesome) Windows Command Prompt Features

by Scott Hanselman

It's always the little throwaway tweets that go picked up. Not the ones that we agonize over. I was doing some work at the command line and typed "dotnet --version | clip" to copy the .NET Core version number into the clipboard. Then I tweeted a little "hey, remember this great utility?" and then the plane took off. I landed two hours later and it had over 500 RTs. Madness.

It's funny that 10 year old command prompt utility (this was added in Vista) that everyone's forgotten elicits such an enthusiastic response.

Since you all love that stuff, here's a few other "forgotten command prompt features."

Some of these have been in Windows since, well, DOS. Others were added in Windows 10. What did I miss? Sound off in the comments.

Pipe command output to the clipboard

In Vista they added clip.exe. It captures any standard input and puts in the clipboard.

That means you can

  • dir /s | clip
  • ver | clip
  • ipconfig /all | clip

You get the idea.

Piping to Clip.exe puts the standard output in your clipboard

F7 gives you a graphical (text) history

If you have already typed a few commands, you can press F7 to get an ANSI popup with a list of commands you've typed. 4DOS anyone?

More people should press F7

Transparent Command Prompt

After Windows 10, you can make the Command Prompt transparent!

It's see through

Full Screen Command Prompt

Pressing "ALT-ENTER" in the command prompt (any prompt, cmd, powershell, or bash) will make it full screen. I like to put my command prompt on another virtual desktop and then use CTRL-WIN-ARROWS to move between them.

The Windows 10 Command Prompt supports ANSI natively.

The cmd.exe (conhost in Windows 10 1511+, actually) now supports ANSI directly. Which means BBS Ansi Art, of course.

Word wrapping

Oh, and the Windows 10 command prompt supports active word wrapping and resizing. It's about time.

Little Fit and Finish Commands

  • You can change the current command prompt's title with "TITLE"
  • You can change its size with MODE CON COLS=x LINES=y
  • You can change the colors from a batch file with COLOR (hex)

What did I miss?


Sponsor: Working with DOC, XLS, PDF or other business files in your applications? Aspose.Total Product Family contains robust APIs that give you everything you need to create, manipulate and convert business files along with many other formats in your applications. Stop struggling with multiple vendors and get everything you need in one place with Aspose.Total Product Family. Start a free trial today.


© 2016 Scott Hanselman. All rights reserved.
     
18 Jun 06:57

Stop saying learning to code is easy.

by Scott Hanselman
WoC in Tech Stock Photos used under CC

(The photo above was taken at the Microsoft NYC office of three amazing young developers working on their apps.)

I saw this tweet after the Apple WWDC keynote and had thought the same thing. Hang on, programming is hard. Rewarding, sure. Interesting, totally. But "easy" sets folks up for failure and a lifetime of self-doubt.

When we tell folks - kids or otherwise - that programming is easy, what will they think when it gets difficult? And it will get difficult. That's where people find themselves saying "well, I guess I'm not wired for coding. It's just not for me."

Now, to be clear, that may be the case. I'm arguing that if we as an industry go around telling everyone that "coding is easy" we are just prepping folks for self-exclusion, rather than enabling a growing and inclusive community. That's the goal right? Let's get more folks into computers, but let's set their expectations.

Here, I'll try to level set. Hey you! People learning to code!

  • Programming is hard.
  • It's complicated.
  • It's exhausting.
  • It's exasperating.
  • Some things will totally make sense to you and some won't. I'm looking at you, RegEx.
  • The documentation usually sucks.
  • Sometimes computers are stupid and crash.

But.

  • You'll meet amazing people who will mentor you.
  • You'll feel powerful and create things you never thought possible.
  • You'll better understand the tech world around you.
  • You'll try new tools and build your own personal toolkit.
  • Sometimes you'll just wake up with the answer.
  • You'll start to "see" how systems fit together.
  • Over the years you'll learn about the history of computers and how we are all standing on the shoulders of giants.

It's rewarding. It's empowering. It's worthwhile.

And you can do it. Stick with it. Join positive communities. Read code. Watch videos about code.

Try new languages! Maybe the language you learned first isn't the "programming language of your soul."

Learning to programming is NOT easy but it's totally possible. You can do it.

More Reading


Sponsor: Big thanks to Redgate for sponsoring the feed this week. How do you find & fix your slowest .NET code? Boost the performance of your .NET application with ANTS Performance Profiler. Find your bottleneck fast with performance data for code & queries. Try it free!


© 2016 Scott Hanselman. All rights reserved.
     
16 Jun 16:44

Le fabricant du Raspberry Pi racheté par Dätwyler pour 775 M€

by Geoffray

Premier Farnell, le principal fabricant de Raspberry Pi vient d’être rachetée par le suisse Dätwyler pour 775 millions d’euros. Cette opération ne devrait occasionner aucun changement de stratégie commerciale.

Le britannique Premier Farnell, fabricant du nano-ordinateur le plus populaire dans le monde pour prototyper des objets connectés rapidement vient de faire l’objet d’une offre de rachat record : pas moins de 775 millions d’euros (soit $867 M) ont été proposés par l’industriel suisse Dätwyler.

Raspberry-Pi-1

Si on se souvient encore du rachat de Makerbot par Stratasys (pour 403 M$) avec des changements importants à la clé (notamment l’abandon de la stratégie open-source), ce devrait être différent pour Raspberry Pi.

Assemblé par le fabricant britannique Premier Farnell dans le cadre d’une licence d’exploitation, le nano-ordinateur pas plus gros qu’une carte de crédit s’est écoulé à plus de 8 millions d’exemplaires sous ses différentes formes et depuis son lancement en 2012.

La fondation éponyme qui gère le Raspberry Pi avait annoncé récemment les dernières évolutions apportées au produit, conçu à l’origine comme un projet éducatif visant à faciliter l’apprentissage du code et à accélérer le prototypage d’appareils électroniques.

D’ores-et-déjà, la Fondation a assuré que le rachat de son partenaire fournisseur ne changerait pas le mode de fonctionnement de Raspberry Pi, bâti à partir du célèbre triptique « Teach, Learn & Make » !

L’organisation devrait ainsi continuer à diffuser ses plans et ses mises à jour en format open-source comme ç l’accoutumée.

Via

16 Jun 05:35

10 Lessons from a Long Running DDD Project – Part 1

by Jimmy Bogard

Round about 7 years ago, I was part of a very large project which rooted its design and architecture around domain-driven design concepts. I’ve blogged a lot about that experience (and others), but one interesting aspect of the experience is we were afforded more or less a do-over, with a new system in a very similar domain. I presented this topic at NDC Oslo (recorded, I’ll post when available).

I had a lot of lessons learned from the code perspective, where things like AutoMapper, MediatR, Respawn and more came out of it. Feature folders, CQRS, conventional HTML with HtmlTags were used as well. But beyond just the code pieces were the broader architectural patterns that we more or less ignored in the first DDD system. We had a number of lessons learned, and quite a few were from decisions made very early in the project.

Lesson 1: Bounded contexts are a thing

Very early on in the first project, we laid out the personas for our application. This was also when Agile and Scrum were really starting to be used in the large, so we were all about using user stories, personas and the like.

We put all the personas on giant post-it notes on the wall. There was a problem. They didn’t fit. There were so many personas, we couldn’t look at all of them at one.

So we color coded them and divided them up based on lines of communication, reporting, agency, whatever made sense

image

Well, it turned out that those colors (just faked above) were perfect borders for bounded contexts. Also, it turns out that 72 personas for a single application is way, way too many.

Lesson 2: Ubiquitous language should be…ubiquitous

One of the side effects of cramming too many personas into one application is that we got to the point where some of the core domain objects had very generic names in order to have a name that everyone agreed upon.

We had a “Person” object, and everyone agreed what “person” meant. Unfortunately, this was only a name that the product owners agreed upon, no one else that would ever use the system would understand what that term meant. It was the lowest common denominator between all the different contexts, and in order to mean something to everyone, it could not contain behavior that applied to anyone.

When you have very generic names for core models that aren’t actually used by any domain expert, you have something worse than an anemic domain model – a generic domain model.

Lesson 3: Core domain needs consensus

We talked to various domain experts in many groups, and all had a very different perspective on what the core domain of the system was. Not what it should be, but what it was. For one group, it was the part that replaced a paper form, another it was the kids the system was intending to help, another it was bringing those kids to trial and another the outcome of those cases. Each has wildly different motivations and workflows, and even different metrics on which they are measured.

Beyond that, we had directly opposed motivations. While one group was focused on keeping kids out of jail, another was managing cases to put them in jail! With such different views, it was quite difficult to build a system that met the needs of both. Even to the point where the conduits to use were completely out of touch with the basic workflow of each group. Unsurprisingly, one group had to win, so the focus of the application was seen mostly through the lens of a single group.

Lesson 4: Ubiquitous language needs consensus

A slight variation on lesson 2, we had a core entity on our model where at least the name meant something to everyone in the working group. However, that something again varied wildly from group to group.

For one group, the term was in reference to a paper form filed. Another, something as part of a case. Another, an event with a specific legal outcome. And another, it was just something a kid had done wrong and we needed to move past. I’m simplifying and paraphrasing of course, but even in this system, a legal one, there were very explicit legal definitions about what things meant at certain times, and reporting requirements. Effectively we had created one master document that everyone went to to make changes. It wouldn’t work in the real world, and it was very difficult to work in ours.

Lesson 5: Structural patterns are the least important part of DDD

Early on we spent a *ton* of time on getting the design right of the DDD building blocks: entities, aggregates, value objects, repositories, services, and more. But of all the things that would lead to the success or failure of the project, or even just slowing us down/making us go faster, these patterns were by far the least important.

That’s not to say that they weren’t valuable, they just didn’t have a large contribution to the success of the project. For the vast majority of the domain, it only needed very dumb CRUD objects. For a dozen or so very particular cases, we needed highly behavioral, encapsulated domain objects. Optimizing your entire system for the complexity of 10% really doesn’t make much sense, which is why in subsequent systems we’ve moved towards a more CQRS model, where each command or query has complete control of how to model the work.

With commands and queries, we can use pretty much whatever system we want – from straight up SQL to event sourcing. In this system, because we focused on the patterns and layers, we pigeonholed ourselves into a singular pattern, system-wide.

Next up – lessons learned from the new system that offered us a do-over!

Post Footer automatically generated by Add Post Footer Plugin for wordpress.