Shared posts

22 Dec 20:21

Jar Spells from @thethrifthywitch

by Unknown

Spell jars are containers where you add ingredients that correspond to the intention of your spell. Until it is sealed, this jar is filled with the ingredients you have selected, charging them with your intention and energy.


Hi, this is Amira Asmodea and today I will bring you some great spell jars created for @thethriftywith.

Spell jars are pretty common and can be really powerful. This seals some of my first ingredients in wax and allows me to burn items right in the jar.   I usually start mine when there is a ½ inch of wax in the bottom, and the wick is still burning.

  • These are the basic steps:  
  • Define your intention  
  • Choose your ingredients  
  • Charge items and fill the jar  
  • Seal and decorate  
  • Meditate with it   
  • Find a place for it.  

I think the most important part is how much intention I put into it. The more I plan and create, the better the spell works. All that effort and intention really pulls together many disparate parts of my magic craft.   

And remember, my best advice is to follow your gut!  


Jar Spell for Bussines Success


A Jar Spell to Raise your Vibration


A Jar Spell to Ground You


Jar Spell for when you're bournt out


Jar spell for Emotional Comfort


Jar Spell for a Spiritual Reset


Jar Spell for Pandemic Depression


Jar Spell for Finding true love


A Jar Spel for Creativity


A Jar Spell for Energy


A Jar Spell for Focus and Concentration


A Jar Spell for Business Success


29 Mar 20:29

MEDICAL POLICE STATE is here: New York county bans unvaccinated people from all public spaces... "imprisons" those who refuse to take dangerous injections

by Isabelle Z.
(Natural News) Government officials exploiting disease outbreaks to scare people into getting profitable vaccines is nothing new, but it has taken on a very concerning twist in New York this week. Rockland County has just declared a state of emergency, taking the opportunity to ban unvaccinated children from going to public places as a measles...
25 Oct 18:05

15 Stunning Images of Fulani-Inspired Braids

by Lisa

Fulani-inspired braids were all the rage this past summer. I may be a bit late to the parade, but I am here for them.  According to Wikipedia, “The Fula people or Fulani or Fulɓe, numbering between 20 and 25 million people in total,[10] are one of the largest ethnic groups in the Sahel and West Africa. 

The way the Fulani people fashion their hair is unique:

Their long hair is put into five long braids that either hang or are sometimes looped on the sides. It is common for women and girls to have silver coins and amberattached to their braids. Some of these coins are very old and have been passed down in the family. The women often wear many bracelets on their wrists.

fulanii-braids

Africa | Wodaabe. Niger. Image appeared in the National Geographic, October 1983 edition (volume 164, No 4)

Below you’ll fine 15 modern images of Fulani-inspired styles.

fulan-braids


fulani-braids-pinterest

For more inspiration watch this tutorial:

Can I also say that I love how we breathe new life into these styles without forgetting to give credit where credit is due?  We love you Mama Africa! And for more braided inspiration, check out this post HERE.

The post 15 Stunning Images of Fulani-Inspired Braids appeared first on Lisa a la mode.

24 May 14:38

Raised Garden Beds 101: Tips on Planning, Building, & Using

by Brittney Smart

Raised garden beds are one of the best tools for gardening. They minimize weeds, they allow for greater organization and access, they facilitate planting and harvesting, and they just look beautiful. There are also about a million different ways to implement raised garden beds into your life – from simple planter pots to 3’ high raised boxes, from small raised beds to large raised beds.

This article is meant to present one tried and true method of raised garden boxes that has worked successfully for our family for about five years now (and still going strong). Feel free to pick and choose what interests you and/or would work in your individual circumstances and situations. Happy gardening!

RAISED GARDEN BEDS: PLANNING PHASE

Planning the Placement & Layout

The first thing you’ll need to do when considering raised garden beds is plan them out. Specific things to consider are: where will the raised garden beds be located (you’ll need a place with access to water and lots and lots of direct sunlight) and how much space you have or want to devote to them (research “square foot gardening” to determine how much space you need for what you want to grow).

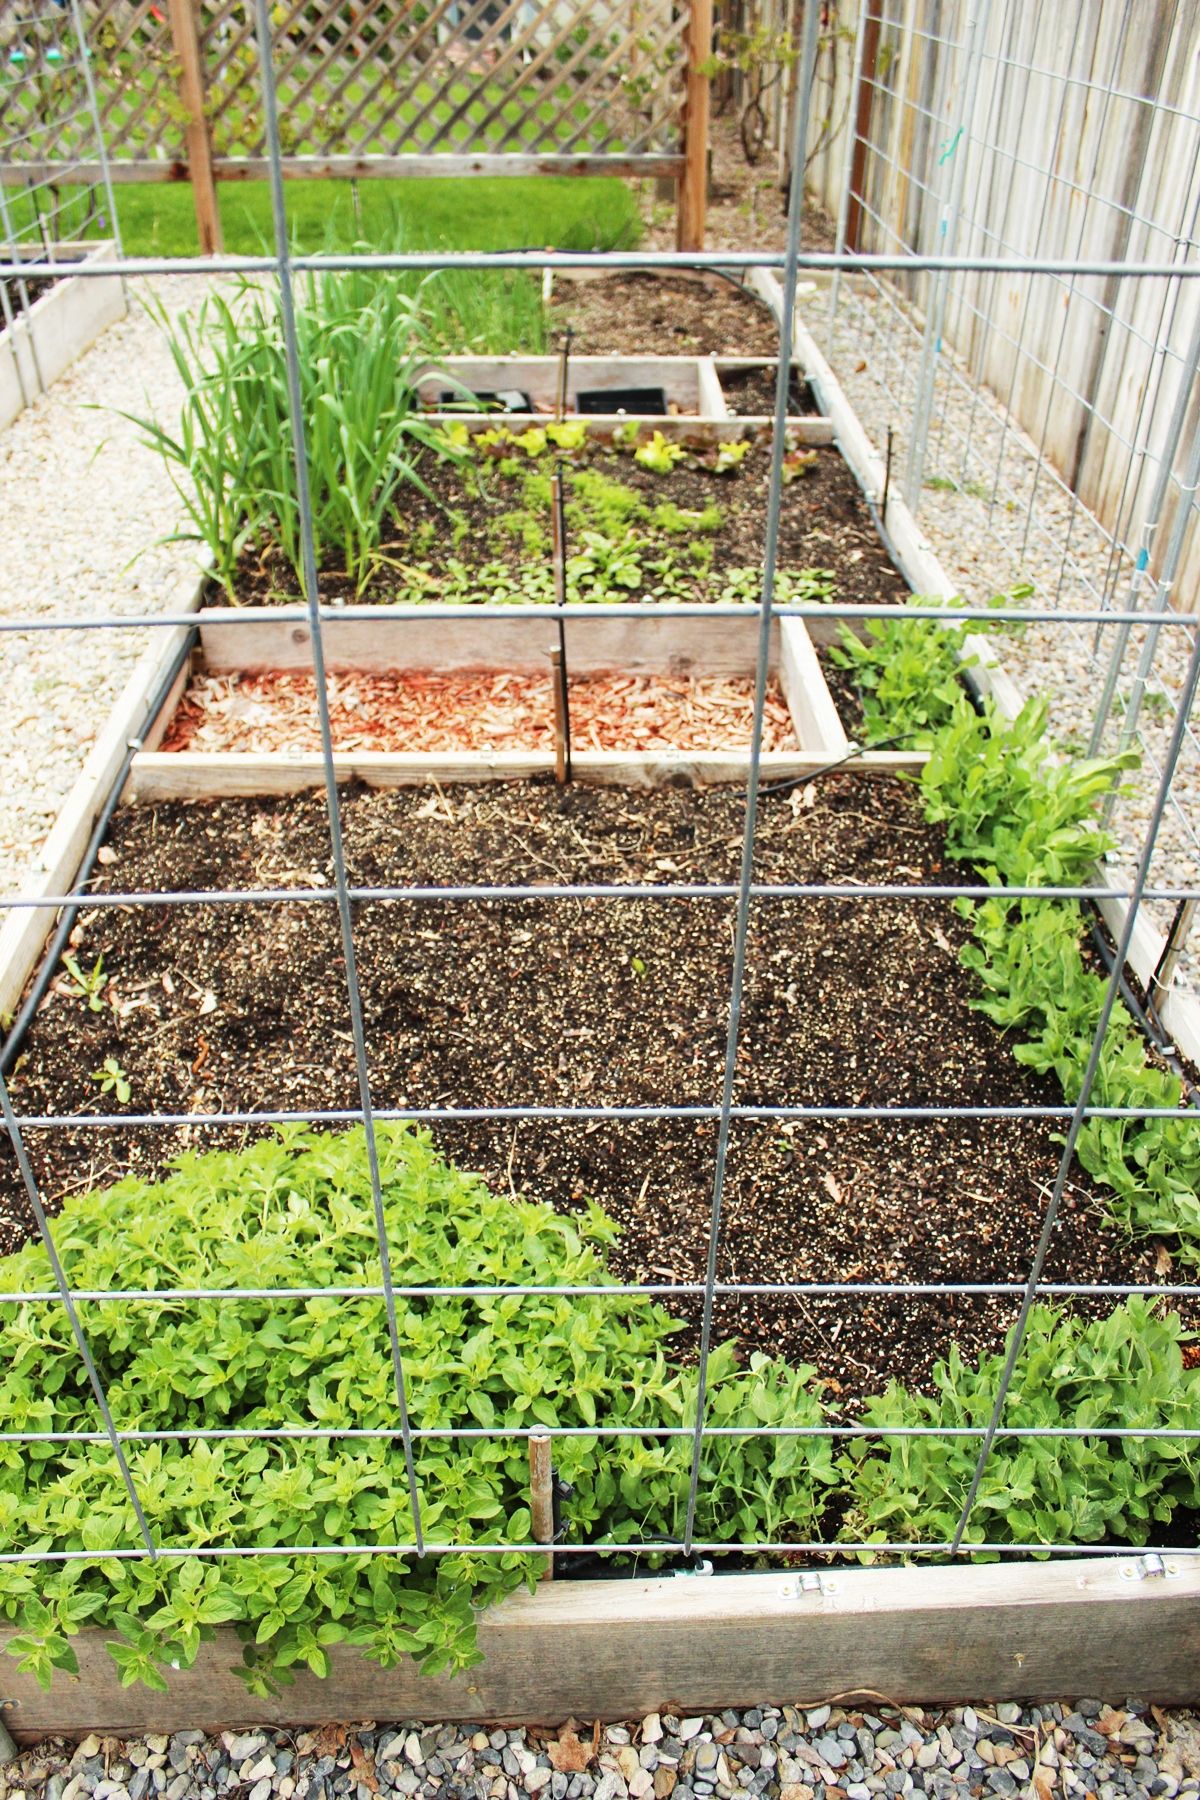
This example shows a sunny part of the yard with two large raised garden beds. Each box measures 18’ x 5’ overall. Because of this extensive length (many people prefer to build beds with smaller dimensions, such as 4×4 or 5×5), this design incorporates two built-in pathways (2’x4’) in each box to allow for easy access to the garden plants for both planting and harvest. These are red bark spaces you see here.

You’ll also want to consider access to the garden itself. Because this raised garden box plot is surrounded by house (one side), fence (two sides), and grape arbor (one side), we planned out the most aesthetic and pragmatic access points possible.

One access point is the gate in the wooden fence, which opens directly into the gap between the two raised garden beds. The other access point is a grape arbor archway, defined by a flagstone pathway in the lawn itself.

Planning for Climbing Plants

One aspect to consider, when planning your raised garden beds, is whether or not you’ll be planting crops with climbing potential. These would be plants such as peas, pole beans, tomatoes, squashes, melons, cucumbers, etc. One option for accommodating climbers such as this is to install galvanized pipe up from the corners of your raised garden beds (secured by 24” rebar into the ground) and running across from corner to corner. (This is discussed later on in more detail.)

(Budget Tip: You can use PVC fittings, instead of galvanized pipe fittings, on your galvanized pipe climbing grid frames.)

Then tie nylon netting with a wide grid (example shows about a 4” grid) onto the pipe. This is a good low-cost option for climbers, as you can harvest from either side of the raised garden beds, although you’ll need to replace the nylon netting every couple of years.

An alternative for climbers, and one that has a higher upfront cost but lower hassle over time, is using metal caging sheets with a wide grid. You can use your same galvanized pipe frame. Use thick wire to attach the wire grid to the galvanized pipe on sides and top. This is our recommended method, as it provides much more stability as the plants and harvest get bigger and heavier (think: pumpkin vines climbing up the metal grid and growing enormous pumpkins – heavy!).

RAISED BOX GARDEN: BUILDING PHASE

Now that you’ve planned out, at least roughly, what you want your raised box garden to look like, it’s time to build. This is a very simple design. Take 2×12 douglas fir (or other weather-hardy wood, such as cedar or redwood) and cut to fit your specifications. As mentioned, these two raised garden beds were designed to be 18’x5’ overall.

Each raised garden box corner is held together with two heavy duty metal brackets, one near the top and one near the bottom (the lower one is covered by soil in this photo). 1-1/2” outdoor screws were used to install the brackets. No other attachment was used or necessary to keep the wood beds together.

To connect the longer lengths of lumber (the 12’ to 6’ lengths making up the raised garden box sides), flat brackets were used. Two brackets on the inside and two on the outside of the planter box at every straight joint.

Where the red bark walkways were installed, 3” exterior screws were used as a lower-cost option to keep the douglas fir boards in place in connection with the raised box garden outer frame. The same is true for the short cross-pieces near the top of each walkway, which were implemented to provide an additional 2 square feet of growing capacity per walkway.

To water the raised box garden automatically, a drip sprinkler line is key. Sprinkler hoses were attached with metal c-clamps around the interior of each square. An L-shaped cutout was made on the top corner of each walkway board so the hose could sit down inside the garden boxes, which minimized opportunities for getting cut, stepped on, tripped over, pulled, kinked, or whatever else. Basically, it was to protect the hose and keep it out of the way.

Each hose then wraps around the interior perimeter of the raised garden box before traveling onto the next one. (Smaller drip hose is used to connect the sprinklers to this larger main hose.) Remember, the hose doesn’t designate planatable area; the raised garden box perimeter does. It’s just nice to have the hose out of the way on the perimeter.

Each of the smaller 1’x2’ sections at the top of each red bark walkway gets a simple round of soaker drip hose, which makes more sense in these smaller areas than installing a sprinkler.

Sprinklers are raised sprinkler heads, generally used as sprayers on drip lines for landscaping, placed either in the corner or centers of the boards of each 5’ section. The sprinklers stand about 12” high so they can spray over the plants, but their posts are typically too flimsy to support and secure the sprayer in the right direction all by themselves. So we’ve inserted 24” bamboo posts directly by each sprayer. Over the winter, some of the zip ties don’t make it, so each spring we replace a few.

Simply pull the sprayer next to the bamboo support post, taking care to keep the sprayer itself free and clear and unobstructed from its spraying duties by the bamboo post.

Wrap a zip tie around the sprinkler post and the bamboo post near the top of the sprinkler post. Tighten the zip tie.

This will keep the sprinkler secure and allow you to specify exactly where you want it spraying. It will also protect it from accidentally getting stepped on and broken as the summer progresses. (Experience talking here.)

As you’ve planned for climbing plants, it’s simple enough to build the grid for them to climb. Use galvanized pipe with either PVC fittings or galvanized fittings (we’ve used both with success) to keep the frame together. Pound 24” pieces of rebar into the ground, about 12”-16” down, then slide your vertical galvanized pipes over top of the rebar. This is secure and stable.

Acquire some sheets of heavy duty metal grating from an outdoors store, and line it up with your frame. Use metal wire to attach the grating to the frame every foot or so.

You can trim down your grating or simply overlap it with another sheet, depending on the tools you have available and the spacing you require. We found it easiest, and most secure, simply to overlap the ends of the grating. We have used nylon netting in the past, because it was initially less expensive. It worked fine and is a good option if you’re starting out and figuring out just how you want your garden to work. But I’d recommend metal grating once you determine that you’ll have climbers every year, simply because it’s easy and heavy duty. This will last a long, long time.

RAISED BOX GARDEN: PLANTING PHASE

Below are some tips and tricks we use for planting basic plants. You can also refer to this instructional article for some other helpful information on planting seeds and growing healthy plants.

You’ll likely find yourself planting in shifts, depending on what zone you live in, and what your spring weather is. Don’t worry about filling in all the square feet of your raised garden beds at once; they’ll be filled later on with tomatoes or peppers or whatever else you want to plant after the last frost.

Onions –We started onions from seed our first year and decided it was much easier and more economical to simply buy onion starts from our trusted local seed and garden store. Begin by raking some of your soil to the side, so you have a flat surface about 3” lower than your actual raised box garden soil level.

If your soil has been used for vegetables in the past, it might be a good idea to supplement its nutrients with a little bone meal, a slow release fertilizer to help stabilize the starts while they acclimate and grow.

Sprinkle a thin layer of bone meal onto this lowered soil level. Ultimately, you want the bone meal to be about an inch below the plants when they’re in the ground.

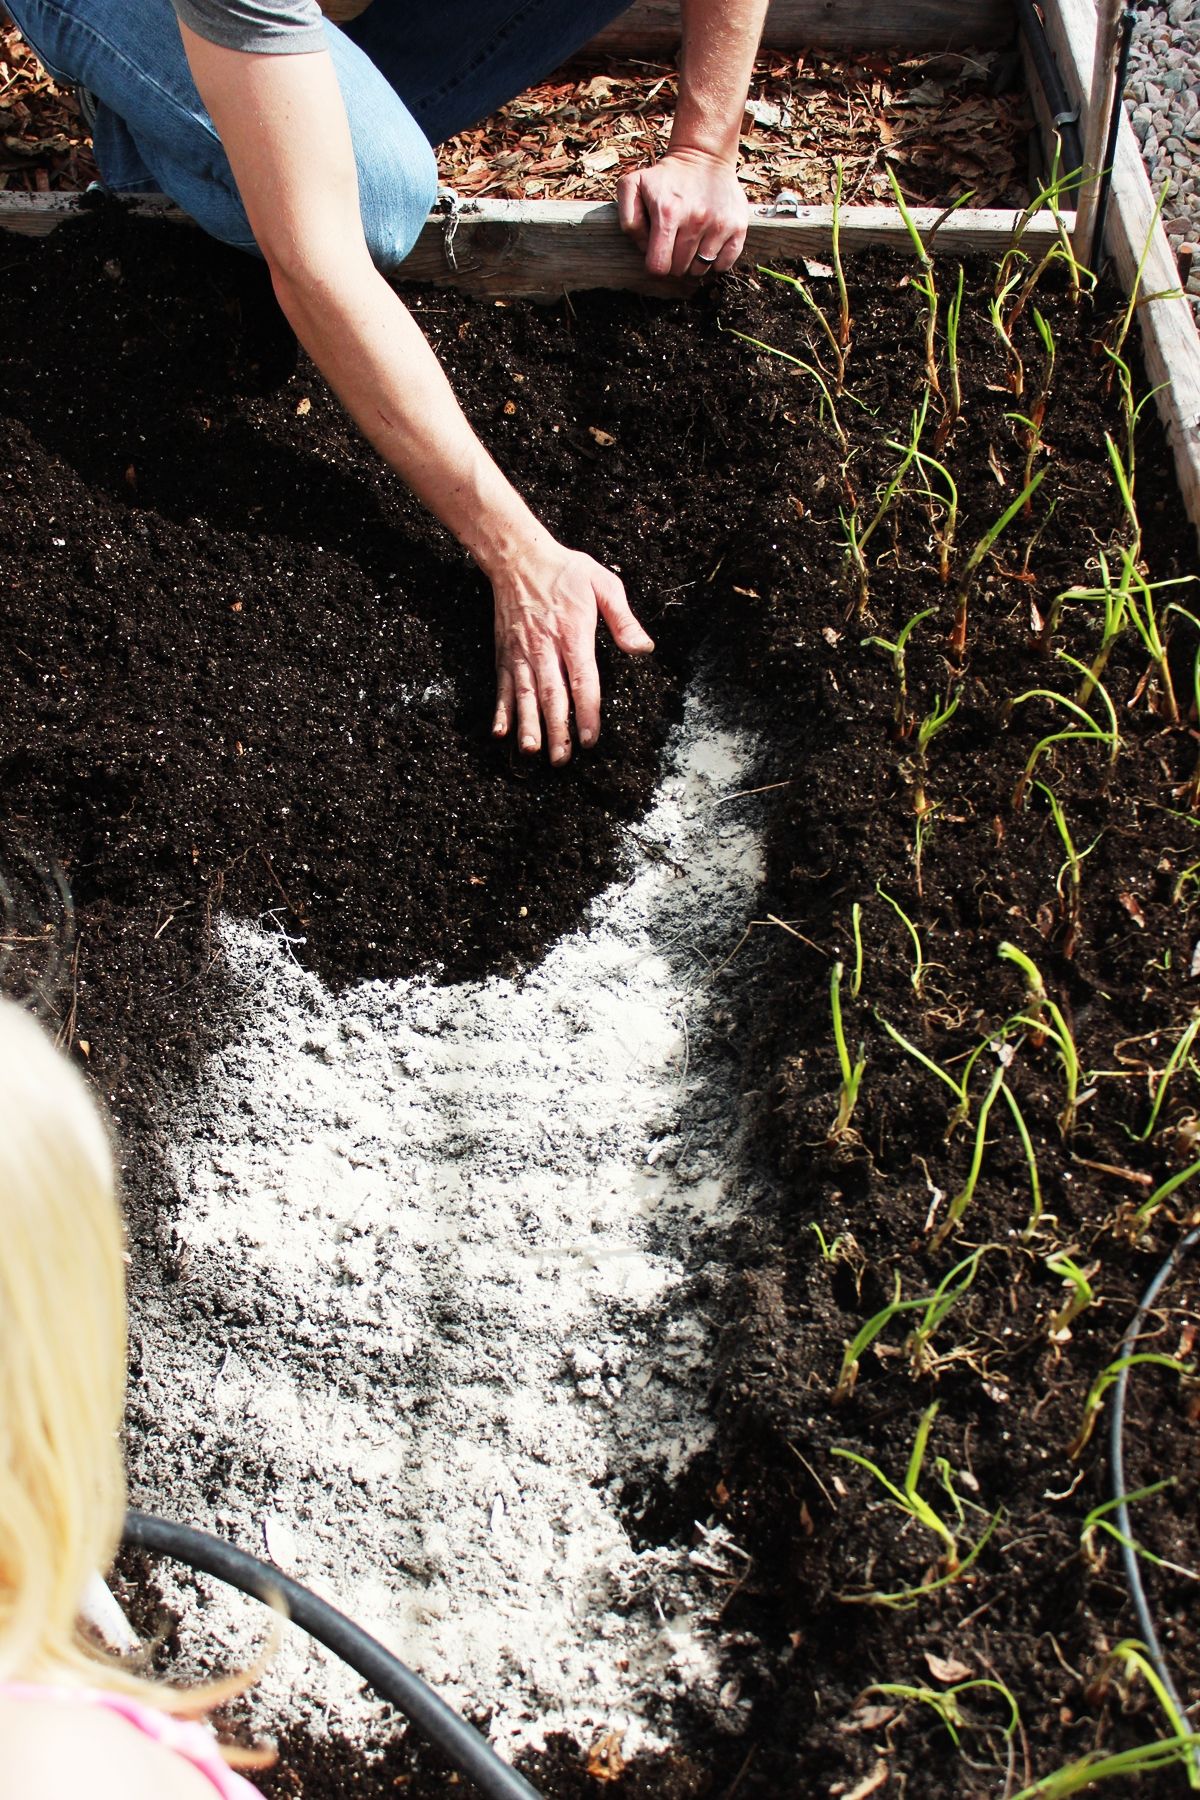
Cover the bone meal back up with the soil you’ve raked aside. This section is now ready to receive onion starts.

Onions are the easiest things in the world to plant and grow, I think! Make a little hole in the ground with your finger, and gently slide the onion start in so all its roots and the bulb are underground about an inch or so.

Carefully pat the soil around the onion plant so it stays in place. You can plant 16 onions per square foot with excellent results.

Here are the onions about a month after the onion starts were planted. Doing well, even after a 3” snowfall the day before this photo was taken.

Peas – Snow peas are another favorite in our kid-friendly vegetable garden. Begin by soaking the peas  for about an hour in water. I should say that some people skip this step altogether and have delicious and healthy peas. We’ve always soaked ours because it’s supposed to help them sprout sooner and better. In the end, do whatever works for you.

Prepare the soil for planting. You can shovel in some fertilizer, some fresh potting mix, vermiculite, or other recommendations from your local gardening experts. We usually add fertilizer and/or growing aids for individual crops as we plant them, so for peas, we simply rake the ground, especially the edges near the metal grate. Peas are climbers.

You can plant peas in a line, about eight peas per square foot. An efficient way we’ve found to plant them is to simply lay them on top of the soil in the line you want.

Then go along and push them about an inch or two into the soil, and gently cover them up with soil. Don’t press the soil down too hard; keep it loose to help the pea germinate.

After a few weeks, when the pea plants have grown tall enough to reach the bottom of your climbing grid, you might need to “help” them along by winding their vines around the grid. Keep an eye on these plants at this point for the next week or so; it’s easy to train them upward when they’re young, and it’s much easier to harvest peas when the plants are climbing.

Strawberries – We transplanted our strawberry plants out of our raised garden beds this year, because they had been successfully bearing fruit for about four years, and it was time to get new plants in a new space.

We added fresh potting soil into this raised planter box (full DIY instructions here) and simply placed the new bare root strawberries into the soil, taking care to keep all roots underground. Strawberries can be planted about four per square foot. We then snaked a soaker hose (hooked up to the automatic drip system, which is KEY for us in successful gardening) around the soil so every strawberry plant has access to water, then staked the hose into place. Viola. Berry simple.

You can see that, after just a few weeks, the drip soaker hose is almost not visible. This is good for both aesthetics and function/protection.

Can you see each plant, loaded with strawberry blossoms and even the starts of the berries themselves? I love the idea of harvesting these from a raised garden box at a waist-height level.

This is what your indoor growing station might look like, while you wait out a cold spell to fill your raised garden boxes. It’s worth the wait, though. With careful planning and regular care, raised garden boxes are a perfect blend of form and function, even years down the road.

You're reading Raised Garden Beds 101: Tips on Planning, Building, & Using , originally posted on Homedit. If you enjoyed this post, be sure to follow Homedit on TwitterFacebook and Pinterest.

12 Jan 06:58

Adding fluoride to public water may cause bone cancer in some, warns expert

by By L.J. Devon, Staff Writer
(NaturalNews) The byproducts of the phosphate mining industry, hexafluorosilicic acid and sodium silicofluoride, are sold to cities around the world, and then dumped into those cities' municipal water supplies. We're told that fluoride prevents cavities, and this is the justification...
11 Jan 04:52

Fill your Body with Energy, Eliminate Toxins and Cleanse Your Fatty Liver With Just One Morning Sip of This Drink

by admin
Shaneka

Health

This amazing combination has the ability to protect you from numerous infections caused by viruses and bacteria.

We all know the health benefits of olive oil. But, when combined with lemon juice, it has amazingly powerful anti-bacterial, anti-viral and anti-inflammatory properties. Moreover, it will revitalize your body and boost your energy.

This drink will also cleanse your body from toxins and harmful chemicals which are dangerous for your health.

You will soon notice that the dark circles around your eyes have disappeared.

However, you have to be persistent and consume the drink on daily basis for at least one month.

Combine one teaspoon of olive oil with one glass of freshly squeezed lemon juice and consume the resulting mixture every morning, on an empty stomach.

After that you can normally have your breakfast.

This drink will improve your digestive function and will help you lose weight.

It is the perfect natural remedy for constipation and irregular bowel movements.

Source: www.justhealthylifestyle.com

03 Jul 12:53

Lupita Nyong’o Demonstrates Her Hair Braiding Artistry

by ThirstyRoots

Lupita Nyong'o braiding hair

Who knew that, Lupita Nyong’o, this talented Oscar award winning actress have braiding skills under her tool belt of skills. Presented by Vogue, Lupita demonstrates on film how she primps her friends hair for free, all for the love of braiding and the artistry of hair styling:

“When I got back to school from learning how to braid hair in Kenya, I also decided it was going to be my side hussle, I was going to make some money braiding people’s hair. So I went through the great troubles of creating a poster, but I just did not have the heart to charge anyone, so my friends would make appointments with me, and I’d spend the whole weekend braiding their hair. I just couldn’t charge them. I never made any money from it.”- Lupita Nyong’o

She states how she loves her hair texture for its versatility and how “braiding just tells a story” with all the different shapes you can create.

Watch the video for an endearing experience of a friend sharing her talents with her girl friends:

16 Aug 19:56

Dating Interracially While Natural

by Kischa Ford

interracial-couple2-470-wplok

“Why are you walking so fast, babe? It’s just rain.”

“Oh, just hush & come on!”

“Is this a black girl hair thing?”

Yes. Yes, it was. There have been many times in my life, mostly as I’m fleeing from water & mostly with people who call me “babe,” when and for whom I’ve been called upon to clarify whether something is a black girl hair thing.

Interracial dating, you see, isn’t my novelty so much as my norm. There’s been only just enough of an assortment over the years to distract me from the very obvious truth of my very obvious “type.” It wasn’t until a roommate once pointed out that a rebound bore a striking resemblance to my previous beau that it at last occurred to me nearly every serious boyfriend I’ve had since the age of majority could be hauled in under the same all-points bulletin. Early to Mid-Thirties. Tall. Lean. Shaved Head. White Male.

And while there are there are a litany of hot buttons on which people will expound when confronting the intersection of dating & race, for me, the Rubicon of the black girl-white boy relationship has always been as simple as broaching the subject of my hair. From the one-month wonders to the loves of my life, when it comes to dating, I’ve frequently had to contend with white boys’ unfamiliarity, appreciation, frustration, and fascination with my ‘do. It’s a love-hate relationship that I have with the relationship the men I like and love have with my hair. Say that ten times fast.

There are always those early first few sleepovers during which I’ll forgo wrapping my hair at bedtime so that I might achieve the ludicrous goal of looking pretty in my sleep.  I neatly splay the scarf over the pillow, only to have it balled up somewhere under the sheets by dawn, & discreetly reposition it in time for morning pillow talk. Soon enough, they’d get around to noticing this little dance, inquiring after its purpose, & listening rapt to my explanation regarding the varying moisture retentions of cotton & silk.

“I’m actually supposed to wrap my hair with it,” I say. “It gets damaged when I don’t.”  My tone is inevitably half sheepish confession and half accusation, as though I acknowledge the silliness but have chosen to lay its partial responsibility at his feet.

“Oh,” he’d shrug in reply. “Then why didn’t you?”

Other thresholds will come, and other questions with them. Why can’t he run his fingers through it while we cuddle? Why don’t I ever want to make love in the shower? I would hear them all as though he were impugning me for denying him life’s myriad sensual pleasures by way of my high maintenance.

I felt it wise, at times, to judge men by their judgment of my hair. It’s not exactly a bad yardstick either. There were those who did wield it as a weapon to wound. The sound of a paddle brush stroking through weft hair was of a particular annoyance to one unfortunately long-lasting partner, a fact he was fond of spitting forth in his surlier moments. But the most part, they were, at worst, entirely less concerned than I gave them credit for and, at best, the most reliable source of encouragement for which I could ever ask.

There was a distinctly, devilishly awestruck “wow” elicited from a former flame on first sight of my newly natural hair that let me know, in no uncertain terms, I had made the right choice. And long before I began my transition, long after I’d all-but-forgotten it was even there, it was my beaus who’d express their desire to see my natural hair. “Why don’t you wear it like that? I bet it’s beautiful,” they’d say, & still I’d find a way to get defensive or to tell them they were in the wrong.

Why did their simple curiosity put me so on edge? Why did I react as though there were four hundred years of history in our bedroom when it was really two lovers learning about one another minds & bodies. What could be sweeter?

I found the more confident I felt in my own skin, less intrusive those questions felt. The comfort level I need to attend to is not theirs, but my own. They’re already my biggest fans.

Kischa Ford is a writer in New York.

31 Jul 20:26

Recipe: Super C Tonic (And A Chance To Win A Juice Cleanse From Love Grace!)

by fp julia

Recipe: Super C Tonic (And A Chance To Win A Juice Cleanse From Love Grace!)

Post image for Recipe: Super C Tonic (And A Chance To Win A Juice Cleanse From Love Grace!)

At our Toronto store event taking place this Thursday, we will have juice samples from Love Grace – a company that specializes in delicious gourmet juices, smoothies, and elixirs.  Jake Mabanta, the founder of Love Grace, was kind enough to come up with some special juice recipes just for the blog, and I’m excited to share the first one here today! This refreshing tonic is the perfect way to kick-start your day.  It’s a burst of citrus flavor with a kick, and I enjoyed ever last drop of it. They’ve also offered to give away a juice cleanse to one lucky reader!

To enter: Tweet the link to this blog post @freepeople, and we’ll select one winner at random at the end of the week who will receive a 1 day juice cleanse courtesy of Love Grace!*

*US only.

super c tonic juice recipe

Super C Tonic

This simple cocktail is a fun way to jump start and maintain your cleanse. High vitamin C content to keep the immune system strong, alkalizing and cleansing.

5 mint leafs
4 oz filtered water
2 oz lime juice
Juice from half of a grapefruit
1 Tbsp agave or coconut sugar
1 tsp camu camu powder
pinch of salt
dash of cayenne
dash of cardamom
1/2 C ice
Muddle mint leaves in a glass or shaker cup. Add remaining ingredients, cover, shake and enjoy!

super c tonic juice recipe

super c tonic juice recipe

super c tonic juice recipe

More healthy recipes from the BLDG 25 Blog.

Follow FP Julia on twitter.

Free People Blog

07 May 19:04

Gang initiation, Tweed Run (Part 1)

by Shini
Shaneka

How wonderful!

ParknCube_TweedRun2013_02b

The 2013 London Tweed Run, with Tokyobike

ParknCube_TweedRun2013_03b

ParknCube_TweedRun2013_02g

Yu Fujiwara, manager at Tokyobike UK and photographer at 8 and 2 blog

ParknCube_TweedRun2013_05

My ride for the day!

ParknCube_TweedRun2013_04

…then to UCL to meet the rest of the gang and fuel up

ParknCube_TweedRun2013_07

feasting on Vintage Rascal models

ParknCube_TweedRun2013_06

ParknCube_TweedRun2013_09

ParknCube_TweedRun2013_10

ParknCube_TweedRun2013_13

ParknCube_TweedRun2013_11

ParknCube_TweedRun2013_14

ParknCube_TweedRun2013_15

ParknCube_TweedRun2013_20

ParknCube_TweedRun2013_16

ParknCube_TweedRun2013_17

ParknCube_TweedRun2013_18

ParknCube_TweedRun2013_19

Our good marshalls

ParknCube_TweedRun2013_21

ParknCube_TweedRun2013_23

ParknCube_TweedRun2013_22

ParknCube_TweedRun2013_24

ParknCube_TweedRun2013_27

ParknCube_TweedRun2013_25

ParknCube_TweedRun2013_28n

One can not decline a last minute invitation to join a biker gang, now can one.

The Tweed Run is one of those few elusive, fantastic events in London that you only hear about after its all happened, or worse, one you see happening one random Saturday when, just the other day you’d reminded yourself to find out when it’s taking place. So yes, being in a (flash mob) biker gang is pure awesome, but to be in time for it is a small miracle. The bigger miracle of course, is actually having tickets for it as they’re allocated through an auction (ours of which were provided by Yu Fujiwara [Tokyobike UK manager]). At 8am we convened at the Tokyobike shop in Shoreditch, where we were presented our rides for the day – mine, a mushroom-coloured beauty – and had our numbers pinned onto our sleeves. Then we joined the rest of the gang at the UCL courtyard, where the 500-strong mob filed in, dressed in some form of tweed, bumping fists and fueling for the six-hour tour through Central London. Promptly at 11am we were shepherded out by the marshalls and a day of grins-on-wheels (and bum-bruising) would begin.

Stay tuned for part two, the fellowship of the Tweeds, and a journey across middle-London.

The post Gang initiation, Tweed Run (Part 1) appeared first on PARK & CUBE.

25 Apr 16:01

Why I need more Raid

by Alicia

We the Tribe sweatshirt, Current Elliot pants, JM Cazabat shoes

Wearing my favorite sweatshirt and trying to step outside of the denim box. I don’t think I’ve worn these pants since Hoggie was an infant (jeez!). The shoes I don’t wear nearly as much as I’d like to. I still think these are the most perfect pair of pumps in existence; they have that whole unfussy, minimal, no platform thing I was going on about in the previous post.

And speaking of the previous post, let me tell you all about that bug problem I mentioned…

*sigh*

Ok, so the temperature here is starting to rise, and it’s about the time for the ants of L.A. to make their way into people’s homes in search of water. Normal. We put down some ant bait and wait for the scouts to not come back inside. Heh. The next day, a swarm is at the window. Then there’s a swarm in the back. Dudeguy, thinking this odd, dutifully purchases a can of Raid and sources where the ants are coming from. He’d removed some old posts to put a new fence up a couple of weeks ago and saw that the ants were coming from the hole. He sprays inside of the hole and ALL OF THE SIX LEGGED CREATURES OF THE WORLD start POURING UP and OUT of it. Ants everywhere. Roaches of various sizes everywhere. It looked just like that part in Indiana Jones and the Temple of Doom where the screamy blonde chick had to reach inside of that bug filled tunnel to keep the wall of spikes from crushing Indy and that little Asian kid.

You remember.

So yes. Disgusting. Insects pouring up out of the ground and spazzing and dying from the Raid. Hundreds of them. He finds another hole where a post had been. Sprays inside the hole. Another swarm.

Now he’s wondering whether or not we should seek out the person who hexed the house. He asks the neighbor what the deal was. Apparently, there was a gopher problem a few years ago and an exterminator came out and…exterminated them. Trouble is, gophers, being the ground dwelling creatures they are, do not surface when exterminated. They die in their network of tunnels and then decay and then attract ALL OF THE SIX LEGGED CREATURES OF THE WORLD to come and feast on the remains. They then breed and turn your backyard into a huge nest of awful, creeping, crawling things that will eventually make their way to the inside of your house when it’s hot outside.

I haven’t slept a decent night since this happened because I think the house is going to suddenly fall into the ground and that I will be eaten alive by insects.

This is a completely rational line of thought.

I am a wholehearted believer in the “Hov did that, so hopefully you won’t have to go through that” school of thought, so here is a lesson for all of you lovies. If you are buying a house, never trust flippers, make sure the countertops are level, and check all of the inspection reports for signs of there ever being gophers on the property. If there ever were, chances are high that you live on top of a kingdom of insects that is waiting for your house to collapse so they can eat you. Or something like that.