×You need to sign in to continue.

Shared posts

21 Oct 04:59

A Beautiful Collection of Insects

The USGS Native Bee Inventory and Monitoring Program is program run by biologists with the U.S. Geological Survey in Maryland. Part of their work is to develop identification tools and keys for native bee species by creating accurate and detailed pictures of native bees and the plants and insects they interact with. The biologists set up a mini studio surrounded by a styrofoam cooler with a black background to make their macro shots, stacking anywhere from 30 to 300 photos to get an image in focus. They have shared their collection of more than 1,200 photos online, from whuich I've selected the following 20 below. [20 photos]


Euglossa dilemma, a male orchid bee from the Biscayne National Monument in Florida. (CC BY USGS/Sam Droege)


21 Oct 04:55

Painting with Light in the Landscape

by Andrew Gibson

Painting with light

Most of the articles I’ve written about light so far have explored the use of natural light. Painting with light in the landscape takes that idea further by mixing artificial light, provided by the photographer, with the ambient light to create surreal and dramatic images.

Painting with light is an effective technique because it works with two ideas that, when combined, become very powerful:

  • Painting with light usually takes place at dusk. The main reason for this is entirely practical. You use either a torch or a portable flash to paint with light, and they are not bright enough to use during the day. The light is very beautiful during twilight, so this turns out to be a benefit.
  • Painting with light uses two colours that work very well together – orange and blue. Now, you may use coloured gels to paint with other colours, but these should still be colours like red, green and yellow that contrast nicely with the natural blue colour of the light you get at twilight.

The tools

Let’s take a look at the tools you can use to paint with light. First is my favourite, a hand-held rechargeable lantern that I bought from a local hardware store (just like this one). It’s powerful – the light has a strength of one million candlepower (you can buy models with two or five million candlepower). It wasn’t expensive, and also comes in useful to keep around the house or in the car. It has a tungsten bulb.

Using the lantern is easy. First, you need a spectacular landscape.

For example, these cliffs at Muriwai, a beach near Auckland in New Zealand, are a dramatic scene:

Painting with light

I was curious to see what happened if I used the lantern to paint the cliffs with light. I returned another evening to try it, here’s the result:

Painting with light

The technique itself is quite simple. Turn the lantern on, point it at the scene you want to paint, then gently move the lantern so the light from its beam covers the surface of the subject. You do this while the camera’s shutter is open.

You’ll need a shutter speed that gives you enough time to paint the subject, so you’re looking at at least ten seconds. Thirty seconds is easier (hence the need for low light). Don’t use neutral density filters to obtain these shutter speeds, as they also block the light from the lantern. You need to wait until the ambient light is low enough to obtain these shutter speeds through a combination of low ISO and small aperture (such as f11 and f16, but preferably not f22 as diffusion will soften the image).

The crucial aspect is timing. Try it too early, when the light is bright, and the light from the torch won’t be strong enough to overpower the daylight. Leave it too late and it will be too dark. The sky will be black, and you won’t have any background detail.

What you’re looking for is the sweet spot between these two extremes. When the light is low enough to give you a shutter speed of around 30 seconds, and the light from the torch balances with the ambient light, and it is still light enough to get good background detail.

The best way of finding the sweet spot is to test it out. Put your camera on a tripod, decide how you will compose the image and then wait for the light to fade. Take a test shot when the light is low enough for a shutter speed of ten seconds or so. Then look at the result on your camera’s screen.

Does the ambient light overpower the light from the torch? Then you need to wait until it gets darker. Did you cover the subject evenly with the torch light? This may take several attempts to get right. Hopefully, the moment that you figure out how to paint the subject with light will coincide with the moment the ambient light and torch light balance each other perfectly.

When you find the sweet spot, keep going until the ambient light fades away. You can decide which image you prefer when you view the results on the computer.

Painting with light

This is a photo taken earlier. You can see that it’s too early to work yet – the light from the lantern is overpowered by the ambient light. It also needs more work to get the coverage right.

Using portable flash

Another way to paint with light is to use portable flash. Using a lantern is simple, and a good way to get started. But if you’d like to take up the challenge, portable flash gives you some interesting options. Here’s why:

  • You can use portable flash to fire multiple bursts of light at the subject, building up the exposure over time.
  • You can use coloured gels to give light of different colours.
  • You can shoot at night, rather than at dusk, using portable flash to fire multiple bursts of light, building up an exposure over time. You can use multiple flashes, or the same flash with different coloured gels, to do so. There are lots of good examples here at Troy Paiva’s Lost America website.

The essence of the technique is again simple. Switch your flash unit to manual, and use the highest powered setting (1:1). Work out your composition in advance, preferably while there is still enough light to see. Wait until the light gets low, then start using your flash to illuminate the subject.

If you are going to be in the frame yourself, make sure you are wearing black clothes. Don’t stand still – keep moving so that you don’t register in the frame. Keep your body between the flash unit and the camera so that the light from the flash head itself doesn’t appear in the frame, just the light that illuminates the subject. Keep checking the camera’s LCD screen to see how the images are coming out, and adjust your technique accordingly.

Here’s a photo I created using a portable flash unit fitted with an orange gel (CTO – Colour Temperature Orange) to imitate the look of a tungsten bulb.

Painting with light

Mastering Photography

Painting with light

My ebook Mastering Photography: A Beginner’s Guide to Using Digital Cameras introduces you to digital photography and helps you make the most out of your digital cameras. It covers concepts such as lighting and composition as well as the camera settings you need to master to take photos like the ones in this article.

Post originally from: Digital Photography Tips.

Check out our more Photography Tips at Photography Tips for Beginners, Portrait Photography Tips and Wedding Photography Tips.

Painting with Light in the Landscape

03 Oct 09:30

Inpaint will magically remove unwanted elements from your photos!

by Giveaway of the Day team

Inpaint will magically remove elements from your photos! With few simple gestures you will get clear, spectacular pictures, just like you intended them to be. Inpaint’s Magic Wand tool allows you to select unwanted objects or persons on a photo in literally seconds, so all you have to do then is to let Inpaint do the rest.

With merely three simple steps you can make power lines, tourists, buildings, background wreckage and other elements vanish as if they never were there. Inpaint also allows you to quickly improve your skin on photos and conceal everything you don’t want to show. Just apply the Marker tool or the Magic Want tool to every problem zone and instantly see the difference!

03 Oct 04:39

It’s Guest Blog Wednesday featuring Mark S. Johnson!

by Brad Moore

I’m writing this post in the wake of the devastating flood that swept through my town of Boulder, Colorado just over two weeks ago.  Like so many others, my family endured the hardship of fighting rising floodwaters only to see them consume 50% of our home.  As if this weren’t challenging enough, the City of Boulder drainage system backed up, filling our basement and part of our first level with sewage.  We spent nearly two weeks without the ability to shower, wash clothes, clean dishes, or cook food.  Although my family was shaken by the impact of the flood, I can already feel hope beginning to wash over me.  I attribute this to the love and support of our family and friends and to the resiliency of the creative human spirit.  The flood is giving me a fresh perspective and helping to crystallize several important ideas that I’d like to share today (the images associated with these ideas are merely intended to entertain and inspire).

In this fast-paced, often cynical world, each and every one of us can benefit from sincere encouragement and inspiration.  Here is an invitation: Consider being the person who provides these things both to yourself and to others.  The result will be a more harmonious world where we feel supported each time we share our work with others or take creative risks.

Creativity is not a gift for a chosen few.  It is your birthright!  Proof of this lies within the heart and mind of every child.  Just yesterday, I marveled as my daughter discovered (for more than 30 minutes) that plastic bags make incredible parachutes for dolls.  Sadly, it is only through repeated negative conditioning that we become convinced that we’re not creative.  In the words of best-selling author Richard Bach, “Argue for your limitations, and sure enough they’re yours.”  When you don’t feel innovative, consider seeking out an image that deeply inspires you and let it serve as a stepping stone to your own creation.  Viewing (and even imitating) work that you love is a great way to get your creative juices flowing.  Often, when I set out to mimic someone else’s work, I wind up creating something that becomes uniquely my own.

Creativity is like a meandering river with numerous bends.  I’ve been creating images for 20 years and I still encounter challenges in every one.  Only though experimentation and so-called “failures” do I arrive at gratifying results.  Mistakes and “failures” are our best learning opportunities.

In the initial stages of each creative endeavor, do whatever you can to gently quiet your inner critic (which masquerades as fear-based thoughts).  We all have one and it doesn’t nourish us.  The more you honor and appreciate yourself and all the uniqueness you bring to this world, the more creative and productive you’ll become.  Remember that the best way to evaluate your own pictures is by how much each one makes your heart sing.

Those whose work we admire most are the ones who have transformed curiosity to passion, and passion to perspiration.  In other words, these folks have worked extremely hard at refining their craft.  While some may pick up basic mechanical skills faster than others, it is only through passion and persistence that these (or any) people become truly accomplished.

Be wary of folks who place rules around art.  Rules are limiting and have the power to eclipse the vibrant human spirit.  When you create for the pure joy of the process, you open yourself up to producing art that is a genuine expression of you.  Personally, I enjoy making images that express more how I felt about a place or event than what I actually saw.  My intention is to convey emotion.  Whether you prefer to depict the world realistically or interpretively isn’t what’s important; what matters is that you are true to your personal vision.

Make a habit of seeing photography as a process and allow yourself to unabashedly employ whatever tools you wish to convey your ideas.  When it comes to expressing myself, I am delighted to use any and all creative resources available, including a vast array of lenses, lights, and software.  My creative process is split between the camera and the computer.  I do everything I can to get the photo right in camera so I can use Photoshop to sculpt it into something that resonates with me.  Keep in mind that how you create art is far less important than what you create.

Consider being transparent about the creative process with your audience.  I get so excited about sharing my images with others that I can’t help but explain all of the thrilling techniques I used to create them.  Don’t be afraid to let the world know how much you enjoyed every stage of the creative process.

Seek out teachers that fuel the embers of your creative spirit and learn as much as you can from them.  As you feed your passion, you’ll expand the scope of possibilities and the toolkit necessary to take advantage of them.  When you’re feeling stuck, learning is also a marvelous way to light your way back to creativity.

The world is filled with compassionate souls who understand the healing power of creativity and beauty.  Although we often don’t hear about these people in the popular media, I believe there are millions of them all around us.  I encourage each of you to let your voices be heard.

I’d like to conclude by sharing three quotes that have lightened my heart during this particularly difficult time.  I sincerely hope that they add a little spring to your step as well.

“Don’t ask what the world needs.  Ask what makes you come alive, and go do it.  Because what the world needs is people who have come alive.”
–  Howard Thurman

“The people who make a difference in your life are not the ones with the most credentials, the most money…or the most awards.  They simply are the ones who care the most.”
–  Charles Schulz

“In large measure becoming an artist consists of learning to accept yourself, which makes your work personal, and in following your own voice, which makes your work distinctive.”
– David Bayles and Ted Orland

See your creative expression as your gift to the world.  Give yourself permission to be creative.  Make time for your art.  Allow creative momentum to build inside of you.  Create art that resonates with your personal vision of the world.  And most importantly, have fun with the process!  Thank you.

Mark S. Johnson is an Adobe Photoshop luminary, a photographer, an author, and one of the most passionate instructors you will ever encounter.  Through the Rocky Mountain School of Photography, The Radiant Vista, and Boulder Digital Arts, he has lectured in front of and worked side-by-side with countless individuals, including Adobe’s Chief Executive Officers, Jane Goodall, the U.S. Ambassador to Finland, and Academy Award winning director, Louie Psihoyos.  Mark’s tutorials appear on the National Association of Photoshop Professionals (NAPP) and Planet Photoshop websites, and his imagery and articles have been featured in Photo Techniques, Nature’s Best, and After Capture magazines.  He is a contributor to Dewitt Jones’ heartwarming Healing Images campaign and a Trey Ratcliff Flatbooks author.  Watch hundreds of Mark’s inspiring and entertaining Photoshop tutorials at MSJPhotography.com.

02 Oct 07:40

Perspective Pilot is specially designed software for perspective correction of a photo.

by Giveaway of the Day team

Perspective Pilot is a specially designed software for perspective correction of a photo. In urban landscape photos, vertical lines of building walls often are inclined or curved. The program allows you to straighten the lines, making your photo pictures more attractive.

To make photo correction:

  • Press and move the cursor to set a line, which should be either vertical or horizontal;
  • Set another vertical or horizontal axle if needed;
  • Press the Finish button to reduce the noise arising from perspective correction.
01 Oct 08:54

הכרת מושגי יסוד חלק 9 – מד האור

by El Ninio Photography

אני מאמין, שכדי לעזור לצלמים לצאת מהלך הרוח של צילום באוטומט עליהם להכיר את מושגי היסוד.

לכן, החלטתי להתחיל בסדרת פוסטים העוסקים בהכרת מושגים אלו.

בפוסט הראשון דיברנו על אור וקאמרה אובסקורה, בשני דיברנו על פוקוס ועדשות, בשלישי דיברנו על עדשות, אור והגדלה וברביעי על חשיפה ועצירות אור.

המשכנו בפוסט החמישי לדבר על הצמצם, בשישי דיברנו על התריס ובשביעי על ISO.

בפוסט השמיני בסדרה, ראינו איך הגורמים המרכיבים את משולש החשיפה משתלבים יחד.

בפוסט הזה ,התשיעי הסדרה, נדבר על מד האור של המצלמה.

אז מה זה מד האור?

דיברנו בעבר על הטווח הדינמי של המדיה (הפילם או החיישן) .
כדי להמנע מתת חשיפה או מחשיפת יתר, יש צורך לקבוע כמה מוארת הסצנה המצולמת – כדי לנוכל לקבוע מהי החשיפה הנכונה.

כמובן שאפשר לנחש ולהתנסות, ועם הניסיון נוכל לדייק יותר. אך מד האור מדויק בהרבה ומאוד נוח לשימוש.

מד  האור (Light Meter) במצלמות SLR מודד את עוצמת האור העובר מבעד לעדשה
(Through The Lens – TTL).
התהליך הזה של מדידת עוצמת האור העובר מבעד לעדשה  קוראים Metering.
מד האור מניח שהוא מודד את האור משטח אפור 18% (כאשר 0% זה לבן ו100% זה שחור) ועל סמך זה מחשב את החשיפה.

העניינים מתחילים להסתבך כשהסצנה מורכבת מחלקים שהם מוארים מאוד או חשוכים מאוד ביחס לשאר. תנאים כאלו יכולים לבלבל את מד האור ולגרום לטעות במדידה (תת חשיפה או חשיפת יתר), תלוי לאיזה חלק של הסצנה היה חשוף מד האור.

במצלמות חדישות יותר, ישנו מערך של מספר מדדי אור הפזורים על פני מרחב בפריים (עד כדי כמה עשרות) כדי לדייק יותר במדידה. המידה שבה כל מד אור כזה משפיע על מדידת החשיפה הסופית תלוי במצב המדידה שבחרתם (Metering Mode).


איך (או מתי) להשתמש במד האור? 

אז אנחנו כבר יודעים שחשיפה נכונה מאופיינת ע"י איזון בין שלושת מרכיבי משולש החשיפה, הלוא הם הצמצם, מהירות התריס והISO.
מד האור נותן למרכיבי משולש החשיפה ערכים בהתאם למצב בו נמצאת המצלמה (M, Tv, Av, P).

מצב אוטומטי (P) – בחצי לחיצה מד האור קובע (בנוסף לפוקוס אלא אם אתם משתמשים בפוקוס בכפתור אחורי) את ערכי משולש החשיפה ע"פ הניחוש שלו.

אבל אם אתם כבר קוראים את הפוסט הזה ואת קודמיו, אתם רוצים להפסיק להשתמש באוטומט ולכן…

מצב חצי אוטומטי – שליטה בצמצם (Av / Aperture Priority) – במצב זה אנחנו שולטים בצמצם והמצלמה קובעת ע"פ מדידת האור את ערך מהירות התריס כדי לקבל חשיפה נכונה. את הISO המצלמה תשנה רק אם הוא מכוון לאוטומטי.

מצב חצי אוטומטי – שליטה בתריס (Tv / Shutter Priority) – במצב זה אנחנו שולטים במהירות התריס והמצלמה קובעת ע"פ מדידת האור את ערך הצמצם כדי לקבל חשיפה נכונה. את הISO המצלמה תשנה רק אם הוא מכוון לאוטומטי.

מצב ידני – במצב זה אנחנו בשליטה מלאה גם על הצמצם וגם על התריס. במצב זה, מד האור רק אומר לנו אם לדעתו נתוני החשיפה כמו שהם עכשיו קרובים למה שהוא מחשיב שחשיפה נכונה.

כאמור, במצב זה כל הכוח בידיים שלנו.
לכן נוכל, למשל, לשנות את הISO ולא להוריד מהירות תריס כי אנחנו יודעים שאנחנו מצלמים ספורט או למשל להוריד מהירות תריס ולא לשנות צמצם כי אנחנו יודעים שאנחנו מצלמים פורטרט ורוצים להפריד את האובייקט מהרקע.


פיצוי חשיפה

אמנם מד האור הוא מכשיר מדוייק להפליא, אך כמו של מכשיר לפעמים הוא טועה, במיוחד בסצנות בהן יש קונטרס גדול או החזרות אור.

כאמור, מד האור מניח שהוא מודד את האור משטח אפור 18% (כאשר 0% זה לבן ו100% זה שחור) ועל סמך זה מחשב את החשיפה.

לכן, למשל בחוף הים בצהרי היום או במקום מושלג, אור השמש מוחזר מהחול או השלג ומטעה את מד האור והתוצאה היא חשיפת יתר. במקרה כזה, כדאי להשתמש בפיצוי חשיפה של 1+ או 2+ EV כדי "להגיד" למד האור שהוא מודד את האור ממשטח מואר יותר מ 18%.

לחלופין, אם למשל נצלם מישהו כשברקע השמיים הכחולים, מד האור חושב שהשמיים הם עיקר התמונה ומחשב חשיפה נכונה כדי לא לשרוף אותם. הבעיה היא שכך האובייקט יראה כמו סילואט ולא נקבל בכלל פרטים.
ניתן לפתור זאת חלקית בחלק מהמקרים בעזרת מצבי מדידת האור אך גישה צפוייה יותר תהיה להשתמש בפיצוי חשיפה כדי לאזן אותה ולחשוף נכון לאובייקט.

נדבר בהרחבה על פיצוי חשיפה בפוסט נפרד.


אל תשכחו להרשם לערוץ היוטיוב כדי לקבל עדכונים על סרטוני ההדרכה הבאים!

בנוסף, אתם יכולים לבקר ולעשות לייק בדף הפייסבוק ולהרשם לטוויטר 🙂
תוכלו גם להרשם לרשימת התפוצה של הבלוג בתחתית העמוד כדי לקבל עדכונים כשיוצא פוסט חדש…

!Happy Shooting

27 Sep 11:50

They’re Finally Here!The Sony Smart Lenses – QX10 & QX100

by laurel

Meet the Sony Smart Lenses, pro-quality lenses that are also full-fledged cameras!

These first-of-their-kind lens cameras use your smartphone as a viewfinder, settings panel and shutter release.

Plus, they connect wirelessly, so you can use them attached to your phone or totally off board to snap the perfect shot at any angle.

Get all the advantages of a DSLR – shallow depth of field, optical zoom, a 20 megapixel sensor that’s 4x the size of your iPhone’s! And, retain the ease of shooting and sharing on your phone.

*We are getting a limited supply and shipping them out first come, first serve.*

Learn More or Reserve Yours Now

 Tweet it!      Share

p.s. Want to see the QX10 in action? We will be demonstrating this innovative wonder on a live video stream *TODAY* (Wed. 9/25) at 9am PST (that’s noon to you, East Coasters). Head to our Ustream page to have all your burning questions answered!

Related posts:

  1. Attachable Lenses for Your Camera-Phone, Fisheye & Macro/Wide Angle Phone Lenses Extra photos for bloggers: 1, 2, 3 Camera-phones. They’re a...
  2. Better Lenses for Less Money: How To Use Vintage Lenses with Your DSLR Extra photos for bloggers: 1, 2 ~Have a cool photo...
  3. The iPhone Lens Wallet Keeps Your Cell Lenses in One Place Check out that sweet collection of lenses for your smarty-pants...
27 Sep 11:50

A Trip to the Galapagos Islands

Google Maps' Street View team recently traveled to several locations in the Galapagos Islands, snapping panoramic views as they went. Using backpack-mounted cameras and underwater gear, they documented the unique diversity of the archipelago that helped inspire Darwin's theory of evolution. The government of Ecuador established the Galapagos National Park in 1959, setting aside 97% of the islands' land area for preservation. Collected here are images from Google's team as well as from other photographers, taking you on a virtual visit to these amazing islands. [30 photos]


Daniel Orellana of the Charles Darwin Foundation collects seashore imagery with the Street View Trekker at the Los Humedales wetland area on Isabela Island in the Galapagos. (AP Photo/Google)


27 Sep 11:46

Behind The Scenes of Three of My Most Popular Landscape Photos

by John Davenport

In the following post I’m not going to remind you again that you need to bring your tripod with you. I’m not here to warn you that weather is unpredictable and you should check the latest forecast before heading out the door.

Nope this post won’t cover the fact that you should bring a flashlight and a few other miscellaneous tools just in case something goes wrong. And of course I won’t be telling you that you should tell someone where you’re going and when you’ll be back incase you do get lost, hurt or otherwise incapacitated and need help getting home.

Instead of rehashing the basics or providing some motivational tips to get you off the couch I’m going to show you three ‘behind the camera’ photographs that I took with my iPhone, share the final shot, and talk a bit about how I made each image.

Sound good? Okay let’s start!

First Up – A Small Cascade Near Trap Falls in Ashby MA

IMG_1902

As you can see the camera was positioned as close to the water as I could comfortably get it – one wrong move and it’s all over for me and my love of photography.

So does the fear of putting my camera in the drink stop me from attempting to grab a photograph? Not in the least!

p1637190443-4-650x365

This shot was something I saw from 100 yards up the bank of the river. I noticed the cascade and knew that it’d be the perfect place to set up my D7000 and Tokina 11-16mm, but how was I going to get into the middle of the river?

As I got closer to the scene I noticed that there were a few wet stones no larger than an iPad leading out into the middle of the river – right where I wanted to be. All I needed was a little balance and some luck and both my camera and I would make it back to the shore dry and one ‘keeper’ richer.

Standing on a rock in the middle of the river the size of an iPad is no easy task and trying to fiddle with camera settings and frame a shot doesn’t make it any easier. I used the Manfrotto’s center-column design, which allows you to swing the center column out so that it is parallel to the ground, to get as close to the water as I could, and I used the live view feature on my DSLR to frame the shot and achieve perfect focus.

After taking a few test shots and fine tuning my exposure I settled on the following settings for the shot: ISO 100, 11mm, f/14, 13.0 seconds. (Note: There is also an ND filter in play here which allows for the longer exposure time).

Next Up – A Stunning Sunset at Stony Brook in Norfolk MA

IMG_1713

Okay so this photograph probably isn’t even close to as dramatic as the one above, but it is still able to show you a bit about my thought process when capturing photographs. I could have photographed this scene further back from a nice easily accessible lookout, but I clambered over rocks and got as close to the shore as I could.

By positioning the camera on the tripod I was freely able to adjust the settings and fine tune the exposure and composition of the shot. The settings I used here were: ISO 100, 36mm, f/10, 1/160.

sunset at stony brook

Finally – Capturing Lightning Out Of My Window

Here in south eastern New England we don’t get all that many storms and due to the tall trees and densely populated urban areas it’s not easy to get a clear view of the sky when they do occur.

After hearing my phone alert me to a sever thunderstorm watch that was in effect until well after dark and a quick look at the radar confirmed that it looked like it would pan out. I quickly decided to get a plan together to capture my first lightning bolts as a photographer.

IMG_1571

With a couple hours of notice I was able to get really creative with my set up. I found a piece of cardboard and some duct tape to make a makeshift shelter for my room and the rest of my camera. I knew I wanted to open the window and the screen to get as clear a sight line as possible, but I didn’t want the rain or mosquitos to get into the house. (If you’re curious I finished sealing the cardboard after I took this photo).

I made sure to set my focus while I still had daylight to work with as it would get difficult to do so when darkness hit. I used my ND filter to lengthen the shutter speed which would hopefully allow me better chances to capture bolts of lightning and locked down my settings as follows: ISO 100, 13mm, f/9.0, 20.0 seconds.

Once everything was set up all that was left to do was wait for the storm to get close. As soon as I heard the first crack of thunder I set the Nikon’s intervolometer to capture an image every 25 seconds for about an hour or so, turned out all the lights in my house, and went to bed.

A few hours later, after the storm had long passed, I woke up curious to see if my trap had worked. The end result was a handful of lightning bolts frozen in time – this is one of my favorites.

lightning photo

Do you have any behind the scenes stories to share?

Tell us about how you captured one of your favorite shots in the comments below!


Post originally from: Digital Photography Tips.

Check out our more Photography Tips at Photography Tips for Beginners, Portrait Photography Tips and Wedding Photography Tips.

Behind The Scenes of Three of My Most Popular Landscape Photos

27 Sep 11:40

Mantis popularity

by Arnold Chao

IMG_0306

Dead leaf mantis.

Empusa pennata (Empuse)

254/365_092013

 Phyllocrania paradoxa

Orchid Mantis

the Mantis

Mantis with Lady bug prey.

Idolomantis Takes Chewbacca's Portrait

Mantis palo (Empusa pennata)

Green and green

Mantis_2_100812

Cõng Sên...

Morning toilet

Pseudocreobotra wahlbergii

Explore popular pictures of insects, and you’re bound to find the mantis. Easily recognized by their distinctive forelegs and triangular face, these bugs eat pests with such aggression that they inspired two Chinese martial art styles. Mantises are even pampered as exotic pets by their devoted fans, unlike their closest relatives, cockroaches and termites. More than 2,400 species comprise their Mantodea insect order, including the uniquely camouflaged ones that mimic vegetation.

See, and share, more animal photos in the Magnificent Mantises gallery and Praying Mantis group.

Photos from thienbs, Andy @ Pang Ket Vui, melch2B, Gregg Kiesewetter, Celimaniac, ReaganPufall, Spice ♥, davidgerardball, scott cromwell, rio en medio – Jose, myu-myu, marakawalv, xuanthanh_arc, Fab. B, and Celimaniac.


27 Sep 11:40

How to Reduce Camera Shake – 6 Techniques

by Natalie Norton

Pin It

In this classic DPS post (now updated) photographer Natalie explores 6 ways you can hand hold lenses at low apertures and low shutter speeds and still avoid blurry images caused by camera shake.

6 Simple Techniques to Help Avoid Camera Shake

I’m a mover and a shaker in general, and this is particularly true when I’m on a shoot. I’m twistin’ and turnin’, climbin’ and jumpin’ and to top it all off, I DO NOT have a steady hand, plain and simple.

As often as possible I opt for lenses with VR (Vibration Reduction) or IS (Image Stabilization). You pay a pretty penny for this feature. For me, it’s worth the extra cost, and for the point I’m at in my photography it’s a reasonable expense. But that wasn’t always the case, and what about uber slow shutter speeds with no tripod. No IS or VR can hold up under pressure like that. . .no matter how magical they may be. . . and magical they are, trust you me.

6 Techniques to Reduce Camera Shake

Here are 6 options for avoiding camera shake and achieving crisp, delicious images no matter the length of the lens, no matter the shutter speed.

Shooting wide open? NO PROBLEM; I’ve got your back!! Enjoy!

1. Elbows In

As often as possible pull your elbows in to your body and exhale completely before depressing the shutter. When you’re working with a wide aperture or low shutter speed (or both), even a breath can introduce shake. Pulling your elbows tight to your body can really help keep you steady. I also press my elbows firmly into my chest for even greater stability.

Avoiding-Camera-Shake-1

2. Raise Your Left Shoulder….

I am definitely a right eyed photographer, but this tip that I learned from “The Moment It Clicks” by Joe McNally, requires that I shift for a moment to my left eye. What I’m doing here is raising my left shoulder, and bracing my left elbow into my rib-cage (no arrow for this one). For further stability, you can pull your right elbow in to your chest. As always, exhale completely before depressing the shutter to avoid introducing shake.

Avoiding-Camera-Shake-2

3. Create a Tripod With Your Knee

You can create your own tripod by resting your elbow on your knee while in a seated position. Again, bring that other elbow in for greater support.

Avoiding-Camera-Shake-3

4. Lay Down

These two images illustrate perhaps the most obvious way to avoid shake without a tripod. Lie flat and let the lens sit directly on the ground. The problem with this is that you’re likely to have quite a downward tilt to the lens and unless you’re aiming to photograph the pavement, you probably won’t end up with the shot you’re hoping for. In the first image you’ll notice that I placed my hand flat against the cement and balanced the lens on top of it to give myself some height. In the second image you’ll see that I created a fist with my hand to give myself even greater height.

How To Avoid Camera Shake-1

5. The Machine Gun Hold

This next technique is sometimes referred to as the machine gun hold. I rarely use this technique as I find it awkward and difficult to maintain for more than a second or two. Just because it doesn’t work for me, doesn’t mean it won’t for you. . . give it a try.

Avoiding-Camera-Shake-6

6. Cradle It

In this next image you’ll see that I created a sort of cradle for the lens between my shoulder and my wrist. I also stabilized the hold by balancing my elbow on my knee.

Avoiding-Camera-Shake-7

Well there you have it. That’s how I avoid “The Shake” (I’ve named him that because he’s like an evil monster who comes in and ruins my otherwise perfectly delicious images). Please share YOUR tricks and techniques in the comment section below, and as always. . .

Happy Shooting! – Get more daily tips like this one by subscribing to Digital Photography School

Further Reading on Camera Shake


Post originally from: Digital Photography Tips.

Check out our more Photography Tips at Photography Tips for Beginners, Portrait Photography Tips and Wedding Photography Tips.

How to Reduce Camera Shake – 6 Techniques

25 Sep 07:51

שוחרר טריילר שני לסרט "ג'ובס", יוקרן בישראל בעוד שלושה שבועות

by ליאור אסולין

jobs-woz-filmבסוף השבוע הבא יעלה לאקרנים סרט הקולנוע "ג'ובס" המתאר את חייו ופועלו של סטיב ג'ובס, אחד ממייסדי חברת אפל ומי שהיה אחד האנשים המשפיעים בעולם הטכנולוגיה. רגע לפני שזה קורה, מפרסמת מפיצת הסרט וידאו טריילר שני בו אנחנו מקבלים הצצה נוספת לעלילה שמתארת בין היתר את תהליך הקמתה של חברת אפל, את הפיכת חלומם של שני תלמידי קולג' מקליפורניה לתאגיד רב-לאומי שנמצא כיום בחזית הטכנולוגיה.

אשטון קוצ'ר שמשחק בסרט את דמותו של ג'ובס, סיפר בראיונות לעיתונאים כי במהלך הכניסה לדמותו של המנכ"ל האגדי, הוא צפה ביותר ממאה הרצאות ושבדומה לג'ובס, החל בדיאטה טבעונית. לצידו של קוצ'ר מככב ג'וש גד ("21", "אהבה וסמים אחרים") בתפקיד סטיב ווז'ניאק, אשר היה המוח מאחורי מחשבי ה-Apple I ו-Apple II שתרמו רבות לביסוס מעמדה של החברה הצעירה. מלבד העיסוק בחייו של סטיב ג'ובס, הסרט מספר גם על התמורות בחברה אפל ומציג את כניסתה לתודעה, הנפקתה בבורסה, קריסתה לאחר סילוקו של ג'ובס ותהליך שיקומה עם חזרתו והצגת חזונו המחודש.

לחץ כאן לצפיה בוידאו

הביקורות הראשונות לסרט אינן נלהבות ואף לא מהללות יתר על המידה את משחקו של קוצ'ר שהתאמן במשך חודשים ארוכים על דמותו של ג'ובס. בכדי לשפוט בעצמנו, נצטרך להתאזר בסבלנות עד לתאריך עלייתו של הסרט בישראל – יום חמישי, ה-29 באוגוסט.

בד בבד, התסריטאי זוכה האוסקר ארון סורקין ("הרשת החברתית", "הבית הלבן") עובד בימים אלו על תסריט משלו לסרט על חייו של סטיב ג'ובס, אולם לגבי פרויקט זה אין יותר מדי פרטים. ניתן לשער שבדומה לעלילת הסרט "הרשת החברתית", ינסה סורקין לעסוק דווקא בצדדים האפלים יותר שבאישיותו של ג'ובס.

25 Sep 07:19

Image to PDF Creator Free lets you quickly build PDFs from your pictures

by Mike Williams

There are many ways to share a group of pictures with others. A zipped email attachment, say. An online album. You could share a folder on Dropbox, maybe, and that’s just the start.

For a really simple solution, though, why not just present them in a PDF file? You’ll get control over image order; you can add metadata to tell people more about the pictures ("Title", "Subject", "Author"), and the finished document will be viewable on just about every device and platform around. It’s extremely easy, too -- all you need is a copy of Image to PDF Creator Free.

The program launches with a simple and straightforward interface, which makes it extremely obvious how to proceed. And the first step is clearly to click "Add" and select the pictures you’d like to share (support for more than 30 graphics formats means you’re unlikely to have any import problems).

If the image order matters then you can rearrange them by clicking something, and moving it up or down the list.

A Settings dialog allows you to define your PDF size and metadata tags.

And when you’re happy, clicking Convert will have the final PDF file created in seconds.

There’s nothing complicated here, at all. No slideshow effects, no transitions or soundtrack. You can’t include a title page (unless you create one as an image and add it manually, anyway), or add captions to your pictures.

Image to PDF Creator Free does do exactly what its name suggests, though, quickly and without hassle, and that’s good enough for us. If you need a simple way to present small groups of images then it’s well worth a try.

25 Sep 07:17

Microsoft's Surface 2 lineup can win you over, but it won't

by Mihaita Bamburic

If we are to believe all the comments posted on the Interwebs by Microsoft fanboys, then the Surface lineup should have delivered two of the most popular tablets on the market and Apple and Android OEMs should have gone out of business by now. But, once reality sets in and we overlook the silly one-sided comments, people just don't care enough about Microsoft's slates -- the 4.5 percent Windows market share, from IDC's Q2 2013 report, coupled with the $0.9 billion write-off speak for themselves.

Now there's a second-generation Surface lineup which was unveiled yesterday, comprised of Surface 2 and Surface Pro 2, that quietly wants to change people's perception about Windows-based slates and their preference towards Android tablets and iPads. On paper, the new Surfaces look great. Microsoft appears to have gotten the hint -- more power, more battery life, more versatile kickstand, more accessories. The new Surface lineup is simply "more" than its predecessor. Yet I don't think many people will notice that and rush to pre-order now or buy on sales day.

The Specs

Surface 2 specs: 10.6-inch ClearType display with a resolution of 1920 by 1080; 1.7 GHz quad-core Nvidia Tegra 4 processor; 2 GB of RAM; 32 GB or 64 GB of internal storage; 5 MP back-facing camera with 1080p video recording; 3.5 MP front-facing camera with 1080p video recording; Wi-Fi 802.11 a/b/g/n; Bluetooth 4.0 LE (Low Energy); stereo speakers; dual microphones; USB 3.0 port; microSDXC card reader; HD video out port; sensors: accelerometer, ambient light, gyroscope and magnetometer and Windows RT 8.1. Microsoft quotes up to 12 hours of battery life or 10 hours of video playback. The Surface 2 comes in at 10.81 x 6.79 x 0.35 inches and less than 1.49 pounds.

Surface Pro 2 specs: 10.6-inch ClearType display with a resolution of 1920 by 1080; 1.6 GHz dual-core Intel Core i5-4200U (Haswell) processor with 2.6 GHz Turbo Boost; Intel HD Graphics 4400 graphics; 4 GB or 8 GB of RAM; 64 GB, 128 GB, 256 GB or 512 GB of internal storage; 720p front and rear cameras; Wi-Fi 802.11 a/b/g/n; Bluetooth 4.0 LE (Low Energy); stereo speakers; microphone; USB 3.0 port; microSDXC card reader; mini DisplayPort 1.2; sensors: accelerometer, ambient light, gyroscope and magnetometer; stylus and Windows 8.1 Pro 64-bit. Microsoft quotes up to 7 hours of video playback. The Surface 2 comes in at 10.81 x 6.81 x 0.53 inches and 2 pounds.

Will Consumers And Power Users Want Surface?

I said that the Surface 2 and Surface Pro 2 look good "on paper". And both devices do. Each features a faster processor and improved battery life -- two key parts in providing a great tablet experience. Microsoft also realized that its Surface 2 (previously known as Surface RT in the first generation) needs a crisper display, so the tablet received a new panel with a higher resolution, of 1920 by 1080, which brings it on par with Android tablets from last year and places it under the third-generation iPad (in terms of resolution). Except that the hardware specifications you see above are average, and not outstanding. If you want the latest and greatest in terms of hardware you might want to look at new Android tablets, iPad 4 (or the next generation, which is likely to ship around the same time as Surface 2) or a Windows-based ultrabook, running Haswell, with a touchscreen.

Of the two, the Surface 2 is aimed at consumers looking to buy a tablet for web browsing, social networking, light work and content consumption -- basically, it's still an iPad rival but without the latter's ecosystem prowess (or Android tablets' for that matter).

But, the Windows RT-based slate only excels in the work department. It comes with Office 2013 RT with Outlook 2013 RT, which provide undeniable value for those who want to actually work on their tablet. But bar Outlook 2013 RT, the same work-related functionality has been available on Surface RT as well and it didn't break any sales records -- IDC places Windows RT device shipments at just 200,000 units for Q2 2013. That's terrible.

For web browsing, both Android tablets and iPads are more attractive propositions compared to Surface 2, as each of their ecosystems offer more third-party browsers (Chrome, Dolphin, Firefox, Opera and others) with richer functionality compared to Internet Explorer 11.

As far as social networking goes, Windows Store can only tout official Foursquare and Twitter apps. Android and iOS also allow folks to use Facebook, Google+ and LinkedIn, to name a few of the most popular ones.

Some of you may argue that Surface 2 comes with better multitasking credentials compared to Android tablets and iPads. And you wouldn't be wrong, at least not completely. Lately, Android OEMs have started to pay attention to this functionality as well.

Samsung allows Galaxy Note (yes, the phablet) users to run two apps at the same time, and this extends up to the maker's Android slate flagships as well. Again, multitasking didn't really help Surface RT sales (Windows RT 8.1 will handle this better though).

When it comes to content consumption there's simply no comparison between Surface 2 and its aforementioned adversaries. Both of its popular rivals offer their users the possibility to experience a higher number of popular music and video streaming services, buy ebooks from more places and, generally speaking, do more. The reason for this is simple -- Windows Store cannot attract tier-one developers, who are waiting for a large-enough user base to create before stepping in.

Considering the above, Surface 2 looks to be, like its predecessor, highly overpriced for what it can offer. At $449, it's close in price to the 16 GB iPad 4 (which kicks off at $499) and more expensive than most Android tablets. Why would consumers choose Surface 2 over its more obvious rivals? That's a question which I struggle to answer and, judging by the Windows RT shipments for Q2 2013, so do the vast majority of tablet buyers.

Of the two new Surfaces, Surface Pro 2 is the one that will appeal most to users looking for a prosumer device, or hybrid between a laptop and a tablet. This is a niche market where, according to Corporate VP of Surface Panos Panay, Surface Pro is "the best-selling device in its class". Don't get fooled by that title. Windows tablet shipments topped 1.8 million units in Q2 2013, a number which includes those running Windows 8. It is a small part of the market -- topped 45.1 million units in total during Q2 2013 -- which Surface Pro reigns over.

If I were to choose between Surface 2 and Surface Pro 2, as a power user, I'd go with the latter any day of the week. It's undoubtedly fast (I have first-hand experience with Intel's Haswell processors and ultra-fast SSDs), flexible in terms of built-in storage and RAM capacities (the 64 GB and 128 GB models come with 4 GB of RAM while the 256 GB and 512 GB models come with twice as much at 8 GB of RAM), can now last longer than four to five hours -- Microsoft says that battery life is improved by 75 percent. That theoretically means that people could use it for seven to nine (well, 8.75 if you want to be precise) hours without plugging it in. That's great, and likely one of the highest runtimes for any Windows 8-based devices currently on the market or soon to be released.

The main problems with Surface 2 are its addressable market, which is basically the niche I mentioned above, and its pricing strategy, which makes it a direct competitor to high-end Windows touchscreen ultrabooks and Apple's 11.6-inch MacBook Air lineup that kicks off at $999 with a built-in keyboard and 128 GB of internal storage and Windows 8 compatibility via BootCamp. As Mark Wilson puts it, "Don't get me wrong... I love my Surface. But it is what it is... essentially a ***ing expensive Windows laptop" -- other consumers likely share the same feelings towards it.

Then there is the matter of internal storage, which hinders the appeal of the entry-level Surfaces. The 32 GB Surface 2 and the 64 GB Surface Pro 2 have at most 15 GB and 28 GB, respectively, of user-accessible storage. This nullifies any major advance the former may have over Android tablets and iPads, while in the latter's case it means that power users will be unable to install sizeable apps on the device. In both cases, the pricier models (64 GB Surface 2 and 128 GB Surface Pro 2) make more sense but they're also $100 more expensive.

Another issue is that users have to purchase an attachable keyboard, which should be included out-of-the-box, in order to experience Surface at their fullest, the way they're meant to be experienced. The said accessories are a key part in differentiating the two tablets from the competition, which Microsoft fails to do at the moment (maybe the company will only offer bundles at some point, at the same base prices with the tablets, but I doubt it). And, they're expensive with the cheapest model costing $119.99. That's quite a lot.

But Microsoft Does Some Things Right Too

Microsoft addressed one of my main complaints for the first-generation Surface -- lackluster initial availability. The second generation is set to be released in 22 markets initially, including Australia, Austria, Belgium, Canada, China (from November), Denmark, Finland, France, Germany, Hong Kong, Ireland, Italy, Luxembourg, the Netherlands, New Zealand, Norway, Portugal, Spain, Sweden, Switzerland, UK and US. That's a major improvement over the first generation which was only available in eight markets at first. More is better and I can only hope that Microsoft will release it in at least 100 markets by the end of the year or early 2014 at the latest.

Another thing that Microsoft does right is same-day availability for both Surface 2 and Surface Pro 2. The former generation tablets launched on different dates, with the Windows RT-based slate showing up months before its Windows 8-based sibling. That's a mistake which, thankfully, Microsoft is not repeating this time around. It's also important to note that both tablets, according to the information provided so far, will launch in the aforementioned 22 markets simultaneously. Again, it's a good approach.

Microsoft also improved the accessory ecosystem, with no more than seven devices being announced. Only four of them will be available right away, to pre-order, with the remaing three to arrive early next year (check my Surface 2 pre-order story that I linked to in the first paragraph for further information). The ones that are the most appealing to me are the Power Cover, which adds more battery life, and the Docking Station for Surface Pro, which adds extra connectivity options. There is also talk about an LTE version of Surface, which is estimated to arrive in the first half of 2014. That's also good news.

Windows Is Nice, the Lack of Apps Is Not

Apps are instrumental in making any mobile device sell well today. Killer apps are even more important. Windows Store touts more than 100,000 offerings -- the number is impressive, unless it's compared to that of Apple's App Store or Google's Play -- but not many of them are "killer" ones. And prospective buyers notice that, partly due to exposure from the tech media and partly due to their experience in running Windows 8 or Windows RT on devices they currently own. This is not an issue that will go away overnight.

Some killer titles were previously touted, like Facebook and Flipboard, but the major offerings have yet to arrive at this point. Maybe they'll come later this year, but they're certainly not available when pre-orders started in US, which is a major market, earlier today. Microsoft should have nailed the Surface 2 unveiling, by also announcing a few killer apps but it didn't. And it didn't nail the unveiling either. But I digress.

Consumers want apps on tablets, because apps are optimized for touch input while legacy software is not. I am sure that no one (well, maybe there are a few brave users out there) would like to experience the desktop Office 2013 suite on a small touchscreen. It just doesn't work and consumers will not relate to this experience. Die-hard Windows users (dare I say fanboys too) will come up with various arguments as to why apps are not instrumental to the success of the Surface 2 lineup. Well, they're wrong and the market share agrees with me.

The Surface 2 lineup has great potential -- the hardware is great, the speed is improved (well, for Surface 2 it's no longer a problem), the battery life is significantly improved -- but so far that's all that it's got going for it -- potential. Why would consumers choose Surface 2 or Surface Pro 2 over their rivals? The platform is indeed quite competent after looking through all the specs and major software benefits but the app ecosystem continues to drag it down now. Maybe tomorrow will be different, or next month, or early next year or who knows when. But the app ecosystem is not good enough now, nor will it improve significantly in the upcoming months for consumers to flock to Surface 2 or Surface Pro 2. Until that changes, the lineup's potential will not convince many to switch or buy into what's available now -- attractive Surface tablets without the perspective of popular apps in sight.

24 Sep 06:20

Harvest moon 2013

by Arnold Chao

Pearl Fuji

Hollywood Harvest Moon

Moon Over Shangri-la

Harvest Moon Lighthouse

The full moon that welcomes the beginning of autumn is known as the harvest moon, and many of you captured it’s beauty from various locations and famous landmarks. Balancing on top of Japan’s Mount Fuji to rising above the Chicago Harbor Lighthouse, the moon’s position a couple days ago helped create some splendid nightscapes.

See, and share, more spectacular moonlit moments in the Harvest Moon 2013 gallery and Moon Full or Otherwise group.

Photos from shinichiro*, Dan Gabai, laura.nicli, gordeau, and katie47n.


24 Sep 06:19

Paint.NET prepares the ground for the next major revision

by Mike Williams

Rick Brewster has announced the availability of Paint.NET 3.5.11, the latest edition of his excellent image editor. As you’d expect for a minor version update, the "changes" list is rather short, but there are still some welcome tweaks here.

The Undo data for your selection manipulations is now saved to disk, for instance, reducing memory usage during lengthy editing sessions.

Performance tweaks mean some filters (Sharpen, Median, Fragment, Unfocus) run much faster than before.

If you’ve had problems with the Gaussian Blur effect, an issue where it was incorrectly calculating alpha values for non-opaque pixels has now been fixed.

But the main reason for getting Paint.NET 3.5.11 is the update engine, which now supports upgrading to version 4.0.

This next major update promises a "brand new, asynchronous, fully multithreaded, hardware accelerated (via Direct2D) rendering engine", apparently, for much better performance with even the largest images. There’s new support for soft brushes, an extended Shapes tool with many more shapes, enhanced selection rendering quality, pressure sensitivity support (maybe), a revamped interface, and more.

Perhaps the real benefit is that many of the core tools have also been reworked to simplify their use.

If using the Paint Bucket tool doesn’t deliver the results you need right now, for instance, you’ll click Undo, change the tolerance and try again. And again, and again.

But in version 4.0, you’ll be able to use the Paint Bucket, then update the tolerance, or move the point where you first clicked, and see the results right away: no Undo, no starting again, just a much easier and more natural approach to editing.

When’s it due? Brewster says "soon", but that vagueness suggests "not for a while", months rather than weeks. Whatever the truth, you’ll need Paint.NET 3.5.11 if you want the program to upgrade itself automatically, so we’d recommend you grab a copy immediately.

24 Sep 06:16

Leaving Google: Apps to Not Be Evil

by Phillip Gruneich

The last few months have been a wake-up call for anyone who cares about privacy. But perhaps it’s just been another headline blocking your way to the last round of sports, because I’ll tell you one truth: the generation I’m part of just doesn’t care about privacy. We all knew Google and most free services were grabbing our data and serving us ads. We grew up with that routine, so much so that some of us learned to share online before we got into math. This behavior is so prevalent that the upcoming generations have their fates sealed already, with their pictures being exposed all over the internet sometimes before they’re even born. It’s like The Truman Show, with many, many Trumans.

Yet, I didn’t leave Google due to privacy, I did so because of its use of my private data. Using Google daily and being targeted with its ads is like having a bad fight with your best friend, when he uses your darkest shared secrets against you. After a chain of events, the dismissal of Reader and the new ads in Gmail camouflaged within your inbox, I decided it was time to jump out. That’s what I did and I’m here to tell you how.

Like the article? You should subscribe and follow us on twitter.

Search

If you decide to move away from Google, this is where I suggest you to start. There’s Bing from Microsoft, which is free and offers a good alternative. Still, though, with Bing you’re also keeping your data on a large company, one in the governmental watch roll. If you’re looking for a versatile and private search engine, your best pick is definitely DuckDuckGo, which is the place I chose to find stuff. It has an average learning curve, but it is worth.

DuckDuckGo is versatile and cares about your privacy.

DuckDuckGo is versatile and cares about your privacy.

There’s one thing to think about when you choose any of these services, one that will haunt you as long as you try to move away from Google: integration. Most browsers nowadays offer Bing as a default search engine — even Google Chrome, which also has DuckDuckGo on the list. If you’re on Safari you can pick Bing already. For DuckDuckGo you’ll have to rely on an extensions like Glims to give you more options. Bing is also an option on mobile, meanwhile DuckDuckGo demands the use of its own app or, as I do, an action in Launch Center Pro (that is, on the iPhone).

I’m still looking for a proper replacement for Google Images, which I call from DuckDuckGo itself sporadically. So if you have a great suggestion, leave it in the comments.

Storage

I was never a huge fan of Google Drive for the same reason it was so hard to move away from Google Search. Dropbox is so much better integrated among my applications and resources. As an Apple user, whatever is not synced through Dropbox uses iCloud. Another fine new alternative is Copy, which offers a good amount of capacity for new accounts.

Zoho has many underrated apps to create great spreadsheets.

Zoho has many underrated apps to create great spreadsheets.

However, the best part of Drive is not the storage, but its tools. Creating a spreadsheet or a presentation is smooth and fantastic. Microsoft has been offering the Office package for the web and last year, when Google Docs was still a thing, it took the best outcome in our comparison. We also have a recent review of the suite you should check out. Apple users can count on the recent iWork Beta, which is the tool I’m relying upon nowadays. If you’re trying to stay away from any major corporation, Zoho offers many web apps, including a Docs suite.

Social Networking

Well, this one was quite easy since I never actually used Google Plus — and odds are you don’t use it either. Next!

Email

This was definitely the biggest challenge of this whole quest. Gmail is a great web app, probably the best email client around. But Google knows that and they now are pushing ads harder and harder into it. After they added tabs to Gmail, the advertising game changed and they began introducing ads among your inbox items.

I didn’t even use the web interface, but that move was a blow way too low for me. I began connecting dots and conspiring that, since they were being so aggressive with their ads, they may try a Twitter move, limiting access from third-party apps to Gmail and pulling us into the ads. I moved quickly and was lucky to count on AppStorm to offer a great roundup of email options and give me the proper information to choose Fastmail, which beyond supporting your custom domain also offers its own handle, a blazingly fast experience attached to a clean interface and a great integration.

As you can see, my mom doesn't know how to add subjects to emails.

As you can see, my mom doesn’t know how to add subjects to emails.

But maybe the worst part of changing email is editing all the information attached to it. Profiles, newsletters, contacts. It’s a lot of work. After years using Gmail, having a clean sheet was great to start over and avoid undesired emails. Since most of my logins are stored within 1Password, I had a huge deal of manual labor, but at least I could keep track of it while also removing unused apps, resulting in a tidy library.

I also don’t chat through email much, so only a few key contacts needed my updated info. The problem is that one of them was my mother. It was hard enough to teach her how to turn her computer on and when she asked me “But why did you change your email?” I couldn’t find the words. Her question echoed through every aspect of this change, but I have no regrets.

YouTube and other sporadic uses

There are some Google apps that I couldn’t find a proper alternative. YouTube is the main one, because it truly stands out because of its content, not the platform per se. YouTube is everything Google+ wants to be. I also link my blog to Google Authorship, since not because I stopped using Google that the rest of the world has done the same.

Often Microsoft and Apple provide alternatives to most tools offered by Google, such as Maps and Calendar and then you must evaluate your goal here. If you’re running away from the ads, there’s no problem with sticking to any of those options. However, if you care about your privacy, you’ll have to dig deeper into the options.

Your Move?

Moving away from Google — and even the other internet giants — is definitely possible today. The question is, will you actually do it? We’d love to hear your thoughts on if and why you’d move away from Google today. It’s a move many of us have already started, and I can’t help but think that more will follow in our shoes going forward, especially as people become more conscious of the privacy concerns of leaving all our data in Google’s hands.


24 Sep 06:15

Apple breaks its sales record, sells 9 million iPhone 5s and 5c models in opening weekend

by Wayne Williams

With queues stretching around Apple stores and talk about stock sell-outs dominating the tech news, it comes as no surprise that the iPhone 5s and 5c enjoyed brisk sales this launch weekend. The only question was exactly how many units the Cupertino, Calif.-based tech giant would shift of its new devices.

While Apple predictably doesn’t break the number down into 5s and 5c sales, we now know thanks to an official announcement that combined the devices sold some 9 million units worldwide in the three days since they launched on 20 September. This beats the previous record for first weekend iPhone sales, which was 5 million for the iPhone 5 last year.

In addition, Apple says over 200 million iOS devices are now running the redesigned and divisive iOS 7, making it the fastest software upgrade in history.

"This is our best iPhone launch yet -- more than nine million new iPhones sold -- a new record for first weekend sales," says Tim Cook, Apple's CEO. "The demand for the new iPhones has been incredible, and while we've sold out of our initial supply of iPhone 5s, stores continue to receive new iPhone shipments regularly. We appreciate everyone's patience and are working hard to build enough new iPhones for everyone".

In a piece he wrote last week, my colleague Joe Wilcox said, "Expect the company to combine both phone sales, when boasted in PR, to give greater sense of demand. That's a way to hide whether or not sales of one is weak. Apple does this with iPad, by not breaking out mini sales, which by all analyst estimates cannibalize sales of the larger tablet", which of course was spot on. However, early indications suggest the iPhone 5s is outselling the 5c by at least 3 to 1.

24 Sep 05:37

Nikon Shutter Count

I have created a new tool to determine your total Nikon DSLR's shutter count or also known as total shutter actuations.
23 Sep 22:40

The Ultimate Guide to Learning how to use Your first DSLR

by Elliot Hook

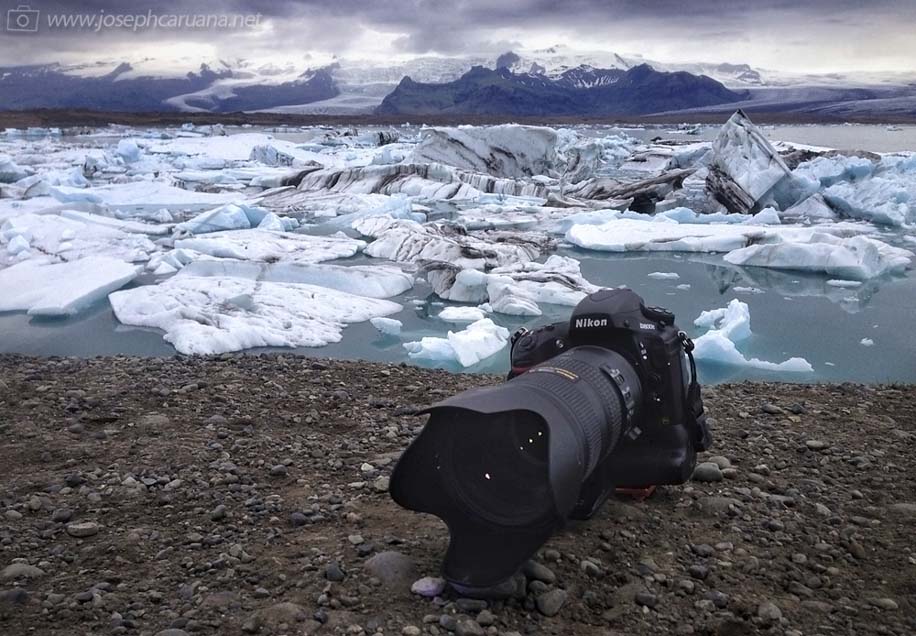
If you’ve bought yourself a DSLR and, after unpacking it from the box, you are intimidated by the number of buttons and dials, and by the thickness of the manual, it can be very tempting to put the manual down, flick it onto ‘Auto’ and start shooting.  Whilst that is fine for some, it may not be long until you crave the creative control that inspired you to purchase a DSLR in the first place, but where do you begin? 

If you consider yourself a beginner who is unsure of how to make the most of your camera, this post is designed for you.  It’s intended to be a brief, a one-stop shop to help you take your camera off auto, and take control of your DSLR.  It isn’t intended to be a replacement for your camera manual, so will not explain every last setting in great depth, but will cover enough of the basics to get you in control of your camera, and give you the key topics to go back to your manual to read.

The topics covered in this post are:

1. Shooting modes
- aperture priority
- shutter priority
- program
- manual
2. ISO
3. Completion of the ‘exposure triangle’
4. Metering
- exposure compensation (+/-)
5. Focussing
- focussing modes (AF-S/AF-C)
- focus points
6. File size/types
- raw vs jpeg
7. White balance

Which should be more than enough to get you on your way.  So let’s begin…

1. Shooting modes

The best place to start is with shooting modes.  The shooting modes will most likely be found on a dial labelled with ‘auto, Av, Tv, P, M’ and maybe more.  Selecting a shooting mode will determine how your camera behaves when you press the shutter, for example, when ‘auto’ is selected, the camera will determine everything to do with the exposure, including the aperture and shutter speed.  The other modes, ‘Av, Tv, P, M’, are there to give you control:

Mode-dial.jpg

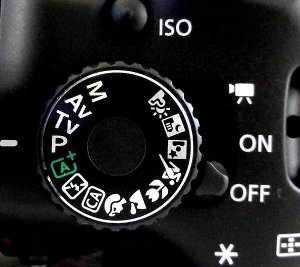
Don’t worry if your mode dial looks a little different; different manufacturers use different abbreviations for the shooting modes.  Your mode dial may have the letters ‘A, S, P, M’ (instead of Av, Tv, P, M), yet they all function in the same way.  Below, I have given each abbreviation for the given mode.

Aperture Priority (Av or A)
Aperture priority can be thought of as a ‘semi-automatic’ shooting mode.  When this is selected, you as the photographer set the aperture and the camera will automatically select the shutter speed.  So what is aperture and when would you want to control it?

The aperture is the size of the opening in the lens through which light is allowed to pass whenever the shutter is opened – the larger the aperture, the more light passes through.

The aperture is measured in ‘f-stops’ and is usually displayed using an ‘f-number’, e.g. f/2.0, f/2.8, f/4.0, f/5.6, f/8.0 etc, which is a ratio of focal length over diameter of the opening.  Therefore, a larger aperture (a wider opening) has a smaller f-number (e.g. f/2.0) and smaller aperture (a narrower opening) has a larger f-number (e.g. f/22).  Reducing the aperture by one whole f-stop, e.g. f/2.0 to f2/8 or f/5.6 to f/8.0, halves the amount of light entering the camera.

Aperture illustration

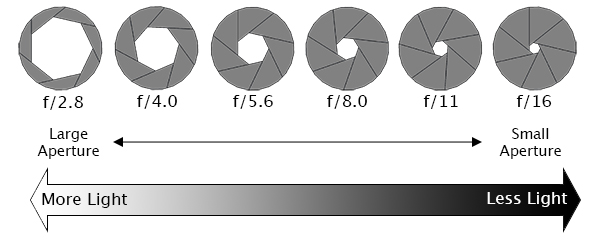
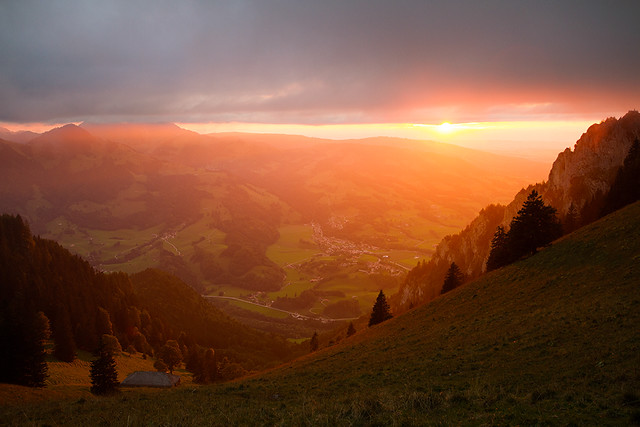
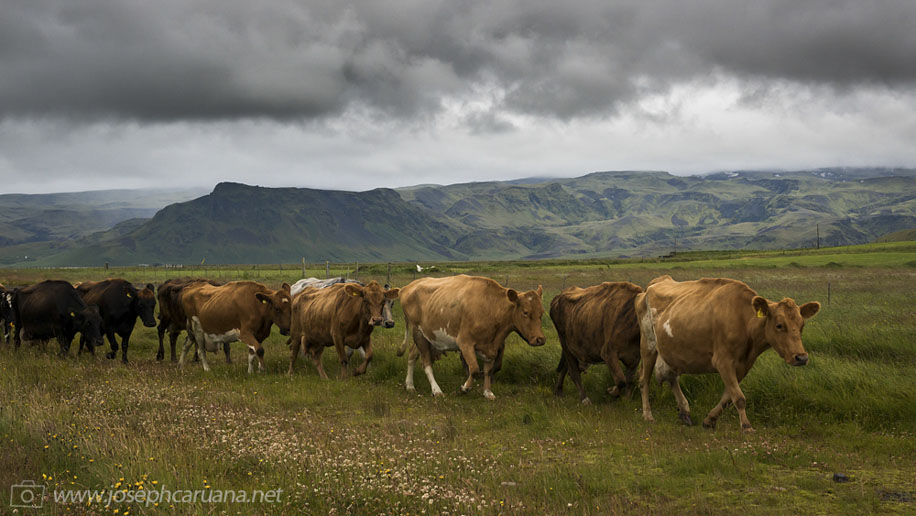
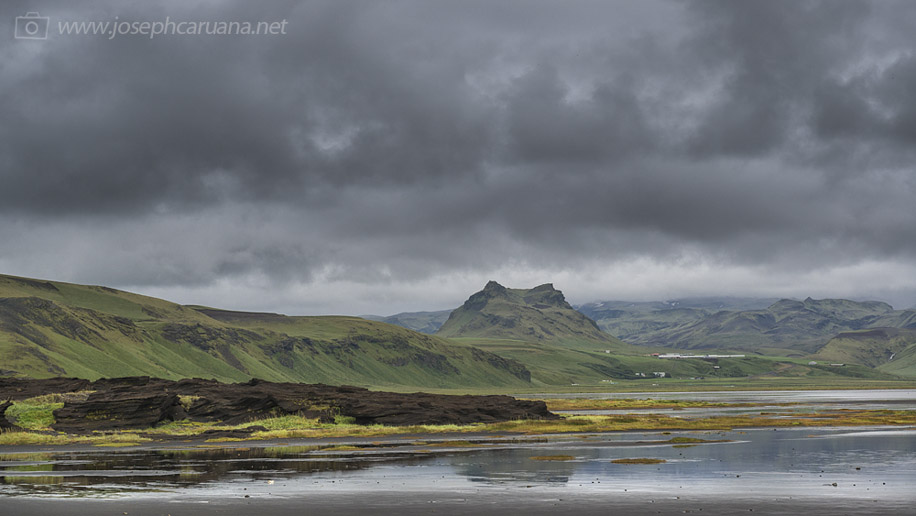
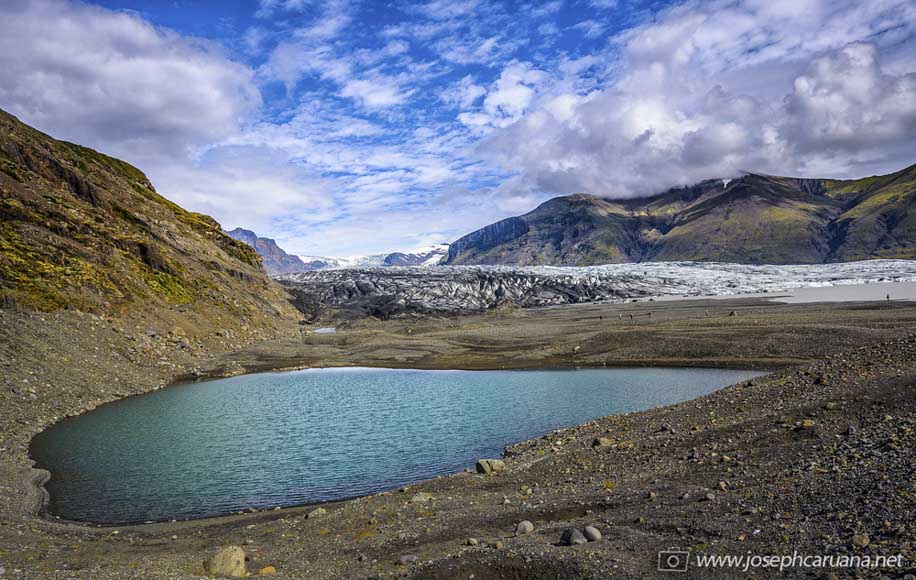
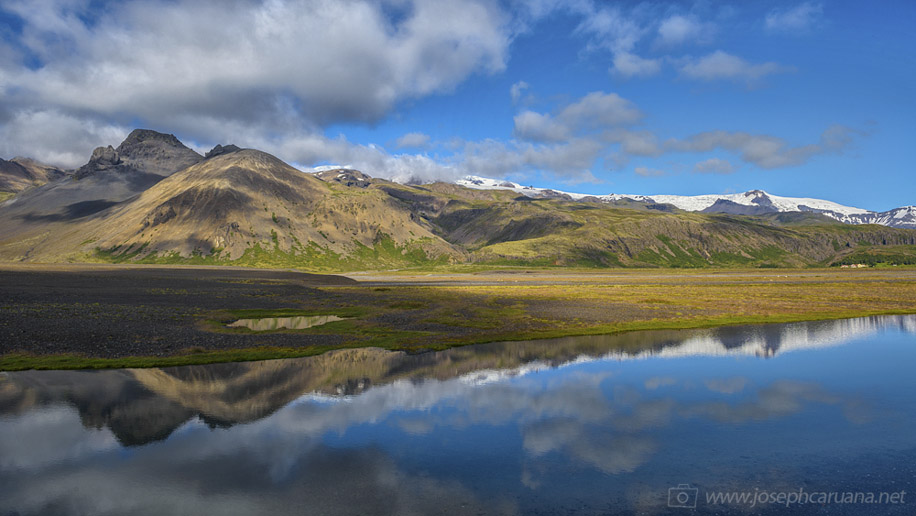
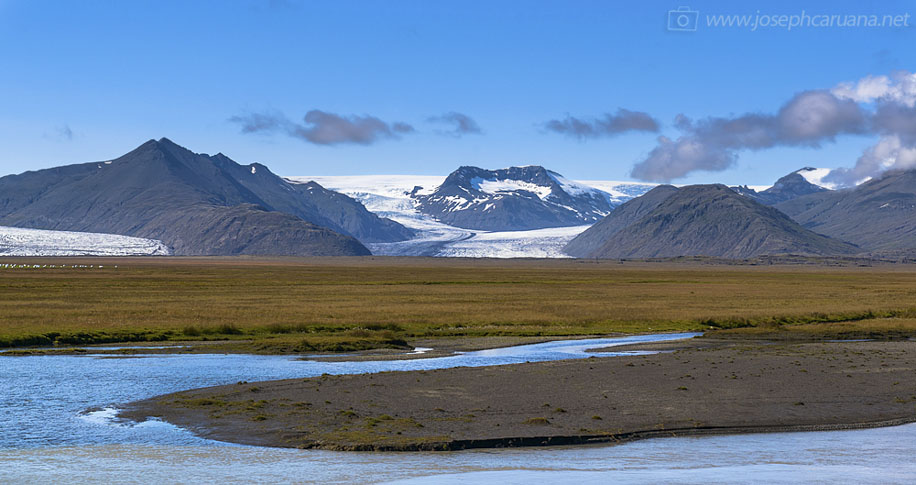
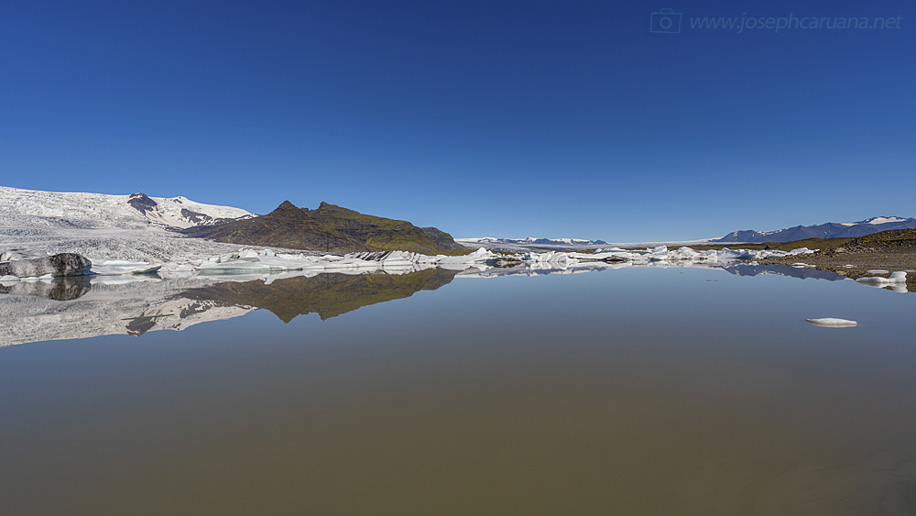
Aperture is one of the most important aspects of photography as it directly influences the depth of field – that is, the amount of an image that is in focus.  A large depth of field (achieved by using a small aperture (large f-number)) would mean that a large distance within the scene is in focus, such as the foreground to the background of the landscape below.

landscape taken at small aperture

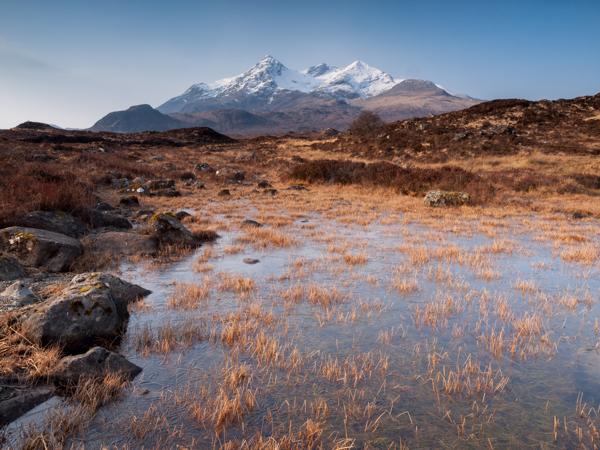
An aperture of f/13 was used here to give a large depth of field, ensuring that the whole image, from the foreground grasses to the background mountains. was sharp

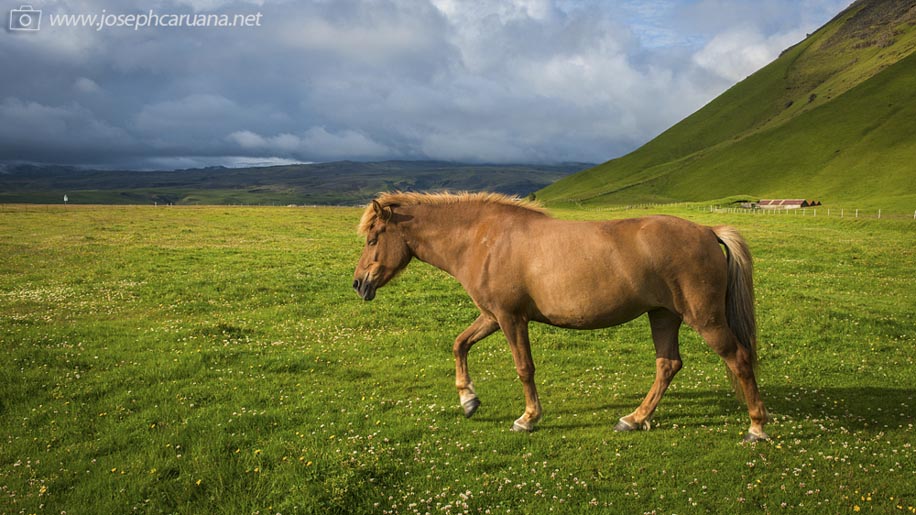
Whereas a shallow depth of field (achieved by using a large aperture (small f-number)) would produce an image where only the subject is in sharp focus, but the background is soft and out of focus.  This is often used when shooting portraiture or wildlife, such as the image below, to isolate the subject from the background:

large aperture wildlife

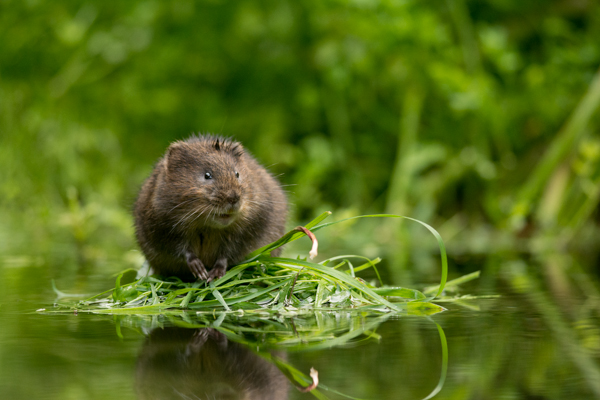
A large aperture of f/4.5 was used to capture this water vole, against a soft, out of focus background

So when using aperture priority, you can get complete control over your depth of field, whilst the camera takes care of the rest.

Shutter Priority (Tv or S)
Similarly to aperture priority, this is another ‘semi-automatic’ shooting mode, though in this instance, you as the photographer set the shutter speed and the camera will take care of the aperture.  The shutter speed, measured in seconds (or more often fractions of a second), is the amount of time the shutter stays open when taking a photograph.  The longer the shutter stays open, the more light passes through to the sensor to be captured.

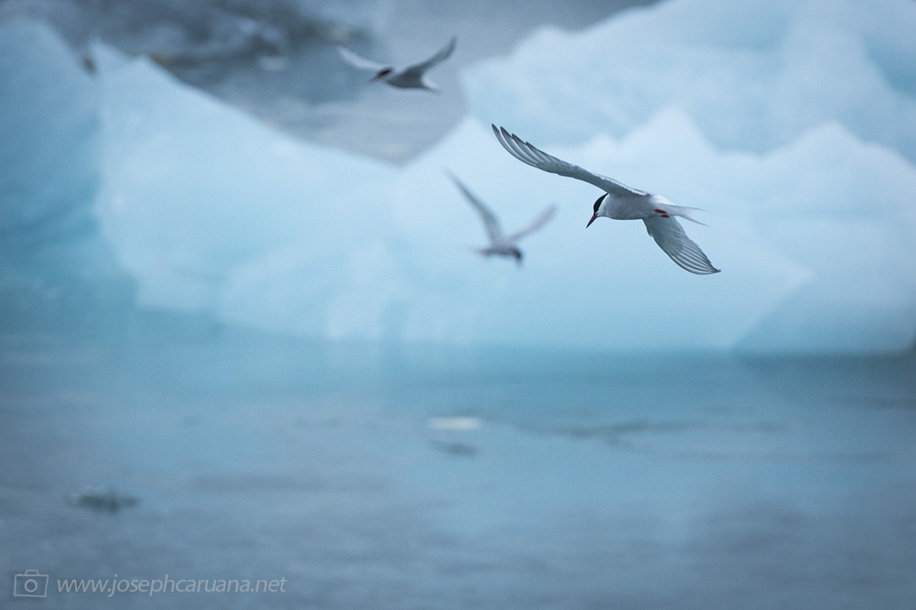
You would select a short shutter speed if you wanted to freeze a fast moving subject, such as shooting sports, action or wildlife, for example:

fast shutter speed

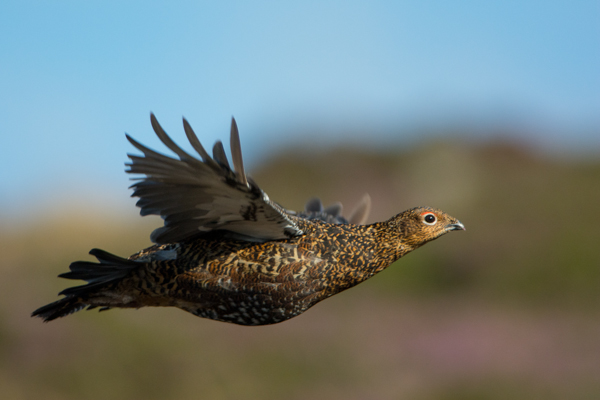
A very fast shutter speed of 1/4000th sec was used to freeze the motion of this grouse in flight

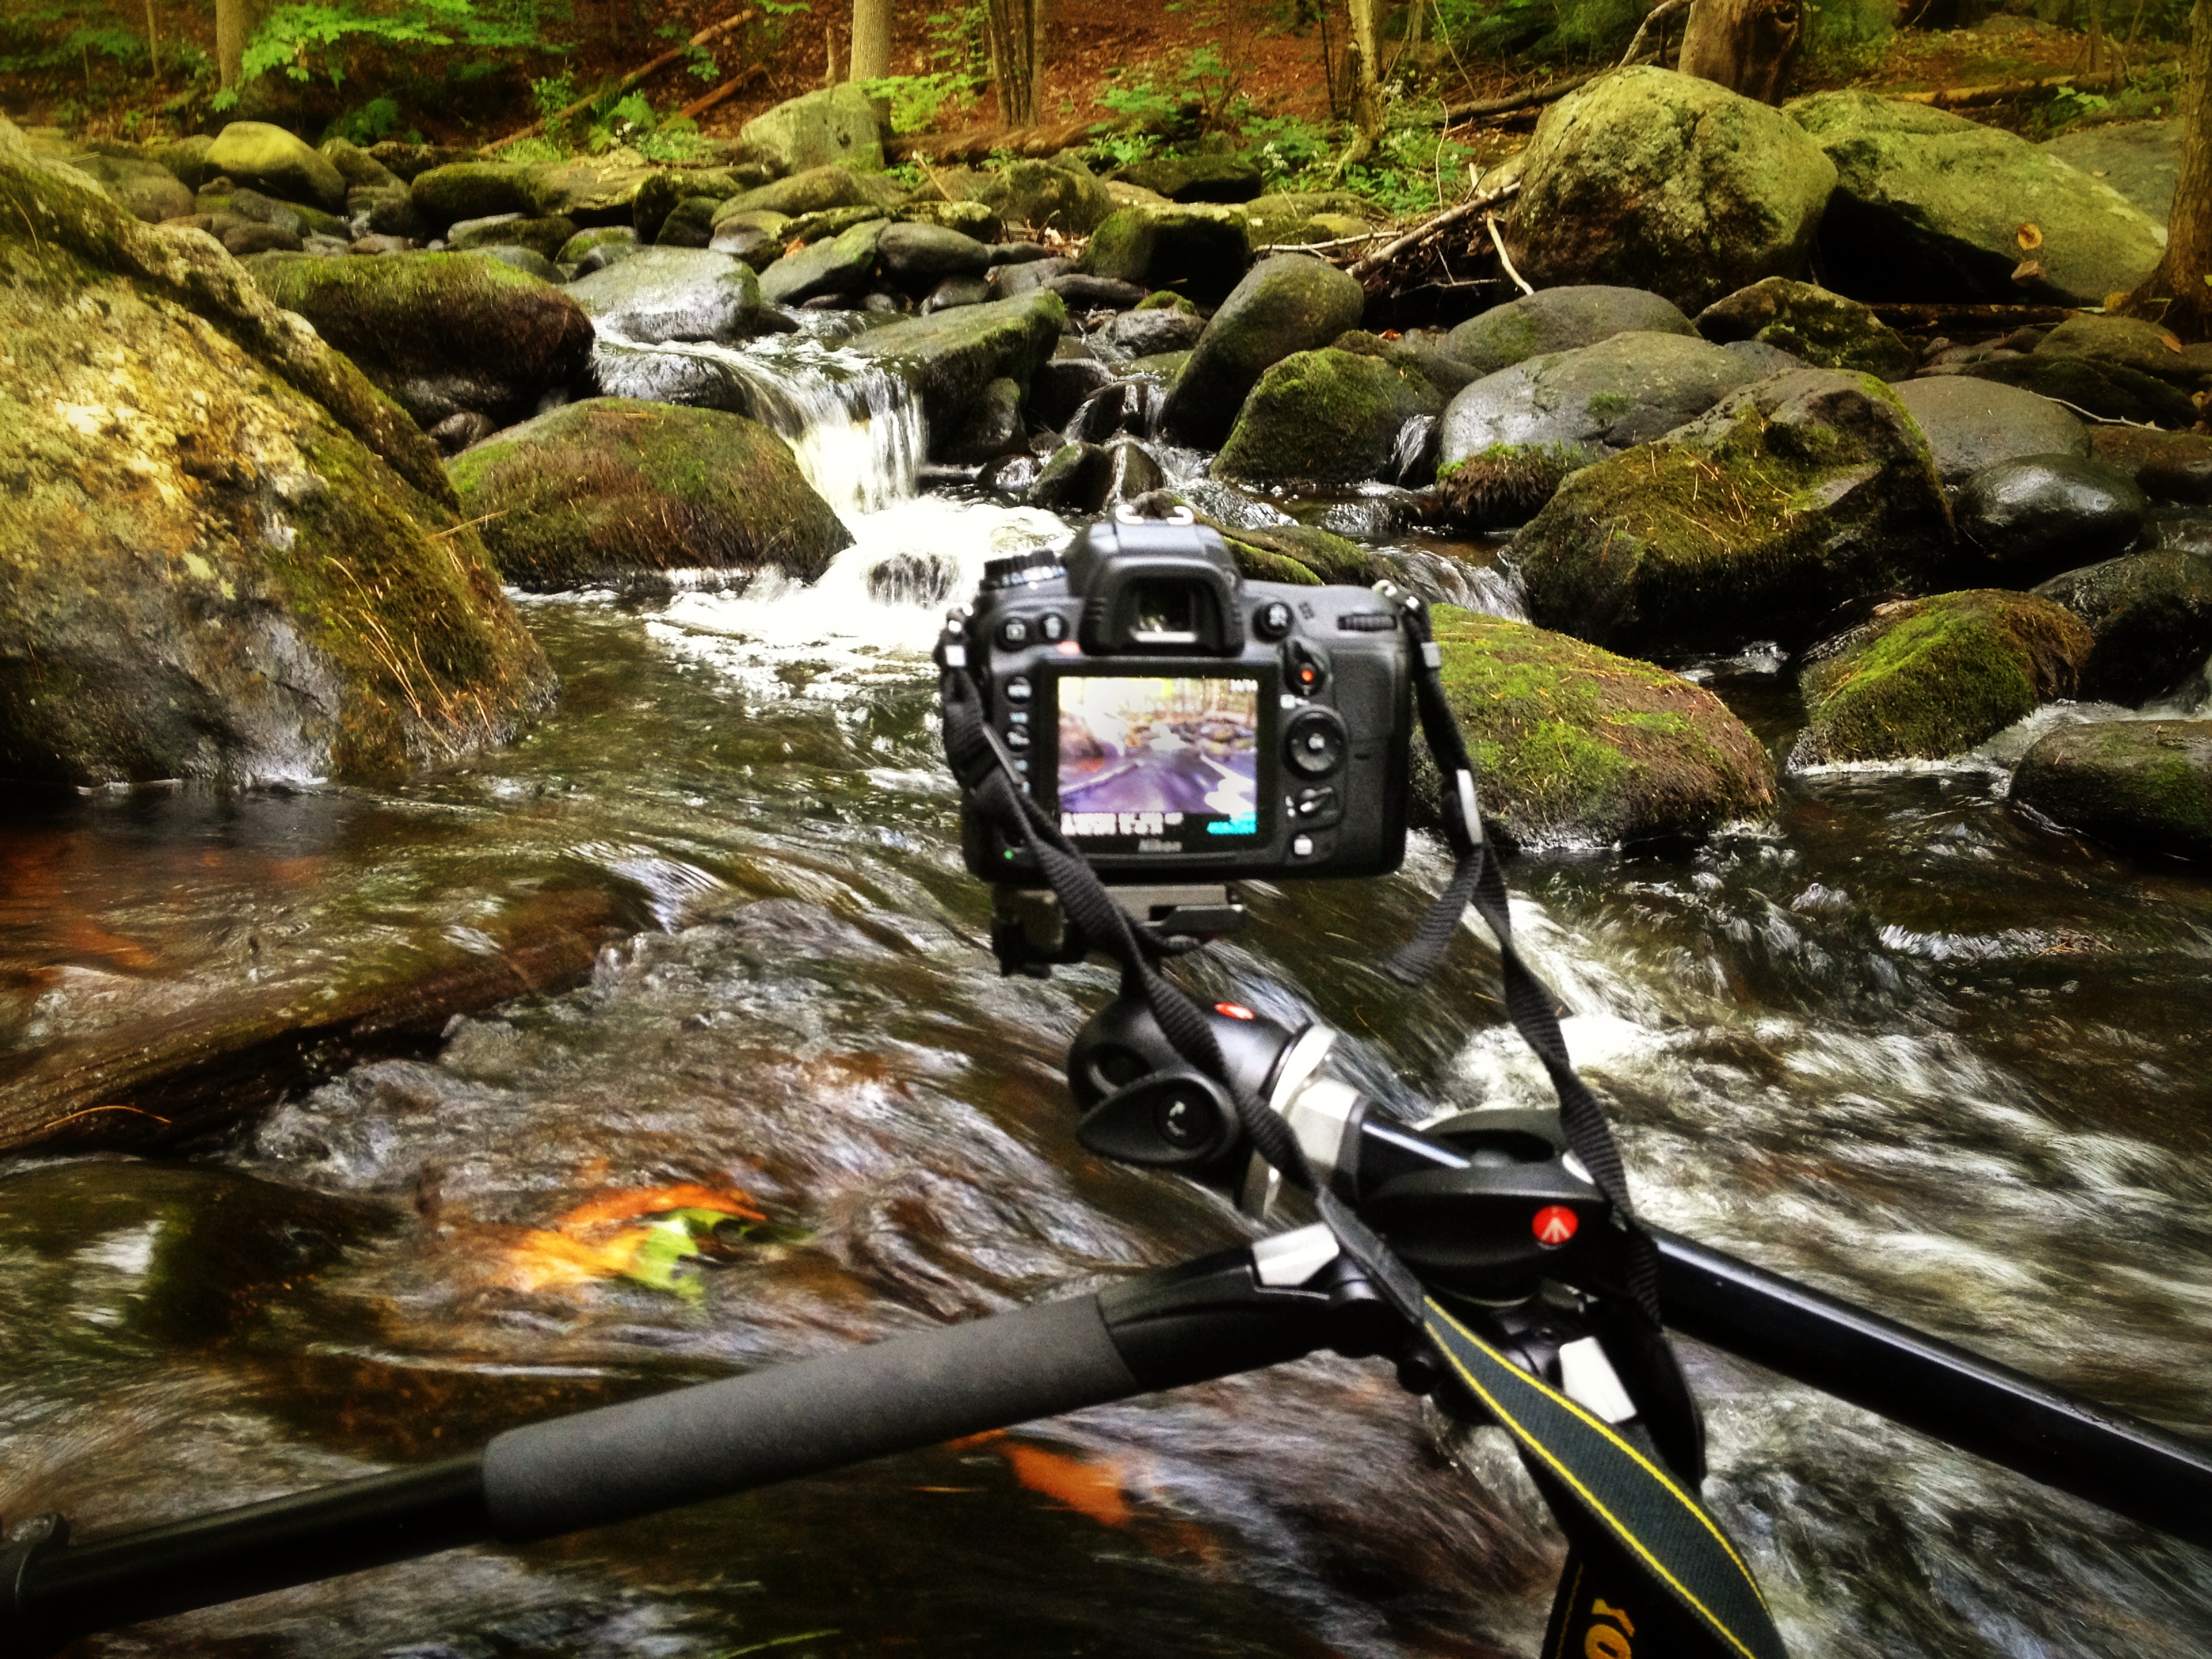
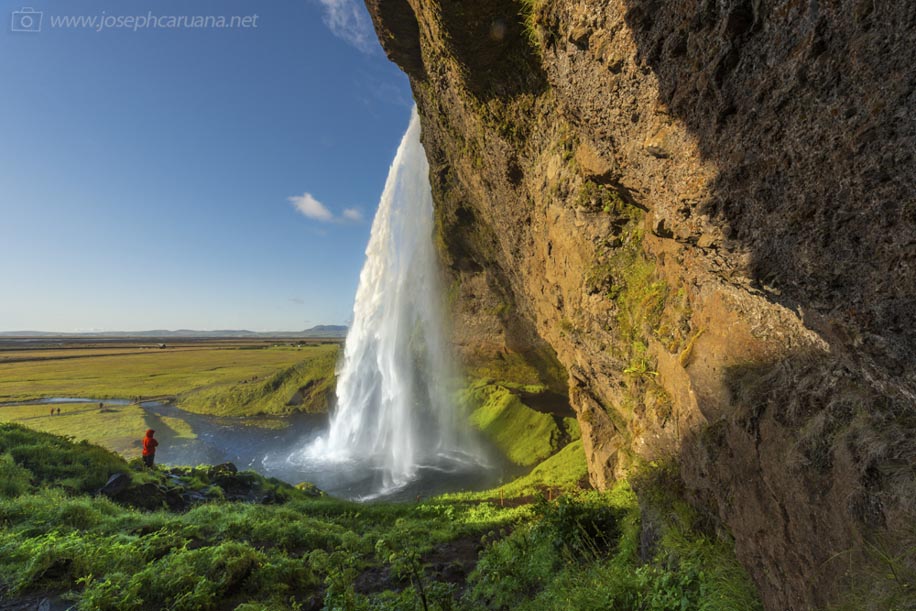
You would use a long shutter speed if you wanted to blur a moving subject, for example water rushing over a waterfall (slower shutter speeds will require you to put the camera on a tripod to ensure the camera is held steady whilst the shutter is open):

Slow Shutter Speed

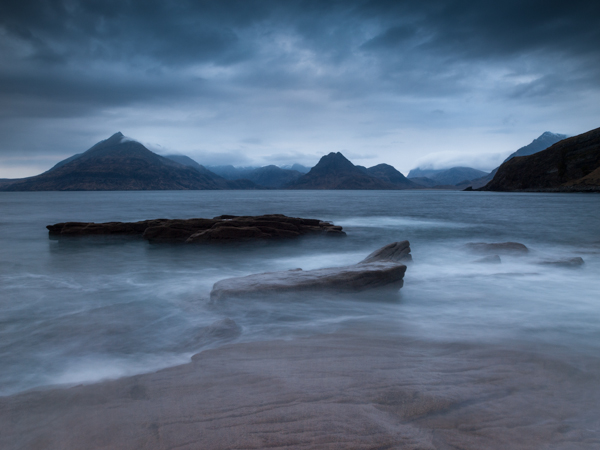
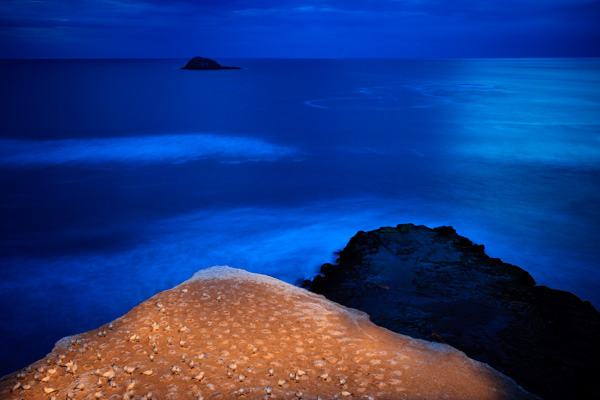
To capture the motion of the waves, and render the water with a soft, milky texture, a shutter speed of 6 seconds was used here

So whilst you worry about what shutter speed you need for a given photograph, the camera will determine the appropriate aperture required to give the correct exposure.

Aperture and shutter priority shooting modes may be semi-automatic, meaning that some may deride their use because they’re not fully manual, however they are incredibly useful modes to shoot in that can give you enough creative control to capture scenes as you envisage them.

Program (P)
Program mode is almost a halfway house between the semi automatic modes of aperture/shutter priority and full manual control.  In program mode, you are able to set either the aperture or shutter speed, and the camera will maintain the correct exposure by adjusting the other one accordingly, i.e. as you change the aperture, the shutter speed will automatically change, and vice versa.  This gives you additional freedom that using either aperture priority or shutter priority cannot give without switching between shooting modes.

Manual (M)
Manual mode is exactly what it sounds like, you are given full control over the exposure determination, setting both the aperture and shutter speed yourself.  There will be an exposure indicator either within the viewfinder or on the screen that will tell you how under/over exposed the image will be, however, you are left to change the shutter speed and aperture yourself to ensure you achieve the correct exposure.

Practically Speaking: as a first step to taking your camera off ‘auto’, aperture priority and shutter priority modes offer two very simple ways to start to understand how the different setting impact your images and are a perfect starting place for learning how to use your camera more creatively.

2. ISO

ISO is a measure of how sensitive the sensor of your camera is to light.  The term originated in film photography, where film of different sensitivities could be used depending on the shooting conditions, and it is no different in digital photography. The ISO sensitivity is represented numerically from ISO 100 (low sensitivity) up to ISO 6400 (high sensitivity) and beyond, and controls the amount of light required by the sensor to achieve a given exposure

At ‘low’ sensitivities, more light is required to achieve a given exposure compared to high sensitivities where less light is required to achieve the same exposure.  To understand this, let’s look at two different situations:

Low ISO numbers
If shooting outside, on a bright sunny day there is a lot of available light that will hit the sensor during an exposure, meaning that the sensor does not need to be very sensitive in order to achieve a correct exposure.  Therefore, you could use a low ISO number, such as ISO 100 or 200.  This will give you images of the highest quality, with very little grain (or noise).

Low ISO

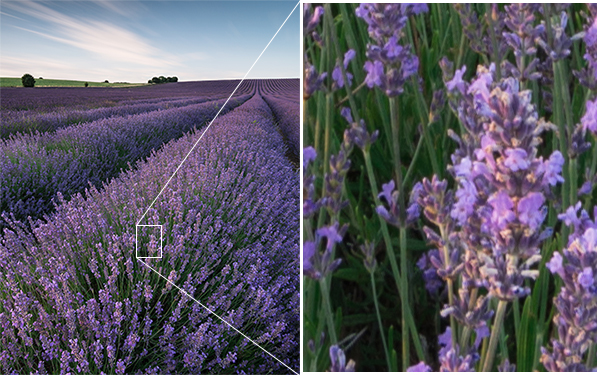
Taken at ISO 100, the image does not show signs of noise (even when looking at the 100% crop (right)

High ISO numbers
If shooting in low light conditions, such as inside a dark cathedral or museum for example, there is not much light available for your camera sensor.  A high ISO number, such as ISO 3200, will increase the sensitivity of the sensor, effectively multiplying the small amount of available light to give you a correctly exposed image.  This multiplication effect comes with a side effect of increased noise on the image, which looks like a fine grain, reducing the overall image quality.  The noise will be most pronounced in the darker/shadow regions.

High ISO

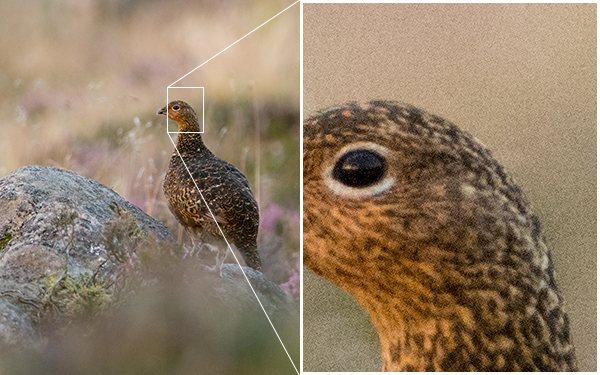
This image was taken as the sun was going down, meaning there was not much ambient light. Therefore, this was shot with ISO4000, however you can see very obvious noise in the 100% crop (right)

Practically Speaking: you want to keep the ISO as low as possible, as the lower the ISO, the less noise and the higher the quality of the resulting image.   Outside on a sunny day, select ISO200 and see how it goes.  If it clouds over, maybe select an ISO between 400-800.  If you move indoors, consider an ISO of around 1600 or above (these are approximate starting points).  

Most digital SLRs now have an ‘auto-ISO’ function, where the camera sets the ISO depending upon the amount of light in which you are shooting, keeping it as low as possible.  Auto-ISO is a very useful tool when starting out with your camera, as it is allows you to define an upper limit i.e. where the images become too noisy such as ISO1600 or 3200, and then forget about it until situations where you specifically want to override the automatic setting, for example if taking landscape images using a tripod, you can afford to use the lowest ISO possible. 

3. Completion of the Exposure Triangle

It’s important to note that aperture, shutter speed and ISO are all part of the ‘exposure triangle’.  They all control either the amount of light entering the camera (aperture, shutter speed) or the amount of light required by the camera (ISO) for a given exposure.

Therefore, they are all linked, and understanding the relationship between them is crucial to being able to take control of your camera.  A change in one of the settings will impact the other two.  For example, considering a theoretical exposure of ISO400, f/8.0, 1/10th second.  If you wanted to reduce the depth of field, and decided to use an aperture of f/4.0, you would be increasing the size of the aperture by two whole f/stops, therefore increasing the amount of light entering the camera by a factor of 4 (i.e. increasing by a factor of 2, twice).  Therefore, to balance the exposure, you could do the following:

  • Situation 1: Reduce the shutter speed by a factor of 4, i.e. to 1/40th second.
  • Situation 2: Reduce the ISO by a factor of 4, i.e. to ISO100
  • Situation 3: A combination of the above, shutter speed by a factor of 2 (to 1/20th second) AND reduce the ISO bv a factor of 2 (to ISO200).
Exposure triangle

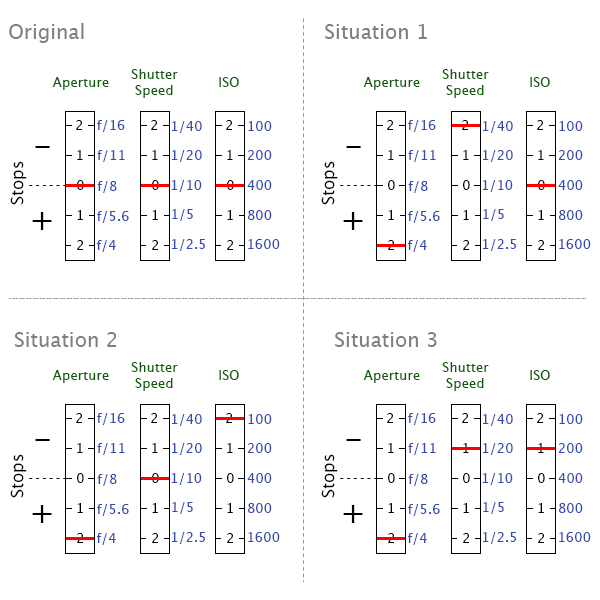
Aperture, shutter speed and ISO are all facotrs that influence your exposure, and are all linked. It’s just a case of balancing the books!

They all have the net effect of reducing the amount of light by a factor of 4, countering the change in aperture.  It’s just a case of understanding that they are all linked, and so changing one setting, will cause a change in another.

Using a combination of the semi-automatic shooting modes and auto-ISO would mean you won’t necessarily need to think about adjusting your exposure in such a way initially, however understanding the relationship that ISO or aperture has with shutter speed, and knowing the practical implications is a big step in mastering your DSLR .

4. Metering

Through out all of the above discussion, I have said that the camera calculates the exposure depending on the amount of available light, but what is it actually doing?

When taking a photograph, using any form of automatic exposure calculation (e.g. aperture priority mode, shutter priority mode, auto-ISO etc) the camera always tries to calculate an ‘average’ exposure.  It will asses the entire scene, both light and dark areas, and determine the exposure so that all of the tones within the entire image average to 18% grey – called the ‘middle’ grey.

This is known as metering, and it is the reason that if you point your camera at a bright white scene, such as after it has snowed, and take a photograph the resulting image will always appear darker than you or I see it.  Similarly, if you point your camera at a really dark scene, such as a low-lit room, and take a photograph the resulting image will always be brighter than you or I see it.

The scene is always being averaged by the camera and most of the time that results in the image appearing to be correctly exposed.  However, you can control what areas of the scene are being assessed by the camera in order to influence the way in which the exposure is metered.

Generally, there are three metering modes that you can choose from:

Average - The camera will assess the tones across the entire image form corner to corner, and expose the scene to 18% grey from that assessment.

Centre-weighted – The camera weights the exposure reading for the area in the centre of the viewfinder that can total up to approximately 80% of the scene, ignoring the extreme corners of the image.

Spot metering – The camera will use a very small area of the scene, typically a small circle in the centre of the viewfinder that totals approximately 5% of the viewfinder area.  It will make the assessment of dark/light tones in this area and expose the entire scene to 18% grey, from that assessment.

Practically speaking: when starting out with your camera, either average or centre weighted metering are a good starting point.  They will both provide a fairly consistent measure of the exposure required and, if you select one mode and stick with it, you will soon begin to understand when a scene will be under exposed (i.e. too dark) or over exposed (i.e. to light) compared to how you see it with your own eyes.

But what can you do if a scene is under/over exposed?  That is where exposure compensation comes in.

Exposure compensation

Generally found on a small +/- button near the shutter, this is one of the most useful functions to learn how to use.  It allows you to either increase or decrease the cameras default meter reading to account for the actual brightness of a scene.

evbutton.jpg

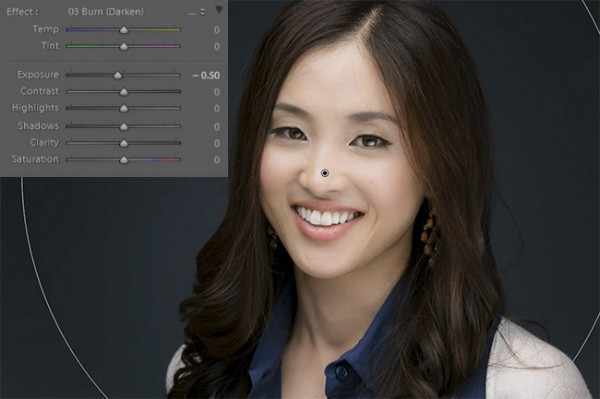
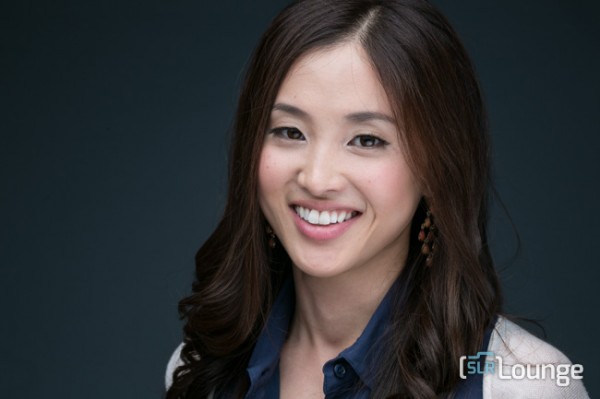
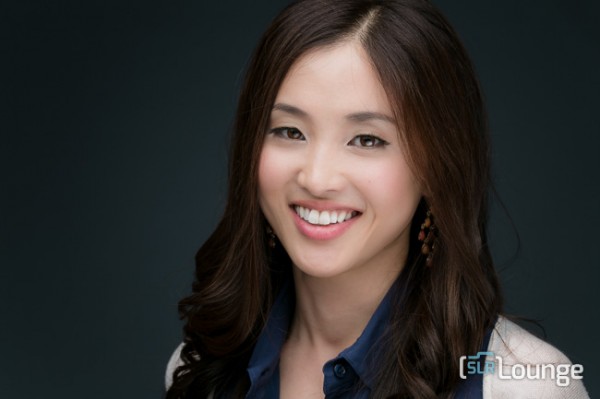
If a scene contains primarily bright tones and is being rendered too dark, for example, a bright white snow scene (that will typically be reduced to 18% grey by the default metering system), you can apply positive exposure compensation to let the camera know that the scene should be lighter than middle grey.

exposure compensation

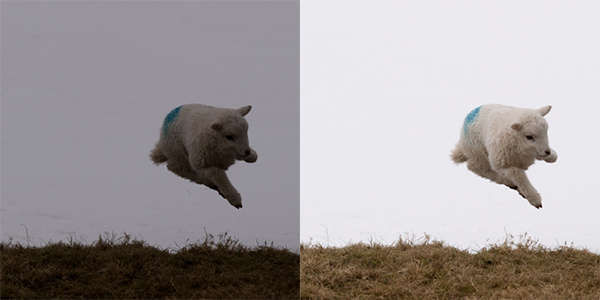
A spring lamb leaping in front of a snowy hillside. Left: Straight out of camera, with the snow caught as grey. Right: With +2 stops exposure compensation (added in post processing). The bright snowy background caused my camera to underexpose this scene by nearly two stops, which could have been corrected by exposure compensation in camera.

Conversely, if a scene contains primarily dark tones and is being rendered too light, for example, a dark night scene (that will typically be increased to 18% grey by the default metering system), you can apply negative exposure compensation to let the camera know that the scene should be darker than middle grey.

5. Focussing

Regardless of what shooting mode you are using, or what ISO you define, the chances are there will be a subject of your image that you want to have in focus.  If that focus is not achieved, the image will not be what you wanted.

Autofocus modes
DSLRs come with a range of autofocus modes, however, for simplicity, the two that are most important to understand are AF-S and AF-C

AF-S – autofocus-single.  This is best used when taking photos of stationary subjects such as portraits of people, landscapes, buildings etc.  When you half-press the shutter, the focus will be acquired and locked on that point for as long as you hold the button down.  If you want to change to focus, you need to release the button, recompose and then re-half-press.

AF-C – autofocus-continuous.  This is best used when taking photos of action or moving subjects such as sports and wildlife.  When you half-press the shutter, focus will be acquired and locked on to a given subject.  When that subject moves, the focus will adjust with it, refocusing all of the time until the photograph is taken.

(These modes are not to be confused with the AF/MF switches on the lens, where AF stands for autofocus and MF stands for manual focus.  That switch is an override for if you want to manually focus your lens.  If you want to make use of the autofocus modes discussed above, ensure the lens is set to AF).

Focus Points
Both of those focus modes rely on what are known as focus points.  When you look through the viewfinder, you should see a number of squares/dots overlaid across the screen.  When you half-press the shutter, you should see one of these squares be highlighted in red.  That is the active focus point, and it is that position within the frame that the camera is focussing on.  A viewfinder with 9 focus points is shown below:

focus-points

New DSLRs can come with over 50 focus points and the temptation is to leave it on fully automatic focus point selection, with the thinking that the camera will be able to select the correct focus point.  However, only you know what you want to focus on, and there is no better way than ensuring the correct subject is in focus than by using one focus point, and placing that focus point over the subject.

If you select a single focus point, you should be able to change which point is active fairly easily either by using directional buttons one of the dials.  If you select a focus point that is on your desired subject, you will ensure that the camera focuses where you want it to.  After a small amount of practice, you will soon get into the habit of being able to change the focus point without taking the camera away form your eye.

Practically speaking:  Initially, set your camera to use a single focus point (your camera manual should tell you how to do this).  This way, you will be able to choose what you are focussing on, ensuring that the subject you want to capture is in focus.  Once you are familiar with the basic focussing modes and focus point selection, you can then explore the more advanced modes that your camera may offer.

6. File Size/Types

You will have the option to be able to change the size of the images that your camera records, and in which file type.  You want to set the file size to the largest possible (whether it is ‘large’ or ‘fine’ or ‘super fine’) to ensure that you are making the most of the mega pixels that you have just invested in.

You will also have the option of choosing whether to record the images as ‘raw’ or ‘jpeg’ file type.  A raw file is uncompressed, and so contains a lot of image data that allows for a lot of flexibility during post-processing (i.e. on your computer) but also comes with additional complications such as the need to ‘process’ every file using dedicated editing software and a larger file size.  A jpeg is a compressed file type, that is automatically processed by the camera.  They will be ‘print ready’ straight out of the camera, and are much smaller files, meaning you can fit more images per memory card.

Practically speaking: When starting out with your camera, using jpeg is the most straight forward.  It will enable you to get the best results whilst you learn the basics or your camera before complicating matters with post-processing of raw files.  
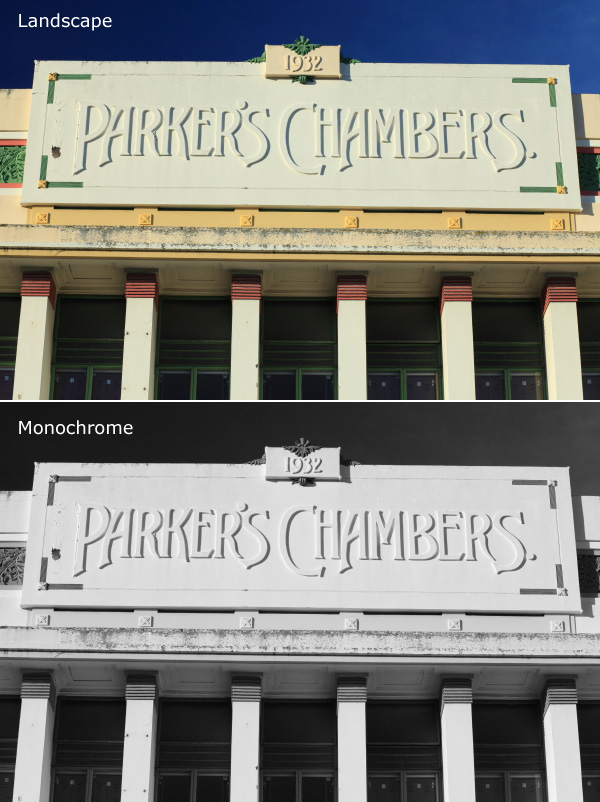
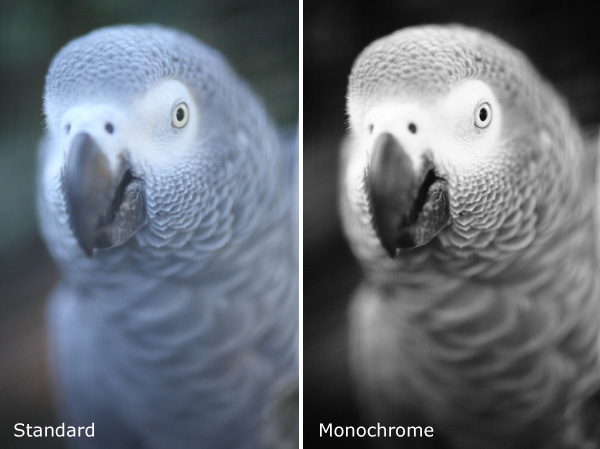
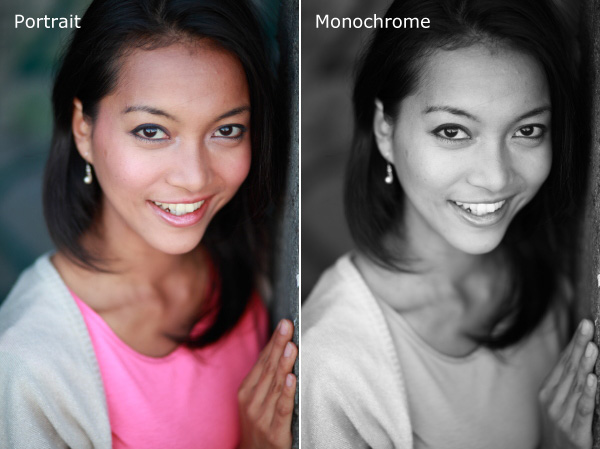
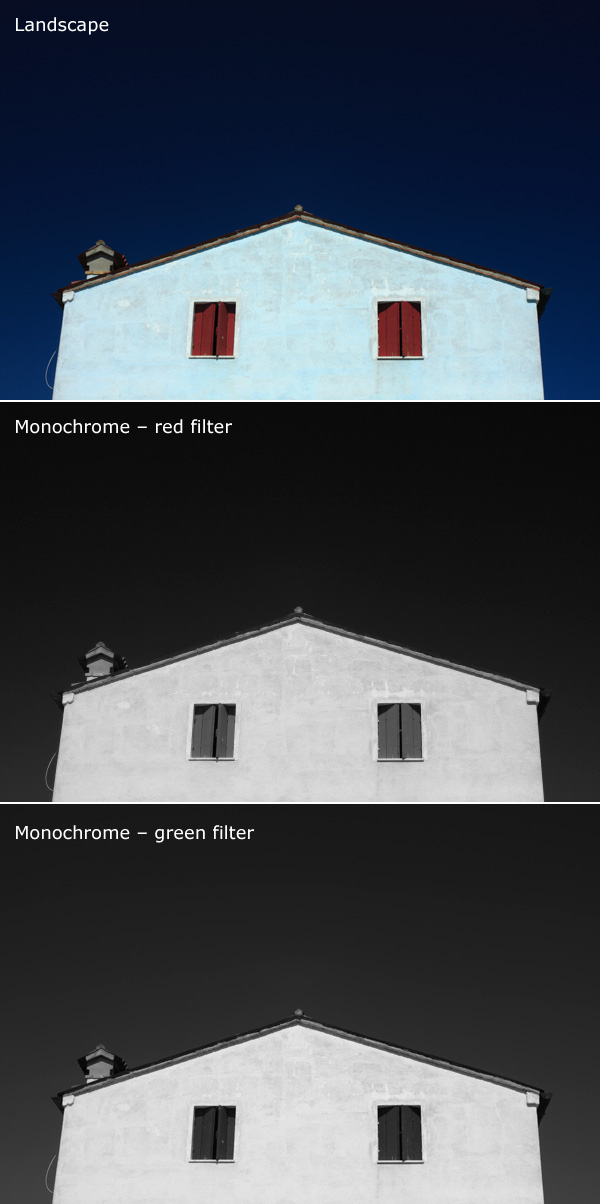
7. White Balance

If shooting in jpeg, as recommended above, you will need to make sure you set your white balance before taking a picture.  The white balance can significantly impact colour tone of your photographs.  You may have noticed that sometimes your images have a blueish tone to them or, in others, everything looks very orange.  This is to do with the white balance and, whilst you can make some adjustments to the image on your computer, it is much simpler if you get it right up-front.

Different light sources (such as the sun, light bulbs, fluorescent strips etc) emit light of different wavelengths, and therefore colours, which can be described by what is known as colour temperature.  Light from a candle, or from the sun during sunrise/sunset, is very warm, and contains a lot of red/orange wavelengths; whereas light from a fluorescent strip is much cooler, containing a lot of blue wavelengths.  This coloured light is reflected off of surfaces, but our brain in clever enough to recognise this and automatically counter the effect, meaning that we still see a white surface as a white surface.  However, your camera is not that intelligent, and unless told otherwise, will record the orange or blue tones giving the colour cast to your images.

white balance

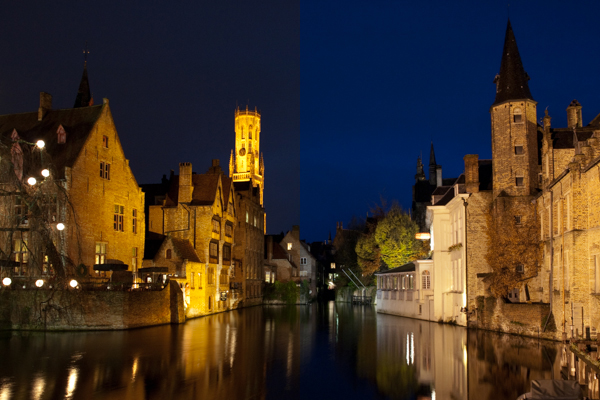
Left: The image captured using auto white balance has a heavy yellow tone from the artificial street lighting. Right: the same image, corrected for a ‘Tungsten’ white balance, giving the cooler tones on the stone work, and the bluer sky

As the colour temperature of different light sources is well known, there are a number of presets built into your camera that help to overcome the different colours of light in different situations – cooling the warm light, and warming the cool light – all in the cause of trying to capture the colours of the scene accurately.  The ‘auto’ feature (auto WB or AWB) will attempt to predict the colour of the light by detecting the predominant colour of the scene and then countering it, however it may not necessarily make a correct decision, leaving you with inaccurate colours.  Therefore it is best to set the colour balance before you take your image and just to make sure (note: the above image was a raw file giving me a lot of latitude for white balance correction.  Jpeg files are not as susceptible to white balance adjustments, meaning the white balance correction needs to be made before the image is taken):

Daylight – To be used on clear sunny days.  Bright sunlight, on a clear day is as near to neutral light that we generally get

Cloudy – To be used when shooting on a cloudy day.  Adds warm tones to daylight images.

Shade – To be used if shooting in the shade, as shaded areas generally produce cooler, bluer images, so need warming up.

Tungsten – Used for shooting indoors, under incandescent light bulbs, or under street lights, to cool down the yellow tones.

Fluorescent – Compensates for the green/blue tones of fluorescent light strips when shooting indoors.

Flash – the flash will add a cool blue cast to the image, so used to add some warmth.

Practically speaking: avoid auto white balance and set the white balance manually.  Generally, you will be able to look up at the sky and see what kind of day it is, and determine the colour balance required pretty easily.  If you move indoors, just check the lighting that you are shooting under, and again select the appropriate white balance.  It will soon become second nature to set it as you take your camera out of the bag.

Conclusion

So that is an overview of the settings you will encounter when you want to take the leap and take your camera off ‘Auto’.  You don’t necessarily need to consider them all straight away, but  exploring and understanding the effect of each setting will soon have you in complete control of your camera.  The biggest step, that will give you the most noticeable difference in the feeling of control and direct influence on creative results, will be to start using the ‘aperture priority’ or ‘shutter priority’ shooting modes and once you are familiar with those, you can start thinking about exploring further.  Soon enough, you will no longer think of your camera as a mysterious black box, but understand how to achieve the photographic results that you bought it for in the first place.


Post originally from: Digital Photography Tips.

Check out our more Photography Tips at Photography Tips for Beginners, Portrait Photography Tips and Wedding Photography Tips.

The Ultimate Guide to Learning how to use Your first DSLR

23 Sep 22:39

5 Ways to Take Better Smartphone Photos

by John Davenport

When you think about smartphone photography what comes to mind? My guess is you probably think about Instagram, photo filters, bad selfies and any number of other keywords that describe this new wave of photography.

hero

Today, I’m going to share a few tips on how you can improve your smartphone photography and start capturing interesting photographs wherever you are with whatever you have in your pocket. If you like this post you might also want to check out this DPS eBook specifically written for improving your iPhone photography.

Oh and no just because Apple improved their camera in the 5s doesn’t mean that they’ve created a device that will make you a better photographer – you’ll just get the same boring images – unless you learn how to become a better photographer.

Take Your Time and Treat it Like a DSLR

Smartphone photos on Flickr, Facebook and Instagram get a bad reputation for being terrible because well, 95% of them are terrible. One of the biggest reasons that this is the case is because 95% of the photos on these sites are taken not as photographs, but as a way of sharing moments – they’re snapshots.

IMG_0826-650x650

People aren’t thinking about capturing a photograph – they’re thinking about how cool that thing that happened in front of them is. If you want to truly impress people with your smartphone photographs you have to first and foremost start treating your smartphone more like a camera and less like a phone.

In the photo above I noticed that the sun setting behind me was reflecting off the mirror at the other end of the bar. I positioned my beer and spent a few minutes taking different shots, both in portrait and landscape orientation, as the sun quickly passed its way below the horizon.

Think With Filters in Mind

The great thing about smartphone photography is the ease of which you have to process your captured image. While it might not be true that every photograph looks “better” with a filter, it is certainly true that filters can add interest to an otherwise boring photo. That said you shouldn’t simply think “oh well I’ll just add a filter to it to make it awesome” instead think “that would look really cool with this filter!” and then shoot your photo accordingly.

IMG_0104

When I saw these two hikers sit down in front of me on a recent hike I knew right away that it’d make for a great “old time” family portrait style photo. I framed the shot and instantly went in that direction when I process the image – there was no doubt in my mind as to how I wanted the image to look from the moment I captured it.

Get Into Strange & Uncomfortable Positions

Smartphones are light, easy to maneuver and have a large screen making it possible to compose your image in awkward positions. Use this to your advantage and don’t be afraid of looking like someone who’s had a few too many hallucinogenic drugs in public. If you’re taking a photo people will understand won’t they?

So get down on your knees, on your back or hang upside down and have fun capturing photos that you would otherwise be unlikely to get with a larger heavier device.

Use Third Party Lenses

In most cases the third party lenses are best used for specialty situations like fisheye or macro photography that the built in cameras just aren’t capable of doing. With the iPhone I use the Olloclip 3 in 1 attachment and absolutely love the macro lens (read my full review here).

Dragonfly Macro

The above photograph was captured using an iPhone 4S with the Olloclip Macro attachment and to be honest the quality of this photograph even stunned me when I finally got it onto my computer. One of the key points to keep in mind here is that when you are using this lens you are required to be about 10-15 millimeters away from your subject to achieve focus – that’s incredibly close to a an insect that typically is fairly skittish.

Use Third Party Camera Apps

Yes the smartphones come with built in functionality, but in most cases they are fairly basic and while they will work well enough if you’re looking to capture a snapshot to go beyond that there are certainly better options out there. Many of the good quality camera apps on the market offer improved stability control, better filter options, and the ability to pick a focus and exposure point separately allowing for better control over the final image. Seeing as there are so many good apps out there rather than listing one that I recommend how about you leave your favorites in the comments below!

Have Fun and Share

Okay so ultimately the best part of smartphone photography is how easy it is to share your creations with the world. So now that you’ve learned how to take better smartphone photos how about sharing some of your favorites below – let us know which phone and apps you’re using to capture the images!

Learn more about taking photos with iPhones with our iPhone PHotography eBook.

Post originally from: Digital Photography Tips.

Check out our more Photography Tips at Photography Tips for Beginners, Portrait Photography Tips and Wedding Photography Tips.

5 Ways to Take Better Smartphone Photos

23 Sep 22:39

Documentary Photography – Six Tips for Creating a Legacy

by Darlene Hildebrandt

documenting-dps-02

We’ve all gone through times in our lives where we’ve lost loved ones. As a portrait photographer I would get calls all the time for “Urgent” family photos where one family member was terminally ill, and yet others that have photos done after the loss of a loved one.

Why do we wait until it’s too late, or almost too late to capture the lives of those most important to us?

As photographers (and before you argue that you aren’t a “professional” or you aren’t a photographer, I’m here to tell you that you are! If you take photographs you are a photographer, and this applies to you!) it is almost our duty to record the lives and times of those closest to us, family and friends. I’m not just talking about birthday parties and weddings, which are both important, but how about everyday life?

Last fall/winter my husband and I lost our two cats who were 18 and 19. He had them for 18 years, they lived with me for five. It hit me hard and I wrote this: “Do What’s Important Photograph Your Loved Ones”.  I vowed to go and photograph my grandmother who is now 92. I finally did that and I have some tips for you on how to go and photograph, and document the lives of your loves ones both young and old.

So this article comes with both tips AND a challenge, for you to go do the same.

  1. Documentary means as it happens naturally, in their environment.
  2. Capture the person’s essence, their real personality
  3. Remember to capture the details and scene setters
  4. Think big picture, take shots for the background of a collage or potential photobook or album
  5. Not every photo needs to show their face. Facing away from camera, hands and body are important too.
  6. Create a story with images, leave a legacy
Unfortunately Uncle Ward has now passed on, but his legacy does live on in these images, now treasured by family.

Unfortunately Uncle Ward has now passed on, but his legacy does live on in these images, now treasured by family. They sure did love their instant coffee. He even took a spoonful of the grounds and ate it!

#1 DOCUMENTARY MEANS IT OCCURS NATURALLY

Documentary photography usually refers to a popular form of photography used to chronicle significant and historical events. It is typically covered in professional photojournalism, or real life reportage, but it may also be an amateur, artistic, or academic pursuit. The photographer attempts to produce truthful, objective, and usually candid photography of a particular subject, most often pictures of people. – Wikipedia

Get into their day to day life. Plan to go spend a few hours chatting with the person, listen to their stories, capture what comes naturally and what just happens. Don’t create something that isn’t part of them, just be there to grab moments in time that will mean so much down the road.

The afternoon "soaps"

The afternoon “soaps” among all her family photos that plaster the walls.

Neil going to feed the cattle

Neil going to feed the cattle

#2 CAPTURE THEIR TRUE ESSENCE

This is not too far off from #1 but let’s take it a bit deeper. Just being in their home, using their environment doesn’t guarantee you’re getting into their heart and soul. If this is someone close to you, as in my grandmother, what is it about them you want to capture? What part of their personality do you want to shine through in the photos:  wisdom,  a gentleness; intelligence, caring, a sense of fun, or all of the above? Is there something quirky about them that makes them unique, how can you show that in your images?documenting-dps-14

For my grandmother she is a social butterfly so I photographed her with some friends and playing cards (see above).  My husband’s uncles are farmers and storytellers. We got out the old family photo albums and listened to them for hours while they showed us old photos from the 1940′s. They came alive as they recounted tales of their younger days and when they had a TV delivered “a couple years ago” which we later learned to be around 1975!

documenting-dps-06

We found out my husband’s grandmother was a hobby photographer during the 20′s and she had some really great images and albums!

documenting-dps-17

The key here is to get emotional. I don’t want to see a studio portrait, or even a lovely window light portrait for this type of project, I go for real, raw, emotion.

#3 REMEMBER TO CAPTURE THE DETAILS

When photographing a person with the intent of documenting, make sure you think in terms of these three views: overall, medium range, and close-up or details. What that means is don’t forget to get in close on some things, and not just have the whole face or person in every image. Details like how they hold their spoon as they stir their tea (so get in close on the hands or maybe even just the tea cup) can add a lot of impact.

Tea and cookies at Grammy's. For as long as I can remember she's been feeding us. "Do you want a cookie dear?"

Tea and cookies at Grammy’s. For as long as I can remember she’s been feeding us. “Do you want a cookie dear?”

She does love her Bingo

She does love her Bingo

Tea at the Uncles'

Tea at the Uncles’

#4 THINK BIG PICTURE AND SET THE SCENE

Things around them in their daily life set the scene, so remember to capture some of those things too. If they live in a house make sure to get an exterior shot, some of the garden, and maybe even a close-up of the wall you can use later as a textured background. Does she has a favorite dress, one you always think of when you think of her – if so they photograph it, or a section of the material. Is he a craftsman, then by all means photograph his tools.

The most important thing in my grandmother’s life is her family and in her small living room the walls are literally plastered corner to corner with family photos. Weddings, graduations, new great grandchildren, and even the pets are all there. Every shelf and horizontal surface has photos on it. You can bet I captured that (even though I’d taken make of those photos over the years, seeing them all up in one places speaks volumes to anyone that enters that room and you instantly know what she’s all about. She also collects angels and always has one pinned on her blouse. She has hundreds of them in her house everywhere.

documenting-dps-19

For the uncles that all consuming thing for them was farming and their animals. So I got lots of images of the barn, farm buildings and old retired machinery. Do all that without their assistance, let them go about their day while you just shoot background stuff. Think about how those images may work together making a photo album or even a digital book.

documenting-dps-18

The Cooper Homestead farmhouse

The Cooper Homestead farmhouse

#5 NOT EVERY SHOT NEEDS TO SHOW THE FACE

Similar to get in and show the details, think outside the box. Not every image needs to show the face or even hands. How about feet? Use a slower shutter speed and add some motion if applicable. Shoot for something different here that the “norm”. Think about how to represent them, and their life without showing their face.

documenting-dps-16

With her youngest great grandchild, young and old.

Unfortunately Uncle Ward has now passed on, but his legacy does live on in these images, now treasured by family.

#6 CREATE A STORY WITH IMAGES

Every other point in this article leads directly into this one, telling a story. By following all the tips above you pretty much can’t help but create images that do just that so the only thing I will add here is to do it consciously. Go in knowing you’rl./e creating a story. Intention is a powerful thing. When you show up planning to create a story, your subconscious will naturally kick in and go to work for you, if you aren’t aware (hint:  that’s why it’s your subconscious).

documenting-dps-12documenting-dps-08documenting-dps-09

One other thing you can do it go look at other photo stories, specifically some of the great photographers, masters of the photo essay. W. Eugene Smith comes to my mind, go study some of his stories for LIFE magazine. Anything by Cartier-Bresson but especially The Decisive Moment. Or some of my favorites Dorothea Lange, Margaret-Bourke White and Walkers Evans who all documented the Great Depression. Find out what draws you in to their images. How do they use scene setters and detail shots? Learn from the masters.

ACTION PLAN

If you read my articles regularly you’ll know what I’m going to say – get out there and go photograph someone important to you. That’s the first step! Then DO something with the images that will create a family heirloom. A book is ideal as you can make copies for the whole family.

To see the full book I made of The Uncles for an example of how to put it all together. Blurb.com is a great way to make books that are high quality that don’t break the bank. I’ve made several copies of this one for family and have done other volumes for special occasions and family events as well as clients. 

Cheers, Darlene

Post originally from: Digital Photography Tips.

Check out our more Photography Tips at Photography Tips for Beginners, Portrait Photography Tips and Wedding Photography Tips.

Documentary Photography – Six Tips for Creating a Legacy

23 Sep 22:39

Stitching Images For Larger Prints

by Rick Berk
For this image I decided I wanted to cover all of Lower Manhattan from the Statue of Liberty (far left) to the Empire State Building (far right, under the Brooklyn Bride, colored red, white and blue. I was using a Canon EOS 5D Mark III. My EF 24-70 f/2.8L II at 70mm covered the skyline and water with some sky vertically, so I positioned the camera vertically and proceeded to take 9 shots, moving the camera by turning the tripod head on it's rotating base. I overlapped portions of each frame so Photoshop would have a point of reference when stitching. Each of the nine exposures was taken at ISO 200, 90 seconds, at f/16.

For this image I decided I wanted to cover all of Lower Manhattan from the Statue of Liberty (far left) to the Empire State Building (far right, under the Brooklyn Bride, colored red, white and blue. I was using a Canon EOS 5D Mark III. My EF 24-70 f/2.8L II at 70mm covered the skyline and water with some sky vertically, so I positioned the camera vertically and proceeded to take 9 shots, moving the camera by turning the tripod head on it’s rotating base. I overlapped portions of each frame so Photoshop would have a point of reference when stitching. Each of the nine exposures was taken at ISO 200, 90 seconds, at f/16.  If printed at it’s native resolution at 300 dpi, it would measure 18.39 inches by 88.25 inches.  My photo lab maxes out at 108″, which it says it can print this image to.

Several months ago I was asked by a potential client if I had any images that were capable of being printed very large- up to 20 feet across! It pained me to explain that, no, based on my camera’s resolution, I did not have any images capable of being printed that large.  I had never gotten into doing many stitched panoramas or other prints, and couldn’t afford a Gigapan or other panorama photography tool.  For the most part, I’d had no call for it in my daily business. Generally, when shooting landscapes, I think in terms of one frame, and fill it with my composition. This has worked well for the most part, as long as I didn’t want to print much larger than around 48″ inches across.  Suddenly, however, I had a desire to go much larger.

This past week in the United States, we commemorated the 12th anniversary of the September 11th terrorist attacks. Every year New York City remembers the victims with a tribute in light- two columns of light representing the fallen towers of the World Trade Center.  It seemed a perfect opportunity to start playing with panoramics, especially since one of the images the aforementioned client wanted was a skyline shot of New York City.

The general rule of thumb for printing on standard inkjet printers is to print at 300 dpi.  To find out how large you can print an image, simply take the pixel dimensions and divide by 300. From a camera such as the EOS 5D Mark III, that means an image of 5760 x 3840 pixels can be printed at about 12.8 inches by 19.2 inches.  It is true, using various resizing techniques you can print larger.  I have on many occasions. But to get to the extreme sizes beyond approximately 48″, you’ll need to start combining images by stitching them together.

There are currently a few automated panoramic photo options on the market, including Gigapan’s and Panogear’s. Both can be somewhat pricey.  But just because you don’t have these nice accessories does not mean you can’t make stunning panoramic images.  A tripod is helpful, but not completely necessary if you can handhold the shutter speed your camera is set to.  A tripod is helpful for locking your camera in place from shot to shot. The reason a tripod is helpful is that if your tripod head has markings for panoramics on the base, you can use these for reference when repositioning the camera for each shot. More on that in a bit.  Another helpful tool is an L bracket. This will help you position your camera vertically if desired to shoot verticals to stitch the final piece.  L brackets can be purchased from several manufacturers and are usually camera-specific.  Acratech makes a universal L bracket with a quick release that any camera can attach to using an Arca-Swiss style plate.

You’ll want to start by defining your image in your mind. Where does it start, where does it end? Then, how far up does the image go, and how far down?  can you cover the up and down with one vertical?  Or would you be better off shooting two rows of images. Or more? Keep in mind when planning that you’ll want to shoot with some extra area around the image to leave room for cropping if needed.  You’ll also want to make sure you leave some overlap in each shot so the stitching software can find a point of reference to see where the next shot goes. I used Photoshop for these, but there are other programs out there. Feel free to suggest your favorite in the comments below.

For the first image in this article, I wanted to shoot the Lower Manhattan skyline, from the Statue of Liberty to the Empire State Building.  I had a 24-70mm lens, and at 70mm I covered exactly what I wanted, from top to bottom, with a vertical shot.  I took 9 shots in that orientation, while rotating the tripod head incrementally until I got my last shot.

For the second shot in this article, there was a more prominent foreground element, the pilings from the old pier.  I decided to do this one in a horizontal orientation, using two rows of three shots.  This was again taken using the 24-70mm lens, at 70mm.  I shot this one starting at the far right, shooting in columns- upper right, lower right, lower center, upper center, upper left, lower left.  I used the playback feature on the camera to check my reference points. Again I stitched it using Photoshop’s Photomerge feature.

This shot was six horizontal shots stitched together. Because of the overlap, the 3 shots across and 2 up and down will not add up to the full resolution of the individual images simply put together. This image came together at  10,531 pixels by 5904 pixels. At 300 DPI the file can be printed at 19.68 inches by 35.1 inches. My lab, however, tells me they can print this image up to 8 feet wide.

This shot was six horizontal shots stitched together. Because of the overlap, the 3 shots across and 2 up and down will not add up to the full resolution of the individual images simply put together. This image came together at 10,531 pixels by 5904 pixels. At 300 DPI the file can be printed at 19.68 inches by 35.1 inches. My lab, however, tells me they can print this image up to 8 feet wide. They are not using inkjet printers and thus are not subject to the same parameters.  The same still holds true however.  The larger the file, the larger it can be printed.

I have not yet heard anyone say that any photo stitching program is perfect.  There will be errors in stitching.  A misplaced post, a skewed building. To correct these, I simply opened the source file and added it to the stitched file on a new layer.  Then I created a layer mask to show only the area I wanted shown, which would correct the issue.

For your exposure, you’ll need to be in manual mode. You need the exposure to be uniform across the image.  If you leave your camera in any auto mode where the camera helps set the exposure, you run the risk of your exposures varying.  For the first image in this article, my exposure was 90 seconds at f/16, ISO 200 for each image.  This is important, particularly when photographing the area around the statue of liberty which had huge dark areas.  In auto mode, the camera will try to brighten these areas, which will cause problems when the stitching if the skies or water don’t match from shot to shot. In the interest of full disclosure, I made this mistake myself with the second image, the six-shot stitch.  I shot in aperture priority and there was a variation of plus or minus 2/3 of a stop from shot to shot.  This caused all kinds of headaches in my first attempt at stitching.  I was able to correct this by reproccessing the RAW files with an exposure adjustment to match the exposures.  In addition, if your camera has a feature for vignette correction, such as Canon’s Peripheral Illumination Correction, turn it on.  This will even out the exposure so there are no dark areas in the corners, which can be difficult to correct later on.

I’ve toyed with stitching panoramics before, but never seriously.  This is one of my first attempts at a serious pano.  It’s well worth exploring more in the future.  I might even start saving for a new piece of equipment just for that purpose!


Post originally from: Digital Photography Tips.

Check out our more Photography Tips at Photography Tips for Beginners, Portrait Photography Tips and Wedding Photography Tips.

Stitching Images For Larger Prints

23 Sep 22:39

How to Professionally Retouch Portraits in Lightroom

by Post Production Pye

The Following is an excerpt from the SLR Lounge Lightroom Preset System v5 and accompanying workshop from the Lightroom Workshop Collection v5.  The Lightroom Preset System is designed to take you from Ordinary to Extraordinary photos in just a few seconds and clicks.

In this article we’re going to do a headshot retouch to show how capable Lightroom is. Of course for a professional headshot retouch Photoshop is necessary, but Lightroom is also surprisingly capable. We’re going to utilize one of our “Soft Portrait” presets, similar to the one we used in our Color Portraiture with Retouch and Enhancement Tutorial, and then we’re going to utilize our brush presets to make our retouches. The complete written tutorial is below, and you can also watched the video tutorial at the end of this article.

Here’s a sneak peak at what our image will look like before and after the retouch.

beforeafter


Read the Written Tutorial

The first thing we’re going to do is select our “01-10 BASE – SOFT: 11a. Extra Soft – Skin Desat” which will soften the skin by decreasing the Clarity and adjusting the Noise Reduction settings. The preset also adjusted the Red and Orange in our HSL, lowering them slightly so we get desaturated skin tones. We also added a little bit of contrast using the  “03-40 ADJUST – SHADOW BLACKS: 43 Darken – Light (+10,-20)” preset. The Tone Curve is set in s subtle “S” shape, giving us a slight contrast boost, and we have our standard amount of Sharpening applied to this photo. We’re going to set our Color Temperature to 4900 and add +0.40 to the Exposure to give the skin a nice bright look. For those that don’t have the Preset System, here are what our Develop Settings look like after our presets and adjustments are applied.

alldevelopsettings

The first brush adjustment we’re going to be making is for her skin. We’re using our “21 Skin Softener” preset, and you can see settings of our brush in the photo below. These settings will smooth skin without destroying skin texture. We want to make sure we’re only applying this brush to the skin, and you can press “O” to bring up the overlay so you can see exactly where the brush is being applied as shown below. You can also delete  areas of brush application by holding down “alt on a PC or “opt” on a MAC to erase the adjustments.

skinbrush

Moving on, we’re going to hit “New” to  make new brush adjustments, and we’re going to select our “23 Line Diminisher” preset. We want to diminish some of the smile lines and lines under the eyes. This part of the retouch should be subtle, diminishing the lines and not removing them completely. Once again, you can see the brush preset settings and the area of affect in the image below.

linediminisher

Now we’re going to hit “New” and select the  ”24 Eye Brightener” preset. We’re going to brighten up the eyes and we want it to be subtle because if the eyes are too bright it will have an abnormal look. The best way to check if eyes are too bright is to simply zoom out to a thumbnail view and check to see if the eyes look like they are glowing or unusually bright based on the surrounding tones.

eyebrightener

Furthering our edit on the eyes, we want to brighten up the iris’ to add nice colors to them and to exaggerate some of the nice catch light. We’re using our “25 Iris Enhancer” and we want to make sure we’re only making adjustments on the iris’ and nothing else.

irisenhance

Now we’re going to move onto our lips. Our “26 Lip Enhancer” preset adds nice color and contrast to the lips.

lipenhance

The last brush we’re going to use is for the hair. With our “15 Hair | Lashes” preset, we’re going to pull out some nice color and texture from her hair.

wendyhair

At this point we’re done with our retouches. If you like you can do some additional blemish removal. When doing blemish removal we recommend keeping blemishes that are apart of their look. The last thing we’re going to do is add a Radial Filter with the Exposure set to -0.50.

radialfilter

And now we are left with our final image. Here’s a before and after of our portrait.

Before

lightroom-5-tutorial-professional-headshot-retouch-0001

After

lightroom-5-tutorial-professional-headshot-retouch-0002

Watch the Video Tutorial

If you would like to see exactly how all of the settings and adjustments were applied, please watch the video below from the SLR Lounge YouTube Channel.

Conclusion and Learn More

We hope you all enjoyed this tutorial. If you are interested in learning more or purchasing the SLR Lounge Lightroom Preset System v5 or the newly released Lightroom Workshop Collection v5, please click any of the links in this article.

Post originally from: Digital Photography Tips.

Check out our more Photography Tips at Photography Tips for Beginners, Portrait Photography Tips and Wedding Photography Tips.

How to Professionally Retouch Portraits in Lightroom

23 Sep 22:38

Mastering Monochrome Mode

by Andrew Gibson

Mastering monochrome mode

Andrew S. Gibson is the author of Mastering Photography: A Beginner’s Guide to Using Digital Cameras, on offer now at Snapndeals for a limited time.

One of the benefits of digital photography that I really appreciate is the ease with which I can convert images to black and white. It was much harder back when I first became interested in photography. I remember wanting to try black and white, and print images in a darkroom, but living in a property with no spare space to build a darkroom meant that it was years before I was able to start learning to print.

Now, black and white is as accessible as switching to your camera’s monochrome mode. Some people still prefer chemical processes, but for the rest of us it means no more darkrooms and no more waiting to process film and make prints. The process is instant. That has opened up black and white photography to many more photographers, which can only be a good thing.

Use Raw

I want to make one thing clear before continuing. You will always get the best results in black and white by using the Raw format and converting your files to black in white in software like Photoshop, Lightroom or a plug-in like Silver Efex Pro 2. But there are still good reasons to switch your camera to monochrome mode for shooting in black and white. Let’s take a look at what they are.

Monochrome mode helps you visualise in black and white.

Mastering monochrome mode

Seeing in black and white is an acquired skill. It takes time to learn how scenes that you are accustomed to viewing in colour translate to black and white.

The benefit of switching to monochrome mode is that the camera displays your photos in black and white on the LCD screen. This helps you see how the scene looks in monochrome.

You can take it further by increasing the contrast or changing the colour filter settings (I’ll cover this below if you don’t know how to do this or why).

The photo above is an example. The colour version is what I would see on my camera’s screen if I set the Picture Style to Landscape. Underneath that is what I would see in monochrome mode.

Monochrome mode helps you take better colour photos.

Mastering monochrome mode

Years ago I read an interview with David Muench in which he described his style as ‘black and white photography in colour’. That statement has always stuck with me.

What did he mean by that? Well, the basis of a good black and white image is tonal contrast – the way that light and dark tones are arranged within the composition.

David Muench’s colour photos rely as much on tonal contrast as they would if he were shooting in black and white. Tones are an important building block in the composition of his images even though he is shooting in colour.

That idea has become the basis of much of my colour photography. I believe that strong colour photography utilises tonal contrast as much as good black and white. That’s why using monochrome mode, and learning to see in black and white will make you a stronger photographer in colour too.

The photo above is a good example of tonal contrast. The two images show how it would look on my camera’s screen in both standard and monochrome Picture Styles. I increased contrast in the monochrome Picture Style as the light was so flat.

Monochrome mode helps you take better black and white portraits

Mastering monochrome mode

I find that models love to see their photos on the camera’s LCD screen during a shoot. If you want to work in black and white, switching to monochrome mode and showing your model the previews in black and white helps them get an idea of how the processed images will come out. If your model gets excited about the results he or she will work harder to create good images.

The example here shows the difference between portrait and monochrome Picture Styles (contrast increased in monochrome mode).

Monochrome mode – what you need to know

Every manufacturer approaches this differently, so check your manual, but the basic idea is the same.

These are the settings you are looking for, by manufacturer:

Canon: Picture Style
Nikon: Picture Control
Sony: Creative Style
Pentax: Custom Image
Olympus: Picture Mode
Sigma: Colour Mode
Fujifilm: Film Simulation

Look for the setting labelled Monochrome (or something similar). Once selected, you should also be able to customise it. My Canon EOS cameras have four parameters you can adjust in Monochrome mode:

Mastering monochrome mode

Sharpness

Ignore this if you’re shooting in Raw, as you can adjust sharpness when processing the image. If you’re using JPEG, be careful not to oversharpen – you can increase sharpness in Photoshop if you need to.

Contrast

The biggest concern many photographers have about using monochrome mode is that the photos often tend to look flat and consequently somewhat boring and inspired. That’s because the camera manufacturer would prefer to give you a flat black and white image by default, in order to retain highlight and shadow detail. The assumption is that you will adjust contrast in Photoshop if you need to.

However, increasing contrast in-camera gives you a better preview that can make it much easier to visualise how the scene converts to black and white. Be careful if you’re shooting JPEG, as you won’t be able to pull back any lost shadow or highlight detail in Photoshop.

But if you’re using Raw, you can set the contrast to whatever you want.

One thing to watch out for in Raw: the histogram and highlight alert are generated from the preview you see on the screen. If you increase contrast, your camera may tell you that the highlights are clipped, when the detail is actually there in the Raw file. You more you increase the contrast, the more likely this is to happen.

Filter effect

Before digital, black and white photographers would use coloured filters to alter the tones of their black and white images. Coloured filters make colours corresponding to the colour of the filter lighter, and the opposite colour on the colour wheel go darker.

For example a red filter makes red colours go lighter and blue ones (such as the sky) go darker.

This is how you could use the filters:

Red: Makes blue skies go really dark. Very dramatic, especially if you increase contrast too.

Orange: Makes blue skies go dark, but not as dark as the red filter.

Yellow: Darkens blue skies a little. Also lightens skin tones, and can be good for portraits.

Green: Makes anything green lighter. Often used to lift photos containing a lot of things that are green, such as grass or vegetation.

Mastering monochrome mode

Here’s an example to help you see the effect of using coloured filters. The differences are subtle, but you will see that the sky is darker and the shutters are lighter in the version with the red filter..

Again, if you’re using JPEG select your colour filter carefully, as you can’t change it in post-processing. In Raw it doesn’t really matter, just choose the filter, if any, that gives you a good preview. You can apply any filter setting you want when you process the image.

Toning effect

On my EOS cameras the toning effects are a bit too strong to be effective. Regardless of whether you are using JPEG or Raw you can tone your photos much more efficiently in post-processing anyway. It’s probably best to leave this setting alone.

Raw vs. JPEG

Remember, if you use monochrome mode with JPEG files you will get what you see on the LCD screen – black and white images with whatever sharpening, contrast and filter effect settings you used. That may suit some photographers but I really suggest that you use Raw. That way you have a full colour image that you can process any way you like, including converting to black and white with software that gives a much better result than your camera possibly could.

Mastering Photography

Mastering monochrome mode

My latest ebook, Mastering Photography: A Beginner’s Guide to Using Digital Cameras introduces you to digital photography and helps you get the most out of your camera. It covers concepts such as lighting and composition as well as the camera settings you need to master to take photos like the ones in this article. It’s available now at Snapndeals for a special price for a limited period.

Post originally from: Digital Photography Tips.

Check out our more Photography Tips at Photography Tips for Beginners, Portrait Photography Tips and Wedding Photography Tips.

Mastering Monochrome Mode

23 Sep 22:38

The weekend in red and blue

by Kay Kremerskothen

Los Angeles

Reflections from a vanishing day

dream in an open place

Caminando hacia el otoño....

Derniers rayons sur la Gruyère

Photos from d.r.i.p., steinliland, =anja=, T.I.T.A., Arafinwë, and rbnisonfire, uploaded during the weekend.


23 Sep 22:36

Guest post: Nikon D800E does Iceland

by [NR] admin

Nikon D800E does Iceland 16
Nikon D800E does Iceland 13
Nikon D800E does Iceland 27
Joseph Caruana (websiteFacebookYouTube500px) shares his photographs and experiences during a recent trip to Iceland with the Nikon D800E (click on images for larger view):

Visiting Iceland had been on my bucket list for a very long time.  A place full of natural wonders and fantastic scenery, it called both to the scientist and the photographer in me.  So when the opportunity came along, I didn't require any persuasion.

Nikon-D800E-does-Iceland-28
The idea of being outdoors for the whole stay was quite appealing, so we opted for camping.  We hired a car to give ourselves the freedom of roaming the place to our hearts' content, drew up a (not-so-rough) plan of which sites we wanted to visit and when, and three months later we were on our way.

Nikon D800E does Iceland 2
Nikon D800E does Iceland 6
Nikon D800E does Iceland 4
Nikon D800E does Iceland 3
Nikon D800E does Iceland 7
Upon arriving at Keflavik International Airport, we were welcomed by rain and a howling wind.  A short walk to the car was sufficient to convince me that if the weather were to stay like this, I'd have to work quite hard to get any decent shots.  But while driving to the first planned camping site, it quickly became clear to me that, as expected, the weather here was very variable and changed quite rapidly over both space and time (no physics references intended).  I realized that the light here would have to be constantly chased.  Indeed, the car would come in very useful later on, when we changed plans a number of times and drove for several kilometres to escape cloudy patches and emerge in beams of sunlight.

Nikon D800E does Iceland 9
Nikon D800E does Iceland 10
Nikon D800E does Iceland 12
The camera I took with me was my trusty D800E.  The list of lenses included the usual suspects: the 14-24mm f/2.8G ED, 24-70mm f/2.8G ED, 70-200mm f/2.8G ED VRII, and 50mm f/1.4G.  Way back when I was still trying to decide between the D800E and the D4, I had opted for the former because of its staggering image quality, and in particular its high resolution and superb dynamic range at its base ISO setting.  For this latter quality alone in particular, the D800E came into its own while shooting in Iceland.  (I should point out that none of the images presented here are HDR.)

Nikon D800E does Iceland 25
Nikon D800E does Iceland 8
Nikon D800E does Iceland 11
Oftentimes, I was photographing waterfalls at close range (such as when I was shooting Seljalandsfoss from behind, with the sun right in front, a scene exhibiting a very wide range of brightness levels).  At this proximity to the waterfall, spray was landing on my 14-24mm's bulging objective at such a rate that I had to turn around and wipe the lens dry after barely a single shot, as the rest would all be spoiled by out-of-focus water droplets.  (A piece of advice:  carrying a piece of perspex to shield the lens while composing the picture makes the process much easier.  Alas, I didn't have one with me at the time, so snapping a good shot became quite an ordeal.)  Once the lens was exposed to take a picture, I'd rarely get more than one "clean" shot, so acquiring bracketed exposures was out of question.  But the D800E's fantastic dynamic range enabled me to record detail in both the highlights and deep shadows in a single exposure.  It goes without saying that I always shoot RAW to have more flexibility in the editing stages.  You'd think that one would get used to the camera's dynamic-range capabilities after months of shooting with it, but back in the digital darkroom, I end up being surprised each and every time at how much detail it manages to record in both extremes of the brightness scale.  (Note:  If you're after long-exposure, filtered shots intended to yield silky-smooth waterfall images, then you'll have to keep a bit of distance to avoid spray.  In this case, it's also a good idea to shoot the same picture quite a few times to enable the removal in post of any water-droplets that might find their way on your lens.)

Nikon D800E does Iceland 17
Nikon D800E does Iceland 20
Nikon D800E does Iceland 15
Nikon D800E does Iceland 14
The D800E's great performance at higher ISOs was very useful in a different scenario.  Such is the beauty of Iceland that one could literally stop the car to take pictures every few meters.  Since that's hardly practical if one is there on a short trip, the compromising solution is to keep taking pictures even when the car is moving, if you're not the one doing the driving, that is!  Needless to say, this is not going to give you a technically perfect image, most especially with a sensor as discriminating as that of the D800E.  But faced with the prospect of having a decent (if not so perfect) picture or no picture at all, I always opt for the former.  In such situations, turning up the ISO to enable the use of sufficiently small aperture settings (to achieve reasonable depth of field) without visible motion-blur worked pretty well.  And once again, I was very happy with the dynamic range offered, even at these higher ISOs.

Nikon D800E does Iceland 5
Nikon D800E does Iceland 18
Nikon D800E does Iceland 19
Well, I thoroughly enjoyed my stay in Iceland and would only wish that other photographers who might be thinking of potentially visiting the place have the same memorable experience.  So I thought I'd list a few tips which might come in useful (they also apply in general).  Here they go:

Prepare for the worst

Mentally prepare yourself for the very real possibility of constant rain and bad weather. It is all too easy to get very excited about prospective photos you've planned well in advance, only to get there and realize that the sun is nowhere in sight. So be prepared to make the most of whatever weather conditions Iceland might throw at you. Most of the time, I was getting myself and the equipment completely drenched.  Having said that, the weather in Iceland can change quickly and dramatically, so always be on the lookout for brief windows of opportunity. If you can gain access to a weather forecast (especially a short-term forecast), all the better. Sometimes, you might have to drive for a couple of hours (or more) to chase some clear patch of sky since it might be amazingly clear in one place whilst being completely clouded over a couple of hundred kilometres away.  But most importantly, remember that rain or shine, you have to get out there.  There is one thing that will guarantee you no shots: staying indoors (or in your tent).  So if the rain is pouring and the wind blowing, well, sometimes you just have to suck it in and head out anyway.

The lens-cleaning cloth is your best friend

Bring with you MANY lens-cleaning cloths. Trust me when I say that your lenses will keep getting wet, be it from rain or waterfall spray, and your lens cloth will become wet and useless pretty quickly. Make sure you have plenty others tucked away in your bag. Also, take with you a few plastic bags (or even better, a proper camera cover) to protect your gear from rain while still allowing you to shoot.

Take plenty of memory cards and batteries

There's no such thing as having too many of these.  I don't think I ever took as many pictures in so short a time - and D800 files eat up memory cards very rapidly.  So ample memory and power are a must.

Plan your shots in advance

This has been said before, but it's worth repeating here.  Some pictures can be planned well in advance.  If you know where the sun will be in respect to your subject, you can make sure that you get there during the best time.  (And if you happen to be clouded over, then it's time to improvise.)  A free tool which you might find useful to plan your photography is The Photographer's Ephemeris. I normally use this tool in conjunction with Google Earth to plan my photography.

Ignore your plans every now and then

Take a random detour. Some of my favorite pictures were snapped where I least expected them.  Spontaneous decisions to head down some route off the beaten path rewarded me with some of my favorite images.

Less is more

It is often the case that when you are surrounded by vast, beautiful landscapes, you will want to somehow capture it all.   Be disciplined with yourself.  Remember that including everything in your frame will not make for a better picture.  If you have a persistent inkling to get a super wide-angle shot that captures most of what you see, well, then for heaven's sake go ahead and do it to get rid of the distraction - and then focus on what's important.

Keep warm

This one is pretty obvious, but I'll list it here nevertheless.  Don't even think about visiting Iceland without some proper waterproof clothing and hiking shoes/boots.  If you get wet, not only is it a very unpleasant feeling, but it's quite likely that you will become careless and your photography will suffer too.  Also, make sure to take some thick clothes with you, even if visiting during Summer.  It can get quite chilly, especially when approaching glaciers (and obviously, at night).  The layers system is the one I found to work best.  One of the worst feelings in the world for a photographer is to be forced to leave an awesome location simply because it's too cold.  So keep yourself dry and warm.

Stay safe

Keep your own safety in mind.  It's easy to get very excited about a potential photo opportunity, in the process forgetting where you're placing your feet.  When shooting from cliffs in particular (be it for wildlife or landscapes/seascapes), whenever possible I insist on first finding a place from where I can get a view of the whole cliff wall right at the spot where I'll be setting up my tripod. That way I can tell whether the spot I've eyeballed happens to be a flakily protruding bit which could end up falling under my weight.  Indeed, this has potentially saved my skin on more than one occasion.  As a general rule of thumb, I adhere to the dictum that if you feel something might be too dangerous, it very probably is.  So back off before it's too late!

Forget about the missed opportunities

At some point or other we've all missed an opportunity for a fantastic picture.  Perhaps we arrived too late, or we weren't quick enough to draw the camera out, or we didn't have the right lens with us .  Well, it's no use spoiling the rest of your trip by mulling over the one photograph you've missed.  There are plenty others to be taken.  If you don't enjoy the rest of your journey and focus on the remaining opportunities, you're bound to end up way more disappointed in the end.  So forget about the missed shots and instead anticipate the many more that lie ahead.

I'll leave you with those bits of advice, for what they're worth.  In summary, I heartily recommend visiting Iceland if you ever get the chance.  It's a truly magical place and a photographer's paradise, which I will surely be revisiting soon.  Happy shooting!

Nikon D800E does Iceland 1

Partial equipment list

  • Nikon D800E
  • 14-24mm f/2.8G ED, 24-70mm f/2.8G ED, 70-200mm f/2.8G ED VRII and 50mm f/1.4G
  • SB-900 Speedlight (which I didn't use in the end)
  • Hoya NDX400 neutral density filter
  • Three Legged Thing 'Eddie' tripod
  • Bean bag
  • Remote release
  • Glidecam HD-4000 (which in the end I didn't use as I focused my attention entirely on photography)
  • Plenty of memory cards and batteries
  • Apple Macbook Pro (I was backing up pictures on the fly and occasionally having a quick look in the evening at some of the pictures of the day)
  • Compass, swiss knife, torchlight, notebook
  • Rain-cover for camera
  • Lowepro Fastpack 350 and separate raincover
  • Warm clothes, thermals, hiking boots, gloves, cap, etc.
  • Camping essentials (sleeping bag, mat, etc.)

Nikon D800E does Iceland 21
Nikon D800E does Iceland 22
Nikon D800E does Iceland 23
Nikon D800E does Iceland 26
Nikon D800E does Iceland 24
If you have an interesting idea for a guest postyou can contact me here.

Posted by NikonRumors.com
This RSS feed is copyrighted and cannot be republished in any way without permission.
Follow [NR] on Facebook and Twitter.


19 Sep 08:23

Every Day with Rachael Ray - October (2013)

Every Day with Rachael Ray - October (2013)

Every Day with Rachael Ray - October (2013)
English | PDF | 170 pages | 88 MB
27 Aug 10:52

So You’re Going to Shoot A Wedding: Part 3 of 3 [editing, etc.]

by Lynsey Peterson

It’s done.  You survived it.  It was the longest day of your photography career, you’re exhausted, and all you can think about is how right I was (it’s cool—I get that a lot).  But…….You. Did. It.  And chances are you didn’t get locked in a bathroom,  or miss the kiss, or have a complete equipment failure, or faint face-first into the cake.  You shot a wedding.  What’s next?

 IMG_0651b

Back-up everything.  Possibly several times

As no-brainer as this is, when I shoot portraits, I’m not a diligent about it as I should be.  I’m more of a “cross my fingers/hope for the best/fly by the seat of my pants” kind of gal in most areas of my life.  But a wedding is different.  Good luck explaining to a new bride that your laptop played a vanishing act with the images and you need her to re-do the whole wedding for photographic purposes.  It’s my greatest fear.  My greatest fear used to be a complete equipment failure at a wedding, but then I had that happen a few weeks ago and somehow survived it, so I’ve graduated my fear list a bit.  As soon as I get home from a wedding, no matter that I can barely see straight, I upload everything to my computer, and then back-up everything to an external drive or disc.  Additionally I don’t erase my memory cards until I need them again and I have cloud storage.  Because I’m neurotic like that.  Weddings are often thousands of images and this takes both time and space.  Having both of those things is yet another factor in the expense of wedding photography (see: never shoot a wedding for free).  In most other areas of my life, I am totally okay with just hoping for the best and surrounding it with good thoughts.  But this isn’t one of them.

IMG_0594b

Give a sneak peek

These images are going to take you a long time to go through, edit, and deliver.  Unless you have some sort of crazy amazing one day editing process, which if you do, I’m going to need you to email that to me immediately.  While everyone is anxious to see pictures, no one is more anxious than a still-glowing bride.  Give them a little taste and buy yourself some time to ice your camera-strap-indented neck and regain clear vision.  Social media is a fabulous option for this if it’s available to you.  That way everyone can see them and fawn over how great the images are, giving you a little boost of confidence and the newly minted couple a little attention—both of which work in your favor for the long editing road ahead.  (Oh friend, it’s a long road.)

IMG_4988b

Decide if you are interested in doing this again

Every wedding I have ever shot has led to at least one referral.  In general, I don’t photograph weddings.  Yet, there I am, every summer, finding myself wanting to pass out from heatstroke with a 10 pound black box in front of my face.  Why?  Because I’m a sucker.  I suppose I could tell you that it’s because I love weddings and true love and all that, but the truth is: I’m a sucker.  Throw a few compliments at me and I’ll do about anything that doesn’t involve roller coasters.  I hate roller coasters.  (I also hate those rides where you spin on something that’s spinning.  I’d like to have a long talk with the guy who thought that was a good idea for your internal organs.)  Even if you didn’t hand out a single business card……even if you don’t have a single business card…..they will find you.  Unless you were a miserable human being to be around (I don’t judge—I’ve been there), you will get a call about another wedding.  Decide right now if this is something you ever want to do again so you can handle that call that will come later.  There is nothing wrong with saying no, thank you.  It might not be your cup of tea.  Or quad carmel latte (I’m becoming a really expensive coffee date lately).  There is also nothing wrong with having loved it.  The point is that you need to decide quickly because there is literally a barista of sorts waiting on your order and she has a whole line of impatient people behind you and a smoke break coming up.

IMG_0231b

Don’t overdo it

The last wedding I shot came in at just shy of two thousand images.  There were 26 guests, and that’s including the dog ring bearer.  I shot for less than 4 hours.  I’m an over-shooter.  I know this.  In my defense: WHAT IF I MISS SOMETHING???  For this said wedding I have no less than 40 images of “the kiss”.  Truth?  They all look the same.  Don’t get me wrong—it was an amazing kiss.  Record books, in fact.  But, those 40 images I shot in probably 30 seconds of time all look pretty much the same.  Yet I want them to see every one!!!  What if they love one that’s slightly different than another??  What if the clouds moved just a bit and it makes for the best of forty?  I don’t know.  What I do know is that to the average person, all 40 of those images look exactly the same.  Pick one, edit it to loveliness, and move on.  No one knows you have forty of them.  And likely, no one cares.

IMG_3669b

Deliver the images with deserved fanfare

I personally don’t do any printing; if you book a session or a wedding with me, your flat fee includes my time, the finished (edited) high resolution images on a disc, and a full printing and usage release.  This is how I have been doing it for years and I find that not having to mess with an 8×10 print of this one or a 5×7 of that one or marking-up my printing costs to cover everything is a much easier way of doing things.  And easy works best for me because I am a terrible insomniac (see numerous references to coffee above) and when I get overwhelmed with work (which is often), I go lock myself in my closet and cry a little.  However, just handing over a disc feels like a near let-down when I’ve been editing for weeks and, as previously mentioned, spent an extremely long and tiring day just shooting the images.  I like a little fanfair, and because wedding photography is such an investment, I think my clients should get a little ribbon and bow.  Or maybe a horn section.  Depends on what I have access to at the time.  I like to put together a “highlight” slideshow of 50 or so of the images that the couple can send to their friends and family to watch online.  Additionally, I usually put together a little gift of sorts to give along with the disc—maybe a large print that I put in a readymade frame or for a smaller wedding, I might print off 4×6 prints of each image and put these in a pretty box so theycan make awedding album easily.  It honestly just depends on the couple and what I charged.  My goal here is only to hand them over something more lovely than a cold silver flat circle.

 lynsey_peterson22

Wedding photography was never my goal, nor do I consider myself a wedding photographer.  I have never advertised or marketed for it, though I have shot about 70 of them in the last decade.  It’s tough—I’m not set-up to be a wedding photographer, both from an equipment and time perspective, yet I find myself doing several a year even still.  All joking aside, I don’t EVER take on a wedding just for the money or just out of wanting to do something wonderful for a loved one.  Every wedding I have ever shot I only ended up there because I truly felt that I was the best person for the job.  Many times I was right (this isn’t a time to be humble), but a couple times I was wrong and it makes for a painfully long event day and editing process.

IMG_7294b

The reason wedding photography is met with such passion by veterans and hobbyist alike is because it’s a big deal; there are no re-dos, no second chances.  It’s a type of photography that is all it’s own.  So only shoot the weddings where you feel confident that you and the couple feel similar about the end vision.  Only shoot the weddings where you genuinely like the couple; if you wouldn’t want to have a beer with them, you’re not going to want to spend a 10 hour day with them.  Only shoot the weddings that will give you more than a paycheck, whether that be experience, a day of fun, or that good feeling of doing something wonderful for someone else and knowing you did a good job.  It doesn’t matter if you believe in true love or soul mates, it doesn’t matter if you feel like weddings are too over-the-top and unnecessary, it doesn’t matter if one of the biggest highlights was the free piece of cake (I’m a big fan of cake), what matters is that you went in there knowing that you were the person for the job, that you stayed there feeling like you were doing a great job, and you left there happy to have done it.

me at jillandty

Tired and glad for it to be over, but happy to have done it.

Post originally from: Digital Photography Tips.

Check out our more Photography Tips at Photography Tips for Beginners, Portrait Photography Tips and Wedding Photography Tips.

So You’re Going to Shoot A Wedding: Part 3 of 3 [editing, etc.]

15 Aug 16:04

The 12 Best Places to Find Free Stock Photos

by Mihir Patkar

Whether you’re building a website, creating a flyer, refining your presentation or just looking to spruce up your project, chances are that you are going to need some great photography. Of course, photographers cost a ton and might be out of your budget, and you might not have the time, equipment, or skills to take the best photos for our own projects.

But there are enough websites out there which offer great images for free. By popular demand, here’s our AppStorm roundup of the very best places to find free and legal stock photos online.

Like the article? You should subscribe and follow us on twitter.

Stock.Xchng

The original, minimal and free stock photo site.

The original, minimal and free stock photo site.

In your quest for great online images, this is the first site you should be heading to. Stock.Xchng — known as SXC to most people who use it regularly — has some of the best images you will need for almost any search. It’s got a robust search engine, complete with advanced search to filter your options further. And at last count, it had almost 401,700 images in its database.

Stock.Xchng is owned by iStockphoto, so often the top line of the results will be a series of paid images. Everything below, though, is free: all you need to do is sign up and Stock.Xchng will open up its treasure chest.

Pixabay

Photos, clipart, and more for free.

Photos, clipart, and more for free.

One of the newer stock image stores on the web, Pixabay has three propositions that make me go back to it often. First, the ability to search for or filter images by their orientation — it’s a simple feature but one that most others lack. Second, the Leaderboards, where Pixabay highlights the most downloaded, most voted and most viewed images of the last 30 days. This is usually great to find yourself a new wallpaper, and also a way to learn about new photographers.

Best of all, Pixabay doesn’t require you to sign up — just enter a captcha code and download the image, available in different file sizes so you don’t have to waste bandwidth on an unnecessarily large photo. It’s got featured paid images from Shutterstock, but that’s hardly worth fussing about.

Lorem Pixel

A smarter way to get dummy images

A smarter way to get dummy images

If you are building your own site or just need images for any sort of layout, then it’s the dimensions that really matter, not what the photo is all about. And Lorem Pixel was made for such “dummy image” needs. The app has a placeholder generator that lets you define the height and width (max: 1920 pixels) of an image, choose a category (abstract, animals, business, cats, city, food, nightlife, fashion, people, nature, sport, technics, transport) and whether you want colour or greyscale. That’s it!

Now, copy and paste the image Lorem Pixel generates out of its database of over 600 million images into your project. Or, if you want to simplify it even more, you can also insert a dummy image in HTML through a “cheat code” URL:

http://lorempixel.com/<height>/<width>/<category>

Isn’t that nice and simple?

PlaceKitten

placekitten

Just what the internet needs: more cats. No, seriously.

PlaceKitten is very similar to Lorem Pixel, but the only difference is that all the images on the site are of cute little kittens. Hey, who doesn’t like to look at a furball? Much like LP, all you have to do is insert that “cheat code” URL:

http://placekitten.com/<height>/<width>

Making life easier (and cuter) for developers, one cat at a time.

Unsplash

We can't believe they're free, either.

We can’t believe they’re free, either.

Unsplash takes a completely different approach to the world of stock photos. Here, it’s not about “finding” the right image — in fact, there’s not even a search bar on the site. Instead, the site’s editors pick out 10 great images every 10 days. All the photos are high resolution and are CC0, i.e. no rights reserved in the Creative Commons licensing policy, which means you can do whatever you want with them.

The high quality of the photographs used makes them an instant no-brainer to use for your stock needs — even if it’s a dummy image, make it a great dummy image. This is also a great place to get desktop wallpapers, one for each day of the week with a few to spare.

Death To The Stock Photo

Killing stock photos with better stock photos

Killing stock photos with better stock photos

Following the paths of Unsplash, Death To The Stock Photo is a project by two photographers who were bored and disgusted by the unoriginal, uncreative stock images found on most sites. So they set about curating a monthly newsletter of high-resolution lifestyle photography that is delivered to your inbox, and you can do whatever you want with those images. They are planning to launch a site soon, but right now, it’s newsletter only. But that’s fine with us, considering how nice the shots are.

Oh yeah, and signing up for the newsletter gets you a bonus free image pack.

Icon Finder

The individual icons and sets of icons you need.

The individual icons and sets of icons you need.

Your search for a great icon ends here. Really. If it’s not on Icon Finder, you can just stop looking because chances are, it doesn’t exist.

Currently housing over 313,000 icons in almost 1,500 icon sets, this portal will get you the right icon every time. Just make sure you have the filter set to ‘free’ and the right licensing based on your needs. Icon Finder even lets you sort the icons by size, which is quite necessary at times since 512px icons are hard to find.

Open Clip Art

Clipart, if you really need it

Clipart, if you really need it

There has been no looking back ever since Microsoft PowerPoint first introduced us to Clip Art. We can argue over whether it’s really great to put clipart in your documents and more, but face it: people use it all the time. And the best place to find the perfect clip art for your needs is Open Clip Art.

I particularly like this site because it gives you an SVG of the file, along with the option to download a PNG. The search isn’t as great as we would’ve liked, but with a total of 44,600 clip art images in the database, you would be hard pressed to find a similar collection elsewhere.

Flickr

Say what you want about Yahoo!, but the new Flickr is great

Say what you want about Yahoo!, but the new Flickr is great

Yahoo’s done quite the great job of late keeping their name on the radar. Their perhaps most popular property, Flickr, has recently gotten a great new redesign, enough that many of us are going back to storing our pictures on the service. But even pre-update, Flickr has long been the world’s biggest photo-sharing community, and there are plenty of users who upload their images with a Creative Commons license. Finding those free-to-use shots is easy with Flickr’s advanced search, which lets you specifically choose CC-licensed content, and further refine that by whether to use it commercially as well as whether to modify, adapt or build upon.

It may not be just about stock photos, but it certainly is still one of the best places to find great, free photography.

500px

The Flickr alternate to beat

The Flickr alternate to beat

If Flickr can do it, why can’t 500px? The increasingly popular alternate to Flickr, 500px has a beautiful catalogue of photos and a robust search engine to let you narrow down images based on the different types of Creative Commons licenses — just choose the option you want in the drop-down filter in your search results. In fact, 500px has set up a custom page to let you understand those licenses and browse images stored under each license.

Wikimedia Commons

Wikipedia for pictures. And audio. And video.

Wikipedia for pictures. And audio. And video.

If they can share the world’s information, surely they can share the world’s images. The Wikimedia Foundation’s Wikimedia Commons is one of the largest repository of free images you can grab, but do check out the attribution notes under each one. The photos are free, but you often have to give the right person credit for them. Including video and audio files, the database currently stands at 18 million media files.

Google Image Search

The place everyone goes to find images. Just make sure you're supposed to use them.

The place everyone goes to find images. Just make sure you’re supposed to use them.

Of course, apart from all these options, you can rely on good old Google to do the job as well. Head to the Advanced Image Search (by clicking on the Gear icon in the top-right corner of your search results) and scroll down to the drop-down titled “usage rights”. You can choose images that are free to use or share, to modify or to use commercially, as well as combinations of those options.

Want even more? Here’s a list of the best artwork and photography from museums and more around the world.

That’s all for Now!

This is by no means an exhaustive list. So I’d like to hear from you. Which of these sites were useful to you? Which stock photography sites do you usually visit? Drop a line in the comments below.