Shared posts
World Lymphoma Awareness Day: Covid-19 can be fatal for lymphoma patients
செப்டம்பர் 14-ம் தேதி சென்னை நிலவரம்; கரோனா தொற்றிலிருந்து மீண்டவர்கள், சிகிச்சையில் இருப்பவர்கள்: மண்டல வாரியான பட்டியல்

சென்னையில் கரோனா தொற்றிலிருந்து மீண்டவர்கள், இறப்பு, சிகிச்சையில் இருப்பவர்கள் குறித்த பட்டியலை சென்னை மாநகராட்சி நாள்தோறும் வெளியிட்டு வருகிறது.
அதன்படி இன்று (செப்டம்பர் 14) வெளியிடப்பட்ட பட்டியல் இதோ:
காகிதம் உள்ளிட்ட மூலப்பொருட்களின் விலை உயர்வால் அட்டைப் பெட்டி விலையை நாளை முதல் 20 சதவீதம் உயர்த்த உற்பத்தியாளர்கள் முடிவு
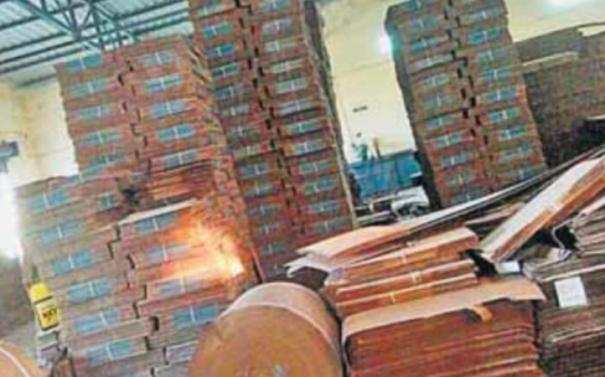
தென்னிந்திய அட்டைப் பெட்டி உற்பத்தியாளர் சங்கத்தின் கோவை, திருப்பூர் மாவட்ட அமைப்பு நிர்வாகிகள் அவசரக் கூட்டம் காணொலிக் காட்சி மூலம் நடைபெற்றது.
இதில் விவாதித்து எடுக்கப்பட்ட முடிவுகள் குறித்து சங்கத் தலைவர் ஈ.வி.ராதாகிருஷ்ணன் கூறியதாவது: கரோனா தாக்கம் காரணமாக அட்டைப்பெட்டி உற்பத்தியின் முக்கிய மூலப் பொருளான காகிதத்தின் விலையும், மற்ற உப மூலப் பொருட்களான பசைமாவு, ஸ்டிச்சிங் பின் போன்றவற்றின் விலையும் கடந்த 3 மாதங்களாக அதிகரித்து வருகிறது. மேலும், தொழிலாளர் பற்றாக்குறையுடன், அவர்களது ஊதியமும், போக்குவரத்து செலவுகளும் உயர்ந்துள்ளன.
வைகை அணை பூங்காவில் சுற்றுலா பயணிகளுக்கு விரைவில் அனுமதி: பராமரிப்புப் பணி மும்முரம்
வைகை அணை மற்றும் பூங்காவில் சுற்றுலாப் பயணிகளுக்கு விரைவில் அனுமதி அளிக்கப்பட உள்ளது.
வைகை அணை தேனி மாவட்டத்தின் பிரதான சுற்றுலாத் தலங்களில் ஒன்றாகும். கரோனா பாதிப்பு காரணமாக கடந்த மார்ச்சில் மூடப்பட்டது. இதனால் பரபரப்பாக காணப்படும் வைகை அணை பூங்கா கடந்த 6 மாதங்களாக ஆள் நடமாட்டம் இன்றி வெறிச்சோடி காணப்படுகிறது. சுற்றுலா பயணிகளுக்கு அனுமதி இல்லாததால் கடந்த 5 மாதங்களில் ரூ.20 லட்சம் வரை நுழைவுக் கட்டண இழப்பு ஏற்பட்டுள்ளது.
நோய் எதிர்ப்பு சக்திமிக்க மோர் உள்ளிட்ட ஆவின் நிறுவனத்தின் 5 தயாரிப்புகள்: முதல்வர் பழனிசாமி அறிமுகப்படுத்தினார்
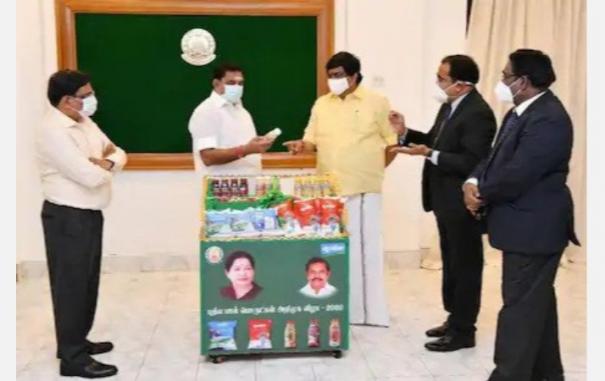
நோய் எதிர்ப்பு சக்தி மிக்க மோர்,சாக்கோ மற்றும் மேங்கோ லஸ்சிஉள்ளிட்ட 5 ஆவின் பொருட்களை முதல்வர் பழனிசாமி அறிமுகப்படுத்தினார்.
இதுகுறித்து தமிழக அரசு நேற்று வெளியிட்ட செய்திக்குறிப்பில் கூறியிருப்பதாவது:
கராத்தே மான் - உங்கள் சுட்டிகளுக்குச் சொல்ல ஒரு குட்டிக்கதை #DailyBedTimeStories #VikatanPodcast
``மான் முகேஷை யாராவது பார்த்தீங்களாடா?''
பற்களுக்கு நடுவுல சிக்கியிருந்த இறைச்சித் துணுக்குகளை, கழுகு நகத்தால் குத்திக் குத்தி எடுத்துக்கிட்டே கேட்டுச்சு புலி பூபாளன்.
``நாங்களும் அவனைத்தான் தேடிட்டு இருக்கோம். நாலு நாளா கண்ணுலயே படலை''ன்னு சொல்லிச்சு குள்ளநரி குட்டன்.

காட்டுக்குள் இருந்த அந்தப் பாறை மேல் கால்மீது கால் போட்டு உட்கார்ந்திருந்துச்சு பூபாளன். பாறையின் வலது பக்கம் சாய்ந்து நின்னுட்டிருந்துச்சு குட்டன். இடது பக்கம் கரடி காத்தவராயன். இன்னொரு குள்ளநரியான மொட்டையன், தரையில் கால்களை நீட்டி உட்கார்ந்திருந்துச்சு.
இதுதான் அவங்களோட மீட்டிங் ஸ்பாட். தினமும் மதியச் சாப்பாட்டை முடிச்சதும் இங்கே ஒண்ணுகூடுவாங்க. அன்றைக்குக் காலையிலிருந்து என்னவெல்லாம் செஞ்சாங்கன்னு பேசுவாங்க. ஒண்ணும் பெரிய சாகசமெல்லாம் இருக்காது.
``இன்னிக்கு, காலைக் கடனைக் கழிக்க ஆற்றுப் பக்கம் போனேனா... சாரைப்பாம்பு ஜித்து, புற்களுக்குள்ளே படுத்துட்டிருந்தான் போல. யாருக்குத் தெரியும்? நான் கவனிக்காம அவன் மேலேயே காலைக் கடனைக் கழிக்கப் போக, ஜஸ்ட் மிஸ்... சடக்குன்னு ஓடினான் பாரு... அந்த அதிர்ச்சியில எனக்கு எதுவுமே வரலை''ன்னு ஆரம்பிக்கும் குட்டன்.

புலி பூபாளன் விழுந்து விழுந்து சிரிக்கும். மொட்டையன் சும்மா இரு! தன் பங்குக்கு கம்பு சுத்தும். அடுத்து, காத்தவராயன் `கரடி' விடும். இவங்களோட நோக்கம்... தலைவன் பூபாளனை சிரிக்கவைக்கிறதுதான்.
ஆனால், பூபாளன் சொல்றதெல்லாம் பெரிய சாகசமாகத்தான் இருக்கும். அது நிஜமோ பொய்யோ தெரியாது. மத்த மூணு பேரும், `ஆஹா... ஓஹோ... சூப்பர் தல... அடுத்த காட்டு ராஜா நீங்கதான்'னு பாராட்டுவாங்க.
இப்படி பேசிட்டிருக்கும்போது அந்தப் பக்கமாகப் போகும் மான்கள், முயல்கள் எனக் கண்ணில் சிக்கும் அப்பிராணிகளைக் கூப்பிட்டு வம்பு செய்வாங்க. அதில் ஒரு ஆள்தான் மான் முகேஷ். அந்த முகேஷைத்தான் நாலஞ்சு நாளா காட்டுக்குள்ளே காணலை.
``அவனை எப்படியாவது தேடிப்புடிச்சு இழுத்துட்டு வாங்கடா. மத்தவங்களைவிட அவனை வம்புபண்றது நல்லா டைம் பாஸ் ஆகும்''ன்னு சொல்லிச்சு பூபாளன்.

Also Read: நேயமுகில் பயணம் - உங்கள் சுட்டிகளுக்கு சொல்ல ஒரு குட்டிக்கதை #DailyBedTimeStories #VikatanPodcast
சரியாக அந்த நேரம் பார்த்து ரெண்டு முயல்குட்டிகள் அந்தப் பக்கமாக வந்துச்சுங்க.
``அடேய் பசங்களா, இங்கே வாங்க'' என அதட்டலுடன் கூப்பிட்டது கரடி காத்தவராயன்.
`ஆஹா... இன்னிக்கு எவ்வளவு நேரம் இவங்ககிட்ட சிக்கப்போறோமோ'ன்னு பயந்துட்டே, ரெண்டு முயல்களும் பக்கத்தில் போனாங்க.
``எங்கேடா அந்த முகேஷ் பயலைக் காணலை?''ன்னு உறுமிச்சு புலி பூபாளன்.
``எங்களுக்குத் தெரியலை வருங்கால ராஜா'' என்று நடுங்கிக்கிட்டே சொல்லிச்சு ஒரு முயல்.
பூபாளன்கிட்ட யார் பேசினாலும் `இந்த வருங்கால ராஜா'வை முன்னாடியோ பின்னாடியோ போட்டுத்தான் பேசணும்.

``எங்களுக்கே கதை சொல்றீங்களா... எப்பவும் ஒண்ணாத்தானேடா சுத்துவீங்க. உங்களுக்குத் தெரியாம எங்கே போயிருப்பான்'' என்று ஒரு முயலின் காதுகளைப் பிடித்து தூக்கிச்சு குள்ளநரி குட்டன்.
அப்போது...
``டேய் குட்டா... அவனை விடு''ன்னு ஒரு குரல்.
நிமிர்ந்து பார்த்தால், கொஞ்சம் தள்ளி நின்னுட்டிருந்துச்சு மான் முகேஷ். அது நின்னுட்டிருந்த தோரணையைப் பார்த்து எல்லோருக்கும் ஆச்சர்யம். வழக்கமாகக் கண்களில் இருக்கும் மிரட்சி, தளர்ந்த உடல் கிடையாது. கம்பீரமாக நின்னுட்டிருந்துச்சு.

``என்னடா சவுண்டு பெருசா இருக்கு''ன்னு கேட்டுச்சு புலி பூபாளன்.
``ஏன்னா, நான் இப்போ சாதாரண முகேஷ் இல்லே... கராத்தே முகேஷ். கராத்தேன்னா என்ன தெரியுமா?'' எனச் சொல்லிட்டு, கால்களைக் காற்றில் சுழற்றி, உடம்பை வளைச்சு சின்னதா வித்தை காட்டிச்சு.
குட்டன் வாயைப் பிளந்துக்கிட்டே, கையில் பிடிச்சிருந்த முயலை விட்டுடுச்சு. மத்தவங்களும் திகைச்சுப் போய்ட்டாங்க.
பூபாளன் மெதுவா குனிஞ்சு காத்தவராயனின் காதுக்குள், ``இது என்ன டான்ஸுடா வித்தியாசமா இருக்கு''ன்னு கேட்டுச்சு.
``வருங்கால ராஜா... இது டான்ஸ் இல்லே. கராத்தேங்கற தற்காப்புக் கலை. இதைச் சரியா பண்ணி தாக்கினா, யானை அண்ணாச்சியையே சாய்ச்சுபுடலாம். இதை இவன் எங்கிருந்து கத்துட்டு வந்தான்னு தெரியலையே''ன்னு நடுங்கிச்சு காத்தவராயன்.
``என்னங்கடா முழிக்கறீங்க... சந்தேகமா இருந்தா பக்கத்துல வாங்க. குட்டா நீ வர்றியா?''ன்னு முகேஷ் கேட்டதும், குட்டன் பிளந்த வாயை `டபக்'குனு மூடிக்கிச்சு.

``இந்தாப்பா தம்பி... நாலஞ்சு நாளா ஆளைக் காணோமே... பாவம், மனுசங்க புடிச்சுட்டுப் போய்ட்டாங்களோன்னு தெரிஞ்சுக்கத்தான் கேட்டேன். நம்ம ஆள் ஒருத்தர் இப்படி கராத்தே தெரிஞ்சுட்டு வந்தது சந்தோஷம். மைண்ட்ல வெச்சுக்கறேன். நான் ராஜாவானதும் நீதான் என்னோட கறுப்புப் படை மான். போய்ட்டு வா''ன்னு பயத்தை மறைச்சுக்கிட்டு, கைகளைத் தூக்கி ஆசீர்வாதம் செஞ்சது புலி பூபாளன்.
மான் முகேஷ் கம்பீரமாக நடக்க, ரெண்டு முயல்களும் அதோடு சேர்ந்து நடக்க ஆரம்பிச்சதுங்க. கொஞ்ச தூரம் போனதும், ``சூப்பர் அண்ணே... எப்படிண்ணே இந்த கராத்தேவை கத்துக்கிட்டீங்க?'' எனக் கேட்டது ஒரு முயல்.
``நாலு நாளுல எப்படிடா கத்துக்க முடியும். ஒரு இடத்துல பார்த்ததை சும்மா சுத்திவிட்டேன். இவங்க வம்பு பண்றது பற்றி என் அம்மாகிட்ட சொல்லி அழுதப்போ, எல்லா நேரமும் நான் உன்னோடு இருக்க முடியாது. உனக்கான வழியை, தைரியத்தை நீதான் தேடிக்கணும்னு சொன்னாங்க. நிஜமா ஒரு நாள் கத்துப்பேன். இந்த அறிவாளிகளுக்கு இப்போதைக்கு இது போதும்'' என்று சிரிச்சது முகேஷ்.
அவ்வளவுதான் கதை!
Also Read: மிட்டாய்ப் பெட்டி - உங்கள் சுட்டிகளுக்கு சொல்ல ஒரு குட்டிக்கதை #DailyBedTimeStories #VikatanPodcast
இந்தக் கதையை அழகான குரலில் ஆடியோவாகக் கேட்க...
சுட்டிகளுக்கு இந்தக் கதையைச் சொல்பவர்: அபிநயா ஶ்ரீகாந்த்

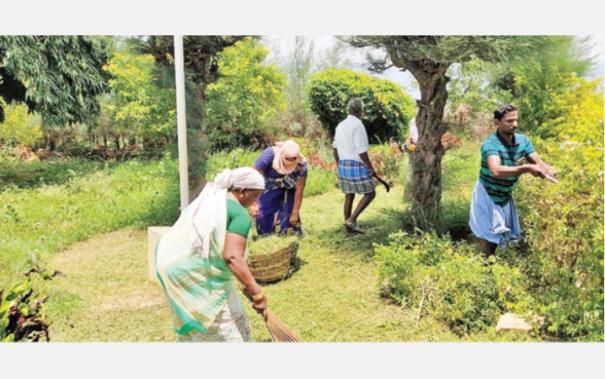
`வயலில் இறங்கி நெல் நாற்றுகளை விதைத்த குழந்தைகள்!’ - அசத்திய தமிழக அமைச்சரின் பள்ளி
அந்தக் குழந்தைகளுக்கு சுமார் நான்கு, ஐந்து வயதுதான் இருக்கும். இந்த உலகைப் பற்றிய எந்தவித புரிதலும் இல்லாத மழலைப் பிஞ்சுகள் அவர்கள். அப்படிப்பட்ட குழந்தைகள் சுமார் 50 பேர், விவசாய நிலத்தில் சேற்றினுள் இறங்கி நெல் நாற்றுகளை நடுவது போன்ற புகைப்படம் ஃபேஸ்புக்கில் வைரலாகப் பரவியது.
Also Read: ‘‘எங்கள் பள்ளி... எங்கள் வயல்!''
யார் அந்தக் குழந்தைகள் என விசாரித்தபோது, ஈரோடு மாவட்டம், கோபிசெட்டிபாளையத்தில் உள்ள `ஸ்ரீ வெங்கடேஸ்வரா இன்டர்நேஷனல் மாண்டிசோரி பிளே வே ஸ்கூல்’ என்பது தெரியவந்தது.
இதையடுத்துப் பள்ளியின் தாளாளர் அம்பிகாவிடம் பேசினோம். ``கல்வியை வலுக்கட்டாயமாகத் திணிக்கக் கூடாது. கல்வி மீதான ஆர்வத்தைத் தூண்டினால், தானாகவே குழந்தைகள் படிப்பார்கள் என நினைக்கிறோம். குழந்தைகளுக்கு தைரியத்தையும் தன்னம்பிக்கையையும் கொடுக்கும் வகையில் பள்ளியில் நடைபெறும் நிகழ்ச்சிகளில் குழந்தைகளையே காம்பியரிங் செய்ய வைப்பது போன்றவற்றைச் செய்கிறோம். அதோடு எங்கள் பள்ளியில் படிக்கும் சுமார் 90 குழந்தைகளையும் மாதத்துக்கு ஒருமுறை வெளியில் அழைத்துச் சென்று செயல்முறைக் கல்வியைக் கற்றுக் கொடுக்கிறோம்.

அந்தவகையில், கோபிசெட்டிபாளையத்துக்கு அருகில் கல்விக்கு முக்கியத்துவம் கொடுக்கும் கடவுளான வைஷ்ணவி தேவி கோயிலுக்கு அழைத்துச் சென்று அங்கு குழந்தைகளை சூரிய நமஸ்காரம் உட்பட 12 ஆசனங்களை செய்யச் சொல்லிக் கொடுத்தோம். ஈரோடு ரயில்வே ஸ்டேஷனுக்கு அழைத்துச் சென்று, ரயில்வே நிலையம் மற்றும் அதன் சுகாதாரம் குறித்து நேரடியாக குழந்தைகளுக்கு விளக்கினோம். அதன்வரிசையில் தான், குழந்தைகளுக்கு உணவு மற்றும் விவசாயத்தின் மீதான விழிப்புணர்வைக் கொடுக்க நினைத்தது விவசாய நிலத்திற்கு அழைத்துச் சென்று நாற்று நட வைத்திருக்கிறோம்” என்றார்.
மேலும் தொடர்ந்தவர், ``சாப்பாட்டுக்கு வழியில்லாமல் பலர் இருக்கும் இதே நாட்டில்தான், உணவை வீணாகக் குப்பையில் கொட்டும் நபர்களும் இருக்கின்றனர். பள்ளிகளில் நான்கு சுவர்களுக்குள் இருக்கும் குழந்தைகளுக்கு உணவு எப்படி உருவாகிறது. அதைத் தயாரிப்பது எவ்வளவு சிரமம் என்பதை நேரடியாகக் காட்டினால் அவர்கள் உணவை வீணாக்க மாட்டார்கள் என நினைத்தோம். கையில் நெல் நாற்றுக்களைக் கொடுத்ததும் என்ன செய்வதென தெரியாமல் முழித்தவர்கள், எப்படி நாற்று நடுவது என விவசாயிகள் சொல்லிக் கொடுத்ததும் கடகடவென அருமையாக நட்டனர்.

`இன்னும் கொடுங்க மிஸ் நான் நடுறேன்னு’ குழந்தைங்க உற்சாகமானது மட்டுமல்லாமல், ‘நான் நட்டதுல அரிசி வருமா மிஸ்... பச்சையா இருக்கிற இதை நட்டா, எப்படி சாப்பாடு வெள்ளையா வருது..' என நிறைய கேள்விகளைக் கேட்டு மலைக்க வைத்தனர். `வீட்டுக்குப் போகலாம் வாங்க'ன்னு கூப்பிட்டும் வயலைவிட்டு வரமாட்டேன்னு குழந்தைகள் அடம் புடிச்சாங்க. கடைசியில பம்பு செட் தண்ணியில குளிக்கலாம்னு சொன்னதும்தான் வயலை விட்டு மேல ஏறுனாங்க. உணவை வீணாக்காமல் சாப்பிடணும்னு குழந்தைங்க மனசுல பதிய வைக்கணும்னுதான் நினைச்சோம்.
ஆனா, அந்த நிகழ்வுக்குப் பிறகு பள்ளிக்கு வந்த பெற்றோர்கள், `என் குழந்தை இப்ப சாப்பாடு வேணாம்னு அடம் பிடிக்கிறதே இல்லை. சாப்பாட்டை வீணாக்காம சாப்பிடுறதோட, எங்ககிட்டயும் சாப்பாட்டை வீணாக்காதீங்கன்னு அறிவுரை சொல்றாங்க’ எனச் சொல்ல எங்களுக்கு அவ்வளவு சந்தோஷம். குழந்தைங்க புரிஞ்சிக்கிட்டா போதும்தான் நினைச்சோம். ஆனா, அவங்க மற்றவர்களுக்கே அறிவுரை சொல்ற அளவுக்கு மனசுல ஏத்திப்பாங்கன்னு நாங்க நினைக்கலை” என்றார்.
குழந்தைகளின் இந்தச் செயலைக் கேள்விப்பட்டு ஈரோடு மாவட்ட ஆட்சியர் கதிரவன் பாராட்டியதோடு, குழந்தைகளுக்குப் பாராட்டுச் சான்றிதழ் கொடுக்கவும் சொல்லியிருக்கிறாராம். இந்தப் பள்ளி தமிழகச் சுற்றுச்சூழல் துறை அமைச்சர் கே.சி.கருப்பணன் நடத்தி வரும் பள்ளி.

இந்த நிகழ்வு வெளியே வைரலாகப் பரவிய பிறகுதான், நம் பள்ளியில்தான் இது நடந்ததென அமைச்சருக்கே தெரிந்ததாம். வளரும் தலைமுறைகளுக்கு வெறும் பாடத்தை மட்டும் கற்றுக் கொடுக்காமல், விவசாயம் மற்றும் சூழல் சார்ந்தவற்றையும் பள்ளிகளில் கற்றுக்கொடுத்தால் நன்றாக இருக்கும்.

With rate cut likely, market wonders how low Fed will go
நீங்களே ஆன்லைனில் வருமான வரி தாக்கல் செய்யலாம்... எப்படி?! #DoubtOfCommonMan
இது வருமான வரி தாக்கல் செய்யும் காலம். ஆண்டுக்கு இரண்டரை லட்ச ரூபாய்க்கு மேல் சம்பாதிக்கும் அனைவரும் கட்டாயம் வருமான வரிக் கணக்குத் தாக்கல் செய்ய வேண்டும். ஆன்லைனிலேயே கணக்கைத் தாக்கல் செய்யமுடியும் என்றாலும், அதற்கான நடைமுறைகள் தெரியாமல் பலரும் தவிக்கிறார்கள்.

விகடனின் #DoubtOfCommonMan பக்கத்தில் வாசகர் சுரேந்திரன் இதுதொடர்பாக ஒரு கேள்வியை எழுப்பியிருக்கிறார். "எனது ஆண்டு வருமானம் 10 லட்சம் ரூபாய். நான் ஆன்லைனில் வருமான வரிக்கணக்கைத் தாக்கல் செய்ய முடியுமா? அதற்கான நடைமுறைகள் என்ன?" என கேட்டிருந்தார். ஆடிட்டர் கே.ஆர்.சத்யநாராயணனிடம் இந்தக் கேள்வியை முன்வைத்தோம்.
"தாராளமாக, அவரவர்களே ஆன்லைன் மூலம் வருமான வரிக்கணக்கைத் தாக்கல் செய்யமுடியும். ஆனால், சிலவற்றுக்கு வருமான வரிச்சட்டம் 44ஏபி என்ற பிரிவின் ஆடிட்டர் சரிபார்த்து சான்றிதழ் தரவேண்டி இருக்கும். அவற்றுக்கு மட்டுமே தனி நபரால் வருமான வரித்தாக்கல் செய்ய முடியாது. ஒருவருடைய ஆண்டு வருமானம் அல்லது ஆண்டு `டர்ன் ஓவர்' அல்லது விற்பனை ஒரு கோடி ரூபாய்க்குமேல் இருந்தால், அவருக்கான வருமான கணக்குகளை ஆடிட்டர் சரிபார்த்து சான்றிதழ் அளித்த பின்னர்தான் தாக்கல் செய்யமுடியும். ஆண்டு வருமானம் ஒரு கோடி ரூபாய்க்குக் குறைவாக இருக்கும்போது சம்பந்தப்பட்டவர்களே வருமான வரிக்கணக்கைத் தாக்கல் செய்யலாம்.

மாதச்சம்பளதாரர்கள் வருமான வரித்துறையின் இணையதளத்தில் www.incometaxindiaefiling.gov.in/home ஐடிஆர்-1 படிவத்தை நிரப்பி, வருமான வரி தாக்கல் செய்யலாம். Log in செய்வதற்கு முன் பார்ம்-16, பான் கார்டு, ஆதார் கார்டு ஆகியவற்றை கையில் வைத்துக்கொள்வது நல்லது.
முதலில் இணையதளத்தில், உங்களுடைய தனிப்பட்ட விவரங்களைப் பதிவுசெய்து பயனாளர் ஐடியை உருவாக்க வேண்டும். அதற்கு, நீங்கள் தனிநபரா, கூட்டுக்குடும்பமா என்றெல்லாம் ஆப்ஷன் இருக்கும். சரியானதைத் தேர்வு செய்ய வேண்டும். அதன்பின் பான் கார்டு எண், பெயர், பிறந்த தேதி, இந்தியாவில் வசிப்பவரா அல்லது வெளிநாட்டில் வசிப்பவரா என்பது போன்ற விவரங்களை அளிக்க வேண்டும். அடுத்து மொபைல் எண், இமெயில் முகவரி போன்ற விவரங்களைப் பதிவுசெய்ய வேண்டும். மொபைல் எண்ணை உறுதிப்படுத்த `ஒன் டைம் பாஸ்வேர்ட்' வரும். அதேபோல், இமெயில் முகவரியை உறுதிப்படுத்த முதலில் ஒரு ஆக்டிவேஷன் லிங்க் மெயிலுக்கு வரும். மெயிலிலும் ஒரு `ஒன் டைம் பாஸ்வேர்ட்' வரும். இரண்டு ஒன் டைம் பாஸ்வேர்ட்களையும் பதிவுசெய்து நிரந்தரமான பாஸ்வேர்டு உருவாக்கிக்கொள்ள வேண்டும்.

அதன்பின்னர், இணையதளத்தில் Log in செய்ததும் அடுத்த பக்கம் திறக்கும். அந்தப் பக்கத்தில் Filing of Income tax return என்ற லிங்கை கிளிக் செய்யவும். அதில், பான் கார்டு எண்ணைப் பதிவுசெய்து கணக்குத் தாக்கல் செய்யும் ஆண்டை (2019-20) தேர்வுசெய்ய வேண்டும். அடுத்து, ஐ.டி.ஆர்-1 பார்மைத் தேர்வு செய்ய வேண்டும். `Submission mode' என்ற ஆப்ஷனில் 'Prepare and Submit Online' என்பதைத் தேர்வுசெய்து continue கொடுங்கள். ஐ.டி.ஆர் -1 பார்ம் கிடைக்கும்.
அதில், உங்களது வங்கிக்கணக்கை பதிவு செய்ய வேண்டும். இன்கம்டாக்ஸ் ரிட்டர்ன் தொகை ஏதேனும் உங்களுக்கு வர வாய்ப்பிருக்கும் பட்சத்தில் அந்தக் கணக்கில் பணம் வரவு வைக்கப்படும். அடுத்து continue கொடுத்தால், விதிமுறைகள் திறக்கும். இந்தப் பக்கத்தில் 7 மெனுக்கள் இருக்கும். இரண்டாவது மெனு, General Information. இதில் உங்களது பான் கார்டு, பெயர், ஆதார் எண் உள்ளிட்ட தனிப்பட்ட விவரங்கள் அனைத்தும் பதிவு செய்யப்பட்டிருக்கும். அவற்றைச் சரிபார்த்துக்கொள்ளுங்கள்.

அடுத்து computation of income and tax என்ற மெனுவை கிளிக் செய்யுங்கள். அதில், உங்களது மாதச்சம்பளம், வங்கி வட்டி வருமானம், இதர வைப்பு நிதி வருமானம், சொந்தமாக வீடு இருந்தால் அதிலிருந்து கிடைக்கும் வருமானம், வங்கிக்கடன் ஏதாவது பெற்றிருந்தால் அதற்கான வட்டி, வேறு ஏதேனும் முதலீடுகள் செய்திருந்தால் அந்த விவரங்கள், காப்பீடுகள், வருமான வரிச்சட்டம் 80டி பிரிவுக்கான சலுகை விவரங்கள் அனைத்தையும் நிரப்ப வேண்டும். பெரும்பாலும் இது ஏற்கெனவே நிரப்பப்பட்டிருக்கும். ஏதேனும் விடுபட்டிருந்தால் நிரப்பிக்கொள்ளுங்கள். உங்கள் மொத்த வருமானம், கழிவுகள் போக நீங்கள் கட்ட வேண்டிய வரி அல்லது உங்களுக்கு ரிட்டனாகும் தொகை குறித்த விவரங்களும் அதில் இருக்கும்.
அடுத்த மெனு Tax details. இதுவரை பிடித்தம் செய்யப்பட்ட தொகை, டிடிஎஸ் விவரங்கள் இந்தப் பக்கத்தில் இருக்கும். அடுத்த மெனு, Taxes paid and verification. இந்தப் பக்கத்தில் நீங்கள் கட்ட வேண்டிய தொகை அல்லது ரிட்டனாகும் தொகை, உங்கள் வங்கிக்கணக்கு விவரங்கள் இருக்கும்.

அடுத்த மெனு Donations 80G. நீங்கள் ஏதேனும் தொண்டு நிறுவனத்துக்கோ, அல்லது தேசிய பேரிடர்களின்போது முதல்வர் அல்லது பிரதமர் நிவாரண நிதிகளுக்கோ நன்கொடை அளித்திருந்தால் அவற்றை இந்தப் பக்கத்தில் பதிவிட வேண்டும். இந்த நன்கொடைகளுக்கு 50 சதவிகிதம் முதல் 100 சதவிகிதம் வரை வரிக்கழிவு உண்டு. அரசு சார்ந்த அமைப்புகளுக்கான நன்கொடைகளுக்கு 100 சதவிகித வரிக்கழிவு கிடைக்கலாம். தொண்டு நிறுவனங்களுக்கு நன்கொடை அளித்தால் 50 சதவிகிதம் வரிக்கழிவு வழங்கப்படும். நன்கொடை அளித்த நிறுவனத்திடம் அது தொடர்பான சான்றிதழ் பெறுவது அவசியம். அந்த நிறுவனத்தின் பான் கார்டு மற்றும் முகவரியைப் பதிவுசெய்ய வேண்டும்.
அடுத்துள்ள மெனு Donations 80GGA. அறிவியல் ஆராய்ச்சி சார்ந்த பணிகளுக்கு நன்கொடை வழங்கியிருந்தால் இந்த மெனுவில் விவரங்களைப் பதிவுசெய்ய வேண்டும். நன்கொடைகள் குறித்து நீங்கள் செய்யும் பதிவுகள், Taxes paid and verification பக்கத்தில் பதிவாகிக்கொண்டே வரும். எல்லாப் பதிவுகளையும் முடித்தபிறகு, எல்லாவற்றையும் மீண்டும் ஒருமுறை சரிபார்த்து Taxes paid and verification பக்கத்துக்கு வந்து preview and submit பட்டனை அழுத்த வேண்டும். நீங்கள் ஏதேனும் விவரங்களைப் பதிவு செய்யாமல் விட்டிருந்தால் அதுவே உங்களுக்குச் சுட்டிக்காட்டும். எல்லாம் நிறைவாகப் பதிவு செய்திருந்தால் சப்மிட் ஆகிவிடும்.

இதோடு முடிந்துவிடாது. இன்னும் ஒரு முக்கியப் பணி இருக்கிறது. கணக்கைத் தாக்கல் செய்தது நீங்கள் தான் என்பதை உறுதிசெய்ய இ-வெரிபிகேஷன் செய்ய வேண்டும். கணக்கைத் தாக்கல் செய்ததும் இ-வெரிபிகேஷன் என்றொரு மெனு உங்கள் பார்வைக்கு வரும். அதில் மூன்று ஆப்ஷன்கள் தரப்பட்டிருக்கும். மூன்றாவதாக உள்ள `ஆதார் கார்டு வழியாக இ-வெரிபிகேஷன் செய்யும்' பட்டனை அழுத்தினால் ஆதார் கார்டில் இணைத்துள்ள மொபைல் நம்பருக்கு ஒரு `ஒன்டைம் பாஸ்வேர்டு' வரும். அதை அந்தப் பக்கத்தில் பதிவு செய்து சப்மிட் கொடுத்தால் முடிந்தது. நீங்கள் எந்த மெயிலை வருமான வரிக் கணக்கில் பதிவு செய்திருக்கிறீர்களோ, அந்த மெயிலுக்கு சான்றிதழ் வந்துவிடும்.
நீங்கள் கூடுதலாக வரி கட்ட வேண்டியிருந்தால் ஆன்லைனிலேயே கட்டிவிடலாம். உங்களுக்கு பணம் ரிட்டனாகும் வாய்ப்பிருந்தால் நீங்கள் தந்துள்ள வங்கிக்கணக்குக்கு தானாக வந்துவிடும். மாதச்சம்பளம் பெறுபவருக்கு ஒரு வீடு மட்டும் சொந்தமாக இருக்கும்வரை ஐடிஆர்-1 படிவமே போதுமானது. குறைவான வருமானமுள்ள சிறு விற்பனையாளர்களாக இருந்தால் ஐடிஆர்-4 என்ற படிவத்தின்மூலம் வருமான வரித்தாக்கல் செய்யலாம்.

இதுபோன்ற கேள்விகள் உங்களிடமும் இருக்கிறதா? இங்கே கேளுங்கள்...

81 ரத்தினங்கள் 08: தாய்க் கோலம் செய்தேனோ அனுசுயாவைப் போலே
TN Speaker's driver knifes one in tiff over water
 In a fight over water, Tamil Nadu assembly speaker Dhanapal's car driver attacked a woman and her husband with a knife at their apartment in Anakaputhur on Thursday.
My thoughts on the Micro Nikkor 60mm f/2.8G Lens and the 105mm Macro
The post My thoughts on the Micro Nikkor 60mm f/2.8G Lens and the 105mm Macro appeared first on Digital Photography School. It was authored by Lily Sawyer.

I must tell you first of all that before I had the Micro Nikkor 60mm f/2.8G lens, I have always used the bigger and heavier big brother – the Micro Nikkor 105mm f/2.8G Macro. While this article will be about what I think of the 60mm, I feel I must also compare it with the 105mm as I have used both.

Lens specs
Let’s start with the basic similarities: both are prime lenses with an f/2.8 maximum aperture and f/32 minimum aperture, have the same number of diaphragm blades and both rounded blades. Both are autofocus, and being G lenses, have an internal ultrasonic motor type.
In terms of differences, the 105mm has vibration reduction while the 60mm hasn’t. The 105mm weighs in at 720g, much heavier due to the size and optics with 14 elements compared to the 60mm at 425g with 12 elements. Interestingly, both have the same filter thread size at 62mm which I found handy when changing filters.

The main difference, however, for me (and the most crucial one of all) is the focusing distance, which is roughly 6 inches for the 60mm and double that for the 105mm at 12 inches. Why does this difference matter to me?
With the 60mm, I need to be really close to the subject to fill the frame. It can get quite tricky when being so close and sometimes I revert to manually focusing the lens. When photographing rings, to get a really great shot, you have to be extremely close for the ring to take up a lot of the frame. As I usually prop both the ring and lens on a steady surface, I can take my time to focus and get really close.
However, because it’s a wider lens than the 105, sometimes I just can’t fill the frame enough with very tiny objects. I then resort to cropping in post-production for these instances.
The 105mm lens with it’s narrower field of view means I don’t have to get as close to the subject and still can get close enough to fill the frame with it. I find there is less need for cropping in post-production too. Because I am usually photographing still life objects such as rings, movement isn’t an issue. However, this becomes one if you were photographing, say insects, where you can’t be close enough otherwise you disturb them and lose the insects as well as your shot.
When I use these lenses

Generally, and as a rule, when I’m doing smaller and shorter shoots like an engagement session, I bring three lenses – wide, medium and long. Because my shoots are mostly on location and often we walk around quite a lot, I try to pack as lightly as possible. For these types of shoots, I use my three prime lenses: a 35mm f/1.4 G, an 85mm f/1.8G, and a 105mm f/2.8 macro. The 105mm here acts as my longer lens and my macro without the bulk of the 70-200mm zoom and another micro lens being the 60mm.
When I do a wedding that only requires a few hours coverage, I also don’t bring my entire arsenal. Instead, I carefully choose my lenses to make sure I have everything covered for those hours. For short weddings, I pack my 24-70mm f/2.8 G, 70-200mm f/2.8G, 85mm f/1.8G, and 60mm f/2.8G. I don’t need the bulk of the 105mm when I cover that focal length with my zoom but I still need a macro, and the 60mm is perfect.
How I use these lenses

I find the Nikkor 60mm Micro Lens is such a versatile focal length and being a micro lens means I do not have to carry my 50mm f/1.4G along with my other lenses anymore. It fulfills both macro capability – mainly for the ring shot and close-up details like food, table setting, and flowers – and a versatile focal length that allows for natural portraits without distortion and those not-so-close-up details.
When using the 60mm for portraits, I am usually shooting with apertures between f/2.8 – f/5.6. When using it as a micro/macro, I am shooting at apertures between f/7.1 – f/11.
The 105mm, as well as being a macro lens, is also perfect for portraits and gives you that creamy bokeh with gorgeous background compression.
When using the 105mm for portraits (which I love doing), I am usually shooting with apertures between f/2.8 – f/4. When using it as a micro/macro, I am shooting at apertures between f/7.1 – f/8. I find that this lens really sings at f/7.1. I have set my camera to 1/3 stops hence the f/7.1.
Performance

Both lenses have top specs and perform brilliantly. Generally speaking, I find that when shooting with both lenses, more ambient or available light is required.
Both lenses tend to produce more vignetting than other lenses. However, there is one main difference to the performance of both lenses. Provided there is enough light for the subject matter, the 60mm is faster and quicker to grab focus whereas the 105mm is slower and often hunts for focus. The 60mm works better for moving objects without flash than the 105mm in the same scenario. While the use of artificial light such as electronic flashes does away with this issue, I am mainly speaking about natural or ambient light.
Recommendation

In summary, I highly recommend both lenses both in quality and overall performance. I think there is a lens for each purpose. You just need to analyze which lens you require to achieve your aim. I don’t think there is a one lens for all. My preference is for prime lenses because of their cleanness and sharpness of images, and for me, they perform better.
However, they cannot compare with the zoom lenses when it comes to fast-moving and hectic shoots like weddings where I physically cannot be zooming in and out with my feet all day.
If you are looking for a prime that gives you the flexibility to shoot portraits and macro, then the 105mm is your lens. However, if you are after more of a travel, photojournalistic, natural view type of images and need a micro, then the 60mm would be my suggestion.
On family holidays, I used to carry my 50mm f/1.4 G. You can read here an article I have written on 5 creative uses of the 50mm. But that was during my pre-60mm days. Since then, my 60mm has replaced my 50mm for these occasions. If I am only allowed one lens for family holidays and travel, I go for the 60mm. I may have lost the wider aperture of the 50mm f/1.4 G, but as holidays are usually during the summer when light is abundant, the difference it makes is not an issue.

I hope you found this helpful. Do let me know your thoughts in the comments section below.
The post My thoughts on the Micro Nikkor 60mm f/2.8G Lens and the 105mm Macro appeared first on Digital Photography School. It was authored by Lily Sawyer.
சாத்தூர் கர்ப்பிணி விவகாரம்; அரசின் அலட்சியமே முழு காரணம்: சமூக சமத்துவத்திற்கான டாக்டர்கள் சங்கம் குற்றச்சாட்டு
10 Must-Have Photography Accessories
You finally have your new camera and after the first few weeks of taking it out, you begin to realize that there may be other things that you need. Sometimes it is hard to know what photography accessories are really necessary and which are more “nice to have” items. It’s certainly possible to spend a lot of money on extra photography gear so it pays to put a bit of thought into it.

Of course, what you need will depend on the kind of photography you will be doing. A landscape photographer will need lots more things than a city street photographer. A studio portrait shooter will have a whole shopping list of expensive lights and stands required (not to mention the studio space in which to put it all).
But let’s start at the beginning, what are the most basic and necessary photographic accessories.
1. Extra Camera Batteries
Having a spare camera battery is a lifesaver, especially if you have remembered to charge it in advance. There is nothing worse than running out of power for your camera when you are away from home. You can choose to buy the branded battery to suit your camera, but there are also more cost effective third party options. My preference is to stick with branded, I have found they perform better over the life of the battery. Feel free to run your own experiments though.
For anyone shooting in very cold weather, it’s recommended that you have several batteries and some way of keeping them warm. Very cold weather chews through battery power, as do taking long exposures or lots of burst shooting.

2. Spare Memory Cards
Opinion is divided on whether you should have a few high capacity memory cards, or several smaller capacity ones. The theory is if a card gets corrupted, with a smaller capacity card you run the risk of losing less images. Check which memory cards are recommended or preferred for your camera as there are several brands available, but not all perform at the same level.
Check the speed of the card as well, if you are likely to do a lot of fast shooting. How well the card can process those bursts of images can have impact on the performance of your camera. If a card is too slow you will get buffer overuns as the card struggles to keep up saving all the frames.

Once you have several memory cards, it also makes sense to have some way of organizing and storing them. Some people have different systems to indicate when cards are full or empty. Come up with a plan so you know which cards are exposed and which are ready to go.

3. A Camera Bag
I am quite convinced that the perfect camera bag is like the Holy Grail – impossible to find. Everyone has different requirements which mean there is no one solution. Backpacks, roller bags, sling bags, waist packs, straps, clips, belts, and body harnesses are all available options.

My sling bag for walking around the city, or times I only want to take the very basics.
There are so many choices and it can be easy to get confused, here are a few things to keep in mind when shopping for a camera bag:
- Look for good padding in the shoulder straps.
- That the bag is the right length for your back (I am an average height woman and a lot of bags are too long for me).
- It has enough pockets to keep useful stuff like filters and batteries and for them to be easily accessible
- The bag is as light as possible.
- How does it behave when you put it on the ground, does it tip over?
- That it is waterproof (water resistant material, flaps over the zips and the best bags come with a built in rain cover).
- There is enough room to store all your stuff safely with sufficient padding and dividers.
- There are good cheststraps and waist belts on backpack style bags (they take up a surprising amount of the load off your shoulders if you use them).
Over time you will probably try several different styles of bag until you find an option that is the best compromise for what you want versus what you can find.

My main bag is a backpack, the F-stop Kashmir designed for women. This is the closed position.

Backpack in the open position. Different bags can be accessed in different ways.
4. Footwear
Pretty much everywhere you go with your camera will involve some form of walking for able bodied people. This means you need to have good supportive comfortable footwear which is suitable to your conditions. Don’t forget good quality socks as well (my preferred brand is Thorlo). When looking for shoes or boots take into consideration weight, fit, comfort, flexibility, waterproofness and of course the price.

These shoes are very light and breathable, however they are not very waterproof and the soles can be a bit slippery on wet rocks. But they are super comfortable to wear all day, which is the most important thing.
Heavy boots are really tiring to walk in for long periods but you might need them for really cold weather. Depending on the type of walking and situations you will encounter, you may even consider more than one set of footwear.
5. Jackets and Outer Layers
Modern technology has made outdoor clothing very light, and it is recommended that you build up layers to adjust to changing conditions. Being too hot and sweating in very cold conditions is uncomfortable but also may contribute to hypothermia, particularly if wind chill is a factor.

Hunters Element hunting jacket in green, and Kathmandu grey windproof jacket.
So build up a selection of light technical layers you can wear or carry easily in your bag or pocket. I have three jackets, the grey one is very light and warm and scrunches down into all the corners of my pack. The green jacket is a heavier hunting jacket that has excellent wind protection, with huge pockets in the front. Not shown is a rain shell to layer over the grey jacket for added dryness protection.
6. Extra Protection
Hats and gloves are also a necessity to keep you warm and dry. Particularly if you are outside doing landscapes or nature photography and you are sitting still for long periods. Again, layering up is useful, pictured are my thin windproof but quite warm gloves, with some heavier gloves to put on over top. The heavier gloves make it difficult to use the camera, which is why two layers of protection help me to function and stay warm.
The bottom half also needs protection. These are rain trousers that are designed to pull on over top of your standard leg layers.

Your backpack and camera also deserve consideration for protection as well. Pictured below are my orange backpack rain cover and a rain cover for my camera that allows shooting in the rain.

7. Tripod
Unless you are a hardcore street photographer (needing to be light and mobile) then a tripod will likely be a requirement at some point. Necessary for sharp landscape images, long exposures, astrophotography, macro and all kinds of studio work.
A tripod requires two components to work – the legs and the head. Sometimes you can purchase them bundled together, or you may wish to purchase them separately to suit certain requirements. Here are some key things to look for in a tripod:
- Are the legs tall enough for you? I was surprised to find many tripods too short for me at 5’6″ – having the right sized legs makes it easier on your neck and reduces the need to use the center pole.
- Does the center pole adjust to horizontal mode? Very useful for doing still life and macro work.
- Is it a clip or a twist-lock type of leg extension? People prefer different options – wildlife photographers often use twist-lock legs as they are quieter.
- How heavy is it? Carbon fiber is the lightest option, but it is also very expensive and in comparison, not always that light. Plus a heavier tripod offers more stability when used outside.
- Is there at least one leg wrapped? Carrying a bare metal pole on a cold frosty night is unpleasant.
Tripod head
Tripod heads come in many variations as well. Ball and socket are quite common but take two hands to utilize. A good quality head will be made out of solid material and be strong enough to hold your camera and its heaviest lens at a variety of angles. Do your research on weight tolerances and creep before purchasing.
Additional tripod accessories worth considering are L-plates for your camera body, and if you are into macro, nodal rails as well. Also learn how to take your tripod legs apart and clean, especially when used in water or in the ocean. This will extend the life of your tripod and save you money.
Take time to invest in a good tripod/head combination and it will last you for many years.

Manfrotto legs with an Acratech head. My preference is for click adjustable legs.
8. Camera Manual
It’s small and light and easy to tuck into your camera bag and really handy to have when you need it. It may never get used, but it’s good to have on hand. Take your camera manual with you!

9. Card Reader
There are several different ways to transfer data from your camera to your computer. Some new camera bodies have wireless, or can be connected via a cable to the computer for data transfer. However, that tends to chew up battery power quite quickly on the camera.
My preference is to use a USB card reader. USB 3 or the newer USB-C provide fast data transfer for those in a hurry. Additionally having a small portable reader allows you to take it with you when traveling, allowing you to download on the road.
Card readers are cheap, light, easy to pack and come in really useful when traveling. Get one with lots of different ports to cover any requirements.


10. Other Useful Stuff
 There are other non-photo things that are useful to have around as well such as; change for parking meters or entry fees, a compass, sunscreen (mine is on a carabiner clipped to the outside of my backpack for easy access), and a pen and paper is always useful.
Other items that may come in handy are; business cards, model release forms, snacks, your cell phone loaded with a variety of useful apps, and the list goes on.
Conclusion
What you need in terms of photography accessories will depend on the type of photography you do and where you do it. This list should cover the basics that any new photographer is likely to need, or at least might need to think about investing in at some point. Being aware of your options is important as good bags and tripods can be expensive, so you will need to budget for them.
Many people forget about their own personal comfort and think cheaper clothing options will be okay. For general purpose photography that may well be the case, but anyone heading into nature should be as prepared as they can be. Good quality outdoor clothing will last and be an investment. No one wants to miss a sunrise because they were cold and wet and in an unpleasant situation.
Remember to look after yourself as well as your camera gear.
The post 10 Must-Have Photography Accessories by Stacey Hill appeared first on Digital Photography School.
21 Images That Show a Trip to the Market
Markets the world over are fascinating places. A photographer’s paradise, with a cornucopia of things to aim the camera at. Here are 18 images from a trip to the market:

By Carsten ten Brink

By Roberto Verzo

By David Stanley

By jpellgen

By Brook Ward

By Bud Ellison

By swong95765

By sara marlowe

By Rod Waddington

By Vanila Balaji

By aotaro

By David Guyler

By Neil Howard

By Leticia Roncero

By eugenuity

By James Merhebi

By Ryan Bodenstein

By Grant Matthews

By sdosani

By Carla Cometto

By Didier Baertschiger
The post 21 Images That Show a Trip to the Market by Darlene Hildebrandt appeared first on Digital Photography School.