If you hate the chemicals in standard laundry products, but are put off by the price of natural ones, try making your own! Just like homemade household cleaners, DIY laundry solutions work well and cost much less per use than their in-store counterparts.
Last Wednesday I had the pleasure of a tour of the home and gardens at Moss Mountain Farm, P. Allen Smith’s ferme ornée, or ornamented farm, in the Arkansas River Valley near Little Rock, Arkansas.
I took an embarrassment of photos and wanted to share some of them with you.
At the beginning of the tour, we assembled in front of Smith’s Georgian era-inspired farmhouse (new and green-built, but it looks like the real thing) He gave a gracious welcome to his home, complete with an overview of the concept of a ferme ornée (think Monticello) and a brief history of the home’s construction from concept to reality.
We entered through his classic southern front porch beneath a haint blue ceiling (dual purpose: keeps away evil spirits and discourages insects).
He escorted us inside for more graciousness and a few words about the design of the interior.
I could show you so many pictures this page would take a week to load, but I’m going to break it down for you to its essence: books, art (particularly portraiture & landscapes), and antique casegoods. He draws the line at antique seating; if you can sit on it, it’s a reproduction. As Mr. Smith points out, he never sat in a comfortable antique chair. Come to think of it, neither have I.
Mr. Smith entertained us with anecdotes. His walls, as I mentioned, are filled with portrait paintings. Arguably the most striking of these is a looming painting of the Osage Chief Black Dog in full tribal dress complete with scalps and carrying a tomahawk. In his mild-mannered drawl, Mr. Smith related the time a visitor inquired as to whether or not the featured subject was one of his relatives.
My favorite part of the house must be the porches. This is how we do porches in the south: screened, baby, screened, as you can see from this view of the back of the house:
Prepare to swoon; this is the second floor sleeping porch.
Imagine the cool breezes from across the river valley, the summer night noises, and the expanse of stars on a clear evening.
And in case you feel the need for a little al fresco bathing, the porch is complete with its own bathtub.
In cooler months, never fear, an interior guest room awaits:
Sleep in, wake up rested, and contemplate the gentle, diffuse light from the north window:
And make your way downstairs for breakfast:
With a view.
But enough of my rêve éveillé. After the tour of the home, we trailed off through the gardens.
Past the outdoor kitchen. Yes.
And one of the outdoor fireplaces. It, and all of the fireplaces are Rumford. The Rumford fireplace design has special meaning to me as it is the type my father put in his and my mom’s last home. It’s incredibly efficient and puts out heat like nobody’s business.
(Hi, M.!)
Hm. What would be a fitting residence for chickens as adorable as these silkies? Think. Think.
Of course, a Chicken Palace:
The espalier fruit trees were inspirational. I need to learn more about this craft to make sure my baby espaliers get off to a good start. Look at these clusters of bloom:
The raised bed vegetable gardens were beautiful. Guard chickens?:
Meet the donkey on the way to Chickenville:
Mr. Smith founded the Heritage Poultry Conservancy to promote and preserve threatened breeds of domestic poultry, and his chicken barn is worthy of the epicenter of this undertaking. With interior stalls that back up to outdoor paddocks all fanning out from a central interior aisle, it has the feel of a horse barn, only on a slightly more petite scale.
On looks alone, I think the Light Brahma had to be my favorite of the day.
Not far from Chickenville, between the livestock pasture and the home, is this metal-framed folly, wrapped in burlap and covered in living vines. From a distance it has the look of a stone hut. The roof is covered in sheets of moss, and the effect is inviting.
The stone fruit orchard:
A few beehives in an out-of-the-way corner near the orchard:
I have to show you the sky that day. This color in this pic hasn’t been boosted.
All that walking around makes a tourist hungry. Thankfully, salad of herbed chicken lightly dressed with a feta cheese dressing awaited:
Espalier isn’t foolproof. And if something goes wrong, all is not lost. Use the carcasses to ornament the dining barn.
It was a beautiful day and a very successful tour. I would like to thank Mr. Smith for opening up his Garden Home Retreat. When I got home, I was asked what was the most meaningful thing I learned, and what was the most surprising.
Good questions, both. The most meaningful thing I experienced was a new affirmation of the power of the personal sharing of our homes/gardens. We do this informally among friends, showing guests the way we live at home and what is important to us. It’s a powerful portal into who we are.
The most surprising thing was Mr. Smith’s openness with his home, his desire to share with us. Moss Mountain Farm is a monumental achievement, a home of great beauty and taste, the culmination of much thought and research and education, not to mention labor. It is a rare thing to take what is in your heart and mind and make it a reality from the ground up, and it requires remarkable determination.
This simple recipe was my favourite food of the entire weekend. And there was some stiff dessert competition this weekend too. I’ve been craving doughy fresh bread like nobody’s business. In honour of breaking in the new kitchen, I decided to revisit one of my favourite old recipes on the blog: Organic Homemade Spelt Tortillas. And by old, I mean it was posted a good 5 years ago! Time is flying. Before I know it, you’ll be calling me Grandma Glow.
Not only did I improve upon the previous recipe, but I discovered a way to shave 40 minutes off the dough-sitting time. In other words, the dough rest wasn’t even necessary. What the what? I know. As a result, these spelt tortillas are literally thrown together quicker than you can run to the store. They are much fresher and tastier too. This makes me a happy girl, especially after the dishwasher and washing machine broke within a 24 hour period. That was after they leaked all over floors of course. Nobody said moving was easy, but stuffing homemade wraps in my face sure helps.
The beauty of the wrap is that you can add any toppings you’re in the mood for. Change it up every time! One of my favourite simple combos is vegan butter spread over a warm tortilla with a sprinkle of Herbamare (heaven). Or for a sweet treat, spread on coconut oil and sprinkle it with cinnamon and sugar. Drool. Or toast it in the oven and make a pizza. Ok, now I’m getting hungry again!
The veggie wrap above is a simple mix of fresh orange pepper, red onion, cucumber rounds, hummus, black pepper, and yellow mustard. I don’t know what it is, but I’ve been craving yellow mustard all day + all night. I’m dipping veggies in yellow mustard for crying out loud (for the record, I put on more mustard after shooting these photos). Things are getting weird in my mouth. Whenever Eric sees me with the mustard he says, “I put that shit on everything!” in the voice of the old lady from the Frank’s hot sauce commercial.
When I took my first bite of this veggie wrap I almost shed a tear of joy. All the moving and renovation pains vanished from my memory during those crunchy, fresh, zippy bites. Simple homemade food is the best food, don’t you think? Eric also demolished his wraps (yes, I managed to share somehow) and said he can’t get over how much better they taste compared to his regular store-bought ones. It was a success on all fronts! I’ll let you know if I try out any other flours – and you can feel free to do the same in the comments.
Cheers to a new, fresh spring week and significantly fewer boxes to unpack. Yellow mustard for life!
Easiest 5-Ingredient Spelt Flatbread
Vegan, nut-free, refined sugar-free, soy-free
In no time at all, you can have a fresh, pliable spelt tortillas made with just 5 ingredients! Lightly adapted from my Organic Homemade Spelt Tortillas.
Yield 6 large or 8 small
Prep Time 10 Minutes
Cook time 10 Minutes
Total Time 20 Minutes
Ingredients:
2 cups + 2 tablespoons light spelt flour (see note)
1/2 teaspoon fine grain sea salt
1/2 teaspoon baking soda
3/4 cup almost boiling water
1 tablespoon extra virgin olive oil
Directions:
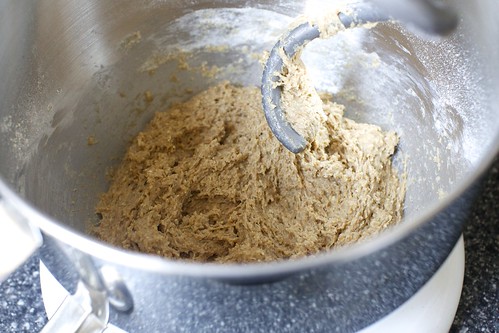
In a large bowl, whisk together the flour, salt, and baking soda.
Stir in the hot water and oil until a shaggy looking dough comes together.
Knead the dough with your hands about 15 times, soaking up the extra flour at the bottom of the bowl as you go. If the dough is still too wet, add a touch of flour and knead again.
Shape dough into a ball and place in the bowl. Cover with a tea towel so it doesn’t dry out.
Preheat a large skillet over medium heat.
Grab a chunk of dough just larger than a golf ball. Shape into a ball and sprinkle on some spelt flour to coat lightly.
Place a large nonstick baking mat on the counter and flour a rolling pin. You can also use parchment paper instead of a nonstick mat. Sprinkle the mat with a dusting of flour.
Roll the dough all directions into a circular shape until it's paper thin. It’s ok if it’s not a perfect circle - mine usually come out all kinds of odd shapes! Drizzle the tortilla with a tiny bit of olive oil and spread it out to coat the entire surface.
Place the tortilla on the preheated skillet, oil side down. Cook over medium heat for around 30 seconds and then flip it with a spatula and cook for another 30 seconds or so. If you cook for too long, your tortilla might be prone to tearing or drying out, so keep that in mind.
Place cooked tortillas on a plate and cover with a tea towel to prevent drying. Repeat steps for the rest.
Store leftovers on a plate with a lightly damp paper towel spread out on top. Cover the plate with plastic wrap and place in fridge.
Note: Other flours might work besides light spelt flour, but I haven't tested any yet. Please let us know in the comments if you try any out!
Oh, and in case you are wondering – yes, they do wrap nicely! I didn’t experience any tears or cracks with this batch. I think this is due to cooking it for much less time than the previous recipe and also using light spelt flour instead of whole spelt flour. I’ll have to test more versions to be sure…
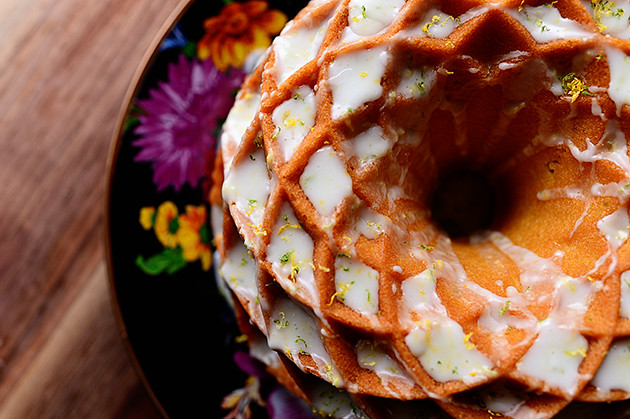
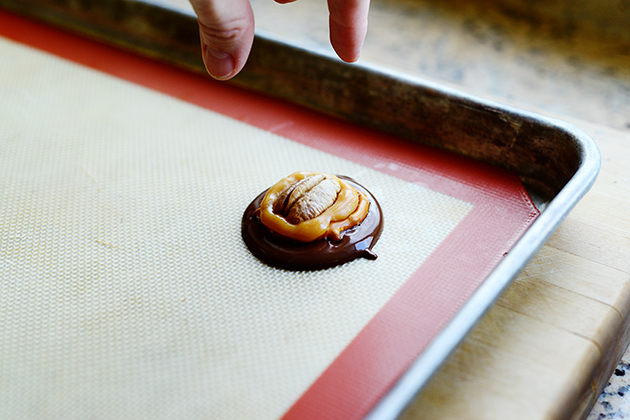
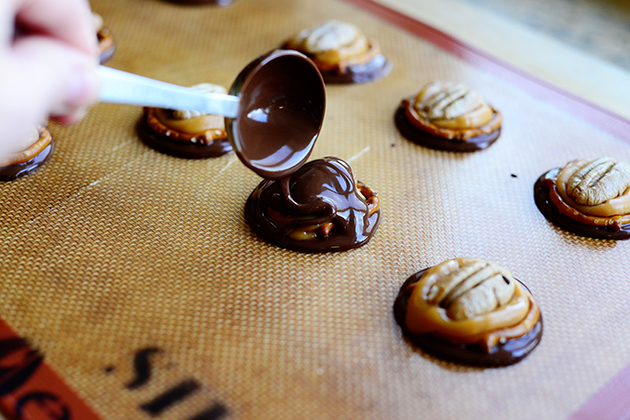
Okay, first of all: the intricate surface of this cake is not due to my superior cake sculpting skills.
It’s entirely due to this beautiful, brilliant bundt pan, which I bought last week in a fit of culinary impulse while at my favorite restaurant supply store in the big city. I had no idea what I was going to do with it, I just knew I had to make it mine.
Yesterday after we got home from church, I decided to try it out using the classic 7-Up Cake recipe many of us grew up with, which I posted on this website several years ago. It’s as moist and delicious as ever, and for this I gave it a little extra citrus twist, and wound up loving the results.
C’mon! Let’s make it!
I mean bake it!
Let’s go.
Start with 3 sticks of softened butter. And did you know that if you set cold butter on the countertop above your dishwasher while it runs through the cycle, it hastens the softening process?
It’s true.
To the 3 sticks of butter, add 3 cups of sugar. (Are we seeing a pattern here?)
Cream the butter and the sugar together…
Then drop in 5 eggs, one at a time, mixing after each one.
It helps to crack the eggs into a bowl or a small pitcher ahead of time. Lessens the likelihood that you’ll drop some shell in there while the mixer’s going, which lessens the likelihood that you’ll cuss.
Cussing while baking is banned in seventeen states. So the more you can do to prevent it, the better off you’ll be!
Mix this together until it’s all combined.
Then, in a separate bowl, combine 3 cups of flour (seeing? pattern? here?) with a little salt and add the dry mixture a cup at a time until it’s mixed together.
Next, with the mixer on low, pour in some 7-Up! Or Sprite! Or Sierra Mist!
(Or…Orange Crush, anyone?)
(You didn’t hear that from me.)
Finally, zest a lemon and a lime…
And mix it into the batter. Scrape the sides thoroughly, then mix it again until it’s all combined.
Spray the crazy, wacky bundt pan (or any bundt pan) with baking spray…
Spoon all the batter into the pan…
Even out the top…
Then bake the cake for a good 1 hour 10 minutes…or a little longer if it needs it! (A toothpick inserted should not come out totally clean; but it shouldn’t be wet with batter.) Then let it cool in the pan for 15 minutes…
Before turning it out to cool completely.
Magical! I love how evenly it browned, and how beautifully golden it is.
This pan is a revelation.
When it was cool, I put it on a cake platter and got to work on the glaze.
All I know is, something delicious needs to go in those crevices.
For the glaze, I put some powdered sugar in a sifter with a dash of salt.
Then, after sifting it, I threw in some more lemon and lime zest…
Squeezed in some lemon and lime juice…
And whisked it around to see where I was. It was almost perfect, but needed to be just a teeny bit thinner.
A tablespoon of water later, and it was just right!
I just used a spoon to drizzle the glaze all over the place, getting it in all the crevices and letting it drip everywhere.
Then I sprinkled on some more zest just to make it purty.
Honestly, in the end I really couldn’t tell if it was scary or beautiful.
So I think I’ll just go with scary beautiful!
And once I cut into a slice and remembered just how darn good this cake is, I really didn’t care what it looked like.
This was delicious. The cake is super moist, but the added zip of the lemon and lime zests really made it extra flavorful.
And then you have the beautiful surface, which holds yummy little wells of the glaze.
Everyone in the Drummond house loved it!
(They just got a little tired of waiting so that I could snap a photo of every single slice.)
Enjoy this, friends! And be sure to head over to Pioneer Woman Home and Garden to enter to win the beautiful bundt pan…and some other great baking stuff!
1 Tablespoon Lemon Zest, Dried For At Least 30 Minutes
1 Tablespoon Lime Zest, Dried For At Least 30 Minutes
1 Tablespoon Lemon Juice
1 Tablespoon Lime Juice
1 Tablespoon Water + More As Needed
Preparation Instructions
Preheat oven to 325 degrees.
In the bowl of an electric mixer fitted with the paddle attachment, cream together butter and sugar. Add eggs one at a time, mixing after each addition. Combine flour and salt, then add it 1 cup at a time, mixing after each addition. With the mixer on low, slowly add the 7-Up until combined. Add 1 tablespoon of both lemon and lime zest and mix. Scrape the bowl and mix again.
Thoroughly spray a bundt pan (I used a Jubilee bundt pan) with nonstick baking spray. Add large spoonfuls of batter until the pan is filled, then even out the surface. Bake for 1 hour 10 to 1 hour 15 minutes. Remove the pan from the oven and let it sit in the pan for 15 minutes. Carefully turn it out onto a cake plate and let it cool.
Combine all the glaze ingredients in a bowl and gently whisk until thick but pourable. Use a large spoon to drizzle it all over the cake. Let the glaze set, then slice and serve!
Optional: Sprinkle with a little extra lemon and lime zest.
Hey, guys. It's Mandi! After living in an apartment with a tiny kitchen with no windows, I was so excited to move into a home with a roomier kitchen that included both a dishwasher and a window at the sink! I had grand plans of putting pots of herbs on the sill, envisioning my apron-clad self happily snipping away at herbs before making authentic Italian dishes from scratch. Yeah. Well, we've been here for over two years, and I'm just now getting around to getting any kind of herbs on that windowsill. What took me so long? Well, my windowsill was too narrow for pots, so I just kind of gave up ... until I got the idea to make a hanging herb planter with a piece of PVC pipe. And it worked out perfectly!My kitchen window doesn't get a ton of light because it opens to an area of our home that is north-facing and covered by a porch. So I keep my needy herbs, like basil and rosemary, in front of our dining room windows, which get lots of bright southern light all day long. For this window planter, I chose mint because it's pretty hearty as far as herbs go, and it also enjoys a moister soil than other herbs, so having great drainage isn't as crucial when growing an aggressive herb like mint.
Be careful about planting mint with other herbs because it tends to take over the entire pot. If you really want to make mint share the soil, then you might want to keep it contained in some kind of plastic pot to keep it from spreading and taking over neighboring plants.Supplies: -4" PVC pipe - $2 per foot* -2 4" knock-out plugs - $2 -2 small eye hooks - $1 for a pack of two -2 larger eye hooks - $1.20 for a pack of two -4 small S-hooks - $1 per pack of 5 -2 12" lengths of #16 chain - about $.50 per foot
Total cost of supplies for a 2' planter: $9.70
*You typically have to buy pipe in large pieces, even if you only want a small section. So a 5' length of 4" PVC pipe will cost you about $10, even if you are only using 2'. To use up leftover pipe, you may want to make two planters or split supplies with a friend.
Tools:
-power drill -drill bits (just a tiny bit smaller than the eye hooks) -3" hole saw (the kind you use to cut holes for door knobs—like this)Step One: Drill pilot holes for your small eye-hooks 3/4" from each end of the pipe. Make sure they are placed directly across from each other. Then screw in the eye-hooks.Step Two: Mark the center for each hole you will be drilling for the plants. Do this in line with the hooks you just put in. Where you want your holes to be spaced may vary from mine, but I marked my centers to be 4.75" apart from each other.
Step Three: Use a hole saw bit on a power drill to cut holes on center with the marks you just made. The image above shows me using a Forstner drill bit (because that's what I had), but it didn't end up working out on the cylindrical shape of the pipe, so I had to borrow a hole saw to finish the job. You may want to use sandpaper to smooth the holes if they look rough after cutting.Step Four: Clean up the PVC "dust" from inside the pipe, and pop in the kock-out plugs on the ends of the pipe. These will fit really tightly, which is great for keeping the soil and water inside the planter.Step Five: Prepare the planter for the soil by pouring small rocks into the bottom of the pipe. This will help the water drain and help prevent root rot from too much water sitting at the bottom of the plants' roots.Next, add soil over the rocks, packing it into the ends and spaces between the holes. Put the plants into the holes, and add soil to the area around it, packing it in lightly.Step Six: Drill pilot holes into the millwork framing your windows, then screw in the larger eye-hooks. I wanted my planter to rest just a couple of inches above my windowsill, so I measured the height of the PVC pipe, plus the length of chain and hooks, added the couple of inches of spacer room, and used that measurement for where I should drill for the eye-hooks. I measured up from my windowsill to make sure the hooks were even on each side.I love having cheery plants in my kitchen window now—so much that I might go take care of that sink full of dishes I keep meaning to take care of. And hey, maybe tonight I'll make mojitos? I think I'm going to love having fresh mint 'round these parts!
Most nights that Trey leaves dinner plans up to me I try to make some variation of this dish. I might change it up by piling it over chips (nachos!) or serve with rice instead of quinoa (homemade chipotle!). The ingredients really don't change all that much no matter what name I give it. What can I say? I just love black beans. I think I get it from my mother. She's also a black bean loving kind of lady. Eating a mostly vegetarian diet, this works perfectly for us too, as it's a pretty well-balanced meal having vegetables, grains, and a dose of protein from the beans. Oh, and it's totally delicious! It's one of those meals that doesn't feel healthy, even though it actually is.Quinoa Burrito Bowls, serves two.
1 cup (uncooked) quinoa 1 15 oz. can black beans 1 15 oz. can sweet corn 1 large bell pepper 1/2 red onion 2-3 cloves of garlic 1/4 teaspoon cayenne 1/2 teaspoon cumin 2 tablespoons chopped, fresh cilantro 2 tablespoons olive oil 1 lime salt + pepper 3/4 cup shredded cheese (optional) 2-3 tablespoons sour cream (optional)
First, get the quinoa going as it will take the longest to cook. I've really gotten into quinoa over the past year, and there are a few tips for cooking it that I'd like to share with you. Begin by rinsing the dry quinoa before cooking. This helps to take off that sometimes bitter-edge taste. The second thing I suggest is to cook the quinoa in vegetable stock instead of water, or a mixture of the two. This helps to add some extra flavor. Other than that, follow the package directions and within 15-16 minutes you'll have some delicious quinoa. While the quinoa cooks, drain the canned corn and place it in a small pot or pan. Heat over low heat. Stir in the cayenne and a little salt and pepper. You don't really need to cook the corn; we're just looking to warm it up.
In another small pot or pan, heat the black beans with the cumin and one of the garlic cloves (minced). Again, we don't need to cook the black beans—just warm them well.
Slice up the bell pepper and onion. Mince the remaining garlic. In a large skillet heat the olive oil over medium heat. Add the peppers, onion, and garlic, and cook until the peppers begin to soften (about 4-5 minutes). Season with a little salt and pepper.Once the quinoa is done, toss in the cilantro and give it a stir. Season the quinoa with a little salt if needed.Now it's time to build our burrito bowls! I like to start with quinoa in the bottom, then add the cheese (if using). Now layer on the corn, black beans, and pepper mix. Add some sliced avocado and sour cream if you like.Serve with a few lime wedges. A little citrus is a must. Enjoy! xo. Emma
Credits // Author: Emma Chapman, Photos by: Emma Chapman and Elsie Larson. Photos edited using Luna from the Fresh Collection.
I am a lover of any form of pasta primavera, and I pretty much have been for the past 25-plus years. This recipe is a spinoff of the one I posted here back in the dark ages of this cooking website—except instead of big chunks of veggies, I keep them in a fine dice, and instead of penne pasta, I use cheese tortellini—and my two girls and I absolutely devoured it for dinner last night.
Marlboro Man and the boys, meanwhile, had beef and bean burritos. How’s that for reinforcing gender stereotypes on a Sunday evening?
Ha. It wasn’t intentional, man. It just…happens sometimes.
Anyway, back to the pasta: It was delicious! You’ll love it!
Here’s how I made it.
Mince up some onion pretty finely.
Zees ees a somewhat delicate deesh, so I want all the ingredients to be delicate, too!
Mince up some garlic, too!
Next, peel some carrots…
Cut them into matchsticks…
Then cut the sticks into a dice.
Cut some florets off a head of cauliflower…
Then break it into very small pieces.
Remember: Zees ees a delicate deesh!
Grab some frozen peas and have them at the ready…
Then grab a hunka hunka burning ham…
And cut it into pieces. Fun fact: I didn’t realize this was sliced ham until after I diced it up!
But ham is ham, man…no matter how you slice it.
Or dice it.
Melt some butter in a large skillet, and throw in the onions and garlic.
Stir it around and cook it for a minute or so…
Then throw in the carrots…
And the cauliflower…
Then stir it and cook it for another minute.
(I’m not cooking anything too long because I want the veggies to remain somewhat crisp and delightful. Not mushy and pitiful.)
(I love how the color of the carrots starts to transfer a bit to the cauliflower. Purty.)
Next, pour in a good splash of white wine…
And a splash of broth…
Then cook it for 2 or 3 minutes, or until the liquid is mostly reduced.
And now for the fun part: pour in some heavy cream…
Then add a little salt (it doesn’t need much!) and plenty of pepper…
(I repeat: Go easy on the salt. Because of the cheese mixture in the tortellini [not to mention the Parmesan we're about to the sauce], the dish has plenty of salt going on as it is. Taste before adding more than just a sprinkle.)
Add about a half a cup of Parmesan…
Then stir it together and let the sauce bubble up and become magical.
Oh! I forgot about the tortellini.
Cook it and drain it and tell it you’ll be right back.
Back to the sauce: pour the frozen peas right on in…
Along with the ham.
Then stir it around so it’s all wonderfully, beautifully, sublimely combined. The peas and ham will heat up pretty quickly if the sauce is nice and hot.
Grab some basil if you have some.
You can chop it up, or you can roll the leaves into a tight roll and slice it really thin.
Then just sprinkle it in…
And stir it around.
Now just toss in the tortellini!
Oh…baby.
Delicious!
It’s everything that’s lovely about pasta primavera—crisp spring veggies, flavorful cream sauce—but the tortellini really makes it magical.
Enjoy every single bite! And you can make this even quicker and easier-er by using frozen peas and carrots. Supah fast!
Some other things you can add:
* Chopped or sliced mushrooms. Saute with the carrots and cauliflower.
* Finely diced red pepper. Not exactly a spring veggie, but it adds pretty color!
* Diced zucchini. Ditto about it not being a spring veggie…but I won’t tell anyone.
* Crumbled goat cheese. Stir into the sauce for a little extra richness.
* Softened cream cheese. Stir into the sauce for a little extra naughtiness.
* And of course, substitute any kind of pasta for the tortellini. Of course, it will then no longer be called Tortellini Primavera. Proceed at your own risk.
Cook tortellini a couple of minutes less than package directions call for. Drain and set aside.
Melt the butter in a large skillet over medium-high heat. Add the onions and garlic and stir to cook for 1 minute. Add the carrots and cauliflower, stir, and cook 1 minute. Splash in wine and broth, then cook for 2 to 3 minutes, until the liquid reduces a bit. Stir in cream and Parmesan and stir.
When the mixture is hot, stir in peas, ham, salt, and pepper. Allow them to heat up in the sauce. When the sauce is hot, stir in the tortellini. Check for seasonings, add more if needed, and serve with extra Parmesan and basil.
Posted by Ree | The Pioneer Woman on March 31 2014
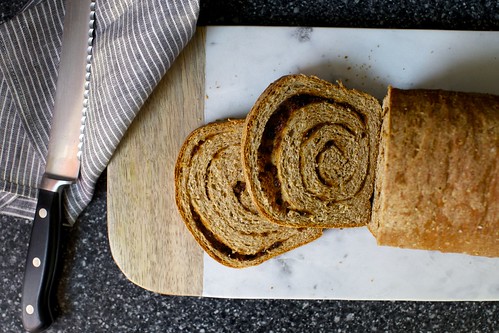
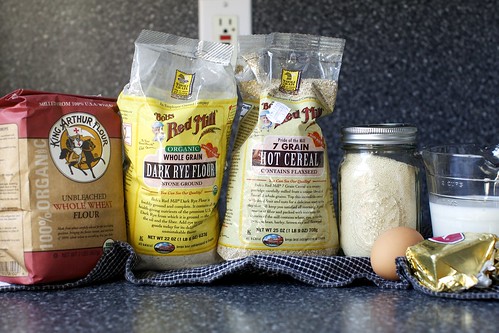
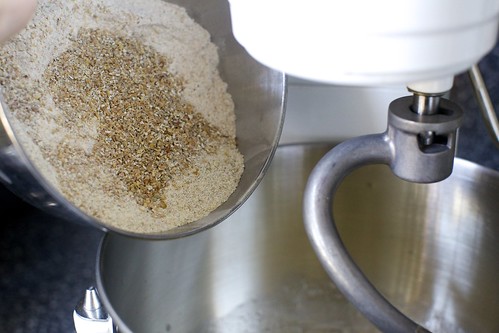
A couple weeks ago, when we lamented the fact that the people who raised us and claimed to love us still didn’t find it in their hearts to provide us with the specific food products we yearned for (basically, we are all the Honest Toddler on the inside), I remembered yet another item on the denied list which was quickly added to my Writ of Grievances with my progenitors that I will carry with me to the grave and blame for all of my misfortunes, like that Amazon reviewer who said my cookbook was “tantamount to culinary fanfic.” Just kidding, I just took too many melodrama pills this morning.
But I do clearly remember a friend’s dad making us the most glorious thing for breakfast after a sleepover: cinnamon swirl toast with salted butter. The slices came from a package of bread with a brand name on it that we had in our own home, but only the whole-wheat kind, and as the full extent of the betrayal crystallized in my mind, I realized that this meant that my mother would go to the store, see the cinnamon swirl varietal on the shelf and reach past it for the one that tasted like sad. I expressed my disappointment made my case to my mother when I got home but I was ineffective in convincing her that sugary cinnamon raisin swirl bread was an essential part of my daily nutrient intake.
If you follow me on Instagram, you've already been subjected to hefty amount of greek yogurt pictures over the past couple of years. I am a big, big fan of greek yogurt. It's one of my go-to quick breakfast favorites, and I use it often in baking or in soup (instead of sour cream). As with anything you eat often, sometimes it can get boring. Having options to change up the flavor is a must. Here are a few of my personal favorites.1. Banana Bread Greek Yogurt:
You'll need one ripe banana, 1/4 teaspoon vanilla extract, 7 oz. greek yogurt (one small container), and a few walnuts or banana chips. Mash up the banana and stir into the yogurt. Stir in the extract, and top with nuts or banana chips. This one is awesome for breakfast.2. Chocolate Pudding Greek Yogurt:
You'll need 1 1/2 to 2 tablespoons instant chocolate pudding and 7 oz. greek yogurt. Stir together. Stir well; you don't want any clumps of powder. This one is probably my favorite because as you stir, the yogurt will begin to thicken—like chocolate mousse. Top with fresh fruit. I personally think this makes a better afternoon snack or light dessert than a breakfast because it feels so decadent, even though it's pretty healthy. You could also freeze this and have a really great frozen yogurt treat! 3. Cookie Dough Greek Yogurt:
This one is another almost dessert. I first saw cookie dough greek yogurt here. To make this, you'll need 1 tablespoon creamy peanut butter, 1 tablespoon honey, 1/4 teaspoon vanilla extract, and a few mini chocolate chips. Mix together and enjoy this treat! 4. Lemon Meringue Greek Yogurt:
I discovered this combination last week while making Citrus Tarts. To make lemon meringue greek yogurt, you'll need 1 to 1 1/2 tablespoons lemon curd (homemade or store bought is fine) and 7 oz. greek yogurt. Stir together and top with granola. I love this for breakfast because the citrus really wakes you up. Yum! What about you? Do you have any favorite ways to enjoy greek yogurt? xo. Emma
Credits // Author and Photography: Emma Chapman. Photos edited with Luna of the Fresh Collection.
Hey, guys! It's Katie here. I recently made one of my most favorite toys for my kiddos and I just had to share! I have to admit, when this idea popped into my head I may have gotten a little overly excited. You see, one of our very favorite things to do as a family is tend to the garden, but since we live in the Midwest there has been none of that for many months now. Soon the weather will be warm and we will be growing goodies in the garden again, but until then this toy garden box will help tide the girls over. Here's how to make your own: Supplies: -A color variety of felt (purple, orange, green, and red were necessities for me) -Green pipe cleaners -Velcro -Brown paint & paint brush -Brown jersey cotton -Needle & thread/scissors Now, let's start with the garden box. Grab any good-sized box you have lying around your house. I chose one that was pretty shallow so it would be easy to "plant" in.
Step One: Cover the entire box in brown paint.
Step Two: In between coats of paint, you can start on your "dirt." Cut a piece from your brown jersey fabric to fit the width of the box (mine was 13" x 14"). Fold it in half and run a stitch up the edge with your sewing machine.
Step Three: Flip right side out and cinch one end closed with a running stitch pulled tight and tied off. Stuff it full and cinch the remaining end closed. Repeat as many times as needed to fill your box.
Step Four: Insert your "dirt" pillows and make sure they fill the box. Now, onto the carrots! Step One: Cut out a large triangle from orange felt and fold in half (mine was 5" at its widest point and 5" long). Stitch from the bottom to the top edge. Be sure not to stitch it closed.
Step Two: Cut out a circle for the top of your carrot, along with the leaves. Stitch the leaves to the top portion of the carrot.
Step Three: Flip the carrot right side out and stuff. Hand sew the carrot top on. To make the beets:
Step One: Cut out a large circle from your purple felt (mine was 7 1/2" in diameter). Clip four even triangles out of the circle (as shown above). Join each edge with the one next to it with your sewing machine. Repeat until the beet is sewn all the way around.
Step Two: Flip right side out and stuff until firm. Cinch the top closed and tie off.
Step Three: Cut a long leaf shape from your green felt (mine was 8" tall). Stitch a purple stalk piece to your leaf to create a sort of pocket. Leave the bottom open.
Step Four: Insert a pipe cleaner into the stalk. Cut off the excess and repeat.
Step Five (optional): I used contrasting thread to sew veins onto the leaf to make it look more realistic.Step Six: Insert three leaves into the beet and hand sew them in place. Tie off and you're all finished! Repeat as many times as you'd like. I made two beets for my box.Now onto the strawberries!
Step One: Cut out a simple strawberry shape (as seen above—mine was 2" at its widest point and 2" long). Stitch around the edges, leaving the top open.
Step Two: Flip right side out and stuff. Cinch the top closed and tie off with a knot.
Step Three: Add small, decorative stitches all over the strawberry. Cut a small green top and sew a piece of soft velcro to it. Hand stitch the top onto the top of the strawberry. Repeat as many times as you'd like. I made four strawberries for my plant.Step Four: Twist a group of pipe cleaners together. I used three.
Step Five: Cut out leaf shapes in groups of three. Create jagged edges and then stitch the leaves to the pipe cleaners on the bottom side. Repeat this step until the pipe cleaners are entirely concealed.
Step Six: Grab another pipe cleaner and insert it through a leaf shape (this leaf looks more like the top of the strawberry, with four points). Round the edge of the pipe cleaner and lay flat against the felt leaf.
Step Seven: Stitch a rough piece of velcro over the rounded pipe cleaner. Repeat on both ends. Step Eight: Twist the pipe cleaner around the base of the plant. Now you're all done! Now it's time to plant (and unplant) your garden in the box! My little Poesy girl had so much fun with this part! I added some simple felt flowers and some store-bought ladybugs to add to the fun of the garden box. This is one of my very favorite children's toys to date! It's a great way for little ones to learn about gardening. Happy crafting! xo. Katie
Credits // Author: Katie Shelton, Photography: Katie Shelton & Sarah Rhodes. Photos edited with Spring from the Signature Collection and Phoenix from the Fresh Collection.
Perhaps you don't recongize the names Tobias Frere-Jones or Jonathan Hoefler but you've certainly read their work — every lower-case, upper-case and symbol of their designs. They're co-owners of Hoefler & Frere-Jones, the company which has produced some of the most successful and famous typeface designs ever.
Perhaps you don't recongize the names Tobias Frere-Jones or Jonathan Hoefler but you've certainly read their work — every lower-case, upper-case and symbol of their designs. They're co-owners of Hoefler & Frere-Jones, the company which has produced some of the most successful and famous typeface designs ever.
Late last year I spent a week in London for work. I didn’t have much free time, but the few minutes I did have, I experimented with two apps on my phone: Craft Beer London and London’s Best Coffee. I loved both, and I was really happy to find that one of the coffee shops from the app, Workshop Coffee ,was one minute from my hotel. I could have coffee in the morning on my way to work and buy my lunch at the same time! At first, I wasn’t enthused about the only sandwich option they have available before mid-morning, the ham, egg and basil sandwich, but I thought I’d give it a try. Little did I know that I would fall in love with the combination of flavors that you would never see me eat otherwise! Baked ham, boiled eggs, mayonnaise and basil. However, the sandwich was divine and I haven’t stopped thinking about it since. So much so, I just had to make it here at home, and it’s today’s recipe because I wanted to share! If you’re like me, this will get you thinking about all sorts of other sandwiches. Just be sure you get really good bread, and if you’re so inclined, make your own mayo! -Kristina
About Kristina: I am the food and drinks editor here at Design*Sponge. I really enjoy editing In the Kitchen With and Behind the Bar because I get to test and taste so many wonderful recipes, and get to have contact with so many of our readers.
See my favorite sandwich these days after the jump!
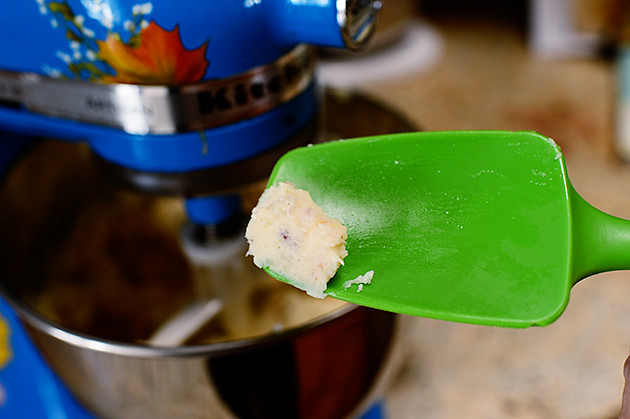
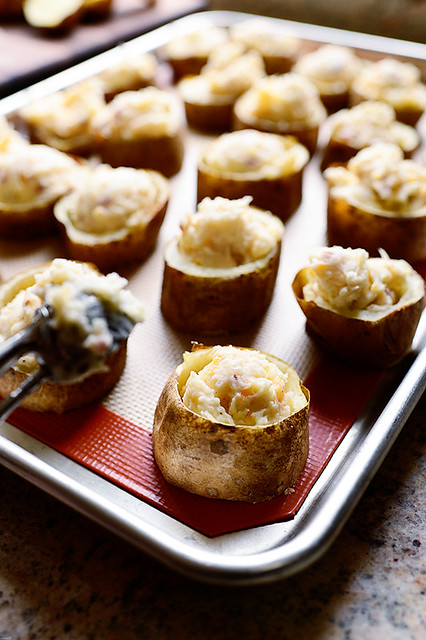
When Marlboro Man, the kids, and I were in Colorado last month, we ordered Twice-Baked Potatoes one night. Instead of the traditional twice-baked potatoes our souls were used to—the hollowed-out potato halves stuffed with luscious filling and baked—they brought plates of curious potato rounds, each with a layer of melted cheese on top. We all looked at one other with panicked expressions. What were these frightening little discs? Who would mess with the simple beauty of a traditional twice-baked potato? What has happened here in Colorado? When did everything go so horribly wrong?
(I suggested under my breath that it was all the marywanna. But Marlboro Man and the kids didn’t hear me.)
After closer examination—i.e., after we all got over our initial trauma and took a bite—we discovered that they were simply reconstructed little twice-baked potatoes; but instead of potato halves, they used potato slices. A simple and clever twist on the twice-baked theme!
I’d been meaning to recreate these once we returned from our ski trip and I could move my limbs again, and yesterday I finally got around to it.
Deliciousness ensued!
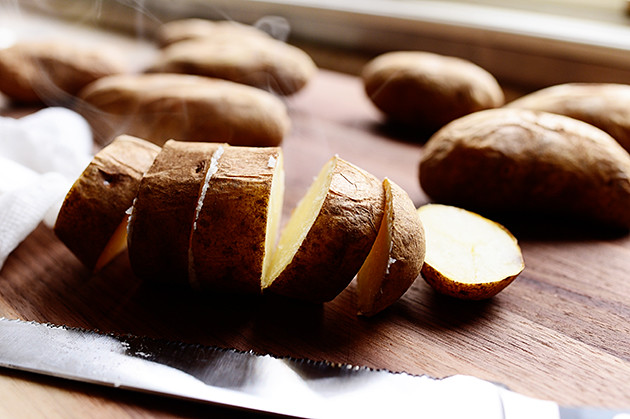
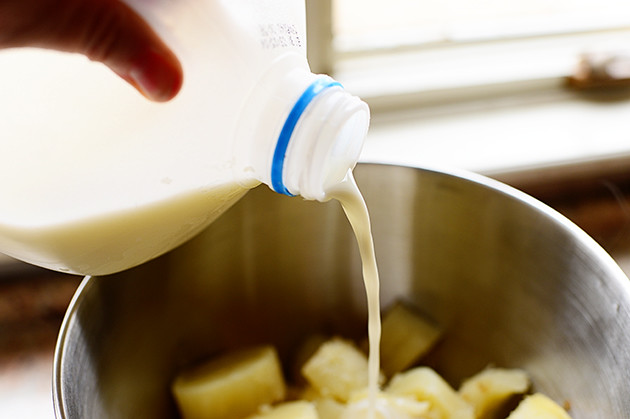
First, scrub a bunch of russet potatoes till they’re really clean.
Dry them, set them on a baking sheet, and bake them at 375 for 30 minutes, or until they’re super tender.
While the taters are a-bakin’, fry up some bacon…
Until it’s nice and crisp but not burned but not chewy but perfectly crisp.
You got all that?
Good. Will you please explain it to me?
After the bacon is cooked, violently throw it onto a cutting board in a neat pile…
Then chop it up into small pieces. Then go hide it somewhere until you need it so you won’t accidentally eat it all with a spoon.
(That may or may not have happened in my kitchen once or dozens of times.)
The taters! They’re done!
So now the fun begins. Transfer the taters to a cutting board.
Then lop off the ends…
And slice them into nice, chunky slices. If I had any sense of measurement, I would at this time tell you to slice “half-inch” slices or “1-inch slices” or “three-fourths inch slices.”
But I’m not that kind of girl.
Keep going until they’re all sliced up. Throw the little annoying end pieces into a pile; you can decide later whether to work them into the mix or whether to kick them to the curb.
(I kicked them to the curb.)
Throw softened butter into a mixing bowl.
Then grab some sour cream (or Greek yogurt if you’re trying to be a good kid) and throw it into the bowl.
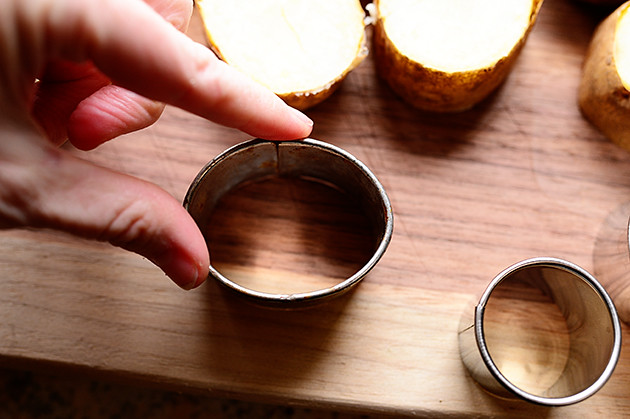
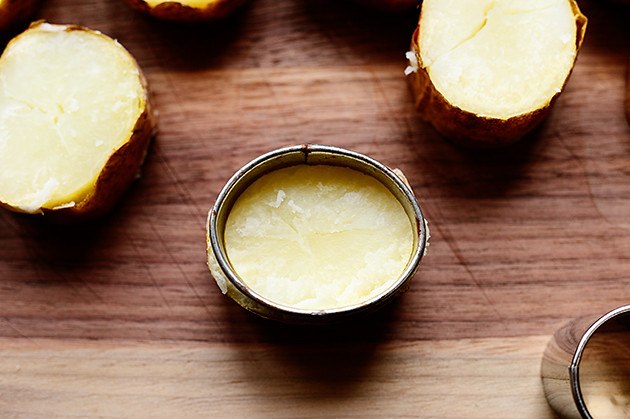
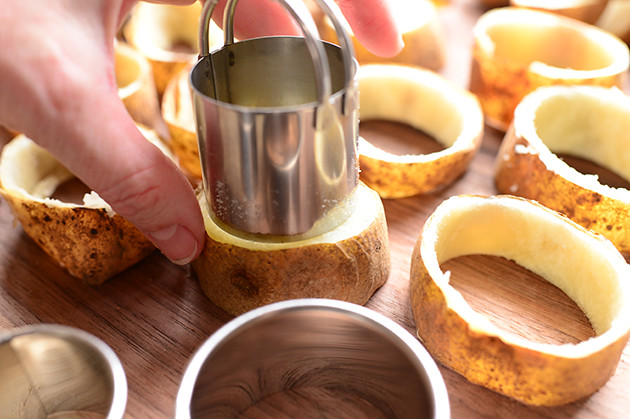
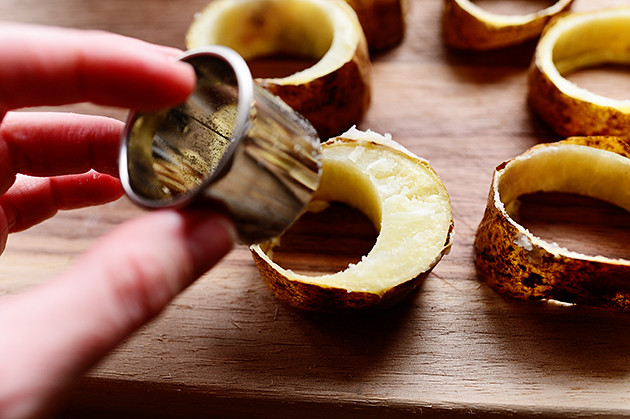
Now, this isn’t 100% required, but if you have them it makes the next step really easy: Grab some different biscuit cutters approximately the same size as the potato slices.
Now, since the potato slices are oblong in shape, you can slightly bend a round cutter to fit. (It’ll bend back, man!)
Then place it over one of the slices of potatoes, making sure the cutter fits inside the edge.
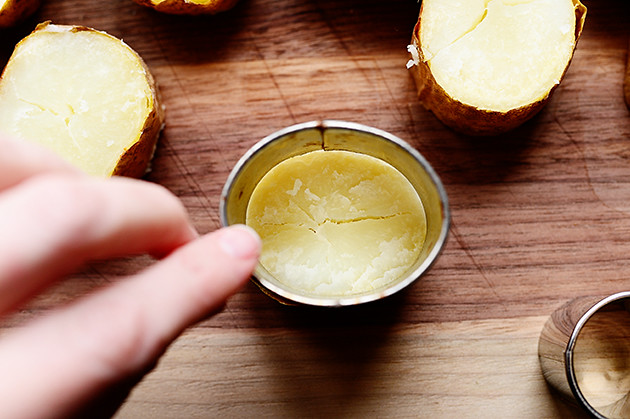
Then just press down…
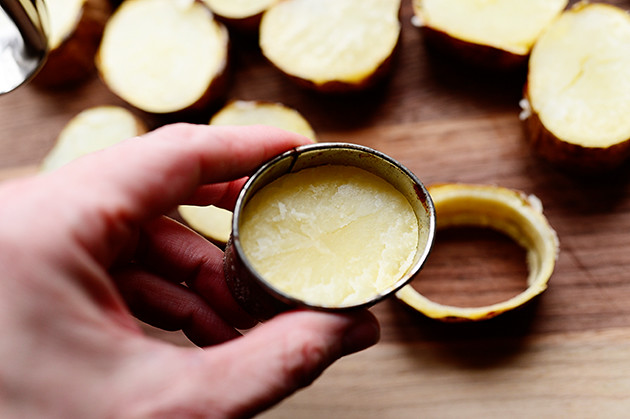
And lift it out!
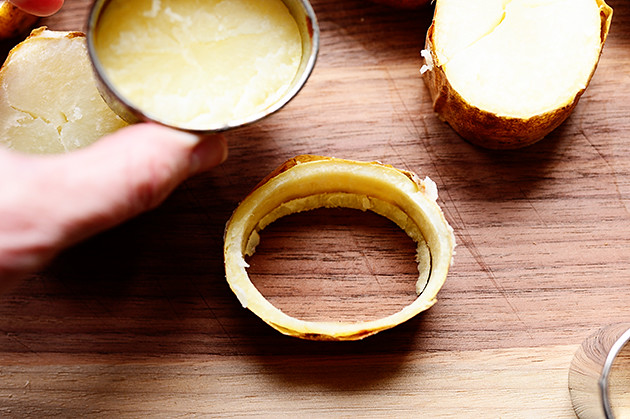
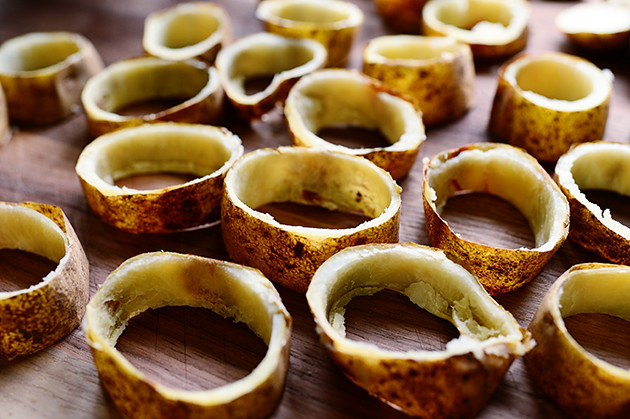
And that’s what you’ve got left! A nice little potato ring.
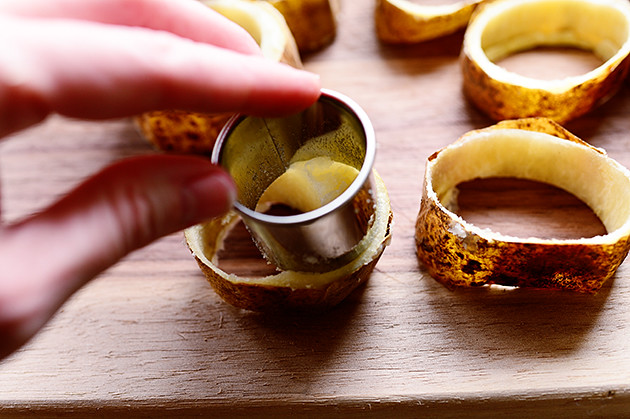
If you don’t want to bend your cutter, just squeeze the potato slice to conform!
Or, if you don’t have one that perfectly fits, just make one cut over to one side…
And a second cut over on the other side.
Keep on going…
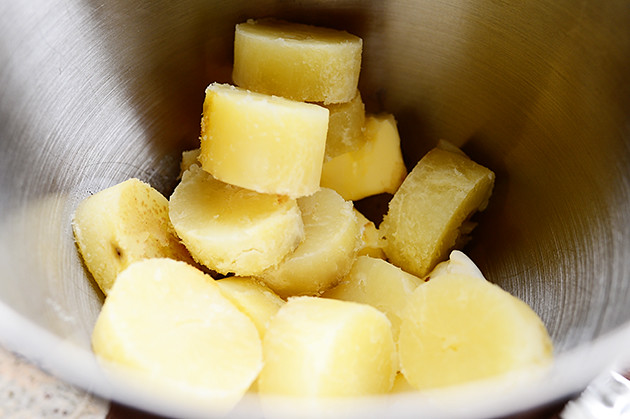
And drop the potato rounds into the mixing bowl as you go. They’ll be nice and warm, so they’ll start melting the butter and warming the sour cream.
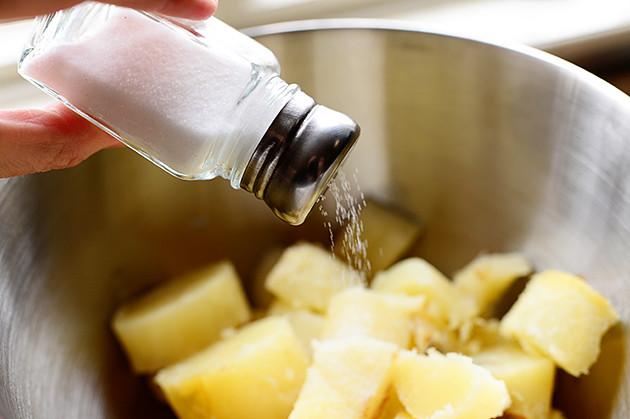
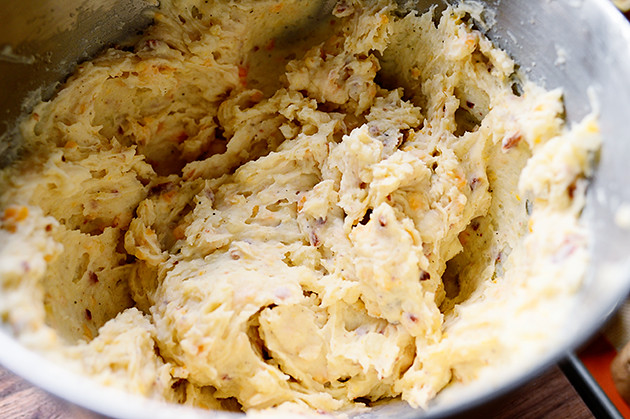
When you’ve finished cutting holes in all the potato slices, you’ll have a bunch of potato innards in the bowl. So add some milk…
Some salt…
Some pepper…
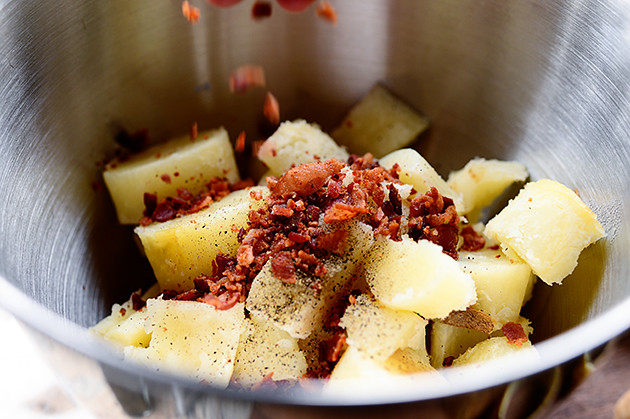
And the bacon…
Mix it on low using the paddle attachment until it’s all combined.
*Note: I’m using the mixer so the potato mixture will be really smooth, but you can just use a potato masher if that’s easier! Either one will work fine.
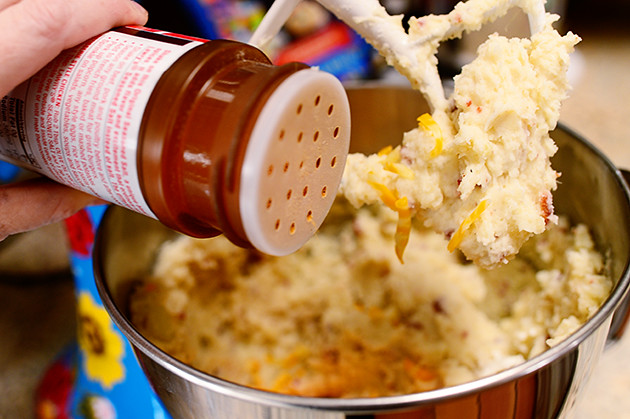
Then I added some grated cheese and, for a little more flavor because I tasted it and thought it was lacking in zip, a little seasoned salt.
Be sure to taste it when you’re finished mixing to make sure it’s absolutely perfect.
And…it’s perfect!
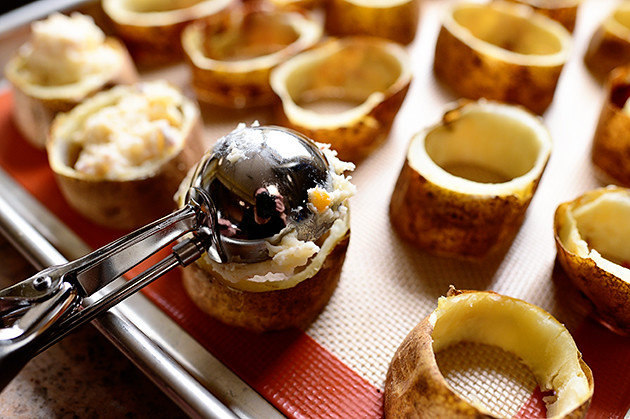
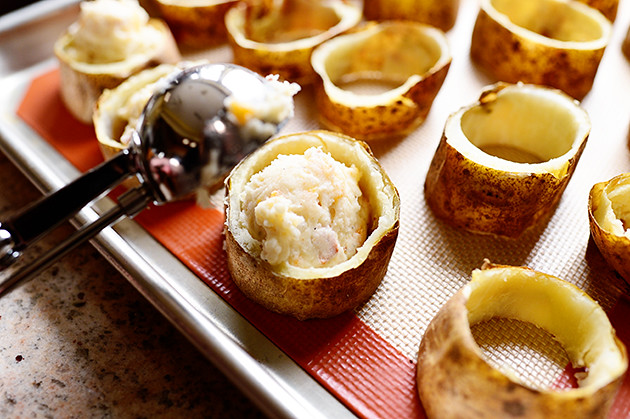
Now it’s time to fill the potato slices. Originally, I was going to use a piping bag, but decided a scoop would be easier.
As with the cutters, just find a scoop (or spoon!) that’s approximately the same size…
(You can see me there. Hi! *Waving*)
And fill the hole with potato filling.
And keep going until you’ve got them all filled. (You should have a little filling left over, which you can now eat as an appetizer.)
(You’re welcome.)
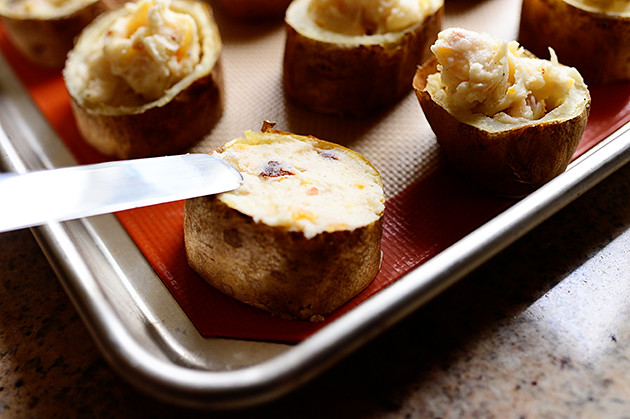
Next, use a spatula or knife to smooth out the surface.
*Note: I smoothed these out to be flush/even with the top of the peel, but I found out after baking them that it would actually have been better to overfill them a little. (They slightly sink after baking.) So mounding the filling is fine.
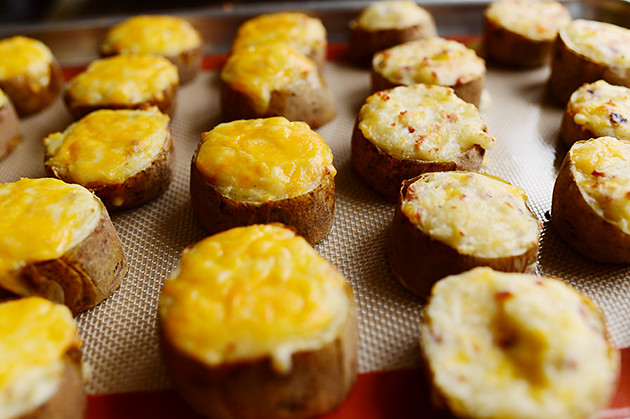
I wasn’t sure whether I’d prefer them plain or cheesy, so I did half with and half without.
Then I just baked them at 375 for about 8 minutes, then broiled them for about 4.
I stood watch while the broiler was on, because I didn’t want the cheese to burn—I just wanted it to go a little past that soft melted cheese stage and into the firmer melted cheese stage without going into the burned melted cheese stage.
GOSH DANG, I’M PICKY SOMETIMES!
Aren’t these fun? What I love about them is that they’re as perfect for a weeknight dinner as they would be for an elegant dinner party! And you can make them well in advance, keep them in the fridge, then just bake them off right before. Or even freeze them, unbaked!
The only tricky part is that if you try to remove them from the pan right away, the soft potato filling tends to stick/stay behind a little. So the remedy is to let them sit on the pan for a good 10 minutes before serving them. This actually is best anyway, because it gives the potatoes a chance to calm down and cool slightly.
A sprinkling of sliced green onions at the end is just what it needs to finish the job.
Hope you enjoy these, guys! They’re lots of fun…
And they have butter, sour cream, and cheese in them.
Preheat the oven to 375 degrees. Place the potatoes on a baking sheet and bake for 30 to 35 minutes, or until the potatoes are tender and the skins are slightly crisp.
On a cutting board, cut off the very end pieces of each potato, then slice the potato into 3 to 4 equal slices. Lay the slices flat and use a round cutter or a spoon to remove most of the insides. Leave a very thin rim of potato around the edge for structure. As you go, dump the insides into a mixing bowl with the butter and sour cream.
Add milk and mix the potato mixture together until smooth. Add bacon, salt, pepper, seasoned salt, and cheese, and mix together. Taste and make sure the mixture is seasoned adequately.
Use a scoop or spoon to fill the potato slices with the potato mixture. Slightly mound the mixture in the slices, as it will settle after baking. Top with additional cheese if desired, and bake at 375 for 8 minutes, or until the cheese is melted. Turn on the broiler and broil for 3 to 4 minutes, watching very carefully so you won't burn them.
Remove from oven and let sit on the baking sheet for at least 10 minutes before removing with a spatula and serving. (Note: Filling will be soft, so the longer they sit after baking, the easier they'll be to remove.)
Can make these well in advance and keep in the fridge or freezer, unbaked!
I baked this pie on a particularly snowy day. I'm happy to report that the snow didn't turn into a week-long storm, causing our (home's) pipes to freeze (again). It was just a really cold day. And I think baking this pie helped me channel some spring vibes.
Strawberry pie. Sounds like a summer treat, right?This yummy pie features a softly sweet strawberry filling and a flaky poppy seed crust. I love everything about this pie but especially the poppy seed crust. It's super versitile, like it would make a fantastic savory quiche crust too. Use it for good, not evil. That's all I ask.Strawberry & Poppy Seed Pie, makes one.
For the crusts: 2 cups flour 1/2 teaspoon salt 2 tablespoons poppy seeds 1 cup cold butter 1/4 cup + 1 tablespoon cold water
For the filling: 45 oz. fresh strawberries 1/2 cup milk 2 tablespoons corn starch 1 cup sugar 1/2 teaspoon vanilla extract
Stir together the flour, salt, and poppy seeds. Cut the cold butter into cubes and blend into the flour mixture until well combined and crumbly. You can use a pastry blender, your clean hands, or you can blend together in a food processor. Up to you. Once the mixture is crumbly, add the water and stir until a dough ball forms. Wrap in plastic wrap and place in the refrigerator for a couple hours or overnight.Divide the dough in half. Roll out one half of the dough to fit in a pie pan. Lightly spray the pan with non-stick cooking spray and place the crust in the pan. Use a fork to poke holes in the bottom.
In a small bowl stir together the milk, corn starch, sugar, and vanilla extract. Set aside.Wash the strawberries. Cut off all the tops. Then slice into thin pieces. Pour the sugar mixture over the strawberries and stir so that every piece gets coated in sugar. Pour the strawberries into the prepared pie crust.Preheat the oven to 375°F. Use the remaining pie dough to create a decorative top. You can add lattice or shapes. I chose to cover my pie in tiny triangles, because I just have tons of time on my hands. :)Bake for about one hour, until the top crusts look brown and flaky, and the filling mixture looks bubbly.
If you like the ooey gooey texture, serve this pie warm. If you want your pie filling to be set a little more (like mine), allow it to cool all the way before slicing into it.Either way you serve this, ice cream is a must. Non-negotiable. A la mode is where it's at. :) Enjoy! xo. Emma
I am a big fan of fruit and chocolate together. Like, a giant fan of it. If fruit and chocolate had a mom, I would be a bigger fan of them than their mom. However, I've changed my diet over the last year to avoid as much refined sugar and dairy as possible, so I've had to get a little creative when picking out my late-night sweet treats. At the moment, I am obsessed with this dairy-free and no-added-sugar banana chocolate shake. I've had it at least five times a week for the past month, and it doesn't look like I'll let up any time soon. Curious how to make one? Healthy Chocolate Banana Shake, serves one
1 frozen, ripe banana 1 1/2 tablespoons unsweetened cacao powder 1 tablespoon almond butter (crunchy or smooth) 1/3 cup unsweetened vanilla almond milk The sweetness in this shake is coming from the banana, so the riper your banana is, the sweeter your shake will be. To freeze your banana, peel the banana and cut it into inch-wide slices and put into a plastic freezer bag. (Cutting it into slices first will help the frozen banana blend easier.) Place the bag into the freezer for several hours until the banana slices are fully frozen. Add the frozen banana to the rest of the ingredients in a blender and blend until smooth. If your blender needs more liquid to handle the frozen banana, you can add more of the almond milk or a dash of water. This is seriously the kind of chocolate shake that would shock someone who doesn't know that it's healthy. I like to keep the same freezer bag for my frozen bananas and keep adding new slices when it gets low. Which is all the time. Because it's so good. Think you'll give it a try? xo. Laura
Credits// Author: Laura Gummerman, Photography: Laura Gummerman and Sarah Rhodes
The Don’t Be A Bear project was started as a 2013 illustrated resolution. Jared Rippy created a new bear each day of 2013 as a reminder to avoid the pitfalls of a bearish attitude. Love this!
It's blood orange season! Here's a simple, delicious recipe for citrus sangria. It's the perfect solution for a last-minute party or casual weekend get-together with friends! Blood Orange Sangria, serves six
1 cup blood orange juice (can be substituted with any citrus juice) 1 lemon (sliced) 1 blood orange (sliced) 3 mandarins or clementines (sliced) 1 bottle of champagne
In a pitcher combine the sliced fruit, juice and champagne. Serve chilled. Enjoy! My favorite thing about champagne punches is that you can pre-make everything for a party and just add the champagne when the guests arrive! Cheers! xo. Elsie
PS. I made this recipe (and a few others!) in collaboration with West Elm. They're going to become recipe cards you can pick up in the stores for free soon! Products featured: Bar Cart, Titanium Knives, Kitchen Towels.
Credits: Author: Elsie Larson, Photography: Janae Hardy and Elsie Larson
The second item in our list of things you never knew you needed is the "toilet snorkel," a device that, in the case of a fire, would allow the user to access (fresh?) air from the sewer.
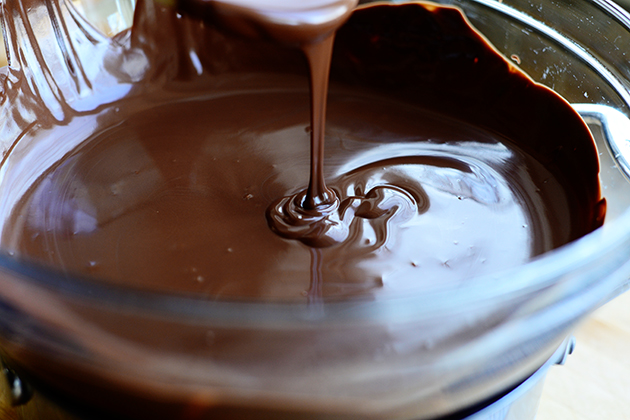
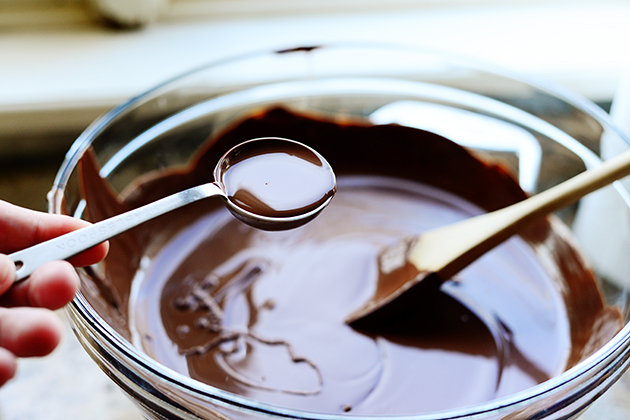
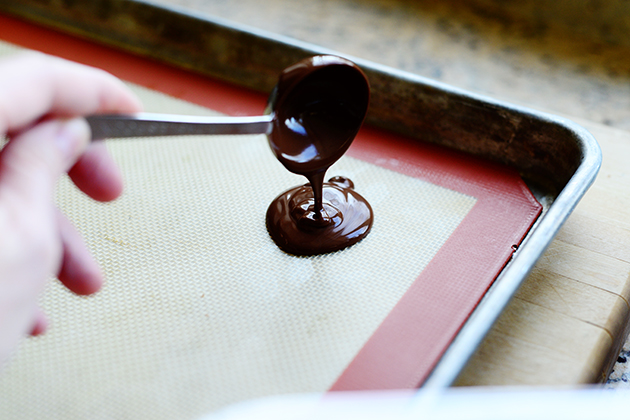
I am a sucker for all things chocolate in general, but chocolate pudding, custard, and pots de creme make me absolutely weak in the knees. So when I heard you can make pudding in a crock pot I had to give that a try. This chocolate custard is quite thick and decadent. I preferred this chilled overnight, and the whipped cream on top is a must! This recipe doesn't contain any additional sugar (other than what might already be in the chocolate), so you can feel free to add a big dollop of whipped cream--or even ice cream--before serving.Triple Chocolate (Crockpot) Custard, serves 4-6. Recipe adapted from Hot Crock Chocolate Pudding.
12 egg yolks (What to do with whites? Make angel food cake or pavlova!) 4 cups heavy cream 1/2 teaspoon salt 15-16 oz chocolate (I used a mix of white, milk, and dark chocolate) whipped cream for garnish
Place the egg yolks, cream, and salt in the crockpot. Whisk to combine well. Chop up the chocolate and throw that in the crockpot as well. Cook on high for thirty minutes.Use a heatproof spatula to stir up the mixture, and scrape down the sides of the bowl. Now cook on low for two hours, stirring and scraping down the sides every twenty minutes.
Once the custard has cooked it may be a little grainy. (Mine was.) Pass the custard through a fine mesh strainer, cover, and refrigerate overnight.I found that, for me, using the crockpot to make custard produced a slightly more coarse texture. It just wasn't quite as silky smooth as other custards/puddings you can make on the stove top. (Although this took up way less attention; I cooked other things while this just set in the crockpot.) And this custard was so delicious that I didn't end up minding the texture. But if you make this at home, leave us a comment and let us know what you think. Enjoy! xo. Emma
Chocolate glazed donuts are a big weakness for me. I just love them. I have pretty strong opinions about glaze to donut ratio, as well as the age old question: Sprinkles or no sprinkles? Having a preference, let alone a strong opinion about either of these just goes to show I eat too many donuts.
And it's almost Valentine's day. Holidays must be celebrated with donuts, right?And so these are heart shaped donuts. But that's not all! The chocolate glaze contains a special ingredient that adds just a touch of, dare I say it, romance. (I said it, I said it!)
You might be thinking, "Emma, I don't have time to make donuts. Most of your recipes seem to take hours once you allow time for the dough to rise. I'm busy! Even though I do love donuts and think you're a total genius to add wine to the chocolate glaze."
Man, you are so complimentary today. But also, since these are biscuit donuts, they take less than thirty minutes to make, start to finish. You're welcome.Chocolate + Red Wine Glaze, makes about 2 cups.
1/2 cup butter 1/4 cup red wine (any kind you like, so you can drink the rest ;) 2 tablespoon light corn syrup 3.5 oz. dark chocolate 2 cups powdered sugar
In a small pot melt together the butter and wine over low heat. Add in the corn syrup and chocolate. Stir as the chocolate melts so everything will blend together. Remove from heat and whisk in the powdered sugar, 1/2 cup at a time. And here's why these take no time at all to make: They are made from canned biscuits. Use cookie cutters to cut out your donut shapes (got mine in the dollar bins at Target!). Fill a dutch oven or heavy duty pot with 2-3 inches of oil (I used vegetable). Heat the oil to 350°F. I prefer to use a candy thermometer to monitor the oil. Fry the donuts for about 1 minute on each side. Remove to a bed of paper towels to soak up any excess oil. Once the donuts are cool enough to handle dip them in the glaze. Top with sprinkles. You can use any leftover chocolate glaze for dipping fruit (like strawberries or apple slices) or top ice cream for a red wine sundae. Yum! And if your'e in the mood for baked donuts instead of fried I thought these looked pretty good. Enjoy. xo. Emma
I don't throw around exclamation points willy-nilly, but Google's new Build with Chrome is so awesome it deserves one. Maybe even two! Okay,… Continue reading on Curbly.com
Eric is in love with this creamy cauliflower pasta dish. I mean, in love. In fact, he asked if we could make it together on Valentine’s Day. Who am I to deny a grown man cauliflower? Plus, creamy pasta and Valentine’s Day go hand and hand. Chocolate too, of course. I’d say it’s a win-win.
Traditional Alfredo sauce is mostly made up of butter, cheese, and often, cream. Decadent? You betcha. Hiding a super healthy vegetable? Not so much. I’m happy to say this cauli-power sauce brings us both decadence and nutrition. To be honest, I was super skeptical to try the blended-cauliflower-as-pasta-sauce trend and I wasn’t rushing to try it out. But after whipping up a version in my kitchen, I went crazy for this stuff. And by crazy, I mean standing over the pot of pasta and spooning it into my mouth uncontrollably. Yea that happened. It’s downright irresistible just like you’d hope a creamy pasta to be. Of course, soaked cashews can create a fine alfredo sauce too, but it’s great to have a change from nuts. All you have to do to make this sauce nut-free is swap the almond milk for a nut-free non-dairy milk of your choice. Fun, right?
This sauce makes a lot (3 cups!) which means you can happily drown the pasta with the sauce. No skimping here! It is cauliflower after all. I stirred the sauce into whole grain spelt ribbon pasta which was quite tasty. I gravitate toward meals that leave me feeling good and this certainly made the cut. Not bad for a decadent-tasting pasta, I say.
Cauli-power Fettuccine "Alfredo"
Vegan, soy-free, sugar-free
A decadent-tasting, but super light and energizing vegan alfredo pasta sauce made with a base of cooked cauliflower! You have to taste this to believe it. The nutritional yeast gives this sauce a lovely "cheesy" flavour while the blended cauliflower creates a luxurious (but light) creamy base. If you don't want to serve it over pasta, try serving it over your favourite roasted vegetables or stirred into cooked rice. Thanks to Pinch of Yum for inspiring this tasty recipe!
1/2 cup unsweetened and unflavoured almond milk (or non-dairy milk of choice)
1/4 cup nutritional yeast
1 tablespoon fresh lemon juice
1/2 teaspoon onion powder
1/4-1/2 teaspoon garlic powder
3/4 teaspoon fine grain sea salt, or to taste
1/4-1/2 teaspoon pepper, to taste
Fettuccine pasta of choice (I used one (8-oz) box of Eden Organic Spelt Ribbons)
Fresh parsley, for garnish
Directions:
Add cauliflower florets in a large pot and cover with water. Bring to a low boil. Once boiling, cook for another 3-7 minutes until fork tender. Drain.
Meanwhile, add the oil into a skillet and saute the minced garlic over low heat for 4-5 minutes until softened and fragrant, but not browned.
In a high speed blender, add the cooked and drained cauliflower, sauteed garlic, milk, nutritional yeast, lemon juice, onion powder, garlic powder, salt, and pepper. Blend until a super smooth sauce forms. If using a Vitamix use the tamper stick as needed. The key here is to get a really smooth sauce so don't be afraid to let it run for a minute or so. Set aside.
Bring a large pot of water to a boil. Add your desired amount of pasta and boil for the time instructed on the package. Drain pasta.
Add cauliflower sauce into the pot (you can use the same pot!) and add the drained pasta. Heat over low-medium until heated enough to your liking. Salt again to taste (the pasta dilutes the flavour).
Serve with fresh minced parsley and black pepper. Feel free to add in your favourite sauteed or roasted vegetables. I think peas, spinach, or broccoli would work very nicely! I added mushrooms, but I wasn't overly crazy about them in this dish.
Notes: 1) To make this pasta sauce extra decadent-tasting, add a tablespoon or two of vegan butter into the sauce. 2) To make this dish gluten-free, use gluten-free pasta. 3) To make this nut-free, use a nut-free non-dairy milk such as soy milk instead of almond milk. Be sure to use unsweetened and unflavoured milk.
When we were discussing ideas for new columns this year, I sat back and thought about what I felt was really missing from the web. I kept coming back to the idea of decorating, but I wanted to tackle something more practical and knowledge-based, rather than just inspiration. While trying to shape the column’s focus I was reminded of an important lesson I learned while writing Design*Sponge at Home: photographs should teach and not just describe. I was so used to listing and linking items in a home tour, rather than using it as a teaching moment (to explain how and why the things in a room worked), that I was missing a chance to really help readers (and myself) gain more design confidence and practical decorating skills. So it’s with that concept in mind- empowering readers with practical design lessons and tips- that I’m launching this new series. Learning From A Room will examine one single room from the perspective of the decorator (whether that’s a home owner or interior designer) and break down the design skills, tips and principles being used so you can learn from them and try them in your own home. I hope this column will help break down the some of the walls between inspiration and creative realization. Here’s to tackling our design challenges head on in 2014!
Today we’re starting with my favorite interior designer, Portland, Oregon’s Jessica Helgerson. This dining room is part of a full Brooklyn home tour you can see right here. All photographs are courtesy of Andrew Cammarano – xo, grace
Click through for the full interview, decorating tips and Jessica’s go-to white paint!
I don't know about you. But with all the holiday treats and comfort foods happening throughout this month, I think finding a few super healthy (but still delicious) meal ideas can really help me feel better. Man cannot live on candy canes and peppermint marshmallows alone. This is one of my current favorite easy, healthy dinners. I am a brussels sprout freak. I love them! And if you want to make this even more substantial, feel free to add some baked tofu or cooked shrimp. Quinoa & Brussels Sprout Salad, serves 2-3 as a meal.
1 lb. brussels sprouts 2/3 cup uncooked quinoa (I used regular and red quinoa) 2/3 cup water 2/3 cup vegetable broth 1 lemon 5 tablespoons olive oil 1/2 tablespoon balsamic vinegar 1/3 cup chopped nuts (I used almonds but any nut you like is great) salt + pepper
Rinse and cut the brussels sprouts in half. Coat them with 3 tablespoons olive oil and bake at 400°F for 30 minutes.In a medium sized pot combine the quinoa, water and vegetable stock. You can use all water if you don't have vegetable stock on hand. It just adds flavor. Bring the mixture to a low boil, then reduce the heat to a simmer. Cover and cook until all the liquid has absorbed, about 12-15 minutes.For the dressing combine the lemon juice (about 1/4 cup from one large lemon), 2 tablespoons olive oil and 1/2 tablespoon balsamic vinegar. Once the brussels and quinoa are ready combine in a large bowl, add the almonds and pour over the dressing. Toss so everything gets coated well. Season with a little salt + pepper.I like this salad served pipping hot, but it could easily be served cold as well. Either way. Live your life. xo. Emma
Credits // Author and Photography by: Emma Chapman
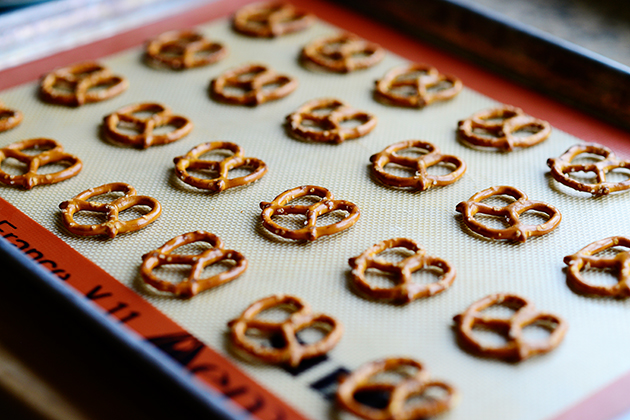
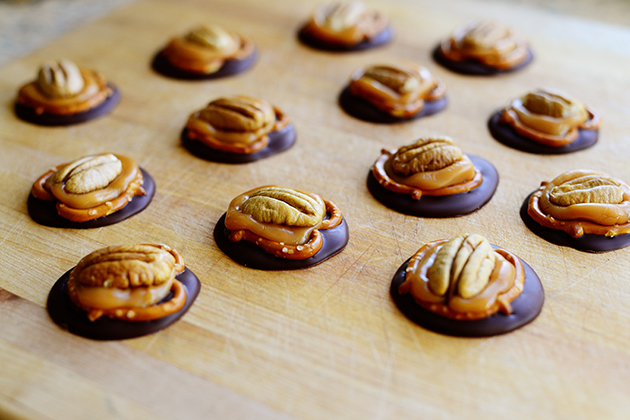
First of all, in case you didn’t know, mini pretzels are sweeping the nation. No, really—they are! All you need to do is Google “Pretzel Treats” and you’ll find quadrillions of recipes for various goodies using miniature pretzels (either square or twists) as a base. Pretzel treats are a really perfect for Christmastime because you can use different colors of sprinkles and candies to decorate them, and they’re easy treat to make with young kids. And the center of all of it is a good ol’ salty pretzel, which always makes anything sweet taste a little bit better.
A couple of days ago, I made a quick batch of turtles using mini pretzels. My good friend Jaden has a version on her website using—wait for it—Rolo candies. (See the recipe here. Fabulous!) But since I didn’t have any Rolos on standby, I just took the old school route and used caramels and melting chocolates.
These would be perfect on a tiered cake stand as part of a holiday buffet…or just wrapped in little cellophane bags and given to friends at Christmas.
Or Valentine’s Day.
Or June 11.
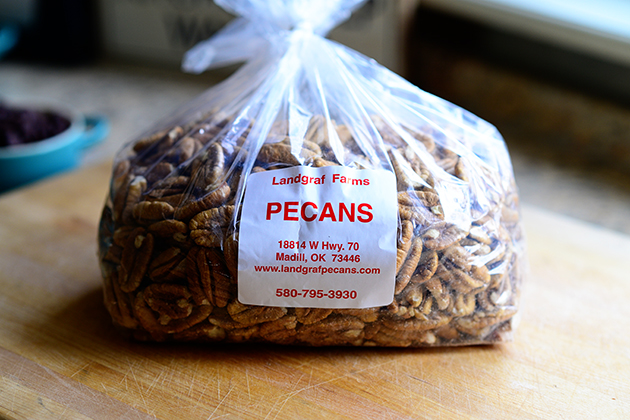
All you need are mini pretzels, caramels, pecans (not shown here because I’m a 44-year-old airhead) and some kind of chocolate. I used a mix I’ll tell you about in a minute, but if you have a good candy store nearby, a good milk chocolate would be perfect.
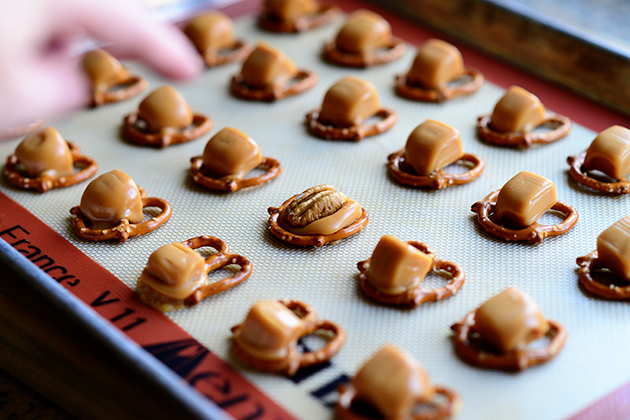
Preheat the oven to 325 degrees and lay mini pretzels all over a baking sheet lined with either parchment paper or a baking mat like this.
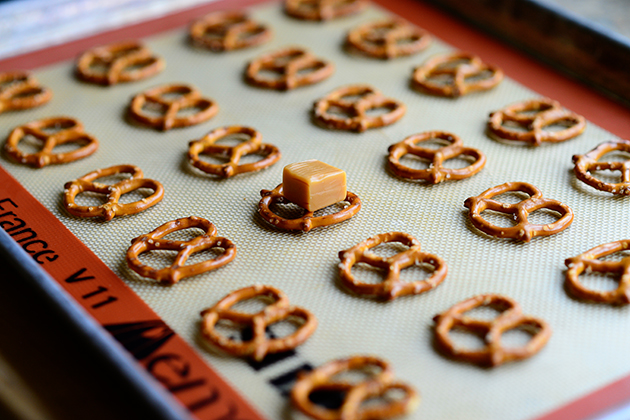
Unwrap the caramels, and one by one, set them on the pretzels…
Until they’re all covered!
Now just pop the pan in the oven for about 4 to 5 minutes or so…
Until the caramels have softened but haven’t started melting all over the universe yet. Keep your eye on them!
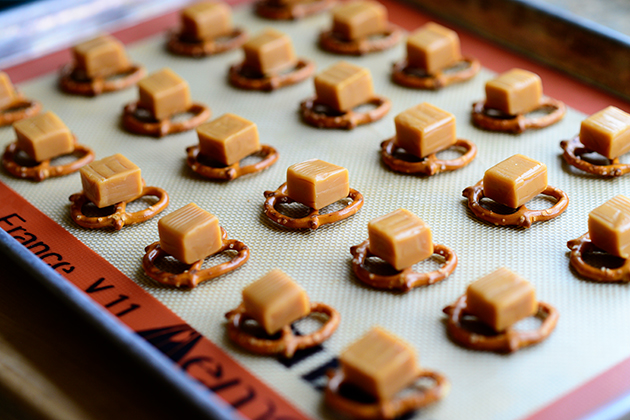
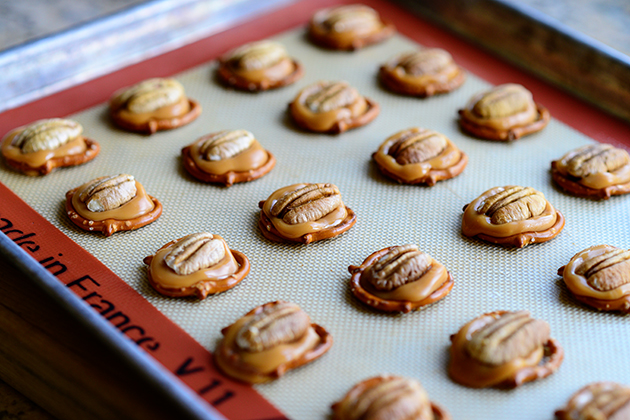
Now grab some pecan halves. I just got these as a gift, which is one of the things I love about Christmastime. Pecans, pecans, pecans!
Just grab a pecan half and carefully press it onto one of the caramels. Press lightly; you just want the pecan to be secured and the caramel to perfectly fit within the pretzel.
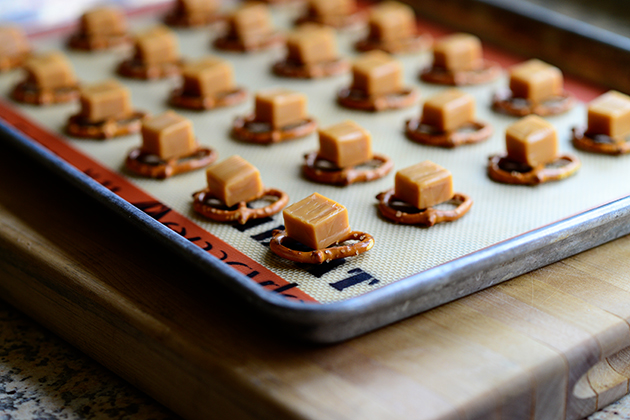
Then just keep on going until they’re all done! Now you just need to let them cool completely, so set them aside…
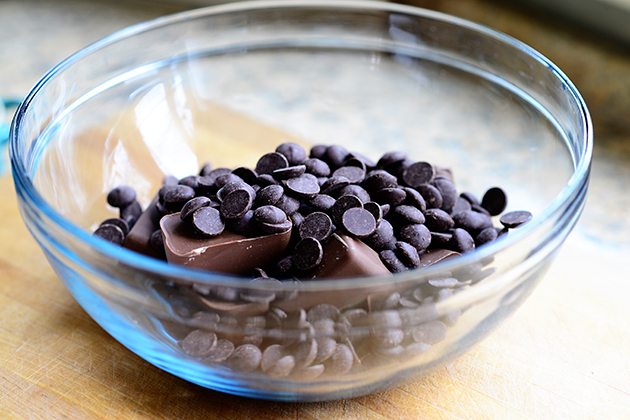
And start melting the chocolate as they cool! I didn’t have any good milk chocolate for melting, so I wound up grabbing some chocolate almond bark…
Then grabbing some good bittersweet chocolate I had on hand…
And mixing that in. I did this because even though chocolate almond bark is great for melting, the flavor doesn’t really scream “Chocolate.” And that’s probably because it isn’t really chocolate. It’s almond bark. Long story.
So basically, I used the almond bark for “filler” and spiked it with a sharper, good-quality chocolate. But this was sort of a wing-it type of thing; once again, just a good quality milk chocolate would be perfection.
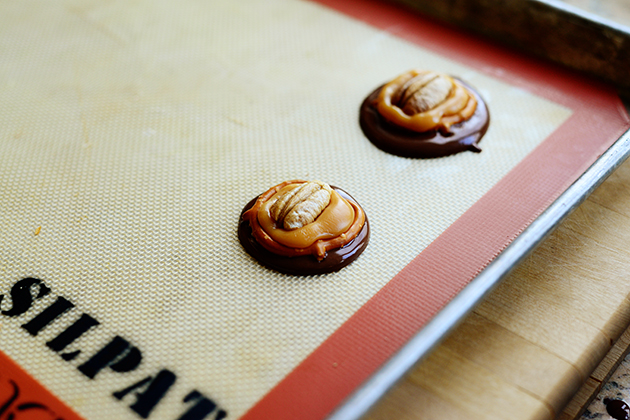
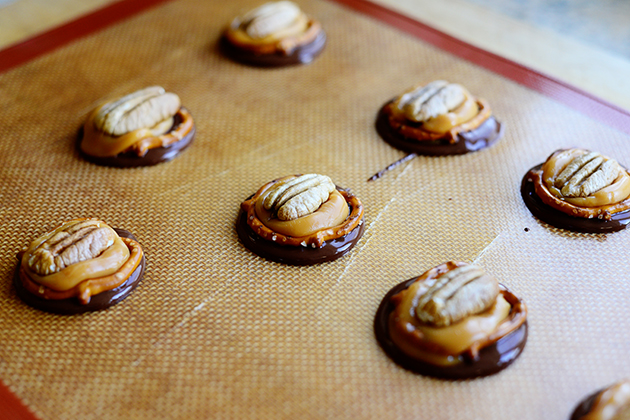
So once the pretzel/caramel/pecan thingies are cool, remove them from the tray.
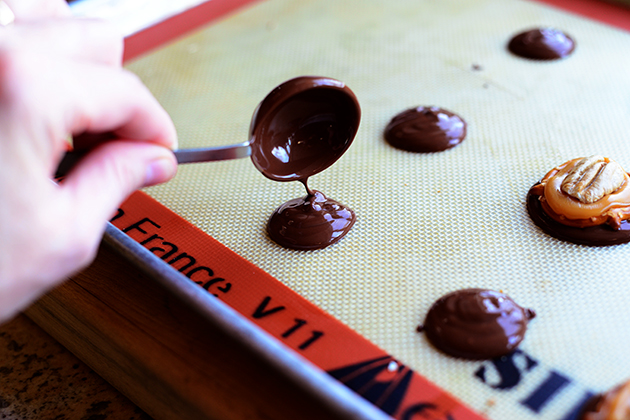
Then grab a tablespoon of the melted chocolate…
And pour half of it on the tray.
Then just drop one of the pretzels right on top!
That first one was a little bit, because I used closer to a tablespoons…but the second one, at half a tablespoon, was just right.
So just keep going, drizzling several rounds of chocolate at once…
And carefully dropping on the pretzels. They’ll sink naturally into the chocolate, so no need to really press them in. Just make sure they stay centered on the chocolate as they settle.
Then you just need to let them set! You can do this at room temperature, but expect it to take quite awhile. Or, you can hasten it along by putting the turtles in the fridge for 30 minutes or so; just keep in mind that the caramel will be really firm—too firm to chew—when you first pull it out of the fridge.
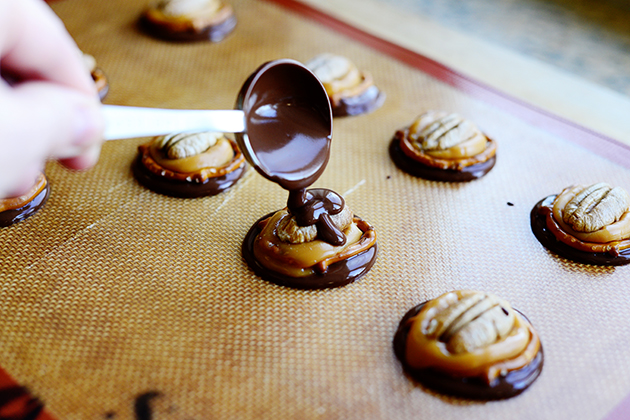
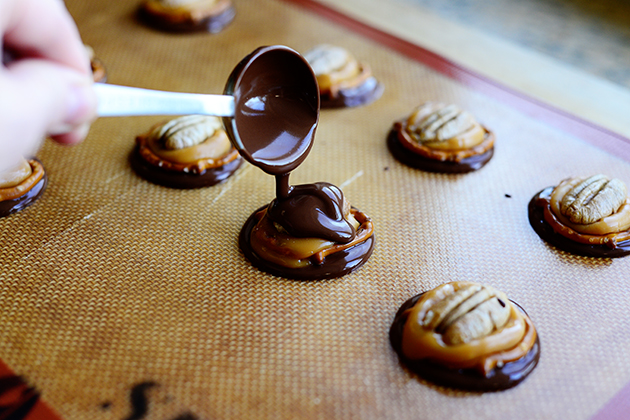
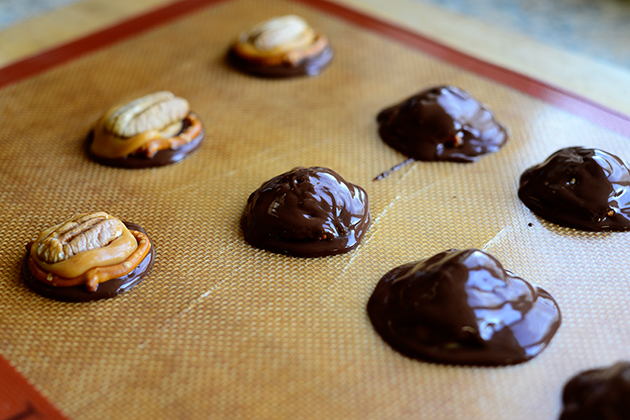
Now, I did a few of them on a separate baking mat so I could have a little extra fun.
I drizzled more chocolate…
All over the top…
Until it was all coated.
Then I repeated with the rest of them…
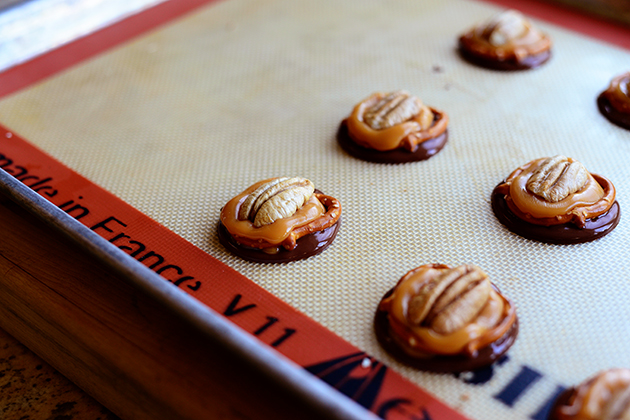
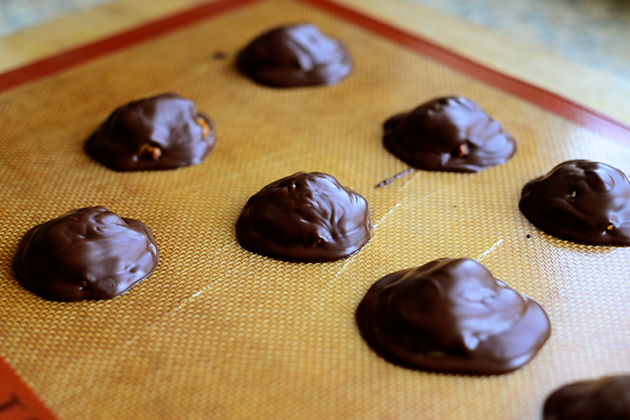
And popped ‘em into the fridge to cool! This is just a more substantial version of the other ones and keeps the pretzel and caramel “enclosed” in chocolate. It’s also more in line with the original turtle-style candy!
Either option is just lovely. The only thing I’d change (and I added this in the printable below) is to toast the pecan halves and let them cool before making the candies. I think that would bump up the flavor even more. And as I’ve said approximately four million times already in this post, good milk chocolate is the way to go.
8 ounces, weight Good Quality Milk Chocolate, Melted
24 whole Pecan Halves
Preparation Instructions
Preheat oven to 325 degrees.
Place the pecan halves in a single layer on a baking sheet and put in the oven for 5 to 6 minutes, shaking the pan once halfway through, until they're lightly toasted. Remove them after they're toasted and put them on a plate to cool.
Line the baking sheet with parchment paper or a silicone baking mat. Arrange the pretzels neatly on the pan, then top each pretzel with an unwrapped caramel. Place the pan into the oven for 4 to 5 minutes, or until the caramels are softened (but definitely not melting.) Remove the pan from the oven.
Gently press a pecan half onto each caramel, just enough for the caramel to fill the pretzel. Set them aside to cool completely.
Meanwhile, melt the chocolate. When the pretzel/caramels are cooled, remove them from the baking sheet. Spoon small dollops (1 1/2 teaspoon helpings) of chocolate all over the baking mat, then lightly drop each pretzel onto the middle of each dollop, making sure they're centered.
Allow them to cool completely before serving (you can hasten this along in the fridge.)
Variation: Spoon a little melted chocolate all over the tops of the turtles to cover the whole thing in chocolate.
I really love the idea of block-style painting a piece of plexiglass and hanging it reverse like in the first photo. Splash of color without being heavy!
For years, I have been toiling over what to do with our living and dining room. I’ve gone to you all, my dear readers, in months gone by with my initial thoughts and asked for your opinions. I’ve badgered friends and cats with this subject over and over.
Because frankly, this room was boring. Clean? Yes. Minimalistic? Yes. But, B-O-R-I-N-G? Double yes.
And although I felt ready to pull the trigger, there were many objections for change:
1. Financially I can’t in good conscience spend money redoing something we just did 5 years ago.
2. If Biceps had his way, this room would have had center seating (black), gray walls and little else. He wanted to go for the art museum feeling.
3. I hate taping and caulking.
4. I hate cutting in trim.
5. I hate cleaning out brushes and roller.
6. I’m pregnant and flat out didn’t want to.
I decided to finally quit talking about changing the living room and the dining room and just get this thing done. Using many of these items above as inspiration, the trigger was pulled–while Biceps was at the station and couldn’t stop me. Heh heh.
I started by assessing the initial costs:
1. Paint $60
2. Blue Painters Tape, Painters Caulk, tray liners $25
3. Trim for picture frame molding $36
After buying my necessities, I rolled up my sleeves and got to work. First, I pulled everything into the center of the room and started taping and caulking like a son of a gun. (I will share the reason behind this process in detail this week).
I waited for Biceps to determine the size of the picture frame moldings. It was a long process, which enriched our marriage. (I will also show you in detail how to install your own picture frame molding this week).
While Biceps was back at the station, I opened my can of paint and panicked a little. Was it really that blue? After a short stint of talking myself off the ledge, I grabbed my favorite Purdy brush and got to work cutting in the trim.
And didn’t stop for 2 days. The living and dining room is now a lovely shade of “exotic sea” blue, which Biceps and I both love (thankfully).
Don’t worry, I will show you the finished product after hanging all my lovely art work. That is another process that is enriching our marriage.


")
")
")
")


