Buñuelos are a traditional Colombian Christmas treat, but they are also popular year round for breakfast with hot chocolate or coffee. On December 7th in Colombia, friends get together to celebrate “el dia e las velitas”, a Christmas tradition in honor of the Virgin Mary. They light candles in front of their houses or on […]
The post Buñuelos Colombianos (Colombian Buñuelos) first appeared on My Colombian Recipes.Ilumeen
Shared posts
06 Sep 12:29
Piña Colada Shortcakes
by Jonathan
 I know we just got through Labor Day and that technically marks the final days of summer, but if you’re in Southern California it feels like summer is just getting started with this heatwave of never-ending proportions. Can it just cool down already, please? At the same time though, I’m already seeing Halloween decorations and pumpkin recipes everywhere I turn and I’m like, “Labor Day was literally three days ago, can we get a little breather before we start thinking spooky time?” I’m a fickle individual, what can I say? If you’re in other parts of the country and you’re experiencing the opposite effects of what I just described, and you just want to hang on to those last fleeting moments of the sunny season, then this dessert is for you. It’s like if the classic strawberry shortcake went on a much needed tropical vacation to the Bahamas and decided to get a makeover; one that Rupert Holmes himself would approve of. If you get that really bad, really cheesy reference, then we can still be friends. It’s classic piña colada cocktail meets quintessential strawberry shortcake (minus the strawberry) with pineapple and coconut and rum instead and I don’t think any of us will mind too much. Grown ups deserve to have fun with dessert as well and I think that if we can just hang on to summer a little bit longer before we dive straight into pumpkin spice mania, then we’re doing our small part for society.
 Let’s start by making the biscuits for our shortcakes. They’re just like regular sweet biscuits for shortcakes but with a coconut twist. So in a large bowl, whisk together the flour, sugar, baking powder, and salt until well combined.
 Add in the cold cubed butter and work into the dry ingredients with either your hands, a pastry blender or a potato masher until the mixture resembles coarse crumbs.
**Note: You don’t want to over-work the butter or else you’ll warm it up too much and the biscuits won’t rise properly. Try to work as fast as possible. You also want some large chunks of butter throughout.**
 Stir in the heavy cream and mix just until the dough comes together to form a scraggly dough. Try not to over mix it at this stage because again, we don’t want to warm up the butter in the dough too much. It’s a hard balance.
 Dump the dough out onto a floured work surface and knead a few times just to bring the dough together. Roll it out to 3/4 of an inch thick and then cut out into eight 3-inch round biscuits.
**Note: If you need to you can cut out however many you can get through the one roll and then form together again and reroll. Just know that the second round of biscuits won’t get as high. You don’t want to roll it out more than the second time.**
 Brush the biscuits with an egg wash and sprinkle with unsweetened shredded coconut. Bake in a preheated 400 degree F until golden brown and puffed up, about 15 to 20 minutes.
 While the biscuits bake, let’s focus on the pineapple filling. This step in marinating the pineapple is similar to macerating the strawberries in a classic strawberry shortcake. In a medium bowl, toss together fresh pineapple chunks, sugar, coconut extract, dark rum, a pinch of salt, fresh lime zest and lime juice.
**Note: You can omit the rum if you’d like and use a teaspoon of vanilla extract instead, but this is a piña colada shortcake after all so its kind of essential.**
 You want the pineapple to marinate for at least 30 minutes, covered in the fridge, but you can make it a day in advance if you want to prep ahead of time. Basically, the longer it sits the better flavor it will have.


Another component that is crucial to shortcakes is the whipped cream. You can’t have this dessert without fresh whipped cream. Beat heavy whipping cream on high with a splash of rum, vanilla and cream of coconut until soft and fluffy.
**Note: Cream of coconut is that stuff you can find in the alcohol mixer section of the grocery store. It’s mostly sugar, which is why I don’t add any sugar to the whipped cream. It’s a mandatory ingredient in piña coladas so that’s why I’m adding it here.**
 To assemble the shortcakes, split the cooled biscuits in half, add a dollop of the coconut whipped cream to the bottom half of each and then top with those marinaded pineapple pieces and a maraschino cherry. You can’t have a tropical cocktail dessert without a bright sugary cherry.


These are best eaten right away after you’ve assembled them, but if you want to plan things ahead, you can make each component earlier on and keep it separately covered in the fridge (except the biscuits, those can be at room temperature), and then just assemble the shortcakes right before you plan on serving them!

Piña Colada Shortcakes

Prep time
Cook time
Total time
Piña Colada Shortcakes are a tropical twist on the classic strawberry shortcake. Coconut biscuits filled with rum soaked pineapple pieces and sweet cream!
Author: The Candid Appetite
Serves: 8 servings
Ingredients
Shortcakes:
- 2 cups all-purpose flour, plus more for surface
- ¼ cup sugar
- 1 tablespoon baking powder
- ½ teaspoon salt
- ½ cup (1 stick) chilled unsalted butter, cubed
- 1 cup heavy cream
- 1 large egg, beaten
- ¼ cup unsweetened shredded coconut
Filling:
- 2 cups diced fresh pineapple
- 2 tablespoons granulated sugar
- 2 tablespoons dark rum
- ½ teaspoon coconut extract
- 1 teaspoon grated lime zest
- 1 tablespoon fresh lime juice
- pinch of salt
- ¼ cup drained maraschino cherries
Whipped Cream:
- 1 cup heavy cream
- 2 tablespoons cream of coconut (cocktail mixer)
- 1 teaspoon dark rum
- 1 teaspoon vanilla extract
Instructions
- Preheat oven to 400 degrees F. Line a baking sheet with parchment paper, set aside.
- In a large bowl, combine the flour, sugar, baking powder, and salt. Cut in the butter until it resembles coarse crumbs. You want some large chunks of butter throughout it. Stir in the heavy cream until the dough just comes together. Dump out onto a floured work surface and knead a few times. Roll out to about ¾ of an inch thick and cut into eight 3-inch rounds. Place on the prepared baking sheet and brush with egg and top with the coconut. Bake until lightly golden brown and puffed up, about 15 to 20 minutes. Remove from oven and let cool completely.
- In a medium bowl, toss together the diced pineapple, sugar, rum, coconut extract, lime zest, lime juice, and salt until evenly combined. Cover and let chill in fridge for at least 30 minutes.
- To make the whipped cream, beat the heavy cream on high with the cream of coconut, rum and vanilla extract until thick and fluffy, about 5 to 8 minutes.
- To assemble the shortcakes, split the biscuits in half, spoon the coconut whipped cream onto the bottom of each and top with pineapple chunks (with a bit of the marinating liquid) and top with a cherry and replace with the top of the biscuit. Serve immediately. Enjoy!
Notes
You can put together the pineapple filling a day in advance and bake the biscuits ahead of time, then just assemble everything right before serving!
3.5.3228
The post Piña Colada Shortcakes appeared first on The Candid Appetite.
04 Feb 19:58
Spotted: NEW Wet n Wild Walmart-Exclusive Contour Sticks and Eyeshadow Palettes (with Reader Swatches)
by G.
Read more...
[This is a preview of this blog post. To read the full post, please visit my blog by clicking the title above. Thank you!]


[This is a preview of this blog post. To read the full post, please visit my blog by clicking the title above. Thank you!]
16 Nov 22:31
Filed under: Uncategorized Tagged: Cats, Derpy

Can We….HELP You?
by Brinke
 “Just poked my head out to look at the weather, and jumped when I saw this guy starting back at me!” -Shelley H.
Filed under: Uncategorized Tagged: Cats, Derpy
24 Apr 12:09
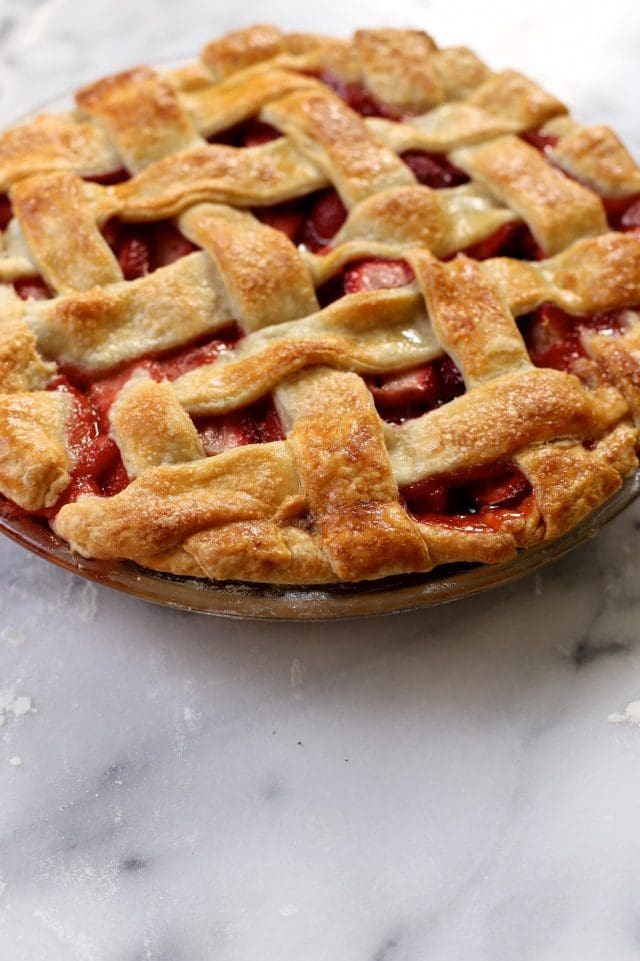
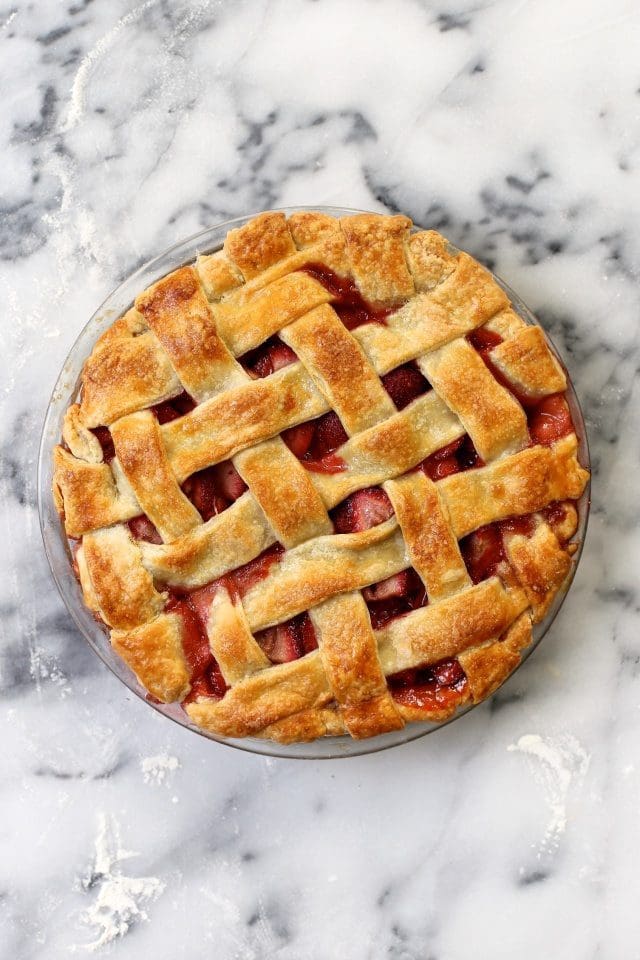
Strawberry Lattice Pie
by joythebaker
It’s Summer Pie Practice Season. Isn’t that what you call Spring?
Beautiful strawberries are starting to hit the markets, and they’re a bit early for super sweetness, but not too early to start experimenting with pies and practicing our lattice technique!
I hope this coming weekend finds you in the kitchen baking away. Maybe throw some blueberries in this pie, or a handful of raspberries. It’s the perfect time to get our Summer frame of mind right. Also, doesn’t everyone want a pie in their house come Sunday night?
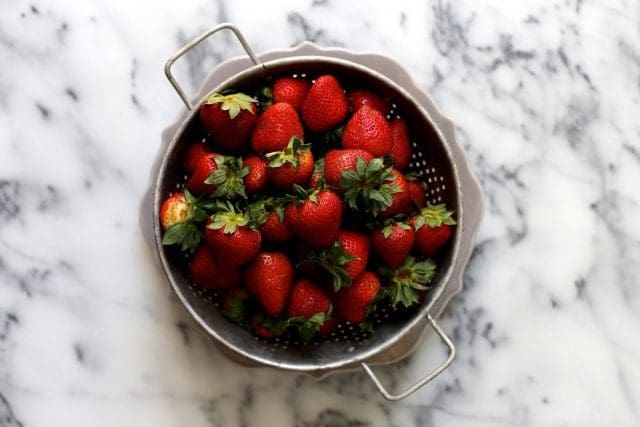
These strawberries are big, beautiful, and not quite sweet enough for pie. Not to worry… nothing a little brown sugar can’t fix right up.
For more in pie adventures, see: Gluten-Free Strawberry Ginger Pie or Peach and Blueberry Pie… though it’s a little soon for peaches. I suppose we just need to be more patient before we get all Summer-pie-happy.
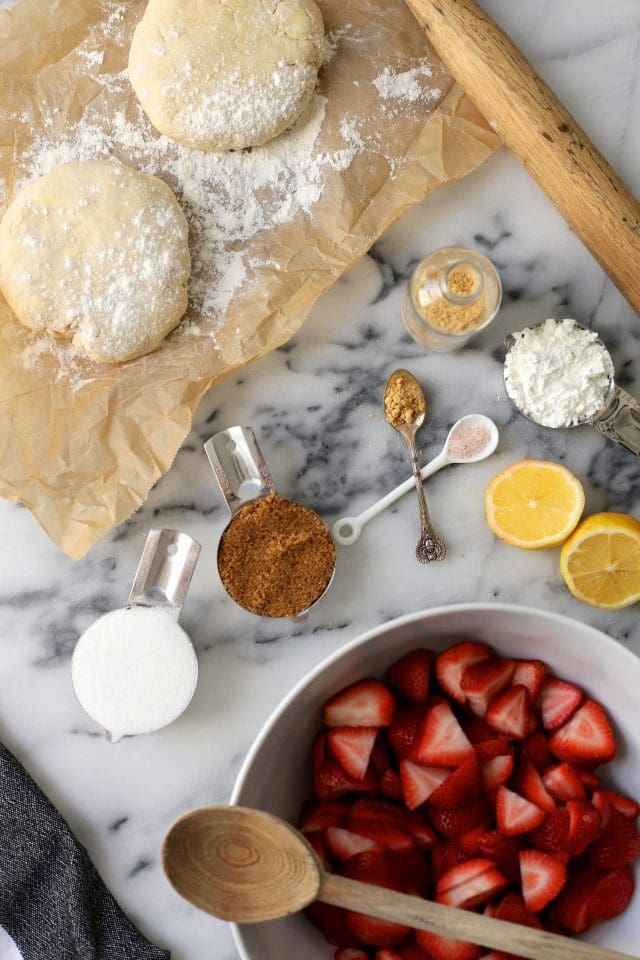
Here’s the good news: strawberry pie is super simple to make. Sliced strawberries, sugars, cornstarch for thickening, a hint of ground ginger for balance, and lemon to bring out all the flavors!
Pie crust… well you know how I feel about pie crust. Make it! You’re a baking champion.
Just in case: Five Tips For The Best All-Butter Pie Crust From Scratch
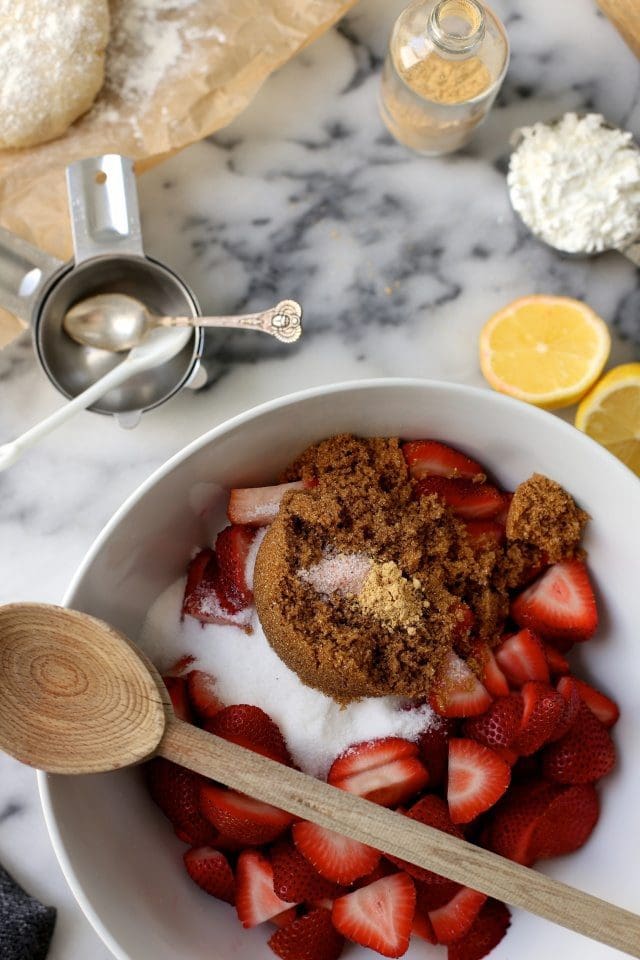
All in the bowl. No time to be shy!
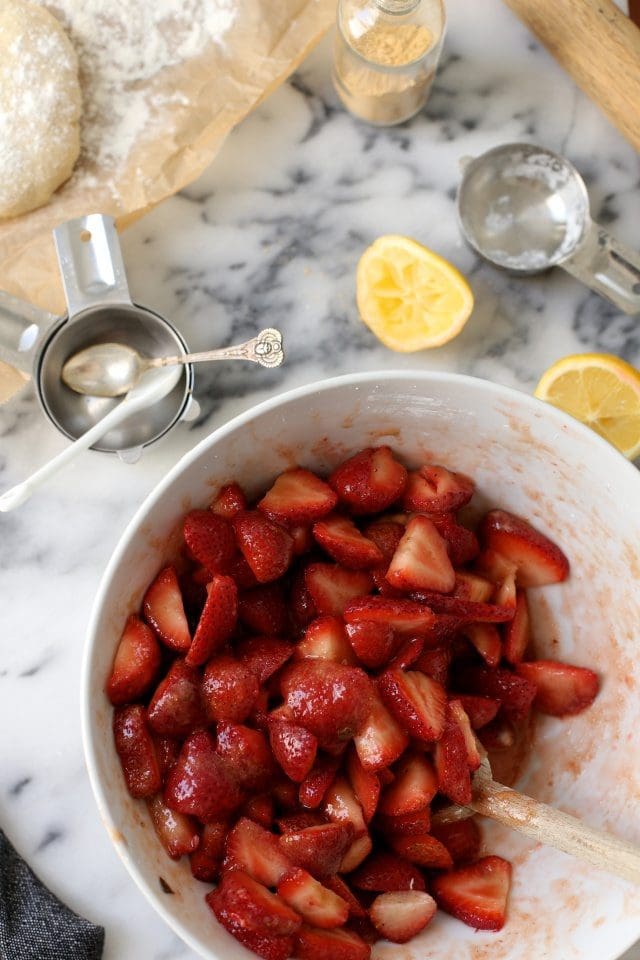
Toss the strawberries, sugars, and cornstarch until all of the cornstarch has absorbed and disappeared.
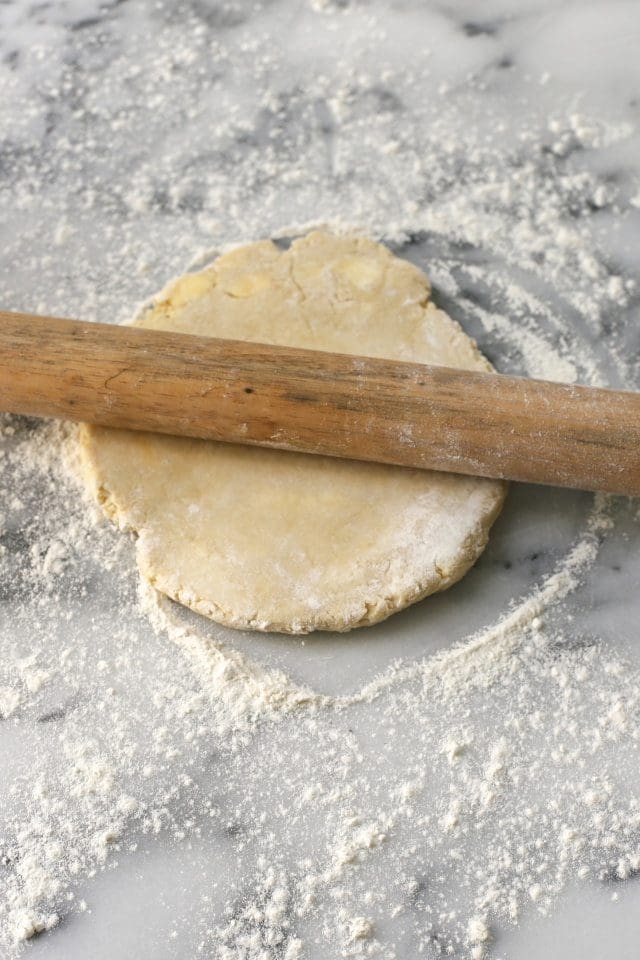
And it’s time to roll out the chilled dough! You’ll need a good amount of flour, some courage, and a great big rolling pin.
This beautiful wooden rolling pin is from Food52. It’s simple and sturdy and really just perfect.
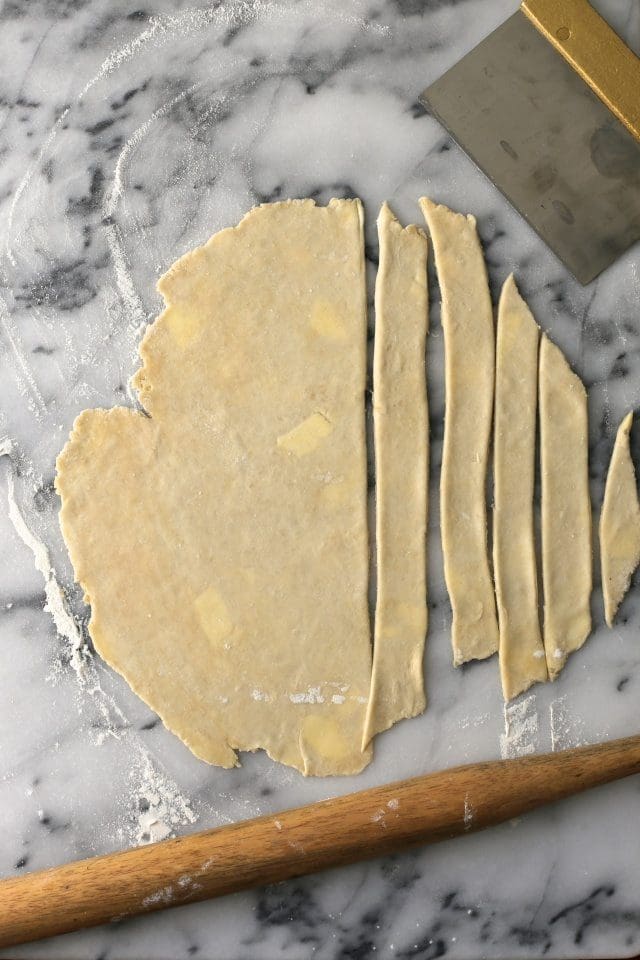
Lattice work. 1-inch strips to weave across the top of the pie. It’s like pie magic. No biggie.
See all those butter chunks!? That’s no accident. That’s going to create the most flavorful and flakey crust!
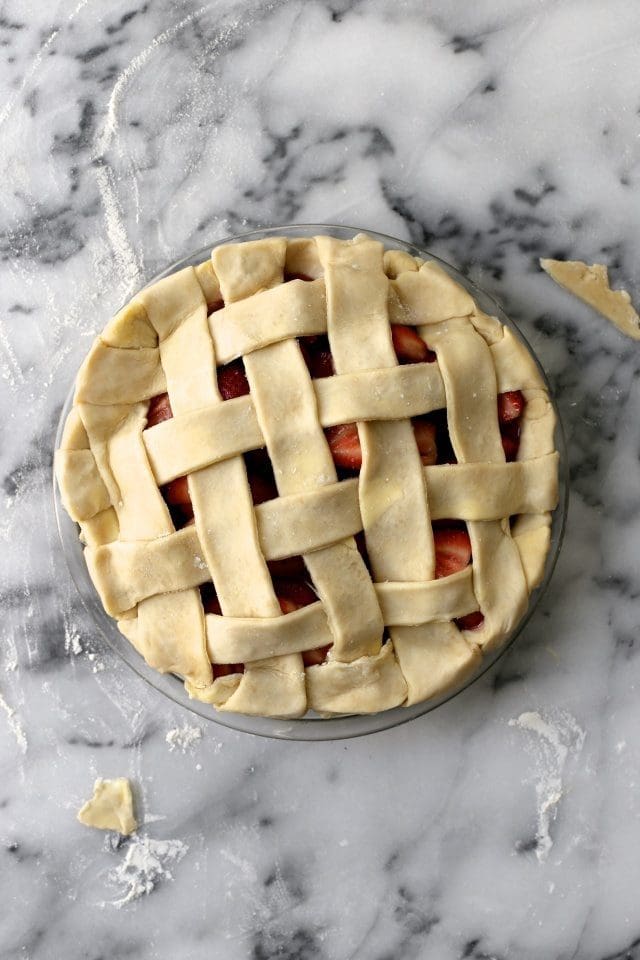
How to make a lattice pie crust. Step one: hold your breath. Step two: cross your fingers. Step three: close your eyes tightly. Step four: hope for the best.
That’s how I bake. You too?
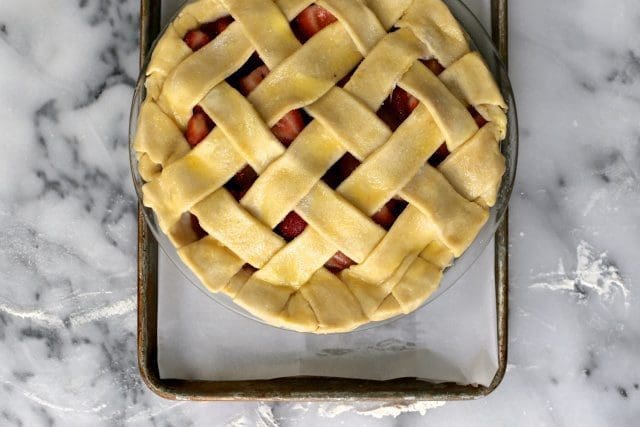
Before baking the pie is brushed lightly with egg wash and sprinkled generously with sugar.
Put the pie on a pan.
Do NOT put the pie on any pan. Just… definitely put the pie on a rimmed baking sheet. That’ll catch all of the drips.
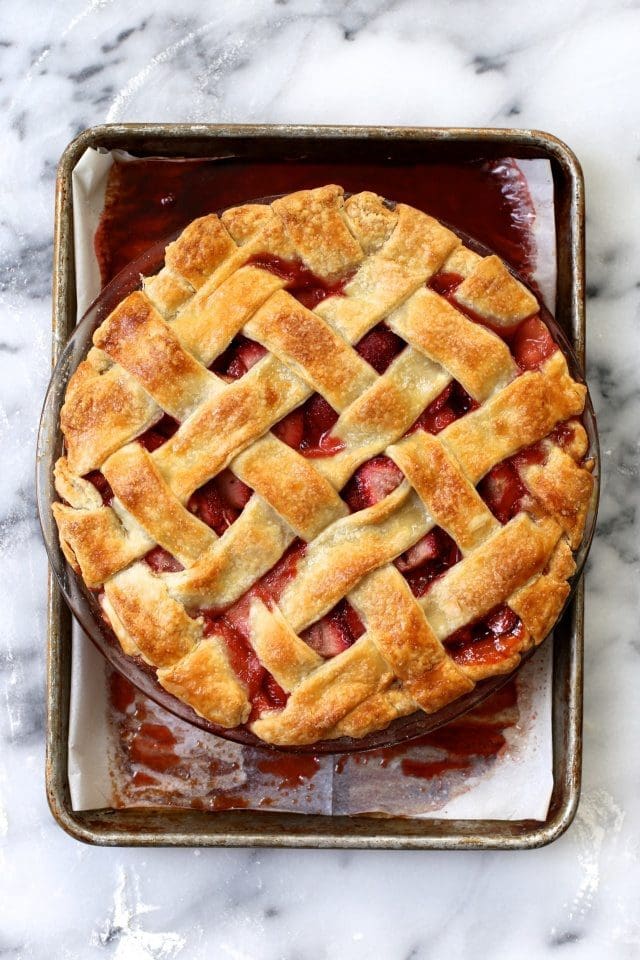
Because this pie is for-real juicy. All over the place juicy. Delicious and perfect… and juicy.
After it’s baked and golden brown, I let the pie rest for a few hours at room temperature before slicing into it. The juices need to settle down, decide where they want to be, and thicken.
If you’re wondering what a slice looks like… well, a delicious mess, that’s what. This pie is packed full of lightly spiced strawberries, juicy beyond compare, and a very nice entrance to the warm days ahead.
Strawberry Lattice Pie
2015-04-23 13:36:56
Prep Time
45 min
Cook Time
45 min
Prep Time
45 min
Cook Time
45 min
For the Crust
- 2 1/2 cup all-purpose flour
- 2 tablespoons sugar
- 3/4 teaspoon salt
- 1 cup (2 sticks) unsalted butter, cold, cut into cubes
- 1/2 cup cold buttermilk
For the Strawberry Filling
- 5-6 cups fresh strawberries, hulled and sliced in half
- 1/2 cup granulated sugar
- 1/3 cup lightly packed brown sugar
- 1/4 cup cornstarch
- large pinch of salt
- 2 tablespoons fresh lemon juice
- heaping 1/4 teaspoon ground ginger
- 1 large egg, beaten and granulated sugar for topping the unbaked pie
Instructions
- To make the crust, in a medium bowl, whisk together flour, sugar and salt. Add cold, cubed butter and, using your fingers, work the butter into the flour mixture. Quickly break the butter down into the flour mixture. Some butter pieces will be the size of oat flakes; some will be the size of peas. Create a well in the mixture and pour in the cold buttermilk. Use a fork to bring the dough together. Try to moisten all of the flour bits. On a lightly floured work surface, dump out the dough mixture. It will be moist and shaggy. That’s perfect. Divide the dough in two and gently knead into two disks. Wrap each disk in plastic wrap and refrigerate for 1 hour. Allowing the dough to rest in the refrigerator will help rechill the butter and distribute the moisture.
- To make the filling, in a medium bowl toss together strawberries, sugars, cornstarch, salt, lemon juice and ground ginger. Toss until all of the cornstarch has disappeared into the strawberries and let rest for 10 minutes. The strawberries will begin to produce juice.
- To assemble the pie, on a well-floured surface, roll the bottom crust 1/8″ thick and about 12″ in diameter. Transfer it to a pie pan. Trim the edge almost even with the edge of the pan.
- Spoon filling into piecrust.
- Roll out the top crust in the same manner. Use a pizza slicer to slice the dough into 1-inch wide strips and weave the crust strips on top of the pie. Use this guide to help you: http://www.thekitchn.com/how-to-make-a-lattice-pie-crust-cooking-lessons-from-the-kitchn-191672
- To finish, place a rack in the center of the oven and preheat oven to 400 degrees F. Line a baking sheet with parchment paper and set aside.
- Brush the egg wash over pie crust, then sprinkle with sugar.
- Place pie on baking sheet and bake for 15 minutes, then reduce the temperature to 350°F and bake the pie for 30 minutes more, or until the crust is golden and the cherry filling is bubbling. Remove from the oven and allow to cool completely before serving.
By Joy the Baker
Joy the Baker http://joythebaker.com/
You Might Also Like:


Vgreco51 likes this
27 Feb 19:47

First thang's first - this pie is amazing. The crust is so far beyond delicious that a word hasn't even been invented yet to describe how good it tastes. UH-MAZING.


No Bake Key Lime Pie with Ritz Crust!
by Sarah Coates
First thang's first - this pie is amazing. The crust is so far beyond delicious that a word hasn't even been invented yet to describe how good it tastes. UH-MAZING.
29 Dec 18:17
Filed under: Uncategorized Tagged: Pocket Pets

Hmm, Interesting!
by Not That Mike The Other Mike
Well, I never. Really? You don’t say. That is absolutely fascinating. I did not know that. My, the things they can do these days. My, oh my. Don’t that beat all? This is most interesting, do go on.

Posted to Imgur by Yhetti.
Filed under: Uncategorized Tagged: Pocket Pets
01 Nov 16:30


Supernatural’s Jensen Ackles Unwittingly Becomes Halloween Costume Gold
by Geek Girl Diva

I’m pretty sure we have a winner for best Jensen Ackles costume in the form of this Boo! Bloody Brain Wig. It was found in the wild by Tumblr user shelikesikea-comet.
I’m sure it’s all totally legit.
(via Buzzfeed)
26 Aug 05:22
Filed under: Uncategorized Tagged: Kittens

A Little More Nuts Than Usual
by Not That Mike The Other Mike
IMPORTANT: Trader Schmoe’s has announced a recall of its current batch of almond cookies due to a tendency for the cookies to become hostile. Any attempt to eat these cookies may result in injury, possibly laughter-related.

“These almond cookies are very aggressive,” notes Redditor ateraxiaa.
Filed under: Uncategorized Tagged: Kittens
Ilumeen likes this
12 Feb 18:20

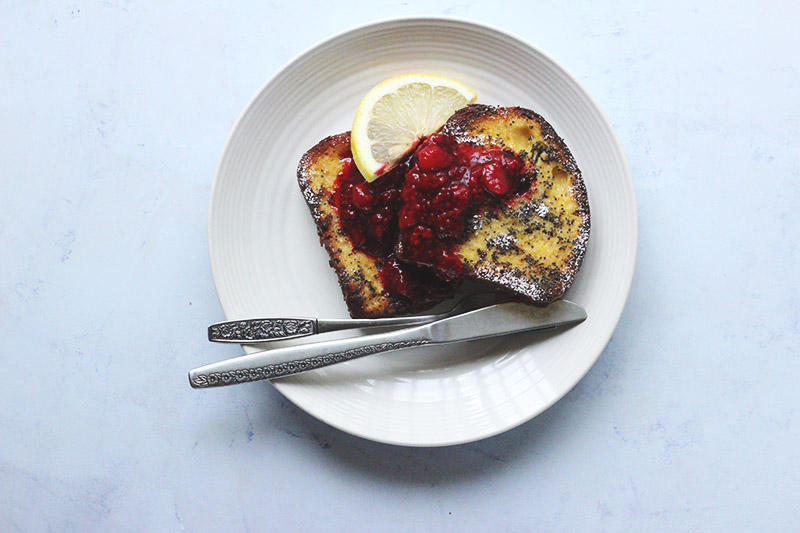
Lemon & Poppy Seed French Toast
by Sarah
This is a leisurely breakfast.
This breakfast is like listening to one of your favourite musicians do acoustic cover versions of classic songs. Just relaxed, awesome, totally without stress or tension, and bloody good fun.
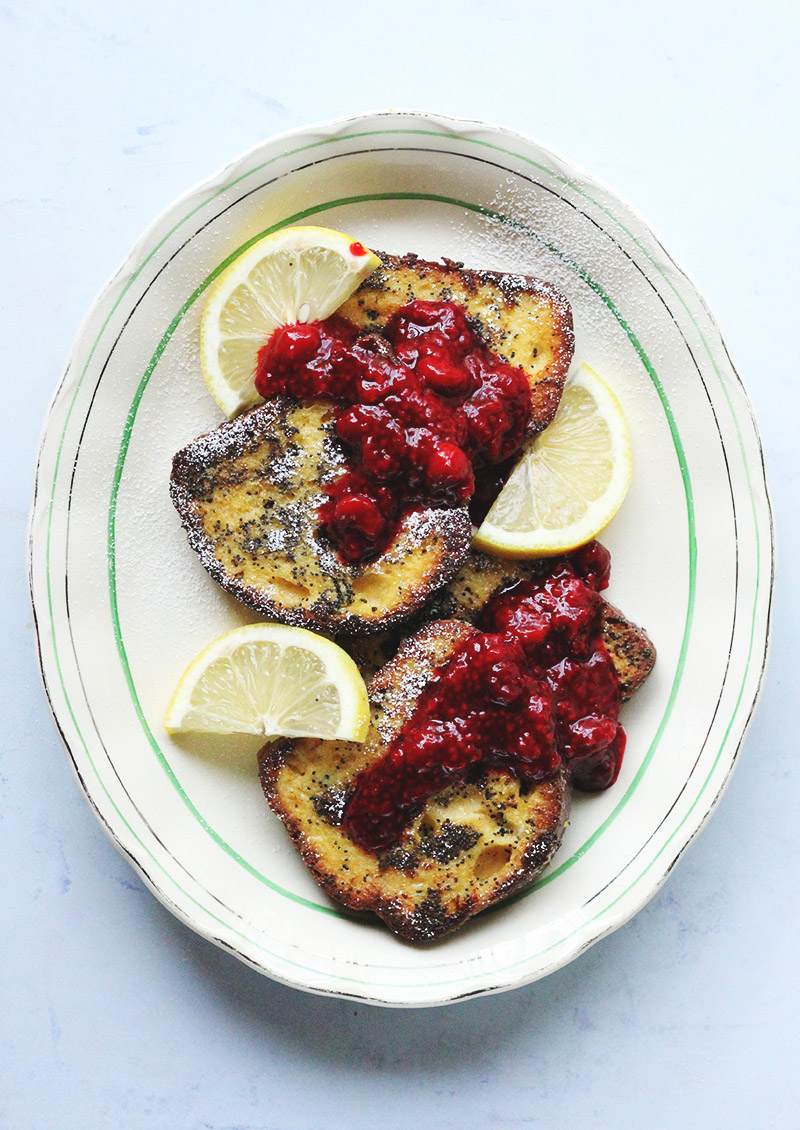
It’s french toast, but bumped up a notch. It’s got a spring in its step. Its brioche, soaked in eggs, milk, lemon zest and poppy seeds. Its fried in a little butter, and smothered in raspberry sauce.
The poppy seeds add their characteristic deep, mysterious flavour and the lemon zest does its lemony thang. The raspberries, just heated with some lemon juice and icing sugar, bring the whole thing, mouthwateringly together.

This is what you want to make for breakfast when you’ve got time. On a Sunday when pyjamas well into the afternoon is completely acceptable, and there is no-one in the house who will point out that perhaps you should think about, you know, showering.
This is food for relaxing with. This is a breakfast for happiness and easy mornings and lemon and poppy seed French toast.

The great thing is that you’ll probably have all the bits for this in the house, except maybe the poppy seeds. The raspberries can come out of the freezer, and there is no stale bread that doesn’t french-toast well.
The poppy seeds totally make this for me, though. Just make sure you’ve got someone around who’ll tell you if you have any in your teeth. That’s a good rule for life, actually. Are you dreaming of the weekend, like me?
xx Sarah.

Lemon & Poppy Seed French Toast
A sweet, simple take on traditional French Toast with lemon zest and poppy seeds.
Author: Sarah Coates
Serves: 2
Ingredients
- 2 eggs
- ⅓ cup milk
- 1 tbsp honey
- 1 tbsp poppy seeds
- 1 lemon
- 4 slices brioche (or other stale bread)
- 1 cup frozen raspberries
- icing sugar, to taste
- butter, for frying.
Instructions
- In a small bowl, whisk together the eggs, milk, honey, poppy seeds and the zest of the lemon.
- Place the slices of brioche into a shallow dish and pour over the egg mixture. Leave to soak, turning occasionally.
- To make the raspberry sauce, place the raspberries, the juice of half the lemon, and a few teaspoons of icing sugar into a small saucepan and place over a medium heat.
- Cook until the raspberries are warm and pulpy. Taste, and add more sugar if desired. Set aside.
- To cook the french toast, place a large frying pan over a medium low heat, and add a tablespoon or so of butter.
- Once the butter is melted, add the pieces of soaked brioche, and cook slowly for about 2 minutes each side or until golden brown and cooked through.
- Serve warm with the raspberry sauce.
3.2.1275
Kate likes this
23 Dec 19:17


All images & tutorial copyright Allison Beth Cooling; do not use/post without linking back to me.
Easy Geo Earrings: "Handmade Holiday" Project 007
by noreply@blogger.com (The Quiet Lion)


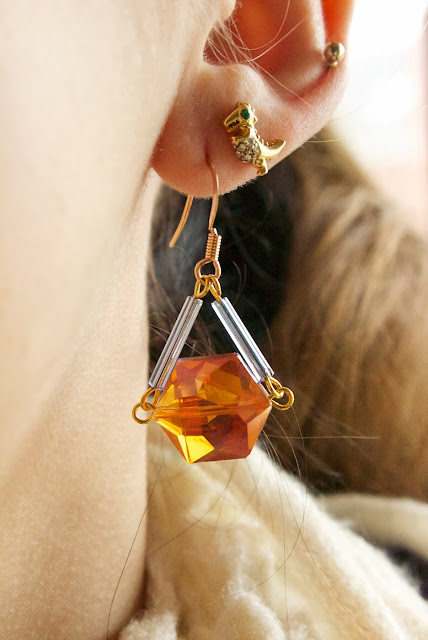
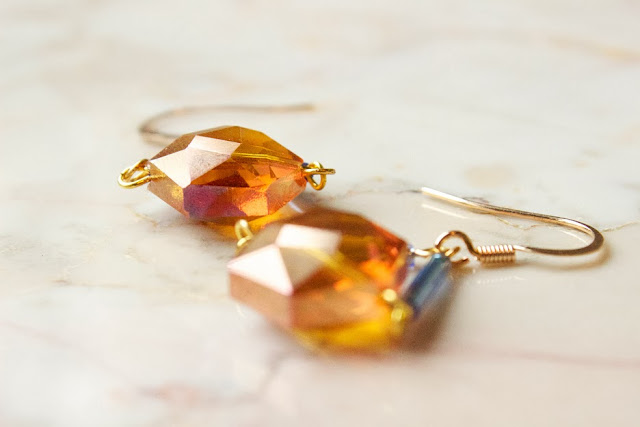
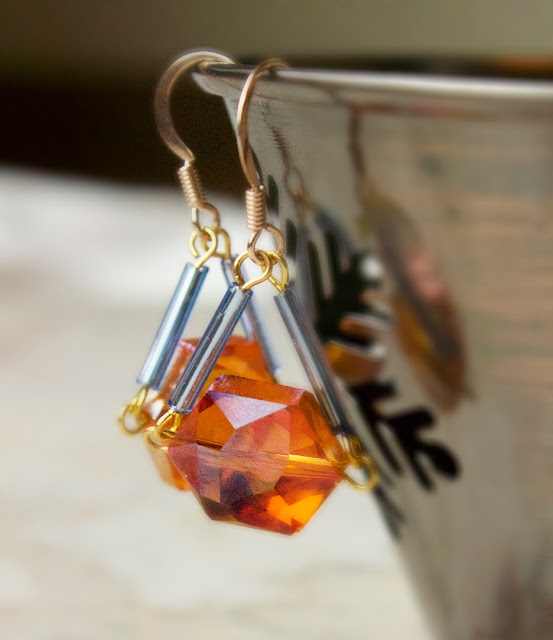
My last tutorial before X-mas, and the last in my "Handmade Holiday" initiative! I've picked the easiest, quickest and cheapest tutorial for last. You will create a pair of geometric earrings that are simply made from a cut crystal and bugle beads.

Like most of my tutorials, this one is highly customizable; pick your favorite colors and metal style to make a look your own! Make sure you choose a hexagon-cut crystal (mine from Cousin) to get this look. If you don't care about the geometric theme, try out a round crystal or even a teardrop crystal. Whatever you like!

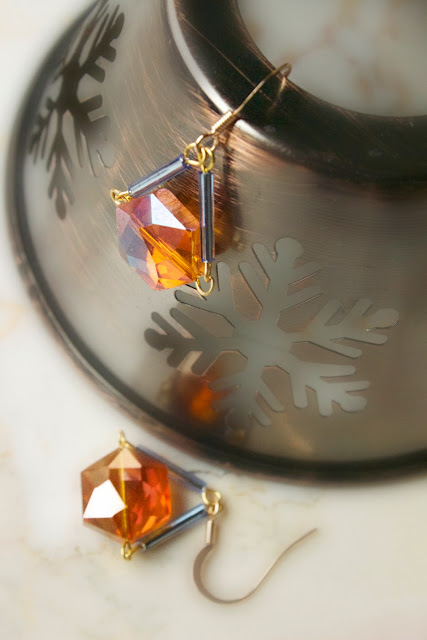
These seriously take 5 minutes to make, I timed it. I chose a color scheme of warm orange and light blue, complimented by gold for a contrasting yet cohesive look.

The small, dainty size of these earrings are great for everybody, and they aren't too heavy. The crystals make them dressy, but the cool bugle beads and simple design give them a casual vibe.

Make these for anyone on your last-minute shopping list; they won't be disappointed!!

For a casual cool look, pair these simple earrings with a bright, on-trend watercolor print top and finish with both black leggings and black sneaker wedges.
Leggings by Tory Burch, top by Generation Bliss.
Are you ready? Let's get started!

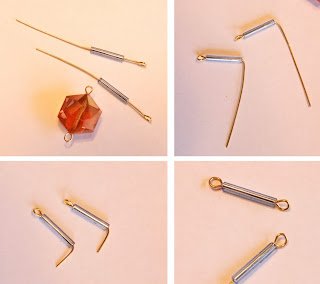
Step 1: Gather materials. Needed are crystals, pliers (round nose), wire cutters, gold fishhooks, gold eye pins, and extra-long bugle beads.

Step 2: Add your crystal to the eye pin. Eye pins differ from headpins because they have a loop on the end, not a metal stopper. We need the loops so we can attach the beads to one another! Bend the eye pin at a 90 degree angle right after the bead. Cut about 3mm from the bead, and loop to finish. You should have the second picture.

Step 3: Add a bugle bead to an eye pin, and repeat. Repeat the last step's technique of bending, cutting and looping to create two bugle bead links. You should have the last picture.

Step 4: Attach your bugle bead links to each side of the crystal, by twisting the loop open then twisting it back. Finally, add your fishhook to the empty ends of the bugle bead links! Your crystal should hang nicely in the middle. Repeat all the steps to make another earring.

See how simple?!!

Ok, you've only got a couple more days left. Now go and make your earrings!!

All images & tutorial copyright Allison Beth Cooling; do not use/post without linking back to me.
No more posts. Check out what's trending.