Although it may have cost Texas more to recover from the ransomware attack than paying the ransom, in the long term a refusal to pay extortionists will help to discourage future attacks.
Guillaume.pugnet
Shared posts
10 Sep 09:26
Hackers who hit Texas with ransomware attack demanded $2.5 million, got nothing
by Graham Cluley
23 May 15:55
La France championne d'Europe des achats en ligne pour les PGC
Pour les achats de produits de grande consommation en ligne, la France est en tête de l'e-commerce en Europe et avec une forte implantation du drive.


05 Jun 14:49

Filed under: Interviews, The Hackaday Prize


THP Hacker Bio: fl@C@
by Mike Szczys
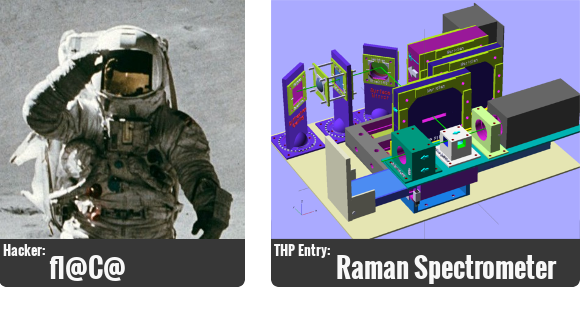 Now that we’re starting to get serious about The Hackaday Prize we thought we’d take a look at the lives of some of the hackers who have submitted entries. Meet fl@C@, who is working on a Raman Spectrometer which is largely 3D printed and uses a Raspberry Pi. He was kind enough to answer all of our questions, some serious and some not so.
![]()
Image: OldComputers.net
Creating. It’s probably no surprise that I have many hobbies…but hardware hacking is my life. I got my first taste with my dads Imsai 8080 (showing my age, but I was fairly young!)..Then it was an Apple][.. I really dove into that. I built my own from a bare pcb to a working machine when I was around 11 or 12. Just moved up from there.. Really went nuts when I got a job at a surplus electronics store in the silicon valley.. I rarely took home a paycheck.. I have a few other hobbies, I'm a private pilot...love flying. I built a pretty cool device that allowed me to datalog my flights, my heartrate, keep track of the fuel, it speaks and connects to the comm to remind me when to switch tanks, etc.. I'll have to put that up on the project page.
![]() Well...For my day job, I am a Network Engineer.. I can't really say for which company, but it's big.
Well...For my day job, I am a Network Engineer.. I can't really say for which company, but it's big.
![]()
My Passion is Going Big
I would say my passion is going big..if it's worth doing.....it's worth overdoing. I love coming up with ideas that would make a difference. The spectrometer I am working on is actually only a small part of a larger project I am working toward. There are never enough hours, or dollars to cover all of my ideas...but I always work as hard as I can to get there.. TLDR- I'm excited every day to wake up and make another step towards changing the world.
![]() I work from home, but in the office... it's definitely the snack machine. Seriously? We can't build a machine that dispenses snacks without getting them stuck?
I work from home, but in the office... it's definitely the snack machine. Seriously? We can't build a machine that dispenses snacks without getting them stuck?
![]() I'd say linux. I've been a fan of ubuntu for a while.. lately I've been playing with xubuntu. I don't care for messing with computers..lol.
I'd say linux. I've been a fan of ubuntu for a while.. lately I've been playing with xubuntu. I don't care for messing with computers..lol.  I love electronics, hardware, software and all that.. but I do not geek out over PC hardware..I consider them another tool...they need to work when I need them to work. lol
![]() Not sure if you want a breakdown of what gear I have....I have quite a bit and a pretty elaborate lab setup..but I'm really a bit of a minimalist when it comes to day to day use.. I use my scope when it's appropriate..my logic analyzer (saelae logic rocks) pretty often.. but I'd say my go to device is usually my DMM since it's what I tend to use most often...I have a few, but I like to use the one that connects up to my PC so I can make screenshots, and/or see it from a distance..
Not sure if you want a breakdown of what gear I have....I have quite a bit and a pretty elaborate lab setup..but I'm really a bit of a minimalist when it comes to day to day use.. I use my scope when it's appropriate..my logic analyzer (saelae logic rocks) pretty often.. but I'd say my go to device is usually my DMM since it's what I tend to use most often...I have a few, but I like to use the one that connects up to my PC so I can make screenshots, and/or see it from a distance..
![]()
 I would have to default to the mBed for this one..for general purpose. I started out like most people probably with the basic stamp waaaay back...and went through a few others..and settled on the mBed when there was just one device, but now they have so many platforms that you can fit to whatever need..and some of them are dirt cheap. I'm using the ST Nucleo041RE for the spectrometer project, and it's only $10 at mouser. I have just started peering into FPGA stuff, I hope to get some more time to work with them very soon, I see lots of potential.. I never really used Arduino's until the past year or two when I got into quadcopters..they have a purpose..and are ok for quick and dirty stuff since you can source a pro mini on ebay for like 3 bucks..
![]() Python has become my best friend. C++ is great and all, I've been forced to use VB6 for work...where they even use winbatch....... But python works.. and it's easy to crank something out quickly, and you can build some pretty robust stuff with it..
Python has become my best friend. C++ is great and all, I've been forced to use VB6 for work...where they even use winbatch....... But python works.. and it's easy to crank something out quickly, and you can build some pretty robust stuff with it..
![]() Well, I have a couple that come to mind immediately that I honestly would love to share with the world...but won't just yet.. =) So, I'll go with what is left...hopefully it's plenty for now..
Well, I have a couple that come to mind immediately that I honestly would love to share with the world...but won't just yet.. =) So, I'll go with what is left...hopefully it's plenty for now..
- I'd love to build a fusor. I built my first tesla coil when I was 17.. I'd love to take the hobby fusor to the next step..
- A Moon Rover. Seriously. And the vehicle to get it there. I think we all agree rockets and gasoline both need to go away. Mankind needs to reach out beyond what we're confortable with.
- A fully autonomous multirotor. I actually started this project..have it all layed out..but it's not high enough on my priority list to make it the rest of the way..I have probably 80% of the parts new in a box..I've started doing a writeup on it..and hope to get it up soon.
![]()
Learn the Value of Knowing Where and How to Find the Information [You] need
I wish that everyone would learn the value of knowing where and how to find the information they need to accomplish a goal. Schools typically force you to memorize facts and information that is often worthless. I would like for people to learn instead how to be adaptive in their approach to problems, and understand that there is always more than one answer.. and there is a huge resource out there that will enable you to make educated decisions and reach grander goals. We live in a great time with that…and in that way, the internet is underutilized…
![]() The timing was right…I thought this was an interesting and unique project..I had promised myself to try to be more open and share..this project was perfect since it has 3d parts people can print themselves, a raspberryPi, a sorta arduino and a cool laser…plus I figured there are several people out there that could either benefit from a low cost raman spectrometer, or at least benefit from some part of it..be it the parts I designed or just the understanding of how it works and what they’re used for…
The timing was right…I thought this was an interesting and unique project..I had promised myself to try to be more open and share..this project was perfect since it has 3d parts people can print themselves, a raspberryPi, a sorta arduino and a cool laser…plus I figured there are several people out there that could either benefit from a low cost raman spectrometer, or at least benefit from some part of it..be it the parts I designed or just the understanding of how it works and what they’re used for…
![]()
 I always keep an open mind, and consider any advice given.. There have been many aspects of this project that created a challenge.. This is my first serious venture into 3d printing this much stuff…I’ve never really worked with lasers and optics in such a way.. Avoiding spending thousands on optics was a major challenge. I have been doing all the research I can to understand the best approach to imaging…My first idea was to modify a webcam to take long exposures since the light reaching the camera will be fairly faint..after looking into that, it’s not just a lot of work and difficult to reproduce…but the cameras that others have modified are ancient and next to impossible to find. I wanted to go with a camera that anyone could find…the raspiCam kept surfacing as the best choice…so, the next challenge was how to get the long exposure…the raspiCam driver doesn’t really allow for 10-30 second exposures… so the next idea was to take several shots, and stack them to build a usable image.. so my latest approach is to take a 90fps video for a couple seconds, split that into individual frames, and stack those.. If anyone has suggestions in this area, I’d love to hear them.. I planned on using either mathematica or qtoctave from python, etc..
![]()
 A Moon Rover. =) It’d probably most definately be a team effort.. But I think as a community, the skills are out there. And the google XPrize shouldn’t be the only game in town.. I think things are building up to this kind of stuff anyway, but someone’s got to be first.
![]()
Live Out Loud Every Day
![]() I’d just like to say…putting this project on this site was a major debate for me. I grew up with parents that had secret clearances, and privacy was central. I’ve been trying to build up the courage to share my work and ideas with the world because I think it benefits everyone. This project is my first to share, and for it to be featured here, and for me to be honored with being the first the be featured is really amazing. I appreciate this whole community, I’ve learned a lot from it over the years and I hope to be able to give back and contribute more soon!
I’d just like to say…putting this project on this site was a major debate for me. I grew up with parents that had secret clearances, and privacy was central. I’ve been trying to build up the courage to share my work and ideas with the world because I think it benefits everyone. This project is my first to share, and for it to be featured here, and for me to be honored with being the first the be featured is really amazing. I appreciate this whole community, I’ve learned a lot from it over the years and I hope to be able to give back and contribute more soon!
Filed under: Interviews, The Hackaday Prize
19 Dec 14:01

Kinect Commands, Xbox One
by Greg Duncan
Today's post is a little unusual as it's as much about the Xbox One as it is the Kinect, but what's important about it is just how cool the Kinect for Xbox One is (and thereby very likely the Kinect for Windows v2 will be)
Here's An Awesome Xbox One Command Cheat Sheet That Won't Come Packaged With Every Console
When we picked up our review console last Thursday we were given this really cool designed Xbox command gesture guide.
Basically, it's a quick cheat sheet to have around while gaming.
Here's a version of the guide that will be available to consumers.*
Project Information URL: http://www.businessinsider.com/xbox-one-command-and-gesture-cheat-sheet-2013-11, http://support.xbox.com/en-US/xbox-one/kinect/common-gestures
Download URL: http://www.businessinsider.com/document/528df01aeab8ea6d738d802d/xbox-one-kinect-commands.pdf


18 Nov 20:55

SmartOffice4TFS
by Brian Harry MS
A couple of weeks ago one of our great partners, eDev Technologies (makers of InteGREAT – an excellent formal requirements management tool for TFS), released a new set of tools called SmartOffice4TFS. Whereas InteGREAT is a pretty comprehensive requirements suite, SmartOffice4TFS is intended for teams with a less formal process but who still need to be able to manage requirements as documents.
SmartOffice4TFS helps bridge the gap between the work that the development team is managing in TFS and stakeholders/customers/vendors/etc. that need a document. To make SmartOffice4TFS even more attractive, eDev Technologies is offering a 40% discount to MSDN subscribers through the end of the year.
There are two parts to SmartOffice4TFS – SmartWord4TFS and SmartVisio4TFS.
SmartWord4TFS allows you to export TFS work items/requirements into document templates, update edit those documents and publish updates back into TFS. It enables full round tripping. This enables you to produce standard requirements documents from data in TFS and author TFS requirements online or offline. Meanwhile, you get all the capabilities with MS Word – like SharePoint workflows for review and approval processes.

SmartVisio4TFS has similar abilities but designed for working with diagrams. It enables you to link work items to individual elements of your diagram and can color the shapes on your diagram based on the state of the related work item. Of course, it supports the same handy round tripping with TFS that the Word add in does. As a really cool bonus, SmartVisio4TFS can process your flow diagrams and automatically generate test cases that cover all the branches in your process.

Thanks,
Brian
14 Oct 12:02


Grilling: Texas-Style Beef Short Ribs
by Joshua Bousel

[ Photographs: Joshua Bousel ]
When I got the request in to tackle giant Texas-style beef ribs as a Grilling post, I was a bit dubious as to whether it could even be done. Unless there's some secret every Texas pitmaster is guarding with their life, the path to transcendent beef barbecue is all about knowing your meat and your cooker, plus the months, years, and generations it takes to perfect the art. Still, I'm not one back down from a challenge, and after a couple racks of short ribs done in my humble smoker, I realized there's enough to say to set you on the right track to great ribs. That said, making them the best they can be will still come down to your dedication to cook them over and over again.
Big 'n' Beefy

Everything might be bigger in Texas, but it sure is smaller in New York. Starting out with that fundamental requirement of giant bones top-loaded with beef wasn't so easy in my home locale of Astoria, Queens.
When I went looking, I can across two common variety of beef ribs—back ribs and short ribs. Back ribs are what you get when a rib roast is divorced from its bones. That rib roast meat fetches top dollar, so it makes sense that most of the meat stays with the roast or steaks, and very little is left on the ribs, but they do have some great stuff between the bones. Back ribs make fine barbecue, but they weren't the giant hunks of meat I was after.
That leaves the short ribs, which are cut from the lower portion of the rib cage and often have a nice layer of fat-laced meat sitting on top. The challenge here was finding ones that would live up to the Texas name. More often than not, the short ribs I came across were cut into small, individual bone portions with wildly varying amounts of meat on them. Fortunately, my local butcher had a few nice racks that had four bones each—around 10-inches squared—with approximately 1 1/4-inches of meat sitting on top. They may not have been quite as large as some ribs I've gotten in Texas, but were close enough to do the job well.
Simple Seasoning

After I had ribs in hand, the prep was pretty minimal. As I do with my pork ribs, I started by peeling the membrane off the backside of the ribs. This was probably more out of reflex than necessity, but that membrane becomes plasticky and leathery during cooking, and if you're going to gnaw on all sides of the bone, it doesn't make for great eats.
From there, I trimmed down any excessively large areas of hard fat. Fat on the ribs is your friend—and delicious—but big, thick blocks of it will be overly chewy in the end, so I shoot for a layer of fat on top that's about 1/8-inch thick.
Finally came the seasoning. When it comes to Texas barbecue, a beef rub need go no further than salt and pepper. I did a fifty-fifty mix of kosher salt and coarsely ground black pepper, with a little garlic powder thrown in for my own taste. I liberally covered each of the racks with the rub and they were ready to get smoking.
Low and Slow

The concept of cooking barbecue is to take tougher pieces of meat and make them tender and delicious. Cuts like pork shoulder, brisket, and short ribs all have a lot of intramuscular fat and connective tissue that needs to time break down and render, which is why these cuts are all preferably cooked low and slow.
Since short ribs aren't quite as giant of a chunk of meat as brisket—which can take upwards of 12-18 hours to slow cook—the time commitment isn't as demanding. I started my two racks cooking at 225°F, using a mix of charcoal and oak wood chunks, and let them go until I was able to insert an instant read thermometer into the meat with no resistance, which clocked in at six hours. Starting out, I wasn't sure what the right temperature was for tender short ribs, but both racks got there at around the 165° mark.
The Butcher Wrap
If you're taking a barbecue trip around Texas, you'll likely encounter butcher paper-wrapped barbecue. While foil-wrapping meat during the cooking process is super prevalent in competition-style barbecue—it's also used by some great Texas pitmasters—swapping foil for butcher paper serves a slightly different purpose.
Foil is not porous, so when you wrap meat in it, moisture is trapped inside and humidity jumps to nearly 100%. This counters typical surface evaporation on the meat, drastically speeding up the cooking process. Butcher paper, on the other hand, allows moisture to escape, so it's not very effective in speeding things up. That said, it does retain some moisture and, most importantly, butcher paper helps with the development of the bark—the dark outside layer that forms on slow-cooked meats.
Since butcher paper "breathes," just enough steam is retained to soften the bark, but not enough to make it lose its thick, slightly crunchy character altogether. Plus, butcher paper becomes saturated in the rendered fat of the meat, and a little extra fat sitting on the surface of the beef only seems to make things better.
Just to test things out, I wrapped one rack of ribs in butcher paper in the last hour of cooking, and left the other unwrapped. With the short cooking process and holding times—I let the ribs rest about one hour in a Cambro before digging in—the butcher paper didn't make a huge difference, but there the bark of the wrapped ribs was slightly superior. I assume if cooking and holding times were longer, the moisture retained by the butcher paper would make more of a difference.
Don't Mess With Texas (Beef Ribs)

Salt, pepper, smoke, and meat are all I started with; what we ate were some ribs that were incredibly moist, tender, peppery, and insanely beefy that I think would make a Texan proud (they passed muster with my Texan wife, but she's from Houston, so take that for what it's worth). Did they match the quality of the best beef ribs I've ever had at Louie Mueller's? No. But they were inching up towards the some of the really excellent bones I've enjoyed at Black's, in Lockhart.
The only way I'm going to improve these is by cooking giant beef short ribs over and over again, until I can spot the perfect cut of meet, hit the right temperatures in my smoker, discover the ideal time to wrap, and the best amount of time to hold. None of these can fully be translated into a recipe, since they'll vary from cook to cook. At the end of the day, its the intuition that results from repetition that's this recipe's "secret" ingredient, but I'm sure this post will, at the very least, give you a good start toward making some truly excellent beef ribs.
About the author: Joshua Bousel brings you new, tasty condiment every other Wednesday and a recipe for weekend grilling every other Friday. He also writes about grilling and barbecue on his blog The Meatwave whenever he can be pulled away from his grill.
Get the Recipe!
04 Sep 11:43

Pour lancer Matchbook en France, « Amazon doit avoir l’aval des éditeurs »
by marc@pcinpact.com
Amazon a dévoilé hier les grandes lignes de son offre Matchbook. Le principe ? Proposer à tarif préférentiel la version numérique d’un livre physique déjà acheté dans ses rayons depuis 1995. Le Syndicat de la librairie française nous donne sa première analyse de ce mécanisme pour l’heure réservé aux États-Unis, qui porte déjà sur 10 000 titres.
    
|

05 Jun 20:55
Filed under: Software Development, software hacks


Retrotechtacular: How I wrote Pitfall for the Atari 2600
by Mike Szczys
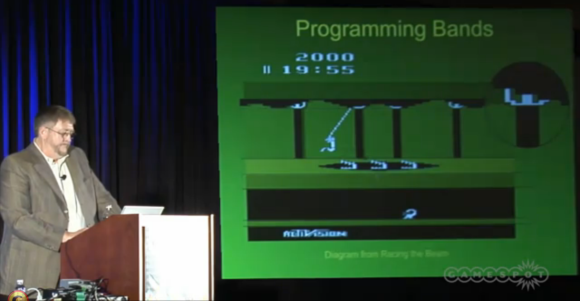
This week we’re taking another departure from the ordinarily campy videos featured in the Retrotechtacular section. This time around the video is only two years old, but the subject matter is from the early 1980′s. [David Crane], designer of Pitfall for the Atari 2600 gave a talk at the 2011 Game Developer’s Conference. His 38-minute presentation rounds up to a full hour with the Q&A afterwards. It’s a bit dry to start, but he hits his stride about half way through and it’s chock-full of juicy morsels about the way things used to be.
[David] wrote the game for Activision, a company that was started after game designers left Atari having been told they were no more important than assembly line workers that assembled the actual cartridges. We wonder if any heads rolled at Atari once Pitfall had spent 64-weeks as the number one worldwide selling game?
This was a developer’s panel so you can bet the video below digs deep into coding challenges. Frame buffer? No way! The 2600 could only pump out 160 pixels at once; a single TV scan line. The programs were hopelessly synced with the TV refresh rate, and were even limited on how many things could be drawn within a single scan line. For us the most interesting part is near the end when [David] describes how the set of game screens are nothing more than a pseudo-random number generator with a carefully chosen seed. But then again, the recollection of hand optimizating the code to fit a 6k game on a 4k ROM is equally compelling.
If you like this you should take a look at an effort to fix coding glitches in Atari games.
[via Reddit]
Filed under: Software Development, software hacks
Isaac, Joshua Pulham and -1 others like this
03 Apr 09:38
Defiance : Des détails sur linter-connectivité
On vous en parlait juste en dessous, Defiance sort aujourd'hui et propose une expérience de jeu jusque là inédite. Connecter une série TV avec un jeu-vidéo. Comme tout bon MMO, vous débarquer dans ce jeu à monde ouvert avec la race de votre choix (Pillarche, Humain ou Irathien) en quête de gloire, ...
29 Mar 07:12

Defrag Tools: #33 - CLR GC - Part 1 | Defrag Tools
by Larry Larsen, Andrew Richards
In this episode of Defrag Tools, Andrew Richards, Maoni Stephens and Larry Larsen walk you through the CLR Garbage Collector. Maoni is the Principal developer for the GC on the CLR team.
Resources:
Maoni's WebLog
Channel9 - CLR 4 Garbage Collector - Inside Background GC
Channel9 - CLR 4.5: Maoni Stephens - Server Background GC
MSDN Magazine - Investigating Memory Issues
Timeline:
[00:00] - What is a Garbage Collector (GC)?
[02:40] - How has the GC changed?
[06:02] - Memory issues
[08:57] - Stress Log (!sos.dumplog)
[10:08] - Troubleshooting and Performance
[12:20] - Demo App
[14:20] - !sos.eeheap -gc
[18:08] - !sos.dumpheap -stat
[20:38] - !sos.dumpheap -mt <mt> (Method Table)
[21:58] - !sos.dumpobj / !sos.do (Dump Object)
[24:15] - Performance Monitoring (SOS, PerfView, Performance Monitor)
[28:06] - Measure immediately after an action, not at a cadence
[29:45] - x clr!WKS::GCHeap::GcCondemnedGeneration (Current GC being collected)
[31:15] - bp clr!WKS::GCHeap::RestartEE (Break after a GC)
[35:30] - More next week...
Guillaume.pugnet likes this
27 Mar 18:25
_thumb.jpg)
_thumb.jpg)
_thumb.jpg)
_thumb.jpg)
_thumb.jpg)
_thumb.jpg)
First Impressions: Kinesis Advantage Mechanical Ergonomic Keyboard
by Jarred Walton
_575px.jpg)
Earlier this month I posted my review of the TECK, an ergonomic keyboard with mechanical switches that’s looking to attract users interesting in a high quality, highly ergonomic offering and don’t mind the rather steep learning curve or the price. The TECK isn’t the only such keyboard, of course, and I decided to see what other mechanical switch ergonomic keyboards I could get for comparison. Next up on the list is the granddaddy of high-end ergonomic keyboards, the Kinesis Contour Advantage.
Similar to what I did with the TECK, I wanted to provide my first impressions of the Kinesis, along with some thoughts on the initial switch and the learning curve. This time, I also made the effort to put together a video of my first few minutes of typing. It actually wasn’t as bad as with the TECK, but that’s likely due to the fact that I already lost many of my typing conventions when I made that switch earlier this year. I’ll start with the video, where I take a typing test on four different keyboards and provide some thoughts on the experience, and then I’ll provide a few other thoughts on the Kinesis vs. TECK comparison. It’s far too early to determine which one I’ll end up liking the most, but already I do notice some differences.
Compared to the TECK—as well as many other keyboards—the Kinesis Advantage feels quite large. Part of that is from the thickness of the keyboard, with the palm rests and middle section being much thicker than on other keyboards. Looking at the way my hands rest on the Advantage, though, I have to say it seems like it should be a good fit for me once I adapt to the idiosyncrasies. I discussed some of the changes in the above video, but let me go into some additional detail on the areas that appear to be causing me the most trouble (and this is after the initial several hours of training/adapting to the modified layout).
_575px.jpg)
My biggest long-term concern is with the location of the CTRL and ALT keys. As someone that uses keyboard shortcuts frequently, I’m very accustomed to using my pinkies to hit CTRL. Reaching up with my thumb to hit CTRL is going to take some real practice, but I can likely come to grips with that over the next few weeks. Certain shortcuts are a bit more complex, however—in Photoshop, for instance, I routinely use “Save for Web…”, with the shortcut CTRL+ALT+SHIFT+S; take one look at the Kinesis and see how easy that one is to pull off! Similarly, the locations of the cursor keys, PgUp/PgDn, and Home/End keys is going to really take some time for me to adjust. On the TECK I actually didn’t mind having them located under the palms of the hands, but here the keys are split between both hands and aren’t centralized.
With that said, the Kinesis keyboards do have some interesting features that may mitigate such concerns. For one, there’s a built-in function for reprogramming any of the keys, so it’s possible with a little effort to change the layout. Of course, for that to be useful you also need to figure out a “better” layout than the default, and I’m not sure what that might be—plus I wanted to give the default layout a shot first. The Advantage also features macro functionality, allowing you to program up to 24 macros of approximately 55 keystrokes. Truth be told, I haven’t even tried the macros or key mapping features yet, but I can at least see how they might prove useful.
There are a few other items to mention for my first impressions. One is that I didn’t like the audible beeping from my speakers at all; I think the keys sound plenty loud when typing (not that they’re loud, necessarily, but they’re not silent either), so adding a beep from the speakers wasn’t useful for me. Thankfully, it’s very easy to disable the sounds with a quick glance at the manual. Another interesting feature is built-in support for the Dvorak layout (press PROGRAM+SHIFT+F5 to switch between QWERTY and Dvorak; note that switching will lose any custom key mappings). Finally, unlike the TECK, Kinesis also includes a USB hub (two ports at the bottom-back of the keyboard near the cable connection).
As far as typing goes, the Cherry MX Brown switches so far feel largely the same to me as on the TECK. I haven’t experienced any issues with “double pressing” of keys yet, but then I didn’t have that happen with the TECK for a couple weeks either. Right now, it’s impossible for me to declare which keyboard is better in terms of ergonomics—and in fact, even after using both for a month I fear I might not be able to come to a firm opinion on the matter—but one thing I do know is that looking at the video above, I can see that my hands and arms move far less when typing on both the TECK and Kinesis. I also know that at least from a technology standpoint, the Kinesis is more advanced than the TECK, what with a USB hub, key remapping, and macro functionality, but it’s also more expensive thanks to those features.
Reviews of this nature are inherently something that will take a while and they end up being quite subjective, but within the next few months I hope to have a better idea of which mechanical switch ergonomic keyboard I like the most…and I have at least one if not two more offerings coming my way. Hopefully you can all wait patiently while I put each through a month or so of regular use. If you’re looking to spend $200+ on a high quality ergonomic keyboard, you’ll probably be willing to wait a bit longer, but if not I believe many of the companies will offer you a 60-day money back guarantee—the TECK and Kinesis both offer such a guarantee if you’re interested in giving one a try.
Gallery: First Impressions: Kinesis Advantage Mechanical Ergonomic Keyboard
No more posts. Check out what's trending.