Shared posts

01 Apr 00:31

Behind-The-Scenes Videos Show How Iconic Movie Special Effects Were Made

by Vincze Miklós

When you're watching a movie, it's easy to get lost in the magic and not think too hard about how King Kong climbed the Empire State Building, how Jurassic Park's T-Rex roared to life, or how Charlton Heston encountered the Statue of Liberty at the end of Planet of the Apes — but these videos reveal all those movie secrets.

Read more...


01 Apr 00:30

valanthos:Sector 5 Slums by jordangrimmer

27 Mar 19:24

Entertainment Effects Group.Blade Runner.Shimago-Domingo...


Entertainment Effects Group.
Blade Runner.
Shimago-Domingo Corporation Advertising Airship a.k.a. “The Blimp”.

In the words of Douglas Trumbull:

The last major item on the effects docket was the giant advertising blimp seen drifting languorously over the city from time to time. It was also among the last elements to be incorporated into the script. “The blimp is an extension of media advertising,” said Scott, “and in a way, it’s also kind of a throwback to my childhood during the second World War. My family was living in a suburb of London, and we had these barrage balloons flying overhead. In fact, there was a whole line of them on cables right across the southern seaboard in kind of a triangular wedge leading into London; and the idea was that the buzz bombs and the Messerschmitts would fly into these cables and be brought down or deflected off course before they could get to the city. I remember one of the balloons burst one night and settled over our house, and we woke up the next morning and thought it was still dark. So all that experience was still in the back of my mind; and I thought maybe in the future we might get back to that idea as an advertising medium. Already they’re talking about moving back to the old-fashioned idea of using blimps to carry cargo and passengers - for fuel reasons, mainly. So you could have a blimp that’s maybe four hundred feet long, with a major screen on it that’s two hundred feet across and a couple others a hundred feet each - that’s a lot of advertising power, especially if it’s really visual. They’d be anchored to the ground, and they’d slowly drift about like a big whale and they’d cover maybe twelve square miles - which is a lot when you consider the population density, but you’d probably still need twenty or thirty of them across a city of fifty or sixty million people.” “The initial idea,” said Douglas Trumbull, “was that the blimp would be this sort of big, dark shape that on the storyboard was drawn to look like a regular blimp with some kind of big illuminated signs on the body - very much like the Goodyear blimp. We thought, though, that the blimp ought to be a really strange-looking contraption, with big flat signs on it at various angles and a few lights on board. Ridley liked that approach, and so that’s the way we did it. It was always supposed to bejustkind of a background thing; but as it turned out, Ridley really fell in love with that blimp and kept ordering up more and more shots. And then he decided he wanted it to be bigger. Well, one of the things you tend to resort to to get scale is lots of tiny little lights. Lights on a miniature tend to look like windows; and therefore, if a little point of light looks like a window, then the overall shape must be very big. So Ridley asked for lots oflittle lights to be added to the blimp, plus a lot of antennas and stuff. As a result, it ended up looking kind of like a sleazy mothership - which the cognoscenti of the special effects business are probably going to have a good laugh over.” Shortly before he left the project, Wayne Smith had put together a small foam study mockup of the blimp as it was conceived at the time. “Originally, it was supposed to be just a throwaway type thing,” said Mark Stetson, “to be seen in the background a few times, and that was it. So we ended up putting it off and putting it off; and aside from Wayne’s foam and paper mockup, we didn’t put any more design effort into it at all for quite a long time. Then, after Bill George had gotten all his other vehicles done, he came to me and asked if I wanted him to build the blimp. I said sure. Aside from the fact that it was supposed to carry advertising signs and look kind of puffy and overinflated, we didn’t have a whole lot to go on. And at first we tried a number of things that just weren’t working, We tried making up a series of masonite templates, assembling them into kind of an x-y grid, and then stretching a sheet of styrene over the top and heating it to see if it would drape over this template grid into the form that we wanted. It didn’t. We tried it with heat and air. and that didn’t work either. We tried it with heat on wet rags to push it out and cool it into place, and it still didn’t work.” “The final form,” Bill George explained, “was fabricated by first building a box with the symmetrical centerline cut in the top. Curved ribs were then added to the inside. So essentially, what it ended up being was a negative skeleton of the intended shape. Next, a thin sheet of surgical neoprene rubber was stretched over the centerline hole in the top, and then filled with wet plaster. The weight of the plaster ballooned the latex between the ribs, spontaneously creating the inflated look. The blimp shape was about three feet long and ended up holding over a hundred pounds of plaster. And there were three of us, mixing plaster with our hands and filling it in, sure that at any moment the over-stretched latex would burst and spill wet plaster all over us, fortunately it didn’t, but I got so excited because it was working that I didn’t notice the plaster had hardened on my forearms. The process may seem like a lot of trouble, but the gentle intersecting curves would have taken weeks to sculpt or carve.” “We let the plaster set up for a few days,” Mark Stetson continued, “and then turned it upside-down and poured a thick rubber mold over it - just a throwaway - and got two quick castings out of it and slapped the thing together. At that point, Ridley reviewed it for the first time, and he was really kind of enchanted with it. But he started asking for lots of changes which I think meant that he really liked it. The advertising projection screens were changed. We added a bunch of bristling antennas around the outside, and lots of fiber optic lights. Mike McMillen and Rick Guttierez were working on it at that point, and Mike came up with a little chopper wheel between the fiber optic bundle and the light source so the little lights would flicker and blink. With the optics spread out across the blimp body and this flickering chopper wheel going, it was really starting to look pretty interesting. We presented it to Ridley again, and he liked it even better this time - but he wanted still more changes. for one thing, he wanted to change the scale so it would look twice as big. So we added more lights and detail pieces and built a new cabin. Dave Dryer also liked it a lot and had some of his own changes he wanted made. So it really went through three full generations of construction before it finally got on camera.” By this time, the old Army-surplus look that was the basis of the original concept had given way to something altogether different - summed up rather aptly by the model shop crew who collectively dubbed it the “mother-blimp.” At first it was intended that the black screens on which the advertising would appear would remain in place at all times. However, once the blimp made its way into the smoke room and began undergoing film tests, David Dryer devised a new approach. “Rather than having some kind of an opaque screen, we decided to have only a border, and nothing tangible within. Then, when it was energised and the advertising message appeared, it would do so kind of magically - almost from nowhere. The image would be kind of semitransparent and it would sputter a bit and zap on like some sort of holographic television. We did that by filming the fill-light passes and the practical light passes without the screen in place. Then, for the commercial pass, we’d insert a silk screen into that area and project our off-world footage - or whatever else the shot called for - onto that, so it seemed to exist in space within that border in front of the blimp.” As they had with the spinners, Don Baker and Tim McHugh accomplished most of the actual blimp photography.

The Blade Runner Airship Hero Model was auctioned in 1998 at Christie’s for a minimum asking price of US$8000. It didn’t sell, and it remains in storage at Warner Brothers, as property of Tandem Productions (Bud Yorkin).

27 Mar 19:20

Entertainment Effects Group.Blade Runner.Hades Landscape.The...


Entertainment Effects Group.
Blade Runner.
Hades Landscape.

The combination of the best distance, camera angles and perspective were the major tricks employed in deceiving the eyes of the audience from seeing the shots of the Hades Landscape miniature scenes as mere photographs.

The sequence was created using a forced-perspective miniature built on a 15ft x 8ft wood table, cut in sections. The detail comes mainly from hundreds of rows of acid-etched brass hand drawn silhouettes inspired from photos taken of towers, pipes, tubes, and other industrial skylines they could find in several El Segundo and Torrance industrial parks from the 80′s. Those brass pieces were arranged on Plexiglas sheets and cast foam foundation and supplemented with painstaking model making of buildings and small structures to fit in-between the brass silhouette rows. Only the front buildings closer to the lens are fully-detailed three dimensional miniatures.

The idea of detailing only the front quarter of the Hades miniature models is an interesting approach which is similar to those used in computer generated 3D models today. In CG, low poly 3D models are often used in places where detailed information is not very important or in areas that are out of the focus of the CG camera. 

Then, the lighting was added. The Plexiglas foundation had photofloods beneath it. There was a single Xenon strong source of light from below the miniature. Next, tiny bulbs the size  of grains of wheat were put at different areas of the miniature. Other parts of the miniature that were seen to have required further lighting were illuminated with tens of thousands of ultra-thin-fiber-optic strands. The process involved feeding one thing edge of the fiber optic cable in to the area of the miniature to be lit and the other edge into a light box that had a small bulb in it. Twenty boxes were used and once the light bulbs in the boxes were turned on, they would carry light through the fiber optic cables. In order to simulate the different colours of light, the tips of the fiber optic cables that went into the rooms were coloured with different shades of red, yellow and orange using gel filters, allowing for all the windows you see in the scene, as well as helping to define the pyramid in the background, that was made with small wood cutout pieces. The footage of the flames in the Hades Landscape was obtained by Bob Spulock and his crew as they filmed in 35mm some gasoline blow-outs in a car park at night, and the explosions were taken from pyrotechnics shot also in 35mm at the California desert for another movie Trumbull worked on, but did not see through to the end. Both elements were then optically added by means of cover mattes and rear projection on white paper cards.

The thick atmosphere was also an idea Trumbull had used before in Close Encounters Of The Third Kind, and it works to good effect here too. The use high density smoke helps to define the layers, while taking advantage of a lot of lights underneath the table to give the right glowing effect of a bustling future Los Angeles. 

Basically, the miniature sets were put in a room filled with vaporised oil and was filmed. However, the camera was controlled remotely from another room as the smoke was said to be hazardous to the camera operators. Trumbull and his crew also had to deal with a considerable amount of heat from the sheer number of lights being used to lit the model. They even had to bring in fans to keep everything cool and the room at a temperature they could work in, and bee-smoke puffers wired to modified domestic smoke detectors to measure and regulate the right balance of smoke needed for the filming operation. 

The success of the filming of the Hades Landscape was the proper use of front projection techniques and motion control passes to enhance the miniatures. 

The basic technology behind motion control photography is the use of a camera that is electronically and mechanically manipulated in capturing different scene objects on the same piece of film at different times. The same movement is precisely repeated a number of times in filming other objects or scenes depending on the nature of what is required.

The principle of front projection works by placing a camera and a projector at right angles to each other. A special mirror that reflects half of the incident rays and allows the other half of the light to pass through it is then place between the camera and the projector. When the projector is switched on, half of the light from the projector goes through the mirror and passes through while the remaining half is reflected off unto the mirror, foreground elements and a reflective screen on the stage. The reflective screen that is placed of the stage reflects and redirects the light through the path it came through the first time. The redirected light travels back through the mirror and is seen by the lens of the camera. The camera records the image it sees from its point of view and all shadows caused by the reflective mirror are not seen from the camera’s point of view because objects perfectly cover their shadows. 

The motion controlled camera EEG used in most VFX sequences in Blade Runner was a bulky 65mm 8-channel computer controlled camera, named the “Icebox” by the crew. Basically, the camera was programmed to record the miniature elements in a pass and other elements such as smoke and lighting effects in other passes. The film would then be rewound after each pass and the subsequent passes are recorded on the same piece of negative. In filming the miniature sets however, the camera had a fixed focal length and the miniatures were designed for the field of view of the camera. The procedure was running the sequence with a timer, shot a pass, rewind and repeat as many times as needed. Then, develop the film (about 8-10 hours of waiting time) and see if the shot was a successful one. If not (or if the film was damaged from the rewinding), the crew had to repeat the whole operation, day after day until the shot was done.

At the end of the shooting, the miniature was damp in oil and dirt, and most of it was destroyed.

27 Mar 19:16

This Biohacker Used Eyedrops To Give Himself Temporary Night Vision

by George Dvorsky

A team of biohackers from California successfully induced a temporary sense of night vision by injecting a simple chemical cocktail directly onto the eye. Incredibly, it allowed them to see over 160 feet in the dark for a brief period of time.

Read more...


27 Mar 15:39

Blade Runner’s Pris Inspired Evening Fashion by Kate G.


Blade Runner’s Pris Inspired Evening Fashion by Kate G.

27 Mar 15:39

Harnois.


Harnois.

27 Mar 15:39

Entertainment Effects Group.Blade Runner.Unreleased Model Shop...


Entertainment Effects Group.

Blade Runner.
Unreleased Model Shop Photographs (1981-1982).
Part 1/3.
27 Mar 15:39

Entertainment Effects Group.Blade Runner.Unreleased Model Shop...


Entertainment Effects Group.

Blade Runner.
Unreleased Model Shop Photographs (1981-1982).
Part 2/3.
27 Mar 15:38

Entertainment Effects Group.Blade Runner.Unreleased Model Shop...


Entertainment Effects Group.

Blade Runner.
Unreleased Model Shop Photographs (1981-1982).
Part 3/3.
27 Mar 15:38

Entertainment Effects Group.Blade Runner.Spinner Sequence...


Entertainment Effects Group.

Blade Runner.
Spinner Sequence VFX. 
Reference Polaroids & Photographs (Characters / Vehicle).
27 Mar 15:31

Creating 3D printed functional bronze scissors using the $1500 Mini Metal Maker

Ever since he launched his Mini Metal Maker 3d printer on Indiegogo, David Hartkop has enabled new possibilities for Makers that want to explore new additive manufacturing terrain. In Hartkop’s case, this involves 3D printing metal-infused clay filaments that can be placed in a kiln post-printing to reveal just the metal material in a finished object. In essence, it’s a low-cost solution for those that want to create metal-based versions of what would normally be plastic 3D prints using the Fused Deposition Modeling method of 3D printing.

This article Creating 3D printed functional bronze scissors using the $1500 Mini Metal Maker is first published at 3ders.org.

27 Mar 15:19

pixelartus:Eitr System: PC Year: TBA Developer: Eneme...


pixelartus:

Eitr

System: PC

Year: TBA

Developer: Eneme Entertainment

Website: eitrthegame.com / forums.tigsource.com

Video: Gameplay Video

Description: “Eitr is an Action RPG which takes inspiration from games such as Path of Exile, Dark Souls and Diablo. The game will be challenging and require timing and precision to progress through the environments. Players will need to use a combination of blocking, combos, buffs and positioning to succeed in battle.”

24 Mar 00:42

A three rotor Enigma machine wrist watch.

by Simon

IMG_3636

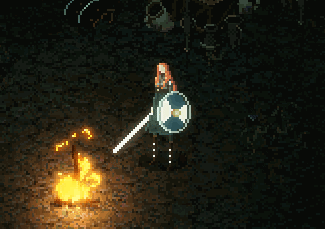
This is one of the most satisfying projects I have done I think. Mainly because this is a real device and something so historically important. It is a fully functioning Enigma machine you can wear on your wrist. This is a three rotor Enigma machine as used by German Wermacht in WW2 for encoding messages. If you don’t know what an Enigma machine is you can read all about it here. Or watch this great YouTube film that explains it (all the Numberphile films are great). Since most people don’t read the details here are some pictures. The technical details are below!

IMG_3624 IMG_3625 IMG_3626

IMG_3627  IMG_3629 IMG_3630

IMG_3631 IMG_3632 IMG_3637

A film of the watch in action is here on YouTube.

I’ve always been interested in the Enigma machine. For years I had it in the back of my mind to make one using Meccano or LEGO Technic. I never did that though.

Last Christmas I was visiting the UK and one of my trips was to Bletchley Park, home of the WW2 code breakers. For a geek like me this place is heaven. It was absolutely amazing being there. Definitely worth a visit. I only had a day and it wasn’t enough time (especially if you want to visit the National Museum of Computing next door). One of the most impressive things at Bletchley is the Bombe machine. I vaguely knew about it but sadly didn’t spend enough time studying it while I was there.

Back in London after visiting Bletchley I decided to go see the film The Imitation Game film. At Bletchley Park they had an exhibition about it and the actual bar set used in the film is in the mansion house. Unfortunately I had missed it by a day and it wasn’t showing anymore so I had to wait till I was back in NZ to go see it with some friends.

The first viewing of that film was really annoying. To me it seemed like it was Benedict Cumberbatch playing Sherlock Holmes playing Alan Turing. The character didn’t seem right. And the film was full of Hollywoodisms and the technical details were all very obvious wrong. Or rather very, VERY over simplified (the Bombe doesn’t crack Enigma, it just reduces the possibilities). I decided to find out the real story and figure out exactly how the Bombe actually works (nothing like in the film).

To cut a long story short my aim is to recreate a Bombe using Orwell, the little 8 bit computer I have built. In order to know how a Bombe works you need to know how an Enigma machine works (and is used). And the best way to know how something works is to build it yourself.

So I did.

The operation of the Enigma is actually pretty simple. The Wikipedia article explains how it works pretty well and there are plenty of other great articles online.

To convince myself I knew how it works I coded up my own version using an Arduino. It’s been done before of course but the whole point was to ensure I understood how it works. I had to redo it all myself.

To start with I just used the serial port to input and input characters. It occurred to me though that if I could get that working I could probably make a real working Enigma machine. With a tiny Arduino and a equally tiny OLED screen and a LiPo battery I could make a very small Enigma machine. I decided to make one that was possible to wear on your wrist.

The idea here wasn’t to make the smallest one possible. I decided to make a device that was practical and useable. And something that looks like it was from WW2. Something that could actually be used in the field in place of a real Enigma machine. Obviously there were some limitations. I could have a 26 key keyboard for a start so I had to come up with a UI that would work with a minimal number of keys. I bought a small 128×64 OLED, a suitable battery and started breadboarding it all up. With it working on a normal Arduino I bought an Arduino Pro Mini (or a good replica!) and started looking at getting it running on that. That was pretty easy to get working. The only tricky thing being  having to use a USB to TTL programmer to download to it and those can be fiddly.

The code for the actual Enigma is all my own. I used the brilliant UG8Lib graphic library to drive the screen. This allows you to create your own fonts. The font I am using is a free gothic one called Fraktur which I got from here. I had to convert that into .bdf format using FontForge then I could use the UG8lib tool to convert that to suitable code format.

Fraktur is an interesting font. It’s one that most people would associate with being ‘that Nazi lettering’. It actually is much earlier than the Nazis and they, Hitler himself even, were trying to get people NOT to use it because it was un-German! It’s a funny one that seems to appear in odd places. I used it since it looks right and it was used on WW2 documents such as the covers of the code books. This enthusiastic guy explains it pretty well. Of course the whole UI is in German because it is meant to be a German WW2 device. Trying to find short German words that would fit on such a tiny screen was tricky! Thanks to my German friend Bernd who helped me a bit here.

IMG_3233_1 IMG_3245_1 IMG_3249_1

With the tiny processor, tiny screen, tiny German words, and tiny 150mAh battery I could start designing a suitable housing. Remember the idea wasn’t to make the smallest working Enigma possible, I am sure you could make it smaller, the idea was to make a functioning, practical device. I decided something about the size of a matchbox would be about right. That seems about right for a WW2 era device and it wouldn’t be so tiny to be impossible to build.

IMG_3247_1

My wrists aren’t huge and my normal watch isn’t massive. I started making a casing from steel approximately matchbox sized after laying out the main components on some 1mm graph paper to get an idea of sizes.

The case is made from 0.8mm panel steel. When you’re into making cars it’s the sort of stuff you have lot of lying about. It was some simple metalworking to make a suitable base. I got to use my new Dremel to cut the slots and used some scrap oak wood to make a former to make the rest of the base.

IMG_3290_1 IMG_3291_1 IMG_3292_1

IMG_3294_1 IMG_3297_1 IMG_3299_1

The holes either end are for the on/off switch and a recharging socket. The rectangular slots are for the strap. Recharging is via a little USB single cell LiPo charging board from Sparkfun similar to this one.

With the base done I made a simple top. To make this I used a tool called a joggler which bends a step into the metal (used for doing flush lap joints in car repair). This made a lid that would slot nicely into the base without leaving any open gaps along the sides.

IMG_3300_1 IMG_3302_1

IMG_3306_1 IMG_3313_1

To attach the lid I used counter sunk, domed head screws, similar to those used on a real Enigma machine. They are quite hard to find these days but I got some from the local RS supplier. I had to get 100 but I can use them on Orwell too. To give the screws something to attach to I machined up some brass standoffs. These have a small nipple on the base that fitted into a hole in the bottom casing. They were then soldered in place. To get the position accurate I first made the holes in the top panel, countersunk them then ran a drill through the hole to make a centering dimple in the base. I could then drill the mounting holes in exactly the right place.

IMG_3332_1 IMG_3334_1 IMG_3335_1

IMG_3337_1 IMG_3341_1_1

The stand offs were soldered in place and the bottom sanded smooth.

I then thought about how to actually mount everything inside the casing. I decided to use a small circuit board to which I could mount the screen and buttons. The Arduino Pro Mini would fit into a cut out in the middle of the board. I cut a suitable shape from some PCB board blank. Here you can also see the 2.5mm recharge socket and the main power switch. That was a toggle switch with the toggle cut down to more reasonable proportions.

IMG_3344_1 IMG_3349_1

IMG_3351_1 IMG_3353_1

The screws I had for the lid were too long so needed cutting down. The trick to getting these all the same length it so cut them roughly then insert them into a steel plate you have drilled and tapped previously. The screw protrudes though the plate then you can simply grind the exposed thread until it is flush with the plate. This makes all the screws the same length and makes the ends of them square. If I need to buy a lot of screws or bolts I tend to go for longer than I need since you can always cut them down but it’s much harder to make a short screw longer!

The next step was etching the board. I use the laser printer toner transfer method to do this (plenty of info of that online). I used the same technique to etch a tiny brass nameplate.

IMG_3377_1 IMG_3379_1_1 IMG_3385_1

There is actually a mistake on this board I didn’t notice until it was fully assembled but it was easy to fix (see if you can spot what it is).

Around this time I also started making the strap. I recently decided to learn how to sew so now I have a sewing machine of my own. I used that and some scraps of leather to make the straps. I actually hand wound the machine instead of using the motor so I could accurately position the stitches. I sewed first then cut out the straps to ensure the leather would feed evenly though the dogs. The straps are two layers of leather glued back to back. Masking tape gave me the lines to follow when sewing.  The masking tape also allowed me to mark the centre line so I could punch holes and fit the eyelets. After sewing the tape is removed.

IMG_3357_1 IMG_3358_1 IMG_3361_1

IMG_3364_1 IMG_3356_1 IMG_3365_1

The final part of making the straps was to insert short lengths of piano wire between the two layers to form pins that stop the straps pulling out of the watch. This makes inserting the straps easy. You remove the pin, insert the end through the slot in the case, reinsert the pin then pull the strap home.

IMG_3367_1 IMG_3382_1

The straps and pins also hold the PCB board down in place. Next I made little brass stand offs to mount the screen. This is held down with some 2mm brass screws. I also fitted the tactile switched and machined up some little brass buttons (which are a top hat shape) that poke through the top panel and rest on the tactile switches. I had another OLED screen that I accidentally burnt out I used for mocking up. The one I used in the watch has tape over the rear to prevent short circuits from happening.

IMG_3388_1 IMG_3389_1

IMG_3398_1 IMG_3404_1

I was then able to test fire everything up, first with the board outside the casing. Unfortunately it didn’t work! I’d forgotten I had changed the pin ordering to the OLED to make the wiring simpler. A quick re-download to the Arduino fixed that. I was able to measure the current consumption at this point. When displaying the splash screen about 40mA is drawn. On all the other screens the current draw is about 25mA.

IMG_3413_1 IMG_3419_1 IMG_3420_1

IMG_3421_1 IMG_3422_1 IMG_3423_1

The piece of black felt is there to fill the gap between the screen and the top cover. It also stops the brass buttons from rattling about in the casing.

After that all that remained was to take everything apart and paint the case. The inside is painted with zinc primer just to stop the bare steel rusting. The outside was painted crackle black. I baked the finish in my oven to give a nice hard coating.

IMG_3406_1

The finishing touch was the tiny Enigma badge I had etched. This was infilled in black then glued to the housing.

The actual UI is described below. The device is designed to be used in the field as a real Enigma machine was. The flow is based on the key sheets the Enigma operators used to set up their machines as described here. The UI is simple. The left two buttons work as left and right selectors. The right most button is the select button. Left and right selection are indicated on screen by left and right arrows.

First you turn the machine on.

IMG_3551

A key press on any key takes you to the Walzenlage, or rotor setting, screen. Here you can view the current setting or change the settings. It was hard to find suitable German words for the menus. I used Beibehalten, meaning ‘Maintain’ and Ändern meaning ‘Change’. I had to think of words that would have made sense in WW2 so things like ‘Save’ and ‘Edit’ might not have made sense as these seem more modern UI terms.

The first screen you see is the rotor selection screen. You can edit the selection and choose each wheel from left to right. The selection list gets smaller as each wheel is selected of course.

IMG_3525 IMG_3526 IMG_3527

IMG_3528 IMG_3529 IMG_3530

Next is the Ringstellung, or ring settings screen. Again we can edit and choose each wheels ring setting.

IMG_3531 IMG_3532 IMG_3533

Next we go onto the Steckerverbindungen, or plug board settings, screen. This was the trickiest part of the UI to get working with only three keys. The way it works is this. The left and right buttons increment the left and right columns. You select the pairs of letters you with to plug together (called steckering). The UI will tell you how many current pairs you have. If you reconnect a letter that is already in a pair it will break the previous connections and make a new one so the total number of pairings won’t increase. If you stecker a letter to itself it will break any previous connections to either of those letters. If you are reading from the daily key sheets you simply enter the ten pairings indicated. If you want to enter less there is is blank letter setting. If you select this the plugboard editing will end and show you the list of current connections. Clearing connections is as simple as connecting a letter to itself (called self-steckered in Enigma talk).

IMG_3536 IMG_3537

Next we get to the Grundstellung, or initial indicator setting, screen.

IMG_3538 IMG_3539

IMG_3540 IMG_3541

Next we go to the Umkehrwalze, or reflector screen. Since this is a three rotor Enigma we have the choice of the ‘B’ or the ‘C’ reflectors only.

IMG_3543 IMG_3544

Then we finally get to the encoding screen. The left and right buttons let you select the letter to encode. As you encode each letter the display shows the current rotor positions and the encoded letter in a ticker. The ticker displays 5 letter groups as this is how Enigma messages were transmitted by radio.

IMG_3545 IMG_3546 IMG_3547

This is where I deviate a bit from a real Enigma. I believe that only the Naval Enigmas used rotor wheels with letters on them (I think I remember that from Bletchley Park?). The Army and Airforce machines used rotors with numbers instead. That doesn’t work so well on a UI so I went with letters instead. Funnily enough it seems most online simulations do the same as does this brilliant kitset you can get from the Bletchley Park shop.

As well as the letter we have two additional settings. Klar, to clear to reset the ticker, and Ausgang to exit from encoding.

IMG_3548 IMG_3549

That takes you back into the settings pages. The grundstellung will now be set to whatever the rotors were at after encoding and they can be reset back to the initial settings as per normal Enigma operating procedure.

That’s basically it! It is a one off and it isn’t for sale. Although if anyone really wants to buy it I’ll sell it for US$10000. $5000 so I can go back to visit Bletchley Park and $5000 I’d donate to them :)

10 Mar 03:05

Questions Questions Questions: Answered

by Jana Miller
BONELUST CUSTOM ORDER: Pet Processing for a customer - Menoh. Only part of the skeleton is pictured & it arrived with missing teeth.

Embarrassingly enough I just finished answering the many questions I've gotten behind on here going all the way back to October of last year. Sorry guys, I'm a full time self employed bone artist and simply do not have the time to always get back to your questions in a timely fashion. Especially when it is a time where I have to really focus on something like holiday sales. Which start for me in October.

Please take note of the SEARCH THIS BLOG field to the right here where you can quickly search for answers in my many posts rather than having to look for it one at a time. 

BONELUST PERSONAL COLLECTION: Parakeet Skull. This domestic bird is one that's entirely legal to have in your collection. 💀♥💀


FOR EVERYONE WITH QUESTIONS ABOUT PROCESSING BIRDS: 

I really hardly ever post anything anywhere in general about birds because of legal issues. Most birds you're going to come across in US/Canada are illegal to have any part of dead or alive because they are Migratory Bird Treaty Act protected species. If you were to macerate most birds you're likely going to end up with nothing but a stinky pile of mush. To process birds, rodents & small reptiles/amphibians you can't really macerate like larger medium sized animals. You literally have to carefully remove the feathers, skin & muscle with surgical tools, tweezers & scissors as best you can. I rarely do this myself because it is so tedious. If it is mummified it may be even harder to accomplish. Or you can soak a while in water & if you're lucky you can carefully peel away the skin from the bones & just hope that most of the muscle was already eaten away by carrion insects. I'll have to make a longer blog post about this sometime for sure. But for now there's this one:


BONELUST PERSONAL COLLECTION: A new rodent skull addition to my personal collection - Golden Hamster AKA Syrian Hamster, Mesocricetus auratus. It is approx 1.5" long. ♥💀♥

A LITTLE MORE ABOUT BIRD REMAINS:

Most of the birds protected by the MBTA are not endangered. They are very common and abundant. But that was not the case when the MBTA was created back in 1918. Many common birds were being wiped out into extinction from people hunting them and collecting them & their eggs/nests for their collections. And people using the feathers in fashion. That's the misconception that most people don't understand now. The species that are alive now were saved from extinction by the MBTA. That's why they are so common and abundant now.

It is illegal in US, Canada, Mexico, Russia and Japan to even possess bird remains of species listed on the MBTA. We can not have or sell birds, feathers, bones, eggs, or even nests from anything on that protected list. Likewise, you could be fined up to $15,000 and/or do jail time for having/selling them. So be careful!

Your legal common bird options are - European Starling (Sturnus vulgaris), Feral Pigeon (Columba livia domestica), House Sparrow (Passer domesticus), chickens and other domesticated birds and birds like quail, grouse and pheasants. But some of those game birds you still need permits to hunt and can not be sold.

I want to point out as well that there are MANY pigeon/dove species that ARE protected species and many people have a misconception that they are not. Only Feral Pigeons are OK to have. Also, people often mention that crows are hunted and OK to have. Not that simple. You must have a permit to hunt where they are permitted to hunt and do so in season. Also, hunted crows can not be sold, they can only be gifted. Info about Regulations For Crows.


Final List of Bird Species to Which the Migratory Bird Treaty Act Does Not Apply - Note though that it is somewhat out of date - file orig dated 2005, PDF from 2008. Could be changes since then.

Tons More Animal Parts Laws Can Be Found Here. Here in the US you can quickly look up info on your exact state at the link above which is especially helpful with some laws being so varied from state to state.

BONELUST PERSONAL COLLECTION: The smaller of the 2 snake skulls I posted a couple days ago cleaned up beautifully!. Exact species unknown. But I was told it is from the Colubridae family. I took this photo at an angle to show you how the jawbones don't co

Here is a list of my most frequented blog posts and topics related to the questions I get for quicker reference to find your answers.

TIPS FOR BEGINNER BONE COLLECTORS:

BONELUST BONE PROCESSING Q&A: I want to start collecting bones/animal remains but I'm concerned about disease.

Most Important Thing For a Bone Collector? Patience. 

Starting Over, Learning Anew

Bone Collectors Are Not Sociopaths

BONELUST Q&A: "Can't you get leprosy from armadillos?

DEFLESHING WITH NATURAL DECOMP IN A BONE CAGE:

BONELUST Q&A: "Can I just leave animals to decompose in a bone cage & do nothing else?" 

BONE CLEANING WITH MACERATION:

BONELUST BONE PROCESSING Q&A: What should the remains look like to begin maceration?

The Mathematics Of Maceration - A HowTo Guide For The Patient 

BONELUST Q&A: "I've been macerating bones & they are now a strange color! Are they ruined?"

WHITENING AND SANITIZING BONE:

Whitening Bone Using Hydrogen Peroxide NOT Chlorine Bleach

Bad Words: BOIL & BLEACH

WHAT'S WRONG WITH USING CHLORINE BLEACH ON BONE?

Bad Words: BOIL & BLEACH

WHAT'S WRONG WITH BOILING BONE?

BONELUST Q&A: "Why is it bad to boil bones? It is the way I was taught to clean them a long time ago."


Bad Words: BOIL & BLEACH

GRAVE WAX, MOLD, ALGAE, & MOSS GROWTH ON BONE:

BONELUST Q&A: "What's this white stuff on my bones? How do I get rid of it?" 

Whitening Bone Using Hydrogen Peroxide NOT Chlorine Bleach

DEGREASING BONE:

BONELUST Q&A: "How will I know if a skull needs degreasing, I'm not sure what it even looks like?"

HOW DO I PUT MANDIBLES TOGETHER & TEETH BACK IN:

BONELUST Q&A: "The teeth fell out of my skull! Did I do something wrong? How do I fix it?"

BONELUST Q&A: "How do I put mandibles back together & teeth in?"

USING INSECTS FOR BONE PROCESSING:

"Stick it on an ant pile!"

BONELUST Q&A: "Do you use dermestid beetles?"

WHO AM I? WHAT'S ETHICAL BONE ARTIST MEAN TO ME?:

Meet Jana Miller: Founder & Artist of Bone Lust

BONELUST Q&A: What do you mean when you say you’re an ethical bone artist?

BONELUST BONE ART SHOP Q&A: Who is your animal bone supplier?

Jana Miller Bone Lust Interview on Postal Treats

Bone Collecting from the Beginning

BONELUST PERSONAL COLLECTION: Another new rodent skull addition to my collection. Woodchuck (Marmota monax) AKA groundhog or marmot
09 Mar 20:55

Origami cranes perform synchronized dance routine with the help of magnets

by noreply@blogger.com (Dug North)

I love this ingenious combination of traditional paper origami, magnets, puppetry, and programmed electronics. The flock of dancing cranes is the creation of Japanese designer Ugoita T. The result is a whimsical whole that is more than the sum of the parts. I think there are a lot of other interesting things he could do with this concept.

Feeling inspired? Here is where you can get all kinds of Origami paper, kits, and instruction books. While your are at it, maybe you'll want some small strong magnets!

Via the Colossal blog


11 Feb 01:15

dqdbpb: capsule hotel, nakagin REMEMBER TO CLOSE THIS WINDOW...


dqdbpb:

capsule hotel, nakagin

REMEMBER TO CLOSE THIS WINDOW BEFORE GOING TO SLEEP

THIS CANNOT BE STRESSED ENOUGH

10 Feb 23:37

Photo


06 Jan 22:23

Rapid manufacturing MK3: Detailed Walkthrough & Troubleshooting Guide

by bowman
Bunker.jordan

Seriously impressive work here

But is the process repeatable?

But is the process repeatable?


Based on the interest and comments that these articles have been receiving it seems prudent to offer up more in depth content. The focus here is the “how to”… the raw data will come later.

Sprueing:


Old School

Sometimes it easier to manually sprue. This depends on the easy of printability weighed against the complexity of the required sprue system.

Sometimes it easier to manually sprue.
This depends on the ease of printability weighed against the complexity of the required sprue system.


New School

Design your parts pre-sprued with easy to remove printable supports. This will save time, and minimize the labor post processing.

Design your parts pre-sprued with easy to remove printable supports. This will save time, and minimize the labor post processing. (STL link here)


How do you sprue? Well, to quote a friend and mentor ” You are a little silver car… that can only down shift… with no brakes…  and you are running out of gas.  Ready?  Pick the route to your destination during rush hour traffic.”  Now, imagine you are every car in traffic, that sums up how metal flow behaves. So, you build highways and roads to handle the traffic. Six lane highways with smooth merge lanes, soft lefts and rights for off ramps, no U-turns, wide intersections, and roomy shoulders for nervous drivers to pull over. You want to build clean effective roads for your frantic drivers on a hectic rush hour day.


 Theory meets Practice.

Theory meets Practice. (STL link here)


 Flask Choice:

Make sure the sprue tree doesn't exceed the height of the flask

Make sure the sprue tree doesn’t exceed the height of the flask.  Leave yourself 1/2 inch (13 mm) minimum clearance.


The flasks can be packed very tightly to get more parts with less waste, but be sure to leave enough clearance to prevent flashing.

The flasks can be packed very tightly to get more parts with less waste, but be sure to leave enough clearance to prevent flashing.


Investing:

These are the instructions for the investment being used "Satin Cast 20"

These are the instructions for the investment being used “Satin Cast 20″

Note: the size of flask can change the recommended burnout. Ranging from a 5-12 hour burnout depending on size and number of flasks.

Fill, the flask with 5/8 to 3/4 full with room temperature water. Then pour the water into a rubber bowl and invert the flask to drain.

Fill, the flask with 5/8 to 3/4 full with water [room temperature]. Then pour the water into a rubber bowl and invert the flask to drain.

1. Add investment until it forms an Island 2.  Mix thoroughly 3.  Check the consistency 4. De-gas/ De-bubble (this can be done by tapping, vibrating table, or vacuum chamber).

1. Add investment until it forms an Island
2. Mix thoroughly
3. Check the consistency
4. De-gas/ De-bubble
(this can be done by tapping, vibrating table, or vacuum chamber).


Pour the investment into the flask. Do not vacuum hollow printed parts,  rock the flask back and forth to eliminate larger bubbles, and top the flask off,.Then either tap the flask with the spatula or use a vibrating table to remove any remaining air.

Pour the investment into the flask. Do not vacuum hollow printed parts, rock the flask back and forth to eliminate larger bubbles, then top the flask off. Then either tap the flask with the spatula or use a vibrating table to remove any remaining air.


Burnout:

After the kiln is loaded the ramp up 200-250F should be slow until all the water evaporates from the investment. Normally a kiln will have a huge lag as it tries to get all that thermal mass up to temperature. The rate limiting steps is water's high specific heat, and poor heat transfer.

After the kiln is loaded the ramp up to 200-250F should be slow until all the water evaporates from the investment [see investment instructions (above) for burnout timing or burnout schedule here.] Normally a kiln will have a huge lag as it tries to get all that thermal mass up to temperature. The rate limiting steps is water’s high specific heat, and poor heat transfer.

 Between 450-600F the PLA is viscous enough to flow, but not burn. Scrape out the excess from the drip tray, and reload into the kiln. Let then kiln idle at this temperature until tray no longer has obvious signs of PLA. Scraping is done 2-5 times depending on how much  PLA was invested. If the parts were weighed before investing then the recovered PLA can be check by weight before continuing the burnout.

Between 450-600F the PLA is viscous enough to flow, but not burn. Scrape out the excess from the drip tray, and reload into the kiln. Let then kiln idle at this temperature until tray no longer has obvious signs of PLA. Scraping is done 2-5 times depending on how much PLA was invested. If the parts were weighed before investing then the recovered PLA can be check by weight before continuing the burnout.


Casting:

At this point photos get hard to take. Below there are links to video of the process (it is 30+minutes of video). It was kept in realtime so people will know what to expect.

First video is the casting of Wades Stack from the Rapid Manufacturing MK1 article. The metal ~1400F which is excessively hot, but it seemed prudent to show a workable temperature range.

1st video Wades Stack     (Video Length 10:00 minutes)

Feel free to skip ahead to the time stamp in the image

Feel free to skip ahead to the time stamp in the image


Second video is the casting of the  Gyro Ornament in the sprueing example above. The metal is cast at the ideal temperature, this is more important for thin feature parts, and heavy parts, both are more drastically affected by linear contraction from high temperature cooling.

2nd video Gyro Ornament   (Video Length 9:12 minutes)

Feel free to skip ahead to the time stamp in the image

Feel free to skip ahead to the time stamp in the image


Third video is the quenching process. Remember, aluminum and plaster hold a lot of thermal mass, and erupt violently in the water. When it is done correctly it is safe and quite anticlimactic.

3rd video Quenching   (Video Length 6:47 minutes)

Feel free to skip ahead to the time stamp in the image

Feel free to skip ahead to the time stamp in the image


Fourth video is temperature data for the proper tempering and quenching for the aluminum. Any surface defects are pointed out in the castings. And, there is a quick demonstration on de-sprueing the wades stack.

4th video Tempering/De-sprueing    (Video Length 8:02 minutes)

Feel free to skip ahead to the time stamp in the image

Feel free to skip ahead to the time stamp in the image


This is was cast in the video. It was the third iteration of sprueing. The sprue tree photographed was effective.

This is was cast in video 4. It was the third iteration of sprueing. The sprue tree photographed was effective.


Fifth video is of the working Gyro Ornament… After de-vesting, de-sprueing, some clean up, and tweaking.

5th video functioning Gyro Ornament (Video Length 20 seconds)

Feel free to skip ahead

Feel free to skip ahead


 Wade's gears after the stack has been de-sprued.(Wades Stackable link here)

Wade’s gears after the stack has been de-sprued. (Wades Stackable link here)


Troubleshooting and Diagnostics: 


Symptom: Partial plaster embedded in the part.

Possible Causes: Plaster shift, Porous print, Flashing, Checking, Hollow voids

Hexagonal patterns (Left) are signs that the printed part was not water tight. Large flaking (Center) are signs of poor flow between thin and bulk areas of a part, commonly followed with more spalling. Slitting and Spalling on (Right), is a sign that the contour could not withstand the pressure of the metal flow. Either the plaster was mixed to thin, was physically too thin , or a combination of both.

Hexagonal patterns (Left) are signs that the printed part was not water tight. This is the disadvantage to vacuuming the part in plaster.  Large flaking (Center) are signs of poor flow between thin and bulk areas of a part, commonly followed with more spalling. This can be better solved with proper sprueing. Slitting and Spalling on (Right), is a sign that the contour could not withstand the pressure of the metal flow. Either the plaster was mixed too thin, the part was physically too thin, or a combination of both.

Diagnostics:

Hole diameters in the part are either too small, or too long to withstand the force of the metal flow [TestFeaturesCast.stl].

Hexagon formation, small hexagonal recessed portions indicate that the surface of the 3D print was not water tight, and plaster leaked into the interior geometry.

Air bubbles commonly form on interior surfaces or convex surfaces relative to the parts orientation, allowing fragments of plaster to shift easily at the meniscus’ edges.

Solutions: Check investment mixing instructions, make sure printed part is water tight, do not vacuum part, redesign sprue systems, minimize thin features under  1/16″ or [1.4mm].


Symptom: Cracking

Possible Causes: Premature quenching, large volumetric contraction, or both.

Volumetric contraction tends to cause cracking and shearing internally when right angles from at points where the bulk metal have extreme differences in the surface area to volume ratio.

Volumetric contraction tends to cause cracking and shearing internally when right angles from at points where the bulk metal have extreme differences in the surface area to volume ratio. (VolumetricShrinkTest STL link)


Diagnostics: If the part is heavy it is most likely due to volumetric contraction, this is most common in aluminum.

Solutions: Fillets and chamfers help diffuse these internal stresses. Redesign with gussets, ribs, piercings, through holes, or webs instead of solid mass parts.


Symptom: Bulging/Blebbing

Cause: Premature quenching

These are two different views of the same part.  Bulging is the precursor to Blebbing, they are cause by steam expanding into the molten metal.

These are two different views of the same part.
Bulging is the precursor to Blebbing, caused by steam expanding into the molten metal.

Diagnostics: Bulging is the precursor to blebbing. It occurs when the molten metal comes into contact with water. The energy transfer of water turning to steam forces the steam to expand into the molten metal pushing it out through the hottest remaining contours.

Solutions: Wait longer before quenching, use a thermocouple if necessary to measure the temperature. Aluminum remains viscous ~900F. You can temper the aluminum by quenching between 500-750F. Remember the heavier areas of a part will take significantly longer to cool, the thermocouple will only give you a vague average of the button temperature. Bronze similarly will stay viscous ~1500-1600F …same rules apply.


Symptom: Splicing

Possible Causes: Failure to print a continuous layer, bad flow in mold, or crack in the plaster, firing the kiln too quickly can cause the PLA to expanded and crack the plaster in one continuous plane.

Splicing is often a plane shearing in the printed part, the plaster or both.

Splicing is often a plane shearing in the printed part, the plaster or both.

Diagnostics: Reprint part and look for layers of delamination, make sure the extruder can run continuously. For flow issues, test the edge cases with TestFeaturesCast.stl  the pitch example can ensure that the metal is flowing properly through the mold.

Solution: Minimize the thin features under 1/16″ or [1.4mm].


01 Jan 23:59

Fan Made Working Hero Blaster Replica (.44 Special Live...

Bunker.jordan

WANT.

If I ever have to shoot something, I want to shoot it with a Blade Runner blaster.


Fan Made Working Hero Blaster Replica (.44 Special Live Rounds).

A policeman, licensed gun dealer and designer decided to modify a Coyle Worldcon Blade Runner Blaster using a Charter Arms Bulldog .44 Special gun, creating a fully working Hero Blaster .44 replica. One of a kind.

Not the most accurate gun around (probably by the bulk and odd weight load), but impressive, nonetheless.

01 Jan 23:36

Voight- Kampff Prop Replica by Joberg.


Voight- Kampff Prop Replica by Joberg.

01 Jan 23:36

Spoony Bardess.


Spoony Bardess.

01 Jan 23:35

Hades Landscape Miniature Panel. Two miniature cityscape detail...


Hades Landscape Miniature Panel.

Two miniature cityscape detail panels, each measuring 12 square inches. Constructed of wood with molded resin applied components to appear industrial buildings, with faux hoses, vents and wires. Both exhibit soiling and chipping at the edges, but remain in very good condition. The original grey, green and blue colour paint job has faded into a muddy brown.

Both panels were used as foreground elements in the opening sequence, currently known as the “Hades” landscape and in the fly-by sequence on route to the Tyrell Building. Incredibly detailed, it’s a real shame the huge amount of detail that it is lost when shooting miniatures, even using a 65mm film.

The panels were sold in 2010 at a price of $1000.00 US Dollars each, and currently reside with British private collections.

20 Dec 01:26

Maple Motorcycle Jeans

by Alicia Elfving

maple-jeans-slim-fit-jeans

Maple Jeans is a brand of fashionable and functional motorcycle jeans featuring Kevlar reinforcement and removable armor.

Dave Fairbairn created the line is 2011 when he wanted a pair of jeans that didn’t just provide protection but also looked good. He needed something he could wear during both his commute on his Yamaha YZF and through the work day. He joined forced with Satish Tailor, who is not only a denim lover, former creative designer at Puma, but also part of the MotoGP suit design team. Two years of development and 20,000 miles of prototype testing later, Maple Jeans went into production.

Fancy extra pockets and sturdy seams on Maple Jeans

Fancy extra pockets and sturdy seams on Maple Jeans

Now, Maple currently has only a men’s line… but their current Kickstarter campaign has 15 days to go, and they already smashed their goal by tens of thousands. The goal, £30,000 (roughly $47,000), was Dave’s target for bringing British-made selvedge riding jeans to fruition, but he set higher personal targets for other expansions of Maple Jeans.

  • £60k – Dave can keep 10 British machinists in work for two months and also create a new line of women’s jeans
  • £100k – Dave can do the above and open a Maple Motorcycle Emporium in Henley-on-Thames – his first showroom
  • £100k+ – Take standard Maple jeans mass-market

Their campaign is currently at £57,707… which means there’s less than 2,500 British Pounds between us and a new line of protective motorcycle jeans for women! Given that the Holidays are coming up, now would be a great time to sign up for a pair of Maple Jeans- perhaps your friend/brother/boyfriend/husband needs a pair of super classy incognito protective riding pants. These are them. I don’t know about you guys, but I’d like to see a ladies version.

Maple also makes Kevlar lined, armor accepting custom-fitted denim jackets. I know a lot of folks who would love a jean jacket that’s also safe to ride in!

maple-jeans-jacket1

Maple Jeans kevlar jacket interior maple-jeans-leaf maple-jeans-jacket4 Maple Jeans kevlar jacket back Maple Jeans kevlar jacket hardware

Check out their Kickstarter campaign here, and current product on MapleMoto.com!

related: more gear | UglyBROS-usa jeans

The post Maple Motorcycle Jeans appeared first on Moto Lady.

20 Dec 00:23

Vivian Bales: Harley Enthusiast Girl

by Alicia Elfving

vivian-bales-bike-trophy

Vivian Bales is an extraordinary motolady who helped pave the way for women motorcyclists today.

Not only was she the first motorcycle magazine cover girl, but she completed many cross-country rides on her D-series Harley Davidson. She was just 17 years old when she bought her first bike and taught herself to ride.

Born in Florida in 1909, she was raised in Georgia, and eventually passed away in Albany in December of 2001. In her long life, she was a seamstress, dance instructor, and after buying her first motorcycle in 1926, she became an explorer and stunt rider. Her first bike was a HD Model B (350cc single cylinder)- but after riding for awhile, she began planning longer rides and traded up to a 1929 flathead Harley with 740 CCs.

A young lady of 20 getting ready to take off on her first cross country trip ion 1929, Vivian wrote Hap Jameson at the Harley-Davidson Enthusiast Magazine to tell him of her road trip plans. Vivian was only 5’2″ tall, weighing a mere 95 lbs, and couldn’t kickstart her own bike… but she was named the official goodwill “Enthusiast Girl” of the magazine. This opened up HD dealers across the United States up for fuel, maintenance, and even accommodations.

Bales considered motorcycles to be the “key to the whole United States”, riding over 5,000 miles from Albany, Georgia, to the HD Factory in Milwaukee, Wisconsin alone on her maiden voyage. She had been riding less than three years at the time, but neither physical stature or age could stop her. Her returning trip included riding through Canada, stops in Manhattan, the Carolinas, and Washington DC to meet President Herbert Hoover in her trademark all white riding gear with “The Enthusiast Girl” emblazoned across the chest.

Arthur Davidson called her “The Georgia Peach”. A truly amazing pioneer in the motorcycle industry.

vivian-bales-hd Vivian Bales by David Uhl vivian-bales-trophy "Vivian Bales: The Enthusiast Girl" vivian-bales
related: more motorcycle history

The post Vivian Bales: Harley Enthusiast Girl appeared first on Moto Lady.

19 Dec 23:34

Haunting Illustrations for Orwell’s Nineteen Eighty-Four, Introduced by the Courageous Journalist Who Broke the Edward Snowden Story

by Maria Popova

“It was a bright cold day in April, and the clocks were striking thirteen.”

Few things in creative culture are more enchanting than an artist’s interpretation of a beloved book. There is Maurice Sendak’s rare and formative art for William Blake’s “Songs of Innocence,” William Blake’s paintings for Miltpreon’s Paradise Lost, Picasso’s 1934 drawings for a naughty ancient Greek comedy, Matisse’s 1935 etchings for Ulysses, and Salvador Dalí’s literary illustrations for Cervantes’s Don Quixote, Dante’s Divine Comedy, Shakespeare’s Romeo and Juliet, and the essays of Montaigne.

Since 1947, The Folio Society has served as the premier patron saint of such contemporary cross-pollinations of great art and great literature. Now comes a gorgeous slipcase edition of the George Orwell classic Nineteen Eighty-Four (public library), illustrated by Jonathan Burton — a book both timeless and extraordinarily, chillingly timely as we confront the aftermath of the NSA fallout, and the best visual interpretation of Orwell since Ralph Steadman’s spectacular illustrations for Animal Farm.

In the introduction, Guardian editor-in-chief Alan Rusbridger — who broke the Edward Snowden story in a masterwork of journalism and stood up to real-life Big Brother by refusing to hand over Snowden’s data to the government — explores the parallels, contrasts, and essential civic discourse springing from the difference between the two camps:

As the full impact of the Snowden revelations sank in, many people made the same connection, and Amazon announced a dramatic rise in sales of Nineteen Eighty-Four. To some, the young NSA analyst had revealed a world which was near-Orwellian; others thought that he had described a state of affairs that Orwell could barely have imagined. Just before Christmas 2013 a US District Judge, Richard Leon, pronounced the NSA’s surveillance capabilities to be “almost Orwellian.” Orwellian, beyond Orwellian, not-quite Orwellian. As the debate ricocheted around the world there soon developed the counter-school: not at all Orwellian. Or even, “Orwell got it wrong,” ignoring Thomas Pynchon’s caution about Nineteen Eighty-Four that “prophecy and prediction are not quite the same.” The not-Orwellians found it offensive that a book describing a totalitarian dystopia should be confused with the efforts of one of the most open, liberal democracies in the world to defend itself. And so the debate about the “Orwellian” nature of what the NSA was up to became a proxy for discussion of the issue itself.

But the book’s most important legacy, as Rusbridger suggests, lives in precisely that limbo between what Orwell got right and what he got wrong — a testament to “the unknowable question of what future purpose technology might be put to,” the darker answers to which we must at the very least acknowledge, even as we strive to offer more ennobling ones.

'There seemed to be no colour in anything, except the posters that were plastered everywhere.'

'On it was written, in a large unformed handwriting: I love you.'

'He knelt down before her and took her hands in his.'

'At the far end of the room, O'Brien was sitting at a table under a green-shaded lamp.'

'He propped the book against his knees and began reading: Chapter I. Ignorance is Strength.'

'Almost unconsciously he traced with his finger in the dust on the table.'

Complement Nineteen Eighty-Four with two other Folio Society favorites — artist Mimmo Paladino’s stunning etchings for Ulysses and John Vernon Lord’s visually gripping take on Finnegans Wake — then revisit Orwell on the freedom of the press, why writers write, the four questions a great writer must answer, and his eleven golden rules for the perfect cup of tea.

Illustrations courtesy of Folio Society © Jonathan Burton 2014

Donating = Loving

In 2014, I poured thousands of hours and tons of love into bringing you (ad-free) Brain Pickings. But it also took some hefty practical expenses to keep things going. If you found any joy and stimulation here over the year, please consider helping me fuel the former and offset the latter by becoming a Supporting Member with a recurring monthly donation of your choosing, between a cup of tea and a good dinner.


♥ $7 / month♥ $3 / month♥ $10 / month♥ $25 / month


You can also become a one-time patron with a single donation in any amount.


Brain Pickings has a free weekly newsletter. It comes out on Sundays and offers the week’s best articles. Here’s what to expect. Like? Sign up.

Brain Pickings takes 450+ hours a month to curate and edit across the different platforms, and remains banner-free. If it brings you any joy and inspiration, please consider a modest donation – it lets me know I'm doing something right. Holstee

03 Dec 01:41

Astrophotography and Data-Analysis Sense Exoplanets

by Mike Szczys

[David Schneider] was reading about recent discoveries of exoplanets. Simply put these are planets orbiting stars other than the sun. The rigs used by the research scientists include massive telescopes, but the fact that they’re using CCD sensors led [David] to wonder if a version of this could be done on the cheap in the backyard. The answer is yes. By capturing and processing data from a barn door tracker he was able to verify a known exoplanet.

Barn Door trackers are devices used to move a camera to compensate for the turning of the earth. This is necessary when taking images throughout the night, as the stars will not remain “stationary” to the camera’s frame without it. The good news is that they’re simple to build, we’ve seen a few over the years.

Other than having to wait until his part of the earth was pointed in the correct direction (on a clear night) at the same time as an exoplanet transit, [David] was ready to harvest all the data he needed. This part gets interesting really quickly. The camera needed to catch the planet passing in between the earth and the star it revolves around (called a transit). The data to prove this happened is really subtle. To uncover it [David] needed to control the data set for atmospheric changes by referencing several other stars. From there he focused on the data for the transit target and compared points across the entire set of captured images. The result is a dip in brightness that matches the specifications of the original discovery.

[David] explains the entire process in the clip after the break.


Filed under: digital cameras hacks, slider
17 Nov 21:13

Photo


16 Nov 23:44

Photo


16 Nov 15:18

From Cubicle to Clock Repair

DNorth-87-1-copy

This article appeared in Make: Vol. 40.

This article appeared in Make: Vol. 40.

Being a dedicated automaton maker, I started to learn how to repair antique clocks because it seemed like a good way to commune with the master automaton-makers of old. I didn’t expect that it would turn into an occupation that would allow me to leave my cubicle-based job for good, but a few factors made it possible.

Preparing for the Leap
In some respects, I’ve been preparing for this change in jobs for a long time. I’ve saved some money. I’ve amassed a huge collection of tools. I’ve taken courses on small business, jewelry making, machine tools, and wood finish repair. Over the last couple of years, I’ve also taken a bunch of clock repair courses with the National Association of Watch and Clock Collectors (NAWCC).

_MG_1338-1

Just Plain Lucky
In one important respect, I just got lucky. By chance, I met Bob Frishman, owner of Andover, Massachusetts-based Bell-Time Clocks, at an antique show. Bob has been collecting, fixing, and selling clocks for 33 years and is active in the horological world. I got to know Bob, and he eventually asked me if I’d ever considered doing clock repair for a living. With Bob’s invaluable guidance, I took the leap in July of 2013, and I love my new job.

Making Things
I don’t feel like I’ve accomplished anything if I can’t point to something tangible at the end of the day that I either made or fixed. Clock repair requires both fixing and making — mostly with wood and brass, my two favorite materials.

Learning Every Single Day
There are so many different types of clocks, with so many different possible problems, that I’ll never know all there is to know. I like that. Every day I gain new knowledge — some of it handed to me, some hard-won.

Keeping a Venerable Trade Alive
There aren’t enough qualified clock repairers these days, and few schools teach the trade. However, the clocks are still around. If they aren’t cared for, I fear they’ll be scrapped. I can’t claim to possess exceptional expertise or a long, illustrious career, but I’m proud to be next in a long line of clock repairers.

The Tools
The tools of the trade are so diverse, so specific, so traditional, and so arcane. I love them all. My favorite is my watchmaker’s lathe, also an antique, made in nearby Waltham, Massachusetts.

It Fits Where I Live
On the two-block walk from my home to my repair shop, I walk on cobblestone streets, past old brick buildings and an old steam locomotive, within sight of a large tower clock, and over a canal that once powered the textile mills of Lowell, Massachusetts. Many consider the city to be the cradle of the Industrial Revolution in the United States, and the entire downtown is a National Historical Park. Working on old machines in this setting, I feel connected to the history that surrounds me.

New Understanding of Automata
My original motivation holds true. I’ve seen some antique clockwork automata for a second time recently and realized that I understood what I was seeing in a new way. I now know the names of those funny little parts, what they do, and how they were fabricated. More importantly, I know why a clockmaker would be uniquely qualified to make a lifelike machine. Eventually, I’ll incorporate what I’ve learned into my own automata.

Customers Actually Want to See Me
When you visit your car mechanic, you may or may not be there by choice. Sometimes you simply must get your car running again. It’s not the same with clock repair. Customers have definitely made a choice to have their clock fixed. They have a complicated, delicate machine that they treasure for whatever reason. Perhaps it’s clever, perhaps it’s beautiful, or perhaps it belonged to a grandmother. Perhaps all three things are true. It’s an honor to be entrusted with these heirlooms and gratifying to see a customer’s face when they hear their clock chime for the first time in years.

See more of my work at AutomataBlog.com and ClockFix.com.

Related