Critique : Lupin partie 2, plus dure sera la chute
Thomas Prrt
Shared posts
Seeed Studio Offers Free Assembly for 5 PCBs

[Review / Guide] Sainsmart 5″ inch HDMI touch display
Here is a nice little screen sold by Sainsmart, not only compatible with Raspberry-like boards, but with every HDMI-enabled device.
It could be powered via a 5v mini-USB cable and doesn’t need an external power supply so it is really autonomous.
It also features a SPI touch panel.
Unfortunately, the Sainsmart’s description is partly wrong, and they don’t give much details about installation / use. Lukily, I have sorted everything for you.
Note : this installation guide probably works also for the 7″ inch version !
1- Specifications
| LCD Panel | HannStar HSD050IDW1 |
| LCD Type | TFT Transmissive Normal White super wide viewing angle |
| LCD Size | 5″ inches (display area : 108mm x 65mm) |
| LCD Resolution | 800 x 480 RGB |
| Pixel pitch | 0.135mm x 0.135mm |
| Video output | HDMI |
| Video controller | Texas Instruments TFP401 |
| Touch panel type | Resistive |
| Touch panel output | SPI + 1 interrupt on 7x 2.54mm pin header |
| Touch controller | Texas Instruments TSC2046 |
| Powering | 5V via Mini-USB |
| Size | 143mm x 85mm x 75mm (including pin header extrusion) |
| Price / Availability | $49.99 at Sainsmart |
This display is very easy to use : just plug it to any HDMI port and to a 5V mini-USB and it will work.
The touchpanel needs a little more work, though.
2- Pictures
 |
 |
 |
|
 |
 |
3- Touchpanel wiring
Touchpanel uses one SPI channel, one additionnal pin for interrupt and one pin for ground.
So, it means touchpanel will only work with a SPI enabled board : Raspberry Pi, Banana Pi, Beaglebone, etc… It won’t work with a regular PC.
This guide is aimed to Raspberry Pi, but it may be adapted for other boards easily.
| Display pin | Raspberry Pi pin |
| GND | GND |
| T_IRQ | GPIO 25 (pin 22) – Change to another pin if you wish |
| T_MISO | SPI_MISO (pin 21) |
| T_MOSI | SPI_MOSI (pin 19) |
| T_CS | SPI_CE0 (pin 24) – Change to SPI_CE1 (pin 26) if you want to use the second SPI cable select. |
| T_CLK | SPI_SCLK (pin 23) |
| T_BUSY | Not connected |
4- Touchpanel installation
TSC2046 controller is ADS7846 compatible, and last versions of Raspbian has an overlay ready to use.
Edit /boot/config.txt, enable spi and activate ADS7846 overlay.
sudo nano /boot/config.txt
Add these lines to the end of the file :
dtparam=spi=on
dtoverlay=ads7846-overlay,penirq=25,cs=0
Change cs=0 to cs=1 if you want to use the second SPI cable select.
Change penirq if you wired T_IRQ on another pin
5- Console touch calibration
Input devices get a device name which depends on the order of detection (/dev/input/eventX).
These udev rules will create a symlink /dev/input/touchscreen pointing to the touch controller device. Reloading the driver or rebooting is necessary for the change to take effect.
/etc/udev/rules.d/95-ads7846.rules
SUBSYSTEM=="input", KERNEL=="event[0-9]*", ATTRS{name}=="ADS7846*", SYMLINK+="input/touchscreen"
/etc/udev/rules.d/95-stmpe.rules
SUBSYSTEM=="input", ATTRS{name}=="stmpe-ts", ENV{DEVNAME}=="*event*", SYMLINK+="input/touchscreen"
Now, reboot.
In order to use the touch panel with python, X, and to calibrate it, a few packages need loading :
sudo apt-get install -y libts-bin evtest xinput python-dev python-pip
sudo pip install evdev

# install ts_test with Quit button
sudo wget -O /usr/bin/ts_test http://tronnes.org/downloads/ts_test
sudo chmod +x /usr/bin/ts_test
To calibrate the touchscreen :
sudo TSLIB_FBDEVICE=/dev/fb0 TSLIB_TSDEVICE=/dev/input/touchscreen ts_calibrate6- X windows touch calibration
xinput-calibrator provides a way to calibrate the touchpanel for X windows use. Install
cd /tmp
wget http://tronnes.org/downloads/xinput-calibrator_0.7.5-1_armhf.deb
sudo dpkg -i -B xinput-calibrator_0.7.5-1_armhf.deb
rm xinput-calibrator_0.7.5-1_armhf.deb
Configure xinput-calibrator to autostart with X windows.
sudo wget -O /etc/X11/Xsession.d/xinput_calibrator_pointercal https://raw.github.com/tias/xinput_calibrator/master/scripts/xinput_calibrator_pointercal.sh
echo "sudo /bin/sh /etc/X11/Xsession.d/xinput_calibrator_pointercal" | sudo tee -a /etc/xdg/lxsession/LXDE-pi/autostart
On first start of X windows a calibration window will be displayed.
startxDelete /etc/pointercal.xinput and restart X to recalibrate.
Touch panel rotation
xinput-calibrator doesn’t handle touchpanels with X/Y swapped.
If your calibration results in swapped axis, add these config files.
/usr/share/X11/xorg.conf.d/99-ads7846-cal.conf
Section "InputClass"
        Identifier      "calibration"
        MatchProduct    "ADS7846 Touchscreen"
        Option  "SwapAxes"      "1"
EndSection
/usr/share/X11/xorg.conf.d/99-stmpe-cal.conf
Section "InputClass"
        Identifier      "calibration"
        MatchProduct    "stmpe-ts"
        Option  "SwapAxes"      "1"
EndSection
7- Disable screen blanking
Edit /boot/cmdline.txt and add consoleblank parameter
sudo nano /boot/cmdline.txtadd this to the end of the line :
consoleblank=0Edit /etc/kbd/config and edit display blanking parameters
sudo nano /etc/kbd/configFind these lines and replace the values with 0 (zero) :
BLANK_TIME=0
POWERDOWN_TIME=0
8- Conclusion
This is a very cool display. It works out of the box (minus the touchpanel), is totally autonomous and the quality is great.
I only hope Sainsmart will upgrade it to 5″ inches 1080p panel, as the LCD controller chip seems to support it…
Sources :
https://www.raspberrypi.org/forums/viewtopic.php?t=64993&f=45
https://github.com/notro/fbtft/wiki/FBTFT-on-Raspian
https://github.com/raspberrypi/linux/blob/rpi-4.0.y/arch/arm/boot/dts/overlays/ads7846-overlay.dts
Original article : [Review / Guide] Sainsmart 5″ inch HDMI touch display by www.hardware-libre.fr
State Machines: blink.ino learns to snooze
I’m a big fan of state machines. Almost every Arduino sketch usually ends up with at least one intentional state machine and a bunch of non-intentional state machines as well. Here, I’ll introduce the concept of state machines, and apply a state machine to a microcontroller’s “Hello world!” blink routine. After that I’ll explore some more complicated state machines, such as an alarm clock.
What is a state machine
A ‘state’ is the condition of a thing at a specific time. Something that can accomplish tasks and that utilizes states at its core is a state machine. They are also known as Finite State Machines (FSM), meaning that we know all possible states of the thing. The key to the state machine is the concept of time and history. The state of the machine is evaluated periodically. Each time it is evaluated, a new state is chosen (which could be the same state again), and the output is presented.
Our newly released servo trigger https://www.sparkfun.com/products/13118 is a good example of a state machine, and was developed with a similar technique. It’s a switch case statement under the hood, but with accurate timing added in.
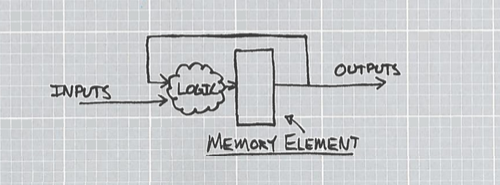
A generic state machine:
A diagram of a generic state machine. The memory element contains the current state known as the state variable. When the state machine is serviced, the state variable is updated with the value of the next state. Here, the next state is a function of both the current state and some input. The cloud of logic is some system that decides what the next state is to be, or the next state logic.
A simple state machine: The counter
A classic example of a state machine is a counter. For example, a ‘for loop’ or a 74x4040 logic IC both work as a state machine. Each time the machine is poked, either by the clock line or looping behavior, the state of the memory changes to a new state equaling the old state plus one. The finite set of states it can have is the numbers it can count.
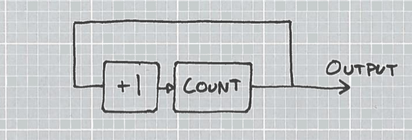
A basic counter expressed as a state machine
Parts of the counter state machine:
- The current state is the value that has been counted.
- The output is the current state.
- The next state logic is whatever the current state is plus 1.
- There are no inputs. In a more advanced diagram, an enable line or reset counter function would be drawn as an input.
The state machine advances at whatever rate it is serviced.
Moore and Mealy state machines.
Digital logic professors love to ask test questions about Moore vs. Mealy and so I have to talk about them. I don’t think the distinction makes too much sense while writing state machines in C; it’s more of a “how to make logic hardware” distinction. For us, the lesson from Moore and Mealy is that people existed who thought about this stuff and invented ways of notating it. While they targeted logic hardware, we’ll target c software.
Moore State Machine
Edward Moore wrote a paper in 1956 (Gedanken-experiments on Sequential Machines) and thus the style of machine is named after him. He says the output is dependent only on the state, and the next state is dependent on the current state (or output), and the input.
Our previous diagram
You can see that no matter what the input state is, the output only depends of the current state contained within the memory element.
Mealy State Machine
Another guy, George Mealy, wrote a paper one year earlier than Moore, entitled A Method for Synthesizing Sequential Circuits, in which he goes into great depths about creating state machines from mathematical functions, and describes those state machine’s outputs in terms of their inputs.
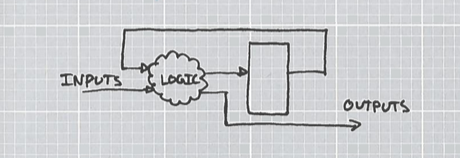
To diagram the Mealy machine, the output is made to depend on both the current state and the input. Here, the cloud of next-state logic contains the output logic as well:
One way of drawing a Mealy machine
It could also be drawn by seperating the cloud into next-state logic and output logic:
Another way of drawing a Mealy machine
Abstract State Diagrams
So far, we’ve seen that a state machine has some memory that stores the current state, that it must have come from some state, and that it will go to the next state. Our current diagram doesn’t show how it moves through states though. The goal should be to draw a map of the movement between states so we can write code that emulates our design. This is called a state diagram.
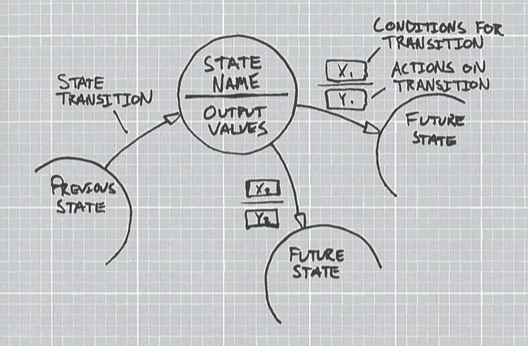
This is how I diagram the states of a state machine, using ideas from Moore and Mealy.
An abstract state diagram
Parts of the diagram:
The circle is the state
The colloquial name of the state is given in the top half of the circle
The output of the state is given in the bottom half of the circle. Sometimes this is explicit, like “X=1,” and the state behaves like a Moore, though sometimes it could be “OUTPUT = INPUT” where during that state, make the output equal whatever the input was. In this sense, the machine is very Mealy. I lump the two together for writing C state machines because it doesn’t really matter to the C construction of the machine.
The arrow is the state transition path.
The Xs, above the line, are the conditions for that state transition to occur. If the conditions are met, that will be the transition path.
The Ys, below the line, are things that happen during the transition. This concept deviates from the strictly digital logic world of Moore and Mealy and stems from the consecutive execution nature of C. While running a program, it’s easy for me to check for the transition conditions and do some one-time action while changing the states, so I put the actions under the conditions.
Always keep in mind that these are abstract representations of code and are a tool for creating higher levels of operation. Put as much detail as you need into the diagramming.
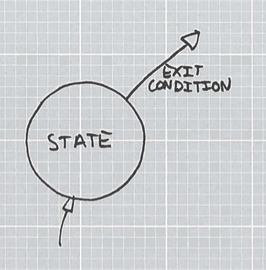
Consider a basic state that can move to a new state.
Simple state with incomplete set of state transitions
What happens if the exit condition is not met? I’ve cheated with my diagram and haven’t defined all possible actions of the state. Often I won’t quite know the full solution of my program until after the diagrams are made, and I embellish them as I go. With this diagram, I assume that if the conditions are not met, the state will go back to itself.
Fully specified state
Here, all possible state transitions are defined.
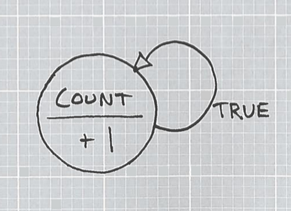
State diagram of the counter
Check out the behavior of the counter as drawn with a state diagram.
State diagram of a simple counter
Here, all possible states are represented with a single circle. The action of the state is to add one. To determine the next state, it’s easy to see that we only have one option, which is to go back to the state we were in.
The blink.ino Sketch
blink_fsm.ino
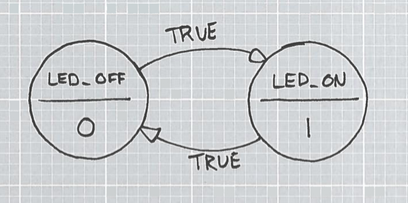
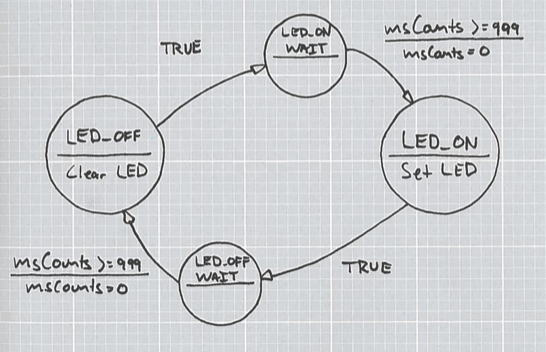
Let’s get out of the theoretic world by re-writing the familiar blink.ino sketch with the behavior and syntax of a state machine, using a switch-case. The example is to light the LED for 1 second, turn it off for 1 second, and repeat. Here there are two states, LED_ON and LED_OFF.
A basic LED toggler
In each state, the LED value is shown under the line. The arrows are each labeled TRUE because no matter what, we’ll move to the next state. This state machine doesn’t have any inputs. Every second, we’ll evaluate the state machine. If the state is 1, the output is 1 and move to the state 0. Here’s the C implementation:
Full source file (github): blink_fsm.ino
To make the state machine in C, create a variable that holds the current value of the state, define words for each numeric value that the state can be, and write a switch-case to evaluate the next state.
Defining the states:
//Define the states of the machine
#define LED_OFF 0
#define LED_ON 1
Creating the (global) state variable:
uint8_t fsm_state = LED_OFF;
So far, the state can be one of two options, so the smalles size data type is selected.
The state machine is built in the loop():
void loop(){
  //state machine
  switch (fsm_state)
  {
    case LED_OFF:  //Statements to execute every time LED_OFF is reached
      digitalWrite(13, LOW);
      fsm_state = LED_ON;
      break;
    case LED_ON:   //Statements to execute every time LED_ON is reached
      digitalWrite(13, HIGH);
      fsm_state = LED_OFF;
      break;
    default:
      break;
  }

  delay(1000);              // wait for a second
}
Every time the loop is executed, the state machine is evaluated. The state variable (fsm_state) is global, so it retains the state.
You may notice that every second we wait 1 second and evaluate the state machine. The extra code associated with the processing of the state machine will cause the cycle time to be greater than a second! It will run a little slow. This could be interrupt driven for better accuracy.
blink_fsm_ms.ino
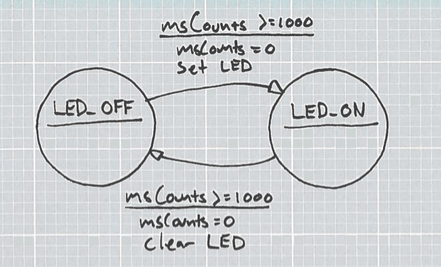
I don’t want to have to wait for a whole second. I could be accomplishing other things during that time! I would rather process the state machine at some faster interval, like 1 ms, and stay in a single state 1000 times in order to delay.
A basic toggler that is clocked faster than the toggle speed.
With this design, I won’t leave the state unless the msCounts reaches 1000. The loop is delayed for 1ms instead of 1000ms. When the condition is true for a state transition to occur, the LED state is written and the counter is reset.
Full source file (github): blink_fsm_ms.ino
As before, the same states and state variable is used. The state machine is expanded to provide functionality if and only if the state transition is to occur.
switch (fsm_state)
{
  case LED_OFF:
    //Statements to execute every time LED_OFF is reached
    //Statements to execute when it's time to move to the next state
    if(msCounts >= 1000)
    {
      digitalWrite(13, HIGH);  //Process the next state's function
      fsm_state = LED_ON;
      msCounts = 0;
    }
    break;
  case LED_ON:
    //Statements to execute every time LED_ON is reached
    //Statements to execute when it's time to move to the next state
    if(msCounts >= 1000)
    {
      digitalWrite(13, LOW);  //Process the next state's function
      fsm_state = LED_OFF;
      msCounts = 0;
    }
    break;
  default:
    break;
}
Now, each state only moves if the state transition logic is true, using an “if” statement. Here’s where it’s obvious how easy it is to add 1-time tasks to the action of transitioning states. They’re just added to the “if” statement, and will be executed only when the state moves.
The state machine works but I’m not terribly happy about how it came out. Notice that the LED state is set LOW during the LED_ON state and HIGH during the LED_OFF state. It’s easy to run one-time code leaving a state, but not during the entrance of the state. It’s counter-intuitive to me and I think it can be made clearer by adding two more states, each that only wait.
blink_fsm_final
A toggler that uses an additional state to wait for the counter.
Here, the states LED_ON and LED_OFF write to the LED, clear the counter, and move on.
Timing and accuracy side note: The counter has been modified to 999 to account for the extra state, but it doesn’t help much. We’re getting farther off the faster we run the clock. This is because the time it takes to evaluate the state machine is starting to approach the total time to execute loop() INCLUDING the delay(1); statement.
Full source file (github): blink_fsm_final.ino
First, the extra two states are added to the list of #defines.
//Define the states of the machine
#define LED_OFF 0
#define LED_ON_WAIT 1
#define LED_ON 2
#define LED_OFF_WAIT 3
The state variable is the same so we’ll move on to the actual state machine implementation.
//state machine
switch (fsm_state)
{
  case LED_OFF:
    //Statements to execute every time LED_OFF is reached
    digitalWrite(13, LOW);
    fsm_state = LED_ON_WAIT;
    break;
  case LED_ON_WAIT:
    //Statements to execute every time LED_OFF_WAIT is reached
    if(msCounts >= 1000)
    {
      fsm_state = LED_ON;
      msCounts = 0;
    }
    break;
  case LED_ON:
    //Statements to execute every time LED_ON is reached
    digitalWrite(13, HIGH);
    fsm_state = LED_OFF_WAIT;
    break;
  case LED_OFF_WAIT:
    //Statements to execute every time LED_ON_WAIT is reached
    if(msCounts >= 1000)
    {
      fsm_state = LED_OFF;
      msCounts = 0;
    }
    break;
  default:
    break;
}
We see that the extra states have become extra cases in the switch statement. States that always move on simply assign the next state to the state variable. The delay states check the counts before assigning a new state, thus retaining the state they were in.
More timing side notes: Run the msCounts incrementer with a 1 ms timer Interrupt Service Routine (ISR) instead. Meanwhile, loop the FSM as fast as possible. This will correct timing. Keep in mind that if the code execution time between ISR calls (the state machine processing time) is longer than the ISR call interval, the program will most likely lock up.
“Yeah, so what? The LED was blinking to begin with!”
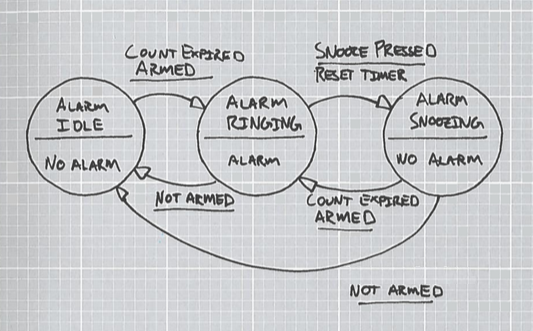
Please consider an alarm clock’s alarming functions. What would its behavioral model look like? The alarm clock has several states it can exist in and has a couple of inputs that can be used to control it.
States
- Pleasantly keeping time
- Vengeful alarm execution
- Eagerly awaiting the end of the snooze cycle so it can wake you up again
Inputs
- Arm switch
- Snooze button
There are a few more, like time set and alarm set inputs, but this example is limited to just the alarm operations.
Described as a state machine:
The alarm functions of the alarm clock.
Try mentally walking through the operation of the state machine. I see that I can’t get from ‘idle’ to ‘ringing’ if the alarm clock is not armed. Also I can’t get back to ‘idle’ by pressing the snooze button, I have to disarm the alarm. This meets my internal definition of how an alarm clock acts, so I proceed.
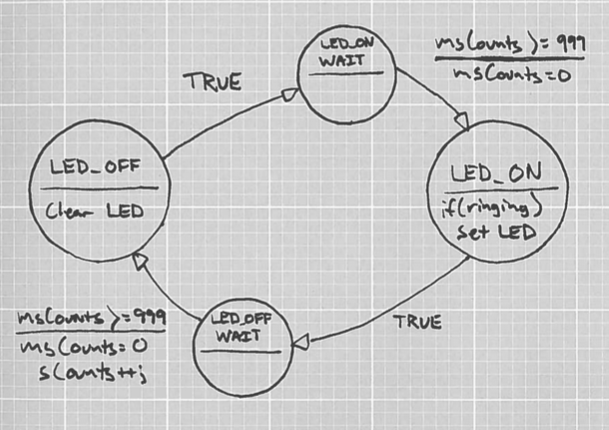
There isn’t a way of actually tracking time yet, even if just for the experiment. Rather than keeping track of days, hours, etc. I want to only keep track of seconds. So I’ll need to count seconds. Well, the LED toggling state machine does that already! I’ll just change it to keep track and add the whole darn state machine in.
Re-using the blink state machine to count seconds.
As a benefit, I can block the blinking of the LED unless the alarm is going off, and use that as the debug output.
Here’s the full source file (github): alarm_clock.ino
Hardware connections:
- Connect a normally open button between pin 7 and ground of an Arduino. This will serve as “SNOOZE.”
- Connect a SPST switch between pin 9 and ground. This will serve as “ARM.”
The code is very similar to the previous examples, but has two state machines built up in it.
First, the timer state machine states and variables:
//Timer FSM numbers
uint16_t msCounts = 0;
uint16_t sCounts = 0;

#define LED_OFF 0
#define LED_ON_WAIT 1
#define LED_ON 2
#define LED_OFF_WAIT 3
uint8_t timer_fsm_state = LED_OFF;
Next, the alarm state machine states and variables. The alarm time is set to 15 seconds from reboot (actually about 20 with error), and the snooze cycle is set for 5 seconds.
//Alarm FSM numbers
#define ALARM_SECONDS 15
#define SNOOZE_SECONDS 5
uint8_t alarmActive = 0;
uint16_t nextAlarmTime = 65535;

#define ALARM_IDLE 0
#define ALARM_RINGING 1
#define ALARM_SNOOZING 2
uint8_t alarm_fsm_state = ALARM_IDLE;
Loop() evaluates both state machines each time it runs.
//timer state machine
switch (timer_fsm_state)
{
  case LED_OFF:
    //Statements to execute every time LED_OFF is reached
    digitalWrite(13, LOW);
    timer_fsm_state = LED_ON_WAIT;
    break;
  case LED_ON_WAIT:
    //Statements to execute every time LED_OFF_WAIT is reached
    if(msCounts >= 1000)
    {
      timer_fsm_state = LED_ON;
      msCounts = 0;
    }
    break;
  case LED_ON:
    //Statements to execute every time LED_ON is reached
    if(alarmActive == 1)
    {
      digitalWrite(13, HIGH);
    }
    timer_fsm_state = LED_OFF_WAIT;
    break;
  case LED_OFF_WAIT:
    //Statements to execute every time LED_ON_WAIT is reached
    if(msCounts >= 1000)
    {
      timer_fsm_state = LED_OFF;
      msCounts = 0;
      if( sCounts < 0xFFFF )
      {
        sCounts++;
      }
    }
    break;
  default:
    break;
}

uint8_t buttonValue = digitalRead(7);
uint8_t switchValue = digitalRead(9);

//alarm state machine
switch (alarm_fsm_state)
{
  case ALARM_IDLE:
    if((sCounts >= nextAlarmTime)&&(switchValue == 0))
    {
      //Goto next state
      alarm_fsm_state = ALARM_RINGING;
      alarmActive = 1;
    }
    break;
  case ALARM_RINGING:
    if(buttonValue == 0)
    {
      nextAlarmTime = sCounts + SNOOZE_SECONDS;

      alarm_fsm_state = ALARM_SNOOZING;
      alarmActive = 0;
    }
    if(digitalRead(9) == 1)//If switch went off, goto idle instead
    {
      alarm_fsm_state = ALARM_IDLE;  // this overwrites the snooze button option
      alarmActive = 0;
    }
    break;
  case ALARM_SNOOZING:
    if(sCounts >= nextAlarmTime)
    {
      //Goto next state
      alarm_fsm_state = ALARM_RINGING;
      alarmActive = 1;
    }
    if(switchValue == 0)
    {
      //Goto alarm idle
      alarm_fsm_state = ALARM_IDLE;
    }
    break;
  default:
    break;
}
To operate, close the “ARM” switch and load the program.
Conclusion
In my experience, any coder who can diagram a program before writing it will succeed at the program. I’ve written one too many programs that ended up as a wad of nested ‘if’ statements because I didn’t plan ahead. Inevitably, I needed to add one little thing that horribly broke the program and I was forced to re-evaluate my life choices. Using tools like state machine diagrams, flowcharts, class diagrams and unit tests have allowed me to write more complex yet maintainable code (while staying relatively sane). The state machine is just another idea to have in the toolbox and I hope that it will help you in the future!


