
Type nerds, check out this Adjustable Clampersand. Brilliant and amazing, right?
(Thanks Allan)

Good morning! Another day, another comic. Just click through! This one is about Edward, the Black Prince! It is in celebration of heading to Leeds this weekend for Thought Bubble, which I am very excited for! There is a big ol’ statue of him there. Becky Cloonan and I are fans. She’ll be there too! A lot of great people will be, possibly even… YOU?
And at the bottom of the comic, you’ll notice a link to the new shirts in the store, which I am just going to keep on reminding you about. Get ‘em while they’re hot.
Shh.listenI loooove this rooooom
Welcome to my home! (again) Today I'm excited to share a tour of our dining room.
Before I share all of the details, here's a "before" peek. These photos are from our house listing and this is exactly what it looked like the first time we viewed (and fell in love with) our home.I always knew the dining room would feel very different, very quickly. We fell in love with this room for the high ceilings, large open doorways, big windows and size. The border, green trim and overall darker color scheme were things we knew we wanted to update right away.
When we moved in we hired a painter to paint the entire downstairs. We chose a soft white color (Valspar's Thistle Seed). When it came to furniture we knew we wanted the biggest table the room could fit. We created a DIY table that we've enjoyed more than words can say this past year. It was definitely one of my favorite DIY projects of all time, because I really don't think we could have found a table we love more at any price!
The yellow chairs started out as a temporary solution. I had my eye on some pricey fiberglass chairs, but wasn't ready to pull the plug. I purchased all of these chairs from thrift shops and flea markets one week and painted them all yellow to match. A year later, I still think the fiberglass chairs are pretty, but I'm strangely attached to these for now. I highly recommend this project if you like the mismatched look and are trying to find ways to cut expenses while settling into a new home. Moving is SO expensive. It's nice to find ways to save hundreds (if not thousands) with little tricks like this.
On a side note, you can see in these photos how bare our dining room was. It was like that for the longest time, until we decided to add the hooks all the way around the room.Oh Suki!
Our cocktail cart was a great investment! It's been awesome for parties and dinners and I enjoy keeping it stocked with fun ingredients throughout the year. When we have guests I love mixing them custom drinks from the flavors and spirits that they love most. I'm so glad we created a designated display area for my little cocktail hobby!
The light fixture was the final project that really made this room feel complete (for now, at least)! I loved the chandelier, but this fixture fits our style much better. We have a dimmer switch for nighttime. It looks so cute turned down low for a cozy dinner.
We recently added these gold and bronze stars (made from contact paper) to our white piano for the holidays. This design is 100% inspired by a cute star ceiling I love from Little Green Notebook. I plan to keep this design on until the new year.
I usually post a source list at the end of my home tours, but I just realized that nearly everything in this room was homemade except for our rug (from Urban Outfitters). That's pretty crazy, right?
I'm excited to see how this room evolves over the years. I've been thinking about sanding and refinishing the tabletop in a darker color after the business moves to the new studio. I would love to add more to this room over time, but a part of me really likes the simplicity too. It's a great blank canvas for dinner parties! Speaking of, wish you could all come over for a party. Thanks for taking a look at our space! xo. Elsie
PS. If you'd like to see more rooms in our home you can see the living room here and the kitchen here.

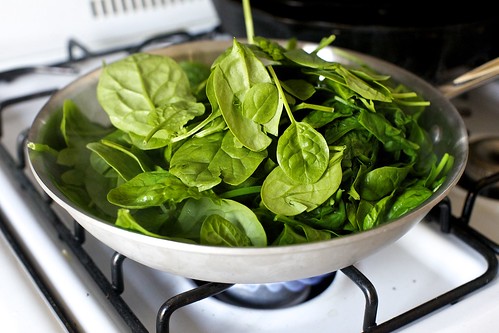
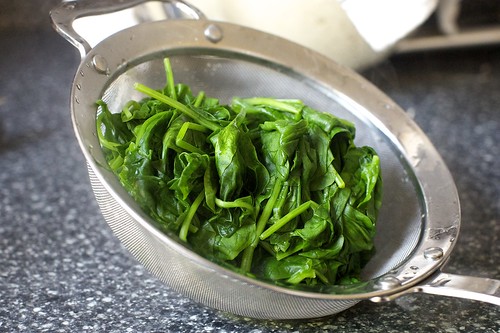
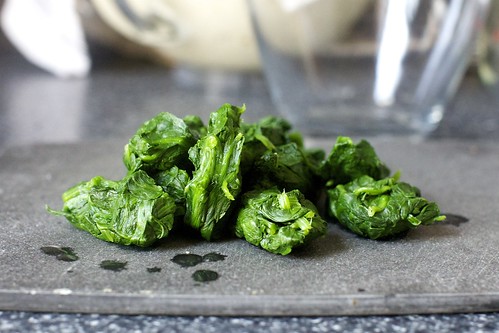
Here, spinach that has been wilted and squeezed, is re-plumped, so to speak, with creme fraiche, parmesan, salt and pepper, and is generously spread over a tiny pizza. An egg centers on this pile (and sometimes around it, at least in my kitchen) and the whole mess is baked together until the edges of the pizzette are brown, the spinach is tender, with a slight gratin-like effect, and the egg is white at the edges and just-runny-enough in the center and I think it might be my perfect meal. I would have it for breakfast, lunch, or dinner almost any day of the week (also in the rain, on a train, on a boat, with a shark…) and now that I’ve discovered that glorious late-season spinach still exists at markets around here, I might just make it happen.
... Read the rest of spinach and egg pizzette on smittenkitchen.com
© smitten kitchen 2006-2012. | permalink to spinach and egg pizzette | 135 comments to date | see more: Eggs, Italian, Photo, Pizza, Spinach, Vegetarian
Mmmmm!! I love appetizers. Emma and I have been known to order what we call "appetizer feasts" when we go out for dinner, so we try more apps and skip the main course. They're delish! Today I'm excited to share my own little spicy spin on one of my favorite classic appetizers, spinach artichoke dip!
Spicy Skillet Artichoke Dip, Serves a large group (perfect for a party!)
1 pound frozen spinach
1 can artichoke hearts
1/2 cup mayonnaise
1/3 cup sour cream
1/2 cup mozzarella cheese
1/2 cup parmesan cheese
1 tablespoon salt
1 tablespoon garlic powder
1 tablespoon crushed chili flakes
1 tomato
1 red onion
Thaw, drain and chop the frozen spinach. Chop the artichoke hearts into small pieces. In a large bowl, combine the spinach, artichoke hearts, mayonnaise, sour cream, mozzarella cheese, 1/4 cup parmesan cheese, salt, garlic powder and crushed chili flakes. Mix until the entire mixture is evenly moist. If you don't like spicy food, omit the chili flakes or cut them in half for something less spicy. Pour the mixture into a cast iron skillet and top with the remaining parmesan cheese. Bake for 30 minutes or until the top is golden at 350°F. When it is done allow it to cool for five minutes before serving. Garnish the top with chopped tomatoes and onions. Enjoy!
I served mine with toasted pita bread. I cut the pita bread into slices, brushed them with a little oil and baked them in the oven for three to five minutes at 350°F.We all pigged out on this during work one day and later I used it to top a salad (SO good). Then I added some to a piece of baked salmon (also really good!) If you don't make this for a party, expect to have some leftovers. xo. Elsie
Credits// Author and Photography: Elsie Larson
One of my goals this year is to start experimenting with making my own cheese. I'd really LOVE to take a class sometime, and I bought a kit online for making mozzarella. The year is beginning to wind down, and I realized that I haven't started on this goal yet. Where does all the time go?! From what (little) research I've done ricotta cheese is suppose to be the easiest (and quickest) cheese to make. So, at the very least I thought I could give that I try this week.
I took the plunge, and I am happy to report that making ricotta at home is SUPER easy! It's so encouraging to have a little success when you're trying something new.
There are tons of resources out there to learn how to make ricotta. I followed a short tutorial from the September edition of the Food Network Magazine. I found my batch needed a bit more vinegar and time to properly curdle, so I've added those tweaks to the directions below.
Homemade Ricotta Cheese, makes 2 1/2 to 3 cups.
6 1/2 cups whole milk
1 1/2 cups heavy cream
1 teaspoon salt
1 tablespoon lemon juice
3 1/2 tablespoons white vinegar
First over a large glass bowl place a fine mesh sieve covered with a few layers of cheese cloth.In a large non reactive pot (stainless steel or ceramic works best here) combine the milk, heavy cream and salt. Cook over medium heat, stirring occasionally, until the mixture is warmed through. Turn up the heat just a little add the lemon juice and vinegar. You don't really need to stir much, just every minute or so to be sure the bottom of the mixture isn't burning. Your milk should curdle after 5-6 minutes. Remove from heat and pour into your prepared sieve.
Allow this to drain for 15-20 minutes. Once drained you can store your cheese in an air tight container in the refrigerator for up to seven days.
Ricotta cheese is pretty cool, in that it can easily be used in both savory or sweet combinations. You can stir a little ricotta into your favorite pasta dish or on top of pizza. For a breakfast/snack option try topping toast with Nutella, ricotta and strawberries OR ricotta, blueberries and honey. Yum! Enjoy. xo. Emma
Credits // Author and Photography: Emma Chapman
It's soup season guys. We recently posted about ten of our favorite soup recipes. And, it got me thinking. I really loved this asian style dumpling soup. It's the dumplings, really. Love them. It kind of has the same effect as ramen noodle soup. It's just warm, carb-y, comforting goodness. So, I decided to spice things up and play around with new flavors.
What I love about making your own dumplings is you can cater them to your favorite tastes or dietary needs. We mostly eat vegetarian at our house, along with some seafood here and there. But, most store bought dumplings I can find in my area use pork as the main ingredient. By making my own I was able to switch out the pork for shrimp and use all fresh ingredients as well. Loved the result!
Hot & Sour Dumpling Soup, serves 2-3.
For the dumplings:
1 package of won ton wrappers (you'll only need half of them)
1/2 pound cooked shrimp, tails removed
2 cloves garlic
1 teaspoon grated ginger
2 tablespoons chopped cilantro
1/2 teaspoon sesame oil
1 teaspoon rice vinegar
2 teaspoons soy sauce
1 teaspoon worcestershire sauce
1/2 teaspoon sriracha (or more if you like it hot)
1/4 teaspoon red pepper flakes
Combine all the ingredients in a food processor and pulse a couple of times until well combined. Place a small amount of the shrimp filling in the center of a won ton wrapper. Lightly wet the edges with a little water. Then fold up the edges and press together. Try to remove any air from inside the won ton as you fill them. This will make around 20-22 small dumplings.
For the soup:
1 cup dumpling water
3-4 cups Chinese hot & sour broth (or seafood stock/broth, or even chicken broth is fine)
1 garlic clove, minced
1 red bell pepper, sliced thin
1/4 cup chopped green onions
1/8 cup chopped fresh cilantro
soy sauce to taste
First cook the dumplings for 1-2 minutes in enough boiling salted water that they have enough room to float around and not stick together. Remove all the water except for one cup, add the broth and vegetables. Cook over medium heat just until everything is hot. Taste and add a little soy sauce if needed.
Serve immediately. The dumplings will continue to cook as long as they are in the hot broth, so make this just before you plan to serve it. Enjoy! xo. Emma
Credits // Author and Photos by: Emma Chapman

Mondays aren’t all bad, you know.

I mean, if you had this burger to look forward to after your first day back, it might make Monday your new favourite day of the week.
Ok, probably not. But, let me just say one thing: This burger needs to be a part of your life as soon as possible!

These Thai-inspired veggie burgers are made with a base of shredded sweet potato and chickpeas and are flavoured with fresh ginger, garlic, cilantro, basil, and a sprinkle of lime juice and toasted sesame oil. Oh my lanta! If that weren’t enough, salted, roasted chopped peanuts are stirred into the mix to give these burgers a wicked nutty crunch that’s just downright hard to resist. Even the uncooked batter is delicious in its own right!

I stacked the baked golden patties with roasted sweet potato rounds (if we’re roasting, we might as well roast the leftover sweet potato!), fresh tomato and lettuce, and then drizzled it with some of my favourite spicy peanut sauce.

Even Eric, the peanut butter hater, loves these burgers – peanut sauce and all. I don’t know whether to be happy or sad.
The peanut sauce makes a good amount, so I made a simple shredded kale salad to serve on the side. I added a shredded carrot and a few green onions into the finely chopped kale. A nice little side salad!
The sauce is good on pretty much everything from salads to wraps to roasted veggies and noodle bowls. You can also make this sauce with almond butter or even sunflower seed butter for a nut-free version (adjusting other ingredients to taste, of course). See my tips in the recipe below on how to make this recipe nut and soy free. I’ve got you covered.
Monday you never looked so good. Let’s live it up!

Bursting with flavour, these Thai-inspired veggie burgers will make your every dream come true! The patties are made with a base of shredded sweet potato and chickpeas and are flavoured with fresh garlic, ginger, cilantro, basil, and a sprinkle of lime juice and sesame seed oil. To add some delicious crunchy texture, I've mixed in some chopped roasted and salted peanuts into the mix. These burgers are naturally gluten-free and you can make them soy-free by using coconut aminos instead of the tamari (or simply omit the tamari all together). See my note below on making this recipe nut-free. Peanut sauce is adapted from my Almond Butter Sauce.
Notes: 1) To make the burgers soy-free, use coconut aminos in place of the tamari or simply omit it all together. 2) To make this recipe nut-free, omit the peanuts in the burgers and use sunflower seeds instead. For the peanut sauce, you can probably use sunflower seed butter instead of the peanut butter, but you will likely have to adjust the other ingredients to taste since its more bitter than peanut butter.
A big Happy Birthday goes out to my amazing mom!! XOXO

I’m on this weird veggie burger/ball lucky testing streak. After months of testing veggie burger and ball recipes to no end, everything is finally clicking into place and the ingredients are binding and syncing and dancing on my taste buds. I would shed a tear of joy if I weren’t too busy stuffing my face in veggie goodness!

I’ve had many requests for a vegan “meat” ball recipe and I thought it was time make some magic happen! It’s actually something I’ve been working on here and there over the past year or two, never quite getting it right, but determined to keep trying. Initially, I was working on a mushroom lentil combo, but I had issues with the lentils drying out too much, producing a stiff and cranky end result. I’m not going to give up on it though; I just had to switch it up for a while lest I go completely mad.
In the meantime, I came up with these Italian bean balls. Considering that we polished them off in less than 2 days, I’d say they were a hit on all fronts. I don’t want to pretend that these taste like traditional meat balls, but they are magnificent in their own right with a great flavour and texture. And to me, that’s what vegan cooking is all about – creating alternatives to traditional fare that taste so damn good who cares that they don’t have meat. That’s always my goal with recipe creation. Options. Enticing veggie-based alternatives.
The hardest part was choosing which bean to use. Navy? Kidney? Pinto? Black? Chickpea? Adzuki? etc. Kidney beans won (so far, anyway). Not to mention, the purple/red skins are quite beautiful all mashed up among the speckled orange and green bits. Have you ever seen such a vibrant batter?

To infuse some Italian flavours into the mix, I added plenty of fresh basil, finely chopped sun-dried tomatoes, dried oregano, and fresh parsley. For some depth of flavour, toasted walnuts really took it all to the next level. I just love the combo of walnuts and tomato (such as in my pesto), they were just made to go together in the same mouthful!
To keep with the light and fresh theme, I served it over a bed of spaghetti squash. It’s #2 on my squash favorite’s list with delicata reigning supreme and butternut claiming third place. This list seems to change every week, but for now those three are in steady rotation in my kitchen. With a sprinkle of pink salt and freshly ground black pepper, the crunchy strands of spaghetti squash are ready to form a fiber-filled base for all your pasta dreams. We felt so energized and light after eating this meal- always appreciated this time of the year when it’s easy to crawl under a blanket and hibernate. Well, we still do that too, but at least we can feel a bit better in the process.


By Angela Liddon
|
|
|

Delightful Italian bean balls filled with basil, oregano, garlic, and sun-dried tomatoes round out this fresh & light meal of spaghetti squash "pasta" and tomato sauce. I bake the bean balls for a good amount of time until golden and quite firm, so they stand up better to the tomato sauce. I suggest roasting the spaghetti squash in advance (and preparing tomato sauce in advance too, if making homemade) and simply reheating it just before serving. I heat the tomato sauce in a pot and once it's hot enough I gently fold in the bean balls to cover in the sauce and then serve it immediately. The bean balls will soften with time, so it's best not to leave them in the sauce for too long. While they don't taste like traditional meat balls, I can assure you these are a flavourful plant-based option with a great texture! Feel free to shape the mixture into burger patties, if that floats your boat. This recipe is adapted from my Thai Sweet Potato Burgers.
Notes: 1) To make this recipe nut-free, omit the walnuts and use sunflower seeds instead (or omit entirely - but keep in mind they add a great crunch!). 2) For how to roast a spaghetti squash, see this post.
Recipient's email* (Seperate Email Addresses with comma)
Your Name*
Please fill in the code below*

Stay tuned tomorrow for a special reveal of the Canadian cover of my cookbook!

A few weeks ago, we ran a recipe for a Monte Cristo sandwich with fried egg, and I shared a bit of my own personal enthusiasm for the versatility of the egg. This week’s recipe for baked eggs by Food52′s Amanda Hesser, takes eggs back to basics, presenting them in one of the simplest ways to eat the dish. Eggs prepared in simple ways, like these baked eggs, is one of my favorite breakfast items to enjoy when I eat out each time I am home in the United States. Amanda’s recipe is great because you can add to it whichever herbs you like most. -Kristina
About Amanda: Amanda has designed a 17th-century-style herb garden at a French chateau, created the Twitter app Plodt, and appeared in Julie & Julia, playing herself. She was also named one of the 50 most influential women in food by Gourmet. Before she and Merrill Stubbs started Food52, Amanda was a reporter at the New York Times, and the food editor at the Times Magazine. She wrote the award-winning books Cooking for Mr. Latte and The Cook and the Gardener, and edited the essay collection Eat, Memory. Her last book, a Times bestseller and the winner of a James Beard award, is The Essential New York Times Cookbook. Amanda is a trustee of Awesome Food, and is an adviser to The Spence Group.
See Amanda’s recipe after the jump.
    
|

It all started with an opened can of pumpkin purée, only one-third full, staring back at me as I cleaned out the fridge. Make something with me please! I don’t know about you, but it pains me to see food, or anything for that matter, go to waste. Heck, I even save egg shells and spent coffee grounds for compost.
So, what can one make with the remainders of a can of pumpkin purée? Pumpkin waffles! Lightly spiced with ground cinnamon, nutmeg, ginger, and cloves, these pumpkin waffles are a fun way to change up a waffle breakfast. In this recipe we add a little finely ground cornmeal too; it gives the waffles just a little crunch.
Continue reading "Pumpkin Waffles" »
I love handing out candy on Halloween night. It's super fun seeing all the cute costumes. I feel like every year I see at least one Harry Potter. And, that just warms my heart. Make no mistake, a big part of Halloween is all the candy! It's got me thinking about some of my personal favorite treats. I have a lot, trust me. But one favorite is Twix bars. Here's an easy (no-bake) way to make your own homemade version.
Needed: shortbread (any shape or brand you prefer), one bag of soft caramels, one tablespoon milk or cream, one bag of mini chocolate chips and two tablespoons oil. First, cover a baking pan with wax paper and a light mist of non stick cooking spray. Place the short breads in the pan. Melt the caramels with the milk or cream over low/medium heat. Allow to cool slightly, then pour over the short breads. I add a little coarse grain sea salt here, but that's just optional. :) Let the caramel set until it has hardened (I let mine set overnight). Cover a cutting board or work surface with wax paper and a light mist of non stick cooking spray. Flip the bars out onto the wax paper. Cut into bars and trim off any excess caramel on the edges. Melt the chocolate with the oil. I microwaved mine in a glass bowl on high for 30 seconds, stir and repeat until the chocolate is fully melted (mine took about a minute and 30 seconds total). Last, dip the bars in the chocolate and tap off the excess. Place on a cooling rack and allow the chocolate to set before eating. You can put the bars in the refrigerator to speed up the process.
For trick or treating we all know that store bought, individually wrapped candy is the way to go. These homemade candy bars would be fun to serve at a party, take to the office or just leave in a giant jar on your kitchen counter (taunting you).
Warning: don't do that last suggestion. Trust me. Enjoy! xo. Emma
Credits// Author and Photos by: Emma Chapman
Shh.listenThat bar shelf is BEAUTIFUL

This tiny apartment in the Bedford Stuyvesant neighborhood in Brooklyn is the happy home of Kay Wang, her boyfriends Christopher Tryens, the couple’s dog, Corn (short for Conquistador), Chops, the cat, and Sushi, the cat. In case you’re counting, that’s two humans and three animals under one tiny live/work studio apartment. The apartment is a rental in what was formerly an old textile factory built in 1959, that was gutted in 2011 and turned into studio and one-bedroom apartments. Before that, it sat vacant for a number of years (Kay says that Google street view still shows the building abandoned and boarded up prior to its conversion.). Initially, it was a huge challenge to make the space feel both spacious but comfortably lived in while still allowing for two people to have the space to breathe. In addition, to just finding space to live, the apartment is also where Kay designs and fabricates her jewelry line, The Things We Keep. Prior to her work as a jeweler, she was a marketing executive for nearly nine years. She wasn’t happy in the corporate world so she began to teach herself the basics of silversmithing/lost wax and was able to make the switch to full-time jeweler a year and half ago. Faced with the lack of space, Kay decided to design the home by highlighting only those things particularly meaningful to her. It’s now a happy (albeit tiny space) for both living and working. -Amy
Image above: This is the second home of my workbench as I’ve continually tweaked the configuration of our live/work space (it used to live underneath the lofted bedroom area) and the new found space has been a breath of fresh air. The green enameled lampshade was a lucky swap meet score, the magnifying doctor’s lamp was scored at a studio lot sale in LA for mere pennies due to the fact that it was broken, but fixing it required nothing more than a bit of patience and finessing a few new wires and parts. :) The shelf above was put up as a place to house some of my favorite things: a little blue and white sculpture made in my first ceramics class, a sculpture from Morgan Peck, and a painting of my dog Corn by a dear friend’s eight year old daughter.

Image above: In the area that used to house my workbench, I’d fulfilled a two year dream of finally finding a space to put a small dining room table so our guests finally have somewhere to sit when they come over for dinner. The white enamel lamp shade was another lucky swap meet find, the strung elephants and stuffed cloth birds in the foreground were brought home from separate trips to Istanbul and Vietnam, and the pile of wood in the background is an everyday reminder there are more spoons to carve and more cutting boards to make.

See more of this small Brooklyn apartment after the jump!
(more…)
|
|

I am crazy about pendant lights because they are uber versatile and super easy to customize. Whether you use a pre-wired cord and socket set or assemble one yourself, the process is simple and the possibilities are endless.With the right materials an a little bit of consideration it’s easy to create a bespoke lighting looks for any space. When picking out cord for this project I was immediately attracted to the black and white hounds tooth cord because it’s so graphic (and I’m a sucker for black and white). I decided to pair it with the softer solid mint green cord for contrast. I used 2 lengths of the pattered cord and one of the sold one because I felt that 3 different cords would be too busy. I finished the look off with mirrored bottom bulbs because they added a hit of silver and in this configuration the bulb is as much a part of the design as the cord. -Megan
Megan is the Special Projects Editor at One Kings Lane and will be sharing projects with us twice a month. You can check out her column, Weekend Decorator

The full how-to continues after the jump!
|
|

Spaghetti squash is winter squash unlike any other. When you cook it and scrape it with a fork, the flesh peels away like ribbons of pasta, hence the name. The taste is light and texture almost a little crunchy. Spaghetti squash’s best friend? Sausage. They just like each other, like pasta and meatballs.
So when I saw this recipe in my friends Todd Porter and Diane Cu‘s stunning new cookbook Bountiful, with recipes inspired by their garden, I couldn’t wait to dive in. I changed it ever so slightly, adding a cup of sliced kale for some green, and using minced red onions instead of shallots. Score! Thank you Diane and Todd, this recipe is fabulous.
Continue reading "Roasted Spaghetti Squash with Sausage and Kale" »

Over the years, it seems like every other week a new study comes out about the nutritional values of the eggs. Sometimes the yolk is the bad guy, sometimes the whites. I stopped trying to keep up with science when I had twelve eggs in one week and my cholesterol level went down. I really love eggs and love the stares I get when I order thirty at a time from the farm where we buy our food. It is one staple that is always in the refrigerator for any contingency– cakes, frittatas, fried eggs, whatever. Quick and easy. This week, food writer and photographer Lara Ferroni gives us yet another idea for the wonderful egg, a Monte Cristo sandwich with fried eggs, goat cheese, and preserves, from her new book Put an Egg on It. I hope you love the look of this as much as I do! -Kristina
About Lara: Lara Ferroni is a food writer, photographer and egg fanatic who lives in Portland, Oregon. She is also the author (and photographer) of Doughnuts and Real Snacks, and regularly shoots for Imbibe Magazine and Epicurious.com. Visit her blog, www.laraferroni.com. Her new book, Put an Egg on It is a book all about eggs! See her other recipes which have appeared on the In the Kitchen With column for black sesame and vanilla ice cream, chocolate coconut caramel cookies (homemade girl scout cookies), and ginger recipes.
See Lara’s spectacular sandwich after the jump!
|
|
 When I was in New York City last weekend, I stayed in this hotel and ordered room service for breakfast from Fireside, the hotel’s restaurant, Saturday morning. I wanted to get something that would keep me going for a good part of the day, as I knew I wouldn’t have time to have lunch, and while my ever-demanding id was begging me to order pancakes or French toast or one of those other naughtily delicious things on room service menus, my eyes instead went to something called a “Carb Buster.” And since Jillian Michaels and I are still in the middle of our fling, I knew she’d love me even more for making such a choice.
It turned out to be just the ticket! A couple of poached eggs on a bed of delicious veggies, a couple of links of chicken sausage, and a single wedge of cheese, which had softened from sitting on the very warm plate and was perfectly soft and mushy. I wouldn’t exactly call it low-calorie, but it was absolutely scrumptious and definitely gave me what I needed to get on with my day.
Yesterday, I recreated it at home since I hadn’t been able to get it out of my mind since Saturday. I left out the sausage component, as it’s really the poached eggs that are the stars of the show, and of course you can substitute any veggies you happen to have in your fridge: mushroom, bell peppers, etc.
(Oh, and a slice of avocado wouldn’t be shabby at all.)
Here’s how to make it!
 Slice off the tops of a zucchini and a yellow squash.
 Then quarter them lengthwise…
 And cut them into pieces. You need about a cup of each.
 Do the same to half an onion: Chop it into large chunks.
 Then grab a tomato or two (depending on the size) and cut a couple of really thick slices.
 Now, in a skillet, melt a tablespoon of butter or a little olive oil over high heat. Your choice!
 Throw in the onion…
 And stir it around, cooking it for 2 or 3 minutes.
 Throw in the zucchini and squash…
 Sprinkle them with salt and pepper…
 And cook them for about 3 to 4 minutes until they’re golden brown and getting softer. Then just turn off the heat and set the skillet aside.
 If you have a grill pan, place the tomato slices over medium-high heat…
 Until they have nice little grill marks. Then just remove them to a plate and set ‘em aside, too. If you don’t have a grill pan, just throw them into a hot skillet to try to get a little color on them.
 Now it’s time to poach the eggs! Bring a saucepan of water to a very gentle boil, then add a teaspoon of vinegar to the water. After that, use a wooden spoon to stir a whirlpool in the water…
 Then crack an egg…
 And drop it right in the middle of the whirlpool. It’ll slowly spin around in a circle and the whites will eventually fold in on themselves and come together.
 Let the egg cook for about a minute—just long enough to set—then remove it with a slotted spoon and repeat with the other egg. Check the doneness of both yolks; if they seem too soft, just drop them back into the water for another 30-45 seconds until it seems right.
I don’t mind these stringy whites, but you can always pull them off if you want a nice, perfect poached egg.
 To serve it all up, pour the veggies into a bowl or on a plate and place the tomato slices over to the side.
 Then one by one, lay the poached eggs…
 Right on top.
 Slice a wedge of cheese. This is Monterey Jack, but any ol’ cheese will do!
 Place the cheese over on the side, but make sure it’s touching the veggies so it’ll get soft and miraculous.
 So far so good!
 But it needs a little S & P, baby.
This is looking…perfect.
 Time to dig in!
 Oh my lands. Look at that.
Soft egg yolks are my love language.
I feel like I’m looking into the egg’s soul!
Enjoy this, guys. Truth be told, this bowl is enough for two people…
Unless you’re me. In which case, grab a fork and dive in! I will say that I missed having some kind of sausage on the side, so if you’re so inclined, add a link or two!
Here’s the handy printable.
Melt the butter in a medium skillet over medium high heat. Add the onions and cook until 2 to 3 minutes, or until starting to soften. Add the zucchini and squash, sprinkle with salt and pepper, and stir to cook for 3 to 4 minute. Remove from the heat and set aside.
Grill the tomato slices on a grill pan or simply sear them in a hot skillet. Remove and set aside.
Bring a medium saucepan of water to a gentle boil. Add the vinegar. Use a wooden spoon to carefully stir the water into a circular "whirlpool." Crack one egg into the water and allow it to swirl around in the water until the egg begins to set. Let it stay in the water for 1 minute, then remove it with a slotted spoon and set it on a plate. Repeat with the other egg. If eggs need to be cooked longer, just add them back to the water for 30 seconds at a time.
Spoon the vegetables on a plate or in a bowl and set the eggs on top. Lay the tomato slices on the side. Place the cheese slice on the side so that it starts to soften from the heat.
Sprinkle eggs with salt and pepper and serve!
Note: Add a link or two of chicken or pork sausage if desired.
Posted by Ree on October 9 2013
