
This glorious image popped up in my Pinterest feed and it turned out to be another delicious creation from my food stylist friend, Sam Linsell of Drizzle… Continue reading on Curbly.com
Shh.listenoh. ma. gaw.
This glorious image popped up in my Pinterest feed and it turned out to be another delicious creation from my food stylist friend, Sam Linsell of Drizzle… Continue reading on Curbly.com
Hey, guys and gals—Mandi here! Whether you're into super heroes, wizardly fiction, or just like thunder storms, this lightning bolt mobile isn't just for kiddos. It's a quick and dirty project, too. Well, only dirty really if you accidentally get metallic paint on your fingers, but hey—instant manicure, I guess! Check out the simple instructions to make your own lightning bolt mobile.
Supplies:
-printer paper
-fishing line and/or lightweight string
-metallic paint (spray or otherwise)
-one 4" wide sheet of basswood
-one 10" long dowel (diameter is your preference)
Tools:
-printer
-power drill
-smallest drill bit
-craft blade
-steel ruler
-cutting mat
-pen
-scissors
Step One: Click here and here to download each required lightning bolt template. Then print out the templates and cut out the shapes.
Step Two: Lay out the lightning bolt shapes onto the basswood and trace with a pen.
Step Three: Cut out the shapes with a fresh craft blade using a steel ruler to guide the blade.
Step Four: Paint the shapes with metallic paint in a well-ventilated area. Be sure to wear protection over your mouth and nose!
Step Five: Drill tiny holes into the top of each lightning bolt. Before I marked my holes, I held up each bolt with lightly pinched fingers to make sure the bolt would hang straight where I drilled the holes. This means they won't be drilled at the center. Check out my hole placement below for reference.
Step Six: Drill five tiny holes across the length of the dowel. (I chose to paint my dowel white, by the way.) The holes do not need to be perfectly spaced.
Step Seven: Tie fishing line/jewelry line onto each lightning bolt and through the holes of the dowel. Make sure the bolts are lying out, as shown above, before knotting the wire and trimming away the extra line. Then thread string through the outside holes for hanging the mobile.
I hung my mobile using a small, sticky-back cup hook, but you could use screw hooks or brackets as well. If you're not into metallic paint, you can make this mobile any color. Hey—why not try rainbow lightning bolts? -Mandi
Credits // Author and Photography: Mandi Johnson. Photos edited with Spring of the Signature Collection.
")
My desire for vegetables has been fleeting over the course of the first and second trimesters. Some days I don’t want to touch them with a ten foot pole (except in smoothies, maybe), but when I do get a craving for veggies I have to eat all the vegetables, as soon as possible. There’s no middle ground. I either make a salad the size of my head or no salad at all.
These lettuce-wrapped tacos are the result of one of my undeniable, all-consuming veggie cravings last week. All I could think about was something super fresh and crunchy. Before I knew it I was pulling every single vegetable out of my fridge and piling it onto the counter. Eric could see that crazy look in my eyes and he knew I would stop at nothing to get my fix. I whipped up the lentil-walnut taco meat from my cookbook, sautéed some red pepper and onion, blended up some cashew sour cream, and got to chopping. I knew this was going to be the veggie-packed meal of my dreams. I almost shed a tear of joy when I took my first bite. Heck yes. I hit the flavour, texture, freshness jackpot! Somehow I managed to share with Eric and we stuffed ourselves silly. Surprisingly, we even had leftovers for lunch the next day. I’m telling you, these tacos prove that leftovers can be a great thing. It was such a fun treat to open the fridge the next day and have this great lunch waiting to be gobbled up a second time around.
")
Here’s how I constructed the wraps:
1) Romaine/Iceburg/Butter lettuce “wrap” + Lentil-Walnut Taco Meat (creates an amazing base for a taco!)
")
2) Sautéed onion and bell pepper:
")
3) Chopped tomatoes or salsa:
")
4) Lots of Cashew Sour Cream:
")
5) Chopped green onion + a squeeze of lime juice
")
Other topping ideas = sliced avocado, cilantro, hot sauce, _________ ?
6) Stuff into face. Make a HUGE mess. Repeat as necessary (until you can’t fit one more bite).
Veggie craving conquered.
")
Get ready to pack in a ton of veggies in one irresistible, healthy meal. If you haven't tried my lentil-walnut taco meat, this is a great recipe to do so. It's high-protein, and the taco seasonings and chewy texture create a realistic-tasting taco base. Feel free to use tortilla wraps or corn shells instead of lettuce wraps or you can make this recipe into a big salad too. You can save time by cooking the lentils and prepping the taco meat in advance. This recipe is inspired by Minimal Eats taco wraps and it's adapted from my Raw Taco Salad and the lentil-walnut meat is adapted from the The Oh She Glows Cookbook (page 186).
Tips:
1) I used French green lentils in my taco meat because I love their chewy texture, but regular green and brown lentils work too. Do not use red lentils as they are too mushy and don't have the required chewy texture for this recipe.
2) Nut-free taco meat: I haven't tried this yet, but you might want to try subbing the walnuts for 1/2-3/4 cup toasted sunflower seeds. Let us know how it goes if you try it out!
3) My Cashew Sour Cream recipe can be found here.
")
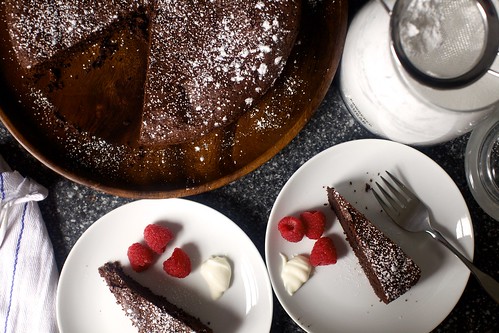
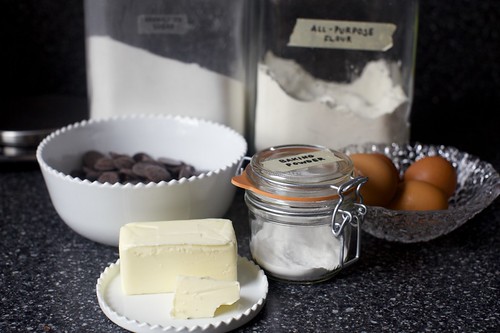
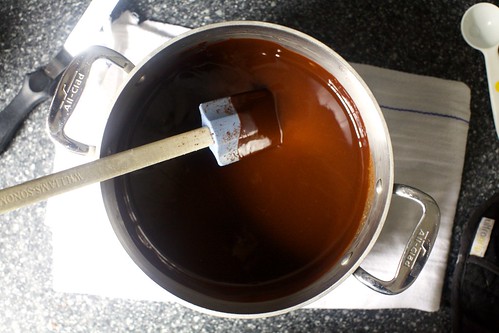
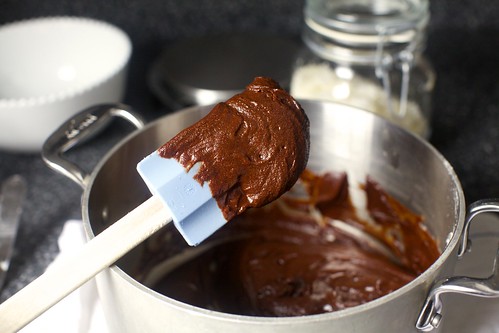
It’s incredibly simple, just butter (she’s French, so bien sûr), dark chocolate, sugar, flour, a bit of baking powder and her secret ingredient: water. A spoonful or two here and another there creates a decadent crumb you won’t read about in any cookbook. Sure, you could use milk or maybe replace a spoonful with some kirsch but she does not so I do not. The whole thing, save some hand-whisked egg yolks and machine-whipped egg whites (which gives it an airy lift and almost crackly meringue of a lid), is mixed in the pot where you melt the chocolate. It bakes in 30 minutes, which is convenient when your afternoon is rerouted, and tastes amazing. And I bet she regrets ever giving me the recipe.
... Read the rest of valerie’s french chocolate cake on smittenkitchen.com
© smitten kitchen 2006-2012. | permalink to valerie’s french chocolate cake | 166 comments to date | see more: Cake, Chocolate, French, Photo
A handful of home farm staples, treats, and neat stuff I’ve run across in my travels across the web this week. I have a giant soft spot for this slouchy, feminine style from the 20′s and 30′s. It makes me think of those cozy English mysteries on PBS I love so much. With 22 patterns to knit, for $6.24 (reg. $24.95) you can have A Handknit Romance for a steal of a price.
 Keep meaning to get the perfect hat to garden in? Make your own. This looks like it might just be the one: reversible sun hat pattern, pdf available for $8.50 from worthygoods of Bar Harbor, Maine. Check out her kids’ caps patterns, too.
 Taking baby to the beach? My Swim Baby has reusable cloth swim diapers on sale 50% off, plus sun hats and other swim gear for tinies.
 I’m partial to Lodge because my father hailed from the company’s home of South Pittsburg, TN. In 2011 they started making these seasoned steel pans in addition to their famous cast iron. The shape of this pan and the Lodge reputation are calling me. I’d love to try one of these puppies. Skillets start at $44.95.

Grace asked me to write this article last week after I “returned” a salad to a local sandwich shop because it was not worth the $10 that I had paid for it. Becoming a person who asks for what she wants has not come naturally. Like many people (dare I say particularly women), I always feel like when I ask for things, I’m fighting against that part of me that wants to be rewarded for not asking. I feel like someone will notice my supreme sacrifice and quiet patience – above all, what a good person I am for not being demanding – and all my wishes will come true because I didn’t ask and was good and quiet.
But the more experience I have in the real world (not the fantasy world in my mind), the more I realize this is not the case. People are simply too busy trying to get through their own days and their own lives to figure out the secret wishes floating around in my head. So about this time last year, I started an experiment. It came out of a phone conversation with my dad, who was doing research for his book. He told me about a concept called Rejection Therapy. I’ve spoken about it on After the Jump, but the basic concept is that most of us are so afraid of hearing the word “no,” that we neglect to ask for things.
When I heard about the concept, I was immediately transported back to my first job in New York. I was working for a company that sold book binding supplies and was hired on the same day for the same job as another girl. She and I, both new to the city, became good friends and one day she let her salary amount slip. She was making about $100 more per week than I was. At the time, this was a huge difference. I was just barely scraping by on the amount I was making. I was so shocked that I asked how she got more money. She told me that when she was offered the job, she just told them that she needed more. I felt like the wind was knocked out of me. I couldn’t believe it was so simple. She just asked. -Amy
Read more about asking for what you want after the jump!
If you've been reading A Beautiful Mess for awhile, you know that we LOVE our posts about houseplants. We love shopping for them, we love arranging them, and we love living with plants! After my husband and I bought our new house, I immediately began mentally decorating our daughter's room when it hit me: Um, what if our plants are poisonous? It turns out that many of them were (I'm looking at you, beloved fiddle-leaf figs) and that a lot of the non-toxic ones just looked kind of boring. So I started doing a little research on interesting-looking house plants that are non-toxic to children, cats, and dogs, and I thought I'd share my favorite seven non-toxic houseplants with you guys today.
1. Baby Rubber Plant (also called peperomia)
I love this plant for its thick, waxy leaves! It's technically a succulent but it looks a little different from most succulents. The baby rubber plant just needs some bright, indirect sunlight, and occasional watering, and it's good to go!
2. Donkey's Tail (also called burro's tail)
I was so glad to find at least one typical succulent on the non-toxic lists. These are great, as they require little water, and they're pretty forgiving if you forget to water them! They do need more sunlight, though, so they're best by a window.
3. Boston Fern
There are MANY varieties of ferns: some are highly toxic (some are even carcinogenic), and a few are not, such as the Boston fern. Be sure you check the labels, and don't go just by appearance, as they all look incredibly similar! Boston ferns need lots of watering but don't do very well in direct sunlight, so they make great houseplants if you can remember to keep them watered.
4. Fittonia (also called nerve plant or mosaic plant)
These require conditions much like our boston fern—indirect sunlight and a lot of water!
5. Spider Plant (also called airplane plant)
The spider plant needs moderate light, but the good news with this one is that it needs to dry out between waterings! Forgetful people of the world, rejoice with me.
6. Hoya (this variety is also called Hindu rope, Krinkle Kurl, or wax plant)
I love how weird this plant looks. It grows the best in bright, indirect light, and you don't have to water it very much at all.
7. Prayer Plant (also called rabbit's tracks)
This one is my absolute favorite. It's low maintenance, and I can't stop looking at it—it looks so interesting! It likes a lower-light environment, and you have to keep its soil moist (but not too soggy), but it's really a beautiful thing to have around.
If you aren't sure what some of your houseplants are and you'd like to check on them, take some photos of them on your phone and visit your local nursery! They'll be able to help and answer questions about your plants. I think it's really important to at least know the names of your plants if you're worried about your kids or your pets munching on them on the sly, right?
There are plenty more non-toxic plants out there if you are interested! I'm definitely not an expert on plant toxicity, so please do the research if you are concerned. Here is a good resource for what plants are toxic and non-toxic for children, and here is a list for dogs and cats (and horses, if you happen to have a horse that lives in your house). And of course, let's just try and avoid eating houseplants in the first place. ;) Let me know if you have any tips as well! xo. Sarah
Credits // Author and Photography: Sarah Rhodes. Photos edited with Lula (B&W) from the Signature Collection (with the "monochromes" layer turned off).
 This is one of those recipes that causes me to sit and stew for hours over what the heck to call it. My title choices were:
Chicken & Green Chile Enchiladas
Green Chile & Chicken Enchiladas
Enchiladas with Chicken and Green Chile
Enchiladas with Green Chile and Chicken
Green Enchiladas (grody!)
Chicken Enchiladas with Caramelized Onions, Green Chiles, and Other Really Good Stuff
So I did what I normally do when I feel myself overwhelmed with recipe title options: I stripped it down to its bare bones and called it Chicken Enchiladas.
I feel cleansed.
These are delicious! I whipped them up yesterday in an effort to use some chicken, corn tortillas, and chunks of cheese that I needed to use, and they wound up being super tasty. Now, these chicken enchiladas are not to be confused with my White Chicken Enchiladas here on my website, which have more of a white sauce approach, and they are not to be confused with my White Chicken Enchiladas in my second cookbook, which is similar to the one on my website, but that has roasted peppers throughout, and they are not to be confused with my Easy Green Chile Enchiladas, which I learned to make while on a visit to Albuquerque in 2012.
Wait. Now I’m confused. So I’ll just move forward with this recipe. A pretty easy, throw-together dinner!
 Sprinkle some boneless, skinless chicken breasts with lots of seasoning: I used a little Cajun spice, cumin, and chili powder. Because of the other ingredients in this dish, it’s best not to use seasoning mixes that contain salt. But otherwise, season away!
Note: While I cooked three breasts to begin with, I only wound up needing two. The third one was graciously gobbled by my beloved.
 Heat some vegetable oil in a large skillet over medium heat and cook the chicken on both sides…
 Until it’s totally done in the center. This’ll take a good 8 minutes or so.
 Meanwhile, chop up an onion…
 And when you pull the chicken out of the skillet…
 Throw the onion into the skillet!
 Stir the onions and let them cook around in all that flavorful wonderment…
 Until they’re extremely dark and caramelized and luscious. Remove them from the pan and set them aside. These will play a pivotal role in the flavor of the enchiladas, so don’t underestimate them!
 Turn the heat to low and pour in 3 cans of green chile enchilada sauce.
And guess what? You can use regular enchilada sauce instead! This recipe is totes flexible that way. And that is why I ultimately decided not to incorporate “Green Chile” in the recipe title. I didn’t want to pigeonhole it.
Oh, and yes: You may roast your own green chiles, place them into a bag to allow them to sweat, peel them, and puree them with other ingredients of your choice if you would prefer to make your own green chile enchilada sauce. But that wasn’t how I rolled yesterday.
 Let the sauce warm up in the skillet. And here you can see what I love about this kind of dish: I cooked the chicken in the skillet, then removed it cooked the onions in all the chicken flavor. Then I removed the onions and warming up the sauce in all the chicken and onion flavor. Layers of flavor, baby!
 While the sauce is warming up, brown some corn tortillas either on a hot skillet or over your stovetop burner. Doesn’t take very long.
 You’ll want to soften them a bit, and you’ll want to brown them so they have a few little black flecks on them.
 Meanwhile, use a fork to shred the chicken finely…
 And because we’re being obsessive about layering all the flavors in this dish, pour the juices from the chicken plate right into the enchilada sauce…
 And stir it around.
 Also grate up a whole bunch of cheese. I will pretend that this is a cheddar-jack combination, but it’s actually—wait for it—cheddar-mozzarella. I had a block of mozzarella cheese that was much closer to its expiration date than the Jack, and I made a judgment call. Sorry to cross continents!
 Now you’re all ready, both physically and emotionally, to assemble the enchiladas.
 First, pour about 2 cups of the sauce in the bottom of a large casserole dish…
 And spread it into an even layer.
 Then, one at a time, dunk the tortillas into the sauce…
 Sprinkle some cheese down the middle…
 Along with some chicken…
 And some of the dark, delicious onions.
 Yum!
Yum!
 Then just roll it up…
 And put it seam-side down in the sauce.
 Then just keep going until the pan’s all filled!
 Scoop whatever’s left on your pan after all the enchiladas are assembled…
 And do the same with the onions if you have any left!
 Finally, pour on the rest of the enchilada sauce in the skillet…
 And sprinkle on the rest of the cheese.
 I like to sprinkle on a little chili powder on top, then it goes in the oven for about 30 minutes.
 Bada BING!
Oh my, did this ever smell good.
Now, this is the hard part, but it’s very important: You need to let the pan sit about 15-20 minutes before you serve up the enchiladas. They stay together much better this way, and they’ll still be nice and warm.
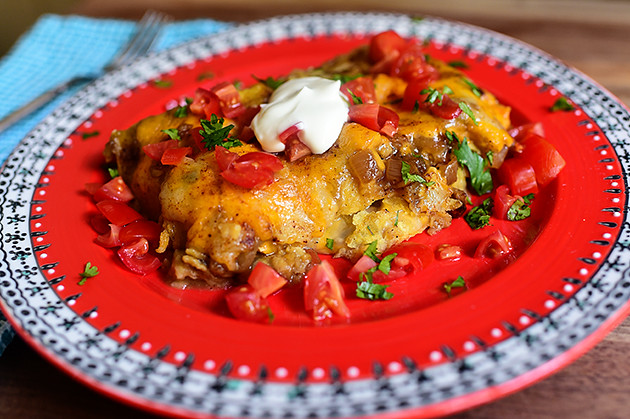
 Serve a couple on a plate, sprinkle on some diced tomatoes, and add a dollop of sour cream.
 Then add some chopped cilantro.
I’ll say it again: Bada BING!
In the absence of a more cerebral description (I used all my brain power figuring out the recipe title), this was very, very yummy.
Here’s the handy dandy printable!
Preheat the oven to 350 F.
One at a time, hold tortillas over the stovetop burner (heated to medium heat) to brown slightly, about 30 seconds per side. Set warmed tortillas aside.
Sprinkle both sides of the chicken breasts with the cumin and chili powder. Heat the oil in a skillet over medium heat and cook the chicken on both sides until done in the middle, about 4-5 minutes per side or until juices run clear. Set it aside on a plate to cool, then shred it finely with a fork.
Throw the onions into the same skillet and stir them around to cook for 4 to 5 minutes, until deep golden brown and caramelized. Remove them from the pan and set them aside on a plate. Pour in the enchilada sauce and reduce the heat to low, allowing it to warm through.
Pour 2 cups of sauce into a 9 x 13 inch casserole dish. To assemble the enchiladas, dip a tortilla into the sauce then lay on a sheet pan or plate. Sprinkle some cheese down the middle, followed by some chicken, and finally, some of the caramelized onions. Roll it up tightly, then place it, seam side down, in the pan. Repeat with the rest of the tortillas.
Pour the rest of the sauce over the enchiladas, then sprinkle on the rest of the cheese. Give it a final sprinkling of chili powder, then bake it for 30 minutes, or until hot and bubbly.
Remove it from the oven and let it sit for 15-20 minutes before serving. Serve 2 enchiladas at a time, topping with a dollop of sour cream, a sprinkle of diced tomatoes, and a sprinkling of cilantro.
Posted by Ree | The Pioneer Woman on June 9 2014

Cute and easy DIY project for the nursery on the blog today featuring @scotchducttape #diy
Shh.listenNot very hygienic...


Ever get hungry at a museum? You can lick the walls at Edinburgh’s Jupiter Artland, where Scottish artist Anya Gallaccio's work Stroke is on display. It took her three days to paint the space with 90 pounds of 70 percent cocoa, confectioner-quality chocolate, which she invites visitors to touch and taste.
Shh.listenTHIS LOOKS SO GOOOOOOOOOD

Now that I’m carting around a small watermelon-sized bump, I find myself relying on quick and easy recipes more than ever. My feet just don’t want to be on the ground for long come 7pm, especially since I spend a lot of the day on my feet testing recipes. So, I figure now is a great time to build on my quick and easy recipe collection to help us get through the next several months (years?). No matter what your particular situation, I think there’s always a demand for healthy, delicious meals that don’t take long to throw together. I hope to showcase more of these recipes in the months to come. With summer around the corner, this seems like the perfect time to kick it off!

This is one such easy meal that we’ve been making lately (when I can peel myself away from the watermelon and kiwi, that is) and it’s on the table in 30 minutes flat. Noodle bowls are awesome because you can customize them any way you like – a total clean out the fridge kind of meal. If I have some veggies on their last legs (rubbery celery, I’m looking at you), they are brought back to life in a noodle bowl.
This is a flavourful and comforting meal without feeling heavy in the slightest. Just like the noodle bowls in my cookbook, I use a small amount of noodles (rather than a whole package) and pair it with several cups of vegetables for lots of nutrition and fibre-packed satiety. The julienned carrots add a pasta-like texture, softening like a noodle when heated. It’s my secret to keeping the meal light and energizing without feeling like you’re missing out on those comforting, starchy noodles.

A veggie-packed, light-on-the-noodles noodle bowl that's paired with a quick and easy homemade Teriyaki sauce. The sauce isn't traditional by any means - I've swapped the soy sauce for coconut aminos (a great low-sodium option) and the Mirin (sweet rice wine) for seasoned rice vinegar. It turned out great regardless. Go ahead and customize this noodle bowl with whatever you have hanging around. I made lots of Teriyaki sauce so you’ll have some to bring the leftovers back to life the next day. Also, feel free to change up the protein source. I used frozen shelled edamame because it’s so quick, but fried tofu would also be tasty. Teriyaki sauce is inspired by allrecipes.com.
Notes: I used coconut aminos (which is very low in sodium), but feel free to use low-sodium tamari instead. I recommend adding it to taste since it has a higher sodium content than coconut aminos so you might not need as much. To get more servings out of this dish, feel free to add more soba noodles.
Soy-free option: Omit the edamame and replace with adzuki beans, chickpeas or another bean of choice. Use coconut aminos instead of tamari.
gluten-free option: Use gluten-free soba noodles such as brown rice or buckwheat. Be sure to check the label of your tamari and other ingredients as well.


Shh.listenTotally going to make these
I adore simple slice and bake cookies. They are the perfect companion to an afternoon or evening cup of coffee. Although I must say, I'm getting to the age that I just can't have caffeine past 5:00 or 6:00 in the evening if I want to sleep that night. I used to never understand why my grandmother, Norma Jean, would serve decaf coffee after a family dinner. But now I totally get it. Coffee tastes great with dessert, but I still want to sleep later that night. :)
Or maybe this has nothing to do with age. I don't really know. I just used to be able to drink coffee anytime of day and it didn't really affect me, but that has changed in the last year or so. Anyway, let's focus on the cookies for a second. :)
Brown Butter Icebox Cookies, makes about four dozen.
Adapted from Taste of Home: The Ultimate Cookie Collection (first cookbook I ever owned).
1/2 cup brown butter (4 ounces)
1 cup sugar
1 egg
1/2 teaspoon vanilla extract
2 cups flour
1/2 teaspoon baking soda
1/2 teaspoon salt
2 tablespoons water
Cream together the (softened) brown butter and sugar. I'm using some brown butter I saved from making brown butter popsicles. You can use regular butter if you like, but I highly recommend at least trying brown butter once, as I think you'll be amazed at the flavor difference (it's a little more sweet and nutty). Stir in the egg and vanilla extract.
In another bowl, combine the flour, baking soda, and salt. Stir this in with the butter mixture. If your batter seems too crumbly, add a tablespoon or two of water until a firm dough ball forms. I needed the full 2 tablespoons of water, so likely you will too.
Roll the dough into a long cylinder. Wrap tightly in plastic wrap and freeze for at least 2 hours or overnight. You can also leave this in the freezer, if it's well wrapped, for weeks and weeks and have it ready in case you have impromptu guests over or something. Always impressive to have homemade cookie dough ready in a snap.
When you're ready, slice the dough as thin as you can. It doesn't have to be perfect, trust me (see above). Place on a baking sheet lined with parchment paper or a baking mat. Bake at 325°F for 10-12 minutes.
Once the cookies have cooled slightly, drizzle or dip them in chocolate (or white chocolate), and add a sprinkle of sea salt. This part is totally optional, but I just love it.
Enjoy these and happy baking! xo. Emma
Credits // Author and Photography: Emma Chapman. Photos edited with Stella of the Signature Collection.
 I love grilled veggies. I love burritos.
Ergo, I love grilled veggie burritos.
You’ll love them, too! They’re perfect if you happen to have made a pot of beans the day before (either black or brown!) and the possibilities for fillings are deliciously endless.
Here’s how I made mine last night!
 First, make some rice: Heat some olive oil in a saucepan over medium-high heat and add some long grain rice.
 Stir it around for a minute or two…
 Then pour in some chicken broth.
 Zest a lime and cut it in half…
 Then add the zest…
(Cut my finger Friday.)
(Ouch. It hurt.)
 And squeeze in the juice.
 Bring it to a boil, then reduce the heat to low, cover the pot, and cook for 25 minutes or so. I forgot about mine and it cooked a teeny bit too long…but it was still delicious. After it’s cooked add the zest and juice of a second lime, stir it around, and set the rice aside!
 Now, you also need some beans to go with that rice. I used black beans from a can and gave them a rinse before heating them in a small saucepan.
 But if you have time, you can whip up a batch of these black beans. They’re lovely!
(Pssst. These burritos are a great leftover meal if you’ve made a big pot of beans.)
 Now for the grilled veggies: Throw some corn on a grill pan over medium heat. Brush with olive oil, sprinkle with salt, and let it grill for 12-15 minutes, turning it to get nice grill marks on the outside.
 Slice some zucchini and squash into 3 slices lengthwise…
 Then dip a brush in olive oil…
 And lightly brush both sides.
 Put them on the pan, sprinkle them with salt…
 And grill them until they have great grill marks on the outside and are tender but not totally mushy.
 Remove them and set them aside for a bit.
 I would like to take this opportunity to talk about how much I love grilled vegetables. Slap these in a panini, dice them and add them to a quesadilla, or just serve them as a side dish.
Love.
 When they’re cool enough to handle, cut the zucchini and squash into a large dice…
 And slice the kernels off the corn cobs.
 You’ll also need some cilantro…
 And some cheese…please.
 At the last minute, stir some cilantro into the rice. Yum!
 Warm a burrito-sized flour tortilla and spoon some rice down the middle.
 Top the rice with beans…
 Zucchini/squash…
 Corn…
Corn…
 A little chopped onion…
 A little diced tomato…
 A little squeeez of lime…
 Some cheese and cilantro leaves…
 Then it’s time to roll it up, and this is impossible for me to shoot because I need both hands, but basically you tuck in both ends…
 Then roll it up as tight as it will go.
 Slice it in half…
 And…ta-da!
So, so good. The only thing missing was some spicy salsa; I wound up dipping this in a little dish of it, but in hindsight I should have spooned it over everything before I rolled up the burrito.
(Some sour cream would be heavenly, too!)
(And some guacamole.)
(Anything goes with a burrito!)
 If you want to forgo the tortilla, just dish some rice in a bowl…
 Spoon on some beans…
 And pile everything on top, ending with a squeeze of lime.
 A little salsa, too!
This was such a nice Sunday evening treat.
Here’s the handy dandy printable!
Heat the olive oil in a large saucepan over medium heat. Add rice and stir around for 2 minutes. Pour in chicken broth and the juice and zest of 1 lime. Bring to a boil, then reduce to a simmer, cover, and cook for 20-25 minutes until all the liquid is absorbed. Stir in the juice and zest from the remaining lime, then stir in the cilantro. Set aside.
Brush zucchini and squash slices, along with the ears of corn, with olive oil. Sprinkle with salt. Grill them on a grill pan, a charcoal grill, or saute them in a heavy skillet over medium-high heat, turning them halfway through. Remove when the veggies have great color on the outside. Set aside to cool, then dice them.
Heat the beans in a small saucepan until hot.
Warm the tortillas in the microwave for 30 seconds.
To assemble the burritos, lay out each tortilla on your work surface. Spoon on rice, then beans, then sprinkle on plenty of grilled veggies. Top with chopped onion, tomato, cheese, and any other toppings you'd like. Spoon salsa all across the top. Tuck in the sides, then roll the burrito up as tightly as you can. Cut in half and chow down!
Posted by Ree | The Pioneer Woman on June 2 2014
Shh.listenI like this style for the black dressers' paint redux that will happen


Nicole took advantage of a road trip to try a new thrift store, and she scored this cute, little dresser. Since it cost her "practically nothing," it was the perfect chance to try a little decor experiment.
Shh.listenGold polka dots! Researching gold contact paper now!


Name: Gemma (5 months)
Location: Dublin, Ireland
My main inspiration for my daughter's room was gold confetti. I wanted to make Gem's room girly without being too pink. I painted the walls with the gold polka dots, and went from there. Gemma's room is teeny tiny so I went with white walls and curtains to keep the space bright. I also wanted to have a touch of vintage in the room, so brought in the old sideboard, as well as a few other pieces here and there.


A lot of people remodel their homes right after (or right before) moving in, but by the time Kyle and Angela decided to take the plunge and redo their kitchen, they had been living in their Clinton Hill apartment for 11 years. They had a lot of time to save, and scheme, and they knew exactly what they wanted: more counter space, a more open floor plan, and a kitchen with a little bit of midcentury style.
Shh.listenYes!
 Toasted ravioli is a St. Louis specialty; Marlboro Man and I first tried it years and years ago when we visited St. Louis to attend my brother-in-law’s wife’s brother’s wedding. At least I think that’s whose wedding it was. It might have been my brother’s wife’s brother-in-law’s wedding. Or it might have been my wife’s brother-in-law’s brother’s wedding.
(Don’t pay any attention to me. I could go on like this for hours.)
Anyway, toasted ravioli, despite its moniker, is actually fried ravioli (I’m not quite sure where the word “toasted” came into play), and while it seems like it would be a complicated munchie to make, it really couldn’t be easier. It’s the perfect predinner bite for any Italian(ish) menu, or just a fun snack for a night of movie watching.
 For the breading of the ravioli, you need 3 dishes: One with an egg/half-and-half mixture…
 One with flour…
 And one with seasoned breadcrumbs.
 Then just grab the ravioli right out of the freezer! You want them to be totally frozen, not thawed at all.
 Okay, here’s the breading process: One by one, dunk the ravioli in the egg mixture…
 Then dredge it in the flour…
 Dunk it back into the egg mixture…
 Then drop it into the breadcrumbs and toss it around to coat.
 Put them on a plate as you go! And you can easily do this breading ahead of time and pop them back into the freezer until you need them; if you’re having nine million people over, this is the way to go!
 When you’re ready to fry them, heat some vegetable oil over medium-high heat; if you have an oil thermometer, bring it to 400 degrees. Carefully drop in the breaded ravioli, 3 or 4 at a time…
 And fry them until they’re golden and crisp, about 1 1/2 to 2 minutes. (You’ll need to carefully turn them over halfway through the frying so they brown evenly on both sides.)
 Keep going until they’re all fried up, draining them on a paper towel-lined plate as you go.
 When they’re all fried up, pile them on a platter with a dish of marinara sauce…
 Then sprinkle on some freshly grated Parmesan…
 And some minced parsley.
 Then serve ‘em up!
 Warning: These are extremely habit forming. Enter at your own risk!
Here’s the handy dandy printable.
Heat the oil in a medium pot over medium-high heat until it reaches 400 degrees.
Whisk together the eggs and half-and-half in a dish. Place the flour in a separate dish. Pour the breadcrumbs into a third dish.
Grab the ravioli right out of the freezer. One at a time, drop the ravioli into the egg mixture, then dredge them in flour, then dunk them once again in the egg mixture, then coat them in the breadcrumbs. Set them aside on a plate as you go.
3 or 4 at a time, drop the breaded ravioli into the oil and fry them for 1 1/2 to 2 minutes, until the surface is golden brown and the filling is hot. They brown quickly, so watch them the whole time!
Remove them to a paper towel and repeat with the rest of the ravioli. Transfer them to a serving platter, sprinkle on the Parmesan and parsley, and serve with the marinara sauce.
Posted by Ree | The Pioneer Woman on May 27 2014
 Whoa…Memorial Day weekend sneaked up on me! What about you?
In preparation for a summer filled with barbecues and get-togethers, I wanted to share this gorgeous drink recipe, which I included in the Fourth of July section of my holiday cookbook. It’s precious and pink, and is so delicious and refreshing, it should be illegal. It’s almost too adorable to eat. I mean drink. I mean both!
Most of all, it’s super fun…and it just screams summer.
Here’s how to make it!
(Note: I make a pretty big quantity below…but it can easily be halved!)
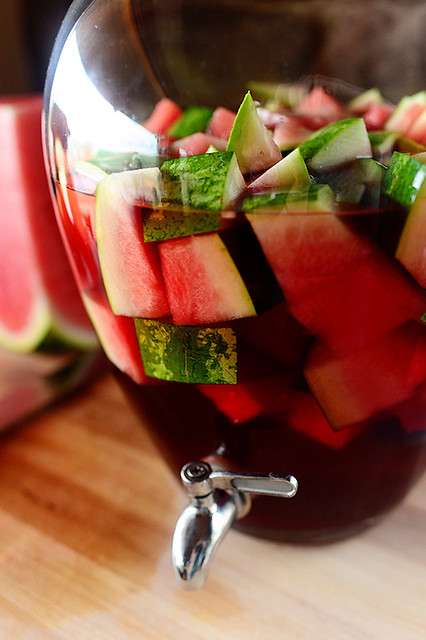
 Seedless watermelons are the way to go with sangrias! Going around the watermelon, slice off a 2-inch slab, making sure you have plenty of red fruit attached to the green rind.
 Slice the rind into thick strips…
 And cut the strips into chunks.
 Basically, you want chunks of rind with a nice bite of fruit attached!
 Keep going until all the rind is diced up…
 And throw the chunks into a big vat. (Just make sure it can fit in your fridge!)
 Next, pour in the wine. I used rosé, but you could also use any white wine you want. It’s best if it’s chilled, but this is going into the fridge anyway, so if it’s not…no biggie.
 Just keep pouring in the wine…
 Then stick the container in the fridge and chill it for several hours. 6 minimum, more if you can.
 Then, just before serving, pour in a bottle (or two!) of chilled Champagne, sparkling wine, or, if you want something a little sweeter, moscato.
Yum.
(You can also sweeten the sangria by adding a simple syrup: sugar dissolved in equal parts water.)
 Serve the icy cold sangria in wine glasses…and use tongs to stick a piece of watermelon in each one, if you like.
(And be sure to snack on the watermelon as the party progresses. Yum!)
Have a very happy Memorial Day weekend, everyone!
Note: This make a large quantity and serves 18-24 people! It can easily be cut in half.
Several hours before serving, slice 2-3 inch slabs of rind from around the outside of the watermelon, making sure there's plenty of red fruit attached. Slice the rind into 2-inch strips, then cut the strips in the other direction to make large chunks. Add the chunks into a large vat and add the rose wine. Cover the vat and stick it in the fridge to let it chill for at least 6 hours---more if you can!
Right before serving, stir in the chilled Champagne, sparkling wine, or moscato.
Serve in wine glasses...and use tongs to remove individual pieces of fruit. Yum!
Posted by Ree | The Pioneer Woman on May 23 2014
During the last six months we've added a new family member to our household, a sweet beagle puppy we named Mrs. Bananas. Trey's sister, Michelle, had a beagle with a litter. Mrs. Bananas was the very last puppy still in need of a good home, and Trey and I just couldn't resist! Anyway, the first few months she went through a bit of a chewing phase, to say the least. We are through that now, but some of our furniture is a little worse for wear. One item that suffered more than others was our coffee table. Mrs. Banana's just loved chewing up the legs of that table! It had been a hand-me-down from Rachel to Elsie to me, so I guess it was just its time to go. I've been wanting to make an epoxy resin table for some time now, so I figured this was my opportunity. So as a part of our Canon USA collaboration I created this photo-heavy epoxy resin coffee table.
Most of the time when I see these types of tables, people will add pennies or bottle caps to a tabletop and seal it with epoxy resin so the surface is smooth and hard. I've also seen a few with old (vintage photos) or with sealed-in menus (I saw one like this at a bar in Nashville last year). I decided to use personal photos along with some thin-sliced geodes I purchased locally. Since these photos would be highly visible on a coffee table in our living room, I decided I wanted to use personal photos with an abstract feel. I used a few photos from our engagement and wedding as well as some from different places we've visited together (including San Francisco, Hawaii, and even our hometown). I printed my photos on 13" x 19" paper using our Canon PRO-100.
We created a video of how we made our epoxy resin tabletop. I watched a lot of different videos online while I was researching different types of epoxy resin products and procedures. Most of the videos I found either didn't explain the process well (usually they felt too vague and left me with a lot of questions), or they were exceptionally long and made the process seem way more difficult than I found it needed to be. Once I tried it I found it really wasn't that difficult! So I kept this in mind as we worked to create our video.
DIY Epoxy Resin Coffee Table
Supplies:
-table with 1/4" (or less) lip around all the edges (I wanted to use an older, found table but I never found one that fit our space AND had a lip around the edge. So Josh made me this super simple table over a weekend so it's the exact size I wanted to fit our space.)
-photos and objects you want sealed in the table (make sure the objects are not taller than the lip of your table)
-spray adhesive or glue
-glaze coat pour-on high gloss epoxy resin* (the brand we used was from Famowood)
-disposable paper, plastic cups, or small pitchers
-disposable stir stick (I used part of a leftover dowel rod)
-disposable gloves (you may also want to wear an apron and safety goggles)
-drop cloth to cover your work area, in case of spills or drips
-masking or painter's tape
-small, handheld propane torch (I used a kitchen torch)
*The amount of epoxy resin you'll need depends on how large and deep the area you are covering is. My coffee table is 4' x 5" x 16" with a 3/8" depth (from the tabletop to the top edge of the lip). I used 1 gallon and 2 quarts of the epoxy resin coating.
Step One: Prepare your tabletop. If you're using a found table, make sure to lightly sand and clean the surface where the epoxy will be poured. You'll also want to tape off the edges. The tape will prevent the epoxy resin from oozing out of any cracks or edges while it hardens.
Step Two: Print photos. As I mentioned above, I printed my photos at 13" x 19" and trimmed them to fit my surface area.
Step Three: Plan design. Move your photos and objects around on the tabletop until you have a design you love. For any photos or papers use a light coat of spray adhesive or glue to set them in place. You don't want them to float or bubble up during the epoxy resin pouring process, so make sure they are securely in place now.
Step Four: Mix the epoxy resin. Follow the instructions, as some products will differ from others. The instructions from the brand I used had me mix the resin and hardener together in two disposable containers for four minutes, in each container. Whatever mixing duration your instructions include, be sure to follow them. During this stage you'll want to wear gloves, apron, and possibly safety goggles (or glasses) to protect yourself from these chemicals. You also need to work in a well-ventilated space. I worked near two large windows that I opened during this step, as these chemicals give off a strong smell. Be careful if it's a windy day since you don't want particles floating into your epoxy once poured.
Step Five: Pour the mixed epoxy resin over the countertop, taking care not to add too much; otherwise it can overflow the edges. My instructions suggested only mixing one to two quarts at a time so I had to repeat this process multiple times. If you are adding more epoxy resin (in layers), try to pour in circles or lines and avoid pouring in large clumps over one area; this will help the mixture to ooze into the proper place. If you find you don't have enough epoxy resin, allow your first coat to cure overnight before adding more the next day. Do not add more to a coat that is only partially cured as this can result in uneven drying, causing imperfections in your surface. If in doubt, call the technical support listed in the instructions (I did!).
Step Six: Use a small propane torch to remove any bubbles in the surface. You might feel inclined to skip this step because you don't want to buy a torch. As I mentioned above, I used a kitchen torch, and it made a HUGE difference in the final look of my table. You could also use a heat gun instead of torch. Any of these options will do, but don't skip this step!
Once the surface has cured for at least 24-48 hours (although 72 is recommended), you're ready to start using your new table! Be sure to keep it free from dust or other particles while it's drying. And it's a good idea to press your finger into an edge of the table before placing anything heavy on it, just to make sure yours is, indeed, fully dry. Not too bad, right? Thanks for letting me share our new coffee table with you. xo. Emma
Credits // Author: Emma Chapman, Photography and Video by: Sarah Rhodes. Video music by: Jeremy Larson. Coffee table structure built by: Josh Rhodes. Photos edited with Imogen from the Folk Collection.
Trailer: ‘Magic in the Moonlight' - July 25th
Written and directed by Woody Allen, starring Colin Firth, Emma Stone, Marcia Gay Harden, Jackie Weaver and Hamish Linklater.
Shh.listenHo-ly-hell.
Let's get one thing clear right from the start. Even though these are indeed brown butter popsicles, that doesn't mean you should be imagining a stick of butter on a popsicle stick.
Stop imagining this. That's not what's going on here. These are way more like pudding pops or ice cream bars than anything else.
Actually, these are very much inspired by our favorite Jeni's Ice Cream flavor, Brown Butter Almond Brittle. That ice cream is amazing! These popsicles incorporate a very similar flavor. You're gonna love it, I swear.
Brown Butter Popsicles, makes 8 standard-size popsicles.
Adapted from Brown Butter Almond Brittle Ice Cream via Jeni's Splendid Ice Creams at Home.
2 cups milk (I used whole milk)
4 tablespoons Greek yogurt
1 1/2 cups butter (We don't use it all! Don't worry.)
1 cup heavy cream
2/3 cup sugar
2 tablespoons brown sugar
Begin by melting the butter in a large pan over medium heat. Bring to a low boil. Allow to boil/foam for about 6 minutes until the butter begins to turn a dark, caramel brown color. Remove from heat and allow to cool for 5 minutes.
Remove the browned butter from the pan, leaving behind the small dark brown bits at the bottom. You can store the browned butter in the refrigerator and use for another purpose (baking, cooking, anything you like!). We're only interested in the small dark brown bits at the bottom of the pan.
Add the remaining ingredients to the pan. Stir over medium/low heat so the sugar fully dissolves (3-4 minutes). Allow to cool.
Pour the mixture into your popsicle molds. If you want to add a small white stripe to the bottom of your popsicles, pop them in the freezer for 30 minutes to an hour, then drizzle a little cream over the top. Fully freeze overnight.
When you serve them, roll the top or edges of the popsicle in crushed Heath bar to add a little crunch. Enjoy these! xo. Emma
Credits // Author: Emma Chapman, Photography: Sarah Rhodes and Emma Chapman. Photos edited with Celeste from the Fresh Collection.


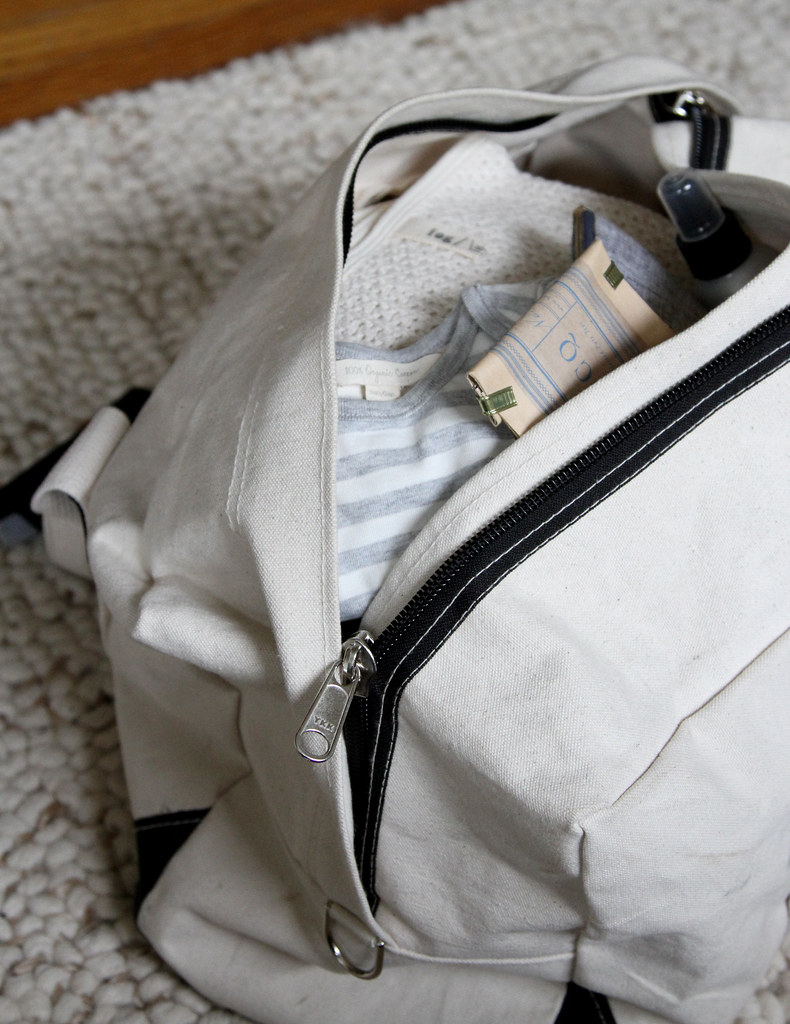
Earlier this month Taryn filled you in on five things that are never worth skimping on in the home, a great list! But what about when it comes to baby time! Everyone tells you "you must get this" "you can't live without a decent that". What really is worth the big bucks, when it comes to baby goods?
Shh.listenLOVE THIS BEBE ROOM


Project by: Erica Palmeira/Cheer Up! Design
Location: Melbourne, VIC, Australia
When I started his project, I had in mind that I needed to create a flexible decor, one that mum and dad could easily adjust in the years to come. Besides that, the nursery should be cheerful and unique, without exceeding a tight budget. Oh, there was a special request: include "Mingau", their black and white cat, in the decoration.


“Book on Book” is an acrylic transparent page holder that keeps a book open.


Lula's nursery, which we featured recently on the site, is such a sweet, soft space full of whimsy and served with a perfect dollop of girliness. Love it? Want to try it at home? Here's how you can, for under $375 (including crib and rocker)!
in 1990, the Teenage Mutant Ninja Turtles appeared on “The Oprah Winfrey Show” to promote their Pizza Hut album, “Coming Out of Their Shells.” My mom recorded it on a VHS tape for me, and labeled it “TURTLES ON OPRAH.” That VHS tape sat in my entertainment center for over a decade, before getting popped into a VCR one evening in high school when me and my friends were bored.
Everything changed.
This is 43 minutes of nostalgic ’90s insanity. Oprah Winfrey, trying her hardest to wrangle an audience of 9 year olds that JUST want to see the Turtles fight — even though the Turtles keep telling them that they are done with violence. There are dance numbers, awkward questions, and a grown woman wearing a Turtles costume just sitting in the audience, unexplained.
As far as I know, no other copy of this exists. I have never found it online, and all I’ve seen on YouTube is a video of the final ten minutes, with a warped aspect ratio. I digitized this around 2003 to put on VCD’s for my friends. I just discovered the file. I just uploaded it to YouTube.
Everything has changed again.
THIS.
CHANGES.
EVERYTHING.
 On Saturday’s episode of my Food Network show, I cooked a handful of recipes for Edna Mae, my husband’s wonderful, perfect, lovely grandmother. All the dishes were freezer-friendly, and I broke them all up into smaller, single-serving portions so Edna Mae could just pull them out when she needed them. This is perfect for one or two-person households, because you can just grab the amount you need for that meal (and possibly a leftover snack after the fact) rather than bake off an entire casserole and be forced to eat leftovers all week. (Not that leftovers are bad! I wouldn’t turn ‘em down. But I love food, man.)
One of the recipes I made on Saturday’s show show were Lasagna Rollups. I actually did a Vegetable Lasagna version based on my regular Veggie Lasagna recipe, and they really were delicious. Yesterday, however, I made a regular, meaty version for my carnivorous family. And even though we’re a household of six, I went ahead and broke them up into smaller portions so we’d have more flexibility during the next week. This way, if someone gets a hankerin’ for meaty lasagna, they can just pull one out, stick it in the oven, and go to town.
Here’s how I made mine yesterday, but keep in mind you can use any lasagna recipe you love! Just roll the cheesy filling inside the noodles as shown below, place them in a pan (small or large, depending on your needs), and top them with whatever sauce you want.
 First, mince up some garlic…
 And dice up an onion.
 Then heat up a pot, add some olive oil, and violently throw them both in.
 Stir them around and let them cook for a couple of minutes…
 Then throw in zee meat! I did a mix of ground beef and Italian sausage, but you can use all beef, all sausage, you can sub regular pork breakfast sausage for Italian sausage, you can add diced pepperoni, you can sub ground turkey for the ground beef…anything!
 Add salt and pepper…
 And cook the meat until it’s totally brown. If there’s excess grease, drain it off iffin’ you want!
And iffin’ you don’t want? Don’t. But your cardiologist will be mad at you.
 Now add in a big can of diced tomatoes…
 And a big can of tomato paste.
 Mince up some fresh parsley and basil…
 And throw it in.
If you haven’t noticed, there’s a great deal of throwing in this recipe.
 Now just stir it all together, then turn down the heat and simmer it for a good 30 minutes or so!
 And while the sauce is a-simmerin’, boil the noodles until they’re al dente…
 Then, after you drain them, lay them flat on a piece of foil so they’ll be nice and straight and cooperative and compliant.
 Now, just make the cheesy filling: This is whole milk ricotta, but you can use part skim ricotta if you have more common sense than I do. You can also use cottage cheese instead of ricotta, which I always do in the lasagna I’ve made for the past eleventy hundred years. Basically, any weird, white, soft, slightly runny cheese will do.
 Next, crack in a couple of eggs…
 And some Parmesan cheese.
 Stir it around until it’s all combined, then stir in salt and pepper…
 And add some more basil and parsley.
 The final element you need to prepare is the mozzarella! I’m using the fresh/bright white stuff, but you can also use the regular storebought Americanized mozzarella, too. The lasagna rollups are delicious either way.
 Just grate up the cheese…and now it’s time to build the suckers!
 Get the pans ready first. These are disposable (or reusable; just wash them out with warm, soapy water) foil loaf pans. I thought of using the mini-loaf pans for even smaller portions, but they’re just so…so…diminutive. With these regular ones, each pan will hold about 4 rollups, which could be a big serving for one person, two regular-sized serving for two people, or two different meals for one person!
I have no idea what I just said.
 By now the sauce is ready!
 So grab a small amount…
 And spread it onto the bottom of each pan.
 Next, get a good spoonful of the ricotta filling…
 Spread it onto one of the noodles…
 Roll it up…
 And place it in the pan, right on top of the sauce.
 Repeat it with three more noodles…
 Then spoon a good layer of sauce over the top.
 Sprinkle on a nice amount of mozzarella and a sprinkling of Parmesan…then just repeat with all the other ingredients until you have 5-6 pans of rollups!
 Cover them with foil and freeze them, or go ahead and bake them right away. (These are the ones I made for the show; it’s fun to see them all assembled! Oh, and you can double the recipe to make a whole, whole bunch.)
 If you’re baking it straight away, bake it at 375 for about 20 minutes, or until hot and bubbly. If you’re baking it from a frozen state, stick it in a 350 oven, still covered in foil, for about 30 minutes. Then take off the foil and let it bake for another 10-15 minutes, until bubbly.
 Then just serve up as many rollups as you need. One for little kiddos, four for big, burly, strapping, handsome, active, virile cowboys.
Sorry about the virile part there.
 This is two rollups, which is the size of a nice, big square of lasagna. Perfect!
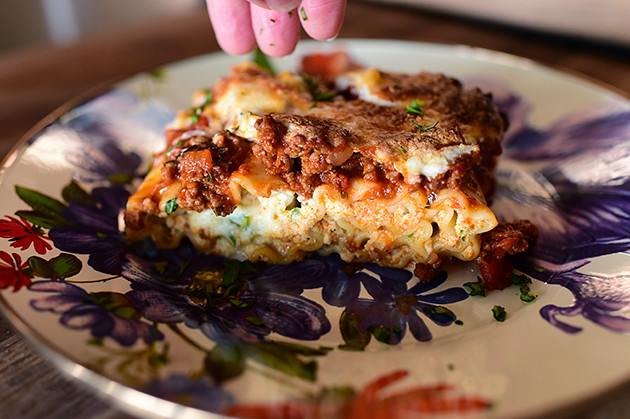 Sprinkle on a little more parsley and basil…
 And just dig right in. I love the rollups, because they make it easy to serve up a variety of sizes of lasagna helpings—anywhere from one rollup to four.
And they freeze beautifully.
And they just happen to be delicious.
Here’s the handy dandy printable!
Boil lasagna noodles until al dente. Drain and lay flat on a sheet of foil.
In a large pot, heat olive oil over medium-high heat. Add onions and garlic and cook for a couple of minutes. Add the ground beef and sausage and stir it around, cooking it until totally browned. Drain excess fat, then add diced tomatoes, tomato paste, salt, pepper, parsley, and basil. Reduce the heat and simmer for 30 minutes.
Make the filling by combining ricotta, eggs, Parmesan, salt, pepper, parsley, and basil. Stir to combine.
To assemble, spoon a little sauce into the bottom of a 9 x 13 inch pan OR smaller disposable foil loaf pans. Spread 2-3 tablespoons ricotta filling on each noodle, then roll them up. Lay them sideways in the pans (4 will fit in the loaf pans, or you can fill a 9 x 13 inch pan with the rollups.) Top with remaining sauce, plenty of grated mozzarella, and grated Parmesan.
If baking immediately, bake at 375 for 20 minutes or until hot and bubbly.
If baking from a frozen state, bake, covered in foil, at 350 for 30 minutes, then remove the foil and continue baking for 15 minutes, or until lasagna is done.
Posted by Ree | The Pioneer Woman on May 12 2014

Love this Retro Diner/Movie Board by Goodwin + Goodwin. Each board comes with a set of clear plastic alphabet letters, numbers and symbols that can be used to create any combination of words you want, fits 14 characters approx and the clear plastic letters simply slot in.

Adam Chang created the NY Train Project, an online gallery of 118 subway stations in Manhattan. Pick a line and discover the various signage styles.
(via)


