Shared posts

22 Oct 07:47

¡Se suspende el Plan Miami!

by Rivethead

El Plan Miami seguirá siendo un sueño para LaLiga, por ahora. Relevent, socio estratégico de la patronal y promotora de llevar el Villarreal-Barcelona a Estados Unidos el próximo 20 de diciembre, ha anunciado que lo cancela. La decisión se ha tomada a raíz de la gran polémica generada en torno al partido, con los jugadores en pie de guerra por la falta de transparencia y con el Real Madrid denunciando al Consejo Superior de Deportes el proyecto. “LaLiga lamenta profundamente que este proyecto, que representaba una oportunidad histórica e...

etiquetas: la liga, miami, tebas

» noticia original (as.com)

22 Oct 07:31

Tute, en Gocomics  [web]  [twitter]  [facebook]

Tute, en Gocomics  [web]  [twitter]  [facebook]

[twitter]  [facebook]

22 Oct 07:25

Broadcom envió a Bitnami tras un muro de pago

by tendero-digital

Aquí llevó media tarde perdida por no estar atento a algunas noticias que escaparon a mi atención en su día.


broadcom compro vmware


Como os conté el otro día en la entrada sobre Lubuntu, le hemos prestado a mi hijo tres PCs veteranos para que replique un entorno donde debe desplegar una práctica universitaria. Hoy comiendo me comenta que le está dando problemas la creación de uno de los módulos que debe correr en un contenedor Docker. Usa Kafka. Así que le paso un tutorial de Kafka que en alguna tarde de pruebas usé yo hace tiempo para conocer este software (cada uno tiene una forma de entretenerse…).

Vuelve al cabo de una hora y me dice que es imposible, que no se carga. Entonces miramos por algunos foros el error que nos aparece, seguimos los pasos que indican, pero no se resuelve. Cambiamos de táctica y nos vamos a preguntarle a la IA. Como hace una semana conseguí una licencia Pro de Gemini (algo bueno tenía que tener la universidad) empezamos por ahí. Enseguida nos da varias recetas. Algunas ya las habíamos aplicado antes, pero otras eras nuevas. Vamos siguéndolas (eso de que algo no funcione me atrae como un imán) y no hay manera. Borramos todo el docker, regeneramos… nada.. siempre acaba con error. Probamos en otro PC… mismo resultado.

Y entonces se me enciende una bombillita en la cabeza. Veo que la imagen que estamos usando de Kafka es de Bitnami. Recuerdo que esta empresa fue fundada por un español y que posteriormente la compró VMware. Hace un par de años Broadcom adquirió VMware. Una de las cosas que se notó de la adquisición es que trató de terminar con todas las licencias perpetuas de VMware. Así que una rápida búsqueda (ahora que creo que tengo un culpable) me saca de dudas. Este verano Broadcom empezó a cerrar todos los repositorios de código libre de Bitnami y a enviar todas las imágenes tras un muro de pago…

Hay veces en las que uno lee una noticia y piensa que no le va a afectar (hace tiempo que no usaba VMware directamente) ya que para mi Bitnami sigue siendo una empresa independiente y española… pero no es así y pierdes una tarde con lo que crees que es un error de configuración y resulta que es un cambio de política empresarial.


La entrada Broadcom envió a Bitnami tras un muro de pago se publicó primero en Al otro lado del mostrador.

22 Oct 07:24

Lo que debes saber y nadie te cuenta sobre lo que de verdad sucede en el mundo

by El Canal del Coronel

Programa especial con Ariel Umpiérrez analizando todas las últimas noticias internacionales más inquietantes del momento.
Un programa imprescindible para entender lo que de verdad está sucediendo en el mundo.
22 Oct 07:23

La verdad detrás de los despidos en Sanidad de Andalucía 🤔

by Escaños en Blanco para dejar Escaños Vacíos

¿Qué cambios han experimentado los ciudadanos después de la salida de dos consejeros en tan poco tiempo? Ninguno!!!
#SanidadAndalucía #PolíticaSanitaria #ConsejerosDeSalud #SaludPública #Andalucía #Destitución #EscañosenBlanco #EscañosVacíos #shorts
22 Oct 07:23

Cómo lograr engagement real en equipos remotos multiculturales | Óscar Cabo León

by Valeria Colombo

¿Se puede construir engagement real en equipos remotos multiculturales? 🚀

En este episodio de The ShortList con Óscar Cabo León, Senior Global Talent Partner en Mitek Systems, desmontamos los mitos y revelamos cómo liderar con impacto global.

Aprenderás:
• Los errores más comunes en engagement multicultural.
• Cómo detectar señales tempranas de desconexión.
• Prácticas simples que funcionan en cualquier cultura.


00:00 Introducción a la Gestión del Talento y el Vino
03:13 Errores Comunes en el Engagement Multicultural
05:49 Diferencias Culturales en la Motivación y Compromiso
08:39 Patrones Conductuales en Equipos Multiculturales
11:11 El Rol del Líder en Equipos Diversos
13:41 La Importancia de la Sensibilidad Cultural
16:19 Viajar con Humildad: Aprendiendo de Otras Culturas
20:13 Liderazgo en Entornos Multiculturales
23:00 La Importancia de los Básicos en Liderazgo
27:24 Ética y Responsabilidad en Recursos Humanos
31:04 Prácticas para el Compromiso en Equipos Remotos
38:15 La importancia de la gastronomía en la cultura empresarial
43:39 Iniciativas para fomentar la conexión cultural
48:46 Escuchar para mejorar el engagement cultural
53:08 Cierre The Shortlist


👉¿Tienes una opinión distinta? Déjamela en los comentarios.

👉 Si te gustó esta charla, Dale like, suscríbete y activa la campanita 🔔 para no perderte todo el contenido que te ayude a destacar en el mundo de Talent Acquisition.

👉 Y si crees que a alguien le vendría bien escucharla… compártela.

📩 Suscríbete a mi newsletter diario. Día que no estás consejo que no vuelve jamás. http://valeriacolombo.tech/newsletter/

Sígueme en:
🔗 LinkedIn: https://www.linkedin.com/in/valeria-colombo-inbound-recruitment/
🔗 Spotify: https://open.spotify.com/show/4KJTHEc..
22 Oct 07:22

ETA no fue derrotada: el PSOE lo impidió con un perverso pacto con los terroristas

by Elentir
Uno de los mayores mitos de los últimos años en España es el que afirma que la banda terrorista ETA fue derrotada por la democracia. Los favores a ETA por los que Pedro Sánchez no quiere que se hable sobre esos terroristas Una traición que no imaginábamos el día que los aliados de Sánchez destrozaron […]
22 Oct 07:15

Las manitas del mal

by Escaños en Blanco para dejar Escaños Vacíos

Hablamos de la "curiosa" manera de colocar las manos de algunas personas, en especial políticos, cuando están hablando en público. Proviene de Angela Merkel y tiene alguna explicación de la psicología.

Síguenos en:
Twitter: https://x.com/escanosenblanco
Instagram: https://www.instagram.com/escanosenblanco/
Telegram: https://t.me/canalEscanos
Web: https://www.escanos.org
22 Oct 06:29

Beyond “Try Again Later”: A strategic guide to obtaining high-demand resources in Google Cloud

by Jenna Inouye

Stop hitting ZONE_RESOURCE_POOL_EXHAUSTED errors. Learn how to use GCP’s provisioning models to get the compute you need, when you need it.

Writer: Davide Zanon, Technical Writer (Google Cloud)
Editor: Jenna Inouye, Technical Writer (Google Cloud)

You’re on a deadline.

You need a powerful GPU — or a large number of vCPUs… but you keep getting the dreaded ZONE_RESOURCE_POOL_EXHAUSTED error.

This common and frustrating problem can derail your projects at the worst possible time. And while the error message tells you to “try a different zone, or try again later,” this can feel like a guessing game.

Which zone will work?

How long do you need to wait?

In this blog post, you’ll learn how to strategically select from Google Cloud’s four powerful VM provisioning models: Standard, Spot, Flex-Start, and Reservation-Bound. By understanding these models and when to best use them, you can move from hoping for the best to confidently securing the resources you need.

What we’ll cover:

  • Why are you seeing resource availability errors?
  • How can the four provisioning models help you avoid these errors?
  • How can you choose the right model for your specific workload?
  • How can you maximize your chances of getting the resources you need?

Why aren’t my resources available?

Google Cloud is a shared, multi-tenant environment. High-demand resources — especially new hardware like the latest GPUs — can sometimes be fully utilized in a specific zone. Typically, this is a temporary and localized issue. The ZONE_RESOURCE_POOL_EXHAUSTED message is a signal of this momentary scarcity.

But when you need it fixed, you need it fixed. And that’s when you can consider a different provisioning model.

How can using a different provisioning model help?

Often, a ZONE_RESOURCE_POOL_EXHAUSTED error is a failure of reactive provisioning (i.e., requesting a Standard VM in one place and hoping for the best). The four provisioning models offer a framework for proactive and strategic capacity management.

By moving beyond the default Standard VM and consciously selecting a model based on your workload’s tolerance for interruption, price sensitivity, and time constraints, you change your request’s relationship with Google Cloud’s finite resource pool — and ideally reduce your chances of running into these errors.

Overview: The four provisioning models

To manage resource availability, you have four options: Standard VMs, Spot VMs, Flex-Start VMs, and Reservation-Bound VMs. To understand these provisioning models, think of resource utilization as going out to dinner:

  • Standard VMs: You walk into a popular restaurant without a reservation. You’ll likely get a table, but you might have to wait — and you’re not guaranteed a specific table.
  • Spot VMs: You use a discount site to find last-minute deals. You get a cheap deal, but you might need to sit at the bar and wait for a table if a full-paying customer arrives.
  • Flex-Start VMs: You attend a special “pop-up” dinner event that’s only available for a limited time. You get a fantastic meal at a discount, but your schedule has to be flexible — you don’t control when or where the dinner occurs.
  • Reservation-Bound VMs: You make a reservation in advance at an exclusive restaurant. You are guaranteed a table at a specific time — and it’s your table for the entire evening — but it’s more expensive than other options.

In brief, each of these four provisioning models gives you variable levels of control on different aspects of your deployment — and there are benefits and drawbacks to each.

Standard VMs: Default, on-demand, and pay-as-you-go

Use Standard VMs for stable, continuous workloads like web servers, databases, and enterprise applications. With a standard VM, you pay a standard price and have capacity guarantee.

How to use a Standard VM:

gcloud compute instances create

Spot VMs: The bargain hunter’s choice

Use Spot VMs for fault-tolerant, interruptible workloads like batch processing, HPC, CI/CD, and data analytics. Spot VMs provide spare Google Cloud capacity at a steep discount (from 60 to 91%). These VMs can be preempted (stopped) by Google Cloud at any time if the capacity is needed elsewhere.

How to use a Spot VM:

gcloud compute instances create –spot

Flex-Start VMs: The pop-up powerhouse

Use Flex-Start VMs for short-term, stable workloads like small model pre-training, model fine-tuning, and HPC simulations. Flex-Start VMs provide access to high-demand resources like GPUs for up to seven days at a discount (up to 53% for A4, A3, and A2 machine series). Flex-Start VMs are only available for zonal managed instance groups (MIGs) and the instances are automatically deleted after seven days.

How to use a Flex-Start VM:

gcloud compute instance-groups managed resize-requests create

Reservation-Bound VMs: The guaranteed spot

Use Reservation-Bound VMs for large-scale, long-running workloads with strict deadlines, like large model training or ensuring capacity for a product launch. Reservation-Bound VMs give you the ability to reserve capacity in advance for a specific time, with a very high assurance of capacity. However, you’ll pay for the reservation for the entire reservation period — whether you use the VM or not.

How to use a Reservation-Bound VM:

gcloud compute reservations create

At a Glance: Choose your provisioning model

Provisioning Model: Standard

  • Best for: Stable, continuous workloads
  • Pricing model: Pay-as-you-go
  • Availability: On-demand, best-effort
  • Lifespan: User-controlled
  • Capacity assurance: Best-effort

Provisioning Model: Spot

  • Best for: Fault-tolerant, interruptible workloads
  • Pricing model: Highly discounted, pay-as-you-go
  • Availability: On-demand, best-effort
  • Lifespan: Can be preempted at any time
  • Capacity assurance: Best-effort

Provisioning Model: Flex-Start

  • Best for: Short-term, stable workloads (up to 7 days)
  • Pricing model: Discounted, pay-as-you-go
  • Availability: Scheduled, best-effort
  • Lifespan: Up to 7 days
  • Capacity assurance: Best-effort

Provisioning Model: Reservation-Bound

  • Best for: Critical, time-sensitive workloads
  • Pricing model: Reserved pricing
  • Availability: Guaranteed at a future date
  • Lifespan: User-controlled within reservation period
  • Capacity assurance: Very high

When choosing a model, follow these tips:

  • Be flexible: If possible, be flexible with your region, zone, and machine type. A slightly different configuration might be readily available.
  • Use reservations for critical workloads: This is the single most effective way to guarantee capacity and avoid resource errors.
  • Use regional MIGs with ANY_SINGLE_ZONE: When you create a regional managed instance group, using the ANY_SINGLE_ZONE distribution shape allows GCP to find a zone with available capacity for you.
  • Check availability before you start: You can use the gcloud compute zones describe command to get a real-time view of the resources available in a zone.

Your next steps: Create a provisioning strategy

By moving past reactive, best-effort provisioning and adopting a strategic approach, you can dramatically increase your success rate in securing high-demand resources on Google Cloud. And the strategy is simple: Match your workload’s needs (tolerance for interruption, cost sensitivity, and timeline) to one of the four provisioning models.

You can determine the right solutions for your needs by:

  • Auditing your workloads: Categorize your current and future projects based on their tolerance for interruption and time sensitivity.
  • Prioritizing reservations for critical path items: If a project relies on a specific GPU type or a large pool of vCPUs to hit a deadline (e.g., a product launch or a major AI model training), create a Reservation-Bound VM as far in advance as possible.
  • Automating fallbacks for Spot and Standard: When using Standard or Spot VMs, build automation to retry requests across different zones or even regions rather than manually hitting “re-submit” in the console.
  • Experimenting with Flex-Start: For your next GPU-accelerated batch job that runs less than seven days, try using a Flex-Start VM within a zonal MIG to secure a discount and access potentially scarcer hardware.

Further reading


Beyond “Try Again Later”: A strategic guide to obtaining high-demand resources in Google Cloud was originally published in Google Cloud - Community on Medium, where people are continuing the conversation by highlighting and responding to this story.

22 Oct 06:28

How to Build a Full-Stack Serverless CRUD App using AWS and React

by Chisom Uma

Imagine running a production application that automatically scales from zero to thousands of users without ever touching a server configuration. That's the power of serverless architecture, and it's easier to implement than you might think.

If you're a junior cloud engineer ready to move beyond theoretical AWS concepts and build something real, this tutorial walks you through creating a complete serverless coffee shop management system.

You'll learn how to architect, deploy, and secure a production-ready application using AWS's most powerful serverless services.

Without further ado, let's get started!

Table of Contents

Prerequisites

  • Basic knowledge of AWS.

  • Basic knowledge of AWS serverless services.

  • Knowledge of React (not required).

  • Basic knowledge of Postman or other API testing tools.

Tools We’ll be Using

What We are Building

We'll build a complete serverless coffee shop management system using AWS cloud services. Coffee shop owners will securely log in through AWS Cognito authentication and have full control over their inventory, adding new products, updating stock levels, viewing current inventory, and removing discontinued items. To follow along with this tutorial, you can clone the repo here.

This is what our user interface (UI) looks like:

image of coffee shop dashboard serverless project

Why Serverless?

AWS serverless services like Lambda, Cognito, and API Gateway automatically scale to zero during quiet periods and instantly ramp up when traffic spikes. While 'serverless' might sound like there are no servers at all, this isn't actually the case. It means that AWS handles all the heavy lifting, provisioning, managing, and scaling of the infrastructure behind the scenes. You only pay for what you use.

Architectural Overview

Our architecture uses DynamoDB as the data store, with Lambda functions (enhanced by Lambda layers) handling all API Gateway requests. Cognito secures the API Gateway, while CloudFront CDN delivers everything globally. The React frontend connects directly to the Cognito UserPool and gets hosted on S3 with CloudFront distribution. For production deployments, you can add a custom domain using CloudFlare and AWS Certificate Manager.

Build a Serverless Full-Stack App

In this section, you’ll build a full-stack serverless architecture.

Step 1: Create a DynamoDB table

To create a DynamoDB table, navigate to your AWS console and select the DynamoDB section. You can do this quickly by typing “DynamoDB” into the AWS search bar and clicking on DynamoDB. Next, follow the steps below to complete your table creation:

  1. Click Create table.

  2. Input table name as “CoffeeShop” or anything you want to name it.

  3. Input partition key as “coffeeId” or anything you want to name it.

  4. Click Create table.

Step 1.1: Create items

You need to create items for the table. This helps with testing connectivity to your DynamoDB table.

For our use case, we’ll be creating an item in the table called “coffee” and input attributes such as coffeeId, name, price, and availability. To create an item:

  1. Click Explore items on the left navigation pane.

  2. Click Create items.

  3. Click the CoffeeShop radio button, then click Create item.

image of dynamodb page

  1. Click Add new attribute. This allows you to add different data types such as strings and booleans. The JSON structure below shows the attributes created.

{
    "coffeeId": "c123",
    "name": "new cold coffee",
    "price": 456,
    "available": true
}

Step 2: Create an IAM role for the Lambda function

Next, create a Lambda function that interacts with the DynamoDB table using an IAM role attached to the function. We’ll be setting up an IAM role named "CoffeeShopRole" that serves as a shared execution role for all Lambda functions in the coffee shop application.

This role includes the following permissions:

  • CloudWatch Logs: Full logging capabilities (create, write, and manage log streams)

  • DynamoDB Access: Complete read, write, update, and delete operations on the "CoffeeShop" table.

To do this:

  1. Navigate to the AWS IAM console.

  2. Navigate to Roles.

  3. Click Create role.

  4. Select the Lambda service.

  5. Search for “AWSLambdaBasicExecutionRole.”

  6. Name your role and click Create role.

This is what the role looks like:


{
    "Version": "2012-10-17",
    "Statement": [
        {
            "Sid": "VisualEditor0",
            "Effect": "Allow",
            "Action": [
                "dynamodb:PutItem",
                "dynamodb:DeleteItem",
                "dynamodb:GetItem",
                "dynamodb:Scan",
                "dynamodb:UpdateItem"
            ],
            "Resource": "arn:aws:dynamodb::<DYNAMODB_TABLE_NAME>"
        },
        {
            "Effect": "Allow",
            "Action": [
                "logs:CreateLogGroup",
                "logs:CreateLogStream",
                "logs:PutLogEvents"
            ],
            "Resource": "*"
        }
    ]
}

This policy allows us to create CloudWatch logs. Next, create an inline policy to allow communications to DynamoDB. Select the following actions for the table:

  • Get

  • Put

  • Update

  • Scan

  • Delete

Next, connect your table ARN to the policy by navigating to the created table and copying the ARN into the policy.

Step 3: Create Lambda Layer And Lambda Functions

Now, we need to connect our Lambda function to the DynamoDB table. For this, we’ll need the DynamoDB JavaScript SDK. To get started, create two folders: lambda > get in your IDE, preferably VS Code. Navigate into these folders in your terminal and run the npm init command to initialize your project. Update your package.json file with this:


{
  "name": "get",
  "type": "module",
  "version": "1.0.0",
  "main": "index.js",
  "scripts": {
    "test": "echo \"Error: no test specified\" && exit 1"
  },
  "author": "",
  "license": "ISC",
  "description": ""
}

Note: that we’ll be using ECMAScript throughout the course of this tutorial.

Next, we have to create a reusable Node.js Lambda layer containing the DynamoDB JavaScript SDK and shared utility functions. This layer acts like a common library that can be attached to multiple Lambda functions, eliminating the need to bundle the same dependencies repeatedly in each function's deployment package.

To use the SDK, create a new folder in your directory titled index.mjs and paste in the code below:


// getCoffee function
import { DynamoDBClient, GetItemCommand } from "@aws-sdk/client-dynamodb"; // ESM import
const config = {
    region: "us-east-1",
};
const client = new DynamoDBClient(config);
export const getCoffee = async (event) => {
    const coffeeId = "c123";
    const input = {
        TableName: "CoffeShop",
        Key: {
            coffeeId: {
                S: coffeeId,
            },
        },
    };
    const command = new GetItemCommand(input);
    const response = await client.send(command);
    console.log(response);
    return response;
}

The code above is the getCoffee function that connects to the DynamoDB table called CoffeShop, looks up the coffee with the ID c123, and displays its details.

Change region to your specific region.

Next, install the Lambda dependencies for the SDK using the command below:


npm i @aws-sdk/client-dynamodb @aws-sdk/lib-dynamodb

Then, create a zip file for all the current files using the command below:

zip -r get.zip ./*

This creates a zip file in your project directory. Now, navigate to the Lambda function page on your AWS console and upload this zip file.

Click Test to test your application. If you run into an error, edit the Runtime settings and change the handler name to index.getCoffee. Deploy and run the code again, you should get a successful response from DynamoDB as shown below:

Response:


{
  "$metadata": {
    "httpStatusCode": 200,
    "requestId": "R14Q5UMTP3K9P9NAF1OGG0IB57VV4KQNSO5AEMVJF66Q9ASUAAJG",
    "attempts": 1,
    "totalRetryDelay": 0
  },
  "Item": {
    "available": {
      "BOOL": true
    },
    "price": {
      "N": "34"
    },
    "name": {
      "S": "My New Coffee"
    },
    "coffeeId": {
      "S": "c123"
    }
  }
}

Now, let’s make the necessary changes to make our function ready for the API gateway to get the API. When someone requests a coffee using the /coffee endpoint, we want the app to returns a list of all coffees. But if the request is made to /coffee/c123 or /coffee/id, then the app returns only details about that specific coffee.

To do this, head back to your index.mjs file and paste in the code below:


import { DynamoDBClient } from "@aws-sdk/client-dynamodb";
import { DynamoDBDocumentClient, GetCommand, ScanCommand } from "@aws-sdk/lib-dynamodb";
const client = new DynamoDBClient({});
const docClient = DynamoDBDocumentClient.from(client);
const tableName = process.env.tableName || "CoffeShop";
const createResponse = (statusCode, body) => {
    const responseBody = JSON.stringify(body);
    return {
        statusCode,
        headers: { "Content-Type": "application/json" },
        body: responseBody,
    };
};
export const getCoffee = async (event) => {
    const { pathParameters } = event;
    const { id } = pathParameters || {};
    try {
        let command;
        if (id) {
            command = new GetCommand({
                TableName: tableName,
                Key: {
                    "coffeeId": id,
                },
            });
        }
        else {
            command = new ScanCommand({
                TableName: tableName,
            });
        }
        const response = await docClient.send(command);
        return createResponse(200, response);
    }
    catch (err) {
        console.error("Error fetching data from DynamoDB:", err);
        return createResponse(500, { error: err.message });
    }
}

Run the zip -r get.zip ./* command again and re-upload the zip file in your Lambda function page.

This AWS Lambda function implements a serverless API endpoint for retrieving coffee data from a DynamoDB table, using the AWS SDK v3 to create a document client that can either fetch a specific coffee item by ID (when an id parameter is provided in the URL path) or return all items from the table (when no ID is specified, though there's a missing import for ScanCommand).

The function extracts the coffee ID from the incoming event's path parameters, constructs the appropriate DynamoDB command (GetCommand for single items or ScanCommand for all items), executes the database operation, and returns a properly formatted HTTP response with JSON headers and appropriate status codes - either a 200 success response with the coffee data or a 500 error response if something goes wrong during the database operation.

Repeat the steps above for the create, update, and delete functions. You can find these functions in your cloned project repo.

Step 4: Create an API Gateway To Expose Lambda Functions

To create an API that points to the Lambda function:

  1. Navigate to API Gateway > Routes and click Create.

  2. Create the following endpoints.


GET /coffee  -> getCoffee lambda function
GET /coffee/{id}  -> getCoffee lambda function
POST /coffee  -> createCoffee lambda function
PUT /coffee/{id}  -> updateCoffee lambda function
DELETE /coffee/{id}  -> deleteCoffee lambda function
  1. Navigate to Integrations and create integrations for these endpoints. To do this, go to the Manage integrations tab, click Create, and select Lambda as the integration target.

Now, in your API Gateway portal, click on API: CoffeeShop...(random numbers) and copy the invoke URL for testing, as shown in the image below:

image of postman interface during testing

The get request with an id returns a 200 OK response with the created items in DynamoDB. You can play around with the rest of the endpoints on Postman :)

Adding Lambda Layer to Solve the Dependency Issue

Before we continue with this tutorial, I’d like to address one problem with the previous steps so far. All functions use the same dependency, but for each function, we had to maintain separate node_modules folders and packages.json files. To fix this issue, we’ll be using Lamba Layer. Layer contains all the dependencies, while the functions contain only your code.

To get started:

  1. Create a new folder in your IDE called LambdaWithLayer.

  2. Create two additional folders under the LambdaWithLayer named LambdaFunctionsWithLayer and nodejs.

Note: You must use the name nodejs for this to work.

  1. Navigate to the nodejs folder and initialize using the npm init command.

  2. Install dependencies using the command below:

npm i @aws-sdk/client-dynamodb @aws-sdk/lib-dynamodb
  1. Create a new file called utils.js under the nodejs folder and paste in the code below:

import { DynamoDBClient } from "@aws-sdk/client-dynamodb";
import {
    DynamoDBDocumentClient,
    ScanCommand,
    GetCommand,
    PutCommand,
    UpdateCommand,
    DeleteCommand
} from "@aws-sdk/lib-dynamodb";
const client = new DynamoDBClient({});
const docClient = DynamoDBDocumentClient.from(client);
const createResponse = (statusCode, body) => {
    return {
        statusCode,
        headers: { "Content-Type": "application/json" },
        body: JSON.stringify(body),
    };
};
export {
    docClient,
    createResponse,
    ScanCommand,
    GetCommand,
    PutCommand,
    UpdateCommand,
    DeleteCommand
};

Here, we imported all the commands for our API operations. Now, we can create Lambda Functions without installing the SDK dependencies for each one. For example, you can create a get folder under the LambdaFunctionsWithLayer folder for the get function, then create an index.mjs file under the get folder. Next, paste the code below:


import { docClient, GetCommand, ScanCommand, createResponse } from '/opt/nodejs/utils.mjs'; // Import from Layer
const tableName = process.env.tableName || "CoffeShop";
export const getCoffee = async (event) => {
    const { pathParameters } = event;
    const { id } = pathParameters || {};
    try {
        let command;
        if (id) {
            command = new GetCommand({
                TableName: tableName,
                Key: {
                    "coffeeId": id,
                },
            });
        }
        else {
            command = new ScanCommand({
                TableName: tableName,
            });
        }
        const response = await docClient.send(command);
        return createResponse(200, response);
    }
    catch (err) {
        console.error("Error fetching data from DynamoDB:", err);
        return createResponse(500, { error: err.message });
    }
}

Now we can see that, in the code, we no longer require dependencies for the get function. We just imported from the layer.

Repeat the above steps for other functions.

Note: You can find the code for other functions in the cloned repo.

  1. Create a zip folder for each function. You can do this by creating a file called create_zip.sh under the LambdaFunctionsWithLayer folder. Then paste the script below:

echo "Creating zip for layer"
zip -r layer.zip nodejs
echo "Creating zip for GET Function"
cd LambdaFunctionsWithLayer/get
zip -r get.zip index.mjs
mv get.zip ../../
cd ../..
echo "Creating zip for POST Function"
cd LambdaFunctionsWithLayer/post
zip -r post.zip index.mjs
mv post.zip ../../
cd ../..
echo "Creating zip for UPDATE Function"
cd LambdaFunctionsWithLayer/update
zip -r update.zip index.mjs
mv update.zip ../../
cd ../..
echo "Creating zip for DELETE Function"
cd LambdaFunctionsWithLayer/delete
zip -r delete.zip index.mjs
mv delete.zip ../../
cd ../..
echo "Success!"

Run the script using the sh create_zip.sh command. This creates zip files (including a layer.zip file) that you can upload to your AWS Lambda function Layer page.

  1. In your AWS Lambda function page, navigate to Layers and upload the layer.zip file**.**

  2. Update the functions by uploading the newly created zip files for each code.

  3. Add the layer to the function by clicking Layers in the function view:

image of get coffee lambda layer

Next, click Add a layer, then select Custom layers. Then choose “DynamoDBLayer” and version “1”.

  1. Click Add.

  2. Repeat for all the other functions.

Step 5: Set up React Application And Upload Build To S3 Bucket

To set up our React application, navigate to the frontend folder of the cloned repository on your local machine and run npm install to install the dependencies. Then run npm run dev to start your development environment on your local machine. You should see the preview in your browser at: http://localhost:5173/.

image of coffe list ui

If you inspect the page using Chrome DevTools, you’ll see that we ran into some CORS error:

image of chrome dev tool console

Now, let’s fix this problem. To do that:

  1. Navigate your API Gateway page.

  2. Click on CORS on the left navigation panel.

  3. Click Configure.

  4. Copy your localhost URL and paste it into the Access-Control-Allow-Origin field.

image of cors configuration

Ensure to remove the / at the end of your URL as shown in the image above.

  1. Click Add.

  2. Enter the Access-Control-Allow-Headers field with the text content-type and click Add.

  3. Include GET, POST, OPTIONS, PUT, and DELETE in Access-Control-Allow-Methods.

  4. Click Save.

Now it returns our coffee, and the CORS error has been resolved.

image of solved cors error

When you add a new coffee, you should see the newly created items in your DynamoDB database.

Step 6: Set up Amazon API Gateway Authorizer

AWS Congnito helps you secure your Amazon API Gateway. Gateway validates the access token with Amazon Cognito to ensure it is valid and has not expired, and grants or denies access based on token validity.

To get started:

  1. Navigate to Amazon Cognito > User pools.

  2. Click Create user pool.

  3. Select Single-page application (SPA).

  4. Select email as the preferred sign-in and sign-up method.

  5. Use http://localhost:5174/ or your own local URL as the return URL.

  6. Click Create user directory.

You’ll be presented with a page containing code that we can copy and paste into our app for integration. But before we do that, let's head back to API Gateway and integrate it with Cognito. To do that:

  1. Go to the Authorization section in API Gateway.

  2. Navigate to Manage authorizers.

  3. Click Create.

  4. Select JWT and name it “Cognito-CoffeeShop”

  5. Copy your issuer URL from Cognito Overview. Your issuer URL is the Token signing key URL. If you click on the URL, you’ll be taken to your browser, where you'll see the keys that’ll be used for verification.

  6. For the Audience, navigate to the Cognito user pool, then to App clients, and select CoffeShopClient. Copy the Client ID.

  7. Click Create.

  8. Go to Routes and add authorizations to each endpoint.

Now, to integrate with our front-end app:

Navigate into the frontend folder and run the command below:

npm install oidc-client-ts react-oidc-context --save
  1. Go to the App clients section in Cognito user pools to find the readily available code snippets for integration.

  2. Edit your main.jsx file to include the code below:


import { createRoot } from 'react-dom/client'
import { BrowserRouter as Router, Route, Routes } from "react-router-dom";
import './index.css'
import App from './App.jsx'
import ItemDetails from "./ItemDetails";
import { AuthProvider } from "react-oidc-context";
const cognitoAuthConfig = {
  authority: "https://cognito-idp.us-east-1.amazonaws.com/us-east-1_rXq7q3KLm",
  client_id: "6fjfrlaup7oph5lhf1q8q6pnp4",
  redirect_uri: "http://localhost:5174",
  response_type: "code",
  scope: "email openid phone",
};
createRoot(document.getElementById('root')).render(
  <AuthProvider {...cognitoAuthConfig}>
    <Router>
      <div>
        <Routes>
          <Route path="/" element={<App />} />
          <Route path="/details/:id" element={<ItemDetails />} />
        </Routes>
      </div>
    </Router>
  </AuthProvider>
)

Here, we imported AuthProvider from react-oidc-context, then wrapped our app with AuthProvider. Then, move the code in the App.jsx file to a newly created Home.jsx file, and update App.jsx file with the code below:


import { useEffect, useState } from "react";
import "./App.css";
// App.js
import { useAuth } from "react-oidc-context";
function App() {
  const auth = useAuth();
  const signOutRedirect = () => {
    const clientId = "6fjfrlaup7oph5lhf1q8q6pnp4";
    const logoutUri = "http://localhost:5174/";
    const cognitoDomain = "https://us-east-1rxq7q3klm.auth.us-east-1.amazoncognito.com";
    window.location.href = `${cognitoDomain}/logout?client_id=${clientId}&logout_uri=${encodeURIComponent(logoutUri)}`;
  };
  if (auth.isLoading) {
    return <div>Loading...</div>;
  }
  if (auth.error) {
    return <div>Encountering error... {auth.error.message}</div>;
  }
  if (auth.isAuthenticated) {
    return (
      <div>
        <button onClick={() => auth.removeUser()}>Sign out</button>
        <Home />
      </div>
    );
  }
  return (
    <div>
      <button onClick={() => auth.signinRedirect()}>Sign in</button>
      <button onClick={() => signOutRedirect()}>Sign out</button>
    </div>
  );
}
export default App;

Now, when you run the application again, you should see this login page on your browser:

Sign in and Sign out buttons

When you click on Sign in, you’ll get directed to the Sign in page. Click Sign up. You should see the page below to create your account.

Sign in page with a form

During sign-up, a verification code is sent to your sign-up email. Once you’re logged in, you can then access your coffee dashboard.

Step 7: Create Cloudfront Distribution With Behaviors For S3 And API Gateway

To create a distribution.

  1. Navigate to CloudFront.

  2. Click Create distribution.

  3. In the Origin page, select the S3 bucket and browse through your created S3 buckets.

  4. Select your coffee shop bucket.

  5. Set origin path to /dist.

  6. Select Origin access control under Origin access.

  7. Update your React code and AWS Cognito with the distribution domain name provided in the CloudFront log-in pages tab.

Step 8: Set up React Application And Upload Build To S3 Bucket

In this step, we’ll be building our React application and uploading the static files to an Amazon S3 bucket, which is then served from a CloudFront distribution.

To get started:

  1. Create an S3 bucket and give it the name “mycoffeeShop123new”. This name should be globally unique across all AWS accounts.

  2. In the frontend folder, run the npm run build command. This creates a dist folder in your directory.

  3. Head back to the S3 bucket and drag-and-drop the dist folder into S3 to upload it.

  4. Click Upload.

Now, copy your CloudFront distribution URL and try to access your site in a private browser, for example, Chrome incognito. You should see your site live in the browser.

Troubleshooting Access Denied Error

You may encounter an access denied error in the browser:


<Error>
    <Code>AccessDenied</Code>
    <Message>Access Denied</Message>
</Error>

It may be because of a likely S3 + CloudFront configuration error. Here are the steps to resolve this issue:

Step 1: Set up Origin Access Control (OAC)

  1. Go to CloudFront > Your Distribution > Origins tab.

  2. Select your S3 origin and click Edit.

  3. Under Origin access, select Origin access control settings (recommended)

  4. Click Create new OAC (or select an existing one).

  5. Click Save changes.

Step 2: Update S3 Bucket Policy

After saving, CloudFront will show you a "Copy Policy" button. Click it, then:

  1. Go to your S3 bucket > Permissions tab.

  2. Scroll to Bucket policy and click Edit.

  3. Paste the copied policy (it should look like this):


{
    "Version": "2012-10-17",
    "Statement": [
        {
            "Sid": "AllowCloudFrontServicePrincipal",
            "Effect": "Allow",
            "Principal": {
                "Service": "cloudfront.amazonaws.com"
            },
            "Action": "s3:GetObject",
            "Resource": "arn:aws:s3:::YOUR-BUCKET-NAME/*",
            "Condition": {
                "StringEquals": {
                    "AWS:SourceArn": "arn:aws:cloudfront::YOUR-ACCOUNT-ID:distribution/YOUR-DISTRIBUTION-ID"
                }
            }
        }
    ]
}
  1. Click Save changes.

Step 3: Set Default Root Object

  1. Go back to CloudFront > Your Distribution > General tab.

  2. Click Edit.

  3. Set Default root object to index.html.

  4. Save changes.

Now, try accessing the site again. It should work.

This brings us to the end of this tutorial. I hope you were able to learn a thing or two about building serverless systems :)

Conclusion

Congratulations! You've just built a production-ready serverless application from the ground up. You've successfully architected a complete CRUD system that automatically scales, stays secure with Cognito authentication, and costs you only what you actually use.

22 Oct 06:26

Trump reclama 230 millones de dólares al Gobierno que él mismo preside: "La decisión tendrá que pasar por mi despacho"

by Andrés Gil

Trump reclama 230 millones de dólares al Gobierno que él mismo preside: "La decisión tendrá que pasar por mi despacho"

El presidente de EEUU afirma que tiene la última palabra sobre el dinero que reclama por las investigaciones federales sobre él realizadas en el pasado

Juez y parte. El presidente de EEUU, Donald Trump, ha afirmado este martes que el Gobierno federal le debe “mucho dinero” por investigaciones pasadas del Departamento de Justicia sobre él e insistió en que tendrá la última palabra sobre cualquier pago: “Cualquier decisión tendrá que pasar por mi despacho”.

Los comentarios de Trump a los periodistas en la Casa Blanca se produjeron en respuesta a preguntas sobre una noticia del New York Times que afirmaba que había presentado reclamaciones administrativas antes de ser reelegido, en las que solicitaba aproximadamente 230 millones de dólares en concepto de daños y perjuicios relacionados con el registro realizado por el FBI en 2022 en su propiedad de Mar-a-Lago en busca de documentos clasificados y con una investigación sobre los posibles vínculos entre Rusia y su campaña presidencial de 2016.

Trump ha dicho este martes que no conocía las cifras en concreto y dio a entender que no había hablado con los abogados al respecto. Pero, añadió: “Todo lo que sé es que me deben mucho dinero”.

Aunque el Departamento de Justicia tiene un protocolo para revisar este tipo de reclamaciones, Trump afirmó: “Es interesante, porque soy yo quien toma la decisión, ¿no? Esa decisión tendrá que pasar por mi despacho”.

El presidente de EEUU también dijo que podría donar el dinero de los contribuyentes o utilizarlo para ayudar a pagar el salón de gala que está construyendo en la Casa Blanca.

“En cualquier circunstancia, todos los funcionarios del Departamento de Justicia siguen las directrices de ética profesional”, dijo un portavoz del Departamento de Justicia a The Associated Press.

Trump mostró interés en la indemnización durante una aparición en la Casa Blanca la semana pasada con el director del FBI, Kash Patel, y la fiscal general Pam Bondi, que formó parte del equipo legal de Trump durante uno de los procesos de destitución en su contra.

“Tengo una demanda que iba muy bien y, cuando me convertí en presidente, dije: 'Me estoy demandando a mí mismo'. No sé. ¿Cómo se resuelve la demanda?”, dijo: “Diré: 'Dame X dólares', y no sé qué hacer con la demanda. Es una gran demanda. Me estoy demandando a mí mismo, así que no sé”.

El NYT dijo que las dos demandas se presentaron ante el Departamento de Justicia como parte de un proceso que busca resolver las denuncias federales mediante acuerdos y evitar pleitos.

Una de las demandas administrativas, presentada en agosto de 2024 y revisada por The Associated Press, solicita una indemnización por daños y perjuicios compensatorios y punitivos por el registro de su finca Mar-a-Lago y el caso resultante en el que se le acusa de acumular documentos clasificados y frustrar los esfuerzos del Gobierno para recuperarlos.

Su abogado, que presentó la demanda, alegó que el caso era un “proceso malicioso” llevado a cabo por la Administración Biden para perjudicar la candidatura de Trump a la Casa Blanca, lo que obligó a Trump a gastar decenas de millones de dólares en su defensa.

Esa investigación dio lugar a cargos penales que el fiscal especial del Departamento de Justicia, Jack Smith, aparcó el pasado mes de noviembre debido a la política del departamento sobre procesos a presidentes en ejercicio.

El Times afirmó que la otra demanda busca una indemnización por daños y perjuicios relacionados con la investigación sobre Trump y Rusia, concluida hace tiempo y que sigue enfureciendo al presidente.

21 Oct 20:22

El Gobierno de Mazón admite que tiene parados nueve millones en donaciones para víctimas un año después de la dana

by luspagnolu

La portavoz del Gobierno valenciano, Susana Camarero, ha revelado que ya han aprobado el uso de 3,4 millones de euros en ayudas sociales a familias numerosas o en situación de vulnerabilidad a razón de 1.000 euros de ayuda directa por familia tras avanzar elDiario.es que se desconocía el destino de los fondos.

etiquetas: gobierno, mazón, nueve, millones, donaciones, víctimas

» noticia original (www.eldiario.es)

21 Oct 20:22

Amazon espera reemplazar a 600.000 trabajadores estadounidenses con robots, según documentos filtrados [ENG]

by Bifaz

Según informes, los documentos muestran que el equipo de robótica de Amazon está trabajando para automatizar el 75 por ciento de todas las operaciones de la compañía y espera eliminar 160.000 puestos de trabajo estadounidenses que de otro modo serían necesarios para 2027. Esto ahorraría alrededor de 30 centavos en cada artículo que Amazon almacena y entrega a los clientes, y se espera que los esfuerzos de automatización le ahorren a la compañía 12.600 millones de dólares entre 2025 y 2027.

etiquetas: amazon, robots, trabajo, reemplazo, empleo, trabajador

» noticia original (www.theverge.com)

21 Oct 20:22

China rompió una máquina de litografía ASML para tratar de hacer ingeniería inversa (ING)

by jm22381

En los últimos meses, una antigua máquina de litografía de ultravioleta profundo (DUV) de ASML se rompió en China. Llamaron a los técnicos holandeses de ASML para arreglarla pero estos descubrieron que los chinos dañaron la máquina al desmontarla e intentar volver a montarla. Eso no es porque los chinos quieran saber cómo producir en masa estas máquinas más antiguas. Es porque los técnicos chinos están tratando de aprender las complejidades de las máquinas DUV para construir sus propias máquinas más avanzadas y producir chips más avanzados.

etiquetas: china, máquina, litografía, asml, técnicos, ingeniería, inversa

» noticia original (nationalinterest.org)

21 Oct 20:02

Se supone que la gracia es hacer una caricatura, no UNA FOTO.

by Fino
21 Oct 20:01

Para que luego digan que el gobierno no gasta en vivienda.

by Fino
21 Oct 20:01

Yolanda Díaz: “Queda Gobierno de corrupción para rato”.

by Fino

Extra:

Pilar Alegría, preguntada por las últimas declaraciones de Víctor de Aldama: “Yo es que por las noches no veo ficción”.

Ver post completo: Yolanda Díaz: “Queda Gobierno de corrupción para rato”.

21 Oct 19:59

HBO Max prices increase by up to $20 today

by Scharon Harding

HBO Max subscriptions are getting up to 10 percent more expensive, owner Warner Bros. Discovery (WBD) revealed today.

HBO Max’s ad plan is going from $10 per month to $11/month. The ad-free plan is going from $17/month to $18.49/month. And the premium ad-free plan (which adds 4K support, Dolby Atmos, and the ability to download more content) is increasing from $21 to $23.

Meanwhile, prices for HBO Max’s annual plans are increasing from $100 to $110 with ads, $170 to $185 without ads, and $210 to $230 for the premium tier.

Read full article

Comments

21 Oct 19:57

If the economy is so bad, why are stock markets booming?

by Money & Macro

Advertising sponsor: Start browsing securely from anywhere! Check out Proton Pass and Proton Drive for a safer, faster, and more open internet using my link 👇🏻
Proton Drive ➡️ http://proton.me/moneymacro
Proton Pass ➡️ http://proton.me/pass/moneymacro

If you appreciate the research, consider buying me a 'coffee' at https://ko-fi.com/moneymacro or supporting long-term for membership benefits via: https://www.patreon.com/moneymacro

WANT AN IN-DEPTH INDUSTRIAL POLICY MASTERCLASS?
https://school.moneymacro.net/p/industrial-policy-masterclass

LIKE CHATTING ECON WITH ME?
△ Follow me on Twitter: https://twitter.com/joerischasfoort
△ Follow me on LinkedIn: https://www.linkedin.com/in/joeri-schasfoort/
△ I have a private Discord server for Senior and Chief economist Patrons / members.

SOURCES:
I've linked my sources in the blog that goes along with this video. Links are in the text.
https://www.moneymacro.rocks/blog

Timestamps:
00:00 Intro
02:17 How did we get here?
09:16 Why did the story of big Firm competition fail?
09:23 Sponsor
14:05 Are giant monopolies actually making our economies worse?
16:32 What can we do to fix our economies?

Attribution:
Music by Epidemic Sound: http://nebula.tv/epidemic
Thank you to AP Archive for access to their archival footage.
Stock footage and others clips by Getty

Written by Alejandro Iribas De La Puerta and Dr. Joeri Schasfoort
Edited by VNKR Studies
21 Oct 19:57

Carlos Latre: "La Universidad de Málaga Está Estudiando Mi Cerebro"

by Alex Fidalgo

Episodio completo: https://youtu.be/1xNdPwR-7nI
______
Colabora con el canal:
⭐️ Hazte miembro: https://www.youtube.com/channel/UCcpOe_g8sfr2GSoLZISy6yA/join
📲 Donaciones: https://paypal.me/loquetudigas
_______
Escucha todos los episodios en podcast:
Apple Podcasts: https://apple.co/2XGmrNs
Spotify: https://spoti.fi/3fKeN2p
iVoox: https://bit.ly/2HJdwq9
________
Sígueme En:
Facebook: https://www.facebook.com/lqtdradio
Twitter: https://twitter.com/lqtdradio
21 Oct 19:56

¡BRUTAL! ATAQUE a la MAYOR REFINERÍA de PETRÓLEO en HUNGRIA

by Rubén Gisbert

En Europa se produjeron explosiones en refinerías pertenecientes a empresas rusas o que reciben petróleo ruso.

▪️Ayer por la tarde, en Rumania, hubo una explosión en la refinería Petrotel de «Lukoil».
▪️Según datos oficiales, fue causada por la acumulación de gases formados debido a una fuga de residuos en un canal para inspección de tuberías. Un trabajador resultó herido.
▪️Y ayer por la noche se incendió la mayor refinería de Hungría en Százhalombatta, que recibe petróleo a través del oleoducto «Druzhba», informa Euronews.
▪️El incendio comenzó tras una explosión en la unidad AV3. La causa del accidente aún se está investigando.

Según reportes una gran explosión sacudió la refinería de petróleo más grande de Hungría.

Múltiples incendios y una gran explosión afectaron la refinería MOL pocas horas después de otra explosión en la refinería de Lukoil en Rumanía.

TRAS CENSURAR el ANTERIOR, SÍGUEME en MI NUEVO INSTAGRAM para ESTAR INFORMADO al MINUTO: https://www.instagram.com/gisbertruben/
Y SOBRE TODO en el CANAL de TELEGRAM: https://t.me/s/rubengisbertoficial
https://rubengisbert.com.es
CANAL SECUNDARIO de DIRECTOS: https://www.youtube.com/channel/UCN85XS0O8AKzyYu5OqVaLIw
SÍGUEME EN MIS OTRAS REDES:
►Instagram: https://www.instagram.com/gisbertruben/
►Facebook: https://www.facebook.com/gisbertruben
►Twitter: https://twitter.com/gisbert_ruben
►Twitch: https://www.twitch.tv/rubengisbert
►TikTok: https://www.tiktok.com/@rubengisbert

PARA COLABORAR Y AYÚDAR A SEGUIR CREANDO CONTENIDO:
►Patreon: https://www.patreon.com/laguaridadelzorro
►Donaciones Paypal: https://www.paypal.com/donate/?cmd=_s-xclick&hosted_button_id=6YHX8UT3AR786&source=url

Conviértete en miembro de este canal:
https://www.youtube.com/channel/UCkHR9m-tscD3ojD7_viIfTA/join
21 Oct 19:55

Consejos gratis para Trump si quiere hacer América Great Again

by Adrián Díaz 李安
21 Oct 19:50

El Viaje Con Jesús Calleja Que Me Cambió La Vida

by Alex Fidalgo

El Viaje Con Jesús Calleja Que Me Cambió La Vida

🎙️ Episodio 497: “Toqué Fondo… Y Volví a Empezar” - Carlos Latre
21 Oct 19:49

Ukrainians no longer want to fight

by Glenn Diesen
21 Oct 19:49

Israel are trying to ethnically cleanse Southern Lebanon

by Glenn Diesen
21 Oct 17:57

Almería vuelve a ser la provincia más pobre de España: esta es su renta media

by Lord_Cromwell

El Instituto Nacional de Estadística (INE) ha publicado este martes el Atlas de Distribución de Renta de los Hogares del año 2023 y la provincia de Almería no sale, como viene siendo una tónica habitual en estos últimos años, bien parada. Según estos datos, Almería es la provincia española con menor renta neta por habitante: 11.543 euros por persona. Pero no está sola. Andalucía acapara todos los titulares de datos negativos y es que según el INE, las siguientes provincias con menos renta también son andaluzas: Jaén y Huelva.

etiquetas: almería, provincia, pobre, españa, renta, media

» noticia original (www.diariodealmeria.es)

21 Oct 17:44

Amazon's Reputation At Risk After 15 Hours Of Disruptions; May Spark Customer Demand For 'Cloud Diversification'

by Tyler Durden
Amazon's Reputation At Risk After 15 Hours Of Disruptions; May Spark Customer Demand For 'Cloud Diversification'

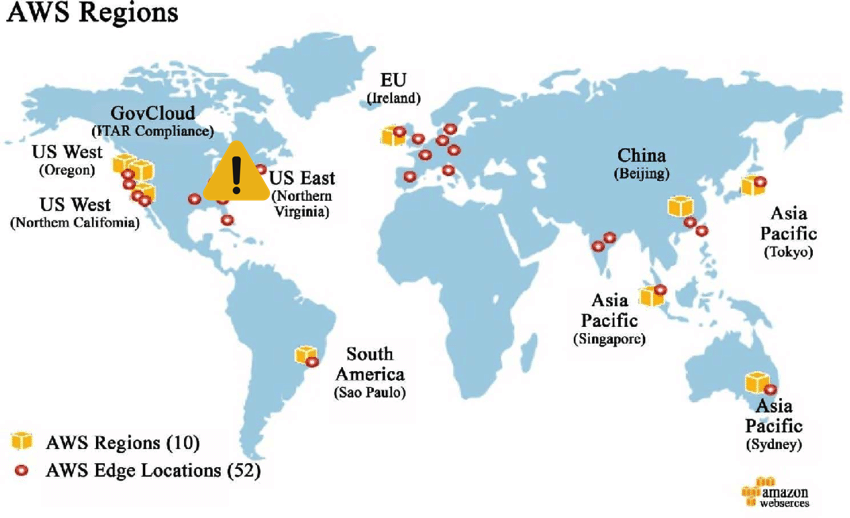
What many Americans discovered early Monday morning is that nothing online is guaranteed, not even the biggest websites, apps, or messaging services, after a massive outage in Amazon Web Services' (AWS) U.S. East 1 region in Northern Virginia triggered 15 hours of internet chaos. The disruption has reignited fears about overreliance on a single cloud provider and is expected to push major companies toward spreading their infrastructure risk across multiple clouds rather than relying on just one.

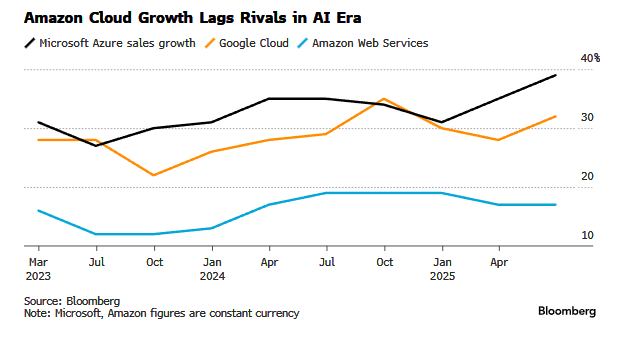
Bloomberg reports that yesterday's AWS outage in the U.S. East 1 region was one of the company's worst disruptions since 2021. The incident could prompt companies to diversify their cloud infrastructure risk, potentially slowing AWS' growth while intensifying competition from Microsoft and Google.

"The outage will likely fuel customers wanting to spread their infrastructure between multiple clouds, which could be a positive for smaller vendors like Google," Bloomberg Intelligence analyst Anurag Rana wrote in a note, adding that it's unlikely to result in any meaningful market share loss for Amazon due to the difficulty of shifting workloads between clouds and industrywide capacity constraints.

The breakdown originated in AWS's Northern Virginia region, its largest data center cluster, when a malfunction in a digital directory for a core database service triggered cascading failures across other subsystems, resulting in online disruptions for highly-trafficked platforms such as Venmo, Robinhood, Zoom, Salesforce, Snowflake, and even Amazon's own Alexa, Prime, and Ring services. There were even reports of Amazon delivery disruptions (read here).

AWS engineers managed to restore data center operations in the Northern Virginia region to "normal" status by late Monday evening, about 15 hours after the problem first emerged. This outage echoes a 2021 incident that disrupted Netflix, Disney, and other global platforms.

If the AWS outage left you frustrated, imagine the chaos when China moves on Taiwan or disrupts critical infrastructure amid the ongoing Salt Typhoon and/or unleashes its full cyber arsenal against the U.S. Let's hope the trade war is resolved soon, because a nation suffering from "TikTok brain rot" might not survive a week without its social media.

Tyler Durden Tue, 10/21/2025 - 12:05
21 Oct 17:43

52 Year Old: "Do This If You Want Your Marriage To Last..."

by Sprouht

52 Year Old: "Do This If You Want Your Marriage To Last..."

📗 Grab our SPROUHT JOURNAL to develop the structure and clarity to change your life this year: https://bit.ly/3HqecgP

✉️ For business inquiries contact
business@sprouht.com
21 Oct 17:36

¿En qué momento hemos pasado de tener leyendas como Freddie Mercury, Michael Jackson, Prince, Elvis Presley, Whitney Houston… a esto?

by Fino
21 Oct 17:26

AWS Outage Explained with root cause in simple words

by Abhishek.Veeramalla

Career Guidance + Resume Reviews
www.youtube.com/abhishekveeramalla/join

On October 20, 2025, AWS experienced a major outage that disrupted applications worldwide. But here’s the twist the biggest impact was on Amazon DynamoDB, while other AWS services like S3 and EC2 stayed mostly unaffected.

In this video, I’ll break down exactly why:
- What AWS’s internal health monitoring system actually does
- How DynamoDB’s routing is tightly coupled to that monitoring layer
- Why DNS failed for DynamoDB but not for other services
- How a localized health authority failure can take down a critical service

🧠 What you’ll learn:
- How AWS health monitors work behind the scenes
- Why DynamoDB is more sensitive to control plane failures
- How AWS structures SLAs to limit payouts
- The difference between direct vs. indirect SLA breaches
- Real architecture lessons on resilience and blast radius control

Free Course on the channel
==============================
- Free DevOps Playlist: https://www.youtube.com/playlist?list=PLdpzxOOAlwvIKMhk8WhzN1pYoJ1YU8Csa
- AWS Zero to Hero Playlist: https://www.youtube.com/playlist?list=PLdpzxOOAlwvLNOxX0RfndiYSt1Le9azze
- Azure Zero to Hero Playlist: https://www.youtube.com/playlist?list=PLdpzxOOAlwvIcxgCUyBHVOcWs0Krjx9xR
- Terraform Zero to Hero Playlist: https://www.youtube.com/playlist?list=PLdpzxOOAlwvI0O4PeKVV1-yJoX2AqIWuf
- Python for DevOps Playlist: https://www.youtube.com/playlist?list=PLdpzxOOAlwvKwTyYNJCUwGPvql0TrsPgv

About me:
========
Instagram: https://www.instagram.com/abhishekveeramalla_official/
Telegram Channel : https://t.me/abhishekveeramalla
LinkedIn: https://www.linkedin.com/in/abhishek-veeramalla
GitHub: https://github.com/iam-veeramalla
Medium: https://abhishekveeramalla-av.medium.com/

Disclaimer: Unauthorized copying, reproduction, or distribution of this video content, in whole or in part, is strictly prohibited. Any attempt to upload, share, or use this content for commercial or non-commercial purposes without explicit permission from the owner will be subject to legal action. All rights reserved.