Brief: Double-clicking on the deb file doesn’t install it via the software center in Ubuntu 20.04? You are not the only one facing this issue. This tutorial shows how to fix it.
I found that strange because installing a program using the deb file is one of the simplest methods. All you have to do is to double-click the downloaded file and it opens (by default) with the Software Center program. You click on install, it asks for your password and within a few seconds/minute, the software is installed.
I downloaded the .deb file for installing Rocket Chat messenger and when I double-clicked on it to install this software, the file was opened with the archive manager. This is not what I expected.
DEB files opened with Archive Manager instead of Software Center
The “fix” is simple, and I am going to show it to you in this quick tutorial.
Installing deb files in Ubuntu 20.04
For some reasons, the default software to open the deb file has been set to Archive Manager tool in Ubuntu 20.04. The Archive Manager tool is used for extract zip and other compressed files.
The solution for this problem is pretty simple. You change the default application in Ubuntu for opening DEB files from Archive Manager to Software Install. Let me show you the steps.
Step 1: Right click on the downloaded DEB file and select Properties:
Step 2: Go to “Open With” tab, select “Software Install” app and click on “Set as default“.
This way, all the deb files in the future will be opened with Software Install i.e. the software center applications.
Confirm it by double clicking the DEB file and see if it open with the software center application or not.
Since we are discussing deb file installation, let me tell you about a nifty tool gdebi. It’s a lightweight application with the sole purpose of installing DEB file. Not always but some times, it can also handle the dependencies.
Si votre boite à outil web a encore un peu de place, voici un logiciel à y ajouter : FreeFileSync. Comme son nom l’indique assez bien il vous permet de synchroniser et comparer des dossiers entre eux, gratuitement. Il est disponible pour Windows (7 et plus), Linux ou macOS (10.8 et plus).
FFS est assez léger à l’utilisation puisqu’il ne va pas copier chaque fois l’entièreté d’un dossier, mais plutôt comparer s’il y a eu des différences depuis son dernier passage et mettre à jour les fichiers si c’est le cas. Le soft vous propose également de créer de programmer des sauvegardes régulières.
Parmi ses autres options intéressantes : l’exclusion de certains types de fichiers, le support FTP/FTPS pour les sauvegardes sur un serveur, la synchronisation avec Google Drive, le batch de travaux, synchroniser les mobiles via le protocole MTP, accéder aux fichiers en ligne avec SFTP … et surtout aucune limite au nombre de fichiers à synchroniser. Et bien plus.
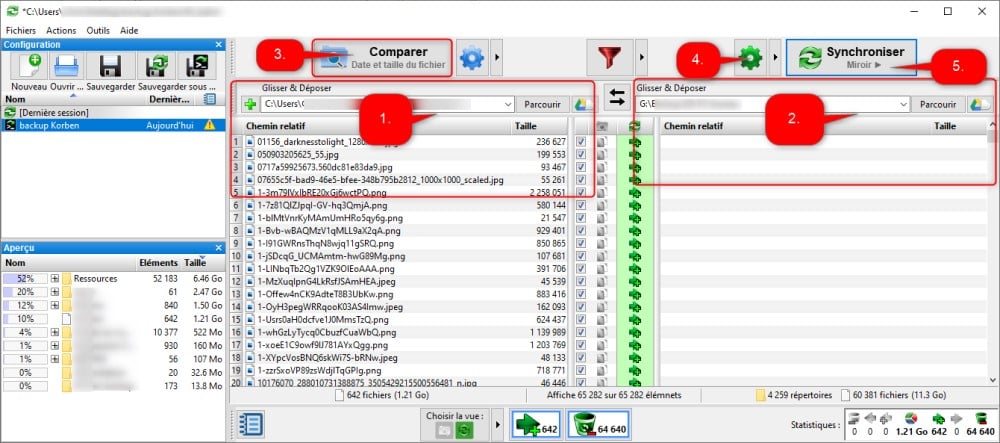
Une fois installé et ouvert vous allez simplement faire glisser (ou sélectionner via le bouton « Parcourir ») le dossier de départ dans la première zone principale (1) puis faire de même avec le dossier dans lequel placer la copie (2).
Vous devrez ensuite « Comparer » les 2 dossiers (3). Sur la gauche vous aurez donc la liste des fichiers composant votre dossier de base et sur la droite la liste de tous les fichiers avec des différences (si vous effectuez la manip pour la 1re fois, la liste de droite sera vide puisqu’il n’y a rien à comparer).
Attention, par défaut, la synchro se fait dans les 2 sens ! Si un fichier du dossier de départ a diminué de poids, il pourrait être remplacé par celui du dossier de destination par mégarde. Pour éviter cet éventuel souci, il suffit de cliquer sur la roulette (4) et choisir la variante qui vous convient (miroir, mise à jour, 2 sens …). C’est sur cette page que vous pouvez en profiter pour lui dire quoi faire des fichiers remplacés, les envoyer à la corbeille ou conserver les différentes versions.
Reste ensuite à démarrer la synchro (5) et le tour est joué !
Je vous pose leur tuto vidéo pour le cas ou vous voulez créer une tâche automatisée
Et si vous effectuez un don sur leur site vous aurez droit à une version avec quelques bonus : copie de fichiers en parallèle, mise à jour automatique, recevoir des notifications par email …
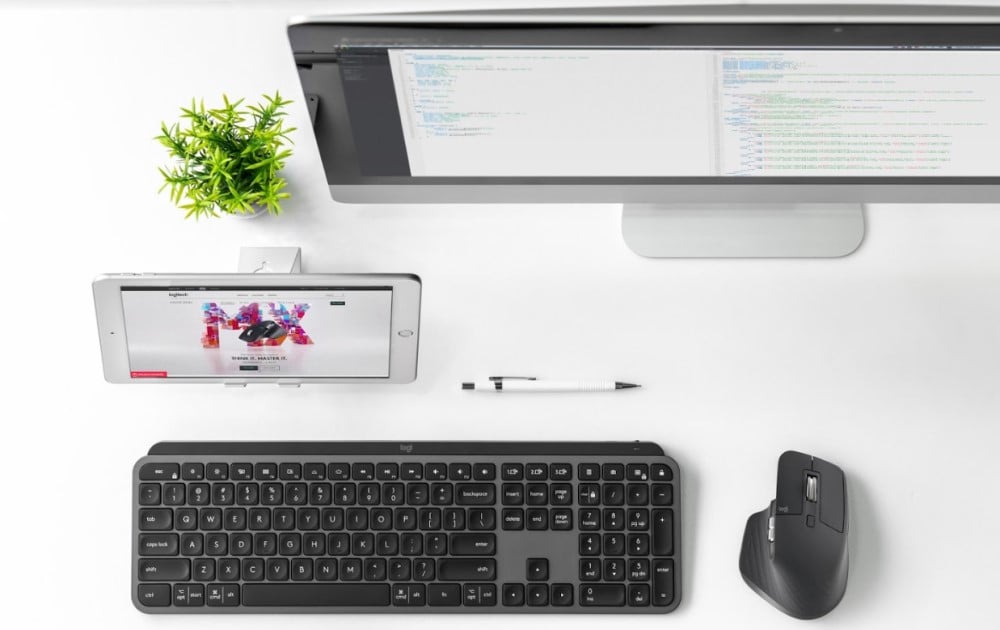
Combien commencent à prendre un certain plaisir à bosser depuis chez eux ? Oui et cela même s’il y a plein d’inconvénients et de distractions, et que la période d’adaptation est parfois compliquée. J’avais d’ailleurs publié un article pour commencer à mettre en place vos nouvelles habitudes de télétravailleurs.
Et si aujourd’hui nous allions un peu plus loin avec l’aide de Logitech ? Après avoir paré à l’essentiel, raffinons un peu (j’écris cette phrase avec le petit doigt levé comme il se doigt).
Depuis que j'ai la Freebox Révolution (depuis bientôt 7 ans), j'utilise la fonction NAS qu'offre cette dernière via son boîtier serveur, qui intègre un disque dur. Le disque dur est utilisé pour les enregistrements fait par la Freebox, mais permet aussi de stocker et partager des vidéos, des photos, des fichiers directement téléchargés par la Freebox. Je ne détaillerai pas plus les fonctionnalités de la Freebox, on retrouve facilement des tas d'informations à ce sujet.
Dans les fonctions de partage, il est possible de partager le disque dur via le protocole Samba (Partage Windows). Cela marchait très bien jusqu'à ce que je passe ma machine principale sous Ubuntu 20.04 en avril dernier. La Freebox est bien vu sur le réseau dans l'interface du gestionnaire de fichiers (Nautilus), mais quand je clique pour me connecter et consulter le contenu du disque dur comme j'avais l'habitude de faire, je tombe sur un message
"impossible d'accéder à l'emplacement impossible de monter le partage Windows: le logiciel a provoqué l'abandon de la connexion"
J'ai essayé pas mal de choses, dont la connexion au répertoire partagé via la ligne de commande avec les commandes liées à samba sans succès, jusqu'à ce que je tombe sur ce message dans le forum d'Ubuntu-fr.
Le protocole samba de la freebox est bloqué sur SMB1, ce qui est obsolète et non sécurisé. Ce qui fait qu'avec la dernière MAJ, les disques ne sont plus lisibles. J'ai contourné le soucis en activant le serveur ftp depuis le Freebox OS. Du coup, tout est redevenu comme avant, juste une petite manip supplémentaire à effectuer.
Confirmé par une mise en avant de la note suivante sur la page de documentation de la freebox v6 dans le wiki d'ubuntu-fr : A partir de Ubuntu 17.10 : Il est possible que vos montages réseaux utilisant cifs ne fonctionne plus. En effet, suite à la monté en version du protocole Samba (SMB3 désormais, au lieu de SMB1). Un palliatif est de forcer l'utilisation de Samba en version 1 en rajoutant vers=1.0 dans les options de montage. Comme dans l'exemple ci-dessus.
Deux solutions : forcer le protocole samba en version 1 en ligne de commande pour le montage du partage réseau (c'est documenté, on a des lignes de commandes et le fichier /etc/fstab à modifier) ; activer le FTP.
Je suis parti sur l'option 2 pour changer un peu. Le soucis est que, via FTP, quand je saisis l'url ftp://mafreebox.freebox.fr/ dans le champ "Connexion à un serveur" de Nautilus, même si je vois le contenu du disque dur, je ne peux pas lire / ouvrir un fichier directement depuis la Freebox, il faut que je le télécharge en local.
Pour remédier à ça, il faut monter le disque distant via ftp avec fuse et curlftpfs. Là encore, c'est documenté sur https://doc.ubuntu-fr.org/curlftpfs
Et pour le montage avec les droits de lecture /écriture, il faut saisir la commande ainsi :
Je me suis fais un alias Bash pour me faciliter la vie. Je lance l'alias depuis un terminal et dans Nautilus, j'ai mon disque monté en lecture / écriture à distance.
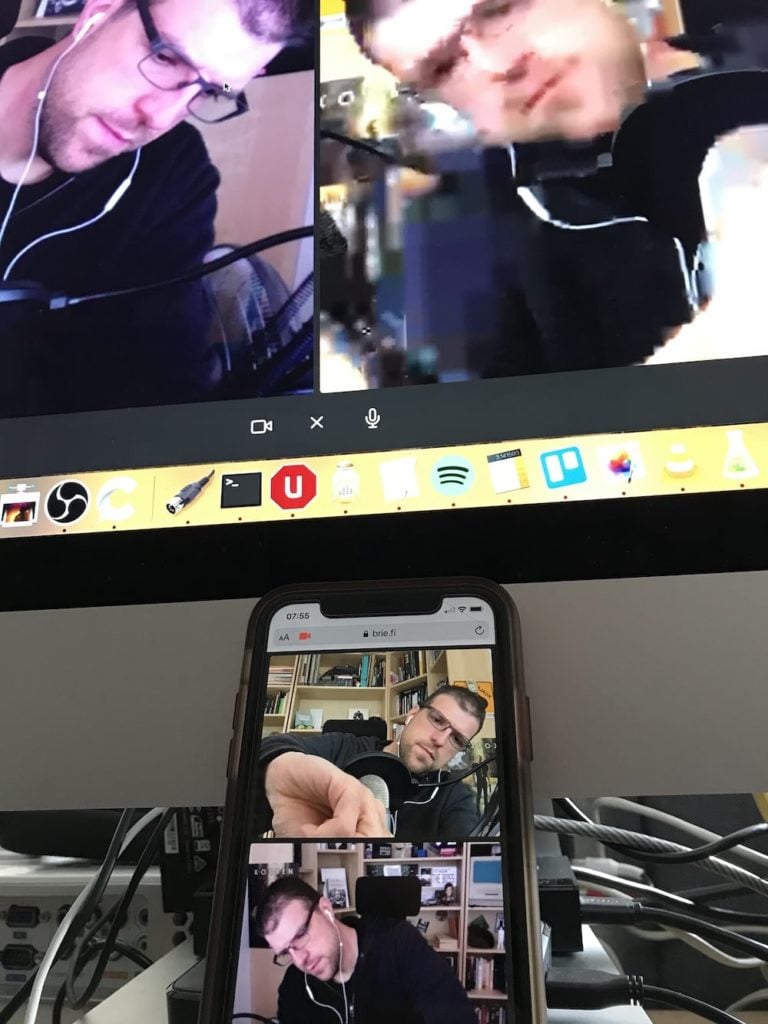
Briefing est un service en ligne qui permet d’établir des connexions audio vidéo avec vos correspondants de manière totalement anonyme et sécurisée.
Alors comment ça fonctionne ? Et bien ce logiciel sous licence MIT fonctionne dans n’importe quel navigateur grâce à WebRTC et ne dépend pas d’un serveur central pour l’échange à proprement dit, car il se repose uniquement sur des connexions en P2P.
Cela dit il y a quand même un serveur pour héberger le site web, pour coordonner les utilisateurs dans les différentes « rooms » et également un serveur STUN/TURN pour passer au travers des firewalls.
À la connexion sur Briefing, vous obtenez une URL, que vous pouvez partager à vos correspondants afin d’établir la communication, et cela depuis un ordinateur, un smartphone ou une tablette.
Le projecteur intelligent Alfawise Q9 BD 1080P combine les caractéristiques de style et de performances puissantes, il dispose d’une résolution Full HD 1080P pour vous offrir une vidéo et une image ultra-claires. Il a lire une variété de formats, VCD, DVD, BD, DV. Un spectre écran de 40 à 300 pouces pour vous offrir une expérience de visionnement plus large. Il est largement utilisé dans les maisons, les bureaux, les écoles et les lieux de divertissement.
The default Yaru theme in Ubuntu 20.04 gives it a polished, modern look. The folders in the default Yaru theme have a purple-aubergine touch to keep in line with the branding of Ubuntu.
If you are not a fan of the purple shade, you have the freedom to change the color theme in Ubuntu.
You may change the theme of Ubuntu to give it a different color but that would mean ditching Yaru theme.
If you just want to change the folder color in Ubuntu 20.04, there are two ways to do that:
Give a different color and emblem to selected folders (for better organizing the files and folders)
Change the colors for all folders by changing the Yaru color theme
Let me show you both methods.
Change folder colors and emblem for selected files and folders
I know that some people keep their folders in different color/location to indicate whether a work is in progress or pending or completed.
If you are one of those people, you can use the Folder Color utility and change the color of the folders. You may also add emblem to the folders (the green tick sign for competition, + sign for new, exclamation mark for important etc). You can see some examples in the previous image.
You can also use the Folder Color utility on files. You cannot change the color files icons but you can add emblems to them.
Once installed, you’ll have to restart Nautilus file manager using nautilus -q command. After that, you can go to the file manager, right click on a folder or file. You’ll see a Folder’s Color option in the context menu. You’ll see the color and emblem options here.
You can also restore the original folder color by choosing Default in the menu.
For Ubuntu 18.04 or older versions, Folder Color is available to install from the software center. The Folder Color utility is also available for Linux Mint/Cinnamon desktop’s Nemo file manager and MATE desktop’s Caja file manager.
How to remove Folder Color tool?
If you don’t want to use Folder Color, you may remove the app and delete the PPA. First remove the app:
Yaru Colors theme pack to change the color variant of Yaru theme
Yaru Colors Blue Theme Variant
If you want to keep on using Yaru theme but with a different color variant, Yaru Colors theme pack is what you need.
Yaru Colors consists of 12 color variants of Yaru. The colors are aqua, blue, brown, deep blue, green, grey, MATE green, orange, pink, purple, red and yellow.
The themes consist of GTK theme, icons, cursor them and GNOME shell theme.
Icons- Changes the accent color of folders
GTK themes- Changes the accent color of the application windows
cursor theme- Adds an almost negligible colored outline to the cursor
GNOME Shell theme- Changes the accent color in the message tray and system tray
You can download Yaru Colors theme pack from its GitHub repository:
When you extract the content you’ll find icons, Themes folders and both of these folders contains the twelve mentioned color variants. You can copy the icons and Themes folder in ~/.local/share/.icons and ~/.local/share/themes folders respectively.
If you are not comfortable doing it all by yourself, you’ll find the install.sh shell script in the extract folder. You can run it to install all or selected few themes via an interactive terminal session.
To change the GNOME Shell theme, you’ll have to use GNOME Tweak tool. You may also use GNOME Tweak to change the icons and themes back to the default ones.
Making a GIF can be fun and many users would like to know how to make one. You can create a GIF very easily with GIMP, the powerful open-source image editing software.
In this GIMP tutorial, I’ll show you how to create a simple GIF in GIMP.
Making a GIF in GIMP
Using GIMP as an animation tool requires you to think of every layer as of an animation frame. In this tutorial, I will create a simple web banner based on It’s FOSS logo. I will use 2 images as my layers but feel free to add more when you make your own.
The method that I use here is called “the combine method”, in which the new frame is added to the previous frame. My idea is to make a “flashing” web banner, to draw the attention at something important.
I presume that you have already installed GIMP in Ubuntu or whichever operating system you are using. Let’s start making the GIF.
Step 1
From the File menu, click on Open as Layers and select all the images you want to include in the GIF. Then click Open.
You can order your images in the layers tab. The GIF sequence will start with your bottom layer and run through each layer bottom to top.
Change the order of layers
From the main menu select Filters, then Animation and finally click Optimise (for GIF).
What “Optimise” does?
Optimise examines each layer, and reuses information from previous frames if they haven’t changed at the following frame. It only stores new values for pixels that change, and purges any duplicate parts.
If a frame is exactly the same as the previous one, it removes that frame completely and the previous frame just stays on the screen for longer.
To view GIF, from main menu click on Filter then Animation and Playback.
Press the Playback button to start GIF. To save GIF on the File Menu select File, click on Export as.
Name your GIF and choose the folder you want to save it in. On “Select File Type“, choose GIF Image.
Save As Gif
When prompted select ‘As Animation’, ‘Loop Forever’, set the desired delay value and to take effect click on “Use delay entered above for all frames”.
The most important option is to set the frame disposal action as “Cumulative layers (combine)” to get the “flashing” effect for our banner. Click Export as a final step.
Gif Export Options
Your GIF is ready!
This was an easy-to-follow, simple example, although GIMP has a much greater depth in animation creating and requires a good amount of study and practice to master it.
If you are interested in more GIMP tutorials, you may read how to outline text in GIMP. Stay tuned at It’s FOSS for more such useful tips in the future. Subscribing to the weekly newsletter is the best way to stay updated. Enjoy!
Brief: In this tutorial, you’ll learn how to assign static IP address on Ubuntu and other Linux distributions. Both command line and GUI methods have been discussed.
IP addresses on Linux Systems in most cases are assigned by Dynamic Host Configuration Protocol (DHCP) servers. IP addresses assigned this way are dynamic which means that the IP address might change when you restart your Ubuntu system. It’s not necessary but it may happen.
Dynamic IP is not an issue for normal desktop Linux users in most cases. It could become an issue if you have employed some special kind of networking between your computers.
Another use case is with servers or remotely administered desktops. It is easier to set static addresses on those systems for connection stability and consistency between the users and applications.
In this tutorial, I’ll show you how to set up static IP address on Ubuntu based Linux distributions. Let me show you the command line way first and then I’ll show the graphical way of doing it on desktop.
Method 1: Assign static IP in Ubuntu using command line
Note for desktop users: Use static IP only when you need it. Automatic IP saves you a lot of headache in handling network configuration.
Step 1: Get the name of network interface and the default gateway
The first thing you need to know is the name of the network interface for which you have to set up the static IP.
You can either use ip command or the network manager CLI like this:
nmcli d
In my case, it shows my Ethernet (wired) network is called enp0s25:
Ubuntu> nmcli d
DEVICE   TYPE      STATE      CONNECTION
enp0s25  ethernet  unmanaged  --
lo       loopback  unmanaged  --
ip route
default via 192.168.31.1 dev enp0s25 proto dhcp metric 600
169.254.0.0/16 dev enp0s25 scope link metric 1000
192.168.31.0/24 dev enp0s25 proto kernel scope link src 192.168.31.36 metric 600
As you can guess, the default gateway is 192.168.31.1 for me.
Step 2: Locate Netplan configuration
Ubuntu 18.04 LTS and later versions use Netplan for managing the network configuration. Netplan configuration are driven by .yaml files located in /etc/netplan directory.
By default, you should see a .yaml file named something like 01-network-manager-all.yaml, 50-cloud-init.yaml, 01-netcfg.yaml.
Whatever maybe the name, its content should look like this:
# Let NetworkManager manage all devices on this system
network:
  version: 2
  renderer: NetworkManager
You need to edit this file for using static IP.
Step 3: Edit Netplan configuration for assigning static IP
Just for the sake of it, make a backup of your yaml file.
Please make sure to use the correct yaml file name in the commands from here onward.
Method 2: Switch to static IP address in Ubuntu graphically
If you are on desktop, using the graphical method is easier and faster.
Go to the settings and look for network settings. Click the gear symbol adjacent to your network connection.
Next, you should go to the IPv4 tab. Under the IPv4 Method section, click on Manual.
In the Addresses section, enter the IP static IP address you want, netmask is usually 24 and you already know your gateway IP with the ip route command.
You may also change the DNS server if you want. You can keep Routes section to Automatic.
Once everything is done, click on Apply button. See, how easy it is to set a static IP address graphically.
If you haven’t read my previous article on how to change MAC Address, you may want to read in conjunction with this one.
More networking related articles will be rolling out, let me know your thoughts at the comments below and stay connected to our social media.
So, you think Linux terminal is all work and no fun? These funny Linux commands will prove you wrong.
The Linux terminal is the place to get serious work done. We have plenty of useful linux command tips and tricks to help you with that.
But, did you know that you can have a lot of fun using the terminal? Well, if you did not, then you are not alone. Most Linux users see the terminal as an interface that is designed and built for system management and development tasks.
However, you will be surprised to know that there are tons of terminal based games and ASCII games that you can play in the terminal.
And, in this article, I’m going to explore some interesting, some funny and some ridiculous commands that you can type into the terminal on Linux and have fun!
Have some fun in Linux terminal with these commands
You’ll find a lot of these commands ridiculous or useless but some of them could actually be put to some good use.
I have added installation instructions for Ubuntu/Debian. If you are using Ubuntu-based distribution, please make sure to enable universe repository as most of these commands are not in the main repository.
If you are using Arch, Fedora, SUSE, Solus or any other non-Ubuntu distributions, please use your distribution’s package manager to install these funny Linux commands.
1. Run a train in the terminal
Let’s take a ride in the locomotive and begin our auspicious journey. And I mean it literally!
The sl command allows you to run a train in your terminal.
Here’s how to install the command:
sudo apt install sl
Once done, you can simply type in the following in the terminal to get started:
sl
Impressive, isn’t it? But, hold on. We are not done yet! Apparently, you can fly your locomotive. Just add the option -F, Mr. Potter:
sl -F
This should make the locomotive get wings to fly off from the terminal window!
2. Add the Matrix effect to your Linux terminal
Remember the iconic sci-fi movie The Matrix? The green text falling down on the terminal became an identity of Matrix.
You can have this Matrix digital rain on your Linux box as well! You just need to install cmatrix and type it in the terminal.
Installing cmatrix on Debian/Ubuntu Linux:
sudo apt install cmatrix
Now, all you have to do is type the following to get the matrix screen on terminal:
Keep your fire extinguisher handy because now you are going to start a fire in your terminal!
To get it installed, here’s what you have to type:
sudo apt install libaa-bin
Once done start a fire in your terminal by entering:
aafire
Press Ctrl+C to stop it.
4. Fortune Cookie Command
Want to know your fortune but there are no fortune cookies around you?
Not to worry, you just need to type “fortune” on your terminal and press enter. The terminal will display a random sentence just like you usually get in fortune cookies.
Install it with:
sudo apt install fortune
Once done, simply type in the command below to know your fortune:
fortune
Now this is one of the commands here that you could actually use. You can use it as message of the day so that in a multi-user environment, all the users will see a random fortune cookie when they login.
You may also add it to your bashrc file so that it shows you a random message as soon as you log in to the terminal.
5. Pet lover? This is for you
Oneko is a little fun command that will change your regular cursor into a mouse and creates a curious little cat who will chase your cursor once you move it. It’s not limited to just the terminal. You can keep on working while the cat chases the cursor.
Now, that’s something fun to do specially if you have kids at home.
Install Oneko with this command:
sudo apt install oneko
Run it with this command:
oneko
In case you want a dog instead of a cat, type:
oneko -dog
There are a few more types of cats available. You can get that information by using oneko –help. To stop it, use Ctrl+C.
6. Little brother is watching you
Xeyes is a tiny gui program that let the user draws a pair of ever watching eyes! It will follow your mouse cursor constantly. Run the command and see it yourself!
You can install it using this command:
sudo apt install xeyes
And then use it with this:
xeyes
Press Ctrl+C to stop it.
7. Let the terminal speak for you
To try out this command, make sure you have turned on your speakers. eSpeak is a fun command that gives your terminal a voice. Yes, you heard that right.
Install the package first:
sudo apt install espeak
Next, you need to simply type in the command along with a text that you want to listen as audio:
espeak "Type what your computer says"
Whatever you place in the double quotes, your computer is obligated to say! It’s like echo command in Linux. But instead of printing, it speaks.
8. Toilet (but it has nothing to do with a washroom)
This sounds weird, yes. But, it’s just a command that transforms a text into large ASCII characters.
Install toilet with this command:
sudo apt install toilet
Once done, you just need to type in:
toilet sample text you want
I don’t know why this little program is called toilet.
9. What does the fox cow say?
Cowsay is a command that displays a cow using ASCII characters in the terminal. And by using this command you can instruct the cow to say anything you want.
Not to be confused with any audio – it will just display a text (like you usually see in a comic book).
Cowsay Cowthink
Installcowsay:
sudo apt install cowsay
Once you have it installed, you just need to type in:
cowsay "your text"
Whatever you place in the double quotes, your cow is obligated to say! I have seen a few sysadmins using it to display the message of the day. Maybe you can do the same. You may even combine it with fortune command.
10. Banner Command
The banner command works just like the toilet command but it is limited to print only 10 characters at most.
You can install banner command like this:
sudo apt install sysvbanner
Then use it in the following way:
banner "Welcome"
Replace content in the double quotes and you shall have your desired text displayed.
11. Yes command
The “yes” command helps you to loop an automated response until you terminate the command. This command will print the exact same thing indefinitely. If you want to produce huge amounts of junk text fast, then this command will work like a charm.
You may also use it to provide a yes to a command (if it prompts for it). For example, the apt upgrade command asks for your confirmation, you can use it like this:
yes | sudo apt upgrade
You don’t need to install any package for it. Yes command is already available.
Terminate the yes command loop, simply press CTRL + C.
12. Get a new identity, well, sort of
Want to generate a random fake identity? I give you the command “rig”. Once you place this in the terminal, it will generate a fake identity.
Install rig with this command:
sudo apt install rig
Then simply type this:
rig
It may be used in scripts or web-apps that displays random information but I haven’t done anything of that sort on my own.
Wrapping Up
I hope you liked this list of fun Linux commands. Which command do you like the most here? Do you know some other such amusing commands? Do share it with us in the comment section.
Srimanta Koley
A passionate writer, a distrohopper and an open source enthusiast, Srimanta is extremely fond of everything related to technology. He loves to read books and has an unhealthy addiction to the 90s!
This beginner tutorial discusses a few difficulties you may face while adding files and folders on the desktop screen on Ubuntu.
I know a few people who are habitual of putting all the important/frequently used files on the desktop screen for quick access.
I am not a fan of a cluttered desktop screen but I can imagine that it might actually be helpful to some people.
For the past few releases, it has been difficult to add files on the desktop screen in Ubuntu’s default GNOME desktop. It’s not really Ubuntu’s fault.
The GNOME developers thinks that there is no place for icons and files on the desktop screen. There is no need of putting files on the desktop when you can easily search for it in the menu. And that’s part true.
This is why the newer version of GNOME’s File Manager Nautilus doesn’t support icons and files on the desktop very well.
That said, it’s not impossible to add files and folders on the desktop. Let me show you how you can still use it.
Adding files and folders on the desktop screen in Ubuntu
I am using Ubuntu 20.04 in this tutorial. The steps may or may not vary for other Ubuntu versions.
Add the files and folders to the “Desktop folder”
If you open the file manager, you should see an entry called Desktop in the left sidebar or in the folders list. This folder represents your desktop screen (in a way).
Desktop folder can be used to add files to the desktop screen
Anything you add to this folder will be reflected on the desktop screen.
Anything added to the Desktop folder will be reflected on the desktop screen
If you delete files from this ‘Desktop folder’, it will be removed from the desktop screen as well.
Drag and drop files to desktop screen doesn’t work
Now, if you try to drag and drop files from the file manager on the desktop, it won’t work. It’s not a bug, it’s a feature that irks a lot of people.
A workaround would be to open two instances of the file manager. Open Desktop folder in one of them and then drag and drop files to this folder and they will be added on the desktop.
I know that’s not ideal but you don’t have a lot of choices here.
You cannot use Ctrl+C and Ctrl+V to copy-paste on the desktop, use the right click menu
To add salt to injury, you cannot use Ctrl+V the famous keyboard shortcut to paste files on the desktop screen.
But you can still use the right click context menu and select Paste from there to put the copied files on the desktop. You can even create new folders this way.
Right click menu can be used for copy-pasting files to desktop
Does it make sense? Not to me but that’s how it is in Ubuntu 20.04.
You cannot delete files and folder using the Delete key, use the right click menu again
What’s worse is that you cannot use the delete key or shift delete key to remove files from the desktop screen. But you can still right click on the files or folders and select “Move to trash” to delete the file.
Delete files from desktop using right click
Alright, so now you know that at least there is a way to add files on the desktop with some restrictions. But it doesn’t end here unfortunately.
You cannot search for files with their names on the desktop screen. Normally, if you start typing ‘abc’, files starting with ‘abc’ are highlighted. You don’t get it here.
I don’t know why so many restrictions have been put on adding files on the desktop. Thankfully, I don’t use it a lot otherwise I have been way too frustrated.
If you upgrade to Ubuntu 20.04 LTS from Ubuntu 18.04 LTS you’ll find that your new OS looks and behaves a bit differently from the one you were running before. This is because the cumulative […]
Here is a list of tweaks and things to do after installing Ubuntu 20.04, to get a smoother and better desktop Linux experience.
Ubuntu 20.04 LTS brings plenty of new features and visual changes. If you choose to install Ubuntu 20.04, let me show you a few recommended steps that you can follow to get started with it.
16 Things to do after installing Ubuntu 20.04 LTS “Focal Fossa”
The steps I am going to mention here are my recommendation. You may ignore a few customization or tweaks if they don’t suit your need and interest.
Similarly, some steps may seem too simple but essential for someone completely new to Ubuntu.
Let’s get started with the list of things to do after installing Ubuntu 20.04 LTS codenamed Focal Fossa.
1. Get your system ready by updating and enabling additional repos
The first thing you should do after installing Ubuntu or any other Linux distribution is to update it. Linux works on a local database of available packages. And this cache needs to be synced in order for you to be able to install any software.
It is very easy to update Ubuntu. You can run the software updater from the menu (press Windows key and search for software updater):
Software Updater in Ubuntu 20.04
You may also use the following command in the terminal to update your system:
Make sure to check the boxes in front of the repositories:
Enable additional repositories
2. Install media codecs to play MP3, MPEG4 and other media files
If you want to play media files like MP3, MPEG4, AVI etc, you’ll need to install media codecs. Ubuntu doesn’t install it by default because of copyright issues in various countries.
Some software vendors provide .deb files to easily install their application. You may get the deb files from their website. For example, to install Google Chrome on Ubuntu, you can get the deb file from its website and double click on it to start the installation.
Gaming on Linux has come a long way. You are not restricted to a handful of games included by default. You can install Steam on Ubuntu and enjoy a good number of games.
The GameMode automatically adjust Linux system performance to give more priority to games than other background processes.
This means some games that support the GameMode (like Rise of Tomb Raiders) should have improved performance on Ubuntu.
5. Manage auto-updates (for intermediate and experts)
Recently, Ubuntu has started to automatically download and install security updates that are essential to your system. This is a security feature as a regular user, you should leave it as it is,
You can opt for the Show immediately so that it notifies you of security updates as soon as they are available instead of automatically installing.
Control the auto updates settings
6. Control automatic suspend and screenlock for laptops
If you are using Ubuntu 20.04 on a laptop then you may want to pay attention to a few power and screenlock settings.
If your laptop is on battery mode, Ubuntu will suspend the system after 20 minutes of inactivity. This is done to save battery power. Personally, I don’t like it and thus I disable it.
Similarly, if you leave your system for a few minutes, it automatically locks the screen. I don’t like this behavior as well so I prefer disabling it.
If you want a minimal looking desktop, you can disable the icons on the desktop. You can also disable the launcher from the left side and the appindicators in the top panel.
All this can be controlled via the new GNOME Extensions that is already available by default.
By the way, you can also change the position of the launcher to the bottom or to the right by going to the Settings->Appearance.
9. Use emojis (smileys) and special characters or disable it from the search
Ubuntu provides an easy way to use smiley or the emoticons. There is a dedicated application called Characters installed by default. It basically gives you Unicode of the emojis.
Not only emojis, you can use it to get the unicode for French, German, Russian and Latin characters. Clicking on the symbol gives you the opportunity to copy the unicode and when you paste this code, your chosen symbol should be typed.
Emoji Ubuntu
You’ll find these special characters and emoticons appearing in the desktop search as well. You can copy them from the search results as well.
Emojis appear in desktop search
If you don’t want to see them in search results, you should disable their access to the search feature. The next section discuss how to do that.
10. Master the desktop search
The GNOME desktop has a powerful search feature. Most people use it for searching installed applications but it is more than just that.
Press the super key (Windows key) and search for something. It will show any applications that matches that search term, followed by system settings and matching applications available in the software center.
Desktop search
Not only that, the search can also find text inside files. If you are using the calendar, it can also find your meetings and reminders. You can even do quick calculations in the search and copy its result.
Quick Calculations Ubuntu Search
You can control what can be searched and in which order by going into Settings.
11. Use nightlight feature to reduce eye strain at night
If you use your computer or smartphone at night, you should use the night light feature to reduce eye strain. I feel that it helps a lot.
The night light feature adds a yellow tint to the screen which is less pinching than the white light.
You can enable night light in the Settings -> Displays and switching to Night Light tab. You can set the ‘yellowness’ as per your liking.
Nightlight feature
12. Got a 2K/4K screen? Use fractional scaling to get bigger icons and fonts
If you feel that the icons, fonts, folders everything looks too small on your HiDPI screen, you can take advantage of the fractional scaling.
Enabling fractional scaling gives you more options to increase the size between 100% to 200%. You can choose the scaling size that suits your preference.
Enable fractional scaling from Settings -> Displays
13. Explore GNOME Extensions to extend the usability of GNOME desktop
The GNOME desktop has tiny plugins or add-ons called Extensions. You should learn to use GNOME extensions to extend the usability of your system.
As you can see in the image below, the weather extension shows the weather information in the top panel. A tiny but useful thing. You may also take a look at some of best GNOME extensions here. Don’t install all of them, use only those that are useful to you.
Weather Extension
14. Enable ‘do not disturb’ mode and focus on work
If you want to concentrate on work, disabling desktop notifications would come handy. You can easily enable ‘do not disturb’ mode and mute all notifications.
Enable ‘Do Not Disturb’ to get rid of desktop notifications
These notifications will still be in the message tray so that you can read them later but they won’t pop up on the desktop anymore.
15. Clean your system
This is something you don’t need to do right after installing Ubuntu. But keeping it in mind will help you.
Over the time, your system will have significant amount of packages that won’t be needed anymore. You can remove them all in one go with this command:
You can also install new themes in Ubuntu though personally, I like the default theme in this release. This is the first time that I have stuck with the default icons and theme in an Ubuntu release.
So these were my recommendations. What are the steps you follow after installing Ubuntu? Share your favorite things and I might update this article with your suggestions.
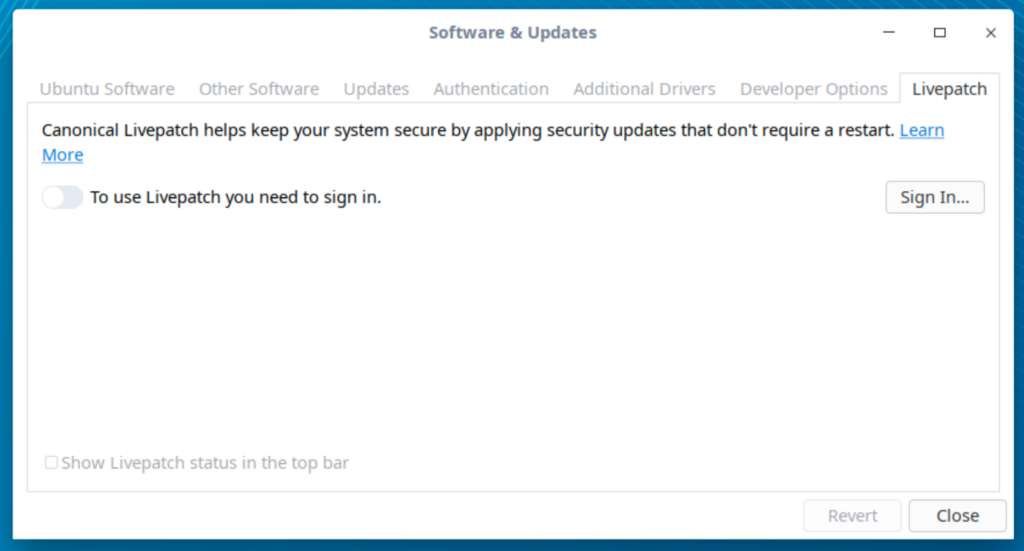
Connaissez-vous le Live Patching ? Il s’agit d’un service proposé par Canonical permettant de mettre à jour le système Ubuntu sans avoir à redémarrer la machine. Cela permet de réduire les temps d’indisponibilité de vos services et de maintenir votre serveur sécurisé automatiquement.
Notez que ce service fonctionnera uniquement sur les versions LTS (Long Term Support) d’Ubuntu.
Si vous voulez activer cette option sur votre serveur, voici comment faire.
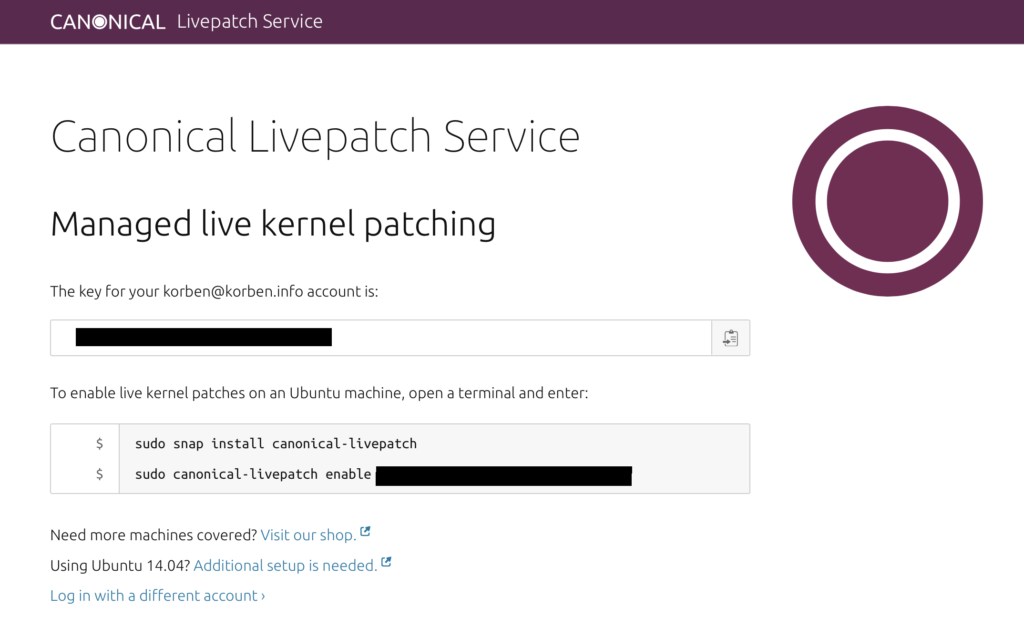
Étape 1 : Obtenir une clé LivePatch
Pour cela, vous devrez vous créer un compte Ubuntu One / Canonical en passant par ici. Une fois authentifié sur le service de Livepatch, vous obtiendrez une clé API.
Étape 2 : Configurer LivePatch
Sur votre serveur, entrez les commandes suivantes :
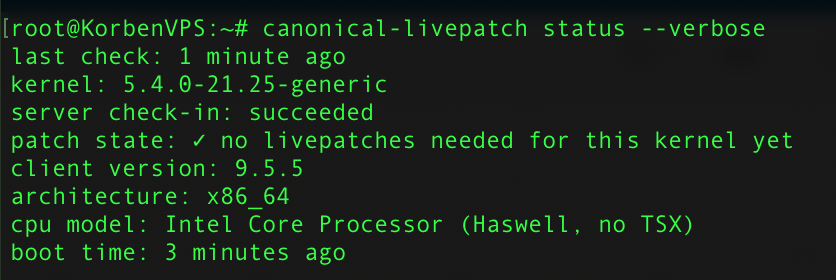
Pour observer le comportement de LivePatch, entrez la commande suivante. Vous verrez ainsi si un nouveau patch a été déployé et quand.
canonical-livepatch status --verbose
Bonus : Et sur Desktop ?
Et si vous êtes sur une machine Desktop, c’est également possible en suivant exactement la même procédure que ci-dessus ou en utilisant l’utilitaire de mise à jour d’Ubuntu, via l’onglet LivePatch.
Si votre Mac commence un peu à tirer la langue et/ou que vous voulez l’alléger des choses inutiles qui s’y accumulent au fil des années, jetez un oeil sur le soft CleanMyMac X.
L’idée derrière ce dernier est de mettre à disposition une boite à outils qui va regrouper plusieurs programmes d’optimisation. Il va par exemple nettoyer le contenu inutile, retirer les éventuels malwares ou encore monitorer en temps réel les performances de votre machine (CPU, mémoire, batterie…).
Disponible depuis la publication de Windows 10 May 2019 Update, l’outil Sandbox (bac à sable en français) permet de profiter d’une sorte de Windows dans Windows.
Cette solution met en place une seconde instance du système d’exploitation afin d’exécuter des applications dans un environnement sécurisé. Il est ainsi possible d’exploiter des logiciels particuliers sans être inquiété des modifications qu’ils pourraient entrainer sur les fichiers.
Cette machine virtuelle peut aussi être mis à contribution pour apporter son aide à la lutte contre le nouveau coronavirus. Microsoft explique comment cela fonctionne.
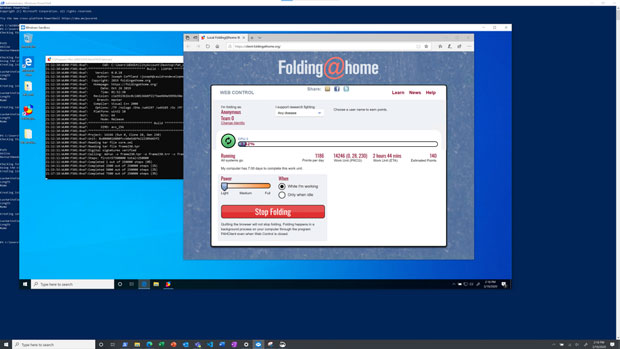
Sandbox permet à chaque utilisateur de Windows 10 de donner une partie des ressources de son processeur dans le cadre du projet Folding@Home.
Le projet Folding@home permet de concentrer la puissance de calcul de milliers d’ordinateurs à travers le monde. Son objectif est de simuler le repliement des protéines dans différents environnements de température et de pression. Son fonctionnement s’appuie sur le participatif puisqu’il fait ses calculs à l’aide de la puissance non-utilisée des ordinateurs, des téléphones et des consoles de jeux de volontaires.
Windows 10 et Sandbox, comment cela fonctionne-t-il ?
Microsoft a créé un script PowerShell « spécial » si vous souhaitez contribuer à ce projet. L’opération se fait en deux étapes. Il faut récupérer le Script puis l’exécuter au travers d’une invite de commande lancer en mode administrateur. Voici la ligne de commande
« Windows Sandbox vous pouvez exécuter l’application open-source Folding@Home pour aider à simuler la dynamique des protéines. Folding@Home est l’un des projets informatiques distribués les plus populaires réunissant des scientifiques citoyens qui se portent volontaires pour exécuter des simulations de dynamique des protéines sur leurs ordinateurs personnels pour lutter contre le COVID-19 et d’autres maladies. »
Ce script PowerShell télécharge automatiquement le client Folding@Home et le lance dans Windows Sandbox. Si Sandbox n’est pas activé, le script l’activera et redémarrera le PC. Il suffit ensuite de relancer le script.
Pour la 13ème semaine de l'année 2020, voici 10 liens intéressants que vous avez peut-être ratés, relayés par le Journal du hacker, votre source d’informations pour le Logiciel Libre francophone !
De plus le site web du Journal du hacker est « adaptatif (responsive) ». N’hésitez pas à le consulter depuis votre smartphone ou votre tablette !
Le Journal du hacker fonctionne de manière collaborative, grâce à la participation de ses membres. Rejoignez-nous pour proposer vos contenus à partager avec la communauté du Logiciel Libre francophone et faire connaître vos projets !
Et vous ? Qu’avez-vous pensé de ces articles ? N’hésitez pas à réagir directement dans les commentaires de l’article sur le Journal du hacker :)
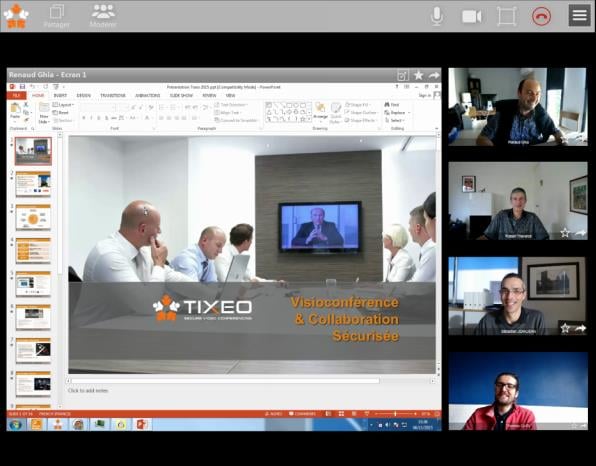
Je continue à réfléchir sur la meilleure façon de vous accompagner sur la traversée de cette crise de Covid-19 et comme sur le forum, on me demandait quel service utiliser pour donner des cours à distance ou faire des réunions, voici une petite liste d’outils que je vous invite à tester.
J’en connais bien certains comme Zoom, Tixeo Hangouts ou Teams, et d’autres un peu moins, donc je vous laisserai vous faire votre propre avis par l’expérimentation. Je vous ai mis les plus connu, ceux qui m’ont traversé l’esprit. Si vous en avez d’autres en tête, n’hésitez pas.
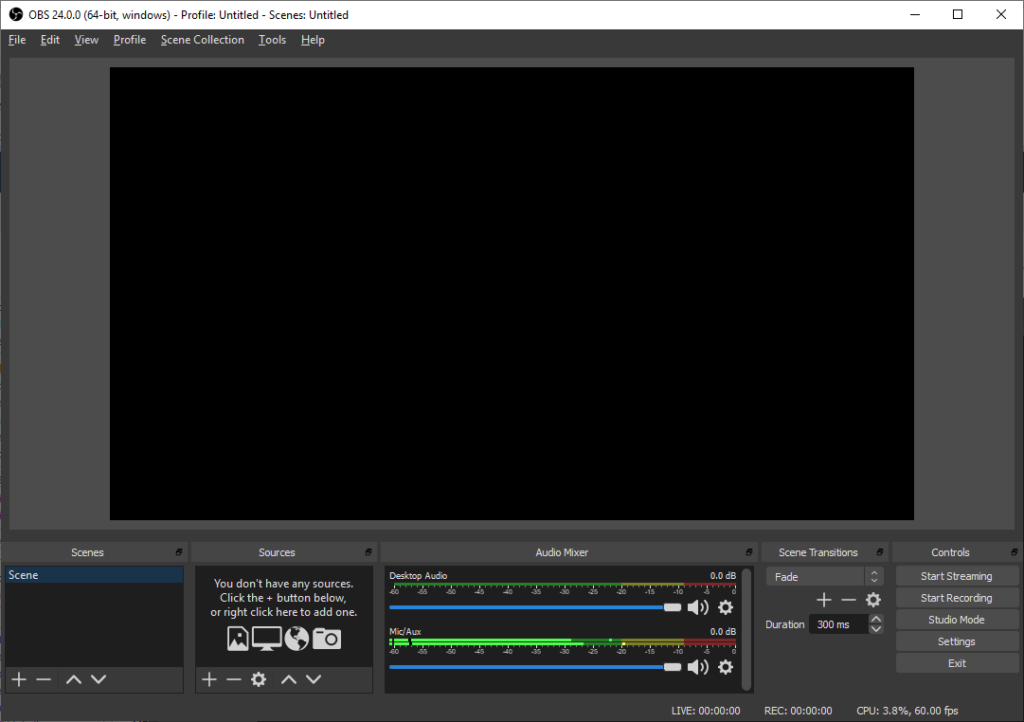
Avec un système de chaine YouTube, une diffusion live et le logiciel OBS, il est possible directement de donner par exemple un cours, de lire les commentaires écrits en live et bien sûr de permettre une diffusion postérieure de la vidéo, le tout en « privée » si l’URL n’est pas diffusée.
C’est l’un des plus connus et il fonctionne super bien. Je l’utilise régulièrement. C’est gratuit pour le forfait de base et ça permet de faire des réunions, de diffuser des vidéos, d’échanger en audio, ou de se parler en tchat.
JoinMe est très simple d’utilisation, tout se passe dans le navigateur et il permet de faire des appels en audio-vidéo à plusieurs et de partager son écran.
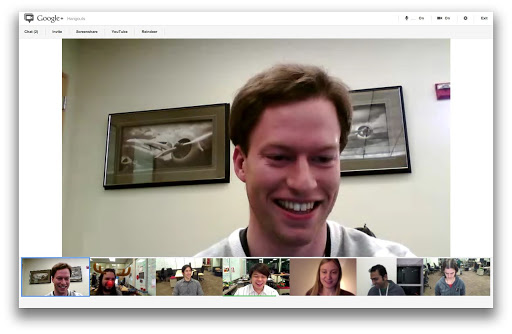
Celui là, on ne le présente plus. C’est gratuit, pas toujours très stable selon les connexions, mais ça permet de faire de l’appel vidéo, audio et du tchat à plusieurs sans se prendre la tête. Une version entreprise est également disponible.
On ne présente plus non plus Slack, mais on ignore souvent que celui-ci possède une fonctionnalité Slack Calls qui permet de partager son écran et d’effectuer des appels audio et vidéo en plus du reste comme les canaux de discussion ou le partage de fichiers.
Même chose, c’est une référence dans le domaine. Webex propose dans sa version gratuite la possibilité de faire des réunions jusqu’à 100 personnes en vidéo, partage d’écran…etc
La startup française Tixeo propose un système de visioconférence audio-vidéo + chat très sécurisé (certifié CSPN et qualifié par l’ANSSI). Par contre pas d’option gratuite.
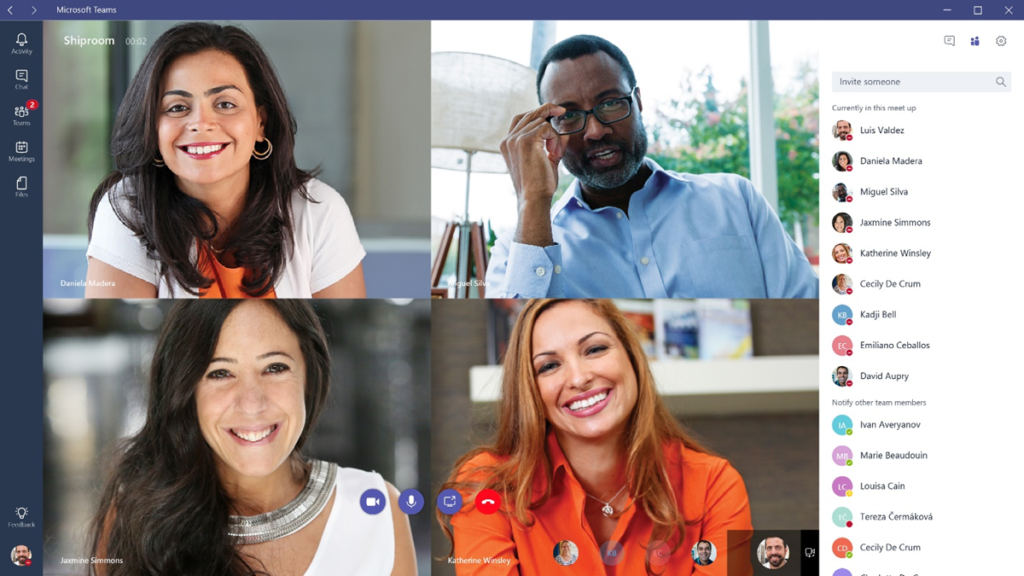
Je l’ai encore utilisé cette semaine et ça fonctionne du feu de dieu. Microsoft Teams permet de travailler de manière collaborative et sa version gratuite permet de discuter à l’écrit ou en audio-vidéo , mais aussi de partager et stocker des documents (jusqu’à 10 Go pour l’équipe au complet) et s’intègre parfaitement avec la suite Microsoft Officie.
Permets de faire des réunions audio et vidéo en ligne depuis n’importe quelle machine, mais aussi des webinaires pour ceux qui veulent. C’est une solution payante, mais il y a une offre d’essai de 14 jours.
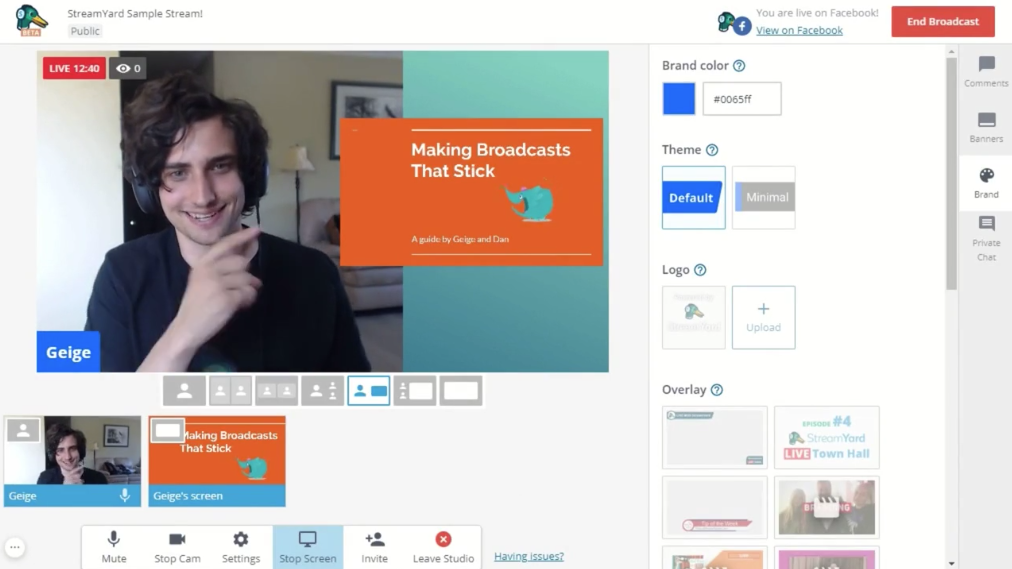
Celui-ci est gratuit dans son forfait de base et permet d’accueillir jusqu’à 6 participants, de faire du partage d’écran, tout en streamant de l’audio-vidéo pour vos réunions.
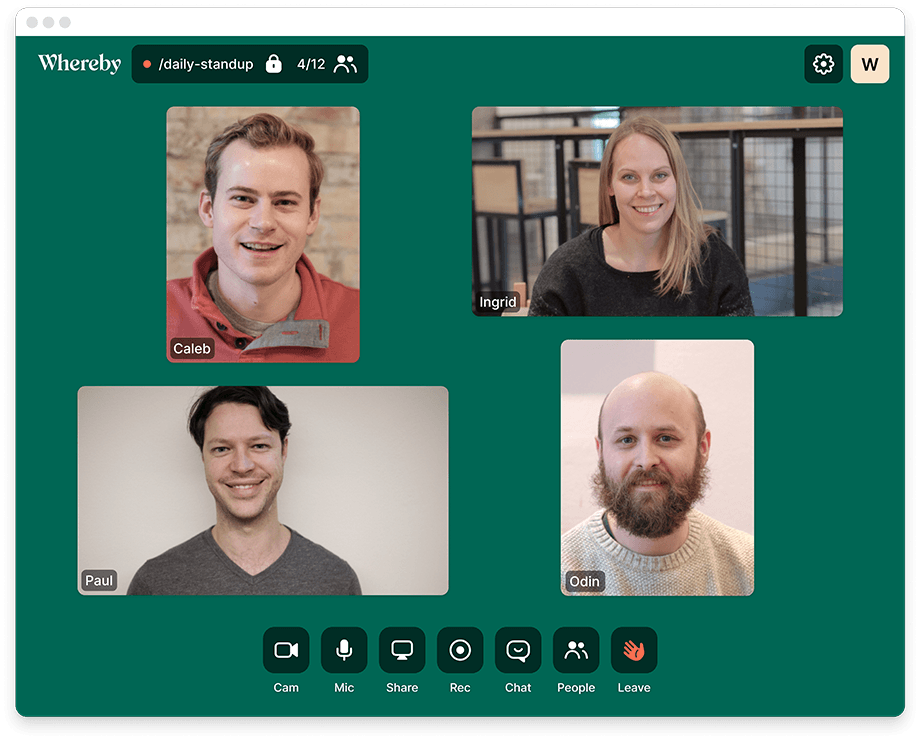
Dans sa version gratuite Whereby permet de faire des confs call à 4 participants et de partager son écran.
Il en existe encore bien d’autres, mais je n’aurais pas le temps aujourd’hui de tous les passer en revue. Par contre je vous invite à en ajouter dans les commentaires sur le forum et je les ajouterai par la suite.
Durant les moments difficiles que nous nous apprêtons à vivre durant les semaines à venir, beaucoup d’entrevous vont découvrir les joies du télétravail.
Welcome my friends !
Bosser à la maison n’est pas forcément simple pour tout le monde et je me suis dit que vous faire un retour d’expérience personnel pourrait vous servir. En effet, je bosse en télétravail depuis 15 ans environ et j’ai mis en place plusieurs choses qui me permettent de travailler sereinement.
De plus, le fait que les enfants (si vous en avez) resteront eux aussi à la maison va compliquer l’affaire, car malheureusement, je ne suis pas sûr que tous les employeurs (ou le gouvernement) aient bien conscience de ce que ça implique de s’occuper d’enfants entre 0 et 15 ans toute une journée, surtout s’il faut leur dispenser une instruction et pas les laisser le nez collé sur les dessins animés.
Message aux employeurs : Comprenez que si vos employés ont aussi des enfants à garder, ils ne pourront pas bosser à 100%. Acceptez cela, c’est mort les gars. Acceptez aussi qu’ils bossent en décalage tôt le matin et un peu le soir et que leur journée risque d’être compliquée. Ça sera mieux que rien.
Le bureau
Pour ceux qui le peuvent, je vous conseille vivement d’avoir un endroit à vous réservé au boulot. Aménagez une chambre pour ça, un bureau, un placard, la cave ou je ne sais pas, mais ayez votre espace. Travailler dans le salon ou dans le canapé, avec les distractions à portée de main ou les interactions sociales familiales, ce n’est pas simple surtout si vous devez vous concentrer.
Pensez aussi à la déco (plantes vertes par exemple) et au casque qui annule le bruit extérieur pour rester au calme même si ça hurle dans la baraque. Je donne quelques conseils matos ici.
Instaurez une routine
Ça peut paraitre con, mais vos habitudes sont toutes chamboulées donc vous allez devoir rapidement instaurer une routine. Début du boulot à une heure précise avec option « starter », c’est-à-dire un élément « plaisir » qui va vous permettre de démarrer la journée comme un petit café à déguster devant l’ordi avec une tâche pas trop prise de tête comme lire les news sur Korben.info par exemple. Pensez aux pauses aussi. Travailler sur écran nécessite des pauses régulières.
Sortez de votre bureau pour vous aérer, boire de l’eau (c’est important), échanger quelques mots avec ceux qui sont sous le même toit que vous, faire un tour dehors pour respirer un peu d’air frais…etc. C’est hyper important, car quand on bosse à la maison, on peut vite être happé par l’écran et aucun collègue ne viendra nous taper sur l’épaule en proposant une pause café ou clope.
La situation risque de durer, donc autant prendre de bonnes habitudes tout de suite.
La fatigue
Qui veut aller loin ménage sa monture. C’est pourquoi je vous encourage à faire vos horaires sans tirer sur la corde. Gardez du temps pour vous et pour votre famille par exemple le soir. Pas la peine de vous recoller le soir devant l’ordinateur pour prendre de l’avance pour le lendemain.
L’utilisation d’écrans le soir va stimuler votre cerveau et vous aurez ensuite du mal à dormir. Donc, prévoyez un temps nécessaire de repos, car il n’y a que quand on est reposé qu’on prend les bonnes décisions. Si vous vous levez tôt, instaurez aussi une petite sieste en milieu de journée. 10 min suffisent à faire rebooter le cerveau.
Le stress
Alors déjà, il faut être bienveillant avec vous-même. La situation globale liée au Coronavirus et les changements que cela implique dans votre vie sont peut-être une source de stress pour vous. C’est bien normal et naturel. Renseignez-vous sur le yoga, les massages, la méditation, la visualisation positive, les techniques de respiration et j’en passe pour réduire ce stress.
Ensuite concernant le stress « classique » lié au boulot, pensez bien à vous aménager des paliers de décompression notamment en fin de journée. Si vous avez passé une journée compliquée avec des conf call et des merdes urgentes à gérer toute la journée, ne foncez pas ensuite dans le salon pour décharger tout ce stress sur votre famille. Éteignez l’ordinateur, et posez-vous 10/15 min pour souffler, prendre une douche ou faire un truc que vous aimez. C’est une période tampon nécessaire pour un retour à la normale après une journée de boulot.
Le smartphone
Le smartphone ne va pas non plus être simple à gérer. Pas de présence physique avec les collègues, ça peut dire possiblement plus de coup de fil ou de SMS. Si vous avez la chance d’avoir un téléphone du boulot, éteignez-le quand vous quittez votre espace de travail y compris durant vos pauses.
Si c’est votre téléphone perso et que vos collègues appellent dessus, précisez-leur que vous ne répondrez à rien après 19h par exemple. Ne lisez pas non plus les SMS de travail le soir, ça va vous stresser. Je pourrais m’étendre sur le smartphone durant des heures, mais bon vous voyez l’idée. Ne vous laissez pas envahir par cet objet. Ne laissez pas le boulot bouffer tout votre espace personnel via le smartphone. Soyez vigilant.
La communication
La communication avec les collègues risque d’être compliquée. Prévoyez un chat de discussion type Slack ou Riot, un système de suivi de tâches via un Gitlab ou un Trello, la boite mail bien sûr et pour les coups de fil et les réunions, réduisez au maximum. En France, on aime bien s’écouter parler et la réunionnite quand vous avez en plus du boulot, des gosses qui font du MMA dans le couloir, ce n’est pas un truc que vous allez apprécier. Allez à l’essentiel en termes de communication, et si vous mettez en place un point quotidien, limitez-le volontairement à 20 min par exemple pour forcer tout le monde à aller droit au but. Acceptez aussi qu’il y ait des bugs de communication, avec des ratés, des incompréhensions. Ça arrive et d’ailleurs ça m’arrive encore.
La solitude
Il se peut aussi qu’au contraire, vous vous retrouviez isolé seul face à votre ordinateur. Pas de panique. Si vous avez besoin d’aide, vous avez Internet. Les forums (le mien est ouvert, n’hésitez pas à venir y demander des conseils techniques), les réseaux sociaux, les coups de fil aux collègues…etc. Faites des pauses Facebook ou Twitter pour échanger quelques mots avec vos amis et rompre la solitude, prenez des nouvelles des anciens que vous ne pouvez plus aller voir…etc.
Moi je suis tout seul (physiquement) environ 10h par jour et j’ai besoin de cela pour rester équilibré donc là les enfants H24 à la maison depuis lundi dernier (oui j’avais anticipé) c’est difficile pour moi. Mais je parle avec des gens toute la journée sur les réseaux donc je ne me sens jamais seul.
Mais il y a aussi des gens qui détestent la solitude et il existe des tonnes de moyens de ne pas être seul en gardant des interactions sociales au travers d’Internet avec vos communautés. Pensez-y.
Comme je vous le disais, garder les enfants ET bosser en même temps c’est compliqué. Ça va dépendre de l’âge et du tempérament de vos enfants, et de votre boulot. Ne culpabilisez pas si vous n’y arrivez pas, c’est normal. Essayez plutôt d’aménager vos horaires pour que ces 2 mondes (enfants/boulot) n’entrent pas en collision.
De plus, si vous avez un conjoint qui continue de bosser à l’extérieur, expliquez-lui bien que vous n’aurez pas le temps de passer l’aspirateur ou de faire la vaisselle pendant vos heures de boulot ou votre pause déj. Il y en a beaucoup qui pensent que parce qu’on travaille à la maison, on devient femme ou homme au foyer et que forcément, si la baraque est en bordel, c’est de votre faute. Non, et non. Insistez là-dessus avant que ça ne crée des tensions avec votre conjoint.
Dites stop à votre employeur
Certains employeurs n’ont clairement rien à foutre du bien être de leurs employés et vous serez peut être concerné par un chef qui va essayer de vous fliquer en vous appelant toutes les 30 secondes et vous prendra à défaut si vous êtes sorti faire une course rapide ou si vous avez la musique à fond ou les enfants qui piaillent. Sachez ne pas décrocher si vous n’êtes pas en mode boulot et tant pis pour le chef.
Message aux employeurs n°2 : Si vous avez recruté quelqu’un, c’est pour ses capacités et bien sûr son sérieux et son implication dans son travail. Alors, lâchez prise et ne fliquez pas vos employés. Je sais c’est stressant de penser que vous les payez et qu’ils sont en train de mater Netflix, mais la plupart des gens a à coeur son travail et vous ne pourrez rien faire. Mettez en place un système de tickets (Trello / Gitlab par exemple), fixez des objectifs (en gardant à l’esprit que s’ils ont des enfants, ils en feront moins qu’au bureau et vous devrez aussi accepter ça) et laissez-les travailler. C’est quand les gens sont responsabilisés qu’ils agissent comme des personnes responsables donc faites leur confiance, ce sont des pros.
Conclusion
Voilà, ça c’est ce qui me vient là maintenant à l’esprit. Je pense que je compléterais cet article par la suite si d’autres conseils relatifs au télétravail me viennent. Si vous aussi vous avez des conseils, mettez-les dans les commentaires de cet article et j’irai les lire.
Bon courage à tous, serrons-nous les coudes et n’oublions pas qu’après la pluie, vient toujours le beau temps. Ce n’est que temporaire.
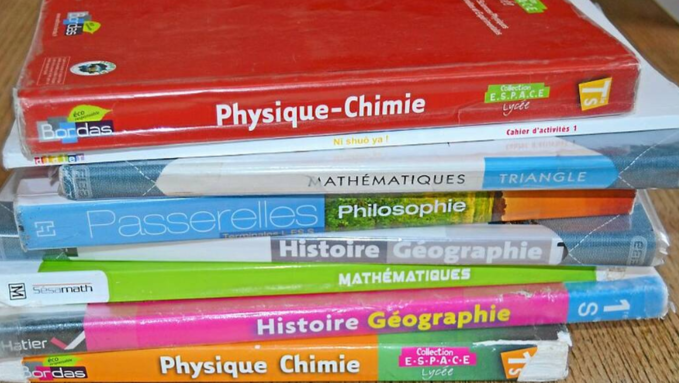
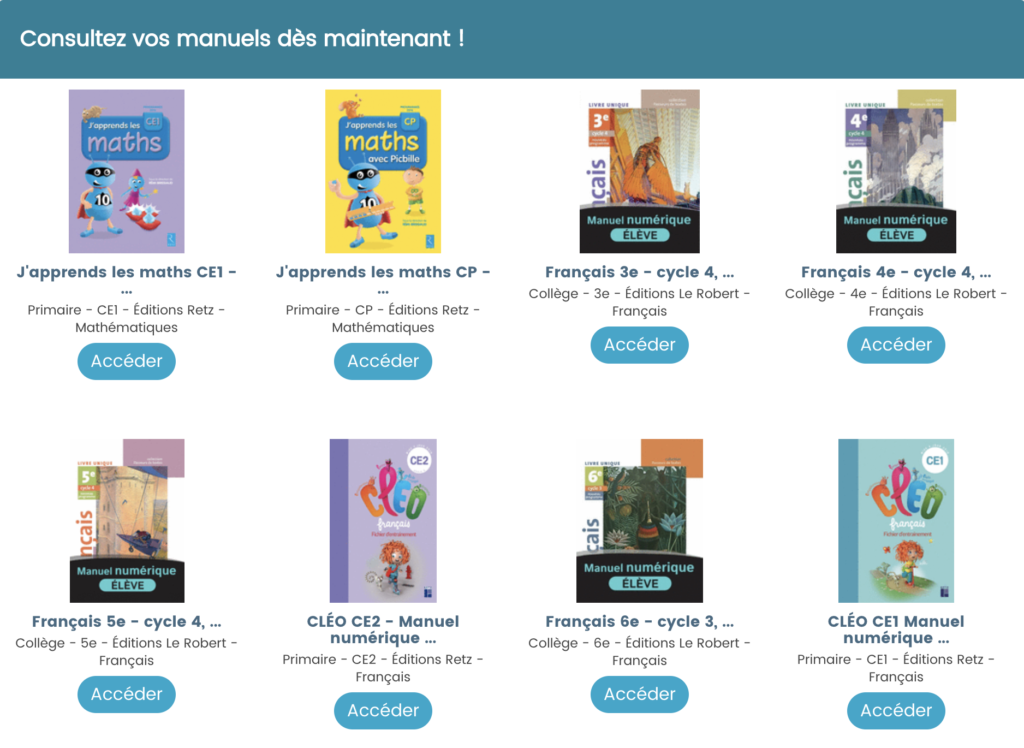
Je pense que la nuit a porté conseil à beaucoup de gens et j’imagine qu’on est nombreux à réfléchir sur des moyens d’aider les autres. C’est le cas des éditions Bordas, Le Robert, Retz et Nathan qui au travers de leur site BiblioManuels ont décidé de débloquer gratuitement la consultation de tous leurs manuels scolaires, de la primaire au collège. C’est cool ! Merci à eux ! D’ailleurs, j’espère que d’autres entreprises montreront l’exemple en aidant les gens, que ce soit les enfants ou les adultes. C’est le moment de faire preuve de solidarité !
À vous les maths, le français, l’anglais, l’histoire géo…etc. Vous allez kiffer !
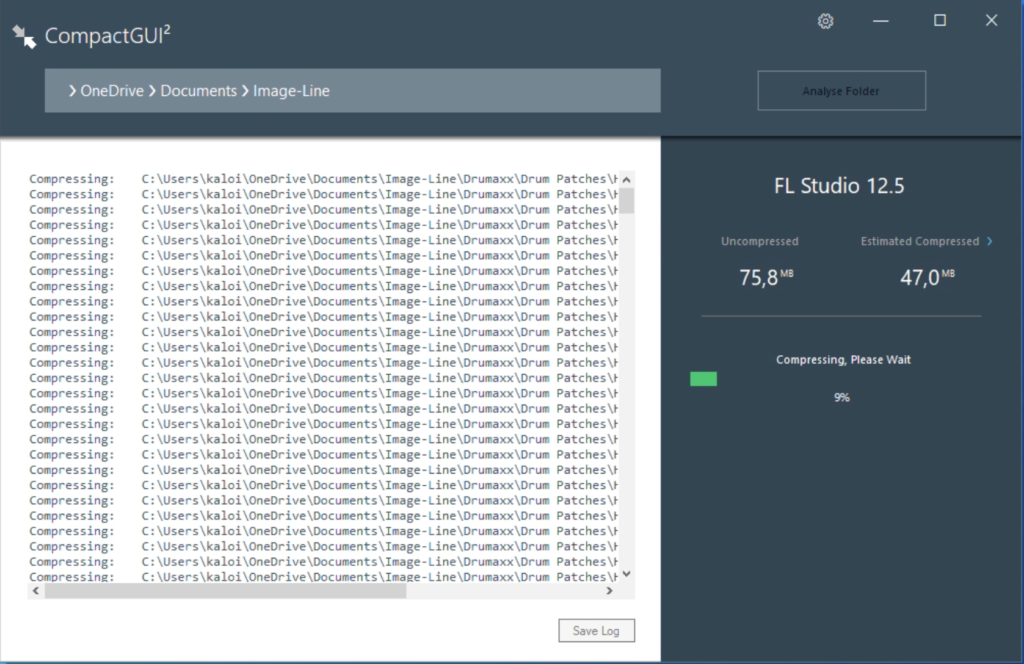
Les plus jeunes d’entre vous l’ignorent peut-être mais ça fait super longtemps que Windows propose une fonctionnalité permettant de compresser de manière transparente des fichiers. Cela permet de gagner un peu de place sur le disque dur, de manière totalement transparente, c’est-à-dire sans pour autant enfermer des documents dans des archives zip et logiquement, sans perte notable de performance.
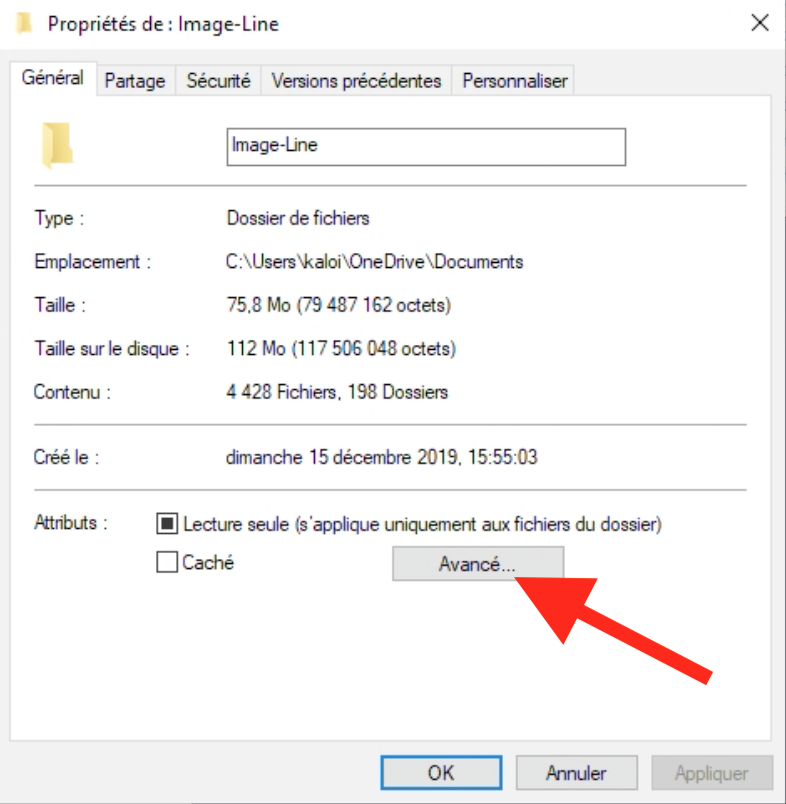
De base, quand vous faites un clic droit sur un dossier, que vous allez dans les propriétés, puis cliquez sur le bouton « Avancés » et cochez la case « Compresser le contenu pour libérer de l’espace disque«
Windows 10 propose cette possibilité remise au goût du jour, sous la forme d’un utilitaire en ligne de commande baptisé Compact.exe. La différence avec cet outil proposé dans Windows 10 et la fonctionnalité équivalente dont je vous parlais juste avant sur les anciens Windows, tient dans le fait que l’algorithme de compression a changé. Celui proposé dans Windows 10 est largement supérieur.
Les taux de compression sont meilleurs sans quasiment aucun impact sur les performances. Même si vous avez un disque dur un peu ancien, vous pourriez y voir un intérêt d’abord pour le gain de place proposé, mais aussi vis-à-vis de temps de chargement accélérés puisque les fichiers sont chargés et lus dans la RAM et plus lu directement depuis le disque.
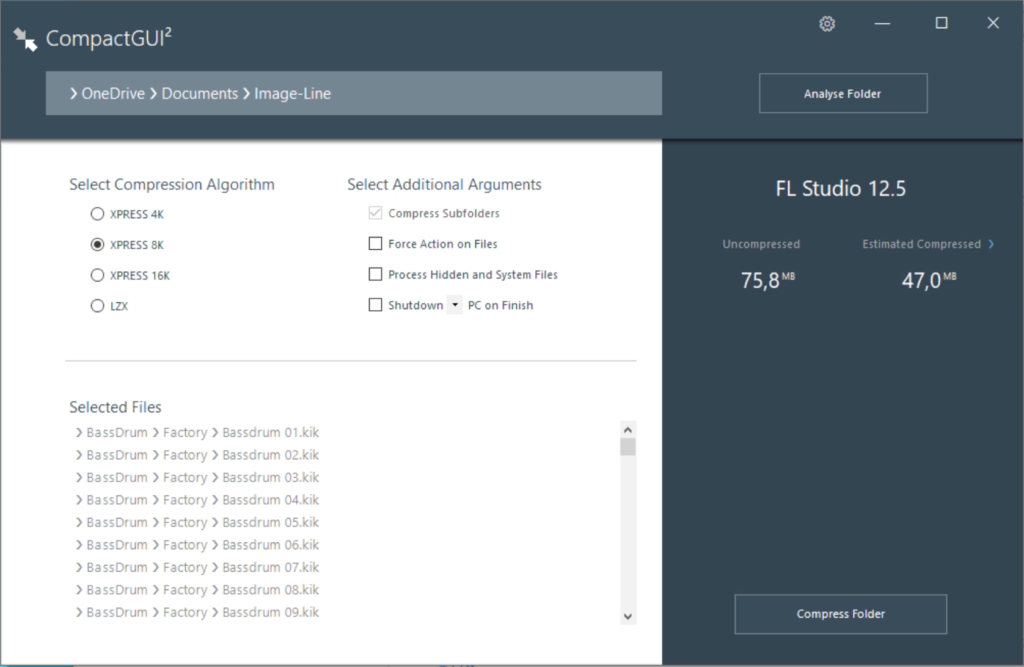
La bonne nouvelle, c’est que le développeur ImminentFate a eu la bonne idée de proposer une GUI pour cet outil, c’est-à- dire une interface graphique qui va vous permettre de choisir les répertoires de votre choix à compresser en toute transparence, ainsi que l’algo de compression.
Comme vous pouvez le voir sur ma capture écran, le gain de place estimé n’est pas négligeable.
Et surtout, le dossier compressé reste accessible librement via l’explorateur de fichiers.
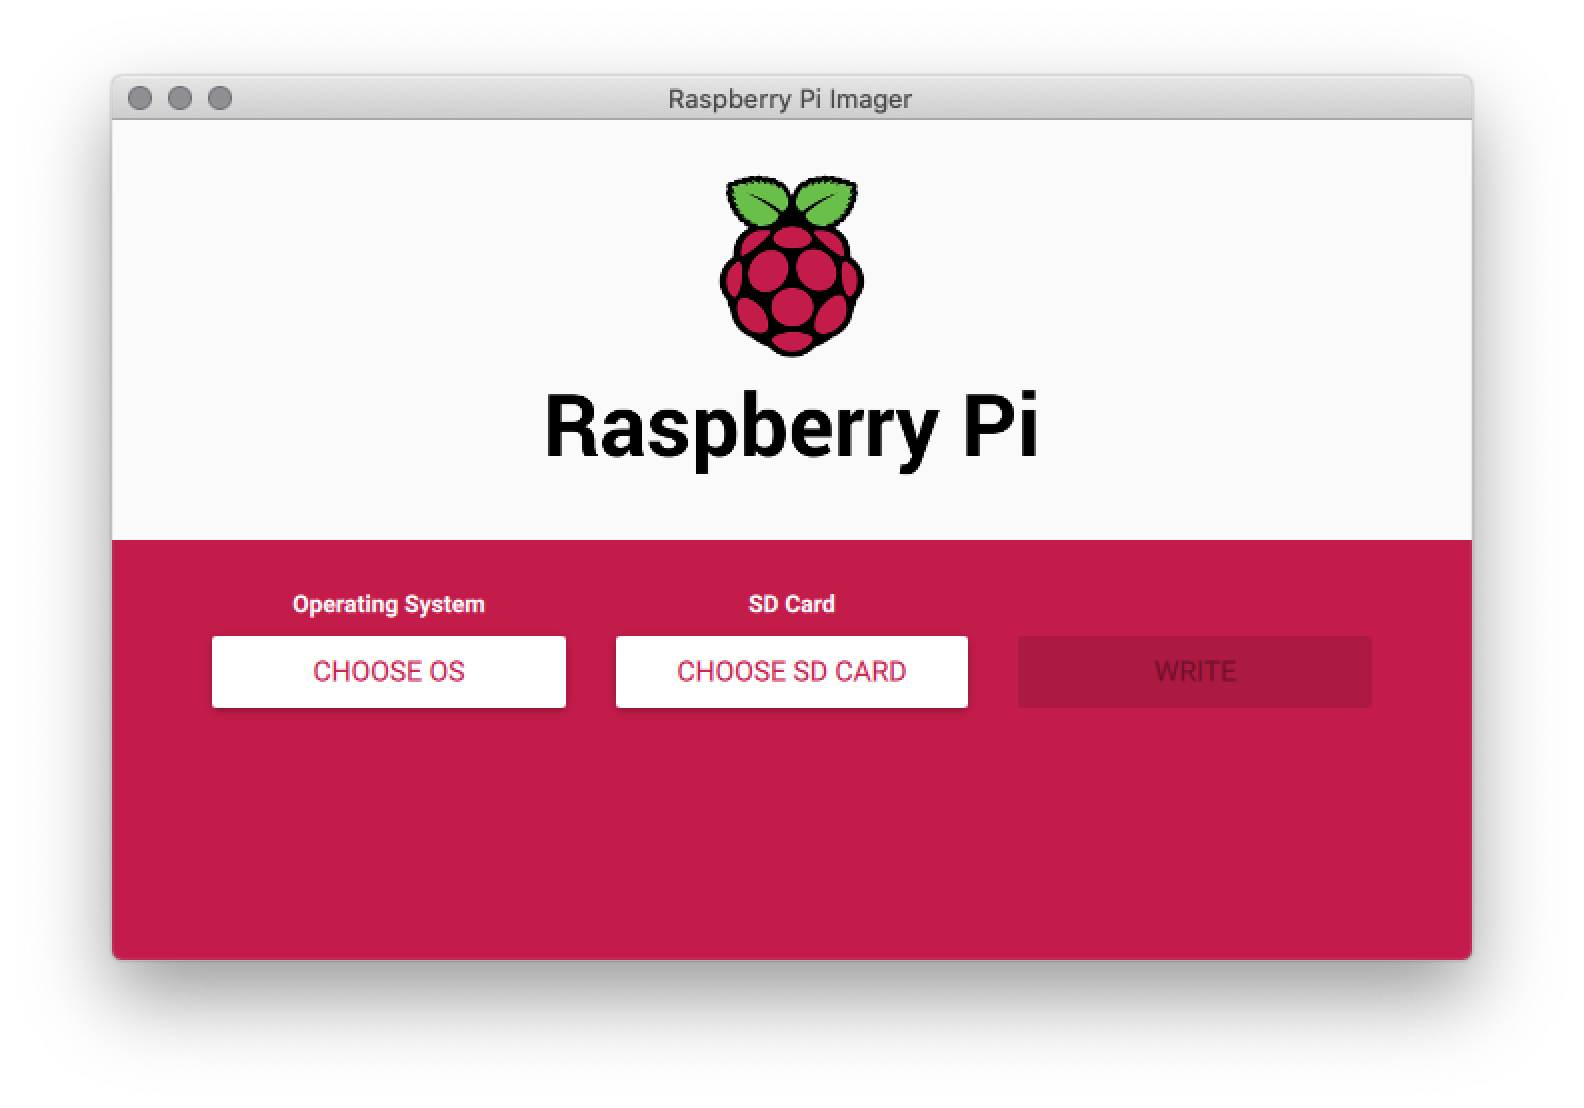
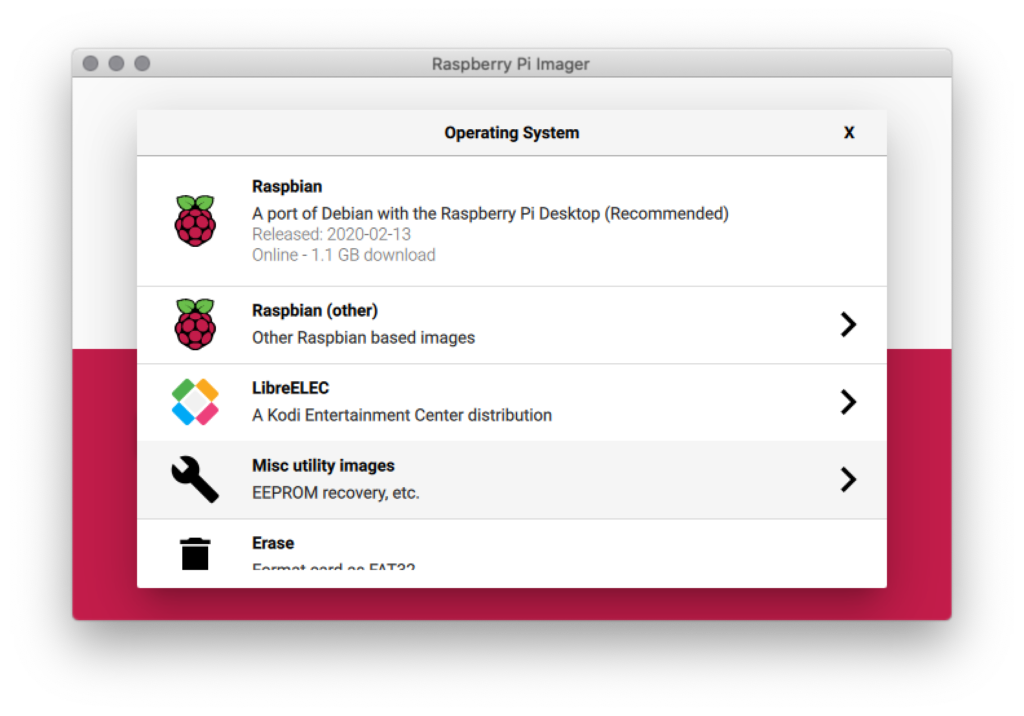
Ceux qui débutent le savent bien, il n’est pas forcement très simple de déployer l’OS (Linux le plus souvent) de votre choix sur une carte SD pour ensuite l’utiliser avec un Raspberry Pi.
Pour ma part, j’utilise depuis des années Etcher devenu BalenaEtcher qui fonctionne toujours très bien. Toutefois, la fondation Raspberry Pi a sorti un nouvel utilitaire baptisé « Raspberry Pi Imager » qui tourne sous macOS, Linux et Windows et qui permet de déployer des images « officielles » type Raspbian ou LibreElec (avec Kodi pour votre media center) et bien sûr n’importe quelle image de n’importe quelle distrib.
Le fonctionnement est similaire aux autres outils de ce genre. Vous choisissez un .img comme source, une carte SD comme destination et vous cliquez sur le bouton WRITE pour envoyer la sauce !
Et voilà ! Et si vous voulez augmenter la durée de vie de vos cartes SD sur Raspberry Pi, je vous renvoie à cet article.
Je ne sais pas si vous aviez vu l’épisode des Webosaures que j’ai enregistré avec Rémi il y a 2 semaines, mais nous revenions avec émotions sur les anciennes versions de Windows. A l’époque, c’était magique.
Du coup, j’ai eu une idée et je vous propose une séance de travaux pratiques ce soir. Nous allons replonger avec douceur dans l’ancien temps et installer un Windows 3.11 pour de vrai sous Windows 10 ou Linux ou macOS. Je vous préviens, vous allez galèrer un peu avec le clavier américain si vous n’avez pas l’habitude mais vous y arriverez, je crois en vous !
Pour ceux qui veulent tricher et aller directement à l’essentiel, cliquez ici.
Etape 1
Ça c’est facile. On va installer DosBox. Pour ceux que ça saoule, vous pouvez aussi prendre la version portable pour Windows.
Etape 2
Maintenant il faut télécharger Windows 3.11. Vous en trouverez une copie sur ce site. Il y a également des versions plus anciennes ou plus récentes de Windows si vous voulez vous amuser.
Décompressez ensuite le zip récupéré.
Etape 3
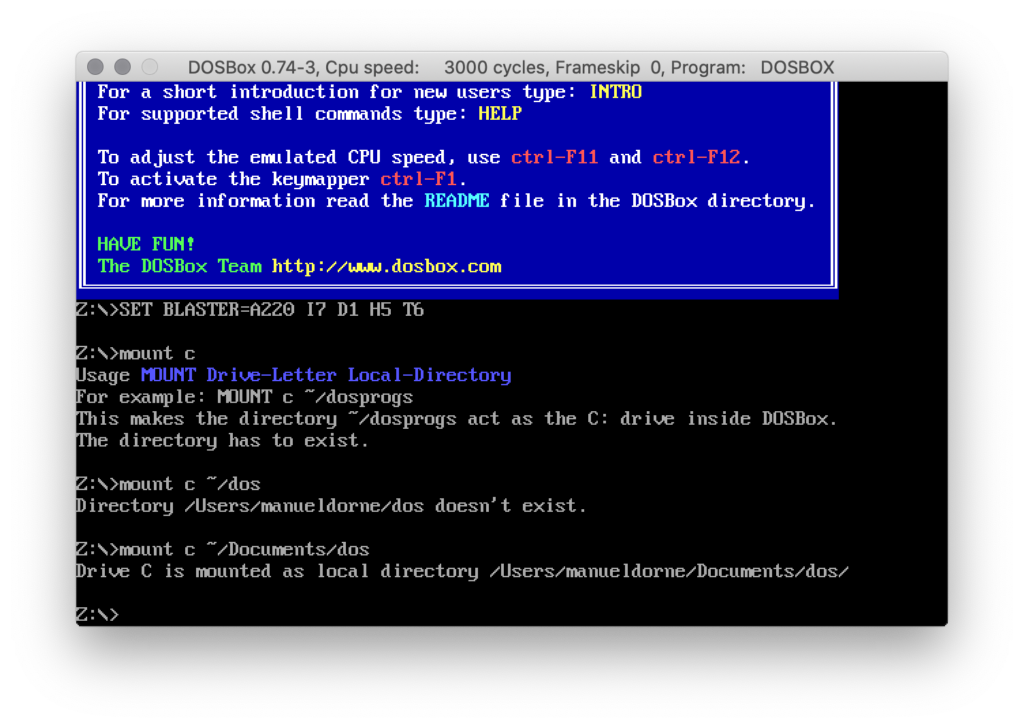
Maintenant, il va falloir monter un répertoire local sous DOSBox. Admettons que vous ayez décompressé le zip de Windows 3.11 dans un dossier situé ici : c:\dos
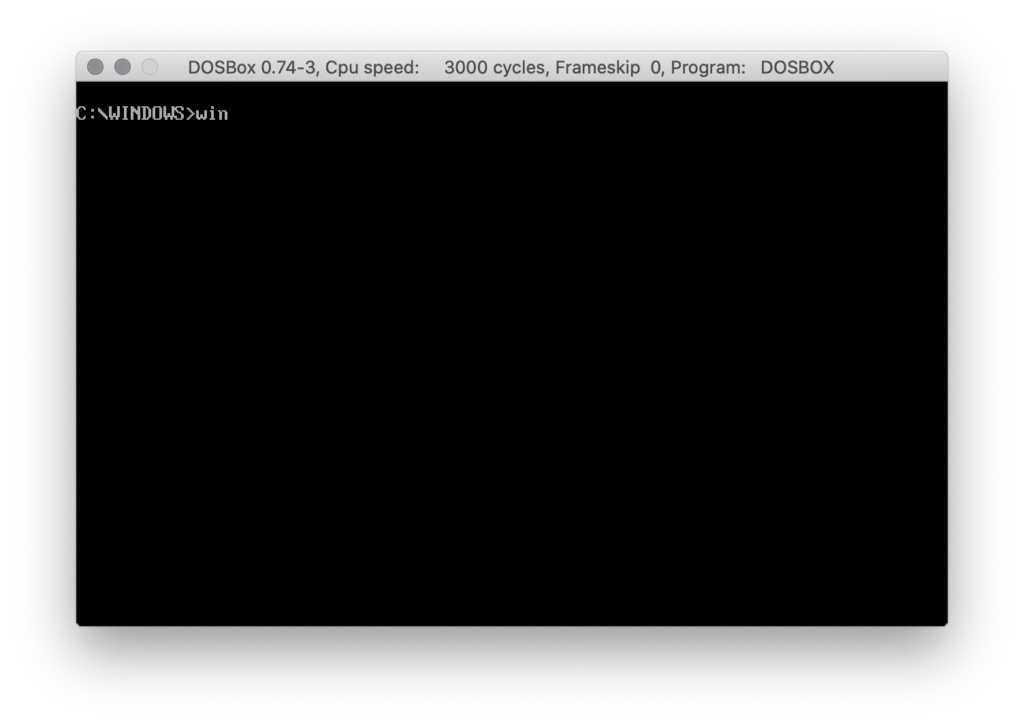
Lancez DosBox et entrez y la commande suivante :
mount c c:\dos
Cela aura pour effet de monter en c: votre répertoire « c:\dos »
Si vous êtes sous mac ou Linux et que vous avez décompressé Windows 3.11 dans un repertoire « dos » situé dans votre répertoire home, entrez la commande suivante :
mount c ~/dos
Etape 3
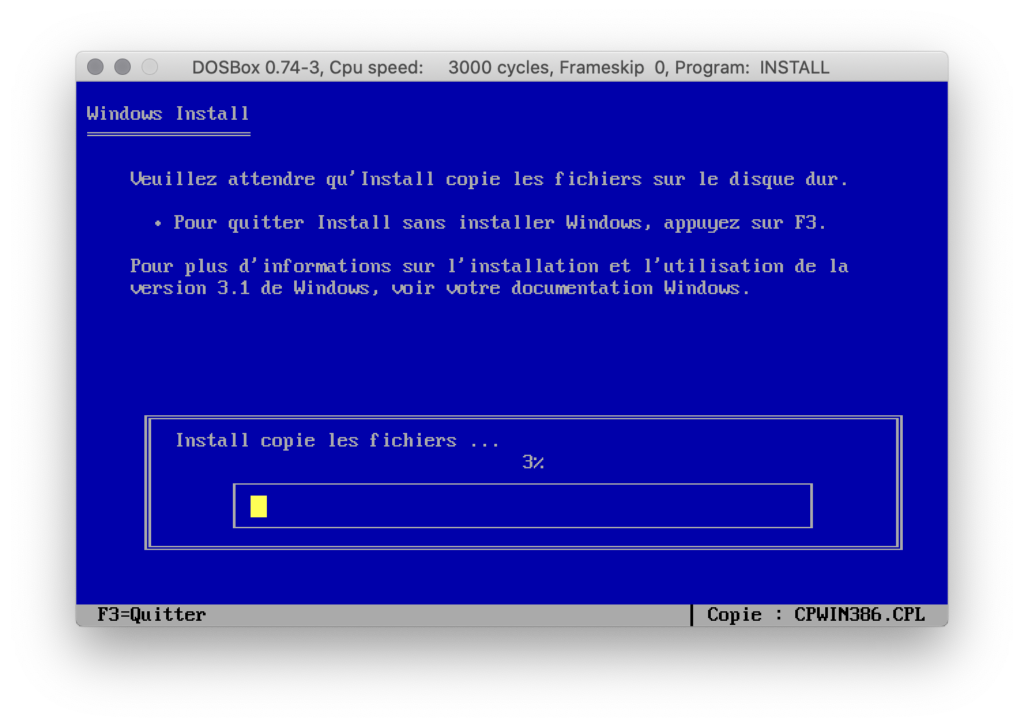
Si vous avez récupéré une archive de Windows 3.11 avec dedans des fichiers IMA, il s’agit d’images de disquettes. Vous pouvez les extraires avec un outil comme Winimage et les renommer en .dmg (sous mac uniquement) pour pouvoir les ouvrir et en extraire le contenu. Mettez tout dans un répertoire que vous appelerez « install » puis sous DosBox, lancez :
c:\install.exe
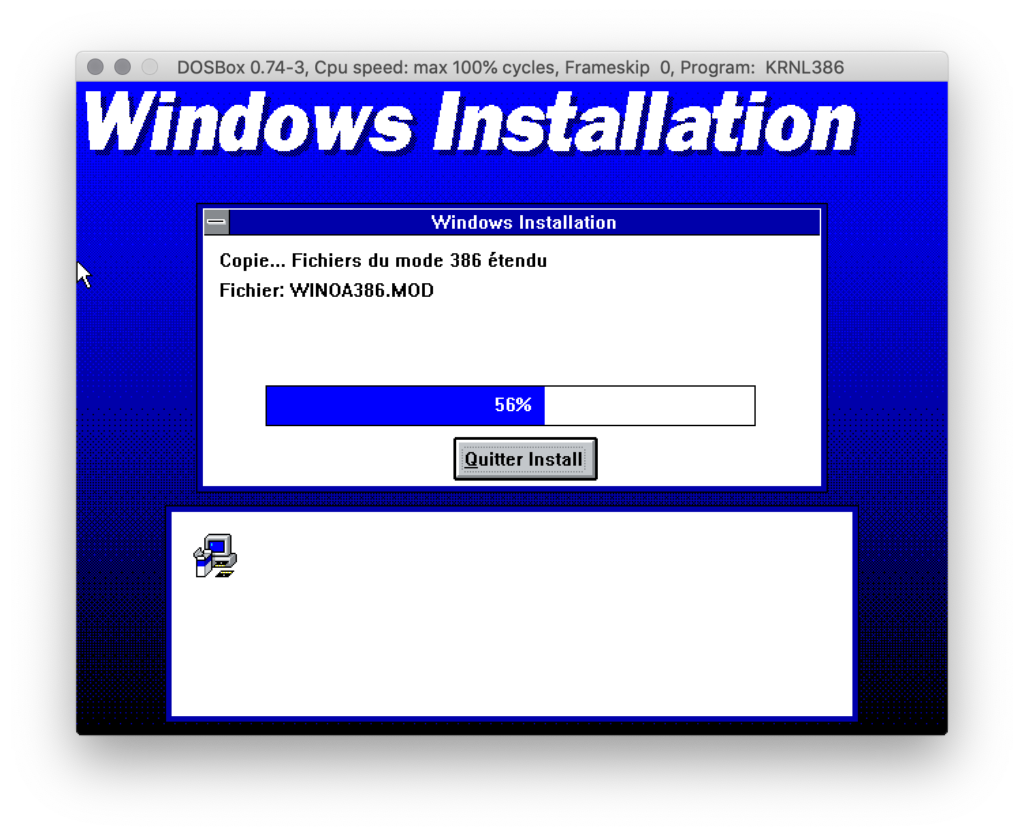
Suivez alors la procédure d’installation de Windows 3.11. Il vous sera ensuite demandé de rebooter et DosBox se relancera.
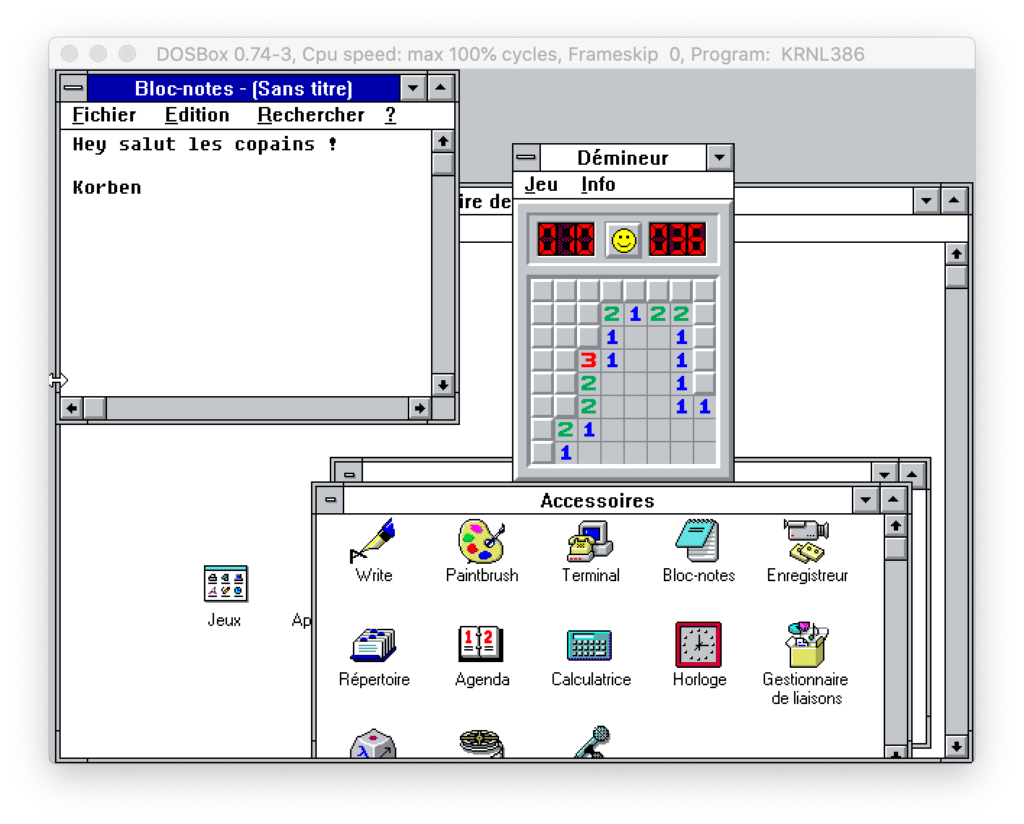
Ne me dites pas que ça ne vous fait pas un petit quelque chose de revoir ça. Une petite larme peut-être ? ahahaha.
Etape 4
Pour lancer Windows sous DosBox, remontez votre répertoire « dos » comme expliqué dans l’étape 1 puis faites :
Alors aujourd’hui, on va regarder comment hacker son propre ordinateur afin de faire sauter le mot de passe root d’une machine Linux.
On va donc apprendre à changer, comme un champion, le mot de passe de n’importe quel compte, y compris le mot de passe root, d’une machine sous Ubuntu.
Pratique si vous êtes bloqué à l’extérieur de votre ordinateur parce que vous avez oublié votre mot de passe.
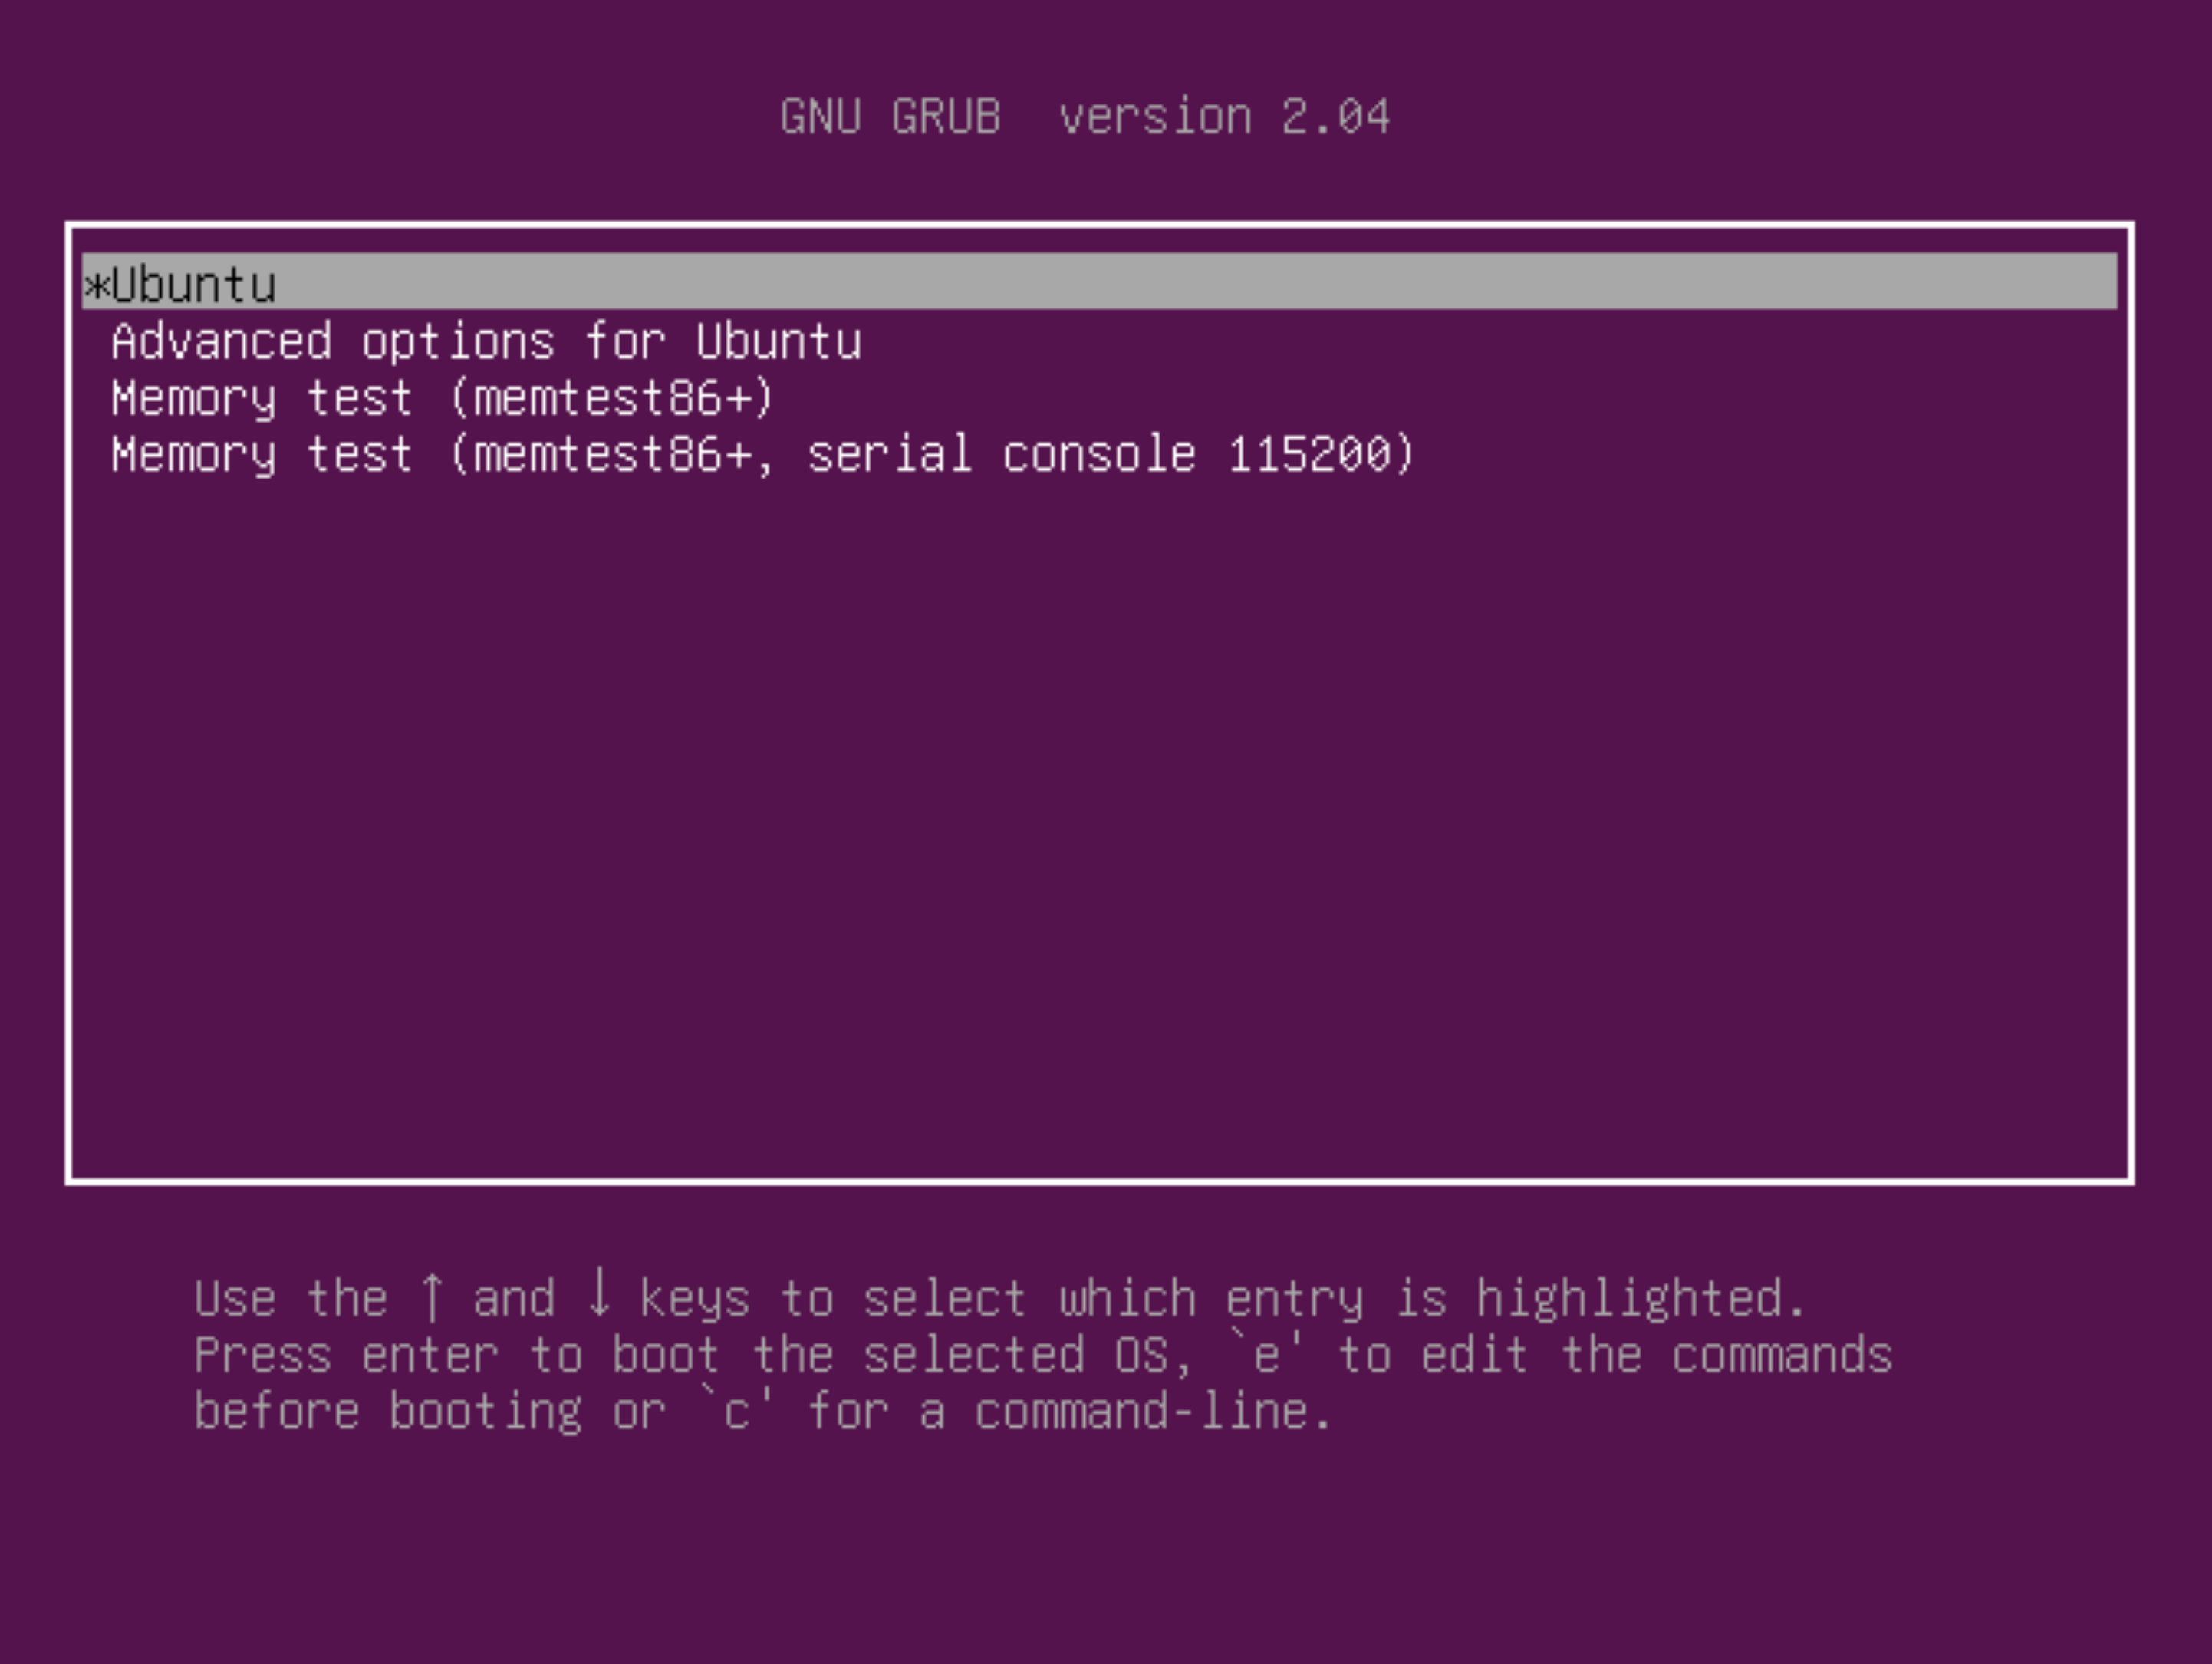
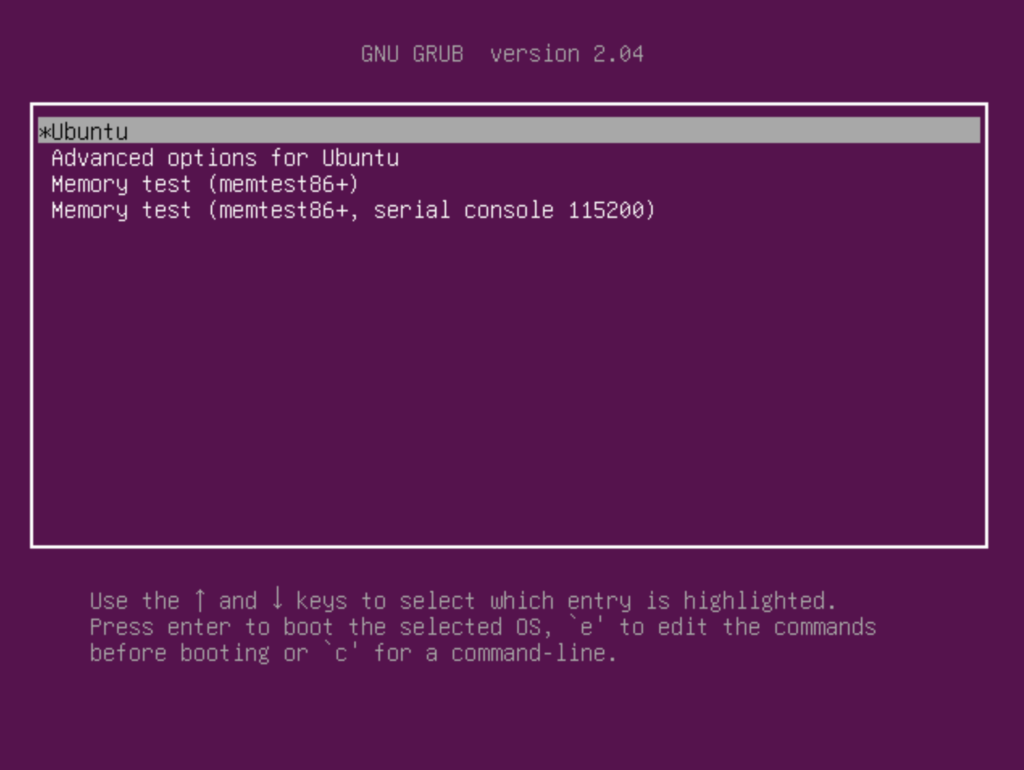
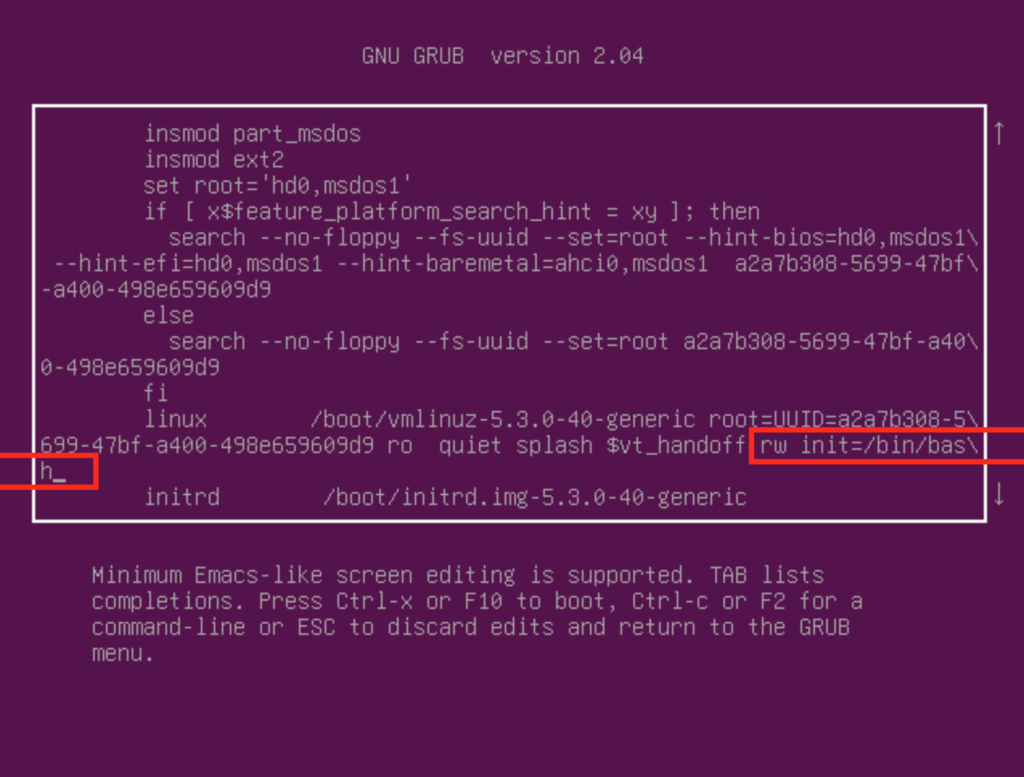
Alors tout d’abord, au lancement de la machine, vous devriez voir un menu qu’on appelle le menu GRUB. Il permet de choisir la méthode utilisée pour booter. Parfois il se peut que GRUB soit masqué. Dans ce cas, au moment du boot, appuyez sur la touche MAJ pour le voir apparaitre.
Une fois sur le menu Grub, appuyez sur la touche ‘e‘.
Cela vous permettra d’éditer le script de bootloader utilisé par Grub.
Cherchez la ligne qui commence par linux et ajoutez à la fin de cette ligne
rw init=/bin/bash
Puis faites un CTRL X pour booter. Vous allez tomber sur un shell bash en root.
Entrez alors la commande en remplaçant USER par le nom de l’utilisateur dont vous voulez changer le mot de passe.
passwd USER
Et voilà ! Mot de passe changé !
Rebootez ensuite la machine et le tour est joué !
Pour ceux qui veulent voir la procédure en vidéo, la voici :
Most of us have used some system information tool at some point or the other to quickly analyze the devices, hardware, and software of a computer system. Tools like HwInfo display information that is useful in various situations. SystemInfo belongs to the genre and is an open source software.
The program is a portable software, so you can just download the executable and run it directly. The interface looks a lot like Piriform's Speccy, and as a matter of fact even the GitHub page for the program has a Speccy tag. Maybe it was the inspiration behind the application?
Do note that this is not a system monitoring application. If you want one of those, you can try Thilmera7 or Desktop Info, or Conky for Linux. Regardless of that, SystemInfo is quite the useful tool. You can view all of your system's hardware information on a single page. Built a new computer? Bought a new laptop? Run the program to see if everything is as it's supposed to be.
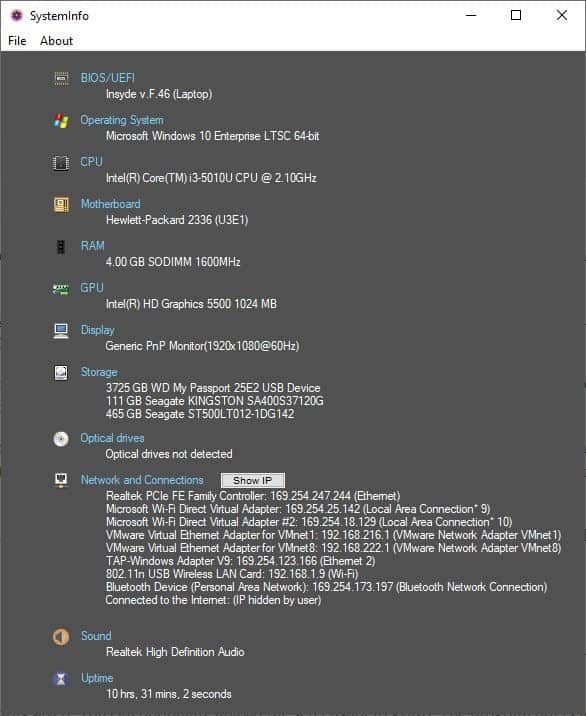
There are no settings whatsoever. It's that simple. SystemInfo lists the BIOS/EUFI name and version number, Operating System information, CPU model and clock frequency, Motherboard model number, total memory and the RAM frequency, GPU, Display, Storage drives (model number and total storage), Optical drives, Network Adapters, Sound cards and the Uptime of the computer.
I'm not certain if this is a bug, but there are a couple of issues with the application. It detected only 1 of my memory modules and showed that the laptop has 4GB of RAM. In reality, it has 2 memory chips, and Windows detects it correctly as a total of 8 gigs. Aside from this, it works pretty well and accurately detected that the system doesn't have an optical drive, and has an SSD (which I have installed using a SATA Caddy in place of the DVD drive).
Screenshot
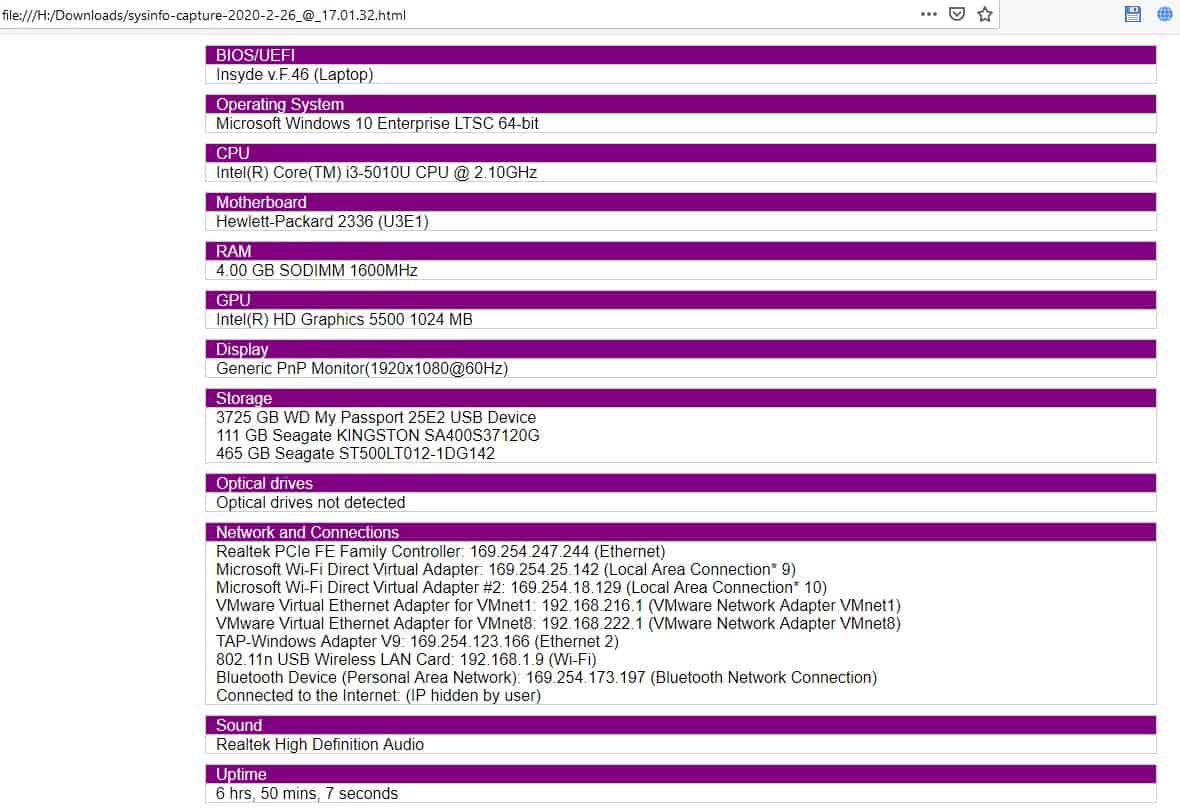
SystemInfo has a built-in screenshot saving option that you can access from the File menu. Snapshots are saved in the PNG format at a location of your choice. The default file name is saved in the following format: sysinfo-capture-YYYY-M-DD_@_HH.MM.SS.
The file name contains the Year, Month, Day, Hour, minute and even the second when the screenshot was saved. You can optionally upload the screenshot to gyazo. The program offers to open the saved file in the default viewer.
Export Results
If you'd rather have a text based result, you're in luck. SystemInfo can save the details in HTML, XML or TXT documents. You can also Import XML files that you have saved previously.The Hide IP (Show IP) button can be used to toggle the IP address. This is useful when you're taking a screenshot of the window, or exporting it to a file, and wish to hide your IP address from prying eyes. The program is written in C++.
The fact that its portable makes SystemInfo a useful little tool to carry on a USB Flash Drive. And since it has no options to tinker with, it's suitable for all users.
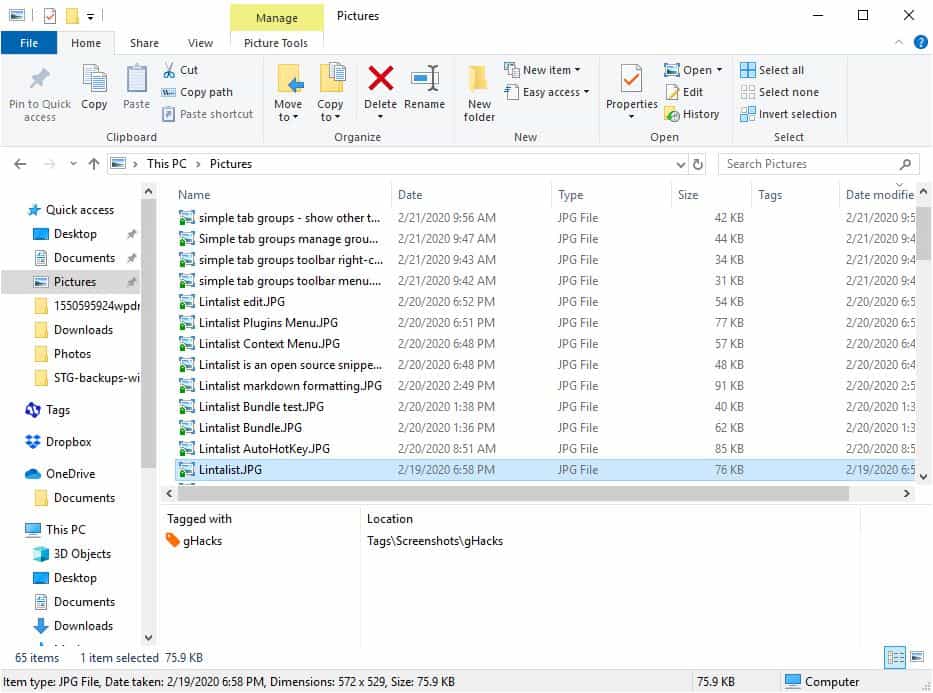
Tagging For Windows is a freeware file and folder categorization tool that can help you find your files quickly. This is not a search tool like Everything, but sort of a file management system that works with Windows Explorer.
Note: After installation, the program will ask you to enter your license key. You can request for a free license key by entering your email address at this page. You'll receive a mail asking you to confirm your email id, after which it says "Confirm Subscription" for some reason. You can use a throwaway email id to get the license and activate it.
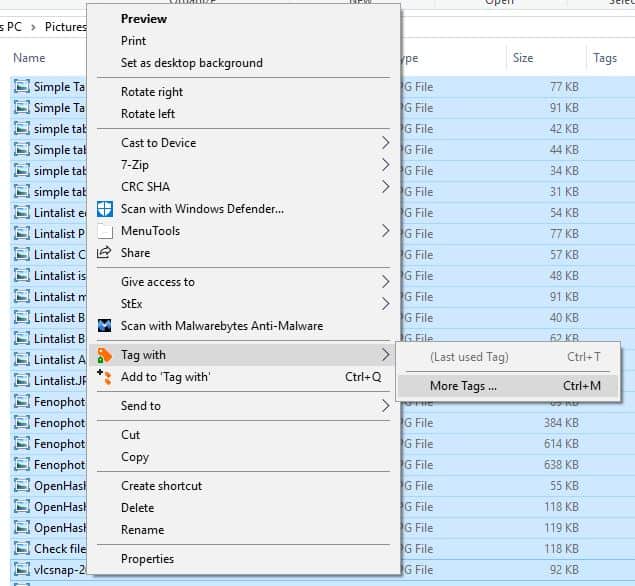
Open Windows Explorer and you will see a new pane at the bottom of the interface. This is the Tags pane, for now it will be blank because no files have been tagged yet. So let's add some.
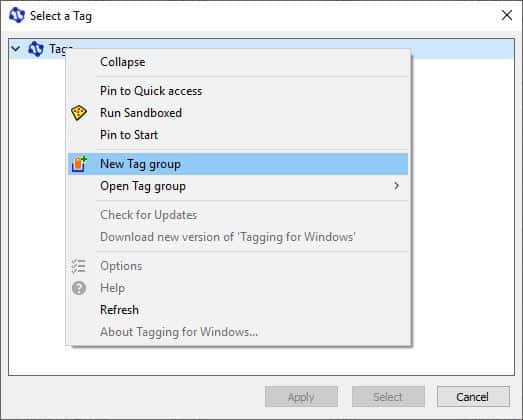
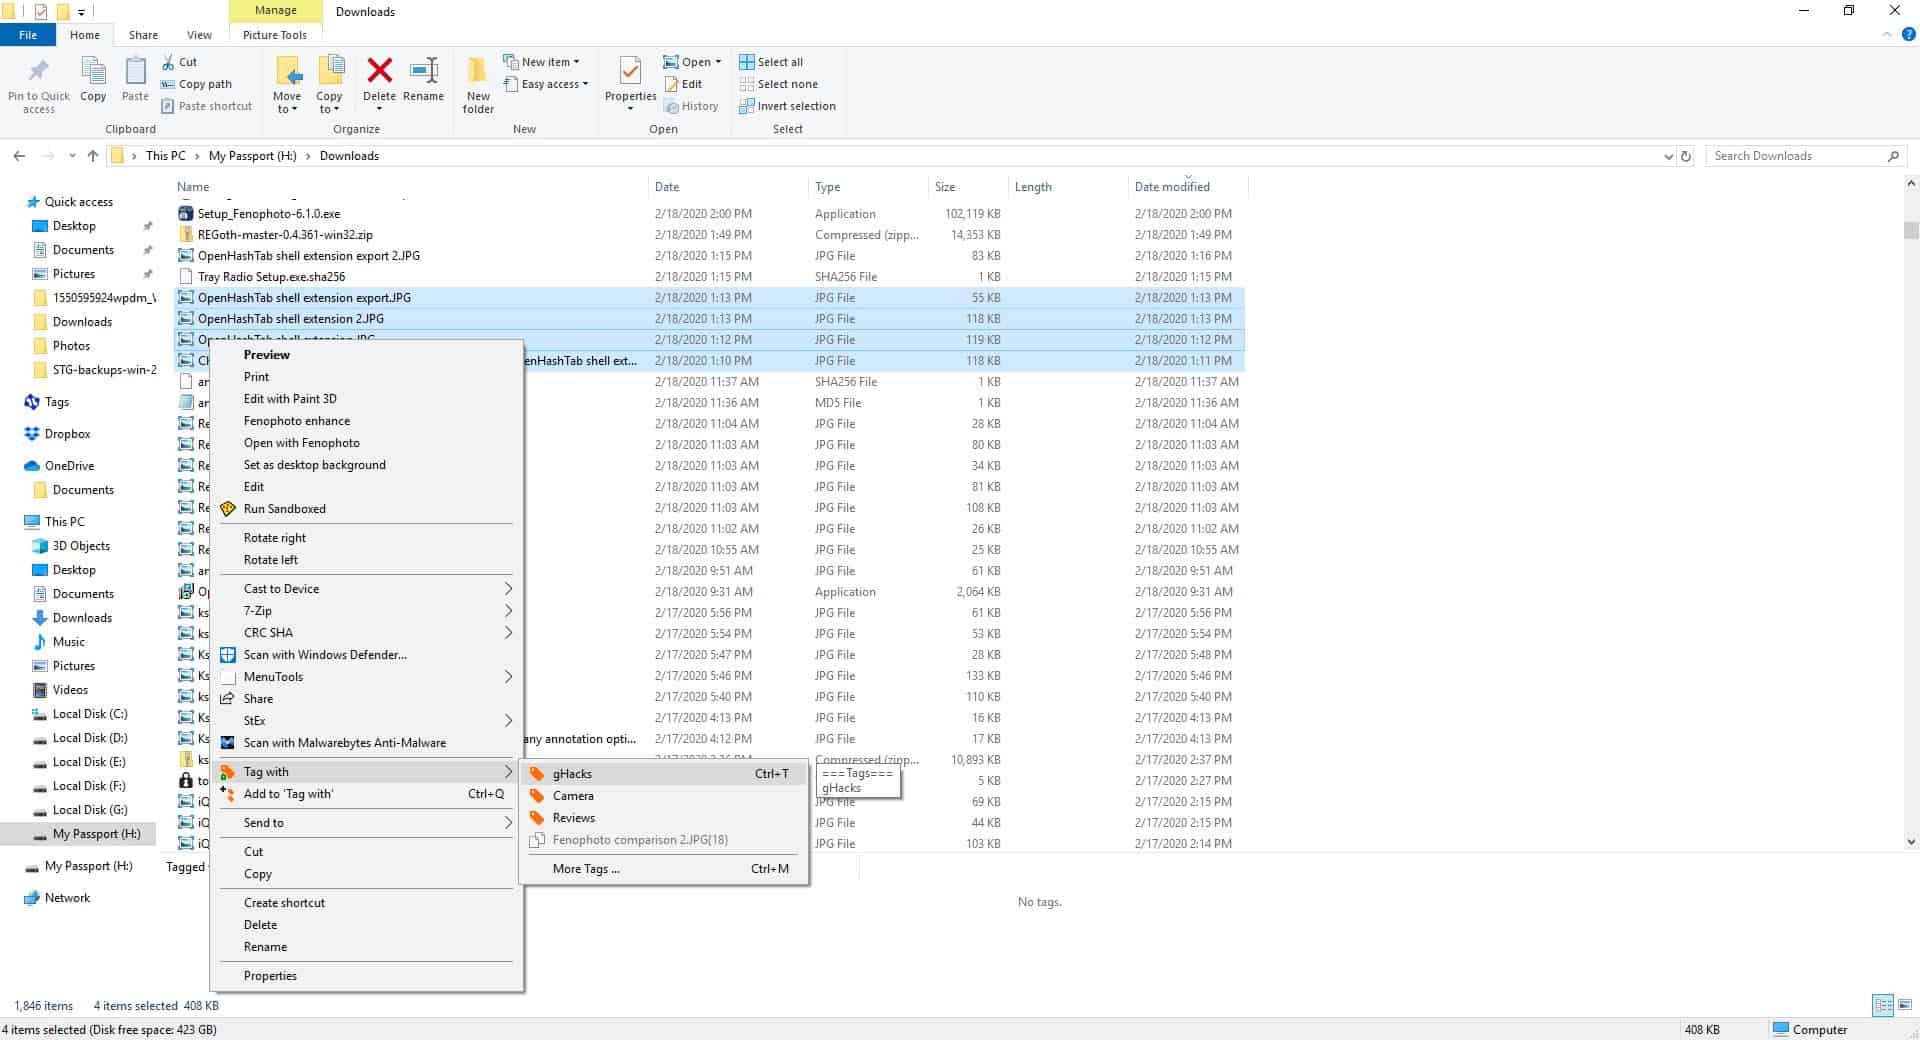
Select some files or folders and right-click on them to view the context menu. Choose the "Tag With" option, and then click "More Tags". A pop-up window titled "Select a tag" should open. Right-click on the word Tags, and you should see the "New Tag Group" option.
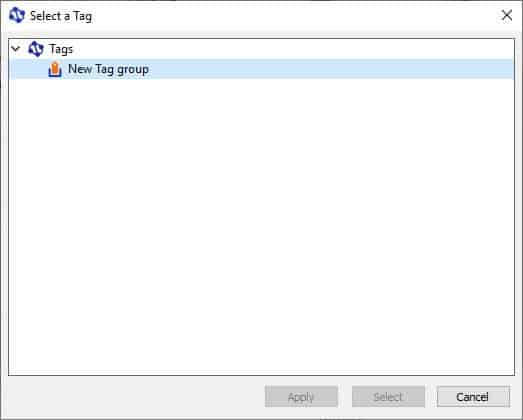
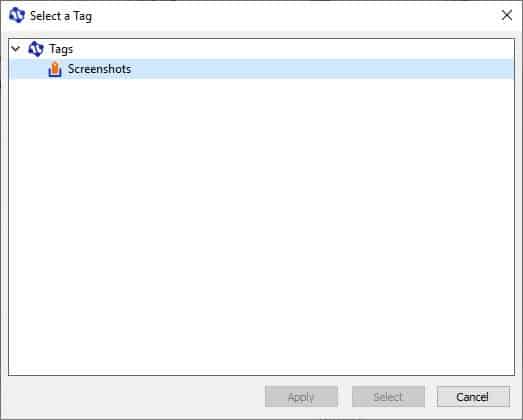
Use it to create your first tag group (sort of like a folder that contains your tags). You can rename it to anything you want, choose something relevant to the file like Docs, Pics, Music, etc. Right-click on the tag group, create a new tag. Hit apply or select to assign the new tag to the files that you chose.
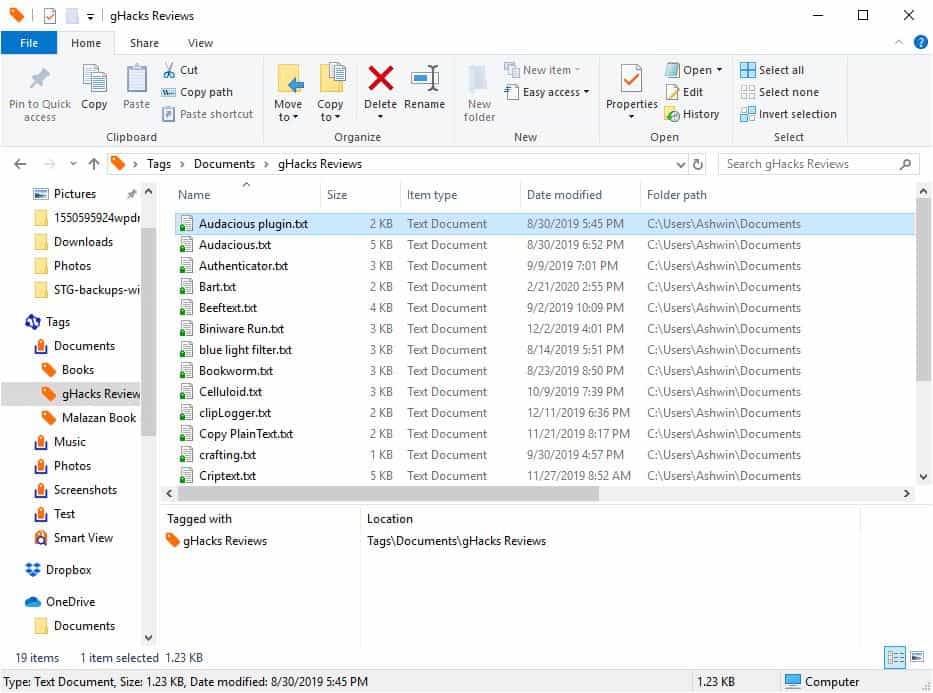
The file icons will be changed slightly, i.e. they will have a tag (badge). You will also notice that the tags pane in Explorer now displays the name that the file has been tagged with, and the location of the tag. The next time you want to use these tags, you don't have to go through this process, as the tag will be available directly in the Context Menu.
A file or folder can have more than one tag, and likewise a tag may be associated with many files and folders.
How to use these tags?
As mentioned earlier, a selected file/folder's tag is displayed in the tags pane in Explorer. Tagging a file creates a two-way link, one is the file, the other is the tag. Double-clicking a tag will list all the files that it's been associated with as if they were in the same folder. You can also right-click on a tag in the Tags pane, and select the Show Within Group, to view all content in that folder.
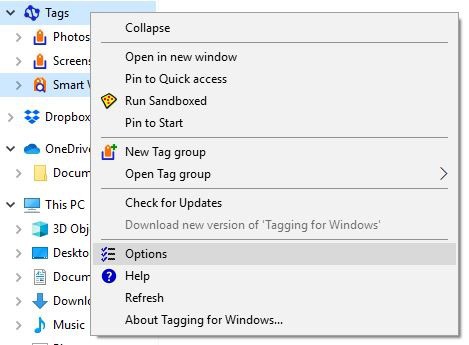
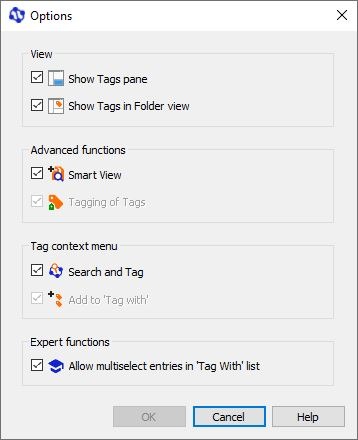
The Windows Explorer sidebar will have a new item named Tags. Select it to view your tags and in turn all items that were tagged. Right-click on the main Tags icon to access the context menu options. This allows you to toggle the tags pane, tags in folder view, smart view, search and tag (context menu item).
Smart View
This is sort of a multi-tag folder. You can right-click files and folders and select "Add to Smart View". These can then be used to filter the list of files based on a combination of the tags, i.e., if you added files with different tag like Home, Office, Vacation, etc you can narrow down the list to only display those which contain a combination of the tags like Home or Vacation.
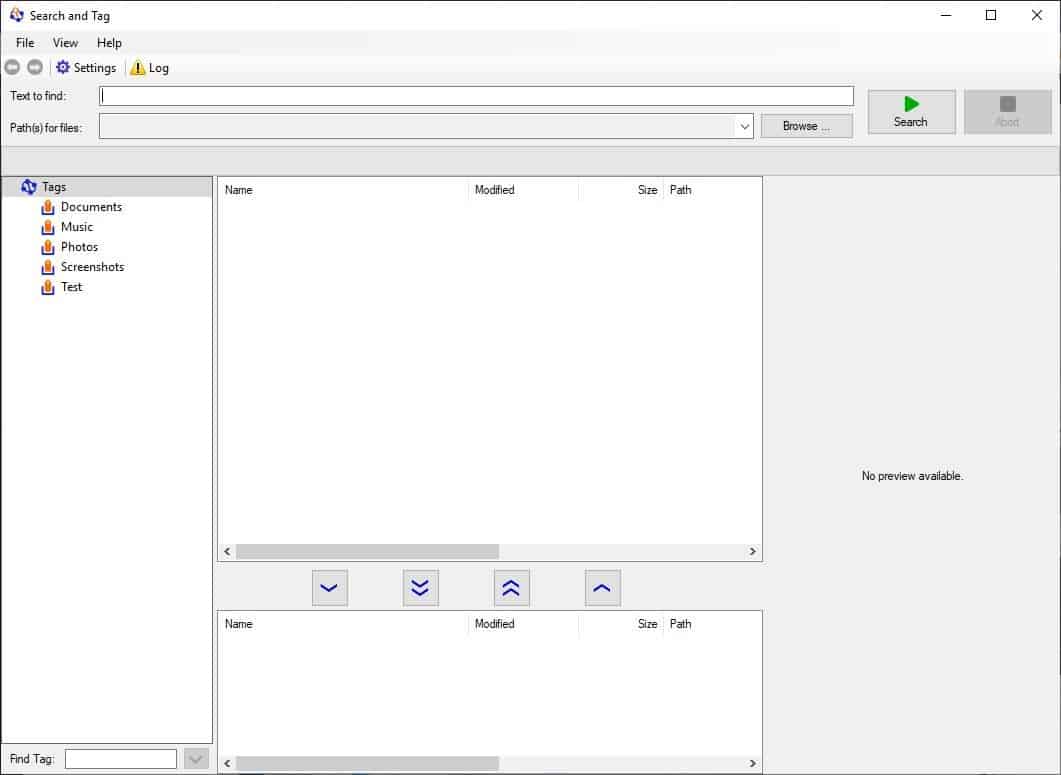
Tagging For Windows - Search and Tag
Search and Tag is not just a search tool, it is the primary interface of Tagging For Windows. The primary purpose of this program is to search for files and tag them (without using Explorer). The GUI has four-panes.
All created Tags and Tag Groups are displayed on the left pane. You can use Search and Tag for creating tags as well, the process is the same as the Explorer one, except that you have to right-click on the word "Tags" on the left pane.
The top pane is the search results pane. To use it, you'll need to perform a search. You can search for files using the Text to Find field/ Hit the browse button next to the Paths for Files option to set the location where the program should look for the files. The application can search insider folders, drives, tag and tag groups.
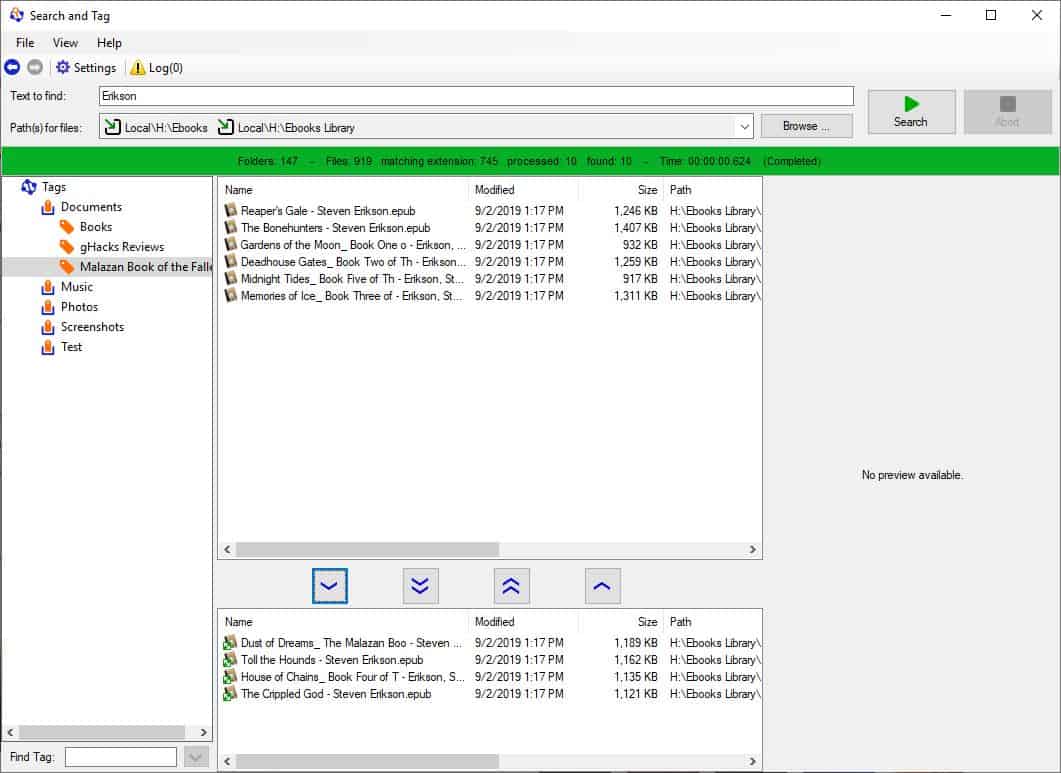
The search tool can find filenames and content, or just one of the two. And that means it can look inside the content of documents to find the keyword you searched for. The supported formats are TXT, RTF, PDF, PPT, PPTX, XLS/XLSX, DOC/DOCX.
When a search result is completed, you can highlight any file and its preview is displayed in the right pane. This works with images and documents.
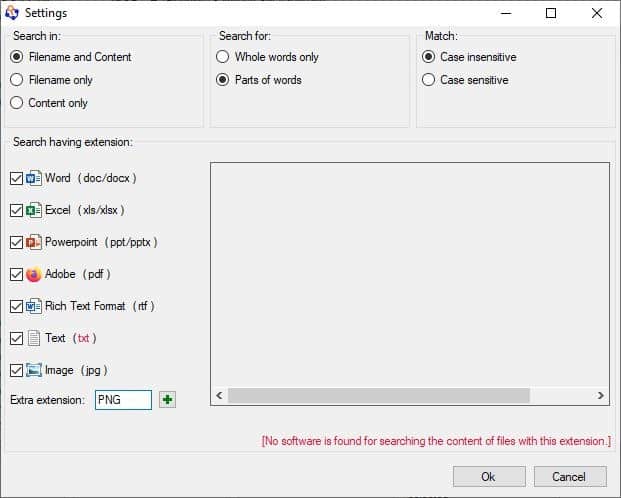
By default, the program does not search for images. Click the Settings button to include images though it's still limited to the JPG format. Not to worry, enter the extension of the format that you wish to add and click the + button to add it. For e.g. I want to add PNG, so I do it like this.
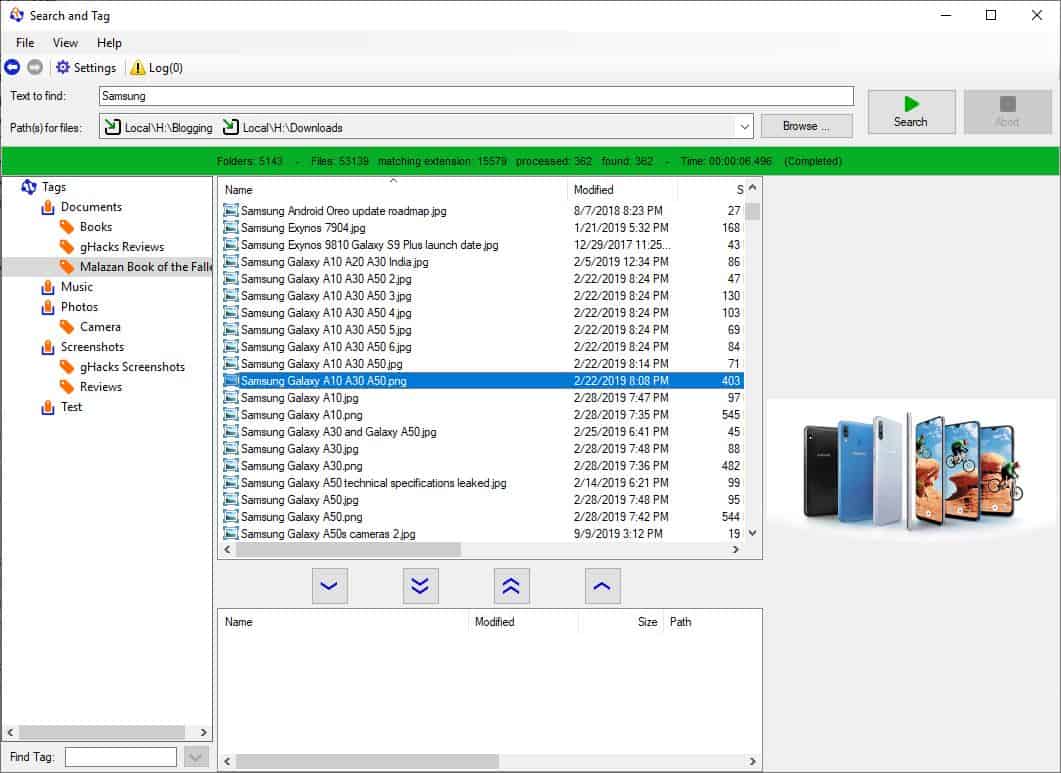
Once you add it, the program will include all files with the extension in the search results. Here's a screenshot of a search result which includes a PNG file, and the program even displays the preview of the image.
You can tag files by selecting them from the results pane and using the buttons below it. The files that you've tagged will appear on the bottom pane.
The program has a slight learning curve, but once you grasp the concept, you will find it to be useful in categorizing files and accessing them quickly.
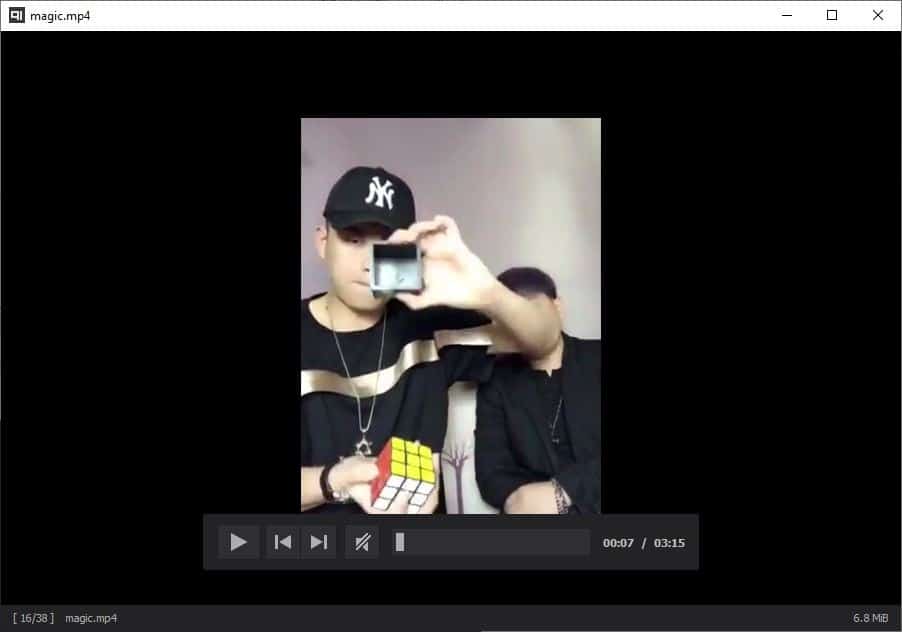
ImageGlass or the all-time favorite IrfanView are excellent choices if you want some advanced options in your image viewer; qimgv is a slightly simpler alternative that may work for some.
The application is an open source program for Window to view images. It comes with optional support for video playback.
The application offers to associate itself as the default handler for images and videos during the installation. The option is enabled but you can uncheck it if you don't want that to happen. qimgv starts with a blank interface that has a dark theme and you will notice no interface elements other than the title bar and the "no file opened" message at the bottom.
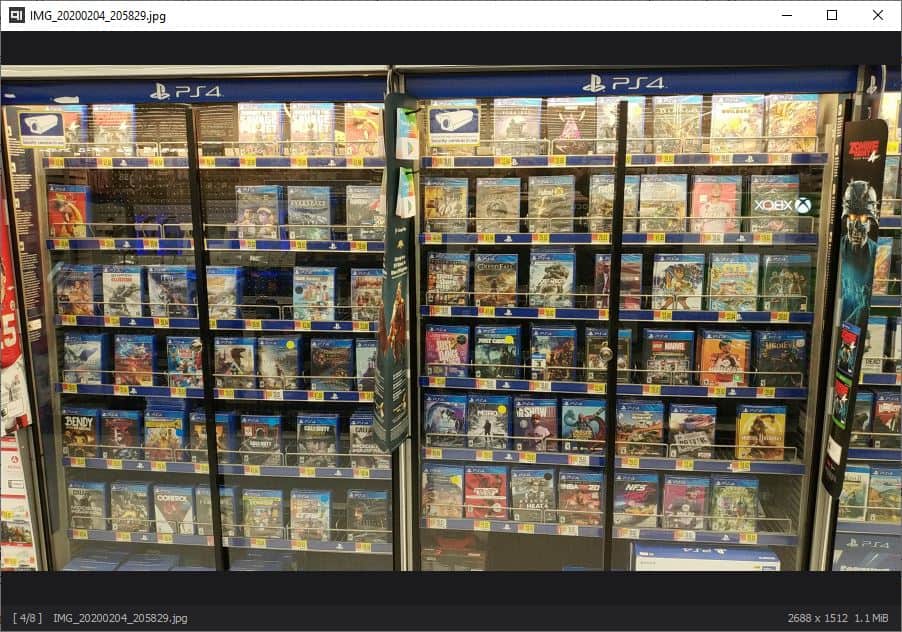
Get started by dragging and dropping a picture onto the interface to view it, or right-click anywhere in the GUI to access the program's context menu and select open to navigate to the image's location. qimgv supports BMP, JPG, PNG, JPEG, GIF, APNG, ARW, CR2, CRW, CUR, DNG, ICNS, ICO, JFIF, JP2, NEF, PBM, PGM, PPM, RAF, SVG, SVGZ, TGA, TIF, TIFF, WBMP, WEBP, XBM, XPM image formats, and WEBM, MP4 videos. Animated GIFs are supported too.
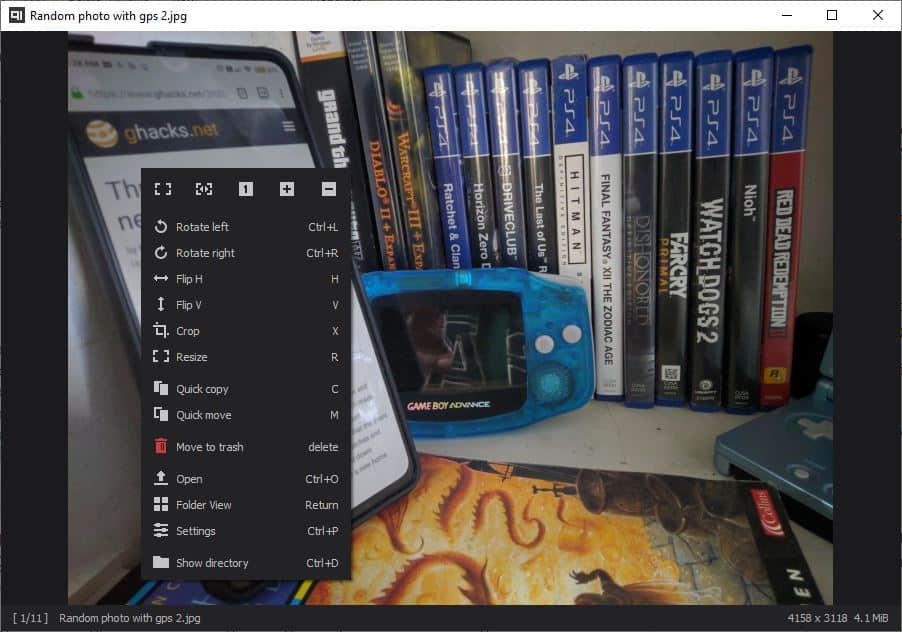
The program has many keyboard shortcuts, all of which are customizable. Use the arrow keys or the mouse wheel to view the next or previous image. Zoom in and out by holding the right mouse button, or by using the + and - buttons in the context menu. The program also supports traditional methods like Control and +/- or Control and mouse wheel. The scaling and zoom levels of the application can be modified from the settings.
The quick copy and quick move menu items are useful when you want to place images in different folders. There are nine quick folders to choose from, and annoyingly all of these are set to the current user folder. But, you can change the location of each directory by clicking on the folder icon. When the quick copy/move panel is in view, you can tap the number key (1 to 9), to paste the selected image in the respective folder.
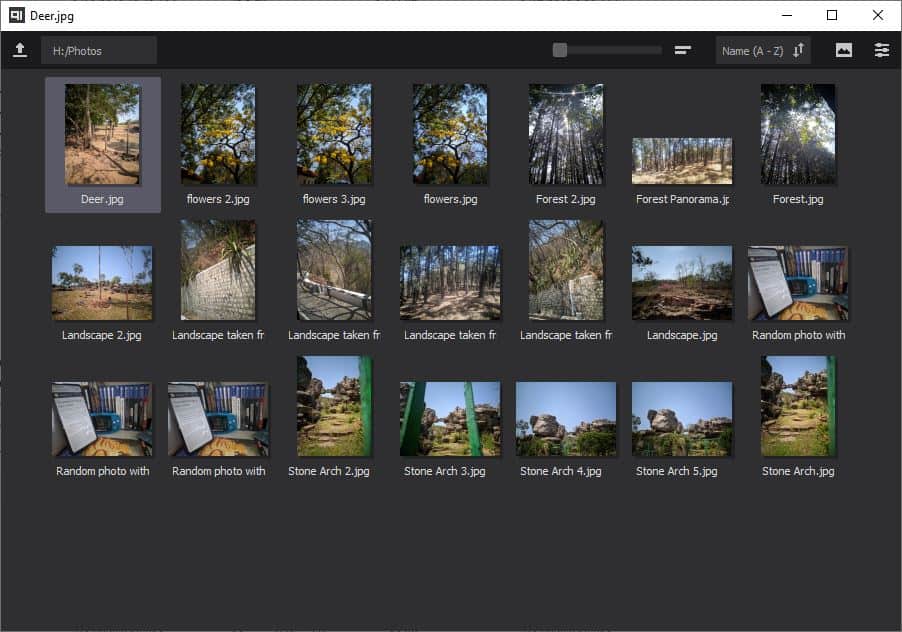
The context menu also has options to switch to full screen or fit the picture to the window, width or reset it to the actual size. When an image is loaded, you can switch to the Folder View by hitting enter, or from the menu. This mode displays a thumbnail preview of every image in the folder. The slider at the top of the screen may be used for resizing the thumbnails.
A thumbnail panel is placed at the top of the screen that auto-hides when you mouse away from it. This panel is enabled to work only in full screen, but you can set it to work in windowed mode or even change its location to the bottom of the screen. The status bar at the bottom of the screen displays the resolution, file size and the name of the current image.
Videos are played directly in the program's interface (i.e, MPV is not opened as an external program), which is kind of a cool way to browse media folders.
Note: There are four versions of qimgv executables and four ZIP files available on the GitHub page. The EXEs are installers, and the archives are portable versions. The confusing part was the massive size difference of the files. I tested all of them and found that two of the EXEs and two of the archives are for the 32-bit and 64-bit versions (has x64 in the name). The other 4 files which have video in the name, contain MPV.EXE and MPV-1.DLL that the program uses as the built-in Video Player. If you already have MPV on your computer, you can set its location from qimgv's Advanced Settings.
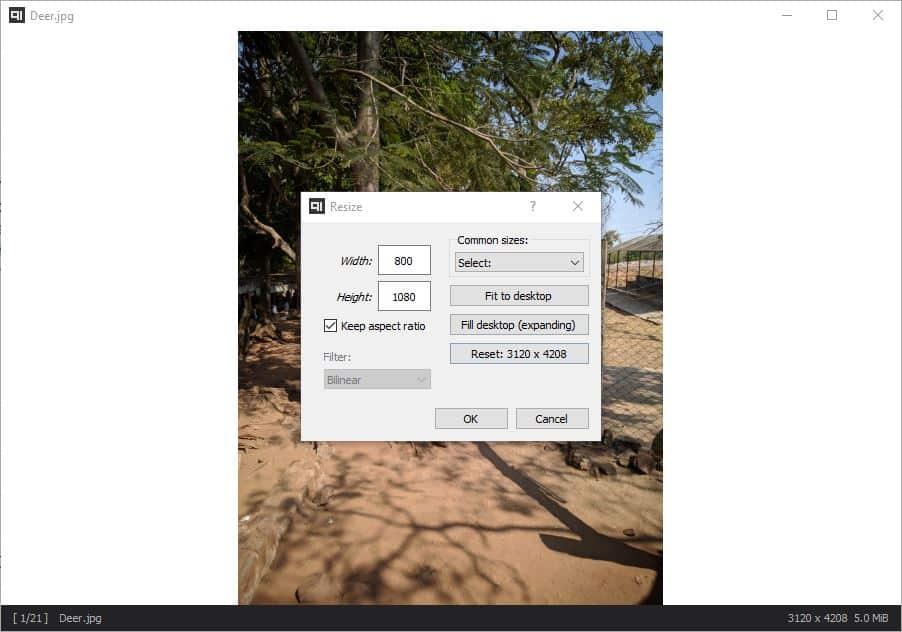
qimgv has some basic editing options such as cropping and resizing, while maintaining the original aspect ratio of the image.
The resizer has many resolution sizes that you can select or use a custom size. You may also use the program to rotate pictures or flip them horizontally or vertically. Navigate through folders faster by enabling mouse settings such as smooth scrolling, infinite scrolling and mouse wrapping.
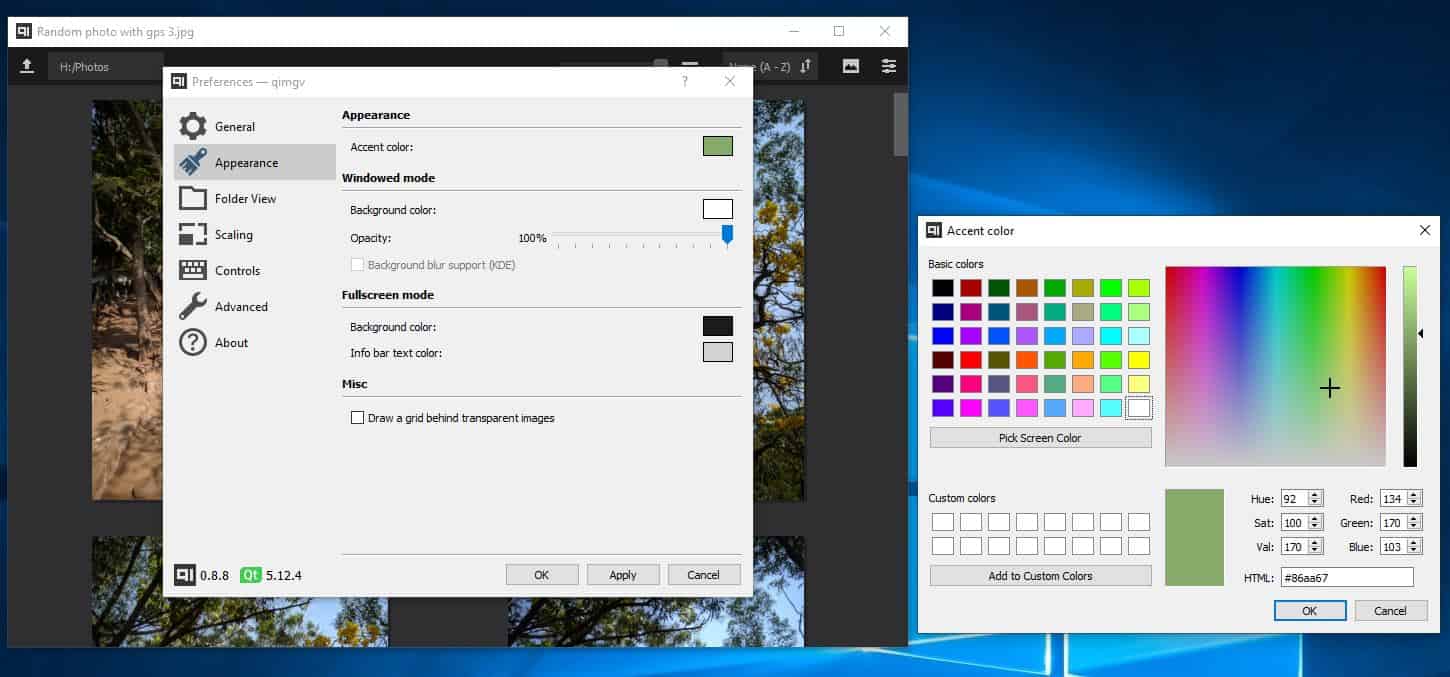
Don't like the dark theme? Head to the Appearance settings to change qimgv's background color, accent color, and opacity of the interface.
The lack of a history option to load recent directories or images quickly is a minor annoyance. The application crashed when loading folders which had hundreds of images. Aside from these issues, qimgv is more than a worthy replacement for Windows Image Viewer, especially if you're into keyboard shortcuts.
Je travaille régulièrement sur des traitements de fichiers CSV.
J'apprécie beaucoup ce format de fichier car il se génère et se lit
facilement, qu'on soit informaticien ou non. J'ai d'ailleur écrit 2
librairies PHP pour lire, générer et valider des CSV :
deblan/csv et deblan/csv-validator.
Lors des mes analyses, je me confronte parfois à des fichiers qui
comportent beaucoup de colonnes et c'est un enfer d'utiliser un tableur pour
visualiser et filtrer ces tableaux très larges.
Après quelques recherches, j'ai découvert deux projets qui se complètent à merveille !
Le premier est un outil qui transforme un fichier CSV en une base de données SQLite : csvs-to-sqlite.
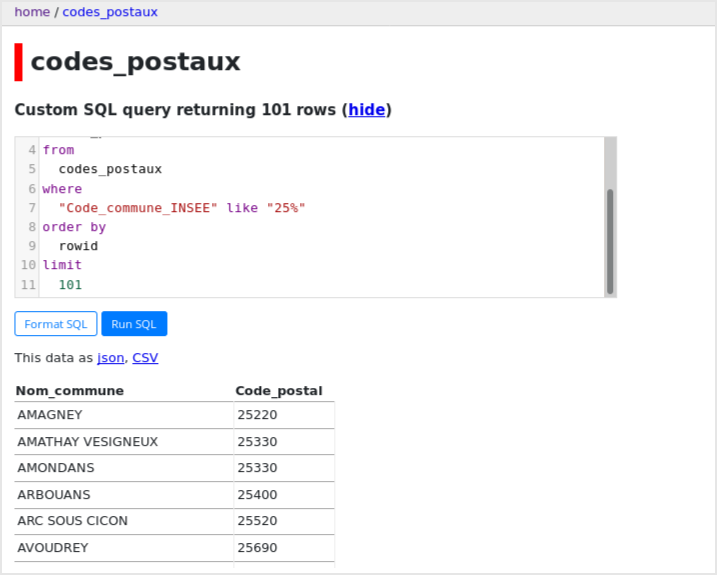
Le second génère une interface web (avec un serveur web intégré) pour faire
des requêtes SQL sur une base de données SQLite : datasette.
Ce sont des outils écrits en Python qui s'installent et s'utilisent en une poignée de secondes.
$ sudo pip3 install csvs-to-sqlite datasette
Pour illustrer, je vais traiter le fichier CSV de la base officielle des codes postaux
disponible sur data.gouv.fr.
$ wget -O codes_postaux.csv https://datanova.legroupe.laposte.fr/explore/dataset/laposte_hexasmal/download/\\?format\\=csv\\&timezone\\=Europe/Berlin\\&use_labels_for_header\\=true
$ csvs-to-sqlite -s ";" codes_postaux.csv codes_postaux.db
$ datasette serve codes_postaux.db
Serve! files=('codes_postaux.db',) (immutables=()) on port 8001
INFO:     Started server process [8550]
INFO:     Waiting for application startup.
INFO:     Application startup complete.
INFO:     Uvicorn running on http://127.0.0.1:8001 (Press CTRL+C to quit)
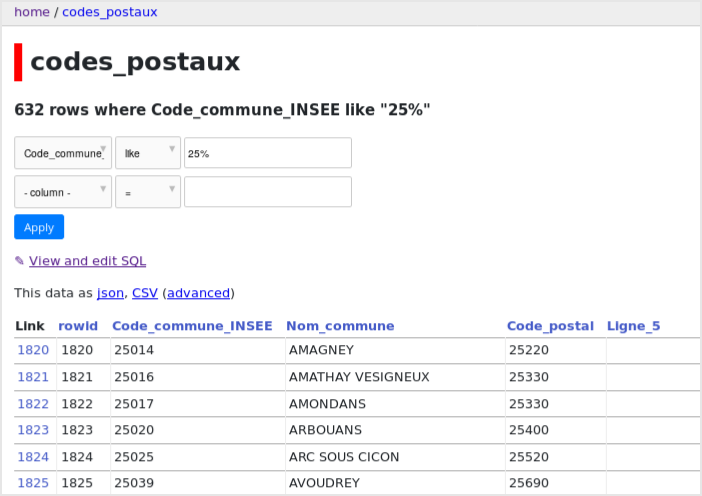
On peut maintenant accéder à http://127.0.0.1:8001 depuis un navigateur et commencer
à analyer et traiter les données :
Et le plus intéressant pour moi, c'est de pouvoir écrire des requêtes SQL affiner
vraiment les données affichées :
Enfin, on peut générer un nouveau fichier CSV (ou JSON) avec les données filtrées.
Pour ceux que ça intéresse, j’ai mis en ligne cette nuit une vidéo tutoriel où j’explique comment activer WSL (Windows Subsytem for Linux).
WSL est une fonctionnalité de Windows 10 qui permet de bénéficier d’un shell Linux directement depuis Windows. Mais dans mon tuto, je vous explique même comment aller encore plus loin et avoir carrément un bureau (xfce4) et lancer des applications Linux graphiques.
La manip est assez rapide à faire et plutôt cool si vous voulez profiter d’un Linux pour lancer quelques outils de temps en temps ou pour vous familiariser avec cet OS encore trop méconnu des utilisateurs chevronnés de Windows.
Dites-moi si ce format vous plait. Si oui j’en ferai d’autres !