How about adding a cordless, rechargeable, waterproof, and energy efficient light that can live indoors or out to your abode? The Ball LED Lamp is pretty perfect for making your outdoor evening soirees a little more romantic. It’s entirely portable, and will withstand all sorts of bad weather. You can even throw it in the pool for a floating lighting display (I’m sure party planners already know this) should you want a more impressive atmosphere. Get the Pebble Remote to control color options and/or several lamps up to a distance of over 66 feet.
Design by Smart & Green.
Material(s): Polyethylene
Dimensions:
13.8″ L X 13.8″ W X 13.8″ H
Weight: 5 pounds
Bulbs: 1 X 1W rechargeable bulb LED module, 52 LEDs (included)
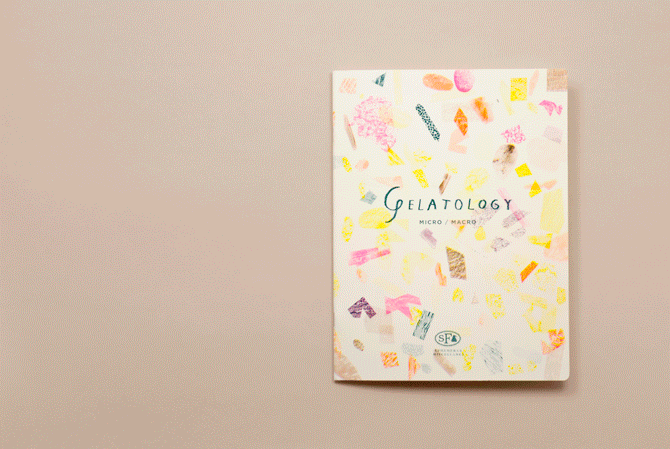
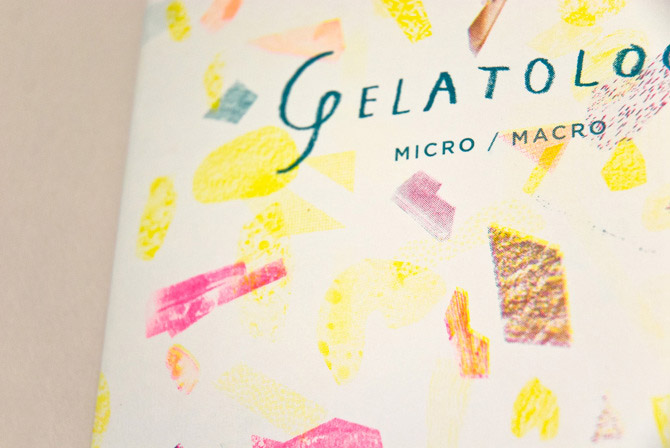
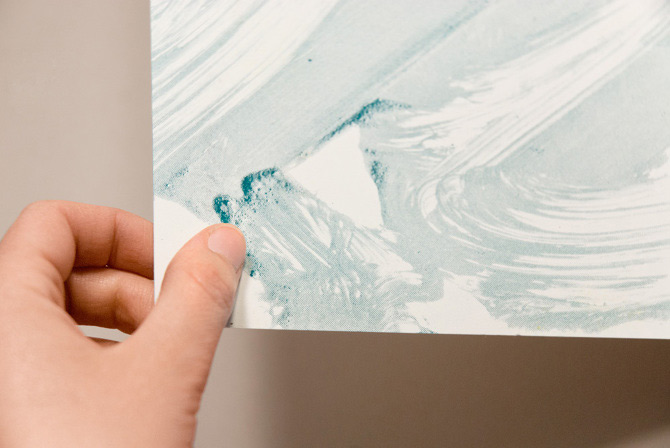
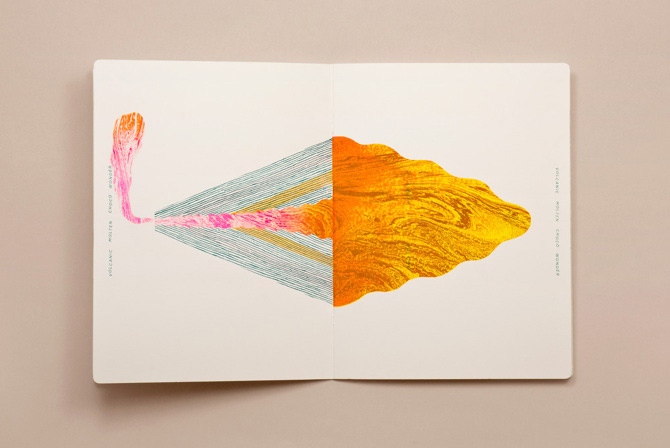
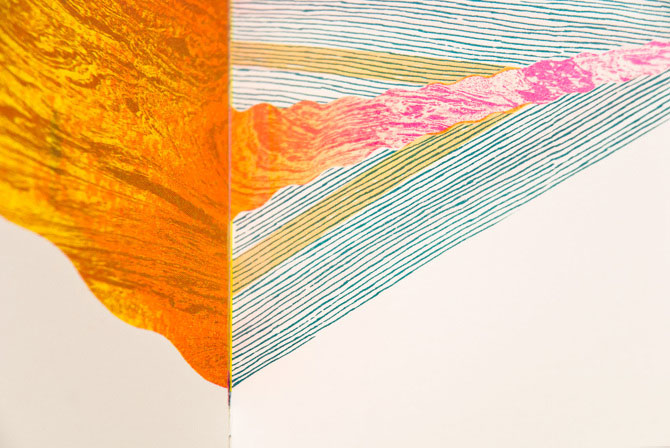
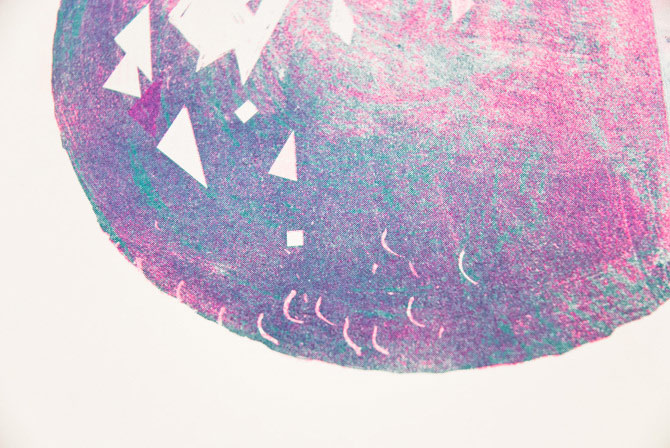
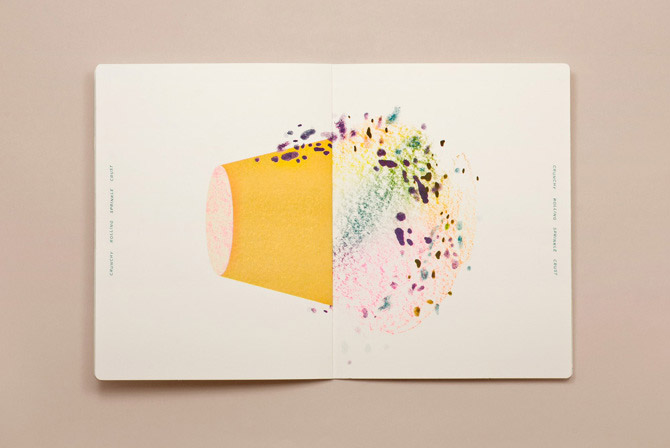
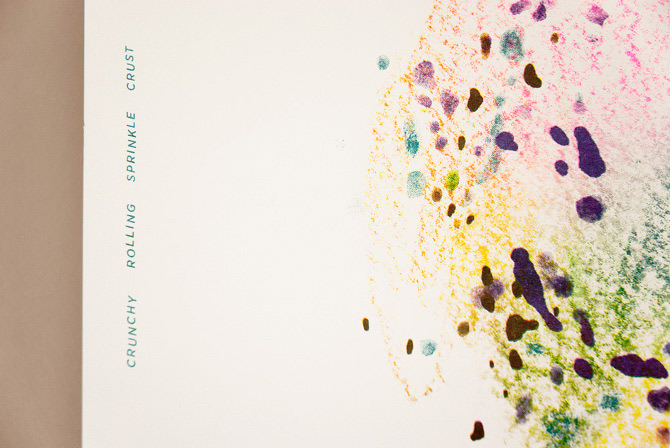
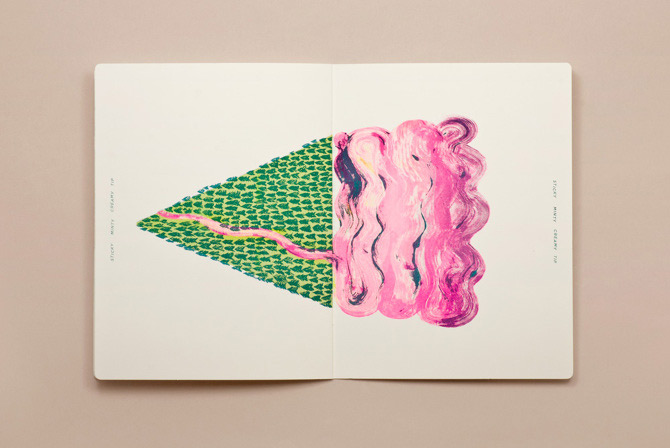
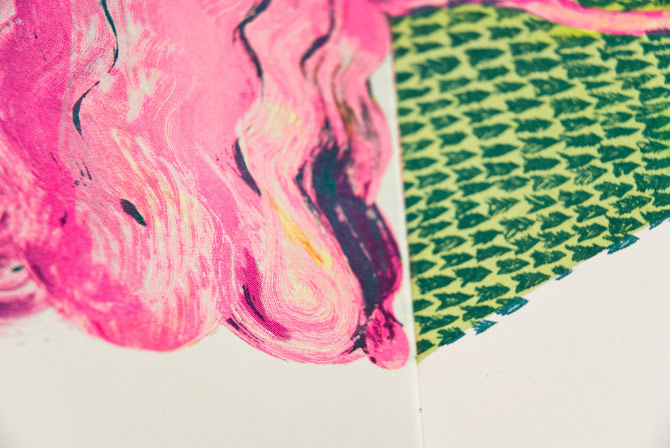
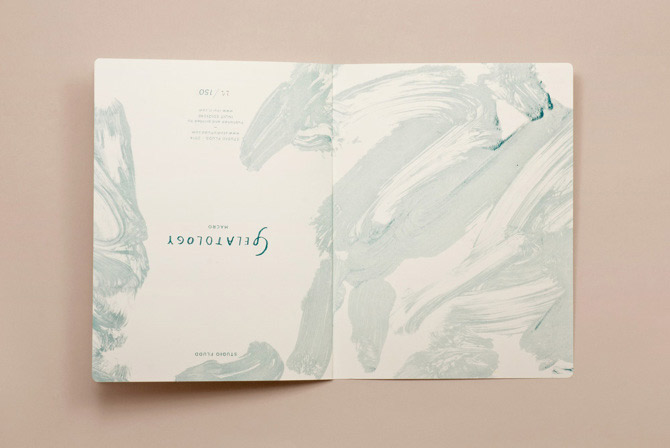
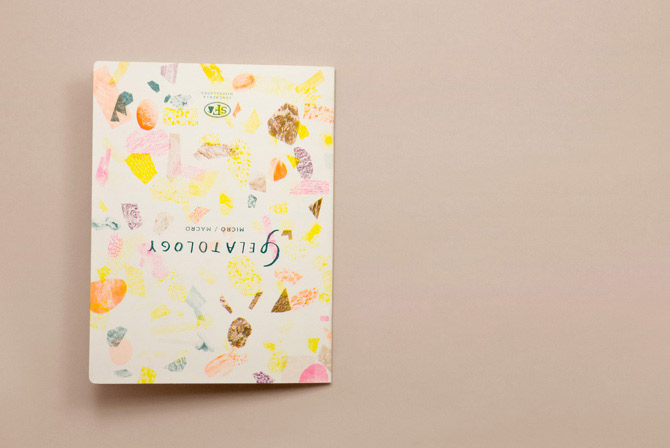
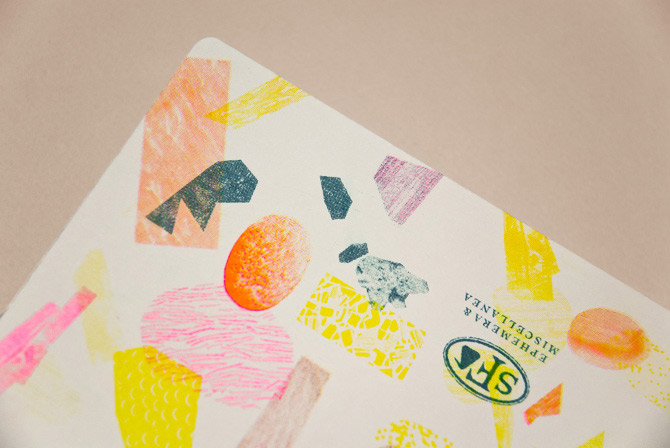
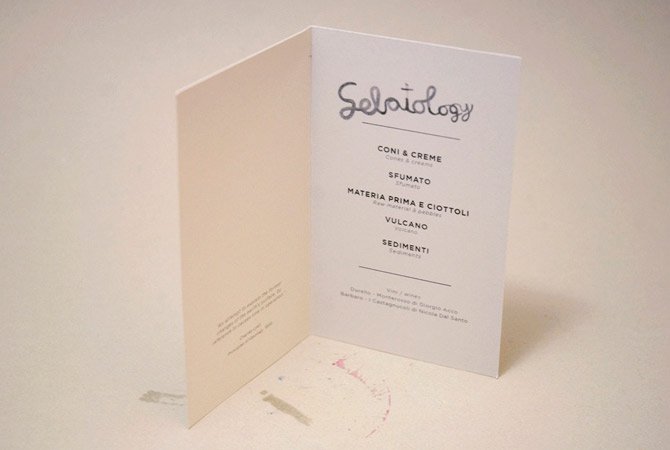
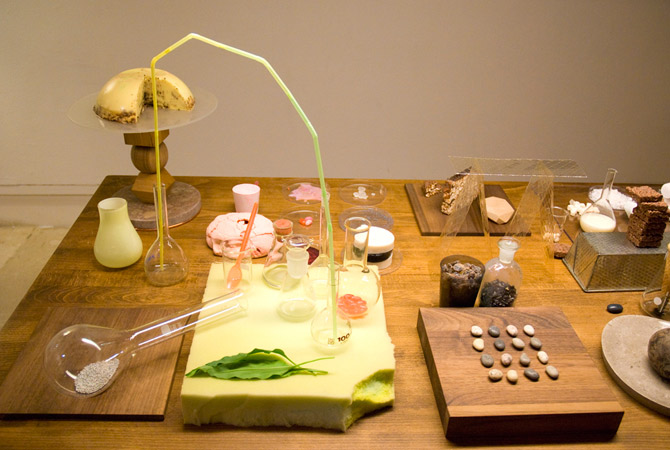
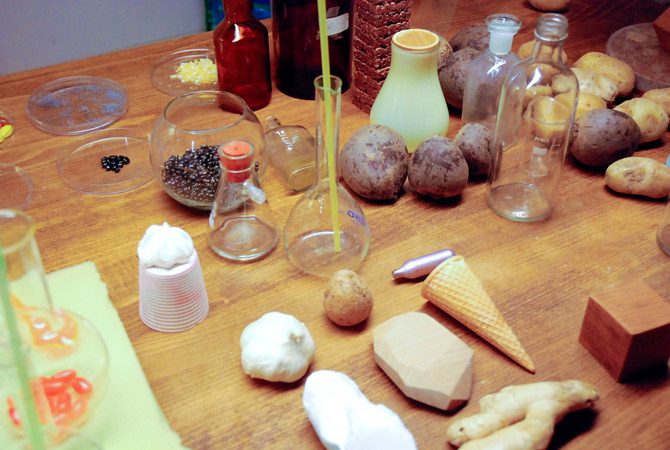
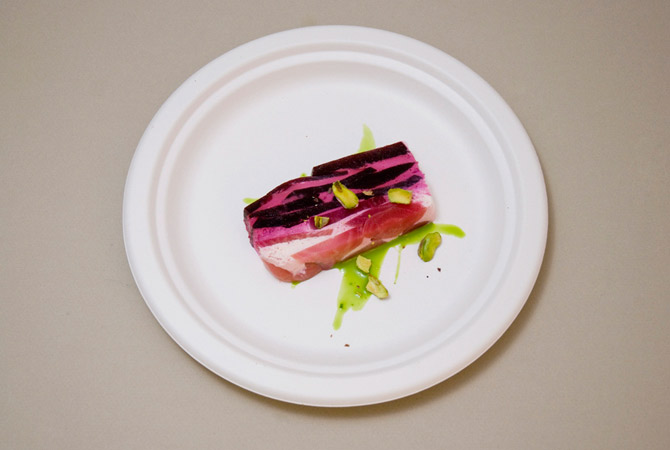
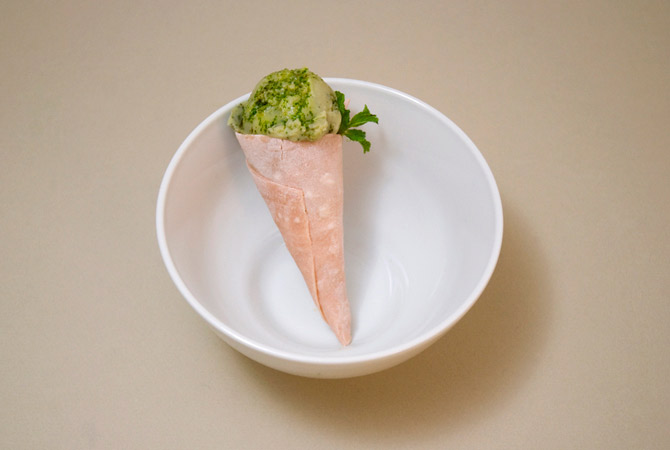
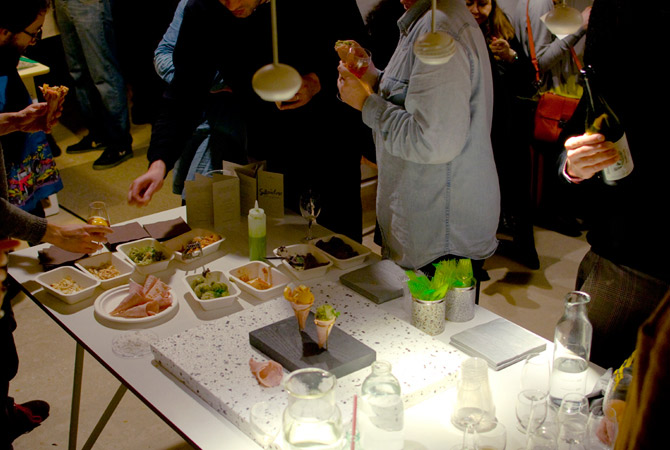
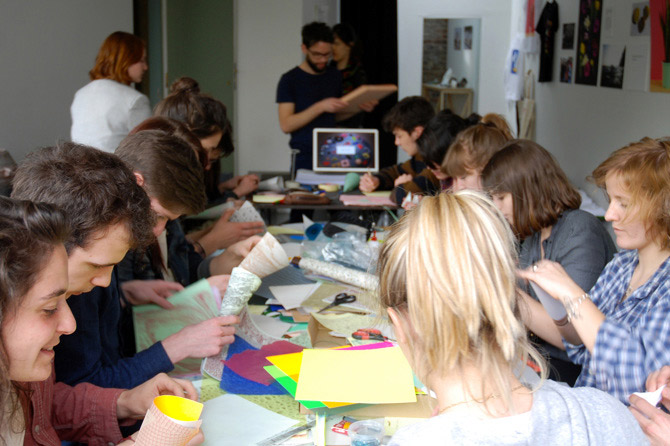
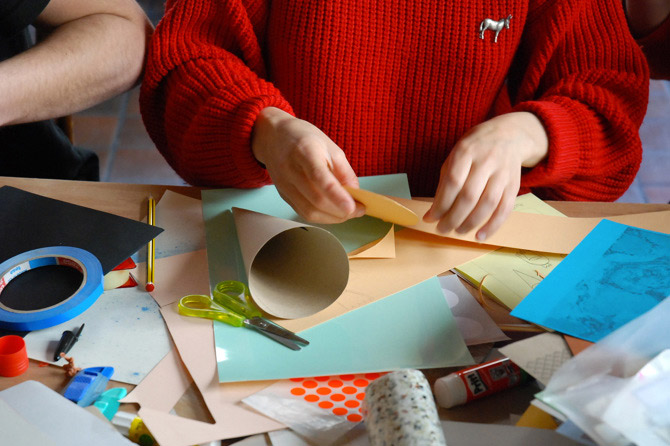
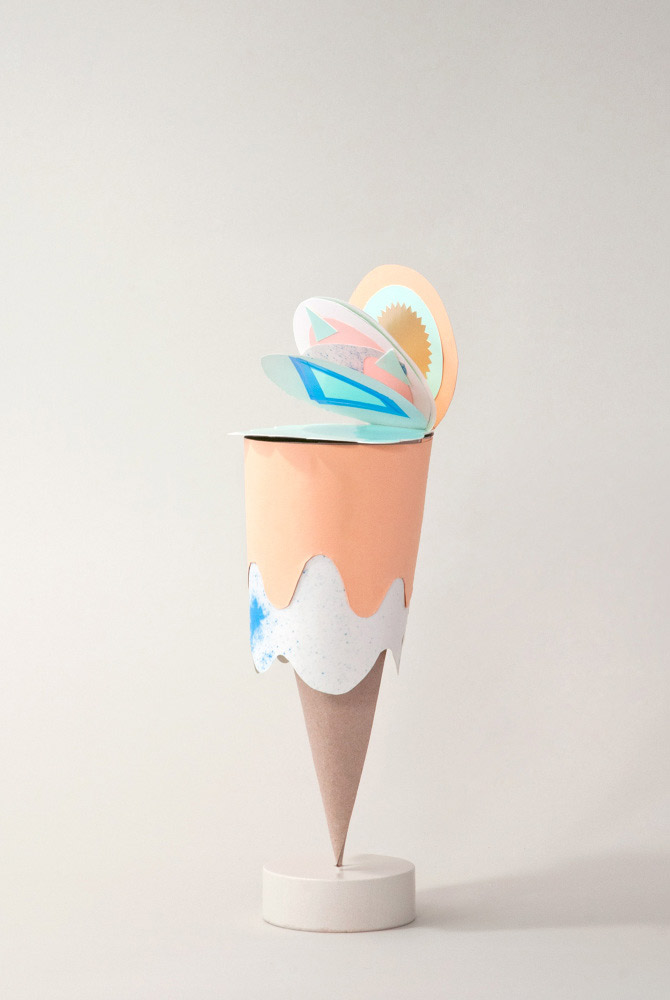
Studio Fludd‘s Gelatology project, which we featured back in November, has grown into a new booklet titled “Micro / Macro” and expanded into a full-fledged banquet and traveling workshop.
If you’re unfamiliar with Gelatology, it all started as a booklet and print series exploring relationships and analogies between ice cream and geology, all as a part of Studio Fludd’s self-publishing collection “Ephemera & Miscellanea.” The project’s second booklet and event series puts this fascinating, abstract concept on both visual and experiential planes.
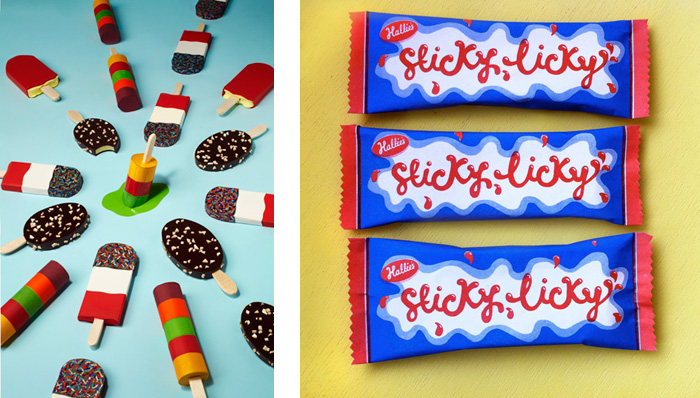
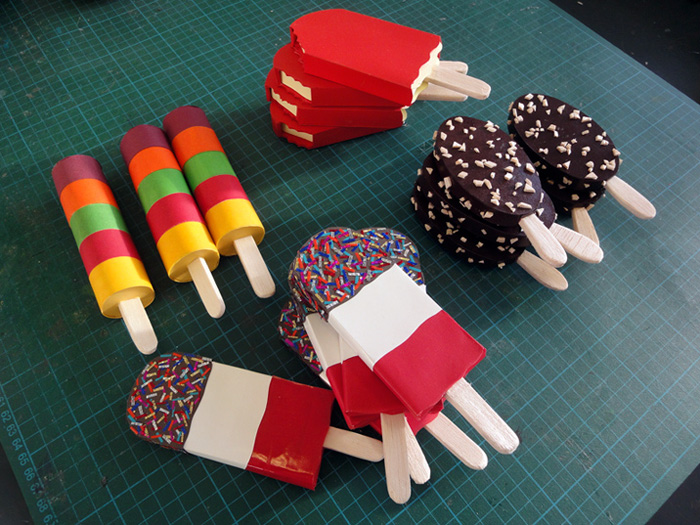
I don’t know what’s in the water over in London, but the city boasts some pretty serious set design talent. A recent favorite is Hattie Newman, who works primarily with the cut-paper aesthetic.
Hattie’s lovingly-crafted paper objects can be found in fashion stories, alongside articles, in window displays, and functioning as seasonal installations.
Personal project: Ice Lollies
She nails the cheerful, colorful look that many cut-paper illustrators share, but Hattie is unique in that some of her 3-D objects feel quite moody and sophisticated.
For Madame Magazine. That giant pencil shaving is wonderful.For Madame Magazine.French GQ MagazineMmm, facets.
Spikes! For a window installation.Editorial illustration for Eureka Magazine
See more of Hattie’s work, including full versions of projects shown above, on her portfolio. And if you’re a glutton for process shots, check out Hattie’s Tumblr.
It’s been a little while since I checked in with what Fuzzco was up to, and since I always love their work, I figured now is the time. Here are a few projects that caught my eye when I took a look around…
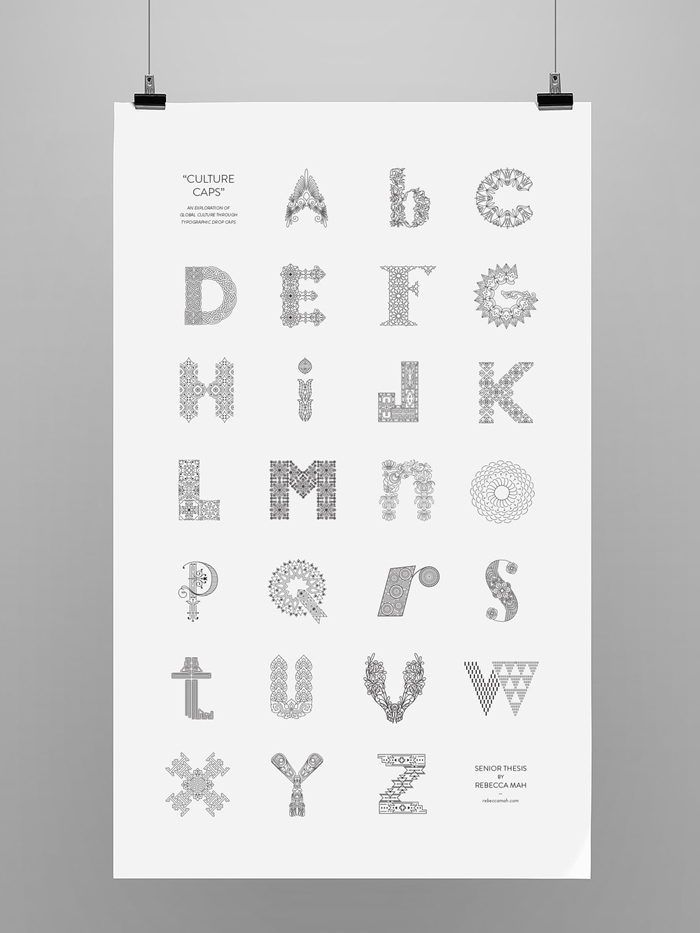
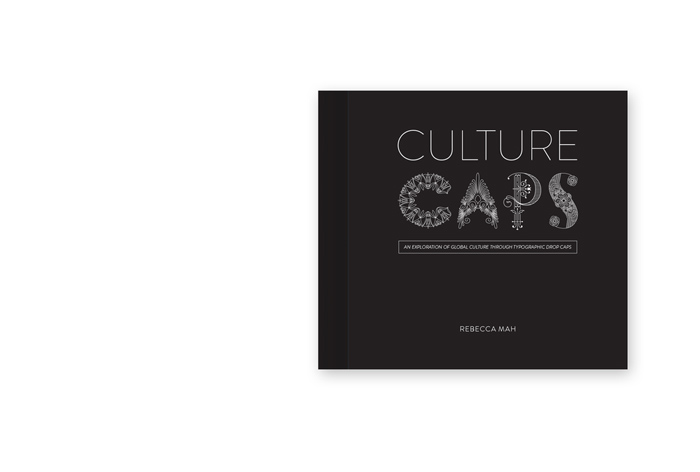
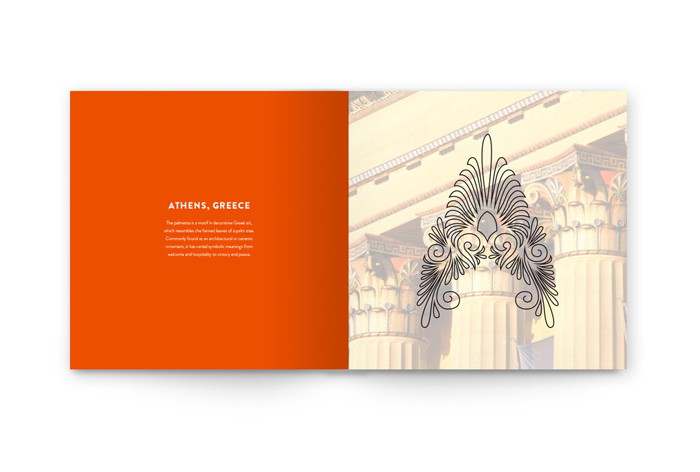
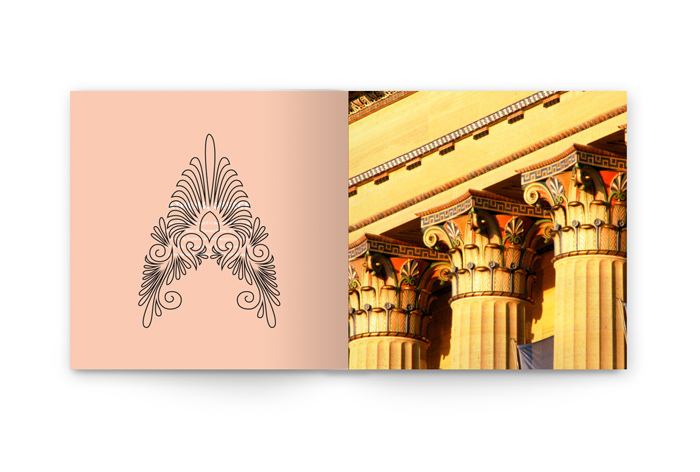
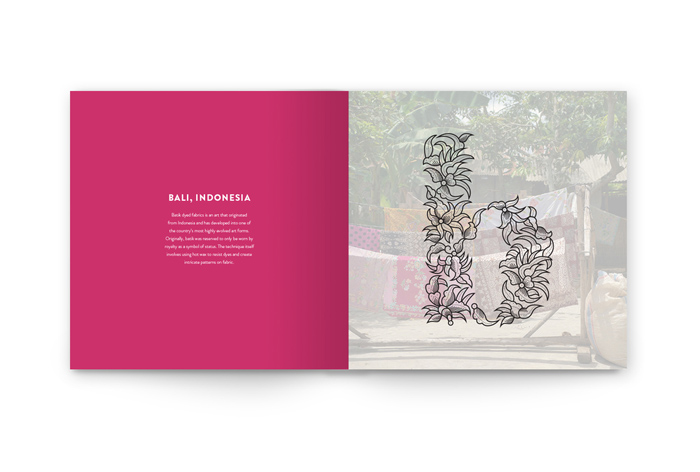
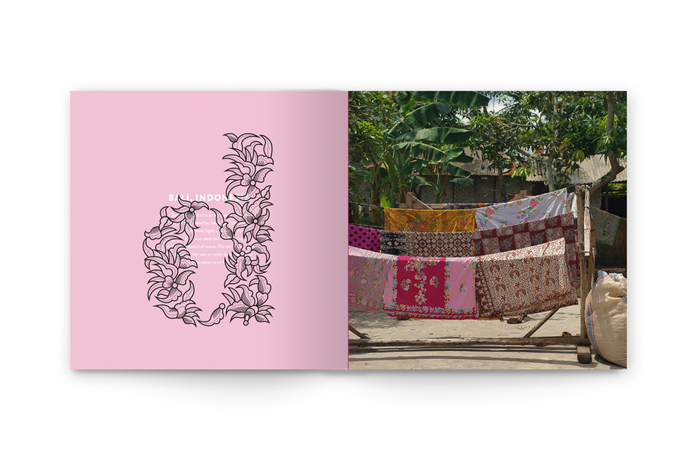
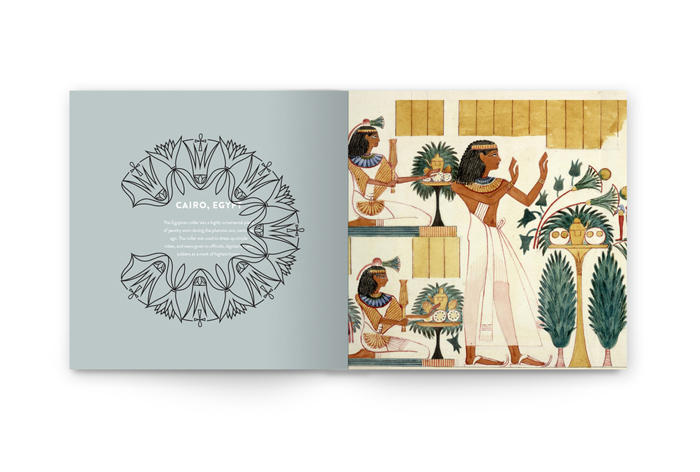
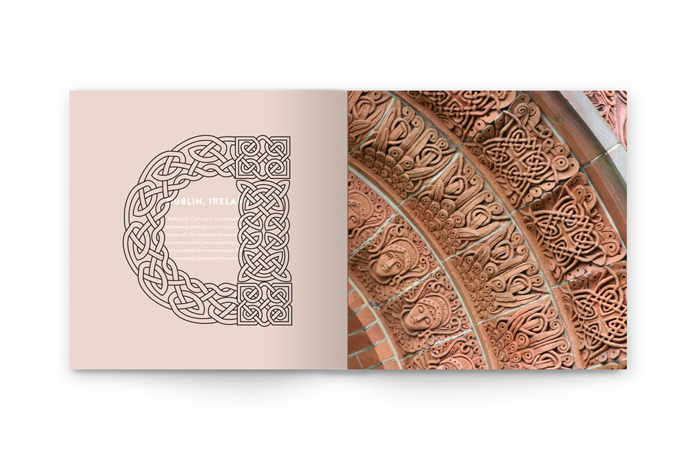
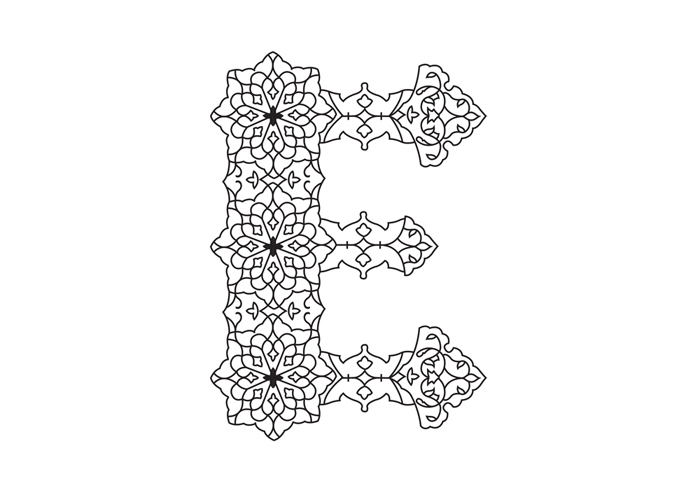
For her senior thesis, Tyler School of Art graduate Rebecca Mah created Culture Caps, a drop cap alphabet influenced by different regions corresponding to each letter. In this series, Rebecca expertly incorporates regional design aesthetics to create a hand-lettered trip around the world.
Rebecca nails the small things with the beautiful details in each letter, and handles the bigger picture skillfully with the composition of her book, poster, and website, collectively making this project a phenomenal execution.
It appears Rebecca’s got a bright design future ahead of her, so be sure to check out more work and keep up with her her website.
[No ver si no han visto hasta el episodio 8 de la 4ª temporada] Game of Thrones es como tener de novia a Adriana Lima pero que te pega: sufres pero jamás la dejarías, obvio. Es causa de una vorágine de sentimientos para todos sus seguidores. Nunca sabes cuando un personaje va a morir, porque no importa si su nombre aparece en los créditos principales. A George R. R. Martin no le importa lo que sientes, acéptalo; él se alimenta de tu miseria. Por eso está tan gordo.
Se acerca el fin de la 4ª temporada de una de las series con mayor fandom. Con tanta atención sobre ella a lo largo de su existencia, empezando por los libros, es obvio que la comunidad en línea iba a tener sus propias versiones, opiniones, etc., sobre esta. Si no la conocen se pueden dar una idea de qué va con estos 7 ejemplos de genialidad. ¿Les gusta la violencia explícita, las boobies (jejejé, dije boobies ) y/o los dragones en un contexto fantástico-medieval? Esta es la saga que tienen que seguir.
Spoilers adelante... [Foto: theprincessandthegeek.com]
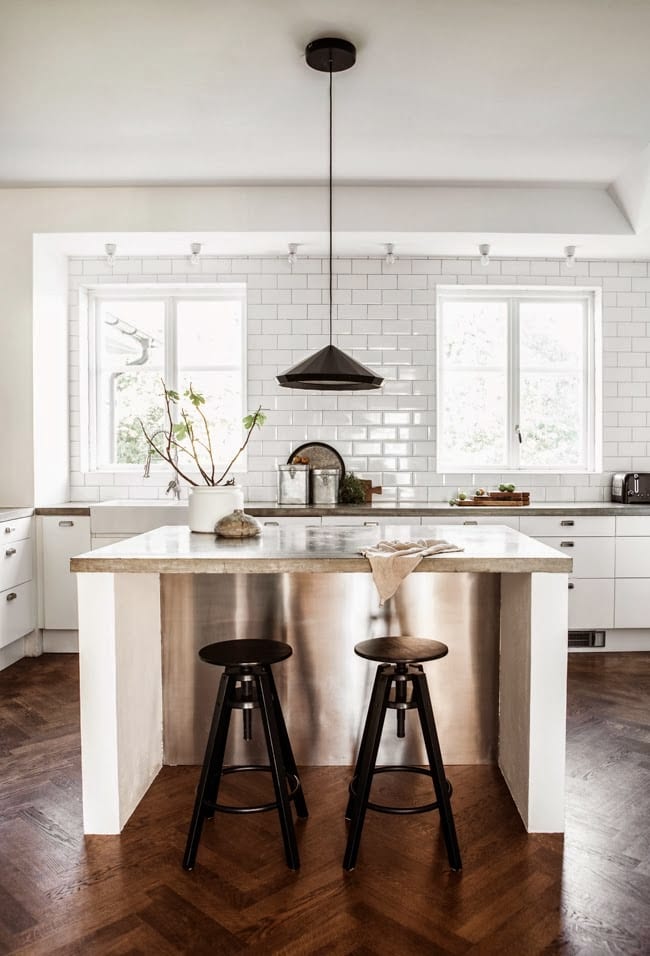
If I really think about it, my obsession with walled window dividers in homes began with this kitchen that I’m still pretty in love with. It resumed again with this office. And then, suddenly, it seemed as though this architectural detail was everywhere…
And not just reserved for kitchens, by any means. The open window makes sense for any space where you want to flood the light in, while still having some sort of reason for division - shutting out noise, keeping in heat, providing privacy when needed (these windows could be easily draped) but otherwise allowing for the feel of an open floor plan…
In my own home – a loft whose light mostly comes from the front of the building – I could see how it would be used with a certain layout, but at the same time, I wouldn’t really want to close off any part of the space. It’s a beautiful detail, but I’m wondering how practical, considering how much we all adore our open kitchen living plans. Thoughts?
I stumbled across Pop’Africana through the wonderful rabbit hole that is Instagram. 50 clicks later, I was on their Facebook page, thumbing through vintage imagery of African hair styles from the The Africana Book of Style: Vol I.
Many of the designs were new to me, and all were breathtaking in the most complicated and intricate of ways. Much of the imagery appears to fall under the category, Nigerian Nostalgia, which showcases the lifestyle and customs of African women throughout history.
Much of the book was shot by JD Okhai Ojeikere, a Nigerian photographer born in 1930, and known for his work with unique hair styles. The the modern imagery is by Namsa Leuba, a younger photographer whose work focuses on African Identity through Western eyes.
To learn more about Pop’Africana as well as Oroma Elewa, the Founder and Editor, check out her interview with IntotheGloss. She discusses her desire to share, spread and curate innovative fashion from Africa throughout the globe.
Credits: Photo: Thibaud Larrieu Gibier, Art Direction: St Sebenza (Anna Frera, Thomas Conchou, Lucie Ernoult, Thibaud Larrieu Gibier) Models: Lucy Faucherre, Benjamin Graland & Ophelie G., Special Thanks: St Sebenza & Volna Zylberberg
Marlene Huissoud is a French-born, London-based “experimental designer.” She launched her scarf line in 2012, which now consists of two collections, “Automatic,” seen above, and “Serendpt.”
“This work is about these little automatic drawings we all do when we are speaking on the phone. Except that I keep drawing them for hours and hours. My series of automatic drawings are all done by hand with a simple pen. The aim of the series is to question the randomness and the irregularity of hand drawing. Each drawing represents between 20 hours to 30 hours of drawing. The A3 format is used to canalize the density of these simple geometric forms that I reproduce automatically with a simple pen. The mistakes of the hand process take an important part in this failure of reproducing geometric prints. Then, I adapt the drawings to the textiles, to give a movement, a dance to my prints…”
Dealer Steve Lazarides, who worked with Banksy until 2009, is curating a show for Sotheby’s gallery space S|2, “Unauthorized Retrospective.” Included are pieces never before seen in public, and works from Lazarides' personal collection. The exhibition opens today.
I had the strangest weekend. My husband went to New Orleans for a bachelor party and my in-laws insisted upon watching my son for one of the nights he was away. I was all set to argue that I probably could handle a single potty-trained, getting-himself-dressed, occasionally listening almost-5 year-old for all of 48 hours but when I opened my mouth the only words that came out were, “Thank you! What a fantastic idea!”
All of a sudden, I was flying completely solo for the first time in half a decade and I had no idea what to do with myself. Would I finally clean the apartment? Would I have a giant party? Would I go away by myself for the night, just because I could? Would I watch two matinees in a row and eat popcorn and Reese’s pieces for dinner? Why had I not been planning for this day my all five years I’d had to think about it; I bet when Jacob was 8 months old and hadn’t slept through the night for any of them, I had a crystal-clear idea of where I’d run if given the chance. (Spoiler: Back to bed. Or Paris! Or both!) But that was then and this was Saturday. So, I went for a haircut. I took a walk. I ducked into tiny bookstores and bought new things for everyone to read. With friends, I went for manicures and pedicures, ordered cava and tapas, and stuffed wedding invitations. I slept in! I got a massage with a gift certificate I received over 3 years ago! I finished the book I was reading and started a new one! I realize this is probably the dullest story ever told, but I honestly couldn’t believe the lap of limitless luxury my life had become. I can’t believe there are people that live like this every single day; I can’t believe I was once one of them. This is probably how having kids turns you into one of those fuddy-duddies you remember your parents being.
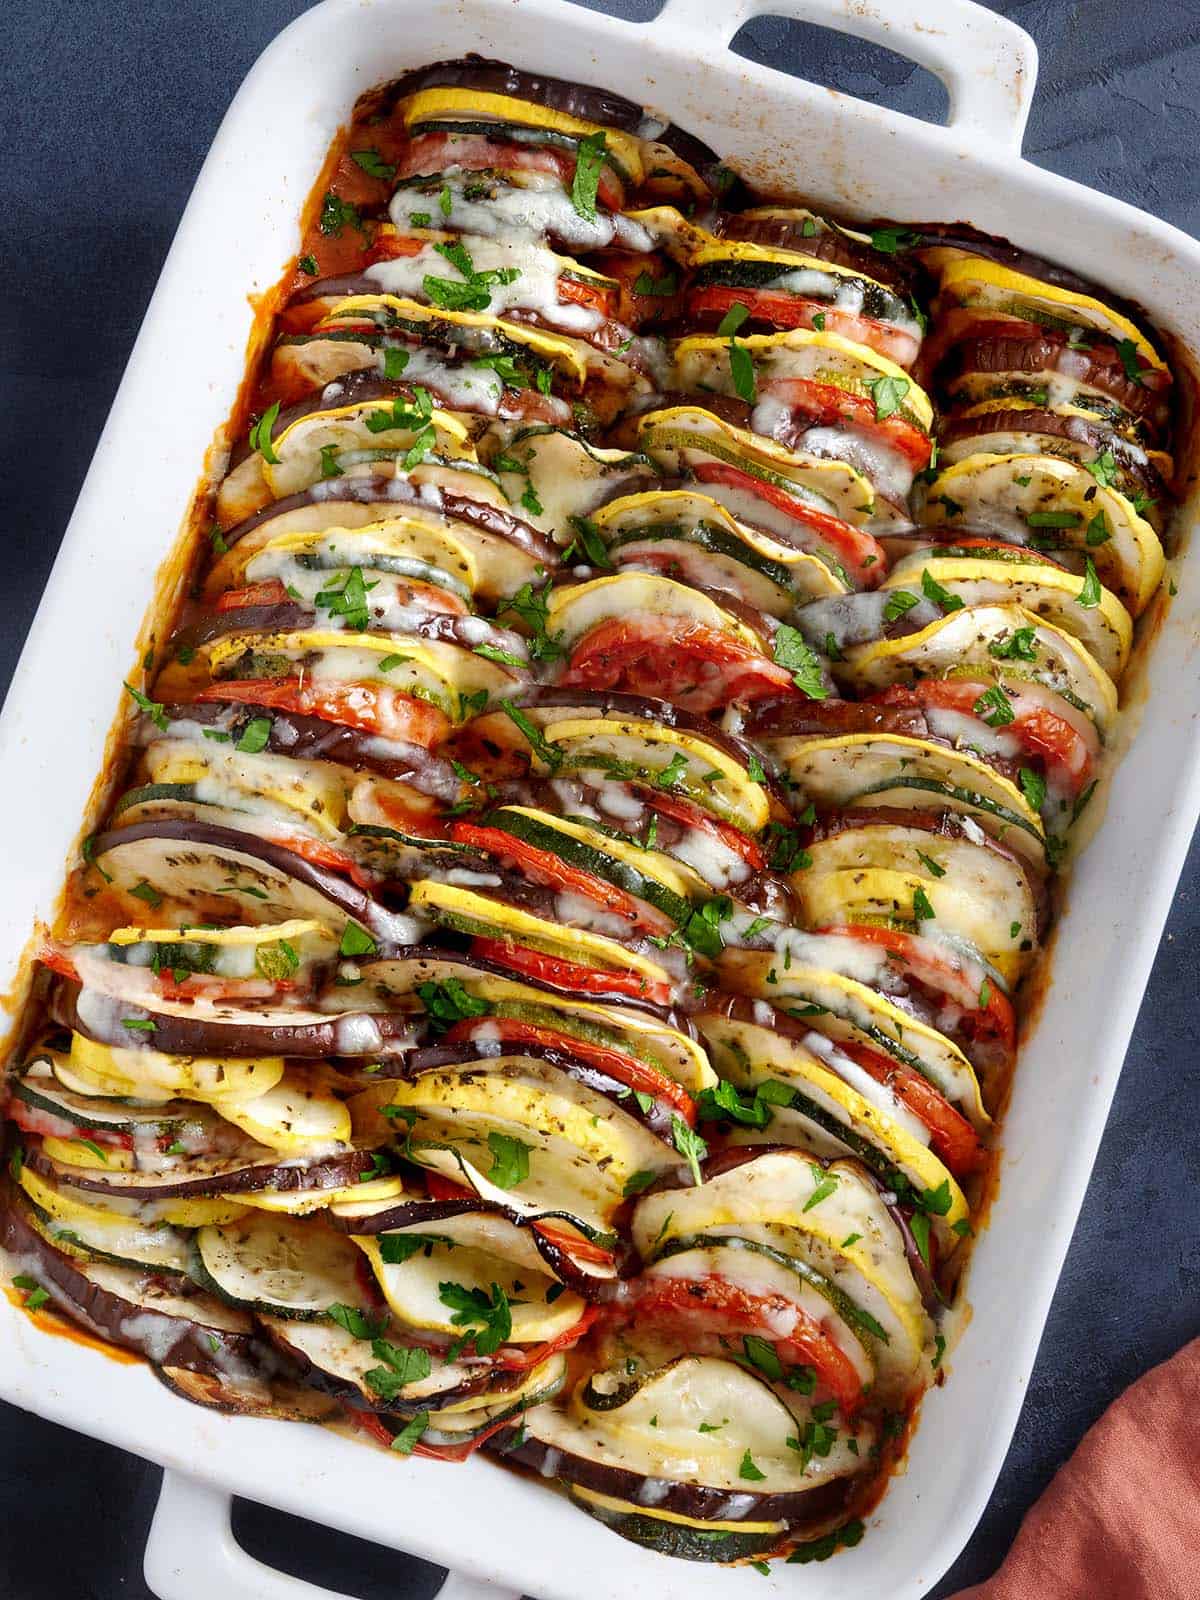
What happens when you take thinly sliced vegetables, layer them in a dish, add a rich red sauce, plenty of herbs, and a cheesy topping? You get this insanely delicious oven roasted ratatouille, aka “the vegetable dish that vegetable haters won’t be able to get enough of.” While this interpretation of ratatouille isn’t exactly traditional, I think you’re going to love it. And once you learn how to make ratatouille this way, you’ll want to make it all the time!
“Easy to make, beautiful to look at, really inexpensive, very healthy and MUCH better than my stovetop ratatouille. My husband and I devoured it. Yum with a capital Y.”
Vicky
Easy Ratatouille recipe in the oven
Ratatouille is a classic French dish that’s rich, comforting, and perfect for sopping up with a piece of crusty artisan bread or ladling over a bowl of polenta. Like many traditional recipes, there are countless versions out there—and mine takes a bit of a twist.
Rather than stewing the vegetables together in a pot, I chose to make an oven roasted ratatouille, which is a common alternative to the stewed version. Not only is oven roasting the sliced vegetables super pretty, but it’s a little more hands-off than stewing vegetables in a pot, which I appreciate. I also added marinara sauce to the bottom of my casserole dish, which ends up mixing with the juices from the vegetables and creating the most delicious sauce (get some bread ready for dipping). Lastly, I topped with cheese, which definitely isn’t the norm for ratatouille, but it sure was delicious!
Recipe Tips & Variations
This recipe is extremely flexible. I’ve given some approximate weight values for the vegetables below, but you can really use whatever size you have available and whatever you can squeeze into your baking dish. But a word of advice: once sliced, the volume of the vegetables always ends up being more than you estimated, so err on the side of smaller vegetables.
I don’t peel my vegetables as the skins help hold their shape and add color to the finished dish. However, feel free to peel your veggies if preferred!
Use soft veggies (and slice them evenly). While this recipe is my easy oven-roasted version, I kept the vegetables true to a classic ratatouille recipe by using eggplant, zucchini, tomatoes, and onions. If you want to change things up, you can mix in other soft veggies like red or orange bell peppers, sliced mushrooms, or other tomato varieties like beefsteak tomatoes. Just make sure everything is cut to about the same thickness so the layers cook evenly.
This Oven Roasted Ratatouille is packed with layers of fresh veggies, marinara sauce, and melty cheese. A simple, cozy side dish that tastes like comfort!
Step-by-step videos can be seen below the recipe card.
3 Roma tomatoes thinly sliced, (360g, 2 ½ cups)$0.87
1 Tbsp olive oil $0.18
½ tsp dried basil $0.25
½ tsp dried oregano $0.03
⅛ tsp black pepper freshly cracked, $0.03
⅛ tsp salt $0.01
1 cup mozzarella shredded, $0.97
1 Tbsp fresh parsley chopped (optional), $0.05
Instructions
Gather all your ingredients and preheat the oven to 400ºF.
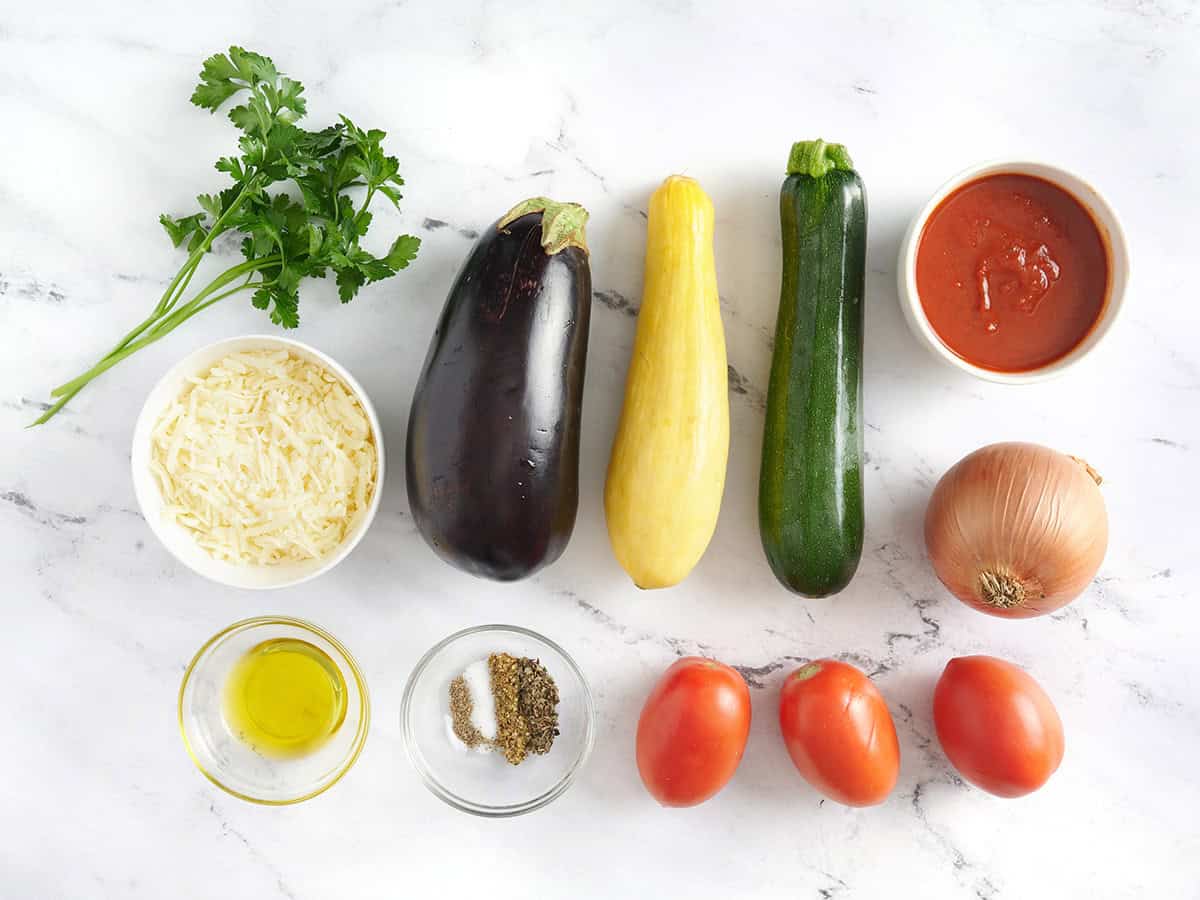
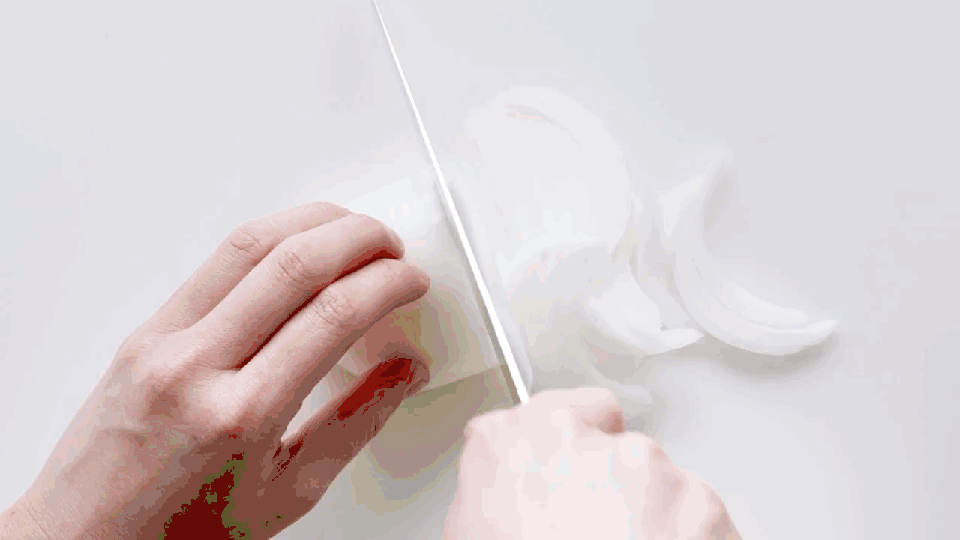
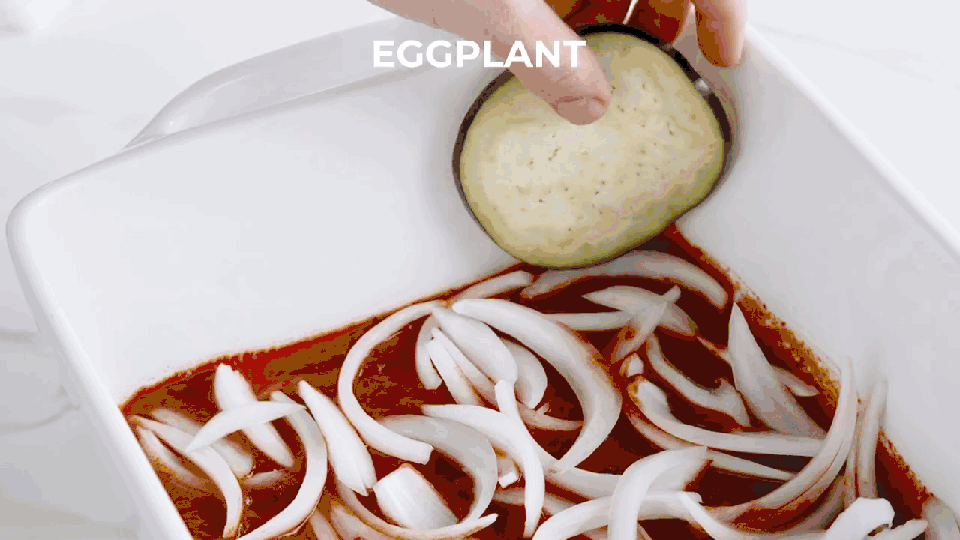
Thinly slice the yellow onion. Slice the eggplant, zucchini, yellow squash, and tomatoes into ⅛-inch thick slices. Cut any pieces with a larger diameter into half-rounds.**
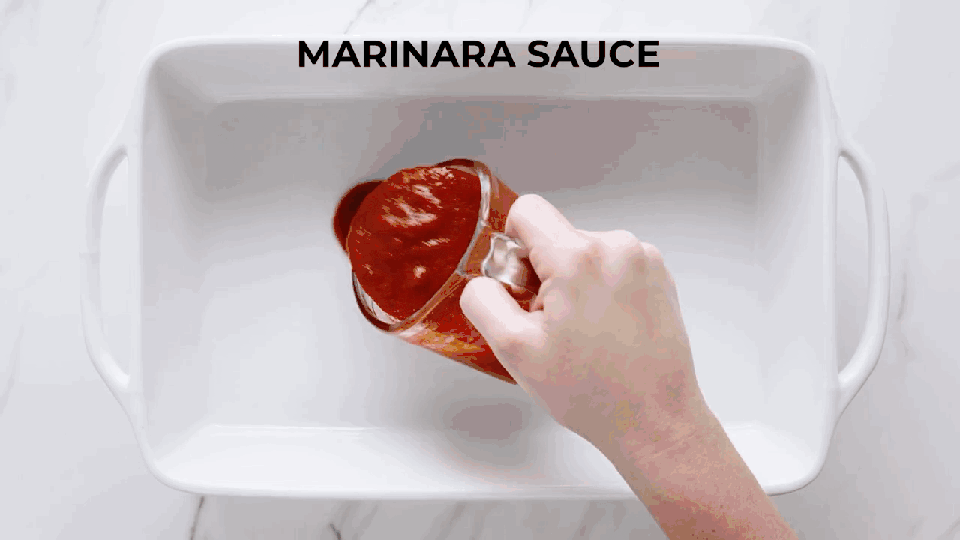
Pour the marinara in the bottom of a large casserole dish. Sprinkle the sliced onions over top.
Begin to line up the sliced eggplant, zucchini, squash, and tomatoes into the dish, standing on their sides, and in an alternating pattern until all of the pieces are used up. Drizzle the olive oil over the vegetables, then sprinkle the basil, oregano, salt, and pepper over top.
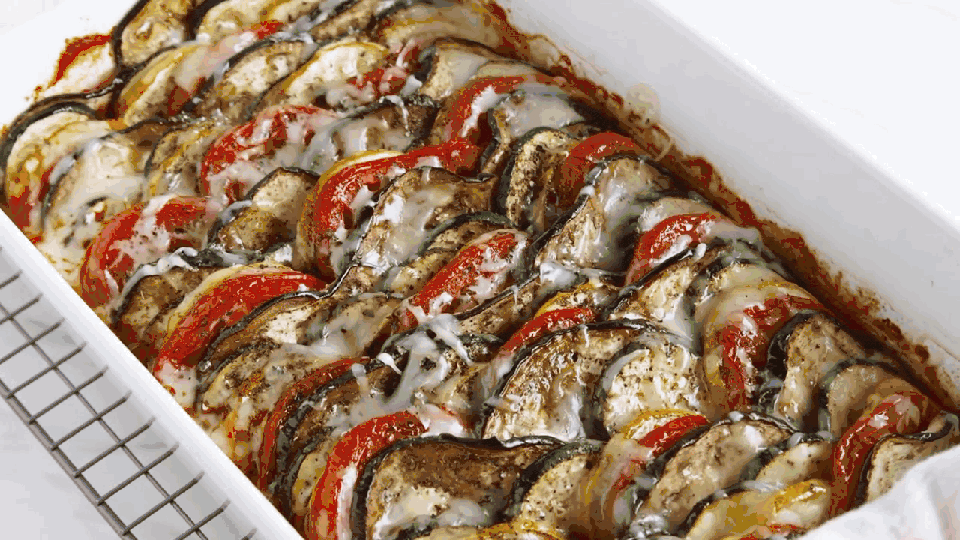
Transfer the dish to the oven and roast the vegetables for 40 minutes. After 40 minutes, remove the dish from the oven and sprinkle the shredded mozzarella over top. Return the casserole dish to the oven for five minutes, or until the cheese is melted and creamy.
After roasting, sprinkle the chopped parsley over top, then serve.
*You can use any marinara sauce you like. Store-bought marinara sauce makes this recipe super easy to throw together, whereas homemade marinara sauce adds a rich flavor that makes the dish taste extra special (and you can alter it to suit your tastes!)
**Try to purchase vegetables that are a close size in diameter to make layering easier.
How to Make Oven Roasted Ratatouille Step-by-Step Videos
Gather all of your ingredients: Preheat your oven to 400ºF. For this recipe, I used one small eggplant (about 1 lb.), one yellow onion, one yellow squash (about ½ lb.), one zucchini (about ½ lb.), and three Roma tomatoes. The eggplant, squash, zucchini, and tomatoes are the vegetables that will get layered pretty in the dish, while the onion will hide underneath in a base layer.
Slice vegetables: Thinly slice the eggplant, squash, zucchini, and tomatoes. You want everything to be similar in height when placed in the casserole dish, so for pieces with a larger diameter, you’ll want to slice those in half (I did this for the eggplant and larger ends of the squash and zucchini). Aim for ⅛-inch thick slices.
Thinly slice the onion. Spread 1 cup marinara in the bottom of a large casserole dish. Sprinkle the sliced onion over top.
Layer vegetables: Layer the vegetables in the dish standing up on their sides, like cards in a card catalog (wait, did I just date myself??). They do NOT need to be perfect. Just start squeezing them in as best you can. It’s nice to try to alternate them in a pattern, but once you get toward the end, you might have more left of one type of vegetable, so just start popping them in there anywhere they’ll fit.
Drizzle 1 Tbsp olive oil over top. Sprinkle ½ tsp dried basil, ½ tsp dried oregano, ⅛ tsp freshly cracked pepper, and ¼ tsp salt on top of the vegetables.
Transfer the dish to the preheated 400ºF oven and roast for 40 minutes.
After 40 minutes, remove the dish from the oven and sprinkle 1 cup of shredded mozzarella on top. Return the dish to the oven and bake for an additional 5 minutes, or until the cheese melts and looks creamy.
Garnish and serve: Top with 1 Tbsp chopped parsley (optional), then serve! This roasted ratatouille is so delicious…and it’s just begging for a beautiful baguette to bathe in it. Mmmmm. You’ve got to spoon some of that sauce from the bottom of the pan onto your plate!
Closer look? So pretty. I ❤️ vegetables!
Serving suggestions
Oven roasted ratatouille makes a delicious side dish for grilled or roasted meat. Try it with juicy herb roasted pork tenderloin. Or serve it next to garlic butter baked cod, where the flaky, buttery fish balances the ratatouille’s rich texture and tangy tomato notes. For something equally satisfying, I’d pair it with juicy baked chicken breasts. You could also serve this as part of a vegetarian meal by pairing it with something like a rich and creamy Parmesan risotto or serving it on top of a bowl of polenta!
Storage & Reheating
Store any leftovers in the fridge, in an airtight container, for up to 3-4 days. I usually reheat individual portions in the microwave until heated through. You can also freeze this dish for up to 3 months, but the veggies will turn out much softer once thawed and reheated. Let your oven roasted ratatouille cool completely before storing it in the fridge or freezer.
How is it that it’s almost Memorial Day already? ‘Splain it to me Lucy! When I was a kid, a week seemed like an eternity. Now, well into middle-agedom, I blink and it’s a new month. One good yawn and we’ve moved from pea shoots to picnic salads.
Speaking of which, picnic salads that is, everyone needs a good potato salad in their picnic repertoire, right? This one fits the bill. It’s sort of a potato salad a la Nicoise. No mayo, the dressing is a mustard vinaigrette; new potatoes are tossed with green beans, roasted red bell peppers, red onion, minced Kalamata olives, parsley and arugula.
From the idea that some of us have everything, Pim de Graaff from The Netherlands created Nothing. His Nothing is a piece of wood with a black finish that reminds people to enjoy everything they already have. Absurdly poetic.
I have what some would call a “Jekyll and Hyde-esque” decor style. I’m really drawn to minimal Scandinavian decor, but cannot resist the richness of beautiful crown molding, velvet sofas, and turkish rugs. I love the idea of simplistic living spaces, but without warmth, there just too cold and boring.
And then there is the home of Daniella Witte, who combines these two styles beautifully. I could only dream to find an apartment with crown molding and parquet flooring! Le sigh.
lonny has got one colorful home tour on their site right now. i’m not sure if i could ever be so bold, but fashion designer Manish Arora’s Paris pied-à-terre is over the top bright, beautiful and very bohemian. “I cannot live in the dark,” the New Delhi–born fashion designer says — no kidding! i couldn’t help but share his exuberant lust for living! for the full tour, check out lonny.
i never thought i’d be one of these people. these people who get all into how they make their coffee and tea, but it’s happening. okay, it’s happened. i now have like four or five contraptions for making coffee, and tea, too. i’ve got the Bodum Chambord French Press, the Bialetti Espresso Maker, the one-cup drip filter, a Chemex, not to mention the two or three tea pots and the freud tea ball. excessive? perhaps. but i like the way they look on my kitchen counter — although it’s getting a tad bit crowded, so i’m thinking i actually need a coffee cart — a cart dedicated to my current coffee and tea fixation. here’s some cute little coffee stations that have inspired me, especially this one up top from a beautiful mess. so great, right? i was so inspired i ordered a DeLonghi Kmix Espresso Maker in white, but their orange one is pretty darling, too.
only deco love keeps a darling little scandinavian-inspired station, too!
i blame much of my problem on sfgirlbybay photographer extraordinaire, cindy loughridge, who demonstrated to me how to properly use my Chemex. enabler! her tumblr, 365 days of coffee is a great one.
Sivan Askayo’s Intimacy Under the Wires project started almost four years ago in the vibrant alleyways of Tel Aviv’s Jaffa neighborhood and has taken her from Madrid, Barcelona, London, Florence, Venice, Buenos Aires, Vietnam and Naples to snap the anonymous clothing. I love the vibrant colors that create unique palettes with the homes they are displayed against.
Sivan tells us “I do feel that the laundry images tell a deep story of the place and the clothes’ owners. I must admit that when I am not on assignments, sometimes I am choosing my travel destination by my curiosity for its laundry. It happened to me in Naples, Italy and in Menton, The French Riviera; in both locations I visited especially for this purpose.”
This Kale Salad recipe by Smitten Kitchen is so good I had to make it two days in a row. I am raving about Kale!? I guess, I am a real Brooklynite now.
The New Zealand branch of the razor company Schick commissioned these images for its “Free Your Skin” advertising campaign. They were made by the agency Sharpe + Associates, which notably credits the photography to Troy Goodall and the animal photography to Stephen Stewart. This suggests that there is some Photoshop trickery at work here.
That’s disappointing. Wouldn’t you like to be able to claim to wear a live, preferably wild ferret as a beard? Or maybe a honey badger or wolverine?
And once you had such a beard, why would you ever want to shave again? I don’t understand how these ads would sell razors.
Me gusta peroooooo, no se, siento que se va a manchar mucho la parte del exprime bolsitas…
There’s nothing like a hot cup of tea to bring peace and relaxation. There is one minor annoyance though – getting every inch of tasty tea out of that tea bag, and well, getting rid of it.
The Tea Cup SlingsHOT by Samir Sufi solves both those problems at once. It has a little funnel for you to squeeze every last drop of tea out of the bag without dripping everywhere. It also acts as a place for your old tea bag to rest while you sip your tea.
Contact Sufi at samir.sufi@gmail.com for more information.
I’m kind of breaking my own rules with this post, but let me explain.
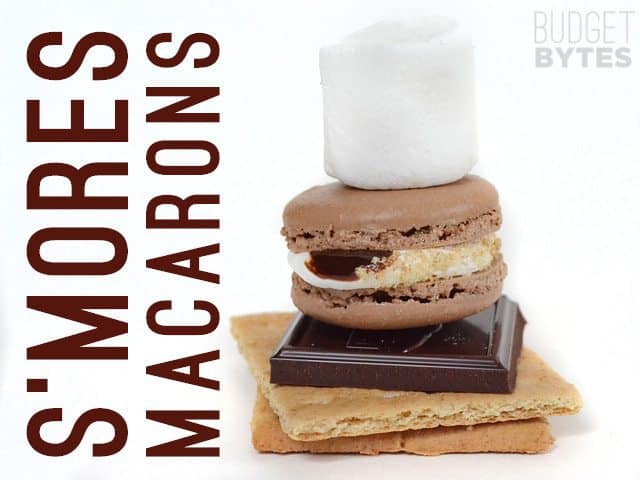
If you’ve been following my blog for a while then you know that I never do promotional, affiliated, or underwritten posts. I don’t like it when blogs are just one big commercial. BUT when I was invited to be a part of a macaron contest hosted by an amazing local bakery, I couldn’t resist. You see, I’ve always wanted to know how to make French macarons and I just love a good challenge. So, I said, “Sign me up!”
The contest is hosted by Sucré, an amazing confectionary here in New Orleans. They specialize in macarons, but have a million other amazing sweets and things. Sucré challenged 13 bloggers to come up with their own unique flavor of macaron and have opened up the voting to the public. Check out the other submissions and vote for your favorite here.
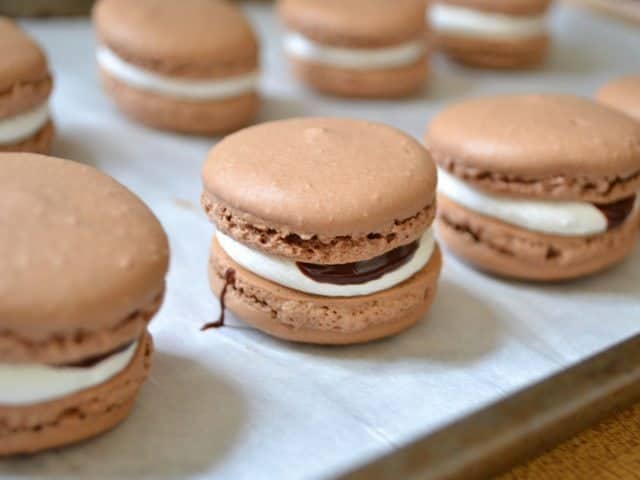
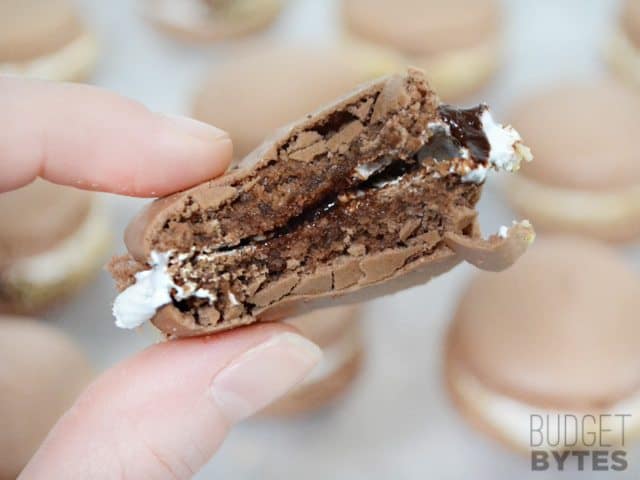
So about the macarons… yes, they were challenging! But, once I got the hang of it I realized they are incredibly simple. I decided to try a s’mores flavor combination: a chocolate macaron shell filled with homemade marshmallow creme and chocolate ganache, all dipped in crushed graham crackers. I can’t figure out what was more fun about this–making the macarons, photographing the macarons, or eating the macarons! This project was super fun, so I hope you enjoy the macaron making tutorial! :)
Smores Macarons
The macaron shell recipe is adapted from Martha Stewart and the Marshmallow Creme is from Chow.com.
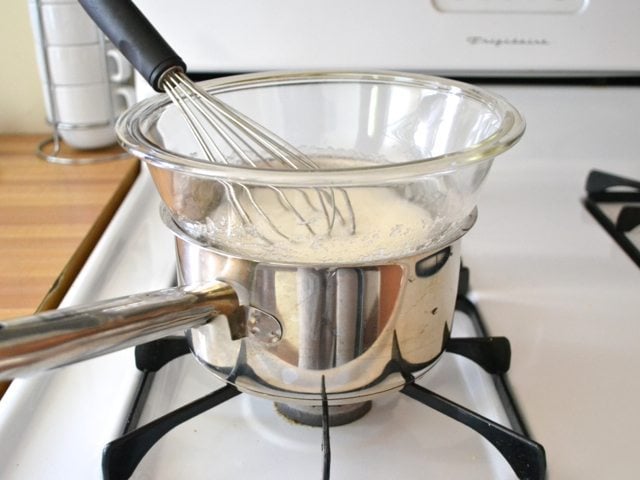
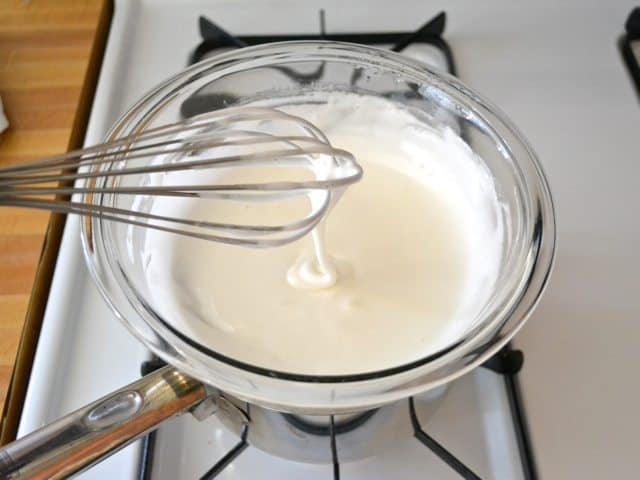
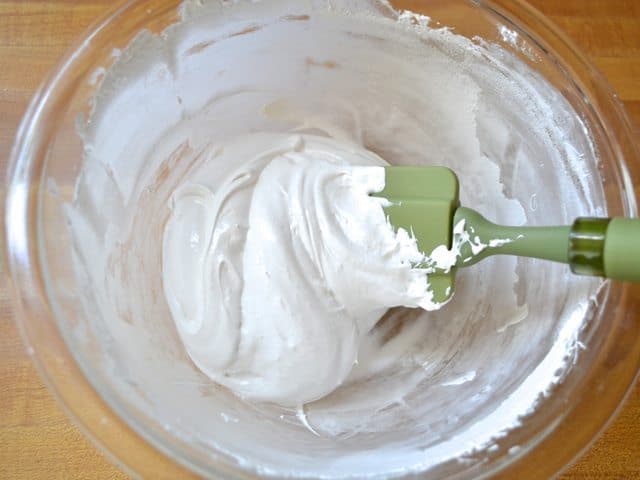
Begin by making the marshmallow cream. In a glass or metal bowl, whisk together the egg whites, granulated sugar, cream of tartar, and a pinch of salt until well combined. Place about 1 inch of water in a small sauce pot and bring it to a boil. Place the bowl with the egg white mixture over the boiling water and whisk by hand for 6 minutes. Remove the bowl from the heat, add the vanilla, and use a hand mixer or stand mixer to whip the egg white mixture to glossy peaks (about 5 minutes). Refrigerate until ready to use.
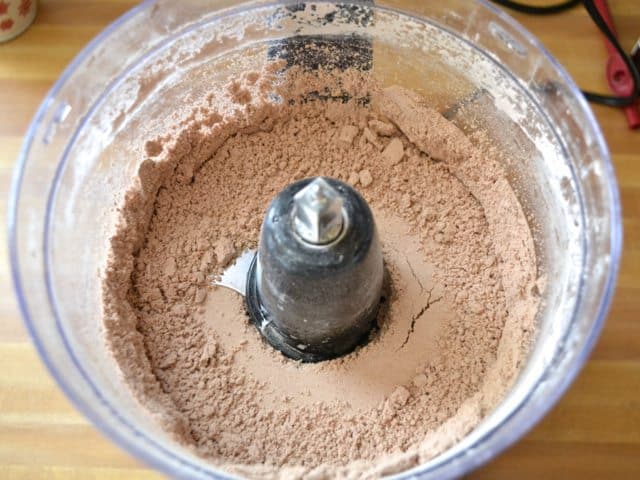
Next, begin the macaron shells. Place the almonds, powdered sugar, and cocoa powder in a food processor. Process the mixture until it is a super fine powder. Sift the mixture through a wire sieve into a bowl.
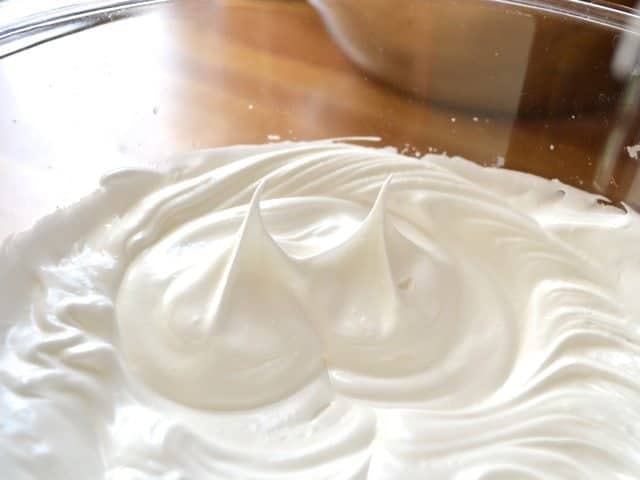
In a separate bowl (glass or metal) combine the egg whites, sugar, and cream of tartar. Stir or whisk together until combined, then use a hand mixer or stand mixer to whip the whites into stiff, glossy peaks (about 5 minutes).
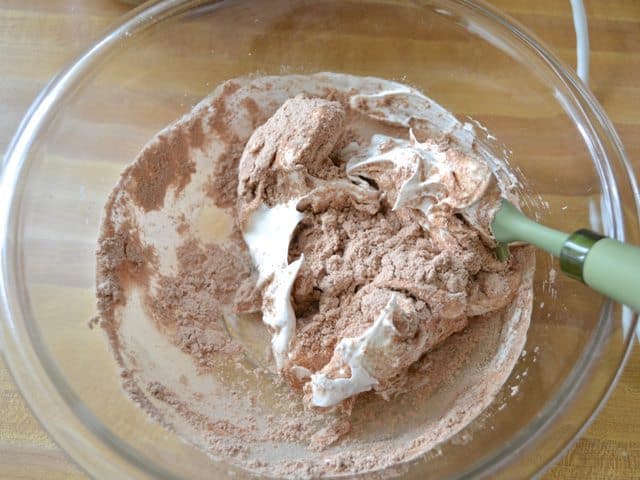
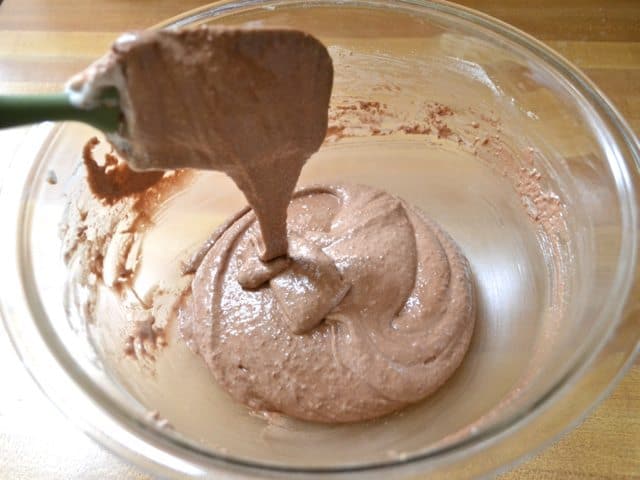
Fold about ⅓ of the cocoa almond mixture at a time into the whipped egg whites until no dry powder remains. After all of the dry mixture has been folded in, the mixture should have the consistency of thick, hot lava.
Cover two baking sheets with parchment paper. Use a pastry bag to pipe the macaron mixture into 1.5 inch rounds on the parchment paper. Leave enough space for the macarons to spread slightly without touching. After piping all of the macarons onto the sheet, slam the baking sheet on a counter a few times to force any larger air bubbles to the surface. Let the cookies sit out at room temperature for about 30 minutes so that the surface dries slightly (this helps form a "foot" or ruffle on the bottom of the macaron).
Preheat the oven to 350 degrees. After 30 minutes of sitting, the macarons should have a dull, less glossy appearance. Bake one sheet at a time for 13 minutes each. Allow the macarons to cool to room temperature before removing from the parchment.
To make the ganache, break up the chocolate into small pieces and place in a microwave safe bowl. Add the heavy cream. Microwave on high for 15 seconds, then stir well. Microwave for 15 seconds once more, then stir until the chocolate is completely melted and has created a smooth mixture with the cream. Let cool.
Fill a pastry bag with the marshmallow creme and a second bag with the chocolate ganache. Flip half of the macarons over and pipe a circle of marshmallow creme around the outside edge of the bottom. Fill the center of the marshmallow creme circle with ganache, then place a second macaron shell on top and press down slightly. Dip the filled macarons in the crushed graham crackers to make it stick to the marshmallow creme. Tip: Dip soon after filling as the marshmallow dries a bit and gets less tacky as it sits.
3.2.2310
Step by Step Photos
I began with the marshmallow creme, so that it would have time to cool and “set” in the refrigerator. In a glass or metal bowl, whisk together two egg whites, 1/2 cup granulated sugar, 1/8 tsp cream of tartar, and a pinch of salt until it is all combined.
Create a double boiler by bringing about 1 inch of water to a boil in a small sauce pot. Place the bowl with the egg white mixture on top, and whisk the mixture over the heat for 6 minutes. This melts the sugar without cooking the egg whites, which will create the unique marshmallow texture.
You don’t have to whisk vigorously, just make sure you’re stirring it the whole time with the whisk. After 6 minutes it will look kind of creamy like this.
Now add 1/4 tsp of vanilla and use a hand mixer or stand mixer to whip the mixture until it forms glossy peaks (about 5 minutes). The creme will be pretty soft and gooey still, but it will stiffen up as it cools. Cover it and refrigerate to cool it faster.
Now on to the macaron shells… Place 2/3 cup slivered almonds, 1 cup powdered sugar, and 2 Tbsp cocoa powder in a food processor. Process until it is a fine powder.
You really want this mixture to be as fine as possible or else your macarons will be all bumpy and lumpy. You can pinch some of the powder between your fingers to see if you feel any granules. Process a little more, if needed.
Then sift the mixture into a bowl to remove any larger pieces. I thought I had mine pretty smooth, but I still had quite a few granules. Discard those large granules.
In a separate glass or metal bowl, stir together two egg whites, 1/4 cup of sugar, and 1/8 tsp cream of tartar until well mixed.
Then use a hand mixer or stand mixer to whip the egg whites up into stiff, glossy peaks. You’ll know the peaks are “stiff” when you pull out the beaters and the peaks stand straight up without flopping over. When you start to get close to this point, check the peaks a few times to make sure you don’t go too far. If you over beat the whole mixture will break down and separate.
Now, fold in 1/3 of the almond cocoa mixture at a time until no dry powder remains. Every time you add more dry mixture you’re going to go, “OH NO! I’ve ruined it!” but then it will begin to come together. The first time I tried to make these I was very afraid of collapsing the whipped egg whites, but the truth is that you want them to deflate a little. So, just fold gently until it all comes together…
When it’s all folded in it will have the same texture as thick, hot lava. When you lift some up with your spatula, you want it to run back into the bowl SLOWLY. Kind of like thick cake batter. If it’s running like liquid, it’s over mixed.
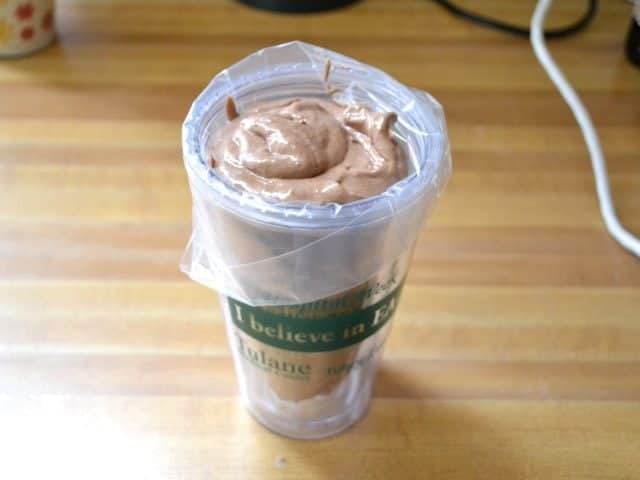
Fill a pastry bag with a plain, round tip with the macaron batter. The easiest way to fill the bag is to place it in some sort of tall cup and fold the bag over the edges, like this.
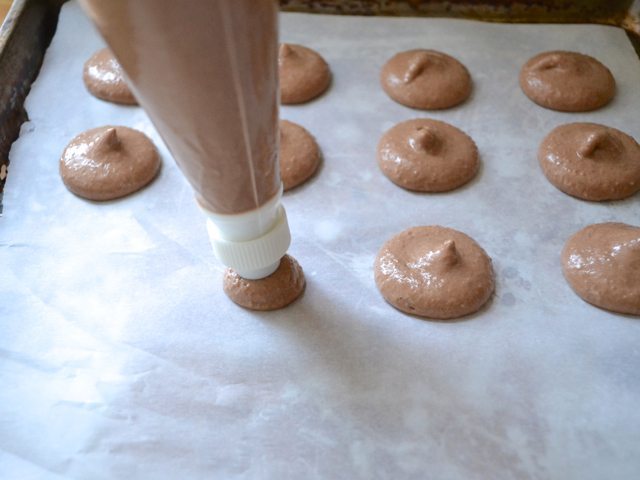
Cover two baking sheets with parchment and pipe the macaron batter into 1.5 inch circles on the parchment. Be sure to leave enough room for them to spread a little. Hold the pastry bag straight up at 90 degrees from the sheet and squeeze the batter out, without lifting the tip up. If you keep the tip fairly close to the baking sheet as you squeeze, the batter will extend out in an almost perfect circle. Pretty cool.
After you’ve piped all of the batter onto the baking sheets, slam the baking sheets down on the counter a few times to force any large air bubbles out the top (see the one that popped out of the side there?). This also helps flatten the little peaks left behind by the pastry tip. Now, let the macarons sit out at room temperature for about 30 minutes so they can dry out a bit.
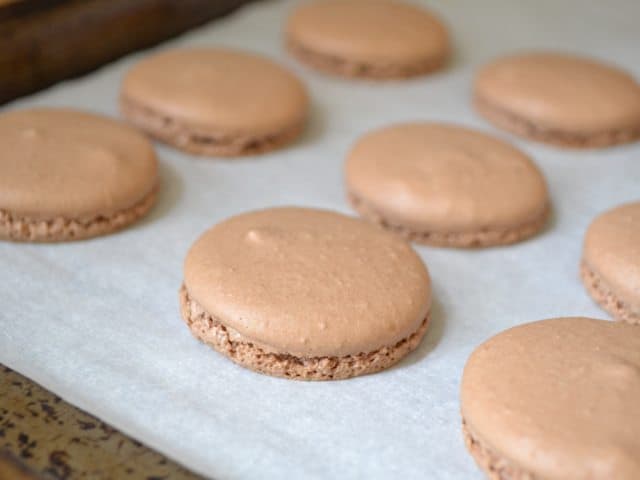
Towards the end of the 30 minute resting period, preheat the oven to 350 degrees. Once it’s heated, bake one sheet of macarons at a time for 13 minutes each. As they bake they will want to expand, but since the top has dried out and become stiff, they can only expand up and therefore create that classic ruffle or “foot”. Let the macarons cool to room temperature before removing them from the parchment.
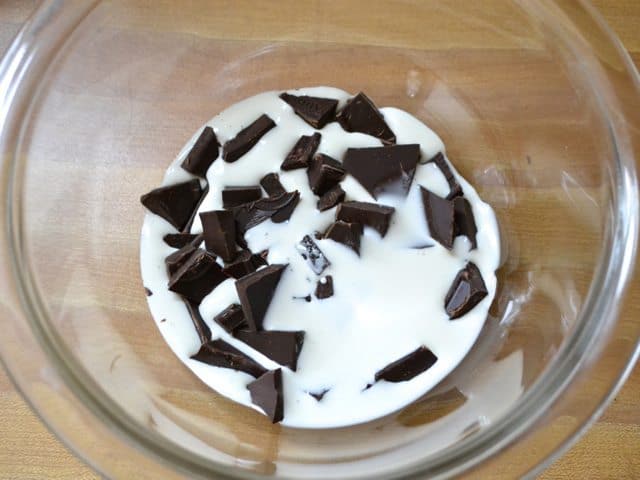
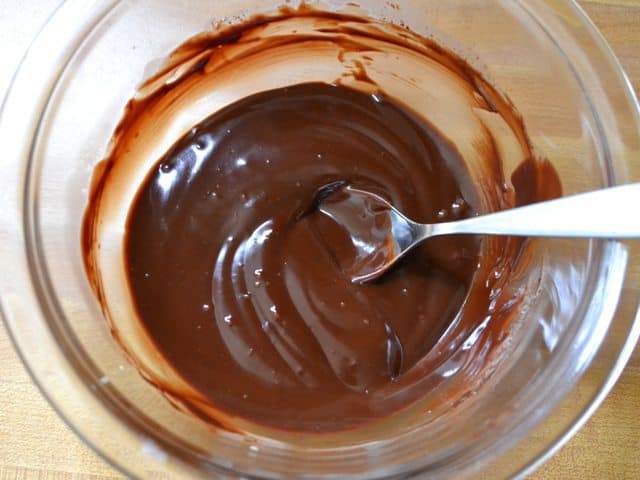
To make the ganache, break 2 oz. of chocolate up into small pieces and place them in a bowl. Add 1/4 cup of heavy cream, microwave on high for 15 seconds, then stir it really, really well. Microwave for another 15 seconds, then stir until the chocolate has completely melted in…
And you have a super smooth ganache, like this! Now, let that cool for a minute.
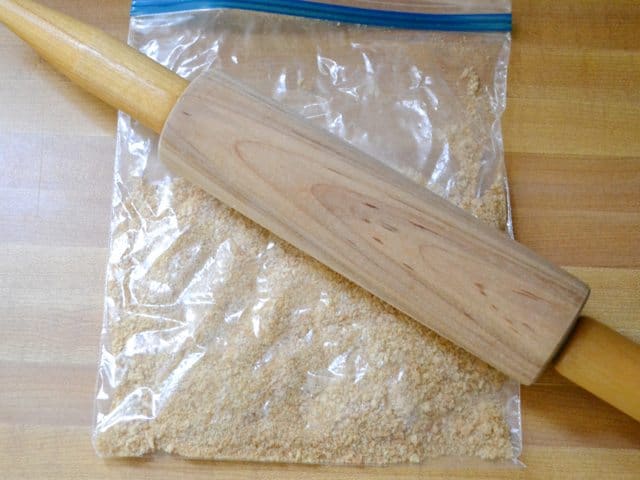
Crush your graham crackers into a super fine powder, like this. You really don’t need a lot. Just a few crackers (I crushed far too many).
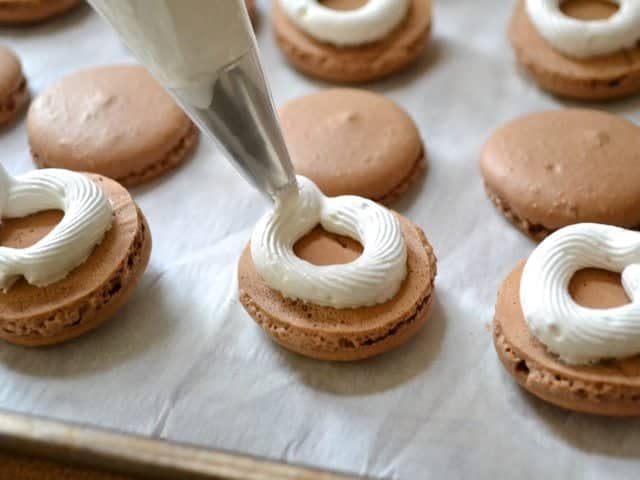
Fill a pastry bag with the marshmallow creme and another bag with the ganache. Flip half of the macarons over and pipe a circle of marshmallow creme around the bottom. Don’t pipe all the way at the edge, though, because it will spread out as you add the top macaron shell.
Then add ganache inside the marshmallow creme. See, the creme kind of holds the soft ganache in place like a fence. :D
Then add the top macaron shell and press down a little to make the filling go all the way to the edge. Some of the ganache will likely squeeze out of its “fence”.
Dip the macarons in the crushed graham crackers to make it stick to the marshmallow. Try to dip them right away, though, because the marshmallow dries a little and becomes less tacky as it sites. You can coat the entire circumference or just do half for a nice visual effect.
And that’s how you make a S’mores Macaron! A little involved, but really, really fun!
And totally decadent!
Don’t want to bother? Sucré ships their goods, so check out their online shop!
Last week for Easter we featured a very traditional recipe for hot cross buns, a sweet bun I associate quite closely with England and Australia, but not so much with the US (despite the nursery rhyme!). This week, in contrast, we are featuring Soft Cinnamon Rose Rolls with Creme Fraiche Icing, a sweet bun that I relate quite closely with American sweets. The recipe is by Beth Kirby, the author and photographer behind the blog Local Milk. Beth is a fellow Tennessean, and recent winner of Saveur’s Best Food Blogs for her photography. It just so happens that while I was eagerly waiting to see Beth’s cinnamon rolls, I was making some sticky buns of my own, the calories from which will probably take the rest of the year and half of 2015 to burn off. That said, I think it’s ok to eat cinnamon rolls at least once a year, but only homemade ones. -Kristina
About Beth: Born and raised in Tennessee, Beth Kirby works as a freelance photographer, writer, recipe developer and stylist, and she spends the rest of her time blogging about cooking with locally sourced ingredients, travel, the sacred found in the mundane, and entertaining on her website, Local Milk. Her work has appeared in print in Home and Hill Magazine and Food & Wine, and online on Kinfolk, Food52, Saveur, The Kitchn, Spenser Magazine and more. When not behind the stove, lens or keyboard she can usually be found combing farmers’ markets and flea markets alike in search of inspiration for her next project. You can find her on Pinterest, Twitter, Facebook, and Instagram.
See how to make Beth’s cinnamon rolls after the jump!
It’s gorgeous photos like these from Rockett St. George‘s upcoming Spring/Summer 2014 lookbook that seriously make me consider painting my white walls with bold and dark hues. Rockett St. George is an UK based online boutique with an eclectic selection of chic homewares including selections from Abigail Ahern, Amazonia, and more. From Rockett St. George: “We search the UK from top to bottom to source an ever changing supply of clever, quirky and sometimes downright bonkers products to excite and quicken the pulse.”
I'm so excited to be a part of the 50th anniversary celebration of Nutella! Nutella has been a favorite of mine for years and years and I'd wager you feel the same!
50 years of Nutella. 50 years of stories.
This offer is for U.S. residents, all you need to do is go to the Nutella promotion site and enter your own Nutella story, be sure to include the hashtag #NutellaStoriesCoupon to recieve a coupon from Nutella. Also, use hashtag #SweetPaulNutella to be entered for a chance to win a special Nutella 50th Anniversary Prize Package! Visit the Nutella stories siteHERE.
After submitting a story, you will receive an email with a request for a mailing address where the coupon can be sent. The coupon will be mailed to US residents within 4 to 6 weeks after the campaign ends on 5/18/14
disclosure:
This post was brought to you by Ferrero U.S.A, Inc., the makers of Nutella® hazelnut spread. I received promotional consideration to write this post to support the Nutella 50th Anniversary … all opinions expressed are my own.
Offer Terms:
Offer good only in the U.S.A., excluding Puerto Rico. Void where prohibited. Participants must be 13+ years to submit a story to nutellastories.com and be eligible for offer. Offer begins on 5/5/14 at 12:00 a.m. ET and ends on 5/18/14 at 11:59 p.m. ET (the “Offer Period”). Offer valid while coupon supplies last. #NutellaStoriesCoupon must be included at the end of the story to be eligible for this offer. After submitting a story, eligible participants will receive an email requesting a mailing address for the coupon. Coupon will be delivered by mail to the mailing address provided by the participant (PO boxes will not be permitted). Allow 4-6 weeks from the end of the Offer Period for delivery of coupon. Ferrero is not responsible for lost, incomplete, damaged, illegible, postage-due or misdirected submissions to the program. Limit: One (1) coupon per person/per e-mail address/per mailing address. Ferrero reserves the right in its sole discretion to withdraw or modify the terms of this offer or reject any submission deemed to be in violation of these terms.
Sweet Paul's Nutella Berry Pizza
You will need:
1 cup warm water
1 tablespoon honey
1 tablespoon dry yeast
2 1/2 cups flour
1/2teaspoon salt
4 tablespoons olive oil
about 1/2 small jar of Nutella
3 cups mixed berries, I used strawberries, blueberries and raspberries
1/3 cup toasted coconut flakes
fresh mint leaves
In a bowl, mix water, honey, and yeast. Leave it for 5 minutes so that the yeast starts to work. Add flour, salt, and oil. Work the dough together. Cover with plastic and let it rise for 1 hour. Preheat oven to 400°F. On a baking sheet, press the dough out with your fingers to form a large or several smaller pizzas. Bake for about 12 minutes. Remove from oven and allow to cool slightly. spread an even layer of Nutella on on the pizzas. Sprinkle with berries, coconut and mint and serve.
La galería londinense StolenSpace gallery acaba de presentar dos exposiciones de dos grandes mujeres dentro del Street Art, ‘Glamorous Darkness’ de Miss Van y “Let’s Not Get Caught, Let’s Keep Going’ de Olek.
A través de esta muestra las dos artistas se rinden homenaje mutuo, por un lado Miss Van presenta varios lienzos inspirados en Olek mientras esta exhibe fotografías con arte textil y modelos inspirados en el trabajo de Miss Van. En lo personal las obras de ambas artistas me parecen maravillosas.
I’m not ashamed to admit that I spent an entire weekend binging on the two seasons of House of Cards in March. I’m also not ashamed that back in January I started watching Breaking Bad for the first time and finished all five seasons in a couple of weeks. I would’ve finished both TV shows earlier had work not gotten in the way. But want to know just how long it takes to watch a TV show from start to finish? Of course you do. How else will you be able to plan your weekends?
Sherlock comes in as the quickest TV show to ‘master’, at 14 hours. But if you’re thinking about binging on 24, you better pull a few sickies and tell the boss you won’t be in for the next week or so – watching that series from start to end will cost you 6 days and 2 hours. But hey, who’s counting?
Clearly, the plushest and most huggable taxidermy animals I’ve ever seen. Art director, Jessica Dance, collaborated with photographers David Sykes and Kim Jakobsen To in bringing to life – or death, rather – these two amazing animal trophy collections.
The first series, entitled ‘Woolly Mammals’, features a ‘meeting of minds’ between her and David Sykes, wherein all their creative weirdness produced an equally peculiar shoot. Using 100% lamb wool for the bear, the beaver, and the moose, Jessica was able to create a home setting filled with disturbingly cute animals.
The second series, ‘The Knit Heads’, is in collaboration with Kim Jakobsen To. It was a commissioned project by The Assembly Network, in which more animal trophies – like sheep and pig – adorned the real life meeting rooms to set a new and interesting atmosphere.
The rest of her gallery is worth seeing. You can check out the rest of her knitting here.
There’s one great line in Oliver that almost every knows: ‘Please sir, I want some more‘. He’s referring to the colorless slop he and his penniless pals had to eat up almost every day. Have you ever wondered what that slop must’ve looked like?
What about the ‘surpassingly excellent’ chowder of Moby-Dick, or the opulent feasts in The Great Gatsby? Photographer Dinah Fried captured many a famous meal in her book, Fictitious Dishes: An Album of Literature’s Most Memorable Meals, in which we can see just what the foods we’re reading about looked like. Makes you hungry, huh?
Sorry, hipsters, beards have finally become too mainstream. In fact, scientists at the University of New South Wales claim that the popularity of beards has reached its saturation point. ‘Peak Beard’, as they like to call it, is that awkward moment where there are too many bearded people in society, causing the novelty to lose its attraction.
The study involved 36 photos of men with different types of facial hair – clean shaven, light stubble, heavy stubble, and full beard. 1,453 women and 213 men then ranked these photos according to attractiveness, with the clean shaven guys getting the most nods in the end.
Researchers said that the more unique a trait is, the more attractive it is, otherwise known as the NFD (negative frequency dependence) principle. But not to worry, in around 10 years or so, beards will become the cool thing once again as the clean shaven look reaches its saturation point. Until then, better cancel that beard transplant appointment.


 Credits: Photo: Thibaud Larrieu Gibier, Art Direction: St Sebenza (Anna Frera, Thomas Conchou, Lucie Ernoult, Thibaud Larrieu Gibier) Models: Lucy Faucherre, Benjamin Graland & Ophelie G., Special Thanks: St Sebenza & Volna Zylberberg