Jimena Azpeitia
Shared posts
Zesty Lime Shrimp and Avocado Salad
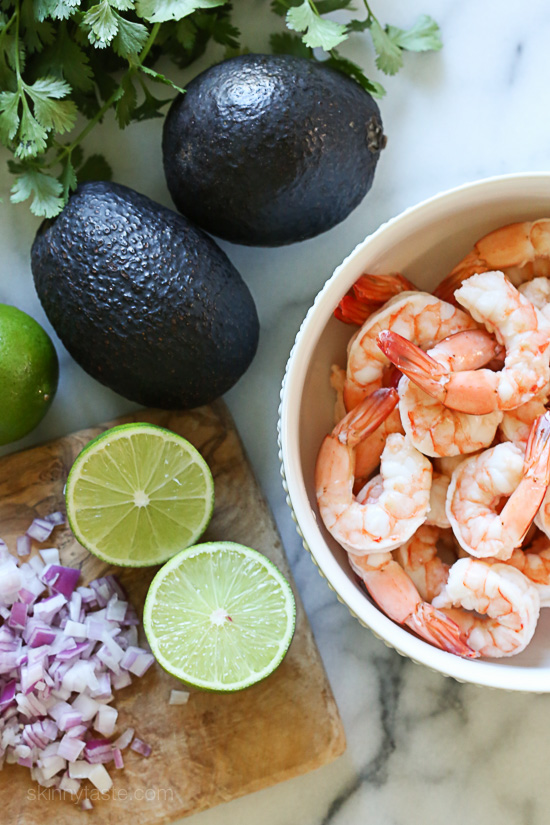
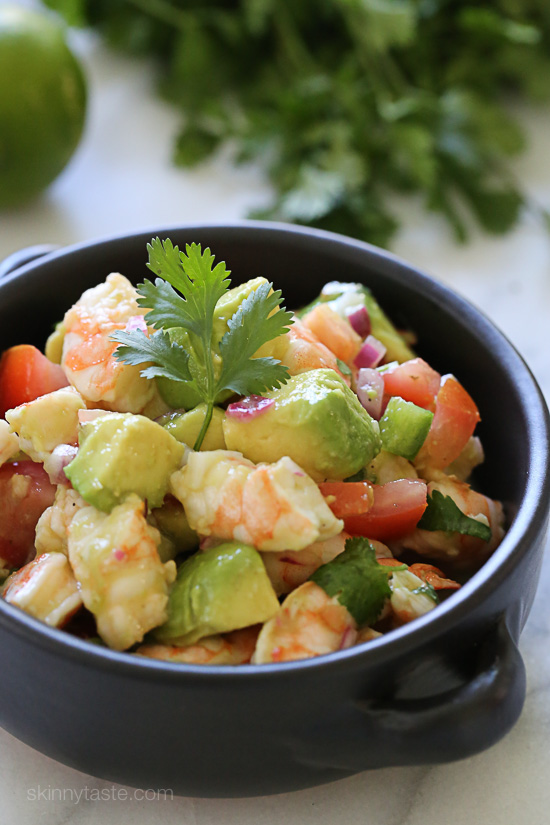
Talk about a light and refreshing salad that requires no cooking! Lime juice and cilantro are the key ingredients to creating this wonderful, healthy salad you'll want to make all summer long. Made with cooked peeled shrimp and the freshest ingredients – avocados, tomatoes, red onion, cilantro and chopped jalapeño tossed with some freshly squeezed lime juice and a touch of olive oil.
I'm remaking this from the archives for lunch today, so I took the opportunity to re-shoot this since the photos needed some updating. This is perfect to serve as an appetizer, or for a lunch or light meal. You can put this over a tostada to make it a little more substantial and you can easily adapt this to suit your taste by adding more or less cilantro, jalapeño etc. If you plan on making this ahead of time, you can combine all the ingredients except for the avocado and cilantro and keep this refrigerated, then add them just before serving. This easily doubles for a large crowd.
Click Here To See The Full Recipe...
Nendo’s Glass Tables for Glas Italia Appear to Glow
For Salone del Mobile 2015, Nendo debuted a new, ethereal collection of glass tables called soft for Glas Italia. With bright chromatic edges that have a grading, blurred effect, these tables are contradicting the idea of sharply-edged glass.
The collection consists of three different low tables, each made with exactly five sheets of frost glass. Built like a box, the tables come in square or rectangular shapes. The creation of these tables was actually more intricate than it seems — the reverse side of the glass was printed with a specific pattern to make it look as if the colors were blurred on the glass.
Photos by Kenichi Sonehara.
12 of the Best in Coffee Brewing Technology
Though tea may be the more civilized beverage, it’s the roasted bean of coffee which flows within the veins of many designers and non-designers alike. Before you pick a mug to sip from, consider it’s the process – whether manual, mechanical, or electronic – which will determine whether your morning/afternoon cup tastes worthy of all the preparation and money spent on good whole beans. There are numerous coffee brewing and roasting machines far superior to the drip machines your parents used or the one sitting in your office break room. All 12 of these coffee contraptions offer the addition of pleasing the eyes as much as the palate:
Trinity ONE: Mark Folker’s stainless steel and black walnut timber finish coffee device is advertised “to be on display, not hidden away”, a multi-technique preparation station capable of pour over, air pressure, and cold brew so users can experience the taste of beans in numerous ways.
The Ottomatic by Chemex: Is there any name more connected to the renaissance of barista experience coffee preparation than Chemex? Their new machine takes on a punny turn with its name, a nod to the brands departure from manual pour over preparation and to an automated brewing system which handles the heating and pour for you.
Moka Pot: Designer Joey Roth has already applied his keen eye for material, form and function in the realm of audio speakers and self-watering planters. He put those same talents to use while partnering with much beloved Blue Bottle Coffee Roasters to create an updated design of the classic Moka Pot (with some Hayes Valley Espresso, please!).
Dutch Lab Eiffel: Would anyone like a cup of slow cold drip Dutch coffee? Oui! As much a design statement as a coffee preparation device.
notNeutral Gino & Lino Dripper Set: Small, simple, and easy to take anywhere for pour-over duty, this would make a nice Father’s Day gift alongside a couple bags of your local roaster’s best.
KitchenAid Siphon Brewer: One of the bigger brands primarily known for small kitchen appliances like mixers and blenders, the eye-catching brewing globe will likely mesmerize those waiting for their cup as the water transfer from the reservoir chamber up to siphon and brew in a liquid dance. The brewing method is a little shorter from start to finish, producing a milder cup.
Ikawa Home Roaster: Scheduled to arrive February 2016, this Kickstarter is ramping up for production, bringing the bean roasting right to the drinker’s home and onto iOS and Android devices. The whole roasting process can be customized according to beans used, then monitored using the compatible smartphone app, tracking temperature while the beans turn from green to different degrees of brown, sending a notification when the roasting process is finished.
Poppy Pour Over: Subjectively speaking, the statuesque all-in-one grind and pour-over Poppy is our favorite design. Water temperature, grind size (burr-type), and brew times are all adjustable, while scheduling brewing time is accessible via app, making this brewing machine equal parts brain and beauty.
BKON Craft Brewer: If Tony Stark was to ever design a coffee brewing machine this touch-panel laboratory-style equipment would be it. The makers call the technology used here RAIN — Reverse Atmospheric INfusion – a vacuum flavor extraction process which works with coffee, tea, fruit, or even booze. Watch the process here and check if your bank account allows for a spare $40,000, because that’s how much one will set you back.
Wilfa Precision: The Wilfa Precision was released back in 2013, but only became available recently in the United States after US kitchen and cooking retailer, William-Sonoma partnered with the Nordic coffee maker to bring it to their stores. Designed by world champion barista Tim Wendelboe, the Wilfa is engineered to bring water to the perfect temperature before brewing begins.
Ratio Coffee: That’s not a cheap plastic body. Oh no, the Ratio is comprised of die-cast aluminum with a satin nickel ceramic finish and walnut wood arms, partnered with a lab-grade borosilicate glass carafe, and a natural cork stopper to seal in heat and flavor after this pour over carefully blooms and collects a serving one drip at a time.
Cold Bruer: We not only got to see the Cold Bruer in person at last week’s Dwell On Design show, but also had the opportunity to enjoy several cups made with this affordable cold drip machine. Cold drip coffee lovers can adjust brewing time between 3-12 hours using the simple to use drip control valve; it’s a dummy proof design (“1 drip per second and you’ll be safe.”). This isn’t for the impulsive drinker, but for careful planners and schedulers who waiting for a good thing is worth it – the final brewed batch we tasted was characterized by a very vibrant and full flavor, sans any acidity marring the cup. Our sample of Ethiopia Boke from Temple Coffee & Tea made with the Cold Bruer was so good we refilled twice!
Dangerous Popsicles
Dangerous Popsicles are a collection of weird shaped popsicles inspired by cacti and life-threatening bacteria/viruses.
Salt and Vinegar Zucchini Chips
I want to try to make these Salt and Vinegar Zucchini Chips.
Letterpress at Home Kit
This Letterpress At Home Kit is very tempting. My kids and I could have some serious fun with it. Anyone know if it’s any good?
monYay: Notifly
Notifly is a calendar notification device that sits on your desk and lets you know when you have a meeting, by blowing a bubble. It’s one of three joy-filled conceptual provocations created by IDEO NY designers for Studio 360’s Redesigns series. The goal of these inventions: turn much-dreaded Mondays into wahoo-worthy Mon-yays!
One Pot Roasted Red Pepper Pasta
This one goes out to all of you “one pot pasta” lovers out there… I know there are a lot of you!
This One Pot Roasted Red Pepper Pasta combines roasted red peppers, fire roasted tomatoes, a hefty dose of garlic, sweet Vidalia onion, and dried basil for a smoky sweet pasta that practically cooks itself. Using vegetable broth in place of water gives the pasta extra depth and takes care of most of the need for the usual added salt and seasonings. The ingredients all simmer together in one pot (yes, even the pasta!) and creates its own thick, silky sauce. There’s so much flavor here you’ll wonder why you ever boiled pasta in plain water.
The other great thing about this pasta is that you can make it creamy, like I did, or not. Once my pasta was finished cooking, I stirred in a few dollops of cream cheese until it melted into the sauce and made the whole pot luxuriously creamy. It’s a little indulgent with the cream cheese, but I also tasted it before adding the cheese and it was still amazing. So, you have the option of no cream cheese, full cream cheese, or even half cream cheese. It’s up to you!
- 5 cups vegetable broth $0.60
- 1 lb. Fettuccine $1.00
- 1 small Vidalia onion $0.61
- 4 cloves garlic $0.32
- 1 12oz. jar roasted red peppers $2.49
- 1 15oz. can fire roasted diced tomatoes $1.29
- ½ Tbsp dried basil $0.07
- ¼ tsp crushed red pepper (optional) $0.03
- Freshly cracked black pepper $0.05
- 4 oz. cream cheese (optional) $1.08
- Thinly slice the onion and mince the garlic. Remove the red peppers from the liquid in the jar and then slice them into thin strips.
- In a large pot, combine the broth, onion, garlic, red pepper slices, diced tomatoes (with juice), basil, crushed red pepper, and some freshly cracked black pepper (10-15 cranks of a pepper mill). Stir these ingredients to combine. Break the fettuccine in half, then add it to the pot, attempting to submerge the pieces as much as possible.
- Place a lid on the pot and turn the heat up to high. As soon as the pot reaches a full boil, give it a quick stir to loosen any pieces that may have stuck to the bottom, return the lid, and turn the heat down to medium-low.
- Let the pot simmer on medium low for 10-12 minutes, stirring every couple of minutes to make sure nothing sticks to the bottom. Return the lid as quickly as possible after each stir. After ten minutes, test the pasta to see if it is al dente. Once the pasta is tender, remove it from the heat. (If the pasta becomes too dry before it is tender, simply add a small amount of water and continue to simmer.)
- Divide the cream cheese into tablespoon sized pieces, then add them to the pot. Stir the pasta until the cheese melts in and creates a smooth sauce (it will look lumpy at first, just keep stirring). Serve hot.
This recipe makes a very large batch. I froze one serving last night to test the freeze/thaw cycle and it faired pretty well. The sauce was a bit more dry after reheating in the microwave, but the flavor was still great.
Step by Step Photos
Begin by slicing one Vidalia onion and mincing four cloves of garlic. Remove the peppers from a 12oz. jar of roasted red peppers, and slice them into thin strips.
Using both fire roasted red peppers AND fire roasted diced tomatoes gives the pasta a slightly smoky/sweet flavor.
Now it’s time to add everything to the pot. For the pictures, I added everything at one time, but it will help if you add everything in two steps. First add 5 cups of broth, the sliced onion, minced garlic, sliced red peppers, diced tomatoes (with the juices from the can), 1/2 Tbsp dried basil, 1/4 tsp crushed red pepper (optional), and some freshly cracked black pepper. Stir all those ingredients together, then break the pasta in half and submerge it under the liquid. Breaking the past in half helps it incorporate into the other ingredients better and makes it fit better in the pot (and under the liquid).
Place a lid on the pot and put it over high heat. Once it reaches a boil, stir the pot to loosen anything that has stuck to the bottom. Return the lid quickly, turn the heat down to medium-low, and let the pot simmer for 10-12 minutes. Stir the pot every couple of minutes or so to make sure nothing sticks, but always replace the lid quickly so that it keeps simmering and you don’t loose too much of the moisture. After 10-12 minutes, the pasta should be tender, but still slightly firm (al dente). Remove it from the heat.
If you want creamy pasta, add 4 oz. of cream cheese in dollops to the pot. I added half of the 8oz. package, but I bet it would still be pretty creamy if you cut that amount in half. It’s pretty flexible.
Stir the pot until the cream cheese is fully melted in. It may look a little chunky at first, but keep stirring and it will eventually become smooth and creamy.
Then EAT. :)
The post One Pot Roasted Red Pepper Pasta appeared first on Budget Bytes.
El tarot psicodélico de Oliver Hibert
Jimena Azpeitiate lo prompro¿
El ilustrador estadounidense Oliver Hibert realizó un increible proyecto titulado “The Major Arcana” que consistió en reinterpretar 22 cartas del Tarot imprimiéndoles su característico y surreal estilo enmarcado por colores brillantes y mucha psicodelia.
Si les interesa hacerse de esta serie de cartas, las pueden conseguir a través de la web de Von Zos y cuesta $50 USD.
Oliver HibertEscacalógico
Jimena Azpeitiapoposhas!!!
Escacalógico, el diccionario enciclopédico de cacas, es un proyecto del ilustrador madrileño Juan Díaz-Faes que en teoría suena bastante asqueroso pero en el papel es realmente divertido.
A lo largo de mas de 150 ilustraciones, este libro aborda todos los tipos habidos y por haber de la caca, desde la famosa en forma de pastelito pasando por formas como la serpiente, el pretzel o creaciones mas explosivas como la bomba o el mojón cuántico.
¿Qué les parece este proyecto? ¿A poco no les gustaría tener un carte con todas las formas de la caca en su baño?
Minimal & playful furniture
Anyone who's seen the Bloesem space knows about our love for the trestle legs that hold up our table tops. Thin and elegant, they don't take up much leg space and gives the space a light and airy feeling. And New gives us that same feeling. Using steel, Jo and Mirka have a minimal design aesthetic topped with a beautiful colour range.
Their powder coated designs bring a playful element to any space, with the use of colour and geometry in form. Produced in small batches in Britain, each piece is unique.. we love the playfulness they have injected into the pieces of furniture we view more as practical pieces in our home.
.. And New
the glass menagerie.
i simply love the look of this room above and i adore a great storage piece with glass doors. so much more interesting to put our beloved collectibles on display, rather than hidden away from sight in a cabinet with dull wood doors. i went hunting for some glass cabinets, and i found both affordable options and more high-end cabinets, but a pretty good range to choose from. pretty perfect for offices, dining areas, media storage, and bathrooms, too. i’m considering two IKEA FABRIKÖR side-by-side for my office.
west elm’s antique finish cabinet.
IKEA FABRIKÖR; and IKEA Klingsbo cabinets with glass doors.
anthropologie’s mirrored display armoire.
lindebjerg design glass cabinet.
west elm’s blackened metal display cabinet.
IKEA HINDÖ; IKEA Stockholm and curio cabinet from west elm.
west elm’s industrial rolling metal cabinets and media towers with glass doors.
lindebjerg design cabinets.
Dark, Moody Lights Inspired by Traditional Cooking Pots
Designed by Young & Battaglia, the design duo behind British design brand Mineheart, the Cauldron lights aim to bring an urban tribal vibe to your space. Made of smooth black glass, the lights were inspired by traditional cooking pots you see used above open flames.
Hang one or in a group to create more of a dramatic look. The Cauldron lights come in four shapes – three pendants and one table lamp.
Featured Designer: Emily Sanford
Emily Sanford is a licensed surface pattern designer specializing in watercolor. She lives and works with her family in New York City.
“After graduating from Roberts Wesleyan College with a degree in Fine Arts, and concentration in ceramics, I continued my personal work as a ceramic artist in my home studio. I was using vintage fabric and wallpaper designs as inspiration for surface pattern texture on my pottery. I also pursued less creative career tracks, from fine art shipping, to arts non-profit work, to real estate. When my daughter was born I picked up graphic design as a hobby, and began incorporating my watercolor paintings into this new found interest.
Spoonflower was the catalyst to my interest in surface pattern design as a business. When my designs started selling, my love for the field was born. When I realized that I could create a digital product from scratch that could sell to a multitude of industries around the world, my mind exploded with ideas and excitement for surface pattern design. It has been such thrill to work with clients in the US and around the world, in many markets and on a variety of products.
My work continues to evolve but always has two common elements: bold color in a simple palette, and hand drawn texture. I am loving the nature of graphite and watercolor together. The feminine wash of watercolor mixes with the bold modern lines of graphite work together in beautiful ways.
I am everyday inspired by my daughter, my city, and my peers, but mostly let the paint and process guide my work.
All of my work starts on paper with gouache, watercolor, pen, ink or graphite. I usually work on mixed media, or watercolor paper. After photographing the images, I clean them up in Photoshop and repeat in Photoshop or Illustrator.”
Emily is active on social media, especially Instagram, and shares a lot of behind the scenes details, and designs. You can also follow her on Facebook and Twitter, check out her Spoonflower shop or visit www.emilysanforddesign.com to learn more about her work. Have a great Friday! -Chelsea
The post Featured Designer: Emily Sanford appeared first on Pattern Observer.
Shop Visit: Ink & Peat
Jimena Azpeitiadejemos todo y pongamos una tienda coqueta mana!
Home and floral boutique Ink & Peat is situated on North Williams and bears the tagline ‘Organically Inspired’. A visit to the bright and airy shop proves that correct right away. Owner and floral designer, Pam Zsori, puts together beautiful collections of high design items for the home — many of which incorporate natural motifs and themes such as flowers, leaves, minerals, and sweet animals. The floral counter at the back of the shop provides the perfect balance with fresh stunning bouquets, custom floral arrangements and live plants.
A highly popular shopping destination, Ink & Peat is the sort of store that makes your friends exclaim, “I love that place!”, whenever you mention it. In fact, I arrived for my visit just before opening and found that I wasn’t the only person waiting to get inside. Within twenty minutes, the store was packed with people admiring the jewelry, ceramics, cookbooks, skincare and fragrances, pillows, throws, children’s books and toys, stationary, original art, totes, and more. Ink & Peat has long been a personal favorite and my go-to whenever I need a sure to please gift for friends or family.
Some of my favorites in the shop right now include amazing fragrances from Sage Lifestyle (you must stop in and smell the Onyx blend!), a gorgeous selection of crystals and geodes in pretty pastel shades, air plants, vegetarian cookbooks, and brightly colored necklaces from Australian line Elk.
Ink & Peat is located at 3808 N Williams Avenue here in Portland, Oregon. The shop is open Monday through Friday from 11AM to 6PM, Saturday from 10AM to 6PM and Sunday from 11AM to 5PM. You can also follow @inkandpeat on Instagram and find them on Facebook and Pinterest.
This post and photographs are by Honey Kennedy contributor Allison Burt-Tilden. Make sure to visit Allison’s lovely blog Votre Grande Soeur ♥
tile for days.
as i roam around my neighborhood, one of the things that i find so inspiring are the beautiful tiles adorning the charming spanish bungalows that cover the hills here in echo park. sometimes it’s a tile trim around an outdoor fireplace, or decorating a few steps to the gorgeous old front doors. but regardless of where i find them, they’ve always got this lovely worn, ‘lived-in’ look that i love. i’ll bet they could tell some good stories, those tiles.
l to r: ernest mcleod; stephen chee; house & garden; david feix.
l to r: pope’s mule; coté maison; batixa; true & sania.
mi casa (above + Below).
Chipotle Black Bean Tortilla Soup
Jimena Azpeitiaesta chopita se ve tan llenadora como una torta de tamal, me la haces?
I know it’s getting warmer outside and you likely aren’t craving soup as often. But I love soup year-round, so can we just pretend it’s a little rainy outside and we’re cuddling up on the couch with this bowl of goodness watching Netflix?
Ok, I thought you’d be on board.
This recipe was inspired by this 30 minute Blended Chipotle Red Salsa!
This stuff was too good just to be eaten with chips. I mean, there would be absolutely no shame in that, but I had bigger hopes and dreams for this jar.
This soup is simple – just 1 pot required – and is very hands off.
Simply sauté vegetables then add your spices, salsa, stock and beans and let it simmer away! And 30 minutes later you have restaurant-worthy tortilla soup on your hands. Huzzah!
This soup may be easy but it’s big on flavor. It’s
Hearty
Savory
Quick
Subtly chipotle-spiced
Super flavorful
Packed with fiber + protein
& simple!
I love making this kind of meal when you need to entertain but don’t want to spend a lot of time and money on the meal. It’s also a great soup to make ahead for lunches and easy weeknight dinners throughout the week. And at nearly 11 grams fiber and 12 grams protein per 1 cup, you can’t go wrong! Add a little avocado on top for some healthy fats and you’re all set.
If you give this recipe a try, let us know! Leave a comment below and rate it! And while you’re at it, take a picture and tag it #minimalistbaker on Instagram or send us a snap on Snapchat (find us at @minimalistbaker and @jshltz). We LOVE seeing what you come up with. Cheers, friends!
- 2 Tbsp (30 ml) avocado, grape seed or coconut oil
- 1/2 white or yellow onion, diced
- 3 cloves garlic, minced
- 1/2 red or orange pepper, diced
- 1 1/2 tsp cumin
- 1 tsp chili powder
- 1 1/2 cups (~360 g) Red Chipotle Salsa (or any blended or chunky spicy salsa)
- 4 cups (960 ml) vegetable stock
- 2 Tbsp (24 g) coconut sugar or maple syrup (optional | to taste)
- 2 15-ounce (425 g) black beans cooked in salt, slightly drained
- 1 15.25-ounce (432 g) whole kernel corn, drained
- Lime juice
- Fresh cilantro, chopped
- Red onion, diced
- Tortilla chips
- Ripe avocado, cubed
- Hot sauce
- Heat a large pot over medium heat. Once hot, add oil, garlic, onion, pepper, a pinch each salt and pepper and stir. Cook for 4-5 minutes, stirring frequently, until onions are translucent and the peppers have a bit of color.
- Add cumin and chili powder and stir to coat. Then add salsa, vegetable stock and coconut sugar. Stir to combine, then increase heat to medium heat and bring to a low boil.
- Once it’s boiling, add black beans and corn and stir. Reduce heat to low and simmer, covered for 30 minutes or more, stirring occasionally. The longer it simmers, the more the flavor will develop. It’s even better the next day.
- Serve as is or with recommended serving options above.
- Leftovers will keep covered in the refrigerator for 5-6 days, or in the freezer for 1 month.
Easy Spinach Ricotta Pasta
Jimena Azpeitiaporque me gusta la mateca??? porque??? :(:
I looove ricotta cheese. It’s flavor is light and fresh flavor, making it great for warm weather dishes. I’ve tried making my own fresh ricotta in the past, but I haven’t yet been able to achieve the texture or flavor that I like. So, when I saw ricotta on sale at the store, I jumped at the chance to make this recipe for Spinach Ricotta Pasta that has been swimming around in the back of my head for a while.
This recipe makes a super quick garlic ricotta sauce that only takes minutes to prepare. I added my favorite versatile vegetable, frozen spinach, to help get a little green and fiber into the meal. If you’re not into spinach, you could try frozen broccoli florets, but I’d make sure to chop them up into smaller pieces before adding them in.
This recipe makes about four side dish sized servings (2 oz. of pasta each), but you could beef it up by adding some chicken, or even more vegetables (any grilled vegetable would be awesome with this). Want a little deeper flavor? Try topping it off with some Parmesan. Personally, I liked the light, fresh flavor that ricotta on its own.
And one last note: all ricotta is not equal. I’ve had some brands that are so good I could eat it with a spoon and others that are just dry and tasteless. It may take some experimenting to find one that you really like. And for this recipe in particular, full fat ricotta is definitely best (lower fat ricotta can sometimes be gritty).
- ½ lb. uncooked fettuccine $0.75
- 2 Tbsp olive oil $0.32
- 2 cloves garlic $0.16
- ½ cup milk $0.24
- 1 cup whole milk ricotta $1.22
- ¼ tsp salt $0.02
- Freshly cracked pepper $0.05
- ¼ lb. frozen chopped spinach $0.40
- Place the frozen spinach in a colander to thaw while you work on the past and sauce.
- Bring a large pot of water to a boil and then add the pasta. Let the pasta boil until al dente, then drain in a colander. Reserve about ½ cup of the pasta cooking water to help loosen the sauce later if needed.
- While the pasta is boiling, prepare the ricotta sauce. Mince the garlic and add it to a large skillet with the olive oil. Cook over medium-low heat for 1-2 minutes, or just until soft and fragrant (but not browned). Add the milk and ricotta, then stir until relatively smooth (the ricotta may be slightly grainy). Allow the sauce to heat through and come to a low simmer. The sauce will thicken slightly as it simmers. Once it's thick enough to coat the spoon (3-5 minutes), season with salt and pepper.
- Squeeze the thawed spinach to remove as much excess water as possible (squeeze it in your fist), then add it to the ricotta sauce. Stir until the spinach is distributed throughout the sauce. Taste and adjust salt or pepper if needed. Turn the heat off.
- Add the cooked and drained pasta to the sauce and toss to coat. If the sauce becomes to thick or dry, add a small amount of the reserved pasta cooking water. Serve warm.
Step by Step Photos
Before you begin, take about 1/4 lb. of frozen spinach out of the freezer to thaw. Place it in a colander to thaw so that excess moisture can drain away. The amount is flexible, so I just estimated 1/4 of a one pound bag. Begin boiling a large pot of water for the pasta. Once boiling, add 1/2 lb. of pasta to the water and boil until the pasta is just tender. I love this Delallo pasta because it has this great rough texture that helps grab pasta sauce. It’s the best (not a paid advert!).
Once the pasta is done cooking, drain it in a colander, but save about 1/2 cup of the cooking water to help loosen the sauce later if needed.
While the pasta is cooking, you can quickly assemble the ricotta sauce. Start with two cloves of garlic, minced, and 2 Tbsp of olive oil. Place both in a large skillet and sauté over medium-low heat for one to two minutes, or just until it’s soft and fragrant. Try to avoid letting it brown.
Whole milk ricotta is going to make the best sauce, so I highly suggest it for this recipe. Every brand is a little different, as well. It’s been such a long time since I’ve bought ricotta that I forgot which is my favorite brand, but this one was decent, IMHO.
Add one cup of the ricotta and 1/2 cup of milk to the skillet with the garlic and oil. Stir the ingredients together until they’re relatively smooth. The oil may sit on top and the ricotta may still be a bit lumpy or grainy, but that’s okay. Let the sauce heat through and come to a low simmer. It will thicken a little as it simmers.
Once the sauce is thick enough to coat the spoon, season with 1/4 tsp salt and some freshly cracked pepper. Prepare the spinach by squeezing out as much moisture as possible. I just grab it in my hand and squeeze into a fist and let all the water drip out. Once it’s fairly dry, stir it into the sauce.
Stir the spinach into the sauce until it’s well distributed throughout. Turn the heat off.
Finally, stir in the cooked and drained pasta and toss to coat in the sauce. If the sauce becomes too thick or dry, add a little of the reserved pasta cooking water to help loosen it up some.
While it’s totally against “tradition”, I find that breaking long pasta like spaghetti or fettuccine in half before cooking it helps me stir in other ingredients later. The strands are still fairly long so they look nice on the plate, but the slightly shorter length helps other ingredients to incorporate into the mix. Can you tell that these are half length noodles?
So there it is. A light yet creamy weeknight pasta that can be thrown together in the time it takes for the pasta to cook. Perfect as a side to grilled or roasted meats, or as a vegetarian main dish when served in larger portions. Pair it up with a medley of grilled vegetables and you’ll be in heaven!
The post Easy Spinach Ricotta Pasta appeared first on Budget Bytes.
Simple Blackberry Cobbler (Vegan + GF)
Jimena Azpeitiaoink
It’s almost summer. Can you feel it?
When I think of summer, cobblers, crisps and ice cream come to mind. Also, bike rides, beach trips and patio drinks. What about you?
This summer I’m determined to further explore my love for berries, starting with this simple blackberry cobbler. Shall we begin?
There’s something extremely romantic and effortless about a fruit cobbler to me. I suppose it’s because it’s a dump, mix and bake sort of recipe – my favorite kind.
I’ve tried crisps in the past but never a cobbler. My family wasn’t big on cobblers, so I seemed to have missed them altogether. Sad day. I was determined to change that.
And to ensure everyone can enjoy this recipe, I kept it both vegan and gluten free. Bonus? Just 1 bowl and roughly 30 minutes required.
It starts with a lightly-sweetened, 5-minute biscuit-inspired topping that’s vegan butter-free, relying instead on coconut oil to give it that quintessential crumbly, flaky texture.
Then, it’s onto the blackberries, which are tossed in sweetener (coconut or cane sugar) and a bit of arrowroot to thicken.
A sprinkle of pecans and coconut sugar finish it off before going into the oven. This is the perfect time to make some coconut whipped cream or soften some dairy-free ice cream. What’s a cobbler without toppings, after all?
This cobbler is dreamy. It’s:
Warm
Fruity
Crumbly
Tender
Perfectly sweet
A little tart
Simple + quick
& Perfect for summer gatherings
This would make the perfect dessert to whip up for guests or warm-weather gatherings. It’s so effortless and easy, yet makes you look like a pro, especially when baked in a cast iron – so fancy.
The best part about this recipe is it’s versatile:
No gluten free flour? Sub all purpose.
No blackberries? Sub another fruit (such as raspberries, blueberries, or nectarines)
No coconut oil? Sub vegan butter.
No pecans? Sub walnuts or omit.
If you make this recipe, let us know how it goes! Leave a comment and rate it, which is super helpful for us and other readers. And don’t forget to take a photo and tag it #minimalistbaker on Instagram! We adore seeing what you come up with. Cheers and happy baking!
- 3/4 cup (111 g) gluten free flour blend* (sub all purpose if not gluten free)
- 1/4 cup (22 g) gluten free oat flour (ground from GF rolled oats)
- 1 1/2 Tbsp (14 g) organic cane sugar* + more for topping
- 1/2 Tbsp baking powder
- 1/4 tsp baking soda
- 1/4 tsp sea salt
- 2 1/2 Tbsp cold coconut oil or vegan butter (use refined coconut oil for a less intense coconut flavor)
- 1/3 cup unsweetened almond milk + 1 tsp lemon juice
- 1/4 cup pecans, chopped (optional | or sub walnuts or chopped almonds)
- 24 ounces (684 g) fresh blackberries* (let thaw if frozen)
- 2 Tbsp organic cane sugar (or sub coconut sugar or other sweetener of choice)
- 1 Tbsp arrowroot powder or cornstarch (optional | for thickening)
- Preheat oven to 400 degrees F and butter a 12-inch cast-iron (or similar sized) pan with vegan butter or coconut oil. Set aside.
- Add all dry topping ingredients to a mixing bowl and whisk to combine. Also measure out almond milk and add lemon juice to begin curdling.
- Add vegan butter or coconut oil to the dry ingredients and use a fork or pastry cutter to cut it in. It should resemble the consistency of fine, wet sand.
- Add almond milk mixture a little at a time, stirring, until a dough is formed. It shouldn’t be too sticky - you will likely not use it all.
- Transfer to a lightly floured surface (with gluten free flour) and form into a disc with your hands. Set aside to rest.
- Add berries to the same mixing bowl and toss with sugar and arrowroot or cornstarch and then add to the buttered cast iron.
- Gently break the biscuit topping apart and position it on top of the blackberries in clumps. Press down gently so it doesn't stick up too much (see photo).
- Sprinkle the top with 1-2 Tbsp additional cane or coconut sugar and the chopped pecans. Bake for 20-28 minutes, or until bubbly and the topping is browned (see photos) and semi-firm to the touch.
- Serve with dairy free ice cream or coconut whipped cream. Store leftovers covered in the fridge for up to a few days, though best when fresh as the topping tends to get soggy.
* For the cane sugar, I blitzed mine into a powder in my coffee/spice grinder for a finer consistency, which is optional. You can also sub regular sugar or another dry sweetener of choice. Alternatively, you could omit it for a more savory biscuit-style topping.
*No blackberries? Sub another fruit (such as raspberries, blueberries, or nectarines).
*Inspired by Sprouted Kitchen’s Blueberry Oat Cobbler. Topping adapted from my Best Damn Vegan Biscuit.
*Nutrition information is a rough estimate for 1 of 4 servings without coconut whip or ice cream.
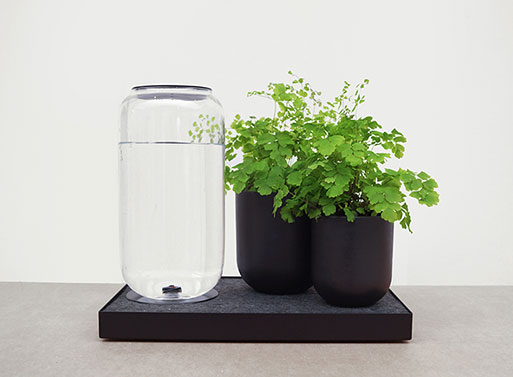
Tableau by Pikaplant
Hooray! Those of us still struggling to keep houseplants alive now have a savior: the Tableau by Pikaplant. The Tableau incorporates a water reservoir so that our plants can drink when needed- even we’re away on a vacation (or just incredibly forgetful). The reservoir will hold enough water for up to three plants for a month, so they’ll be happy and healthy for at least that long. No electricity needed, it all works thanks to gravity and a steel base with a capillary fabric that plants can wick water through when needed. Back the project on Kickstarter within the next few days to receive one of your own.
Zuzunaga’s Beach Towel Collection
An old, fraying beach towel doesn’t help you look any better, so why not upgrade to one of these smack-you-in-the-face-with-pattern towels by Cristian Zuzunaga? The upside is if you don’t have a spectacular (according to the media) body, the towel will grab people’s attention first (as in, ‘Ooo, who’s that fascinating person with that beach towel?’) and, if you do have a spectacular (according to the media) body, you’ll look like you have good taste (‘Ooo, who’s that hottie with that cool beach towel?’). You get the idea.
Size: 39.5″ l x 70.75″ w (100x180cm)
Material: 100% Cotton
Bushel Brush by Fredericks & Mae
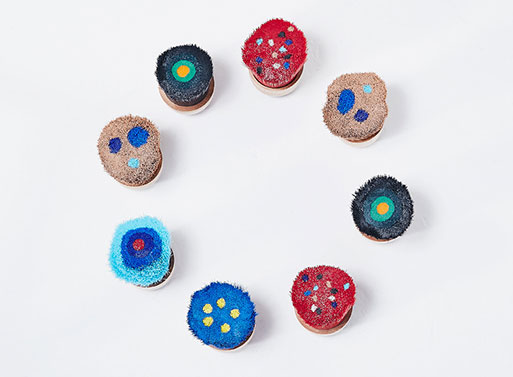
Let’s feast our eyes on the Bushel Brushes by Fredericks & Mae. Are they weird and wonderful? Yes. May you use them for practical things like cleaning? Indeed, you may. How about fun things like painting? Yes, though do be sure to clean the brushes very thoroughly afterwards. You could also just keep one or two on your desk for sweeping away dust and crumbs, and that way you’d be justified to keep them out on display all the time just so you could turn them over and admire the dotted colors hidden within the nylon fibers.
“These sculptural brushes are made by bundling nylon fibers and are finished with a hand turned wooden cap. Their functionality is limitless.”
Small 4.5″ x 2.75″
Large 9.5″ x 5″
Materials: maple, nylon, rubber
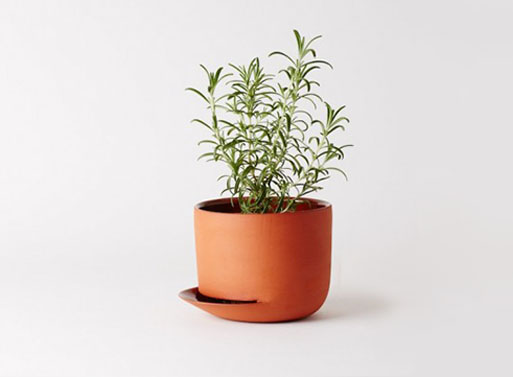
Herb Pots by Anderssen Voll for Mjolk
You might have the greenest thumb in the entire world and you could still use a better herb pot. This container by Anderssen Voll has a small side opening that allows watering from the bottom instead of the top, which promotes healthy root growth by minimizing soil displacement. Did you water your herbs a bit too much? Pour away any excess easily by tipping the pot to the side. Let’s also take a moment to admire the elegant shape, which might be pretty hard to find in your local garden shop.
The opening on the side also allows you to pour away excess water 20 minutes after watering.
Designed by Anderssen Voll for Mjolk
Made from hand thrown terracotta in Toronto.
Small: D5.5″ x H5.25″, $185.00
Large: L10″ x W7″ x H5″, $285.00
Voice Recorder by Richard Upchurch
Jimena Azpeitiacomo el tuyo!
Celebrate handcrafted noise with this Voice Recorder by Richard Upchurch. No, there’s no fanciness involved, it’s just a box with a voice recorder in it. However, the fun to be had is in the playback button and the control knob where you adjust the speed and pitch. Maybe think about filling up break time with a little bit of silly sound business? Or, better yet, it might be a good Mother’s Day gift if you record a heartfelt-yet-funny message?
Available from the MoMA Store or directly from Richard Upchurch’s Etsy site brandnewnoise.
See the demo on vimeo.
From our archives; originally posted Feb 17, 2011.
Torrijas - Spanish Fried Milk Toasts
Jimena Azpeitiadodiiii quieroooo
This recipe is loosely based on Sandra Celis Roiz's torrijas recipe fromt he book "Nuestras Recetas: Sabores de Cantabria" by The Editors at Estvdio.
Start by making the syrup. Combine all ingredients in a small pot and simmer for 45 minutes and set aside to cool. Once it is cool, remove the peels and cinnamon. For the torrijas, combine the milk, sugar, cinnamon, and orange peel in a pot and bring to a boil over medium heat. Stir frequently and watch the mixture carefully. Once it’s come to a boil, turn off the heat and allow the mixture to cool. Place your bread into a shallow pan or cookie sheet with a lip. Once the milk mixture is lukewarm, pour it over your bread. Allow your bread to soak up the milk. If your baguette is really hard, you can leave it in the milk for a few minutes. You don’t want the bread to be so soggy that it falls apart. In a frying pan, heat a half inch of olive oil over medium high heat until it’s very hot. In a bowl, lightly beat 6 eggs. In batches, take each piece of bread from the milk and dip it in the eggs and put it in the oil. Allow the torrijas to cook to golden brown and then flip and fry the other side until golden. Drain torrijas on paper towels and continue the frying process in batches until you’ve used all the bread. Put the fried torrijas into a bowl or plate and drench with all of the syrup. You can eat the torrijas hot, warm, or cold. Store leftovers in the refrigerator and eat them cold for breakfast the next day!
Plantón en Tepepan contra plaza comercial
Jimena Azpeitiatssss mana, esto es lo que me decias no?
Mini Garden Turkey Loaf Meal
Jimena Azpeitiaes una prueba mana, no lo queria compartir
When I first started this blog I used to cook in “complete meal” mode (a main dish + sides) and post each recipe individually, as well as a “complete meal” summary. Somewhere along the line I got away from that format and I think the blog lost a little of its effectiveness because of it. When I took part in the SNAP Challenge last September I had to once again think about the big picture and it seemed to be very helpful to both me and you.
I’ve decided to start working in “complete meal” mode again, so I can show not only the cost of each recipe, but how the ingredients affect the total cost of my trips to the grocery store. You’ll be able to see the cost of the meals as I usually calculate them (each ingredient costed out by volume used), as well as my receipt from that week showing total purchase price and the costs associated with replenishing staple or pantry items. I think it will be very helpful to see the food costs from both perspectives. Plus hopefully it will help those of you who may need help pairing recipes and making a complete meal. Yay! :D
As you may know from my posts earlier this week, this meal included:
Mini Gardent Turkey Loaves: $9.44 (recipe) / $1.57 (serving)
Spinach and Feta Mashed Potatoes: $4.79 (recipe) / $0.80 (serving)
Total meal cost: $14.23 (total) / $2.37 (serving)
The servings included two mini turkey loaves and about 3/4 to 1 cup of mashed potatoes. They’re not huge servings, but enough to squash my hunger and make my tummy happy. If you have a more ravenous appetite or some teenagers in the house, you can bulk up the meal on the cheap with something like steamed broccoli (a bag of frozen spears is usually less than $2) or maybe some dinner rolls.
Here’s what my receipt looked like for this meal:
I did have to replenish some pantry items, like bread crumbs, ketchup, and a bag of yellow onions, but I also had some ingredients already on hand, like fresh spinach, feta, butter, milk, salt, pepper, butter, garlic, olive oil, Worcestershire sauce, eggs, apple cider vinegar, and brown sugar. Oh, this receipt also include some powdered sugar that I used for another upcoming recipe.
So, you can see how the unit cost calculation for the meal compares to the receipt cost for the items I had to purchase. It will be different for every person depending on what you have in your pantry and what needs to be bought. It’s interesting to compare the two.
Ingredient Lists:
Here’s a breakdown of what you’ll need to complete this meal. I’ve broken the list into two categories, pantry items and grocery items. Pantry items are ingredients that people are likely to have on hand or can be kept a long while and reused in other recipes, while grocery items are more specific to this recipe. As always, this will vary from person to person, so make sure to check both lists to see what you’ll need to purchase.
Pantry Items
- Olive oil – 1 Tbsp
- Butter – 3 Tbsp
- Garlic – 1 clove
- Garlic Powder – 1/4 tsp
- Salt – 1 1/4 tsp
- Pepper – to taste
- Worcestershire Sauce – 1 Tbsp
- Ketchup – 3/4 cup
- Eggs – 1 large
- Breadcrumbs – 3/4 cup
- Brown Sugar – 2 Tbsp
- Apple Cider Vinegar – 2 Tbsp
- 1/4 cup Milk
Grocery Items
- Onion – 1 small
- Carrots – 2 medium
- Zucchini – 1 small
- Mushrooms – 8oz. package
- Ground Turkey (93% lean or higher) – 19oz. package
- Russet Potatoes – 2-2.5 lb.s
- Fresh Spinach – 2 cups packed (this can actually be bought of a salad bar, if needed)
- Feta – 2oz.
Preparation Notes:
If you’re making the two recipes together, I would begin with the Mini Garden Turkey Loaves. Once those are prepped and in the oven, you can start on the Spinach and Feta Mashed Potatoes. They cook quickly in the microwave, so you should be able to have them fully prepared by the time the turkey loaves are finished baking.
If you prefer to bake the potatoes instead of microwaving them, start baking them before beginning the turkey loaves. They will bake the entire time you are preparing the turkey loaves, as well as while the turkey loaves are in the oven. They should both finish up at about the same time, then you’ll just need to mash the potatoes and stir in the seasonings.
Oh! And as always, make sure to read through both recipes completely (and check the step by step photos) before you begin, so you can have a mental game plan.
Leftovers?
If you don’t have a house full of six people, worry not. Both of these recipes freeze beautifully.
I packed up four of the six servings in individual containers, chilled them in the refrigerator, then transferred them to the freezer. I’ve been munching on these all week. Woot!
Is this meal summary helpful to you? What other info would you like to see? I’m flexible! :)
The post Mini Garden Turkey Loaf Meal appeared first on Budget Bytes.
Coconut Sugar Caramelized Plantains
Jimena Azpeitiame haces unos dodi?
It’s not often that I eat dinner solo these days, but one recent evening when John was away I walked down to our local Whole Foods and went straight for the hot food and salad bar.
Have you ever been there? That place is like magic!
It was there that I fell in love with caramelized plantains. Oh mama.
One bite in and I immediately knew I had to recreate them for the blog.
I’m not sure what fats or sugars are used in their version, but I wanted to clean things up and infuse some extra flavor.
More flavor is always better in my opinion.
Instead of relying on brown or cane sugar, I went with coconut sugar – a more natural sugar extracted from sap of cut flower buds on the coconut palm. Crazy awesome, right?
A lot of you guys have been asking me if I ever use it and have also been subbing it in a lot of our recipes for cane sugar, and it got me curious. So thanks for the tip!
I haven’t done much baking with it yet (recommendations / tips welcome), but what I do know is it works fabulously for caramelizing.
This recipe is simple, requiring just 5 ingredients and 15 minutes. And the flavor pay off is HUGE.
To ensure the plantains got nice and brown I went for coconut oil, which infuses a little extra flavor. And I doused the plantains in coconut sugar, cinnamon and a pinch of salt before throwing them in the pan – a cast iron is ideal if you have one.
What happens next is pure magic. The outside of the plantains get all brown, caramelized and sweet, and the inside gets extremely tender and melt-in-your-mouth worthy.
Can we say, new favorite dessert?
I think you guys are going to LOVE this dessert! It’s:
Warm
Super Flavorful
Caramelized
Perfectly sweet
Satisfying
Quick
and Naturally Sweetened!
I served my plantains with some coconut whipped cream and additional sprinkle of coconut sugar. So good!
But I also think they would be amazing with my Coconut Sea Salt Caramel Ice Cream! Can we say best vegan ice cream sundae ever?
If you guys try this recipe, let us know! Leave a comment and rate it – it’s super helpful to us.
And, don’t forget to take a picture and tag it #minimalistbaker on Instagram so we can see! Do you realize there’s more than 7,000 #minimalistbaker hashtags on Instagram thanks to you all? That’s amazing! Keep tagging and keeping up the the good vibes.
Cheers, friends!
- 3 ripe plantains (tender to the touch and yellow going on brown)
- 3 Tbsp coconut sugar (or sub cane sugar)
- 1/4 tsp ground cinnamon
- Pinch sea salt
- 1-2 Tbsp coconut oil (or olive oil)
- OPTIONAL: Coconut Whipped Cream (for topping)
- Heat a large cast iron or metal skillet over medium-high heat and chop your plantains in 1/2 inch slices.
- Add to a mixing bowl and toss with coconut sugar, cinnamon and sea salt.
- Once the skillet is hot, add coconut oil and only as many plantains as will fit comfortably in the pan without crowding. Cook for 2-3 minutes on each side, or until browned and caramelized.
- Serve warm with dairy free ice cream or coconut whipped cream. Best when fresh, though leftovers will keep in the fridge covered for a few days.
*Recipe adapted from / inspired by Whole Foods.
Scribble Rugs by Front for Moooi
Front launched a brand new series of abstract rugs for Moooi Carpets, an offshoot of the Moooi brand, that look like someone took a set of colored pencils out and went to town. Scribble Rugs are irregularly shaped and appear to be sketches that have been blown up.
The colorful hand-drawn scribbles seriously look just like drawings with each pencil line perfectly visible. Scribble rugs are available in seven colors.
9 Timeless Chairs Under $299
There comes a point in one’s adult life when it’s time to purchase a set of dining room chairs– that is if you value that sort of thing! Through the majority of my twenties I collected chairs from garage sales and thrift stores. It worked well and I loved the eclectic look, with the exception of the two that broke while guests sat in them.
Never before have we had this much access to designer furniture at prices that don’t break the bank. Still, it took quite a bit of searching to find chairs that will stand the test of time for an affordable price. With the exception of the Shaker Chair, all designs are original. It’s difficult to find design classics for under $300, so let’s look at some great alternatives:
1. Air-Chair by Jasper Morrison, $699 for a set of 4 ($174 each): The classic indoor/outdoor chair. I particularly like the pink and green color!
2. Afteroom Chair, $299: This three-legged chair is the result of creating a simple design, including only what’s necessary for the chair to function comfortably.
3. Episode Dining Chair, $229: I usually don’t gravitate towards upholstered dining room chairs, but I like how simple this CB2 version is. Great for long dinner parties.
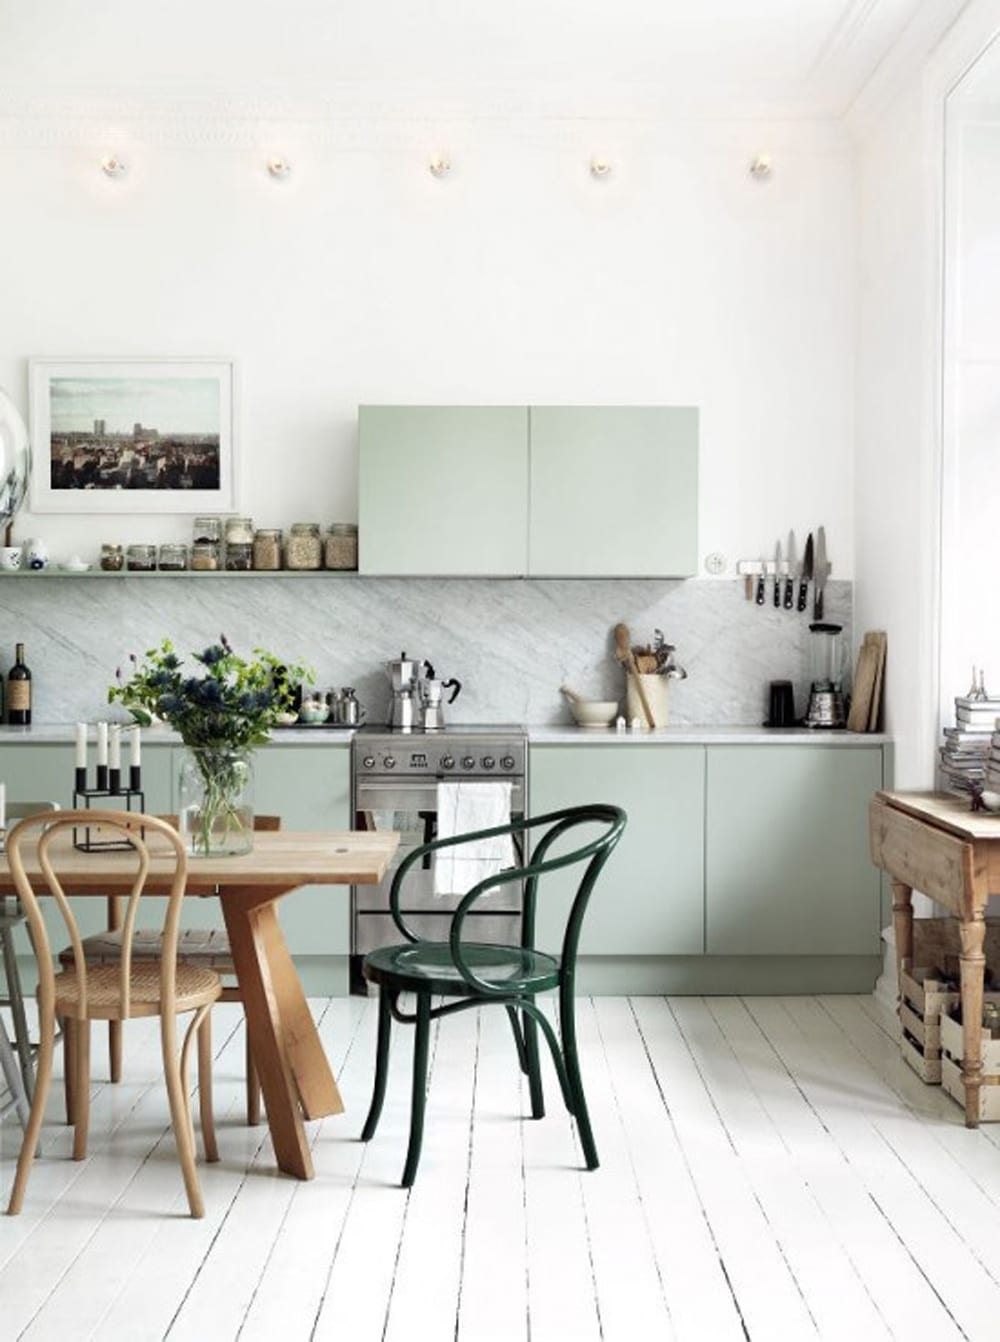
4.Thonet Chair 18, $150: A classic choice; this chair will never go out of style. I like the way designer Emma Persson Lagerberg introduced hunter green through an accent chair from the same era. Image: Petra Bindel
5. Blu Dot Real Good Chair, $149-$299: The real good chair brings a playful industrial look that works in almost every space. The copper version takes on a life of it’s own as it patinas. Image: Marika Jarv
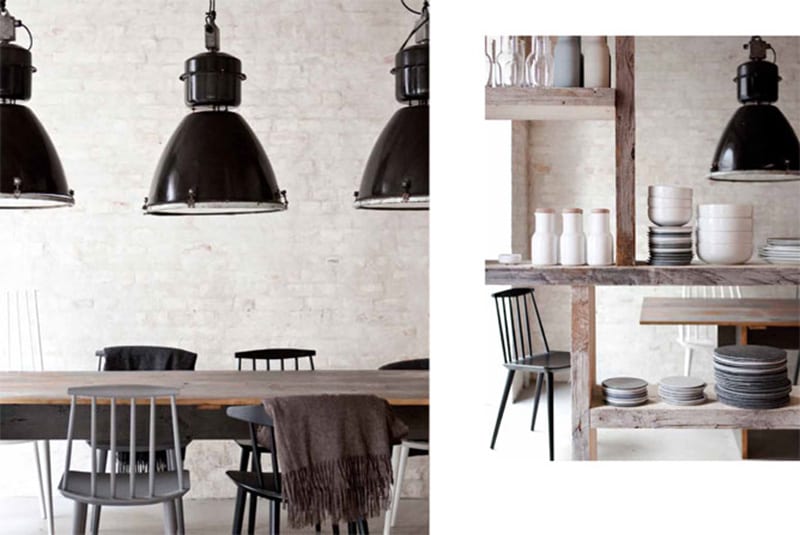
6. Salt Chair, $129: Another design that won’t go out of style. The footprint of the Salt Chair is small, which makes it great for older homes with tight dining rooms. Image: Interior of Host
7. Riviera Side Chair, $225: Why wouldn’t you transport yourself to Paris at breakfast, lunch and dinner?
8. Shaker Chair, $165: The teak originals from Hans J Wegner are well worth the investment, but for many of us it just doesn’t make sense for our budgets. I’ve found Dot & Bo to be a good resource for the next best thing.
9. Blu Dot Hot Mesh Chair, $129: So much personality in one hot little chair.