Shared posts

26 Jan 03:40

Reasons to check insurance rates before buying your first car

by Michael Keenan

Filed under: Car Buying,Misc,Ownership

When it comes to buying a first car, most people research various models and prices, figure out which cars fit in their budget, and then take a few for a test drive.

Continue reading Reasons to check insurance rates before buying your first car

Reasons to check insurance rates before buying your first car originally appeared on Autoblog on Wed, 25 Jan 2017 14:21:00 EST. Please see our terms for use of feeds.

Permalink |  Email this |  Comments
26 Jan 03:40

Best way to finance your first car

by John Csiszar

Filed under: Ownership,Ownership,Car Buying,Car Dealers,Used Car Buying

The process of buying a car is the same, whether it's your first time or your 20th.

Continue reading Best way to finance your first car

Best way to finance your first car originally appeared on Autoblog on Wed, 25 Jan 2017 14:21:00 EST. Please see our terms for use of feeds.

Permalink |  Email this |  Comments
26 Jan 03:40

How to negotiate the price of your first car

by Michael Keenan

Filed under: Car Buying,Misc,Ownership,Ownership

Unlike most purchases, buying your first car usually involves some negotiations over price.

Continue reading How to negotiate the price of your first car

How to negotiate the price of your first car originally appeared on Autoblog on Wed, 25 Jan 2017 14:21:00 EST. Please see our terms for use of feeds.

Permalink |  Email this |  Comments
26 Jan 03:39

Financing a car 101: things you should know before you sign

by Michael Keenan

Filed under: Car Buying,Misc,Ownership,Ownership

You've searched, compared and haggled, and finally you've settled on the car you want at the price you're willing to pay.

Continue reading Financing a car 101: things you should know before you sign

Financing a car 101: things you should know before you sign originally appeared on Autoblog on Wed, 25 Jan 2017 14:21:00 EST. Please see our terms for use of feeds.

Permalink |  Email this |  Comments
26 Jan 03:36

Don't fall for these dealer tricks when buying your first car

by Karina Hernandez

Filed under: Car Buying,Misc,Ownership,Ownership

Shopping for a new ride at a dealership involves more than just kicking tires.

Continue reading Don't fall for these dealer tricks when buying your first car

Don't fall for these dealer tricks when buying your first car originally appeared on Autoblog on Wed, 25 Jan 2017 14:21:00 EST. Please see our terms for use of feeds.

Permalink |  Email this |  Comments
25 Jan 23:50

Find the Best Spots for Houseplants In Your Home With the "Shadow Trick"

by Patrick Allan

If you want to brighten up your home with some lush greenery, it’s important to consider what level of lighting those houseplants will need. This trick will help you determine whether an area in your home is suitable for certain plants.

Read more...

24 Jan 16:52

Five Life Lessons the Show Moonshiners Has Taught Us

by Miss Cellania

Moonshiners is a reality TV series on the Discovery Channel that follows several guys who make moonshine. Its fans are divided into those who believe that it's a documentary and they are really manufacturing illegal whiskey, and those who know better but enjoy the drama between the characters. Either way, it's the drama that hooks the viewer. TVOM looks at some of the highlights from the show's stories, and the life lessons from friends and families in the forests of Appalachia. With video evidence for each.

24 Jan 16:51

How to Find Last Minute Flights and Travel Deals Online

by Rob Nightingale
last-minute-flights-deals

How do you go from wanting to take a last-minute vacation to booking something that’s not going to break the bank? Let’s say you’ve got some time off work coming up in a few weeks. What tips, tricks, and advice will help you find the absolute best last-minute deals? Over the past few years, I’ve traveled to around 30 different countries. Almost all those trips were booked last minute, and each cost far less than the “average” vacation. In this article, I’ll show you some of the tips I’ve picked up along the way. And none of them involve hanging...

Read the full article: How to Find Last Minute Flights and Travel Deals Online

24 Jan 16:51

Disco Demolition Night: Scenes from the Night Disco Died (or Did It?) at Chicago’s Comiskey Park, 1979

by Josh Jones

Surely you’ve heard of Disco Demolition Night, when Chicago DJ Steve Dahl invited listeners to the 1979 White Sox double header against the Tigers at Comiskey Park, offering tickets for .98 cents if they brought a disco record he could blow up between games. The event drew thousands more than Dahl expected, turned into a riot on the field, and has since passed into history for its rallying cry of “Disco sucks!” and its heralding of the end of disco’s reign.

Disco died at the end of the 70s, the story goes. But many music fans know differently. Disco didn’t die. It mutated, became House music, New Wave, and other hybrid genres. It made its way into the music of the Clash, Blondie, Michael Jackson, Madonna, and others. Nonetheless, Disco Demolition Night represented a widespread backlash that drove disco off the pop charts and back where it came from—the mostly black, Latino, and gay clubs in New York, Chicago, Detroit, and other cities.


Many people who have written histories of Disco Demolition have come to see it “as a not-so-subtle attack” against those groups of people, writes NPR, against “disco’s early adopters.” Dahl, who has co-authored his own book about the night, disagrees, but he admits that images of the event look “like a book burning.” Disco “obviously threatened a lot of rockers,” he concedes. Another witness to the event, an African-American usher named Vince Lawrence, saw evidence firsthand.

Lawrence—a disco fan and aspiring musician—tells the podcast Undone that he was actually looking forward to the event. He liked Dahl and “had strict intention of keeping records that were good that I didn’t have.” However, as he collected the records at the gate, he noticed among them Marvin Gaye and Stevie Wonder albums, “records that were black records,” he says, but not disco. He tells NPR, he saw “Curtis Mayfield records and Otis Clay records…. Records that were clearly not disco.” He balked, but was told he had to take them and issue tickets.

After Dahl rolled onto the field in a Jeep and blew up the dumpster full of records, chaos ensued, and the stunt turned into “this zany, real life slapstick routine,” says Undone’s host Pat Walters, “until all the sudden, it’s just not.” Rioters set a bonfire, stole the bases (literally), and became a raging mob. On his way out of the park, Lawrence was attacked by fans yelling “Disco Sucks!” and breaking records in his face.

Columnist Renee Graham, a gay woman of color who was a teenager at the time, recalls seeing photos of the event and being reminded of White Citizens Councils smashing rock and roll records because they brought white and black kids together. “This wasn’t just ‘We don’t like this music,’” she says, “this was ‘We don’t like these people who listen to this music.’” By 1979, however, “those people” included many of the same kids’ classmates, siblings, parents…. Disco had gone mainstream after Saturday Night Fever and the Bee Gees’ breakout. “It was almost like musical gentrification,” says Graham.

The Rolling Stones, Rod Stewart, Led Zeppelin, KISS—all of them appropriated disco. And the rock kids were furious. After the riot at Comiskey, “disco became a four-letter word.” Careers collapsed, radio stations changed format, record stores reordered, almost overnight. Had none of this happened, it’s possible disco would have fizzled out. Driven underground, back to its roots, it instead found new expression in the hands of pioneers like Chicago DJ Frankie Knuckles, the “Godfather of House,” and New York’s “Little” Louie Vega and Kenny “Dope” Ramirez.

Knuckles DJ’ed at Chicago club the Warehouse, which lent its name to the music—predominantly disco or disco inspired—he played. As house music evolved, “you could hear it fill in the space that disco had occupied,” says Walters. Vince Lawrence, too young to get into the Warehouse, began staging his own house parties, and these spread to cities all over the country, and eventually to Europe, where the music influenced bands like the Eurythmics and New Order, who discovered house on the Spanish island of Ibiza. Undone makes the case that Disco Demolition Night saved disco, in a way, so that it could emerge and influence many more appreciative crossover fans in the decades to come.

Related Content:

Disco Saves Lives: Give CPR to the The Beat of Bee Gees “Stayin’ Alive”

Rita Hayworth, 1940s Hollywood Icon, Dances Disco to the Tune of The Bee Gees Stayin’ Alive: A Mashup

Saturday Night Fever: The (Fake) Magazine Story That Started it All

Josh Jones is a writer and musician based in Durham, NC. Follow him at @jdmagness

Disco Demolition Night: Scenes from the Night Disco Died (or Did It?) at Chicago’s Comiskey Park, 1979 is a post from: Open Culture. Follow us on Facebook, Twitter, and Google Plus, or get our Daily Email. And don't miss our big collections of Free Online Courses, Free Online Movies, Free eBooksFree Audio Books, Free Foreign Language Lessons, and MOOCs.

24 Jan 16:49

A Firearm Coloring Book Aims To Make Gun Safety Fun

by Susannah Breslin, Contributor
A young female entrepreneur is taking on the big business of coloring books -- with guns.
24 Jan 16:48

The moment that it is not your job anymore huehuehue

24 Jan 16:48

Best Things to Buy at Aldi

The discount grocer beat competitors' prices on these four supermarket staples.
24 Jan 16:42

Please take me there...(a village with no roads)

24 Jan 16:42

17 Essential Safari Tips and Tricks for Mac Users

by Khamosh Pathak
safari-mac-tips

If you’re a Mac user, then your go-to browser is likely Safari. And because all browsers have their own sets of unique features, it’s important to get familiar with what Safari has to offer.

Like many apps, the neatest features may not be obvious. So to help you make the most of your Safari experience, here are several tips and tricks that you can put to good use when browsing the web.

Unlock the "Most Useful Mac Keyboard Shortcuts" cheat sheet now!

This will sign you up to our newsletter

Enter your Email
Unlock

1. Enable Picture-in-Picture for Every Site

safari picture in picture

Picture-in-Picture was one of the best new parts of Safari that arrived with macOS Sierra. Being able to watch a video that’s floating over everything else is really useful. It works on a lot of popular video streaming sites.

On sites like Vimeo, you’ll find the Enter Picture-in-Picture button in the bottom toolbar. But on YouTube, right-click and then right-click again to open the shortcut menu. From there, select Enter Picture-in-Picture.

The video will pop right out. You can then drag it to any corner of the screen. To exit Picture-in-Picture, click the small Exit button to the left of the play button.

2. Customize the Toolbar

safari customize toolbar

Having a functional toolbar with the buttons you use most is key to using Safari. If you never use the Home button, for instance, you can remove it. And if you want a button for the Sidebar, you can add it.

To make changes, right-click on the toolbar and select Customize Toolbar. Then drag the buttons you want from the popup window into the toolbar or those you don’t want from the toolbar to the window. You can also arrange the buttons as you like. Click Done when you finish.

3. Search Between Tabs

safari search between tabs

Many people are used to opening a lot of tabs when browsing or working on the web. Safari helps you manage this tab overload by neatly stacking related tabs in the Tab Overview page. To access it, click View > Show Tab Overview from the menu bar.

When you’re on this page, press the Control + F keyboard shortcut and you’ll see a search box at the top. You can then quickly search all your tabs.

To exit the Tab Overview page, just click any of the tabs on it.

4. Turn Off Notification Popups

Disable Notifications For Websites Safari

If you visit a lot of blogs or news sites, you may see a prompt to subscribe to new posts. Rather than denying the request every single time, you can disable this feature altogether.

Click Safari > Preferences from the menu bar and select the Websites tab. On the left, click Notifications. Then, at the bottom, uncheck the option for Allow websites to ask for permission to send notifications.

You can also click the dropdown box to the right of any website in your list to Deny or Allow notifications for particular sites.

5. Pin Tabs

safari pin tab

If you visit specific sites regularly, you can keep them close at hand by pinning them. When you pin a website, it stays docked on the left edge of the tab row. To pin a tab, just right-click on it and select Pin Tab.

To switch to a pinned tab, click it as normal or use the Cmd + 1, Cmd + 2, etc. keyboard shortcut, depending on its place. For more shortcuts like these for pinning tabs, grab this Safari shortcuts cheat sheet.

6. Mute Tabs

Mute Tabs In Safari

Frustrating auto-play videos are rampant on the web. And many times, you’re not sure exactly where audio suddenly starts coming from. Luckily, Safari tags a tab that’s playing audio with a little speaker icon.

What’s better is that no matter where the audio is playing, you’ll see a speaker icon in the address bar as well. Click the speaker icon in the tab or address bar to mute the tab.

You can also right-click the speaker icon in the address bar to Mute Other Tabs than the one you’re viewing.

7. Arrange Tabs

When you have several tabs open at once, it can be difficult to find the one you need at the moment. Instead, use Safari’s Arrange Tabs feature.

Right-click one of your tabs, put your cursor over Arrange Tabs By, and then click either Title or Website. Your tabs will then auto-arrange according to your choice, making it easier to find the one you want.

8. Enable URL Previews in Status Bar

safari URL previews

You can see the URL of a link in the status bar while you hover over it with your cursor. Click on View from the menu bar and select Show Status Bar and you’re set. This is a handy security function, as it allows you to double-check that links actually go to where they claim.

9. Customize the Favorites Screen

safari favorites screen

The Favorites screen is what shows up when you open a new tab, as well as when you click the address bar. This is thus your welcome mat for the web. You can easily customize the screen to add shortcuts to your most frequently visited websites.

Visit a site and then right-click the plus sign button on the left of the address bar. From the dropdown, select Favorites. And on the Favorites screen, you can drag icons to rearrange them.

10. Save Pages as PDFs

Exporting a web page as a PDF doesn’t require a special extension when you use Safari. Visit the page and click File > Export as PDF.

Then, just choose where you want to save the page and hit Save to export.

11. Share Pages Using AirDrop

In addition to sharing files, AirDrop is a great way to send web pages across all your Apple devices. Say you’re on a site and want to open it on your iPad instead. Click on the Share button and select AirDrop. Then select your other device to open it there.

12. Enable Handoff to Make Browsing Better

Allow Handoff On Mac

Handoff and Continuity are two slick technologies that let you seamlessly switch between macOS and iOS. Maybe you have a page open in Safari on your iPhone that you want to open on your Mac, for example.

To enable Handoff on Mac, open System Preferences and select General. Toward the bottom, check the box for Allow Handoff between this Mac and your iCloud devices.

On iPhone or iPad, open Settings and choose General. Select AirPlay & Handoff and turn on the toggle for Handoff.

When the feature is enabled, you’ll see a Safari shortcut at the left edge of your Mac’s Dock. When you click it, it will open the page from your iOS device in Safari.

13. Check Out Reader View

Safari Reader View CNN

Want to make reading cleaner? Open an article on a website in Safari and click the Reader View button that’s on the left of the address bar.

All the page’s formatting, ads, and distractions will vanish in favor of a minimal, beautiful, easy-to-read layout.

14. Use iCloud Tabs

iCloud Tabs In Safari Tab Overview

iCloud Tabs is a genius feature that lets you access and control tabs that are open in Safari on your other Apple devices. After you click on the Tab Overview page (see #3 above), look at the bottom to see your other devices and tabs open on them.

From there, you can either close the tabs on those devices or open a tab from another device right on your Mac.

15. Take Advantage of AutoFill

AutoFill Settings Safari

For sites you visit often that require a username and password, you can speed up the login process with AutoFill. The AutoFill feature also works with your details from the Contacts app, credit cards you choose to save, and other form data.

To enable AutoFill, click Safari > Preferences from the menu bar. Select the AutoFill tab and check the boxes for the items you want to include. You can edit the info using the corresponding buttons.

16. Personalize Your Pages

Personalize Pages In Safari

You may not realize it, but you can customize every page you visit in Safari. When you land on a page, right-click the address bar and select Settings for This Website.

Then, check boxes for using the Reader View and enabling content blockers if you like. For the remaining settings, just click and you can adjust page zoom, auto-play, popup windows, your camera and microphone, screen sharing, and location details.

17. Use Look Up

Look Up In Safari

Safari has a handy little feature called Look Up that lets you get more details on a word or phrase on a page you’re visiting.

Select the text on the page and either right-click and pick Look Up [word or phrase] or long-press on your trackpad.

You’ll then see a popup window giving you a definition and other options across the bottom, depending on the word or phrase. So you may see iTunes Store, TV Shows, Siri Knowledge, and other sources as well.

Even More Safari Tricks

These essential tips and tricks for Safari are simple but useful. So try to keep them in mind and take advantage of them as you’re browsing or working on the web in Safari on your Mac.

And for more help, check out our ultimate guide for customizing Safari or how to find, install, and remove Safari extensions.

Read the full article: 17 Essential Safari Tips and Tricks for Mac Users

24 Jan 16:40

500px Unveils the Directory: A Listing that Helps Photographers Find Work

by DL Cade

Online photography community and licensing marketplace 500px announced an interesting new service today. It’s called the 500px Directory, and it allows photographers to advertise their services, show off their work to prospective clients, and get hired, all in one place.

The 500px Directory was actually released in Beta back in December, but today marks its worldwide release with almost 50,000 photographers representing 191 countries already signed up and ready to hawk their wares to prospective buyers.

500px users who sign up to use the Directory will see a Services tab and Hire button added to their account. On that tab, they can advertise the services they offer, when they’re available, languages they speak, list the gear they have at their disposal, and create Sample galleries to show off specific specialties like “Aerial” photography or “Portraits.”

Here’s what a fully set up Services tab looks like:

Once a client gets in touch, photographers can set their own rates and negotiate their own contracts through that “Hire” contact form—no need to worry about pre-set licensing rates and royalties and all that other mess.

What’s more, there’s no service fee. The catch being that, starting in April, you will need to have a 500px Plus or Awesome account to use the 500px Directory. Until then, consider this your 60+ day free trial, when you can set up your Services tab, display your work, and see if you can get any bites from clients.

The Directory will also connect directly to 500px’s On-Demand services—where they work with high profile clients like Google and Lonely Planet who want to leverage the website’s global community for custom work. If you want to be at the top of the list for consideration when one of these big names comes to 500px looking for a custom assignment, you probably want to be part of the 500px Directory.

Finally, addition to the Directory, 500px also announced a new partnership with Adobe Stock. The 500px Marketplace will contribute 100,000 “highly curated” images to be a part of the Adobe Stock Premium collection of licensable images.

Between the 500px Directory and the Adobe Stock deal, both the photo sharing community and licensing pieces of the 500px puzzle are getting a big boost today. To learn more about either of these branches, check out 500px’s official announcement or visit the 500px Directory by clicking here.


Full Disclosure: DL Cade previously worked for 500px as the company’s Editor in Chief.

21 Jan 14:19

Whenever you feel worthless

21 Jan 03:13

Old-Fashioned Swedish Glögg Recipe

by Jackson Scarlett

An ancient spiced, mulled wine for warming your insides in the winter months

Read More

20 Jan 12:52

A tour of Air Force One - CNET

by Fox Van Allen
Take a look inside America's most famous plane as it flies America's most famous passenger.
20 Jan 01:46

Restoring Elvis's BMW 507

by Ittai Geiger
Featured new bimmer cover photo

Elvis Presley was an absolute gearhead. In the 50's, he made two Cadillacs famous: a pink Fleetwood Series 60 and an Eldorado with Fins that would make a 747 jealous. In the 60's it was all about dapper Limousines; Lincoln, Cadillac, and even Rolls Royce. In the 70's we saw the King dabble in sideburns and sports cars, like the De Tomaso Pantera and even a Ferrari Dino 308 GT4.

Elvis’s BMW 507 was built in 1957 

What most people don’t know is, in the late 50’s, during his stint in the US Army, he snuck in a quick love affair with the iconic BMW 507; one of the most sought after Bimmers ever built.

Before Elvis bought his 507, it had it’s own 15 seconds of automotive fame touring the European Motor Show circuit and appearing in the German film “Hula-Hopp Conny” 

1958 - With The Cold War looming over the world, the US instituted the only extended peacetime military draft in its history. Elvis, at the prime drafting age of 23 years old, was drafted into the Army and shipped off to Friedburg, Germany for two years of military service. 

After a painstaking process of confirming it’s authenticity and Vehicle Identification Number (VIN) the BMW Classic team went to work in Munich, gutting and disassembling the 507 

While there, the mega star found himself at a BMW dealership standing in front of an all-white, hand built, sleek two seat roadster, powered by a 3.2-litre V8 with twin carburetors that delivered 148 horsepower. All it took was a short test drive, and Elvis purchased it without any hesitations. Fortunately for him, he didn’t live on the base at the time, which gave him plenty of opportunity to cruise the German streets and use the Bavarian dream machine as his daily driver. Everywhere Elvis drove, stampedes of international fans swarmed the car, leaving traces of red lipstick kisses all over it’s pristine white body. This drove the King mad, and he had the entire car painted red.

BMW followed the original build specifications and methods, restoring the entire car by hand and using original spare parts from their vault in the process 

When his two years of service were up, Elvis returned to The States, and nobody knows quite how he parted with the BMW, but he did, and, according to records, it made its way to a Chrysler dealership in New York. From there, the 507 traded hands between only a few owners who raced the vehicle without knowing of its royal past.

The restored car is exactly the car Elvis fell in love with, in it’s glossy “Feather White” dress

Fast forward to a few years ago, and 30 miles south of San Francisco, Elvis’s 507 sat untouched, under a dusty car cover in the back of a barn on a pumpkin field in Half Moon Bay, CA. It sat there for nearly a decade without a motor until BMW’s Classic Department was informed about it.

A photo I took of Elvis's 507 at the 2016 Pebble Beach Concours d'Elegance

2016 marked BMW’s 100-Year anniversary, and at the Pebble Beach Concours d'Elegance, they chose Elvis’s 507 as their torchbearer. BMW considers it the grandaddy of their motorsports and performance legacy, and only 250 of them were ever produced, which means, at auction, they fetch up to $3,000,000 depending on condition and historical importance. 

Ittai Geiger is a local San Francisco car nerd and comedian. When he's not capturing a #streetfind, he's cruising around on his moto or putting in laps at the local kart track.


Photos courtesy of BMW Group — Classic Department 

20 Jan 01:31

Bread Baking 101 for Beginners

by Jeremy Anderberg

My bread-baking hobby all started with a Netflix documentary. Cooked, based on Michael Pollan’s book of the same name, explores the origins of food in our world and communities. One of the episodes — “Air” — focused on bread. Pollan, who also narrates the series, takes us on a world tour of the history and science of bread-making. With just 4 simple ingredients, he explains, a world can be fed: flour, water, salt, and yeast. (And that last one can be found and added naturally in the right conditions.)

Four ingredients? I could make bakery-quality bread — the very staff of life — in my own kitchen with just four ingredients?

The idea was planted in my mind, but I neglected to take action on it, and the inspiration went dormant. Then I interviewed Bo Pryor for our SYWMJ series, and I learned that part of his weekly routine is making bread with his children. The inspiration re-surfaced, I asked him for a recipe, and a new hobby was born.

I started out with Bo’s sandwich loaf. Then I made some easy French bread, a few Dutch oven boules (that’s French for “round loaf”), a baguette-style airy loaf — soon enough it became a weekly hobby of exploring various recipes and methods. And now, just a few short months later, I’m making sourdough bread, English muffins, dinner rolls, etc. It’s really quite an easy learning curve.

Below, I present Bread Baking 101: guidance and recipes for very beginners — folks who may have never baked anything in their whole life — on how to make bread at home. I guarantee you’ll end up with a bakery-quality loaf from your very own oven.

The Benefits of Baking Your Own Bread

If you’ve never thought about baking your own bread before, why consider starting? Here are 3 reasons:

It’s healthier. Take a look at the ingredients list of any pre-packaged bread you buy at the grocery store. You’ll find a bunch of unpronounceable chemicals and preservatives. Your homemade bread will literally just be flour, water, salt, and yeast. There may be added accoutrements like cheese, herbs, dried fruits, etc., but the base of your loaves will be built on a simple foundation of four ingredients. While bread is calorie-rich and not particularly healthy in general (at least in the modern age where you’re typically not burning off all those carbs), if you’re going to eat and enjoy it, homemade is the way to go. I actually appreciate that my bread starts to harden and mold after a week — just like real, unadulterated organic matter should.

It’s an easy way to impress friends/family, guests, and party hosts. Few things impress loved ones and other guests at a dinner party like a homemade loaf of bread. It has a certain magical quality about it that isn’t replicated in other foods — possibly because it’s one of mankind’s oldest cooked foodstuffs.

Plus, being that a man should never arrive empty-handed to a party, bread makes for something unique and wonderful to present to another host. Rather than a bottle of wine or a six-pack — as is the usual — show up to the door with a fresh loaf, and you’ll be sure to stand out. It’s also a nice gift because it can be served with dinner or other party treats, or it can be reserved to be enjoyed later on.

It connects you to your food, and rebels against big corporations. The vast majority of Americans these days are totally disconnected from their food. Everything we ingest is prepackaged, frozen, reheated in microwaves. And the giant corporations who manufacture all that “food” for us are making billions of dollars because we don’t know how and don’t want to take the time to cook our own.

Push back against the corporate behemoths and learn how to bake a loaf of bread. It’s incredibly satisfying not only to the taste buds, but to the soul, too.

Next, let’s go into the basic ingredients and supplies needed, and then into a couple recipes.   

Ingredients Needed

The ingredients needed to make bread are incredibly simple, and you’re almost guaranteed to have the majority of what you need already at home.

Yeast. Yeast is the living organism that makes your bread dough rise and creates those lovely air bubbles in the crumb — without it, you’d have a flatbread or a tortilla. There’s a ton of complicated science behind yeast and what it’s actually doing in bread (and beer!), and if you’re looking for a good explanation, check out this resource library from Red Star. But for our purposes, just know that you need it, and there are two types of yeast usually found in the grocery store:

  • Active Dry — yeast that is dry, granular in texture, and needs proofing — that is, it needs to be mixed with lukewarm (about 110° F) water to activate (beware: if the water is too hot, it will kill your yeast). This water/yeast solution is then added to your dry ingredients.
  • Instant/Rapid Rise — with a finer consistency, instant yeast activates more quickly than “active dry” and doesn’t have to be proofed first — it can be put right in with your dry ingredients. “Rapid rise” is a variety of instant yeast to which enzymes have been added to help the dough rise faster.

There are other varieties of yeast — fresh and sourdough starter, namely — but the above two are all the beginning baker needs to know. Both kinds of yeast come in either packets or jars; if you plan on baking frequently, it’s worth getting a jar from which you can dole out perfectly portioned measurements (you’re not always going to need a packet-ful).

So which kind of yeast should you use? While each type will produce slightly different effects in your breads, and some bakers swear by active dry, they’re fairly interchangeable. Instant has the advantage of convenience in that it doesn’t have to be proofed and helps your dough rise faster (potentially saving 10-20 minutes of time). For that reason, I prefer instant. Just choose one type, get used to using it, and make it your go-to.

Flour. While any old all-purpose (white) flour will do, there are some variations to consider when buying flour for bread.

  • Whole Wheat — whole wheat flour adds density, some sweetness, and additional health benefits to your bread. Many people also just prefer the taste of whole wheat bread over white. Know, however, that you can’t just substitute the same amount of whole wheat flour when a recipe calls for white. Doing 100% whole wheat flour without changing the loaf’s preparation techniques would give you a brick of bread — its properties don’t allow for the same fluffiness. Usually you’ll see 20-40% of the total flour being whole wheat, so I recommend only working with whole wheat when a recipe specifically calls for it rather than freestyling.
  • Bread Flour — this is a variety of white flour, but it has a higher protein content. What does that mean for our purposes? It leads to better gluten development — the bonds formed by the water and flour are stronger. You end up with a really nice chewy and elastic structure. You can sub in bread flour 100% for any recipe that calls for all-purpose. It’s exclusively what I use for my loaves.
  • Specialty Flours — when walking down the baking aisle at the store you’re bound to see other specialty flours like rye, semolina, oat, etc. As a beginner, stay away from these until you’ve gotten some experience. As with whole wheat, you’ll rarely, if ever, use these as 100% of the flour content in a typical loaf of bread, so don’t try it.

In conclusion, any all-purpose white flour will do. I like to use bread flour as a substitute, and it’s easily found in most grocery stores. Use whole wheat flour if the recipe calls for it. Stay away from the other stuff until later on.

Salt. Your basic table salt will do! I usually put 25-50% less salt in the bread than what the recipe calls for. I personally like to let the bread flavor come through pure, and then sprinkle some sea salt on top if I feel it needs it.

Water. I’ve always used tap water, and it comes out just fine!

Others. Many recipes call for additional ingredients to sweeten things or create a different type of texture. These can include milk (usually calls for whole), butter (usually calls for unsalted), oil, honey, etc.

Supplies Needed

Digital scale. If there’s one tool a home bread baker needs above all others, it’s a digital kitchen scale. Cheap versions are a little over $10; the one I use was $30. I’m sure the cheap ones work just fine.

Why do you need a scale versus just measuring cups? It’s almost entirely for the flour. When scooping flour out of a bag with a measuring cup, every person doing it (and every time you do it) will garner a scoop with a different density. The flour can get smashed down and then you get more than needed, or it can be a little too fluffy and you’ll have less than desired. In short, the cup of flour in a measuring cup is not always the same one cup of flour called for. With a scale, you’re getting exact amounts in grams. It’s just the better way to go.

Additionally, most bread recipes are written in either grams or ounces anyway, so your measuring cups wouldn’t do you a whole lot of good without having to do some math for every ingredient.

Mixing bowls. I tend to use more than one mixing bowl when I make bread, so have a couple clean and handy.

Measuring cups/spoons. Both liquid and dry, and for some recipes you’ll need spoons for down to 1/4 tsp or even 1/8 tsp (though not for the ones in this article).

Spatula/wooden spoon. Any will do.

Dutch oven. For the second recipe, a Dutch oven with a lid is needed. I melted the plastic handle off mine the first time, so a steel handle is preferred.

Two Beginner Recipes for a Great Homemade Loaf of Bread

These recipes are where, I believe, every home bread baker should start. They’re super easy, don’t require kneading, and produce a really amazing loaf. Once you feel comfortable working with the ingredients, stirring and transferring dough, etc., then you can move on to more advanced breads and techniques (which I’ll write about in the future!).

I’ve included the step-by-step pictures for the first recipe. The steps are similar for the second recipe, and really for all bread recipes. Mix dry ingredients, mix wet ingredients, form into dough, let rise, bake. That’s simplified, of course, but that’s the gist of it!

Easy Sandwich Loaf

This is a classic sandwich loaf recipe, that adds some butter and honey for additional sweetness. You’ll need a loaf pan for this recipe.

Ingredients

  • 310 grams flour (all-purpose or bread) – 2 cups
  • 55 grams whole wheat flour – 6 tablespoons
  • 7 grams yeast – 2 1/4 teaspoons
  • 2 tablespoons unsalted butter, melted
  • 14 grams honey – 1 tablespoon
  • 4 grams salt – 3/4 teaspoon
  • 1 1/4 cups warm water

Directions

1. In a large bowl, whisk together the flour, salt, and yeast, so it’s all well-incorporated.

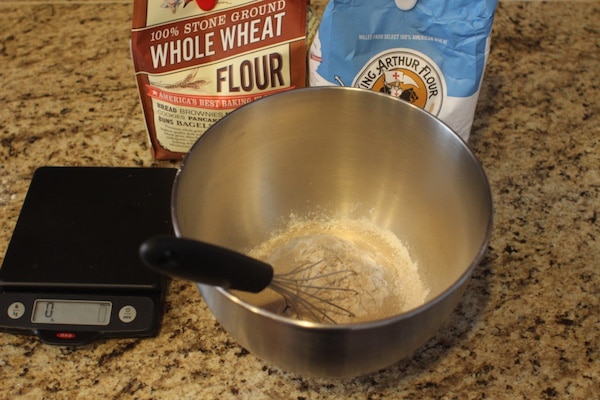
Whisking together dry ingredients.

2. Whisk together warm water, melted butter, and honey in liquid measuring cup until honey is dissolved.

3. Add the liquid mixture to the flour mixture and stir until the batter comes together. Then use the spoon or spatula to fold the dough over on itself 4-6 times until a more firm dough starts to form.

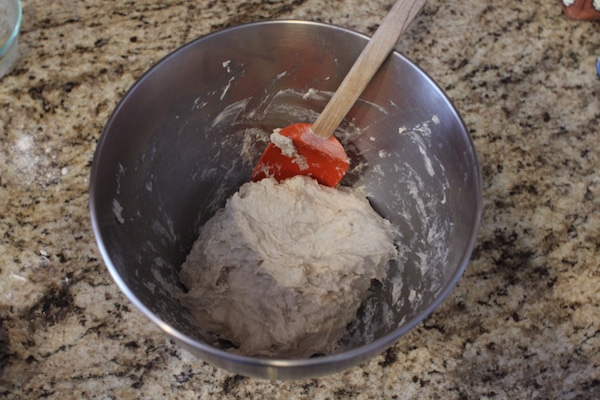
The dough is coming together after mixing the wet and dry ingredients with a spatula.

4. Cover tightly with plastic wrap and let dough rise until it’s about doubled in volume (30-40 min.).

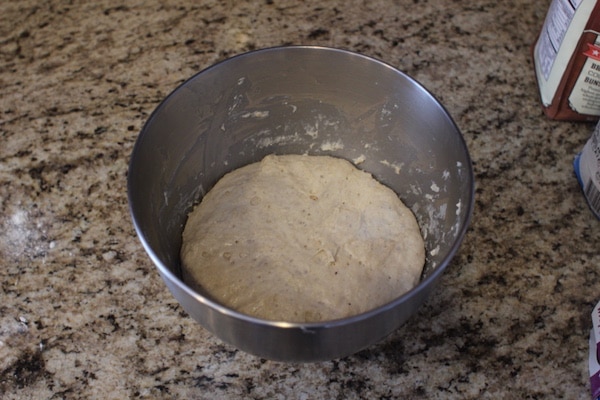
You can see the dough has about doubled in volume, filling some of the space of the mixing bowl. It’s also naturally smoothed out a bit. The bubbles are the yeast doing its job!

5. Preheat oven to 375 degrees, and grease your loaf pan (Pam for the win here!).

6. Transfer dough to the loaf pan, cover with plastic, and let rise until the dough gets to 1/2” below the lip of the pan. Uncover, and let rise until the dough is level with the lip of the pan. This should all take about 30-40 minutes.

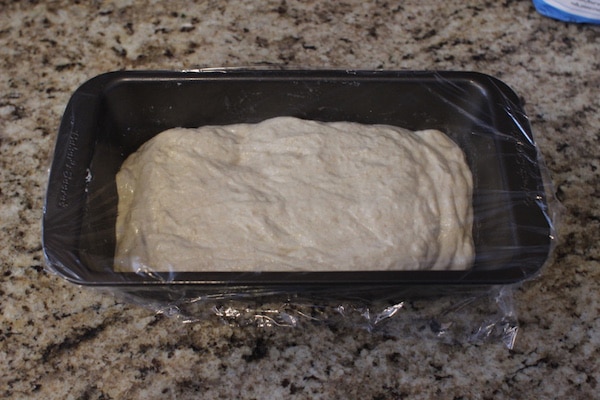
The dough naturally deflates some when transferring to the loaf pan. That’s A-okay. It can actually rise too much, in which case the loaf deflates when cooking.

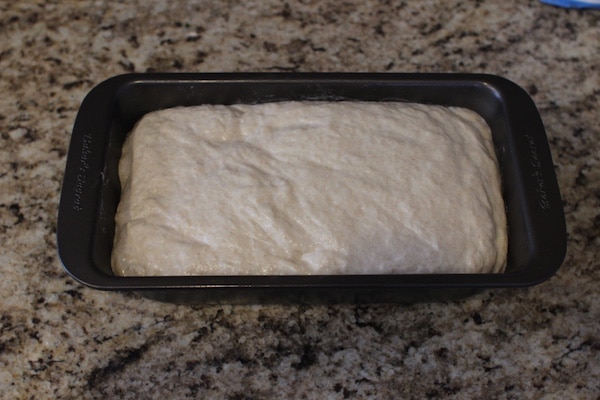
Almost ready for baking! Just a few more minutes.

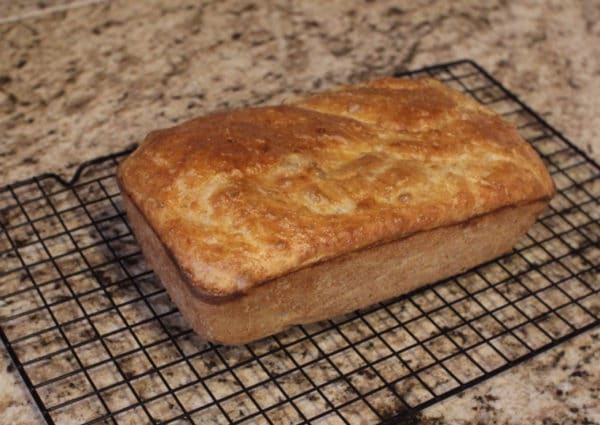
7. Bake 40-45 minutes, until the top is a nice golden-brown. Let loaf cool in the pan for 15 minutes or so, before transferring to a cooling rack or cutting board.

8. Let cool for a couple hours before slicing and enjoying! If you cut bread too soon, the steam that’s still in there will escape, and the bread will dry out much quicker.

Dutch Oven Boule

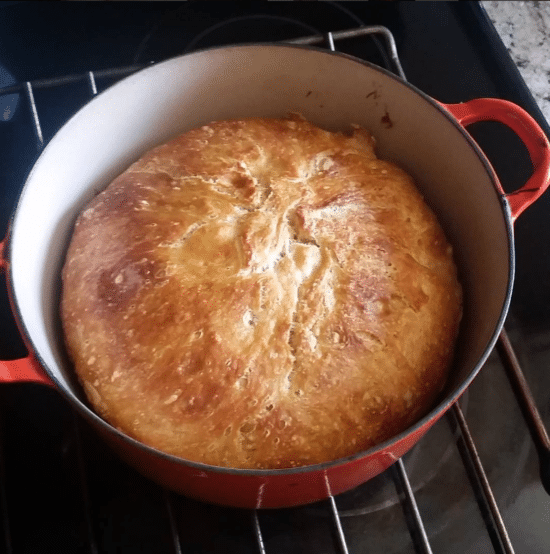
This recipe is stupidly easy, and it tastes amazing. This was my family’s favorite bread of mine before I recently got some speciality bread-baking tools (more on that in Bread Braking 201). This is an overnight rise, so start the bread the day or night before you’d like to bake it. Hardly any skill needed — just some time and attention.

Ingredients (I’ve included standard measures as well, in italics)

  • 630 grams flour (bread or all-purpose) – 4.5 cups
  • 18 grams salt – 1 tbsp
  • 1 1/2 grams yeast – 1/2 tsp
  • 2 1/2 cups lukewarm water

Directions

  1. In a large bowl, whisk together the flour, salt, and yeast, so it’s all well-incorporated.
  2. Add 2 1/4 cups water, stir until a sticky, pretty wet dough forms. If not all of the flour is incorporated, slowly add more water, a tablespoon or so at a time. This isn’t your standard dough; it’s very moist and would be impossible to form into any shape at this point.
  3. Transfer to a clean, lightly oiled bowl. Cover tightly with plastic wrap, and let it rise on the counter at room temperature overnight, or up to 24 hours.
  4. After the bread has risen, use a spoon to fold the dough over itself 4-6 times, deflating some of the air from it. Let rise another 2-3 hours.
  5. When you’re ready to bake, place your Dutch oven, with the lid, into the conventional oven. Preheat it to 475 degrees.
  6. When the conventional oven is preheated, pull the Dutch oven out (with oven mittens, please) and place it on the stovetop. Using a spoon, pour your dough into the hot dutch oven. It’ll sizzle a little bit.
  7. Place the lid back on, and put it back in the oven. Bake for 35 minutes with the lid on, then another 15-20 minutes with the lid off.
  8. Pull the Dutch oven out of the conventional oven, and let the bread sit in there another 15 minutes or so, before carefully flipping it over to get the bread out. The high heat ensured that the bread wouldn’t stick, so it should plop right out.
  9. Let cool for a couple hours before slicing in and enjoying!

For a whole wheat variation, use 420 grams (3 cups) all-purpose flour (or bread flour) and 240 grams (1.5 cups) whole wheat flour.

You can also add: grated cheese (1 cup, gruyere is excellent), dried fruit (1 cup, blueberries are my favorite), rosemary (1-2 tablespoons). These are all added between steps 1 and 2. Use your imagination and experiment!

______________________________

Sources/Inspiration

Cooked by Michael Pollan
52 Loaves by William Alexander
In Search of the Perfect Loaf by Samuel Fromartz
Bread Illustrated
Bread: A Global History by William Rubel
Bread Science: The Chemistry and Craft of Making Bread by Emily Buehler
Bake Magazine

The post Bread Baking 101 for Beginners appeared first on The Art of Manliness.

20 Jan 00:56

Eagle Spyder GT

With 30 years experience working with Jaguar E-Types, there are few people more qualified to build their own than Eagle. The Eagle Spyder GT is in fact the company's fourth...

Visit Uncrate for the full post.
19 Jan 22:34

12 Secrets of Caterers

by Suzanne Raga

No, they don't make everything from scratch.

19 Jan 22:32

In Pre-WWII Berlin, the Shape of Your Roof Was a Highly Political Decision

by Jeff Reuben
article-image

Sharp observers will notice something strange about the attractive residences lining Am Fischtal, a bucolic street in the Zehlendorf section of Berlin. On one side, the buildings have flat roofs, while on the other they are pitched: a situation that is less architectural happenstance than the result of a so-called “roof war,” waged in the Weimar Republic and which embodied many of the deeper conflicts that roiled Germany in the years before the Nazis came to power.

Flat roof advocates argued in the 1920s that they were less expensive to build and maintain, in addition to fitting in with Modernist ideas about minimalism and functionality, like using roofs as terraces. But the pitched roof partisans—including many nationalists—argued something entirely different: that flat roofs were a blight on traditional German architecture, or, as the critic Paul Schultze-Naumburg wrote, “immediately recognizable as the child of other skies and other blood.” Other critics were more explicit. The architect Paul Bonatz, for one, said that flat roofs bear “more resemblance to a suburb of Jerusalem than to a group of homes in Stuttgart.”

The two sides met on Am Fischtal, which today survives as a literal and figurative monument to the Weimar Republic’s increasing political divide. The flat roof residences came first, part of a housing development built by a leftist housing cooperative between 1926 and 1932 known as Onkel Toms Hütte, or Uncle Tom's Cabin, an unlikely moniker borrowed from a nearby tavern which was named after the Harriet Beecher Stowe novel. Across the street, GAGFAH, a housing cooperative supported by conservative white collar unions, built their response in 1928: a community called Fischtalgrund, which consists of 30 buildings with 120 housing units. The roofs, of course, were pitched.

“What happened in 1928 in the quiet Berlin forest suburb,” Bruno Taut, the architect who designed Onkel Toms Hütte later wrote, “was like an omen of that which all Germans experienced in 1933”—when the Nazis came to power.

article-image

Before residents moved in, Fischtalgrund opened first as an exhibition in September and October 1928, its location inspiring the press to run stories about the “Zehlendorf Roof War,” and, indeed, it made good copy. The public, also, was interested: a year earlier, a flat roof housing development built in Stuttgart attracted nearly 500,000 people during an exhibition, in the process casting a spotlight on flat roofs.

But for the architects involved, the debate was more nuanced. Heinrich Tessenow, the lead architect behind Fischtalgrund, publicly rejected the idea of a war.

“Here as there, this is essentially a serious search for the best architectural solutions,” he said then. Meanwhile, the architect Walter Gropius, a well-known flat roofer and ostensibly Tessenow’s opposition, insisted “the question of whether a roof is flat or pitched is to be answered solely on the basis of practicality, technology, and efficiency. It is a mistake to make it a religious symbol, as is the case in the battle around the new architecture today.”

article-image

Still, such conciliatory comments were often downplayed or ignored in press reports, and, symbolically, the roof debate evolved as a proxy for the fight over Germany’s future.

On Am Fischtal, it was the flat roofers who struck the opening blow. Onkel Toms Hütte was developed by GEHAG, a cooperative housing corporation owned by blue collar unions with left-wing political affiliations that, during the 1920s, was one of the leaders in creating better housing for Berlin workers, who up until that time typically lived in crowded and unsanitary tenements called rental barracks.

article-image

GEHAG had hired Bruno Taut to be its chief architect in 1924. Although not well remembered today, Taut was a part of a group, including Gropius, Ludwig Mies van der Rohe, and Le Corbusier, who popularized Modernist architecture in Europe during the 1920s. At Onkel Toms Hütte, Taut led a team of architects in creating a new community of approximately 1,900 housing units in colorful rowhouses and small apartment buildings with flat roofs spread across several blocks.

And in 1926, just as Onkel Toms Hütte began construction, the roof debate intensified, prompting GAGFAH to scramble a response, which would turn out to be Fischtalgrund, in which 17 architects designed new houses and small apartment buildings, all with pitched roofs. To lead their effort, GAGFAH chose Tessenow, an architect who used traditional designs but also emphasized that “the best is always simple,” an approach similar to Modernist thinking. While the political debates raged, in other words, the architects working on Am Fischtal were never that far apart.

article-image

Today, Onkel Toms Hütte celebrates its architectural legacy and in particular Taut, who left Germany when the Nazis came to power and died in 1938 while working in Turkey. There is a monument dedicated to him in the community, while the roof war itself is also commemorated by an interpretive sign on Am Fischtal.

Karl Kiem, a German architectural historian, argues that apart from their contrasting roofs, the two developments share many similarities, such as their human scale and balance between built form and landscape. The roof war is a reminder of a divisive past, but flat and pitched roofs have co-existed for nearly 90 years and together they form a listed historic district, suggesting that now Am Fischtal is a symbol of harmony, not conflict.

19 Jan 22:14

Turn a Soup Can Lid Into an Emergency Whistle

by Alan Henry

A survival whistle is a must in any good bug out bag, but if you don’t have one, or you’re stuck without a way to signal to others where you are, a soup can lid will do the trick. This video from Specific Love Creations shows you how to make one, even if you need to open a can to do it.

Read more...

19 Jan 22:00

How The Running Man Predicted 2017

How The Running Man Predicted 2017
Thirty years ago, a film starring Arnold Schwarzenegger nailed the climate of 2017. A television host gives orders to a police state in the throes of an economic collapse, and...

Visit Uncrate for the full post.
19 Jan 21:58

BeeLine, the navigation aid that lets you enjoy getting lost - CNET

by Richard Trenholm
The BeeLine is a simple, compass-like wearable for cyclists, walkers and explorers who want to know where they're going, even when they don't.
19 Jan 21:58

Giant Skittles spill turns highway into strange red hellscape - CNET

by Amanda Kooser
A lot of cows won't be tasting the rainbow after a load of red Skittles destined for cattle feed spilled off a truck and all over a highway.
19 Jan 21:49

Here's how much the Range Rover has changed since 1970 - Roadshow

by Andrew Krok
Spoiler alert: The answer is "a fair bit."
19 Jan 03:53

Kizer Vanguard Kane Flipper Knife

submitted by Mikey Bautista

Looking at this knife, your first thought was probably like ours: this thing must be expensive. With its great blade shape and clean lines, you'd think it's got to be a custom, right? Think again. The Kizer Vanguard Kane—a collaboration with custom knife maker Matt Degnan—is actually a production knife. And as far as those go, the Kane is a rare combination of good build quality, versatile materials, and an affordable price.

The Kane keeps its price low by making use of more common materials, namely VG-10 steel for its blade and G10 for its handles. But don't judge a knife by its spec sheet. Its 3.5” drop point blade is large and versatile for even heavy cutting tasks. The G10 scales seamlessly join with stainless steel at the handle, bolsters, and liners for a sleek, streamlined look. Combine this with clever touches like a large finger choil for secure grip and a bearing pivot system for smooth opening  and you've got yourself a knife ready for comfortable use. And while it is on the larger end of EDC knives, a slim profile and spring titanium clip lets you slip the Kane into your pockets for everyday carry.

Let's also not forget the best part: this is a lot of knife for under a hundred dollars. If you need something beefy and gets the job done and looks great while doing it, pick up the Kizer Vanguard Kane from Amazon at the link below.

Buy on Amazon

19 Jan 03:50

PacSafe Z400 Anti-Theft Messenger Bag

submitted by Jonathan Tayag

Having a bag to carry your valuable essentials is pretty convenient, but someone out to grab your stuff probably feels the same way. In one brief moment, you can kiss all your belongings goodbye. That is, unless you're carrying a bag designed to beat burglars at their own game, like Pacsafe's Intasafe Z400 messenger bag. It's built from the ground up to seriously resist theft so you can carry with confidence as you go about your commute.

With lightweight stainless steel wire in the Z400's shoulder strap, good luck to anyone who tries to cut the bag away off your shoulder. eXomesh slashguard material reinforces the bag's poly canvas exterior to guard against pickpockets attempting to slash holes into the bottom of the bag to grab your stuff. Its zipper pulls also come together at a single anchor lock point Pacsafe calls the Roobar, making it convenient for you to secure the bag. RFID security adds to the Z400's physical defenses, which is great for keeping your passport and cards safe against electronic identity theft.

With 19L capacity and room to carry both a 15" laptop and 10" tablet, there's plenty of room to keep your everyday essentials safe. The interior also comes with internal pockets and storage compartments to keep it all organized.

Peace of mind is one lock away. The only thing you have to worry about is figuring out which color works best for you. Pick up the Pacsafe Instasafe Z400 at the Amazon link below.

Buy on Amazon