
Visit Uncrate for the full post.

Thomas Jefferson had very specific instructions for the obelisk that would mark his grave upon his death. He stipulated it should be made of course stone and inscribed with his proudest accomplishments (including writing the Declaration of Independence and founding the University of Virginia, but notably omitting serving as president of the United States). He did not specify where the tombstone should be located in perpetuity, however, and perhaps he should have.
The granite obelisk was supposed to mark the founding father’s grave at Monticello, his Virginia estate, but today it instead resides on the campus of the University of Missouri, where it is locally famous but otherwise largely unknown.
The grave marker and accompanying marble epitaph were originally erected at Monticello, seven years after Jefferson's death in 1826. But in 1883, Jefferson’s descendants donated the tombstone (which at this point was in desperate need of repair thanks to visitors’ proclivity for chipping off parts of it for souvenirs) to the university in Columbia, Missouri.
To this day the reason for the choice is not entirely clear, but it’s not entirely random either. Missouri was the first university founded within the territory acquired in the Louisiana Purchase during Jefferson's tenure as president. The school's design was even inspired by the founding father's plans for the University of Virginia, of which he was so proud.
The most picturesque campsites in the world are often booked months in advance, and unlike fancy hotels, there is no national park Expedia to send you an alert when a site suddenly becomes available. Now there is.

(From BBC News)
Justify maintained his unbeaten run to win the Kentucky Derby as Aidan O’Brien missed the chance to make history.
O’Brien, who won the 2,000 Guineas at Newmarket earlier on Saturday, was hoping to saddle the first European-based horse to win the race.
After heavy rain saturated the dirt track for the 144th running of the race, favourite Justify powered home by two and a half lengths.
Justify has now won all four of his races this year and is the first champion since Apollo in 1882 to win the showdown for three-year-olds without running anywhere as a two-year-old.
Whether you're a beginner or an expert you're going to need proper gear to hike. Here are Rory Bosio's 10 picks.

With the quality of smartphone cameras these days, everyone’s a photographer now. But some of us take this hobby more seriously than others, and some even make money from smartphone photography.
Whatever kind of smartphone photographer you are, you’re probably on Instagram. But what if you’re bored of seeing over-the-top food pics, selfies, and other staged-for-Insta photos?
Thankfully, there are a number of great Instagram alternatives available. We’ve compiled a list of the best alternatives to Instagram, so you don’t have to go searching for them.
Are you tired of Instagram’s square format for photos? Dayflash is an Instagram alternative which puts the emphasis on an immersive, full-screen experience.
It’s free to sign up for Dayflash. Simply create an account and start sharing your full-screen photos with the world. All images captured with the built-in camera retain high-resolution quality at 1080p. Although in order to reduce clutter, they don’t get saved to your device automatically.
The viewfinder takes up the entire screen of your device. This format leads to even more aesthetically-pleasing photos, making it one of the best camera apps for Android and iOS.
You can dump photos into Dayflash from your Camera Roll or Photo Library, which means you’ll never lose an opportunity to share. Photos appear in the original resolution, but they look slightly more zoomed-in thanks to Dayflash’s fullscreen focus. Dayflash’s photo editor also allows you to make edits to your images, giving you the tools to make basic adjustments, use filters, or add effects.
When you feel the need to get creative, Dayflash is more inspiring than Instagram. It recommends other popular users on the service to help you discover others who share your passion. It even comes with a collaboration feature that lets you find and team up with other users for your next post or shoutout.
And if you can’t give up Instagram just yet, Dayflash lets you add your Instagram username to your Dayflash profile. This way, others can check out your Instagram in one tap.
Download: Dayflash on iOS (Free)
SmugMug offers a community of photographers built by photographers. It’s definitely one of the best places to show off your photographs.
To join SmugMug, you need to create a free account. This begins a 14-day free trial, after which you choose one of four plans: Basic, Power, Portfolio, and Pro. The prices start at $7/month for Basic and go up to $42/month for Business.
SmugMug lets you easily add new photos directly from your photo library or camera roll, and gives you unlimited storage. It even has an auto-upload feature that transfers any new pictures on your device to the app, as long as you’re connected to WiFi.
For moments when you have less-than-reliable internet connections, SmugMug’s option of making entire galleries available for offline viewing is a lifesaver (and makes it a great Instagram alternative for photographers on-the-go). That way, you’re still able to show off your best work to friends, family, or clients.
If you want to better organize your photos, just favorite certain collections for quicker access. SmugMug lets you share images and video through SMS, email, Twitter, or Facebook, so it’s not limited to in-person viewing.
When you need a jolt of inspiration, follow other members of the SmugMug community. The app makes it easy to look up friends, family, colleagues, and anyone else whose work you admire. And when you follow someone, you can view all of their public galleries.
Download: SmugMug for iOS | Android (Free for up to 14 days)
If you want to join a community that rivals that of Instagram then EyeEm is your best bet. EyeEm’s community is over 20 million strong, and it’s a fantastic way to find inspiration and even sell your photos.
Upon signing up for EyeEm, you’re greeted with a fresh feed of amazing pictures from talented photographers. Here, you’ll find featured photographers, pictures taken near you, photography tips, and several other themed galleries. It’s a great way to get your creative juices flowing.
EyeEm lets users snap new photos from the app, or import images from your phone’s gallery. The EyeEm Selects feature scans your images and picks out photos with the highest aesthetic score, according to its algorithm.
After you select your photo, you can do basic edits or apply filters, and it’s all free. Once that’s done, add a caption, pick out tags (this helps others discover and possibly buy your images), and then bam, it’s uploaded to EyeEm.
When you’re on EyeEm, it’s not just about getting likes. EyeEm focuses on inspiring other members to get more creative with their photos, not to mention that you have the potential to make money from your work as well.
Download: EyeEm on iOS | Android (Free)
For those looking for a serious photography community, then 500px is another option. 500px has a community of over 15 million photographers who are passionate about their work.
As you check out other users, it’s easy to find your muse among such talent. The community encourages feedback from others, helping you grow and mature as a photographer.
When you’re ready to share, 500px lets you upload full-resolution photos directly from your smartphone. 500px allows you to get instant feedback from others, and you’ll gain recognition for your work.
500px also hosts a number of contests in which you can put your photography skills to the test. Winners typically receive a cash prize, photography gear, or even trips.
Connecting with other photographers is also important in 500px, and once you start following people, they’ll become a connection. There’s also curation in 500px, so you get recommendations based on your own personal tastes, and the app’s editors are able to provide guidance as well.
With 500px, you get a serious community that’s focused on quality photography, not just the amateur photos you’ll find on Instagram. If you consider smartphone photography important, then you should consider joining the 500px collective.
Download: 500px on iOS | Android (Free)
If you like Instagram selfies, then Retrica will up your game. The focus of Retrica is primarily on selfies and the freedom to express yourself through them.
Retrica provides users with a huge arsenal of fun filters that focus on your beauty, so you don’t have to spend time editing them to perfection. And if you can’t decide which selfie looks best, a built-in collage maker lets you add multiple images in the format of your choice, and share it with the community.
Not only is Retrica perfect for snapping selfies, but it’s also one of the best GIF maker apps for your smartphone. Switch to Retrica’s GIF feature, and it’ll take rapid shots of your subject, resulting in an awesome GIF.
Once you’ve perfected the selfie of the day, share it with the community or to your favorite social networks. Retrica’s populace is also quite large, so it’s a great way to make new friends and find more inspiration.
Download: Retrica on iOS | Android (Free, premium version available)
VSCO, also known as the Visual Supply Company, is well-known for its photo editing software, but did you know it’s also a community?
This app provides users with a powerful camera replacement, as well as a fully-featured photo editing studio. Everything comes in a minimally designed package. The editing tools let you create the perfect picture, and VSCO’s filters are super high quality.
The VSCO community is packed with creators from all over the globe. Your VSCO profile serves as a page where you can upload your best shots to share with others, or you can keep a photo journal or collection on the service as well.
When others follow you or like your pictures, you’ll get notified. The curated collections in the Discover tab let you find other talented photographers to connect with, eventually leading to inspiration. This Instagram alternative has a strong emphasis on hobbyist photographers, which is great when you’re trying to build your skills and share your shots.
VSCO is free to download and use, but there is an optional paid membership. This premium subscription costs $20/year and provides full access to all of VSCO’s preset libraries, more editing tools, and educational content. It may be worth investing if you’re looking to expand your photography skillset.
Download: VSCO on iOS | Android (Free, premium subscription available)
Agora encourages you to explore the world through photographs. This awesome alternative to Instagram has an impressive community of photographers from over 193 different countries, making it easy to find inspiration and discover new cultures.
When you first open the app, Agora presents you with a feed of incredible pictures, as well as a carousel of some of the app’s best photographers. From here, you can start scrolling through pictures and finding users who you want to follow.
Agora hosts several photography contents. While some have a specific theme, there are other general competitions done on a weekly and annual basis. It’s a fantastic way to win some extra cash doing what you love!
But what really makes Agora unique is its emphasis on vote-based competitions. It doesn’t have a group of judges that deliberate on winners—instead, it lets users vote for the winning photographs.
Download: Agora for iOS | Android
The chances are, you’ve acquired a lot of photographs on your device—so why not share them with the world? While Instagram might be trendy, it isn’t the only place for your photos. The above Instagram alternatives offer more serious communities for photographers, allowing you to show off your work and gain inspiration in the process.
In case you do decide to stick with Instagram after all, take a look at the best Instagram photo editors.
Read the full article: The Best Instagram Alternatives for Photographers
The latest MacBook Pro sheds almost all ports; it includes only a headphone jack, a few USB-C connectors, and it also supports the latest high-speed Thunderbolt 3 standards. What’s the difference?
Despite the “U” in USB standing for “universal,” the standard has come under fire for confusing consumers. Some cable manufacturers have been accused of breaking standards, and cheap USB-C cables might even damage your electronics.
Let’s try and make sense of this mess of MacBook ports.
Also known as USB Type-C, USB-C is a symmetrical connector designed to replace the existing Type-A and Type-B connectors. Unlike its predecessors, you can insert USB-C any way. That means no more fishing around in the dark wondering whether you’re holding the cable the right way round.
USB-C strictly relates to the shape of the connector and the port into which it fits. It’s not a standard for data transmission, like USB 2.0 or 3.1. Despite USB-C using a 24-pin connector, many different standards have used the USB-C shape.
All USB-C cables must be able to carry at least a 3A current up to 60W at 20V. Many smartphones use the USB-C standard to facilitate fast charging, which pulls in a higher voltage thanks to the increased power throughput.

Some USB-C cables can carry 5A for 100W at 20V, enough to charge the latest high-end MacBooks and HP Spectre line of laptops (to name but a few). Devices using the USB-C standard for data and power transfer include Google’s Pixel smartphones, the latest MacBook Pro, the Nintendo Switch, and many portable USB batteries.
Not all USB-C cables are made equal. Many devices, like the latest MacBooks, let you use USB-C cables for a range of “Alternate Modes” including:
There’s something important to note if you intend on using any of these standards. You must buy a cable that explicitly states it is compatible with the mode you want to use. So if you want to connect your TV to your MacBook over USB-C, make sure the cable supports HDMI Alternate Mode.
Thunderbolt is a hardware interface developed by Intel and Apple, introduced to the market in 2011. Thunderbolt 3 is the latest iteration of this standard, which has become a signature MacBook port. Whereas the first two generations of Thunderbolt devices used the Mini DisplayPort connector, Thunderbolt 3 uses USB-C exclusively.
Much of the confusion surrounding USB-C and Thunderbolt relates to the shape of the connector. You cannot buy Thunderbolt 3 cables that don’t use the USB-C standard. At the same time, Thunderbolt 2 cables don’t fit into Thunderbolt 3 ports since they’re a different shape (they are backwards-compatible with the right adapter though).

Thunderbolt 3 improves on the standard in almost every way. It doubles the bandwidth of the previous generation to 40Gbps. It’s now also USB compatible, which means it can combine multiple technologies into one port. Add to this the array of Alternate Mode applications as outlined above, and you’ve got one port to rule them all.
The latest standard supports HDMI 2.0, DisplayPort 1.2 (with resolutions up to 4K), and PCIe 3.0. This provides enough bandwidth to finally realize the potential of external graphics cards. It can also incorporate USB Power Delivery, with up to 100w of power throughput. This is how Apple was able to replace MagSafe power connectors with USB-C ports on its latest machines.

Thunderbolt has one last trick up its sleeve: daisy chaining. You can connect Thunderbolt devices in a daisy chain, allowing you to link multiple devices together and still only use a single USB port on your computer.
The superior speeds and connectivity over USB 3.1 and similar standards are made possible because Thunderbolt cables are active. A microchip built into the connector enables higher performance and greater versatility than standard “passive” USB cables. You can still use passive USB-C cables used to connect some Thunderbolt 3 devices, but they will work at much slower speeds.
The following Apple computers are compatible with Thunderbolt 3, using USB-C connectors:

The following Apple computers are compatible with Thunderbolt 2, using Mini DisplayPort connectors:

The following Apple computers are compatible with the original Thunderbolt standard, using Mini DisplayPort connectors:
Not sure which computer you have? Boot it up, log in, and click on the Apple menu in the top-left of the screen. Select About This Mac and you’ll see information pertaining to your model beneath your current macOS version number. Note that the regular MacBook model doesn’t support Thunderbolt at all, just USB-C and USB 3.1.
Apple does not supply a Thunderbolt 3 cable with new MacBooks. The USB-C cables and adapters used to charge Apple’s latest laptops are only capable of USB 2.0 speeds. Depending on the model, these can carry power throughputs of 27W, 60W, and 87W at maximum load.

Buying the right cable is important. If you’re buying a cable to use with your new USB-C Mac, you have two choices: USB or Thunderbolt.
In terms of speed:
USB-C cables come in a variety of speeds and configurations. The thicker (5A) cables will carry a higher voltage and allow you to charge more power-hungry devices. USB is fully backwards compatible, and you can even use USB-C with the traditional USB-A connector if you buy an adapter.
USB-C cables will have some limited Thunderbolt compatibility, and transfer speeds may even exceed those of USB 3.1. However, because USB-C cables are passive and not active, they are no replacement for Thunderbolt 3 cables. Check out our roundup of the best USB-C cables.
Thunderbolt 3 cables are generally more expensive, since they have more technology inside them. They aren’t always compatible with the USB 3.1 gen 2 standard, especially if they’re longer than around 1.5 feet.
If you’re confused, you’re not alone. The industry has done little to ease the head-scratching that comes with deciphering which peripheral you need. If in doubt, look at what you will be using your cable for. Here are some ideas:

Then there’s the small issue of adapters. Some early Thunderbolt 3-compliant accessories, like adapters for Ethernet or HDMI ports, are not supported by the latest MacBook Pro. macOS will block some peripherals if they are not explicitly supported.
If you’re buying an adapter specifically for use with your Mac, it’s worth going out of your way to ensure it’s compatible with macOS. That means buying Apple’s first party products, buying your peripherals from an Apple Store, or searching the web and asking around before you buy.
Cables can ruin the sweetest of setups. The confusion between USB-C, USB 3.1 and its poorly-named iterations, and Thunderbolt 3 doesn’t help. But for the foreseeable future, they’re here to stay, and we’ll have to live with it.
On the plus side, many once-wired peripherals and gadgets are now totally wireless. The latest smartphones can charge wirelessly, wireless keyboards and mice are the norm, and a new Wi-Fi standard is introduced every few years that pushes network speeds ever higher.
Until the wireless future arrives, you’ll just have to manage that cable clutter in smarter ways.
Creating digital copies of cherished analog recordings is a useful skill to have. Not only does it make listening to your collection easier, but you’re preserving the original medium by causing less wear over time.
Many modern turntables are already equipped with digital interfaces for this precise reason. Other setups will require some additional hardware, but none of it is beyond the reach of the vinyl hobbyist.
So let’s run through the process of recording and cleaning up your vinyl recordings.
The first thing you’ll need to do is download Audacity for your operating system. Audacity is free, open source audio recording and editing software. You could use another app, but we chose Audacity since it comes with everything you need in one package.
We’ll be running through this process on a Mac, but instructions for Windows and Linux users are virtually identical. Keep in mind most USB turntables and audio interfaces are designed for use with Windows and Mac machines only, so Linux users may encounter some driver issues.

Once you’ve downloaded and installed Audacity, turn your attention to your vinyl collection. Whichever record you choose, be sure to give it a quick clean before you start. You can use cleaning solutions designed specifically for vinyl, but at the least a vinyl brush will help dislodge dust from within the grooves.
In order to record vinyl to your computer, you’re going to need one of the following:

If you’re opting for the USB turntable option, you’ll simply need to plug it into your computer and enable the built-in preamp. Many turntables have a switch on the back next to the USB output that toggles the preamp on or off. If possible, get one with a preamp volume control.
If you’re in the market for a USB interface, something like the Behringer U-PHONO UFO202 provides everything you need in one package: a preamp, appropriate stereo inputs, and a grounding pin. It draws its power from your computer, so you don’t need to plug anything in aside from the turntable.
BEHRINGER U-PHONO UFO202 BEHRINGER U-PHONO UFO202 Buy Now At Amazon $25.00Other USB audio interfaces will do just fine too. Since your turntable is likely already running into a regular amplifier, you can take this already-amplified stereo signal and route it through any old USB interface.
Whichever option you choose, Audacity will likely recognize the input as something generic like USB Audio CODEC or USB PnP Audio Device. Once you’ve connected your turntable to your computer correctly, the instructions for capturing that audio are the same regardless of the method you’re using.
Before you start recording, it’s a good idea to spend a few minutes setting up Audacity.
Open Audacity and access Preferences, then click on Devices in the left side menu. From the Recording dropdown, choose your turntable or USB audio device (if it doesn’t show up, make sure it’s connected and powered up, then restart Audacity).

Next, click on Recording in the left sidebar. Here you can check the Software Playthrough option, which allows you to listen to your recordings while you make them.

Finally, click on Quality in the menu. It’s recommended that you use the default Audacity settings for new recordings. Make sure Default Sample Rate is set to 44100 Hz, and Default Sample Format is set to 32-bit float.

Before you hit record, it’s a good idea to monitor your recording to avoid clipping. Clipping occurs when the source audio is too loud, causing distortion and audio loss. If the waveform reaches the top of the scale, clipping will occur.

To check your levels:
Some USB devices won’t allow you to change the volume of an incoming signal. In this instance, the signal you get is the signal you’re stuck with. This is why turntable preamps with volume controls are most useful.
The only application we found that can help in this regard (we tried many, including Soundflower, Sound Control, and Sound Siphon) is Loopback. It’s not cheap at $99, but it gets the job done. Create a virtual audio device with your USB audio device, then use that as your recording input in Audacity. You’ll have full control over input volume.

Your other option is to invest in a USB audio interface and connect your turntable that way instead. This is almost certainly cheaper than the $99 you’ll pay for Loopback, but adds more cables to worry about. However, you may find other uses for recording system audio with Loopback in the future.
Know another app that can route USB device audio to a virtual device, and restore volume control? Let us know in the comments!
Once you’ve set up Audacity, hit the Record button to create a new track, then start playing the vinyl on your connected turntable. If you enabled Software Playthrough you’ll hear the recording in real time. Sit back and wait for the recording to complete.

Turntables are especially sensitive to vibrations, so make sure there’s no external interference while recording. You can buy vinyl shelves and shock-absorbing stands to mitigate vibrations and shocks.
Hit the Pause button when it’s time to turn the record over, then Resume the recording once you’ve done so. It’s best to record the whole record (or multiple discs, where applicable) before you start processing audio and labelling tracks.
In Audacity click Tracks > Add New > Label Track to create a track below your audio recording. Zoom out so that you can see the full recording (or a decent chunk of it). On the label track, click and drag the entire length of a track, then press Cmd + B (or Ctrl + B) to create a label.
Enter a track name, ideally with the track number at the beginning to make exporting your record easier. Repeat until you’ve labeled all tracks.

At this stage it’s possible to clean up your audio if you want, using a variety of Audacity’s built-in tools. This includes removing pops and cracks from audio, reducing hiss, or increasing the overall volume if you think it’s too quiet.
Click removal removes pops and clicks from the audio, which is a common issue with vinyl recordings. To use it, find a click in your track (they look like vertical lines) and listen to confirm that it’s something you want to remove. Now with the audio selected, head to Effects > Click Removal. Play around with the settings until you’re happy with the results.
Hiss removal is another tool at your disposal. First select a few seconds of audio made between tracks, when only the background hiss is audible. Then head to Effects > Noise Reduction and click Get Noise Profile.
Now, select your whole track with Cmd + A (or Ctrl + A). Finally, go back to Effects > Noise Reduction then hit Preview to see what the results sound like. Tweak the settings, then hit OK to apply.

Finally, Effects > Amplify will let you boost the volume if you think your recording is a little too quiet.
With your tracks labeled and your audio cleaned up, head to File > Export > Export Multiple. Choose a format in which to save your audio. Uncompressed WAV files are lossless and therefore the closest to “master” quality, but they take up a lot of space.
You might want to keep a WAV copy on an external drive, then export an MP3 or M4A version for listening on your portable devices. FLAC is another good choice; despite being lossy, it’s a high-quality compressed audio format that results in no discernible loss in sound.

3M Caulk Remover is substance that, once applied to any caulk, softens it to the consistency of butter in about 4 hours. Comes in a squirt bottle, and is slightly thinner than common glue.
[This is a Cool Tools Favorite from 2005]
Solid money management requires more than just making your own coffee, but there are plenty of small things we do everyday that contribute to our overall financial health in significant ways.

One New Jersey township was having a bit a poop problem recently. Someone was repeatedly taking a dump at the football field and track complex at Holmdel High School. The police said it was happening “on a daily basis.”

For her latest project “A Dog’s Life,” photographer Alícia Rius shot portraits of dogs and their possessions to provide a glimpse into “the kind of life they live.”
“Just like humans, dogs form attachments to their personal possessions and can give the viewer deeper insight into their identity,” Rius writes. “The items that shape their daily routine, that they carry, keep, and even eat give us a glimpse into their hearts and minds.
“They show us what makes them most proud or happy and even puts their vulnerability on display. Capturing the things that mean the most to them also captures the heart of the viewer as the dog’s life is fully exposed in one image.”


Some breeds were easier to depict than others, Rius says. In the end, she chose six dogs that had the strongest themes:
1. The Neurotic (a 4.5-year-old English Bulldog named Bear) with all the chewed toys.
2. The Senior (a 14-year-old Cocker Spaniel Dachshund mix named Magda) that spends her days in hospitals and getting medicated.
3. The Best in Show (a 3-year-old Afghan Hound named Zig), that lives the life of a beauty pageant.
4. The Princess (a 1.3-year-old Maltese Shih Tzu mix named Lola Rose) that lives in a pink world and has the most extravagant things.
5. The Stray dog (an 8-year-old Shar Pei-Pitbull mix named Marmaduke that’s up for adoption), who lives in the streets and tries to survive with what he finds.
6. The Athlete dog (a 7-year-old Australian Shepherd named Knuckles), that is obsessed with fetching just anything.
In all, the project took 3.5 months from start to finish, with 2.5 months of conceptualizing and planning, 3 days of production and shooting, and 3 weeks of retouching.
You can find more of Rius’ photography on her website, Instagram, and Facebook.

Although streaming movies for free might sound synonymous with piracy, there are a bevy of free movie streaming sites on the internet. And these are packed full of movies you can stream for free, and it’s all completely legal.
Whether you’re looking for movies or television shows, finding streaming video is totally feasible. It just requires you to know where to look. With that in mind, here are the best free online movie streaming sites to check out.
If you visual content, we have compiled the Top 10 free movie sites into a quickfire video below!
There’s a ton of free and legal video online, so you’ll find a real mix of content. A healthy portion of the movies available to stream for free are public domain. Because these films have lapsed in ownership and fallen into common property, many sites host such video treasures.
But it isn’t just B-movies available to stream online; you’ll also find many big-budget releases. Often, these are ad-supported. Like watching a movie on television, you’ll have to sit through limited commercials. Nevertheless, the movies are usually presented uncut.
You shouldn’t expect to see the latest releases. Instead, you’ll mostly see movies dating back anywhere from a few months to many years. Additionally, some sites include original productions and amateur films.
To watch on the go, here are the best free movie apps to install on your phone instead.
It’s no surprise that YouTube ranks among the best free movie streaming sites you can find. It offers a ton of free films to pick from, including many public domain films from channels such as the aptly titled Public Domain Films and Public Domain Cinema.
Furthermore, sites such as Popcornflix host full movies via YouTube, and you’ll find an official Free to Watch section from YouTube.
There’s a fantastic mix, with everything from gems like Plan 9 From Outer Space to action movies such as Recoil with Danny Trejo and Steven Austin. You’ll also find cult classics, such as Curse of the Puppet Master and much more.
You may have to dig for what you most want to watch, but for those with patience, YouTube is a treasure trove of free, legal streaming cinema.
Boasting a solid array of syndicated content and original productions, Crackle is a must for any film buff. Its rotating selection varies, but you’ll find quality movies such as the cult favorite comedy Hot Rod, gothic horror flick Bram Stoker’s Dracula, the masterful 1988 remake of The Blob, and the horror-crime film The Exorcism of Emily Rose.
Aside from films, Crackle features television shows such as Charlie’s Angels, Hell’s Kitchen, and even original programming like its Snatch series. With its robust lineup of movies and shows, we also think Crackle is one of the best free Roku channels.
CONtv, formerly known as Viewster, features a lot of anime content, plus TV shows inspired by video games. However, you’ll still find some free movies to enjoy here, including a lot of horror B-films. Some of it requires a subscription, but a lot of the content is available to watch for free.
While Vudu is best known for its digital video rentals and sales, the Vudu Movies on Us section makes it one of the best free movie streaming sites too. With a comprehensive array of movies such as La La Land, The Karate Kid, and Saw 3, it’s a fantastic service.
Vudu Movies on Us operates in a similar way to Crackle by providing full, uncut movies with limited commercials. Through hosting films with ads, Vudu is able to offer free movies and TV shows.
You still need to register for a Vudu account to use this service, but it’s worth doing so. Once you do, you can use your account to activate digital copies of movies and shows, as well as buy and rent movies from Vudu.
For a free Netflix alternative, check out SnagFilms. With unique categories such as Athletes and Their Triumphs and Explore the World, SnagFilms specializes in fresh content. The library of more than 2,000 videos includes films, shows, and documentaries. Additionally, there’s a portion of original comedy shorts.
The service offers a fantastic classic movies category as well. Don’t expect a ton of well-known fare, but for under-the-radar movies and more, SnagFilms is a gem.
Like Crackle, Popcornflix presents full movies with limited ads. Here, you’ll find a range of movies in a rotating selection, from Double Dragon to Flawless and Roman Holiday. The service even offers some original content to boot.
Flicks are segmented into categories such as popularity, genre, new arrivals, and staff picks, making Popcornflix easy to use. With a beefy lineup and excellent navigation, Popcornflix is an awesome choice for free, legal movie streaming.
Providing free movies and shows, Tubi is another fantastic service. Here, you’ll be able to view newer movies including The Giver and Serena, as well as older titles such as Fist of Fury.
Helpfully, Tubi offers a Leaving Soon category so you can catch movies and shows before they disappear, and thus prioritize your streaming queue. Be sure to check out Not on Netflix, too.
Pluto TV has a lot to offer. You’ll find a Live TV section where you can switch between channels, much like traditional cable. Find the Movies section on the left side to jump to channels that only play films, though they may be in the middle of one when you do so.
If you can’t find something that you like on the live stations, open the left sidebar and switch to On Demand. Here you’ll find tons of free movies you can start streaming right away.
As the name suggests, Classic Cinema Online focuses on older content. Even its website aesthetic captures a decidedly retro vibe, with a backdrop of red theater curtains. You can find movies such as Pinocchio, The Thin Man, and Citizen Kane here.
Some of the inclusions may have you calling the definition of “classic cinema” into question. Nevertheless, Classic Cinema Online is pure gold for old-school movies.
On Veoh, you’ll be able to stream a number of movies and shows. In addition, Veoh hosts user-submitted content, making it one of the best alternatives to YouTube.
Veoh’s filters help you find something you’ll want to watch. However, in our testing, a lot of the videos came up as unavailable, and the ads on the page are often inappropriate. It’s worth a look, but this isn’t one of the first movie sites you should visit.
Although Yidio isn’t a content host, it does act as an excellent aggregator of free streaming movies and TV shows. The way Yidio works is by redirecting to third-party sites such as Amazon Prime, Netflix, and others. As such, certain films and shows do require a subscription.
Using the Free filter will help you find content that comes at no cost. Unfortunately, not everything in the free categories is actually free. Clicking on some titles prompts you to sign up for a free trial.
Still, Yidio makes finding free movie streams far easier than checking individual sites, and you can filter by rating, genre, and more to find something to watch.
Don’t be fooled by The Roku Channel’s name. While it’s available for Roku streaming devices via an app, you can watch on the web too. In a few clicks, you can stream anything from Stranger than Fiction to Fury.
The selection rotates, and there are helpful categories including Martial Arts, Mysteries, and Family Night. As expected, you’ll have to sit through ads, but ad-supported means free, right?
Libraries are most often associated with books, but that’s not all they provide. Kanopy lets you stream tons of “thoughtful entertainment” movies for free with a participating library card or university credentials.
So long as you have a compatible login, you can watch hundreds of free movies. These include a lot of documentaries and international films.
Did you know that the premier movie database also hosts free movies? Launched in 2019, the IMDb TV service allows anyone with a free IMDb account to watch a selection of free movies and TV shows. In addition to watching online, you can enjoy this content on your Fire TV.
As of this writing, your movie options include A Few Good Men, Ace Ventura: Pet Detective, and Air Force One. You’ll also find some TV series and IMDb originals to enjoy.
As the name suggests, Free Movies Cinema features legal free movie streaming. Unlike many sites, the selection touts not only general categories like action and comedy, but also short films.
There’s also a collection of fan-made movies, such as Portal and Watch Dogs, based on the video games of the same name.
With the subtitle “a tribute to classic movies,” you can probably already guess that Big Five Glories is mostly dedicated to public domain cinema. Here, you’ll find mostly older fare such as The Old Dark House, Charlie Chaplin classic The Kid, and noir gems like The Scar.
The front page features a “now playing” section, and you can sort by rating to find quality flicks to stream. At the time of writing some of these movies were unavailable, so your results may vary.
At Retrovision, you’ll find loads of content similar to what’s available on Big Five Glories or Classic Cinema Online. It’s packed with older, public domain, free streaming films. Watch flicks from bygone eras, such as Aces and Eights, Battle Beyond the Sun, and The Black Brigade.
Site organization is pleasant, with a sidebar highlighting genres such as film noir, crime, and cartoons, as well as specific actors or characters.
If you’re looking for free documentaries, you’ll find plenty at Top Documentary Films. It packs a varied selection including Square One, Future By Design, and even amateur documentaries like The Smash Brothers.
Browse the Top 100 documentaries to find something that’s popular, or take a look at recently added movies or the various genres.
With these free online movie sites, you now know where to look for hundreds of free movies. Enjoy these legal films anytime, anywhere and you’ll never be without something to watch.
Keep in mind that your ISP can secretly throttle your video streaming speeds. To avoid this, you should use a VPN like ExpressVPN, CyberGhost, or Hotspot Shield to preserve your video streaming speeds. A VPN is also great for protecting yourself when you want to download videos from the internet.
Use our special link to get three FREE months when you sign up for one year of ExpressVPN, our preferred VPN.
Read the full article: The Best Free Movie Streaming Sites
Ah, Facebook. A near-endless stream of privacy and security issues, a CEO who cares more about answering to Wall Street than to his users, a newsfeed that’s lost all semblance of what it once was, and a way of interacting that’s scientifically proven to make you miserable.
Are there really any good reasons not to delete your Facebook account?
If you want to unfriend Mark Zuckerberg forever, you’ve come to the right place. In this article we explain how to permanently delete your Facebook account, how to uncover any apps that rely on your Facebook credentials, and how to ensure you don’t get cut off from your family and friends in the process.
In simple terms, deactivating your Facebook account hides (almost) all of your data. It’s akin to a temporary deletion. If someone were trying to find you on the network, they would not be able to tell that you have—or ever had—a Facebook account.
Your profile will not show up in search results, and your status updates, photos, and other data will disappear from the public eye. The only trace of your account that might remain visible is the inbox messages you sent to other people. Facebook also says your image might still be available on other people’s friend lists, but in our experience, it never is.
However, Facebook retains your data. Which means you can reactivate your account in an instant and get back where you left off. All of your friends, statuses, photos, videos, and timeline content will immediately be available again.
Deactivating your account should only be used in certain situations. For example, perhaps you’re trying to boost your productivity and want to stop social networking for a month, or maybe you want to hide your life from a vindictive ex-partner until things cool down.
You should not deactivate your Facebook account if your main reason for wanting to end your association with Facebook is privacy-based. It will not solve any of the issues for which Facebook has recently been receiving bad press.
Head to facebook.com and enter your login credentials. Once you’re looking at your Facebook home screen, click on the small arrow in the upper right-hand corner and choose Settings.
From the Settings menu, choose General in the panel on the left-hand side of the screen, then go to Manage Account > Edit.
Next, scroll down to the Deactivate your account section and click on Deactivate your account. Facebook will prompt you to enter your password.
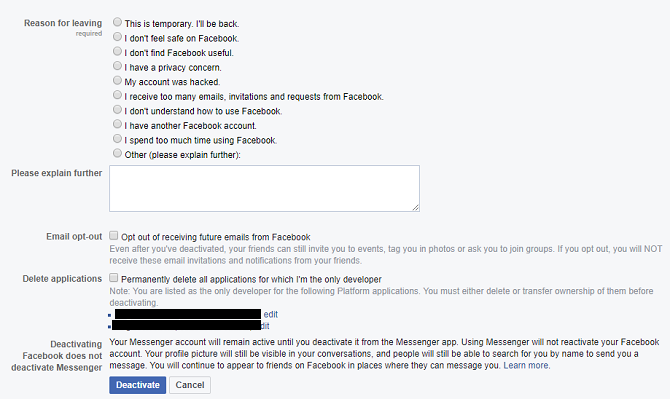
On the final screen, you will need to choose whether you want to keep receiving emails from Facebook and whether to delete any Facebook apps for which you are the sole developer.
When you’re ready, hit Deactivate.
Note: Deactivating Facebook will not deactivate Facebook Messenger. That’s a separate process and beyond the scope of this article.
If you change your mind and want to return to Facebook, just head back to the social network’s login page and enter your old credentials. The reactivation process takes a matter of seconds.
Note: Your account will also be reactivated if you use your Facebook credentials to log into a third-party app or service.
Whereas the various issues connected with deactivating your Facebook account are somewhat nuanced, what happens when you delete a Facebook account is much more clear-cut.
Quite simply, if you delete your Facebook account, all of your information will be gone for good. There is no way to retrieve the data, and there is no way to reactivate your account at a later date. If you decide you want to rejoin the social network, you’ll need to make a new account.
Facebook will wipe almost all your data from its servers. Once again, messages you’ve sent to other people will live on in their inboxes, and data such as log records will stay in Facebook’s database, though all personal identifiers will be removed.
When you delete your account, Facebook gives you a cooling off period. If you log back into your account within two weeks, it will automatically reactivate. It means if you’re determined to permanently delete Facebook, you’ll need to stay strong for a few days.
Once the cooling-off period passes, Facebook promises to all trace of your profile from its servers within 90 days. But don’t worry, during the 90 days, your data is not available to other Facebook users.
Remember we mentioned at the start that it was intentionally hard to completely delete Facebook? This is where it becomes apparent.
Remarkably, there is no way to delete your Facebook account from within your account. Instead, you need to visit a dedicated page: facebook.com/help/delete_account.
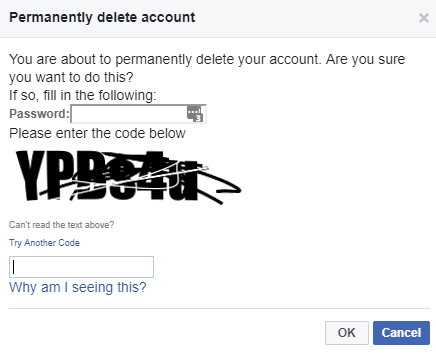
Once the page has loaded, click on Delete my account. You will need to enter your password and pass the Captcha test. Once that’s done, click OK and the deletion process will be set in motion.
Before you remove your Facebook account forever, there are a few steps you need to take to ensure that a) the process runs smoothly, and b) you don’t have a burning feeling of regret later on.
Just because you’ve decided Facebook is no longer fit for purpose today, it doesn’t mean you should disregard all the content you have amassed on there over the years.
For many of the photos, messages, and videos on your account, Facebook is probably the only copy of the file available. Buried in those memes and cat videos are images of unforgettable trips, family moments, and great times with friends.
So, before you reach for the “Delete” button, you need to make sure you have a copy of it all.
To download all your personal data from Facebook, log into your account and go to Settings > General > Download a copy of your Facebook data.
You can choose which types of data you want to include. It ranges from the obvious (like photos and posts) to the obscure (such as the Wi-Fi networks you’ve used).
When you have made your selection, click on Create File. Depending on the amount of data you want to download, it could be several hours until the file is ready.
Many apps and services give you the option to sign into their accounts using your Facebook credentials.
We’re not sure why anyone would choose this option; it’s a privacy nightmare. You’re willfully giving those companies access to all your Facebook data. But we digress. Plenty of people use this login method.
If you’ve used your Facebook login credentials for apps like Spotify or Feedly, you need to change your login details with them before you delete Facebook permanently. Failure to do so could leave you locked out of your account.
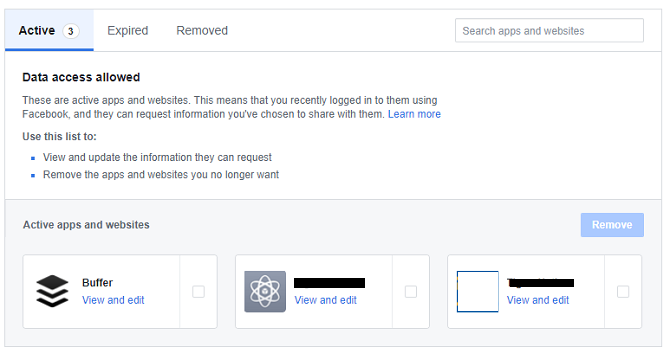
You can see which apps have access to your Facebook account by going to Settings > Apps and Websites.
Important: You need to approach the third-party app developer directly, you cannot make the necessary changes through Facebook.
Yes, we all know Facebook has its problems. That’s why you’re reading this article. But it remains unsurpassed as a way to keep in touch with friends and family far away. You might not speak to your Great Aunt Marge regularly, but the fact you’re there if needed is probably a comforting thought for her.
You need to give Marge—and all the other family and friends you’re connected to—plenty of warning. Vanishing without a trace will worry people.
Clearly, you can’t post the same “I’m leaving” message day-after-day, so why not change your Facebook profile picture to an image of your username on Instagram, Snapchat, or any other network you plan to keep using?
By doing so, you won’t be pestering people with spam, but they’ll learn that you’re planning to delete your Facebook account every time you pop up on their newsfeed. You can even crop your friends list back before posting your new details to prevent them spreading too widely.
Facebook is going through a rough patch. But, as much as the company is in the firing line at the moment, it’s hard to believe it won’t bounce back.
Therefore, don’t make any rash decisions. Make sure you really want to delete your account before committing. Remember, the process is irreversible after two weeks. Are you sure you want to throw away a decade of memories?
Perhaps it would make more sense to just trim your Facebook friends list or delete your newsfeed. Both steps can instantly improve your experience on the network without taking the nuclear option.
Image Credit: serazetdinov/Depositphotos
If something goes wrong with your Mac, you’re generally left with two options: pay someone to try to fix it, or buy a new machine. Unlike Windows OEMs, Apple isn’t particularly accommodating when it comes to diagnosing hardware problems.
As a result, the simple Apple hardware and diagnostics tests built into your Mac aren’t that useful. They test hardware components, but the information gleaned lacks the depth required to make a meaningful diagnosis.
If you really want to know what’s wrong with your Mac, you’ll have to take matters into your own hands.
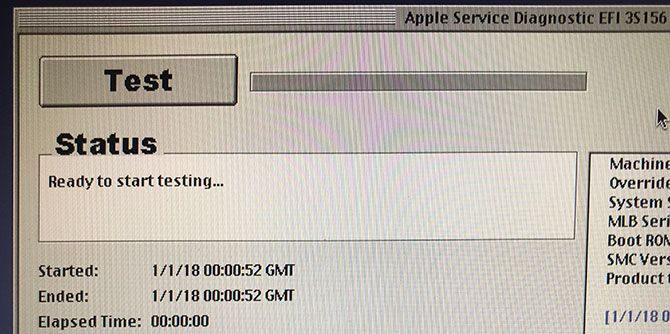
Apple Service Diagnostic, or ASD for short, is Apple’s in-house diagnostic tool used by technicians to isolate and fix hardware issues. These tools are not provided to the general public, and instead are made available to registered Apple technicians as part of the company’s Global Software Exchange (GSX).
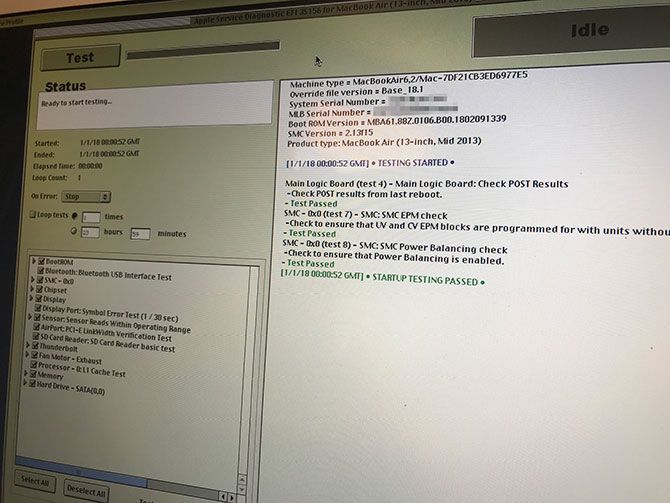
This isn’t a one-size fits all operation. Each Mac, or “family” of Mac computers, will have its own ASD release. To test a MacBook Air from 2013, you’ll need the ASD release that accompanied that specific hardware configuration. Newer post-2015 Mac models use a completely different system, which runs via the internet and requires a login.

You can test pre-2015 Macs offline, provided you have the right ASD release. Whereas Apple Hardware Test or Apple Diagnostics will simply indicate whether or not your computer has a fault, Apple Service Diagnostic will give you as much information about that fault as possible.
Due to the sheer volume of information provided, you might be left more confused after testing than you were when you started. It’s also a time-consuming process to track down the right images, create a bootable disk, run the tests, and then interpret the results yourself.
If you’re running a post-2015 Mac and you aren’t a registered technician, your Mac can’t use these tools. And if you’re not prepared to research the results you receive and what they mean, ASD testing may be of little use to you. But if you’re dead set on fixing your own Mac, or at least fancy giving it a try, read on.
We won’t provide direct links to specific ASD images here, nor will we facilitate requests in the comments below. ASD is Apple’s own in-house software, so downloading a copy without prior consent may be considered piracy, which is bad.
Don't worry, the reason this Macbook failed ASD is because it's not the original hard drive that's in it. Everything else passed. #diskdepot pic.twitter.com/FgIqb713Rk
— Disk Depot (@diskdepot) September 2, 2017
With this in mind, it’s understandable that Mac owners want agency over their machine. If replacing a faulty RAM module will give your MacBook an extra few years, the use of ASD starts to look a little more justified. You can isolate small issues like fan failures with ASD and fix them relatively cheaply. Bigger problems like CPU and GPU failings will signify it’s time to buy a new Mac.
Apple’s obfuscation of diagnostic data has led to thousands of forum posts dedicated to sharing ASD images via torrents and cloud libraries. You don’t need to look far before you start finding downloads available on fairly reputable websites.
To find the right ASD image, you’ll need to match your particular hardware with an ASD release. Computer repair technician and blogger Danny Dullin has an extensive list of ASD releases and applicable hardware which should point you in the right direction.
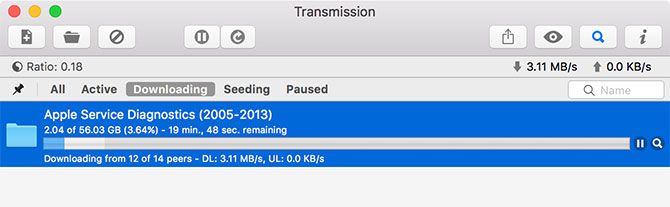
I was able to find the right ASD images for my 2012 MacBook Pro Retina and the dodgy 2013 MacBook Air that lives under my desk in about 10 minutes of searching with Google. There are a lot of resources out there dedicated to sharing these images.
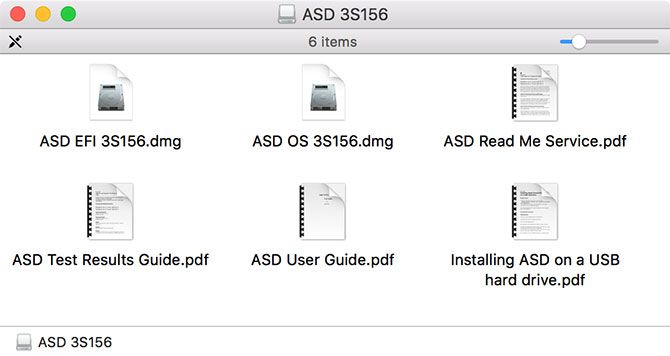
If you manage to get your hands on the right ASD release for your particular machine, mount the DMG and inside you’ll find two other DMG files and a few PDFs explaining what to do with them. There are two different ASD testing methods provided in each release: EFI and OS.
EFI stands for Extensible Firmware Interface, which is basically your Mac’s low-level firmware. Tests are performed outside of an operating system environment. This is a great way to test a component like RAM. Since running an operating system will put some of that RAM to use, it could prevent a thorough test.
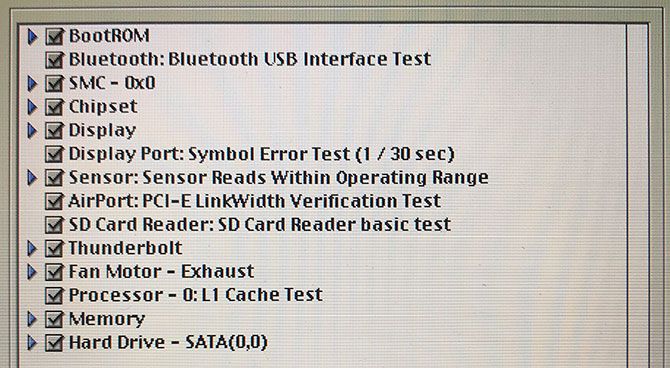
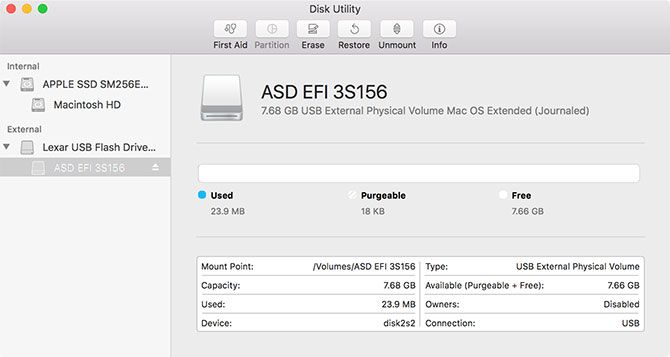
EFI testing only requires an external drive of 30MB or greater. The test will take around an hour, and will be most effective testing hardware that’s normally in use when an operating system is running (like the RAM).
OS stands for operating system, and an ASD OS test boots a limited version of macOS in which to carry out tests. Since you can run more than one test at once, it’s a quicker way of diagnosing your Mac. It’s not advised to use OS-level testing for issues concerning core components, like memory or CPU.
OS-level testing is particularly useful when testing components like touchpads and keyboards, where user input is often required. Since you’re running a whole OS, you’ll need an external drive of at least 20GB to perform the test.
Both of these tests have their places, and it largely depends on what you’re testing. If in doubt, start with EFI testing, then move on to OS testing.
First, you’ll need to create a bootable USB disk from which to run your tests. Apple recommends installing both tools on separate partitions, on a drive of 40GB or greater:
Note: It’s possible to install each of these tools on a single partition and run them directly, which is perfect if you only have a small USB drive to hand for EFI testing (screenshot shown below). To do this, create a standard macOS partition and “restore” the image as you would in step four and five above.
You’re now ready to run Apple Service Diagnostic on your Mac!
This is the easiest part of the whole process, since it mainly requires patience:
It’s really important to wait for ASD to initialize before clicking Test. The first time I tried an EFI test I clicked the button too soon and it hung. It’s also possible to test specific components, skip certain tests (useful if they cause your Mac to hang), and stress test the system by looping the process.
With your results close to hand and any error codes or messages noted, the next logical step is to search the internet for help. Consider posting your issue and pertinent information on forums like Ask Different, /r/AppleHelp or Apple Support Communities.
Another option is to find the technician’s manual for your particular Mac model. I managed to find both of my MacBook manuals freely available on Scribd. These provide detailed information about specific components, and may help decode some of the error codes and messages ASD throws at you.
At the end of the process, your machine might pass EFI and OS testing perfectly. At this stage it’s probably safe to say your issues are likely caused by software. You should consider reinstalling macOS and starting again.
Failed RAM tests might explain performance issues and sudden reboots. To fix this, you might be able to replace the RAM module. Similarly, replacing an SSD that’s not up to par might be a worthwhile pursuit if it extends your MacBook’s lifespan.
You can often fix problems with fans relatively easily, while you can substitute a cheap USB peripheral for a bad Bluetooth or Wi-Fi chip. Other issues with the CPU, GPU, display, and so on are probably a signal that it’s time to buy a new Mac.
Image Credit: Fotofabrika/Depositphotos
If you’re planning on taking a trip—whether in a few days or in several months—and that trip is going to require a flight, then you should definitely look into using Skyscanner. The popular travel far aggregator website is easy to use and will help you score cheap flight tickets.
While Skyscanner’s interface is intuitive enough that you should have no trouble using it, there are a few oft-overlooked features that you should know about if you really want to bring your ticket prices down—by hundreds of dollars, in some cases.
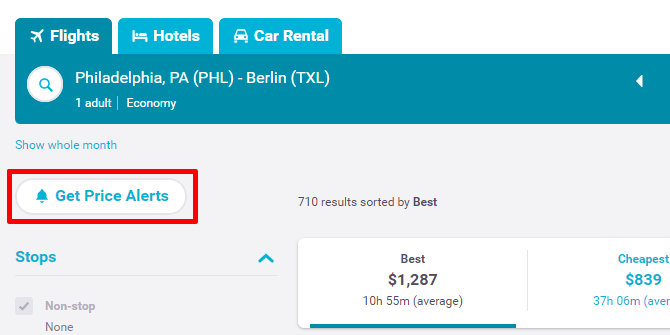
If your trip is way in the future, meaning at least three months down the road, then you should really use Skyscanner’s Price Alerts feature to get notified when a particular flight enters your realm of affordability. The further away the trip, the more effective this tactic can be.
Once you’ve entered your starting airport, the destination airport, the date of departure (and date of return if you’re in for a two-way ticket), and cabin class, click Search Flights to get a list of results. At the top left, click the Get Price Alerts button. In the popup, enter your email address, then click Create Alert.
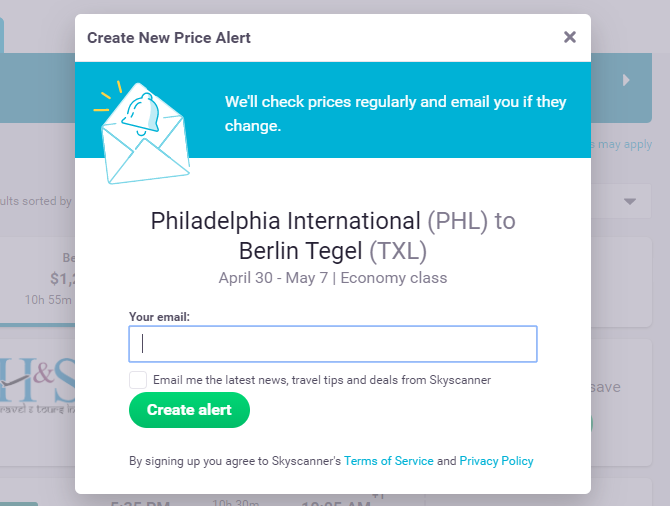
Note that these alerts will only check the exact details you entered: starting and destination airports, date range, and cabin class. When cheap flights become available, alerts are delivered to your inbox. You can modify or cancel price alerts at any time.
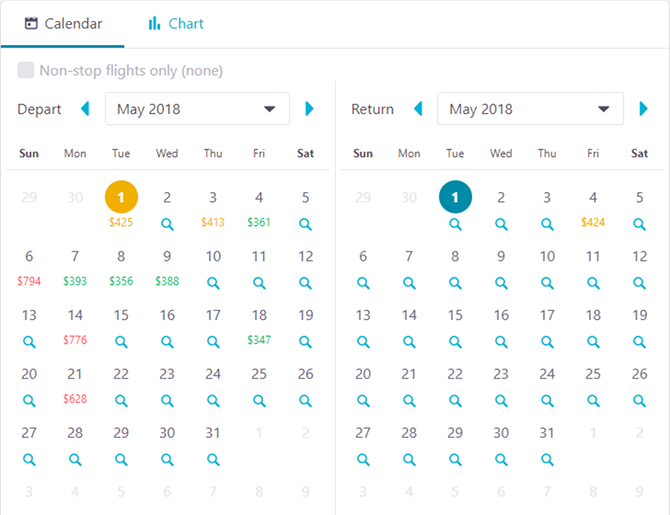
Use this neat trick to use when your flight is way off in the future: set the departure date and/or return date to “Whole Month,” then select a particular month. The search results will show you what the price would be for every day in that month, allowing you to pick the most affordable one that fits your schedule.
Take it one step further and select “Cheapest Month” instead of a particular month. This will automatically look at every single month in the next year and return results for the month with the cheapest dates. Instead of guessing the best time of year to travel, Skyscanner can do it for you—all based on actual data!
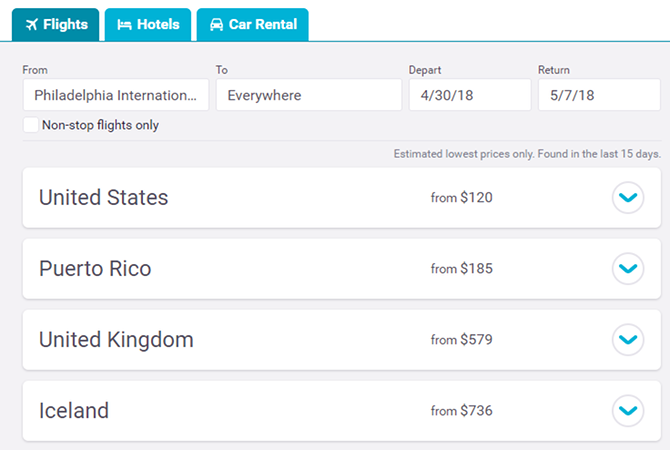
If you’re feeling free-spirited and are open to traveling anywhere, you can actually enter “Everywhere” as your destination and Skyscanner will compile a list of all available flights you can take, categorized by destination country and sorted by price.
While the results aren’t as accurate as when you input a specific destination—the “Everywhere” results are estimated values from the last two weeks—you’ll still find all kinds of great deals this way. It’s the perfect tool for anyone who wants to travel the world with excellent last-minute flight ticket prices.

Just because you live near an airport doesn’t mean the cheapest flights will leave from there. If you’re willing to drive out to a different one, even if it means leaving your house an hour earlier, then you could save a hefty amount on the final cost of travel.
For example, in the screenshot above, a round-trip flight from Newark to Dallas (EWR to DFW) would cost $707 for the given dates, whereas the same flight from Laguardia to Dallas (LGA to DFW) would cost $196. (Of course, they’re also at different times, but you get the idea!)
In Skyscanner, if you had put EWR as your starting airport and DFW as the destination, you’d probably come away spending $707. But if you had just marked the “Add nearby airports” box before searching, you’d have saved about $500 per person. Is that worth the extra hour to use another airport? I’d say so.
Let’s say you’re in Orlando and you want to fly out to Sydney, Australia. You throw in both starting and destination airports into Skyscanner and find that the best one-way ticket costs a bit too much, so you trash the idea… But wait! With a bit of time and cleverness, you might be able to cut that price down.
Open two different Skyscanner browser tabs. In the first one, start a search with Orlando as the starting airport and “Everywhere” as the destination (from tip #2). In the second tab, do the same thing with Sydney as the starting airport. Both should be one-way searches on the day you want to depart. Now compare results and look for a country that’s on both lists.

If you spot such a country, you can now create your own flight route: fly from your location to the intermediate country, then from that country to the destination country. You won’t always find a route that’s cheaper than flying direct, but sometimes you can—and when you do, the savings can be significant.
Do the same thing for the return flight except using the return date. You may have to fly through another country, or you may have to fly direct. So you’ll have to weigh those options. Still, it might be worth it if you can get cheap flight tickets!
When you’re stuck between two similarly priced flights from different airlines, it pays to consider each airline’s policies, charges, and fees. If one of them allows a free checked bag per passenger while the other doesn’t, plus other miscellaneous fees, it could come out much more expensive than you were expecting.
Use Skyscanner’s airline fees index for an easy way to check.
One thing’s for sure: saving money on flights is the best way to cut down on the cost of a trip. But it isn’t the only way. Check out our article on calculating the true cost of your next vacation, the results of which may surprise you.
The protection of personal data and information is often the spotlight thanks to incidents like the Facebook and Cambridge Analytica scandal. But most information leaks are not due to companies willingly selling your data. Rather, they are the result of breaches and hacks.
To make matters worse, you often only hear about these data breaches years later. Luckily, there are several online tools that can help you determine whether your accounts are secure. Here are a few of the best tools to check whether your online accounts have been hacked or compromised.
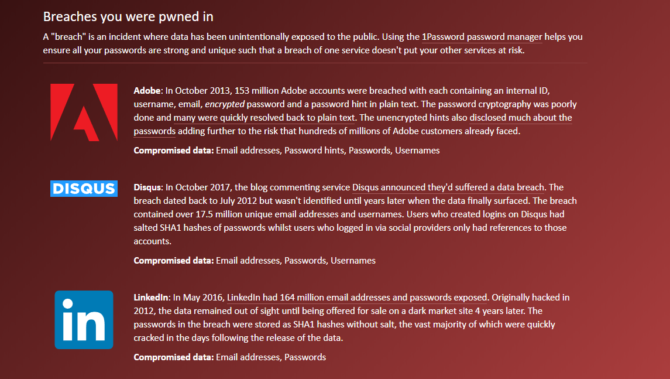
Have I Been Pwned is one of the best ways to check if your online accounts have been compromised. The tool uses your email address to check whether it is associated with any hacked data. Security expert Troy Hunt created the website, which lets users cross-reference their information with databases of breached credentials which were made public on sites like Pastebin.
All you need to do is write your email address in the website’s search bar. The site will then identify whether your email appeared in any compromised data.
If your email address is associated with a data breach, the website specifies the date of the breach, the affected service or company, and details on the leaked data.
You can also use Have I Been Pwned to sign up for a notification service which will let you know if your account appears in any new data breaches.
Over time Facebook has released more tools for users to check if their account is secure. The latest such tool lets you check if Facebook sold your data to Cambridge Analytica.
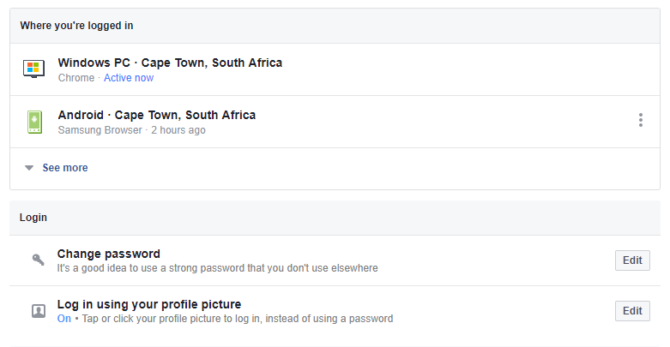
However, your Facebook account dashboard can help you keep tabs on your account security by giving you details on login locations and current active sessions. You can find this tool in under Settings > Security and login.
Facebook provides a list of locations and devices with active sessions under a tab called “Where you’re logged in”. If you see something out of the ordinary, such as an unrecognized device or a location you haven’t visited, you can report it or log out of the session using the drop-down menu next to each listing. The list also lets you see the last login date to give you more context.
If you have tons of active sessions on devices that you’re not using, we recommend you log out of them to increase your overall account security.
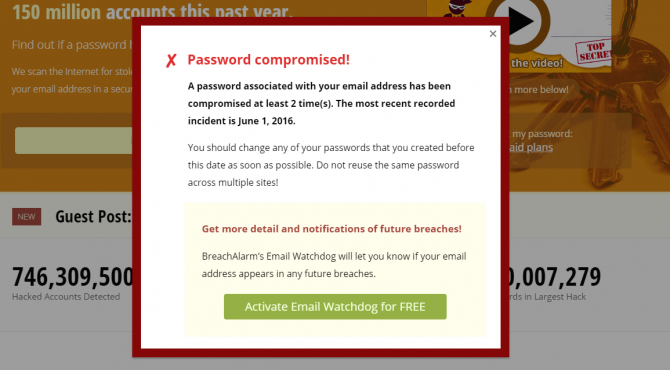
BreachAlarm is an alternative tool to Have I Been Pwned, which uses a similar process to check if an email address is associated with hacked data. It also provides data on leaked passwords.
The main difference between BreachAlarm and Have I Been Pwned is that the former offers a paid service for businesses. This service allows users to subscribe to notifications on data breaches where their email accounts and employee credentials have appeared.
You can also sign up for other plans which offer different levels of email support from BreachAlarm employees.
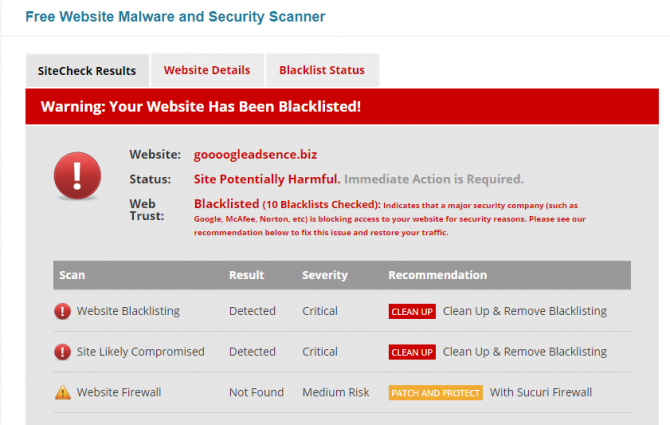
Hackers don’t only target personal online accounts such as social media, but also websites. While bigger websites have a number of security measures in place, websites of small businesses or bloggers often suffer from hacks.
You can check your own website for malware with the Sucuri SiteCheck, a free domain malware scanning tool. Sucuri searches a domain address for any known malware, its blacklisting status, website errors, and any out-of-date software. It will also identify whether you have a website firewall.
We tested the tool with known malware sites versus sites we know are secure to confirm that the tool can accurately identify a compromised site.
While SiteCheck offers users the option to sign up to Sucuri services to address vulnerabilities, the tool is free.
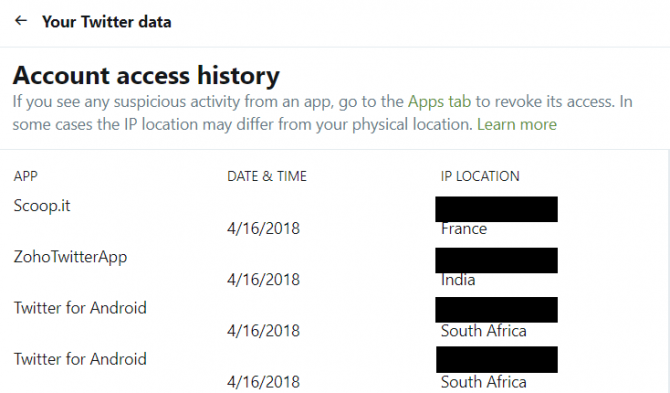
Much like Facebook, Twitter allows users to monitor login locations and active sessions. This can help you determine if an unauthorized third party is accessing your account.
To do this, simply open the Your Twitter Data menu within your Twitter settings. Here you can find a login history for your account. This history includes a list of locations from where your account has been accessed, as well as the app that accessed your account.
If you use scheduling apps such as Zoho Social or Buffer, you can expect to see a few foreign locations in your account history. This is because Twitter is noting the IP Location of the app, rather than the physical location where you are using the app.
Should you see a foreign country in your location history, check under the app names to see whether it’s a service you have authorized. If you see an app you don’t recognize, or one you no longer use, you can revoke access under the Twitter Applications tab.
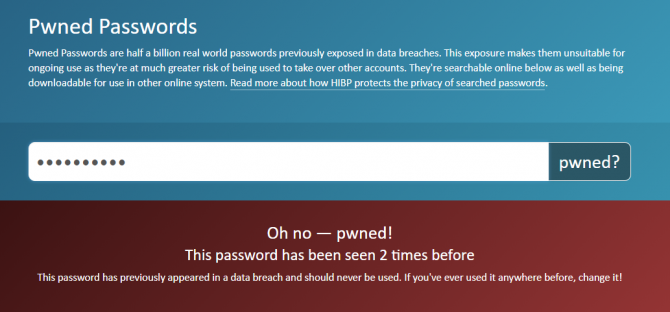
Pwned Passwords is part of Have I Been Pwned, but instead of checking email addresses, the tool checks lists of leaked passwords. This is particularly useful to know as many hackers use credential stuffing to access user accounts.
If you’re a person who recycles their password or uses the same password across all accounts, it’s essential to know whether your password is actually safe. Pwned Passwords includes half a billion passwords exposed by breaches.
The tool does note that even if your password hasn’t appeared in any breaches, this doesn’t mean it is a good password. So even if you get the all-clear, you should make sure to create strong passwords for all your accounts.
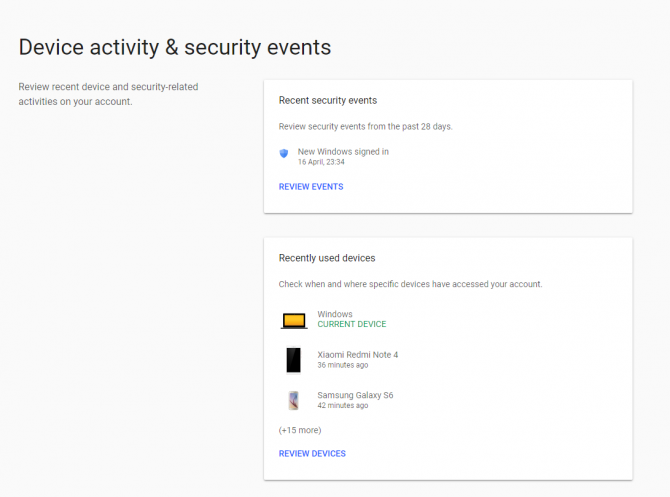
Google’s security tool allows users to check the activity and login locations for all Google-related apps and accounts. In order to access this history, simply sign into your Google profile and select “device activity and security events”. Under this tab, you will see any password changes or added recovery options that have taken place in the past 28 days.
You can also check how many devices are currently logged into your Google accounts. Any security events will also have a geo-location tag, which means that you can check exactly where it happened.
If you notice anything suspicious, you should select the option to Secure Your Account.
To manage the apps which have access to your Google account, go to Sign-in & security > Apps with access to your account > Manage apps. Here you can review your apps and revoke permissions if needed.

While many of the tools on this list are quite comprehensive, they only allow you to check certain credentials or specific accounts. That’s why using a tool like PrivacyRights.org can be useful to determine your account safety.
The website has a record of all data breaches in the US since 2005. This is a total of over 8,000 breaches.
Privacy Rights acts as a data breach search engine, allowing you to filter results according to company names, industry, date of breaches and more. This requires a bit more effort than the other tools on this list, but it addresses some of the gaps. For example, BreachAlarm and Have I Been Pwned won’t be able to tell you about data breaches of accounts that don’t include your email address—such as online banking accounts or online university accounts.
But with the Privacy Rights search tool, you can check if your bank or university has suffered a data breach in the past decade. Simply search for the name of your institution to see if it was hacked.
The site won’t be able to tell you whether your specific data was compromised. However, by identifying whether an institution was breached, you can get a heads up on whether you should change your login details. For example, searching for Equifax will bring up details about the infamous Equifax data breach.
It incredibly important to keep your accounts secure and to make sure your data isn’t compromised. At the same time, your eagerness to do this should not be the source of a breach.
Some tools available on the web aren’t secure. Or worse, they are posing as security tools but are actually attempting to harvest credentials. This is just one of the ways hackers access your accounts.
When checking up on your account security, make sure to only use tools which others have vouched for. If a third-party site requires you to provide more than a simple email address, rather avoid it.
Even if you haven’t been affected by a breach, you should always consider increasing your online account security. For tips on how to do this, read our guide on setting up two-factor authentication for your social accounts.
Image Credit: belchonock/Depositphotos
Customize your pie for perfection.
 Fresh Florida shrimp adds a tender seafood flavor to your homemade pizza pie. You can also use, scallops, clams, lobster or …
Pizzas have, in my opinion, moved from the sublime to the ridiculous. A simple “tomato pie” topped with mozzarella cheese and pepperoni is now hard to find, and pizzas topped like cheeseburgers or peanut butter-and-jelly sandwiches have made their way to “pizzeria” menu boards. Don’t get me wrong, I like fancy pizzas as much as the next guy, but…
So how about a fancy pizza that’s easy to prepare and one that will excite your family and friends when they come to your dinner table?
Pesto Pizza with Sun-Dried Tomatoes and Seafood
First, make some pizza dough in your food processor. Let it rise twice. Next, crush basil, garlic, pine nuts and olive oil with your mortar and pestle. Then, dry some San Marzano tomatoes in your food dehydrator and soak them in extra virgin olive oil for a day or so. Finally, when it’s time to cook, form the dough into a 12- to 16-inch round.
Just kidding. Here’s my simple method with easy ingredients:
Buy a pre-made pizza crust (I like the two-for-$2.99 crusts at Trader Joe’s) or some pizza dough at the Publix bakery. In either case, buy several—I keep pre-made crusts in the freezer for last-minute meals.
Pre-heat your oven to 450 degrees. Form the dough, if necessary, and put it on a lightly oiled pan. Top with a layer of store-bought pesto, followed by chunks of mozzarella cheese and some well-drained store-bought sun-dried tomatoes (packed in olive oil). Sprinkle with some sea salt, a few crushed red pepper flakes and some dry oregano. Cook until cheese melts and the crust starts to brown, 10 to 15 minutes.
At this point, the choice of seafood is yours. I like 40 to 50 count shrimp, peeled and deveined. You might consider bay scallops, sliced sea scallops, clams, squid rings or even thin slices of pre-grilled octopus.The final cooking time is up to you and depends on how long it takes to cook your seafood. Ten minutes should be sufficient, and you may want to finish the cooking under the broiler, to add color.
Give the pizza a few minutes to cool after it comes out of the oven and then top with some shaved Parmesan cheese and a sprinkle of chopped Italian parsley. Then, hide the empty jars and packages—and take credit for all the “work” you’ve done. FS
First Published Florida Sportsman Magazine September 2016
The post Easy Seafood Pizza appeared first on Florida Sportsman.
Chunk, skewer, marinate, grill—it’s that simple

Grilled fish kabob meets bacon vinaigrette—savory and satisfying.
I’m allergic to fish—unless it’s fried. But I will make an exception, especially on a spring evening when I come home with some fish that’s “grillable.” But it’s got to be something more special than just a slab of meat on the grill to interest my family and me.
Fish kabobs, skewered chunks of firmfleshed fish like swordfish, cobia, tuna or wahoo, are perfect for the grill. They cook quickly and involve little preparation. Oneto 11⁄2-inch chunks are easily cut from fish steaks. Allow about one half pound of fish per serving. I do recommend using two skewers at a time, allowing better control while turning the kabobs. While there are literally hundreds of recipes for marinades, ranging from bottled Italian dressing to elaborate, specialty nut oil and exotic spice combinations, a simple chipotle marinade does wonders to bring a spicy note to the fish without overpowering its natural flavor.
Serve your kabobs over a bed of rice or orzo pasta aside a veggie or two. For an optional sauce, try my simple, salty, bacon vinaigrette, served with the kabobs. A bit on your fork, along with a bite of fish, will melt in your mouth. Just remember this rule: Fish needs to taste like fish and everything goes well with bacon!

The marinade only requires a few ingredients.
In a food processor, blend the ingredients. Then, pour over the skewered fish in a nonreactive or glass dish, cover with plastic wrap and refrigerate at least one hour. Makes enough to marinate 4 skewers.

Chunks of firm-fleshed fish marinate before grilling.
Cook the bacon in the oil over medium heat until almost crispy. Then add shallots and cook, stirring frequently, until they start to brown, about 5 minutes. Add vinegar and sherry, scraping the bottom of the pan to deglaze it. Serve at room temperature. Makes about one cup. FS
First Published Florida Sportsman Magazine April 2015
The post Spicy Fish Kabobs appeared first on Florida Sportsman.

Traditional Spanish paella is known as an everyman’s dish. They’re elaborate and are typically made with rice, seafood, and meat and take a lot of preparation to bring to the table. They’ll also feed a crowd. But what about a paella that’s simple enough for a last-minute workday family meal?
The rice part is simple. The formula for successful long-grain rice is two parts water to one part rice, brought to a boil in a saucepan and simmered for about 20 minutes until fluffy. This recipe calls for replacing some of the water with spicy Ro-Tel diced tomatoes and green chili peppers. You know Ro-Tel—it’s the same stuff you mix with Velveeta to make that yummy party dip! Since the Ro-Tel has some tomatoes in it, I consider the 10-ounce can to be one cup, and then add a cup of water and a cup of rice.
I find this dish to be good with wild game sausage. It could also be made with shrimp or chicken, or with any combination—or all three—of those meats. Luckily I have lots of friends who bring me packages of sausages at the end of hunting season, so I have lots of choices among sausages, too.
Some packages contain wild hog meat, with Italian seasonings like fennel seeds and parsley. Others are venison based, with basil and garlic flavorings. In all cases, it seems the best versions have been ground with about 20-percent pork fatback. All these sausages work well, especially when grilled and then sliced thinly and stirred into the cooked rice, tomato and pepper mixture.
One word of advice about this recipe. Ro-Tel is pretty hot. To make the dish a bit milder, you may want to dilute some to get the 10-ounce amount you use. I’ve tried it full-strength, but found it so hot I almost couldn’t enjoy the flavor of the sausage. Half-strength is a good compromise, unless you like the heat. FS
The post Poor Man’s Paella appeared first on Florida Sportsman.
Many digital cameras have monochrome modes, but they're not as good at capturing true blacks and whites -- here's why.
What’s Your Swan Song?
NPR’s All Things Considered compiled a list of songs people want played at their funeral and it’s fascinating. My emotions were all over the place. I wanted to cry, I laughed, and at times I was confused and disapproving. I was kind of disappointed my pick wasn’t included. Since jr. high my swan song has always been Angel of the Morning (The Pretender’s cover). It wasn’t until I was older that I realized it was actually about a one-night stand. Still kind of fitting.— CD
Low brow foods
I wasn’t sure I wanted to watch another series of cooking shows on Netflix, but I wound up devouring the entire 8 episodes of Ugly Delicious. Featuring chef David Chang, it’s a personal and idiosyncratic investigation into the kinds of foods that are taken for granted, from home cooking, to low-brow favorites like pizza, to foods that don’t get much respect, like fried rice. There’s a lot of Chang in it as he bounces around ideas (and locations around the globe), but he is honest, questioning, searching, and always interesting. — KK
Screenshot tip
This tip comes from Andy Baio (@waxpancake). He tweeted: “Did you know that you can paste screenshots straight from your clipboard into Twitter or Slack? On macOS, capture any part of your screen to the clipboard with Shift-Ctrl-Cmd-4, then Cmd-V to paste it into your tweet or Slack message. I use this constantly.” — MF
Most comfortable robe
My husband bought me this robe for Christmas and it is so soft and comfortable that I actually sleep in it from time to time. It’s lined with lightweight fleece, so it’s very warming but not bulky. — CD
Visit culturally significant sites
My first choice when seeking exotic destinations is to check this list of UNESCO World Heritage Sites. These are 1000 culturally significant places worth preserving, which means they are usually the best places to visit. While many sites are well known, many more are little known gems. Most counties have at least a couple. I’ve never been disappointed traveling to a World heritage site. — KK
Sandpaper assortment
I needed to get sheets of sandpaper in various grits to polish some 3D prints I made, and this $8 assortment fit the bill. They range from 80 to 3000 grit. Here’s a website that shows you how to polish PLA plastic. — MF

You won’t find any smokes in this retro cigarette vending machine. Feed it some cash, and instead of a cigarette you’ll be rewarded with little pieces of art.
What was started in Winston-Salem, North Carolina, in 1997 by artist Clark Whittington as a temporary art exhibit has now grown into an expansive project. Today more than 100 refurbished cigarette vending machines stocked with work from more than 400 artists are spread across the United States and beyond.
Whittington transformed the machines, which were banned by many towns in the late 20th century, into what are essentially little art stores. All you have to do is donate $5 and crank the handle to receive your own original, handmade souvenir. Anything from paintings, jewelry, little sculptures, or drawings will fall into your hands.
The Cosmopolitan Hotel and Casino in Las Vegas, Nevada, houses the one of the largest single collections of machines throughout its lobby and hallways. There are six such classic Art-o-mats within the Cosmo. Finding them is half the fun … choosing which artist to purchase a treasure from is the other.

A giant, chicken-shaped church, known as Gereja Ayam, is perched on a hill in a forest on the Indonesian island of Java. It’s less than a 20-minute drive from Borobudur, the world’s largest Buddhist monument. On clear mornings, if you climb onto the platform inside the chicken’s gleaming white crown and face southeast, you can watch the sunrise illuminate the topmost candi (stupa) of the ancient temple.
The church’s farcical avian design has inspired many debates and fan theories over the years, each one attempting to solve the mystery of why someone would spend money to build a hollow chicken in the middle of the jungle. “It was left behind by the Dutch colonists,” one person wrote on Kaskus, a popular Internet forum. “No,” someone replied. “It’s haunted. I’ve seen kuntilanak [vampiric female demons from Indonesian lore] there.”
But the chicken church isn’t a Dutch remnant, and it’s not haunted by ghosts, either. It was built by a man named Daniel Alamsjah, who’s now 75.

Alamsjah, a Christian, says that in 1988, after his nightly prayers, he received a vision of a dove with snow-white wings, resting at the top of a hill. (An interview with Alamsjah was conducted in a mix of Indonesian, Javanese, and English.) A disembodied voice asked him to build a house of worship for all people. When he awoke, he tried to dismiss the vision as a mere hallucination.
In his telling, Alamsjah started taking the dream more seriously when one of his employees failed to show up in Jakarta after Ramadan, the mid-year fasting season. Then a manager for the German chemical company BASF, he was in charge of making sure his team ran smoothly. He went to Magelang, the man’s hometown, to track him down. Alamsjah found his employee, who asked for one more day at home and invited his boss to Bukit Rhema (Rhema Hill) to see the sunrise, before returning to Jakarta.
“I was amazed!” Alamsjah says. “It was the same hill and the same view that I saw in my vision.” He prayed all night and read his Bible for guidance. One verse kept popping up. The verse in question, Isaiah 2:2, reads: “In the last days, the mountain of the Lord’s temple will be established as the highest of the mountains; it will be exalted above the hills, and all nations will stream to it.”
In the morning, a passerby mentioned that Bukit Rhema, situated between the small Indonesian villages of Kembang Limus and Karangrejo, was surrounded by nine different Javanese mountains, which Alamsjah understood to be a reference to the verse and thus a confirmation of his dream.

Before returning home to the city, Alamsjah left his contact information in Magelang with the local head of Karangrejo. Two weeks later, someone who owned part of the land on Bukit Rhema came to Jakarta to offer Alamsjah his share. After several negotiations, Alamsjah paid Rp. 3,500,000 (around $2,000 at the time) for 5,000 square meters (a little over an acre) of land.
Despite his lack of architectural experience, Alamsjah says he designed the church himself, trying to stay faithful to the dove he’d seen in his vision. Wasno, the head of the nearby village of Gombong and a member of Alamsjah’s 30-person construction crew, says, “Actually, it did look like a dove—in the beginning. But then we added the crown. Daniel wanted it to symbolize holiness, but people thought it was a rooster crest. So they started calling it a chicken instead of a dove.”

Construction began in 1992—the process of getting legal permission ate up four years—and the team used handmade cement, bricks, local sand, and scrap metal to build and fill in the dove’s frame. But the project was plagued by problems from the start.
According to Alamsjah, a major newspaper in Indonesia ran a report on him in 1996, stating that a Christian man was building a church in a Muslim neighborhood. Local officials, spurred by the rush of complaints that followed the article, tried unsuccessfully to withdraw Alamsjah’s building license.
“I tried telling them that it wasn’t for just Christians,” Alamsjah says. “I was making rooms for Muslims, Buddhists, atheists, Catholics, everyone—it was designed to be inclusive.” But complaints were constantly being filed—the stack of reports in the Borobudur district police’s office from the 1990s about Alamsjah are so numerous that they’re too heavy for a person to carry on their own.

Beyond conflict with the community, there were also financial issues. In 2000, a lack of funds forced Alamsjah to quit the project in the middle of construction. The second and third floors hadn’t been started at all, and half of the 12 underground prayer rooms were mere holes in the ground. Alamsjah says he couldn’t afford to tile the floor, so visitors would either stand or sit down on the dirt.
Without a caretaker, the chicken quickly fell into disrepair. The weeds around the structure grew back, and vandals snuck in to hang out and scribble on the walls. Once in a while, curious tourists would stop by, eager to see the huge chicken for themselves. Richard Lomanta, a Jakartan who traveled there in 2008 when it was abandoned, says, “Everyone I knew called it the chicken church, even back then. Just look at it—it looks nothing like a dove.”
Alamsjah had switched careers at this point and now managed a rehabilitation center nearby. He told some of his employees to stay near the church and collect entrance fees. A few people would stop by each week, but the number barely reached 100 per month. For nearly two decades, it seemed that the church was fated to be reclaimed by nature.

Fifteen years after the project was halted, however, the chicken church suddenly went viral on international media. The Daily Mail and the Huffington Post both released features about it on July 13, 2015, and a year later, it served as a shooting site for the sequel of the Indonesian cult classic film, Ada Apa Dengan Cinta (What’s the Deal With Love).
The recognition spurred the arrival of a flock of tourists: up to 2,000 a week, according to Alamsjah’s ticket records. The proceeds from the nominal entrance fee (Rp. 10,000, or less than USD $1 per person) gave Alamsjah enough money to resume construction.
“I was so relieved,” Alamsjah says. “The locals saw how popular the site was, and they began to benefit as well [from the tourism].”

These days, the chicken church is no longer abandoned. The renovations made in the last two years include jeweled tiles; paneled windows; a small, paved access road; and work on the underground prayer rooms, which are nearly finished. Displays in the main hall (the body of the chicken) document the project’s growth from a divine dream to a full-fledged poultry temple. So many tourists come each year that Alamsjah even built a small cafe inside the chicken’s rear (it sells traditional Indonesian snacks and coffee).
“You know, everyone said I was crazy,” Alamsjah says. “In the 90s, I kept rereading that [Bible] verse, trying to find the courage to continue. My children were very angry at me. I had to keep telling them, this isn't my plan. This is God's plan. It’s been 30 years, and I’m glad I continued—thousands of visitors come each year to pray or to reflect on their lives, and my children finally respect what I’ve accomplished.”


